1
Replacing Power Supply Fuses
This section explains how to replace the fuses located on the Trackspot
circuit board and rear panel.
You will need:
•
flat head screwdriver (to replace the rear panel fuse only)
•
replacement fuse (see Table 3-1 for type and sizes)
Caution:
When operating, equipment surfaces may
reach temperatures up to 67° C (153° F).
Allow 5 minutes for the fixture to cool before
handling.
Warning:
Replace fuses only with the specified type
and rating.
To replace the fuse:
1.
Unplug the fixture. If the fixture has been operating, allow the
fixture to cool as described above.
2.
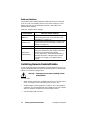
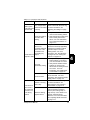
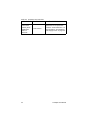
Determine which fuse(s) to replace by referring to Table 3-1 below.
Table 3-1. Description and function of Trackspot fuses
Fuse
Location
F1
circuit
board
F2
circuit
board
F3
circuit
board
F4
rear panel
3.
Type and
Rating
Size
Protects
Symptom
All Motors
No motors work.
Yellow Enable
LED does not
light.
5mm x
20 mm
Data Link
No response to
data link.
5mm x
20 mm
Data Link
No response to
data link.
5mm x
20 mm
Main
Power
Input
No power. Unit
appears dead.
5.0 A, 250V,
5mm x
Fast Blow
20 mm
Only
.125 A,
250V, Fast
Blow Only
.125 A,
250V, Fast
Blow Only
4.0 A, 250V,
Slow Blow
Only
Replace the fuse(s) with a fuse of the same type and rating.
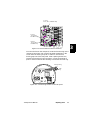
To access the fuses on the circuit board, remove the fixture’s
access door and locate the fuse to be replaced (see Figure 3-5).
After replacing the appropriate fuse(s), replace the fixture’s access
door and secure the thumb latch.
3-4
Replacing Parts
Trackspot User Manual