1
Echo Meter User Manual
Model EM3
Wildlife Acoustics, Inc.
www.wildlifeacoustics.com
Firmware Version 1.0.0
Copyright © 2011 Wildlife Acoustics, Inc.
Rev. 12/6/11
All rights reserved. Wildlife Acoustics is registered in the U.S. Patent and
Trademark Office. Song Scope, Song Meter, Echo Meter, EM3, SM1, SM2,
SM2BAT, Wac2Wav, and Real Time Expansion are trademarks of Wildlife
Acoustics, Inc. All other trademarks are the property of their respective owners.
U.S. Patent Numbers 7,454,334 and 7,782,195. Additional U.S. and
international patents pending.
Electromagnetic Interference
Note: This equipment has been tested and found to comply with the limits for a
Class B digital device, pursuant to part 15 of the FCC Rules. These limits are
designed to provide reasonable protection against harmful interference in a
residential installation. This equipment generates, uses and can radiate radio
frequency energy and, if not installed and used in accordance with the
instructions, may cause harmful interference to radio communications.
However, there is no guarantee that interference will not occur in a particular
installation. If this equipment does cause harmful interference to radio or
television reception, which can be determined by turning the equipment off and
on, the user is encouraged to try to correct the interference by one or more of the
following measures:
• Reorient or relocate the receiving antenna.
• Increase the separation between the equipment and receiver.
• Connect the equipment into an outlet on a circuit different from that
to which the receiver is connected.
• Consult the dealer or an experienced radio/TV technician for help.
Use of ferrite clamped headphone and microphone cables are required to
comply with the Class B limits in part 15 of the FCC rules. A Fair-Rite
0431173951 ferrite clamp (or equivalent) must be placed on the headphone and/
or microphone cables with the ferrite residing within one loop of the cable. This
ferrite clamp is included with Wildlife Acoustics microphone cables.
Modifications not expressly approved by the manufacturer could void the user's
authority to operate the equipment under FCC rules.
Table Of Contents
Table Of Contents
Introduction..........................................................................
1
Getting Started.....................................................................
Layout ..............................................................................
Buttons and Ports .......................................................
Display .......................................................................
Powering Up ....................................................................
Settings.............................................................................
Time:..........................................................................
Sample Rate: ..............................................................
Prefix:.........................................................................
Format:.......................................................................
Max dur:.....................................................................
Trigger: ......................................................................
Schedule:....................................................................
Buttons:......................................................................
Save and exit? ............................................................
Erase all files?............................................................
Set factory defaults?...................................................
Gain..................................................................................
3
3
3
4
4
4
5
5
6
6
6
7
8
8
8
8
9
9
Monitoring and Playback....................................................
Volume and Output source ..............................................
Starting and Stopping Monitoring ...................................
Broadband Monitoring.....................................................
Heterodyne Monitoring....................................................
Playback...........................................................................
11
11
11
11
13
14
Spectrogram Display ...........................................................
Viewing Modes and Adjustments....................................
Compressed and Expanded Views...................................
Viewing Past Calls...........................................................
Frequency Reference Line ...............................................
Zooming in the X and Y Axes .........................................
15
15
16
17
18
18
Copyright © 2011
Echo Meter EM3 User Manual
iii
Table Of Contents
Recording..............................................................................
Active Recording .............................................................
Recording Modes.......................................................
Stopping and Restarting.............................................
Trigger Display ..........................................................
Time Stamps ..............................................................
Tags and Voice Notes ................................................
Scheduled Recording .......................................................
21
21
21
21
22
22
22
23
Batteries and Charging .......................................................
Charging ..........................................................................
Monitoring Battery Life...................................................
Other Power Options .......................................................
25
25
25
25
Flash Cards........................................................................... 27
Managing the Recordings ...................................................
Transferring the Recordings to a Computer ....................
Using Song Scope............................................................
Using WAC2WAV ..........................................................
29
29
29
29
Optional GPS Antenna........................................................ 31
Using the GPS Antenna ................................................... 31
Viewing the GPS Data..................................................... 31
Specifications........................................................................ 33
Warranty .............................................................................. 35
Declaration of Conformity (EN 45014).............................. 39
iv
Echo Meter EM3 User Manual
Copyright © 2011
Introduction
Introduction
The Echo Meter EM3 Handheld Ultrasonic Recorder was designed from the
ground up specifically for active ultrasonic handheld monitoring. It includes
several technologies for monitoring bats in real-time and to simultaneously
record bats using both full spectrum and zero crossing technology. Additionally,
using state of the art digital signal processing techniques, the Echo Meter
incorporates the first ever real-time spectrogram in a handheld unit.
The recorder is designed for outdoor use and can handle extreme hot or cold
temperatures as well as high humidity. It is not, however, designed for use in
precipitation.
The EM3 is shipped ready to use. It includes rechargeable batteries, an AC
charger, and a flash card. The default factory settings allow you to begin
monitoring bats in minutes.
The optional GPS accessory automatically logs your position for walking or
driving transect surveys and accurately sets the EM3's internal clock to the
correct time.
The EM3 can be used as a short-term passive recorder using a simple scheduling
option. For complex schedules or long-term passive recording in any
environment, the Wildlife Acoustics Song Meter SM2BAT is a more appropriate
detector.
Copyright © 2011
Echo Meter EM3 User Manual
1
Introduction
2
Echo Meter EM3 User Manual
Copyright © 2011
Getting Started
Getting Started
Layout
The layout of the EM3 inputs and buttons can be seen below. The
subsequent sections of this User Manual will discuss the functionality
behind the buttons in detail.
Buttons and Ports
Copyright © 2011
Echo Meter EM3 User Manual
3
Getting Started
Display
Card Capacity
Battery Indicator
Compressed/Expanded
Trigger Indicator
Axis Indicator
Mode
Optimal HET
Freq.
Monitoring
Mode
Waveform
Freq.
Ref.
Line
X Scale
Time
HET Freq
Buffer Location
GPS Status
Indicator
GPS Location
Powering Up
To power on the unit, press the Power button until you see the Wildlife
Acoustics splash screen. After a few seconds you will see the spectrogram.
The first time you power up the unit, it will be in monitoring mode. When
the unit is powered down it will remember its last mode for the next power
up. To turn off the EM3, just press and hold tshe power button until you see
"Shutting Down" on the top of the display. The spectrogram history buffer
and the settings are preserved and present when you turn the unit back on.
Settings
Press and hold the X/Y button to enter the settings menu.
4
Echo Meter EM3 User Manual
Copyright © 2011
Getting Started
The default settings are shown below.
Use the Left and Right Arrow buttons to navigate to a setting field and the
Up and Down Arrow buttons to change the setting. When positioned at a
left most settings field, the Up and Down Arrow buttons will go to the
previous and next settings row.
Time:
Set the time and date as well as the UTC (Universal Time Coordinated)
time zone offset. The UTC setting is necessary to assure the correct
time display when using the GPS. If the batteries are removed from the
EM3 for longer then about 30 seconds, the clock will cease to keep
time. If the clock has been reset due to extended removal of batteries
or batteries that have been fully discharged, the clock setting will blink
??:??:?? on the spectrogram display so you know it is incorrect and
needs to be set.
Sample Rate:
Set 256kHz or 384kHz sample rate. Each can record up to a maximum
of half the selected sample rate (i.e. 128kHz and 192kHz respectively).
The 384kHz setting will consume card space faster and the calls
displayed on the spectrogram will be less smooth. At the higher
384kHz sample rate, the spectrogram display is not "overlapped" as
with the 256kHz sample rate so the calls shown will appear more
pixilated.
Copyright © 2011
Echo Meter EM3 User Manual
5
Getting Started
Prefix:
Here you can specify a filename prefix of up to 12 characters that will
be prepended to the recordings filename. This can be used to uniquely
label recordings made by each Echo Meter (e.g. to designate a location
and/or project). Use the Up and Down button to scroll through the
letters, numbers and hyphen. Use the Right button to advance to the
next character space.
Format:
There are three recording formats that can be selected; WAC, WAV or
WAV/ZC. In WAC mode, recordings are made in Wildlife Acoustics'
proprietary lossless WAC compression format (WAC0 for those
familiar with Wildlife Acoustic's Song Meter passive recorders). WAC
files are intended to be set for long durations, several minutes to 30
minutes. In WAV mode, a discrete WAV file is created for each trigger.
In WAV/ZC mode, an Anabat sequence file is additionally created. For
ZC output, the division ratio used is either 8 in RTE or HET monitoring
mode (details on those later), or twice the division ratio selected when
using FD monitoring mode.
The best recording format is dependent on your particular needs. WAC
does have a few advantages over WAV/ZC. In WAC, files will be about
60% the size of WAV files. Additionally, in WAC mode, the unit
records continuously until the max duration is reached. There is no
pause time between triggers, it is always ready to record. Another
advantage is that you can monitor uninterrupted in WAC mode whereas
in WAV mode, RTE output and the spectrogram will pause during the
save and prepare file process, this process takes under a second after
each triggered recording. The only disadvantage of WAC files is that
they must be converted to WAV or ZC files using Wildlife Acoustics
free WAC2WAV software (found in the “Downloads” section of
Wildlife Acoustics’ website). before they can be analyzed in most
popular analysis software. The WAC files can, however be opened in
Wildlife Acoustic’s Song Scope software.
Max dur:
Maximum duration sets the maximum recording time in any recording
mode. This can be set from 1 second to 30 minutes. In WAV or WAV/
ZC mode, this will set the maximum trigger length. This can be used
6
Echo Meter EM3 User Manual
Copyright © 2011
Getting Started
to specify a max recording size to assure compatibility with your
analysis software. In WAC mode this is used to set the maximum WAC
recording time. It will not affect trigger length. Max trigger length for
WAC files can be adjusted in post processing using the WAC2WAV
software.
It is important to note that when the batteries die during a recording,
that recording cannot be written to the card and is lost. For this reason,
you may want to set the max duration setting lower in WAC so as to
prevent data loss. There will be a couple seconds in between each WAC
file where data will not be recorded.
Trigger:
These are the recording trigger settings that determine what the EM3
considers a triggered event for recording. The triggers allow significant
reductions in file size by only recording when there is bat activity. Note
that these settings have no effect on what will be displayed on the
spectrogram or presented in the speaker/headphone audio.
The EM3 monitors the spectral noise across the frequency spectrum.
When a signal is detected that is both above the specified trigger
frequency (in kHz) and is at least the specified level threshold (in dB)
above the ambient background levels, a trigger is detected and the unit
will begin recording. The recording will continue until no trigger is
detected for the specified trigger window period of time or until the
maximum duration (see above) has been reached.
To enable a recording trigger, first, set the frequency threshold in kHz.
This is the setting directly to the right of “Trigger:” This should be set
lower than the frequency of any echolocation of interest. Note that
lower values may result in false triggers from low frequency noise
sources. Next set the amplitude threshold for the trigger. This is
directly to the right of the frequency threshold. Higher values are less
sensitive and lower values are more sensitive. 18dB is recommended as
a good starting point. Next, set the trigger window in seconds. This is
directly to the right of the amplitude threshold. A triggered event will
continue as long as there is activity that exceeds these amplitude and
frequency thresholds and then will continue for the specified trigger
window after the last trigger. In other words the recording will continue
as long as there is activity, and then will continue for the trigger
Copyright © 2011
Echo Meter EM3 User Manual
7
Getting Started
window after activity has no longer been detected or until the
maximum duration is reached, whichever comes first.
When the EM3 is triggered and recording, a circle appears to the right
of "RECORD" on the display. The circle also appears when monitoring
so you can get a sense of trigger function and adjust settings
accordingly.
Schedule:
Set the start and stop time for scheduled recordings. You also must
enable the feature here. Details on scheduled recording are in the
Scheduled Recording section on page 20.
Buttons:
This sets the functionality of the Letter buttons. These buttons can
function as heterodyne frequency presets or can 'tag' a recorded file
name with the button letter pressed during the recording.
The Letter buttons will act as tags unless a heterodyne preset has been
set in the settings menu. Details on tag functionality can be found on
page 19. If a Heterodyne preset is set, that Letter button will
immediately tune to that frequency when in Heterodyne monitoring
mode (but will not tag). When in Real Time Expansion or Frequency
Division mode, and a Letter button configured as a heterodyne preset
is pressed, the EM3 will switch to Heterodyne mode and tune to the
preset frequency.
Save and exit?
To save all settings, select Yes and then press the X/Y button to exit the
settings menu. You may exit without saving the modified the settings
by pressing and holding the X/Y button.
Erase all files?
This will erase all files on the flash card. If you select Yes and then
press the X/Y or Mode button, all files will be erased and the EM3 will
exit the settings menu.
8
Echo Meter EM3 User Manual
Copyright © 2011
Getting Started
Set factory defaults?
This will return all defaults to factory presets. If you select Yes and then
press the X/Y button, all settings will be returned to factory defaults
and the EM3 will reboot. Factory default settings include the settings
found in the settings menu as well as contrast, brightness, display view
mode, zoom levels, volume and several other parameters such that the
EM3 will be in the same state as new. Alternatively, holding the Left
button while removing and reinstalling a battery will restore all factory
defaults as well.
Gain
Gain is set with a three-way switch on the left side of the EM3.
Available gains are 36dB, 30dB and 24dB. The settings positions are
not in that order. Positions are shown on the label on the bottom of the
unit.
The EM3 ships with 36dB set as a default and this is optimal for most
cases. If a loud bat echolocates very close to the microphone, clipping
may occur and the gain should be set lower for better recording quality.
SM2BAT users note that these gain settings do not equate to the same
settings on an SM2BAT as the EM3 microphone has a different circuit
and is more sensitive than an SMX-US.
Copyright © 2011
Echo Meter EM3 User Manual
9
Getting Started
10
Echo Meter EM3 User Manual
Copyright © 2011
Monitoring and Playback
Monitoring and Playback
The EM3 can convert ultrasonic bat echolocations to audible frequencies in real
time using three technologies: heterodyne (HET), frequency division (FD) or
Wildlife Acoustics' Real Time Expansion (RTE). Regardless of which
monitoring technology is selected, the unit can simultaneously record in full
spectrum and optionally zero crossing to the flash card. Calls can also be made
audible using time expansion playback.
Volume and Output source
Sounds can be monitored through the speaker on the back of the unit or
through headphones via the standard stereo headphone connector on the left
side of the unit. Inserting headphones will mute the speaker. To adjust
volume for either, press the Speaker button and then press either the Plus/
Minus buttons or the Up/Down buttons to adjust the volume. Pressing any
other button or waiting 5 seconds exits the volume adjustment mode. The
adjustment level is displayed on the bottom of the screen.
Starting and Stopping Monitoring
To enter monitoring mode from stopped mode, press the Mode button. You
will see MONITOR on the top line of the display. This indicates that the unit
is monitoring but not recording. During a recording you will see
RECORDING on the top line of the display indicating that the unit is both
recording and monitoring.
To stop monitoring or recording press the Stop button. In recording mode,
the Stop button will also stop the monitoring. Recording is covered in a
subsequent chapter. In stopped mode the spectrogram does not update and
you will see STOPPED on the top line. To restart monitoring, press the
Mode button.
The unit will power down if no button is pressed in Stopped mode for a few
minutes to conserve batteries.
Broadband Monitoring
The Mode button toggles between broadband monitoring and HET
monitoring. Broadband monitoring allows you to hear bats at all
frequencies, whereas HET monitoring only plays bats around a tuned
frequency.
Copyright © 2011
Echo Meter EM3 User Manual
11
Monitoring and Playback
There are two broadband monitoring technologies. Press and hold down the
Mode button to switch between Real Time Expansion (RTE) and frequency
division (FD). At the top right of the screen you will see RTE or FD with
the selected division ratio (see below).
The default broadband monitoring mode is RTE. RTE is a patent pending
method of acoustically delivering the maximum amount of spectral and
temporal information of the bat echolocation in real-time. It is the closest
thing to having bat ears! The ultrasonic signal is expanded in submillisecond scales, such that the echolocation is actually expanded into the
silences between the echolocation calls.
Alternatively, you can select Frequency Division (FD) as the broadband
monitoring mode. FD, also known as zero crossing, is a method of
converting calls to the audible range by detecting the zero crossing of the
ultrasonic signal to produce a square wave, dividing the square wave by the
division ratio and then playing back the divided square wave through a
filter. Before the advent of more sophisticated microprocessors, FD was the
only method for monitoring broad-spectrum. This technology does not
provide as much tonality as RTE, but is provided for those accustomed to
this method. FD requires that a threshold be set such that only higher
amplitude waveforms result in a “zero crossing”. If the crossing was truly
zero, the output would be only white noise and no bats would be heard. To
set the frequency division sensitivity threshold, press and hold the speaker
button to go to FDADJ (FD adjustment) mode. Now the Plus and Minus
buttons can be used to adjust the threshold while you listen to frequency
division output. You want to set the threshold a couple levels above the
point that constant white noise is heard. RTE does not require any
adjustment and this threshold has no effect on the mode.
In broadband mode (RTE or FD) the Fraction buttons can be used to select
the division ratio that will be applied to the bat echolocations.
The audible output of the bat echolocation will be a fraction of the original
frequency dependent on this selection. For example a 32kHz echolocation
would be heard at 2kHz if the 1/16 division was selected. The division ratio
is shown to the right of the monitoring mode (RTE or FD) on the display.
Once you have selected the preferred broadband monitoring mode (RTE or
FD), momentarily pressing the Mode button again (but not holding down)
12
Echo Meter EM3 User Manual
Copyright © 2011
Monitoring and Playback
toggles the EM3 between the selected broadband monitoring mode and
HET. The intended use is that you would monitor in broadband (while
viewing the spectrogram) and then, if your ears prefer, "zoom in"
acoustically on the echolocations with HET.
Heterodyne Monitoring
Heterodyne (HET) is a narrow-band method that lets you tune to a narrow
range of ultrasonic frequencies (about 8kHz range on the EM3). HET uses
a tunable carrier wave to play the difference in frequency between the
carrier wave and the echolocation call. This allows the frequency to be
shifted to an audible frequency range. Using this technology, small
differences in the frequency of the echolocation can sound quite dramatic
in the audible output signal. For example, if the HET is tuned to 50kHz and
a bat echolocates at 51kHz, the EM3 will play back at the difference of
1kHz. If another bat echolocates at 55kHz it will be heard as 5kHz. Even
though the frequencies of the original call are only 10% different the sound
played for the user is 500% different. Because of this effect, HET can be a
useful tool to differentiate species with similar calls at similar but different
frequencies. Also small variations in the call frequency are sometime
indicative of species and are exaggerated by this effect.
HET mode has three methods of tuning the frequency: auto, preset and
manual. When you press Mode to enter HET mode, the EM3 automatically
calculates the optimal HET frequency for that bat pass and tunes the HET
frequency to that value. To retune to a new frequency of a new bat pass,
double click the Mode button (this is really switching the EM3 into
broadband mode and then back again to HET). This estimated optimal
frequency is displayed in parentheses in the top right of the display and is
shown in all monitoring modes. The tuned HET frequency is shown to the
right of that with a .1 Hz resolution and is only shown in HET mode. There
is also a triangular indicator on the Y axis indicating the tuned frequency.
You can also go to HET mode by pressing one of the Letter buttons if you
have configured the button as a HET preset in the Settings menu. If in HET
mode, pressing a Letter button will simply tune the EM3 to that frequency.
If in broadband mode (RTE or FD), pressing a Letter button will switch to
HET mode at that frequency in one step.
Additionally, the detector can be fine-tuned manually using the Plus and
Minus buttons.
In HET mode, the Fraction buttons have no effect.
Copyright © 2011
Echo Meter EM3 User Manual
13
Monitoring and Playback
Playback
You can also playback the bat echolocations using time expansion. First
press the Stop button to stop recording and monitoring, then scroll back in
time in the spectrogram using the Left Arrow button to the area you would
like to play and press the Play button. You will see PLAYBACK on the top
line of the display and the visible portion of the spectrogram will be played
back, slowed down by the selected division ration on the Fraction buttons.
You can also use the Up and Down Arrow buttons to zoom out the X scale
(in X mode) to include a larger portion of the buffer in the playback. It is
better to be in compressed mode for playback, as the space in between the
echolocations will be quite long otherwise!
To continue monitoring, press the Mode button, or press the Record button
to begin recording.
14
Echo Meter EM3 User Manual
Copyright © 2011
Spectrogram Display
Spectrogram Display
The EM3 has an integrated real-time spectrogram. This allows you to see
important characteristics of bat echolocation as they are happening. While
monitoring or recording, the spectrogram is updated with new bat calls.
Viewing Modes and Adjustments
The default view mode for the spectrogram is "black on white" as shown
below.
If you press and hold the Display button the display will switch to "white
on black mode" as shown below. This mode might be preferred for use in
the field as it is easier on the eyes in the dark.
Copyright © 2011
Echo Meter EM3 User Manual
15
Spectrogram Display
If you momentarily press and release the Display button, you can then
adjust brightness using either the Plus and Minus buttons or Up and Down
buttons. The contrast is adjusted using the Right and Left Arrow buttons.
The adjustment levels are displayed on the bottom of the screen. Pressing
any other button or waiting 5 seconds exits the display adjustment mode.
The backlight can be easily turned off by double clicking the Display
button. This is useful if you are monitoring without watching the screen and
want to conserve power or do not want the display interfering with night
vision. From this state, any button will restore the backlight.
Compressed and Expanded Views
Two viewing options are available, compressed view and expanded view.
You can toggle between these options using the Compress/Expand button.
The icon symbol to the right of the battery capacity symbol on the top line
of the LCD display shows which view you are in. Compressed view is
shown as two straight lines and expanded view as three straight lines.
The compressed view removes the silent intervals between bat calls in the
spectrogram so you can see more calls on the display. Expanded view
shows the calls in "real-time". This is useful to understand interecholocation timing. In expanded view the window might display just the
empty space between bat calls, so in this view it is better to zoom out.
Zooming is described below. The same bat pass is shown in the two
screenshots below. The first screenshot shows compressed view and the
second expanded view.
16
Echo Meter EM3 User Manual
Copyright © 2011
Spectrogram Display
Viewing Past Calls
While continuing to acquire new bat calls, you can scroll back in time to
review recent bat activity by pressing the Left Arrow button. Pressing and
holding the Right or Left Arrow buttons will allow you to scroll more
quickly through the spectrogram. The system can store about 5 seconds of
continuous bat signals, but by compressing the silent intervals between bat
calls, the actual time can be up to a few minutes depending on bat activity.
The buffer is saved when the EM3 is powered off, so when it is turned back
on, past calls are preserved. Note that when scrolled back to the back of the
buffer to view past calls and still monitoring, the end of the buffer is moving
with the new data being monitored, as it is finite in length. When what you
are viewing at the end of the buffer is overwritten, the display will start to
scroll forward in time with the new data. This can give the impression that
you are viewing real time data, when in fact you are viewing old data that
is scrolling! After reviewing past calls you can jump to the front of the
buffer to display real time data by double clicking the X/Y button.
A scrollbar indicator shown as a black horizontal line on the X axis of the
spectrogram indicates where you are in time as you scroll back through the
spectrogram buffer. The width of the bar shows how much of the buffer you
are viewing and the location shows the relative location in the buffer. If
zoomed all the way out such that you were viewing the entire buffer on the
spectrogram, the black bar would cover the entire width of the X axis. In
expanded mode, the behavior might seem odd, as the relative width changes
as you scroll back. This is because the silent spaces between echolocations
Copyright © 2011
Echo Meter EM3 User Manual
17
Spectrogram Display
are stored efficiently; thus the amount of the buffer shown on the display is
dependent on the percentage of silent space on the display.
Frequency Reference Line
A frequency reference line is available to aid in determining the exact
frequency of a bat echolocation. The Plus and Minus buttons move the
reference line in RTE/FD mode. In HET mode, however, the Plus and
Minus buttons control the tuning frequency.
To hide the reference line, adjust it down and off the screen using the Minus
button. Press the Plus button to scroll it back to visibility
Zooming in the X and Y Axes
In addition to allowing you to review the spectrogram by scrolling through
the buffer, the Arrow buttons and X/Y button allow zooming in on regions
of interest. The X/Y button toggles the Arrow buttons between X mode and
Y mode. The currently selected mode can be seen in the top line of the LCD
display to the right of the Compressed/Expanded icon.
In X mode the Left button scrolls back in time, the Right button scrolls
forward in time, the Up button zooms in and the Down button zooms out.
Note that everything zooms from the right edge of the screen. The X axis
scale is shown in the lower left corner of the display as ms/div (milliseconds
per division or tick mark). For the 384kHz sample rate setting, the available
divisions are 250ms, 100ms, 50ms, 20ms, 10ms, 4ms, 2ms and 1.5ms. For
the 256kHz sample rate setting, the available divisions are 250ms, 100ms,
50ms, 20ms, 10ms, 3ms, 1.5ms and 1ms. If you are scrolled back in time
and want to view the present, just double click the X/Y button.
In Y mode, the Right button zooms the Y-axis zoom (frequency) and the
Left button restores it. While zoomed in, the Up and Down buttons let you
scroll the Y-axis so you can center in on the narrower frequency band of
interest. There is only one zoom level on the Y axis. Since the X mode will
be used more commonly, if left in Y mode the EM3 will revert back to X
mode after a few seconds.
18
Echo Meter EM3 User Manual
Copyright © 2011
Spectrogram Display
The simulated screenshots below show the same bat echolocations in
different modes of operation. The first is shown with the default zoom level,
the next with Y zoom and finally with Y zoom and full X zoom.
Copyright © 2011
Echo Meter EM3 User Manual
19
Spectrogram Display
In all three screenshots, you can see the frequency reference line and in the
last two you can also see the triangular HET frequency indicator. All of the
above screenshots show the display with the EM3 set to a sample rate of
256kHz. At this sample rate you will see a maximum frequency on the Y
scale of 120kHz. If the 384kHz sample rate is selected the Y-axis scale will
go to a maximum of 190kHz.
20
Echo Meter EM3 User Manual
Copyright © 2011
Recording
Recording
Active Recording
To begin a recording, press the Record button. This starts a recording in
WAC, WAV or WAV/ZC mode depending on the format selected in the
settings menu. Once the recording has started, the elapsed time of the
recording will be shown on the top line of the diplay as mm:ss RECORD.
The recording takes under a second to start, during this time you will see
PREPARING on the top line of the display. Note, EM3 is always in
Monitoring mode while in Recording mode.
Recording Modes
In WAC mode, triggered WAC files will be made back-to-back based
on the Max Duration value in the settings menu.
In WAV or WAV/ZC mode, each trigger will be written as an individual
file. At the end of each trigger you will see SAVING at the top of the
screen as the file is saved and PREPARING as the next file is readied.
When ready, you will see WAIT TRIGGER as the EM3 waits for a
triggered event. The process of saving a file and opening a new file in
between each recording takes under a second.
You will want to make sure that you have adjusted the zero cross
threshold before recording in ZC mode. This process is described in the
Monitoring chapter above. The default threshold setting is quite high
and is unlikely to record any zero cross data. If no zero crossings are
recorded in ZC mode, the file will not be written!
Stopping and Restarting
To end a recording, press the Stop button (pressing and holding the
Power button will also stop the recording before powering down). Stop
will terminate any active recording and write the file. Stop will also
stop the monitoring mode and STOPPED will show on the top line of
the display. After stopping a recording, you can press the Mode button
to resume monitoring mode. Or press Record to start a new recording
and simultaneously initiate Monitoring mode.
Copyright © 2011
Echo Meter EM3 User Manual
21
Recording
Trigger Display
When the EM3 is triggered a circle appears to the right of "RECORD"
on the display. The circle also appears when monitoring so you can get
a sense of trigger function and adjust settings accordingly.
Time Stamps
WAC recordings are saved in a "Data" folder on the flash card and have
names of the form Prefix_YYYYMMDD_hhmmss.wav, where Prefix
is the prefix specified in the settings menu, YYYY is the year, MM is
the month, DD is the day, hh is the hour, mm is the minute, and ss is the
second. In WAC mode, Echo Meter maintains the proper time so that
when the triggers are viewed in Song Scope, Wildlife Acoustics'
licensed analysis software, the appropriate space is shown between
triggers.
When WAC files are converted to WAV or ZC files using WAC2WAV,
the files will be time-stamped in the filename with a 1 ms resolution.
More information on WAC2WAV can be found in the Viewing the
Recordings chapter. WAC2WAV will prepend the tag letter (see next
section) to the filename if "split triggers" is selected.
In WAV or WAV/ZC mode, the files are saved to the "Data" folder and
the filenames follow the same convention as above but prepend __ in
front of the year and add A_/B_/C_/D_ if tagged using the tagging
feature.
Tags and Voice Notes
The Echo Meter has the ability to "tag" a recording to aid in
organization of your files. The Letter buttons are used to tag the
individual triggers. This allows you to efficiently sort tagged
recordings during analysis. If in WAC mode, pressing a Letter button
will save that information in the WAC file such that when the WAC is
converted to WAV or ZC files with "split trigger" selected in
WAC2WAV, the tag letter will be prepended to the filename of the
resultant WAV or ZC files. If in WAV or WAV/ZC mode, the letter will
be prepended to the respective recording file name on the card.
Additionally, holding down any Letter button will extend the trigger
window until the button is released. If you speak while holding down
the Letter button, your voice will be recorded along with the ultrasonic
22
Echo Meter EM3 User Manual
Copyright © 2011
Recording
signal, so you can effectively record a voice note with the bat calls
inside the trigger recording. When listening in the bat analysis software
of your choice at real speed you will hear your voice and no bats. If the
recording is played slowed down, you will hear the bats, but your voice
will be shifted to the infrasonic range and will not be audible.
As there are four options available you can develop any "key" for the
tags that make sense to you. For example, "A" might mean that it was
possibly a very interesting call which you want to analyze later, "B"
might mean that it is definitely not an important recording and can be
discarded, etc. Or you can just use one letter as a voice note button and
know that any recording that is tagged includes important voice notes.
Scheduled Recording
Scheduled recordings are enabled in the Settings menu. If "enabled" is
selected and the unit is shut down, the EM3 will auto-wake at the specified
start time, disable the monitoring output, turn off the display backlight, and
start a recording in the selected mode (WAC, WAV or WAV/ZC). It will
continue to make back-to-back recordings until the specified end time is
reached.
While recording, the user can interrupt and stop recording or initiate
monitoring, but the Echo Meter will still power off at the specified end time
unless the scheduled recording setting is disabled in the Settings menu.
Note that if scheduled recording is not enabled, schedule start and end times
are ignored even if set.
Copyright © 2011
Echo Meter EM3 User Manual
23
Recording
24
Echo Meter EM3 User Manual
Copyright © 2011
Batteries and Charging
Batteries and Charging
The EM3 includes four high capacity rechargeable NiMH AA batteries. These
batteries allow up to 12 hours of operating time.
Charging
The integrated charger allows the batteries to be charged by simply
attaching the included charger to the power port on the left side of the EM3
and plugging the adapter into the wall. The unit will power down during the
charge cycle and cannot be used. The LED on the side of the unit will
display amber (red plus green) until charging is compete at which time it
will display only green. Recharging dead batteries should take 3-4 hours. It
is recommended once a year to replace or condition the batteries in a quality
charger to maintain optimal operating time.
It is possible to swap batteries in the field for longer life. If the swapping is
done within 30 seconds or so, the clock will not reset. All other settings will
be preserved regardless of how long the batteries are absent. Removing the
batteries does, however, erase the spectrogram buffer.
Monitoring Battery Life
The top line of the display battery icon shows the battery level in four
increments. When the EM3 calculates that the battery life is nearly over, it
will alert the user that the batteries are depleted and the unit is shutting
down. If recording, the recording will be saved before shutdown. If the
EM3 is recording and the batteries are removed, the recording in process
will not be saved.
If no button is pressed in Stopped mode for a few minutes, the unit will
power down to conserve batteries.
Other Power Options
The EM3 will work with disposable alkaline AA batteries, but the battery
icon was designed for the included batteries and will not be accurate.
WARNING: Never plug in the included charger if non-rechargeable
Alkaline batteries are installed!
The EM3 can also be powered from the power port using a 6V DC supply.
When used with a 6V supply, the unit will remain powered up. When used
with the included 9V supply, the unit is powered down when charging.
Copyright © 2011
Echo Meter EM3 User Manual
25
Batteries and Charging
WARNING: Charge only rechargeable nickel metal hydride batteries in the
EM3. Charging any other type of rechargeable or non-rechargeable
(disposable) batteries may cause them to leak, rupture or explode resulting
in risk of fire, property damage, injury or death.
WARNING: Do not use the charger if the LED indicator does not remain
continuously red plus green (amber) during the entire charging cycle. If the
red light blinks on and off while charging, the EM3 could be damaged and
may cause batteries to leak, rupture or explode resulting in risk of fire,
property damage, injury or death.
WARNING: Charge only on a fireproof surface and away from flammable
material. The EM3 battery charger is designed to terminate the charging
process when batteries are fully charged, however, in the event of a defect
or damage to the batteries or the EM3, batteries could become extremely
hot resulting in risk of fire, property damage, injury or death.
WARNING: Batteries may become hot to the touch while charging.
26
Echo Meter EM3 User Manual
Copyright © 2011
Flash Cards
Flash Cards
One SDHC or SDXC card can be used for recording. The EM3 includes a 4GB
card suitable for a night or two of bat recording. For scheduled recordings,
SDHC cards are available up to 32GB and SDXC cards are available up to
128GB to allow weeks of recording. A very general rule of thumb for memory
consumption with average bat activity using the recommended trigger level
settings is 2GB of card use per night in WAC mode and double that in WAV or
WAV/ZC modes.
At this time SDXC cards must be reformatted to FAT32 format to work properly.
Information on how to do this is available on our Users Forum at
www.wildlifeacoustics.com. Support of native SDXC format is planned for a
future firmware release.
On the display, card status is either xxx/yyyGB(zz%) to indicate xxx used of yyy
total GB and zz% full, or one of the following:
•
NO CARD
card not present.
•
CARD ERROR
problem mounting card
•
FILE ERROR
problem while writing file to card.
•
NEW CARD
if you remove a card and replace it with a
new card, this is the status until you actually
start recording.
The flash card is also used to upgrade the unit's firmware. To upgrade, put the
.EM3 firmware image on the flash card in your computer. Turn the EM3 off and
insert the card into the EM3. Now turn the EM3 on while holding the Up Arrow
button. You will see any firmware files that are on the flash drive. Select the
newest firmware and press the X/Y button. The EM3 will upgrade and restart.
Copyright © 2011
Echo Meter EM3 User Manual
27
Flash Cards
28
Echo Meter EM3 User Manual
Copyright © 2011
Managing the Recordings
Managing the Recordings
Transferring the Recordings to a Computer
Simply remove the flash card from the EM3 and place in a suitable card
reader on your computer. You can open the files directly from the card or
drag and drop them onto your computer.
Using Song Scope
Song Scope is Wildlife Acoustics' licensed analysis software for
recordings. The WAC recordings can be viewed natively in Wildlife
Acoustic's Song Scope software. If the GPS antenna was used, the GPS
locations can also be viewed directly in Song Scope by hovering the mouse
on an area of the spectrogram. Tags are also directly viewable in the same
way.
Using WAC2WAV
You will also want to download and install the latest version of Wildlife
Acoustic's free WAC2WAV post-processing software from the
"Downloads" section of Wildlife Acoustic's website at
www.wildlifeacoustics.com. This software allows you to convert the EM3
WAC recordings to WAV or ZC files for analysis in the software of your
choice. The EM3 recordings are compatible with all popular analysis
packages. Use of WAC2WAV is covered in the "Help" of that software.
Copyright © 2011
Echo Meter EM3 User Manual
29
Managing the Recordings
30
Echo Meter EM3 User Manual
Copyright © 2011
Optional GPS Antenna
Optional GPS Antenna
An optional GPS antenna is available to log the GPS location of recordings and
to sync the clock to the GPS time base with a less than 1 ms error.
Using the GPS Antenna
The GPS antenna plugs into the port on the right side of the EM3 and
attaches to the back of the device with the supplied fastening "dots". The
antenna can be extended if necessary for better placement (during car
transects for example) using a standard CAT-5 network extension (male to
female) cable.
When the GPS is plugged in, a "?" will appear to the right of the time on the
bottom line of the display. This indicates that a GPS antenna is connected
and recognized but not yet synchronized. When the GPS has acquired
satellites and is time synchronized, the "?" will be replaced with a "$". If the
display shows a "!”, an error has occurred communicating with the antenna.
Check the connection and try again.
The latitude and longitude will be displayed to the right of the time in
decimal degrees format. If the GPS has been used recently in the area, the
position fix will take under a minute. If a significant amount of time has
elapsed or the GPS has been shipped some distance, the GPS must
download new tables. In this case the first position fix can take up to 40
minutes, but subsequent fixes should still occur in under a minute.
The GPS uses the WGS-84 coordinate system and uses WAAS mode for
increased accuracy in North America and Hawaii.
Viewing the GPS Data
GPS data is logged once a second. If the recordings are in WAC mode,
location information can be viewed in Song Scope (version 3.4 or later) by
Copyright © 2011
Echo Meter EM3 User Manual
31
Optional GPS Antenna
dragging the curser around the spectrogram. If the recordings are in WAC
mode and converted to WAV in WAC2WAV, a gps.txt log file with the GPS
coordinates from the end of each triggered event will be generated in the
converted recordings destination folder. If converted to ZC, the GPS
coordinates will be placed within the file such that they can be natively
viewed in compatible zero crossing software. If recording in WAV or WAV/
ZC mode locations of each WAV will be stored in a gps.txt log file and the
location will be embedded in the ZC file. Whether created on the EM3 in
WAV or WAV/ZC mode or in WAC2WAV during conversion, the gps.txt
file has the appropriate heading to allow easy conversion to Google Map or
Earth files using http://www.gpsvisualizer.com/
32
Echo Meter EM3 User Manual
Copyright © 2011
Specifications
Specifications
•
Dimensions:
• 5.7 in (14.5 cm) long
• 3.6 in (9.1 cm) wide
• 1.25 in (3.2 cm) high
•
Weight:12 oz (0.34 kg) with included batteries
•
Operating Temperature Range: -4ºF to +185ºF (-20ºC to +85ºC)
•
Battery Run Time: Up to 12 hours per charge
•
Battery Charge Time: 4 hours
•
Audio Sample Rate: 256kHz or 384kHz
•
Microphone Directionality:
• Optimal signal is ±30º vertically and ±60º horizontally
•
Effective Microphone Bandwidth: 1kHz to 192kHz
•
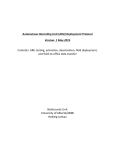
Microphone Frequency response:
EchoMeterEM3FrequencyResponse
25
20
15
RelativeSensitivity(dB)
10
5
0
Ͳ5
Ͳ10
Ͳ15
Ͳ20
Ͳ25
20,000
40,000
60,000
80,000
100,000
120,000
140,000
160,000
180,000
Frequency(Hz)
Copyright © 2011
Echo Meter EM3 User Manual
33
Specifications
34
Echo Meter EM3 User Manual
Copyright © 2011
Warranty
Warranty
Wildlife Acoustics Inc. Limited Warranty
HARDWARE: Wildlife Acoustics, Inc. ("WAI") warrants to the original end
user ("Customer") that new WAI branded products will be free from defects in
workmanship and materials, under normal use, for one (1) year from the original
purchase date. WAI warrants refurbished WAI products, marked and sold as
such, for ninety (90) days from the original purchase date.
SOFTWARE: WAI warrants to Customer that any WAI branded software will
perform in substantial conformance to their program specifications for a period
of ninety (90) days from the date of original purchase. WAI warrants the media
containing software against failure during the warranty period. WAI makes no
warranty or representation that the operation of the software products will be
uninterrupted or error free, or that all defects in the software products will be
corrected.
EXCLUSIONS
This warranty excludes (1) physical damage to the surface of the product,
including cracks or scratches on the outside casing; (2) damage caused by
misuse, neglect, improper installation or testing, unauthorized attempts to open,
repair, or modify the product, or any other cause beyond the range of the
intended use; (3) damage caused by accident, fire, power changes, other
hazards, or acts of God; or (4) use of the product with any non-WAI device or
service if such device or service causes the problem.
Any third party products, including software, included with WAI products are
not covered by this WAI warranty and WAI makes no representations or
warranties on behalf of such third parties. Any warranty on such products is
from the supplier or licensor of the product.
EXCLUSIVE REMEDIES
Should a covered defect occur during the warranty period and you notify WAI,
your sole and exclusive remedy shall be, at WAI's sole option and expense, to
repair or replace the product or software. If WAI cannot reasonably repair nor
replace then WAI may, in its sole discretion, refund the purchase price paid for
the product. Replacement products or parts may be new or reconditioned or
comparable versions of the defective item. WAI warrants any replaced or
repaired product, part, or software for a period of ninety (90) days from
shipment, or through the end of the original warranty, whichever is longer.
Copyright © 2011
Echo Meter EM3 User Manual
35
Warranty
OBTAINING WARRANTY SERVICE: Customer should refer to WAI's
website at www.wildlifeacoustics.com/support for information on obtaining
warranty service authorization. Methods for obtaining warranty service may
vary depending on whether purchases were made from an authorized provider
of WAI products, or from WAI directly. All requests for warranty service
authorization must be made within the applicable warranty period. Dated proof
of original purchase will be required. Products or parts shipped by Customer to
WAI must be sent postage-paid and packaged appropriately for safe shipment.
WAI is not responsible for Customer products received without a warranty
service authorization and may be rejected. Repaired or replacement products
will be shipped to Customer at WAI's expense. All products or parts that are
replaced become the property of WAI. WAI shall not be responsible for
Customer's software, firmware, information, or memory data contained in,
stored on, or integrated with any products returned to WAI for repair, whether
under warranty or not. The repair and replacement process for products or parts
in locations outside of the United States will vary depending on Customer's
location.
WARRANTIES EXCLUSIVE: THE FOREGOING WARRANTIES AND
REMEDIES ARE EXCLUSIVE AND IN LIEU OF ALL OTHER
WARRANTIES, TERMS OR CONDITIONS, EXPRESS, IMPLIED OR
STATUTORY, INCLUDING WARRANTIES OF MERCHANTABILITY,
FITNESS FOR A PARTICULAR PURPOSE, ACCURACY,
CORRESPONDENCE WITH DESCRIPTION, SATIS- FACTORY QUALITY
AND NON-INFRINGEMENT, ALL OF WHICH ARE EXPRESSLY
DISCLAIMED BY WAI AND ITS SUPPLIERS.
LIMITATION OF LIABILITY: NEITHER WAI NOR ITS SUPPLIERS
SHALL BE LIABLE FOR INCIDENTAL, CONSEQUENTIAL, INDIRECT,
SPECIAL, OR PUNITIVE DAMAGES OF ANY KIND, LOSS OF
INFORMATION OR DATA, LOSS OF REVENUE, LOSS OF BUSINESS OR
OTHER FINANCIAL LOSS ARISING OUT OF OR IN CONNECTION
WITH THE SALE OR USE OF THIS PRODUCT, WHETHER BASED IN
CONTRACT, TORT (INCLUDING NEGLIGENCE), STRICT PRODUCT
LIABILITY OR ANY OTHER THEORY, EVEN IF WAI HAS BEEN
ADVISED OF THE POSSIBILITY OF SUCH DAMAGES AND EVEN IF
ANY LIMITED REMEDY SPECIFIED IN THIS LICENCE AGREEMENT IS
DEEMED TO HAVE FAILED OF ITS ESSENTIAL PURPOSE. WAI'S
ENTIRE LIABILITY SHALL BE LIMITED TO REPLACEMENT, REPAIR,
OR REFUND OF THE PURCHASE PRICE PAID, AT WAI'S OPTION. IN NO
EVENT SHALL WAI'S LIABILITY FOR ALL DAMAGES RELATED TO
THE PURCHASE OF PRODUCT EXCEED THE AMOUNT PAID FOR THE
36
Echo Meter EM3 User Manual
Copyright © 2011
Warranty
APPLICABLE PRODUCT. THE FOREGOING LIMITATIONS WILL APPLY
EVEN IF THE ABOVE STATED REMEDY FAILS OF ITS ESSENTIAL
PURPOSE.
DISCLAIMER: Some countries, states, or provinces do not allow the exclusion
or limitation of implied warranties or the limitation of incidental or
consequential damages so the above limitations and exclusions may be limited
in their application to you. When implied warranties may not be excluded in
their entirety, they will be limited to the duration of the applicable written
warranty. This warranty gives you specific legal rights; you may have other
rights that may vary depending on local law. Your statutory rights are not
affected.
GOVERNING LAW: This Limited Warranty shall be governed by the laws of
the Commonwealth of Massachusetts, U.S.A., and by the laws of the United
States, excluding their conflicts of laws principles. The United Nations
Convention on Contracts for the International Sale of Goods is hereby excluded
in its entirety from application to this Limited Warranty.
Wildlife Acoustics, Inc., 970 Sudbury Road, Concord, MA 01742-4939, United
States of America, (888) 733-0200, www.wildlifeacoustics.com
Copyright © 2011
Echo Meter EM3 User Manual
37
Warranty
38
Echo Meter EM3 User Manual
Copyright © 2011
Declaration of Conformity (EN 45014)
Declaration of Conformity (EN 45014)
•
Manufacturer:
Wildlife Acoustics, Inc.
970 Sudbury Road
Concord, MA 01742-4939
United States of America
•
Declares that the following product:
Product Name:
Echo Meter
Product Model Numbers: EM3
Product Type:
Handheld Bat Detector and Recorder
Conforms to the appropriate country standards and governing regulations listed
below. We, as the manufacturer, are fully responsible for the design and
production of the above-mentioned equipment.
•
FCC Part 15, Class B Federal Communications Commission
Rules Part 15
•
ICES-003, Class B
2004, Industry Canada, InterferenceCausing Equipment Standard, Digital
Apparatus
•
EN 55011, Class B
2007, Industrial, scientific and medical
(ISM) radio-frequency equpment Electromagnetic distrubance
characteristics - Limits and methods of
measurement
•
AS/NZS CISPR 11, Class B2004, Industrial, scientific and
medical (ISM) radio-frequency
equipment - electromagnetic
distrubance characteristics - limits and
methods of measurement
Copyright © 2011
Echo Meter EM3 User Manual
39
Declaration of Conformity (EN 45014)
•
CISPR Publication 11, 2003/A2, 2006Industrial, scientific and
medical (ISM) radio-frequency
equpment - Electromagnetic
distrubance characteristics - Limits and
methods of measurement
•
EN 61326-1:2006
Electrical Equipment for Measurement,
Control and Laboratory Use EMC
Requirements
•
EN 61000-4-2
Electrostatic Discharge (ESD) 4kV
Contact Discharge, 8kV Air Discharge,
4kV Horizontal and Vertical Couppling
Planes (HCP and VCP, respectively)
•
EN 61000-4-3
Radiated Electromagnetic Fields, 3 V/
m, 80 to 1000 MHz; 3V/m, 1.4 GHz to 2
GHz; 1 V/m, 2 GHz to 2.7 GHz
This class B digital apparatus also meets all requirements of the Canadian
Interference-Causing Equipment Regulations.
Cet appareil numerique de la Classe A respecte toutes les exigences du
Reglement sur le materiel brouilleur du Canada.
This product operates on 6V DC.
This product was tested in a typical configuration. Note that there may be some
undesirable recording quality when subjected to electromatnetic interference
with the optional GPS attached..
Ian Agranat, President
Wildlife Acoustics, Inc.
November 1, 2011
40
Echo Meter EM3 User Manual
Copyright © 2011
Declaration of Conformity (EN 45014)
Copyright © 2011
Echo Meter EM3 User Manual
41