1
Song Meter User Manual
Model SM2
Wildlife Acoustics, Inc.
www.wildlifeacoustics.com
Firmware Version 2.2.0
Copyright © 2007-2010 Wildlife Acoustics, Inc.
Rev. 5/10/10 (Firmware release Song Meter II R2.2.0)
All rights reserved. Wildlife Acoustics and Song Sleuth are registered in the
U.S. Patent and Trademark Office. Song Scope, Song Meter and Digital
Birdsong Detective are trademarks of Wildlife Acoustics, Inc. All other
trademarks are the property of their respective owners. Patents pending.
Prohibition against Eavesdropping
United States law (Federal Communications Commission Part 15 Section 15.9)
states “Except for the operations of law enforcement officers conducted under
lawful authority, no person shall use, either directly or indirectly, a device
operated pursuant to the provisions of this Part for the purpose of overhearing
or recording the private conversations of others unless such use is authorized by
all of the parties engaging in the conversation.”
You are responsible for complying with all applicable laws within your
jurisdiction.
Electromagnetic Interference
NOTE: This equipment has been tested and found to comply with the limits for
a Class A digital device, pursuant to Part 15 of the FCC Rules. These limits are
designed to provide reasonable protection against harmful interference when the
equipment is operated in a commercial environment. This equipment generates,
uses, and can radiate radio frequency energy and, if not installed and used in
accordance with the instruction manual, may cause harmful interference to radio
communications. Operation of this equipment in a residential area is likely to
cause harmful interference in which case the user will be required to correct the
interference at his own expense.
Changes or modifications not expressly approved by Wildlife Acoustics, Inc.,
could void the user's authority to operate the equipment.
Introduction ................................................................. 1
Updates and Support ...........................................................
1
Overview ...............................................................................
Connectors .......................................................................
Inside the Enclosure.........................................................
1
1
3
Getting Started ............................................................ 10
Removing and Replacing the Cover................................... 10
Installing Batteries...............................................................
Main Batteries..................................................................
External Power.................................................................
Clock Battery ...................................................................
10
10
11
11
Installing Flash Cards ......................................................... 11
Installing Microphones........................................................ 11
Mounting the Song Meter ................................................... 12
Waking Song Meter ............................................................. 12
Configuration .............................................................. 14
Using the Song Meter Configuration Utility ..................... 14
Menu Navigation.................................................................. 14
Viewing or Changing the Daily Recording Schedule .......
Adding a New Scheduled Recording Time .....................
Changing an Existing Scheduled Recording Time ..........
Deleting an Existing Scheduled Recording Time............
15
16
17
17
Viewing or Changing Song Meter Settings........................
Time and Date..................................................................
Location Settings .............................................................
Audio Settings..................................................................
Sensor Settings.................................................................
17
17
18
20
23
Copyright © 2007-2010 Song Meter SM2 User Manual
iii
Utilities ..................................................................................
Putting the Song Meter to Sleep ......................................
Loading and Saving Configuration Files .........................
Erase All Cards ................................................................
Setting Factory Defaults ..................................................
25
26
26
26
27
Start Recording Schedule.................................................... 27
Managing Power and Memory Resources......................... 28
Power Resources.............................................................. 28
Memory Resources .......................................................... 31
Viewing or Changing the Advanced Recording Schedule
Advanced Recording Commands ....................................
Advanced Recording Example ........................................
Configuring Advanced Recordings .................................
Solar Tracking .................................................................
Ending a Recording Schedule at a Specified Time .........
Caveats and Implementation Details ...............................
33
33
36
37
39
39
40
Making Recordings .................................................... 41
Autonomous Operation ....................................................... 41
Audio Files ............................................................................ 43
Data Log Files ...................................................................... 43
Aborting a Recording in Progress...................................... 44
Manual Recording Feature ................................................. 44
Song Meter Specifications.......................................... 45
Physical Specifications ....................................................
Audio Specifications........................................................
Sensors .............................................................................
Storage .............................................................................
Power ...............................................................................
Future expansion..............................................................
iv
45
45
46
46
46
47
Song Meter SM2 User Manual Copyright © 2007-2010
SMX-II Microphones....................................................... 47
....................................................................................... 48
Warranty...................................................................... 48
Wildlife Acoustics Inc. Limited Warranty ........................ 48
Declaration of Conformity (EN 45014) ..................... 51
Copyright © 2007-2010 Song Meter SM2 User Manual
v
Introduction
Updates and Support
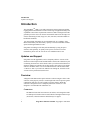
Introduction
The Song MeterTM SM2 is a second-generation acoustic monitoring and data
logging platform both flexible to meet a broad range of applications today and
expandible to meet future requirements tomorrow. SM2 was designed from the
ground up to be the most cost-effective and reliable solution for the long-term
acoustic monitoring of birds, frogs, bats, fish, cetaceans, and other wildlife in
harsh field conditions.
You can program Song Meter to record automatically on a schedule. Song
Meter has the battery life and memory capacity to record for hundreds of hours
spread out through months at a time.
Song Meter recordings can be analyzed automatically by Song ScopeTM
software, sold separately, to quickly locate species of interest. For more
information, please visit our web-site at www.wildlifeacoustics.com.
Updates and Support
Song Meter is field upgradeable, and we frequently add new versions of the
firmware to make improvements and add features. Please take a moment to join
our mailing list and/or our on-line forum so that you will be notified when new
firmware updates are available. The on-line forum is also a place to get support
and leave feedback. Please visit www.wildlifeacoustics.com and click on the
“Contact Us” link if you wish to be added to our mailing list, and click on the
“Forum” link to join the discussion board.
Overview
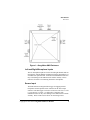
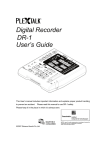
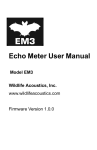
A diagram of the SM2 weather-proof enclosure is shown in Figure 1 below. This
enclosure, when properly closed, is weather tight and vented to protect against
condensation and stress on seals caused by pressure changes. While the
enclosure is designed to survive temporary immersion in water, it is not
designed or recommended for underwater use.
Connectors
The SM2 enclosure has four connectors as follows, each designed to make
a weatherproof seal when mated or used with the watertight connector caps
(not shown). Unused connectors should always be capped.
1
Song Meter SM2 User Manual Copyright © 2007-2010
Introduction
Overview
Figure 1—Song Meter SM2 Enclosure
Left and Right Microphone Inputs
The two microphone inputs are for the left and right channels and can
mate directly with the SMX-II weatherproof acoustic microphones, or
extended on an optional cable. Connection with unauthorized devices
may cause damage to the SM2 and will void the warranty. Please
contact us for advice on connecting alternative microphones.
Sensor Input
The SM2 includes an integrated data-logger for logging internal
temperature and an optional sensor connected to the sensor input
connector. The data-logger can resolve 10-bits on a scale of 0-3.3 volts
(i.e. precision of 3.3/1024 = 3.2 millivolts). Connection with
unauthorized devices may cause damage to the SM2 and will void the
warranty. Please contact us for advice on connecting sensors.
Copyright © 2007-2010 Song Meter SM2 User Manual
2
Introduction
Overview
External Power Input
The SM2 can be configured (jumper-selectable) to use either internal
power from four D-size Alkaline or NiMH batteries, or external power
through this connector. The power connector can safely accept
voltages from 4-10V DC and is intended for 6V external battery
systems. An optional power adapter is available that provides 5V
output to this connector from higher voltage (6-20V) input sources
suitable for a 12V solar power system and provides protection against
accidental reverse currents and overvoltage. Connection with
unauthorized devices may cause damage to the SM2 and will void the
warranty.
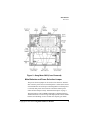
Inside the Enclosure
All of the Song Meter electronics, batteries, data storage flash cards,
display, and controls are mounted inside the weatherproof enclosure to
protect them from the elements, and are therefore inaccessible without
removing the enclosure’s cover as described in “Removing and Replacing
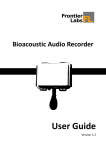
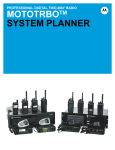
the Cover” on page 10. Figure 2 below illustrates the inside of the SM2 with
various parts described in more detail below.
3
Song Meter SM2 User Manual Copyright © 2007-2010
Introduction
Overview
Figure 2—Song Meter SM2 (Cover Removed)
Main Batteries and Power Selection Jumper
The power selection jumper can be used to select between “internal”
and “external” power sources. If internal power is selected, the four Dsize main batteries are used to power the Song Meter. If external power
is selected, then power comes from the external 4-10VDC power
connector described previously “External Power Input” on page 3.
The main batteries can be NiMH rechargeable or Alkaline batteries.
Alkaline batteries are best for long-term deployments because NiMH
batteries self-discharge at a rate of about 30% capacity per month.
Copyright © 2007-2010 Song Meter SM2 User Manual
4
Introduction
Overview
The SM2 will drain batteries down to approximately 3.5-3.8 volts.
While this is good for long deployments with disposable Alkaline
batteries, it can cause damage to NiMH batteries (they may no longer
charge properly) because they are not designed to be discharged below
about one volt per cell (or 4.0 volts total). So, if you are using NiMH
batteries, we recommend that you plan on replacing the batteries before
they are depleted.
The SM2 uses almost no current (around 0.5mA) when “sleeping”
between scheduled recording events so it can remain idle (not
recording) for months at a time (noting that batteries will discharge on
their own over time). When recording, depending on accessories,
sample rates, compression, and other variables, the SM2 can use as
little as 50mA current. That translates to almost 280 hours of recording
time using high quality Alkaline batteries. See “Managing Power and
Memory Resources” on page 28 for more information.
Clock Batteries
The SM2 uses two AA alkaline batteries to power the clock. These
batteries have an expected life of between two and three years.
However, we recommend that they are tested and/or replaced at the
beginning of each field season because the Song Meter will not operate
if they are depleted.
Flash Card Slots A, B, C and D
The SM2 supports standard off-the-shelf SD and SDHC flash memory
cards for storing recordings and data logs. Recordings are stored in
standard “.WAV” format files or in our proprietary “.WAC” lossless
compression format. Data is logged in tab-delimited “.TXT” text files.
The four card slots can be populated with one to four flash cards of
assorted capacities. As of this writing, today’s SDHC cards are
available in up to 32GB (32 billion bytes). With four slots, the SM2 has
a capacity of 128GB today, and more as higher capacity cards become
available.
In addition, the flash card slots can also support SDIO cards so that we
can provide new functionality in the future with plug-in peripherals
like GPS, Bluetooth and WiFi.
5
Song Meter SM2 User Manual Copyright © 2007-2010
Introduction
Overview
Indicator LED
A low-power LED on the board, and visible through a window on the
enclosure cover, provides a visual cue as to the status and health of the
Song Meter. When sleeping but scheduled to wake up for a future
recording, the LED will blink green once a minute for one second.
When actively recording, the LED will blink green for a fraction of a
second each second. Otherwise, the LED remains off.
The LED is intended to provide some status, but not at the cost of high
power consumption. Therefore, it may not be easily seen in bright
sunlight or from off angle.
Headphone Jack
The standard 3.5mm stereo headphone jack provides an audio output
capability. When making a recording, you can press the “Select” button
to toggle the headphones on and off to listen to the recording in
progress and check audio levels and quality.
Amplifier Configuration Jumpers
Several jumpers are provided to configure the left and right
microphone input channels.The jumpers are arranged in five rows of
two columns. The column on the left controls the left channel and the
column on the right controls the right channel.
The first row, labelled “2.5V Mic Bias”, enables a 2.5V bias through a
2.2K resistor to the signal input. This is required for most electret
microphones including the SMX-II microphones. To enable the bias,
the two jumper pins are shorted with a jumper installed. To disable the
bias, the jumper should be removed. (You can leave the jumper
hanging on one pin so you don’t loose it).
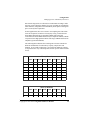
The second and third rows configure a two-pole butterworth high-pass
filter to attenuate unwanted low-frequency sounds. Each of these two
rows have four pins such that a jumper can short either the left two, the
middle two, or the right two pins. If both jumpers short the left pins, the
cut-off frequency is around 2Hz. If both jumpers short the middle pins,
the cut-off frequency is around 180Hz. If both jumpers short the right
pins, the cut-off frequency is around 1kHz as illustrated below.
Copyright © 2007-2010 Song Meter SM2 User Manual
6
Introduction
Overview
2Hz Cut-off:
.*. . .
.*. . .
High pass
Filter
180Hz Cut-off:
. .*. .
. .*. .
High pass
Filter
1,000Hz Cut-off:
. . .*.
. . .*.
High pass
Filter
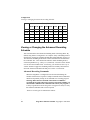
The fourth row configures the first stage of a two-stage microphone
pre-amplifier. A jumper shorting the left two pins provides 0dB gain,
shorting the middle two pins provides +24dB gain, and shorting the
right two pins provides +36dB gain.
The fifth row configures the second stage of a two-stage microphone
pre-amplifier. A jumper shorting the left two pins provides 0dB gain,
shorting the middle two pins provides +12dB gain, and shorting the
right two pins provides +24dB gain.
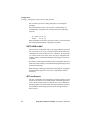
The combined amplification of the pre-amplifier is the sum of these
two stages as follows:
+0dB
.*. . .
.*. . .
Gain Stage 1 (+ 0dB)
Gain Stage 2 (+ 0dB)
.*. . .
. .*. .
Gain Stage 1 (+ 0dB)
Gain Stage 2 (+12dB)
. .*. .
.*. . .
Gain Stage 1 (+24dB)
Gain Stage 2 (+ 0dB)
+12dB
+24dB
7
Song Meter SM2 User Manual Copyright © 2007-2010
Introduction
Overview
+36dB
. .*. .
. .*. .
Gain Stage 1 (+24dB)
Gain Stage 2 (+12dB)
. .*. .
. . .*.
Gain Stage 1 (+24dB)
Gain Stage 2 (+24dB)
. . .*.
. . .*.
Gain Stage 1 (+36dB)
Gain Stage 2 (+24dB)
+48dB
+60dB
Note that there is an additional third-stage gain for audio rates <=
48kHz that can be configured from the user interface for +0 to +12dB
additional amplification in 1.5dB increments. Song Meter can
therefore be configured for gains between +0 and +70dB in 1.5dB
increments on each channel.
LCD Display
A 4-row by 20-column LCD display is used for status and
configuration.
Reset Button
The reset button forces the Song Meter to reboot to its initial power-up
state. Note that this does not reset any saved parameters, but will cause
an advanced schedule to be reset so it will start again from the
beginning. Avoid pressing the reset button while recording.
Wake/Exit Button
Song Meter normally sleeps until the next scheduled recording time
arrives. In order to check or configure Song Meter, it must be woken
up manually. Press the Wake/Exit Button to wake up the Song Meter.
To put Song Meter back to sleep and resume the recording schedule,
press the Wake/Exit button again. If the Wake/Exit button is pressed
during a scheduled recording, the Song Meter will begin recording
immediately until the scheduled ending time of the recording, and then
go to sleep to wait for the next scheduled recording.
Copyright © 2007-2010 Song Meter SM2 User Manual
8
Introduction
Overview
If Song Meter is awake and not recording, it will automatically resume
the recording schedule after 5 minutes of inactivity.
Up, Down, Select and Back Buttons
Use the Up, Down, Select and Back buttons to navigate Song Meter’s
menus. The Up and Down buttons are used to advance to the previous
or next menu item or parameter value. The Select button is used to
select the menu item or lock in the parameter value, and the Back
button is used to back up.
Temperature Sensor
The built-in temperature sensor is located on the motherboard inside
the enclosure and can be used to log temperature.
Note that the temperature measured is the air temperature inside the
enclosure. If the SM2 is shaded from direct sunlight, this will generally
be reasonably close to the ambient air temperature outside the
enclosure. However, if exposed to sunlight, the air temperature inside
the enclosure can rise significantly.
See “Sensor Settings” on page 23 and “Data Log Files” on page 43 for
details.
9
Song Meter SM2 User Manual Copyright © 2007-2010
Getting Started
Removing and Replacing the Cover
Getting Started
Removing and Replacing the Cover
The SM2 cover has four plastic cover screws in the corners as shown in Figure
1 on page 2. These screws have clips to prevent them from falling out and getting
lost. For best results, use a properly sized flat-head or phillips-head screw driver
to turn the screws. Note that the plastic is soft, and use of incorrect tools can
damage the heads. When in doubt, a flat-head screw driver is safest. If necessary,
you can purchase replacement cover screws from us.
If the enclosure is wet on the outside, we recommend drying it off with a towel
before removing the cover. You can then loosen the cover screws by turning
them counter-clockwise and lifting the cover straight away from the enclosure
body.
To close the cover again, make sure the indicator LED window is correctly
oriented and tighten the screws by turning them clockwise. Be careful not to
over-tighten the cover fasteners. If the fasteners are too tight, the knife-edge
of the cover can warp slightly reducing the effectiveness of the gasket seal.
Additionally, there is some risk of stripping the threads. Instead, gently tighten
the fasteners until the plastic on the cover just meets the plastic on the enclosure
at the corners. Continue to tighten a generous 1/8th turn more. This is equivalent
to approximately 9.0 inch-pounds or 1.0 newton-meters of torque.
Installing Batteries
Main Batteries
If using internal batteries, make sure the power source jumper is set
properly as described in “Main Batteries and Power Selection Jumper” on
page 4.
Song Meter takes 4 standard “D” size batteries and works with disposable
Alkaline batteries as well as rechargeable NiMH batteries.
If you are using NiMH rechargeable batteries, you should make sure they
are fully charged as these batteries tend to discharge over time when not in
use. Warning: NiMH batteries can be damaged if discharged beyond
their capacity. See the section on “Managing Power and Memory
Resources” on page 28” for more information.
Copyright © 2007-2010 Song Meter SM2 User Manual
10
Getting Started
Installing Flash Cards
Be sure to install the batteries in the correct orientation as indicated by the
battery holder.
Battery life can vary widely depending on the battery capacity, brand,
charger used, temperature, etc.
External Power
Instead of the internal batteries, you can also provide power to the Song
Meter from an external 6 or 12 volt battery or solar power system using the
SM2PWR adapter. Make sure the power selection jumper is set to select
power from the external connector. The SM2PWR adapter provides 5V
power to the Song Meter through the connector, and provides battery clips
to attach to a large 6 or 12 volt battery. The SM2PWR provides voltage
protection up to 20 volts and reverse current protection to prevent damage
from accidentally reversing the battery polarity.
Clock Battery
Song Meter uses two AA alkaline batteries to power the clock. These
batteries should last between two and three years, but we recommend that
you check and/or replace them before each field season because the Song
Meter will not operate when these batteries are depleted.
Installing Flash Cards
You must install at least one flash card in order for Song Meter to make and store
recordings. You may install up to four flash cards for additional storage capacity.
Song Meter supports SD and SDHC cards. We recommend using Class 4 and
higher cards.
Installing Microphones
The SMX-II weather-proof microphones can attach directly to the left and right
microphone input connectors on the Song Meter. Alternatively, they can be
extended on cables. The connector is keyed and the microphone (or cable) can
be pushed into the connector when oriented correctly and then locked into place
by turning the locking ring on the microphone or cable clockwise.
11
Song Meter SM2 User Manual Copyright © 2007-2010
Getting Started
Mounting the Song Meter
Mounting the Song Meter
You must first remove the enclosure cover as described in “Removing and
Replacing the Cover” on page 10.
With the cover removed, you can drop M4 or #6 screws into any of the four holes
used for mounting the cover. The tips of the screws will emerge through holes
in the back of the Song Meter and can be screwed into the fixed object. When
the cover is replaced, the plastic cover fasteners will cover the heads of the
mounting screws.
There are many possible mounting solutions. You could drop #6 wood screws
into the four holes and screw them into a piece of plywood which, in turn, could
be easily mounted to a tree or post. Or, you could drop #6 machine screws using
wing nuts on the back to secure a wire or chain.
Waking Song Meter
Song Meter is designed to remain in a deep sleep between recording events and
must be manually awoken in order to view or change the recording schedule or
settings.
The SM2 can be awoken by pressing either the “Wake/Exit” button or the
“Reset” button. The “Wake/Exit” button causes the SM2 to wake up preserving
any advanced scheduling state so that a schedule-in-progress can be resumed
where it left off. The “Reset” button reboots the Song Meter from its power-on
causing the advanced scheduling state to be cleared so that a schedule-inprogress can only be restarted from the beginning.
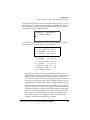
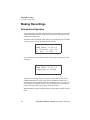
When the Song Meter wakes up, the display will show something like the
following:
2009-Sep-11 13:32:56
Song Meter II R2.2.0
A: 32G 48%B: 32G 0%
C: N/A
D: N/A
The top row displays the current date and time and is updated every second.
The bottom two rows display the status of the four SD flash memory card slots
labelled “A” through “D”.
Copyright © 2007-2010 Song Meter SM2 User Manual
12
Getting Started
Waking Song Meter
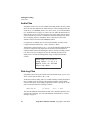
If no SD flash card is plugged into a slot, “N/A” is displayed to indicate that the
slot is not available.
Otherwise, its capacity in gigabytes and percent full are displayed. In the above
example, slots A and B each have a 32GB card installed with A at 48% full and
B empty at 0% full, and slots C and D have no card installed. Note that if a card
is write-protected, “WP” will be displayed instead of a percent full indication.
If a problem occurred while scanning a card, “ERROR” will be displayed.
13
Song Meter SM2 User Manual Copyright © 2007-2010
Configuration
Using the Song Meter Configuration Utility
Configuration
Using the Song Meter Configuration Utility
All of the Song Meter settings and recording schedule can be configured directly
on the Song Meter using the display and buttons as described throughout this
manual. As a convenience, you may also create, view, or edit Song Meter
configuration files using the Song Meter Configuration Utility application
software. This software is available at no charge from the Wildlife Acoustics
website at http://www.wildlifeacoustics.com/.
The Song Meter Configuration Utility also comes with sample configuration
files that may already fit your needs for a variety of applications.
Menu Navigation
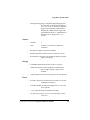
After waking the Song Meter, press the “Select” button to enter the main menu.
The display will look like this:
Song Meter Main Menu
- Schedule (daily)
- Settings
- Utilities
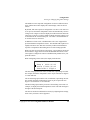
By convention throughout this manual, the box above shows the contents of the
20 column by 4 row display. The double underline indicates the blinking cursor
position. Each menu screen can only display three lines at a time. Any lines
shown below the box can be seen by scrolling down using the “Down” button.
The “Up” and “Down “ buttons can be used to scroll through the menu choices.
To select a menu choice, press the “Select” button. To return to the previous
menu, press the “Back” button. From the main menu above, you can press the
“Back” button to return to the start-up screen.
The “Wake/Exit” button will start or resume the recording schedule.
Copyright © 2007-2010 Song Meter SM2 User Manual
14
Configuration
Viewing or Changing the Daily Recording Schedule
Viewing or Changing the Daily Recording
Schedule
The Song Meter can be configured to follow a simple daily recording schedule
(the default), or a more advanced recording schedule (discussed later).
From the main menu, scroll to the “Schedule” line. Note that the line indicates
which scheduling mode is selected in parentheses e.g. “(daily)” or “(advanced)”.
Press the “Select” button once to select the schedule mode. If necessary, you can
then use the “Up” or “Down” buttons to toggle the scheduling mode between
daily and advanced. Select the daily schedule mode and press “Select” a second
time. The display will look like this:
Schedule:
(HH:MM)
- Add new entry
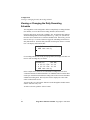
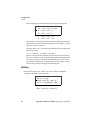
If a recording schedule has already been programmed, the display will show one
line for each recording entry as follows:
Schedule:
(HH:MM)
- @ 05:30 for 01:30
- @ 23:00 for 01:00
- Add new entry
In the example above, there are two scheduled recording times, one from
5:30AM for an hour an a half and another at 11:00PM for an hour. Note that there
can be up to 128 different scheduled recording times. If there are more than three
scheduled recording times, then only three will be displayed at a time with
others scrolled off the screen.
You can use the “Up” and “Down” buttons to scroll through the schedule entries
and the “Add new entry” line.
To make a selection, push the “Select” button.
15
Song Meter SM2 User Manual Copyright © 2007-2010
Configuration
Viewing or Changing the Daily Recording Schedule
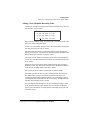
Adding a New Scheduled Recording Time
Use the “Up” and “Down” buttons to scroll to the “Add new entry” line, and
then press the “Select” button.
Schedule:
(HH:MM)
- @ 05:30 for 01:30
- @ 23:00 for 01:00
- @ 00:00 for 00:00
Notice that the “Add new entry” is replaced with “@ 00:00 for 00:00” with
the cursor on the starting time hour.
Use the “Up” and “Down” buttons to select the closest hour to the desired
start time, then press the “Select” button.
The cursor will now advance to the minutes portion of the starting time.
Again, you can use the “Up” and “Down” buttons to change the minute (and
hour) to the desired start time, then press “Select”.
The cursor will now advance to the hours portion of the recording duration.
Use the “Up” and “Down” buttons to select the closest number of hours and
press “Select”.
Finally, the cursor will advance to the minutes portion of the recording
duration. Use the “Up” and “Down” buttons to select the minute (and hour)
of the desired recording duration, then press “Select”.
You can use the “Back” button to back up if you make a mistake.
Notice that you may not have any two recording periods that overlap. In
fact, there must be at least a one minute gap between the end of one
recording period and the beginning of the next. If you attempt to create a
recording entry that violates this rule, the error message “OVERLAP! TRY
AGAIN” will be displayed for 5 seconds.
Also note that the maximum file size for any individual recording is 2GB.
If you specify a duration (times sample rate, times number of channels,
times 2 bytes per sample) exceeding 2GB, the recording may be split into
more than one file.
Copyright © 2007-2010 Song Meter SM2 User Manual
16
Configuration
Viewing or Changing Song Meter Settings
Changing an Existing Scheduled Recording Time
Use the “Up” and “Down” buttons to scroll to the entry you wish to change,
and then press the “Select” button. The cursor will advance to the starting
time hour. Follow the steps above to change the entry.
Deleting an Existing Scheduled Recording Time
Use the “Up” and “Down” buttons to scroll to the entry you wish to delete,
and then press the “Select” button. Follow the steps above and set the
recording duration to 00:00. This will cause the entry to be deleted.
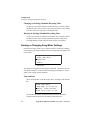
Viewing or Changing Song Meter Settings
From the main menu, use the “Up” or “Down” buttons to scroll to the “Settings”
choice and press the “Select” button to enter the settings menu. The display will
look like this:
Song Meter Settings:
-Time and date
-Location
-Audio
-Sensors
The settings are organized into four groups as indicated. You can use the “Up”
and “Down” buttons to scroll to the desired settings group and press “Select”
again to enter a group-specific submenu.
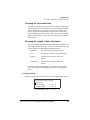
Time and Date
Select “Time and date” from the settings menu. The display will look like
this:
Time and date:
2009-Sep-16 03:00:39
-Solar Sunrise/Set
Rise 05:52 Set 17:58
The current time and date are shown on the second line, and today’s
calculated sunrise/sunset times are shown on the bottom line.
17
Song Meter SM2 User Manual Copyright © 2007-2010
Configuration
Viewing or Changing Song Meter Settings
Changing the Time and/or Date
To change the time and/or date, scroll to the second line and press the
“Select” button. The cursor will select the year and you can change the
year by pressing the “Up” and “Down” buttons. To continue, press
“Select” again to select the month, day, hour, minute, and second.
After changing the seconds, pressing “Select” one more time will lock
in the new time and date. At any time, you can back up by pressing the
“Back” button.
Changing the method of Solar Calculation
You can also change the method for sunrise and sunset calculations by
scrolling down to the “Solar” line. Press “Select” and use the “Up” and
“Down” buttons to scroll through the following choices:
•
Sunrise/set
when the sun is just below the horizon
•
Civil
when the sun is 6 degrees below the horizon
•
Nautical
when the sun is 12 degrees below the
horizon
•
Astronomical
when the sun is 18 degrees below the
horizon
For sunrise and sunset calculations, you will also need to configure
your location (latitude and longitude) and timezone as described
below.
Location Settings
From the settings menu, select “Location”. The display will look like this:
Location Settings:
-Prefix
-Latitude
0.00 N
-Longitude
0.00 W
-Timezone UTC + 0:00
Copyright © 2007-2010 Song Meter SM2 User Manual
18
Configuration
Viewing or Changing Song Meter Settings
Filename Prefix
Song Meter lets you specify a filename prefix of up to 12 characters
that will become part of the recording file names and can be used to
uniquely label recordings made by each Song Meter (e.g. to designate
a location and/or project). Recordings are saved in a “Data” folder on
the flash card and have names of the form
Prefix_YYYYMMDD_hhmmss.wav, where Prefix is the prefix specified
here, YYYY is the year, MM is the month, DD is the day, hh is the hour,
mm is the minute, and ss is the second at which the recording was
started. The suffix “.wav” is used for uncompressed files, and “.wac”
for the proprietary lossless audio compression WAAC format.
Log files are also saved in the “Data” folder and have names of the
form Prefix_Sensor-X.txt where X is the card slot letter A, B, C or D.
The prefix may contain capital letters, numbers, and hyphens. Press
the select button to advance to each position in the prefix, and then use
the up and down arrows to select from among the possible characters.
Press select one more time to mark the end of the prefix.
The default value is no prefix, in which case no Prefix_ will be present
in the recording file names.
Latitude
Latitude is one of the parameters used to calculate the actual time of
sunrise and sunset for scheduling recordings relative to sunrise and
sunset times. You can specify the latitude of the Song Meter’s location
on the globe in degrees north (N) or south (S) of the equator.
Longitude
Longitude is one of the parameters used to calculate the actual time of
sunrise and sunset for scheduling recordings relative to sunrise and
sunset times. You can specify the longitude of the Song Meter’s
location on the globe in degrees west (W) or east (E) of Greenwich.
Timezone
Timezone is one of the parameters used to calculate the actual time of
sunrise and sunset for scheduling recordings relative to sunrise and
sunset times. You can specify the local timezone (as used to set the
19
Song Meter SM2 User Manual Copyright © 2007-2010
Configuration
Viewing or Changing Song Meter Settings
clock) in hours relative to UTC (Universal Time Coordinated). Half
and quarter timezones (e.g. :00, :15, :30, :45) are also supported.
Note that Song Meter does not automatically adjust for daylight
savings time. This is mostly because daylight savings time is
determined by government action and not by nature, so we can not
predict the start or end of daylight savings time as this in fact changes
from time to time in different countries by their respective
governments.
Audio Settings
From the settings menu, select “Audio”. The display will look like this:
Audio Settings:
16000
-Sample rate
-Channels
Stereo
-Compression
Off
-Gain left + 0.0 dB
-Gain right + 0.0 dB
-Advanced settings
Sample Rate
Song Meter supports the following sample rates (in samples per
second):
•
48,000
•
44,100
•
32,000
•
24,000
•
22,050
•
16,000
•
8,000
•
4,000
The default value set by the factory is 16,000 samples per second.
Copyright © 2007-2010 Song Meter SM2 User Manual
20
Configuration
Viewing or Changing Song Meter Settings
Channels
Song Meter can record in Stereo (both left and right channels) or Mono
(using either the left or right channel). The default value set by the
factory is two-channel stereo recording.
Gain
The Song Meter audio path has three gain stages for amplification of
the microphones on each channel. The first two stages are configured
by jumpers as described in “Amplifier Configuration Jumpers” on
page 6. The third stage can be configured independently for each
channel from between + 0.0 dB and + 12.0dB in 1.5 dB increments.
The default value set by the factory is + 0.0 dB for both channels.
Compression
Song Meter can compress audio files to increase storage capacity. By
default, compression is turned off and the audio files are stored as
uncompressed “.WAV” files. If compression is turned on, Song Meter
will instead store audio files using the proprietary Wildlife Acoustics
Audio Compression (WAAC) file format “.WAC” files.
The WAC0 format is a lossless audio compression format designed to
provide efficient compression for typical open microphone field
recordings. On average, “.WAC” files will be 60% the size of
uncompressed “.WAV” files. Actual compression rates will vary
depending on the sounds picked up by the microphones.
The WAC1-8 formats are lossy compression formats in which the least
significant 1 to 8 bits of the 16-bit audio samples are dropped,
respectively. In most cases, the amplified self-noise of the microphone
is well above the -96dBV full-scale represented by 16-bit audio
samples such that the lower bits generally contain only random noise
and no detectable information. For SMX-II and SMX-US
microphones at +48dB gain, the noise floor is typically above the least
significant 6 bits so that the WAC6 format can be used without any
detectable loss of information and improving compression ratios to
about 5:1.
To calculate the noise floor of a microphone in dBV, take the sensitivity
in dBV/pa, subtract the SNR in dB, and add the gain in dB. For
example, an SMX-II with sensitivity of -40dBV/pa and an SNR of
21
Song Meter SM2 User Manual Copyright © 2007-2010
Configuration
Viewing or Changing Song Meter Settings
63dB amplified by +48dB has a noise floor of -40 - 63 + 48 = -55dBV.
Each bit represents a dynamic range of about 6dB, so the significant
bits above the noise are 55/6 = 9.2 bits. So we can keep 10 and drop 6
of the 16-bits using the WAC6 format.
Some additional processing power is required when compression is
used resulting in an increase of power consumption.
Advanced Settings
The advanced settings sub-menu looks like this:
Advanced
-Dig HPF
-Dig HPF
-Dig LPF
-Dig
-Trg
-Trg
-Trg
-Trg
-Div
Settings:
Left
Off
Right
Off
Left
Off
LPF Right
Lvl Left
Lvl Right
Win Left
Win Right
Ratio
Off
Off
Off
1.0s
1.0s
16
The first four lines configure optional per-channel digital band-pass
filters to filter out frequencies below the high-pass filter (HPF) and
above the low-pass filter (LPF). The corner frequencies of these filters
are configurable to the sample rate divided by either 3, 4, 6, 8, 12, 16,
24, 32, 48, 64, or 96.
The next four lines configure optional per-channel triggers. When
triggers are enabled, recording is suspended until a trigger event is
detected. Recording then continues until no trigger event is detected
for the specified period of time between 0.1 and 9.9 seconds (default
1.0 seconds). For .WAV files, the file is simply shortened with periods
of no activity on all active channels removed from the recording. For
.WAC files, highly compressed zero-value frames are stored in the
recording independently preserving elapsed time between triggered
events.
There are two kinds of triggers. Adaptive triggers are configured
between +1 and +88 dB SNR and indicate a threshold level above the
Copyright © 2007-2010 Song Meter SM2 User Manual
22
Configuration
Viewing or Changing Song Meter Settings
rolling average background spectrum within the frequency band
selected by the band-pass filters. A +6dB trigger works fairly well for
most cases. A higher value will be less sensitive and a lower value will
be more sensitive.
The second kind of trigger is an absolute threshold between -1dB and
-88dB full scale rms of the total energy in the frequency band selected
by the band-pass filters.
“.WAC” files can be read by our Song Scope software. Additionally,
we provide a free cross-platform “.WAC” to “.WAV” (wac2wav)
conversion program available from our website at:
http://www.wildlifeacoustics.com/downloads/
Finally, for SM2s equipped with ultrasonic sample rate boards (e.g.
SM2BAT), the “Div Ratio” option sets the frequency divider used for
headphone output when listening to ultrasonic signals in realtime. The
default value is 16. This setting is not displayed unless an ultrasonic
board is installed.
Sensor Settings
The Song Meter has two sensor ports including a built-in temperature
sensor (port zero) and an optional external sensor connected to the sensor
port connector (port one).
The Song Meter can take a voltage measurement on either sensor port with
10-bit resolution. The voltage range is 0-3.3V with a resolution of 3.2
millivolts.
Each sensor can be configured and/or calibrated to translate a voltage
reading into meaningful units appropriate for the sensor.
These sensors can be configured and calibrated by selecting “Sensors” from
the settings menu. The display will look like this:
Sensor settings:
0: (Linear
)
1: (Linear
)
0:
22.4 1: 1.650
23
Song Meter SM2 User Manual Copyright © 2007-2010
Configuration
Viewing or Changing Song Meter Settings
The middle two lines represent configuration for the two different sensor
ports, and the bottom line displays the current display value for the two
sensors.
By default, both sensor ports are configured on a “Linear” scale. Port zero
is set up to use the built-in temperature sensor and automatically converts
voltage levels to degrees celsius as displayed on the bottom line and in the
sensor logs. Port one is set up by default to display the actual voltage level
as measured on the external sensor port. The value is not deterministic if
no external sensor is connected.
In addition to a linear scale, a Steinhart-Hart scale is also supported for
precision thermistor temperature sensors. The Steinhart-Hart equation is a
slightly non-linear curve that more accurately models actual thermistor
response to temperature thus making more accurate readings possible.
When you select on one of the two sensor ports, you can then use the up and
down buttons to toggle between Linear and Steinhart-Hart modes. Press
select again to configure the Linear or Steinhart-Hart parameters for your
particular sensors.
When configuring a linear sensor, the display looks like this:
Sensor 0 (Linear
)
- Zero @ 0400.00 mV
- Scale 1/0019.50 mV
- Precision 1 digits
The first setting represents the offset, in millivolts, representing zero units.
For example, the built-in temperature sensor on port 0 measures 0 degrees
C at 400 millivolts.
The second setting represents the scale, in millivolts, representing one unit.
For example, the built-in temperature sensor on port 0 represents each
degree C as a difference of 19.5 millivolts.
The third setting represents the precision of the resulting conversion. For
example, we display the internal temperature sensor value with one digit to
the right of the decimal point.
The sensors can then be calibrated for accuracy by adjusting these settings,
and a variety of sensors can be supported.
Copyright © 2007-2010 Song Meter SM2 User Manual
24
Configuration
Utilities
When configuring a Steinhart-Hart sensor, the display looks like this:
Sensor 1 (Steinhart)
- Rs 100 x10^2 ohms
- A 1143 x10^-6
- B 2313 x10^-7
- C 1093 x10^-10
- D -7251 x10^-14
Rs represents a series resistor between the thermistor and ground and can be
specified with a 3-digit mantissia and exponent. In this example, a 10,000
ohm series resistor is specified.
The other values A, B, C, and D represent coefficients of the Steinhart-Hart
equation as follows:
1/T = A + B (Ln Rt) + C (Ln Rt)^3 + D(Ln Rt)^5
Where T is the temperature in Kelvin, Rt is the resistance of the thermistor,
and A, B, C, and D are constants. When using the SM2 with Steinhart-Hart
sensors, the resistance is calculated with knowledge of the series resistor
Rs, and then the temperature is calculated and converted to degrees celsius
with one digit precision to the right of the decimal point.
Utilities
From the main menu, select “Utilities” to access a number of additional
commands. The display will look like this:
Utilities:
-Go to sleep
-Load config from A:
-Save A:SONGMETR.SET
-Erase all cards
-Set factory default
25
Song Meter SM2 User Manual Copyright © 2007-2010
Configuration
Utilities
Putting the Song Meter to Sleep
Selecting “Go to sleep” puts the Song Meter to sleep immediately. In this
mode, the Song Meter will not wake up again until the “Wake/Exit” or
“Reset” buttons are pressed. This is a convenient way of putting the Song
Meter into a low power state for short-term transportation or storage and
prevent it from automatically waking to make scheduled recordings. For
long-term storage, it is better to move the power source selection jumper to
“external” to effectively disconnect the internal batteries. See “Main
Batteries and Power Selection Jumper” on page 4.
Loading and Saving Configuration Files
The recording schedule and settings can be saved to or loaded from a .SET
file on the flash card plugged into slot A. This feature is handy if you need
to configure several Song Meters using the same schedule and settings. For
example, you can configure one Song Meter and save the configuration,
then load the same configuration on other Song Meters.
You can also use the Song Meter Configuration Utility application software
to conveniently create or edit configuration files on your computer and
visualize the recording schedule. Note that by default, microphone gain
settings, sensor settings and the prefix are not updated when you load
settings. The microphone gain settings and sensor settings may be
calibrated to the tolerances of individual microphones and Song Meters,
and the prefix is intended to uniquely identify each Song Meter in the field.
However, you can override these parameters when using the Song Meter
Configuration Utility application software.
To load a configuration file, select the “Load config from A:” selection
from the utilities menu. The display will show a list of available .SET files
present in the top directory of the flash card in slot A. You can then scroll
through the list of files and select the configuration file you wish to load.
The schedule and settings will be updated from the configuration file.
To save a configuration file, select “Save A:SONGMETER.SET” from the
utilities menu. This will save the schedule and settings to a file called
SONGMETER.SET on the flash card installed in slot A.
Erase All Cards
You can permanently delete all the files on all flash cards to make room for
new recordings. Select “Erase all cards” from the utilities menu. You will
Copyright © 2007-2010 Song Meter SM2 User Manual
26
Configuration
Start Recording Schedule
be prompted to confirm this action. Scroll down to “Yes” and press the
“Select” button. All flash cards will then be erased.
Setting Factory Defaults
Selecting “Set factory default” from the utilities menu causes all of the
parameter settings to be set to the factory defaults and erases both the daily
and advanced schedules.
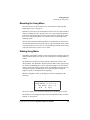
Start Recording Schedule
Press the “Wake/Exit” button. If the next scheduled recording is more than 45
seconds away, the following message is displayed:
2009-Sep-12 13:34:12
Going to sleep until
2009-Sep-12 05:30:00
The top row indicates the current time and date. The bottom shows the next
scheduled recording start time. After 5 seconds, the Song Meter will go into a
deep sleep and the display will go blank. You should now replace the protective
cover. See “Removing and Replacing the Cover” on page 10. The LED
indicator light will blink once per minute for one second to indicate that the Song
Meter is asleep and scheduled to wake up.
If the next scheduled recording event is in progress or within 45 seconds away,
then Song Meter will begin preparing to record and begin recording at the
correct start time (or as soon as possible if a scheduled recording is already in
progress).
If there were no scheduled recordings configured, the following message is
displayed instead and Song Meter will go into a deep sleep until manually
awoken:
2009-Sep-12 13:34:12
NO SCHEDULED EVENTS
Going to sleep......
27
Song Meter SM2 User Manual Copyright © 2007-2010
Configuration
Managing Power and Memory Resources
Managing Power and Memory Resources
Recording time is limited by power and memory resources. Song Meter can only
record while it still has sufficient power available in the batteries and while it has
sufficient room to save recordings in the SD/SDHC flash cards. Download our
free Song Meter Configuration Utility to see estimates of how long battery and
memory resources are expected to last given your specific recording schedule
and configuration.
Power Resources
The Song Meter SM1 can run on 4 “D”-size Alkaline or rechargeable
NiMH batteries. Song Meter draws only 50-90 milliamps of current when
recording (depending on sample rates and compression), and almost no
measurable current (approximately 0.5 milliamps) when sleeping between
recording events. Add another 7 milliamps if using the external SM2PWR
adapter.
Rechargeable NiMH Batteries
Good rechargeable NiMH D batteries have a capacity of 11,000 mAh
(milliamp hours) delivering an estimated potential battery life of 120220 hours of recording time. Unfortunately, NiMH batteries have a
high self-discharge rate and will typically lose 1% of their capacity per
day, so the effective recording time may be greatly reduced depending
on the recording schedule.
Actual battery life will also vary due to a number of other factors
including the quality of the batteries and charger used, temperature,
time between charges, etc. NiMH batteries may need to be cycled
several times before they are able to hold a full charge. In addition,
some Song Meters might draw a little more or a little less current due
to the variability in tolerances of electronic components used.
Warning: NiMH batteries should not be over-discharged. If you are
using NiMH batteries, and Song Meter runs out of power before it runs
out of memory, the batteries will continue to discharge and may
become unable to accept a new charge if left in this state for too long.
We recommend that you either arrange your recording schedule to run
out of memory first, or plan on retrieving the batteries before they are
expected to run out of power.
Copyright © 2007-2010 Song Meter SM2 User Manual
28
Configuration
Managing Power and Memory Resources
Alkaline Batteries
Good alkaline batteries will typically deliver around 14,000 mAh when
used with Song Meter. In addition, alkaline batteries have a very long
shelf life and can maintain over 90% of their full capacity for a year.
Song Meter will typically deliver around 150-280 hours of recording
time when using Alkaline batteries.
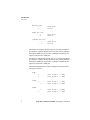
Estimating Battery Life
The following table illustrates typical estimated run-times based on
daily recording minutes for 11,000mAH NiMH and 14,000mAH
Alkaline batteries assuming a 60mA drain during recording (add 30
seconds for each recording per day to account for overhead), 0.5mA
drain while sleeping, and 1% daily self discharge rate for NiMH
batteries. When using audio compression, power consumption can rise
from 55mA to 90mA depending on sampling rates, so these estimates
should be reduced accordingly. Recording time will be about 80% at
24kHz stereo with compression and 70% at 48kHz stereo with
compression. Additional power is consumed when using advanced
features like digital band-pass filtering and triggering.
Alkaline
NiMH
Scheduled
Recoding
Time per
Day
Total
Run-time
(days)
Total
Recording
Hours
Total
Run-time
(days)
Total
Recording
Hours
5 minutes
775
65
87
7
10 minutes
608
101
83
14
15 minutes
501
125
80
20
20 minutes
425
142
78
26
25 minutes
370
154
75
31
30 minutes
327
163
72
36
29
Song Meter SM2 User Manual Copyright © 2007-2010
Configuration
Managing Power and Memory Resources
Alkaline
NiMH
Scheduled
Recoding
Time per
Day
Total
Run-time
(days)
Total
Recording
Hours
Total
Run-time
(days)
Total
Recording
Hours
35 minutes
293
171
70
41
40 minutes
265
177
68
45
45 minutes
243
182
66
50
50 minutes
223
186
64
53
55 minutes
207
190
62
57
1 hour
193
193
61
61
2 hours
106
212
46
91
3 hours
73
219
37
110
4 hours
56
223
31
122
5 hours
45
225
26
131
6 hours
38
227
23
138
7 hours
33
228
20
143
8 hours
29
229
18
147
9 hours
26
230
17
151
10 hours
23
230
15
153
11 hours
21
231
14
156
12 hours
19
231
13
158
13 hours
18
231
12
160
Copyright © 2007-2010 Song Meter SM2 User Manual
30
Configuration
Managing Power and Memory Resources
Alkaline
NiMH
Scheduled
Recoding
Time per
Day
Total
Run-time
(days)
Total
Recording
Hours
Total
Run-time
(days)
Total
Recording
Hours
14 hours
17
232
12
161
15 hours
15
232
11
163
16 hours
15
232
10
164
17 hours
14
232
10
165
18 hours
13
232
9
166
19 hours
12
233
9
167
20 hours
12
233
8
168
21 hours
11
233
8
168
22 hours
11
233
8
169
23 hours
10
233
7
170
24 hours
10
233
7
170
Memory Resources
Song Meter has four SD/SDHC card slots. As of this writing, high capacity
flash cards are available with up to 32GB (gigabytes = billion bytes). Thus,
with four 32GB cards, Song Meter can be configured with a capacity of
128GB, and more in the future as higher capacity flash cards become
available.
Recordings consume 2 bytes (16-bits) per sample, times the sample rate,
times the number of channels per second. For example, a recording made at
a sampling rate of 44,100 samples per second in stereo (2 channels)
consumes 2 x 44,100 x 2 = 176,400 bytes per second. With 128GB total
capacity, 128,000,000,000 divided by 176,400 = 725,623 seconds = 201
hours of recording time.
31
Song Meter SM2 User Manual Copyright © 2007-2010
Configuration
Managing Power and Memory Resources
Note that the largest file size allowed for an individual recording is 2GB.
You may need to adjust the duration of a given recording to fit within this
limit. Otherwise, Song Meter will automatically break up the recording into
pieces to satisfy this requirement.
In most applications, there is no reason to use sampling rates faster than
twice the frequencies of interest. The majority of frog vocalizations are
under 4KHz and need only be sampled at 8KHz while most bird
vocalizations are under 8KHz and need only be sampled at 16KHz (with the
exception of some high-pitched warblers who sing at 10KHz and need to be
sampled at greater than 20KHz).
The following tables illustrate the recording time in hours available for
different combinations of total memory capacity, sample rates and
channels. If you enable compression, you can almost double the capacity.
(Compression rates vary with sample rates and site-specific ambient sound
levels).
Mono (1 channel)
48,000 44,100 32,000 24,000 22,050 16,000
8,000
4,000
2GB
5.8
6.3
8.7
11.6
12.6
17.4
34.7
69.4
4GB
11.6
12.6
17.4
23.1
25.2
34.7
69.4
138.9
8GB
23.1
25.2
34.7
46.3
50.4
69.4
138.9
277.8
16GB
46.3
50.4
69.4
92.6
100.8
138.9
277.8
555.6
32GB
92.6
100.8
138.9
185.2
201.6
277.8
555.6
1111.1
64GB
185.2
201.6
277.8
370.4
403.1
555.6
128GB
370.4
403.1
555.6
740.7
806.2
1111.1 2222.2
1111.1 2222.2 4444.4
Stereo (2 channels)
48,000 44,100 32,000 24,000 22,050 16,000
8,000
4,000
2GB
2.9
3.1
4.3
5.8
6.3
8.7
17.4
34.7
4GB
5.8
6.3
8.7
11.6
12.6
17.4
34.7
69.4
Copyright © 2007-2010 Song Meter SM2 User Manual
32
Configuration
Viewing or Changing the Advanced Recording Schedule
Stereo (2 channels)
48,000 44,100 32,000 24,000 22,050 16,000
8,000
4,000
8GB
11.6
12.6
17.4
23.1
25.2
34.7
69.4
138.9
16GB
23.1
25.2
34.7
46.3
50.4
69.4
138.9
277.8
32GB
46.3
50.4
69.4
92.6
100.8
138.9
277.8
555.6
64GB
92.6
100.8
138.9
185.2
201.6
277.8
555.6
1111.1
128GB
185.2
201.6
277.8
370.4
403.1
555.6 1111.1 2222.2
Viewing or Changing the Advanced Recording
Schedule
This section describes the advanced scheduling mode of the Song Meter. By
default, Song Meter is configured to use a simpler “daily” scheduling mode as
described in “Viewing or Changing the Daily Recording Schedule” on page 15.
The advanced scheduling mode can be selected from the main menu.Scroll to
the “Schedule” line. Note that the line indicates which scheduling mode is
selected in parentheses e.g. “(daily)” or “(advanced)”. Press the “Select” button
once to select the schedule mode. If necessary, you can then use the “Up” or
“Down” buttons to toggle the scheduling mode between daily and advanced.
Select the advanced schedule mode and press “Select” a second time.
Advanced Recording Commands
When the Song Meter is configured to use advanced scheduling, the
schedule is defined as a sequence of simple commands. Each command is
numbered sequentially with up to 99 commands in a recording program.
Warning: When the last command of the advanced schedule is
executed, the program will end. If you want to repeat the schedule, you
must include a GOTO LINE command at the end of your program. It
is always a good idea to use the Song Meter Configuration Utility to verify
that advanced schedules will work as expected.
There are several types of commands as follows:
33
Song Meter SM2 User Manual Copyright © 2007-2010
Configuration
Viewing or Changing the Advanced Recording Schedule
AT TIME hh:mm:ss
The “At Time” command is used to cause Song Meter to wait until the
specified time of day. If possible, Song Meter will put itself to sleep
until just before the scheduled time. Song Meter will wake up about 30
seconds early to take into account preparation time so that subsequent
recordings begin at the specified time.
AT SRIS-hh:mm:ss
The “At Sunrise” command is used to cause Song Meter to wait until
the specified amount of time before the next occurring sunrise. See
“Solar Tracking” on page 39 for details.
AT SSET-hh:mm:ss
The “At Sunset” command is used to cause Song Meter to wait until the
specified amount of time before the next occurring sunset. See “Solar
Tracking” on page 39 for details.
RECORD hh:mm:ss
The “Record” command is used to cause Song Meter to record for the
specified duration. If a zero duration is specified, no audio recording
will be made. However, the internal temperature sensor and external
sensor port will be read and logged to the sensor log file.
Note that the maximum file size is 2GB. You should make sure that the
specified duration (times sample rate, times number of channels, times
2 bytes per sample) is less than this 2GB limit. Otherwise, the
recording will be split into multiple recordings.
PAUSE hh:mm:ss
The “Pause” command is used to cause Song Meter to wait for the
specified duration. If possible, Song Meter will put itself to sleep until
about thirty seconds before the end of the pause. Additionally, Song
Meter will take into consideration any delays in finishing and saving
the previous recording such that the delay begins when the previous
recording ended, not when the previous recording was saved. We
recommend a pause of at least 30 seconds to give Song Meter enough
Copyright © 2007-2010 Song Meter SM2 User Manual
34
Configuration
Viewing or Changing the Advanced Recording Schedule
time to finish a previous recording and prepare for a subsequent
recording.
Note that sequential “Pause” and “At Time” commands may be
consolidated by Song Meter. For example, consider the following
sequence:
AT TIME 05:00:00
PAUSE
01:00:00
When Song Meter comes across the sequence above, it will sleep until
just before 06:00AM without waking up at 05:00AM.
GOTO LINE aa bbX
The “Goto Line” command is used to create programable loops (which
may be nested). If “bb” is zero, the loop is always taken and the next
command to be executed will be line “aa”. Otherwise, the loop to line
“aa” will be executed “bb” times. After “bb” loops, Song Meter will
continue with the commands immediately following the “Goto Line”
command.
Be careful to avoid unwanted infinite loops. If Song Meter detects an
infinite loop while running, it will abandon the program and go to sleep
until awoken manually.
When inserting or deleting commands from the program, Song Meter
will automatically adjust the “Goto Line” command line numbers
referenced.
SET rrrrrXcccccc
The “Set” command is used to change the recording settings to use the
sample rate specified by rrrrr and the number of channels specified by
cccccc. These settings will be used until the next “Set” command, or
until the program is restarted. When an advanced schedule program is
first started, the initial settings specified by the settings parameter
menu are used.
35
Song Meter SM2 User Manual Copyright © 2007-2010
Configuration
Viewing or Changing the Advanced Recording Schedule
DO
The DO command starts a DO...UNTIL block as defined by a sequence
of RECORD, PAUSE, GOTO LINE, or SET commands followed by
either an “UNTTIME, UNTSRIS+, or UNTSSET+ command. These
UNTIL commands specify an ending time for the block.
After the DO command, the advanced schedule program will continue
normally. However, if the ending time is reached, any recording in
progress will be truncated and the advanced schedule will skip ahead
to the command following the UNTIL command.
If the UNTIL command is reached before the ending time, the schedule
will wait for the ending time before continuing.
DO...UNTIL blocks may not be nested.
GOTO commands within the DO...UNTIL block should not jump out
of the DO...UNTIL block.
AT TIME, AT SRIS- and AT SSET- commands should not be used
inside a DO...UNTIL block.
UNTTIME hh:mm:ss
The “Until Time” command ends a DO...UNTIL block and specifies a
specific ending time of day.
UNTSRIS+hh:mm:ss
The “Until Sunrise” command ends a DO...UNTIL block and indicates
an ending time as the specified amount of time after the next occurring
sunrise.
UNTSSET+hh:mm:ss
The “Until Sunset” command ends a DO...UNTIL block and indicates an ending
time as the specified amount of time after the next occurring sunset.
Advanced Recording Example
Consider the following example:
01 AT TIME 05:30:00
Copyright © 2007-2010 Song Meter SM2 User Manual
36
Configuration
Viewing or Changing the Advanced Recording Schedule
02
03
04
05
06
07
08
09
RECORD 00:30:00
PAUSE
01:00:00
RECORD 00:01:00
PAUSE
00:09:00
GOTO LINE 04 10X
PAUSE
01:00:00
GOTO LINE 04 1X
GOTO LINE 01 0X
In the above example, a fairly complex schedule is defined in only 9
commands.
First, look at lines 01 and 02 in the example. Song Meter will wait until
5:30AM and record for 30 minutes (5:30-6:00AM).
Next, in line 03, Song Meter will wait for an hour (7:00AM), and then (line
04) record for one minute (7:00-7:01AM), and then (line 05) wait for 9
minutes (7:10AM).
Now look at line 06. The “Goto Line” command will go back to line 04 and
repeat line 04 and 05 10 times. This will cause ten one-minute recordings
to be made every 10 minutes at 7:10, 7:20, 7:30, 7:40, 7:50, 8:00, 8:10, 8:20,
8:30, and 8:40AM. The pause in line 05 added to the one minute recording
causes Song Meter to wait until 8:50AM before reaching the “Goto Line”
command on line 06 for the 11th time (after the 10th loop). Song Meter will
now continue processing at line 07.
Next look at line 07. Song Meter will wait for an hour (9:50AM).
On line 08, another “Goto Line” command will cause lines 04 through 07
to be run one more time. This will result in eleven more one-minute
recordings to be made at 9:50, 10:00, 10:10, 10:20, 10:30, 10:40, 10:50,
11:00, 11:10, 11:20 and 11:30AM. The last pause on line 05 ends at
11:40AM, and the pause on line 07 ends at 12:40PM.
Finally, line 09 causes the program to run all over again from the beginning
waiting until 5:30AM on line 01.
As you can see, this simple 9-line program is able to schedule 23 different
recordings per day at various intervals and durations.
Configuring Advanced Recordings
From the main menu, scroll to the “Schedule” line. Note that the line indicates
which scheduling mode is selected in parentheses e.g. “(daily)” or “(advanced)”.
37
Song Meter SM2 User Manual Copyright © 2007-2010
Configuration
Viewing or Changing the Advanced Recording Schedule
Press the “Select” button once to select the schedule mode. If necessary, you can
then use the “Up” or “Down” buttons to toggle the scheduling mode between
daily and advanced. Select the advanced schedule mode and press “Select” a
second time. The display will look like this:
Schedule: (Advanced)
-01 <Add/Insert>
If an advanced recording schedule has already been programmed, the display
will show one line for each recording entry, for example:
Schedule: (Advanced)
-01 AT TIME 05:00:00
-02 RECORD 00:30:00
-03 PAUSE
01:00:00
-04
-05
-06
-07
-08
-09
-10
RECORD 00:01:00
PAUSE
00:09:00
GOTO LINE 04 10X
PAUSE
01:00:00
GOTO LINE 04 1X
GOTO LINE 01 0X
<Add/Insert>
To change or delete a line, use the up and down buttons to scroll to the
desired line and press the select button. You can then use the up and down
buttons to choose from different commands or to choose “<Delete>” to
delete the line. Press the select button to confirm your choice and advance
the cursor to any parameters to be modified. Continue using the select, up
and down buttons to complete the command, or the back button to back up.
To add or insert a line, scroll down to the “<Add/Insert>” entry and press
the select button. You may then use the up and down buttons to change the
line number. By default, a new line is created at the bottom of the program.
However, you can choose a different line number and the new line will be
inserted above your choice. Press the select button to confirm the line
number and continue as described above to choose the command and
parameter values for the new line until it is complete.
Copyright © 2007-2010 Song Meter SM2 User Manual
38
Configuration
Viewing or Changing the Advanced Recording Schedule
Solar Tracking
Song Meter can be used to schedule recordings relative to actual sunrise and
sunset times as they change according to the time of year and location on
the globe. To use the solar tracking feature, the Song Meter’s coordinates
must be specified (see “Latitude” on page 19 and “Longitude” on page 19).
In addition, the timezone used to set the clock must be specified relative to
UTC (see “Timezone” on page 19).
Sunrise and sunset times are calculated according to when the sun rises or
sets at the horizon. Alternatively, civil twilight (6 degrees below the
horizon), nautical twilight (12 degrees below the horizon), or astronomical
twilight (18 degrees below the horizon) can be specified. See “Changing
the method of Solar Calculation” on page 18.
The advanced scheduling commands “AT SRIS” and “AT SSET” can be
used to cause Song Meter to wait until some specified time before the next
occurring sunrise or sunset respectively (see “AT SRIS-hh:mm:ss” on
page 34 and “AT SSET-hh:mm:ss” on page 34). The following example
advanced scheduling program would record daily for one hour beginning
15 minutes before sunrise, and another hour beginning 15 minutes after
sunset:
01
02
03
04
05
06
AT SRIS-00:15:00
RECORD 01:00:00
AT SSET-00:00:00
PAUSE
00:15:00
RECORD 01:00:00
GOTO LINE 01 0X
The calculated sunrise and sunset times for the current day can be viewed
by visiting the “Change time and date” menu. See “Changing the Time and/
or Date” on page 18 for details.
Ending a Recording Schedule at a Specified Time
The DO...UNTIL commands described above can be used to end a
recording schedule relative to sunrise, sunset, or a specific time of day.
For example, the following sequence will record 5 minutes every hour from
15 minutes before sunrise until 15 minutes after sunset daily:
01 AT SRIS-00:15:00
39
Song Meter SM2 User Manual Copyright © 2007-2010
Configuration
Viewing or Changing the Advanced Recording Schedule
02
03
04
05
06
07
DO
RECORD 00:05:00
PAUSE 00:55:00
GOTO LINE 03 00X
UNTSSET+00:15:00
GOTO LINE 01 00X
Caveats and Implementation Details
The SM2 remembers the program state when interrupted. This means that
you can manually wake up the Song Meter in the middle of an advanced
schedule to check status, and Song Meter will then resume the advanced
schedule where it left off when you press the “Wake/Exit” button. To reset
the schedule from the beginning, you can press the “Reset” button. The
schedule is also automatically reset if you make any changes to the schedule
or other configuration parameters.
Copyright © 2007-2010 Song Meter SM2 User Manual
40
Making Recordings
Autonomous Operation
Making Recordings
Autonomous Operation
After configuring Song Meter as described in the previous chapter, pressing the
“Wake/Exit” button will cause Song Meter to put itself to sleep until the next
scheduled recording event.
Song Meter will automatically wake up about 30 seconds before the scheduled
event to prepare. The start-up display will be as before:
2009-Sep-11 13:32:56
Song Meter II R2.2.0
A: 32G 48%B: 32G 0%
C: N/A
D: N/A
After scanning the four SD flash card slots, the message “Preparing to record”
will appear:
2009-Sep-11 05:29:11
Song Meter II R2.2.0
Preparing to record
Song Meter is now preparing itself to begin recording and will wait for the
scheduled starting time to begin. Note that if a scheduled recording time is
already in progress, Song Meter will begin recording as soon as it is ready to do
so and end the recording on schedule. You can abort the next recording and
return to the main menu by pressing the “Wake/Exit” button.
When Song Meter begins recording, the display will indicate progress as shown
below:
41
Song Meter SM2 User Manual Copyright © 2007-2010
Making Recordings
Autonomous Operation
2009-Sep-11 13:32:56
Recording: 01:29:12
B:0909111332.WAV 0%
44100xStereo
5%
The top line of the display shows the current date and time as before.
The second line indicates the time remaining in the current recording.
The third line shows the flash card slot and short file name of the recording file
(MMDDhhmm.WAV) and the percent complete. Note that unique long file names
are actually used on the flash card of the form
Prefix_YYYYMMDD_hhmmss.wav).
The last line shows the sample rate and number of channels (x2 for stereo, x1 for
mono), and the percentage indicates how full the SD flash card slot is on which
the recording is being made.
You can press the “Select” button to toggle between the display above and the
following. In this mode, the audio being recorded is also sent to the headphone
jack so you can check levels.
2009-Sep-11
Recording:
L:***
R:****
13:32:56
01:29:12
-45.2dBV
-41.1dBV
The rms signal levels of each channel are shown both graphically (with each
asterisk representing 6dB) and with an indication of signal level relative to
1Vrms full scale.
When making recordings at ultrasonic sample rates e.g. 192kHz or 384kHz,
output to the headphones will be frequency divided by the specified Div Ratio
in the advanced audio settings configuration.
Copyright © 2007-2010 Song Meter SM2 User Manual
42
Making Recordings
Audio Files
Audio Files
Song Meter creates a file for each scheduled recording under a directory called
Data. The file name indicates the actual start time of the recording and has the
format Prefix_YYYYMMDD_hhmmss.wav, where Prefix_ is a user-defined label
(see “Filename Prefix” on page 19), YYYY is the year, MM is the month (00-12),
DD is the day (00-31), hh is the hour (00-23) mm is the minute (00-59), and ss
is the second (00-59). The file is a standard 16-bit PCM uncompressed “.WAV”
file. For display purposes, Song Meter shows a shortened version of the
filename on the LCD of the form MMDDhhmm.WAV.
If compression is enabled, files are stored in the Wildlife Acoustics Audio
Compressionformat indicated by “.WAC” instead of “.WAV”.
The filename is shown with an A:, B:, C:, or D: prefix indicating which SD flash
card slot is being used. Song Meter will use the lowest lettered slot that is
available and has sufficient remaining free space to store the recording. If there
is no more room for recording in any slot, the following message will be
displayed for 5 seconds, then Song Meter will go to sleep until manually
awoken:
2009-Sep-11 05:29:11
Song Meter II R2.2.0
MEDIA FULL OR FAILED
Shutting down.......
Data Log Files
Song Meter creates one log file for each card with the name Prefix_Sensor-X.txt,
where X is the card slot letter A, B, C, or D.
At the start of each recording, and every 5 minutes during recording, Song Meter
takes a reading on the two sensors (the internal temperature sensor and the
external sensor port). Each reading is appended on a line to the log file on the
same card used to make the recording as follows:
2009-Oct-01
11:44:25
22.9
1.408
The four tab-delimited fields include the date, time, internal temperature, and
external sensor readings. For scale and calibration information, see “Sensor
Settings” on page 23.
43
Song Meter SM2 User Manual Copyright © 2007-2010
Making Recordings
Aborting a Recording in Progress
Aborting a Recording in Progress
While the Song Meter is recording, you can press the “Back” or “Wake/Exit” to
abort the recording in progress and enter the start-up screen.
Manual Recording Feature
In addition to recording on a schedule, the Song Meter can also start a recording
when the start-up screen is displayed by pushing the “Up” and “Down” buttons
simultaneously. This will start a one-hour recording on the lowest lettered slot
on which the recording will fit.
Pressing the “Select” button toggles between display modes and headphone
output as described in the previous section.
Copyright © 2007-2010 Song Meter SM2 User Manual
44
Song Meter Specifications
Song Meter Specifications
Physical Specifications
•
Dimensions:
8.0” X 8.0” X 2.5”
•
Weight:
2.0 pounds without batteries)
•
Enclosure:
NEMA Type 1,4,4X and 6 (weatherproof,
vented)
•
Operating Temp.: -4ºF to +185ºF
-20ºC to +85ºC
Audio Specifications
45
•
ChannelsChannels:2
•
Interface:
3-pin waterproof connector (ground, signal,
3.3V supply)
•
Bias power:
2.5V 2.2K om, jumper enabled per channel
•
High-pass filter: 2-pole butterworth, jumper selectable per
channel at 2, 180 or 1,000Hz
•
Pre-amplifier:
2-stage, jumper selectable per channel, at
+0, +12, +24, +36, +48, or +60dB gain. For
sample rates <= 48kHz, third-stage
digitally-configurable +0-+12dB in 1.5dB
steps
•
Noise:
-115dBV equivalent input noise
•
ADC:
1V rms full-scale 16-bit, 90dB SNR
•
Sample rates:
4, 8, 16, 22.05, 24, 32, 44.01 and 48kHz
standard; 192kHz with SM2BAT dauther
card.
•
Digital format:
16-bit PCB (.wav) or proprietary lossless
and lossy compression formats (.wac).
•
Headphones:
3.5mm stereo jack
Song Meter SM2 User Manual Copyright © 2007-2010
Song Meter Specifications
•
Filtering and triggering: Configurable digital high-pass and
low-pass filters at sample rate divided by 3,
4, 6, 8, 12, 16, 24, 32, 48 and 96. Adaptable
trigger with configurable threshold above
background 1-88dB, absolute trigger with
configurable threshold -1 - -88dB full scale,
inactivity time for trigger off 0.1 - 9.9
seconds.
Sensors
•
Channels:
2
•
ADC:
10-bit at 3.3V reference (3.2millivolt
resolution)
•
Parameters available for precise calibration
•
Internal temperature sensor accurate to within ±2ºC at 0ºC.
•
External sensor port with 3-pin waterproof connector (ground,
signal, 3.3V supply)
Storage
•
4 SD/SDHC/SDIO flash card slots (Class 4 or greater)
•
128GB total capacity with 4x32GB cards available today,
more as higher capacity cards become
available
•
Compression increases effective capacity by 60-70% typically
•
4-10VDC main power (internal 4 D-size batteries or external
weatherproof connector)
•
6-20VDC through external power adapter for 6 or 12V solar
power systems
•
< 1mA when idle between scheduled recordings
•
The following estimates can vary 10mA depending on flash
cards used:
Power
Copyright © 2007-2010 Song Meter SM2 User Manual
46
Song Meter Specifications
•
55-65mA when recording uncompressed up to 48kHz (except
32kHz), compressed up to 16kHz mono, and
band triggered up to 8khz mono.
•
70-75mA when recording ocmpressed up to 48kHz (except
32kHz), and band triggered up to 24kHz
mono.
•
80-90mA when recording 32kHz and up to 48kHz
compressed, and band triggered up to
44.1kHz mono.
•
90-100mA when recording band triggered up to 48kHz mono.
•
110mA when recording band triggered up to 48kHz stereo.
•
Seperate power for time-of-day clock uses 2 AA-size batteries,
< 0.1milliamps (2-3 year service life)
Future expansion
•
External analog sensor input port
•
SDIO card capable to support GPS, Bluetooth, WiFi, etc.
•
Digital expansion connectors on the motherboard
•
Micro-USB connector on motherboard
•
Field-upgradeable firmware
SMX-II Microphones
47
•
Enclosure:
NEMA 4X weatherproof
•
Sensitivity:
-36±4dB (0dB=1V/pa@1KHz)
•
Frequency response:
flat 20Hz - 20,000Hz
•
Signal-to-Noise Ratio:
> 62dB
•
Directionality:
Omnidirectional
Song Meter SM2 User Manual Copyright © 2007-2010
Wildlife Acoustics Inc. Limited Warranty
Warranty
Wildlife Acoustics Inc. Limited Warranty
HARDWARE: Wildlife Acoustics, Inc. ("WAI") warrants to the original end
user ("Customer") that new WAI branded products will be free from defects in
workmanship and materials, under normal use, for one (1) year from the original
purchase date. WAI warrants refurbished WAI products, marked and sold as
such, for ninety (90) days from the original purchase date.
SOFTWARE: WAI warrants to Customer that any WAI branded software will
perform in substantial conformance to their program specifications for a period
of ninety (90) days from the date of original purchase. WAI warrants the media
containing software against failure during the warranty period. WAI makes no
warranty or representation that the operation of the software products will be
uninterrupted or error free, or that all defects in the software products will be
corrected.
EXCLUSIONS
This warranty excludes (1) physical damage to the surface of the product,
including cracks or scratches on the outside casing; (2) damage caused by
misuse, neglect, improper installation or testing, unauthorized attempts to open,
repair, or modify the product, or any other cause beyond the range of the
intended use; (3) damage caused by accident, fire, power changes, other
hazards, or acts of God; or (4) use of the product with any non-WAI device or
service if such device or service causes the problem.
Any third party products, including software, included with WAI products are
not covered by this WAI warranty and WAI makes no representations or
warranties on behalf of such third parties. Any warranty on such products is
from the supplier or licensor of the product.
EXCLUSIVE REMEDIES
Should a covered defect occur during the warranty period and you notify WAI,
your sole and exclusive remedy shall be, at WAI's sole option and expense, to
Copyright © 2007-2010 Song Meter SM2 User Manual
48
Warranty
Wildlife Acoustics Inc. Limited Warranty
repair or replace the product or software. If WAI cannot reasonably repair nor
replace then WAI may, in its sole discretion, refund the purchase price paid for
the product. Replacement products or parts may be new or reconditioned or
comparable versions of the defective item. WAI warrants any replaced or
repaired product, part, or software for a period of ninety (90) days from
shipment, or through the end of the original warranty, whichever is longer.
OBTAINING WARRANTY SERVICE: Customer should refer to WAI's
website at www.wildlifeacoustics.com/support for information on obtaining
warranty service authorization. Methods for obtaining warranty service may
vary depending on whether purchases were made from an authorized provider
of WAI products, or from WAI directly. All requests for warranty service
authorization must be made within the applicable warranty period. Dated proof
of original purchase will be required. Products or parts shipped by Customer to
WAI must be sent postage-paid and packaged appropriately for safe shipment.
WAI is not responsible for Customer products received without a warranty
service authorization and may be rejected. Repaired or replacement products
will be shipped to Customer at WAI's expense. All products or parts that are
replaced become the property of WAI. WAI shall not be responsible for
Customer's software, firmware, information, or memory data contained in,
stored on, or integrated with any products returned to WAI for repair, whether
under warranty or not. The repair and replacement process for products or parts
in locations outside of the United States will vary depending on Customer's
location.
WARRANTIES EXCLUSIVE: THE FOREGOING WARRANTIES AND
REMEDIES ARE EXCLUSIVE AND IN LIEU OF ALL OTHER
WARRANTIES, TERMS OR CONDITIONS, EXPRESS, IMPLIED OR
STATUTORY, INCLUDING WARRANTIES OF MERCHANTABILITY,
FITNESS FOR A PARTICULAR PURPOSE, ACCURACY,
CORRESPONDENCE WITH DESCRIPTION, SATIS- FACTORY QUALITY
AND NON-INFRINGEMENT, ALL OF WHICH ARE EXPRESSLY
DISCLAIMED BY WAI AND ITS SUPPLIERS.
LIMITATION OF LIABILITY: NEITHER WAI NOR ITS SUPPLIERS
SHALL BE LIABLE FOR INCIDENTAL, CONSEQUENTIAL, INDIRECT,
SPECIAL, OR PUNITIVE DAMAGES OF ANY KIND, LOSS OF
INFORMATION OR DATA, LOSS OF REVENUE, LOSS OF BUSINESS OR
OTHER FINANCIAL LOSS ARISING OUT OF OR IN CONNECTION
WITH THE SALE OR USE OF THIS PRODUCT, WHETHER BASED IN
CONTRACT, TORT (INCLUDING NEGLIGENCE), STRICT PRODUCT
LIABILITY OR ANY OTHER THEORY, EVEN IF WAI HAS BEEN
49
Song Meter SM2 User Manual Copyright © 2007-2010
Warranty
Wildlife Acoustics Inc. Limited Warranty
ADVISED OF THE POSSIBILITY OF SUCH DAMAGES AND EVEN IF
ANY LIMITED REMEDY SPECIFIED IN THIS LICENCE AGREEMENT IS
DEEMED TO HAVE FAILED OF ITS ESSENTIAL PURPOSE. WAI'S
ENTIRE LIABILITY SHALL BE LIMITED TO REPLACEMENT, REPAIR,
OR REFUND OF THE PURCHASE PRICE PAID, AT WAI'S OPTION. IN NO
EVENT SHALL WAI'S LIABILITY FOR ALL DAMAGES RELATED TO
THE PURCHASE OF PRODUCT EXCEED THE AMOUNT PAID FOR THE
APPLICABLE PRODUCT. THE FOREGOING LIMITATIONS WILL APPLY
EVEN IF THE ABOVE STATED REMEDY FAILS OF ITS ESSENTIAL
PURPOSE.
DISCLAIMER: Some countries, states, or provinces do not allow the exclusion
or limitation of implied warranties or the limitation of incidental or
consequential damages so the above limitations and exclusions may be limited
in their application to you. When implied warranties may not be excluded in
their entirety, they will be limited to the duration of the applicable written
warranty. This warranty gives you specific legal rights; you may have other
rights that may vary depending on local law. Your statutory rights are not
affected.
GOVERNING LAW: This Limited Warranty shall be governed by the laws of
the Commonwealth of Massachusetts, U.S.A., and by the laws of the United
States, excluding their conflicts of laws principles. The United Nations
Convention on Contracts for the International Sale of Goods is hereby excluded
in its entirety from application to this Limited Warranty.
Wildlife Acoustics, Inc., P.O. Box 680, Concord, MA 01742-0680, United
States of America, (888) 733-0200, www.wildlifeacoustics.com
Copyright © 2007-2010 Song Meter SM2 User Manual
50
Declaration of Conformity (EN 45014)
Declaration of Conformity (EN 45014)
Manufacturer:
Wildlife Acoustics, Inc.
P. O. Box 680
Concord, MA 01742-0680
United States of America
Declares that the following product:
Product Name:
Song Meter
Product Model Numbers: SM2
Product Type:
Digital Audio Field Recorder
Conforms to the appropriate country standards and governing regulations
listed below. We, as the manufacturer, are fully responsible for the design
and production of the above-mentioned equipment.
89/336/EEC:
(3 May 1989)
Official Journal of the European Communities Council
on Electromagnetic Compatibility
92/31/EEC:
Official Journal of the European Communities
(28 April 1982) Amending Directive 89/336/EEC on: Council Directive
on Electromagnetic Compatibility
CFR 47,
FCC Part 15:
(8/14/2006)
Requirements for commercial data processing
equipment. Class A: Industrial and commercial
EN 55022:
Limits and methods of measurement of radio interference
(1998, A1:2000, characteristics of information technology equipment
A2:2003)
Class A: ITE
CISPR22: (2005) Information technology equipment - Radio disturbance
characteristics - Limits and methods of measurement.
Class A:ITE
AS/NZS:
(CISPR: 2004)
51
Limits and methods of measurements of radio
disturbance characteristics of information
technology equipment. Class A: Industrial and
Song Meter SM2 User Manual Copyright © 2007-2010
Declaration of Conformity (EN 45014)
commercial
ICES-003: issue 4Electronic Emissions from Data Processing Equipment
(2/2004)
and Electronic Office Machines
EN 55024:
Information technology equipment - Immunity
(1998, A1:2001, characteristics - Limits and methods of measurement
A2:2003)
EN 61000-4-2: Electromagnetic compatibility (EMC) Part 4: Testing
(1995, A1:1998, and measurement techniques - Section 2: Electrostatic
A2:2001)
discharge immunity test
EN 61000-4-3: Electromagnetic compatibility (EMC) Part 4: Testing
(1995, A1:1998, and measurement techniques - Section 3: Radiated, radio
A2:2001)
frequency, electromagnetic field immunity test
This class A digital apparatus also meets all requirements of the Canadian
Interference-Causing Equipment Regulations.
Cet appareil numérique de la Classe A respecte toutes les exigences du
Règlement sur le matériel brouilleur du Canada.
This product operates on 6V DC.
This product was tested in a typical configuration.
Ian Agranat, President
Wildlife Acoustics, Inc.
October 1, 2009
Copyright © 2007-2010 Song Meter SM2 User Manual
52
Declaration of Conformity (EN 45014)
53
Song Meter SM2 User Manual Copyright © 2007-2010