1
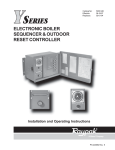
FOSTER DRP
RBC MK 3 CONTROLLER
Program Version F206
SERVICE MANUAL
Revised 09-02-2009
Contents
Introduction
Operator Program
Operating Instructions
Controller Instructions
Setting of Parameters
Configuration Parameters
Standard Parameter Settings
Time and Date
Programs
Program Name
Fast Chill Parameters
Storage Parameters
Recovery Parameters
Prove Parameters
Oven Contact Parameters
Configure End Times
Factory Test Program
Alarm Cancelation
Controller Reset
Fault Messages
Power Interrupt
Modem Dial Number Missing
Fitting Procedure for F206 Eprom
Probe Resistance Values
Overtemperature Stat Settings
Fault Diagnoses
Wiring Diagrams
1 to 2
2
3
4
4 to 11
4
4
5
5 to 6
6
6 to 7
7
7 to 8
8 to 11
11
11
11 to 13
13 to 14
14 to 15
15
15
15 to 16
16
17
17
17 to19
20 to 29
INTRODUCTION
The cabinet and Modular DRP are designed to retard, recover and prove dough products. When utilised correctly the
unit will enable a more consistent product quality to be achieved.
It is therefore important that prior to working on this equipment that this manual is read and understood.
If any point of operation is unclear the engineer should contact Foster Refrigerator (UK) Ltd on (01553) 691122.
The controller contains both ‘User Parameters’ and also ‘Machine Operating Parameters’. Neither of these parameter
sets are accessible to the store operators and as such should not be disclosed to any member of store personnel
(including management).
Similarly the parameters are pre-set on commissioning to ensure consistent product quality and as such should not be
adjusted under any circumstance without prior consent in writing from Head Office bakery personnel.
Note: Although the controller has 9 programs only program 4 is used.
Upon initiation of a complete cycle the controller will display ‘DO NOT LOAD PRODUCT’ until the chamber
temperature reaches -5ºc (fast chill) at this point it will sound an alarm and the display will show ‘LOAD PRODUCT’.
The fast chill program is set for 1hour.
On completion the temperature will be controlled at -5ºc with the controller in the storage mode, there is no fixed time
to this section as the controller calculates how long this temperature is maintained based on the bake time and the
remaining process times.
The recovery time is set for 6 hours and the prove time is set for 2 hours and 30 minutes
An illustration of this is;
Assuming that the current time is 15:00 and the bake time is 06:00 the following day a total time for the cycle is 15
hours.
The controller calculates back from the bake time, ’06-00’, for the prove time of 2 hours and 30 minutes plus the
recovery time of 6 hours
So with the with a fast chill time of 1 hour + recovery of 6 hours + prove of 2 hours and 30 minutes this will leave a
storage time of 5 hours and 30 minutes
When the calculated time for the phase is reached the controller will change from the Storage Mode (RETARD) mode
to the Recovery mode. During the recovery mode the controller increases the temperature of the chamber linearly
1
from the storage temperature to the recovery temperature over 75% of the given period of time. If other parameters
allow it up to 82% humidity may be introduced during this phase.
Upon completion of the Recovery phase the Prove cycle commences. The chamber is then increased to a higher
temperature over 75% of given set time period. During this phase 87% humidity may introduced into the chamber as
required to maintain the required humidity.
When the Prove phase of the cycle is complete the operator is advised both audibly and visually that the current
program is complete and is given an option to either extend the prove time or hold the product. Assuming that these
options are not selected the cycle is complete and as such is halted.
If the product is not ready at the bake time then a Extra Prove (10 minutes), for a maximum of 15 minutes, can be
selected. Similarly, if the product is ready but there is no oven capacity the product can be held in Hold (10 minutes).
The duration of both Extra Prove and Hold are governed by the machine parameters.
Operator Program
Description:
Each stage of the Retarder Prover cycle is explained as follows:
Figure 1 – Retarder Prover Operating Cycle
28ºC
15ºC
7ºC
-5ºC
PHASE 1 – “Chill”
From ‘Start’ the refrigeration attempts to reduce air temperature to -5ºC.
While air temperature is above 0ºC the display shows “Do not load product”.
Typically after 15 to 20 minutes the chamber has reduced to -5ºC an alarm sounds indicating product can be loaded.
The duration of the Fast Freeze Phase is 1 hour.
PHASE 2 – “Retard”
From the end of Phase1 the air temperature is maintained at -5ºC for the duration of the Retard Phase.
The length of the Retard Phase will depend on the required bake off time (end of Phase 4).
PHASE 3 – “Recovery”
From the end of Phase 2 the recovery phase is split into two segments (75% and 25%).
During the first 75% of Phase 3 (4½ hours) the temperature rises from -5ºC to +7ºC.
During the final 25% of Phase 3 (1½ hours) the temperature is maintained at +7ºC.
Through-out this period the humidity is around 82%.
The duration of Recovery Phase is 6 hours.
PHASE 4 – “Prove”
From completion of Phase 3 the Prove Phase starts, and it is split into two segments (75% and 25%).
During the first 75% of Phase 4 (1hour 52 minutes 30 seconds) the temperature rises from +8oC to +28ºC. (Tesco
32ºC)
During the second 25% of Phase 4 (37 minutes 30 seconds) the temperature is maintained at +28ºC. (Tesco 32ºC)
Through-out this period the humidity is maintained at 87%.
The duration of Prove Phase is 2 hours 30 minutes. If the product is not ready at the bake time then an Extra Prove (10
minutes) can be selected for up to a maximum of 15 minutes.
PHASE 5 – “Hold”
On completion of the Prove phase, if the load is not immediately required for baking off, the product can be placed in
the HOLD mode for 10 minutes when the air temperature will be reduced to 15ºC in order to stabilize the product and
can be held for up to a maximum of 20 minutes.
2
OPERATING INSTRUCTIONS
1) To start the Operation
Press ‘START’
2) Select the Bake Program from the
menu. If Prove only program is selected
program will start automatically
14-02-2009
WEDNESDAY
16:45
SYSTEM OFF
PRESS START
SELECT
START
4) Enter the Bake Time
Press ACCEPT or Press EDIT
followed by the up or down
arrows to change the time
BAKE DAY
BAKE TIME
TODAY
18: 34
ENTER BAKE TIME
ACCEPT
EDIT
Retard & Prove
Timed Prove 1
Prv Brd & French
Prv Soft Rolls
Prv Donuts
BAKE DAY
EXIT
ACCEPT
5) Press ACCEPT to Confirm Selected
TODAY
09:48
ACCEPT
EDIT
EXIT
6) An Audible alarm will sound when
the machine is at the correct
loading temperature.
Load the product and press
‘START’
Cycle
BAKE DAY
BAKE TIME
TODAY
ENTER BAKE DAY
CONFIRM SELECTED CYCLE
EXIT
3) Enter the Bake Day for Retard &
Prove. Press ACCEPT or Press the
UP arrow to change the Bake Day
WAIT
FOR
AUDIBLE
ALARM
EXIT
Program 4
28
7
15
-5
-5
Bake Date:
Thursday 09:40
LOAD PRODUCT
PRESS START
STOP
START
7) When cycle is complete an audible alarm will sound, press ‘STOP’, check the product is fully proved, remove and bake.
8) Should an extra proving time be required, select ‘EXTRA TIME’ and press ‘START’.
For HELP press the? Button located above the display.
PLEASE NOTE when changing the machine from Prove to Retard Overnight Operation allow 45 minutes for the cabinet to cool down.
In the event of an emergency switch off the machine at the ‘MAIN ISOLATOR SWITCH’.
02/09 Rev 1
Controller Instructions
The display is a yellow back lighted graphic display with a resolution of 320 * 240 dots.
Above the Display the Info-key
is located. Press to display help and information at all times.
Under the Display the keys LEFT, MIDDLE and RIGHT
are located.
On the right side besides the Display the Arrow Keys UP and DOWN
are located.
NOTE: At any time during a program if the bottom button is pressed and help the display will show: Temp Set
Point, Coil Temperature, Winter/Summer Time and the program number.
Setting of Parameters
After switching the auxiliary voltage on the controller carries out a self-test of the program and shows FLASH TEST
FOR INTEGRITY for a few seconds followed by the program information including version and model details.
After that the Start Screen is shown:
Start Screen
Monday
14.02.2009
08:11
SYSTEM OFF
Press START
START
Configuration Parameters
After pressing the DOWN, RIGHT and LEFT keys together the Configuration Parameters Menu is shown:
These are machine default parameters that are stored in the controller.
Configuration Parameters Menu
CONFIGURATION PARAMETERS
Standard Parameter Setting
Time / Date
Programs
Manual Prove
Manual Fast Chill
Manual Storage
Manual Recovery
Service
Reset Alarms
End Times
Select
Select Standard Parameter Settings using the Arrow Keys and
then press SELECT.
Exit
Standard Parameter Setting (Load Set of Parameters)
Once selected the following screen will appear:
It is important that the correct default parameters are selected for the machine e.g. does it have an integral
condensing unit or is it remotely sited (pack system), is it constructed using modular panels or a cabinet.
DEFAULT PARAMETER SELECT
TESCO/MOD/PACK
TESCO/MOD/INTEGRAL
TESCO DONUT UPRIGHT
TESCO DONUT BENCH
SAFEWAY/MOD/PACK
SAFEWAY/MOD/HT PACK
SAFEWAY/MOD/INTEGRAL
ASDA/MOD/PACK
ASDA/MOD/INTEGRAL
CRAFT/MOD/PACK
CRAFT/MOD/INTEGRAL
CRAFT UPRIGHT
Select
Exit
Select from the listing using the Arrow Keys and then press
SELECT,
The screen will change and display the selected model followed by
Loading Service Parameter and then Loading Program
Parameters.
When the parameters have been loaded the screen will revert back
to the default parameters.
Press Exit to return to the configuration parameter screen
4
Time and Date
Select Time and Date in the Configuration Parameters Menu and the following screen will appear:
CONFIGURE TIME & DATE
Current Time
10 :40
Current Date
14.02.2009
EDIT
TIME
EDIT
DATE
It is important that the correct time and date are loaded ensuring
the correct function of the machine.
ACCEPT
EXIT
For setting the Clock press EDIT TIME:
CONFIGURE TIME & DATE
Modify Parameter:
Current Time
10:45
Value:
^
Accept
SELECT
EXIT
The screen to the left will appear with ‘Current Time’ flashing.
The first digit of the time will have a ^ symbol beneath it and the
value will flash on and off. Modify each Digit with the up or down
arrow keys, confirm the sections by pressing SELECT and continue
to change each of the segments in turn. On completion press
ACCEPT.
Press EXIT to exit without storing the modified values.
The screen will change to display the first screen to allow the
changing of the date.
For setting the Date press EDIT DATE:
CONFIGURE TIME & DATE
Modify Parameter:
Current Date
14.02.2009
Value:
^
Accept
SELECT
EXIT
The screen to the left will appear with ‘Current Date’ flashing.
The first digit of the date will have a ^ symbol beneath it and the
value will flash on and off. Modify Digit with the up or down arrow
keys, confirm the sections by pressing SELECT and continue to
change each of the segments in turn. On completion press
ACCEPT.
Press EXIT to exit without storing the modified values.
The screen will change to display the first screen press EXIT to
return to the Configuration Parameters Menu.
Programs
This allows the selection and deselection of Program Parameters for Retard & Prove
First select Programs in the Configuration Parameters Menu and the following screen will appear:
CONFIGURE PROGRAMS
Program 1
Program 2
Program 3
Program 4
Program 5
Program 6
Program 7
Program 8
Program 9
Select
Exit
If the program is ‘On’ then all parameters are then governed by
their own individual parameters. If the program is ‘Off’ only the
program name and program active screen will be visible.
It is important to note that only program 4 is
switched ON all other programs are switched OFF.
Select from the listing using the Arrow Keys and then press SELECT,
Program 4
The screen will change and display the selected program.
It is important to ensure that program 4 is ON and all other
programs are switched OFF.
Program Active
Yes
Modify?
YES
NO/Exit
To modify the program press YES
5
The screen will change and display the following.
Access Level
Enter Code for Level
L3
0000
^
Exit
Select
To modify the program it is necessary to enter the access code for
level 3. The screen will display 0000 with a ^ beneath the first
0.
Use the up arrow to change the level code to 1122.
Press the up arrow once to change the 0 to 1 and then press select
to move to the next 0. Continue until 1122 is on the display and
then press Confirm
Confirm
The screen will change and display the following.
Program 4
Program Active and yes will flash on and off to proceed press
CONFIRM
Modify Parameter :
Program Active
Value :
yes
CONFIRM
CANCEL
The screen will change and display the following screen
CONFIGURE Program 4
This menu allows for the particular program to be given a name and the parameters to be adjusted within the
default parameters.
CONFIGURE Program 4
Program Name
Fast Chill Parameters
Storage Parameters
Recovery Parameters
Prove Parameters
Min. Prove Time Param.
Oven Contact
Select
Exit
Program Name
The pre-defined name of the program can be changed if required
Configure Program 4
Program Name
Accept
Exit
EDIT
Select Program Name in Program Configuration 4 and the
screen to the left will be displayed.
The Name is now displayed in the Start Menu.
To insert a short description for the Operation Mode into the
Program Name e.g. “Ret&Prv Bread”, select EDIT and the first
letter will have a symbol
^ under it. Use the up or down arrow to
scroll through the alphabet, press SELECT to confirm the change
and the symbol will move to the next letter. On completion press
ACCEPT to store the changes made and the screen will revert
back to the first screen.
Press EXIT to return to the menu and EXIT again to return to the Configure Program 4 menu.
Fast Chill Parameters
Select Fast chill from the Configure Program 4 menu, press SELECT and the screen below will appear.
Configure Program 4
Select YES, the screen will change with Fast Chill Active and yes
flashing on and off, to proceed press CONFIRM.
To return to the menu press CANCEL.
Fast Chill Active
Yes
Modify
YES
EXIT
NO
6
The screen will change and display the following screen
Configure Program 4
Fast Chill Duration
Fast Chill Temperature
Modify
Exit
Select FAST CHILL DURATION and press MODIFY and the following screen will be displayed:
Menu: Fast Chill Duration
Configure Program 4
Fast Chill Duration
Fast Chill Duration MAX
Fast Chill Duration MIN
Modify
Press Modify and the screen will change to show the first digit for
modification.
01:00
Use the UP and DOWN arrows to change the value and press
02:30
SELECT to move to the next digit.
01:00
Once the changes have been made press ACCEPT and proceed
Exit
to change the other values if required.
NOTE: It is not recommended to make changes to the values without managerial consent.
Press EXIT to return to the menu and Select FAST CHILL TEMPERATURE, press Modify, then press YES
followed by CONFIRM and the following screen will be displayed:
Menu: Fast Chill Temperature
Configure Program 4
Fast Chill Temperature
Fast Chill Temperature MAX
Fast Chill Temperature MIN
Modify
Press Modify and the screen will change to show the first digit for
modification.
-05°C
Use the UP and DOWN arrows to change the value and press
+00°
SELECT
to move to the next digit.
-15°C
Once the changes have been made press ACCEPT and proceed
Exit
to change the other values if required.
NOTE: It is not recommended to make changes to the values without managerial consent.
Press EXIT three times to return to the Configure Program 4 menu.
Storage Parameters
Select Storage Parameters from the Configure Program 4 menu, press SELECT and the screen below will
appear.
Press Modify and the screen will change to show the first digit for
modification.
-05°C
Use the UP and DOWN arrows to change the value and press
+00°C
SELECT to move to the next digit.
-10°C
Once the changes have been made press ACCEPT and proceed
EXIT
to change the other values if required.
NOTE: It is not recommended to make changes to the values without managerial consent.
Configure Program 4
Storage Temperature
Storage Temperature MAX
Storage Temperature MIN
MODIFY
Press EXIT to return to the menu and EXIT again to return to the Configure Program 4 menu.
Recovery Parameters
Select Recovery Temperatures from the menu, press YES to modify and then press CONFIRM and the screen
below will appear.
Configure Program 4
Recovery Temperatures
Recovery Humidity
Recovery Duration
SELECT
EXIT
Menu: Recovery Temperatures
Configure Program 4
Recovery Temperature
Recovery Temperature MAX
Recovery Temperature MIN
SELECT
+07°C
+12°C
+05°C
EXIT
Select Recovery Temperature and the following screen will be
displayed:
Press SELECT and the screen will change to show the first digit for
modification.
Use the UP and DOWN arrows to change the value and press
SELECT to move to the next digit.
Once the changes have been made press ACCEPT and proceed
to change the other values if required.
NOTE: It is not recommended to make changes to the values without managerial consent.
Press EXIT twice to return to the menu and Select Recovery Humidity, press SELECT followed by YES to modify,
press CONFIRM and the following screen will be displayed:
7
Menu: Recovery Humidity
Configure Program 4
Recovery Humidity
Recovery Humidity MAX
Recovery Humidity MIN
SELECT
Press SELECT and the screen will change to show the first digit for
modification.
82%
Use the UP and DOWN arrows to change the value and press
95%
SELECT to move to the next digit.
75%
Once the changes have been made press ACCEPT and proceed
EXIT
to change the other values if required.
NOTE: It is not recommended to make changes to the values without managerial consent.
Press EXIT to return to the menu and Select Recovery Duration, press SELECT followed by YES to modify, press
CONFIRM and the following screen will be displayed:
Menu : Recovery Duration
Configure Program 4
Recovery Duration
Recovery Plateau Time
SELECT
06:00
25%
EXIT
Menu: Recovery Duration
Configure Program 4
Recovery Duration
Recovery Duration MAX
Recovery Duration MIN
Select
06:00
07:00
04:00
Exit
Select Recovery Duration and the following screen will be
displayed:
Press SELECT and the screen will change to show the first digit for
modification.
Use the UP and DOWN arrows to change the value and press
SELECT to move to the next digit.
Once the changes have been made press ACCEPT and proceed
to change the other values if required.
NOTE: It is not recommended to make changes to the values without managerial consent.
Press EXIT twice to return to the menu and Select Rec. Plateau Time, press SELECT and the following screen will
be displayed:
Menu: Recovery Plateau Time
Configure Program 4
Recovery Plateau Time
Recovery Plateau Time MAX
Recovery Plateau Time MIN
Select
Press SELECT and the screen will change to show the first digit for
modification.
Use the UP and DOWN arrows to change the value and press
SELECT to move to the next digit.
Once the changes have been made press ACCEPT and proceed
to change the other values if required.
NOTE: It is not recommended to make changes to the values without managerial consent.
25%
50%
10%
Exit
Press EXIT three times to return to the Configure Program 4 menu.
Prove Parameters
Select Prove Parameters from the menu, press SELECT followed by YES to modify, press CONFIRM and the
screen below will appear.
Menu: Prove
Configure Program 4
Prove Temperatures
Prove Humidity
Prove Duration
Extra Prove
Hold
SELECT
Select Prove Temperatures and the following screen will be
displayed:
EXIT
Menu: Prove / Temperatures
Configure Program 4
Prove Temperature
Prove Temperature MAX
Prove Temperature MIN
SELECT
Press SELECT and the screen will change to show the first digit for
modification.
+35°C
Use
the UP and DOWN arrows to change the value and press
+35°C
SELECT
to move to the next digit.
+25°C
Once the changes have been made press ACCEPT and proceed
EXIT
to change the other values if required.
NOTE: It is not recommended to make changes to the values without managerial consent.
Press EXIT to return to the menu and Select Prove Humidity, press SELECT followed by YES to modify, press
CONFIRM and the following screen will be displayed:
8
Menu: Prove Humidity
Configure Program 4
Prove Humidity
Prove Humidity MAX
Prove Humidity MIN
SELECT
Press SELECT and the screen will change to show the first digit for
modification.
Use the UP and DOWN arrows to change the value and press
SELECT to move to the next digit.
Once the changes have been made press ACCEPT and proceed
to change the other values if required.
NOTE: It is not recommended to make changes to the values without managerial consent.
87%
95%
75%
EXIT
Press EXIT twice to return to the menu and Select Prove Duration, press SELECT followed by YES to modify,
press CONFIRM and the following screen will be displayed:
Menu : Prove Duration
Configure Program 4
Prove Duration
Prove Plateau
SELECT
EXIT
Menu: Prove Duration
Configuration Program 4
Prove Duration
Prove Duration MAX
Prove Duration MIN
SELECT
02:30
03:00
00:30
Exit
Select Prove Duration and the following screen will be displayed:
Press SELECT and the screen will change to show the first digit for
modification.
Use the UP and DOWN arrows to change the value and press
SELECT to move to the next digit.
Once the changes have been made press ACCEPT and proceed
to change the other values if required.
NOTE: It is not recommended to make changes to the values without managerial consent.
Press EXIT to return to the menu and Select Prove Plateau, press SELECT and the following screen will be
displayed:
Menu : Prove Plateau
Configuration Program 4
Prove Plateau Time
Prove Plateau Time MAX
Prove Plateau Time MIN
SELECT
Press SELECT and the screen will change to show the first digit for
modification.
25%
Use the UP and DOWN arrows to change the value and press
50%
SELECT to move to the next digit.
10%
Once the changes have been made press ACCEPT and proceed
Exit
to change the other values if required.
NOTE: It is not recommended to make changes to the values without managerial consent.
Press EXIT twice to return to the menu and Select Extra Prove, press SELECT followed by YES to modify, press
CONFIRM and the following screen will be displayed:
Menu : Extra Prove
Configuration Program 4
Extra Prove Time
Extra Prove Temperature
Extra Prove Humidity
SELECT
Exit
Menu : Extra Prove Time
Configuration Program 4
Extea Prove Time
Extra Pr. Max Time
Extra Prove Time MAX
Extra Prove Time MIN
Extra Pr. Max Time MAX
Extra Pr. Max Time MIN
SELECT
00:10
00:15
00:20
00:01
00:30
00:10
Exit
Select Extra Prove Time, press YES to modify, press CONFIRM
and the following screen will be displayed:
Press SELECT and the screen will change to show the first digit for
modification.
Use the UP and DOWN arrows to change the value and press
SELECT to move to the next digit.
Once the changes have been made press ACCEPT and proceed
to change the other values if required.
NOTE: It is not recommended to make changes to the values without managerial consent.
Press EXIT to return to the menu and Select Extra Prove Temperature, press SELECT and the following screen
will be displayed:
9
Menu : Extra Prove Temperature
Configuration Program 4
Extra Prove Temp.
Extra Prove Temp. MAX
Extra Prove Temp. MIN
SELECT
Press SELECT and the screen will change to show the first digit for
modification.
Use the UP and DOWN arrows to change the value and press
SELECT to move to the next digit.
Once the changes have been made press ACCEPT and proceed
to change the other values if required.
NOTE: It is not recommended to make changes to the values without managerial consent.
+30°C
+40°C
+25°C
Exit
Press EXIT to return to the menu and Select Extra Prove Humidity, press SELECT followed by YES to modify,
press CONFIRM and the following screen will be displayed:
Menu : Extra Prove Humidity
Configuration Program 4
Extra Prove Humidity
Extra Prove Humidity MAX
Extra Prove Humidity MIN
SELECT
Press SELECT and the screen will change to show the first digit for
modification.
Use the UP and DOWN arrows to change the value and press
SELECT to move to the next digit.
Once the changes have been made press ACCEPT and proceed
to change the other values if required.
NOTE: It is not recommended to make changes to the values without managerial consent.
87%
95%
75%
Exit
Press EXIT twice to return to the menu and Select Hold, press YES to modify, press CONFIRM and the following
screen will be displayed:
Menu : Hold
Configuration Program 4
Hold Times
Hold Temperature
Hold Humidity
SELECT
Select Hold Times, press YES to modify, press CONFIRM and the
following screen will be displayed:
Exit
Menu: Hold Times
Configuration Program 4
Press SELECT and the screen will change to show the first digit for
Hold Time
00:10
modification.
Hold Maximum Time
00:20
Use the UP and DOWN arrows to change the value and press
Hold Time MAX
00:15
SELECT to move to the next digit.
Hold Time MIN
00:01
Once the changes have been made press ACCEPT and proceed
Hold Maximum Time MAX
00:30
to change the other values if required.
00:01
HOld Maximum Time MIN
SELECT
Exit
NOTE: It is not recommended to make changes to the values without managerial consent.
Press EXIT to return to the menu and Select Hold Temperature and the following screen will be displayed:
Menu: Hold Temperature
Configuration Program 4
Hold Temperature
Hold Temperature MAX
Hold Tempersture MIN
SELECT
Press SELECT and the screen will change to show the first digit for
modification.
Use the UP and DOWN arrows to change the value and press
SELECT to move to the next digit.
Once the changes have been made press ACCEPT and proceed
to change the other values if required.
NOTE: It is not recommended to make changes to the values without managerial consent.
+15°C
+20°C
+02°C
Exit
Press EXIT twice to return to the menu and Select Hold Humidity , press SELECT followed by YES to modify,
press CONFIRM and the following screen will be displayed:
Menu: Hold Humidity
Configuration Program 4
Hold Humidity
Hold Humidity MAX
Hold Humidity MIN
SELECT
Press SELECT and the screen will change to show the first digit for
modification.
Use the UP and DOWN arrows to change the value and press
SELECT to move to the next digit.
Once the changes have been made press ACCEPT and proceed
to change the other values if required.
NOTE: It is not recommended to make changes to the values without managerial consent.
87%
95%
75%
Exit
Press EXIT three times to return to the Configure Program 4 menu.
10
Min. Prove Time Param.
Select Minimum Prove Time Param from the menu, press SELECT followed by YES to modify, press CONFIRM
and the screen below will appear.
Menu: Min. Prove Time Param.
Configure Program 4
Minimum Prove Time
Minimum Prove Time MAX
Minimum Prove Time MIN
SELECT
Press SELECT and the screen will change to show the first digit for
modification.
02:00
Use
the UP and DOWN arrows to change the value and press
01:00
SELECT
to move to the next digit.
04:00
Once the changes have been made press ACCEPT and proceed
EXIT
to change the other values if required.
NOTE: It is not recommended to make changes to the values without managerial consent.
Press EXIT to return to the Configure Program 4 menu.
Oven Contact Parameters
The Oven Contact parameters are not switched on so modification is not required.
Press EXIT to return to the Configure Program 4 menu, press EXIT twice to return to the CONFIGURATION
PARAMETER screen.
Configure End Times
Each of the days when the machines is required the end times can be pre-set to enable the baker to start a
program without having to set the end time.
To access the program select End Times from the Configure Program 4 menu and the following screen will
appear.
CONFIGURATION PARAMETERS
END TIMES
Monday
03-00
Tuesday
03-00
Wednesday
03-00
Thursday
03-00
Friday
03-00
Saturday
03-00
Sunday
03-00
ACCEPT
EDIT
VALUES
SELECT
CONFIGURATION PARAMETERS
END TIMES
Modify Parameters:
Monday
03-00
Min Value :
03-00
Value
:
03-00
Max
:
ACCEPT
SELECT
EXIT
Press EDIT SELECT and the following screen will appear.
Press SELECT and the day and the first segment of the value time
will flash on and off.
Alter the time by using the UP and DOWN arrows to suit the
individual requirement, press SELECT to move from one segment
to the next and when completed press ACCEPT.
Make the necessary changes to the days required and then press
ACCEPT VALUES to return to the Configuration Parameters
Menu.
On completion of all change press EXIT to return to the SYSTEM OFF PRESS START screen.
Factory Test Program
The Factory Test Program is designed to enable the engineer to check the various functions, outputs and probe
readings as a means of resolving machine and/or controller problems.
You can start the factory test program switching off the power supply to the controller and press and hold in the UP
and DOWN Arrow keys during switching on the auxiliary voltage and carrying out the Flash Test.
Remain holding the buttons until the flash test has been completed and the following screen will be displayed.
11
Factory Test (Ver. F203)
1 – Keyboard Test
UP
Factory test ‘1’ allows for the Left, Right, Middle, Up, Down and
Help (?) buttons to be checked.
Press each button once for them to be displayed.
RIGHT + LEFT : Continue
DOWN
To continue to the next test press the RIGHT & LEFT buttons simultaneously.
The next screen will display.
Factory test ’2’ allows for the Display to be tested.
Factory Test (Ver. F203)
2 – Display Test
RIGHT + LEFT : Continue
Middle : Start Test
LEFT
MIDDLE
RIGHT
To continue to the next test press the RIGHT & LEFT buttons simultaneously.
The next screen will display.
Factory Test (Ver. F203)
3 – RS232 / Bus Test
RIGHT + LEFT : Continue
Factory test ’3’ allows for the testing of the Modem
connections.
Modem Connections NOT USED.
---------
Modem
To continue to the next test press the RIGHT & LEFT buttons simultaneously.
The next screen will display.
Factory Test (Ver. F203)
4 – Relay Test
RIGHT + LEFT : Continue
LEFT : Periodic Test
MIDDLE: Static Test
K1 2 3 4 5 6 7 8 9 10
LEFT
MIDDLE
Factory test ’4’ allows for the testing relay outputs.
When the screen is displayed the Periodic Test is in
operation. To change to Static Test press the middle
button.
Each of the relay outputs relates to the following.
K1, 7, 8, 9. = Coil Fans. 2 = Interior Light. 3 = Liquid
Solenoid Valve. 4 = Room Heating. 5 = Defrost
Heaters. 6 = Water Solenoid Valve
RIGHT
To continue to the next test press the RIGHT & LEFT buttons simultaneously.
The next screen will display.
Factory Test (Ver. F203)
5 – Digital Input Test
RIGHT + LEFT : Continue
Factory test ‘5’ tests the digital inputs.
1 = Overtemperature.
2 = Emergency Switch.
3 = Overpressure.
4 to 6 Not used
Inp 1 2 3 4 5 6
LEFT
MIDDLE
RIGHT
To continue to the next test press the RIGHT & LEFT buttons simultaneously.
12
The next screen will display.
Factory test ‘6’ tests the gives the readings against
individual probes.
AN0, AN1, AN2, AN3, Not used.
AN4 = Door contact
AN5 = Humidity Probe reading in ohms and percentage.
AN6 = Evaporator Probe reading in ohms and
temperature °C.
AN7 = Air Probe reading on ohms and temperature °C.
Values below AN4, 5, 6, 7 for reference only these will
change relative to status
Factory Test (Ver. F203)
6 – Analog Input Test
RIGHT + LEFT : Continue
AN0
AN1
AN2
AN3
0
0
0
0
AN4
AN5
AN6
AN7
4
889
746
640
92%
65C
45C
LEFT
MIDDLE
RIGHT
To continue to the next test press the RIGHT & LEFT buttons simultaneously.
The next screen will display.
Factory Test (Ver. F203)
7 – Buzzer Test
RIGHT + LEFT : Continue
UP:
DOWN:
LEFT
Factory test ‘7’ Buzzer Test.
Follow the instruction on the screen
Buzzer ON
Buzzer OFF
MIDDLE
RIGHT
To continue to the next test press the RIGHT & LEFT buttons simultaneously.
The next screen will display.
Factory Test (Ver. F203)
8 – EEPROM Test
RIGHT + LEFT : Continue
LEFT:
Start Short Test
RIGHT + MIDDLE: Long Test
MIDDLE:
Restart Test 1
LEFT
MIDDLE
Factory test ‘8’ EEPROM test.
Press the LEFT button for a short test.
Press the RIGHT + MIDDLE buttons for a long test.
Press the Middle button to return to factory test 1.
RIGHT
On completion of the selected test press the left and right to return to the ‘SYSTEM OFF PRESS START’ Screen.
Alarm Cancelation
The alarm is activated if a fault is active.
Prior to clearing the alarm it will be necessary to change the faulty component.
However in the case of ‘Overtemp Fault’, ‘Over Pressure’ and ‘Emergency Stop’ these are fault messages relating
to situations and not specific component failure so resetting is all that is required.
To clear the alarm set the program to the ‘SYSTEM OF PRESS START’ screen as below:
Start Screen
Monday
14-02-2009
08:11
SYSTEM OFF
Press START
START
With the screen displayed press the DOWN, RIGHT and LEFT keys together.
After pressing the DOWN, RIGHT and LEFT keys together the Configuration Parameters Menu is shown.
Using the DOWN arrow, select ‘Reset Alarms’ and then press ‘Select’.
13
Configuration Parameters Menu
CONFIGURATION PARAMETERS
Standard Parameter Setting
Time / Date
Programs
Manual Prove
Manual Fast Chill
Manual Storage
Manual Recovery
Service
Reset Alarms
End Times
Select
Exit
The ‘RESET ALARM’ Screen, below, will be displayed. The alarm fault will be displayed, e.g. ‘Over Temperature
Alarm’.
RESET ALARMS
Over Temperature Alarm
Reset
Exit
Press ‘Reset’, Resetting Alarms will flash on and off on the display
RESET ALARMS
Resetting Alarms
Once the reset has taken place the screen below will be displayed.
RESET ALARMS
No Current Alarms
Reset
Exit
Press ‘Exit’ to return to the ‘Configuration Parameter Menu’ and then press ‘Exit’ again to return to the ‘SYSTEM
OFF PRESS START’ Screen.
Controller Reset
It may be necessary to reset the panel if it is felt that the controller has been compromised in any way.
To carry out Reset procedure turn the power off to the machine, press and hold the Help button and switch on the
power.
Remain holding the button until the flash test has been completed and the following screen will be displayed.
14
LOAD DEFAULT VALUES
Clear Datalog Buffer too?
Press YES to start the reset program and the following program
will be displayed and the reset program will start
YES
Exit
No
LOAD DEFAULT VALUES
Clear Datalog Buffer too?
Loading Service Parameters
Loading Program Parameters
Clear Datalog Buffer
Address: xxxxx of 35136
YES
On completion of reset the display will return to the SYSTEM OFF PRESS START screen.
It will be necessary to install the default parameter settings for the particular model before starting any program.
2.5
Fault Messages
Wrong checksum after having exchanged the flash EPROM: Press left & right while switching on the auxiliary
voltage to calculate a new checksum. It is strictly necessary to carry out a Reset Procedure after changing the
program!
Possible Fault Messages are:
01
02
03
04
07
08
Air Sensor Short Circuit
Air Sensor Break
Coil Sensor Short Circuit
Coil Sensor Break
Humidity Sensor Short Circuit
Humidity Sensor Break
20
22
23
Defrost Term. Fault (Safety Time 45 Min)
Door Open Fault
Temperature Fault
34
37
41
Overtemp Fault
Over Pressure
Emergency Stop
50
51
52
53
Routine Check
Steam Tank de-scaling
Condenser Clean
Heaters check
60
61
63
Modem not ready
Modem Dial Number missing
Bus Read Fault
Power Interrupt
If there is a power interrupt, all information is stored and the clock continues running for one day.
After power interrupt the unit tries to keep the programmed bake- time.
Communication via remote control is not possible during power interrupt.
Modem Dial Number Missing
If the alarm message ‘Modem Dial Number Missing’ is shown on the display it is necessary to reset the ‘Remote
Access Type’ value to ‘SERIAL’.
Press the DOWN, RIGHT and LEFT keys together the Configuration Parameters Menu is shown, see 2.2.1.
Scroll the list and select ‘Service’. Once selected the screen will change, see 3.4 Service Parameters.
Select ‘Remote Access’. After entering select ‘Remote Access Type’, if ‘Modem’ is shown on the right hand side
press the middle bottom button, EDIT SELECT.
15
Access code will be requested, enter the correct level access code to continue.
The next screen will display ‘Remote Access Type’ flashing’ press the down pointing arrow to change it to display
‘Serial’. Press ACCEPT. The screen will return to the previous, press ACCEPT VALUES.
Once the screen has changed press ‘EXIT’. You will now be back to the ‘Configuration Parameter’ press ‘EXIT’ to
store the change made.
NOTE. Leave the unit for ten minutes to allow the controller to re-set.
After the ten minutes has elapsed access the Configuration Parameters Menu, and reset the alarm.
FITTING PROCEDURE FOR F206 SOFTWARE EPROM
RBCMK3 CONTROLLER
The EPROM is located on the PCB behind the Display Panel and not the Relay Board and is the only one of its
type on this board so it can be easily identified. There may already be a Software revision on the EPROM such as
F203.
Before any work is carried it out is advisable to check the customers settings so that the new EPROM can be set to
the correct temperatures after fitting.
REMOVAL
1)
Remove the Power supply to the machine and turn off the isolator on the Control Panel.
2)
Remove the front part of the Control Panel by removing the 3 screws on top of the Panel
3)
Disconnect the Interconnecting cable between the Relay Board and the Display Panel.
The cover over the Display can then be removed exposing the relevant board. The EPROM is located on
the top board.
4)
Make a note of the orientation of the EPROM in the holder by way of the circular indentation on one edge.
(See fig 1) Remove the EPROM from the holder using the correct lifting tool.
Removal has to be done carefully as the holder can easily be damaged.
Fig 1
Direction Marks
REPLACEMENT
1)
Locate the EPROM onto the holder and ensure it is perfectly square and carefully push fully home into the
socket.
2)
Replace all panels and replace the Interconnecting cable
3)
Re – assemble Control Panel
4)
The Controller will now need to be Reset:
Whilst restoring power hold down the Left & Right keys and allow the Flash Test to be carried out.
Then follow the on screen prompt.
When asked to ‘Clear Data Log Buffer’ select ‘YES’ to continue.
On completion the controller display will return to the Start Screen.
5)
Check that the time and date are set correctly using the procedure in the Service Manual.
6)
Reset all other parameters to customer requirements.
Probe Resistance Values
16
Air and Coil Probe PTC type.
Resistance values against temperature
-55°C
-50°C
-40°C
-30°C
-20°C
-10°C
0°C
+10°C
+20°C
490 Ohm
515 Ohm
567 Ohm
624 Ohm
684 Ohm
747 Ohm
815Ohm
886 Ohm
961 Ohm
+25°C 1000 Ohm
+30°C 1040 Ohm
+40°C 1122 Ohm
+50°C 1209 Ohm
+60°C 1299 Ohm
+70°C 1392 Ohm
+80°C 1490 Ohm
+90°C 1591 Ohm
+100°C 1696 Ohm
Technical Detail
IP Rating:
Range:
Tolerance:
IP65
-30°c to +90°c
+1.25 at 25°c.
+2°c at -10°c and +50°c.
+3°c at -50°c and +80°c
Overtemperature Thermostat Setting
The overtemperature setting is 60°c with a 10°c differential.
FAULT DIAGNOSIS
The following section details a number of faults which may occur and their possible
causes. This list is not exhaustive.
TEMPERATURE
SLOW PROVING
Possible causes are prove heater failure or fan failure. The most likely would be heater related as a
fan failure would also cause problems related to low humidity uneven proving and/or an over
temperature fault.
TEMPERATURE FAULT ACTIVATED
There are a number of possible causes for this fault. The easiest method of diagnosis is to ascertain
the time that the error occurred. It should also be determined the exact condition which causes the
fault (see paragraph 3.4.2). From the time of occurrence it can be determined via the operating
program parameters which condition the machine was in at the time. For example if the machine was
in storage mode at the time the fault occurred the likely (although not certain) cause would refrigeration
related. Similarly if the machine was in recovery, heaters would probably be a good place to start.
OVER TEMPERATURE TEMPERATURE FAULT ACTIVATED
In all probability it is almost certain that this fault would be caused by one or all of the fans being
rendered inoperative. The cause would most probably be controller output or solid state relay failure.
Another cause may be a contactor ‘sticking’ on thus causing the heaters to operate continuously.
HUMIDITY
LOW OR NO HUMIDITY
This can be caused by a number of faults. First check that the water supply to the steam tank is
operating. By energising the solenoid valve and ensuring that water is entering the tank (the later can
usually be done audibly).
Confirm correct operation of the humidity sensor. As an initial indication use the display on the
controller. For example if the room is obviously ‘dry’ but the display is showing 90% humidity the likely
cause would be a humidity sensor failure. If everything appears normal use a calibrated hand held
17
humidity device to compare the value indicated on the display with that on your meter. Small
differences ±15% can be expected although more should be viewed with suspicion.
Ensure that the tank contains water (it may not be filling although water is connected). If this is the
case check that the level controll is operating. Malfunction of the level controller is not necessarily an
indication if a level controller failure (see water overfilling below) although failure to fill usually is.
Check the heater is operating correctly.
In all of the above prove negative ensure that the steam delivery pipes have not become scaled or the
inside of the tank itself is not full of scale therefore preventing sufficient steam production.
WATER
WATER OVERFILLING
The water system is controlled by the level controller situated in the control panel. The first check to
make however is to ensure that no debris from the water supply has passed through the water strainer
and become lodged in the solenoid valve, thus preventing the valve from closing completely.
If the valve is permanently energised this can only be caused by the level controller. However this
does not necessarily indicate a level controller fault. The level controller uses conductivity between the
probes and the tank case to determine water level. If the probes have become scaled due to water
softening being inoperative this will prevent conductivity causing the controller to assume low level thus
causing the solenoid valve to remain open. It should also be ensured that the earth connection
between the level controller and tank has not been disrupted in any way as this will cause the same
scenario.
WATER OVERFLOWING DRAIN PAN
Most likely caused by a drain pipe blockage although this could be a symptom of the steam tank
overfilling.
PRODUCT
DOUGH SKINNING
Rack Badly
Positioned
Slow Pull
Down
•Is rack positioned centrally between guide rails ?
•Check pull down performance - should be +20°C to -5°C in 40
minutes with an empty chamber
•Are evaporator fans running ?
•Is refrigeration system evaporating at -12°C to -15°C ?
Check
Humidity
In Chamber
•Check machine humidity parameters - should be 80% - 85%
•Is water supply to steam tank working ?
Check •Solenoid valve operation
•Water level
•Water control system
•Is the steam element heavily scaled ?
•Is the steam tank heater working correctly ?
•Is the humidity displayed by the controller correct with that inside
the chamber ?
Bakery
Operation
•Is there any delay between product production and loading into the
retarder prover ?
18
UNEVEN PRODUCT DEVLOPMENT
One Part Of The Rack
Is More Or Less
Proved Than Another
•Is rack positioned centrally between guide rails ?
•Are all the evaporator fans running ?
Product Is Not Ready
On Time
•Has the controller end time been set correctly ?
•Is the refrigeration solenoid ‘leaking’ when closed ?
•Are all the heaters operating correctly ?
•Are the fan speeds set correctly ?
•Are the controller parameters set correctly ?
•Is the temperature displayed on the controller correct with that
inside the chamber ?
Product Is Ready To
Early
•Has the controller end time been set correctly ?
•Is the refrigeration system operating correctly ?
•Are the heaters operating at the correct time or is one or more on
all the time ?
•Is there any delay between product production and loading into the
retarder prover ?
•Are the controller parameters set correctly ?
•Is the temperature displayed on the controller correct with that
inside the chamber ?
19
20
21
22
23
24
25
26
27
28
29
Foster Refrigerator
Oldmedow Road
Kings Lynn
Norfolk
PE30 4JU
Tel: 01553 691122
Fax: 01553 691447
Website: www.fosterrefrigerator.co.uk
Email: [email protected]
a Division of ‘ITW (UK) Ltd’
DRP MK3 P V F206 /SM/19/09