1
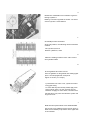
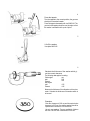
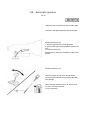
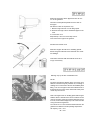
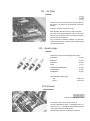
D1 - Air filter
replace
Remove the cover from the air filter housing. Remove
the air filter. If necessary, clean the bottom of the filter
housing.
I nsert the new filter and refit the cover.
850: Replace the filter for the control unit box
Undo the quick-release fasteners and remove the air
duct from the anchorage on the front member. Replace
the filter and refit the air duct.
If the car is driven in adverse conditions, e.g. frequently
on abnormally sandy or unpaved roads, the filter should
be replaced more often.
D2 - Spark plugs
replace
Tightening torques for spark plugs, Nm (kpm)
B 16/18/20
25 (2.5)
B200/230
25 (2.5)
B204/234
25 (2.5)
B 280
12 (1.2)
B 5204/5254, B 5202/5252
25 (2.5)
B 5204/5234 T
25 (2.5)
B 6254/6304
25 (2.5)
Electrode gap, spark plugs
400 0.8-0.9 mm
Others
0.7-0.8 mm
D3-Valves
check/adiust
Special t ool 999 5022 - 5026
1
Undo the valve cover and remove it
Set the camshaft to TDC - combustion for cyl.1
The cams for cyl. 1 should be offset upwards and the
pulley ignition marking should be at 0.
Note! Always rotate the crankshaft's centre bolt.
2
Measure and note the valve clearance for cyl.1
Clearance at inspection:
Cold engine:
0.30-0.40 mm
Hot engine:
0.35-0.45 mm
Clearance at adjustment:
Cold engine:
0.35 mm
Hot engine:
0.40 mm
Same clearance for inlet and exhaust.
For wrong clearance (3-6):
3
Turn the engine about another 1/4 revolution
Piston should NOT be at TDC when adjusting valves,
otherwise valves may strike the piston when the tappets
are pressed down.
Turn the tappet
The grooves should be at right angles to the camshaft's
l ongitudinal direction.
4
Press the tappet down with tool 999 5022. Remove the washer with 999 5026
The groove in the tappet should be located above the
edge so that the washer is accessible with a pair of
pliers.
5
Measure the washer's thickness with a micrometer
Calculate the thickness of the washer to be
used
Example:
Measured play: 0.25 mm. Correct play: 0.40 mm.
Difference in play -0.15 mm.
Measured thickness of existing washer: 3.80 mm.
Correct thickness of new washer: 3.80-0.15=3.65 mm.
Use only new washers.
Available in thicknesses 3.30-4.50 mm in increments of
0.05 mm.
6
Lubricate and fit the new washer
Note! The washer should be fitted with the marking
facing down.
Remove press tool 999 5022.
7
Check and if necessary adjust valve clearance
for the other cylinders in sequence 3,4,2
8
Turn the engine over a few revolutions with the
starter motor
Then check the clearance again. Adjust if necessary.
9
Fit the valve cover.
Use a new gasket.
10
Fit new hoses and ignition cables.
Refit all other parts which were removed.
1
Remove the valve covers
Rotate the crankshaft to ignition position for cylinder 1
36 mm socket.
Marking 1 on the pulley should be opposite the 0-marking on the timing plate. Both the rocker arms for
cylinder 1 should have adequate play.
Note! There are two marks on the pulley, 1 = TDC cyl.
1 and 2 = TDC cyl. 6.
2
Check/adjust valve clearance
I n the set position, the following valves are checked:
I nlet: cylinders 1,2 and 4
Exhaust: cylinders 1,3 and 6
Valve clearance (mm)
I nlet valve
cold engine
hot engine
Exhaust valve
cold engine
hot engine
0.10-0.15
0.15-0.20
0.25-0.30
0.30-0.35
3
Rotate the crankshaft one revolution to gas exchange cylinder 1
Marking 1 should be opposite the 0-mark. The rocker
arms for cylinder 1 should balance.
4
Check/adjust valve clearance
At the set position, the following valves should be
checked:
I nlet: cylinders 3,5 and 6
Exhaust: cylinders 2,4 and 5
5
Clean the sealing surfaces of the valve covers
and cylinder heads
6
Fit new gaskets and valve covers
Use new gaskets. Fix the gaskets with sealing agent
(P/N 1 161 026-8) applied at a few points.
Tighten 10-15 Nm (1.0-1.5 kpm).
T-joint between the valve cover, cylinder block and
ti ming gear casing.
To ensure that the joint is entirely sealed, apply a thin
string of silicon (P/N 11 61 231-4) above the joint.
Note! Do not apply too much silicon, because of the
risk that silicon may enter the lubrication system and
clog the oil ducts.
7
Refit the other parts which were disassembled
Use a new O-ring (gasket) for the vacuum pump, if
fitted. Ensure that the pump shaft is at the upper side
of the camshaft.
Note!
The valves can only be checked/tightened when the
engine is cold.
1
Remove the valve cover
B18 K/KP/U , B 20: Remove the air cleaner.
B 16 F, B18 EP/FP/FT, B 20 F: Remove the inlet
manifold bolts and the screw at the front of the cylinder
head.
Remove the manifold and valve cover.
2
Set cylinder no. 1 at TDC
Note! Cylinder no. 1 is closest to the flywheel.
Always use the crankshaft centre bolt to rotate the
crankshaft.
Both the cams on cylinder 1 should point offset upwards.
3
Check valve clearance for cylinder no. 1
I nlet valve
Exhaust valve
Exhaust valve (turbo)
0.15-0.25 mm
0.35-0.45 mm
0.45-0.55 mm
I = inlet valve
A = exhaust valve
I f adjustment is necessary (steps 4-9)
4
Rotate the crankshaft another 1/4 revolution
The piston should not be at TDC when valve clearance
i s adjusted, since the valves may otherwise strike the
pistons when the tappets are pressed downwards.
Press the tappets downwards with tool
999 5989 and remove the shims
Turn the tappets to the correct position, the grooves run
slightly inwards.
Press on the tappets with tool 5989.
Remove the shims.
Calculate the thickness of the shim to be used
Adjustment
B 16, B18 without turbo, B 20
I nlet valve
0.20-0.25 mm
Exhaust valve
0.40-0.45 mm
Turbo engine
I nlet valve
0.20-0.25 mm
Exhaust valve
0.50-0.55 mm
Measure shim thickness with a micrometer and calcul ate the thickness of the shim which is required.
Carburettor engines:
Remove the fuel pump for adjustment of cylinder no. 4.
Fit a new shim and remove tool
999 5989
Lubricate the shim and check that the assembly mark
faces downwards towards the tappet.
Note! Always use new shims. Available in thicknesses
from 3.25 mm to 4.25 mm in increments of 0.05 mm,
and in thicknesses 4.30, 4.40 and 4.50 mm
Rotate the crankshaft 1 3/4 revolution and check valve
clearance again.
Check/adjust valve clearance for the remaining
cylinders
Check valve clearance in the following sequence:
1-3-4-2
I mportant! Do not forget to rotate the crankshaft a
further 1/4 revolution before valve adjustment.
Refit the valve cover
Fit new gaskets. Apply sealing agent at the four corners
(Volvo P/N 11 61 231-4)
B18 K/KP/U : Fit the fuel pump and air cleaner.
B 16 F, B18 EP/FP/FT , B 20 F: Fit the manifold. Tightening torque: 12 Nm.
Special tool 999 5188, 5195, 5196
1
Set cylinder no. 1 at TDC - injection
Remove the valve cover
Always turn the vibration damper's centre screw, 27
mm socket tool 999 5188 if necessary.
Both cams on the camshaft for cylinder 1 should point
offset upwards.
2
Check the valve clearance for cylinder no. 1
The following values are permitted at inspection:
Cold engine
I nlet
0.15-0.35 mm
Exhaust
0.35-0.45 mm
Hot engine
I nlet
0.20-0.30 mm
Exhaust
0.40-0.50 mm
I = inlet valves
A = exhaust valves
I f clearance is incorrect (steps 3-8):
3
Rotate the engine another approx. 1/4 revolution
When adjusting the clearance, the piston should not be
at TDC, otherwise the valves may strike the pistons
when the tappets are pressed downwards.
4
Press the tappets
Turn the tappets to the correct position, the grooves
should point somewhat inwards.
Press the tappets downwards with tool 999 5196. The
grooves in the tappets should be over the edge, so that
the washer is accessible with a pair of pliers.
5
Lift off the washer
User pliers 999 5195.
6
Calculate the thickness of the washer which gives the correct clearance
The following data applies for setting:
mm
Cold engine
Inlet
0.20
0.40
Exhaust
Hot engine
0.25
Inlet
0.45
Exhaust
Measure the thickness of the old washer with a micrometer. Calculate the thickness of the washer which is
to be used.
Examples:
If the valve clearance is 0.20 mm and the required valve
clearance is 0.25 mm, the existing washer should be
replaced with one which is 0.05 mm thinner.
Use only new washers. They are available in thicknesses from 3.00-4.25 mm in increments of 0.05 mm.
7
Fit the new washer and remove the tools
The washer should be lubricated and placed with the
marking facing downwards, towards the tappet.
8
Check/adjust the valve clearance for the other
cylinders
Check/adjust the valves in the following sequence:
1-5-3-6-2-4.
I mportant! Do not forget to rotate the crankshaft a
further approx. 1/4 revolution before valve clearance
i s adjusted.
9
Recheck valve clearance for all the cylinders
Turn the engine a few revolutions prior to checking.
10
Fit the valve cover
Use new gaskets if necessary.
D4 - Fill engine oil
D5 - Automatic gearbox
fill oil
Undo the rear connection for the oil cooler pipe
Connect a transparent plastic hose to the pipe
Fill about 2 litres of oil
1. Start the engine and let it run at idle speed.
2. Switch off the engine when air bubbles appear in the
hose.
3. Fill about 2 litres of oil
Repeat steps 1 and 2 once. Reattach the pipe to the
gearbox.
Fill about 2 litres of oil
Start the engine and let it run at idle speed
Move the gear selector lever between the different settings
Move the gear selector lever to P, wait 2 minutes, then check the oil level.
Top up if necessary.
Remove the lower return pipe from the oil cool er on the gearbox.
Connect a transparent plastic hose to the return pipe
Fill about 2.5 litres of oil (Dexron II D).
1. Start the engine and let it run at idling speed.
2. Switch off the engine when air bubbles appear in the
hose.
3. Fill 2.5 litres of oil
Repeat steps 1 and 2 once and step 3 once.
Connect the return pipe to the gearbox.
Fill about 2.5 litres of oil
Start the engine and let it run at idling speed.
Move the gear selector lever between the various settings.
Check the oil level with the selector lever in P
Top up if necessary.
Warning! Top up oil with considerable care
Fill oil
Fill slowly through the dipstick tube. If too much oil is
filled, the excess may be pressed out, resulting in
l eakage. Do not check the oil level immediately after
filling. The oil in the pipe must have sufficient time to
flow down into the sump, which means that a hasty level
check may be incorrect.
Note! The engine must run at idling speed with the gear
selector lever is P before the correct oil level can be
read off. If engine speed is increased while the level is
too low, the oil will be whipped up into a foam and the
wrong level will be registered.
The oil level on CVT cars should be measured when the
gearbox has attained normal operating temperature.
Oil capacity, CVT = 3.8 I.
ZF = 3.3 I.
Move the gear lever back and forth between the various
gear positions, and keep it in each position for at least
2 or 3 seconds. Select P and wait 2 minutes. Check the
oil level.
Check the oil level
Wipe the dipstick with a nylon rag, chamois leather or
a rag which does not fluff.
I nsert the dipstick correctly (i.e. with the side marked
" warm/cold" facing the gearbox).
The ZF unit has two measurement ranges: A = cold oil
B = hot oil
Pull up the dipstick after 4 seconds and read the level.
The difference between max. and min. is: ZF, 0.3 I
CVT, 0.6 I
Top up if necessary with Volvo oil:
ZF
P/N 33 44 208-8
CVT P/N 33 44 959-6
D6 - Fluid levels - engine compartment
check/adjust
Check the fluid levels in the
- cooling system, top up if necessary with Genuine Volvo coolant, mixed with clean water (50/50)
- brake fluid reservoir. Quality DOT 4+
- reservoir for power steering oil. If necessary, top up
with ATF-oil, type F or G
- washer fluid reservoir.
The illustration shows the 850 engine compartment.
D7 - Battery
check level/anchorage
Check that there is sufficient battery acid in all the
battery cells. Top up if necessary with distilled water.
Check that the battery is properly anchored and connected.
Clean the battery terminals (do not disconnect the
cables) and apply vaseline to them.