1
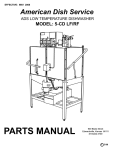
GLV
81
OPERATOR MANUAL
Service 1 800 622 216
Distributed in
Australia by
Parts
1 800 337 963
740 SpringvaleRoad, Mulgrave 3170, Victoria, Tel 03 9518 3888 Fax 03 9518 3818
82
Safe Installation and Use of Wash Equipment
As with all electrical and mechanical equipment dishwashing equipment
can be hazardous if installed or operated incorrectly.
9
9
9
9
9
9
9
9
9
Installation
Use qualified, skilled personnel
Follow installation instructions
Connect to correct voltage and supply current
Provide fully accessible Electrical Isolation Switch
Training and Supervision
Read and Understand the Operating instructions
Train all staff.
This appliance is not intended for use by young children.
Young Children should be supervised to ensure they do not play with the
appliance.
This appliance is not intended for use by infirm persons without supervision
Hot Surfaces
9 Be aware some surfaces can be hot.
9
9
9
9
Chemicals
Commercial dishwashing detergents are hazardous
Read and follow the safety information found on the labels of detergent
containers and Material Safety Data Sheets
Handle with care
Use protective eyewear and clothing if decanting containers
Hot Water
9 Door safety switches are designed for emergency use only.
9 WAIT for the green cycle light to go out before opening the door.
9 Wash water is 60°C and contains caustic detergent so DO NOT put hands in
wash water.
Cleaning
9 DO NOT hose down the machine or splash water over the exterior.
9 Watch for broken glass etc when cleaning the inside of the machine especially
with glasswashers..
If the supply cord is damaged it must be replaced by the manufacturer or its service
agent or a similarly qualified person in order to avoid a hazard.
For further information on any of the above contact
83
Service 1 800 622 216
Distributed in
Australia by
Parts
1 800 337 963
740 SpringvaleRoad, Mulgrave 3170, Victoria, Tel 03 9518 3888 Fax 03 9518 3818
GLV
OPERATING INSTRUCTIONS
START UP
Fit wash pump filter, scrap trays and shut door.
Turn wall and machine power switches ON.
ON light glows red and machine fills automatically.
When the RINSE READY light (tick symbol) and WASH READY light (water symbol)
glow amber the machine is ready to run and may be started.
OPERATION
Load rack into machine and shut door.
Press start button (1,2 or 3) for 1,2 or 3 minutes accordingly.
CYCLE light glows green while machine operates.
When CYCLE light goes out, cycle is complete.
Remove rack. Close door.
Note: Machine will not operate unless READY lights are ON.
SHUT DOWN - IMPORTANT - EVERY NIGHT
Open the door and turn DRAIN switch on.
Allow to drain for approximately 2 minutes
Turn DRAIN and POWER switches off.
Remove scrap trays and wash pump filter, rinse clean and replace.
We recommend regular removal and flushing of wash and rinse arms. To remove arm
assembly, undo thumbscrew.
To clean wash/rinse arms use a toothpick or paperclip, if necessary, to clear the jets,
remove end screws from arms and flush with water/.
Use of correct type and quantities of detergent is essential to the effective operation of
this machine. Use only low foam detergents. Contact your chemical supply company to
either fit an automatic dispenser or to supply suitable powder detergent to manually add
to wash water.
For information on recommended detergent suppliers or local service agents, contact:
Rev 1A
20/5/04
84
Service 1 800 622 216
Distributed in
Australia by
Parts
1 800 337 963
740 SpringvaleRoad, Mulgrave 3170, Victoria, Tel 03 9518 3888 Fax 03 9518 3818
GETTING THE BEST RESULTS FROM YOUR DISHWASHER
1.
Hot Water Supply
An adequate supply of water at the correct temperature and pressure is essential for
effective operation of your machine. An inadequate hot water supply will result in significant
time delays between operating cycles. Refer Installation information for detail. Water
softening is recommended in hard water areas - especially for glasswashing.
2.
Pre-rinsing
Pre-scraping of dishes is required by Food Hygiene Regulations. The best method is to prerinse with warm water with a Fisher Pre-rinse Unit - or alternatively by scraping or dunking in
water. Cutlery should be pre-soaked in warm water, preferably containing cutlery pre-soak
compound - refer your chemical supplier.
3.
Racking Procedures
Do not overload racks or cutlery containers, minimise the overlap of crockery. Cycle times
are short and water consumption per cycle low - so there is no advantage in overloading
racks.
4.
Cycle Times
With multi-cycle machines select cycle 3 initially and switch to faster cycles only if
necessary. Note that water consumption does not increase with longer cycles. For best
results use the longest cycle whenever possible.
5.
Detergent
Use of correct type and quantity of detergent is essential to the performance of the machine.
Low foam specialty products are recommended. We strongly recommend that you use a
professional dishmachine chemical supplier - and will be pleased to recommend a supplier
in your region. Discuss with them the use of cutlery pre soak solution, detergent and drying
agent.
6.
Drying
Single tank commercial dishwashers do not have a drying cycle. However, the machines do
rinse at high temperatures which promote fast drying particularly when drying agents are
used. We recommend prompt removal of the rack from the machine - leave the rack on the
bench for 2 to 3 minutes before emptying. This time will be reduced with correct use of
drying agent (rinse fluid) which reduces water surface tension and allows water to drain
quickly from washware. For advice on drying agents and injectors refer to your chemical
supplier.
7.
Daily Cleaning
It is essential that the machine is drained and cleaned at the end of each day. Drain the
machine then remove, clean and replace filters as per the operating instructions. Regularly
check the wash and rinse jets. Remove wash and rinse arms by undoing the central
thumbscrew. (DO NOT remove the thumbscrew retainer plate if fitted). Flush arms with
water and use a toothpick or paperclip, if necessary, to clear jets. On some models
individual jets can be removed for cleaning by twisting anticlockwise. To remove the end
plugs on these arms first remove the end jet then withdraw end plug. To flush the machine,
leave the drain upstand out, close the door and switch the machine on for about 20 seconds.
DO NOT leave the machine unattended during this process.
85
86
87
88
Ian Mcleod
89
Ian Mcleod
10
9
8
7
6
5
4
3
2
1
J
J
REAR VIEW
I
I
PERSPECTIVE VIEW
H
H
DETAIL A
10
G
G
4
1
8
F
F
5
9
DETAIL A
2
12
3
3
E
E
6
8
6
1
D
D
4
11
10
9
3
3
5
2
C
C
Parts List
ITEM
B
A
PART NUMBER
DESCRIPTION
QTY
1
600 30163
LENS & NEON ASSY (GREEN) 12mm
1
2
600 30161
LENS & NEON ASSY (RED) 12mm
1
3
600 30162
LENS & NEON ASSY (AMBER) 12mm
2
4
600 30212
3 BANK 1 POLE MOMENTARY SWITCH
1
5
32271
TERMINAL STRIP 4 WAY
1
6
600 80003
M4 NUTSERT
2
7
8802
MS PAN POZI ZP M4x25
2
8
600 30213
SWITCH DRAIN 2P NO/NC
1
9
600 30214
SWITCH POWER 2P NO/NO
1
10
251 10042
GLV4 STARLINE/WASHTECH CONTROL PANEL ASSY
1
11
400 70041
WASHTECH GLV CONTROL PANEL LABEL
1
POWER TERMINAL LABEL
9
1
12
REF
10
90
8
7
7
Alexander Jouk
414 ROSEBANK ROAD
AUCKLAND
Tel (09) 829-0930
C
Proj:
Description:
Units:
mm
GLV4 WASHTECH CONTROL PANEL ASSY
Tolerance:
Finish:
Material:
REF
7
6
5
Scale:
+/-0.5
N.T.S.
Drawn by:
Approved by:
3
1-A
Issue Date:
Sheet No.
Drawing No:
23/09/2004
1 /1
PROJECT:
4
Rev.
Checked by:
BAE
DO NOT SCALE - IF IN DOUBT ASK
B
PO Box 90-548
New Zealand
Fax (09) 829-0935
251 10004
A
SPECIFICATION SUBJECT TO CHANGE WITHOUT NOTICE
2
1
Alexander Jouk
91
92