1
DESCRIPTION OF FEATURES
IMPORTANT OPERATING NOTES
The following operating guidelines must be observed at all times in order to prevent
possible personal injury or damage to your Elevator or other property. ThyssenKrupp
Access hereby disclaims all liability (whether arising in contract, tort, (including negligence or strict liability) or otherwise) for personal injury or property damage arising
from user’s failure to observe the following guidelines:
• Do not exceed maximum capacity of Elevator. See capacity tag inside Elevator.
In order to avoid causing damage to your Volant Elevator (the “Elevator”) or other property and
to avoid personal injury, you must become familiar with the location and function of the features and options included on your Elevator before using. It is particularly important that you
familiarize yourself with the safety devices and emergency controls described in bold text below. All Elevator users should have the ability to deactivate the safety devices during normal
use and to activate the safety devices and emergency controls in the event of an emergency.
General
• Close Elevator gate when not in use.
•
•
•
•
• Do not open the Elevator gate when the Elevator is in use. Attempting to open the Elevator
Safety devices
• Do not bypass any safety control sensors.
• Do not lean against Elevator gates or hoistway doors.
gate while the Elevator is in use constitutes a safety hazard and could result in injury to passengers or bystanders. In addition, such attempts will cause the position indicators on the
Elevator to flash continuously until the Elevator has been serviced. If the position indicators
are flashing a past abnormality has been indicated, and service of the Elevator is required
to reset the indicators.
• Do not use elevator to transport freight.
• Do not operate elevator if it has been damaged in any manner.
• In case of fire, do not use elevator.
• Be certain the elevator is at the proper floor level before entering or exiting.
INSTALLATION
PLEASE DO NOT ATTEMPT TO INSTALL YOUR ELEVATOR BY YOURSELF! A COPY OF THE ELEVATOR’S
INSTALLATION INSTRUCTIONS HAS BEEN PROVIDED TO YOUR THYSSENKRUPP ACCESS DEALER AND
DESIGNATED CONTRACTOR FOR USE IN THE INSTALLATION OF THE ELEVATOR. YOU MAY RECEIVE
A COPY OF THE INSTALLATION INSTRUCTIONS AS A COURTESY FOR REFERENCE ONLY. PLEASE
CONTACT YOUR LOCAL MUNICIPALITY FOR INFORMATION ON LOCAL REGULATIONS APPLICABLE
TO THE INSTALLATION AND INSPECTION OF RESIDENTIAL ELEVATORS.
PLEASE NOTE: IN ORDER TO AVOID PERSONAL INJURY AND/OR PROPERTY DAMAGE, INSTALLATION OF YOUR ELEVATOR MUST BE PERFORMED BY AN AUTHORIZED THYSSENKRUPP ACCESS
TECHNICIAN OR OTHER PROFESSIONAL WHO IS LICENSED AND QUALIFIED TO INSTALL THE
ELEVATOR. IF YOU HAVE HIRED A NON-THYSSENKRUPP ACCESS TECHNICIAN TO INSTALL YOUR
ELEVATOR, YOU MUST ENSURE THAT YOUR CONTRACTOR INSTALLS YOUR ELEVATOR IN ACCORDANCE WITH THE INSTALLATION INSTRUCTIONS.
Programmable logic controller (PLC) with digital signal processor
Gearless machine drive
Fully automatic operation
230V, 60 Hz, 20 amp single phase power source
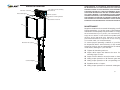
• Upper and Lower Terminal Limits. Stops the Elevator in case the Elevator travels beyond the
floor limit.
• Final Limits (2 upper, 1 lower). Stops the Elevator in case the Elevator travels beyond the
terminal limit.
• Slack Rope Safety. Stops the elevator if one or both of the ropes fail.
• Car Top Stop Switch and Pit Switch. Located on top of the car and near the bottom of the
hoistway, these switches are used to prevent operation of elevator during maintenance.
• Car Gate Safety Switch. PLEASE NOTE: The elevator will not operate if a gate
is open.
• Hoistway Door Interlocks. PLEASE NOTE: The elevator will not operate if a hoistway door is
open.
• Overspeed Governor. Stops the elevator if car moves too quickly or in the event of rope
failure
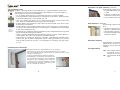
Hall stations
Located near each hoistway door
• L.E.D. display shows the floor on which the Elevator is currently stopped.
• An illuminated ring around the button indicates the Elevator is in use.
• Press and release button to call Elevator to that floor. The ring around the button
illuminates to acknowledge your call.
• If Elevator is already at your floor, press and release the button to unlock the door.
• The L.E.D. display also alerts you to complications that the control system may see.
Refer to Troubleshooting on page 10 for more details.
• Some hall stations may be equipped with an optional key switch. On these systems,
the key must be turned on before pressing the button.
PLEASE NOTE: LOCAL REGULATIONS MAY APPLY TO THE INSTALLATION AND INSPECTION OF
8
5