1
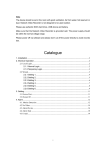
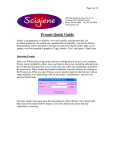
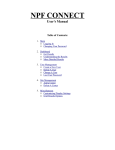
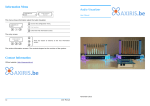
LCD Panel User’s Guide
LCD Console User’s Guide
1-i
LCD Panel User’s Guide
Contents
1.
USING LCD CONSOLE
1-1
1.1.
1.2.
1.3.
INSTALLING LCD PANEL
LCD PANEL DRIVER INSTALLATION
UPGRADING THE EXISTING DRIVER
1-1
1-2
1-2
1.4.
1.5.
1.6.
1.7.
UN-INSTALLING THE EXISTING DRIVER
LCD PANEL SETTING INSTRUCTION
LCD DISPLAY INFORMATION (DISPLAY MODE)
USING THE LCD PANEL (SETTING MODE)
1-2
1-3
1-3
1-3
1.8. BOOT SEQUENCE SELECTION
1.9. PASSWORD ENTERING AND RESETTING
1.9.1. PASSWORD ENTERING
1.9.2. PASSWORD SETTING
1-4
1-4
1-5
1-5
1.10. RETURN TO THE MAIN MENU
1-6
1.11. CONFIGURE LAN 1 (LAN 2) IP ADDRESS, NETMASK, GATEWAY AND DNS
1-6
1-8
1.12. WELCOME MESSAGE SETTING
1.13.
1.14.
1.15.
1.16.
DISPLAY TIME SETTING
COMPUTER INFORMATION MENU SETTING
SYSTEM TIME SETTING
REBOOTING (SYSTEM REBOOTING)
1.17. POWERING DOWN
1.18. APPEARANCE OF LCD PANEL
1-8
1-9
1-10
1-11
1-11
1-12
1-ii
LCD Panel User’s Guide
1. Using LCD Console
During startup, the liquid-crystal-display (LCD) screen on the front panel of the
server displays status information about boot process itself.
When setting up the SR-104, you can use LCD console to enter network
configuration information for the SR-104.
1.1.
Installing LCD Panel
Step 1. Please check the LCD panel kit is included in the component package,
which contains LCD panel, locker and screws. (Fig-19)
Step 2. Put the locker into the case. (Fig-20)
Figure 1
Figure 2
Step 3. Insert LCD panel cable into system connector. (Fig-21)
Step 4. Secure LCD panel with two screws. (Fig-22)
Figure 3
Figure 4
1-1
LCD Panel User’s Guide
1.2.
LCD Panel Driver Installation
The installation procedures illustrated below indicating the installation
under Windows 2000 system.
Step 1. To install driver for the LCD panel, double click “setup.exe” icon on the
floppy disk. Note that after installing the driver, the front side COM2 port
function will be disable automatically.
Step 2. Installation Completed. Restart your computer.
1.3.
Upgrading the Existing Driver
To upgrading the existing driver, please un-install the previous driver by
following the procedures at 5.4 Un-installing the Existing Driver.
1.4.
Un-installing the Existing Driver
To un-install LCD panel driver, go to Star > Programs > GBT LCD Service >
Remove Gservice.exe. Then, Star > Programs > GBT LCD Service
>Un-install shield. (Fig-23)
Figure 5
The driver is un-installed successfully.
1-2
LCD Panel User’s Guide
1.5.
LCD Panel Setting Instruction
The Up arrow button for menu selection and increase the digit
number or character located at the cursor position.
The Down arrow button for menu selection and decreases the digit
number or character located at the cursor position.
The Right arrow button moves the cursor to the right.
The Left arrow button moves the cursor to the left.
The Enter accepts all the selection.
1.6.
LCD Display Information (Display Mode)
The LCD screen indicates the following information:
Host Name
System Date and Time
LAN 1 IP address
LAN 2 IP address
LAN 3 IP address (with optional LAN card)
LAN 4 IP address (with optional LAN card)
FAN 1, 2, 3, 4 speed
CPU temperature
Hard Disk space
Virtual Memory capacity
Physical Memory capacity
1.7.
Using the LCD Panel (Setting Mode)
Once the server is running, the LCD console serves several purposes. Trough the
LCD console, you can:
1-3
LCD Panel User’s Guide
Input Password
Configure the LAN 1 IP address, Netmask, Gateway, and DNS settings
Configure the LAN 2 IP address, Netmask, Gateway, and DNS settings
Configure the LAN 3 IP address, Netmask, Gateway, and DNS settings
(with optional LAN card)
Configure the LAN 4 IP address, Netmask, Gateway, and DNS settings
(with optional LAN card)
Welcome Message Setting
Display time setting (Default 2 sec)
Computer information menu: user can set the desired information whether to
be shown or not.
System time setting
Change Password
Reboot System
Power Down System
Return to the main menu
1.8.
Boot Sequence Selection
When the system is turned on, the LCD screen will display status information
about the boot process itself.
To make the Boot Sequence Selection:
Step 1. The LCD screen displays:
Boot from LAN?
Press <Enter>
Step 2. To boot form LAN, press the Enter button to select boot form LAN in
10 seconds.
Or, not press any button, the system will follow the default setting of boot
sequence from BIOS after 10 seconds.
1.9.
Password Entering and Resetting
When user enter LCD console setting mode, user is required to enter password.
Enter the default password “9999”.
1-4
LCD Panel User’s Guide
For security consideration, please change the password after entering the
setting mode first time.
Please well remember the changed password. If user forgets the changed
password, un-install LCD Panel driver and re-install the driver again.
1.9.1. Password Entering
Step 1. Press the Enter button, the LCD screen displays:
Input Password:
0****
Step 2. Use the ▲ button and the ▼ button to increase or decrease the digital
number.
Step 3. Use the ◄ button and the ►button to change cursor right or left. (The
default password is “9999”)
Step 4. Press the Enter button.
If user enters the incorrect password, the LCD screen will display the
message: “Password Error!” and returns to the display mode.
1.9.2. Password Setting
Step 1. Press the Enter button and go through process 1.9.1 Password Entering
Step 2. Use the ▲ button and the ▼ button to select “Change Password” and
then press the Enter button.
The LCD screen displays:
New Password:
0***
Step 3. Use the ▲ button and the ▼ button to increase or decrease the desired
digital number.
Step 4. Use the ◄ button and the ►button to change cursor right or left.
1-5
LCD Panel User’s Guide
The new password is restrict with exact 4 digital numbers
Step 5. Press the Enter button.
The LCD screen displays:
“ Save change?”
Step 6. Use the ▲ button and the ▼ button to select “Yes, Save!!” or
“No, cancel”
Step 7. By selecting “Yes, Save!!”
The LCD screen displays:
“Wait a moment!!” and return to setting mode. The password is changed
successfully.
Step 8. By selecting “No, Cancel!” the LCD screen will return to setting mode
directly and the password is not changed.
1.10. Return to the Main Menu
When entering the setting mode successfully, user can use the▲ and the
▼button to select “Return??” and press the Enter button to return the display
mode.
1.11. Configure LAN 1 (LAN 2) IP Address, Netmask, Gateway and
DNS
Step 1. Press the Enter button and go through process 1.9.1
Step 2. Use the ▲ button and the ▼ button to select “ LAN 1(LAN 2)
Setting? ” and press the Enter button.
The LCD screen displays: “Use DHCP?”
Step 3. Use the ▲ button and the ▼ button to select ‘Yes’ or ‘NO’
Step 4. By selecting ‘Yes’, Press the Enter button
1-6
LCD Panel User’s Guide
The screen then appears:
“Auto get DNS?”
Step 5. Select “Yes”. The screen appears “ Save change?”
Step 6. Use the ▲ button and the ▼ button to select “Yes, Save!!” or “No,
cancel”.
If user selects “Yes, Save!!” the LCD screen displays:
“Wait a moment!!” and return to setting mode.
If user selects “No, cancel”, the screen will prompt to the setting mode directly.
If user selects “NO” of “Auto get DNS?”
The screen appears:
“Input DNS”
Step 7. Input the desired DNS and save all the changes.
Step 8. By selecting ‘NO’ of “Use DHCP?”
The screen will appear:
“Input IP”
Step 9. Use the ▲ button and the ▼ button to increase or decrease the digital
number.
Step 10. Use the ◄ button and the ►button to change cursor right or left.
Step 11. Complete the setting, Press the Enter button.
Step 12. After IP address setting, repeat step 9 to step 11 for Netmask setting,
Gateway setting and DNS setting.
Step 13. Press the Enter button
The LCD screen displays:
“ Save change?”
Step 14. Use the ▲ button and the ▼ button to select “Yes, Save!!” or “No,
cancel”.
1-7
LCD Panel User’s Guide
If user selects “Yes, Save!!” the LCD screen displays:
“Wait a moment!!” and return to setting mode. The IP address and Netmask is
changed successfully.
If user selects “No, Cancel!” the LCD screen will return to setting mode directly
and all the required settings will not be changed.
1.12. Welcome Message Setting
Step 1. Press the Enter button and go through process 1.9.1
Step 2. Use the ▲ button and the ▼ button to select “ Welcome Message
Setting? ” and press the Enter button
Step 3. Use the ▲ button and the ▼ button to select character.
Step 4. Use the ◄ button and the ►button to change cursor right or left.
Step 5. Press the Enter button
The LCD screen displays:
“ Save change?”
Step 6. Use the ▲ button and the ▼ button to select “Yes, Save!!” or “No,
cancel”.
If user selects “Yes, Save!!”
The LCD screen displays:
“Wait a moment!!” and return to setting mode. The Welcome Message is
successfully changed.
If user selects “No, Cancel!” the LCD screen will return to setting mode directly
and all the required settings will not be changed.
1.13. Display Time Setting
Step 1. Press the Enter button and go through process 1.9.1
1-8
LCD Panel User’s Guide
Step 2. Use the ▲ button and the ▼ button to select “ Display Time Setting? ”
and press the Enter button
Step 3. Use the ▲ button and the ▼ button to increase or decrease the digital
number.
Step 4. Use the ◄ button and the ►button to change cursor right or left.
Step 5. Press the Enter button
The LCD screen displays:
“ Save change?”
Step 6. Use the ▲ button and the ▼ button to select “Yes, Save!!” or “No,
cancel”.
If user selects “Yes, Save!!”
The LCD screen displays:
“Wait a moment!!” and return to setting mode. The Display Time is
successfully changed.
If user selects “No, Cancel!” the LCD screen will return to setting mode directly
and all the required settings will not be changed.
1.14. Computer Information Menu Setting
The computer information menu setting is to a function for user to select which
system information that desired to be displayed on the LCD screen. It contains
information of Time, IP, Hardware Monitor, Disk Info and Memory Info.
To start up Computer Information Setting:
Step 1. Press the Enter button and go through process 1.9.1
Step 2. Use the ▲ button and the ▼ button to select “Computer Info Menu? ”
and press the Enter button
The LCD screen displays
Show this Info?
Time
*
Step 3. Press Enter to make selection.
1-9
LCD Panel User’s Guide
Step 4. If user wants to select the certain item, press the Enter button.
Then, the right hand side of the selected item on the screen will appear a “*”
mark.
Step 5. If user wants to cancel the certain item selection, press the Enter button
again and the “*” mark will be disappeared.
Step 6. Use the ▲ button and the ▼ button to select “OK and Return ” and
press the Enter button to return the display mode.
1.15. System Time Setting
Step 1. Press the Enter button and go through process 1.9.1
Step 2. Use the ▲ button and the ▼ button to select “System Time Setting ”
and press the Enter button
Step 3. Use the ▲ button and the ▼ button to increase or decrease the digital
number.
Step 4. Use the ◄ button and the ►button to change cursor right or left.
Step 5. Press the Enter button
The LCD screen displays:
“ Save change?”
Step 6. Use the ▲ button and the ▼ button to select “Yes, Save!!” or “No,
cancel”.
If user selects “Yes, Save!!”
The LCD screen displays:
“Wait a moment!!” and return to setting mode. The System Time is
successfully changed.
If user selects “No, Cancel!” the LCD screen will return to setting mode directly
and all the required settings will not be changed.
1-10
LCD Panel User’s Guide
1.16. Rebooting (System Rebooting)
Rebooting the server can sometimes cure problems with certain services and is
required to recover from RAID failure.
To reboot your server:
Step 1. Press the Enter button and go through process 1.9.1
Step 2. Use the ▲ button and the ▼ button to select “Reboot ” and press the
Enter button
Step 3. The LCD screen displays “Are you sure?”
Step 4. Use the ▲ button and the ▼ button to select ‘Yes!!’ or ‘No!’.
If user selects “Yes!!” the system will reboot automatically.
If user selected “No!” the LCD screen will return to display mode directly.
1.17. Powering Down
To prevent the potential loss of data, it is important to follow the proper
power-down procedures before turning off the server.
Step 1. Press the Enter button and go through process 1.9.1
Step 2. Use the ▲ button and the ▼ button to select “Power Off ” and press
the Enter button
Step 3. The LCD screen displays “Are you sure?”
Step 4. Use the ▲ button and the ▼ button to select ‘Yes!!’ or ‘No!’.
If user selects “Yes!!” the Server shuts down the services currently running and
powers down.
If user selects “No, Cancel!” the LCD screen will return to setting mode directly
and all the required settings will not be changed.
1-11
LCD Panel User’s Guide
1.18. Appearance of LCD Panel
LCD Panel Buttons and Indicators Description
HDD
LAN 1 Status
Fan Fail LED
LAN 2 Status
Status
Power On/Off
Button
Add LAN 3 / 4
LCD Panel
Status LED
Operating Buttons
1-12