1
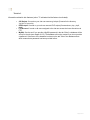
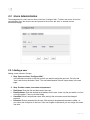
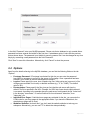
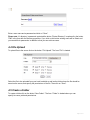
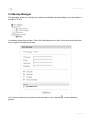
Web Panel User Guide
User Manual
Last modified: 28 May 2007
1
General
1.1 Login and Password
After you have received your user name and password and the URL of the web administration site from
your reseller. Please go to the URL of the web administration system ( https://www.domain.com:81 )
with your browser and enter your user name and password in the form "Login". Confirm by clicking on
"Login".
1.2 User Interface
The web administration interface consists of the following sections:
✔
✔
✔
Menubar: Situated on top consist of menus "Web−Manager", "Web−FTP", "Tools", "Help" and
"Logout".
Structure Tree: The structure tree is the storage system of the web administration system. Your
web sites are managed here. By clicking on "expand" all folders are opened. By clicking on
"collapse" the tree is closed.
Information Field for Customers: On the right panel contain the information about your site
such as features activated as well as control tabs that enables you to perform administration to
your website.
Page 1 of 19
Web Panel User Guide
1.3 Features
The following are the things that each user can perform using the web administration platform:
✔
✔
✔
✔
✔
View web's basic data and statistics (usage, website traffic)
Create and administrate users
Administrate MySQL database
Perform FTP transaction online using WebFTP
Protect website directories using WebFTP
In addition, each website have the following development feature:
✔ CGI-BIN
✔ Perl
✔ PHP (version 4.3.9, php safe mode)
✔ Frontpage extensions (up to 2002 is supported)
✔ MySQL
1.4 Saving Data
The web administration system offers you two possibilities to save data you enter into a form:
✔
"Save"−Button: Click onto the "Save"−button to save your entries. The information will be
submitted, and the structure tree as well as the start page will be reloaded in your browser.
✔
Change the tab: If a form consists of more than one tab you can simply change the tab to
save your data. The data of the old tab will be saved, and the new tab will be loaded,
whereas the structure tree will not be reloaded. This technique of saving data allows you to
process forms with more than one tab in one pass and is one of the main characteristics of
the web administration system.
1.5 Changing Password
You can edit your web administration password under "Tools" −> "Change Password".
Page 2 of 19
Web Panel User Guide
Please enter your current and your new password (2 times) into the form "Change Password" and click
on "Save".
1.6 Language Settings
You can set the language of your web administration system under “Tools” -> “Change Language”.
In the form “Change Language” select the language the system should use for you and click on “Save”.
1.7 Display of Passwords
Passwords that are entered in the system will not be displayed for security reasons after they were
saved. Thus, an empty password field in the form does not mean that no password was entered before.
Page 3 of 19
Web Panel User Guide
1.8 Help
There are several ways to request for help regarding your website. Through the support ticket system,
you can post your questions by creating a new ticket and submit it to our helpdesk to assist. Other forms
of help include reading the user manual, emailing or alternatively call our helpdesk directly for quicker
respond.
Page 4 of 19
Web Panel User Guide
2
Sites
All sites you manage with the web administration system appear in the structure tree. By clicking on the
title of a site you can see its details and edit some of its data.
2.1 Basis Data of a Site
The basis data – visible on the tab “Basis” can only be edited by the hosting company.
The basic data contains the following information:
Basic Data:
✔
✔
✔
✔
Server: Shows the name of the server which hosts your site.
Hostname: The hostname of your site (e.g. www)
Domain: The domain of your site (e.g. yourname.com )
IP Address: The IP address of your site.
Information about the limits:
✔
✔
✔
Space MB: Shows the amount of MB available for your site.
Max. User: The maximum number of users with email boxes that can be assigned to the
site.
Max. Domains: The maximum number of co−domains that can be assigned to the site.
To see the current usage of your site (webspace, number of users and domains) go to the section
Page 5 of 19
Web Panel User Guide
"Statistics".
Information related to site features (value "1" indicates that the feature is activated):
✗
✗
✗
✗
CGI Scripts: If turned on your site can execute cgi scripts (if located in the directory
"cgi−bin" of your site).
PHP Scripts: If turned on your site can execute PHP scripts (file extensions: .php, .php3,
php4).
FTP Access: If turned on all users assigned to the site can access their user directories via
FTP.
MySQL: If active and if you provide a MySQL password in the tab "Other" a database will be
set up for the site (see chapter III 2.5). The database will not be created if you do not provide
a password. If the name of the database is shown on the tab "Other" the database exists
which means that a password has been provided before.
Page 6 of 19
Web Panel User Guide
2.2 Users Administration
The management of a site's users is done via the form “Configure Web”. To add or edit a user click on the
corresponding site in the structure tree and proceed to click on the tab “User” to activate the user
administration page.
2.2.1 Adding a user
Adding a user is done in 5 steps:
1. Step: Open new form “Configure Web”
In the structure tree click on the site to which you want to assign the new user. Go to the tab
“User” and click on the button “New”. The user administration form will up as shown in the next
page.
2. Step: Provide a name, user-name and password
✔
✔
✔
✔
Real Name: Enter the first and last name of the user.
Email Address: Enter the desired email address for the user. Insert only the part which is in-front
of the @ symbol.( if none, just leave blank)
Username: Enter a unique user name. After saving it the user name cannot be changed
anymore.
Password: Enter a password for the user. After saving it the password becomes invisible, i.e.
you cannot see it anymore in the form. If the user forgets his password you can assign him a new
one here.
Page 7 of 19
Web Panel User Guide
3. Step: Limit storage space of the user
This is recommended if the overall webspace is low. In the field “WebSpace MB” enter the
amount in MBs you would want to assign to the new user. “-1” means “Unlimited”.
4. Step: Options for the user
The options available for each user can be selected anytime:
✔
Administrator Privileges: Check “Administrator” if the user should have administrator
privileges for the side. If FTP access has been activated for this site, only the
administrator has access to all directories of the site via FTP. A “normal” user has access
only to his home directory in the directory “user”.
5. Step: Save settings
Click on “Save” to save the new settings for the user. Alternatively, click on “Cancel” to abort the
creation process.
Page 8 of 19
Web Panel User Guide
2.3 MySQL Database
If you find the value “1” next to “MySQL” on the tab “Basis”, then a MySQL database is available for the
virtual site. If you want to use it, you should protect it with a password.
To create a new database, go to the tab “Options” and click on “New” button.
Page 9 of 19
Web Panel User Guide
In the field “Password” enter your MySQL password. Please note that a database is only created after a
password has been entered and saved for the first time. If a database exists, it looks like the previous
picture shown above. The password is not visible for security reasons. But it can be changed at any time
simply by overwriting a new password into the field “Password”.
Click “Save” to save this information. Alternatively, click “Cancel” to abort the process.
2.4 Options
Apart from the details referring to the MySQL database, you can find the following fields on the tab
“Options”:
✔
✔
✔
✔
✔
Frontpage Password: If Frontpage is activated for this site you can enter the password
here which is necessary to connect to the server via Frontpage. Once a password has been
entered it is not visible in the web administration interface.
Logsize: Please specify the max. size of Apache log files. Valid entries are in percent (of the
storage space available for the site) or absolute numbers (e.g. "5" for "5 MB"). The default
value is 30%.
DirectoryIndex: Please specify the files (one per line) that the web server will show by
default if no file is specified in the URL. Example: the URL http://www.domain.tld/documents/
is accessed. According to the example above the web server would search the file "index.html"
in the directory "documents"; if it cannot find that file it would search "index.htm", then
"index.php", etc.
Individual Error Pages: If individual error pages are activated for the site, you can enter the
HTML code for your error pages in the appropriate fields. If you leave the fields blank, the
standard error pages will be used.
Webalizer Statistics: Uncheck this if you don't want the website statistics to take up your
webspace. Alternatively, you can use FTP to delete the stats periodically.
Page 10 of 19
Web Panel User Guide
3. Usage Statistics
3.1 Site Usage Statistics
On the tab “Statistics” you can find statistics covering the following areas:
●
Storage Space and Usage: The storage space available for this site and the actual usage of this
storage space. If MySQL database has been created, DB::MySQL will show the disk usage of the
database.
●
Traffic: You can see the traffic of the current month (web, FTP) as well as the traffic of the last
four years (if available).
Page 11 of 19
Web Panel User Guide
3.2 Webalizer Statistics
Webalizer is a web server log analysis application. It is activated daily at 4am to generate web statistics
for the websites hosted in the web server. You can see them in the folder “stats” of the respective site.
e.g. http://www.domain.tld/stats/.
The statistics site is password protected. To login these are the following possibilities:
1. if no user has been created for the site, you can login with the user name “admin” and the
password “stats”.
2. If users have been created for the site, you can login with every valid user name/password
combination.
Please note: If you have created a new site, the Webalizer statistics are not yet available because
webalizer is executed only once a night. After 24 hours at the latest, the first statistics should have been
created.
Page 12 of 19
Web Panel User Guide
4. Web-FTP/Password Protection of Directories
(.htaccess/.htpasswd)
If you do not have an FTP client or do not like to use it, the web administration system offers you the
possibility to use FTP functionality via your browser:
The following functionality is offered by Web-FTP:
•
File Upload
•
Edit file permissions
•
Delete files
•
Create folders
•
Edit folder permissions
•
Delete folders
•
Password protection of directories (.htaccess/.htpasswd)
To use Web-FTP please select the respective site under “Web-FTP”:
After your selection, the file system of the corresponding site is shown in the structure tree below:
Below the menubar on top, you can find the three buttons “File Upload, “New Folder”, and “FTP Logout”:
Page 13 of 19
Web Panel User Guide
4.1 Show Directory Contents
To see the contents of a folder, click on the corresponding folder in the structure tree.
You will then be shown the contents of the directory.
4.2 File Properties
To edit file properties please click on the name of the file. You will then be shown the properties of
the file.
You can now rename the file, move it to another folder or change its permissions.
4.3 Directory Properties
To see the properties of the site's basic directories "web", "user", "log", "cgi−bin" and "ssl" click on
"/" in the structure tree.
If you click on a folder in the structure tree its subfolders will be shown.
The form "Folder" is loaded:
Page 14 of 19
Web Panel User Guide
To see the properties of a folder, please click on its name. A form such as below will be shown:
You can now edit the folder's properties.
4.3.1 Password Protection of Directories
You can protect a directory in a way that its contents is accessible in a browser only after a valid
user name/password combination has been entered. To do so, click on "Protect Directory" as shown in
the following exhibit.
Page 15 of 19
Web Panel User Guide
Enter a user name and a password and click on "Save".
Please note: If a directory is password−protected the button "Protect Directory" is replaced by the button
"Edit" in the form with the directory properties. If you click on this button existing users will be listed, and
you can edit their passwords. In addition to that you can add new users.
4.4 File Upload
To upload files to the server click on the button "File Upload". The form "File" is loaded.
Select the file to be uploaded from your local hard disk as well as the folder where the file should be
saved on the server, and specify the permissions of the file. Then click on "Save".
4.5 Create a Folder
To create a folder click on the button "New Folder". The form "Folder" is loaded where you can
specify its name, path and permissions.
Page 16 of 19
Web Panel User Guide
4.6 Delete Files and Folders
To delete a file or a folder please click on the "X" on the right side of its name.
Please note: a directory has to be empty before it can be deleted.
Page 17 of 19
Web Panel User Guide
5 Additional Software
The following additional software is available for the web administration system:
●
●
phpMyAdmin: A browser interface for the administration of your MySQL databases.
Backup Manager: A web-based backup application for your website.
5.1 phpMyAdmin
Further information about phpMyAdmin can be found in the website http://www.phpmyadmin.net/ .
The application can be accessed via the link under "Tools" or via the folder "phpmyadmin" which is
located in the web of the web administration system, thus https://www.domain.tld:81/phpmyadmin/ where
www.domain.tld has to be replaced appropriately. Note that the login username is the the database
username while password is as per assigned by the admin user.
Page 18 of 19
Web Panel User Guide
5.2 Backup Manager
The application allows you to backup your website and database by downloading to your workstation or
through a FTP site.
It is available under the menu-bar->Tools. Once the Backup icon is click, a form such as below will ask
for your options to backup which data:
yourwebsite.com
If you choose to backup your website to your workstation, click “Start Backup” to start the backup
process.
Page 19 of 19