1
PC DOS 7 Concise User's Guide
Document Number 25H6979
July 14, 1997
Note
Before using this information and the product it supports, be sure to read the general information under
Appendix A, “Notices” on page 55.
Second Edition (July 1997)
The following paragraph does not apply to the United Kingdom or any country where such provisions are inconsistent with
local law: INTERNATIONAL BUSINESS MACHINES CORPORATION PROVIDES THIS PUBLICATION “AS IS” WITHOUT
WARRANTY OF ANY KIND, EITHER EXPRESS OR IMPLIED, INCLUDING, BUT NOT LIMITED TO, THE IMPLIED WARRANTIES
OF MERCHANTABILITY OR FITNESS FOR A PARTICULAR PURPOSE. Some states do not allow disclaimer of express or implied
warranties in certain transactions, therefore, this statement may not apply to you.
This publication could include technical inaccuracies or typographical errors. Changes are periodically made to the information
herein; these changes will be incorporated in new editions of the publication. IBM may make improvements and/or changes in the
product(s) and/or the program(s) described in this publication at any time.
It is possible that this publication may contain reference to, or information about, IBM products (machines and programs),
programming, or services that are not announced in your country. Such references or information must not be construed to mean
that IBM intends to announce such IBM products, programming, or services in your country.
Requests for technical information about IBM products should be made to your IBM reseller or IBM marketing representative.
Copyright International Business Machines Corporation 1981, 1997. All rights reserved.
Note to U.S. Government Users — Documentation related to restricted rights — Use, duplication or disclosure is subject to
restrictions set forth in GSA ADP Schedule Contract with IBM Corp.
Contents
Part 1. Using the DOS Operating System
Chapter 1. Learning DOS Basics .
Understanding Files . . . . . . . . . .
Directories . . . . . . . . . . . . . . . .
Wildcards . . . . . . . . . . . . . . . .
Paths . . . . . . . . . . . . . . . . . . .
Frequently Used PC DOS Commands
. . . . . . . . . . . . . . . . . . . . . . . . . . . .
1
. . . . . . . . . . . . . . . . . . . . . . . . . . . . . . . . . . . . . .
3
3
4
4
5
6
. . . . . . . . . . . . . . . . . . . . . . . . . . . . . . . . . . . . . .
. . . . . . . . . . . . . . . . . . . . . . . . . . . . . . . . . . . . . .
. . . . . . . . . . . . . . . . . . . . . . . . . . . . . . . . . . . . . .
. . . . . . . . . . . . . . . . . . . . . . . . . . . . . . . . . . . . . .
. . . . . . . . . . . . . . . . . . . . . . . . . . . . . . . . . . . . .
Chapter 2. Using the Online Book Viewer
Starting the PC DOS Viewer . . . . . . . . .
Viewing the Initial PC DOS Viewer Screen .
Moving Around in the PC DOS Viewer . . .
Exiting from the PC DOS Viewer . . . . . . .
Getting Other Types of Online Help . . . . .
. . . . . . . . . . . . . . . . . . . . . . . . . . . . . . . . . .
. . . . . . . . . . . . . . . . . . . . . . . . . . . . . . . . . .
. . . . . . . . . . . . . . . . . . . . . . . . . . . . . . . . . .
. . . . . . . . . . . . . . . . . . . . . . . . . . . . . . . . . .
. . . . . . . . . . . . . . . . . . . . . . . . . . . . . . . . . .
. . . . . . . . . . . . . . . . . . . . . . . . . . . . . . . . . .
Chapter 3. Configuring Your System . . . . . . . . . . . .
Bypassing CONFIG.SYS and AUTOEXEC.BAT Commands
Specifying Startup Commands in Your CONFIG.SYS File .
Using Multiple Configurations . . . . . . . . . . . . . . . . . .
Specifying Startup Commands in Your AUTOEXEC.BAT File
. . . . . . . . . . . . . . . . . . . . . . . . .
. . . . . . . . . . . . . . . . . . . . . . . . .
. . . . . . . . . . . . . . . . . . . . . . . . .
. . . . . . . . . . . . . . . . . . . . . . . . .
Chapter 4. Working with the Text Editor
. . . . . . . . . .
What’s New about the E Editor for PC DOS 7 . . . . . . . .
Starting the E Editor . . . . . . . . . . . . . . . . . . . . . . . .
Creating or Modifying a File . . . . . . . . . . . . . . . . . . . .
Using Cursor Movement Keys to Move Around in the Text File
Using Key Combinations to Manipulate Text . . . . . . . . . .
Chapter 5. Using File Update . . . . . . . . . .
Installing File Update at the Base Location . . . .
Using File Update Menu Choices
. . . . . . . . .
Transferring Updated Files to the Remote Location
Troubleshooting . . . . . . . . . . . . . . . . . . . .
Chapter 6. Making More Memory Available
Determining Your System’s Memory Type . .
Understanding How RAMBoost Works
. . . .
Chapter 7. Troubleshooting
PC DOS Installation . . . . .
DOS Command Problems . .
File Update Utility . . . . . . .
. . . . . . . . . . . . . . . . . . . . . . . .
. . . . . . . . . . . . . . . . . . . . . . . .
. . . . . . . . . . . . . . . . . . . . . . . .
. . . . . . . . . . . . . . . . . . . . . . . .
. . . . . . . . . . . . . . . . . . . . . . .
. . . . . . . . . . . . . . . . . . . . . . . .
. . . . . . . . . . . . . . . . . . . . . . . . . . . . . . .
. . . . . . . . . . . . . . . . . . . . . . . . . . . . . . .
. . . . . . . . . . . . . . . . . . . . . . . . . . . . . . .
. . . . . . . . . . . . . . . . . . . . . . . . . . . . . .
. . . . . . . . . . . . . . . . . . . . . . . . . . . . . . .
. . . . . . . . . . . . . . . . . . . . . . . . . . . . . . . . .
. . . . . . . . . . . . . . . . . . . . . . . . . . . . . . . . .
. . . . . . . . . . . . . . . . . . . . . . . . . . . . . . . . .
. . . . . . . . . . . . . . . . . . . . . . . . . . . . . . . . . . . . . . . . . .
. . . . . . . . . . . . . . . . . . . . . . . . . . . . . . . . . . . . . . . . . . .
. . . . . . . . . . . . . . . . . . . . . . . . . . . . . . . . . . . . . . . . . . .
. . . . . . . . . . . . . . . . . . . . . . . . . . . . . . . . . . . . . . . . . . .
Appendix A. Notices . . . . .
Trademarks and Service Marks
Index
. . . . . . . . . . . . . . . . . . . . . . . .
9
9
10
11
11
12
15
15
16
19
20
23
23
23
26
29
30
33
33
36
37
41
43
43
43
51
51
52
54
. . . . . . . . . . . . . . . . . . . . . . . . . . . . . . . . . . . . . . . . .
55
55
. . . . . . . . . . . . . . . . . . . . . . . . . . . . . . . . . . . . . . . . . . . . . . . . . . . . . . . . .
57
Copyright IBM Corp. 1981, 1997
. . . . . . . . . . . . . . . . . . . . . . . . . . . . . . . . . . . . . . . . . .
iii
iv
PC DOS 7 Concise User’s Guide (OEM Version)
Part 1. Using the DOS Operating System
Chapter 1. Learning DOS Basics
. . . . . . . . . . . . . . . . . . . . . . . . . . . . . . . . . . . . . . .
. . . . . . . . . . . . . . . . . . . . . . . . . . . . . . . . . .
9
. . . . . . . . . . . . . . . . . . . . . . . . . . . . . . . . . . . . .
15
Chapter 2. Using the Online Book Viewer
Chapter 3. Configuring Your System
Chapter 4. Working with the Text Editor
Chapter 5. Using File Update
. . . . . . . . . . . . . . . . . . . . . . . . . . . . . . . . . .
23
. . . . . . . . . . . . . . . . . . . . . . . . . . . . . . . . . . . . . . . . .
33
Chapter 6. Making More Memory Available
Chapter 7. Troubleshooting
Copyright IBM Corp. 1981, 1997
3
. . . . . . . . . . . . . . . . . . . . . . . . . . . . . . . . .
43
. . . . . . . . . . . . . . . . . . . . . . . . . . . . . . . . . . . . . . . . . .
51
1
2
PC DOS 7 Concise User’s Guide (OEM Version)
Chapter 1. Learning DOS Basics
This chapter discusses a few of the basic concepts and terminology you need to know to use PC DOS
and some of the more common PC DOS commands:
Files, file names, and extensions
Directories, current directories, subdirectories, and directory trees
Wildcards
Paths, full and relative
Frequently used PC DOS commands
Understanding Files
The information your computer uses is stored in files. The instructions used to run an application are
stored in program files, and the information you create by using an application is stored in data files.
As you work with an application, DOS processes the information stored in program files and passes it
along to your system when it is needed. When you are finished using the application, you can save your
data files on a hard disk (also referred to as fixed disk) or on a diskette.
Every file has a name. Most files also have an extension. The file’s name always appears first, and the
extension is separated from the name by a period as in the following example:
readme.txt
In this guide, a file’s name and extension are jointly referred to as the file name.
File Names
The name you assign to a file must meet the following criteria:
It can contain no more than eight characters.
It can consist of the letters A through Z, the numbers 0 through 9, and the following special
characters:
_
$
!
%
@
’
underscore
dollar sign
exclamation point
percent sign
hyphen
at sign
apostrophe
^
˜
#
&
{}
'
()
caret
tilde
number sign
ampersand
braces
single quote
parentheses
Note: No other special characters are acceptable.
The name cannot contain spaces, commas, backslashes, or periods (except the period that separates
the name from the extension).
The name cannot be one of the following reserved file names: CLOCK$, CON, AUX, COM1, COM2,
COM3, COM4, LPT1, LPT2, LPT3, LPT4, NUL, and PRN.
It cannot be the same name as another file within the directory.
File names are not case sensitive, so you can type the file name in either uppercase, lowercase, or mixed
case characters.
Copyright IBM Corp. 1981, 1997
3
Extensions
Extensions can help you identify the type of information in a file. For example, if you have a file called
MINUTES.TXT, the extension .TXT usually identifies that it is a text file. The extension must contain no
more than three characters. File-name restrictions regarding characters and spacing also apply to
extensions.
The following are some of the extensions used by DOS:
.EXE (executable) or .COM (command) for files that contain programs.
.BAT (batch or REXX) for files containing lists of commands that DOS carries out consecutively.
.INI (initialization) for files containing startup commands for an application.
Directories
To help you keep track of your files, you can group your files into directories. Just as file folders in a file
cabinet contain groups of related documents, directories can contain groups of related files. Each
directory can be assigned a unique name so that you can identify it.
Sometimes you might want to further divide a directory to be more specific, or else your directory might
contain so many files that it is too confusing to find the one you want. When this happens, you can use
DOS to create additional directories. The directory contained within another directory is called a
subdirectory. This is similar to placing a file folder within a larger file folder. A directory that contains
another directory is called the parent directory.
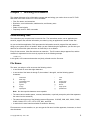
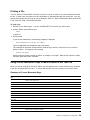
Directory Tree
The organization of directories and files is called the directory tree. When you format a hard disk, DOS
creates one directory called the root directory. The root directory is the very top-most directory. All other
directories you create on the hard disk branch out from the root directory. This is illustrated by the
following:
Current Drive
C:\
OFFICE
Current Directory
LETTERS
MEETING
AGENDA.DOC
NOTES
Destination Directory
Wildcards
If you want to perform a task for a group of files whose names have something in common, you do not
have to use the same command repeatedly for each file name in the group. A substitute for a name or
extension is known as a wildcard. You can use wildcards to specify groups of files.
There are two DOS wildcards:
The asterisk (*) represents a whole word or a group of characters.
4
PC DOS 7 Concise User’s Guide (OEM Version)
The question mark (?) represents a single character.
The following table shows various wildcard combinations.
Wildcard
What it represents
Examples
*.TXT
All files with a .TXT extension
JULY93.TXT, RECIPE.TXT
REPORT.*
All files named REPORT with any extension
REPORT.TXT, REPORT.WRI
M*.*
All files beginning with the letter M, regardless of extension
MEMO.TXT, MARCH.XLS
???.*
All files having names containing three letters or less, with any
or no extension
SUN.BMP, WIN.INI, AUG
Note: When you use an asterisk in the file name or the extension, DOS ignores the letters that come
after the asterisk. For example, if you use the wildcard
\M.EXE
it is the same as if you typed
\.EXE
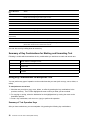
Paths
When you give the full path name for a file, you are stating a series of directory names that DOS follows
before any actions are performed on that file. Each directory name is separated by a backslash (\).
Every file has its own separate path. If you have two files with the same file name but in different
directories, DOS considers these to be two completely different files because it considers the path and the
file name to be the full file specification.
For example, C:\NOTES\AGENDA.DOC and C:\MEETING\AGENDA.DOC can have files with the same file
name, but the file contents can be different because their file specification is different.
The following illustration shows the components that make up a path statement. The path statement is
limited to 127 characters.
Drive
Directory
Subdirectory
File
C: \OFFICE\MEETING\AGENDA.DOC
Root
Directory
Separators
You can specify a PATH command-line statement in your AUTOEXEC.BAT file. The PATH command
indicates which directories DOS is to search for executable files. whenever you start your computer.
When you designate more than one directory, you must separate them with a semi-colon (;) such as in the
following example:
path c:\dos\system;c:\utils;
Chapter 1. Learning DOS Basics
5
Frequently Used PC DOS Commands
The following list lists PC DOS commands that are used most frequently. A brief discussion accompanies
each command. Everything you can use the command for is not covered. For a complete list of all the
commands supported by PC DOS 7 and an in-depth discription of each command, refer to the online
PC DOS 7 Command Reference.
ATTRIB
Use to view or assign the following file attirbutes:
a = archive
r = read-only
h = hidden
s = system
To see a file’s attributes, type the ATTRIB command followed by the file name. For
example, you would type the following to see the attributes associated with the CONFIG.SYS
file on a disk in drive A:
attrib a:\config.sys
CD (Change Directory)
Use to change to a different directory. To use the CD command, type:
cd
followed by the directory to which you want to change.
If you want to change from the current directory to a subdirectory, a directory contained
within the current directory, type the name of the subdirectory. For example, the following
command changes the current directory to the MYDOCS directory within the current
directory:
cd mydocs
CHKDSK (Check Disk)
Use to display the storage capacity of a formatted disk or diskette. You can also use the
CHKDSK command to recover lost allocation units that are taking up space on your hard
disk. An allocation unit is the smallest piece of a hard disk that can be allocated to a file.
Make sure you quit all programs before using the CHKDSK command.
To follow the recommended procedure for using the CHKDSK command:
1. Quit all programs—including memory-resident programs.
2. Change to the hard disk you want to clean up.
For example, you would type d: if you want to clean up the files on drive D.
3. At the DOS command prompt, type:
chkdsk /f
The /f switch finds and recovers any lost allocation units.
4. If there are any lost allocation units, you are prompted to convert them to files.
5. Use the TYPE command to view the contents of the files.
6. Delete any .CHK files you do not want.
COPY
Use to copy:
A file from one directory or diskette to another
A group of files by using DOS wildcards
6
PC DOS 7 Concise User’s Guide (OEM Version)
Suppose drive C is the current drive. If you want to copy the AGENDA.DOC file from the
\MEETING directory on a hard disk in drive C to the root directory on a diskette in drive A,
you would type the following command:
copy \meeting\agenda.doc a:\agenda.doc
DELETE
Use to delete a single file, a group of files, or all files in a directory on a hard disk or diskette.
When you delete files, you might not be able to recover them. Ensure that the files you
specify for deletion are the ones you want to remove.
If you accidentally delete files you want to keep, use the UNDELETE command as soon as
possible to recover them.
You delete a single file by typing the DEL command, followed by the location and name of
the file you want to delete. For example, to delete a file named SALES.LST from a directory
on drive C, you would type the following command:
del c:\sales.lst
DIR
Use to view the contents of a directory. The DIR command stands for directory and lists the
contents of the directory you specify.
For example, if C:\ is your current directory, type the following command to view its
contents:
dir
E
Use to invoke the PC DOS 7 E Editor. You can use the E Editor to create a new text file or
modify an existing file. You must always type the full path of the file.
A quick way to edit your CONFIG.SYS, AUTOEXEC.BAT, or STACKER.INI file is to use one
of the following commands:
e /a
Opens the AUTOEXEC.BAT file for editing.
e /c
Opens the CONFIG.SYS file for editing.
e /i
Opens the STACKER.INI file for editing.
FC (File Compare)
Use to get an approximate comparison of two files by looking at file size and time of creation.
For example, you have two text files that have the same file name; they exist on two different
diskettes. To see if they are the same and where they differ, you can use the FC command.
FIND
Use to search one or more files for the text you specify. DOS displays every line containing
that text.
You can use wildcards to search all subdirectories for a set of files. Add the /s switch to
specify this type of search. The following example searches all .TXT files and the
ADDR.LST file in all subdirectories:
find "Area Code: 2ð6" \.txt addr.lst /s
FORMAT
Use to format a diskette or hard disk. For example, type the following command to format a
diskette in drive A:
format a:
You must specify the drive that contains the diskette you want to format.
HELP
Use this command along with a specified designator to view the detailed help contained in
the online PC DOS 7 books. The designators you can use are:
help doscommand Opens the online PC DOS 7 Command Reference to the PC DOS
command specified by doscommand.
Chapter 1. Learning DOS Basics
7
help letter
Opens the online PC DOS 7 Error Messages to the PC DOS error
messages that begin the with letter specified.
help rexxcommand
Opens the online PC DOS 7 REXX Reference to the REXX command
specified by rexxcommand.
MD (Make Directory)
Use to create a new directory. The new directory cannot have the same name as any other
file or directory contained in that directory.
To create a directory called OFFICE, you would type the following command:
md office
MORE
Use to display the contents of a file or the output of a command one screen at a time. For
example, the following MORE command displays the contents of the LIST.TXT file one
screen at a time:
more < list.txt
MOVE
Use to move files. For example, the following command moves the file AGENDA.DOC from
the current drive to a diskette in drive A.
move agenda.doc a:
If the destination you specify already has a file or files with the same name, you are
prompted by the system.
PATH
Specifies the directories in which DOS searches for executable files (files with a .COM, .EXE,
or .BAT file name extension).
PROMPT
Use to set the appearance of your DOS command prompt. The default is $p$g which
produces C:&bls.>
RD (Remove Directory)
Use to delete only the directory. For example, to delete the \MEETING\NOTES directory,
type the following command:
rd \meeting\notes
DOS removes the NOTES subdirectory from the \MEETING directory on the current drive.
The directory you delete cannot contain any files or other directories. If the directory you
want to delete contains files or other directories, you must delete them first.
REN (Rename)
Use to change the name of a file without changing its location.
For example, the following command changes a file named SALES.LST to SALES.OLD:
ren a:\sales.lst sales.old
XCOPY
Use to copy a directory and its subdirectories. The XCOPY command works with a single
directory or a group of directories. You can create new files in the destination directory as
well as new subdirectories with this command. For example, the following command copies
all files in the C:\NEW\REPORTS\FINANCE directory to the \FINANCE directory on a
diskette in drive A:
xcopy c:\new\reports\finance a:\finance
If you do not make a directory before you use the XCOPY command, one will be created for
you by the XCOPY command.
8
PC DOS 7 Concise User’s Guide (OEM Version)
Chapter 2. Using the Online Book Viewer
The PC DOS Viewer is the documentation viewer for PC DOS 7 that allows you to read online books.
PC DOS 7 comes with three books online:
Name of
Online Book
Windows
Icon
Contains...
CMDREF
The online PC DOS Command Reference, which provides information about
command syntax, PC DOS commands, device drivers, and .INI files.
DOSREXX
A description of the DOS REXX commands.
DOSERROR
An explanation of the more common error messages for DOS and the
optional tools provided with PC DOS.
Note: You must have selected at least one optional tool for Windows in order to have the PC DOS 7.0
Tools group and the online book icons available when you start Windows.
Starting the PC DOS Viewer
The PC DOS Viewer can be started from:
The DOS command prompt
PC DOS Shell
Microsoft Windows
Starting the PC DOS Viewer from the DOS Command Prompt: All online books for PC DOS 7 have a
file extension of .INF and are in the same directory as your other PC DOS 7 files. To start the PC DOS
Viewer and view any online DOS book with an extension of .INF, at the DOS command prompt type:
view bookname
where bookname is the name of the online book—either CMDREF, DOSREXX, or DOSERROR. For
example, you would type view cmdref to view the online Command Reference. The online book also
opens when you include the .INF extension (for example, view cmdref.inf).
Starting the PC DOS Viewer from PC DOS Shell: Before you can start the PC DOS Viewer from the
PC DOS Shell, you must:
Add the program item to the Main group.
Give the program a title, such as “Command Reference,” “Error Messages”, or “REXX Information.”
Specify the command that starts the program, such as view cmdref.inf to start the online PC DOS 7
Command Reference.
Starting the PC DOS Viewer from Windows: To start the PC DOS Viewer while using Windows, use
mouse button 1 and double-click on the icon for the book you want to view. The PC DOS Viewer starts,
and the online book you selected is opened.
The icons for the PC DOS online books are located in the PC DOS 7 Tools group.
Copyright IBM Corp. 1981, 1997
9
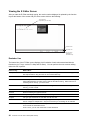
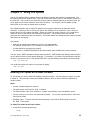
Viewing the Initial PC DOS Viewer Screen
Whenever you type the VIEW command followed by the name of an online book, you will see a screen
similar to this:
Menu Bar
Click on to expand the Table of Contents
Push Buttons
Click on to close expansion
Table of Contents Window
Menu bar for task selection such as: copying and appending to a file, expanding and collapsing the
information tree, searching, printing, accessing online help information about the PC DOS Viewer, and
exiting the PC DOS Viewer.
Select any one of the options on the menu bar by clicking on it with a mouse or, if you are using the
keyboard, highlight the option by using ALT in combination with the highlighted letter of the option,
such as the letter “O” in Options.
Window displaying the contents of each book.
If a topic has subtopics, you will see a plus sign (+) in front of the topic. If you click on the plus sign,
the subtopics are expanded and visible. Also, the plus sign is replaced by a minus sign (-). If you
click on the minus sign, the list of topics will return to its collapsed format.
Push buttons where you can select either the searching, printing, or viewing the index tasks. These
are located at the bottom of the PC DOS Viewer screen.
10
PC DOS 7 Concise User’s Guide (OEM Version)
Click on Previous
Or press ALT+E
To go back to the previous topic you were viewing before you clicked on the
hypertext link. This button is grayed when you have not linked to or opened
another topic.
Click on Search
Or press ALT+S
Search for information by typing a word that indicates the subject you want to find.
Click on Print
Or press ALT+P
Print the topics you have opened and active.
Click on Index
Or press ALT+I
Access the index for the online book quickly.
Click on Contents
Or press ALT+T
Jump to the Table of Contents and make the window active.
Click on Forward
Or press ALT+F
Go to the next topic. You can use this button to page through the online book,
much like when you read through a hardcopy book.
Moving Around in the PC DOS Viewer
There are several ways to move around quickly within the PC DOS Viewer and within the online book:
Click on any of the push buttons at the bottom of the main PC DOS Viewer screen.
Use the combination keys, CTRL+letter, specified for menu selections:
From the active (selected) Table of Contents window or from an active topic window, you can, for
example, press both CTRL+I keys at the same time to access the Index.
Use the combination keys, ALT+letter, specified for pushbuttons and menu options:
At any time, you can, for example, press both ALT+I keys at the same time to access the Index
pushbutton. Or, you can press both ALT+V keys at the same time to access the Services menu
option.
For more information about the other keys and key combinations you can use, click on Help from the
menu bar, and then select Keys help. Click on Key assignments to see a list of the keys and key
combinations.
Use the hypertext links to jump from subject to subject. Many help screens have an “Examples”
hypertext link that, when you double-click on it, opens a window showing examples of how to use the
command.
Use the table of contents to scan the list of topics and then move to that item by selecting it. Either
double-click on the table of contents topic or use the DOWN ARROW or UP ARROW to highlight the
topic and then press ENTER.
Exiting from the PC DOS Viewer
To exit from the PC DOS Viewer and return to the DOS command prompt:
If you are using a mouse, click on Services and then click on Exit.
If you are using a keyboard:
Press F3.
Or, press ALT+V and then type x
Chapter 2. Using the Online Book Viewer
11
Getting Other Types of Online Help
There are various ways to get online help in addition to using the PC DOS Viewer, including the following:
HELP command
/? switch
F1 function key
Help option from the menu bar
Using the HELP Command
Accessing help using the HELP command varies, depending on which of the three online books the
information is found in. Use one of the following to find the type of help information you need.
To see information about a specific DOS command:
1. At the DOS command prompt, type:
help doscommand
where doscommand is the name of the PC DOS command.
2. Press ENTER.
For example, if you want help about the DEFRAG command, type help defrag
To exit the viewer, press F3.
To see information about a specific DOS error message:
1. At the DOS command prompt, type:
help letter
where letter is the first letter of the error message.
2. Press ENTER
For example, type help a to find the error message “Access denied”. You might need to use the scroll
bars on the right side of the window to scroll to the message you want to read.
If the name of the DOS command and the letter that the error messages begins with are the same (for
example, the E command and error messages that begin with the letter “e”), add error preceding the error
message letter:
help error letter
To exit the viewer, press F3.
To look at command examples:
The online help used with the PC DOS Viewer might show the highlighted word “Examples” highlighted in
the top center portion of the help screen. This is called a hypertext link.
If you move the mouse cursor to this word and double-click on it, a small window will pop up showing one
or more examples of how to use this command. If you are not using a mouse, tab to a highlighted word
then press ENTER.
To exit the viewer, press F3.
12
PC DOS 7 Concise User’s Guide (OEM Version)
Using the /? Switch
Each command has a /? switch that allows you to view the syntax and other optional switches. The online
help information displayed is more concise than the information you see when you use the PC DOS
Viewer.
To view the syntax of a command:
1. At the DOS command prompt, type:
command /?
where command is the specific DOS or REXX command you need syntax information for.
2. Press ENTER.
For example, you might type qconfig /? to view the syntax of the QCONFIG command and the switches
and parameters that can be used with this command.
If you type view /? you will see what to type to use the PC DOS Viewer and open the online books.
Using F1 or the Help Option
Certain applications and most PC DOS optional tools, including the PC DOS Viewer, have their own help
information so you may not need to use the PC DOS Viewer.
To access this help information, you must first access the application or the optional tool by either:
Typing the command name at the DOS command prompt to start them (for example, typing cpbackup
to start Central Point Backup).
Or, if you are using a shell program, such as the PC DOS Shell or Windows, double-clicking on the
icon for the optional tool or application you need help for.
Whether you type the command or click on an icon, you can then access help by pressing F1, clicking on
Help at the bottom of the screen or by selecting Help from the menu. Note that not all applications or
tools have a menu bar.
While in the PC DOS Viewer, F1 provides help about menus, fields, push buttons, and menu bar options.
Place your cursor within the field or menu area or highlight the menu option or push button for which you
need information before pressing F1. When you press F1, you see detailed help about the specific item
where the cursor is placed or that you have highlighted.
Getting Help while Using the PC DOS Viewer
On the menu bar is the Help option. You can select Help from the menu bar by clicking on it with the
mouse or by pressing ALT+H.
From the Help option of the PC DOS Viewer, you can get the following types of help:
Help Index
An index of references to help topics for the document you are viewing.
General Help
General information about the Help facility, including descriptions for other items
on the menu bar and the other types of help available.
Using Help
Information about how to use the Help facility.
Keys Help
A list and description of keys you can use while working with or moving around
in the Help facility.
Chapter 2. Using the Online Book Viewer
13
Product Information
14
Information specific to the product you are viewing.
PC DOS 7 Concise User’s Guide (OEM Version)
Chapter 3. Configuring Your System
Configuring your computer is setting it up so that DOS, your hardware, and your applications work the way
you want them or the way they were intended to be used. This can be as simple as customizing the
appearance of the DOS command prompt or as complex as setting up a new hardware component. Most
of DOS’s configuration information is stored in two files:
The CONFIG.SYS file is a text file that contains special commands. These commands set up your
computer’s hardware components and load the device drivers (such as memory, keyboard, mouse,
and printer) so that DOS and applications can use them. When DOS starts, it processes the
commands in the CONFIG.SYS file.
The AUTOEXEC.BAT file is a special batch file that DOS runs immediately after carrying out the
commands in your CONFIG.SYS file. AUTOEXEC.BAT can contain any commands you want to carry
out when you start your system. For example, this file can contain commands that define the port to
which your printer is connected, clear your screen of startup messages, or start your favorite program.
These files must be located in the root directory of your hard disk (usually drive C) for system startup to
carry out the commands in these configuration files.
Normally, DOS carries out the commands in both the CONFIG.SYS and AUTOEXEC.BAT files each time
you start your computer. However, if you need to, you can instruct DOS to bypass the commands in
these files. For more information, see “Bypassing CONFIG.SYS and AUTOEXEC.BAT Commands.”
When DOS was installed, a basic system configuration was installed that works for most people. You
might want or need to change your system configuration.
The settings in your CONFIG.SYS file control the basic components of your system, such as memory and
disk drives. If you change your CONFIG.SYS file and the new settings are incorrect, your system might
not be able to start correctly. If this happens, restart your computer using your bootable startup diskette
(the Setup Diskette from your installation diskettes), and then exit from Setup by pressing F3. Or, you can
use the procedure to bypass CONFIG.SYS and AUTOEXEC.BAT commands.
Bypassing CONFIG.SYS and AUTOEXEC.BAT Commands
If you need to, you can start your system without running the commands in your CONFIG.SYS and
AUTOEXEC.BAT files. This is most useful when you are experiencing system problems that might be
related to the settings in your CONFIG.SYS or AUTOEXEC.BAT file. You have two choices:
You can bypass your startup files completely.
You can have DOS confirm each CONFIG.SYS command and each AUTOEXEC.BAT command.
Bypassing Your Startup Files
If you are having system problems that might be related to the commands in your CONFIG.SYS or
AUTOEXEC.BAT files, you can temporarily bypass those files to start your computer.
To bypass the CONFIG.SYS and AUTOEXEC.BAT files:
1. Start your computer.
2. Press F5 immediately after your computer displays the message Starting PC DOS...
Copyright IBM Corp. 1981, 1997
15
Any device that requires an installable device driver does not work when the installable device drivers are
not loaded. For example, programs that require expanded or extended memory are not able to run
because no expanded-memory or extended-memory drivers are loaded.
DOS uses the default environment variables of PATH=C:\DOS, PROMPT=$P$G, and
COMSPEC=C:\COMMAND.COM temporarily until you correct the problem and restart your computer.
Confirming Each CONFIG.SYS and AUTOEXEC.BAT Statement
You can bypass individually selected CONFIG.SYS and AUTOEXEC.BAT statements when you initialize
your system.
To bypass command-line statements:
1. Start your computer. Just after your computer starts, DOS displays the message Starting PC DOS...
2. Immediately press and release F8.
One at a time, PC DOS displays each command in your CONFIG.SYS file, followed by a prompt. For
example, if the DOS=HIGH command-line statement is in your CONFIG.SYS file, the following prompt
will be displayed:
DOS=HIGH
[Y,N,ESC]?
3. Respond by typing Y for Yes or N for No to load each command in your CONFIG.SYS file.
If you press ESC before all lines of the CONFIG.SYS file are displayed, your system processes the
rest of the lines in your CONFIG.SYS and AUTOEXEC.BAT files. If you press F5 at the [Y,N,ESC]?
prompt, the remaining command-line statements in the file are skipped and you are then returned to
the DOS command prompt.
When PC DOS finishes processing the CONFIG.SYS file, it displays the following prompt:
Process AUTOEXEC.BAT [Y,N]?
4. Answer Y for Yes or N for No to confirm each statement in your AUTOEXEC.BAT file.
As each line of your AUTOEXEC.BAT file is shown, you are given the same choice as you had going
through each line of your CONFIG.SYS.
Specifying Startup Commands in Your CONFIG.SYS File
When your computer starts, DOS carries out commands that configure hardware and reserve space in
memory for information processing. The file that contains these commands is called CONFIG.SYS.
PC DOS Setup creates a CONFIG.SYS file and stores it in the root directory of your startup hard disk.
The commands within this file control devices like your printer, your mouse, the display, various types of
memory, and so forth. You can add and change CONFIG.SYS commands to configure your system as
needed.
For a list of the CONFIG.SYS commands supported by PC DOS and an explanation of how to use them,
see the online PC DOS 7 Command Reference.
16
PC DOS 7 Concise User’s Guide (OEM Version)
CONFIG.SYS File Editing
To edit the CONFIG.SYS file, use a text editor, such as E Editor, that can save files as unformatted
(ASCII) text. Do not edit the CONFIG.SYS file using a word processor that saves files in a special
document format. If you do, your computer might not start.
Because the CONFIG.SYS file controls how DOS starts, DOS reads it only when you start your computer.
Therefore, after changing the CONFIG.SYS file, you must restart your computer for your changes to take
effect.
To make changes to your CONFIG.SYS file:
1. Make a copy of your CONFIG.SYS file on a separate diskette before you make any changes.
2. Edit the CONFIG.SYS file using a text editor, such as the E Editor provided with PC DOS.
3. Add or change CONFIG.SYS commands, as necessary. Each CONFIG.SYS command must begin on
a separate line.
4. When you have finished editing the CONFIG.SYS file, save your changes and exit from the text editor.
5. Restart your system by pressing CTRL+ALT+DEL so that your changes can take effect.
Hardware Devices Configuration
Each hardware component of your computer is called a device. Your computer’s keyboard, mouse,
display, printer, disk drives, and memory boards are all devices. Each device has its own characteristics
that can be customized.
DOS uses a special program called a device driver to control each device. For example, DOS uses a
built-in device driver to control how information is read to and from a diskette drive. DOS has built-in
device drivers for your keyboard, display, hard drives and diskette drives, and communication ports.
Because these device drivers are built in, you do not have to do anything special to use them. You can
customize certain features of these devices by using CONFIG.SYS commands. For a list of these
commands, see the online PC DOS 7 Command Reference.
Other devices, such as memory boards, a mouse, or CD-ROM have device drivers that are not built into
DOS. Such a device driver is called an installable device driver because you install it by adding a
command to your CONFIG.SYS file. Many hardware devices come with their own device drivers. For
example, DOS comes with a device driver called HIMEM.SYS. Several other installable device drivers are
included with DOS.
To use your CD-ROM and access it through PC DOS (using MSCDEX.EXE):
The CD-ROM device driver must be loaded by the CONFIG.SYS file. The device driver for your CD-ROM
does not come with PC DOS. For more information about MSCDEX**, see “Specifying Startup Commands
in Your AUTOEXEC.BAT File” on page 20.
To use an installable device driver:
Add a DEVICE command for that driver to your CONFIG.SYS file. When DOS starts, it loads the device
driver into memory. For example, to load the HIMEM.SYS device driver from the C:\DOS directory, you
would add a command similar to the following to your CONFIG.SYS file:
device=c:\dos\himem.sys
**
MSCDEX is a trademark of the Microsoft Corporation.
Chapter 3. Configuring Your System
17
When DOS reads this command, it loads the HIMEM.SYS device driver into memory. The HIMEM.SYS
device driver remains in memory and manages extended memory.
Many hardware devices come with installation programs that automatically add the necessary commands
to your CONFIG.SYS file.
The order in which DEVICE and DEVICEHIGH commands appear in the CONFIG.SYS file is important
because some device drivers enable devices that are then used by other drivers. For example, the
HIMEM.SYS extended-memory driver must be started before any drivers that use extended memory.
The order in which device drivers should appear in your CONFIG.SYS file is as follows:
1. HIMEM.SYS if your system has extended memory.
2. Your expanded-memory manager if your system has an expanded-memory board.
3. EMM386.EXE if your system is an 80386 or higher processor with extended memory. If your
CONFIG.SYS file includes both an expanded-memory manager and EMM386, the EMM386 command
line should include the noems switch.
EMM386 uses extended memory to simulate expanded memory on systems that do not have
expanded memory. EMM386 can also provide access to the upper memory area. For more
information, see Chapter 6, “Making More Memory Available” on page 43.
4. Any other device drivers.
This list is intended to show only the correct order for device drivers. It is not intended to be a list of the
commands that your CONFIG.SYS file should contain. The contents of your system’s CONFIG.SYS file
depends on the type of system, the amount or type of memory, the hardware configuration, and the
applications you use.
CONFIG.SYS File Examples
The following is a typical CONFIG.SYS file for an 80386 computer with 2MB or more of extended memory:
device=c:\dos\himem.sys
dos=high,umb
device=c:\dos\emm386.exe ram
files=4ð
buffers=2ð
break=on
devicehigh=c:\dos\ansi.sys
In this example:
The BUFFERS command reserves 20 buffers for transferring information to-and-from disk drives.
The FILES command reserves enough room to have 40 files open at one time.
The BREAK command checks frequently for the CTRL+C or CTRL+BREAK key combinations.
The DOS=HIGH,UMB command runs DOS in the high memory area and specifies that programs
should have access to the upper memory area. For more information about the upper memory area,
see Chapter 6, “Making More Memory Available” on page 43.
The DEVICE commands load the HIMEM.SYS and EMM386.EXE device drivers. The HIMEM.SYS
driver manages extended memory. The EMM386.EXE driver, when used in a DEVICE statement with
the ram switch, provides access to the upper memory area and simulates expanded memory.
The DEVICEHIGH commands load device drivers into the upper memory area.
18
PC DOS 7 Concise User’s Guide (OEM Version)
Note: Windows and DOS contain several programs that have the same name. However, the PC DOS
programs have been updated after the release of Windows 3.1. If you install Windows after
installing DOS, check your CONFIG.SYS and AUTOEXEC.BAT files to make sure that you are
using the programs HIMEM.SYS, EMM386.EXE, and SMARTDRV.EXE from the DOS directory
and not from the Windows directory.
Using Multiple Configurations
A single CONFIG.SYS file can define several different system configurations. This can be useful if several
people share a single computer, or if you want to be able to start your computer with a choice of
configurations. Each step in defining how you would type multiple configuration commands in your
CONFIG.SYS file is mentioned. For a complete explanation refer to the PC DOS 7 User’s Guide.
Step 1: Defining a Startup Menu
To use multiple configurations, you must define a startup menu. To do this, create a configuration block
with the block heading [Menu]. A menu block can contain any of the following commands:
The
The
The
The
MENUITEM command
MENUDEFAULT command
MENUCOLOR command
SUBMENU command
See the PC DOS 7 Command Reference for an explanation of each of these commands. Refer to the
PC DOS 7 User’s Guide for a detailed discussion on using these commands in a multiple configuration.
When your computer starts, the startup menu appears and lists the available configurations; you choose
the configuration you want.
If you type this in your CONFIG.SYS file:
DOS produces this startup menu:
IBM DOS Startup Menu
=======================
[MENU]
menuitem=DLS, Load DOS LAN Services Client
1.
menuitem=INTLNK, Load InterLnk Client
2.
menuitem=CPSW, Load Code Page Switching
3.
menucolor=7,1
menudefault=DLS,2ð
Enter
..
.
Load DOS LAN Services Client
Load InterLnk Client
Load Code Page Switching
a choice: 1
Time remaining: 2ð
Step 2: Defining Configuration Blocks
A configuration block is a set of CONFIG.SYS commands that you want DOS to run when that particular
configuration is selected from the startup menu. A configuration block begins with a block header—the
block name surrounded by brackets. The block name must be a single word but can be as long as you
want. When DOS starts with a particular configuration, it carries out all the commands between that block
header and the next block header.
A configuration block can contain any command you would normally place in your CONFIG.SYS file. A
CONFIG.SYS file can define a [COMMON] block that includes commands common to all configurations.
DOS carries out the command in a [COMMON] block for every configuration. You can have as many
[COMMON] blocks as you want; DOS runs [COMMON] commands in the order in which they appear in
the CONFIG.SYS file.
Chapter 3. Configuring Your System
19
Step 3: Using INCLUDE statements for Multiple Configurations
The CONFIG.SYS file can also contain the INCLUDE command. You can include the contents of one
configuration block in another by using the INCLUDE command. The INCLUDE command instructs DOS
to carry out the commands in another configuration block as well as the commands in the current block.
This command specifies the name of the block you want to include; the command can be used only within
a configuration block.
It is a good idea to place a [COMMON] block at the end of your CONFIG.SYS file, even if it does not
contain any commands. Some applications append commands to your CONFIG.SYS file. If your
CONFIG.SYS file has a [COMMON] block at the end, an application can append commands to the
CONFIG.SYS, and DOS will carry out those commands for all your configurations.
Step 4: Modifying the AUTOEXEC.BAT File for Multiple Configurations
When using multiple configurations, it can be useful to have DOS run different AUTOEXEC.BAT
commands for each configuration. You can create branching code in the AUTOEXEC.BAT file by using
batch commands such as the IF and GOTO commands. With batch commands, you can have DOS carry
out different AUTOEXEC.BAT commands, depending on the startup configuration.
Specifying Startup Commands in Your AUTOEXEC.BAT File
Each time you start your system, DOS carries out the commands in your AUTOEXEC.BAT file. This file is
located in the root directory of your hard disk (usually drive C).
The .BAT file-name extension indicates that the file is a batch file—a series of commands that you specify
you want DOS to run. The commands in the AUTOEXEC.BAT file set the characteristics of your devices,
customize information that DOS displays, and start memory-resident programs and other applications. To
run AUTOEXEC.BAT without restarting your system, type autoexec at the DOS command prompt.
AUTOEXEC.BAT File Editing
You can customize your system by adding commands to your AUTOEXEC.BAT file. Use any commands
you would normally type at the DOS command prompt.
To edit the AUTOEXEC.BAT file, use a text editor, such as E Editor, that can save files as unformatted
(ASCII) text. Do not edit the AUTOEXEC.BAT file using a word processor that saves files in a special
document format. If you do, your computer might not start.
Because the AUTOEXEC.BAT file controls how DOS starts, DOS reads it only when you start your
computer. Therefore, after changing the AUTOEXEC.BAT file, you must restart your computer for your
changes to take effect.
To make changes to your AUTOEXEC.BAT file:
1. Make a copy of your AUTOEXEC.BAT file on a separate diskette before you make any changes.
2. Edit the AUTOEXEC.BAT file using a text editor, such as the E Editor provided with PC DOS.
For example, to edit your AUTOEXEC.BAT file using the E Editor, type e autoexec.bat at the DOS
command prompt.
3. Add or change AUTOEXEC.BAT commands, as necessary. Each AUTOEXEC.BAT command must
begin on a separate line.
4. When you have finished editing the AUTOEXEC.BAT file, save your changes and exit from the text
editor.
20
PC DOS 7 Concise User’s Guide (OEM Version)
5. Restart your system by pressing CTRL+ALT+DEL so that your changes can take effect.
Note: Before changing your original AUTOEXEC.BAT file, copy and save it as a different name, such as
AUTOEXEC.BAK, as a precaution.
If you have a CD-ROM, you might want to include the MSCDEX command in your AUTOEXEC.BAT file.
This command must include a /drive:drivename parameter that matches the /drive:drivename parameter
used in the CONFIG.SYS file for the CD-ROM device driver. Each CD-ROM device driver currently in use
must have a unique driver name.
The device driver that came with your CD-ROM must be loaded in the CONFIG.SYS file before you can
access it in PC DOS using the MSCDEX command.
For more information about this command, refer to the online PC DOS 7 Command Reference.
Terminate-and-Stay-Resident Programs
Another common use of the AUTOEXEC.BAT file is to start memory-resident programs—programs that
load into memory and stay there while you use other programs. These are also called
terminate-and-stay-resident (TSR) programs. DOS comes with several memory-resident programs that
are commonly started from the AUTOEXEC.BAT file, such as:
APPEND
CPSCHED
DATAMON SENTRY (or TRACKER)
KEYB
MOUSE
SMARTDRV
For more information about these programs, you can type help followed by the command name at the
DOS command prompt. This opens the online PC DOS 7 Command Reference at the command
specified.
For an abbreviated explanation and command syntax for each commands, you can type the command
name followed by the /? switch.
AUTOEXEC.BAT File Examples
The following example of an AUTOEXEC.BAT file contains the most commonly used AUTOEXEC.BAT
commands:
path=c:\;c:\dos;c:\utility;c:\batch
prompt $p$g
set temp=c:\temp
doskey
c:\smartdrv.exe
In this example:
The PATH command directs DOS to search for program files in the current directory and then in the
following directories: the root directory of drive C, C:\DOS, C:\UTILITY, and C:\BATCH. A semicolon
(;) separates each directory.
The PROMPT command sets the command prompt so that it shows the current drive and directory,
followed by a greater-than sign (>), which is the default prompt.
The SET command creates an environment variable named TEMP and sets it equal to the directory
C:\TEMP.
The name you specify must be the name of an existing directory. Many programs, including DOS
itself, use this variable when storing temporary files.
Chapter 3. Configuring Your System
21
The DOSKEY command loads the DOSKey program into memory. This program provides keyboard
shortcuts at the DOS command prompt. DOSKEY.COM is normally installed by the PC DOS Setup
program in the directory containing your DOS files.
The SMARTDRV command loads the SMARTDrive program into memory.
22
PC DOS 7 Concise User’s Guide (OEM Version)
Chapter 4. Working with the Text Editor
The E Editor is the text editor provided with PC DOS. A text editor allows you to create, edit, and print
memos, letters, and special files (such as AUTOEXEC.BAT or CONFIG.SYS) that customize DOS. For
prior users of the E Editor, you will find the E Editor provided with PC DOS 7 has many new
enhancements.
The E Editor that comes with PC DOS, is not intended to take the place of a word processing program.
While some word processing function may be noticed, the E Editor is not intended to be a substitute for
your word processing program.
What’s New about the E Editor for PC DOS 7
PC DOS 7 introduces many new features and enhancements to the E Editor. Some that will prove
beneficial are:
Menu selections for most of the tasks you perform with a text editor.
The ability to use a mouse to make selections and mark text.
Improved use for the F11 and F12 keys on an enhanced keyboard to switch between loaded files. If
you do not have an enhanced keyboard, you can use the key combinations of CTRL+P or CTRL+N.
The ability to browse a file in read-only mode so that you do not inadvertently change or delete it.
An editable E.INI file that allows you to customize most functions of the E Editor There is no need to
reboot after making changes to the E.INI file; exit the E Editor for changes to take effect.
Expanded math capabilities so that you can work with larger numbers, including binary numbers.
Starting the E Editor
You can start the E Editor by typing e (or e followed by the path and name of the file) at the DOS
command prompt.
When you load the E Editor, you have the option of using the E Editor command line for all your editing
tasks or using the menus to perform selected editing tasks. If you use the E Editor command line, you
need to press ESC to switch between the command line and the editing window.
Copyright IBM Corp. 1981, 1997
23
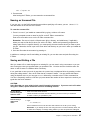
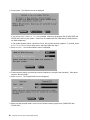
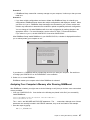
Viewing the E Editor Screen
After you start the E Editor and begin typing, the version number displayed is replaced by the function
keys at the bottom of the screen and you see a screen similar to the following:
Text Input Area
(expands as you enter text)
Command Line
Reminder Line
Function Keys
(switches to
Information line)
Reminder Line
The bottom line of the E Editor screen displays a brief reminder of each action associated with the
function key (or F keys, such as F1=Help and F2=Save). You can perform the most common editing
tasks with one keystroke.
Function Key
What It Does
F1=Help
Accesses help information about function keys and editing commands. You can page through
this help information using the PAGE UP and PAGE DOWN keys.
F2=Save
Saves the file you are editing but does not exit the file.
F3=Close
Removes your file’s text from memory without saving it. If your file has been modified, you
will be asked whether you really want to close the file without saving. When there are no
remaining files in memory, you exit to DOS.
F4=File
Saves your file and quits the E Editor after saving. When there are no remaining files in
memory, you exit to DOS.
F5=Print
Lets you print a file.
F6=Draw
Starts the drawing text graphics feature.
F7=Rename
Lets you change the name of the file you are editing.
F8=Open
Lets you open another file or more than one file at a time.
F9=Undo
Restores the original contents of a line you typed incorrectly. Undo does not restore deleted
lines or changes to multiple lines. Only the current line you are editing can be restored.
F10=Menu
Jumps to the menu. Then the arrow keys can be used to move from selection-to-selection
and to access the associated menus.
From a menu, you can use mnemonics to make selections.
24
PC DOS 7 Concise User’s Guide (OEM Version)
Function Key
What It Does
F11=Previous
Accesses the previous file you have worked on when you have loaded multiple files in the
E Editor. This key is available only on an enhanced keyboard.
This function key and the associated action is not displayed on the reminder line. However, it
is active.
F12=Next
Accesses the next file in the ring when you have loaded multiple files into the E Editor. This
key is available on an enhanced keyboard.
This function key and the associated action is not displayed on the reminder line. However, it
is active.
The reminder line, called the function key text area, changes when you hold down a SHIFT, CTRL, or an
ALT key to show you the function key text appropriate to that shifted state.
Information Line
You also can see the name of the file you are editing, location of the cursor (line number and column
number), working mode (insert, replace, or browse), and the version number of the E Editor.
Command Line
The command line can be found near the bottom of the E Editor screen. To jump the cursor from the
typing area to the command line, press ESC. Press ESC again to return to the typing area.
Window Style
You can change the location of the reminder line, the information line, and the command line by selecting
a different window style.
Getting Help
To get information about the E Editor after the editing window appears, press F1 to display help
information.
When you access the E Editor online help, you are automatically put into browse mode. It is not possible
to edit the help file in browse mode. You can use the arrow keys to scroll right, left, up, or down. In
addition, you can use HOME to move your cursor to the top line of the file or END to move the cursor to
the bottom line of the file.
Chapter 4. Working with the Text Editor
25
You can use the PAGE UP and PAGE DOWN keys to move forward and backward through the help
screens.
To exit the online Help file, press F3.
Leaving the E Editor
You can stop editing and exit from the E Editor three ways: close (without saving changes), file (saving
changes), and exit.
F3=Close
Removes your file’s text from memory without saving it. If your file has been modified, you
will be asked whether you really want to close the file without saving. When there are no
remaining files in memory, exit to DOS.
F4=File
Saves your file and removes it from memory. When all files are removed from memory, you
exit to DOS.
ALT+F4=Exit
Exits the E Editor after closing all files. You are given the option of saving your changes if
necessary. You are returned to the DOS prompt.
Creating or Modifying a File
You can use the E Editor to create a new text file or modify an existing file. For example, try entering
some lines of text in a file named REPORTS.TXT in your root directory. Type the following at the DOS
command prompt:
e c:\reports.txt
and press ENTER
You must always type the full path of the file unless you started the E Editor from the directory where you
eventually want the file to be placed.
You see the editing window. Your directory path and file name are displayed at the bottom of the screen.
For descriptions of the parts of an E Editor screen, see “Viewing the E Editor Screen” on page 24.
1. Begin typing your text from where the cursor is positioned. Try typing the text in the following
example:
The following reports are required for the staff meeting on Friday:
1. Weekly Status Report
2. Funding Report
The default margins are set at 1 and 254. When you reach 254, the text automatically wraps to the
next line.
As you enter the text, note that the Line and Col numbers change near the bottom of the screen.
2. Save and file the information as C:\REPORTS.TXT by pressing F4.
You see Saving C:\REPORTS.TXT flash at the bottom of your screen.
If you do not specify the full path and file name when you load the E Editor, your file will be saved to
the same drive and directory you were at when you created the file.
You can change it by typing save followed by a new drive, directory, or file name. If you were in the
C:\OFFICE\NOTES subdirectory when you typed e reports.txt, your file is saved as
C:\OFFICE\NOTES\REPORTS.TXT instead of C:\. If you want to save the file to this directory, you
would type the following at the E Editor command line:
26
PC DOS 7 Concise User’s Guide (OEM Version)
save c:\reports.txt
3. Press ENTER.
After leaving the E Editor, you are returned to a command line.
Naming an Unnamed File
If you type only e at the DOS command prompt without specifying a file name, you see .Unnamed file
near the bottom on the left side of the screen.
To name the unnamed file:
1. Press F7=Rename if you loaded an unnamed file by typing e without a file name.
You are prompted to enter a name for the file on the E Editor command line.
Enter a file name after Rename on the E Editor command line.
Remember: Be sure to include a full path name (drive, directory, and subdirectory, if applicable)
where you want to find this file when you exit the E Editor. Unlike word processing programs that
always place files in a specific directory, you must specify the exact location where you want to place
this file. Otherwise, the file is put in the same drive and directory as you were in when you loaded the
E Editor.
2. Save and file under the new name by pressing F4.
In addition to creating a new file and editing an existing file, you can also save and print files using the
E Editor.
Saving and Exiting a File
After you create a file or make changes to an existing file, you can save it using a new name or you can
save it using the name you specified when you opened the file. You also can save it with the same file
name or new file name in a different drive or directory.
It is a good idea to save your work in case there is a power loss or equipment failure by pressing F2 often
during the editing session. Also, the E Editor has an “autosave” feature. You can activate this feature
using the Options menu or you can type autosave followed by a number at the E Editor command line.
Your file is temporarily saved to a file after you press ENTER the number of times equal to the number you
typed after the word “autosave”.
CAUTION:
Some files that you open might include special formatting characters. If you save such a file when
using the E Editor, special characters lose their formatting function.
To save the file
and exit using the
same file name:
Press F4 to save the file and exit.
To save the file
and exit using a
different file
name:
1. Press ESC to get to the E Editor command line.
The file is saved in the same drive and directory you were in when you started the
E Editor or where you specified the path.
2. Type:
file newname.ext
where newname.ext is the new file name and extension for the file you are saving.
Remember: If you attempt to save a file using the name of a file that already exists, the
E Editor will not display a message asking whether you want to replace the existing file.
Chapter 4. Working with the Text Editor
27
To save the file in
a different drive
or directory and
exit:
1. Press ESC to get to the E Editor command line.
2. Type:
file drive:\dir\filename.ext
where drive:\dir is the new drive and directory where you want to store the file, and
filename.ext is the name you want to give the file. The name can be the same name or a
new name.
Remember: If you attempt to save a file in a directory that contains a file with the same
name, you are not prompted and asked whether you want to replace the existing file.
Tip: You can save a modified version of a file without losing the original version. For example, if you
have a file named MEMO.TXT, you can keep the original file and save a modified version as
MEMO_2.TXT.
Editing Multiple Files
One advantage you have with the E Editor over other text editors is the ability to open and edit more than
one file at a time. This ability to edit multiple files means, for example, that you can create a new file and
copy (or move) information from an existing file into the new file. Or, you can edit multiple new files,
multiple existing files, or any combination of new and existing files. The files are placed into memory in a
type of invisible ring, and you can switch between all files in the ring by pressing F11 or F12 on an
enhanced keyboard. If you do not have an enhanced keyboard, you can select Previous file or Next
file from the Options menu. Or, you can press CTRL+N to see the next file or press CTRL+P for the
previous file.
To edit more than one file at a time:
Open a file from the DOS command prompt by typing the E command from the DOS command prompt.
Here are some sample commands you might type:
C:\>e report.txt
In this first example, the E Editor loads the file REPORT.TXT you created earlier in
the chapter into the E Editor.
C:\>e report.txt data.dat
In this second example, two files are loaded into the E Editor. Use F11 or F12 on an
enhanced keyboard to switch between files that are loaded for editing.
C:\>e \.c
In this third example, all the files with the C extension are loaded into the E Editor.
While one file is opened, you can open another file by pressing F8, and then typing either a new file name
and path if creating a file, or typing the file name and path if modifying an existing file.
From the E Editor command line, the equal sign (=) substitutes the current file’s directory and saves
keystrokes if you are editing several files in another directory. File names must be separated by spaces.
For example:
Your current directory is C:\EDIT
The current file is C:\MYDOC\PROG\DOUG.DOC
You issue the command: EDIT =TODD.TXT
The E Editor loads C:\MYDOC\PROG\TODD.TXT
28
PC DOS 7 Concise User’s Guide (OEM Version)
Printing a File
You can use the E Editor PRINT command or press F5 to print an open file or just the marked text within
the file. In either case, the printer must be connected to or redirected through your printer port. You can
specify which printer port you want to use by editing the E.INI file. Refer to information about the E.INI file
in the online PC DOS 7 Command Reference.
To print a file:
1. Edit the file you want to print. You can use REPORTS.TXT as a file you want to print.
2. At the E Editor command line, type:
print
or press F5.
3. Press ENTER.
If your file has marked text, the following message is displayed:
Print marked area or entire file (M/F)?
Type the applicable letter designator and press ENTER.
The readiness of the printer is tested first to avoid having to wait for a device time-out in case the
printer is offline. You might see the message:
Printer not ready
which means the printer is turned off, offline, or perhaps out of paper. Make sure the printer is ready
and then repeat the PRINT command.
Using Cursor Movement Keys to Move Around in the Text File
When you load an existing file into the E Editor, your file appears on the screen and the cursor is placed
in the top, far-left position in the text. To view a different part of the file, you have to move the cursor.
Summary of Cursor Movement Keys
Cursor Movement
Key
Action
UP ARROW
Moves cursor one line up.
DOWN ARROW
Moves cursor one line down.
LEFT ARROW
Moves cursor one character to the left.
RIGHT ARROW
Moves cursor one character to the right.
HOME
Moves cursor to column 1 of the current line.
END
Moves cursor to end of the current line.
PAGE UP
Shifts view to page above current page. The cursor stays at same position on screen.
PAGE DOWN
Shifts view to page below current page. The cursor stays at same position on screen.
CTRL+HOME
Moves cursor to top line of file.
CTRL+END
Moves cursor to bottom line of file.
TAB
Moves cursor to next tab stop.
SHIFT+TAB
Moves cursor to previous tab stop.
CTRL+PAGE UP
Moves cursor to top of screen.
CTRL+PAGE DOWN
Moves cursor to bottom of screen.
Chapter 4. Working with the Text Editor
29
Cursor Movement
Key
Action
CTRL+LEFT ARROW
Moves cursor to beginning of word left of cursor.
CTRL+RIGHT ARROW
Moves cursor to beginning of word to right of cursor.
ENTER
Defined by the user in the E.INI file.
CTRL+ENTER
Defined by the user in the E.INI file.
ESC
Moves cursor back and forth between text and E Editor command line.
ALT+E
Moves cursor to end of marked block.
ALT+Y
Moves cursor to beginning of marked block.
CTRL+F5
Moves cursor to beginning of a word.
CTRL+F6
Moves cursor to end of a word.
CTRL+F
Moves cursor to next found text.
(repeat FIND)
CTRL+N
Moves cursor to the next active file in the ring.
CTRL+P
Moves cursor to the previous active file in the ring.
CTRL+Q
When in .ALL file, positions cursor on corresponding line in original file. If not in .ALL file, you are
placed there and the cursor is moved down one line.
You can also scroll by holding down an arrow key.
Summary of Key Combinations for Marking and Unmarking Text
Following is a table which summarizes the key combinations you would use to mark and unmark text.
ALT+B
Block mark for rectangles or lines.
ALT+L
Line mark for one or more lines.
ALT+W
Word mark.
ALT+Z
Text mark for sentences, phrases, or characters.
ALT+U
Unmark.
Using Key Combinations to Manipulate Text
You can perform any type of operation on the marked text that you want (such as copy, move, delete, or
reflow).
To manipulate an area of text:
1. Mark the text you wish to copy, move, delete, or reflow by pressing the key combinations in the
previous summary. The E Editor highlights the area to show you what you have marked.
2. For copying or moving, select the destination for the highlighted text by moving the cursor to the
destination position.
3. Press a key combination, such as ALT+C (copy) to perform the operation.
Summary of Text Operation Keys
After you have marked text, you can manipulate it by pressing the following key combinations:
30
PC DOS 7 Concise User’s Guide (OEM Version)
ALT+A
Copies text to a new location and fills the old position with blanks.
ALT+C
Copies the text to the new location by inserting it and pushing aside existing text.
ALT+D
Deletes marked text. The space formerly occupied is discarded.
ALT+O
Copies text to a new location; overlays the existing text rather than pushes it aside.
ALT+M
Moves marked text from one location to another location and discards the space previously
occupied by the text.
ALT+F
Fills an entire marked area with a character you specify. The character can be a graphic. To
end this operation, press ESC.
ALT+P
Reflows a marked paragraph to the new margin settings. If a block of text is marked, reflows
only the marked text to the new margin settings.
If the text is not marked, the paragraph following the cursor is reformatted.
ALT+R
Reflows the marked text into a new defined area.
ALT+F7
Shifts marked text to the left. If you have text next to the left column of the marked area, it will
overlay any text in the far-left column of the marked area.
ALT+F8
Shifts marked text to the right. All text to the right of the left edge boundary is shifted right.
The far-left marked column is filled with blank spaces.
ALT+E
Moves the cursor to the end of the marked text. Except for line-marked text, this is the far-right
character of the last line. For line-marked text, the cursor column is unchanged.
ALT+Y
Moves the cursor to the start of the marked text. Except for line-marked text, this is the far-left
character of the first line. For line-marked text, the cursor column is unchanged.
Some operation keys do not work with all combination keys, as shown in the following table.
The top heading gives the marking keys. The left column shows the operation keys. At the intersection of
any row and column is a description of where the cursor should be placed to define the destination. If no
such description is given (as at the intersection of ALT+L and ALT+A), the operation is not allowed.
Operation
ALT+L
Adjust (ALT+A)
ALT+B or ALT+W
ALT+Z
Top-Left Corner
Copy (ALT+C)
Line Above
Top-Left Corner
At Line
Delete (ALT+D)
Any Position
Any Position
Any Position
Overlay (ALT+O)
Top-Left Corner
Move (ALT+M)
Line Above
Top-Left Corner
Top-Left Corner
Reflow (ALT+P)
Any Position
Any Position
Any Position
SHIFT (ALT+F7/F8)
Any Position
Any Position
Chapter 4. Working with the Text Editor
31
32
PC DOS 7 Concise User’s Guide (OEM Version)
Chapter 5. Using File Update
Use the File Update Utility to maintain files on two different systems and keep them synchronized. The
two systems can be two separate PCs, a PC and a local area network (LAN), or two different locations on
the same PC. This is useful if you work with the same files on separate systems (for example, when you
use a laptop on the road or take work home from the office). You can also use File Update to keep
backup files of your work on another drive or partition.
This chapter describes how to install File Update on two systems (referred to as base and remote
locations). It shows you how to set up your system and explains how to keep files in “sync” when you
transfer them from one location to another. Before you install File Update, however, it is a good idea to
make sure the time and date at both locations are the same. You must also know how files and
directories are organized on both your systems. File Update tracks any changes that are made to the files
and directories you specify.
Ask yourself:
What are the names and extensions of the files you want tracked?
For example, all files with a .TXT extension, such as REPORT.TXT.
In what directories are these files located?
For example, C:\COMPUTER\SALES at the base location and D:\SALES at the remote location.
You can use the TREE command to answer these questions. TREE displays the directory paths and files
on your drives so that you know where things are. For example, if you want to list all directories and files
on drive C and save the list in a file named TREE.OUT, type the following at the DOS command prompt:
tree c:/f >tree.out
You could also redirect the output to your printer by typing:
tree c:/f >prn
Installing File Update at the Base Location
To get started, you need to install File Update at the base location – the first system or location you want
to install on. This procedure creates an installation diskette, which is used to install File Update at a
remote location.
Notes:
A blank, formatted diskette is required.
The base system must have PC DOS 7 installed.
The base location is the client machine for a system connected by Local Area Network (LAN)
Use the TAB key to move from one input field to another. You can also use the mouse to click on an
entry field or button.
Windows Users: To access the DOS command prompt, select the PC DOS Prompt icon in the
PC DOS 7 Tools group.
To install File Update at the base location:
1. At the DOS command prompt, type:
fileup
Copyright IBM Corp. 1981, 1997
33
2. Press ENTER. The Welcome screen is displayed.
If you receive a Bad command or file name message, make sure the program files (FILEUP.EXE and
FILEUP.HLP) exist on your system. These files are installed with PC DOS and are usually found in
the DOS subdirectory.
If File Update appears without a Welcome screen, the program has been installed. To reinstall, select
Delete Installation from the Setup menu, and begin again with step 1.
3. Select Continue. The Location Names screen is displayed.
4. Create names to identify your base and remote locations (for example, WORK and HOME). Enter these
names in the input fields.
5. Select Continue. The Program Path screen is displayed.
6. Make sure that the path listed is correct for the remote location program files (FILEUP.EXE and
FILEUP.HLP).
34
PC DOS 7 Concise User’s Guide (OEM Version)
File Update assumes the remote location path is the same as the base location path. If the program
files are not in the remote location path, you will not be able to install File Update at the remote
location.
7. Select Continue. The Add/Delete Directory Pairs screen is displayed.
8. Enter the drive and directory path, including all subdirectories, where you want File Update to track
files (see “Notes” on page 35). Select Add after you enter a directory pair—the names of the
directories you want to synchronize on the base and remote locations.
For example, if you type C:\COMPUTER\SALES at the base location and D:\SALES at the remote
location, files in the C:\COMPUTER\SALES subdirectory are updated in D:\SALES at the remote
location when you transfer the files.
Notes:
The path you specify for the base location must currently exist. However, when a path does not
exist at the remote location, it can be created for you when you transfer your updated files.
You can come back after installation to add or delete directory pairs. Directory pairs can be the
same drive and directories, different drives and directories, or the same drive but different
directories.
LAN Users: Specify the actual drive and path (not the remapped value). In other words, you
know that drive G on your client machine equals drive C on your server. Do not specify drive G
directories. File Update provides for drive remapping later in the process.
If you make a mistake or want to delete a directory entry:
a. Choose the directory entry in the Directory List.
b. Select Delete to erase the directory information for both locations.
9. Select Continue. The Diskette Drive Selection screen is displayed.
Chapter 5. Using File Update
35
10. Choose the diskette drive (drive A or B) where you want to create the File Update installation diskette.
11. Insert a blank, formatted diskette in the specified drive, and select Continue.
12. Select OK when installation is completed.
13. Label your diskette “File Update Installation”, and set it aside. You will use it later to install the File
Update system files at the remote location.
If your remote location is connected through a LAN, you do not need to use the File Update
Installation diskette again. You only need to remap the drives.
You have just completed File Update installation at the base location. Go to “Using File Update Menu
Choices” to review menu choices and set up your system.
Important:
The Files Being Excluded choice in the Setup menu contains a default list of file extensions that are not
being tracked. Be sure to review this list so that you do not have files missing when you transfer file
updates. You can add extensions to the “excluded” list so that specific file types are not tracked. You can
also delete any file extensions that you want File Update to include in its tracking.
Using File Update Menu Choices
After you install File Update at the base location, use menu choices to set up your system. Keep in mind
that the Files Being Excluded choice in the Setup menu contains a default list of file extensions that are
not being tracked. It is a good idea to review this list and make any necessary changes.
CAUTION:
Use care when deleting extensions from the default list. These extensions are excluded so that you
do not replace files by mistake. For example, suppose you have a program named “ChartMaker” at both
locations. You have version 1.0 on the base system and version 2.0 on the remote system. If you delete
the “DLL” extension from Files Being Excluded, you will replace files with an incorrect DLL version, and
ChartMaker will not run.
There are many useful choices from the Setup menu.
You Can:
Setup Menu Choice:
Add or delete directories you want tracked
(including all subdirectories).
Add Directory Pairs
Exclude specific file extensions from being tracked.
(Files without extensions are always tracked.)
Files Being Excluded
Monitor specific file names
(even if you excluded the file extension).
Override Excluded Files
36
PC DOS 7 Concise User’s Guide (OEM Version)
You Can:
Setup Menu Choice:
Create an installation diskette
(if you need to create another installation diskette).
Create Installation Diskette
Delete installation
(to begin again and reinstall File Update).
Delete Installation
Display the path where the program files reside at the base and remote
locations.
Display Install Data
You can also select choices from the File Update menu.
You Can:
File Update Menu Choice
Preview – Display the files you updated since the last transfer and the number of
diskettes you will need to complete the transfer.
Update Files – Transfer updated files to diskette so you can transfer files from
one location to the other.
Custom File Selection – Control the type of update you want. You can copy:
Update To Diskette
Changed files for all directory pairs
All files for all directory pairs
Changed files for all “selected” directory pairs
(Use this choice after you complete your first update.)
Preview – Display the files on diskette that you are going to transfer.
Update Files – Transfer updated files from the diskettes created in Update to
Diskette.
Update From Diskette
Preview – Display the files you updated since the last transfer.
Update Files – Transfer updated files from your base location.
Custom File Selection – Control the type of update you want. You can copy:
Changed files for all directory pairs
All files for all directory pairs
Changed files for all “selected” directory pairs
Update Connected System
Re-Map Connected Drives – Remap drive letters.
(Connected drive letters can change if you connect to a LAN.
Transferring Updated Files to the Remote Location
Now that you have installed File Update at the base location and set up your system, resume work on
your files. When you are ready to transfer updated files to the remote location, follow the procedure for
your particular remote location:
Remote System
PC (not connected through
a LAN)
Procedure
“Installing on a PC” on page 38.
Local Area Network (LAN)
“Installing on a LAN-Connected System” on page 40.
Chapter 5. Using File Update
37
Installing on a PC
Follow these procedures if the remote location is a PC, or another drive or partition on the same PC.
1. “Transferring Updates from the Base Location to Diskette” on page 38.
2. “Installing File Update at the Remote Location” on page 39.
3. “Transferring Updated Files to the Other Location” on page 39.
Transferring Updates from the Base Location to Diskette
To transfer updates to the remote location, you must first transfer updated files to diskette. After you
transfer files from the base location to the remote location the first time, use this procedure to transfer files
back and forth from one location to another.
It is not necessary to manually copy and align files at both locations before using File Update.
To transfer updates to diskette:
1. Select File Update.
2. Select Update To Diskette.
You have the option to:
a. Select Preview to display the estimated number of diskettes (by media type) it takes to copy the
files that File Update is tracking.
b. Select OK. The Status screen is displayed with a list of the files to be copied. It also indicates
that you are connected to the appropriate drives (if applicable).
If you want to remove the status screen, press F5.
3. Select File Update.
4. Select Update To Diskette.
5. Select Update Files.
A message is displayed asking if you used your last update diskettes.
If this is the first time you are doing a file update, select Yes.
If you have done an Update to Diskette before but did not transfer the updated files to the other
location, select No to make sure all file changes are transferred.
6. Insert a formatted diskette into the specified drive, and then select Continue.
7. To overwrite any data on the diskette, select Yes; otherwise, select No.
8. Remove the diskette and label the first diskette “#1” and continue inserting diskettes (as prompted)
until all updated files are copied to diskette.
If you have multiple diskettes, label them with the correct sequential number so that you can insert
them when prompted at the remote location.
Important:
When you go to your other system to update your files, be sure to run Update From Diskette before
performing any other functions (for example, adding or deleting directory pairs).
Go to “Installing File Update at the Remote Location” on page 39 if you are installing File Update for the
first time.
38
PC DOS 7 Concise User’s Guide (OEM Version)
If you have already installed File Update at both your locations, go to “Transferring Updated Files to the
Other Location” on page 39.
Installing File Update at the Remote Location
Follow these steps to install File Update if the remote location is a PC (not connected through a LAN
program)..
Notes:
Before you begin, you must have completed “Installing File Update at the Base Location” on page 33
and “Using File Update Menu Choices” on page 36.
The remote system must have PC DOS 7 installed.
Make sure you have the File Update Installation diskette before you begin.
This procedure has to be done only once (unless you select Delete Installation from Setup and
have to begin again).
The following steps apply to “unconnected” PCs. If you are using a LAN, see “Transferring Updated
Files to the Remote Location” on page 37 for the correct procedure to follow.
To install the File Update Utility at a remote location:
1. From the DOS command prompt, type:
fileup
2. Press ENTER.
If you receive a Bad command or file name message, make sure the program files (FILEUP.EXE and
FILEUP.HLP) exist on your system. These files are installed with PC DOS and are usually found in
the DOS subdirectory.
3. Select Remote Setup at the Welcome screen.
4. Insert the File Update Installation diskette you created on your base system in diskette drive A or B.
5. Specify the drive where you inserted the diskette, and select Continue.
6. Select OK when the installation is completed.
Transferring Updated Files to the Other Location
Follow these steps to transfer updated files that you copied to diskette in “Transferring Updates from the
Base Location to Diskette” on page 38. Follow this procedure before performing any setup activities at
the remote location (such as adding directory pairs or changing the excluded file list).
To transfer updated files that you copied to diskette:
1. Select File Update.
2. Select Update From Diskette.
3. Select Update Files.
4. Insert the last diskette of the set that contains the updated files that you transferred.
5. Select Yes to continue.
6. Continue to insert and remove the applicable diskettes. You are prompted with a message indicating
the number of the diskette to be inserted.
You might come across one or more of the following situations:
Chapter 5. Using File Update
39
Files Changed in Both Locations
If a file on your system is new or changed since your last update, a message will be displayed with
the name, the date stamp, and the time stamp of each file. You are given the choice to keep a
specific file or to replace all remaining files. This lets you skip further messages and replace all
conflicting files with the updates from diskette. This message can occur when you work on the same
file at your base and remote locations and you do not update on a regular basis. It can also occur if
an update is not allowed to run to completion.
No Directory Path Exists for a File Listed on the Diskette
If a directory path does not exist for a file on the diskette, a message will be displayed. You are given
the choice of having the system create the directory or of skipping the file and continuing the update
process.
Drives Not Connected
If you are not connected to the drives you need, an error message will be displayed. You cannot
proceed with the update until you connect to these drives.
File Update is now installed and can be run from both locations. Be sure to perform a File Update at your
base and remote locations on a regular basis.
Installing on a LAN-Connected System
Follow these steps to use File Update on a system connected to a Local Area Network (LAN). You do not
need to use the File Update Installation diskette because you are only remapping drives (not installing File
Update).
Notes:
Before you begin, you must have completed “Installing File Update at the Base Location” on page 33
and “Using File Update Menu Choices” on page 36.
Make sure that you are connected to your network drives.
File Update is always run from the client machine.
To remap your drives (you have to do only once):
1. At the DOS command prompt on your base location (client), type:
fileup
2. Press ENTER.
3. Select File Update.
4. Select Update Connected System.
5. Select Re-Map Connected Drives. The Connected Drive Remapping screen is displayed.
40
PC DOS 7 Concise User’s Guide (OEM Version)
6. For drive letters currently specified in Directory Pairs, specify the remapped drive letters used to
access the server drives.
Novell Network Users: The mapping for the base/remote location is the same drive letter.
7. Select OK. You are returned to the main screen.
8. Go through the selection process again of:
File Update
Update Connected System
Preview, Update Files, or Custom File Selection
You have completed File Update installation on your LAN-based system.
Troubleshooting
For troubleshooting tips for the most common questions about or problems with File Update, refer to “File
Update Utility” on page 54.
Chapter 5. Using File Update
41
42
PC DOS 7 Concise User’s Guide (OEM Version)
Chapter 6. Making More Memory Available
RAMBoost is the memory management tool provided with PC DOS. It runs on a 80386SX**-based or
higher processor that has enough extended memory available. For more information about system
requirements, see “RAMBoost System Requirements” on page 44.
The purpose of RAMBoost is to determine the optimal memory location for every device driver,
terminate-and-stay resident (TSR) program, and other programs you have designated for your system. It
carries out this process by analyzing your computer’s existing configuration and automatically reconfiguring
programs to load above 640K after restarting your system. When RAMBoost is through processing, you
should have the maximum amount of available memory to use for your DOS and Windows applications.
If you are having trouble running your programs because there is not enough memory, you might need to
run RAMBoost. For most systems, this simply means typing ramsetup at the DOS command prompt and
following the directions given through the online RAMBoost program. When you have provided the
information RAMBoost needs to run, it takes care of everything else during its processing.
Of course, the more you understand about your system and memory, the more you will appreciate all that
RAMBoost can do for you.
If you are a PCMCIA user, see “Running RAMBOOST with PCMCIA (Non-Thinkpad)” on page 49 for
information about running RAMBOOST with PCMCIA.
Determining Your System’s Memory Type
Before running RAMBoost, you should determine what type of memory your system has and which
programs are currently loaded into memory. Use the MEM command with the /c switch or use the
QCONFIG command. For example, if you used the MEM command, you might type the following at the
DOS command prompt:
mem /c /p
The /c switch provides you with a list of programs and classifies their memory into types of memory, such
as conventional or upper memory. It is the upper memory blocks that are used by RAMBoost to free
conventional DOS memory. The /p switch pauses the information at the end of each screen of
information.
Understanding How RAMBoost Works
RAMBoost manages the area of memory of your computer from 640K to 1024K, called upper memory
blocks (UMBs). RAMBoost runs invisibly on your computer, optimizing available memory automatically
each time your computer’s system configuration changes. If you add or remove programs from your
CONFIG.SYS or AUTOEXEC.BAT files, RAMBoost automatically detects the change. When the system is
rebooted, RAMBoost automatically re-optimizes and rearranges the remaining drivers in upper memory.
**
80386SX is a trademark of the Intel Corporation.
**
Quarterdeck QEMM is a trademark of Quarterdeck Office Systems.
**
Qualitas 386MAX is a trademark of Qualitas, Inc.
Copyright IBM Corp. 1981, 1997
43
RAMBoost works with a memory manager. A memory manager (such as EMM386, Quarterdeck QEMM**,
and Qualitas 386MAX**) makes the open areas in your upper memory blocks available for loading
memory-resident programs and device drivers (referred to as “loading high”). Loading programs high
makes more DOS conventional memory available for your applications. The amount of upper memory
RAMBoost makes available is determined by the expanded memory specification (EMS) manager used
with it.
Because the open space in upper memory is usually in several pieces of different sizes, programs can fit
in some areas but not in others. RAMBoost arranges your memory-resident programs, device drivers, and
other DOS resources such as those specified in the CONFIG.SYS file (for example, FILES and
BUFFERS) into upper memory. This increases the amount of memory available for DOS to run
applications. RAMBoost does this by creating an initialization profile (.INI file) of your memory usage and
by automatically arranging the programs in your upper memory blocks. This provides the maximum
compatible amount of free conventional memory.
You configure RAMBoost once. Then, each time you start your computer, RAMBoost analyzes your
computer’s resident programs and device drivers, selects the optimal loading configuration, and loads
them into upper memory blocks.
Important:
RAMSETUP must be run for each configuration that you want to optimize in a multiple configuration setup.
This way, an .INI profile file is generated for each separate configuration. Your system needs to be
rebooted twice for each configuration. The first time RAMBoost locks in the configuration in the Learn
mode; and the second time, it makes it active. See page 47 for more information.
If you are familiar with memory-management techniques, you can customize RAMBoost’s performance by
manually editing the settings in the profile .INI files. The two primary .INI files are RAMSETUP.INI and
RAMBOOST.INI. Additional .INI files are generated when RAMBoost detects multiple configurations. For
more information about the .INI files associated with RAMBoost, see the online
PC DOS 7 Command Reference.
RAMBoost System Requirements
The following items are required to use RAMBoost Setup (run RAMSETUP). RAMBoost Setup is flexible
in that it works with many memory managers.
A minimum of 512K available extended memory.
A 80386SX-based or higher processor.
For upper memory block support, at least 640K and an EEMS/EMS 4.0 memory manager are
required. Use one of the following EEMS/EMS 4.0 memory managers:
–
–
–
–
HIMEM.SYS and EMM386.EXE provided with DOS
Quarterdeck Expanded Memory Manager-386**
Qualitas BlueMAX** and 386MAX
Helix** Netroom**
Most of these third-party memory managers requires an adjustment to your CONFIG.SYS file before
running RAMBOOST. If you are running RAMBOOST and install a third-party memory manager on
**
Quarterdeck Expanded Memory Manager-386 is a trademark of Quarterdeck Office Systems
**
BlueMAX is a trademark of Qualitas, Inc.
**
Helix and Netroom are trademarks of Helix Software Company
44
PC DOS 7 Concise User’s Guide (OEM Version)
over it (without adjustments), your system might not work correctly. If this happens, check the
third-party documentation for instructions, or contact the manufacturer of the third-party product.
Refer to “Compatibility with Memory Managers and Other Programs” on page 48 for compatibility
information.
Configuration Requirements
You use the RAMSETUP.EXE program to configure RAMBoost. When loaded, RAMBoost automatically
checks for the existence of memory managers, such as HIMEM.SYS and EMM386.EXE, on your system.
Then, it scans upper memory to configure itself with the optimal parameters for managing upper memory.
You need to take the following into consideration before you configure RAMBoost:
Ensure that you load all the software you normally run in your daily routines that start your adapter
cards (for example, a sound blaster card). RAMBoost Setup scans the upper memory area looking for
unused adapter memory. If you do not have your adapter activated, RAMBoost Setup might
incorrectly use the adapter memory space.
If you are using QEMM386, 386MAX, or Netroom, you must install it according to its installation
instructions before you start RAMBoost. You must also make sure it provides upper memory blocks
(UMBs).
When installing RAMBOOST in a multiple configuration environment, it is necessary to configure each
MENUITEM before allowing RAMBOOST to run an optimization process.
1. Boot your system and load the first MENUITEM to be optimized.
2. Start the RAMSETUP program and configure the first MENUITEM. When configured, allow
RAMSETUP to reboot your system.
Do not load the same MENUITEM. Loading the same MENUITEM forces a premature Learn
process that would need to be re-optimized later.
3. Load the next MENUITEM to be configured for RAMBOOST optimization.
4. Start RAMSETUP, configure the MENUITEM, and then allow RAMSETUP to reboot your system.
5. Continue this procedure with each MENUITEM of your multiple configuration.
When you have configured each MENUITEM (as needed), reboot your system. As each MENUITEM
is loaded, RAMBOOST is ready to perform as intended. It will learn and optimize each MENUITEM as
it is loaded without the extra Learn modes.
To configure RAMBoost:
1. From the DOS command prompt, type:
ramsetup
2. Then press ENTER.
RAMBoost Setup reads the RAMSETUP.INI and RAMBOOST.INI profiles and configuration files, and
then displays a window. Which window is displayed depends on whether EMM386 is installed in
memory.
No EMM386 or equivalent statement installed
Chapter 6. Making More Memory Available
45
EMM386 statement or equivalent installed
Any of the following scenarios are possible, depending on what programs exist in your CONFIG.SYS
file when RAMBoost Setup is run:
Scenario 1
If RAMBoost Setup detects that you have no memory manager installed but finds the DOS
memory manager on your computer, select OK on the window that is displayed. RAMBoost,
EMM386, and HIMEM (if it was not present) are installed into your CONFIG.SYS file. Go to step
3 on page 47.
Scenario 2
If RAMBoost Setup detects that you have installed a memory manager other than the one in DOS,
select OK on the window that is displayed. RAMBoost is installed into your CONFIG.SYS file. Go
to step 3 on page 47.
Scenario 3
If RAMBoost Setup detects that you have an EMM386 statement in your CONFIG.SYS file, you
have the option of letting RAMBoost comment out (places the REM command before the
statement) the statement and install a new EMM386 statement that optimizes your system. Select
OK. Your system is rebooted and RAMSETUP is restarted automatically.
You can select and use the Advanced button to make changes to your memory situation. After
making your changes, you must select Keep and then select Reboot.
Note: Use Advanced only if you are very familiar with upper memory concepts and management.
A second possibility exists for this scenario. You could get a message screen that reads:
RAMSETUP will not install because there is only xxx amount
of memory available.
When this occurs, you have the following options:
– Select OK to let RAMBoost Setup uninstall your current EMM386 and install an EMM386
statement that optimizes your system.
– Select Advanced so that you can manually allocate the stated xxx amount of upper memory
needed. After making the change, select Keep and then select Reboot.
46
PC DOS 7 Concise User’s Guide (OEM Version)
Scenario 4
If RAMBoost Setup cannot find a memory manager on your computer, it informs you that you must
install one.
Scenario 5
If you have multiple configurations and want to dictate how RAMBoost Setup is to handle your
configurations, RAMBoost Setup detects the multiple configurations and displays a window. When
you select Reorganize, RAMBoost Setup rearranges the commands in your common section and
includes any statements it determines are needed for optimal compatibility with each configuration.
You can change or limit what RAMBoost will do to each configuration by making changes in the
appropriate .INI file. For more information, see the online PC DOS 7 Command Reference.
If you select Reorganize, the old CONFIG.SYS is saved as CONFIG.SAV.
After RAMBoost Setup installs RAMBoost in your CONFIG.SYS file, a window is displayed that allows
you to reboot (restart) your computer or exit.
Central Point RAMBoost
RAMBoost
RAMSETUP needs to reboot your computer to determine
the best fit for your resident programs and drivers
in upper memory blocks. Please be sure there are no
diskettes in your diskette drives and choose Reboot
to begin this process. Choose exit if you do not want
RAMSETUP to reboot your computer at this time.
R
Reboot
E
Exit
If you select Exit, RAMBoost will be activated the next time you start your computer. Be careful not
to change your CONFIG.SYS or AUTOEXEC.BAT in the meantime.
3. Select Reboot to start RAMBoost.
RAMBoost restarts your computer twice before RAMBoost is activated.
Analyzing Your Computer’s Memory after Running RAMBoost
After RAMBoost is loaded, you might want to do the following to verify that you do have more conventional
memory available:
View your CONFIG.SYS file. Lines similar to the following are placed in this file if you successfully
loaded RAMBoost:
device=c:\dos\emm386.exe noems ram x=aððð-bðff i=b1ðð-b7ff x=b8ðð-bfff ...
device=c:\dos\ramboost.exe load
The i= and x= are INCLUDE and EXCLUDE statements. The ... means that, although more of these
statements are normally included in this DEVICE statement, they are all not listed for this example.
Save the output by typing:
mem /c > filename.ext
Chapter 6. Making More Memory Available
47
where filename.ext is the name of the output file (for example, SAVE2.OUT). The MEM command is
preferred in this case rather than QCONFIG, because it gives more details about your programs’
upper memory.
Print the output from the MEM command after you have run RAMSETUP.
Compare the two printed outputs (before and after running) if you printed or saved the output from the
MEM command before running RAMSETUP.
For most individuals, running RAMBoost should give you more conventional memory than you had before
running it. If it does not, you might have to manually manipulate the upper memory blocks or run
RAMBOOST OPTIMIZE 1. See the online PC DOS 7 Command Reference for information about editing
your RAMBOOST.INI file.
Compatibility with Memory Managers and Other Programs
The following information tells you how to use RAMBoost with specific programs and memory managers.
Helix Netroom386
Ensure that the following statement exists in your CONFIG.SYS file before starting RAMBoost:
device=c:\netroom\rm386.sys ems=c8ðð-efff frame=none
This statement assumes that you are not using EMS.
Qualitas 386MAX and BlueMAX
The following statement should exist in your CONFIG.SYS file before starting RAMBoost:
device=c:\max\386max.sys include=bððð-b8ðð ems=512
Change the EMS parameter to read ems=ð if you do not need EMS. Making this change increases the
upper memory available to RAMBoost by 64K.
If RAMBoost Setup detects 386MAX (Version 7 or above) or detects BlueMax (Version 6.02 or above), it
adds the NO58 parameter to the MAX profile. If you install one of these versions after RAMBoost is
loaded, you either need to edit the MAX profile manually or run RAMSETUP again.
Any version of 386MAX or BlueMAX before the version listed above should not include the NO58
parameter in the MAX profile.
RAMBoost Setup deletes from the CONFIG.SYS file two incompatible BlueMAX or 386MAX (Version 7)
devices, both named EXTRADOS.MAX. These files are no longer necessary, as RAMBoost provides
similar function.
QEMM-386
If QEMM-386 is already installed, you should see the following statement in your CONFIG.SYS file:
device=c:qemm\qemm386.sys ram x=fððð-ffff st:m
If you do not need EMS, add the noems switch to this statement in your CONFIG.SYS file. Making this
change increases the upper memory available to RAMBoost by 64K.
RAMBoost Setup deletes the following incompatible QEMM (Version 7) devices from the CONFIG.SYS
file:
DOS-UP.SYS file
48
PC DOS 7 Concise User’s Guide (OEM Version)
DOSDATA.SYS file
DESQview and Enhanced Windows
RAMBoost does not automatically reset from the DESQview DOS box or the enhanced Windows
environment.
If RAMSETUP is run from within one of the environments, you must restart your computer on exiting the
DESQview DOS box or Windows. This is the only way RAMBoost can optimize memory.
Running RAMBOOST with PCMCIA (Non-Thinkpad)
To run RAMBOOST with PCMCIA on non-Thinkpad systems:
1. Edit your CONFIG.SYS file and remark out or remove the memory manager and reboot (before
activating PCMCIA).
2. Install PCM PLUS (the PCMCIA support product shipped with PC DOS 7) by issuing the PCMDINST
command from your DOS\PCM directory.
3. Configure all your PC-Cards using the PCM or PCMWIN utility and ensure they are functional. For
example, if you have a network card, ensure you can access the network.
4. Restart your system if it doesn't restart automatically after configuring your last PC-Card.
5. Start RAMBOOST by typing ramsetup at the DOS command prompt.
Resolving Memory Conflicts
Memory utilization can be optimized with the use of PC DOS 7 memory optimizer RAMBOOST. But the
systems must be configured so that memory areas for the PC-Card, adapter and Memory Manager (such
as EMM386) do not conflict with one another.
The default memory configuration shipped with the PCMCIA support requires little or no user intervention
for most people. The preconfiguration involves limiting PCMCIA card services to the top 48K of the D
segment: D400-DFFF.
The upper memory map would look like this to RAMBOOST:
C
D
ð
1
2
3
4
5
6
7
8
9
A
B
C
D
E
F
ððððððððððððððððððððððððððððððððððððððððððððððððððððððððððððð
ððððððððððððððððxxxxxxxxxxxxxxxxxxxxxxxxxxxxxxxxxxxxxxxxxxxxx
x- Memory available to PCMCIA Card Services
ð- Memory available to RAMBOOST
You should attempt to configure your PCMCIA resources within the pre-set D400-DFFF range. If
D400-DFFF is not available to PCMCIA or a PC-Card requires memory outside the available range, the
user will have to manually re-configure PCMCIA resources. To determine the required memory space
boundary for the PC-Card, refer to the manual that came with the PC-Card. Most PC-Cards specific
memory requirements can be relocated when the specified boundaries are followed. Use the PCMRMAN
utility to reconfigure PCMCIA resources. Issue the command PCMRMAN /MAP to view PCMCIA resource
allocation. This displays the memory ranges currently available to PCMCIA.
Issue the command PCMRMAN to modify the PCM Plus resources. For example, suppose you have a
card requiring a 16K memory range starting at D000. Use the PCMRMAN utility to “Include” ranges
Chapter 6. Making More Memory Available
49
D000-D3FF; each block listed is 4K in size. Hence, the range of D000-D3FF. You must reboot the
computer so the changes can take affect.
When you start PCM, ignore the WARNING message that the included memory is already excluded and
follow the instruction to press any key to continue.
Use PCM or PCMWIN utility to configure the PC Card** at the location made available through PCMRMAN.
Making more memory available to RAMBOOST
When you run PCMCIA before running RAMBOOST, 48K of upper memory to is made available for
PCMCIA. You might not need this much space allocated. To release the space PCMCIA is not using and
make it available to RAMBOOST, run PCMRMAN to exclude the unused ranges.
For example, you only have a modem card, which requires no memory. You can make 44K of upper
memory available to RAMBOOST by excluding the range D400-DEFF. The upper memory map then
looks similar to the following to RAMBOOST:
C
D
ð
1
2
3
4
5
6
7
8
9
A
B
C
D
E
F
ððððððððððððððððððððððððððððððððððððððððððððððððððððððððððððð
ððððððððððððððððððððððððððððððððððððððððððððððððððððððððððððx
x- Memory available to PCMCIA Card Services
ð- Memory available to RAMBOOST
If you only have an ATA (Harddisk) and a modem, you can then exclude the range D800-DEFF giving
RAMBOOST an extra 28K of upper memory.
The upper memory map then looks similar to the following to RAMBOOST:
C
D
ð
1
2
3
4
5
6
7
8
9
A
B
C
D
E
F
ððððððððððððððððððððððððððððððððððððððððððððððððððððððððððððð
ððððððððððððððððxxxxxxxxxxxxxxxxððððððððððððððððððððððððððððx
x- Memory available to PCMCIA Card Services
ð- Memory available to RAMBOOST
After changing your PCMCIA configuration, RAMBOOST must be re-installed. Type ramsetup at the DOS
prompt and select to have RAMSETUP rebuild the EMM386 statement.
**
PC Card is a trademark of the Personal Computer Memory Card International Association.
50
PC DOS 7 Concise User’s Guide (OEM Version)
Chapter 7. Troubleshooting
This chapter explains how to solve problems you might have after you install PC DOS. It also answers
some common questions about DOS.
If you are having problems, be sure to view the text file README.TXT that came with PC DOS. You can
find this file on the Setup Diskette of your PC DOS installation diskettes or in your DOS directory.
PC DOS Installation
Following are some of the common questions you might have during Setup.
What if the Setup program does not run?
Setup cannot successfully install PC DOS for one or more of the following reasons:
There is insufficient space on your hard disk.
Your primary DOS partition is too small or incompatible with Setup.
You do not have a hard disk.
What should I do if my computer does not restart?
If this happens and if the problem might be related to the settings in your CONFIG.SYS or
AUTOEXEC.BAT, you can temporarily bypass these files to restart your computer.
1. Start your computer.
2. Press F5 immediately after your computer displays the message
Starting PC DOS...
Notes:
1. Any device that requires an installable device driver does not work because the installable device
drivers are not loaded. For example, programs that require expanded or extended memory are not
able to run because no expanded- or extended-memory drivers are loaded.
2. PC DOS uses the default environment variables of PATH=C:\DOS, PROMPT=$P$G, and
COMSPEC=C:\COMMAND.COM temporarily until you correct the problem and restart your computer.
You can bypass selected CONFIG.SYS commands by having PC DOS prompt you for each command in
the CONFIG.SYS file.
To confirm each CONFIG.SYS command:
1. Start your computer. Just after your computer starts, DOS displays the text Starting PC DOS...
2. Immediately press and release the F8 key.
One at a time, PC DOS displays each command in your CONFIG.SYS file followed by a prompt. For
example, when PC DOS reaches the DOS=HIGH, UMB statement, it displays the following prompt:
DOS=HIGH, UMB
[Y,N,ESC]?
Respond by typing either Y for YES or N for NO, for each command in your CONFIG.SYS file, press
ESC to cancel the CONFIG.SYS file processing.
When PC DOS finishes processing the CONFIG.SYS file, it displays the following prompt:
Process AUTOEXEC.BAT [Y,N]?
Copyright IBM Corp. 1981, 1997
51
3. Answer Y for Yes or N for No to confirm each statement in your AUTOEXEC.BAT file.
What can I do when a program does not use XMS extended memory?
Most programs that use extended memory conform to the Lotus**/Intel**/Microsoft/AST** (LIM) eXtended
Memory Specification (XMS). To use such programs with DOS, you need an extended-memory manager,
such as HIMEM.
Some programs do not conform to the XMS. Such programs cannot use extended memory if this memory
is managed according to the XMS.
If you are using HIMEM, you can allocate a portion of your extended memory to programs that use
extended memory but do not conform to the XMS. This is done by including the /int15 switch with the
DEVICE command for HIMEM.SYS. The value you specify for the /int15 switch should be the memory
you want set aside, plus 64K. For example, to reserve 512K of non-XMS extended memory, you would
include the following command in your CONFIG.SYS file:
device=c:\dos\himem.sys /int15=576
Some of the programs that do not conform to the XMS cannot run when DOS is in the high memory area.
If you encounter problems with such a program, load DOS into conventional memory.
What memory managers can I use with DOS?
Most memory managers work with DOS. In general, you cannot simultaneously use two memory
managers that provide access to the same memory. Similarly, you cannot use EMM386 to simulate
expanded memory if you already have an expanded-memory manager installed.
How do I run device drivers and programs in the upper memory area?
If you have a system with an 80386-based or higher processor and extended memory, you can make
more conventional memory available by running certain device drivers and programs in the upper memory
area. DOS provides RAMBoost, a memory optimizer program, that rearranges the existing items in your
CONFIG.SYS and AUTOEXEC.BAT files for you when you run the RAMBoost Setup program. RAMBoost
Setup rearranges your configuration and restarts the computer to load programs into upper memory. For
information about using the upper memory area, see Chapter 6, “Making More Memory Available” on
page 43.
DOS Command Problems
I accidentally deleted a DOS file. Can I get it back?
If you inadvertently delete a DOS file that you need, there are two ways to get the file back:
Restore the file by using the UNDELETE command.
The UNDELETE command can restore a deleted file. It is effective only if you have not changed any
of the information on your hard disk or diskette after deleting that file. If you move or change any files
or directories, you might not be able to restore the deleted file. For information about the UNDELETE
command, type help undelete at the DOS command prompt.
**
Lotus is a trademark of the Lotus Corporation.
**
Intel is a trademark of the Intel Corporation.
**
AST is a trademark of AST Research Incorporated.
52
PC DOS 7 Concise User’s Guide (OEM Version)
Rerun SETUP using the /e switch.
During installation, Setup copies all the DOS files and all the files for the optional tools you selected to
your hard drive. By rerunning SETUP using the /e switch, the file that was deleted will be restored.
However, to save some time, you first need to determine whether the file that was deleted is either:
An optional tool file.
A DOS file pertaining to the operating system.
By determining whether a DOS file or an optional tool file, you save time because only the specified group
of files are copies.
I just got the error message Out of Memory right in the middle of running DEFRAG. How can I
make DEFRAG finish running?
To ensure this problem does not occur again, disable all TSRs before running DEFRAG. This will free up
conventional memory.
Follow the prompt to reboot your computer. Then, run DEFRAG again to run the DEFRAG routine. The
problem that caused this message was that DEFRAG used up all of the conventional memory available.
What should I do when the program or device driver reports the wrong version of DOS?
Some programs or device drivers run only with specific versions of DOS. If a message appears indicating
a program or device driver does not run with DOS, contact your vendor to get an updated program or to
find out whether the current version of the program or device driver is actually compatible with DOS.
If the current version of the program or device driver is compatible with DOS, use the SETVER command
to change the version number that DOS reports to the program or device driver. When you use SETVER,
the program or device driver interprets DOS as the version it is designed to use. For example, if a
program named MYAPP.EXE runs only with DOS 3.3 or earlier, you would type:
setver myapp.exe 3.3
This entry updates the Setver table with your program name. DOS will then report the changed version
number to the program if there is a DEVICE command for the SETVER.EXE device driver in your
CONFIG.SYS file. If the program is compatible with DOS, the SETVER command eliminates the apparent
incompatibility.
Note: Make sure there is only one SETVER.EXE on your hard disk, because each SETVER.EXE
contains a separate version table.
Type help setver for more information about the SETVER command.
Warning: Contact your software vendor for information about whether a program works with PC DOS 7.
It is possible that IBM has not verified whether the program will run successfully if you use the SETVER
command to change the program version number and version table. If you run the program after
changing the version table in DOS, you might lose or corrupt data, or introduce system instabilities. If you
do not contact your software vendor to determine the compatibility of a specific program with DOS, IBM is
not responsible for any loss or damage.
Chapter 7. Troubleshooting
53
File Update Utility
I made changes to my directory pairs and now I can’t find them. What happened?
If you update directory pairs before you select Update From Diskette, directory changes on the “to”
location are replaced. You must re-enter your directory changes.
I keep running into memory problems? Am I doing something wrong?
Using File Update from the DOSSHELL can cause memory problems. Exit from the DOSSHELL (F3)
before starting File Update.
My files are “out of sync” at the base and remote locations. How do I align and synchronize my
files without having to manually copy files from one location to the other?
If the files at your locations are not synchronized, select Copy all files from all directories from the
Custom File Selection choice.
I am missing files. What can I do?
If you are missing files, make sure that:
The extension is not included in the Files Being Excluded list.
The subdirectory is defined in the Directory Pairs list.
54
PC DOS 7 Concise User’s Guide (OEM Version)
Appendix A. Notices
References in this publication to IBM products, programs, or services do not imply that IBM intends to
make these available in all countries in which IBM operates. Any reference to an IBM product, program,
or service is not intended to state or imply that only that IBM product, program, or service may be used.
Subject to IBM’s valid intellectual property or other legally protectable rights, any functionally equivalent
product, program, or service may be used instead of the IBM product, program, or service. The evaluation
and verification of operation in conjunction with other products, except those expressly designated by IBM,
are the responsibility of the user.
IBM may have patents or pending patent applications covering subject matter in this document. The
furnishing of this document does not give you any license to these patents. You can send license
inquiries, in writing, to:
IBM Director of Licensing
IBM Corporation
500 Columbus Avenue
Thornwood, NY 10594
U.S.A.
Trademarks and Service Marks
The following terms, denoted by an asterisk (*) in this publication, are trademarks or service marks of the
IBM Corporation in the United States or other countries:
AS/400
CGA
EGA
IBM
IBM Personal Computer (PC)
IBM Token Ring
Micro Channel
OS/2
Personal Computer AT (PC/AT)
Personal Computer XT (PC/XT)
Personal System/2
Personal System/55
PS/2
PS/ValuePoint
RISC System/6000
VGA
XGA
The following terms, denoted by a double asterisk (**) in this publication, are trademarks of other
companies as follows:
AST
BlueMAX
dBASE
Helix
Hercules
Intel
LapLink
Lotus
Microsoft
MS-DOS
MSCDEX
Netrork
Novell NetWare
Novell
PC Card
PCMCIA
Phoenix
QEMM
Copyright IBM Corp. 1981, 1997
AST Research, Inc.
Qualitas, Inc.
Borland International, Inc.
Helix Corporation
Hercules Computer Technology, inc.
Intel Corporation
Traveling Software, Inc.
Samna Corporation
Microsoft Corporation
Microsoft Corporation
Microsoft Corporation
Helix Software Company
Novell Incorporated
Novell Incorporated
Personal Computer Memory Card International
Association
Personal Computer Memory Card International
Association
Phoenix Technologies, Ltd.
Quarterdeck Office Systems
55
Qualitas
Quarterdeck Expanded Memory Manager
Weitek
Windows
386
386MAX
8086
8088
80286
80386
56
PC DOS 7 Concise User’s Guide (OEM Version)
Qualitas, Inc.
Quarterdeck Office Systems
Weitek Corporation
Microsoft Corporation
Intel Corporation
Qualitas, Inc.
Intel Corporation
Intel Corporation
Intel Corporation
Intel Corporation
Index
Special Characters
/? switch for online help 13
/F switch (CHKDSK) 6
/int15 switch 52
* (IBM trademark) 55
** (other company’s trademark)
= (E Editor) 28
55
Numerics
386MAX
48
A
allocation units
recovering 6
APPEND command 21
ASCII 17
ATTRIB command 6
attribute
file 6
AUTOEXEC.BAT file
editing 20
explanation of 15
multiple configurations 20
startup commands in 20
using to customize system 20
Autosave command (E Editor) 27
B
base location, File Update 33
block, configuration 19
boot
bypassing startup commands 15
commands 15
bootable diskette
See system diskette
BUFFERS command 18
bypassing
AUTOEXEC.BAT commands 16
CONFIG.SYS commands 15
C
calling
the E Editor 23
CD command 6
CD-ROM, installing a device driver
changing
AUTOEXEC.BAT file 20
CONFIG.SYS file 17
Copyright IBM Corp. 1981, 1997
17
changing (continued)
directory (CD command) 6
version table in DOS 53
CHKDSK /F command 6
CHKDSK command
increasing disk space 6
choices (menu) for File Update 36
closing a file (E Editor) 24
CMDREF online book 9
combination keys 11
command
ATTRIB 6
CD (change directory) 6
CHKDSK /F 6
CONFIG.SYS 16
COPY 6
DEFRAG 53
DELETE 7
DEVICE 18
DEVICEHIGH 18
DIR (directory) 7
DOS=HIGH 51
E (Editor) 7
FC (File Compare) 7
FIND 7
FORMAT 7
HELP 7, 12
MD (make directory) 8
MEM 43
MORE 8
MOVE 8
PATH 8
PROMPT 8
RAMSETUP 45
RD (Remove Directory) 8
REM 46
REN (rename) 8
SETVER 53
TREE command 33
UNDELETE 7
VIEW 9
XCOPY 8
commands
for CONFIG.SYS file 16
for help if using /? switch 13
for help with DOS commands 12
for help with error messages 12
for startup in AUTOEXEC.BAT 20
troubleshooting tips for 52
common block, multiple configurations 19
common installation questions 51
57
comparing files, FC command 7
CONFIG.SYS file
adding commands to 16
bypassing commands in 15
changing 17
confirming each command during startup 51
editing 17
example of 18
explanation of 15
multiple configurations 20
configuration
blocks, defined 19
common blocks 19
menu block 19
system 15
configuring
configuration considerations 45
RAMBoost 45
confirming each CONFIG.SYS command 51
Contents push button 11
copying
directories 8
text (ALT+C) using E Editor 31
CPSCHED command 21
creating E Editor file 26
cursor movement
keys 29
move to beginning of marked area (ALT+Y) 31
move to end of marked area (ALT+E) 31
customizing
AUTOEXEC.BAT file 20
E Editor 29
device, hardware 17
DEVICEHIGH command 18
DIR command 7
directories
changing to another 6
copying 8
making 8
moving files 8
recovering deleted files from 7
viewing contents of 7
directory
description of 4
new 8
parent 4
directory tree 4
description of 4
disk, definition of fixed disk 3
diskette
bootable 15
diskettes
formatting 7
transferring File Updates to 38
disks
preparing for DOS files 7
recovering allocation units 6
document format, special 17, 20
documentation links 11
DOS=HIGH command 51
DOS=HIGH,UMB command 18
DOSERROR online book 9
DOSREXX online book 9
drawing lines 24
D
E
data file, definition of 3
DATAMON command 21
defaults (E Editor)
function keys 24
margin settings 26
defining a startup menu 19
DEFRAG command 53
DELETE command 7
deleting
directory entry, File Update 35
marked text (ALT+D) 31
DEVICE command 18
device driver
386MAX 48
explanation of 17
installable 17
Netroom 48
order in CONFIG.SYS file 18
QEMM386 48
RAMBOOST.EXE 47
E Editor
activating the menu 24
cursor movement keys 29
editing a file 24
function keys 24
naming a file 24
printing a file 29
restoring a line 24
saving files 27
E command 26
E.INI file 29
editing
AUTOEXEC.BAT file 20
files using E Editor 24
multiple files 28
multiple files (E Editor) 28
EMM386
commenting out for RAMBoost 46
including noems switch 18
putting device drivers in order 18
simulating expanded memory 18
58
PC DOS 7 Concise User’s Guide (OEM Version)
EMM386 (continued)
using with expanded-memory manager
using with ram switch 18
using with RAMBoost 44
error messages
getting help for online 12
out of memory (DEFRAG) 53
searching for online 12
using online book 9
examples of commands 11
exiting
an E Editor file 26
E Editor 26
PC DOS Viewer 11
extended memory (XMS) 52
F
F1 for online help 13
F5 during startup 15, 51
F8 during startup 16, 51
FC command 7
features of
E Editor 23
file
attributes described 6
deletion 52
extensions 4
name and extension 3
name restrictions 4
names of 3
specification (path and file name) 5
types of 3
File Update
installing at base location 33
installing on a PC (remote) 38
synchronizing files 33
transferring files to remote 37
troubleshooting 54
using menu choices 36
using with LAN-connected system 40
files
comparing using the FC command 7
copying 6
copying to a directory 8
deleting 7
naming 3
printing using E Editor 24, 29
recovering if deleted 7
renaming 8
saving QCONFIG output to 48
storing data in 3
transferring to remote location 37
viewing attributes of 6
FILES command 18
52
fill marked area (ALT+F) using E Editor
FIND command 7
FORMAT command 7
format, special for documents 17, 20
formatting
disks 7
paragraphs with E Editor 31
preparing for DOS files 7
Forward push button 11
function
keys for E Editor 24
31
G
getting help
E Editor 24, 25
online other than PC DOS Viewer
using the /? switch 13
using the PC DOS Viewer 13
12
H
help
F1 key 13
for E Editor 25
from within the PC DOS Viewer 13
Help menu option 13
menu option, PC DOS Viewer 11
online about PC DOS Viewer 10
online other than PC DOS Viewer 12
push button, PC DOS Viewer 11
HELP command 12
Help menu option 13
hypertext links 11
I
INCLUDE command 20
INF file extension, online books 9
INI file
E.INI 29
RAMSETUP.INI 45
installation device driver 17
installing
answering problems 51
File Update at remote location 39
on a LAN-connected system 40
on a remote PC 38
K
KEYB command 21
keys
cursor movement, E Editor 29
for E Editor functions 24
help in PC DOS Viewer 11
Index
59
naming
a file 3
a file in E Editor 24
unnamed E Editor file
Netroom 48
noems switch 18
L
lines, drawing 24
loading
E Editor 23
27
M
MD (make directory) command 8
MEM command 43
memory
extended memory (XMS) 52
Upper Memory Area 52
memory manager
EEMS/EMS 4.0 types 44
other types of and RAMBoost 44
PC DOS-provided 44
used with PC DOS 7 52
memory-resident program 21
menu
block for multiple configurations 19
choices for File Update 36
E Editor 24
option for PC DOS Viewer help 13
system startup choices 19
messages
incorrect DOS version 53
online book of errors 12
out of memory 53
startup 51
modifying E Editor file 26
MORE command 8
MOUSE command 21
MOVE command 8
movement
of cursor 29
of cursor to beginning of marked area (ALT+Y)
of cursor to end of marked area (ALT+E) 31
moving
around in E Editor 29
around in the PC DOS Viewer 11
marked text using E Editor 31
MSCDEX command 17, 21
multiple
.INI files 44
configurations with RAMBoost 44
configurations, common block 19
configurations, menu block 19
editing, E Editor 28
files, editing (E Editor) 28
menu block 19
system configurations 19
N
60
PC DOS 7 Concise User’s Guide (OEM Version)
O
online book
exiting from 11
getting help for 12
names of 9
starting the PC DOS Viewer 9
table of contents 11
viewing the screen 10
online help
E Editor 25
E Editor F1 key 24
getting for the PC DOS Viewer 12
PC DOS Viewer 12
opening files using E Editor 24
overlay text using E Editor 31
P
31
paragraph, formatting (ALT+P) using E Editor 31
parent directory 4
PC DOS 7
error messages 12
memory managers 52
README.TXT file 51
starting the PC DOS Viewer from 9
troubleshooting commands 52
version number 53
PC DOS Viewer
definition of 9
exiting from 11
getting help for 12
getting help while using 13
getting other types of online help 12
moving around in 11
moving around in the PC DOS Viewer 11
starting from a DOS Command Prompt 9
starting from PC DOS Shell 9
starting from Windows 9
starting the online viewer 9
using the HELP command 12
using the viewer 9
viewing the initial PC DOS Viewer screen 10
preview for File Update 38
Previous push button 11
Print command, E Editor 29
Print push button 11
printing
E Editor file 24, 29
problem determination
File Update utility 54
PC DOS 7 commands 52
problem resolutions 51
program file, definition of 3
push button, PC DOS Viewer
Contents 11
Forward 11
Help 11
Index 11
Previous 11
Print 11
Search 11
Q
QEMM386 48
quitting
an E Editor file
26
R
ram switch with EMM386 18
RAMBoost
configuring 45
considerations before configuring 45
overview 43
RAMSETUP command 45
requirements for 44
system requirements 44
RAMSETUP.INI file 45
README.TXT file 51
rebooting
CTRL+ALT+DEL 21
without system file commands 15
recovering
allocation units 6
deleted files 7
reflowing
any position (ALT+P) using E Editor 31
marked area (ALT+R) using E Editor 31
REM command 46
remote location, File Update 39
RENAME command 8
restarting
CTRL+ALT+DEL 21
without system file commands 15
restarting problem 51
restore a file 52
restoring
an E Editor line 24
root directory 4, 15
running 15
system without system commands 15
S
Save command (E Editor) 27
saving
E Editor file and quitting (F4) 24, 26, 27
edited E Editor files (F2) 24, 27
Search push button 11
SETUP
reasons for not running 51
SETVER command 53
shift marked text
to the left (ALT+F7) 31
to the right (ALT+F8) 31
SMARTDRV command 21
special document format 17, 20
speeding up your system 6
starting
computer if troubleshooting 51
DOS by bypassing startup commands 15
E Editor 26
the E Editor 23
the online documentation viewer 9
starting the PC DOS Viewer
from PC DOS Shell 9
from the DOS Command Prompt 9
from Windows 9
startup commands, AUTOEXEC.BAT 20
startup commands, bypassing 15
startup diskette
See system diskette
startup menu 19
switch
/? for command syntax 13
/F for CHKDSK 6
/int15 for HIMEM.SYS 52
system
requirements for RAMBoost 44
system diskette
using Setup Diskette for 15
system file
bypassing 15
configuration 15
T
table of contents 11
text
file extensions 4
file, creating 26
text editor
E Editor 23
special document format 17, 20
topics in the PC DOS Viewer 10
transferring
updated files to diskette 38
updated files to other location 39
Index
61
transferring (continued)
updated files to remote location
TREE command 33
tree, directory 4
troubleshooting
File Update utility 54
PC DOS 7 51
PC DOS 7 commands 52
TSR programs 21
37
U
UNDELETE command 7
undeleting, restore a DOS file
unnamed file in E Editor 27
Upper Memory Area 52
52
V
version of DOS 53
version table for SETVER 53
VIEW command 9
viewing
file attributes 6
PC DOS Viewer screen, initial
using MORE command 8
10
W
wildcard 4, 8
Windows
starting the PC DOS Viewer from
using with File Update 33
9
X
XCOPY command 8
XMS extended memory
62
52
PC DOS 7 Concise User’s Guide (OEM Version)