1
Appeon Developer User Guide
Appeon® for PowerBuilder® 2013
FOR WINDOWS & UNIX & LINUX
DOCUMENT ID: DC20238-01-0651-01
LAST REVISED: May 15, 2013
Copyright © 2000-2013 by Appeon Corporation. All rights reserved.
This publication pertains to Appeon software and to any subsequent release until otherwise
indicated in new editions or technical notes. Information in this document is subject to
change without notice. The software described herein is furnished under a license agreement,
and it may be used or copied only in accordance with the terms of that agreement.
No part of this publication may be reproduced, transmitted, or translated in any form or by
any means, electronic, mechanical, manual, optical, or otherwise, without the prior written
permission of Appeon Corporation.
Appeon, the Appeon logo, Appeon Developer, Appeon Enterprise Manager, AEM,
Appeon Server and Appeon Server Web Component are registered trademarks of Appeon
Corporation.
Sybase, Adaptive Server Anywhere, Adaptive Server Enterprise, iAnywhere, PowerBuilder,
Sybase Central, and Sybase jConnect for JDBC are trademarks or registered trademarks of
Sybase, Inc.
Java and JDBC are trademarks or registered trademarks of Sun Microsystems, Inc.
All other company and product names used herein may be trademarks or registered
trademarks of their respective companies.
Use, duplication, or disclosure by the government is subject to the restrictions set forth
in subparagraph (c)(1)(ii) of DFARS 52.227-7013 for the DOD and as set forth in FAR
52.227-19(a)-(d) for civilian agencies.
Appeon Corporation, 1/F, Shell Industrial Building, 12 Lee Chung Street, Chai Wan District,
Hong Kong.
Contents
1 About This Book ................................................................................................... 1
1.1 Audience ..................................................................................................... 1
1.2 How to use this book .................................................................................. 1
1.3 Related documents ..................................................................................... 2
1.4 If you need help .......................................................................................... 3
2 Introduction ............................................................................................................ 4
2.1 Appeon Developer toolbar in PowerBuilder ................................................ 4
2.2 Web and/or Mobile application development with Appeon Developer ......... 5
3 Before You Begin .................................................................................................. 7
3.1 Installing Appeon for PowerBuilder ............................................................. 7
3.2 Configuring application database connectivity ............................................ 7
3.3 Starting Appeon Server ............................................................................... 7
4 Configuring Appeon Developer ............................................................................. 9
4.1 Using Appeon Developer Configuration Wizard .......................................... 9
4.1.1 Configuring basic settings ............................................................... 10
4.1.2 Selecting PBL file(s) ....................................................................... 12
4.1.3 Configuring deployment settings ..................................................... 13
4.1.4 Selecting DB Type(s) ...................................................................... 14
4.1.5 Declaring transaction object(s) ........................................................ 14
4.1.6 Selecting image files ....................................................................... 17
4.1.7 Selecting INI files ............................................................................ 17
4.1.8 Selecting External files .................................................................... 18
4.1.9 Summary ......................................................................................... 19
4.2 Using Configure Tool ................................................................................ 20
4.2.1 Managing application profiles .......................................................... 20
4.2.1.1 Application Profiles tab page ................................................ 21
4.2.1.2 Application profile settings .................................................... 22
4.2.2 Managing database type profiles .................................................... 41
4.2.3 Managing server profiles ................................................................. 44
4.2.3.1 Server Profiles tab page ....................................................... 44
4.2.3.2 Appeon Server profile settings .............................................. 45
4.2.3.3 Web Server profile settings ................................................... 48
4.2.4 Managing deployment profiles ........................................................ 53
4.2.4.1 Deployment Profiles tab page ............................................... 54
4.2.4.2 Deployment profile settings ................................................... 54
4.2.5 Managing data source profiles ........................................................ 56
5 Using UFA Tool .................................................................................................. 60
5.1 Analyzing an application ........................................................................... 61
5.1.1 Tasks required before you perform feature analysis ....................... 61
5.1.2 Accessing the UFA tool .................................................................. 62
5.1.3 Performing feature analysis ............................................................ 63
5.1.4 Undetected Unsupported Features ................................................. 65
5.2 Working with UFA Report ......................................................................... 68
5.2.1 Modifying unsupported features ...................................................... 68
5.2.2 Manipulating the UFA Report .......................................................... 70
5.2.2.1 Opening or saving a UFA Report .......................................... 70
5.2.2.2 Selecting report view mode .................................................. 71
5.2.2.3 Searching for UFA Report items ........................................... 71
5.2.2.4 Filtering UFA Report items ................................................... 71
5.2.2.5 Specifying report display level .............................................. 74
5.2.2.6 Defining the priority settings of unsupported features ........... 75
5.2.2.7 Customizing the general settings of the UFA Report ............. 76
6 Deploying PowerBuilder Applications .................................................................. 77
6.1 Deployment performance .......................................................................... 77
6.1.1 Speed of Deployment Process ....................................................... 77
6.1.2 Deployment duration for full deployments ....................................... 78
6.1.3 Deployment duration for incremental deployments ......................... 78
6.2 Deployment process ................................................................................. 79
6.2.1 Preparing the PowerBuilder application .......................................... 79
6.2.2 Specifying the deployment settings ................................................. 79
6.2.2.1 Selecting the deployment mode ............................................ 81
6.2.3 Deploying the PowerBuilder application .......................................... 82
7 Debugging Appeon Web Applications ................................................................. 89
7.1 Important Requirements ............................................................................ 89
7.2 Introduction to the debugging procedure .................................................. 90
7.3 Starting Appeon Debugger ........................................................................ 90
7.3.1 Views in Appeon Debugger ............................................................ 92
7.4 Setting breakpoints ................................................................................... 92
7.4.1 Code lines that can be set as breakpoints ...................................... 92
7.4.2 Methods for setting breakpoints ...................................................... 93
7.5 Running the application in debug mode .................................................... 94
7.6 Examining an application at a breakpoint ................................................. 95
7.6.1 Special variable and expression handlings ..................................... 95
7.6.2 Adding variables or expressions to Watch view .............................. 96
7.6.3 Changing the value of a variable or expression .............................. 97
7.6.4 Evaluating an expression ................................................................ 98
7.6.5 Examining context in Call Stack view ............................................. 98
7.6.6 Stepping through the application .................................................... 98
7.7 Fixing the code/stopping the debug procedure ......................................... 98
8 Running Appeon Applications ............................................................................. 99
8.1 Requirements ............................................................................................ 99
8.1.1 Windows account privileges ............................................................ 99
8.1.2 Internet Explorer settings ................................................................ 99
8.1.3 Language setting requirements ..................................................... 106
8.1.4 Disabling anti pop-up software ...................................................... 107
8.2 Accessing Appeon applications ............................................................... 107
8.2.1 URLs for Appeon applications ...................................................... 107
8.2.2 Running Appeon applications ....................................................... 108
8.2.2.1 Launching applications from the Run button ....................... 108
8.2.2.2 Selecting a run mode .......................................................... 110
8.3 Appeon DataWindow menu .................................................................... 111
8.3.1 Enabling Appeon DataWindow menu ............................................ 111
8.3.2 Using Appeon DataWindow Menu ................................................ 111
8.3.2.1 Find ..................................................................................... 111
8.3.2.2 Sort and filter ......................................................................
8.3.2.3 DataWindow printing ...........................................................
8.3.2.4 SaveAs (Obsolete) ..............................................................
8.3.2.5 Additional Enhanced Features ............................................
9 Launching Appeon Workspace Emulator ..........................................................
10 Using Information Manager .............................................................................
10.1 Viewing the reports and logs ................................................................
11 Packaging Applications ...................................................................................
11.1 Packaging a deployment project ...........................................................
11.1.1 What can be packaged? .............................................................
11.1.2 Packaging instructions ................................................................
11.1.3 Modifying the deploy-config file ...................................................
11.1.4 Installing and uninstalling an Appeon application ........................
11.1.4.1 Points to note before installation .......................................
11.1.4.2 Installing an application .....................................................
11.1.4.3 Uninstalling an application ................................................
11.2 Packaging a native mobile project ........................................................
11.2.1 Points to check before packaging ...............................................
11.2.2 Packaging instructions ................................................................
11.3 Customizing and packaging Appeon Workspace ..................................
12 Undeploying Appeon Applications ...................................................................
12.1 Undeploying instructions .......................................................................
12.1.1 Undeploying with the Deployment Profile mode ..........................
12.1.2 Undeploying with the Appeon Server mode ................................
13 Developing with Code Insight .........................................................................
13.1 Activating Code Insight .........................................................................
13.1.1 Configuring Code Insight ............................................................
13.1.2 Enabling Code Insight .................................................................
13.2 Coding with Code Insight ......................................................................
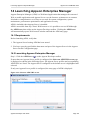
14 Launching Appeon Enterprise Manager ..........................................................
14.1 Requirements ........................................................................................
14.2 Launching Appeon Enterprise Manager ................................................
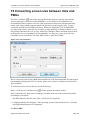
15 Converting screen size between dots and PBUs ............................................
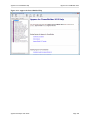
16 Appeon for PowerBuilder Help ........................................................................
17 Extended Toolkit ..............................................................................................
17.1 DLL/OCX Files Package Tool ...............................................................
17.1.1 Packaging DLL/OCX files ............................................................
17.1.2 Installing and uninstalling DLL/OCX files ....................................
17.1.2.1 Installing DLL/OCX files ....................................................
17.1.2.2 Uninstalling DLL/OCX files ................................................
17.2 Appeon Silent Installer (Windows EAServer only) .................................
17.2.1 Creating folder structure of Silent Installer ..................................
17.2.2 Copying installation program of EAServer, Appeon Server,
Appeon Server EBF or Appeon applications ..........................................
17.2.3 Customizing configuration file .....................................................
17.2.3.1 Installation Types ..............................................................
17.2.3.2 EAServer and ASA Path ...................................................
17.2.3.3 EAServer Host Name, Port, Username and Password ......
112
115
116
117
119
121
121
124
124
124
125
134
135
135
135
145
151
151
151
159
170
170
171
174
178
178
179
181
182
184
184
184
186
188
190
190
190
194
194
197
199
199
201
201
202
202
203
17.2.3.4 Appeon Server Port, Username and Password .................
17.2.3.5 Web Server Path ..............................................................
17.2.3.6 Setup Log Path .................................................................
17.2.3.7 Web Applications ..............................................................
17.2.3.8 Web Application Uninstall Program Path ..........................
17.2.3.9 Resource Language ..........................................................
17.2.3.10 SilentInstall.txt example ..................................................
17.2.4 Burning installation CDs ..............................................................
17.2.5 Running Appeon Silent Installer (for End Users) .........................
17.2.5.1 Installing Appeon Server, EAServer and/or Appeon
applications .....................................................................................
17.2.5.2 Uninstalling Appeon Server, EAServer and/or Appeon
applications .....................................................................................
17.2.5.3 FAQs .................................................................................
17.3 Appeon Developer Toolbar Register Tool .............................................
18 Technical Support ...........................................................................................
Index .....................................................................................................................
204
204
205
205
206
207
207
209
210
210
210
210
211
213
215
About This Book
Appeon for PowerBuilder 2013
1 About This Book
1.1 Audience
This book is written for PowerBuilder developers using Appeon Developer.
1.2 How to use this book
There are sixteen chapters in this book.
Chapter 1: About This Book
A general description of this book.
Chapter 2: Introduction
An overview of Appeon Developer.
Chapter 3: Before you begin
Some important instructions that you MUST follow before using Appeon Developer.
Chapter 4: Configuring Appeon Developer
Instructions for configuring Appeon Developer.
Chapter 5: Using UFA Tool
Instructions for analyzing the unsupported features in a PowerBuilder application.
Chapter 6: Deploying PowerBuilder Applications
Instructions for deploying PowerBuilder applications to the Web or the Mobile.
Chapter 7: Debugging Appeon Web Applications
Instructions for using Appeon Debugger to debug an Appeon Web application.
Chapter 8: Running Appeon Applications
Instructions for running Appeon applications after deployment.
Chapter 9: Launching Appeon Workspace Emulator
Instructions for launching Appeon Workspace.
Chapter 10: Using Information Manager
Instructions for viewing reports and log files generated in the Appeon migration process.
Chapter 11: Packaging Applications
Instructions for using Appeon application package tool to generate a deployment package, a
native mobile project, or customization and package for Appeon Workspace.
Chapter 12: Undeploying Appeon Applications
Instructions on how to undeploy Appeon applications.
Chapter 13: Developing with Code Insight
Instructions on how to use the Appeon Code Insight feature.
Chapter 14: Launching Appeon Enterprise Manager
Appeon Developer User Guide
Page 1
About This Book
Appeon for PowerBuilder 2013
Instructions for launching Appeon Enterprise Manager from Appeon Developer.
Chapter 15: Converting screen size between pixels and PBUs
Instructions for using Appeon Size Calculator.
Chapter 16: Appeon for PowerBuilder Help
Instructions for launching the Appeon HTML help file.
Chapter 17: Extended Toolkit
Instructions for using the extended tools provided by Appeon: the DLL/OCX Files Package
tool, the Appeon Silent Installer, and the Appeon Developer Toolbar Register tool.
Chapter 18: Technical Support
Important information for technical support
1.3 Related documents
Appeon provides the following user documents to assist you in understanding Appeon for
PowerBuilder and its capabilities:
• Introduction to Appeon:
Guides you through all the documents included in Appeon for PowerBuilder.
• New Features Guide:
Introduces new features and changes in Appeon for PowerBuilder.
• Appeon Mobile Tutorials:
Gives instructions on deploying, running, and debugging Appeon applications, distributing
native mobile apps, and configuring Appeon server clusters.
• Appeon Installation Guide:
Provides instructions on how to install Appeon for PowerBuilder successfully.
• Development Guidelines for Appeon Mobile:
Introduces general guidelines on developing apps with Appeon Mobile.
• Migration Guidelines for Appeon Web:
A process-oriented guide that illustrates the complete diagram of the Appeon Web
migration procedure and various topics related to steps in the procedure, and includes a
tutorial that walks the user through the entire process of deploying a small PowerBuilder
application to the Web.
• Features Help for Appeon:
Provides a detailed list of supported PowerBuilder features which can be converted to the
Web/Mobile with Appeon as well as which features are unsupported.
• Appeon Developer User Guide:
Appeon Developer User Guide
Page 2
About This Book
Appeon for PowerBuilder 2013
Provides instructions on how to use the Appeon Developer toolbar in Appeon for
PowerBuilder.
• Workarounds & API Guide:
Provides resolutions for issues, such as unsupported features, etc,. encountered when using
Appeon for PowerBuilder.
• Appeon Workspace User Guide:
Gives a general introduction on Appeon Workspace and provides detailed instructions on
how to use the app.
• Appeon Server Configuration Guide:
Provides instructions on how to configure Appeon Server Monitor, establish connections
between Appeon Servers and database servers, and configure AEM for maintaining
Appeon Server and Appeon deployed applications.
• Web Server Configuration Guide:
Describes configuration instructions for Web Servers to work with a single Appeon Server
or an Appeon Server cluster.
• Troubleshooting:
Provides information on troubleshooting issues; covering topics, such as product
installation, application deployment, AEM, and Appeon application runtime issues.
• Appeon Performance Tuning Guide:
Provides instructions on how to modify a PowerBuilder application to achieve better
performance from its corresponding Web/mobile application.
• Testing Appeon Web Applications with QTP:
Provides instructions on how to test Appeon Web applications with QTP.
1.4 If you need help
If you have any questions about this product or need assistance during the installation
process, access the Technical Support Web site at http://www.appeon.com/support.
Appeon Developer User Guide
Page 3
Introduction
Appeon for PowerBuilder 2013
2 Introduction
Appeon Developer, a component of Appeon for PowerBuilder, extends the capabilities of
PowerBuilder, allowing a new or existing PowerBuilder application to be converted into a
bona fide Web application or a native mobile application using only PowerBuilder skills.
Appeon Developer provides a set of tools that enable the entire PowerBuilder-to-Web or
PowerBuilder-to-Mobile process to take place within the PowerBuilder IDE. These tools
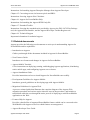
are accessed via a toolbar in the PowerBuilder IDE, which automatically loads each time
PowerBuilder is opened.
Figure 2.1: Appeon Developer toolbar embedded in the PowerBuilder IDE
Appeon Developer converts a PowerBuilder application by parsing the PBLs (source code)
of PowerBuilder applications and generating a set of corresponding HTML, JavaScript and
XML files. When deployed by Appeon Server, these generated files form an exact Webbased or mobile-OS-based replica of the source PowerBuilder application. Any user can
open a standard Microsoft Web browser and access the Web-based version of the original
PowerBuilder application over the Internet, an intranet, or an extranet; or access the native
mobile application deployed by Appeon using a mobile device, such as an iPhone, an iPad,
etc.
2.1 Appeon Developer toolbar in PowerBuilder
All the Appeon Developer tools conform to the US Government Section 508 Accessibility
Guidelines.
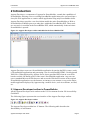
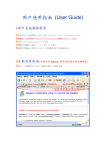
The following figure represents the user interface of the Appeon Developer toolbar.
Figure 2.2: Appeon Developer toolbar
The Appeon Developer toolbar has 15 buttons. The following table describes the
functionality of each button.
Appeon Developer User Guide
Page 4
Introduction
Appeon for PowerBuilder 2013
Table 2.1: Appeon Developer toolbar functions
Button Name
or
Function
Config Wizard
Provides a wizard for quick configuration of Appeon Developer
for Web or mobile conversion.
Configure
Sets configurations of Appeon Developer for Web or mobile
conversion.
Analyze
Analyzes application source code for unsupported features
before deployment. This analysis can cover the whole
application, at object level or within an inheritance hierarchy (It
displays as in PowerBuilder 11.5).
Code Insight
Develops PowerBuilder applications that are free of Appeon
unsupported features.
Deploy
Starts the complete process of deploying a PowerBuilder
application to the Web or Mobile.
Run
Runs the deployed Web application (in Internet Explorer) or the
deployed mobile application (in Appeon Workspace Emulator).
Appeon
Debugger
Debugs Appeon applications.
Information
Manages logs and reports.
Package
Packages Appeon application files for installation.
Undeploy
Undeploys Web or mobile applications from Web Server(s) and
Appeon Server(s).
AEM
Launches Appeon Enterprise Manager (AEM).
Size Calculator
Converts the display size between Dots (Points) and PB Units.
Appeon
Workspace
Emulator
Launches Appeon Workspace Emulator.
Help
Searches, browses, prints, copies, and pastes useful information
from the Appeon user guides.
Get Support
Displays the product version and the support information. The
Check Update button in it allows you to check the Appeon
updates.
Apart from Code Insight and Information, only one Appeon Developer toolbar function can
be launched at any given time. This prevents an Appeon Developer process from interfering
with another.
2.2 Web and/or Mobile application development with Appeon
Developer
For either developing a new Web or native mobile application, or migrating an existing
PowerBuilder application onto the Web or to the Mobile, you need to perform three key tasks
in Appeon Developer: Analyze, Modify and Deploy Automatically.
Appeon Developer User Guide
Page 5
Introduction
Appeon for PowerBuilder 2013
If you use Appeon for PowerBuilder for developing a new Web or native mobile application,
the first step is to write a new PowerBuilder application (refer to Web RAD with Appeon
for PowerBuilder in the Appeon Migration Guide). It is recommended that the new
PowerBuilder application conforms to Appeon coding styles, as laid out in Appeon Features
Help, then you will expend less effort in the first two tasks: Analyze and Modify.
• Task 1: Analyze
You need to analyze the application PBLs for unsupported PowerBuilder objects and
features, using the PowerBuilder IDE extended with Appeon Developer. General rules
of thumb regarding how the application should be structured are outlined in Basic and
Architectural Requirements in Appeon Features Help. The application must meet these
requirements before the analysis can begin.
The first step results in an analysis report highlighting unsupported PowerBuilder objects
and code within the application.
• Task 2: Modify
Next, work around or remove the unsupported PowerBuilder objects and code that prevent
the Web or mobile application from running, using standard PowerBuilder programming.
Appeon Features Help and Appeon Code Examples (an Appeon demo PowerBuilder
application) will guide you through this process by providing information regarding
supported PowerBuilder features as well as example code for implementing these features.
Then, perform a full build of the application in PowerBuilder, ensure that there are no
bugs in the PowerBuilder code and that the application functions correctly.
The second task results in a PowerBuilder application that is ready for automatic
conversion to the Web or to the Mobile.
• Task 3: Deploy automatically
At the push of a button, you can now automatically generate a precise replica of the
PowerBuilder application, that deploys to the n-Tier architecture and can be accessed
by standard Internet Explorer Web browsers (Appeon Web applications) or in Appeon
Workspace on various mobile devices (Appeon Mobile applications).
Then, automatically deploy the generated Web or mobile application files to Appeon
Server. The third task results in a bona fide Web application or a native mobile application
with the look and feel of the source PowerBuilder application.
For detailed information about the Web or mobile conversion, please refer to the Appeon
Migration Guide.
Appeon Developer User Guide
Page 6
Before You Begin
Appeon for PowerBuilder 2013
3 Before You Begin
3.1 Installing Appeon for PowerBuilder
Follow the Appeon Installation Guide carefully; make sure that both Appeon Developer and
Appeon Server have been installed.
Verify that Appeon Developer has been installed to the Developer PC.
Verify that Appeon Server has been installed to the application server, such as, SAP Sybase
EAServer, SAP NetWeaver Application Server, Oracle WebLogic, IBM WebSphere,
TmaxSoft JEUS, JBoss, or Microsoft .NET Framework\IIS. Once Appeon Server has been
installed, the machine hosting Appeon Server is then referred to as Appeon Server.
If using a separate Web Server (e.g. Apache) instead of the application server built-in Web
server, verify that the Appeon Server Web Component has been installed to the Web Server.
Verify that all system requirements have been met for the Developer PC, Web Server,
Appeon Server, and the Database Server. Refer to the Appeon Installation Guide for details.
3.2 Configuring application database connectivity
Perform the following database configurations for all prospective PowerBuilder applications
that will be deployed with Appeon Developer:
1. Set up the database used by the PowerBuilder application to interface with Appeon Server
and the JDBC driver. Refer to the documentation from appropriate database vendors for
instructions.
2. Create the data source in Appeon Server. Appeon provides systematic instructions for
certified database systems. Refer to Setting up Appeon Server data sources in the Appeon
Server Configuration Guide for more information.
3. Map the transaction object in the target PowerBuilder application to the newly created
data source for the prospective Web or mobile application. You can either dynamically
set up the mapping via PowerScript following the instructions in Dynamic transaction
object to data source mapping in the Appeon Server Configuration Guide or establish the
mapping statically in Appeon Developer or AEM.
3.3 Starting Appeon Server
Appeon Developer interacts with Appeon Server and Web server during Web or mobile
deployment. Web or mobile applications are deployed to one or more Appeon Servers and
one or more Web servers. You should verify that the Appeon Server and Web server are
running before deployment. If you use the application server built-in Web server as the Web
server, you only need to start the application server/Appeon Server. For example, if you use
EAServer as the Appeon Server and EAServer HTTP Server as the Web server, you only
need to start the EAServer/Appeon Server. Otherwise, start both the Web server and Appeon
Server. Refer to the documents provided by the Web server vender for how to start the Web
server, and refer to the following instructions to start the Appeon Server.
Appeon Developer User Guide
Page 7
Before You Begin
Appeon for PowerBuilder 2013
Table 3.1: How to start Appeon Server
Appeon
Server
Operating Detailed Instructions
System
.NET
Windows Select Start > All Programs > Appeon for PowerBuilder 2013
> Appeon Server for .NET > IIS Manager
WebLogic
Windows Select Windows Start > All Programs > Appeon for
PowerBuilder 2013 > Appeon Server for WebLogic >
Instances > InstanceName > Start WebLogic
UNIX/
Linux
Run the appeonserver.sh file in the $appeon/bin/ folder, for
example:
$ $BEA_HOME/user_projects/domains/mydomain/appeon/bin/
appeonserver.sh
WebSphere
Windows Select Windows Start > All Programs > Appeon for
PowerBuilder 2013 > Appeon Server for WebSphere > Start
WebSphere
UNIX/
Linux
Run the appeonserver.sh file in the $appeon/bin/ folder, for
example:
$ $WebSphere/AppServer/appeon/bin/appeonserver.sh
JBoss
Windows Select Start > All Programs > Appeon for PowerBuilder 2013
> Appeon Server for JBoss > Instances > InstanceName >
Start JBoss
UNIX/
Linux
Run the appeonserver.sh file in the $appeon/bin/ folder, for
example:
$ $jboss-5.1.0GA/appeon/bin/appeonserver.sh
JEUS
Windows Select Start > All Programs > Appeon for PowerBuilder 2013
> Appeon Server for JEUS > Start JEUS
UNIX/
Linux
Run the appeonserver.sh file in the $appeon/bin/ folder, for
example:
$ $tmaxsoft/JEUS6.0/appeon/bin/appeonserver.sh
EAServer
Windows Select Windows Start > All Programs > Appeon for
PowerBuilder 2013 > Appeon Server for EAServer > Start
EAServer
UNIX/
Linux
Run the appeonserverstart.sh file in the $appeon/bin/ folder, for
example:
$ $JAGUAR/appeon/bin/appeonserverstart.sh
You can run EAServer/Appeon Server in different modes, debug
and normal, using different Java runtime versions and different
Java VMs. For details on how to specify the mode options in
the above syntax, refer to the EAServer System Administration
Guide.
Appeon Developer User Guide
Page 8
Configuring Appeon Developer
Appeon for PowerBuilder 2013
4 Configuring Appeon Developer
The settings configured in Appeon Developer are critical; they are used throughout the entire
PowerBuilder-to-Web or PowerBuilder-to-Mobile process. Appeon Developer settings
determine which PowerBuilder application will be converted to the Web or to the Mobile,
and the manner in which it will be deployed.
Before you attempt to use any other functionality on the toolbar, complete the following
tasks:
1. Set up an application profile for each of the PowerBuilder applications intended for
conversion. Each application profile tells Appeon Developer important information about
the application, such as which PBLs compose the PowerBuilder application, the database
type, etc.
During the application profile setup, set up a profile for the database type used by the
application. This enables Appeon Developer to generate the correct database syntax.
2. Set up at least one Appeon Server profile and one Web Server profile. This enables
Appeon Developer to utilize the Appeon Server and Web Server for deployment.
3. Set up at least one deployment profile, which links at least one Appeon Server and one
Web Server together. This tells Appeon Developer where to deploy the Web or the mobile
application.
Appeon provides a Config Wizard ( ) to quickly configure an application. With your
specifications, the wizard creates the application profile, database type profile, Appeon
Server profile, Web server profile, data source profile, and transaction object mapping. After
creation, all these profiles can be modified in the Configure tool ( ). Besides modifying
the above profile settings, the Configure tool provides you with advanced settings, such as
performance settings, parsing options, Web Services profiles, runtime settings, etc.
4.1 Using Appeon Developer Configuration Wizard
The settings in Appeon Developer Configuration Wizard are the same as those in the
Configure tool, therefore, only basic descriptions will be provided in this section. For detailed
descriptions, refer to Section 4.2, “Using Configure Tool”.
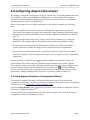
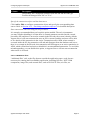
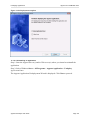
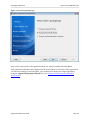
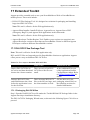
Click the Config Wizard button ( ) on the Appeon Developer toolbar to launch the Appeon
Developer Configuration Wizard.
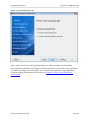
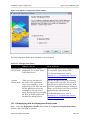
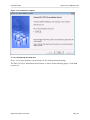
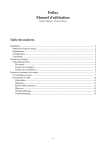
Carefully read the notes and requirements on the Welcome page of the Appeon Developer
Configuration wizard. Click Next to proceed.
Appeon Developer User Guide
Page 9
Configuring Appeon Developer
Appeon for PowerBuilder 2013
Figure 4.1: Welcome page
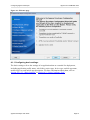
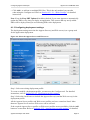
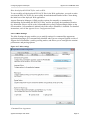
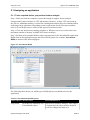
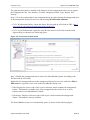
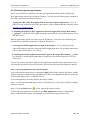
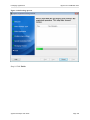
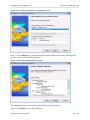
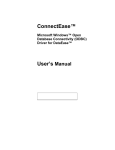
4.1.1 Configuring basic settings
The basic settings refer to the settings of an application that are essential for deployment,
including application profile name, web folder, project type, device type, mobile app name,
mobile app icon, and mobile app description. For more information about them, refer to
Section 4.2.1.2.1, “Basic Settings” in Section 4.2, “Using Configure Tool”.
Appeon Developer User Guide
Page 10
Configuring Appeon Developer
Appeon for PowerBuilder 2013
Figure 4.2: Configure basic settings of an application
Step 1: Specify the application profile name in the Application Profile Name text box.
The application profile name is used to identify the PowerBuilder application during the
entire PowerBuilder-to-Web or PowerBuilder-to-Mobile process.
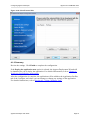
Step 2: Specify the application URL in the Web Folder text box.
The specified text is also used as the name of the folder created under the Web root of the
Web server for storing the files when the application is deployed.
Step 3: Select a project type from the Project Type dropdown list box.
Select "Mobile" if you intend to deploy your PowerBuilder application to mobile devices;
select "Web" if you intend to deploy your PowerBuilder application to the Web; select
"Universal" if you intend to deploy your PowerBuilder application to both the Web and
Mobile.
Step 4: (For mobile apps) Select a device type from the Device Type dropdown list box.
Tablet, Smartphone, and Both are listed for choices. For applications that are designed
for tablets, select "Tablet"; for applications that are designed for smartphones, select
"Smartphone"; for applications that are designed for both devices, select "Both".
Step 5: (For mobile apps) Enter an app name in the Mobile App Name text box.
The mobile app name specified will be displayed in the Appeon Workspace home screen
after the application is deployed to the Appeon Workspace.
Step 6: (For mobile apps) Specify an icon for your mobile applications by clicking the
Browse... button.
Appeon Developer User Guide
Page 11
Configuring Appeon Developer
Appeon for PowerBuilder 2013
The icon specified will be displayed on the Appeon Workspace home screen after your
application is deployed to Appeon Workspace.
Step 7: (For mobile apps) Enter a brief description in the Mobile App Description text box.
The description will be displayed on the home screen of Appeon Workspace as the
application's description after deployment.
Step 8: Click Next.
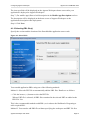
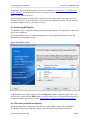
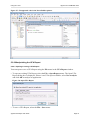
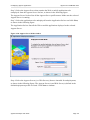
4.1.2 Selecting PBL file(s)
Specify the version and the location of the PowerBuilder application source code.
Figure 4.3: Select PBLs
You can add application PBLs using one of the following methods:
Method 1: Select the PBT file to automatically add the PBL files. Details are as follows:
• Click the browse (...) button to select the PBT file.
When a PBT file is selected, all PBL files contained in the selected PBT are added to the
PBL File List.
This is the recommended method to add PBLs, as it reduces the likelihood of forgetting to
add a required PBL.
Method 2: You can also add PBL files without specifying the workspace and PBT file first.
Appeon Developer User Guide
Page 12
Configuring Appeon Developer
Appeon for PowerBuilder 2013
• Click Add... to add one or multiple PBL files. This is the only method you can take
when using the Configure tool. Refer to Section 4.2.1.2.1, “Basic Settings” for detailed
instructions.
Note: Keep the Keep PBT Updated checkbox checked if you want Appeon to automatically
update the PBLs every time you deploy an application. This ensures that any newly added
PBLs will be deployed and yet avoid missing PBLs after deployment.
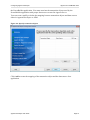
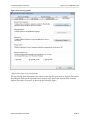
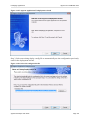
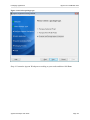
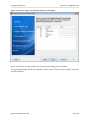
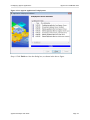
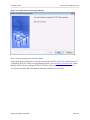
4.1.3 Configuring deployment settings
The deployment settings associate the Appeon Server(s) and Web server(s) as a group used
for the application deployment.
Figure 4.4: Select the Appeon Server and Web server
Step 1: Select an existing deployment profile.
To create or modify a deployment profile, you must use the Configure tool. For detailed
instructions, refer to Section 4.2.4.2, “Deployment profile settings”.
Step 2: Select the check boxes to include the Appeon Server(s) and the Web server(s) in the
deployment profile.
All the Appeon Server profiles and Web server profiles you have created are listed. More
than one Appeon Server and one Web server can be selected.
If the required Appeon Server profiles or Web server profiles are not available, click the Add
button to create them. Refer to Section 4.2.3.2, “Appeon Server profile settings” for detailed
Appeon Developer User Guide
Page 13
Configuring Appeon Developer
Appeon for PowerBuilder 2013
instructions on creating an Appeon Server profile and refer to Section 4.2.3.3, “Web Server
profile settings” for detailed instructions on creating a Web server profile.
Step 3: Click Next to proceed.
When the Next button is clicked, the wizard will test the connection to the Appeon Server
and the Web server. If the connection is successful, the deployment profile is saved with the
associated Appeon Server(s) and Web server(s).
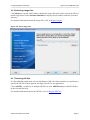
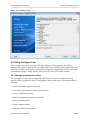
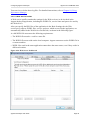
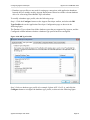
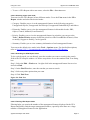
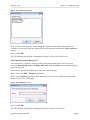
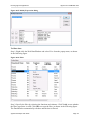
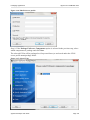
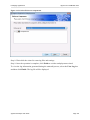
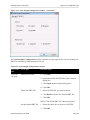
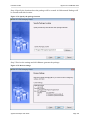
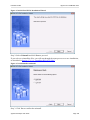
4.1.4 Selecting DB Type(s)
The database type is required during the application deployment if the application connects to
one or more databases.
Select the database type(s) used by the application by selecting the check boxes from the
Used column of the database type.
Figure 4.5: Database types
If the database type is not configured (The Configured column is indicated with "No"), you
should select it and click the Edit button to create a profile for it. For detailed instructions on
creating a database type profile, refer to Section 4.2.2, “Managing database type profiles”.
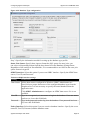
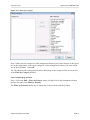
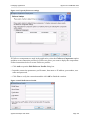
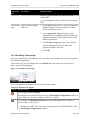
4.1.5 Declaring transaction object(s)
When the application is deployed to the Web or to the Mobile, Appeon Server handles
the database connection using data sources rather than transaction objects defined in
Appeon Developer User Guide
Page 14
Configuring Appeon Developer
Appeon for PowerBuilder 2013
the PowerBuilder application. You must associate the transaction objects used by the
PowerBuilder application with proper data sources created in Appeon Server.
You can create, modify or delete the mapping between transaction objects and data sources
either in Appeon Developer or AEM.
Figure 4.6: Specify transaction objects
Click Add to create the mapping of the transaction object and the data source of an
application.
Appeon Developer User Guide
Page 15
Configuring Appeon Developer
Appeon for PowerBuilder 2013
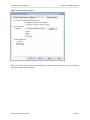
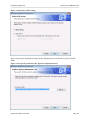
Figure 4.7: Add a transaction object
Step 1: Input the transaction object name used by the application to the Transaction Object
text box.
Step 2: Select the database type from the Database Type dropdown list box.
Step 3: Specify the data source name in the Data Source text box. The data source should
connect to the same database that the transaction object connects to.
Make sure that the data source exists in all Appeon Servers selected for this application
deployment. If the data source does not exist, you can create it by following instructions in
Section 4.2.5, “Managing data source profiles”. After you create a data source, you can select
the Selected column to associate the data source with the transaction object.
Note: The data source tool will be available if Appeon Server is installed to Microsoft .NET
Framework\IIS, and will not be available if Appeon Server is installed to EAServer 6.x,
WebLogic, WebSphere, JBoss, NetWeaver Application Server or JEUS. You should go to
the corresponding application server administration console to configure the data source for
EAServer 6.x, WebLogic, WebSphere, JBoss, NetWeaver Application Server, or JEUS. For
detailed instructions, refer to Database Connection Setup in the Appeon Server Configuration
Guide.
Appeon Developer User Guide
Page 16
Configuring Appeon Developer
Appeon for PowerBuilder 2013
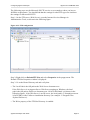
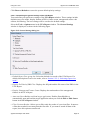
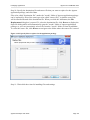
4.1.6 Selecting image files
Click Browse to specify which folder contains the image files that will be used in the Web or
mobile application. Select Include Subfolders to deploy the sub-folders under the specified
directory.
For detailed information about the image files, refer to Deploy Images.
Figure 4.8: Select image files
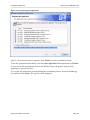
4.1.7 Selecting INI files
If a PowerBuilder application uses an initialization (INI) file which contains user preferences,
specify the INI file so that Appeon can deploy the file for the application.
Click Add File... to add one or multiple INI files or click Add Directory to add all INI files
in the selected directory.
For detailed information about the INI files, refer to Deploy INI Files.
Appeon Developer User Guide
Page 17
Configuring Appeon Developer
Appeon for PowerBuilder 2013
Figure 4.9: Select INI files
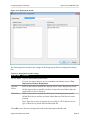
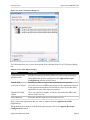
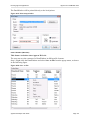
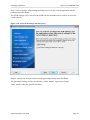
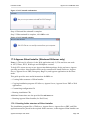
4.1.8 Selecting External files
If your application calls any custom user external files, such as DLL/OCX files, text files,
etc., you can specify them here and deploy them to the Web or the Mobile. Or you can use
the External File Packaging tool provided by Appeon to package the files and install them to
the client. For detailed instructions, refer to Section 17.1.1, “Packaging DLL/OCX files”.
Click Add File or Add Directory to add external files to the table. Then select the Auto
Register column if the file needs to be automatically registered after it is downloaded to the
client. If you choose not to automatically register a file, you can register it manually after it is
downloaded.
For more information about the external files, refer to Deploy External Files.
Appeon Developer User Guide
Page 18
Configuring Appeon Developer
Appeon for PowerBuilder 2013
Figure 4.10: Select External files
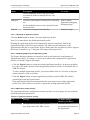
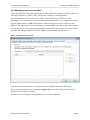
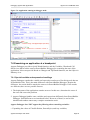
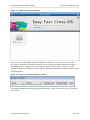
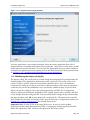
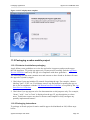
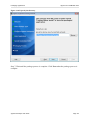
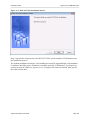
4.1.9 Summary
Review the settings. Click Finish to complete the configuration.
If the Deploy the application now option is selected, the Appeon Deployment Wizard will
be launched for you to deploy the application. For detailed information, refer to Chapter 6,
Deploying PowerBuilder Applications.
After the configuration is complete, the application will be added to the Application Profiles
tab of the Configure tool where you can manage or change any settings of the application.
For detailed instructions, refer to Section 4.2, “Using Configure Tool”.
Appeon Developer User Guide
Page 19
Configuring Appeon Developer
Appeon for PowerBuilder 2013
Figure 4.11: Summary page
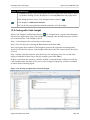
4.2 Using Configure Tool
The Configure tool allows you to modify the settings of existing application profiles,
database type profiles, Appeon Server profiles, Web server profiles, deployment profiles and
data source profiles, and specify the advanced settings for an application profile, such as the
performance settings, parsing options, Web service profiles, and runtime settings.
4.2.1 Managing application profiles
The Configure tool provides an Application Profiles tab for you to modify the settings
specified in the Appeon Developer Configuration Wizard, and use the following advanced
functions:
• Specify the default application profile
• Select the file generation mode for an application
• Delete an application profile
• Boost the application runtime performance
• Specify parsing options
• Specify runtime settings
• Configure Web Service profiles
Appeon Developer User Guide
Page 20
Configuring Appeon Developer
Appeon for PowerBuilder 2013
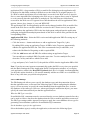
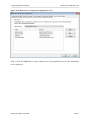
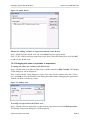
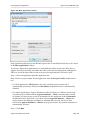
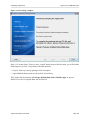
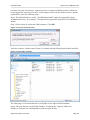
4.2.1.1 Application Profiles tab page
When you click the Configure button ( ) on the Appeon Developer toolbar, the Appeon
Developer Configuration window appears with the Application Profiles tab selected by
default, as shown in the following figure.
Figure 4.12: Appeon Developer Configuration Window
4.2.1.1.1 Specifying the default application profile
To specify which application profile will be used as the default application profile, select the
Default radio button.
The PowerBuilder application defined in the default application profile is selected for
unsupported features analysis, PowerBuilder-to-Web or PowerBuilder-to-mobile conversion,
application packaging, and application undeployment.
4.2.1.1.2 Selecting an application file generation mode
To specify a mode for Web or mobile file generation, click the Mode list box. If you change
the mode, you must perform a full deployment to make the new mode effective.
Table 4.1: File generation mode
Mode
Description
Use in the...
Debug PS/JS
Generates unencrypted JavaScript files for debug
use.
Web or mobile
application debugging
and tuning stage.
Appeon Developer User Guide
Page 21
Configuring Appeon Developer
Appeon for PowerBuilder 2013
Mode
Description
The PowerBuilder source code is provided
as comments in the JavaScript files for easy
reference.
Use in the...
Debug JS
Generates unencrypted JavaScript files for debug
use.
Web or mobile
application debugging
and tuning stage.
No PowerBuilder source code is provided in the
JavaScript files.
Release
Generates encrypted JavaScript files.
Production stage.
4.2.1.1.3 Deleting an application profile
Click the Delete button to delete a selected application profile.
Note: You cannot delete the default application profile.
Deleting the application profile will automatically delete the temporary fold for the
application profile on the Developer machine. The folder has the same name as the
application profile and is created in the \Project folder under the root directory where Appeon
Developer is installed (e.g. C:\Program Files\Appeon\Developer2013\).
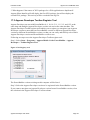
4.2.1.1.4 Exporting/Importing an application profile
The Export and Import buttons are mainly to back up and restore the configuration of
application profile(s), for instance, if you want to transfer the configuration of application
profile(s) to another Appeon Developer.
• Click the Export button to export the selected application profile(s). In the pop-up dialog
box, type a file name, then the selected application profile(s) will be saved into the file as
XML file format.
To select multiple application profiles, you can use Shift+click or Ctrl+click, or drag the
mouse pointer to create a selection.
• Click the Import button to import application profile(s) from the XML file which is
generated by using the Export button.
If the application profile being imported has the same name as an existing application
profile, you will be asked to overwrite or ignore the existing application profile.
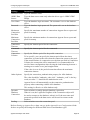
4.2.1.2 Application profile settings
The Application Profiles Configuration window provides seven tab pages for you to edit the
required application information:
Table 4.2: Application Profiles settings
Tab
Settings
Basic Settings The application profile name, project
type, application URL, PBL version
Appeon Developer User Guide
To make changes
effective, you must...
Perform a full or
incremental deployment on
the application.
Page 22
Configuring Appeon Developer
Tab
Settings
Appeon for PowerBuilder 2013
To make changes
effective, you must...
and PBL location of an application. See
Section 4.2.1.2.1, “Basic Settings”.
DB Settings
The database types, transaction objects
and the corresponding data sources. See
Section 4.2.1.2.2, “DB Settings”.
Perform a full or
incremental deployment on
the application.
Additional
Files
INI files, .NET/COM components, image
files and External files. See Section 4.2.1.2.3,
“Additional Files”.
Perform a full or
incremental deployment on
the application.
Misc Settings Command line arguments, application
language, runtime performance, parsing
option, and log-writing mode. See
Section 4.2.1.2.4, “Misc Settings”.
Perform a full deployment
on the application.
Web Service
Profiles
The WSDL file, service name and port for the Perform a full or
Web service(s). See Section 4.2.1.2.5, “Web
incremental deployment on
Service Profiles”.
the application.
Runtime
Settings
Company name and application name
Perform a full or
displayed on the Web application downloading incremental deployment on
page, and mobile application name, icon,
the application.
and description displayed in the Appeon
Workspace and the target mobile device the
application apply for. See Section 4.2.1.2.6,
“Runtime Settings”.
Summary
A summary view of the settings.
See the Section 4.2.1.2.7, “Summary” section
for more details.
Perform a full deployment
on the application.
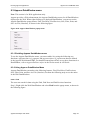
4.2.1.2.1 Basic Settings
After you click Add or Edit on the Application Profiles tab, the Application Profile
Configuration window is displayed with the Basic Settings tab selected by default, as shown
in the following figure.
The Basic Settings tab allows you to modify the web folder, project typ, PBT, application
PBL version and PBL location.
Appeon Developer User Guide
Page 23
Configuring Appeon Developer
Appeon for PowerBuilder 2013
Figure 4.13: Basic Settings
Application Profile Name - The application profile name is used to identify the
PowerBuilder application during the entire PowerBuilder-to-Web or PowerBuilder-tomobile process. It is also used in the appeondb database on Appeon Server to identify the
DataWindow syntax, profile, and registry information for an Appeon application.
The Profile Name cannot contain double-byte characters (such as Chinese, Korean, or
Japanese characters) or special characters (such as, \, /, :, *, ?, ", <, >, or |).
Web Folder - A URL of the Appeon Web or mobile application can contain a combination
of letters, underscores ("_"), and numbers. The specified folder is also used as the name
of the folder created under the Web Root of the Web Server for storing the Web or mobile
application files when the application is deployed.
Project Type - The Project Type determines whether your PowerBuilder application will be
configured for the Web migration process or the mobile migration process. This means the
application will be analyzed, deployed, run, packaged, and undeployed as a Web application
or as a mobile application.
Avoid setting application URLs as existing folder names in the Web server Web root,
because: (1) If a Web or mobile application uses an existing folder under the Web root as the
Appeon Developer User Guide
Page 24
Configuring Appeon Developer
Appeon for PowerBuilder 2013
application URL, a large number of Web or mobile files belonging to the application will
be deployed to that folder, making it difficult to use the folder for its original purpose. (2)
If a Web or mobile application uses a folder that is reserved for the Web server or Appeon
Server, some important files belonging to the Web server or Appeon Server may be replaced
or even removed when the application is undeployed. The following are folder names
reserved for the Web server or Appeon Server that should not be used as application URLs:
appeon, classes, docs, images, ir, wst, and WEB-INF.
The application URL for an application profile can be changed, and the Web or mobile files
stored at the Web Server can have different versions for the Client to access, but Appeon
only remembers the application URL in the last deployment, and performs the application
packaging and application undeployment based on the Web or mobile files generated in the
corresponding folder.
Application PBL files - Select the PBL version and add application PBL files using any of
the following methods:
• Click the browse ... button and choose to add an application Target file (*.pbt).
By adding PBLs using an application Target, all PBLs in the Target are automatically
added to the application PBLs list. This is the recommended way to add PBLs, as it
reduces the likelihood of forgetting to add a required PBL.
• Click the Add button and add PBL files without using an application Target.
You can add one or multiple PBL files at the same time. To select multiple files, hold
down the Ctrl key and choose which files to add.
• Copy and paste (Ctrl+C and Ctrl+V) the path list of PBLs into the Application PBLs field.
Note: If you do not want Appeon to automatically update the PBLs every time you open this
tab (the Basic Settings tab in the Application Profile Configuration window) or you deploy
your application, uncheck the Keep PBT Updated check box. It is kindly recommended that
you keep this option checked, or you need to manually add the new PBLs or revised PBLs (if
there is any) each time you perform a deployment.
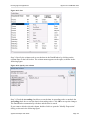
4.2.1.2.2 DB Settings
The DB Settings tab allows you to specify the database types and the transaction objects
that the application uses, as shown in the following figure. When configuring the database
types, it is not necessary to specify the actual databases that the application uses, it can be
any database of the same type. However, when specifying the transaction objects, you must
specify the actual transaction objects that the application uses.
What the DB Type is used for
PowerBuilder SQL statements must be converted into the correct database syntax before they
can be used to retrieve data from the database that the Web or mobile application connects to.
The DB Type settings enable Appeon Developer to apply the correct database driver type for
generating correct database syntax for PowerBuilder SQL statements.
Set the database types for the application
Select the database type(s) used by the application, as shown in the following figure.
Appeon Developer User Guide
Page 25
Configuring Appeon Developer
Appeon for PowerBuilder 2013
Figure 4.14: Database types
The following table describes each element on the DB Type tab.
Table 4.3: Database type settings
Column
Description
Used
You can click the check boxes to select the database types used by the
application. More than one database type can be selected, but only the
configured database types are selectable.
Supported
Database
Types
This column lists all the database types that are supported by Appeon.
Configured
This column is identical to the Configured column in the Section 4.2.2,
“Managing database type profiles” tab. It indicates whether a profile has
been configured for the database type.
If this column of the desired database type is "No", you must click the
Configure button to configure a profile for it before you can use it.
Configuring a database type profile in this tab is the same as configuring
it in the DB Type Profiles tab. Once a database type profile is configured
Appeon Developer User Guide
Page 26
Configuring Appeon Developer
Column
Appeon for PowerBuilder 2013
Description
successfully, the Configured column in both this tab and the DB Type
Profiles tab changes from "No" to "Yes".
Specify the transaction object and the data source
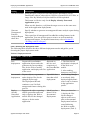
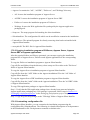
Click Add or Edit to configure a transaction object and specify the corresponding data
source. Refer to Section 4.1.5, “Declaring transaction object(s)” for detailed description.
Start transaction when executing stored procedures
It is strongly recommended that you keep this option enabled. The only circumstance
you may consider disabling it is when there is commit statement executed inside a stored
procedure (SP) and there is no need to commit in the PB code; the reason is that by default
Appeon Server will start a transaction once an SP is executed, and the end user will be able
to see details of this transaction in the Active Transactions tab in AEM; when commit is
executed inside the SP, the transaction will end and disappear from the database end, but as
there is no commit in the PB code, this transaction will still appear as an active transaction in
AEM, which will mislead end users to think this is an uncommitted transaction. To avoid this
misunderstanding, you can disable this option, so Appeon Server will not start a transaction
when an SP is executed.
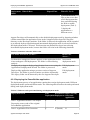
4.2.1.2.3 Additional Files
"Additional files" refer to the files that are outside the application source code, but are
necessary for running the PowerBuilder application, including INI files, .NET/COM
components, image files, and external files, such as DLL/OCX files, text files, etc.
Appeon Developer User Guide
Page 27
Configuring Appeon Developer
Appeon for PowerBuilder 2013
Figure 4.15: Additional Files tab
Deploy INI Files
If a PowerBuilder application uses an initialization (INI) file which contains user preferences,
specify the INI file in this tab so that Appeon can deploy the file for the application.
Click Add to add the INI file(s) into the Deploy INI Files list box.
How INI files are supported in Appeon
During deployment, the specified INI file(s) are converted to XML file(s) and deployed to
Appeon Server. The XML file(s) act as mock INI file(s). When a Client runs the deployed
application for the first time, a copy of the XML file is created in Appeon Server and keeps
the Client's profile information.
For a Client to use the correct profile information in its subsequent visits to the application,
the Client browser must be cookie-enabled. Otherwise, each time the Client visits the
application, a new copy of the XML file is created in Appeon Server, and the new copy only
contains the information of the original INI file.
You can delete the XML files that are unused for a period using Appeon Enterprise Manager
(AEM). For more information on how to maintain XML files in Appeon Server, refer to Auto
Cleanup in the Appeon Server Configuration Guide.
Appeon Developer User Guide
Page 28
Configuring Appeon Developer
Appeon for PowerBuilder 2013
Deploy .NET/COM components
If a PowerBuilder application uses .NET/COM components which contains executable files
(.exe), and COM/COM+ components, specify the .NET/COM components file in this tab so
that Appeon can deploy the file for the application.
Click Add to add the .NET/COM components file(s) into the Deploy .NET/COM
components list box.
Deploy Images
Click Browse to specify which folder contains the image files that will be used in the Web
or mobile application. If you do not specify the path of the image files, the path to the
application PBL files will be displayed as the default path of the image files.
The image files can be in any format supported by PowerBuilder, apart from:
• unsupported run-length encoded (RLE), and
• unsupported Windows metafile (WMF)
All the image files in the specified folder will be deployed to the %Deployment Path%/
images folder in the Web Server. %Deployment Path% stands for the folder storing the Web
application files or the mobile application files. The image files may fail to be displayed on
the Web or in Appeon Workspace, or on mobile devices if the file names are stored in the
database or dynamically generated. To resolve this, you can copy the image files directly to
the %Deployment Path%/images folder, but make sure that the file names are all lowercase;
otherwise, the Web or mobile application may fail to load them.
Deploy External Files
If your application calls any custom user DLL/OCX files (for Web applications only), which
are also called external non-system DLL/OCX files in this tab; or if your application calls any
other external files, such as text files, you can specify them here and deploy them to the Web
server. Deploying DLL/OCX files is used as an example in this guide.
If there are many large-size DLL/OCX files in your application and they could be slow
to download from the Web server at runtime, you may prefer to use the DLL/OCX File
Packaging tool provided by Appeon to package the files into one setup program (see
Chapter 17, Extended Toolkit for detailed instructions), then distribute the setup program to
the users, and have the users install the files to each Client.
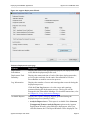
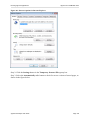
Click Option... in the Deploy External Files group box to open the Deploy External Files
dialog box (as shown in the following figure) and select the required external files to be
deployed.
Appeon Developer User Guide
Page 29
Configuring Appeon Developer
Appeon for PowerBuilder 2013
Figure 4.16: External Files Automatically Deploy and Download
The following table introduces the elements in the Deploy External Files dialog box.
Table 4.4: Deploy External Files dialog box
Column
Description
Register
Allows you to select whether the file will be automatically registered after it is
downloaded to the Client at runtime.
Click Select All to select all files and Unselect All to de-select all of them.
If you choose not to automatically register a file, you can register it manually
after it is downloaded.
File Name
Lists the added files. Click the header of this column to display the files in
alphabetical order.
File Path
Displays the file location.
The following table describes how to add and remove files in the Deploy External Files
dialog box.
Table 4.5: Deploy External Files dialog box
To Do This
Do This
To add files
Click the Add button. A standard File Selection dialog box is
displayed. And then select the files from your local machine. The files
can be stored in any location.
To remove files
Select a file or multiple files using Ctrl or Shift keys, and click the
Delete button to remove the selected files from the list.
To save the
settings
Click OK.
Appeon will copy the files to a temporary folder and then deploy them
to the Web Server during deployment.
Appeon Developer User Guide
Page 30
Configuring Appeon Developer
Appeon for PowerBuilder 2013
How the deployed DLL/OCX files work on Web
To successfully call the deployed DLL/OCX files in the Web application, you need to make
sure that the DLL/OCX files are successfully downloaded and installed to the Client during
the initial run of the deployed Web application.
Appeon Enterprise Manager (AEM) provides options for manually or automatically
downloading and installing the DLL/OCX files, and for specifying the installation location
(by default the files are saved to the %SystemRoot%\system32\AppeonPlugin folder on the
client machine. %SystemRoot% indicates the folder where Windows is installed. For detailed
instructions, refer to the Appeon Server Configuration Guide.
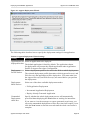
4.2.1.2.4 Misc Settings
The Misc Settings tab page enables you to modify settings for command line arguments,
application languages (It is automatically disabled when you are using an English version of
Appeon for Powerbuilder.), and log-writing modes, and allows you to configure the runtime
performance and parsing options.
Figure 4.17: Misc settings
Command Line Arguments
Appeon Developer User Guide
Page 31
Configuring Appeon Developer
Appeon for PowerBuilder 2013
If an application needs to use command line arguments, enable the command line argument
option, as shown in the following figure.
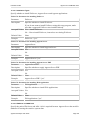
Click Command Line Settings on the Misc Settings tab. The Command Line Settings dialog
box is displayed, as shown in the following figure.
Figure 4.18: Command Line Settings dialog box
• Require a command line argument for the application option: Enables the command line
argument option.
With this check box selected, the following two options will be enabled. Note that they are
effective only if you run the application from the Appeon Developer toolbar.
• Show argument input/confirmation dialog option: A dialog box is displayed after you
launch an application from the Appeon Developer toolbar but before the application
starts. This dialog box enables you to specify the arguments for the application.
• Specify the default command arguments field: The specified default arguments are
directly attached to the application URL when the application is run from the Appeon
Developer toolbar.
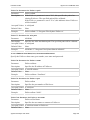
• If both options are selected: A dialog box pops up with the default arguments filled in,
as shown in the following figure. You can either change the default arguments or leave
them alone.
Figure 4.19: Command line argument dialog box
Appeon Developer User Guide
Page 32
Configuring Appeon Developer
Appeon for PowerBuilder 2013
To run an application with arguments from Clients, type the application URL with
the arguments. The format of an application URL with arguments is: http://AppURL/
index.htm?ArgValue. ArgValue indicates the arguments that will be passed to the application.
The arguments must be separated by commas if there are more than one argument.
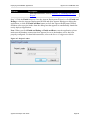
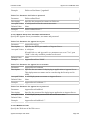
Application Language
Step 1: Click Language Options (only available when you are using a version of Appeon
for PowerBuilder other than English) on the Misc Settings tab. The Language Settings dialog
box is displayed, as shown in the following figure.
Figure 4.20: Application language settings
Step 2: Select a language from the System Prompt Language dropdown list box.
System prompts are error messages, informational messages, warnings, notices, and prompts
that are displayed when you run Appeon applications.
Step 3: Click OK to save the settings.
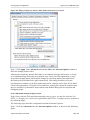
Performance Settings
Appeon recommends that you take advantage of the performance settings to boost the
application's runtime performance. To achieve the best performance, perform the following
steps:
Step 1: Click the Performance Settings on the Misc Settings tab. The Performance Settings
dialog box is displayed, as shown in the following figure.
Appeon Developer User Guide
Page 33
Configuring Appeon Developer
Appeon for PowerBuilder 2013
Figure 4.21: Performance settings
Step 2: Select the performance features based on your needs.
The following table describes how to use the performance features.
Table 4.6: Performance features
Setting
Description
When To Use
10X Web File Compresses files when they are transferred over the
Compression network.
Always
Merge files
Merges the small files during the application deployment.
The small files will be downloaded to the client in one file
package at one call, instead of being downloaded one by
one at separate calls.
In the
production
stage.
Performance
Analyzer
compliance
(for Web
applications
only)
Enables the application to be deployed in a method
compliant with the Performance Analyzer tool.
In the
development
stage.
The application deployed with this option can run with
the Performance Analyzer tool at runtime to diagnose
the performance issues. For more about the Performance
Analyzer tool, see Appeon Performance Analyzer in
Appeon Performance Tuning Guide.
Note: as the data is not encrypted during transmission at
runtime, therefore, this option is recommended to use only
at the test or development stage.
Download
ActiveX
Downloads the two ActiveX files in the same thread at
runtime.
Appeon Developer User Guide
Always
Page 34
Configuring Appeon Developer
Setting
files in a
single thread
(for Web
applications
only)
Appeon for PowerBuilder 2013
Description
Using the same thread to download the two ActiveX
files can speed up the download under particular network
conditions.
When To Use
Parsing options
Unsupported identifiers refer to identifiers that are supported in PowerBuilder but
unsupported in Appeon, due to the different naming convention between PowerScript and
JavaScript/XML. For detailed explanation of such unsupported identifiers, refer to Identifiers
in the Appeon Features Help.
With this automatic-renaming option enabled, when the Appeon Deployment Wizard deploys
an application, it automatically detects unsupported identifiers in the application and renames
these identifiers to supported ones in the files it generates for the application, while keeping
the application source code unchanged. After the deployment, you can get the list of all
the identifiers that are renamed in the deployment log in Chapter 10, Using Information
Manager.
The automatic-renaming feature will not work if the option is disabled. In this case, you must
rename the unsupported identifiers by yourself, following the guidance of the UFA report and
Appeon Features Help.
Appeon Developer User Guide
Page 35
Configuring Appeon Developer
Appeon for PowerBuilder 2013
Figure 4.22: Parsing options
Appeon Developer log-writing mode
The log-writing mode determines the content of the log files generated by Appeon Developer,
including the deployment logs and feature analysis logs. Select the desired mode from the
Appeon Developer Logs box, as shown in the following figure.
Appeon Developer User Guide
Page 36
Configuring Appeon Developer
Appeon for PowerBuilder 2013
Figure 4.23: Log-writing mode
The logging options enable you to select the level of information contained in the logs
according to your needs:
Table 4.7: Log writing options
Mode
Description
Off mode
Generates no log files.
This mode offers the fastest performance since nothing is written to a log file.
Summary
mode
(Default)
Generates log files with basic execution information.
This is useful for tracking errors that have occurred, but inadequate for
detailed troubleshooting.
Use this mode once the application is stable.
Debug mode Generates log files with detailed execution information for troubleshooting
obscure and esoteric issues.
This is useful for technical support, but performance speed will slow down
when using this mode.
Appeon Developer User Guide
Page 37
Configuring Appeon Developer
Appeon for PowerBuilder 2013
You can view or delete these log files. For detailed instructions, refer to Chapter 10, Using
Information Manager.
4.2.1.2.5 Web Service Profiles
A Web service profile contains the settings for the Web service(s) to be invoked in the
Appeon deployed application, including the WSDL file, service name and port to be used by
the Web service.
After you specify the PBL files of the application in the Basic Settings tab, the Web
service proxy objects, WSDL files, service, and port, which are used in the application, are
automatically added to the Web Service Profiles tab, as shown in the following figure.
A valid WSDL file must meet the following requirements:
• The WSDL file must be a .wsdl or .asmx file.
• The WSDL file must reside on the local computer. Appeon cannot access the WSDL file in
a remote machine.
• WSDL files used in the same application cannot have the same name, even if they reside in
different locations.
Figure 4.24: Web Server Profiles tab
Appeon Developer User Guide
Page 38
Configuring Appeon Developer
Appeon for PowerBuilder 2013
Choose which proxy object(s) will be invoked in the deployed application by selecting
the Used column of the object. Click Select All to select all objects; click Deselect All to
deselect all objects; or click Invert Selection to select all objects which were not selected and
deselect the previously selected objects.
If the WSDL file, service and port are not automatically specified for a proxy object, follow
the steps below to select them:
Step 1: Select the proxy object and click Configure. The Configure dialog appears, as shown
in the following figure.
Figure 4.25: Configure dialog box
Step 2: Click Browse to select a WSDL file on the local computer, and then select the service
and port.
A WSDL file may contain multiple services and each service may contain multiple ports.
Step 3: Click OK to save the configuration and return to the Web Service Profiles tab.
4.2.1.2.6 Runtime Settings
The Runtime Settings tab specifies:
1) the company name and the application name that will be displayed on the Appeon
Download Center when the Web application starts;
2) the mobile application name, icon, and application description that will be displayed in
Appeon Workspace.
3) the device type on which the mobile application will run.
You can use any image with any size as the mobile application icon. For better display
quality, we kindly recommend you to use the icons with 86 x 86 pixels for devices with
relatively low resolutions, such as iPad 2, and 172 x 172 pixels for devices with high
resolution, such as iPad 4. Icons smaller than the above recommended will be automatically
stretched to the proper size for the corresponding devices; and icons larger than the above
recommended will be automatically compressed to the proper size for the corresponding
Appeon Developer User Guide
Page 39
Configuring Appeon Developer
Appeon for PowerBuilder 2013
devices. Therefore, for convenience, you can always use the one with 172 x 172 pixels or
larger for any application. The supported formats are PNG (recommended), GIF, JPG, BMP,
and ICO.
Figure 4.26: Runtime Settings dialog box
4.2.1.2.7 Summary
The Summary tab offers a summary view of all configurations of an application profile. It
lists the configurations in a treeview structure, and allows you to review and modify their
values directly.
Use the following two methods to input or modify the configuration (property values):
• For properties that you can input or select values by using a text field, radio buttons, or
dropdown list, such as Mode, Application URL, PBL version, etc., you can directly double
click their Property Values column and then input, modify or select values.
• For properties that you can add/delete multiple items by using a dialog box, such as
application PBLs, INI files, etc., you can right click the property name in the Application
column and then select Add or Delete All from the popup menu.
Appeon Developer User Guide
Page 40
Configuring Appeon Developer
Appeon for PowerBuilder 2013
The configuration changes you make in this Summary tab page will be immediately
synchronized to the other tab pages, but only after you click the OK button, the changes will
be saved.
Figure 4.27: Summary tab
4.2.2 Managing database type profiles
Database type profiles configuration is the easiest way to manage the database types that
Appeon Deployment Wizard supports for application deployments. You can configure
database type profiles in the DB Type Profiles tab, and apply a database type profile for
an application deployment by selecting the profile in the Appeon Developer Configuration
Wizard or in the DB Settings tab of the application profile settings.
Database type profiles in Appeon Developer are different from database profiles in
PowerBuilder:
• You only need to configure one database type profile for a given database type. For
example, if application A connects to ASA database d1 and application B connects to ASA
database d2, you can use the database type profile Sybase ASA 7/8/9/10/11/12 for both
applications, although the connection information in the profile Sybase ASA 7/8/9/10/11/12
sets up connection to ASA database d1.
Appeon Developer User Guide
Page 41
Configuring Appeon Developer
Appeon for PowerBuilder 2013
• Database type profiles are not used for setting up connections with application databases.
Instead, they are mainly used by Appeon Deployment Wizard to call the relevant database
driver for converting PowerBuilder SQL statements.
To modify a database type profile, take the following steps:
Step 1: Click the Configure button on the Appeon Developer toolbar, and select the DB
Type Profiles tab on the Application Developer Configuration page as shown in the
following figure.
The Database Type column lists all the database types that are supported by Appeon; and the
Configured column indicates whether a database type profile has been configured.
Figure 4.28: DB Type Profiles
Step 2: Select a database type profile (for example, Sybase ASE 12.x/15.x), and click the
Configure button to configure the database type profile, as shown in the following figure.
Appeon Developer User Guide
Page 42
Configuring Appeon Developer
Appeon for PowerBuilder 2013
Figure 4.29: Database Type configuration
Step 3: Specify the information needed for setting up the database type profile.
Outer Join Syntax: Specify how Appeon format the SQL syntax for outer joins, you
can select corresponding format from the drop-down list in the Database Settings frame.
Regardless of the settings in PowerBuilder, it is recommended to use ANSI as the outer join
syntax format in Appeon.
ODBC Interface: Select this option if you use an ODBC interface. Specify the ODBC data
source, User ID, and Password.
Table 4.8: ODBC interface settings
Setting
Instructions
Data Source All the data sources configured in Windows ODBC Administrator are
listed. Select a proper data source of the configured database type from the
dropdown list. It is not necessary to specify the actual databases that the
application uses.
Click ODBC Administrator to configure an ODBC data source if it is not
available.
User ID
Type in a recognized (set) user name to login to the database. If no user name
has been set, leave this field blank.
Password
Type in the password used to log in to the database. If no password has been
set, leave this field blank.
Native Interface: Select this option if you use a native database interface. Specify the server
name/IP, User ID, Password, and the database name.
Appeon Developer User Guide
Page 43
Configuring Appeon Developer
Appeon for PowerBuilder 2013
Note: Not all the listed database types are supported by Appeon for the native database
interface. If Sybase IQ, Sybase ASA 7/8/9/10/11/12 or IBM DB2 is your database type, the
Native Interface option is disabled.
Table 4.9: Native database interface settings
Setting
Instructions
Server
Enter the machine name or IP address of the server where the target database
resides.
User ID
Type in a recognized (set) user name to login to the database. If no user name
has been set, leave this field blank.
Password
Type in the password used to login to the database. If no password has been
set, leave this field blank.
Database
Specify the name of the database that will be used by the application.
Release
(ASE only) Specify the version number of ASE database.
Step 4: Specify the "Enclose table and column names in double quotes" option. It
determines whether Appeon Developer encloses the names of tables, columns, indexes, and
constraints in double quotes when it generates the database syntax during deployment.
Notes:
1) When this option is selected, verify that the quoted_identifier setting is set to ON in the
database server.
2) Clear the check box of this option when the updated table name of DataWindow contains
the owner name.
Step 5: Click Test Connection to test the connection to the database.
4.2.3 Managing server profiles
A server profile is a set of parameters for Appeon Developer to connect to, and deploy
applications to, a particular Appeon Server or Web server. Creating and using server profiles
is the easiest way to manage your application deployments because you can:
• Select one or more Appeon Server profiles and Web Server profiles to set up a deployment
profile.
• Easily add, edit, and remove server profiles.
• Test connections in server profiles. If the connection is successful, it means that the
application can be deployed to the server configured in the server profile.
• Manage which applications are accessible from the Appeon Developer shortcut Run
button. The shortcut lists the applications that are deployed to the default server profiles.
4.2.3.1 Server Profiles tab page
There are two main parts on the Server Profiles tab page, as shown in the following figure.
The upper part is for management of Appeon Server profiles, while the lower part is for
management of Web server profiles.
Appeon Developer User Guide
Page 44
Configuring Appeon Developer
Appeon for PowerBuilder 2013
Figure 4.30: Server Profiles
4.2.3.1.1 Default server profiles
You can select an Appeon Server profile or a Web Server profile as the DEFAULT server
profile on the Server Profiles tab page. Appeon Developer's Run shortcut reads the default
server profiles and lists the applications that are deployed to default server profiles, enabling
you to quickly access them. Applications that are deployed to non-default server profiles
are not available in the shortcut. For details about the shortcut, refer to Chapter 8, Running
Appeon Applications.
4.2.3.1.2 Edit, add or delete server profiles
Two sets of Edit, Add, and Delete buttons are available on the Server Profiles tab page for
you to modify, create, or remove Appeon Server or Web Server profiles. Section 4.2.3.2,
“Appeon Server profile settings” and Section 4.2.3.3, “Web Server profile settings” provide
instructions on how to configure the properties for an Appeon Server or Web Server profile
when you modify or create a new server profile.
4.2.3.2 Appeon Server profile settings
Before you edit or add an Appeon Server profile, make sure that the Appeon Server specified
in the profile is running, and that the Appeon Developer computer can successfully connect
to the Appeon Server computer.
If you want to deploy the application to an Appeon Server cluster, you must create profiles
for each participating Appeon Server and deploy the application to all Appeon Servers in the
cluster.
Appeon Developer User Guide
Page 45
Configuring Appeon Developer
Appeon for PowerBuilder 2013
The following figure shows the Appeon Server Profile Configuration window that displays
when you click the Edit or Add button in the Appeon Server group box of the Server
Profiles tab page.
Figure 4.31: Appeon Server Profile
The following table lists detailed instructions on how to specify the properties for an Appeon
Server profile.
Table 4.10: Appeon Server profile properties
Property
Instructions
Profile
Settings
Profile Name
Assign a name to the Appeon Server profile.
Appeon
Server
Settings
Server Type
Select J2EE if Appeon Server is installed to EAServer,
JBoss, JEUS, WebLogic, or WebSphere; select .NET if
Appeon Server is installed to Microsoft .NET Framework.
Server
Enter the IP address or the machine name of Appeon
Server.
Server Port
(http)
Enter the HTTP port number used by Appeon Server.
You should use names that are easy to remember and
identify (for example "Appeon Server for Test" or "Remote
Appeon Server").
Appeon Developer User Guide
Note: Do not enter an HTTPS port here, Appeon Developer
must use an HTTP port to connect with Appeon Server,
though the Appeon deployed application can be connected
with an HTTPS port.
Page 46
Configuring Appeon Developer
AEM
Settings
Appeon for PowerBuilder 2013
Property
Instructions
AEM URL
The URL for Appeon Enterprise Manager (AEM) will be
automatically generated after you specify the Server and
Server Port. The URL will be in the following format:
http://server:port/AEM, (for example, http://localhost:9988/
AEM).
Note:
1) If you use EAServer as Appeon Server, the Appeon
installation program creates an HTTP listener (localhost:
9988) for Appeon Server. If the Appeon Server configured
is a local computer, the following URL should always
work: http://localhost:9988/AEM.
2) Do not use a "localhost" listener in a production
environment.
Deployment
Security
Settings
Connection
method
Select HTTP or HTTPS to connect to AEM.
Deployment
Security
The Get State button can get the state of the Deployment
Security settings in AEM. If Deployment Security is set
to ON, the state will be "Enabled" and you must specify
the deployment user name and password. By default,
the Deployment Security in AEM is OFF, so the state is
"Disabled".
Username
Enter the username used to deploy the application.
If the Web server is configured as an SSL Web Server,
check the HTTPS (secure) option. Otherwise, check the
HTTP (insecure) option.
The username and password for the deployment security
feature are configured in Appeon Enterprise Manager
(AEM).
The username can be left blank if the deployment security
feature is turned off in AEM.
Password
Enter the password used to deploy the application.
The username and password for the deployment security
feature are configured in AEM.
The password can be left blank if the deployment security
feature is turned off in AEM.
After profile configuration, perform the following steps to make sure the Appeon Server
profile can be successfully used for application deployments:
• Check whether the deployment security settings are configured correctly. The username
and password in the deployment security settings must be the same as those configured in
AEM. Make sure you get the correct deployment username and password from the AEM
administrator.
Appeon Developer User Guide
Page 47
Configuring Appeon Developer
Appeon for PowerBuilder 2013
• Test Appeon Server settings by clicking the Test Appeon Server Settings button. Do
NOT proceed to the next step until the testing succeeds.
4.2.3.3 Web Server profile settings
Before you edit or add a Web Server profile, make sure the Web Server specified in the
profile is running and that the Appeon Developer computer can successfully connect to the
Web Server computer.
The following figure shows the Web Server Profile Configuration window that displays when
you click the Edit or Add button in the Web Server group box of the Server Profiles tab
page.
Figure 4.32: Web Server profile configuration window
The following table lists detailed instructions for how to specify the properties for a Web
Server profile.
Table 4.11: Instructions for creating a Web Server profile
Profile
Settings
Property
Instructions
Profile Name
Assign a name to the Web Server profile.
You should use names that are easy to remember and
identify such as "Web Server for Test" or "Production Web
Server".
File Transfer
Type
Appeon Developer User Guide
Use Local Server if the Web Server is on the local
machine.
Page 48
Configuring Appeon Developer
Web Server
Settings
Appeon for PowerBuilder 2013
Property
Instructions
Use Remote Server if the Web Server locates remotely.
Server Type
Select the Web server type.
Appeon supports the following Web Server types: Apache,
EAServer, IIS, JBoss, WebLogic, WebSphere, NetWeaver
Application Server, and JEUS.
HTTP Server
Enter the IP address or the machine name of Web Server.
HTTP Port
Enter the Web Server port number.
Note: Do not enter an HTTPS port here, even though the
Web server is configured as an SSL Web server, because
Appeon Developer must use an HTTP port to connect
with Web server. However, you can access the deployed
application with the HTTPS port.
Local Server
Settings
Web Root Path Enter the home directory of the Web server (for example:
for Apache, the home directory is <apache root>\htdocs
for EAServer, the home directory is C:\Program Files
\Sybase\EAServer6\html;
for IIS, the home directory is C:\Inetpub\wwwroot;
for JBoss 5, the home directory is <jboss5 root>\server
\<instance name>\deploy;
for JBoss 7, the home directory is <jboss7 root>\standalone
\deployments;
for WebLogic 8, the home directory is C:\bea\user_projects
\domains\appeon_domain\applications;
for WebLogic 9/10, the home directory is C:\bea
\user_projects\domains\appeon_domain\autodeploy;
for WebSphere, the home directory is C:\IBM
\WebSphere6\AppServer\installableApps;
for JEUS, the home directory is <jeus root>\webhome
\app_home).
Click the Browse button to select the home directory of the
Web server.
Note: For NetWeaver Application Servers, specify any
path and then deploy the War file in the NetWeaver's
administrative console.
FTP File
Transfer
Settings
FTP Port
Appeon Developer User Guide
Enter the FTP server port number. The typical FTP port is
port 21.
If you use a remote Web Server, Appeon Developer will
upload the files to Web Server using FTP protocol. Note
that Appeon Developer works as a passive FTP client when
Page 49
Configuring Appeon Developer
Property
Appeon for PowerBuilder 2013
Instructions
uploading files. So you need to make sure that you are
using passive FTP and the FTP data port and command
port are configured properly in the firewall.
FTP Username Enter the username for FTP login.
If the FTP server offers anonymous access then the
username should be anonymous.
FTP Password
Enter the password for FTP login.
If no password is set for the FTP server or the FTP
Username is anonymous, leave this field blank.
File
Appeon
Compression Compression
Settings for
War/Jar
JDK
Compression
Select to use the Appeon compression method to compress
the application files into WAR or JAR packages when
deployed to JBoss, WebSphere, JEUS, or WebLogic Web
server.
Select to use the JDK compression method to compress
the application files into WAR or JAR packages when
deployed to JBoss, WebSphere, JEUS, or WebLogic Web
server.
Click Browse to specify the location of JDK 1.4 or above,
for example, C:\j2sdk1.4.2_04\.
To ensure the most compatibility, JDK compression is
recommended for J2EE servers such as JBoss, WebSphere,
JEUS, and WebLogic.
After the profile configuration, perform the following steps to make sure the Web Server
profile can be successfully used for application deployments:
• Test Web Server settings by clicking the Test Web Server Settings button. Do NOT
proceed to the next step until the testing succeeds.
If the Web Server is a remote server, refer to Section 4.2.3.3.1, “Two requirements for FTP
settings” to make sure the configuration for the Web Server profile is successful.
If the Web Server is an SSL Web server, refer to Section 4.2.3.3.2, “If the Web Server
is an SSL Web Server” to make sure the configuration for the Web Server profile is
successful.
4.2.3.3.1 Two requirements for FTP settings
If you configure a Web Server profile for a remote Web Server, make sure the FTP settings in
the Web Server profile meet the following two requirements:
• The user name and password for accessing the FTP server should have permission to read
and write files to the FTP server of the Web Server.
• The FTP home directory should be mapped to the Web root of the Web Server.
Appeon Developer User Guide
Page 50
Configuring Appeon Developer
Appeon for PowerBuilder 2013
The following steps use the Microsoft IIS FTP service as an example to show you how to
fulfill the requirements. You should find that the settings for other FTP types are similar to
the settings for Microsoft IIS FTP.
Step 1: On the FTP server (Web Server), open the Internet Services Manager in
Administrative Tools, as shown in the following figure.
Figure 4.33: FTP configuration
Step 2: Right click on Default FTP Site and select Properties in the popup menu. The
Default FTP Site Properties window is displayed.
Step 3: Go to the Home Directory tab and verify that:
• The Local Path is the full path to the Web Server document root.
If the Web Server is an Appeon Server Web Server running on Windows, the local
path is the full path to EAServer document root: %JAGUAR%\html\ (As shown in the
following figure), if the Web Server is an IIS server, the local path is C:\Inetpub\wwwroot.
%JAGUAR% is the EAServer installation directory (for example: C:\Program Files
\Sybase\EAServer\).
• The Write property of the FTP Site Directory is enabled.
Appeon Developer User Guide
Page 51
Configuring Appeon Developer
Appeon for PowerBuilder 2013
Figure 4.34: FTP site properties
Step 4: Go to the Directory Security tab and verify that the Granted Access option is checked,
as shown in the following figure.
Appeon Developer User Guide
Page 52
Configuring Appeon Developer
Appeon for PowerBuilder 2013
Figure 4.35: Directory security
4.2.3.3.2 If the Web Server is an SSL Web Server
If the Web Server is an SSL or secure Web Server, you can configure the Web Server profile
following the configuration instructions for non-SSL Web Servers, except for the following
two points:
1. You need to configure an HTTPS listener and port number for the Web Server.
2. You must specify an HTTP (not HTTPS) listener and its port number in the HTTP server
settings of the Web Server profile, because Appeon Developer must use the HTTP
protocol when deploying the Appeon application files to the server. After the application
is deployed to the Web server, you can input "https" instead of "http" and the HTTPS port
in the URL to access the application, (for example, https://192.0.0.80:8181/appeondemo/).
4.2.4 Managing deployment profiles
A deployment profile associates specified Web Server(s) and Appeon Server(s) as a group
used for Web or mobile deployment. You may create several deployment profiles (e.g. local
deployment, test deployment, production deployment, and so on), and set the most commonly
used profile as the default profile.
A deployment profile is based on server profiles. Before configuring the deployment profiles,
make sure you have set up one server profile for each of the Appeon Servers and Web
Servers to be used for the Web or mobile conversion. You can add as many deployment
profiles as you need, but there can be only one default deployment profile.
Appeon Developer User Guide
Page 53
Configuring Appeon Developer
Appeon for PowerBuilder 2013
4.2.4.1 Deployment Profiles tab page
On the Deployment Profile tab, you can edit, add, or delete deployment profiles and specify a
default deployment profile.
Figure 4.36: Deployment Profile tab page
The following table describes the tasks you can perform on the Deployment Profile tab.
Table 4.12: Instructions to use the Deployment Profile tab
Use this button
To
Default radio
button
Specify the default deployment profile used for Web or mobile
deployment.
Edit button
Modify an existing deployment profile. This will open the Deployment
Profile Configuration dialog box.
Add button
Create a new deployment profile. This will open the Deployment
Profile Configuration dialog box.
Delete button
Remove a deployment profile.
4.2.4.2 Deployment profile settings
In the Deployment Profile Configuration dialog box, set up the necessary configuration, as
shown in the following figure.
Appeon Developer User Guide
Page 54
Configuring Appeon Developer
Appeon for PowerBuilder 2013
Figure 4.37: Deployment Profile
The following table describes the settings on the Deployment Profile Configuration dialog
box.
Table 4.13: Deployment Profile settings
In this field
You can
Profile Name Type the deployment profile name.
You can use names that are easy to remember and identify such as Test
Deployment, Remote Deployment.
Appeon
Server
Select a check box to include the Appeon Server in the deployment profile.
Web Server
Select a check box to include the Web Server in the deployment profile.
All the Appeon Server profiles you have created are listed. More than one
Appeon Server can be selected.
All the Web Server profiles are listed. More than one Web Server can be
selected.
Note: If the server type of Appeon Server profile is .NET, then the server
type of Web Server profile must be Microsoft IIS.
Click OK to save the new settings and return to the Deployment Profiles tab.
Appeon Developer User Guide
Page 55
Configuring Appeon Developer
Appeon for PowerBuilder 2013
4.2.5 Managing data source profiles
Note: This Data Source Profiles tool works for Microsoft .NET Framework\IIS, but does not
work for EAServer 6.x, JBoss, JEUS, WebLogic, NetWeaver, and WebSphere.
To create data source for EAServer 6.x, JBoss, JEUS, WebLogic, NetWeaver, and
WebSphere, refer to Database Connection Setup in the Appeon Server Configuration Guide.
Appeon applications use JDBC data sources created in Appeon Server to connect to the
database. The Data Source Profile tab allows you to maintain a storage of data sources which
you can specify to use for Appeon applications. Its function is the same as the one provided
in AEM, and changes made on the tab or AEM are automatically synchronized.
Figure 4.38: Data source profile
Follow the instructions below to create a data source on the Data Source Profile tab:
Step 1: Select an Appeon Server from the Appeon Server list box. Only the configured
Appeon Server profiles are listed.
The data sources existing on the application server will be displayed.
Appeon Developer User Guide
Page 56
Configuring Appeon Developer
Appeon for PowerBuilder 2013
Figure 4.39: Data sources existing on the application server
Step 2: Click the Add button to create a data source in the application server. The Add dialog
box is displayed.
Appeon Developer User Guide
Page 57
Configuring Appeon Developer
Appeon for PowerBuilder 2013
Figure 4.40: Add a data source
The following table provides instructions for how to specify the data source settings.
Table 4.14: Instructions to specify data source settings
Settings
Instructions
Name
Type the name of the data source.
The data source name can contain a combination of letters, underscores
("_"), dot ("."), and numbers. Do not use double-byte characters (such
as Chinese, Korean or Japanese characters) or leave a leading or trailing
space.
Driver
Select the driver type for the data source.
Host
Type the database host.
Port
Type the database port.
Appeon Developer User Guide
Page 58
Configuring Appeon Developer
Settings
Appeon for PowerBuilder 2013
Instructions
Database Name Type the database name.
ODBC Data
Source
Type the data source name only when the driver type is ODBC-JDBC
Bridge.
User Name
Type the database login username. The username is set on the database
server.
Password
Type the database login password. The password is set on the database
server.
Maximum
Connection
Pool Size
Specify the maximum number of connections Appeon Server opens and
pools on startup.
Minimum
Connection
Pool Size
Specify the minimum number of connections Appeon Server opens and
pools on startup.
Connection
Timeout
Specify the timeout period for the connection.
Command
Timeout
Specify the timeout period for the commands.
Connection
Lifetime
Specify the lifetime period for the pooled connection.
To be specific, you can specify the timeout period from the time a
connection is created to the time when the connection returns to the pool.
If the actual lifetime of a connection exceeds that specified in Connection
Lifetime, the connection will be terminated. It is recommended to be
used in cluster configuration when forcing the load balancing between a
running server and a server just brought online.
If the value is set to 0, the pooled connection allows the maximum
connection timeout.
Other Options
Specify the connection_authentication property for ASA database.
The value should be "authentic_code=###". "authentic_code" is the key
word, text after "=" should be the authorization code.
Appeon Server will automatically set the connection_authentication
property when connecting with the ASA database.
This setting is effective to ASA database only.
Dynamic
Database
Connection
Select whether to enable dynamic database connection.
Pooling
Select whether to use the connection pool.
When it is on, the LogID and LogPass of the Transaction object will
be used to connect to the database; when it is off, the user name and
password specified in the data source will be used to connect to the
database.
Refer to Setting up Appeon Server data sources in the Appeon Server Configuration Guide
for how to specify the settings for different JDBC drivers and database types.
Appeon Developer User Guide
Page 59
Using UFA Tool
Appeon for PowerBuilder 2013
5 Using UFA Tool
Unsupported Features Analysis (UFA) tool helps you analyze an application for unsupported
features.
The following table gives brief descriptions of the unsupported features report.
Table 5.1: UFA Report
UFA Report
Purpose of the report
Enables you to work around or remove unsupported features
in order to make the PowerBuilder application suitable for
Appeon Web or mobile migration.
What is reported
Most of the unsupported PowerBuilder coding features
including keyword, event, data type, system function, control
(itself and its property, function, event), object (itself and its
property, function, event).
IMPORTANT: There are still some unsupported features
that cannot be reported. These undetected features, though
only a small number, may make up the largest proportion
of your workload depending on how they are used, so
we strongly recommend you carefully check the list in
Section 5.1.4, “Undetected Unsupported Features”.
How to generate the report
Use the Unsupported Features Analysis tool, or perform the
first two tasks in Appeon Deployment Wizard.
Features
These features apply for the report:
Automatic incremental analysis. After the first analysis,
the subsequent analysis is automatically incremental to
save time, but the report generated still contains all the
information as if it were a full analysis.
Analysis at application, PBL or object level. You can choose
to generate UFA Report for an application, PBL(s) in the
application, or object(s) in the application.
This chapter describes:
• How to use the UFA tool to analyze an application and generate the UFA Report.
• Undetected unsupported features. There are a small number of unsupported features that
the UFA Report cannot detect.
• How to use the UFA tool to work around unsupported features effectively.
• How to use the UFA tool to manipulate the UFA Report. For example, you can adjust the
view of the UFA Report so it suits your preferences.
Appeon Developer User Guide
Page 60
Using UFA Tool
Appeon for PowerBuilder 2013
5.1 Analyzing an application
5.1.1 Tasks required before you perform feature analysis
Step 1: Make sure that the computer is powerful enough to support feature analysis.
Unsupported Features Analysis is CPU and memory intensive. A faster CPU can speed up
the process. Additional memory is useful for ensuring that RAM will not be exhausted when
analyzing a large application. Regarding system requirements for the Developer machine,
refer to System Requirements section in the Appeon Installation Guide.
Step 2: Close any unnecessary running programs or Windows services in order to have the
maximum amount of memory available for Features Analysis.
Step 3: Perform an incremental build or object regeneration for the PowerBuilder application.
Right-click on the application target and select a build option (for example, Incremental
Build) as shown in the following figure.
Figure 5.1: Incremental Build
The following table shows you which type of build options you should select for the
application.
Table 5.2: Recommended build options
Build Option What It Does
Regenerate
Recommended For
Refreshes the timestamp for a Object-level Features Analysis. If the object
PowerBuilder object.
is regenerated, the object will be analyzed
even if no change has made to it.
Appeon Developer User Guide
Page 61
Using UFA Tool
Appeon for PowerBuilder 2013
Build Option What It Does
Recommended For
Incremental
Refreshes the objects that
have been changed.
Application-level Features Analysis.
Full
Refreshes all objects.
Not recommended.
Step 4: Perform PBL optimization for the PowerBuilder application.
The purpose of PBL optimization is to remove gaps from libraries and defragment the storage
of objects to get rid of potential problems in PBL files.
5.1.2 Accessing the UFA tool
Click the Analyze button ( ) in the Appeon Developer toolbar to launch the UFA tool. The
Unsupported Feature Analysis Report window (UFA Report window) will be displayed.
Figure 5.2: UFA Report Window
UFA Report window provides a variety of menus to help you manage unsupported features.
The following table gives a brief description of these menus. Some of them are also listed as
shortcut menus on the toolbar.
Table 5.3: UFA Report Window
Menu
Description
File
Generates a UFA report. See Section 5.1.3, “Performing feature analysis”.
Appeon Developer User Guide
Page 62
Using UFA Tool
Appeon for PowerBuilder 2013
Menu
Description
Opens or saves a UFA report. See Section 5.2.2.1, “Opening or saving a UFA
Report”.
Edit
Opens and modifies the unsupported source code in the PowerBuilder painter.
See Section 5.2.1, “Modifying unsupported features”.
Searches for the unsupported features. See Section 5.2.2.3, “Searching for UFA
Report items”.
Filters the unsupported features according to objects, unsupported feature types
or priorities. See Section 5.2.2.4, “Filtering UFA Report items”.
Expands or collapses treeview.
Displays the report in the specified level. See Section 5.2.2.5, “Specifying report
display level”.
View
Selects a display mode of the objects in the Unsupported Feature List treeview.
See Section 5.2.2.2, “Selecting report view mode”.
Tools
Accesses the workaround for the selected unsupported feature.
Defines the priority settings of UFA Report items. See Section 5.2.2.6, “Defining
the priority settings of unsupported features”.
Customizes the general settings of the UFA Report. See Section 5.2.2.7,
“Customizing the general settings of the UFA Report”.
Help
Provides the version number of the UFA tool.
5.1.3 Performing feature analysis
There are two ways to perform a feature analysis of an application:
• Use the Unsupported Features Analysis tool. This option enables you to do a feature
analysis of the whole application, or PBL(s) in the application, or objects in the
application.
• Use the first two tasks in Appeon Deployment Wizard. When you use Appeon Deployment
Wizard to deploy an application, the first task the wizard performs is a feature analysis of
the whole application.
This section mainly gives instructions on the first option (using the Unsupported Features
Analysis tool). For more information about the second option, refer to Section 6.2,
“Deployment process”.
Step 1: Select the File > New Report menu in the UFA Report window. The New UFA
Report dialog box appears, as shown in the following figure.
Appeon Developer User Guide
Page 63
Using UFA Tool
Appeon for PowerBuilder 2013
Figure 5.3: New UFA Report dialog box
The following table gives a brief description of the elements in the New UFA Report dialog
box.
Table 5.4: New UFA Report window
Element
Description
Application profile
dropdown list
Provides a list of application profiles for you to select and analyze.
Search field
Searches for PBLs or objects that contains the text you enter.
Treeview of objects
Gives the treeviews of PBLs and objects for the application selected
in the application dropdown list and allows you to select the whole
application or only some objects to analyze.
Display Full Path
option
Gives you options to display or hide the full path of the PBLs and
objects in the treeview.
Refresh button
Refreshes the PBL and object list in the treeview.
Only application profiles configured in the Appeon Developer
Configuration window will be listed.
Step 2: Select the application that you want to analyze from the Application profile
dropdown list.
The default target to analyze is the default application profile in the Appeon Developer
Configuration window.
Appeon Developer User Guide
Page 64
Using UFA Tool
Appeon for PowerBuilder 2013
Step 3: Check the PBLs and/or objects in the treeview for which you want to generate the
UFA Report.
The treeview lists all the PBLs and objects contained in the selected target. By default, all
objects are selected.
Step 4: Click the OK button to start the feature analysis.
The feature analysis of the selected objects begins, as shown in the following figure.
Figure 5.4: Unsupported Features Analysis Process dialog
Step 5: Click Close when the analysis is completed. The UFA Report is loaded into the UFA
Report Window.
5.1.4 Undetected Unsupported Features
Appeon Unsupported Features Analysis is capable of highlighting the majority of
unsupported features contained in the PowerBuilder application. There are still a small
number of features that the Unsupported Features Analysis will not detect, so they will not be
listed in the UFA Report.
An application containing unsupported features can still be converted to the Web or to the
Mobile and may work correctly, depending on the type and number of unsupported features.
If the deployed application does not work correctly and the UFA Report does not indicate any
unsupported features that are likely to cause such problems, the problems may be caused by
unsupported features that have not been detected. In this case, it is strongly recommended
that you carefully read the undetected features listed below and examine your application to
determine if it contains any of these features.
Table 5.5: Undetected features
Naming conventions
Appeon Developer User Guide
• Duplicate object names. No two objects should have the same
name in an application, whether they are of the same type or
not. The Unsupported Features Analysis cannot detect whether
object names are duplicated in an application.
Page 65
Using UFA Tool
Appeon for PowerBuilder 2013
• More than one application object. Having more than one
application object in an application is unsupported. The
Unsupported Features Analysis cannot detect whether more
than one application object is present.
• Applications named as objects or controls. Application names
that have the same name as PowerBuilder control/object
types are not supported. The Unsupported Features Analysis
cannot detect whether this unsupported issue is present in an
application.
Null values
• Unsupported operation
• Expressions with Null values
ASCII characters
Unsupported special ASCII characters:
• Vertical tab (~v)
Non-visual UserObject A NonVisualObject object assigned to an autoinstantiated NVO
or an autoinstantiated NVO assigned to a NonVisualObject
object.
Variables and constants • Instance variables have identical names as global variables.
• longlong variable
• PUBLIC, PROTECTED, PRIVATE qualifier in the variable
declaration
Forced conversion
Forced conversion between types
Window
Multiple MDI windows in an application.
Overloading,
overriding functions
• Dynamic calling for overloaded functions
• Dynamic calling for overriding functions
Using the return value
of some supported
functions
The return value of the Open or OpenSheet functions
User functions
Remote procedure call (RPC)
Operators
The operator ‘^' with embedded SQL statements.
Stored procedure
• Stored procedures declared in the conditional statement
• DB2 stored procedures
• Stored procedures placed inside an Oracle package
• Oracle stored procedures with Appeon unsupported features
Cursor declare
requirement
Appeon Developer User Guide
• Cursor declared in the conditional statement;
Page 66
Using UFA Tool
Appeon for PowerBuilder 2013
• If a cursor is declared for retrieving rows from table X, the
table X (insert, delete, update) is modified during the cursor
declare-close period.
Cursor statements
• The following two syntax:
1. UPDATE TableName SetStatement WHERE CURRENT
OF CursorName;
2. DELETE FROM TableName WHERE CURRENT OF
CursorName.
DataWindow data
expressions
• Unsupported features in the DataWindow dot notations. You
must make sure the specifications about dot notations are
satisfied in the application. Otherwise, it will cause errors.
• The return values of the DataWindow dot notations are
assigned to user objects.
DataWindow
expression function
lastpos
lastposw
mode
pageAcross
pageCountAcross
profileint
profilestring stdev
var
varp
Partly supported
features
Some partly supported features (such as DataWindow Modify
and Describe functions).
User interface
interactions
Unsupported features in the UI such as shortcut key.
Enumerated data type
Default values of enumerate type variable
Data source
The data sources of dynamically created DataWindows are stored
procedures with input parameters.
Dynamic calls
• Dynamically call the method of a menu object.
• Dynamically call the method that contains reference
arguments.
Others
• PBX
• PSR, for example: dw.dataobject=’*.psr’
• Unsupported DBParm parameters
• Encoding parameter of the Blob functions
• filename & importtype arguments of ImportFile, ImportString,
& ImportClipboard (filename can only be a text file (TXT))
• Property defined in the string variable
• Structure member has comment property
Appeon Developer User Guide
Page 67
Using UFA Tool
System events
Appeon for PowerBuilder 2013
For a complete list of undetected system events, refer to
Undetected Features in Appeon Features Help.
5.2 Working with UFA Report
This section describes:
• How to modify unsupported features. You can use the UFA Report to effectively remove
unsupported features in the application.
• How to manipulate the UFA Report in the UFA Report Window. You can adjust the view
of the UFA Report so it suits your preferences.
5.2.1 Modifying unsupported features
When the UFA Report is loaded, you can view all the unsupported features in the left
treeview and modify them one by one.
Step 1: Expand the unsupported feature list treeview and select the unsupported item.
The detailed analysis of the selected method will be displayed on the right of the window, as
shown in the following figure.
Figure 5.5: Unsupported feature details
Appeon Developer User Guide
Page 68
Using UFA Tool
Appeon for PowerBuilder 2013
The right text box shows a detailed code diagnosis on the unsupported code in seven aspects:
the Unsupported Code, Line Number, Location, Unsupported Item, Type, Reason, and
Priority.
Step 2: View the workaround for the unsupported item by right-clicking the unsupported item
in the unsupported feature list treeview and selecting Workarounds solutions.
• Go To Workarounds Online: Opens the online Workarounds & API Guide at URL: http://
www.appeon.com/support/documents/workarounds/2013/.
• Go To Local Workarounds: Opens the local Workarounds & API Guide installed with
Appeon Help, as shown in the following figure.
Figure 5.6: Local Workarounds Guide
Step 3: Modify the unsupported source code in the PowerBuilder painter according to the
Workarounds & API Guide.
Right click the unsupported item in the unsupported feature list treeview, and select Edit or
Edit Source to open the source code in the PowerBuilder Script view.
• Edit: Displays the source code of the event or function, which contains the unsupported
feature. This button is available only if the unsupported code resides in an event or
function and it is not DataWindow-related.
• Edit Source: Displays all source code of the object, which contains the unsupported
feature. This button is always available.
The PowerBuilder Script view automatically opens, as shown in the following figure.
Appeon Developer User Guide
Page 69
Using UFA Tool
Appeon for PowerBuilder 2013
Figure 5.7: Unsupported code in the PowerBuilder painter
5.2.2 Manipulating the UFA Report
5.2.2.1 Opening or saving a UFA Report
You can open or save a UFA Report using the File menu in the UFA Report window.
• To open an existing UFA Report, select the File > Open Report menu. The Open UFA
Report dialog box is displayed. If there is no UFA report available, select New Analysis
and click OK to analyze an application.
Figure 5.8: Open UFA Report
• To save a UFA Report, select the File > Save menu.
Appeon Developer User Guide
Page 70
Using UFA Tool
Appeon for PowerBuilder 2013
• To save a UFA Report with a new name, select the File > Save As menu.
5.2.2.2 Selecting report view mode
You can view the UFA Report in four different modes. Go to the View menu in the UFA
Report window and select the desired mode:
• Category: Enables you to view the unsupported features in the following categories:
Unsupported Objects, Unsupported PowerScript, Unsupported Embedded SQL and Others.
• Hierarchy: Enables you to view the unsupported features in hierarchical order: PBL,
Object, Control, Method (Event/Function).
• Priority: Enables you to view the unsupported features in priorities (you can go to the
Tools > Define Priority menu to define the priorities of the PowerBuilder features): Have
to modify, Suggest to modify, Can be ignored.
• Summary: Enables you to view summary information of each unsupported feature.
You can set the default view mode in the Tools > Options menu. For detailed descriptions,
refer to Section 5.2.2.7, “Customizing the general settings of the UFA Report”.
5.2.2.3 Searching for UFA Report items
To do a quick search, you can directly enter the text that you want to search in the search
field of the UFA Report window. Or follow steps below to use the standard Find Text dialog
box:
Step 1: Select the Edit > Find menu. Or right click in the unsupported feature list treeview
and select Find.
Step 2: In the Find Text box, enter the text that you want to search.
Step 3: Select any other options that you want.
Step 4: Click Find Next.
Figure 5.9: Find Text
5.2.2.4 Filtering UFA Report items
Filtering helps you restrict the number of the unsupported features displayed in the UFA
Report and quickly find the target unsupported features, especially when there are a large
number of unsupported features in the application.
Appeon Developer User Guide
Page 71
Using UFA Tool
Appeon for PowerBuilder 2013
You can filter the unsupported features by the objects they reside in, or by the feature types,
or by the priorities.
5.2.2.4.1 Filtering by objects
Step 1: Select the Edit > Filter by Object menu. Or right click in the unsupported feature list
treeview and select Filter by Object.
The Filter by Object dialog box is displayed, as shown in the following figure.
Figure 5.10: Filter by object
Step 2: Make sure that the unsupported objects you want to display in the report are on the
right list box, whereas the unsupported objects you want to hide are on the left listbox. Click
OK.
To quickly select all objects of the same type, right click the list and select an object type.
The UFA Report hides the unsupported objects that are on the left listbox in the Filter by
Object window.
5.2.2.4.2 Filtering by categories
Step 1: Select the Edit > Filter by Category menu. Or right click in the unsupported feature
list treeview and select Filter by Category.
The Filter by Category dialog box is displayed, as shown in the following figure.
Appeon Developer User Guide
Page 72
Using UFA Tool
Appeon for PowerBuilder 2013
Figure 5.11: Filter by Category
Step 2: Make sure the categories of the unsupported features you want to display in the report
are on the right listbox, whereas the categories of the unsupported features you want to hide
are on the left listbox. Click OK.
The UFA Report hides unsupported features that belong to the categories that are on the left
in the Filter by Category window.
5.2.2.4.3 Filtering by priorities
Step 1: Select the Edit > Filter by Priority menu. Or right click in the unsupported feature
list treeview and select Filter by Priority.
The Filter by Priorities dialog box is displayed, as shown in the following figure.
Appeon Developer User Guide
Page 73
Using UFA Tool
Appeon for PowerBuilder 2013
Figure 5.12: Filter by Priority
Step 2: Uncheck the priorities of the unsupported features which you want to hide. For
example, if you want to hide the features that can be ignored, uncheck the Can be ignored
option.
Step 3: Click OK.
The UFA Report only displays unsupported features of the specified priorities.
5.2.2.5 Specifying report display level
You can quickly expand or collapse a node of the unsupported feature list treeview by
selecting Expand Sub-node or Collapse Sub-node from the Edit menu or from the popup
menu on any node.
You can also specify the display level using the following steps:
Step 1: Select the Edit > Display Level menu.
Step 2: In the Display Level box, enter the number of the level at which the unsupported
feature list treeview will display.
Figure 5.13: Display Level
Step 3: Click OK.
The UFA Report only displays unsupported features of the specified level.
Appeon Developer User Guide
Page 74
Using UFA Tool
Appeon for PowerBuilder 2013
5.2.2.6 Defining the priority settings of unsupported features
By default, Appeon divides all unsupported features into three priority levels:
• Have to modify: The features flagged with Have to modify are important in the
application and will cause significant functionality loss if they are not modified or worked
around.
• Suggest to modify: The features flagged with Suggest to modify will not necessarily cause
functionality loss if they are not modified or worked around. You can decide whether to
modify them according to their functionalities in the application.
• Can be ignored: The features flagged with Can be ignored are small or trivial features
which will not compromise application functionality even if they are not modified or
worked around.
To customize or change priority levels for unsupported features, take the following steps:
Step 1: Select the Tools > Define Priority menu. The Define Priority window is displayed,
as shown in the following figure.
Figure 5.14: Define Priority dialog box
Step 2: Add, modify or delete the system default priorities in the left Priority Level box.
Step 3: Change priority levels of unsupported feature types by selecting a priority level in the
Priority Name column.
Step 4: Click Save to save the priority settings.
Appeon Developer User Guide
Page 75
Using UFA Tool
Appeon for PowerBuilder 2013
Click Reset to Default to restore the system default priority settings.
5.2.2.7 Customizing the general settings of the UFA Report
You can define your preference settings of the UFA Report window. These settings include
default report view mode, display formats of PBLs, feature count, unsupported source code
edition, and filtering. The new settings will be saved as the default settings.
Select the Tools > Options menu in the UFA Report window. The General Settings
window is displayed, as shown in the following figure.
Figure 5.15: General Settings dialog box
• Default Report View group box: Select the default view mode of the UFA Report. For
detailed description of each view mode, refer to Section 5.2.2.2, “Selecting report view
mode”.
• Display Full Path of PBL Files: Displays the full path and the file name of the PBLs in the
UFA Report.
• Display Unsupported Feature Count: Displays the total number of the unsupported
features in the UFA Report.
• Auto start PowerBuilder and load target application: Enables PowerBuilder to
automatically start and load the target application when you click the Edit or Edit Source
button in the UFA Report window.
• Filter Previous Results: Allows you to filter only the results of a previous filter. It narrows
a filter that resulted in too many data the first time. If you want to search all data of the
report, leave this option as unselected.
Appeon Developer User Guide
Page 76
Deploying PowerBuilder Applications
Appeon for PowerBuilder 2013
6 Deploying PowerBuilder Applications
Appeon Deployment Wizard deploys PowerBuilder applications to be Web or mobile
applications. The deployment should take place only after the application has undergone
careful analysis and is in compliance with the Basic and Architectural Requirements defined
in Appeon Features Help.
The Appeon Deployment Wizard handles the deployment in five steps:
1. Exports the PowerBuilder application source code.
2. Analyzes the PowerBuilder application to verify that it does not contain unsupported
features.
3. Parses the PowerBuilder source code (PBL files) into Web or mobile application files that
are stored on the local machine.
4. Uploads the DataWindow syntax to Appeon Server.
5. Transfers local application files to the Web Server by either file copy or FTP.
Notes:
1) Deploying to an SSL Web Server is no different than deploying to a standard Web
Server. You only need to make sure that the SSL Web Server is set up correctly and is fully
functional. For detailed instructions on configuring a Web Server as an SSL Web Server,
refer to the corresponding documents provided by the Web server vendor.
2) If you want to re-deploy an application which is now running online or on a mobile device:
• You can incrementally deploy the application while keeping the application running online
or on a mobile device, if non-database related source code and image files are changed.
• You must shut down the running deployed application and then full or incrementally
deploy the application if the INI files or database-related source code are changed.
Otherwise, the application may have runtime problems such as database connection failure
or missing tables or fields.
6.1 Deployment performance
The deployment process can be very CPU and memory intensive, so we recommend that
you use a developer computer that conforms to the recommended specifications outlined in
System Requirements section of the Appeon Installation Guide for a Developer PC to run
Appeon Developer.
Be sure to close any unnecessary programs and Windows services in order to have an optimal
amount of memory available for the deployment process.
6.1.1 Speed of Deployment Process
The table below benchmarks the time taken or speed to compile various applications in
PowerBuilder and deploy to the Web or mobile with Appeon. In general, the results indicate
that the speed of the Appeon deployment process is similar to the speed of the PowerBuilder
compilation/build process.
Appeon Developer User Guide
Page 77
Deploying PowerBuilder Applications
Appeon for PowerBuilder 2013
Table 6.1: Appeon Application Deployment Time Benchmarks
PB EXE w/ PBDs
PB EXE w/ DLLs
Appeon
Sales Application
Demo (5.55M)
20 seconds
50 seconds
22 seconds
Appeon Code
Example Demo
(20.5M)
1 minutes 3 seconds
12 minutes 37
seconds
1 minutes 12 seconds
ACF Demo (21.5M)
2 minutes 5 seconds
24 minutes 46
seconds
2 minutes 12 seconds
As a general rule of thumb, each additional megabyte of PBLs will add approximately 8
seconds to the full deployment process. For example, it would take 4 minutes to deploy
a 30MB PFC application. This would only apply for the initial or full deployment. All
subsequent deployments should take no more than few minutes or even possibly as little as a
few seconds.
This rule of thumb applies to hardware configurations that meet the minimum Developer PC
requirements stated in the Appeon Installation Guide. Machines with a slower clock-speed
will take longer to perform the deployment.
6.1.2 Deployment duration for full deployments
Remember the following main points regarding the deployment time:
• The process is very CPU and memory intensive.
• The size and complexity of the application affect the deployment time.
The following is an example of how long it takes to deploy an application with 3.69 MB in
PBLs and images using full deployment:
Table 6.2: Deployment duration
Deployment Task
Elapsed Time
Task 1: Application Source Code Export
8 seconds
Task 2: Application File Generation
27 seconds
Task 3: Web or Mobile Deployment
15 seconds (for a local deployment)
Test environment: a single CPU Intel P4 1.8 GHz with 256 MB RAM and 60 GB IDE hard
drive
All of the generated application files deployed to the server are a combined 1.25 MB in size.
6.1.3 Deployment duration for incremental deployments
Since the initial full deployment can be time-consuming, Appeon provides an Incremental
Deployment for maintaining or upgrading an already-deployed application. This feature
only re-deploys the incremental changes that have been made in the application. Appeon can
detect whether an object has been modified and re-deploy only the changed objects.
Appeon Developer User Guide
Page 78
Deploying PowerBuilder Applications
Appeon for PowerBuilder 2013
6.2 Deployment process
6.2.1 Preparing the PowerBuilder application
Appeon recommends that you perform a build and PBL optimization on the PowerBuilder
application before performing an Appeon Application Deployment. The following table
shows you which type of build options you should select for the application.
Table 6.3: Build options
Build Option
What It Does
When To Perform
Incremental build
Refreshes the objects that have been
changed.
Before a full or
incremental deployment.
Full build
Refreshes all objects.
Not recommended.
Optimize PBLs
Removes unused space in the PBLs
as stored on disk, and reduces object
fragmentation.
After building the
application but prior to
deployment.
Performing an incremental build in PowerBuilder is necessary because when modifications
are made to a parent class, the child class does not reflect the changes unless one of three
things occurs:
1. The child class is opened and saved.
2. An incremental build is performed.
3. A full build is performed.
6.2.2 Specifying the deployment settings
Click the Deploy button ( ) in the Appeon Developer toolbar. The Appeon Deployment
Wizard is displayed.
Appeon Developer User Guide
Page 79
Deploying PowerBuilder Applications
Appeon for PowerBuilder 2013
Figure 6.1: Appeon Deployment Wizard
The following table describes how to specify the deployment settings for an application:
Table 6.4: Appeon Deployment Wizard settings
Setting
Description
Application to be Select an application to be deployed.
deployed list box The default application is listed by default. The application chosen
for deployment will become the default application under Application
Profiles in Appeon Developer Configuration.
Deployment
Profile list box
Select a deployment profile to be used in the Web or mobile deployment.
Deployment
Mode list box
Select one of the three available deployment modes:
The selected deployment profile determines which Appeon Server(s) and
Web Server(s) the application will be deployed to. You must make sure
the Appeon Server(s) and Web Server(s) are started before you perform
the deployment.
• Full Application Deployment
• Incremental Application Deployment
• Deploy Already Generated Application
Unattended
Deployment
check box
Specify whether the whole deployment process will automatically
proceed without displaying the Next button or waiting for interaction.
If you want to view the messages or reports generated at each step, you
can set the unattended deployment to false; the wizard will require you to
click the Next button to start the next task until the whole conversion is
complete.
Appeon Developer User Guide
Page 80
Deploying PowerBuilder Applications
Setting
Appeon for PowerBuilder 2013
Description
Advanced button Select the types of objects or files that will be uploaded to servers:
DataWindow objects, other objects, INI files, external DLL/OCX files, or
image files. By default, all objects and files will be uploaded.
This button is effective only for the Deploy Already Generated
Application option.
When use this function, verify that the target servers are the same ones
used in the application deployments.
Generate
Unsupported
Features
Analysis Report
check box
Specify whether to generate an unsupported feature analysis report during
deployment.
This report lists all unsupported PowerBuilder coding features in the
application. You can use this report to remove or work around the
unsupported features. For detailed instructions, refer to Section 5.2,
“Working with UFA Report”.
6.2.2.1 Selecting the deployment mode
The following table describes the three different deployment modes and guides you in
choosing the proper deployment mode.
Table 6.5: Deployment mode
Deployment What It Does
Mode
Elapsed Time
When To Use It
Full
deployment
Exports all PowerBuilder
application objects and code,
generates the corresponding
files for the Web or mobile
application, and deploys all files
to the server.
Depends on
the size and
complexity of
the PowerBuilder
application.
1. The first time an
application is deployed
to the Web or to
mobile.
Exports objects, re-generates
and re-deploys files for the
changed objects only.
Up to 80% less
time than a full
deployment.
After making changes
to an already fullydeployed application's
source code or features
in the application
profile.
Much less time
than a Full or
Incremental
Deployment.
When you intend to:
Incremental
deployment
The Deployment Wizard
continues even if it finds
unsupported features during this
process.
Deploy
Already
Generated
Application
Bypasses the object exporting
and file generation tasks and
only re-deploys the Web or
mobile files for the changed
objects or for the entire
application.
Appeon Developer User Guide
2. After making
changes to any ESQL.
1) deploy the files
for the changed
objects to the server
after an Incremental
Deployment has been
cancelled during
the Web or mobile
deployment (Task 3).
Page 81
Deploying PowerBuilder Applications
Appeon for PowerBuilder 2013
Deployment What It Does
Mode
Elapsed Time
When To Use It
2) refresh the set of
files on the server after
a Full Deployment has
been cancelled during
the Web or mobile
deployment (Task 3).
3) deploy the
application to a
different server.
Appeon Developer will automatically set the default deployment mode by detecting whether
a folder named after the application exists in the %Appeon%\Developer2013\Projects\
directory on the Developer machine. If the folder is detected, the application will be regarded
as an already deployed application and incremental deployment mode is selected; otherwise,
full deployment mode is selected. This detection can mislead Developer into selecting
incremental deployment mode, because the folder will exist in the following situations:
Table 6.6: Situations when the folder exists
The folder will exist if you have ...
In this case,
choose ...
Performed an unsupported feature analysis on the application before Incremental
it has undergone a full deployment. The folder is created during
deployment mode.
analysis.
Undeployed an Appeon deployed application from servers using the Full deployment
Application Undeployment Wizard. The folder is preserved.
mode.
Deployed the application using a previous version of Appeon
Developer. The folder is preserved unless you delete it manually.
This legacy folder can be detected by the new Appeon Developer.
Full deployment
mode.
6.2.3 Deploying the PowerBuilder application
The deployment process of an application contains three major deployment tasks. Different
deployment modes perform different tasks. The following table describes the tasks performed
during each deployment mode.
Table 6.7: Different tasks performed during each deployment mode
Deployment Task
Full
Incremental Deploy Already
Deployment Deployment Generated
Application
Task 1: Application Source Code Export
Y
Y
N
Y
Y (Partial)
N
Exports the source code of the original
PowerBuilder application.
Task 2: Application File Generation
Appeon Developer User Guide
Page 82
Deploying PowerBuilder Applications
Deployment Task
Appeon for PowerBuilder 2013
Full
Incremental Deploy Already
Deployment Deployment Generated
Application
Analyzes unsupported features and generates
Web or mobile application files.
Task 3: Web or Mobile Deployment
Y
Y (Partial)
Y
Deploys the generated Web or mobile
application files to Appeon Server.
Figure 6.2: Full application deployment
As shown in the above figure, the application to be deployed is the sales_application_demo,
and the deployment mode is Full Application Deployment.
The following are the complete steps in the deployment process:
Step 1: Click Next. The Appeon Deployment Wizard begins Task 1, Application Source
Code Export, as shown in the following figure.
Appeon Developer User Guide
Page 83
Deploying PowerBuilder Applications
Appeon for PowerBuilder 2013
Figure 6.3: Task 1: Application Source Code Export
After Task 1 is completed, Task 2, Application File Generation, will automatically start (as
shown in the following figure) if the Unattended Deployment option is selected, otherwise,
you must click Next at the bottom of the Appeon Deployment Wizard to begin Task 2.
Appeon Developer User Guide
Page 84
Deploying PowerBuilder Applications
Appeon for PowerBuilder 2013
Figure 6.4: Task 2: Application File Generation
After Task 2 is completed, Task 3, Web or Mobile Deployment, will automatically start
(as shown in the following figure), or click Next at the bottom of the Appeon Deployment
Wizard to begin Task 3 if the Unattended Deployment option is not selected.
Confirm that the Web Server and Appeon Server have been started and correctly configured
in Appeon Developer Configuration; otherwise, deployment will fail. If deployment fails,
a Retry button appears so you can retry Task 3 without running through a full deployment
again.
Appeon Developer User Guide
Page 85
Deploying PowerBuilder Applications
Appeon for PowerBuilder 2013
Figure 6.5: Task 3 Web or Mobile Deployment
Click the Cancel button or press the Esc key to terminate Task 3. If you cancel Task 3 during
a Full Deployment, only some of the application files will have been uploaded to the server
and the application will not run correctly. To correct this, select Incremental Deployment or
Deploy Already Generated Application as the deployment mode the next time you attempt to
deploy the application.
Step 2: After Task 3 has been completed, click the Next button at the bottom of the Appeon
Deployment Wizard to display the deployment report page, as shown in the following figure.
Appeon Developer User Guide
Page 86
Deploying PowerBuilder Applications
Appeon for PowerBuilder 2013
Figure 6.6: Appeon Deployment Wizard
Table 6.8: Deployment report page
Element
Description
Deployment
Information
Displays the name of the application deployed, the deployment mode
used, and the deployment profile used.
Deployment Task
Summary
Displays the status and time of each of the three deployment tasks,
as well as the total time for the entire PowerBuilder-to-Web or
PowerBuilder-to-mobile conversion process.
Log Information
Displays the number of errors and warnings that occurred during the
deployment process.
Click the View Log button to view the errors and warnings
generated during the deployment process. The log file can be
managed in the Information Manager. For detailed instructions, refer
to Chapter 10, Using Information Manager.
Available Reports
Displays the reports (Analysis Report) generated during the
deployment process (mainly Task 2).
• Analysis Report button: This report is available if the Generate
Unsupported Feature Analysis Report option on the Appeon
Deployment Wizard is selected before deployment. After you
click this button, the UFA Report Window will be displayed. For
Appeon Developer User Guide
Page 87
Deploying PowerBuilder Applications
Element
Appeon for PowerBuilder 2013
Description
detailed instructions, refer to Section 5.2, “Working with UFA
Report”.
Step 3: Click the Finish button to close the Appeon Deployment Wizard, or click Finish and
Debug to close the Appeon Deployment Wizard and open Appeon Debugger to debug the
application, or click the Finish and Run button to close the Appeon Deployment Wizard,
and then select a project loader from the dialog box that appears to automatically launch the
newly deployed application.
Note: When you click Finish and Debug or Finish and Run to run the application, please
make sure the database connection from Appeon Server to the database server has been
properly configured. For detailed instructions, refer to the Server Configuration Guide.
Figure 6.7: Project Loader
Appeon Developer User Guide
Page 88
Debugging Appeon Web Applications
Appeon for PowerBuilder 2013
7 Debugging Appeon Web Applications
Sometimes a deployed application may not behave well although the original application
does. In these situations, you can examine the execution results of the JavaScript code in the
deployed application using Appeon Debugger.
The usage of Appeon Debugger is similar to that of PowerBuilder Debugger. You set
breakpoints or watch variables in the PowerBuilder source code, same as in PowerBuilder
Debugger. The main difference is that Appeon Debugger runs the generated JavaScript code
but not the PowerBuilder source code, and shows the execution results of the JavaScript code.
This chapter assumes that you are familiar with the functions of PowerBuilder Debugger;
therefore it does not provide descriptions of common debugging features, but focuses on
introducing the specialties of Appeon Debugger. For common debugging features, refer to the
Debugging an application section in the PowerBuilder User's Guide.
Note:
1) The Appeon Debugger only works with IE 9.0 or older versions in this version (of Appeon
for PowerBuilder 2013), but will support to work on IE 10.0 in the next version. However,
this only affacts the debugger. IE 10.0 and Windows 8 is natively supported for running
Appeon Web applications.
2) Appeon Mobile 1.0 provides no debug tool, but you can still take advantage of Appeon
Debugger to debug the business logic of the mobile application.
7.1 Important Requirements
To start and use Appeon Debugger successfully, be aware of the following important
prerequisites and note:
1. Microsoft script debugger must have been correctly installed and registered on the same
machine and script debugging is enabled in Internet Explorer. Otherwise, you may
encounter problems in starting and using Appeon Debugger.
• Modify the Window registration table (this step is required for IE 8 only): In order to
make sure that the Appeon Debugger work correctly, you need to modify the Windows
registration table after the installation of the Microsoft script debugger.
For 64-bit machines, follow the steps below:
1) Go to HKEY_LOCAL_MACHINE\SOFTWARE\Wow6432Node\Microsoft\Internet
Explorer\Main\
2) Add one DWORD value: TabProcGrowth = 0
For 32-bit machines, follow the steps below:
1) Go to HKEY_LOCAL_MACHINE\SOFTWARE\Microsoft\Internet Explorer\Main\
2) Add one DWORD value: TabProcGrowth = 0
• Enable the script debugging option: Simply uncheck the Disable script Debugging
checkbox under the Advanced Internet Options menu.
Appeon Developer User Guide
Page 89
Debugging Appeon Web Applications
Appeon for PowerBuilder 2013
For detailed instructions and solutions, refer to the Appeon Debugger section in the
Appeon Troubleshooting Guide.
2. A script in the deployed application must meet all of the following requirements to be
debugged; otherwise Appeon Debugger will simply ignore it:
• The script is deployed in the Debug JS or Debug PS/JS mode, using the local Appeon
Developer.
If you have changed the application PBLs, or the local application files and the remote
application files are not the same, you must re-deploy the application. Or the newlyadded code will not be selectable in Appeon Debugger.
• The original PowerScript code of the script is supported by Appeon.
If the code is unsupported, it is marked with a icon in the Appeon Debugger Source
view, and cannot be set as breakpoint, nor be located with the Run To Cursor or Set
Next Statement commands in the debugger.
7.2 Introduction to the debugging procedure
Although Appeon Debugger is used for debugging the JavaScript in the deployed application,
breakpoints are not set in the JavaScript, but directly in the PowerBuilder code loaded in
the Appeon Debugger Source view. The generated JavaScript is invisible throughout the
entire process, however the results shown in the Watch view are the execution results of the
JavaScript.
The debugger procedure with Appeon Debugger is the typical 5-step procedure as with
PowerBuilder Debugger:
Step 1: Start the debugger.
Step 2: Set breakpoints.
Step 3: Run the application in debug mode.
Step 4: Examine the application at the breakpoints by watching variables and expressions,
and monitoring the call stack. You may also step through the application after a breakpoint to
closely examine the effects of each code.
Step 5: Fix the code.
The actions performed in each step are not very different from those required in
PowerBuilder Debugger. However, there are some special requirements related with the
actions, and the action results are from the running of JavaScript. Continue reading the
following sections for detailed descriptions of these debugging steps.
7.3 Starting Appeon Debugger
To start Appeon Debugger:
Step 1: Close the other Appeon Developer tools.
Step 2: Start Appeon Server and the Web server that host the Web application.
Step 3: Click Appeon Debugger ( ) on the Appeon Developer toolbar.
Appeon Developer User Guide
Page 90
Debugging Appeon Web Applications
Appeon for PowerBuilder 2013
The "Select a target" window is displayed.
Figure 7.1: Select an application
Step 4: Select an application from the list and click OK.
Appeon Debugger starts and the selected application is loaded in the Appeon Debugger.
The menu bar of the debugger provides three simple menus: File, View and Help. The toolbar
is almost the same as that in PowerBuilder Debugger, except that the "Start Remote" button is
currently unavailable.
Figure 7.2: Appeon Debugger
Appeon Developer User Guide
Page 91
Debugging Appeon Web Applications
Appeon for PowerBuilder 2013
7.3.1 Views in Appeon Debugger
Appeon Debugger contains all the views provided by PowerBuilder Debugger except for
Instances View and Objects in Memory view. Each Appeon Debugger view shows almost
the same information as its counterpart in PowerBuilder Debugger. The following table
summarizes the general differences between the two.
Table 7.1: Comparing the views in Appeon Debugger and PowerBuilder Debugger
Views
Unique to Appeon Debugger
(Unavailable in PowerBuilder
Debugger)
Unique to PowerBuilder Debugger
(Unavailable in Appeon Debugger)
Source
Identifies Appeon unsupported
features with the icon ( )
• Ancestor Script popup menu item
• Descendant Script popup menu item
Source
Browser
None
List of system events, or the events
and functions defined in parent classes,
or some special events (such as Menu
OnCreate event)
Source
History
None
None
Variables
The values of variables
unsupported by Appeon are
marked as "unsupported".
• Parent and Shared views
The Global view displays all
global variables used in the
application, while PowerBuilder
Debugger only displays
instantiated global variables.
• Shared popup menu item
Call Stack
None
None
Breakpoints
None
• Setting special breakpoints
• Parent popup menu item
• Break on changes popup menu item
• Setting occasional or conditional
breakpoints
• Setting a breakpoint when a variable
changes
Watch
Appeon Debugger handles some
expressions in a unique way.
Break on changes popup menu item
Although the views of Appeon Debugger and PowerBuilder Debugger look similar, they
cannot be used together. For example, the breakpoints set in Appeon Debugger cannot be
recognized by PowerBuilder Debugger, and vice versa.
7.4 Setting breakpoints
7.4.1 Code lines that can be set as breakpoints
Pay attention to the following do's and don'ts before setting breakpoints:
Appeon Developer User Guide
Page 92
Debugging Appeon Web Applications
Appeon for PowerBuilder 2013
1. Do set breakpoints to the code lines supported by Appeon.
2. Do set simple breakpoints to script, don't set special breakpoints, such as breakpoints
triggered when a statement has been executed a specified number of times (an occasional
breakpoint), when a specified expression is true (a conditional breakpoint), or when the
value of a variable changes.
3. To set a SQL statement that spans multiple lines as a breakpoint, do set the breakpoint at
the first line, don't set breakpoints at the other lines. If you try to set a breakpoint at the
other lines, the breakpoint will be set to the line that follows the SQL statement.
4. To set a PowerScript non-SQL statement, which spans multiple lines with continuation
characters (&) as a breakpoint, do set the breakpoint at the last line of the statement, and if
it is set at the other lines, the breakpoint icon is still added to the last line.
Note: you can set a breakpoint to the FOR statement, but the application will be suspended
for only once when this statement is executed.
7.4.2 Methods for setting breakpoints
You can set breakpoints in the Source, Breakpoints, Variables, or Watch view, before or after
the application starts to run in debug mode.
Method #1: Setting a breakpoint in the Source view
Step 1: Select the script to display in the Source View.
Select a function or event in the Source Browser view to display its script in the Source View,
or right click on the Source view and select Select Script from the popup menu to select the
script to be displayed.
Step 2: Right click a line in the Source view and select Insert Breakpoints from the popup
menu.
Once a breakpoint is set, a red circle displays at the beginning of the line.
Appeon Developer User Guide
Page 93
Debugging Appeon Web Applications
Appeon for PowerBuilder 2013
Figure 7.3: Breakpoints are set
Method #2: Setting a breakpoint in the Breakpoints, Variables, or Watch view
Step 1: Right click the Breakpoints, Variables, or Watch view;
Step 2: Select Breakpoints from the popup menu to add a breakpoint using the Edit
Breakpoints dialog.
Method #3: Removing or adding a breakpoint at runtime
When the application is already running in debug mode, you can still change the way the
debug works by removing or adding breakpoints at runtime:
Double-click a line in the Source view, or select Insert Breakpoint from the popup menu in
the Source view.
7.5 Running the application in debug mode
Click Start ( ) on the Appeon Debugger toolbar. The application starts to run in the
Internet Explorer. It works normally until it reaches a statement containing a breakpoint. At
this point it stops so that you can examine the application in the Appeon Debugger.
Appeon Developer User Guide
Page 94
Debugging Appeon Web Applications
Appeon for PowerBuilder 2013
Figure 7.4: Application running in debugger mode
7.6 Examining an application at a breakpoint
Appeon Debugger provides a Quick Watch function, and the Variables, Watch and Call
Stack views that work the same as PowerBuilder Debugger for examining the state of the
application. It does not provide Break on Changes and TipWatch functions, nor the Object in
Memory view.
7.6.1 Special variable and expression handlings
Appeon Debugger watches the variable and expression results out of JavaScript code but not
PowerBuilder code. This is the main difference with PowerBuilder Debugger. Despite the
difference, the results shall be mostly the same as in PowerBuilder Debugger. If the results
are different, there are two possible reasons:
1. The deployment of the application contains an error. In this case, determine the cause of
the error and correct the problem.
2. Appeon Debugger handles some variables and expressions differently from PowerBuilder
Debugger. Such differences are introduced below. Be aware of them, so not be false
alarmed and conduct unnecessary complex examination work.
Appeon Debugger does NOT support the following when examining variables:
• Expanding the values of ClassDefinition, PowerObject, and Any variables;
Appeon Developer User Guide
Page 95
Debugging Appeon Web Applications
Appeon for PowerBuilder 2013
• Expanding the runtime values of System variables. Instead, it just expands the inherent
properties of such variables.
For example, with a Window type variable w_1, PowerBuilder Debugger shows all the
values of all the controls and variables contained in w_1, while Appeon Debugger only
shows the values of the Window properties of for w_1.
Appeon Debugger gives different results when evaluating the following expressions:
• It reports errors for expressions that contain unsupported code;
• If the same expression is added multiple times -- in different context -- into the
Watch,Appeon Debugger regards it as one expression, and evaluates its value according to
the context of the breakpoint;
• Appeon Debugger does not validate expressions. Therefore, if an expression does not pass
validation in PowerBuilder, PowerBuilder Debugger does not give evaluation results,
however Appeon Debugger may give a result, sometimes even an incomprehensible result,
such as "[object]+3" for the expression "this + 3".
• If two expressions are interconnected, because the evaluation results of the expressions are
dependent on the orders they are executed, and the ordering may follow different rules in
PowerBuilder Debugger and Appeon Debugger, Appeon Debugger may produce different
results from PowerBuilder Debugger.
7.6.2 Adding variables or expressions to Watch view
Method #1: Adding variables or expressions to Watch with the Quick Watch
Step 1: Select a variable or expression or place the cursor to a variable or expression in the
Source view, right click and select Quick Watch from the popup menu or press Shift+F9.
The variable or the expression will be added to the Expression box on the Quick Watch
dialog.
Step 2: Click the Add Watch button to add the variable or expression to the Watch view.
Appeon Developer User Guide
Page 96
Debugging Appeon Web Applications
Appeon for PowerBuilder 2013
Figure 7.5: Quick Watch
Method #2: Adding variables or expressions directly in the Watch
Step 1: Right click the Watch view and select Insert from the popup menu.
Step 2: Type valid PowerScript expression in the New Expression dialog box, and click OK
to add it to the Watch view.
7.6.3 Changing the value of a variable or expression
To change the value of a variable in the Watch view:
Step 1: Double click a variable or right click a variable and select Edit Variable. The Modify
Value dialog box will be displayed.
Step 2: In the Modify Value dialog box, type a new value for the variable in the New Value
box, click OK to close the Modify Value dialog box and continue debugging the application
with the variable set to the new value.
Figure 7.6: Modify value
To modify an expression in the Watch view:
Step 1: Double-click an expression or right click an expression and select Edit Expression.
The Modify Expression dialog box will be displayed.
Appeon Developer User Guide
Page 97
Debugging Appeon Web Applications
Appeon for PowerBuilder 2013
Step 2: In the Modify Expression dialog box, type the new expression in the New Value box
and click OK.
Notice that it is unsupported to select the Null check box in the Modify Value or Modify
Expression dialog to set the value of the variable or expression to null.
7.6.4 Evaluating an expression
To evaluate an expression in the Quick Watch dialog box and add it to the Watch view:
Step 1: Change the variable or expression in the Expression box.
Step 2: Click Reevaluate to display the new value in the tree view.
Step 3: (Optional) Click Add Watch to add the expression to the Watch view.
7.6.5 Examining context in Call Stack view
You can examine the context of the application by clicking the code lines in the call stack.
To show a different context from the Call Stack view:
• Double-click a line or right click a line and select Set Context
Once a function is selected in the Call Stack view, the Variable views, the Source view, and
the Watch view will all be updated.
7.6.6 Stepping through the application
You can use the Step In, Step Over, Step Out, Run To Cursor, and Set Next Statement
commands to step through an application. Using these commands in Appeon Debugger is no
different from using them in PowerBuilder Debugger.
7.7 Fixing the code/stopping the debug procedure
Once you locate the cause of the erroneous execution results, you can stop the debugging
procedure, return to the PowerBuilder application to fix the code, and re-deploy the
application to verify that the error has been corrected.
To stop the debugging process: close Internet Explorer where the application is running, or
select Stop on the toolbar. The breakpoints you set to the application will be saved when
Appeon Debugger is closed, and will be available when Appeon Debugger is re-opened.
When fixing the code, you must return to the PowerBuilder IDE and make code changes in
the original PowerBuilder application. Redeploy the application and run the application in
Internet Explorer to verify if the problem has been corrected. If the problem still exists and
you need to return to Appeon Debugger to redeploy the application. Otherwise, the latest
code changes will not be reflected in Appeon Debugger.
Appeon Developer User Guide
Page 98
Running Appeon Applications
Appeon for PowerBuilder 2013
8 Running Appeon Applications
Appeon Web applications are accessed via Microsoft Internet Explorer and Appeon Mobile
applications are accessed via Appeon Workspace.
Confirm that the Web Server(s) and Appeon Server(s) hosting the Web or mobile
applications are running, and verify that the Web browser meets the necessary requirements
outlined in the Appeon Installation Guide.
8.1 Requirements
8.1.1 Windows account privileges
Note: This is required for the Web application only.
When you run an Appeon Web application for the first time, the Xcelerator plug-in (ActiveX
controls for improving the runtime performance of Web applications) must be downloaded to
the client.
Different Internet Explorer versions require different privileges for installing the ActiveX
control. For example, if using IE 8.0 or 9.0 on Windows Vista/7/2008, you do not need
administrative privileges to download and register the ActiveX control. You can log into the
machine as a normal user. However, if using IE 8.0 or 9.0 on Windows XP/2003, or if using
IE 7.0 or earlier, you must log in as a member of the Administrator group so you have the
permissions to successfully download and register the ActiveX control.
If you are using IE 8.0 or 9.0 on Windows XP/2003, or if using IE 7.0 or earlier, ask your
administrator to assign the current login account to the Administrators group, so that it
can successfully download and register the Xcelerator plug-in. After that, you can use any
account to log into Windows and run the application.
8.1.2 Internet Explorer settings
Note: This is required for the Web application only.
Settings in Internet Explorer can affect the deployed Web application. Sometimes outdated
files that are cached in the browser can interfere with how a Web application functions and
can cause errors when they are re-deployed many times. Internet Explorer's settings may also
block proxy connections or ActiveX control downloads when the Web application is opened.
Therefore, you need to make sure you configure Internet Explorer's settings accordingly.
Note that you may need to have the administrator rights to modify certain settings.
8.1.2.1 Settings for temporary Internet files
Sometimes cached files in Internet Explorer can cause problems when accessing the
converted Web application after deployment. In order to avoid the risk of providing stale
data, it is imperative that Internet Explorer has the cache options set to Automatically and
that there is sufficient disk space on the Client to enable the Web files to be cached.
To set the cache options:
Step 1: Open Internet Explorer and select Tools > Internet Options, as shown in the
following figure.
Appeon Developer User Guide
Page 99
Running Appeon Applications
Appeon for PowerBuilder 2013
Figure 8.1: Internet Options in Internet Explorer
Step 2: Click the Settings button in the Temporary Internet Files group box.
Step 3: Select the Automatically radio button to check for newer versions of stored pages, as
shown in the figure below.
Appeon Developer User Guide
Page 100
Running Appeon Applications
Appeon for PowerBuilder 2013
Figure 8.2: Temporary Internet File Settings
Step 4: Verify that the Disk space to use scroll box is set to at least 200 MB. Click OK in the
Settings window.
8.1.2.2 Advanced settings for temporary Internet Explorer files folder
During development, the Temporary Internet Files folder should be set to automatically
empty each time Internet Explorer is closed. This will force Internet Explorer to re-download
the entire application every time it is opened, to ensure the latest version of the application is
present, and to prevent interference from outdated cached files.
Here are the necessary steps required to configure Internet Explorer to flush its temporary
files each time the browser is closed:
Step 1: Click the Advanced tab in the Internet Options window, as shown in the following
figure.
Step 2: Check the Empty Temporary Internet files folder when browser is closed check
box under the Security section, as shown in the following figure.
Appeon Developer User Guide
Page 101
Running Appeon Applications
Appeon for PowerBuilder 2013
Figure 8.3: Empty Temporary Internet Files folder when browser is closed
Step 3: Click Apply in the Advanced tab and then OK in the Internet Options window to
allow the settings to take effect.
Allowing the temporary Internet files folder to be emptied each time the browser is closed,
is recommended only during the development stage. Once your Web application is ready
for production deployment, and frequent changes are not being made to the application,
this setting can be disabled once again (unchecked). This setting should be reset once
development is complete so the Web application can be cached in each Client PC for better
Client-side performance. Using this set of guidelines, caching files should be enabled when
they are needed for performance improvement, and disabled during the development and
debugging stages.
8.1.2.3 Advanced settings for proxy server
If the Client visits the Web application through a proxy server, you need to select the Use
HTTP 1.1 through proxy connections option under the HTTP 1.1 settings section, as shown in
the following figure.
The following steps detail the configuration needed in Internet Explorer:
Step 1: Click the Advanced tab in the Internet Options window, as shown in the following
figure.
Appeon Developer User Guide
Page 102
Running Appeon Applications
Appeon for PowerBuilder 2013
Step 2: Check the Use HTTP 1.1 through proxy connections check box under the HTTP
1.1 settings section, as shown in the following figure.
Figure 8.4: Proxy connection settings
Step 3: Click Apply in the Advanced tab and then OK in the Internet Options window to
allow the settings to take effect.
8.1.2.4 Security settings for ActiveX controls and Appeon Xcelerator plug-in download
If the Web application calls OLE objects, DLL files, or runs executable programs on the
Client, then when the Web application is run for the first time on the Client the user will
need to download an ActiveX control (for executing functions that involve client-side
integration) and the Appeon Xcelerator plug-in (for improving the runtime performance of
Web applications) from the Web Server. To ensure that Internet Explorer will not block the
download, configure Internet Explorer's settings, using the following steps:
Step 1: Open Internet Explorer and navigate to Tools > Internet Options > Security.
Step 2: Verify that you selected an appropriate Web content zone. Appeon recommends you
select the Trusted sites zone and add the Web application URL to the Trusted sites.
Appeon Developer User Guide
Page 103
Running Appeon Applications
Appeon for PowerBuilder 2013
Figure 8.5: Select a Web content zone
Step 3: Click the Custom Level button in the Security tab. The Security Settings page is
displayed, as shown in the following figure.
Appeon Developer User Guide
Page 104
Running Appeon Applications
Appeon for PowerBuilder 2013
Figure 8.6: Security Settings page
Step 4: Check the Enable or the Prompt (recommended) radio button for the following
options:
• Download signed ActiveX controls and plug-ins (and Download unsigned ActiveX
controls in Windows XP)
• Initialize and script ActiveX controls not marked as safe
• Run ActiveX controls and plug-ins
• Script ActiveX controls marked safe for scripting
• File download
• Active scripting
• Allow active content to run in files on My Computer (If the version of Internet Explorer is
6.0 SP2)
If Enable is selected, the ActiveX control will download automatically without prompting. If
Prompt is selected, your approval will be required before downloading takes place.
Note: If running the Appeon Web application for the first time in Internet Explorer 8 on
Windows XP, be sure to set "Download signed ActiveX control" to Enable (Do not set to
Prompt or Disable), otherwise, Internet Explorer will crash.
Appeon Developer User Guide
Page 105
Running Appeon Applications
Appeon for PowerBuilder 2013
8.1.3 Language setting requirements
Note: This is required for the Web application only.
The language of the data in the database used by the application should match the Windows
operating system language settings on the machine where Appeon Server is installed. If the
language settings conflict, problems will occur when the Web application is run.
Verify that the language of the data in the database used by the Appeon-deployed Web
application matches the language settings of the client operating system:
Step 1: Select Windows Start > Settings > Control Panel.
Step 2: Click Regional Options, as shown in the following figure.
Figure 8.7: Regional Options
Step 3: Verify that the language selected in the Your locale (location) list box and the
language checked as default in the Language settings for the system settings are the same.
The language can be from different regions as long as it is the same language.
This configuration is not required for English language applications.
Appeon Developer User Guide
Page 106
Running Appeon Applications
Appeon for PowerBuilder 2013
8.1.4 Disabling anti pop-up software
Note: This is required for the Web application only.
If anti-popup software (example: Popup Stopper by Panicware) is installed and is active on
the Client machine, it will not allow any browser pop-ups to occur. This can cause certain
operations to become disabled in the converted Web applications such as the enhanced Web
features detailed below, or other operations that automatically load an Internet Explorer
window or popup. To prevent any problems, it is recommended that users disable any antipopup software while using the converted Web applications.
8.2 Accessing Appeon applications
8.2.1 URLs for Appeon applications
A typical URL for a mobile application is similar to the following:
• http://192.0.0.80:8080/appeondemo/
A typical URL for a Web application is similar to one of the following:
• http://192.0.0.80:8080/appeondemo/x32_index.htm
• http://192.0.0.80:8080/appeondemo/x64_index.htm
A complete application URL consists of five parts:
Table 8.1: Application URL
Application Description
URL
Protocol
Uses "http://" typically. If your Web Server is configured as an SSL Web
Server, use "https://".
IP address
or domain
name
Uses the IP address or domain name of the Web Server. Using localhost
listeners in a production environment is not recommended, although the
Appeon installation program has created an HTTP listener (localhost: 9988)
for EAServer\Appeon Server.
HTTP port
(Optional) Specifies the port number that your Web Server accepts for HTTP
connections. If it is not specified, the default port is 80.
If several Web Servers are running on the same machine, make sure that the
port specified is a port of the Appeon Web Server.
Application Specifies the application name. It is the name that you input in the Application
name
URL field in Application Profiles.
Entry file
For Web applications only. Specifies the name of the entry page:
x32_index.htm for 32-bit system, or x64_index.htm for 64-bit system,
for example, "appeondemo/x32_index.htm" (x32_index.htm can be
omitted), "appeondemo/" (/ cannot be omitted), or "appeondemo/
x64_index.htm" (x64_index.htm cannot be omitted).
Appeon Developer User Guide
Page 107
Running Appeon Applications
Appeon for PowerBuilder 2013
8.2.2 Running Appeon applications
There are more than one method to run the Web application and the mobile application.
Web applications will be run in Internet Explorer. You can use the following two methods to
run a Web application in Internet Explorer:
• Typing the URL of the Web application in Internet Explorer address bar: You can
always use this method to access the application, on the condition that the computer meets
Section 8.1, “Requirements”.
• Launching the deployed Web application from the Appeon Developer Run button
( ): Run is a shortcut to Web applications that are deployed to the default Appeon Server
and Web Server.
Mobile applications will be run in the Appeon Workspace. You can use the following two
methods to run a Mobile application in Appeon Workspace:
• Accessing the mobile application in Appeon Workspace: You can always run the
Appeon Workspace and run a deployed mobile application there. For detailed instructions,
refer to Appeon Workspace User Guide.
• Launching the mobile application from the Appeon Developer Run button ( ): Run
is a shortcut to mobile applications that are deployed to the default Appeon Server and
Web Server.
As you can see from the above, both the Web application and the mobile application can be
run from the Appeon Developer Run button. This section talks about this method in details.
8.2.2.1 Launching applications from the Run button
You can launch the application by clicking the Run button in the Appeon Developer toolbar.
Appeon Developer automatically remembers the URLs of the applications that are deployed
to the default Appeon Server and Web Server.
To run an application from the Appeon Developer toolbar:
Step 1: Verify that the default Appeon Server and Web Server in the Server Profiles settings
have been started.
Step 2: Click the Run button ( ) on the Appeon Developer toolbar.
If more than one application is deployed, the Run Application window is displayed as
shown in the following figure, prompting you to select which application to run.
Appeon Developer User Guide
Page 108
Running Appeon Applications
Appeon for PowerBuilder 2013
Figure 8.8: Run Application window
Only applications deployed to the Default Appeon Server and Default Web Server are listed
in the Run Application window.
If you have deployed an application to several different folders on the same Web Server,
Appeon Developer will only remember the URL used in the last deployment, although the
URLs to access the other folders used in the previous deployments will also be valid.
Step 3: Select an application from the application list.
Step 4: Select a project loader for the application from the Project Loader dropdown list
box.
• For Web applications, IE Browser is the only selectable project loader and is
automatically selected by default; the Orientation dropdown list box is automatically
disabled.
• For mobile applications, Appeon Emulators (either for iPad or for iPhone) are the only
selectable project loaders and the Appeon Emulator -- iPad is automatically selected
by default; you also need to select an orientation for the application in the Orientation
dropdown list box. By default, if you have selected Appeon Emulator -- iPad as the
project loader, the landscape orientation is automatically selected; and if you have
selected the Appeon Emulator -- iPhone as the project loader, the portrait orientation is
automatically selected.
Step 5: Click Run.
Appeon Developer User Guide
Page 109
Running Appeon Applications
Appeon for PowerBuilder 2013
• For Web applications, it will be automatically loaded in the IE browser.
• For mobile applications, it will be automatically loaded in the Appeon Workspace
Emulator, which is Appeon Workspace running on the Windows platform.
8.2.2.2 Selecting a run mode
Note: This is for the Web application only.
When you run a Web application for the first time, a run mode selection page will be
displayed, if you have enabled the Allow user to select run mode option in AEM (see
Appeon Server Configuration Guide for details).
This page allows you to select from the following run modes (as shown in the following
figure):
• Run Now: The application runs immediately and files will be downloaded only when used.
This mode is recommended for high speed network.
• Run After Download: Files will be downloaded before the application runs. This mode is
recommended for low speed network.
You can also set a run mode to be the default mode in AEM (see Appeon Server
Configuration Guide for details).
Figure 8.9: Run Mode window
Appeon Developer User Guide
Page 110
Running Appeon Applications
Appeon for PowerBuilder 2013
8.3 Appeon DataWindow menu
Note: This section is for Web applications only.
Appeon provides a Web enhancement, the Appeon DataWindow menu, for all DataWindows
deployed to the Web. When right-clicking on a deployed DataWindow, you can access the
Appeon DataWindow popup menus: Find, Find Next, Find Previous, Sort, Filter, Print, and
Save As File (Obsolete), as shown in the following figure.
Figure 8.10: Appeon DataWindow popup menu
8.3.1 Enabling Appeon DataWindow menu
To use the Appeon DataWindow menu, you must enable it by using the following two
functions: appeonextfuncs.of_popmenu and appeonextfuncs.of_popmenuon that are defined
in the Appeon Workarounds PBL. For detailed instructions on how to use these functions in a
DataWindow, refer to AppeonExtFuncs object in the Workarounds & API Guide.
8.3.2 Using Appeon DataWindow Menu
Appeon DataWindows menu have the following features: Find, Find Next, Find Previous,
Sort, Filter, Print, and Save As File (Obsolete). Perform the following steps to use the menu
in the Web DataWindows.
8.3.2.1 Find
The user can search for data using the Find, Find Next and Find Previous functions.
Step 1: Right-click the Web DataWindow and select Find from the popup menu, as shown in
the following figure.
Appeon Developer User Guide
Page 111
Running Appeon Applications
Appeon for PowerBuilder 2013
Figure 8.11: Find
Step 2: Select the column and search scope and input criteria for the search.
Use the Find function to find all rows where the orders count column is equal to 2, as shown
in the following figure.
Figure 8.12: Find
Step 3: The first row that matches the search criteria will be highlighted.
Step 4: Right-click and select Find Previous or Find Next to highlight the rows (one at a
time) that match the criteria.
8.3.2.2 Sort and filter
The user can sort data by the column in ascending or descending order, or filter data using a
number of functions.
To sort data:
Step 1: Right-click the Web DataWindow and select Sort from the popup menu, as shown in
the following figure.
Appeon Developer User Guide
Page 112
Running Appeon Applications
Appeon for PowerBuilder 2013
Figure 8.13: Sort
Step 2: Specify the column used to sort the data in the DataWindow by clicking on the
column name in the left list box. The column name appears on the right, as shown in the
following figure.
Figure 8.14: Specify sort column
Step 3: Check the Ascending check box to sort the data in ascending order or uncheck the
Ascending check box to sort the data in descending order. Click OK to accept the changes.
The DataWindow automatically refreshes and the data is sorted.
If you want to edit the selected column, double click it to open the "Modify Expression"
dialog, as shown in the following figure.
Appeon Developer User Guide
Page 113
Running Appeon Applications
Appeon for PowerBuilder 2013
Figure 8.15: Modify Expression dialog
To filter data:
Step 1: Right-click the Web DataWindow and select Filter from the popup menu, as shown
in the following figure.
Figure 8.16: Filter
Step 2: Specify the filter by selecting the functions and columns. Click Verify to test whether
the filter expression is valid. Click OK to accept the filter, as shown in the following figure.
The DataWindow automatically refreshes and the data is filtered.
Appeon Developer User Guide
Page 114
Running Appeon Applications
Appeon for PowerBuilder 2013
Figure 8.17: Specify Filter
8.3.2.3 DataWindow printing
The Print menu provides user ability to print DataWindows directly on printers connected to
the Client.
Step 1: Right-click the DataWindow and select Print from the popup menu, as shown in the
following figure.
Figure 8.18: Print file with physical printers
Step 2: Specify the printer settings and paper settings in the Print Setup window, as shown
in the following figure. Click OK.
Appeon Developer User Guide
Page 115
Running Appeon Applications
Appeon for PowerBuilder 2013
The DataWindow will be printed directly to the local printer.
Figure 8.19: Print setup window
8.3.2.4 SaveAs (Obsolete)
This feature is obsolete since Appeon Web 6.6.
The user can save the contents of a DataWindow in different file formats.
Step 1: Right-click the DataWindow and select Save As File from the popup menu, as shown
in the following figure.
Figure 8.20: Save As File
Appeon Developer User Guide
Page 116
Running Appeon Applications
Appeon for PowerBuilder 2013
Step 2: Specify the file location, file name and file type in the Save As window, as shown in
the following figure.
Figure 8.21: Save As window
Note:
If the DataWindow without any data is saved as the HTML file or the XML file, on the Web
the DataWindow header will not be saved, whereas it will be saved on PB.
8.3.2.5 Additional Enhanced Features
In addition to the popup menu (Find, Find Next, Find Previous, Sort, Filter, Print, Save As
File), Appeon offers more features for users to manage DataWindows on the Web. Users
can place DataWindow columns in a different order by dragging and dropping them to new
positions. When navigating an editable DataWindow, users can use the popup menu to
quickly edit the contents. These features are always available and require no extra coding to
be enabled. The following steps show you how to access them:
Step 1: Select a column header in the Web DataWindow and the selected location is
highlighted, as shown in the following figure.
Step 2: Drag and drop it to the desired location, and the location to be dropped is highlighted
as well.
Appeon Developer User Guide
Page 117
Running Appeon Applications
Appeon for PowerBuilder 2013
Figure 8.22: Select a column header
Step 3: Right click on an item in an editable HTML DataWindow and a menu pops up, as
shown in the following figure.
The user can select the following menu items from the popup menu to perform quick editing:
Undo, Cut, Copy, Paste, Delete, Select All.
Figure 8.23: Popup menu for quick edition
Appeon Developer User Guide
Page 118
Launching Appeon Workspace Emulator
Appeon for PowerBuilder 2013
9 Launching Appeon Workspace Emulator
Appeon provides a shortcut of the mobile device emulator, which is the Appeon Workspace
emulating various mobile devices, on the Windows platform to conveniently run your
Appeon deployed mobile applications.
There are three ways to launch the Appeon Workspace Emulator:
1. Launch Appeon Workspace Emulator from the Appeon Developer Run button ( ).
If the application is deployed to the Mobile, then when you click Run in the Run
Application window, Appeon Workspace Emulator will be launched and the application
will be automatically run in Appeon Workspace Emulator. For details, please refer to
Section 8.2.2.1, “Launching applications from the Run button”.
2. Launch Appeon Workspace Emulator from the Appeon Developer Appeon Workspace
Emulator button ( ). On the click of the Appeon Workspace Emulator icon on the
Appeon Developer Toolbar, you directly open the Appeon Workspace Emulator as
shown in the following figure (Appeon Workspace Emulator for iPad). You will need to
add the application in Appeon Workspace first before you can run it.
3. Launch Appeon Workspace Emulator from Windows Start > All Programs > Appeon
for PowerBuilder 2013 > Appeon Developer > Appeon Workspace Emulator.
Appeon Developer User Guide
Page 119
Launching Appeon Workspace Emulator
Appeon for PowerBuilder 2013
Figure 9.1: Appeon Workspace Emulator
After you have launched the Appeon Workspace Emulator, you can select a device that
the Appeon Workspace Emulator emulates, select a scale percentage from the percentage
dropdown list box , change the view orientation by 90° CW or by 90° CCW, or exit the
Appeon Workspace Emulator from the Appeon Workspace Emulator toolbar, as shown in the
following figure.
Figure 9.2: Appeon Workspace Emulator Toolbar
For detailed instructions on using Appeon Workspace, please refer to the Appeon Workspace
User Guide.
Appeon Developer User Guide
Page 120
Using Information Manager
Appeon for PowerBuilder 2013
10 Using Information Manager
Information Manager provides easy access to all the available reports or log files generated
during the application migration process, including debug, development, and deployment.
The reports are categorized as follows: Analysis. The log files are categorized as follows:
Deploy Log and Analysis Log.
The following table provides a brief description of all the reports generated during the Web
or mobile migration process and the report types they are associated with.
Table 10.1: Report Description
Report
Type
Description
Analysis
Analysis Report is generated during a feature analysis or application
deployment, and records the unsupported features in the application.
After you click this button, the UFA Report Window will be displayed. For
detailed instructions, refer to Section 5.2, “Working with UFA Report”.
The following table provides a brief description of all the log files generated during the Web
or mobile migration process, and the log types they are associated with.
Table 10.2: Log Type Description
Log Type
Description
Deploy Log
Deploy Log is generated during application deployment, and records the
deployment process status.
All log files are named according to the following format:
Log Type (i.e. DeployWizardLog, or FeatureAnalysisLog) + time when the
log file is generated (yyyy/mm/dd/hh/mm/ss) + xml.
For example, DeployWizardLog_20050220101918.xml.
Analysis Log Analysis Log is generated during the feature analysis process, and records
the analyzing status.
10.1 Viewing the reports and logs
Step 1: Click the Information button ( ) on the Appeon Developer toolbar and the
Information Manager is displayed, as shown in the following figure.
Appeon Developer User Guide
Page 121
Using Information Manager
Appeon for PowerBuilder 2013
Figure 10.1: Information Manager
Step 2: Select the application in the top dropdown listbox.
Step 3: Select a report type or log type in the left box and the corresponding report button or
log files are displayed in the right box.
If there is more than one log file generated, the log files are listed in order according to the
date and time of generation; the latest log will be listed at the top.
You can open one log at a time, or open several logs at one time: select a continuous range of
log files by holding down Shift and click log files, or select a disconnected range of log files
by holding down Ctrl and clicking log files. Then click View to open the selected log files.
The View and Delete buttons will be disabled if no log files were generated.
Note: For Deploy Log, you can click View All to view all information such as errors,
warnings, and process description, or click View Warning to view warnings only, or click
View Errors to view errors only.
Step 4: Click the report button or log file to view the report or log.
You can continue with other operations while the Information Manager opens. For example,
you can perform feature analysis, deploy the application, or run the Web or mobile
application. If any new reports or logs are generated when the Information Manager is still
open, the new reports or logs are not reflected in the Information Manager immediately. You
need to refresh Information Manager in either of the following ways:
• Close the Information Manager and open it again, or
Appeon Developer User Guide
Page 122
Using Information Manager
Appeon for PowerBuilder 2013
• Select a different application and then select the original application again in the
Information Manager.
Appeon Developer User Guide
Page 123
Packaging Applications
Appeon for PowerBuilder 2013
11 Packaging Applications
The Appeon Application Package Wizard helps PowerBuilder developers to
• Generate portable deployment packages for Web and/or mobile applications, so the
user can directly deploy the Web and/or mobile application to servers without installing
Appeon Developer and using it to do Web or mobile deployments. The PowerBuilder
developers do not need to provide the source PowerBuilder application to the user; this
protects the author's intellectual property rights. Refer to Packaging a deployment project.
• Generate Xcode projects for native mobile applications, so the user can compile the Xcode
project to an IPA file and distribute it to iOS App Store or for Ad-Hoc deployment. Refer
to Packaging a native mobile project.
• Customize Appeon Workspace and generate the Xcode project for Appeon Workspace.
Refer to Customizing and packaging Appeon Workspace.
Before using the Appeon Application Package Wizard, verify that
1. The target PowerBuilder application has been deployed as required:
You must have performed a full deployment on the target PowerBuilder application
on the same Developer machine where you will use the packaging wizard to pack this
application later, this will generate a complete set of files on the local Developer machine
where the package wizard will be able to obtain and pack files.
2. The deployed application can run correctly.
11.1 Packaging a deployment project
11.1.1 What can be packaged?
The package wizard allows you to pack the following files and settings into an executable
deployment project:
• Mandatory Web or mobile application files
Include all application files, DataWindow syntax, INI files, image files, DLL/OCX files
etc.
• Mandatory application profile, Appeon Server profile, and Web server profile settings
Include the profile name, Application URL, PowerBuilder version, file encryption,
performance settings, server type, Appeon Server version, Appeon Server and Web
server connection settings, AEM, data sources, etc. All these settings will be saved to the
configuration files in the INI folder of the generated package. Of these configuration files,
you can modify the config.xml file using the config.exe tool. For detailed information,
refer to Section 11.1.3, “Modifying the deploy-config file”.
• Optional EAServer components
When the Appeon Server is of type EAServer, you can package the local or remote
EAServer components used by the application. Note that EAServer components work with
EAServer application server only.
Appeon Developer User Guide
Page 124
Packaging Applications
Appeon for PowerBuilder 2013
11.1.2 Packaging instructions
To package an executable deployment project and the related settings, take the following
steps:
Step 1: Start the servers, as the package wizard will pack settings of Appeon Server, AEM,
and NVOs (if any).
Step 2: Click the Package ( ) button on the Appeon Developer toolbar to open the Appeon
Application Package Wizard.
Step 3: Select or create a profile from the dropdown list box and click Next to proceed.
A profile is a configuration file containing configurations that you specify when packaging
the application. You can select an existing profile or create one by entering a name in the
text field. The profile will be automatically saved and listed for selection next time when you
launch the Appeon Application Package Wizard again.
Figure 11.1: Welcome page
Step 4: Select the Package a Deployment Project radio button.
To package an Xcode project for a native mobile app, follow detailed instructions in
Packaging a native mobile project.
To customize Appeon Workspace and then package Appeon Workspace to an Xcode project,
follow detailed instructions in Customizing and packaging Appeon Workspace.
Appeon Developer User Guide
Page 125
Packaging Applications
Appeon for PowerBuilder 2013
Figure 11.2: Select package type
Step 5: Select the profile of the application that you want to package and click Next.
Only applications that have been deployed will be listed here for selection. If the application
you intend to package is not listed here, you would need to deploy the target application
using the Appeon Deployment Wizard first (See Chapter 6, Deploying PowerBuilder
Applications).
Appeon Developer User Guide
Page 126
Packaging Applications
Appeon for PowerBuilder 2013
Figure 11.3: Select an application
The following table gives a brief introduction of the columns:
Table 11.1: Application Package Wizard
Column
Description
Selected
Identical to the default application profile selected in the Appeon Developer
Configuration window.
Profile Name Identical to the application profiles configured in the Appeon Developer
Configuration window.
Mode
Identical to the current mode the application profile is set to in the Appeon
Developer Configuration window.
It is recommended that the packaged applications should be available in
Release mode, as this mode prevents most forms of reverse engineering, and
like application packaging, it protects the author's intellectual property.
Step 6: Select the Appeon Server whose settings will be packaged and click Next.
The Appeon Server settings, such as the server type and the Appeon Server version, will be
saved to the config.xml file in the INI folder of the generated package. If necessary, modify
this file using the config.exe tool after the packaging is complete (refer to Section 11.1.3,
“Modifying the deploy-config file”).
Appeon Developer User Guide
Page 127
Packaging Applications
Appeon for PowerBuilder 2013
All the configured Appeon Servers selected into the default deployment profile in the Appeon
Developer Configuration window are listed, as shown in the following figure.
The selected Appeon Server determines that its AEM settings will be packaged and that the
packaged application can only be installed to Appeon Servers of the same version, such as
2013, but not necessarily the same type.
Figure 11.4: Select an Appeon Server
Step 7: If the selected Appeon Server is of type EAServer, select whether to package
EAServer components.
Appeon Developer User Guide
Page 128
Packaging Applications
Appeon for PowerBuilder 2013
Figure 11.5: Configure EAServer profiles
If EAServer components are used in the application, select the Package EAServer
Components option and then create connection profiles for EAServers which host the
components. Follow instructions below to create EAServer profiles:
• Click Add to create an EAServer profile.
• In the Edit EAServer Profile dialog box, input the following connection parameters: profile
name, host name or IP address, port number, user name, and password.
• Click Test to ensure that the connection is successful.
• Click OK to save the new EAServer profile.
Appeon Developer User Guide
Page 129
Packaging Applications
Appeon for PowerBuilder 2013
Figure 11.6: Edit EAServer profile
Step 8: If the Package EAServer Components option is selected in the previous step, select
which components to package and click Next.
The selected NVOs will be packaged as ComponentName.jar and saved under the /NVO/
server profile name/package folder.
Figure 11.7: Select NVOs
Appeon Developer User Guide
Page 130
Packaging Applications
Appeon for PowerBuilder 2013
Step 9: Select whether AEM settings and data sources for the current application will be
packaged and click Next.
The AEM settings will be saved in the AEM.xml file and data sources will be saved in the
config.xml file.
Figure 11.8: Select AEM settings and data source
Step 10: Specify the storage location for the generated package and click Next.
The generated package will be stored under a folder named "Application Profile
Name_install" under the specified location.
Appeon Developer User Guide
Page 131
Packaging Applications
Appeon for PowerBuilder 2013
Figure 11.9: Specify destination location for the package
Step 11: Wait while the wizard is packing files and settings.
Appeon Developer User Guide
Page 132
Packaging Applications
Appeon for PowerBuilder 2013
Figure 11.10: Application packaging status window
Step 12: Once the operation is complete, click Finish to exit the package wizard.
To view the log information generated during the packaging process, select the View
Package Log box and then click Finish. The log file will be displayed.
Appeon Developer User Guide
Page 133
Packaging Applications
Appeon for PowerBuilder 2013
Figure 11.11: Application packaging finished
After the application is successfully packaged, all the necessary application files will be
packaged into an executable deployment project under the "Application Profile Name_install"
folder under the specified location. You can copy the deployment project to other computers
and deploy the application to any Appeon Servers and Web Servers by following instructions
in Section 11.1.4, “Installing and uninstalling an Appeon application”.
11.1.3 Modifying the deploy-config file
The deploy-config file (config.xml) is created during the packaging process and includes the
default settings of the application: application profile, Appeon Server profile, Web server
profile, EAServer profile, EAServer components, and data sources. You can modify the
config.xml file using the config.exe tool to have identical settings of the target environment,
so that the user can run the installation very conveniently without needing to specify them.
When you run the config.exe file in the generated package, an XML File Configuration
dialog is displayed and loads the Application URL setting, Appeon Server settings, and Web
server settings from the config.xml file. You can modify these settings on the corresponding
tab pages and then click OK to save them to the config.xml file. The instructions to modify
these settings are the same as to modify in the Appeon Developer Configuration window (see
Section 4.2, “Using Configure Tool” for detailed instructions).
Important Note: If using JEUS as the target Web server, be sure to use the default
Application Profile Name and Application URL. Changing the default Application Profile
Name and Application URL will cause the application files unaccessible.
Appeon Developer User Guide
Page 134
Packaging Applications
Appeon for PowerBuilder 2013
Figure 11.12: Configuring the XML file
11.1.4 Installing and uninstalling an Appeon application
11.1.4.1 Points to note before installation
Be aware of the following points before you run the deployment project to install an Appeon
application:
• The Setup program of the generated deployment project runs on the Windows platform
only. To install applications to servers running on Unix\Linux, you must run the Setup
program on the Windows platform and then install the application to remote servers
running on Unix\Linux.
• The target Web servers must have the Appeon Server Web Component correctly installed.
• The packaged EAServer components, if any, can only be installed to EAServer application
server.
11.1.4.2 Installing an application
The generated deployment project runs on the Windows platform only. Therefore, you will
need to copy the deployment project to a computer running Windows and then install the
Appeon Developer User Guide
Page 135
Packaging Applications
Appeon for PowerBuilder 2013
application to any number of Appeon Servers and Web servers located in the same network
area. Installing an application using the deployment project is the same as deploying an
application using the Appeon Deployment Wizard.
Step 1: Start the target Appeon Server(s) and Web server(s) where you want to install the
application.
Verify that the target Web servers already have Appeon Server Web Component installed.
Step 2: Run the Setup.exe file in the generated deployment project.
The Appeon Application Deployment wizard is displayed. Click Next to proceed.
Figure 11.13: Welcome page
Step 3: Select the deploy-config file (config.xml) to ease your configuration of the
installation wizard. The installation wizard will use the settings in the config.xml file.
If you do not want to use the deploy-config file, simply skip this option and click Next to
configure the settings step by step.
Appeon Developer User Guide
Page 136
Packaging Applications
Appeon for PowerBuilder 2013
Figure 11.14: Select the configuration file
Step 4: Input the Application Profile Name and the Application URL for the application
and click Next.
The Application Profile Name is used as the application name to identify an application.
If you want to install multiple instances of the same application on the same server, you can
run the setup package repeatedly and specify different Application Profile Name here. For
example, input appeon_code_examples_test as the Application Profile Name in the first
installation, and input appeon_code_examples_production as the Application Profile Name
in the second installation. The Application Profile Name will be used as the application
name to distinguish the multiple application instances on the same server, so they can be run
independently from each other.
Important Note: If using JEUS as the target Web server, be sure to use the default
Application Profile Name and Application URL. Changing the default Application Profile
Name and Application URL will cause the application files unaccessible.
Appeon Developer User Guide
Page 137
Packaging Applications
Appeon for PowerBuilder 2013
Figure 11.15: Specify Application Profile Name and Application URL
Step 5: Configure and select profiles for the Appeon Server(s) and the Web server(s) where
the application will be installed.
To install the application to more than one Appeon Servers, please make sure the Appeon
Servers are of the same version (such as 2013) as the Appeon Server selected for packaging.
To install the application to an Appeon Server cluster, please create an Appeon Server profile
for each Appeon Server in the cluster. For detailed instructions on how to create the Appeon
Server profile and Web server profile, refer to Section 4.2.3, “Managing server profiles”.
Appeon Developer User Guide
Page 138
Packaging Applications
Appeon for PowerBuilder 2013
Figure 11.16: Specify server settings
Step 6: Select whether to deploy EAServer components.
After NVO components are deployed, you must generate stub/skeleton in EAServer.
Detailed instructions are provided in Generating Stub/Skeleton in EAServer in the Migration
Guidelines for Appeon Web.
Appeon Developer User Guide
Page 139
Packaging Applications
Appeon for PowerBuilder 2013
Figure 11.17: Specify EAServer settings
If EAServer components are used in the application, select the EAServer Components option
and then create connection profiles for EAServers where you want to deploy the components.
Follow instructions below to create EAServer profiles:
• Click Add to open the Edit EAServer Profile dialog box.
• Input the connection parameters: profile name, host name or IP address, port number, user
name and password.
• Click Test to verify the connection and the click OK to finish the creation.
Figure 11.18: Edit EAServer Profile
Appeon Developer User Guide
Page 140
Packaging Applications
Appeon for PowerBuilder 2013
Step 7: If the EAServer Components option is selected in the previous step, select the
EAServer profile from the list and the components to deploy. Click Next to proceed.
Figure 11.19: Deploy NVOs
Step 8: Select whether to install AEM settings and data sources for the current application
and click Next.
Appeon Developer User Guide
Page 141
Packaging Applications
Appeon for PowerBuilder 2013
Figure 11.20: Deploy AEM settings
Step 9: Specify the destination folder for the undeployment tool and the log file and click
Next.
Figure 11.21: Specify location for the Appeon Undeployment Tool
Appeon Developer User Guide
Page 142
Packaging Applications
Appeon for PowerBuilder 2013
Step 10: Specify the destination file and source file that you want to replace for the Appeon
application package, and click Next.
Files (also called "destination file") under the "wcode" folder of Appeon application package
can be replaced by files of the same type (also called "source file"), so that the source file
will be installed instead of the destination file. When you click the Add button, the File
Replacement dialog box is opened. To select the destination file, click Browse to display the
Open file dialog which will automatically open the "wcode" folder of Appeon application
package, so you can conveniently select a file from the "wcode" folder or from its subfolder.
To select the source file, click Browse to navigate to the folder where the source file is stored.
Figure 11.22: Specify files to replace for the application package
Step 11: Wait while the wizard is installing files and settings.
Appeon Developer User Guide
Page 143
Packaging Applications
Appeon for PowerBuilder 2013
Figure 11.23: Deploying the application
Step 12: Once the operation is complete, click Finish to exit the installation wizard.
To run the application immediately, select the Run Application Now option and click Finish.
Or you can run the application later from the Windows Start | Programs | Appeon Web
Application | ApplicationName.
To view the log information generated during the installation process, select the View Log
box and then click Finish. The log file will be displayed.
Appeon Developer User Guide
Page 144
Packaging Applications
Appeon for PowerBuilder 2013
Figure 11.24: Deployment complete
11.1.4.3 Uninstalling an application
Step 1: Start the Appeon Server(s) and/or Web server(s) where you intend to uninstall the
application.
Step 2: Select Windows Start > All Programs > Appeon Application > Undeploy
ApplicationName.
The Appeon Application Undeployment Wizard is displayed. Click Next to proceed.
Appeon Developer User Guide
Page 145
Packaging Applications
Appeon for PowerBuilder 2013
Figure 11.25: Appeon Application Undeployment wizard
Step 3: Select an existing deploy-config file to automatically use the configuration previously
used for the deployment wizard.
Figure 11.26: Select the configuration file
Appeon Developer User Guide
Page 146
Packaging Applications
Appeon for PowerBuilder 2013
Step 4: Specify the Application URL.
Figure 11.27: Specify Application URL
Step 5: Select the Appeon Server(s) and Web server(s) where application will be undeployed.
To create the Appeon Server profile and Web server profile, refer to Section 4.2.3,
“Managing server profiles”.
Appeon Developer User Guide
Page 147
Packaging Applications
Appeon for PowerBuilder 2013
Figure 11.28: Specify server settings
Step 6: Select whether to undeploy EAServer components.
Figure 11.29: Undeploy EAServer components
Appeon Developer User Guide
Page 148
Packaging Applications
Appeon for PowerBuilder 2013
Select the EAServer Components option and then create connection profiles for EAServers
where you want to undeploy the components. Follow instructions below to create EAServer
profiles:
• Click Add to open the EAServer Connection dialog box.
• Input the connection parameters: profile name, host name or IP address, port number, user
name and password.
• Click Test to verify the connection and the click OK to finish the creation.
Figure 11.30: Edit EAServer profile
Step 7: If the EAServer Components option is selected in the previous step, select the
EAServer profile from the list and the components to undeploy. Click Next to proceed.
Appeon Developer User Guide
Page 149
Packaging Applications
Appeon for PowerBuilder 2013
Figure 11.31: Select EAServer components
Step 8: Wait while the wizard is removing files and settings.
Step 9: Once the operation is complete, click Finish to exit the undeployment wizard.
To view the log information generated during the uninstall process, select the View Log box
and then click Finish. The log file will be displayed.
Appeon Developer User Guide
Page 150
Packaging Applications
Appeon for PowerBuilder 2013
Figure 11.32: Undeployment complete
11.2 Packaging a native mobile project
11.2.1 Points to check before packaging
Apple follows some guidelines to review the app before it approves and posts the app to
the iOS App Store. To get the app approved, you may need to carefully read the App Store
Review Guidelines and verify the app is in compliance with these guidelines.
The following lists the most common areas and reasons we have found so far that will cause
the app to be rejected by Apple.
1. Check that if your app includes UI controls for quitting the app. For example, a button
labeling "Quit", "Exit", etc. You'd better remove any mechanism for quitting the app, as
this is not in compliance with the iOS Human Interface Guidelines, as required by the App
Store Review Guidelines.
2. Check that if you app appears to be for demonstration or trial purposes only. For example,
"demo", "trial", "test" or "beta" is displayed on the app UI, app description or release
notes. You'd better remove any these references and complete or fully configure any
partially implemented features.
11.2.2 Packaging instructions
To package an Xcode project for native mobile apps to be distributed on iOS, follow steps
below:
Appeon Developer User Guide
Page 151
Packaging Applications
Appeon for PowerBuilder 2013
Step 1: Click the Package ( ) button on the Appeon Developer toolbar to open the Appeon
Application Package Wizard.
Step 2: Select or create a profile from the dropdown list box and click Next to proceed.
A profile is a configuration file containing the settings that you specify when packaging the
application. You can select an existing profile or create one by entering a name in the text
field. The profile will be automatically saved and listed for selection next time when you
launch the Appeon Application Package Wizard again.
Figure 11.33: Welcome page
Step 3: Select the Package a Native Mobile Project radio button.
To package a deployment project that can install the application to servers, follow detailed
instructions in Packaging a deployment project.
To customize Appeon Workspace and then package Appeon Workspace to an Xcode project,
follow detailed instructions in Customizing and packaging Appeon Workspace.
Appeon Developer User Guide
Page 152
Packaging Applications
Appeon for PowerBuilder 2013
Figure 11.34: Select package type
Step 4: Select the profile of the application that you want to package and click Next.
Only applications that have been deployed will be listed here for selection. If the application
you intend to package is not listed here, you would need to deploy the target application
using the Appeon Deployment Wizard first (See Chapter 6, Deploying PowerBuilder
Applications).
Appeon Developer User Guide
Page 153
Packaging Applications
Appeon for PowerBuilder 2013
Figure 11.35: Select app to be packaged
The following table gives a brief introduction of the columns:
Table 11.2: Application Package Wizard
Column
Description
Selected
Identical to the default application profile selected in the Appeon Developer
Configuration window.
Profile Name Identical to the application profiles configured in the Appeon Developer
Configuration window.
Mode
Identical to the current mode the application profile is set to in the Appeon
Developer Configuration window.
It is recommended that the packaged applications should be available in
Release mode, as this mode prevents most forms of reverse engineering, and
like application packaging, it protects the author's intellectual property.
Device Type Identical to the current device type settings in the Appeon Developer
Configuration window.
Step 5: Specify the parameters for the app and then click Next.
Appeon Developer User Guide
Page 154
Packaging Applications
Appeon for PowerBuilder 2013
Figure 11.36: Configure app parameters
See the following table for details on each parameter.
Table 11.3: App parameters
Group
Value
Description
General
App Name (*)
Specify the name of your app that will appear on the
App Store. For the name to display completely, it should
be about 12 letters but it depends on the width of each
individual letter, for example, w takes more room than i.
The App Name will also be used as name of the
generated package.
App Description
Appeon Developer User Guide
Provide the description of your app that will appear in
the screen under iOS Settings -> App Name after the app
is installed on the iOS-based device.
Page 155
Packaging Applications
Group
Appeon for PowerBuilder 2013
Value
Description
App URL (*)
Specify the app URL. The URL supports both HTTP
and HTTPs formats, for example, https://192.0.0.201/
sales. The URL can be changed in the screen under iOS
Settings -> App Name after the app is installed on the
iOS-based device.
Startup Orientation
Set the initial interface orientation when the app starts.
SSL Verify Peer
Enable or disable the SSL peer verification.
SSL Verify Host
Enable or disable the SSL hostname verification.
Connection Timeout
(seconds)
Specify the timeout seconds for your app connecting to
the server.
Record Logs
Option to record app logs.
Titlebar
Icon
Full Screen by
Default
Set whether to display your app in full screen by default.
Xcode
App Major Version
Specify the version number for your app.
App Build No.
Specify the build number for your app.
iPhone App Icon
(Standard Display)
Specify the app icon for the standard display on iPhone
(57 x 57 pixels).
iPhone App Icon
(Retina Display)
Specify the app icon for the retina display on iPhone
(114 x 114 pixels).
iOS
iPhone Launch Image Specify the launch image for the standard display on
(Standard Display)
iPhone (320 x 480 pixels).
iPhone Launch Image Specify the launch image for the retina display on iPhone
(Retina Display)
(640 x 960 pixels).
iPhone 5 Launch
Image
Specify the launch image for the retina display on iPhone
5 (640 x 1136 pixels).
iPad App Icon
(Standard Display)
Specify the app icon for the standard display on iPad (72
x 72 pixels).
iPad App Icon
(Retina Display)
Specify the app icon for the retina display on iPad (144 x
144 pixels).
iPad Launch Image
(Standard Display in
Landscape)
Specify the launch image for the standard display in
landscape on iPad (768 x 1004 pixels).
iPad Launch Image
(Standard Display in
Portrait)
Specify the launch image for the standard display in
portrait on iPad (1024 x 768 pixels).
iPad Launch Image
(Retina Display in
Landscape)
Specify the launch image for the retina display in
landscape on iPad (1536 x 2008 pixels).
Appeon Developer User Guide
Page 156
Packaging Applications
Group
Appeon for PowerBuilder 2013
Value
Description
iPad Launch Image
(Retina Display in
Portrait)
Specify the launch image for the retina display in portrait
on iPad (2048 x 1496 pixels).
Step 6: Specify the storage location for the package and click Next.
The generated package will be stored under a folder named "App Name_install" under the
specified location.
Figure 11.37: Specify directory
Step 7: Wait until the package process is complete. Click Next when the package process is
complete.
Appeon Developer User Guide
Page 157
Packaging Applications
Appeon for PowerBuilder 2013
Figure 11.38: Package process
Step 8: Click Finish.
Appeon Developer User Guide
Page 158
Packaging Applications
Appeon for PowerBuilder 2013
Figure 11.39: Package complete
Step 9: Go to the folder "App Name_install" under the specified location, you will find the
following two zip files. Copy them to the Mac machine.
• App Name.zip: the application file package
• AppeonMobile.framework.zip: the mobile client libraries
Then follow the instructions in Package & Distribute Native Mobile Apps in Appeon
Mobile Tutorials to compile them into an IPA file.
11.3 Customizing and packaging Appeon Workspace
To customize Appeon Workspace and package it as an Xcode project, follow steps below:
Step 1: Click the Package ( ) button on the Appeon Developer toolbar to open the Appeon
Application Package Wizard.
Step 2: Select or create a profile from the dropdown list box and click Next to proceed.
A profile is a configuration file containing the settings that you specify when packaging the
application. You can select an existing profile or create one by entering a name in the text
field. The profile will be automatically saved and listed for selection next time when you
launch the Appeon Application Package Wizard again.
Appeon Developer User Guide
Page 159
Packaging Applications
Appeon for PowerBuilder 2013
Figure 11.40: Welcome page
Step 3: Select the Customize and Package Appeon Workspace radio button and click Next.
To package a deployment project that can install the app to servers, follow detailed
instructions in Packaging a deployment project.
To package an Xcode project for a native mobile app, follow detailed instructions in
Packaging a native mobile project.
Appeon Developer User Guide
Page 160
Packaging Applications
Appeon for PowerBuilder 2013
Figure 11.41: Select package type
Step 4: Customize Appeon Workspace according to your needs and then click Next.
Appeon Developer User Guide
Page 161
Packaging Applications
Appeon for PowerBuilder 2013
Figure 11.42: Workspace parameters
See the following table for details.
Table 11.4: Workspace settings
Group
Parameter
Description
General
Display Name (*)
Specify the name of your workspace that will appear in
App Store. For the name to display completely, it should
be about 12 letters but it depends on the width of each
individual letter, for example, w takes more room than i.
The Display Name will also be used as name of the
generated package.
Workspace Banner
Whether to display the Workspace Banner in your
workspace.
Workspace Banner
Package
Specify the URL to your own banner. The default page
of your own banner must be "index.html", and the URL
must point to "index.html".
Refer to Replacing the Workspace Banner [164] for
details.
SSL Verify Peer
Enable or disable the SSL peer verification.
SSL Verify Host
Enable or disable the SSL hostname Verification.
Appeon Developer User Guide
Page 162
Packaging Applications
Group
Appeon for PowerBuilder 2013
Parameter
Description
Connection Timeout
(seconds)
Specify the timeout seconds for your app connecting to
the server.
Record Logs
Option to record app logs.
Help Path
Specify the path of your help file. The startup page of
your help must be index.html.
ApplicationEnable Edit App
Enable or disable the Add App and Delete App
functions.
Default App
Specify the default app. The deployed apps are listed.
Full Screen by
Default
Whether to display the app in full screen by default when
it is opened.
Language Default Language
Select the languages to package and specify the default
language of your workspace UI. The workspace UI can
be displayed in English, French, Simplified Chinese,
Traditional Chinese, Japanese, Korean, Italian, and
Spanish. You can select to package which languages.
To display the workspace UI in other languages, refer
to Adding and customizing UI languages [164] for
details.
Xcode
iOS
App Major Version
The version number of your workspace.
App Build Version
The build number of your workspace.
iPhone App Icon
(Standard Display)
Specify the app icon for the standard display on iPhone
(57 x 57 pixels).
iPhone App Icon
(Retina Display)
Specify the app icon for the retina display on iPhone
(114 x 114 pixels).
iPhone Launch Image Specify the launch image for the standard display on
(Standard Display)
iPhone (320 x 480 pixels).
iPhone Launch Image Specify the launch image for the retina display on iPhone
(Retina Display)
(640 x 960 pixels).
iPhone 5 Launch
Image
Specify the launch image for the retina display on iPhone
5 (640 x 1136 pixels).
iPad App Icon
(Standard Display)
Specify the app icon for the standard display on iPad (72
x 72 pixels).
iPad App Icon
(Retina Display)
Specify the app icon for the retina display on iPad (144 x
144 pixels).
iPad Launch Image
(Standard Display in
Landscape)
Specify the launch image for the standard display in
landscape on iPad (768 x 1004 pixels).
iPad Launch Image
(Standard Display in
Portrait)
Specify the launch image for the standard display in
portrait on iPad (1024 x 768 pixels).
Appeon Developer User Guide
Page 163
Packaging Applications
Group
Appeon for PowerBuilder 2013
Parameter
Description
iPad Launch Image
(Retina Display in
Landscape)
Specify the launch image for the retina display in
landscape on iPad (1536 x 2008 pixels).
iPad Launch Image
(Retina Display in
Portrait)
Specify the launch image for the retina display in portrait
on iPad (2048 x 1496 pixels).
Replacing the Workspace Banner:
The banner in the Appeon Workspace is an HTML Web app. You can design your own
workspace banner and replace the Appeon Workspace Banner.
• Replace the banner: Click the Workspace Banner to select your own HTML Web app.
Make sure that the app contains an index.html file under the root directory of the app. The
index.html file is the default file that the Workspace Banner loads.
• Banner size: the height is 248 pixels for iPad (including iPad 2, 3, 4, and mini), and 124
pixels for iPhone (including iPhone 4, 4S and 5); the width is subject to the device (usually
the same width as the device screen). For iPad 2, 3, 4, and mini, the width in Portrait view
is 768 pixels, and the width in Landscape view is 1024 pixels. For iPhone 4, 4S and 5, the
width in Portrait view is 320 pixels, and the width in Landscape view for iPhone 4/4S is
480, and for iPhone 5 is 568 pixels.
• Important Notes:
1) Keep the banner height as 248 pixels for iPad, and 124 pixels for iPhone; and the width
same as the device screen.
2) There are different widths for portrait and for landscape on a device if your workspace
supports both orientations.
3) Pay attention to the compatibilities of the related JavaScript.
Adding and customizing UI language packages:
The workspace UI can be displayed in English, French, Simplified Chinese, Traditional
Chinese, Japanese, Korean, Italian, and Spanish. To add the other language packages to
Appeon Workspace:
1. Navigate to ...\Appeon\Developer2013\AppTemplate\iOS\AppeonWS.bundle\config\Aws
\ under the Appeon Developer installation directory, and open the languages.xml file in a
text editor and uncomment the line of script that corresponds to the language you want to
add. It is recommended that you back up this file before modifying it.
For example, to add the support for German, find the corresponding line of script (or add it
if it is not pre-defined), and then remove the comment as shown below:
<lang code="de" name="Deutsch" c="##"/>
The value of code must be used as the name of the language file in the next step. The
value of name will be displayed in the Language tool of Appeon Workspace.
Appeon Developer User Guide
Page 164
Packaging Applications
Appeon for PowerBuilder 2013
2. Make a copy of an existing language file under ...\Appeon\Developer2013\AppTemplate
\iOS\AppeonWS.bundle\config\Aws\lang, put the copy under the same directory, and
name the copy after the value of code. Take German for example, the language file must
be named as de.xml. Then open the file, and translate the content into the language you
want to add.
3. In the Package tool, click the button in the Default Language field. The language you
added will be displayed for selection. Make sure the Selected check box of the language is
checked.
Figure 11.43: Language
In addition, you can customize the UI text by editing the language file under ...\Appeon
\Developer2013\AppTemplate\iOS\AppeonWS.bundle\config\Aws\lang. For example,
you can open en.xml and change the text (id="1") from "Appeon Workspace" to "ABC
Workspace", so "ABC Workspace" will display in the center of workspace titlebar instead of
"Appeon Workspace".
Step 5 (Optional): Select the apps you want to package into the workspace and specify the
corresponding URLs. The apps deployed in Appeon Developer are listed by default, and
multiple apps can be selected.
Appeon Developer User Guide
Page 165
Packaging Applications
Appeon for PowerBuilder 2013
Figure 11.44: Select apps to be packaged with your Workspace
Step 6: Specify the storage location for the generated package and click Next.
The generated package will be stored under a folder named "Display Name_install" under the
specified location.
Appeon Developer User Guide
Page 166
Packaging Applications
Appeon for PowerBuilder 2013
Figure 11.45: Specify the directory
Step 7: Wait until the package process is complete. Click Next when the package process is
complete.
Appeon Developer User Guide
Page 167
Packaging Applications
Appeon for PowerBuilder 2013
Figure 11.46: Packaging process
Step 8: Click Finish.
Appeon Developer User Guide
Page 168
Packaging Applications
Appeon for PowerBuilder 2013
Figure 11.47: Package complete
Step 9: Go to the folder "Display Name_install" under the specified location, you will find the
following two zip files. Copy them to the Mac machine.
• Display Name.zip: the zip package of the workspace
• AppeonMobile.framework.zip: the mobile client library
Then follow the instructions in Package & Distribute Native Mobile Apps in Appeon
Mobile Tutorials to compile them into an IPA file.
Appeon Developer User Guide
Page 169
Undeploying Appeon Applications
Appeon for PowerBuilder 2013
12 Undeploying Appeon Applications
The Application Undeployment Wizard removes a deployed application from the associated
Appeon Server(s) and Web Server(s), including all DataWindows from the Appeon Server(s),
all the Web or mobile application files from the Web Server(s), and all the Transaction
Object mappings from AEM. This is the only way that an Appeon deployed application
should be removed. Any other method may not fully remove the application, and may cause
errors.
12.1 Undeploying instructions
Step 1: Verify that the Appeon Server and the Web Server(s) hosting the Appeon application
to be undeployed are running before you proceed with undeployment.
Step 2: Click the Undeploy button ( ) in the Appeon Developer toolbar. The Application
Undeployment Wizard is displayed, as shown in the following figure.
Figure 12.1: Application Undeployment Wizard
Step 3: Click Next to continue. The Specify Undeployment Mode window is displayed, as
shown in the following figure, prompting you to select an undeployment mode.
Appeon Developer User Guide
Page 170
Undeploying Appeon Applications
Appeon for PowerBuilder 2013
Figure 12.2: Specify Undeployment Mode window
The following table shows when and how to use each mode.
Table 12.1: Undeployment modes
When To Use It
How To Use It
Deployment If you clearly know which
Profile mode application you want to delete
from which server.
Select an application to be undeployed and
its associated deployment profile.
Appeon
When you are uncertain of
Server mode the name of the application
you want to undeploy, or an
application profile does not exist
for the application you want
to undeploy, but you clearly
know the Appeon Server hosting
the Web or mobile application
intended for undeployment.
Specify an Appeon Server by selecting
an Appeon Server profile. The selected
Appeon Server will refer to all the Web
or mobile applications that are deployed.
Then you can choose one Web or mobile
application for undeployment.
For detailed instructions, refer to
Section 12.1.1, “Undeploying with the
Deployment Profile mode”.
For detailed instructions, refer to
Section 12.1.2, “Undeploying with the
Appeon Server mode”.
12.1.1 Undeploying with the Deployment Profile mode
Step 1: Select the Deployment Profile radio button in the Specify Undeployment Mode
window, and click Next to continue.
Appeon Developer User Guide
Page 171
Undeploying Appeon Applications
Appeon for PowerBuilder 2013
Step 2: Select a Web or mobile application from the Application list box, as shown in the
following figure.
The Application list box lists all the application profile names. Be sure to choose one that has
been deployed and is intended for undeployment. The application and the deployment profile
used in the last deployment will be selected by default.
Step 3: Select the deployment profile that is used to deploy the Web or mobile application
from the Deployment Profile list box, as shown in the following figure. Click Next to
continue.
Figure 12.3: Deployment Profile Mode window
Step 4: Select the Appeon Server(s) or Web Server(s) that are intended for undeployment,
as shown in the following figure. The Appeon Server(s) and Web Server(s) defined in the
deployment profile selected in the previous step are listed. Click Next to continue.
Appeon Developer User Guide
Page 172
Undeploying Appeon Applications
Appeon for PowerBuilder 2013
Figure 12.4: Confirm Appeon Servers and Web Servers
Step 5: Click Undeploy to confirm the undeployment settings and start the undeployment
process, as shown in the following figure.
Figure 12.5: Confirm undeployment settings
The undeployment process begins, as shown in the following figure.
Step 6: Click Finish to close the dialog box.
Appeon Developer User Guide
Page 173
Undeploying Appeon Applications
Appeon for PowerBuilder 2013
Figure 12.6: Undeployment in Progress
12.1.2 Undeploying with the Appeon Server mode
Step 1: Select the Appeon Server radio button in the Specify Undeployment Mode window
as shown in the following figure, and click Next to continue.
Figure 12.7: Specify Undeployment Mode window
Appeon Developer User Guide
Page 174
Undeploying Appeon Applications
Appeon for PowerBuilder 2013
Step 2: Select the Appeon Server that contains the Web or mobile application to be
undeployed from the Appeon Server list box, as shown in the following figure.
The Appeon Server list box lists all the Appeon Server profile names. Make sure the selected
Appeon Server is running.
Step 3: Select the application to be undeployed from the Application list box and click Next,
as shown in the following figure.
The Application list box lists all the Web or mobile applications deployed to the selected
Appeon Server.
Figure 12.8: Appeon Server Mode window
Step 4: Select the Appeon Server(s) or Web Server(s) that are intended for undeployment,
as shown in the following figure. The Appeon Server(s) and Web Server(s) defined in the
default deployment profile are listed. Click Next to continue.
Appeon Developer User Guide
Page 175
Undeploying Appeon Applications
Appeon for PowerBuilder 2013
Figure 12.9: Ready to Undeploy Application window
Step 5: Click Undeploy to confirm the undeployment settings and start the undeployment
process, as shown in the following figure.
Figure 12.10: Undeployment settings
The undeployment process begins, as shown in the following figure.
Appeon Developer User Guide
Page 176
Undeploying Appeon Applications
Appeon for PowerBuilder 2013
Figure 12.11: Appeon Application Undeployment
Step 6: Click Finish to close the dialog box, as shown in the above figure.
Appeon Developer User Guide
Page 177
Developing with Code Insight
Appeon for PowerBuilder 2013
13 Developing with Code Insight
Code Insight is a tool designed to help you write Appeon-supported PowerScript code more
quickly by providing a lookup and paste service inside the PowerBuilder Script view. You
can use it to develop PowerBuilder applications that are free of Appeon unsupported features
and tailored to Web or mobile migration.
The usage of Code Insight is similar to that of PowerBuilder AutoScript. The following table
describes the differences between the PowerBuilder AutoScript and Appeon Code Insight.
Table 13.1: Comparison between AutoScript and Code Insight
Effective
for
PowerBuilder AutoScript
Appeon Code Insight
Functions, events, variables, properties, and
templates for PowerBuilder DO, FOR, IF, and
CHOOSE statements.
Items referred in dot
notations
What pops A list of properties, variables, methods, or
up
statements.
1) A list of properties,
variables, or methods.
2) The Appeon unsupported
properties, variables or
methods that are marked
with a red icon left to them.
Ways to
use it
Two ways to use AutoScript:
• Turn automatic popup on to pop up a list
automatically when you pause while typing, or
• Invoke AutoScript only once when you need it
by selecting the menu items.
Only one way to use Code
Insight:
Step 1: Activate Code
Insight;
Step 2: Configure the
default PBT file;
Step 3: Enable Code
Insight.
Refer to the following
sections for detailed
instructions.
Priority
When Code Insight is activated, AutoScript will be automatically turned off.
13.1 Activating Code Insight
Click the Code Insight button ( ) in the Appeon Developer toolbar to launch Code Insight.
At the click of the Code Insight button, an icon will appear in the status area of the task bar.
Code Insight has five status icons:
Table 13.2: Status of Code Insight
Icon Status
Description
Disabled Code Insight is disabled.
Loading Code Insight is analyzing the default PBT and generating the supported and
unsupported feature list based on the analysis result.
Appeon Developer User Guide
Page 178
Developing with Code Insight
Icon Status
Appeon for PowerBuilder 2013
Description
Off
Code Insight is enabled but ineffective.
On
Code Insight is enabled and effective in the current application.
Gray
This icon appears anytime the PowerBuilder IDE loses focus, even if Code
Insight is disabled.
13.1.1 Configuring Code Insight
Before you can enable Code Insight for a PowerBuilder application, you need to configure
the PBT file of the desired application as the default PBT file. You can also specify the
Appeon feature sets and the feature types for which feature list will be displayed.
Step 1: Click on the icon of Code Insight, and the status-area-icon menu pops up with three
items: Enable (or Disable), Config, and Quit, as shown in the following figure.
Figure 13.1: The status-area-icon menu
Step 2: Click Config to open the Code Insight Configuration window, as shown in the
following figure.
Figure 13.2: Code Insight Configuration window - PBT Files tab
Appeon Developer User Guide
Page 179
Developing with Code Insight
Appeon for PowerBuilder 2013
Figure 13.3: Code Insight Configuration window - System tab
The Code Insight Configuration window contains two tab pages where you can manage the
PBT files and specify what displays in the list.
Table 13.3: Code Insight Configuration window
Select this
tab
To do this
Detailed Steps
PBT File
tab page
Add the PBT files.
1. Click Add.
2. Search and select the PBT file in the common
dialog box.
3. Click Open in the common dialog box.
4. Click OK.
Delete the PBT files.
1. Select the PBT file you want to delete.
2. Click Delete to delete the selected PBT file.
3. Click OK.
NOTE: The default PBT file cannot be deleted.
Set the default PBT file.
1. Select the check box in front of a PBT file.
2. Click OK.
Appeon Developer User Guide
Page 180
Developing with Code Insight
Select this
tab
To do this
Appeon for PowerBuilder 2013
Detailed Steps
NOTE: 1) only one PBT file can be set to the
default PBT.
2) Code Insight can only be effective to the default
PBT.
System tab Specify what to display
page
in the list.
1. In the Auto List group box, opt to automatically
display functions, events, properties, controls
and/or variables in the list.
2. In the Application Type group box, opt to
display only the unsupported features and/or the
supported features for Web applications or/and
Mobile applications.
3. In the Feature Type group box, opt to display
only the unsupported features and/or the
supported features in the list.
4. Click OK.
13.1.2 Enabling Code Insight
After you complete the configuration, you can enable Code Insight and use it to develop the
PowerBuilder application.
Click on the icon of Code Insight and select Enable from the status-area-icon menu, as
shown in the following figure.
Figure 13.4: Enable Code Insight
The Code Insight icon appears in one of the following statuses:
Table 13.4: Enable Code Insight
Status Detailed Steps
Code Insight remains disabled.
This happens when the PBT File list in the Code Insight Configuration window is
empty. Make sure you have added the PBT file to the list.
Code Insight is enabled but ineffective in the current application. To make it
effective, make sure you have
1. Configured the PBT file of the current application as the default PBT file in the
Code Insight Configuration window.
Appeon Developer User Guide
Page 181
Developing with Code Insight
Appeon for PowerBuilder 2013
Status Detailed Steps
2. Opened an object of the current application in a painter (not in the Source editor)
by double-clicking it in the Workspace or selecting Edit from the popup menu.
After taking the above steps, Code Insight becomes effective ( ).
Code Insight is enabled and effective.
You can develop an application with the assistance of Code Insight.
13.2 Coding with Code Insight
When Code Insight is enabled and effective ( ) for an application, you can start editing the
objects of the application using Code Insight. For example, take the following steps to add a
new control and use Code Insight to edit it:
Step 1: Add a button to the current object in the painter.
Step 2: Save the object by clicking the Save button on the PowerBar.
Note: Saving the object enables Code Insight to generate the supported and unsupported
feature list for the new content. Code Insight cannot detect the new content unless the object
is saved.
Step 3: Double click the button to open the Script view and pause for a few seconds after
typing an identifier followed by a dot (for example, pause after This.).
If there is more than one property, variable, method, or statement that could be inserted, the
Code Insight feature list pops up for you to select a supported property, variable or method,
as shown in the following figure.
Figure 13.5: Develop an application with Code Insight
Appeon Developer User Guide
Page 182
Developing with Code Insight
Appeon for PowerBuilder 2013
The unsupported properties, variables or methods in the popup list will have a red icon in
front, as shown in the following figure. Avoid using the unsupported features.
Figure 13.6: Appeon unsupported features displayed in popup window
Step 4: Select a supported property, variable or method from the popup list.
You can use Code Insight to help develop an application free of unsupported features and
suitable for migration.
Appeon Developer User Guide
Page 183
Launching Appeon Enterprise Manager
Appeon for PowerBuilder 2013
14 Launching Appeon Enterprise Manager
Appeon Enterprise Manager (AEM) is a Web-based application that manages the converted
Web or mobile applications and Appeon Server over the Internet, an intranet or an extranet.
It includes a comprehensive set of easy-to-use tools for system configuration, system
maintenance, performance optimization, and application security.
AEM is included when Appeon Server is installed.
AEM is accessible from any Client's Web browser or it is possible to access AEM through
the AEM button that resides on the Appeon Developer toolbar. Clicking the AEM button
will automatically open a Web browser window and load the AEM entry page.
14.1 Requirements
Before launching AEM, verify that:
1. The Appeon Server hosting AEM has been started.
2. You have correctly specified the host name and port of the Appeon Server in the Appeon
Server Profile Configuration page.
14.2 Launching Appeon Enterprise Manager
Step 1: Click the AEM button ( ) on the Appeon Developer toolbar.
If more than one Appeon Server profile is configured, the Select an AEM URL to run page
is displayed, as shown in the following figure. All Appeon Server profiles and corresponding
AEM URLs are listed. The Appeon Server configured as the default server is highlighted and
selected.
If only one Appeon Server profile is configured, the entry page of AEM is displayed.
Figure 14.1: Select an AEM URL to run
Appeon Developer User Guide
Page 184
Launching Appeon Enterprise Manager
Appeon for PowerBuilder 2013
Step 2: Select an AEM URL and click Run, as shown in the following figure.
The entry page of AEM is loaded in an Internet Explorer page, as shown in the following
figure.
Figure 14.2: Appeon Enterprise Manager entry page
The AEM URL is automatically entered into the Internet Explorer address bar when you click
the Run button. You can configure AEM's URL and connection method (https or http) in the
Appeon Server Profile Configuration page.
The default username is admin and the default password is admin. The username and
password settings for AEM can be modified in Security settings in AEM. Refer to Security in
the Appeon Server Configuration Guide for more information.
Appeon Developer User Guide
Page 185
Converting screen size between dots and PBUs
Appeon for PowerBuilder 2013
15 Converting screen size between dots and
PBUs
The Size Calculator ( ) tool in the Appeon Developer toolbar is used to conveniently
convert the display size between dots and PBUs. As we all know, PowerBuilder uses
PowerBuilder units to measure the size while Appeon uses dots as the measurement unit,
which is the same with the popular mobile OS providers, such as Apple (iOS), Google
(Android), and Microsoft (Windows Phone). When you design the UI in PowerBuilder,
you may want to know what the size would be in iOS, Android, or Windows Phone, or you
may already determine the size in iOS, Android, or Windows Phone and want to know how
to design the size correspondingly in PowerBuilder. In either case, you can use the Size
Calculator tool to convert the size from PBU to Dot or from Dot to PBU.
Figure 15.1: Size Calculator
Dot is referred as point in iOS (Both Point and Dot are used interchangeably in both Appeon
documentation and product UI). For details, please refer to the Development Guidelines for
Appeon Mobile.
To utilize the tool to convert the size, do the following:
Step 1: Click the size calculator icon (
) in the Appeon Developer toolbar.
Step 2: Input the size, then select a language, and then click one of the conversion buttons
according to your needs.
• The DPI stands for Dot Per Inch. This is fixed (96) for simplicity.
• Language indicates the language of the operating system of the mobile device. Currently
only English and Japanese are supported.
For Dot to PBU:
Appeon Developer User Guide
Page 186
Converting screen size between dots and PBUs
Appeon for PowerBuilder 2013
Input the size in the corresponding text boxes under the DOT group box, and then select a
preferred language from the Language dropdown list box.
On the click of the DOT to PBU (
corresponding text boxes under the PB Unit group box.
) button, the results appear in the
For PBU to Dot:
Input the size in the corresponding text boxes under the PB Unit group box, and then select a
preferred language from the Language dropdown list box.
On the click of the PBU to DOT (
corresponding text boxes under the DOT group box.
Appeon Developer User Guide
) button, the results appear in the
Page 187
Appeon for PowerBuilder Help
Appeon for PowerBuilder 2013
16 Appeon for PowerBuilder Help
Appeon provides a comprehensive HTML help system that contains:
• Introduction to Appeon
• New Features Guide
• Appeon Mobile Tutorials
• Installation Guide for Appeon Mobile
• Installation Guide for Appeon Web
• Installation Guide for Cloud Platform
• Development Guidelines for Appeon Mobile
• Migration Guidelines for Appeon Web
• Features Help for Appeon Mobile
• Features Help for Appeon Web
• Appeon Developer User Guide
• Workarounds & API Guide
• Appeon Workspace User Guide
• Appeon Server Configuration Guide for .NET
• Appeon Server Configuration Guide for J2EE
• Web Server Configuration Guide
• Troubleshooting
• Appeon Performance Tuning Guide
• Testing Appeon Web Applications with QTP
Appeon for PowerBuilder Help is in compiled HTML format, so that you can search by index
or by typing keywords, navigate back and forth, or print a specified page.
To access Appeon HTML Help:
Step 1: Click the Help button ( ) in the Appeon Developer toolbar.
Step 2: Click the corresponding help book to access the detailed help information, as shown
in the following figure.
Appeon Developer User Guide
Page 188
Appeon for PowerBuilder Help
Appeon for PowerBuilder 2013
Figure 16.1: Appeon for PowerBuilder Help
Appeon Developer User Guide
Page 189
Extended Toolkit
Appeon for PowerBuilder 2013
17 Extended Toolkit
Appeon provides extended tools to ease your PowerBuilder-to-Web or PowerBuilder-tomobile process. These tools include:
• DLL/OCX Files Package Tool: It is designed as a solution for packaging and installing
large-sized DLL/OCX files.
Note: This tool is effective for the Web application only.
• Appeon Silent Installer: Installs EAServer, Appeon Server, Appeon Server EBF
(Emergency Bug Fix), and Appeon Web applications in the silent mode.
Note: This tool is effective for the Web application only.
• Appeon Developer Toolbar Register Tool: Enables you to register (or unregister) one
Appeon Developer version to more than one PowerBuilder version or different Appeon
Developer versions to different PowerBuilder versions.
17.1 DLL/OCX Files Package Tool
Note: This tool is effective for the Web application only.
DLL and OCX files are frequently used in PowerBuilder client/server application. Appeon
offers you two ways to distribute DLL/OCX files.
Table 17.1: Two ways to distribute DLL/OCX files
When to use
Deploy DLL/OCX files to
There are only a few DLL/
the server and then download OCX files or the files are
them to the client at runtime. small.
Package DLL/OCX files
and install them to the client
before the application is run
for the first time.
Which tool to use...
In the Additional Files tab
of the Application Profiles
Configuration window. Refer
to Deploy External Files for
details.
There are many DLL/OCX
Use the DLL/OCX file
files or the files are large; and packaging wizard. Refer to
the client machine is fixed.
the following sections for
detailed information.
17.1.1 Packaging DLL/OCX files
Step 1: Run the EonDLLOCX.exe file under the \Toolkit\DLL&OCX Package folder in the
Appeon Developer installation directory.
The DLL/OCX File Packaging Wizard starts, as shown in the following figure. Click Next to
proceed.
Appeon Developer User Guide
Page 190
Extended Toolkit
Appeon for PowerBuilder 2013
Figure 17.1: DLL/OCX File Packaging Wizard
Step 2: Select an application and click Next.
Only application profiles that are already configured with DLL/OCX files will be listed. For
configuring DLL/OCX files for an application profile, refer to Deploy External Files. When
Next is clicked, the pre-configured DLL/OCX files will be automatically added for you.
Or, skip the selection and click Next to manually add the DLL/OCX files.
Appeon Developer User Guide
Page 191
Extended Toolkit
Appeon for PowerBuilder 2013
Figure 17.2: Select an application
Step 3: Click Add to add the DLL/OCX files, select the Register box to automatically
register the file when installed, and click Next to proceed.
The DLL/OCX files will be automatically added if you select the application of which files
are already configured in the previous step.
Figure 17.3: Add DLL/OCX files
Appeon Developer User Guide
Page 192
Extended Toolkit
Appeon for PowerBuilder 2013
Step 4: Specify the location where the package will be created. A folder named Package will
be created under this location.
Figure 17.4: Specify the package location
Step 5: Review the settings and click Next to generate the package.
Figure 17.5: Review settings
Appeon Developer User Guide
Page 193
Extended Toolkit
Appeon for PowerBuilder 2013
Step 6: Wait until the file packaging process is complete.
Step 7: When packaging is complete, click Finish to close the wizard.
To view the log information generated during the process, select the View Log box and then
click Finish. The log file will be automatically opened. You can also manually open the
DLLOCX.log file in the generated package.
Figure 17.6: Packaging complete
17.1.2 Installing and uninstalling DLL/OCX files
You will use the same setup program (Setup.exe file) in the generated package for installing
and uninstalling DLL/OCX files:
• If the DLL/OCX files are not installed on the client, when you run the setup program, you
will be guided to install the files. Refer to Section 17.1.2.1, “Installing DLL/OCX files” for
detailed instructions.
• If the DLL/OCX files are already installed on the client, when you run the setup program,
you will be guided to reinstall or uninstall the files. If you select to reinstall the files, you
will run through the same process as a new installation, as described in Section 17.1.2.1,
“Installing DLL/OCX files”. If you select to uninstall the files, refer to Section 17.1.2.2,
“Uninstalling DLL/OCX files” for detailed instruction.
17.1.2.1 Installing DLL/OCX files
Step 1: On a client machine, run the Setup.exe file in the generated package.
The DLL/OCX File Installation Wizard starts, as shown in the following figure. Click Next
to proceed.
Appeon Developer User Guide
Page 194
Extended Toolkit
Appeon for PowerBuilder 2013
Figure 17.7: DLL/OCX File Installation Wizard
Step 2: Specify the location where the DLL/OCX files will be installed. Click Next to start
the installation process.
The default installation location is %SystemRoot%\system32\AppeonPlugin (%SystemRoot
% indicates the folder where Windows is installed, typically C:\Windows); if you specify a
custom location in AEM (see Appeon Server Configuration Guide for details), then specify
the same location here.
Appeon Developer User Guide
Page 195
Extended Toolkit
Appeon for PowerBuilder 2013
Figure 17.8: Specify the installation location
Step 3: Wait until the installation is complete.
During the installation process, the DLL/OCX files will first be copied to the specified
location and then registered if they have been selected for auto-registration during the
packaging process.
Step 4: When the installation is complete, select the Let wizard restart the system now
option and click Finish to close the installation wizard and restart your machine.
To view the log information generated during the process, select the View Log box and
click Finish. The log file will be automatically opened. You can also manually open the
DLLOCX.log file in the generated package.
Appeon Developer User Guide
Page 196
Extended Toolkit
Appeon for PowerBuilder 2013
Figure 17.9: Installation complete
17.1.2.2 Uninstalling DLL/OCX files
Step 1: On a client machine, run the Setup.exe file in the generated package.
The DLL/OCX File Installation Wizard starts, as shown in the following figure. Click Next
to proceed.
Appeon Developer User Guide
Page 197
Extended Toolkit
Appeon for PowerBuilder 2013
Figure 17.10: DLL/OCX File Installation Wizard
Step 2: Select Uninstall and click Next to proceed.
If you select to reinstall the files, you will run through the same process as a new installation,
as described in Section 17.1.2.1, “Installing DLL/OCX files”.
Figure 17.11: Reinstall or uninstall
Step 3: Click Yes to confirm the uninstall.
Appeon Developer User Guide
Page 198
Extended Toolkit
Appeon for PowerBuilder 2013
Figure 17.12: Uninstall confirmation
Step 4: Wait until the uninstall is complete.
Step 5: When uninstall is complete, click OK to exit.
Figure 17.13: Uninstall complete
17.2 Appeon Silent Installer (Windows EAServer only)
Notes: 1) This tool is effective for the Web application only. 2) This tool does not work
in .NET, JBoss, JEUS, WebLogic and WebSphere versions.
To help ISVs create an easy-to-use Appeon installation package for the end users, Appeon
specially provides a silent installer which can be customized to install EAServer, Appeon
Server, Appeon Server EBF (Emergency Bug Fix), and Appeon applications in the silent
mode.
This guide provides some useful instructions for ISVs on:
• Creating folder structure of Silent Installer
• Copying installation program of EAServer, Appeon Server, Appeon Server EBF or Web
applications
• Customizing configuration file
• Burning installation CDs
Additional instructions are also provided for end users on:
• Running Appeon Silent Installer (for End Users)
17.2.1 Creating folder structure of Silent Installer
The installation program files of EAServer, Appeon Server, Appeon Server EBF, and Web
application must be placed in the required folder structure, so that Appeon Silent Installer can
Appeon Developer User Guide
Page 199
Extended Toolkit
Appeon for PowerBuilder 2013
run them. For your convenience, Appeon provides a compressed folder structure which can
be decompressed under any directory. To decompress and create the folder structure and the
required files, take the following steps:
Step 1: Run SilentInstall.exe in the "\Toolkit\Silent Install" under the Appeon Developer
installation directory, for example, C:\Program Files\Appeon\Developer2013\Toolkit\Silent
Install.
Step 2: Select where to create the folder structure. Click OK.
Figure 17.14: Specify the location
After the creation, a folder named "Setup" is created with the following sub-folders and files:
Figure 17.15: Folder structure
The following is a brief introduction to each folder in the Appeon Silent Installer:
Setup: The root directory of the Silent Installer. It contains the "Appeon" folder, the
Setup.exe, Uninstall.exe, SilentInstall.txt, and msvcp60.dll files.
Appeon Developer User Guide
Page 200
Extended Toolkit
Appeon for PowerBuilder 2013
• Appeon: It contains the "AS", "AS EBF", "EAServer", and "WebApp" directory.
• AS: It stores the installation program of Appeon Server.
• AS EBF: It stores the installation program of Appeon Server EBF.
• EAServer: It stores the installation program of EAServer.
• WebApp: It stores the Web application files packaged by the Appeon application
packaging tool.
• Setup.exe: The setup program for launching the silent installation.
• SilentInstall.txt: The configuration file which can be modified to customize the installation.
• Uninstall.exe: The uninstall program for silently removing what has been installed with
Appeon Silent Installer.
• msvcp60.dll: The DLL file for Appeon Silent Installer.
17.2.2 Copying installation program of EAServer, Appeon Server, Appeon
Server EBF or Appeon applications
After the required folders and files are generated, you can start copying the installation
program files of Appeon Server, EAServer and Appeon applications to the corresponding
folder.
To copy the EAServer installation program to Appeon Silent Installer:
Copy all files and folders from the directory where setup.exe file resides to the "EAServer"
folder of Appeon Silent Installer.
To copy the Appeon Server installation program to Appeon Silent Installer:
Copy all files from the "ASP" folder on the Appeon installation CD to the "AS" folder of
Appeon Silent Installer.
To copy the Appeon Server EBF installation program to Appeon Silent Installer:
Copy all files from the "asebf" folder on the Appeon installation CD to the "AS EBF" folder
of Appeon Silent Installer.
To copy Web application packages to Appeon Silent Installer:
Step 1: Verify that the Web application packages have already been generated using the
Appeon application packaging tool. If no package is generated, follow steps in Section 11.1,
“Packaging a deployment project” in the Packaging a deployment project chapter.
Step 2: Copy the generated packages to the "WebApp" folder of Appeon Silent Installer.
17.2.3 Customizing configuration file
With Appeon Silent Installer, you can customize the installation program using the
configuration file (SilentInstall.txt). The following is a detailed description of each parameter
in the SilentInstall.txt file. Each parameter contains no default value.
Appeon Developer User Guide
Page 201
Extended Toolkit
Appeon for PowerBuilder 2013
17.2.3.1 Installation Types
Specify whether to install EAServer, Appeon Server and Appeon applications.
Table 17.2: Parameter for installing EAServer
Parameter
EAServer
Description
Specifies whether to install EAServer.
If you do not want to install EAServer using this setup program, make
sure that a supported EAServer was installed already.
Accepted Values Yes -- Install EAServer.
No -- Not to install EAServer, instead use an existing EAServer.
Default Value
None
Example
EAServer ="yes"
Table 17.3: Parameter for installing Appeon Server
Parameter
AppeonServer
Description
Specifies whether to install Appeon Server.
Accepted Values Yes
No
Default Value
None
Example
Appeon Server="yes"
Table 17.4: Parameter for installing Appeon Server EBF
Parameter
AppeonServerEBF
Description
Specifies whether to apply Appeon Server EBF.
Accepted Values Yes
No
Default Value
None
Example
Appeon Server EBF="yes"
Table 17.5: Parameter for installing Web Application
Parameter
WebApplication
Description
Specifies whether to install Web applications.
Accepted Values Yes
No
Default Value
None
Example
WebApplication="yes"
17.2.3.2 EAServer and ASA Path
Specify the path of EAServer and ASA. ASA is required because Appeon Server has an ASA
database for storing the sensitive system data.
Appeon Developer User Guide
Page 202
Extended Toolkit
Appeon for PowerBuilder 2013
Table 17.6: Parameter for EAServer path
Parameter
EAServerPath
Description
If the EAServer parameter is set to "No", this specifies the path of an
existing EAServer. The specified path will be validated.
If the EAServer parameter is set to "Yes", this indicates where EAServer
will be installed.
Accepted Values A valid path
Default Value
None
Example
EAServerPath="C:\Program Files\Sybase\EAServer"
Table 17.7: Parameter for ASA path
Parameter
ASAPath
Description
Specifies the ASA installation path. The specified path will be validated.
Accepted Values A valid path
Default Value
None
Example
ASAPath="C:\Program Files\Sybase\Shared\ASA802"
17.2.3.3 EAServer Host Name, Port, Username and Password
Specify the EAServer host name, port number, user name and password.
Table 17.8: Parameter for EAServer name
Parameter
EAServerName
Description
Specifies the IP address of EAServer.
Accepted Values A valid IP address
Default Value
None
Example
EAServerName="localhost"
Table 17.9: Parameter for EAServer port
Parameter
EAServerPort
Description
Specifies the port number of EAServer.
Accepted Values A valid port
Default Value
None
Example
EAServerPort="9000"
Table 17.10: Parameter for EAServer username
Parameter
EAServerUserName
Description
Specifies the user name to connect to EAServer.
Accepted Values A valid user name on EAServer.
Default Value
None
Appeon Developer User Guide
Page 203
Extended Toolkit
Example
Appeon for PowerBuilder 2013
EAServerUserName="jagadmin"
Table 17.11: Parameter for EAServer password
Parameter
EAServerPassWord
Description
Specifies the password to connect to EAServer.
Accepted Values A valid password for the current user name.
Default Value
None
Example
EAServerPassWord=""
17.2.3.4 Appeon Server Port, Username and Password
Specify the Appeon Server port number, user name and password.
Table 17.12: Parameter for Appeon Server port
Parameter
AppeonServerPort
Description
Specifies the HTTP port number of Appeon Server.
Accepted Values A valid port
If both EAServer and AppeonServer parameters are set to "Yes", port
"9988" is the only available port that can be used.
Default Value
None
Example
AppeonServerPort="9988"
Table 17.13: Parameter for Appeon Server username
Parameter
AppeonServerUserName
Description
Specifies the user name for deploying an application to Appeon Server.
This deployment user name can be created using the Security tool in
AEM.
Accepted Values A valid deployment user name on Appeon Server.
Default Value
None
Example
AppeonServerUserName=""
Table 17.14: Parameter for Appeon Server password
Parameter
AppeonServerPassWord
Description
Specifies the password for deploying an application to Appeon Server.
Accepted Values A valid deployment password for the current user name.
Default Value
None
Example
AppeonServerPassWord=""
17.2.3.5 Web Server Path
Specify the Web root of the Web server.
Appeon Developer User Guide
Page 204
Extended Toolkit
Appeon for PowerBuilder 2013
Table 17.15: Parameter for Web server Web root
Parameter
WebServerRootPath
Description
Specifies the document root of the Web server.
If the WebApplication parameter is set to "No", this parameter will not
take effect.
If the WebApplication parameter is set to "Yes", the specified document
root will be validated.
Accepted Values A valid path
Default Value
None
Example
WebServerRootPath="C:\Program Files\Sybase\EAServer\html"
17.2.3.6 Setup Log Path
Specify the log file path.
Table 17.16: Parameter for log file path
Parameter
LogPath
Description
Specifies the path for the setup log file (APBLog.txt).
Accepted Values A valid path
Default Value
None
Example
LogPath="c:\log"
17.2.3.7 Web Applications
Specify the number of Web applications, application name, data source, transaction object
and database type.
Table 17.17: Parameter for number of the Web applications
Parameter
WebApplications
Description
Specifies the number of Web applications that you want to install.
Accepted Values Any number greater than zero
Default Value
None
Example
WebApplications="2"
If more than one application will be installed, create the following parameters through
incrementing by "1", for example, "WebApplication2", "EAServerNVO2", "ConnectCache2"
and "AEM2" for the second application, "WebApplication3", "EAServerNVO3",
"ConnectCache3" and "AEM3" for the third application etc.
Table 17.18: Parameter for the Web application 1
Parameter
WebApplication1
Description
Specifies the actual name of the first Web application.
Appeon Developer User Guide
Page 205
Extended Toolkit
Appeon for PowerBuilder 2013
Accepted Values An alphanumeric string
Default Value
None
Example
Examples for the first application:
WebApplication1 = "appeon_sales_application_demo"
Examples for the second application:
WebApplication2 = "appeon_code_examples"
Table 17.19: Parameter for EAServer NVO 1
Parameter
EAServerNVO1
Description
Specifies whether to install NVO components.
Accepted Values Yes
No
Default Value
None
Example
EAServerNVO1="Yes"
To make data sources work on the target Appeon Server, be sure to install the required
database drivers to the target Appeon Server. For more information on database drivers, refer
to Database Connection Setup in the Appeon Server Configuration Guide.
Table 17.20: Parameter for data source 1
Parameter
ConnectCache1
Description
Specifies whether to install data sources.
Accepted Values 0 -- Not to install data sources.
1 -- Install and overwrite existing data sources.
2 -- Install but not to overwrite existing data sources.
Default Value
None
Example
ConnectCache1="1"
Table 17.21: Parameter for AEM 1
Parameter
AEM1
Description
Specifies whether to install AEM settings.
Accepted Values Yes
No
Default Value
None
Example
AEM1="Yes"
17.2.3.8 Web Application Uninstall Program Path
Specify the directory for the Web application uninstall program. A shortcut for the uninstall
program will be created in Windows Start menu.
Appeon Developer User Guide
Page 206
Extended Toolkit
Appeon for PowerBuilder 2013
Table 17.22: Parameter for the uninstall program path
Parameter
UninstallWebAppPath
Description
Specifies where the uninstall program for Web applications will reside.
Accepted Values A valid path.
Default Value
None
Example
UninstallWebAppPath="C:\uninstallwebapp"
17.2.3.9 Resource Language
Specify the language of the messages displayed during the installation or uninstallation
process.
Table 17.23: Parameter for the resource language
Parameter
Language
Description
Specifies the language of UI messages.
Accepted Values EN -- English
JP -- Japanese
Default Value
EN
Example
Language="EN"
17.2.3.10 SilentInstall.txt example
The following example shows a sample SilentInstall.txt file.
####################################################################
# Configure installation type: Yes or No
####################################################################
EAServer ="Yes"
Appeon Server="Yes"
Appeon Server EBF="Yes"
WebApplication="Yes"
####################################################################
# Enter the path of the EAServer installed or you want to install.
####################################################################
EAServerPath="C:\Program Files\Sybase\EAServer"
####################################################################
# Enter the ASA path
####################################################################
Appeon Developer User Guide
Page 207
Extended Toolkit
Appeon for PowerBuilder 2013
ASAPath=""C:\Program Files\Sybase\Shared\ASA802"
####################################################################
# Enter the Port, Username, and Password of EAServer
####################################################################
EAServerName="localhost"
EAServerPort="9000"
EAServerUserName="jagadmin"
EAServerPassWord=""
####################################################################
# Enter the Port, Username, and Password of Appeon Server
####################################################################
AppeonServerPort="9988"
AppeonServerUserName=""
AppeonServerPassWord=""
####################################################################
# Enter the Web root of Web server
####################################################################
WebServerRootPath="C:\Program Files\Sybase\EAServer\html"
####################################################################
# Enter the path of Setup Log: APBLog.txt
####################################################################
LogPath="c:\log"
####################################################################
# Enter the Web application number
####################################################################
WebApplications="1"
####################################################################
# Web Application Configuration
# ConnectCache:
# 0: not install
# 1: install, overwrite if exist
# 2: install, not overwirte if exist
Appeon Developer User Guide
Page 208
Extended Toolkit
Appeon for PowerBuilder 2013
# EAServerNVO: Yes or No
# AEM: Yes or No
####################################################################
WebApplication1="Web Application Name1"
EAServerNVO1="YES"
AEM1="YES"
ConnectCache1="1"
####################################################################
# Uninstall Path
####################################################################
UninstallWebAppPath = "C:\uninstallwebapp"
####################################################################
# Language
#[default] = "EN"
# "EN" English
# "JP" Japanse
####################################################################
Language="EN"
17.2.4 Burning installation CDs
After configuration is completed, you can burn installation CDs with the customized silent
installer (the entire "setup" folder) and distribute CDs to your end users.
The Appeon Silent Installer can be provided in one, two or three CDs:
• In one CD: Installing the Appeon Server ("AS" folder), Appeon Server EBF ("AS EBF"
folder), EAServer ("EAServer" folder) and the Appeon Web application ("WebApp"
folder).
• In two CDs: One for installing the Appeon Server ("AS" folder), Appeon Server EBF ("AS
EBF" folder), and EAServer ("EAServer" folder), and the other for installing the Appeon
application ("WebApp" folder).
• In three CDs: One for installing the Appeon Server ("AS" folder) and Appeon Server EBF
("AS EBF" folder), one for installing EAServer ("EAServer" folder), and one for installing
the Appeon application ("WebApp" folder).
Each CD must contain the following four files right under the Setup folder (that is, place the
following files in the same directory level of the "AS", "EAServer" and "WebApp" folders):
• Setup.exe
Appeon Developer User Guide
Page 209
Extended Toolkit
Appeon for PowerBuilder 2013
• SilentInstall.txt
• Uninstall.exe
• msvcp60.dll
17.2.5 Running Appeon Silent Installer (for End Users)
This section provides some additional instructions for end users on using the Appeon Silent
Installer to install/uninstall EAServer, Appeon Server, Appeon Server EBF and/or Appeon
applications
17.2.5.1 Installing Appeon Server, EAServer and/or Appeon applications
Before running the Appeon Silent Installer, be aware that
1. The Setup.exe program can only be run on the Windows platform.
2. The Appeon Server and the Web server must reside on the same machine.
Start the silent installation by running the Setup.exe file on the installation CD.
By default, the configuration file in the same location of the Setup.exe file will be used
during the installation process. To use a configuration file residing in a different location,
run the Setup.exe file from the command line and append the configuration file location, for
example, Setup.exe d:/setuptmp/SilentInstall.txt.
17.2.5.2 Uninstalling Appeon Server, EAServer and/or Appeon applications
To silently uninstall EAServer, Appeon Server, Appeon Server EBF, and/or Appeon
applications:
Run Uninstall.exe on the installation CD. The uninstall program will automatically load the
SilentInstall.txt file on the same CD and remove what has been installed with Appeon Silent
Installer.
To uninstall Appeon applications from Windows Start menu:
Select Windows Start > Programs > Appeon Application > Undeploy Appeon
Web Application. Or run the uninstall program under the location specified by the
"UninstallWebAppPath" parameter.
You will go through the same process as those in Section 11.1.4.3, “Uninstalling an
application” in the "Packaging and Installing Appeon Applications" chapter.
17.2.5.3 FAQs
1. What happens if EAServer is started during the process of silent installation?
Appeon Silent Installer will shut down the EAServer and continue the installation.
2. What happens if EAServer or Appeon Server was already installed during the process of
silent installation?
Appeon Silent Installer will overwrite the existing EAServer or Appeon Server.
Appeon Developer User Guide
Page 210
Extended Toolkit
Appeon for PowerBuilder 2013
3. What happens if the names of NVO packages for a Web application are duplicated?
Appeon Silent Installer will still deploy the first NVO package, but will not deploy the
second NVO package. This activity will be recorded in the log file.
17.3 Appeon Developer Toolbar Register Tool
Appeon Developer can run with PowerBuilder 8, 9, 10, 10.5, 11, 11.5, 12, and 12.5 at the
same time and multiple Appeon Developer versions can run on the same machine. The
Appeon Developer Toolbar register tool enables you to register (or unregister) one Appeon
Developer version to more than one PowerBuilder version or different Appeon Developer
versions to different PowerBuilder versions, so that you can easily and flexibly select which
Appeon Developer version and PowerBuilder version to use.
Following are steps to use the Appeon Developer Toolbar register tool:
Step 1: Select Start > Programs > Appeon Mobile 1.0 for PowerBuilder > Appeon
Developer > Toolbar Register Tool.
Figure 17.16: Registry tool
The PowerBuilder versions existing on this computer will be listed.
Step 2: Select the Appeon Developer version to be registered in the PowerBuilder version.
If you want to unregister an Appeon Developer version from a PowerBuilder version, clear
the selection in the Appeon Developer Version column.
Appeon Developer User Guide
Page 211
Extended Toolkit
Appeon for PowerBuilder 2013
Figure 17.17: Register toolbar to PowerBuilder
Step 3: Click OK to register (or unregister) the selected Appeon Developer version with the
PowerBuilder version.
Appeon Developer User Guide
Page 212
Technical Support
Appeon for PowerBuilder 2013
18 Technical Support
You can get technical support by clicking the Get Support icon in the Appeon Developer
toolbar appearing in the PowerBuilder IDE or launching the Appeon Help from the Windows
start menu.
Get support for Appeon for PowerBuilder 2013
Please send your email to <[email protected]> for technical support and be
prepared to provide the following files listed in the following table to Appeon Technical
Support. This will aid debugging.
Table 18.1: Files required for technical support
File Type
File Name
Appeon Server configuration For EAServer\WebLogic\WebSphere\JEUS\JBoss:
file
All files in the %appeonserver%\repository\<instancename>
\config folder.
For .NET IIS:
All files in the %appeonserver%\AEM\config folder.
%appeonserver% indicates the Appeon Server installation
path.
Appeon Server log file
For EAServer\WebLogic\WebSphere\JEUS\JBoss:
All files in the %appeonserver%\repository\<instancename>
\log folder.
For .NET IIS:
All files in the %appeonserver%\AEM\Log folder.
Appeon Server Repository
DB
For EAServer:
%appeonserver%\db\AppeonServer.db
For .NET IIS:
All files in the %appeonserver%\AEM\db folder.
For WebLogic\WebSphere\JEUS\JBoss:
%appeonserver%\db\appeondb.script
Appeon license file
For EAServer\WebLogic\WebSphere\JEUS\JBoss:
%appeonserver%\license.appeon
For .NET IIS:
%appeonserver%\AEM\bin\license.appeon
Web Server configuration file httpd.conf
Web Page file
Web server path\application name\window name.html
Web server path\application name\window name.js
Web server path\application name\all DataWindows on
window.xml
Appeon Developer User Guide
Page 213
Technical Support
Appeon for PowerBuilder 2013
File Type
File Name
Note: If the window named includes inheritance, then also
supply all ancestor HTML and JavaScript files.
PowerBuilder exported
source code file
PowerBuilder application path\exported window name.srw
PowerBuilder application path\exported DataWindow
names.srd
Note: Exported windows should include exported ancestor
windows and exported ancestor user objects.
Appeon Developer User Guide
Page 214
Index
Appeon for PowerBuilder 2013
Index
A
access Appeon applications, 107
access UFA tool, 62
activate Code Insight, 178
add variables or expressions to Watch view,
96
Additional Files, 27
analyze an application, 61
Appeon DataWindow menu, 111
Appeon Developer toolbar in PowerBuilder,
4
Appeon Developer toolbar register tool, 211
Appeon for PowerBuilder help, 188
Appeon Server port, username and password,
204
Appeon Server profile settings, 45
Appeon Silent Installer, 199
application profile settings, 22
Additional Files, 27
basic settings, 23
DB settings, 25
Misc Settings, 31
runtime settings, 39
summary, 40
Web service profiles, 38
application profile tab, 21
delete an application profile, 22
export or import an application profile, 22
select an application file generation mode,
21
specify default application profile, 21
B
basic settings, 23
burn installation CD, 209
C
change value of a variable or expression, 97
code lines that can set breakpoints, 92
code with Code Insight, 182
configure Appeon Developer, 9
configure application database connectivity,
7
configure basic settings, 10
configure Code Insight, 179
configure deployment settings, 13
Appeon Developer User Guide
convert screen size between dots and PBUs,
186
copy installation programs, 201
create folder structure of Silent Installer, 199
customize and package Appeon Workspace,
159
customize configuration file, 201
customize general settings of UFA report, 76
D
DataWindow printing, 115
DB settings, 25
debug Appeon Web applications, 89
declare transaction objects, 14
define priority settings of unsupported
features, 75
delete an application profile, 22
deploy PowerBuilder application, 77, 82
deployment duration for full deployments, 78
deployment duration for incremental
deployments, 78
deployment performance, 77
deployment process, 79
deployment profile settings, 54
deployment profiles tab, 54
develop with Code Insight, 178
disable anti pop-up software, 107
DLL/OCX files package tool, 190
E
EAServer and ASA path, 202
EAServer host name, port, username,
password, 203
enable Appeon DataWindow menu, 111
enable Code Insight, 181
evaluate an expression, 98
examine an application at a breakpoint, 95
examine context in Call Stack view, 98
export or import an application profile, 22
extended toolkit, 190
F
filter UFA report items, 71
find, 111
fix code/stop the debug procedure, 98
I
If you need help, 3
install an application, 135
Page 215
Index
Appeon for PowerBuilder 2013
install and uninstall an Appeon application,
135
install and uninstall DLL/OCX files, 194
install Appeon for PowerBuilder, 7
install Appeon Server, EAServer and Appeon
applications, 210
install DLL/OCX files, 194
installation types, 202
internet explorer settings, 99
L
language setting requirements, 106
launch Appeon Enterprise Manager, 184, 184
launch application from Run button, 108
Launching Appeon Workspace Emulator,
119
M
manage application profile, 20
manage data source profile, 56
manage database type profiles, 41
manage deployment profiles, 53
manage server profiles, 44
manipulate UFA report, 70
method for setting breakpoint, 93
Misc Settings, 31
modify deploy-config file, 134
modify unsupported features, 68
O
open or save UFA report, 70
P
package a deployment project, 124
package and install Appeon applications, 124
package DLL/OCX files, 190
package native mobile projects, 151
perform feature analysis, 63
prepare PowerBuilder application, 79
R
Related documents, 2
resource language, 207
run Appeon application, 99, 108
run Appeon silent installer, 210
run application in debug mode, 94
runtime settings, 39
search for UFA report items, 71
select a run mode, 110
select an application file generation mode, 21
select DB types, 14
select External files, 18
select image files, 17
select INI files, 17
select PBL files, 12
select report view mode, 71
server profile tab, 44
set breakpoint, 92
setup log path, 205
sort and filter, 112
special variable and expression handlings, 95
specify default application profile, 21
specify deployment settings, 79
speed of deployment process, 77
start Appeon Debugger, 90
start Appeon Server, 7
step through application, 98
summary, 19, 40
T
technical support, 213
U
undeploy Appeon applications, 170
undeploy instructions, 170
undeploy with Appeon Server mode, 174
undeploy with Deployment Profile mode,
171
undetected unsupported features, 65
uninstall an application, 145
uninstall DLL/OCX files, 197
URL for appeon applications, 107
use Appeon DataWindow menu, 111
DataWindow printing, 115
find, 111
SaveAs, 116
sort and filter, 112
use Information Manager, 121
use UFA tool, 60
V
view report and log, 121
views in Appeon Debugger, 92
S
SaveAs, 116
Appeon Developer User Guide
Page 216
Index
Appeon for PowerBuilder 2013
W
Web application uninstall program patch,
206
Web applications, 205
Web Server path, 204
Web Server profile settings, 48
Web service profiles, 38
Appeon Developer User Guide
Page 217