1
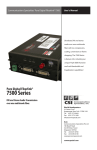
NOTE: Use this manual in conjunction with the spiral bound manual
also provided with this kit. READ THIS MANUAL FIRST.
Fiber Optic Termination Kit - P/N 6202
USER’S MANUAL
WORLD HEADQUARTERS
55 Cabot Court
Hauppauge, N.Y. 11788 USA
Tel: (631) 273-0404
Fax: (631) 273-1638
www.commspecial.com
Email: [email protected]
Communications Specialties Pte Ltd
100 Beach Road
#22-09 Shaw Tower
Singapore 189702
Tel: +65 6391 8790 Fax: +65 6396 0138
Email: [email protected]
© 2002, Communications Specialties, Inc.
P/N: 122003 Rev. B
extinguished around the outside of the connector. There may still be some
light illuminating the rear of the connector. Try to minimize this light as
much as possible, but it is normal to have a small amount remaining.
8) Continue the termination procedure as indicated on Page 27, Section 5.7-10.
Steps for Terminating Fiber Using FC Connectors
1) With the VLLS positioned in front of you with the crimp handle on the left
(as shown in the diagram on Page 14), insert the ST-FC adapter between
the slider and the crimp platform. Position the adapter so that the ST connector is on the left; the FC connector is on the right.
2) Place one end of the ST-ST jumper cable through the opening in the crimp
handle and then connect it to the left side of the ST-ST adapter. It is very
important that the jumper cable go through the crimp handle. Connect the
other end of the jumper cable to the VLLS.
3) Make sure the VLLS is turned OFF.
4) Go to Page 11 of the spiral bound manual. Read all of Section 5 completely
before proceeding. Please note, the procedure described does NOT assume
that the ST-FC adapter and the VLLS are being used. The protective end
cap on the connector must be removed and mated with the right side of the
ST-FC adapter in the slide top before being placed into the crimp platform.
Make sure the cam on the connector is properly positioned as indicated in
Figure 5-7 on Page 15. The cam will face you when properly installed into
the crimp platform.
5) Strip and prepare the fiber as indicated in Section 5.
6) Once the fiber is prepared, turn ON the VLLS. The VLLS should be on
before you place the fiber end into the connector.
7) When the fiber is properly mated into the connector, the red light will be
extinguished around the outside of the connector. There may still be some
light illuminating the rear of the connector. Try to minimize this light as
much as possible, but it is normal to have a small amount remaining.
8) Continue the termination procedure as indicated on Page 27, Section 5.7-10.
4
INTRODUCTION
This fiber optic installation kit enables the user to terminate both single
mode and multimode fiber optic cable with either ST or FC type connectors.
The kit is assembled in two parts: the “Corning UniCam® termination kit,”
which is packed in a blue bag, and the “CSI supplementary materials kit,”
which is packed in a clear bag. This manual is intended to be used in conjunction with the spiral bound manual packed inside the blue bag.
Please note that this termination kit is intended to work only with Corning
UniCam® brand connectors. These connectors are sold by Communications
Specialties as part numbers:
6210: ST type connector for use with 62.5 micron multimode fiber
6211: FC type connector for use with 62.5 micron multimode fiber
6221: ST type connector for use with 8-10 micron single mode fiber
6220: FC type connector for use with 8-10 micron single mode fiber
This Kit Contains:
1 Corning UniCam® termination kit (refer to Page 4, Section 3 in the
spiral bound manual for a complete listing of contents)
1 CSI supplementary materials kit, including:
1
1
1
1
1
ST-ST adapter
ST-FC adapter
ST-ST multimode (orange) jumper cable, 1 meter
ST-ST single mode (yellow) jumper cable, 1 meter
Visible Laser Light Source (VLLS) with power supply
Connectors are not included and must be purchased separately.
1
Theory of Operation:
This kit is designed to provide a reliable, quick and easy method to terminate fiber optic cable using Corning UniCam® ST or FC type connectors.
These unique connectors have a pre-polished tip with a small piece of fiber
inside. This eliminates the need for polishing the end of the connector or for
using epoxy to secure the fiber cable in the connector. When a prepared fiber
cable is inserted into the connector, it mates with the piece of fiber that is
already inside. A small amount of optical coupling gel is also inside the connector to facilitate the transmission of light from one piece of fiber to the other.
The Visible Laser Light Source (VLLS), included in the supplementary materials kit, is used in the termination process to shine a red beam of light into the tip of
the connector. When no fiber is inserted into the connector, the red light visibly
disperses around the body of the connector. As fiber is inserted into the connector during the termination process, the light becomes “piped” into the fiber
cable and is no longer dispersed. The extinguishing of all visible light indicates
that the beam is being successfully channeled directly into the fiber cable and
that the connector has therefore been properly aligned for termination.
TERMINATION INSTRUCTIONS
Getting Started:
1) First, refer to the following pages in the spiral bound manual, entitled:
Assembly Instructions for Corning Cable Systems UniCam® Connectors:
SC, ST-compatible, FC, MT-RJ Compatible, and LC Connectors.
a) Page 4: Review the list of contents that should be included in the blue
bag and familiarize yourself with these items.
b) Page 5: Read the description for “Enhanced UniCam Tool Set Up” and
make sure that the WIDE slide top is installed, as indicated. This is
used for both ST and FC type connectors when the VLLS is used.
c) Page 10: Read the “Laser Handling Precaution” warning, Section 4.5.
2
d) Page 14: Look at the picture in Figure 5.5 and position the UniCam®
tool as shown in the diagram, such that the crimp handle is on your left.
2) Prepare the VLLS for use by installing a 9-volt battery in the unit or using
the external AC adapter.
3) If you are terminating a single mode fiber, use the yellow ST-ST jumper
cable. If you are terminating a multimode fiber, use the orange jumper
cable.
Steps for Terminating Fiber Using ST Connectors
1) With the VLLS positioned in front of you with the crimp handle on the left
(as shown in the diagram on Page 14), insert the ST-ST adapter between
the slider and the crimp platform. Position the adapter so that the word
“TOP” is facing upwards.
2) Place one end of the ST-ST jumper cable through the opening in the crimp
handle and then connect it to the left side of the ST-ST adapter. It is very
important that the jumper cable go through the crimp handle. Connect the
other end of the jumper cable to the VLLS.
3) Make sure the VLLS is turned OFF.
4) Go to Page 11 of the spiral bound manual. Read all of Section 5 completely
before proceeding. Please note, the procedure described does NOT assume
that the ST-ST adapter and the VLLS are being used. The protective end
cap on the connector must be removed and mated with the right side of the
ST-ST adapter in the slide top before being placed into the crimp platform.
Make sure the cam on the connector is properly positioned as indicated in
Figure 5-7 on Page 15. The cam will face you when properly installed into
the crimp platform.
5) Strip and prepare the fiber as indicated in Section 5.
6) Once the fiber is prepared, turn ON the VLLS. The VLLS should be on
before you place the fiber end into the connector.
7) When the fiber is properly mated into the connector, the red light will be
3
extinguished around the outside of the connector. There may still be some
light illuminating the rear of the connector. Try to minimize this light as
much as possible, but it is normal to have a small amount remaining.
8) Continue the termination procedure as indicated on Page 27, Section 5.7-10.
Steps for Terminating Fiber Using FC Connectors
1) With the VLLS positioned in front of you with the crimp handle on the left
(as shown in the diagram on Page 14), insert the ST-FC adapter between
the slider and the crimp platform. Position the adapter so that the ST connector is on the left; the FC connector is on the right.
2) Place one end of the ST-ST jumper cable through the opening in the crimp
handle and then connect it to the left side of the ST-ST adapter. It is very
important that the jumper cable go through the crimp handle. Connect the
other end of the jumper cable to the VLLS.
3) Make sure the VLLS is turned OFF.
4) Go to Page 11 of the spiral bound manual. Read all of Section 5 completely
before proceeding. Please note, the procedure described does NOT assume
that the ST-FC adapter and the VLLS are being used. The protective end
cap on the connector must be removed and mated with the right side of the
ST-FC adapter in the slide top before being placed into the crimp platform.
Make sure the cam on the connector is properly positioned as indicated in
Figure 5-7 on Page 15. The cam will face you when properly installed into
the crimp platform.
5) Strip and prepare the fiber as indicated in Section 5.
6) Once the fiber is prepared, turn ON the VLLS. The VLLS should be on
before you place the fiber end into the connector.
7) When the fiber is properly mated into the connector, the red light will be
extinguished around the outside of the connector. There may still be some
light illuminating the rear of the connector. Try to minimize this light as
much as possible, but it is normal to have a small amount remaining.
8) Continue the termination procedure as indicated on Page 27, Section 5.7-10.
4
INTRODUCTION
This fiber optic installation kit enables the user to terminate both single
mode and multimode fiber optic cable with either ST or FC type connectors.
The kit is assembled in two parts: the “Corning UniCam® termination kit,”
which is packed in a blue bag, and the “CSI supplementary materials kit,”
which is packed in a clear bag. This manual is intended to be used in conjunction with the spiral bound manual packed inside the blue bag.
Please note that this termination kit is intended to work only with Corning
UniCam® brand connectors. These connectors are sold by Communications
Specialties as part numbers:
6210: ST type connector for use with 62.5 micron multimode fiber
6211: FC type connector for use with 62.5 micron multimode fiber
6221: ST type connector for use with 8-10 micron single mode fiber
6220: FC type connector for use with 8-10 micron single mode fiber
This Kit Contains:
1 Corning UniCam® termination kit (refer to Page 4, Section 3 in the
spiral bound manual for a complete listing of contents)
1 CSI supplementary materials kit, including:
1
1
1
1
1
ST-ST adapter
ST-FC adapter
ST-ST multimode (orange) jumper cable, 1 meter
ST-ST single mode (yellow) jumper cable, 1 meter
Visible Laser Light Source (VLLS) with power supply
Connectors are not included and must be purchased separately.
1