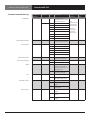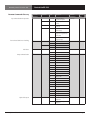
1
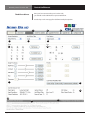
Broadcasting the best results.
Remotely Control Scan Do® HD
Take control of your Scan Do® HD
from the next room or across town!
This guide shows you how.
Scan Do® HD does not require that you
Blue
install any special software or hardware
on your computer.
White
Black
DVI Computer Video to HD/SD-SDI Scan Converter
with Genlock Input and Fiber Optic Output
Remotely Control Scan Do® HD
Get Scan Do® HD updates
online at scandohd.tv
Single Color (B
World Headquarters
55 Cabot Court
Hauppauge, New York 11788 USA
Tel: (631) 273-0404
Fax: (631) 273-1638
[email protected]
Asia
Communications Specialties Pte Ltd
100 Beach Road
#22-09 Shaw Tower
Singapore 189702
Tel: +65 6391 8790
Fax: +65 6396 0138
[email protected]
commspecial.com
Single Color (B
on Black Backg
Remotely Control Scan Do® HD
Contents
Introduction. . . . . . . . . . . . . . . . . . . . . . . . . . . . . . . . . . . . . . . . . . . . . . . . . . . . 4
Presets Overview. . . . . . . . . . . . . . . . . . . . . . . . . . . . . . . . . . . . . . . . . . . . . . . . 4
Control via RS-232. . . . . . . . . . . . . . . . . . . . . . . . . . . . . . . . . . . . . . . . . . . . . . . 5
DB-9F Connector. . . . . . . . . . . . . . . . . . . . . . . . . . . . . . . . . . . . . . . . . . . . . . . . 5
RS-232 Communication Parameters. . . . . . . . . . . . . . . . . . . . . . . . . . . . . . 5
Command Formats. . . . . . . . . . . . . . . . . . . . . . . . . . . . . . . . . . . . . . . . . . . . . . 5
Command Syntax to Unit. . . . . . . . . . . . . . . . . . . . . . . . . . . . . . . . . . . . . . . . 5
Response Syntax from Unit . . . . . . . . . . . . . . . . . . . . . . . . . . . . . . . . . . . . . . 5
Remote Command Glossary . . . . . . . . . . . . . . . . . . . . . . . . . . . . . . . . . . . . . 6
Text Commands. . . . . . . . . . . . . . . . . . . . . . . . . . . . . . . . . . . . . . . . . . . . . . . . 10
Save Text Procedure. . . . . . . . . . . . . . . . . . . . . . . . . . . . . . . . . . . . . . . . . . . . 11
Retrieve Text Procedure . . . . . . . . . . . . . . . . . . . . . . . . . . . . . . . . . . . . . . . . 12
Preset Name Procedure. . . . . . . . . . . . . . . . . . . . . . . . . . . . . . . . . . . . . . . . . 13
Control via Ethernet. . . . . . . . . . . . . . . . . . . . . . . . . . . . . . . . . . . . . . . . . . . . 14
Getting the IP Address. . . . . . . . . . . . . . . . . . . . . . . . . . . . . . . . . . . . . . . . . . 14
Setting the IP Address. . . . . . . . . . . . . . . . . . . . . . . . . . . . . . . . . . . . . . . . . . 14
The Graphical User Interface
Connecting to Scan Do® HD with a browser. . . . . . . . . . . . . . . . . . . 15
Graphical User Interface Overview. . . . . . . . . . . . . . . . . . . . . . . . . . . . 16
Graphical User Interface Configuration. . . . . . . . . . . . . . . . . . . . . . . . 18
Zooming with the Graphical User Interface. . . . . . . . . . . . . . . . . . . . 18
Panning with the Graphical User Interface. . . . . . . . . . . . . . . . . . . . . 19
Adjusting Processing Controls with the
Graphical User Interface. . . . . . . . . . . . . . . . . . . . . . . . . . . . . . . . . . . . . . 19
Managing and Using Presets with the
Graphical User Interface. . . . . . . . . . . . . . . . . . . . . . . . . . . . . . . . . . . . . . 20
Upgrading Scan Do® HD’s Firmware/GUI. . . . . . . . . . . . . . . . . . . 22
Managing Multiple Scan Do® HD’s. . . . . . . . . . . . . . . . . . . . . . . . . . . . . . . 23
Troubleshooting . . . . . . . . . . . . . . . . . . . . . . . . . . . . . . . . . . . . . . . . . . . . . . . 24
Statement of Warranty . . . . . . . . . . . . . . . . . . . . . . . . . . . . . . . . . . . . . . . . . 25
Page Remotely Control Scan Do® HD
Remotely Control Scan Do® HD
Introduction
Introduction | Presets Overview
Scan Do® HD comes equipped with a RS-232 and an standard Ethernet port.
It is suggested that you review the Scan Do® HD User’s Manual prior to
controlling the Scan Do® HD from a remote location.
Presets Overview
Scan Do® HD ships from the factory with no presets stored.
Therefore, it is necessary for the user to store any presets they may desire
for this feature to be active.
You may store and recall presets via the RS-232 port or via the intuitive GUI.
For RS-232 instructions, please see page 8 of this manual.
For ethernet/GUI instructions, please see page 10 of this manual.
The Preset function stores the current settings based on the current output
format timing and DVI input resolution.
Scan Do® HD stores the following information in its Preset memory:
• The Zoom ( H & V size ) of the image
• The Pan ( H & V position ) of the image
• All Processing Control Settings ( Brightness, Sharpness, etc. )
• The Anti-Flicker Setting
Note: A preset may not be recalled if the output format and/or the input
resolution differs from the output format and/or input resolution saved
with the preset.
Remotely Control Scan Do® HD
Page Remotely Control Scan Do® HD
DB-9F Connector
Control via RS-232
The output connector for the RS-232 port on the Scan Do HD is a DB-9F.
The Scan Do HD is DCE and the controlling computer is DTE. The cable connector
is shown below:
6
Scan Do® HD
DB-9 Female DCE
7
8
9
RS-232
Communication
Parameters
1
1
2
2
3
3
4
4
5
5
6
7
8
Computer Com Port
DB-9 Male DTE
9
The following communication parameters should be observed when connecting
to the Scan Do HD via the RS-232 port.
• 19200 Baud
• 8 data bits, no parity, 1 stop bit
• generic TTY
• no flow control
Command Formats
The following command formats should be observed when controlling the
Scan Do HD via the RS-232 port.
• Commands are NOT case sensitive.
• Illegal commands or commands with illegal parameters have no effect.
• The unit will return an error message.
• A carriage return is a carriage return only and does not include a line feed.
Page Remotely Control Scan Do® HD
Remotely Control Scan Do® HD
Command Syntax
to Scan Do® HD
Control via RS-232
The following table lists the syntax for Remote Protocol Commands:
Remote Protocol Commands to Scan Do® HD
Write
Legend
Carriage Return, no line feed
xx
two letter command
yy
parameter in decimal
zz
value from 1 to 5 digits
in decimal
Response Syntax
from Scan Do® HD
Legend
Carriage Return, no line feed
xx
two letter command
yy
parameter in decimal
zz
value from 1 to 5 digits
in decimal
Remotely Control Scan Do® HD
Read
no parameters or values
xx:,
with values only
xx:,zz
with parameters and values
xx:yy,zz
with parameters only
xx:yy,
no parameters
xx:
with parameters
xx:yy
The following table lists the response syntax for Remote Protocol Commands:
Response Syntax From Scan Do® HD
Welcome message
unit title version compile date compile time >
Good command,
no data back
>
Good command,
data back
xx:=zz >
Good command,
address with data back
xx:yy=zz >
Illegal 2 letter
command
E1 >
Parameter out of range
E2 >
Syntax Error
E3 >
Not valid with current
state
E4 >
Communication Error
during reception of
command
E5 >
Timing Error previous command not
yet serviced
E6 >
Hardware Error
E7 >
RS-232 port is locked
E8 >
Resource Limitation
E9 >
Unit timed out while
waiting for a text string
to be sent from the
remote controller.
See the Text Command
Section for more
information.
E10 >
Page Control via RS-232
Remotely Control Scan Do® HD
Remote Command Glossary
Antiflicker
Two Letter
Command
Parameter1
Value1
Description
Available
Commands
Default
Value
af
0
none
Antiflicker level,
automatically selected by
the video processor
read & write
0
1
Center Horizontally
Erase Preset
Manual Antiflicker Level 1
2
Manual Antiflicker Level 2
3
Manual Antiflicker Level 3
4
Manual Antiflicker Level 4
5
Manual Antiflicker Level 5
6
Manual Antiflicker Level 6
7
Manual Antiflicker Level 7
8
Manual Antiflicker Level 8
To read, do
not enter any
parameters
after the colon.
5
none
none
Centers the output image
in the horizontal direction
write
–
cp 7
none
1
Erases Preset 1
write
–
2
Erases Preset 2
3
Erases Preset 3
4
Erases Preset 4
5
Erases Preset 5
6
Erases Preset 6
cv 5
none
none
Centers the output image
in the vertical direction
write
–
On Screen Display
ds
none
0
On Screen Display is Off
read
–
1
On Screen Display is On
EDID
ed
none
0
EDID will come from the
loopthrough monitor if
attached or from the Scan
Do HD if it is not.
read & write
0
1
The EDID always comes
from the Scan Do HD
0
Fan Always On
read & write
0
1
Automatic:
On at 54º C, Off at 49º C
0
Not in Genlock Mode
read
–
1
Searching for Genlock
signal
2
Locked to valid Genlock
input signal
0
Not locked to an input
signal
read
–
1
Locked, but input is not
valid
2
Locked to a valid input
signal
Center Vertically
Fan
Genlock Status
Input Status
Page ch
1
Note:
To write, use the
parameter and
value as shown.
fm
gs
in
none
none
none
Remotely Control Scan Do® HD
Control via RS-232
Remotely Control Scan Do® HD
Remote Command Glossary
Input Resolution Properties
Front Panel & RS-232 Locking
Two Letter
Command
Parameter1
Value1
Description
Available
Commands
Default
Value
ir
0
0 to 2048
Horizontal input
resolution in pixels
read only
–
1
0 to 2048
Vertical input resolution
in lines
2
0 to 8510
Input vertical refresh rate
in Hz/100
3
0
Input scan format is
interlaced (I)
1
Input scan format is
progressive segmented
frame( PsF)
2
Input scan format is
progressive (P)
0
Unlock Front Panel
read & write
0
1
Lock Front Panel
0
Unlock RS-232 Port
1
Lock RS-232 Port
0
LED test mode off
read & write
0
1
LED test mode on
0
NTSC
read & write
3
1
PAL
2
720p, 60 Hz
3
720p, 59.94 Hz
4
720p, 50 Hz
5
720p, 30 Hz
6
720p, 29.97 Hz
7
720p, 25 Hz
8
720p, 24 Hz
9
720p, 23.98 Hz
10
1035i, 60 Hz
11
1035i, 59.94 Hz
12
1080i, 60 Hz
13
1080i, 59.94 Hz
14
1080i, 50 Hz
15
1080p, 30Hz
17
1080p, 29.97 Hz
19
1080p, 25 Hz
21
1080p, 24 Hz
23
1080p, 23.98 Hz
0
Turns the SDI optical
output off
read & write
0
1
Turns the SDI optical
output on
lk 3
0
1
LED Tests
lt
Output Resolution
of
Optical Output
Remotely Control Scan Do® HD
none
3
op
none
none
Page Control via RS-232
Remotely Control Scan Do® HD
Remote Command Glossary
Processing Controls
Preset Information
Two Letter
Command
Parameter1
Value1
Description
Available
Commands
Default
Value
pc
0
0 to 256
Sets the Brightness.
Scales to -1 to +1 in 0.0078
increments
read & write
128,
Scales
to 0
1
0 to 256
Sets the Contrast.
Scales to -2 to +2 in
0.0156 increments
119,
Scales
to 0.1348
2
0 to 719
Sets the Hue angle from
0º to 359.5º in increments
of 0.5º
0
3
0 to 150
Sets the Saturation.
Scales to 0.00 to 1.50 in
increments of 0.01
100,
Scales
to 1.00
4
0 to 16
Sets the Sharpness in 16
steps starting with (0), no
sharpness enhancement
0
none
192-255
Returns the Preset Empty
flag byte. Each bit represents a preset. A one (1)
indicates a preset is empty
and a zero (0)
indicates a preset is stored.
pe
The bits are mapped to the
presets as follows:
bit 0 = Preset 1
bit 1 = Preset 2
bit 2 = Preset 3
bit 3 = Preset 4
bit 4 = Preset 5
bit 5 = Preset 6
bit 6 = Reserved, set to 1
bit 7 = Reserved, set to 1
Pan
Pan - Fixed Positions
pn 5
qd 5
0
1-5
Pans output image up by 1,
2, 3, 4 or 5 step(s) at a time
1
1-5
Pans output image down by
1, 2, 3, 4 or 5 step(s) at a time
2
1-5
Pans output image left by 1,
2, 3, 4 or 5 step(s) at a time
3
1-5
Pans output image right by
1, 2, 3, 4 or 5 step(s) at a time
0
none
Move image to upper right
1
Move image to upper left
2
Move image to lower left
3
Recall Presets
Page rp 4
none
read
Note: The value
that is returned
is a decimal
number that
must be
converted to a
binary number
in order to
decode the
individual bits.
write
–
write
–
write
–
Move image to lower right
1
Recalls Preset 1
2
Recalls Preset 2
3
Recalls Preset 3
4
Recalls Preset 4
5
Recalls Preset 5
6
Recalls Preset 6
Remotely Control Scan Do® HD
Control via RS-232
Remotely Control Scan Do® HD
Remote Command Glossary
Save Presets
Restore Factory Defaults
Two Letter
Command
Parameter1
Value1
Description
Available
Commands
Default
Value
sp
none
1
Stores Preset 1
write
–
2
Stores Preset 2
3
Stores Preset 3
4
Stores Preset 4
5
Stores Preset 5
6
Stores Preset 6
sr
none
none
Reset Scan Do® HD to
Factory Defaults
write
–
Temperature
tm
none
none
Returns the internal
ambient temperature of the
unit in degrees Celsius
read
–
Test Patterns
tp
none
0
Live video, no test pattern
read & write
–
1
100% Color Bars
2
75% Color Bars
Unit Information
vn
none
none
Return unit model name
with firmware version number, date and time
read
–
zc 5, 6
none
none
4:3 center cut zoom. Used
when the output format is
4:3 (Standard Definition)
and the input is 16:9
write
–
Zoom to Fit
zf 5
none
none
The input image is
stretched to the limits of the
output raster in H & V
write
Zoom to Fit
Geometrically Correct
zg 5
none
none
The input image appears
geometrically correct in the
output raster
write
Zoom
zm 5
0
0
Zoom up in H direction
write
1
Zoom down in H direction
0
Zoom up in V direction
1
Zoom down in V direction
0
Zoom up H & V together
1
Zoom down H & V together
4:3 Center Cut Zoom
1
2
–
1 All numbers are decimal
2 A command that is issued with a parameter that exceeds the limits of the move range will cause the image to move to its limit.
3 An “E4” error message received after sending this command means that the output format is currently being set from the Scan Do HD
front panel and the command will not be processed.
4. An “E4” error message received after sending this command indicates that the preset being recalled is empty.
An “E7” error message received after sending this command indicates a memory failure.
An “E9” error message received after sending this command indicates a video processor resource limit.
5. An “E9” error message received after sending this command indicates a video processor resource limit.
6. This command is only applicable to Standard Definition output formats and will return an “E4” error message if executed while
the unit is configured to output a High Definition signal.
7. An “E7” error message received after sending this command indicates a memory failure. The preset was not completely erased.
Remotely Control Scan Do® HD
Page Remotely Control Scan Do® HD
Introduction
Text Commands
Text Commands
Commands to save and recall text strings to the microcontroller’s EEPROM are a
new addition to the standard Scan Do® protocol and are included for the first time
in Scan Do® HD. While the text commands are very similar to the standard user
commands, the Text Command Protocol is unique to the text commands. The
commands to put Scan Do® HD in text mode can be found below:
Two Letter
Command
Sring to
Access1
Number of
Characters
in String1
Description
sn
1-6
1-16
Saves the preset name up to 16 characters for presets 1
through 6 in the EEPROM
rn
1-6
1-29
Recalls the preset name from the EEPROM for presets 1
through 6
su
1-4
1-128
Saves a user’s text string of up to 128 ASCII characters in
the EEPROM in one of four segments
ru
1-4
1-128
Retrieves a user’s text string of up to 128 ASCII characters
from the EEPROM in one of four segments
1 All numbers are decimal
All commands are case insensitive.
Illegal commands or commands with illegal parameters have no effect and the
unit will return an error message.
Text save commands are structured to follow the syntax of a user write command
with parameters and values where the string being accessed is the parameter and
the number of ASCII characters in that string is the value.
Text retrieve commands follow the syntax of a user read command with
parameters where the string to be accessed is the parameter.
Page 10
Remotely Control Scan Do® HD
Remotely Control Scan Do® HD
Save Text Procedure
Text Commands
The procedure for a save text command is as follows:
1) The remote controller sends the storage command with the string to store
and the number of characters in the string.
2) The Scan Do HD puts the remote port in “text” mode and sends out a ready
message where it repeats the command, the string number and the number
of characters in the string.
3) The remote controller receives the ready message and then sends
the string. The string can contain any ASCII character including a carriage
return.
4) The Scan Do HD counts the number of characters specified in the initial
storage command and if the incoming characters equal the number of
characters specified in the initial storage command, the Scan Do HD stores
the string in EEPROM, padding any characters left out of the 128 maximum
with the Hex value of 0xff.
5) The Scan Do HD sends an acknowledgement to the remote controller and
puts the remote port back into regular command mode.
Example of a
Successful Storage Procedure
Sent From:
Protocol:
Remote Controller
su:2,37
Scan Do HD
Remote Controller
Scan Do
Example of a
Failed Storage Procedure
Configured by Joe Cool, June 29, 2007
>
Sent From:
Protocol:
Remote Controller
su:2,37
Scan Do HD
Remote Controller
Scan Do
(after 5 seconds)
Remotely Control Scan Do® HD
su:2=37
su:2=37
Configured by
E10 >
Page 11
Remotely Control Scan Do® HD
Retrieve Text Procedure
The procedure for a retrieve text command is as follows:
1) The remote controller sends the retrieve command with the
particular string to be retrieved.
2) The Scan Do HD returns the command, the selected string, the number
of characters in the string followed by an equal sign and then the text string
itself. The last two characters of the response will be a carriage return
and a prompt.
Example of a
Successful Retrieve Procedure
Sent From:
Protocol:
Remote Controller
ru:2
Scan Do HD
Example of a
Failed Storage Procedure
Sent From:
Protocol:
Remote Controller
ru:2
Scan Do HD
Page 12
ru:2=37=Configured by Joe Cool, June 29, 2007 >
ru:2=0= >
Remotely Control Scan Do® HD
Remotely Control Scan Do® HD
Preset Name Procedure
Storing the preset names will function as stated in the Save Text Procedure
section of this manual.
Presets can only be named if the preset configuration has already been saved.
An E4 error message will be returned if the user tries to name an empty preset.
Note: If the remote controller does not respond to the Scan Do HD with the
completed string within 5 seconds, the Scan Do will send an E10 error message
indicating that it has timed out.
Example of a
Successful Preset Name
Procedure
Sent From:
Protocol:
Remote Controller
sn:6,13
Scan Do HD
sn:6=13 >
Remote Controller
Scan Do HD
Retrieving a Preset Name
Procedure
Weather Map 4
>
Retrieving a preset name differs from other retrieval commands in that the
response to the user will contain the preset name along with the output format
and input resolution of the preset. This information is separated by the
delimiter ~
The format is:
rn:x=yy=preset name~aa~bbbb~cccc >
x
= the preset position
yy
= the strings’ character count
aa
= the output format value as specified in the
Output Format command (of) in the
Remote Command Gloassary.
bbbb = the active horizontal pixels in the input
cccc
= the active vertical lines in the input
Note: If an attempt is made to recall a preset name from a preset that is empty
( no settings have been stored ), the Scan Do HD will send back the
following response: rn:6=0= >
If the preset itself has been stored, but the name has not, then the response back
from the Scan Do HD will be similar to: rn:6=12=~4~1280~1024 >
Example of a
Successful Preset Name
Retrieval
Remotely Control Scan Do® HD
Sent From:
Protocol:
Remote Controller
rn:6
Scan Do HD
rn:6=25=Weather Map 4~13~1024~768 >
Page 13
Remotely Control Scan Do® HD
Connecting to
the Ethernet Port
Control via Ethernet
The rear panel Ethernet port will accept a standard 10/100 Base-T Ethernet
connection. The unit will automatically adjust to either speed from the hub,
switch or router that it is connected to.
The default setting for the unit is to accept an IP address from the router to which
it is connected. This is referred to as DHCP mode.
Viewing and Setting
the IP Address
To see the IP settings the unit has acquired from the router after the connection
is made, ensure that the On Screen Display is enabled and press the following
buttons simultaneously for an 30 second on-screen display of the IP settings:
GENLOCK and LEFT arrow
Note: that it is possible to interrupt a user connected to the Scan Do® HD via the
ethernet port if you view and/or change the network settings.
If you connect the ethernet cable after you have powered on your Scan Do HD,
you may have reset the ethernet port by pressing:
GENLOCK PHASING and RIGHT arrow
Once the Scan Do HD is connected, launch the browser on your PC.
In the Address bar of the browser enter the IP address of the unit.
For example: http://192.168.1.54
You will now see the control screen of the Scan Do HD. For more information on
the Scan Do® HD’s Graphical User Interface, please see page 10 of this manual.
IP Address Button Operation
View the IP Address
GENLOCK +
Enter Edit Mode
GENLOCK +
Note: It is important that your browser have Java Runtime Environment version
1.6 (JRE 6) or later installed. This is normally standard on most browsers. However,
the latest version of Java can be downloaded at: java.sun.com. Macintosh users
can download Java Runtime Environment from developer.apple.com
Setting the IP Address:
If the current network configuration is not displayed, press GENLOCK and the LEFT
arrow to display the network settings.
Press GENLOCK and LEFT arrow to enter “Edit Mode”.
Change Value
or
Use the UP or DOWN arrow keys to enable/disable DHCP mode.
Move Cursor
or
With DHCP disabled:
If DHCP mode is disabled, you may use the LEFT or RIGHT arrows to move
the cursor. To change a value, use the UP or DOWN arrow keys.
Save Changes
GENLOCK +
Cancel Changes
GENLOCK
+
Phasing
Reset Ethernet Port
GENLOCK
+
Phasing
Page 14
To save changes, press the GENLOCK PHASING and LEFT arrow keys and follow the
on-screen instructions.
To cancel your changes, press the GENLOCK PHASING and RIGHT arrow keys.
Note: If no keys are pressed for 30 seconds, Scan Do® HD will exit “Edit Mode”
without saving your changes.
Remotely Control Scan Do® HD
Remotely Control Scan Do® HD
Connecting to the GUI
( Graphical User Interface )
Control via Ethernet
When Scan Do® HD is connected to the network via ethernet,
you may take control via the Graphical User Interface (GUI).
A web browser with Java version 1.6 (JRE 6) or later is required to utilize the GUI.
For more information about browser requirements please refer to the “Browser
Requirements” section below.
To connect to the GUI, you will need to know the IP address of the Scan Do® HD
you wish to communicate with. If you do not have this information, please follow
the instructions on page 14 of this manual.
Connect by entering your Scan Do® HD’s IP address into your browser.
For example: http://192.168.1.57
After entering the IP address, you will receive the following screen:
Click “Connect” to connect to your Scan Do® HD.
Note: You may receive a message stating “The Applications Digital Signature
Cannot Be Verified.” To continue, select “Run”. To prevent this dialog box from
appearing each time you connect, you should select, “Always trust content from
this provider.”
Browser Requirements
Scan Do® HD is designed to work with standard software commonly
available on most modern PC’s and Macs:
Internet Explorer 6 or later.
Firefox 1.5 or later.
Safari 2.0 or later.
Netscape 8 or later.
Java Runtime Environment version 1.6 (JRE 6) or later.
Remotely Control Scan Do® HD
Page 15
Control via Ethernet
Remotely Control Scan Do® HD
Once you have connected to your Scan Do® HD,
you should see the GUI interface represented below.
The GUI at a Glance
Use the key on the next page for GUI functionality descriptions
1
6
2
7
4
3
5
8
9
10
11
12
13
14
15
Page 16
16
Remotely Control Scan Do® HD
Remotely Control Scan Do® HD
The GUI at a Glance
Control via Ethernet
1 Disconnects your browser from the Scan Do® HD.
2 Directs you to scandohd.tv to review and download the latest updates.
3 Allows you to upgrade Scan Do® HD’s firmware.
4 Allows you to upgrade Scan Do® HD’s GUI.
5 Allows you to configure your GUI’s functionality.
See Page 18 for more instructions.
6 Quickly choose your output resolutions.
7 Easily select your Antiflicker level.
8 Generate test patterns.
9 Zoom Controls. See Page 18 for more instructions.
10 Pan Controls. See Page 19 for more instructions.
11 Image Processing Controls. See Page 19 for more instructions.
12 Preset Controls. See Page 20 for more instructions.
13 Current Status of your Scan Do HD.
14 The IP address of the Scan Do HD you are controlling
15 A convenient link for you to download the latest version of
Java Runtime Environment (JRE)
16 Your Scan Do HD’s current firmware and GUI versions.
Remotely Control Scan Do® HD
Page 17
Remotely Control Scan Do® HD
GUI Configuration
Control via Ethernet
The GUI Configuration dialog box allows you to add and remove functionality
from the GUI interface. This is useful when you wish to hide functionality
from users of the GUI interface and to avoid accidental changes to important
properties.
Note: The Scan Do HD does not employ rights management. A user can connect
to the GUI, enable a feature and change its properties.
If you wish to restrict GUI access to specific users and/or groups, your IT
department may be able to help. Ask them about IP to IP restrictions, rights and
pools that can be enabled within your LAN’s router.
Zoom Controls
This will Zoom your output to full screen and will not maintain the aspect ratio.
This will use 4:3 Center Cut Zooming, used when the output format
is 4:3 (Standard Definition) and the input is 16:9
This will render your image geometrically correct in the output raster.
Use these buttons for coarse increments.
Use these button for fine increments.
Page 18
Remotely Control Scan Do® HD
Remotely Control Scan Do® HD
Control via Ethernet
Pan Controls
This will center your image horizontally in the output raster
This will center your image vertically in the output raster.
Use these buttons for coarse increments.
Use these button for fine increments.
Use these buttons to automatically snap your image to the top left, top right,
bottom left or bottom right of the output raster.
Processing Controls
Use these buttons to precisely increase and decrease the property.
Use the sliders to coarsely increase and decrease the property.
Use this button to return the property to the factory default.
Remotely Control Scan Do® HD
Page 19
Remotely Control Scan Do® HD
Control via Ethernet
Presets Control
An active numerical preset button, as well as a preset name, input and output
resolution information, indicate that a preset has been saved.
Simply press the button to recall the configuration.
A deactive numerical preset button indicates that no preset has been saved.
Press “Save Config” to save a configuration.
Pressing this button will allow you to save your current configuration and present
you with the following dialog box:
Choose your preset position using the first pull down menu.
You can enter a name for your preset in the provided text field.
To complete your preset storage, click “OK”. Your preset has now been saved.
Page 20
Remotely Control Scan Do® HD
Remotely Control Scan Do® HD
Control via Ethernet
Presets Control
Pressing this button will allow you to erase a previously saved configuration and
present you with the following dialog box:
Choose the preset you wish to erase from the pull down menu. To complete the
erasure of your preset, click “OK”. Your preset has now been erased.
Pressing this button will restore your Scan Do HD to its factory default settings.
Note: If you are using Scan Do HD’s fiber optic output and your restore your Scan
Do HD to factory defaults, the fiber optic output will be turned off by default. You
must enable the fiber optic output as described in the Scan Do HD User’s Manual
to use the fiber optic output again.
Remotely Control Scan Do® HD
Page 21
Control via Ethernet
Remotely Control Scan Do® HD
Upgrading Scan Do® HD’s
Firmware and GUI
Scan Do® HD is designed to be upgradable in the field. The upgrade process is easy
and intuitive. Simply follow these steps:
1
Connect to Scan Do® HD.
To upgrade the Scan Do® HD’s Firmware and GUI, you need to connect to the
Scan Do® HD via Ethernet. See page 15 of this manual for instructions on
connecting to the GUI.
2
Click “Check for Updates”
Once you are connected to Scan Do® HD, you can search for the latest updates
by clicking on “Check for Updates”.
A new window will appear and you will be redirected to scandohd.tv/myscando
WARNING
Never power off or disconnect
your Scan Do® HD, or try to abort
a firmware/GUI upgrade by
powering off your computer or
closing your browser while an
upgrade is in progress.
Scan Do® HD is backwards
compatible. If you installed an
update that you didn’t intend,
allow the update to complete
following all procedures outlined
herein and then repeat the
upgrade process with the correct
update.
You can review and download
Scan Do® HD updates at
scandohd.tv
If no window appears, you may need to disable pop-up blocking
in your browsers preferences.
3
If you have not registered, you can register by completing the simple form
presented to you at this time.
4
Download and Extract the Update(s)
Download your desired updates to your local computer.
It is recommended that you store your updates on your local computer and not a
network drive to ensure stability during the update process.
5
Return to Scan Do® HD’s GUI and click
“Upgrade Firmware” or “Upgrade GUI”
After downloading and extracting the updates, return to the Scan Do® HD GUI.
If you wish to upgrade your firmware, click “Upgrade Firmware”.
If you wish to upgrade your GUI, click “Update GUI”.
It is recommended that you
update your firmware prior to
updating your GUI.
In some cases, firmware upgrades
may erase your presets. Please
review the firmware’s release
notes prior to installation.
Log In.
If you have previously registered, or you have completed the registration process,
you can log in and download your Scan Do® HD updates.
Note: It is recommended that you update the firmware before updating the GUI.
A dialog box will appear asking you to select the update that you wish to install.
6
Select your desired update.
Select your update and click OK. The update process will begin.
When a firmware update is complete, you must power off your
Scan Do® HD for ten seconds.
When a GUI update is complete, you must quit and restart your web browser
to continue normal operation.
Page 22
Remotely Control Scan Do® HD
Remotely Control Scan Do® HD
Managing Multiple Scan Do® HD’s
As your family of Scan Do® HD’s grows, it can become difficult to remember all of
their IP addresses. However, your IT Department may be able to help by assigning
a DNS Record for each of your Scan Do® HD’s.
DNS, or Domain Name System, allows you to resolve to an IP address using simple
names. For example, the Scan Do® HD website, scandohd.tv, points to or resolves
to 72.3.176.163. Without DNS, you would have to enter in the IP address of our
server to view our website. With Domain Name Servers, we can assign the IP
address an alias or name, in this case, scandohd.tv.
This same technology can be applied to your Scan Do® HD units.
This allows you to create meaningful and memorable names for each
of your Scan Do® HD’s.
Example for XYZ Studios:
Scan Do® HD IP Address
Location
Scan Do® HD DNS Address
192.168.110.35
Studio A
Floor 1
sdhd_a1.xyzstudios.com
192.168.109.97
Studio B
sdhd_b2.xyzstudios.com
Floor 2
192.168.1.119
Production
Suite 12
sdhd_prod12.xyzstudios.com
252.196.18.65
Asia
Production
Suite
asia.prod.xyzstudios.com
Ask your IT department today about Domain Name Services and how they can
help you to simplify the management of your network hardware.
Remotely Control Scan Do® HD
Page 23
Remotely Control Scan Do® HD
I receive a “Processing Error”
when trying to read my
Network Configuration.
Troubleshooting
• Ensure that the ethernet cable is attached to your Scan Do® HD.
• A user may be connected to the Scan Do® HD via Ethernet.
• Reset the ethernet port by pressing GENLOCK PHASING and RIGHT arrow.
• Replace the Ethernet Cable. We recommend Cat 5e cabling.
I have a red X on
my computer screen
• To use the Graphical User Interface, you must have Java version 1.6
(JRE 6) or later installed. You can download the latest version of
Java at java.sun.com or by using the link at the bottom of the GUI.
Macintosh Users: You can download the latest versions of Java for Mac OS X
from developer.apple.com
I cannot connect to the GUI.
It says “Server Not Found”
• Ensure that the ethernet cable is attached to your Scan Do® HD.
• Verify that you have the correct IP address for your Scan Do® HD by following
the instructions on page 14.
• Firewalls and Routers may prevent you from communicating with the
Scan Do® HD, especially from an external location. Contact your IT
department to ensure that you have access to the network.
The GUI is behaving erratically
and/or some features are not
working properly
• Verify that your browser is compatible with Scan Do® HD and that you are
using the correct version of Java. Please review the Browser Requirements
section on page 15 of this manual.
• If you recently upgraded your GUI and failed to upgrade your firmware, some
features of the GUI may fail to work, respond, or otherwise behave erratically.
Not all GUI updates require a firmware update and you should review the
Release Notes for any update prior to installation.
• If you recently upgraded your firmware and failed to upgrade your GUI, some
features of the GUI may fail to work, respond, or otherwise behave erratically.
Not all firmware updates require a GUI update and you should review the
Release Notes for any update prior to installation.
For additional support, please visit commspecial.com or scandohd.tv
Page 24
Remotely Control Scan Do® HD
Remotely Control Scan Do® HD
Warranty
Communications Specialties, Inc. (CSI) warrants that, for a period
of three years after purchase by the Buyer, Scan Do® HD will be free from defects
in material and workmanship under normal use and service. A Return Material
Authorization (RMA) number must be obtained from CSI before any equipment
is returned by the Buyer. All materials must be shipped to CSI at the expense and
risk of the Buyer.
CSI’s obligation under this warranty will be limited, at its option, to either the
repair or replacement of defective units, including free materials and labor. In no
event shall CSI be responsible for any incidental or consequential damages or loss
of profits or goodwill.
CSI shall not be obligated to replace or repair equipment that has been damaged
by fire, war, acts of God, or similar causes, or equipment that has been serviced by
unauthorized personnel, altered, improperly installed, or abused.
RMA numbers and repairs can be obtained from:
Communications Specialties, Inc.
55 Cabot Court
Hauppauge, NY 11788 USA
Tel: (631) 273-0404
Fax: (631) 273-1638
or, in the Asia Pacific Region:
Communications Specialties Pte Ltd
100 Beach Road
#22-09 Shaw Tower
Singapore 189702
Tel: +65 6391 8790
Fax: +65 6396 0138
RMA numbers can also be obtained from our web site: commspecial.com
Please have your serial number (located underneath Scan Do HD) available.
Remotely Control Scan Do® HD
Page 25
Remotely Control Scan Do® HD
Page 26
Remotely Control Scan Do® HD
Remotely Control Scan Do® HD
Remotely Control Scan Do® HD
Page 27
If you haven’t used Pure Digital
Fiberlink® lately, you should
review our comprehensive line
of fiber based solutions today.
Designed exclusively for the
A/V Professional, each
Pure Digital Fiberlink® is
designed and built with
decades of Pro A/V experience.
Call your Sales Representative
or visit us online at
commspecial.com
Blue
White
Black
World Headquarters
DVI Computer Video to HD/SD-SDI Scan Converter
with Genlock Input and Fiber Optic Output
55 Cabot Court
Hauppauge, New York 11788 USA
Tel: (631) 273-0404
Fax: (631) 273-1638
[email protected]
Asia
Class 1 Laser Product
Communications Specialties Pte Ltd
100 Beach Road
#22-09 Shaw Tower
Singapore 189702
Tel: +65 6391 8790
Fax: +65 6396 0138
[email protected]
commspecial.com
©2007 Communications Specialties, Inc. All Rights Reserved.
Scan Do is a registered trademark of
Communications Specialties, Inc.
Pure Digital Fiberlink and the starburst logo is a registered
trademark of Communications Specialties, Inc.
CSI and the triangle designs are trademarks of
Communications Specialties, Inc.
P/N 126211 Rev. C August 30, 2007