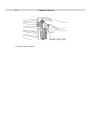
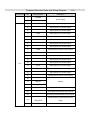
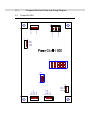
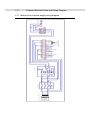
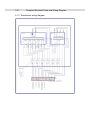
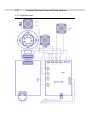
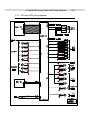
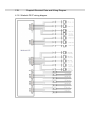
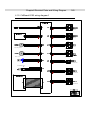
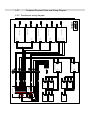
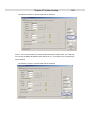
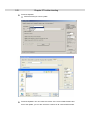
1
i
DL-2410
Service Manual
Oct 10, 2010
ii
Copyright 2010 Shanghai DOLI photographic equipment co., Ltd
All right reserved
The contents of this manual are subject to change without notice.
are registered trademarks of Shanghai Doli photographic equipment co.,
DOLI and
Ltd. in China and/or other countries.
Pakon is registered trademarks of Pakon Inc.
iii
Main technical specification
Print resolution
525 dpi
(maximum)
Maximum print size
457x 608mm
Capacity
550 prints/hour (152x102mm)
Processing time
2' 45"
Light source
LED Matrix
Imaging unit
LCD
Lens
3 fix focus Lens automatically selected depend on print size
Network Protocol
TCP/IP
Colour management
Color under control system built in Linux Server (base on profiles)
2 45 from dry to dry
Process
(CD: 30 second, BF: 30 second)
CD: 11.5L
Working tank volume
BF: 11.5L
STB1: 6.2L, STB2: 6.2L, STB3: 6.2L, STB4: 6.2L
CD: 10L
Replenishing tank volume
BF: 10L
STB: 10L
Paper width
89 - 457mm
Supported file format
Bmp, jpeg, tiff
Power supply
AC 220-230V, 50/60HZ
Rating current
15 A
Power
Maximum 7 KW
Weight
700kg (without chemistry)
Dimension
2480mm 800mm 1760mm (Length x Width x Height)
iv
Explanation of manual
About the chapters
1.
Cautions for work
Contain information on how to achieve safety in service operations.
Be sure to read precautions thoroughly and carefully.
2. Maintenance
Contain items concerning maintenance necessary to make high quality prints.
3. Service
Contain information for service personnel.
4. Electrical parts and wiring diagram
Describe the sensors and PCB s used in this machine and the wiring diagram.
5. Trouble shooting
Describe how to solve the troubles.
Symbols used in this manual
Definitions of the symbols used in this manual are as follow:
Warning symbol.
Text following this symbol contains particularly Information
concerning safety. Pay extra attention to this information.
Important symbol.
Indicates operation or procedures requiring caution,
instructions which should be followed, supplementary
explanations, etc.
Reference symbol.
Indicates the manual or section which should be referred
to.
Help symbol.
Indicates functions or instructions which are convenient to
know.
v
Abbreviations for processing solutions
The names of the processing solution in this manual are indicated as below. Some of
types of processing solutions may have other names.
Processing solutions
Abbreviations
Colour developer
CD
Bleach Fixer
BF
Stabilizer
STB
vi
Index
MAIN TECHNICAL SPECIFICATION .................................................................................................... III
EXPLANATION OF MANUAL.....................................................................................................IV
ABOUT THE CHAPTERS.................................................................................................................... IV
SYMBOLS USED IN THIS MANUAL ..................................................................................................... IV
ABBREVIATIONS FOR PROCESSING SOLUTIONS .................................................................................. V
INDEX ............................................................................................................................................VI
CHAPTER 1 CAUTIONS FOR WORK.......................................................................................... 1
1.1
FOR SAFE OPERATION .......................................................................................................... 2
1.2
COUNTERMEASURE FOR STATIC ELECTRICITY WHEN REPLACING AND MAINTAINING THE
ELECTRICAL PARTS .......................................................................................................................... 3
1.3
HANDLING CHEMICALS ........................................................................................................ 3
1.4
STORAGE ............................................................................................................................ 4
CHAPTER 2 MAINTENANCE ....................................................................................................... 5
PROLOGUE ...................................................................................................................................... 6
2.1
MORNING SETUP ................................................................................................................. 8
2.2
EXPOSURE CENTRE (ABCD) CALIBRATION ......................................................................... 11
2.3
DOUBLE EXPOSURE CENTRE CALIBRATION ........................................................................... 12
2.4
TEMPERATURE CALIBRATION ............................................................................................. 14
2.5
TWISTER 4 CALIBRATION ................................................................................................... 16
2.6
TWISTER 16 CALIBRATION ................................................................................................. 19
2.7
UNIFORMITY CALIBRATION ................................................................................................ 20
2.8
REPLENISHING SYSTEM SETUP ............................................................................................ 27
2.9
COLOUR MANAGEMENT-FROM MONITOR TO PHOTOS ........................................................... 31
CHAPTER 3 SERVICE ................................................................................................................. 34
PROLOGUE .................................................................................................................................... 35
3.1
DL-202PS DENSITOMETER ................................................................................................ 36
3.2
DATA BACKUP AND RESTORE .............................................................................................. 48
3.3
LINUX SYSTEM BACKUP AND RECOVERY ............................................................................. 50
vii
3.4
CLIENT PC SETUP .............................................................................................................. 57
3.5
UNILATERALVALVEOFREPLENISHINGPUMPCLEANINGANDREPLACEMENT ................................................ 62
3.6
FILTER CLEANING AND REPLACEMENT ................................................................................ 64
3.7
RACK SLEEVE REPLACEMENT ............................................................................................. 66
3.8
RACK CLEANING AND EXAMINATION .................................................................................. 68
3.9
CHECK AND CLEAN WORKING TANKS AND PIPES .................................................................. 69
3.10
EXPOSURE PLATFORM DISASSEMBLY .................................................................................. 70
3.11
RAISER DISASSEMBLY ........................................................................................................ 71
3.12
RACK DISASSEMBLY .......................................................................................................... 72
3.13
PHOTO-RECEIVER DISASSEMBLY......................................................................................... 73
3.14
DIVIDER DISASSEMBLY ...................................................................................................... 74
3.15
HOW TO REPLACE RIBBON CARTRIDGE ................................................................................ 75
3.16
DRYER RACK DISASSEMBLY ............................................................................................... 77
3.17
LENS FOCUS ADJUSTMENT.................................................................................................. 79
3.18
SKEW ADJUSTMENT ........................................................................................................... 81
3.19
IMAGE MAGNIFICATION CALIBRATION ................................................................................. 82
3.20
LED ASSEMBLY REPLACEMENT .......................................................................................... 83
3.21
PAPER JAM IN CUTTER OPERATION ...................................................................................... 85
CHAPTER 4 ELECTRICAL PARTS AND WIRING DIAGRAM ............................................... 87
4.1
ACCONTROL-I102 ............................................................................................................ 88
4.2
WASHCONTROL-D107 PCB ............................................................................................... 92
4.3
CTRBOARD-S102 ............................................................................................................. 99
4.4
BPRINTCPLD-S102 ........................................................................................................ 107
4.5
STEPPOWER-S101 ....................................................................................................... 113
4.6
STEP MOTOR DRIVER_104............................................................................................... 115
4.7
POWERCTRL-I001 ........................................................................................................... 117
4.8
MASTER-D103B PCB ................................................................................................... 119
4.9
LCD DRIVER BOARD E PSON 14U ..................................................................................... 122
4.10
SENSORS ......................................................................................................................... 124
4.11
MAIN SOURCE OF POWER SUPPLY WIRING DIAGRAM .......................................................... 131
viii
4.12
AC POWER SUPPLY WIRING DIAGRAM ............................................................................... 132
4.13
TRANSFORMER WIRING DIAGRAM .................................................................................... 133
4.14
DRYER WIRING DIAGRAM ................................................................................................. 134
4.15
NETWORK SKETCH MAP ................................................................................................... 135
4.16
EXPOSURE PART .............................................................................................................. 137
4.17
ACCONTRL-I002 WIRING DIAGRAM ................................................................................. 138
4.18
WASHCTRL-D107 WIRING DIAGRAM ................................................................................. 139
4.19
CTRLBOARD-S102 WIRING DIAGRAM-1............................................................................ 140
4.20
CTRLBOARD-S102 WIRING DIAGRAM-2............................................................................ 141
4.21
PCB BOARD WIRING DIAGRAM ......................................................................................... 142
4.22
TRANSFORMER WIRING DIAGRAM .................................................................................... 143
CHAPTER 5 TROUBLE SHOOTING ........................................................................................ 144
PROLOGUE .................................................................................................................................. 145
5.1
ERROR INDEX .................................................................................................................. 146
5.2
CORRECTIVE ACTIONS ..................................................................................................... 148
003
Paper loading error.................................................................................................... 148
008
Cassette not setup....................................................................................................... 148
009
Blocked ...................................................................................................................... 148
031
No connection with master.......................................................................................... 148
032
Tape failure ................................................................................................................ 149
033
Display failure............................................................................................................ 149
034
Photo preparation failure............................................................................................ 149
300
Paper jam in cutter section ......................................................................................... 149
301
Paper cannot be cut off ............................................................................................... 149
310
Replenishing pump doesn t work ................................................................................. 149
311
Low replenishing flux.................................................................................................. 150
500
Linux Recovery failure................................................................................................ 150
501
Can not connect to printer .......................................................................................... 150
504
Processing solution doesn t warm up........................................................................... 151
505
Linux start-up failure .................................................................................................. 152
ix
700
Photo comes out not dry ............................................................................................. 153
701
Paper scratch ............................................................................................................. 155
705
Photo comes out dirty ................................................................................................. 155
706
Image out of focus ...................................................................................................... 156
707
Colour noise on photos............................................................................................... 156
708
Strong grid lines on photos ......................................................................................... 156
709
Vertical lines on the photos ......................................................................................... 156
710
Uniformity of photo is not good................................................................................... 156
712
White borders on photos ............................................................................................. 157
713
Colour is very different from the monitor preview........................................................ 157
717
Paper length is longer or shorter than the setting length of the corresponding format .. 157
718
Image magnification or scale does not match the monitor preview............................... 157
719
Photo overlapping ...................................................................................................... 157
5.3
LAB UTIL SOFTWARE ........................................................................................................ 159
Chapter 1 Cautions for work
This chapter contains information on how to achieve safety in service operations.
Be sure to read precautions thoroughly and carefully.
Chapter 1 Cautions for work
2
1.1 For safe operation
General precautions
Prior to any part replacement or mechanical adjustment, be sure the air brake
is switched off.
Ground wires (green and yellow) are connected to the covers and units of the
machine. For reassembly, be sure to connect the ground wires as they were.
Be sure to perform an operation check after replacing or adjusting any parts (or
units).
Precaution against electric shock
If any case you have to take care of wiring for the power such as moving the
machine, ask a qualified professional electrician to do so. Do not forget to ground
the machine.
Pay attention to avoid shocks when performing troubleshooting, wiring checking,
or voltage/current measurement.
When replacing a fuse or PCB, be sure to switch off the air brake.
Precaution for operating rotary section
Be careful with your hands, hair, clothes, etc., not to be caught under the gear,
chain, belt, roller, fan and other rotating parts.
Do not remove the cover unless it is specified.
If your hand or the like is caught and you can not move, ask someone around
you to turn off the air brake at once.
3
Chapter 1 Cautions for work
1.2 Countermeasure for static electricity when replacing and
maintaining the electrical parts
If an electronically charged human body touches electronic parts like PCBs, it may
adversely affect the electronic parts.
When handling the electronic parts, be sure to use static-dissipative conductive gloves to
prevent the components on the PCB from being damaged due to static electricity.
The static-dissipative conductive gloves are included in the spare parts of your machine.
When using the static-dissipative conductive gloves, be sure to turn off the air brake
and wait 15 seconds to carry out operation.
1.3 Handling chemicals
The work with the machine involves the handling of slightly poisonous, irritating and
etching substances, to apart from these, the user must ensure sufficient aeration. The air
in industrial workrooms should be exchanged at least 8 to 10 times per hour.
All photographic developers contain substances which may irritate the skin, the mucous
membrane and the eyes and which may cause allergic skin reactions affecting very
sensitive persons. For this reason, avoid long or repeated skin contact, especially with
developer solutions.
For all jobs where photographic processing solutions may splash, e.g. preparing and filling
in chemical solutions, cleaning processing racks etc.:
Wear protective gloves; rinse all solutions that get on the skin with plenty of
running water.
Wear industrial glasses.
Wash with soap and rinse with lots of water after completion of work.
Store chemicals and processing solutions in a safe place.
If a processing solution has been ingested accidentally, immediately rinse mouth with
water, and drink 2 or more cups of water and induce vomiting. Contact a physician as
soon as possible, and follow physician s instructions.
If processing solution gets into eyes, immediately rinse them under running water for at
least 15 minutes, and then contact a physician.
Processing solution stains on your clothing may result in discolouration or fading, when
handling processing solutions, wear clothing for work wear.
Photochemical are not allowed to be drained off into the public sewage system! Please
Chapter 1 Cautions for work
4
obtain the information about the regulations in force about the handling and correct
disposal of chemistry from the country s authorities in charge.
1.4 Storage
The chemicals should be stored and prepared according to the manufacture s information
and advice.
All Colour papers must always be stored in a cool and dry place.
The best storage temperature is between 2
and 10
.
Opened packages have to be stored at a relative humidity of 20-60%.
Storage at 20
over several days is possible without problems.
Storage temperatures above 30
alterations after only a few days.
should be avoided because they will cause visible
Chapter 2 Maintenance
This chapter contains items concerning maintenance necessary to make high
quality prints.
Chapter 2 Maintenance
6
Prologue
For a steady-going machine and making high quality prints, maintenance is very
important.
Maintenance needs to be performed regularly. Otherwise unexpected problems could
arise and the lifespan of the machine could be shortened.
Daily maintenance
Start-up the machine in a sequence.
Spray some fresh water on the upper rollers of the processing racks and the
cross-overs.
Morning test for all the paper magazines
Weekly maintenance:
ABCD calibration if necessary.
Change the STB water.
Clean the filters of the working tanks.
Clean the cross-overs.
Quarterly maintenance:
Uniformity calibration if necessary
Twister 4 calibration if necessary
Twister 16 calibration if necessary
Clean the tanks if necessary.
Check the replenishing pumps, circulation pumps and the pipes to avoid
potential chemical leakage.
Machine start-up sequence:
1.
Turn on the Linux PC.
2.
Turn on the Windows PC
3.
Wait until the Linux PC start-up finish.
4.
Turn on the Drive power.
Improper start-up of the machine could cause unexpected problems of the photos.
7
Chapter 2 Maintenance
Chapter 2 Maintenance
8
2.1 Morning setup
Purpose: To compensate the colour deviation caused by changes of chemicals, etc.,
keep colour output stabilized.
Precondition: Processing solution temperature has reached the set value.
There are two different morning setups, for normal format we simply take method
A---4 times morning setup, for HQ format we take method B----16 times morning setup. (In
factory, the default HQ format is over 8 inches).
Steps:
Method A
Run PhotoSmart.
Complete the Morning Color calibration.
Chapter 2 Maintenance
9
Method B
For HQ formats, you need16 times paper calibration, if you don t have HQ format, first you
need to create it (Refer to the following procedures).
Run maintenance > Formats
Click Create
Chapter 2 Maintenance
10
Select High Quality and click OK to complete.
Then you can do 16 times morning set up.
Same procedures as regular format Paper calibration, you go maintenance >
Color calibration, choose HQ and click Start to begin the calibration..
Chapter 2 Maintenance
11
2.2 Exposure centre (ABCD) calibration
Purpose: To calibrate the image exposure centre of the photo. In the case white border
appears on the photo, this calibration shall be performed for the corresponding formats of
the photos.
Steps:
Open Maintenance.
Select cassette offset.
Select formats and then click Send Test, then computer will send test prints for
the formats you selected.
After the test prints coming out, key in the A0, B0, C0, D0 value of the test prints
to the corresponding format s dialog box.
Click Save, click Send Test again, repeat the above step, until the deviation of A
and C, B and D value is within 2.
This calibration shall be done for each format and each cassette.
For example, if you have 2 cassettes with 152mm paper loaded which are cassette 01 and
cassette 02, you will need to do this calibration for the 152x102mm and 152x203mm
formats etc for both cassettes.
Chapter 2 Maintenance
2.3
12
Double exposure centre calibration
DL-2410 does double exposure for 152x102mm and 127x89mm formats
automatically. For a better understanding of double exposure, you can send 2 copies of
152x102mm format (152mm paper width) in PhotoSmart and then open the printer door
to watch the exposure procedure.
Usually this calibration has been done in the factory, no need to do again by the user.
Purpose: To calibrate the image exposure centre of the 152x102mm or 127x89mm
photos which are printed by double exposure mode, this calibration shall be performed
when white border appears on these photos while the ABCD calibration has been
completed for the corresponding formats.
Precondition: The ABCD calibration has been completed for the corresponding format.
Steps:
Open Maintenance, and then click cassette offset.
Choose 152x102mm or 127x89mm and Cuts: 02 , then click Send Test.
Chapter 2 Maintenance
13
The double exposure centre data is saved under the corresponding format ID in
the Linux Registry, so we need to do this calibration for both 152x102mm and
127x89mm formats.
After the test print coming out, select 1 in Photo, key in the A0, B0, C0, D0 and
A1, B1, C1, D1 value of the test prints to the corresponding format s dialog box.:
Click Save.
click Send Test again, repeat the above step, until the deviation of A and C, B
and D value is within 2.
If you have deleted the 152x102mm or 127x89mm format in Maintenance, the
double exposure centre data of the corresponding format will be lost.
Chapter 2 Maintenance
2.4
14
Temperature calibration
Purpose: To set up the temperature for each working tank according to the requirement of
the processing solution, and calibrate the actual temperature of each working tank to be
the same as its monitor display.
Precondition: The temperature of the processing solution has reached the set value.
Tools required: Thermometer with 0.1
definition.
Steps:
Turn on the machine.
In DL-2410 machine Windows PC, go E: \ 2410 \2410, click
Measure the temperature of each tank by thermometer, and then adjust the
appropriate trimmers on the Washcontrol PCB to get the display temperature
matching the actual temperature which is read out of the thermometer.
15
Chapter 2 Maintenance
Trimmer definitions of the Washcontrol PCB are as below:
Trimmer
Definition
VR2
CD
VR3
BF
VR4
STB1
VR5
STB2
VR6
STB3
VR7
Dryer
VR8
Room Temp.
VR8A
STB4
Select DL-2410 in LAB Model and Linux socket.
Take precaution when measuring to avoid chemical inter-contamination, when
reading the thermometer, leave the thermometer in the tank.
Chapter 2 Maintenance
2.5
16
Twister 4 calibration
A photo printed on a DL-2410 is composed of pixel matrix. DL-2410 uses a 2048 1536
resolution LCD for image making, so that for each time exposure, if there is a
1280 1024pixel matrix coming onto the photo.
Actually this resolution is not good enough for the photographic business, so that DL-2410
uses 4 or 16 times exposure technology to expose 4 or 16 times for each photo; a
2560x2048 or 3840x3072 pixel matrix will come onto the photo at the end.
During each time exposure the information on the LCD is different.
The position of each time exposure is controllable, the final result of the photo must be
composed of a uniformly distributed pixel matrix, if 2 pixels are close to each other too
much then there will be a overlapping effect so that it will come up the tiny horizontal or
vertical lines or grid lines on the photos.
Purpose: To remove the strong grid lines of the photos which are printed by 4 times
exposure mode, in the case the grid lines appear on these photos after several months,
this calibration shall be performed.
Tools required:
Magnifier (at least 8X)
152mm glossy paper
Steps:
1. Send a test print.
On the DL-2410 machine Windows PC run PhotoSmart.
Chapter 2 Maintenance
17
Run Maintenance and choose Grid Calibration.
Choose 04 and choose len 000 and format 6x8inch ..
Click Send Test .
2. On the central district of the test print, observe the joint point between the 01Y 02Y
pointer or the 02X 03X pointer and the square by magnifier.
An bad result as following example:
Chapter 2 Maintenance
18
Usually there are two lines beneath the 01 02Y pointer; the density of these 2 lines
shall be the same. Otherwise the 01 02Y line shall be moved to the direction of the
darker line.
Assuming the density of the left line is higher than the right line, the 01 02Y
pointer shall be moved leftwards. The left side of the 01 02Y line is a minus (-)
sign, therefore in the Grid Calibration the key 01Y and 02Y shall be decreased
the same value in the meantime, such as: -2.
Click Save .
Click Send Test to send a new test print, repeat the above adjustments until the
result is good.
The adjustment methods of 02X and 03X is similar.
Chapter 2 Maintenance
19
2.6
Twister 16 calibration
For big size photos, print resolution by 4 times exposure is not enough; DL-2410 hires 16
times exposure to offer a higher output resolution.
If HQ is selected in maintenance -> formats, this format will be printed by 16 times
exposure.
There is not necessary to apply 16 times exposure to small size formats such as
152x102mm etc, because 4 times exposure is good enough for these sizes while
exposure speed is much faster than 16 times exposure.
Purpose: To remove the strong grid lines of the photos which are printed by 16 times
exposure mode, in the case the grid lines appear on these photos after several months,
this calibration shall be performed.
Required: glossy paper
Steps:
1. Create a new format 457x150mm with HQ selected in maintenance -> formats.
2. Make ring around test prints.
On the DL-2410 machine Windows PC run PhotoSmart..
Run maintenance and choose Grid Calibration,
Choose 16 and adjust the value multip_X and multip_Y until satisfied (you may
make the increment or decrement 0.1)
Chapter 2 Maintenance
2.7
20
Uniformity calibration
Purpose: To calibrate the uniformity of colour or density to be the same at each district of
the photo; to remove the slight vertical lines on the photo.
If you print a photo from a neutral grey test film or a neutral grey test file, and the result is
uniform neutral grey at each district of the photo, then the density and uniformity of the
photo shall be good.
Usually there is a diffuser (mirror box) in film minilab, of which the function is to convert the
diffusive light emitted from halogen lamp to coherent light (parallel light), so as to get a
uniform neutral grey photo.
There is no diffuser in DL-2410. However the density uniformity result of the photo which
is printed from a neutral grey test file is perfect. This attributes to that DL-2410 adopts
software control the transmissivity of each LCD liquid crystal particle that is on LCD to
simulation the effect of a diffuser.
Mask file records the transmissivity correction of the LCD liquid crystal particles, of which
the file extension name is prn.
So the Mask file is a virtual diffuser.
Mask file is a total compensating result of exposure unit. There 4 lens in DL2410, so that
there are 4 Mask files needed for printing.
The Mask file shall be re-calibrated when the following event occurs:
Replace LED
Replace LCD
Replace LCD Driver board
Adjust LCD Driver board
Replace lens
Chapter 2 Maintenance
21
Slight vertical lines appear on the photos
Tools required:
A4 flatbed scanner which is with 24 bit colour and 600dpi scanning capability
Photoshop software
glossy paper
Format recommended: 305 x 356 (lens001), 457 x 508 (lens 000), 457 x 635
(lens002), other formats bigger are also applicable. (Resolution in scanning
500DPI)
Preconditions:
The scanner has been cleaned so that there is no dust or finger mark on it.
The Maintenance > Color Calibrations has been completed for the glossy
paper.
The scanner has been calibrated if necessary.
The scanner calibration shall be performed only if the deviation of the colour or density
between the scan image and the scan object are big.
If scanner is good, you can skip this step by just selecting a scanner profile from the list.
Steps of scanner calibration:
1. Finish the color calibration and create the right format for uniformity calibration
first.( Format recommended: 305 x 356 (lens000), 457 x 508 (lens 002), 457 x 635
(lens001), other formats bigger are also applicable. (Resolution in scanning: 500DPI.)
2. Open the Tabkor Processor software(E:\DL-2410\Scanner)
3. The main interface of the software as blew:
Chapter 2 Maintenance
4. First choose the Lens 000
Choose neuter mask and choose tabkor0 .
22
23
Chapter 2 Maintenance
Scanner resolution: 500DPI and 1x1 (or 1x2) in Block (depend on your scanner, A4
scanner use 1x2, A3 scanner use 1x1), then click send test to send the uniformity
test photo.
5. Scan this photo (resolution: 500DPI) and save as *.bmp, then use the Photoshop
software to remove the dust on the photo. (If you use the A4 scanner, you need scan
the photo to two parts.)
6. In the Tabkor processor software, choose File Load scan bmp First
Chapter 2 Maintenance
Find 4 group of the red sign point on the corner of the uniformity photo, hold press
Ctrl , and right click the red sign point as the picture below:
.
Then it will show the rectangular line as the picture below:
When you finish the fourth corner of red sign point, it will automaticlly show the mark
points on the picture:
24
Chapter 2 Maintenance
25
7. .In the Tabkor processor software, File
Action
Calculate to calculate the date:
You can see the progressing in the lower right corner (if you use the A4 scanner, you need
load second part and click the calculate to finish the calculattion)
Then go to File
Action
Creat mask , you will see a dialog box as below:
Chapter 2 Maintenance
26
Click send test to send the uniformity test photo again.
Click yes to send the calibration photo, and then repeat the steps above until you see the
uniformity calibration photo is equal.
8.
When Lens 000 s uniformity finish, choose lens 002 to continue the calibration.
If red border appears on the photo after scanning, check Clone stamp operation in
Photoshop, you may have to restart the calibration procedure from an early .prn file
which doesn t bring red border to the photos.
To restore an early .prn file to Linux PC before restarting the procedure:
Copy and paste the file into Linux PC \\10.1.1.1\tables folder from Windows PC
(assume that you have backup the early file to Windows PC).
Open Linux registry, specify etc/lens/001/tabkor, change the file name according to
the file you just copied, then click Save now.
Specify etc/lens/000/tabkor, change the file name according to the file you just
copied, and then click Save now.
The same is true for lens 001, at last copy lens 000 to 002. (000
002
001)
In factory, Uniformity Mask is calibrated by a special method-attach a special Lens below
the lens of DL-2410 to reduce the exposure image on the paper, this is the best way by
which you don t have to extend the border of the scan image by Photoshop, but focus
adjustment is needed during the factory procedure by a CCD camera. It is not possible
and not necessary for user to use the factory method, but in case of red border appear s
and not possible to be avoided, factory procedure shall be performed in stead of
Photoshop method.
Please ask dealer for further information.
Chapter 2 Maintenance
27
2.8
Replenishing system setup
Purpose: Setup the replenishing system to meet the requirement of the chemistry
instruction.
Tools required: Measuring cup/cylinder
Steps:
1.
Measure the flux of the CD replenishing pump.
Remove the left side cover of the machine, and then put the replenishing pipe
outlet to the Graduated cylinder or measuring cup.
Graduated
cylinder
Replenish hose
On Linux LCD panel, press any button of the top 4 buttons to enter following
interface:
Press the button on the left to Pumps to enter the following interface:
Chapter 2 Maintenance
28
Press the button on the right to regenerations to enter the following interface:
Press the button on the left to developer to run CD replenishing pump 30
seconds.
The replenishing pump runs 30 seconds and then stops automatically for
each time test.
For the first time measurement, if there is a little air inside the pipe, throw
away the chemistry and then test again.
After the pump stops, repeat running the pump, all together run the pump for 5
times.
Carefully put the replenishing pipe outlet back to the tank, and then read out the
total chemistry value of the measuring cup.
Calculate the average value of the CD replenishing flux for 30 seconds by
dividing the total value by 5.
2.
Input the CD replenishing flux into Maintenance.
Run Maintenance, and select Chemical Setting.
Input the CD replenishing flux value in Developer and then click Save.
Chapter 2 Maintenance
29
3.
Repeat for BF.
4.
Repeat for STB.
5.
In Maintenance > Chemical Setting setup the Regeneration does value depending
on the chemical specification you are using.
Chapter 2 Maintenance
6.
30
Please delete this section!! In Maintenance > Chemical Setting setup the
Regeneration does value depending on the chemical specification you are using.
If the daily print quantity is small, and you want to keep the chemical active, the
Regeneration doses value could be increased a little bit.
Chapter 2 Maintenance
31
2.9
Colour management-from monitor to photos
Purpose: to ensure the colour of the photos look as close as its preview on the monitor.
Preconditions:
Calibration with Densitometer has been performed..
3.1 DL-202Ps Densitometer
Standard ambient light has been installed in the Studio.
It is recommended to use Philips true colour fluorescent lamp as the standard
ambient light of the studio, ask Philips sales and service people for more information
about the fluorescent lamp selection and installation.
Work flow:
1.
Calibrate monitor.
If the monitors colour fidelity is good and support sRGB colour management, set the
monitor to the sRGB mode.
To see if the monitor s colour fidelity is good, Open Photoshop, the background
of Photoshop shall appear to be neutral grey.
Chapter 2 Maintenance
32
If the monitor supports sRGB colour management, sRGB mode can be set in the
monitor adjustment menu that is usually under colour management.
sRGB is the working colour space of PhotoSmart and most digital camera.
If the monitor colour fidelity is not good (for example: old monitor) or it does not
support sRGB colour management, first on the monitor adjustment menu set the
monitor colour management to 6500K, and then create an ICC profile for the monitor
by Adobe Gamma or other software.
Refer to related books of Photoshop for Adobe Gamma.
2.
Register paper profiles.
Paper profiles have been created in the factory for each brand and built in the Linux
PC. For user, just select the correct paper profiles for the cassettes when register the
cassettes, for example: cassette 01 is loaded Kodak paper, so that you shall register
cassette 01 as Kodak band.
Run maintenance.
Select paper roll installation and then click Next.
Select cassette numbers for registration.
Select paper profile for the cassette number which you have just selected.
Complete other registrations.
If the paper profiles is deleted or lost by accidental error, the corresponding
paper brand will not be available in the list of Paper roll installation. In this case,
backup all the calibration data of the machine, reinstall Linux system with Linux
recovery CD, and then restore all the calibration data.
3.2 Data backup and restore
3.3 Linux system backup and recovery
3.
Complete the morning setup.
2.1 Morning setup
4.
Print sample photos; compare the colour between the photos and the monitor preview.
If still not satisfied, use Cassette balance or Master balance for ultimate control.
Chapter 2 Maintenance
33
The colour could be managed from monitor to photos but they will not be 100%
the same. Photos and monitor interpret colour in different ways. Usually the photos
are more brilliant than the monitor preview since the photos belong to another colour
space which is bigger than sRGB and the colour has been transferred to a wider
range than sRGB during the printing and processing.
To use Cassette balance:
Run Maintenance.
Select Paper roll installation.
Select cassette number and then click Modify.
Change the values of C, M, Y, D, for example: + or -0.01.
Click Save.
To use Master balance:
Run Maintenance.
Select Lens Calibration.
Change the values of C, M, Y, D, for example + or -0.01.
Click Save.
After modifying the values, print sample photos again and repeat the above
procedure until satisfied.
Cassette balance only affects the colour of the photos of the given cassette.
Master balance affects the colour of the photos of all the cassettes.
Neither Cassette balance nor Master balance affects the test prints of the morning
setup.
Either Cassette balance or Master balance can be used for quick colour control
especially for black and white photos.
Chapter 3 Service
This chapter contains information for service personnel.
35
Chapter3 Service
Prologue
Take some time to read the manual and study the machine until you understand
everything well before you perform the service.
Ask somebody for help if you are not confident with the things you are going to do to avoid
serious problems.
Chapter3 Service
3.1
36
DL-202Ps Densitometer
Installation
The detail is as follows:
1.
Insert the installation CD of DL-202Ps densitometer, click Densitometer.msi to begin
installation wizard.
2.
Follow the installation wizard to complete installation.
3.
Connect densitometer to the computer. With a Beep sound and the green LED on,
the densitometer is detected by the computer (See Figure3-1).
Figure3-1
37
4.
Chapter3 Service
Insert the CD into CD-ROM. Click Install from a list or a specific location
(Advanced) and click Next (See Figure 3-2)
Figure3-2
5.
Put a tick before Search removable media (floppy, CD-ROM ) and click Next, the
system will search installation drive; Or, put a tick before Include this location in the
search and click Browse to open densitometer drive path and click Next to search
installation drive (See Figure 3-3)
Figure3-3
Chapter3 Service
Click Continue Anyway (see Figure 3-4 and Figure 3-5)
Figure3-4
Figure3-5
Click Finish to finish installation of USB drive (see Figure 3-6)
38
Chapter3 Service
39
Figure3-6
6.
System search again (see Figure 3-7)
Figure3-7
7.
Click Install from a list or a specific location (Advanced) and click Next (see
Figure 3-8)
Chapter3 Service
40
Figure3-8
8.
Repeat step 5 until serial port drive installation finishes (see Figure3-9, Figure 3-10
and Figure 3-11)
Figure3-9
Chapter3 Service
41
Figure3-10
Figure3-11
9.
Click Finish (see Figure 3-12)
Chapter3 Service
42
Figure3-12
10. After finishing the above steps, densitometer drive installation is finished (see Figure
3-13)
Figure3-13
11. Check densitometer serial port in Device Manager
Right click My Computer and select properties (see Figure 3-14)
43
Chapter3 Service
Figure3-14
Click Device Manager (see Figure 3-15)
Figure3-15
Click + before Ports (COM&LPT) and Universal Serial Bus controllers (see Figure
3-16)
Figure3-16
As you can see from the above, serial port and USB drive of densitometer installation is
finished. Its serial port is COM3.
Chapter3 Service
44
12. On the Windows PC, click Start, and then Run, and then key in \\10.1.1.1\winsoftware,
and then enter.
13. Run Config.
14. In Calibration port box, select the correct COM port number.
15. Click OK to close Config.
Show densitometer test value
1.
Open DL-202Ps User Interface (Usually in Windows PC E:\DoLi\Densimeter or
Windows Desktop Start -> Programs-> Doli -> Densitometer).
45
Chapter3 Service
Figure3-17
2.
Click Open>>> on the right side to open a pull-down menu; Select the corresponding
COM, you will hear beep sound and LED turns red (duration: about 0.5 S) from green
and turns green again; A scroll bar pops up (keep scrolling) and corresponding
information is displayed in the primary interface; Communication between
densitometer and its software is established. (see Figure 3-18)
Figure3-18
Chapter3 Service
3.
46
Primary interface: After successful communication, you can see the name, version,
product ID and corresponding information on the top.
4.
The respective value of red, green and blue LED will be displayed in their
corresponding areas.
5.
The next line is for hardware testing. Click R-Led to turn on red LED, you can check
from the bottom hole; the same is true of G-Led and B-LED. Click Buzzer to beep and
click any button to stop. Click G-Indicator and B-Indicator to turn on top indicator.
Calibration
The bottom line is for calibration. It is used with a calibration strip when densitometer has
deviation
Input the three values into the boxes according to calibration strip in left-right sequence.
Click Send Refer-value (W) to save (densitometer beeps). Put the aperture on white test
point, hold on to densitometer for about 6 seconds, the indicator on densitometer will flash
once, and then the values will be shown up at the RGB colour blocks.
Figure3-19
Figure 3-20
Calibration strip
Chapter3 Service
47
In calibration strip, the Test point is used for densitometer calibration; Calibration
value is the value of R, G and B of the test point. For the sake of getting correct color of
photo, please keep these areas clean! Keep calibration strip safe! Make sure no
scratch!
When measuring, the hole of the densitometer base should be placed right in the
middle of Test point.
Check calibration: After finishing the above step, position the densitometer on the white
test point. When the densitometer beeps, check the values. If there is great deviation, it
means the densitometer is not correctly calibrated. Repeat the above steps; if there is still
great deviation (deviation within 001-002 is acceptable), you can restore factory data; Go
to icon
, hold on to Ctrl key and left key of mouse. A dialogue box will pop up in 5
seconds (see Figure 3-21). Click OK.
Figure 3-21
Note: When densitometer data are corrupted or the deviation is unacceptable, first
restore factory data. If fault still remains, change a new densitometer. We
recommend you not to restore factory data frequently.
Open help file
Left click Help (Hotkey: F1) to pop up help file which contains detailed operation
instruction.
Chapter3 Service
3.2
Data backup and restore
Purpose:
To backup the calibration data to prevent unexpected data loss.
To restore the calibration data in case unexpected data loss occur.
Backup data every time before and after a major calibration is performed.
Steps of data backup:
1. On DL-2410 machine Windows PC create a new folder, name data backup.
2. Backup Linux Registry.
On the DL-2410 machine Windows PC click Start.
Click Run.
Key in \\10.1.1.1\win-software, and then enter.
Run Iregedit.
On the left top of the window click Registry.
Click Export all and then wait for a few seconds.
Specify data backup folder which you have just created, click OK.
3. Backup Mask files.
On DL-2410 machine Windows PC, click Start.
Key in \\10.1.1.1\tables and then enter.
Select all .prn files.
Copy and paste these files to data backup folder.
48
Chapter3 Service
49
Steps of data restore:
1. Restore Linux Registry.
On DL-2410 machine Windows PC, click Start.
Click Run.
Key in \\10.1.1.1\win-software.
Run Iregedit.
On the left top of the window click Registry.
Click Import
.
Specify the data file which you have backed up in the data backup folder,
click Open, and then wait a second.
2. Restore Mask files.
On the DL-2410 machine Windows PC, click Start.
Key in \\10.1.1.1\tables and then enter.
Copy and paste the Mask files which you have backed up in the data
backup folder to \\10.1.1.1\tables folder.
3. Completion
Run Maintenance.
Click System:
Click Update date, and then wait 5 minutes.
Chapter3 Service
3.3
50
Linux system backup and recovery
Purpose:
To make a whole Linux system backup by creating a Linux recover CD.
To restore Linux system from Linux recovery CD.
Linux recovery CD is an image of the hard disk of Linux PC. It includes all of the
calibration data of the machine (Fig 3.4.1).
Precondition: Nero has been installed to the DL-2410 machine Windows computer.
Steps of Linux system backup:
Run maintenance.
Click System, and then click Create backup ISO.
Chapter3 Service
51
Wait about 10 minutes; do not do anything to the machine.
On the DL-2410 Windows PC, click Start.
Click Run.
Key in \\10.1.1.1\queue and then enter.
Cut and paste the backup.iso file to Windows PC.
Burn this file to a blank CD by Burn image
of Nero.
Chapter3 Service
Steps of Linux system recovery:
52
53
Chapter3 Service
Open the front panel of the machine.
Connect a keyboard and a monitor to the Linux Server motherboard.
Turn the Linux PC power on, on the keyboard press Delete key to enter BIOS interface
(BIOS interfaces could be different depending on the motherboard model). Check the
following options:
Chapter3 Service
54
Chapter3 Service
55
The Linux mother board has two COM port, it is set as:
COM1: 2F8
COM2: 3E8
Usually the BIOS of the Linux PC motherboard has been configured in the factory,
only the First Boot Device shall be re-configured after installing the external CD-Drive.
Chapter3 Service
56
Steps:
Insert the Linux recovery CD to the CD-ROM of the Linux PC.
Press the Linux PC power button to turn Linux PC off.
Press the Linux PC power button again to turn Linux PC on.
Wait about 10 minutes, the Linux system will be recovered automatically, at this
time you can see the installation information on the Linux LCD Panel.
Finally you may be requested to enter a serial number, just press OK button on
the Linux LCD panel, and then wait till finish; If you see Clean up message, just
wait 5 minutes then go to next step.
Press the Linux PC power button to turn Linux PC off,
Press the Linux PC power button again to turn Linux PC on, and then eject the
Linux Recovery CD immediately (otherwise the Linux system will be recovered
again).
Chapter3 Service
57
3.4
Client PC setup
DL-2410 is a network printer. User can connect up to 253 clients PC to the Linux PC via
network.
PhotoSmart is the only software which can send orders to the Linux PC for
printing.
To setup PhotoSmart on each PC, a dongle (e.g. license) is needed.
The computers talk to each other by TCP/IP protocol on the network.
The IP address of the Linux PC is 10.1.1.1, and it is fixed and cannot be changed; the IP
address of client PC can be configured by user.
Purpose: To configure a new PC connected to DL-2410 machine for printing.
Precondition:
The network card has been setup on the new PC;
The new PC has been connected to the HUB via network cable.
Chapter3 Service
58
Things required:
A dongle for PhotoSmart
The dongle for PhotoSmart and the dongle for Linux PC are different and
cannot be exchanged.
Dongle driver
PhotoSmart setup program
The dongle driver program HASP-64 and the PhotoSmart setup program can be
found in the DL-2410 folder of the DL-2410 machine Windows PC hard disk.
The name of the dongle driver setup program could not be HASP-64, and the
name of PhotoSmart setup program could be not as the technical upgrade. Ask
the service people for the latest information.
A spare USB2.0 port of the new PC motherboard.
Steps:
1.
Configure IP address for a new PC.
On the new PC, click Start and point to settings, then open Control panel.
Open Network connections
Highlight Local Area Connection, and right click mouse, then select
Properties.
Highlight Internet Protocol (TCP/IP) and click Properties.
Chapter3 Service
59
Select Use the following IP address:, set the IP address and the Subnet mask
as the illustration below:
Click OK.
2.
Insert dongle to USB2.0 port of the motherboard.
3.
Run HASP-64 to install driver for the dongle.
Chapter3 Service
4.
Run PhotoSmart to Install PhotoSmart on the new PC.
5.
Set language file and Doli minilab model for the new PC.
On the new PC click Start and then Programs.
Find Doli folder and PhotoSmart folder, and then enter PhotoSmartConfig.
60
Chapter3 Service
61
Set Language file name to english.lng.
Select Machine type of current Doli minilab.
Click OK.
Chapter3 Service
3.5
62
Unilateral valve of replenishing pump cleaning and replacement
Purpose: To clean or replace a unilateral valve of a replenishing pump.
Tools required: Screw driver, container, protection glove.
To prevent chemical running over when cleaning or replacing a unilateral valve, use a
container to contain the chemical during operation.
Ware protection gloves during the operation to avoid chemical contact to your hands.
Steps:
1.
Remove machine back cover.
2.
Remove the fixation screws of the replenishing pump, and take out the replenishing
pump from the machine.
3.
Tweak out the cover of the replenishing pump, remove the inlet element and outlet
element (be care, chemical will run out).
Chapter3 Service
63
4.
Take out the unilateral valves and wash or replace them.
5.
Restore the inlet and outlet cover to the replenishing pump, make sure it is tight.
Make sure the unilateral valve has been installed to the correct direction.
6.
Screw down the fixation screws to restore the replenishing pump to the machine.
7.
Restore the back cover.
Chapter3 Service
3.6
64
Filter cleaning and replacement
Purpose: To clean or replace filters of working tank and to keep the chemical clean.
Dirty chemical can produce dirty photos.
Replace filter if necessary.
Tools required: Container.
Put a filter unit onto a container immediately after removing the filter from working
tank to prevent chemical splattering.
Steps:
1.
Take off the backside cover of a working tank, and take out the filter unit carefully.
2.
Clean the filter units bwith water or replace the filters.
To Replace a filter:
Remove cover, and remove the filter from the pole.
Clean the filter pole with water.
Install a new filter to the pole.
Restore the cover.
Chapter3 Service
65
3.
Restore the filter unit to the working tank.
4.
Restore the left side cover.
Chapter3 Service
3.7
66
Rack sleeve replacement
Purpose: To replace the sleeve of the rack.
The sleeve shall be replaced if it is damaged or Tran mutative or corrupted, or
soiled heavily. Otherwise it could cause paper overlapping or paper jam.
Tools required: Pliers, protection cushion.
Steps:
1.
Remove racks from working tank.
2.
Remove C type rings, gears and bearings on both sides of the rollers which are
included inside the sleeve.
3.
Remove the 3 rollers which are included inside the sleeve from the rack, and then
remove the sleeve.
4.
Replace the sleeve.
5.
Reassemble the 3 rollers into the rack.
6.
Restore bearings.
7.
Restore gears.
8.
Restore C type rings.
9.
Turn the double tooth gear anticlockwise to make sure the sleeve runs well.
67
10. Restore rack to machine.
Chapter3 Service
Chapter3 Service
3.8
68
Rack cleaning and examination
Purpose: To check and clean racks to prevent paper scratching, jamming, and paper
edge damage.
Tools required: Protection cushion,
, cotton cloth.
Steps:
1.
Take out rack from working tank.
2.
Clean rack with a fluffy brush and water to remove residuals from roller and gears.
When cleaning, rotate the double tooth gear to turn the rollers so that rack could
be cleaned thoroughly.
3.
Clean sleeve with a fluffy brush and water.
4.
Clean the crossovers with a cotton cloth and water.
Don t use brush to clean the cross over, the surface of the cross over is very
smooth, it could be damaged by brush or other hard objects that will cause paper
scratch.
5.
Check the following parts to be OK.
Springs
Rollers
Gears
C type rings
Sleeve
6.
Restore the rack and the cross-over to machine.
Chapter3 Service
69
3.9
Check and clean working tanks and pipes
Purpose:
To check working tanks and pipes in order to prevent potential chemical leaking.
To clean working tank in order to keep chemical clean.
For convenience, this check can be performed while replacing chemical.
Tools required: Protection cushion.
Steps:
1.
Connect a water pipe to the tap, place the other end of the pipe to a container and
turn the tap counter-clockwise to drain off chemical.
2.
Remove racks from working tank.
3.
Check all connectors of the pipes, which must be sealed reliably.
4.
Clean all working tanks using a fluff brush and water to remove residuals and stains.
5.
Add water to working tanks until level is OK and power on the machine to start
circulations for about 15 minutes, drain water. Repeat 1-3 times.
6.
Restore everything to the machine.
Chapter3 Service
3.10 Exposure platform disassembly
Precondition:
Paper has been rewind to paper magazine.
Machine has been shut down.
Tools required: Cross screw driver
Steps:
1.
2.
Open printer door.
Remove the 2 fixation screws of the exposure platform.
3.
Pull out the exposure platform.
70
Chapter3 Service
71
3.11 Raiser disassembly
Purpose: To disassemble raiser rack.
Tools required: None.
Steps:
1. Remove the sorter, take away the rack cover
2. Poke the hold-down plate
Hold-down plate
3. Take out the raiser
Chapter3 Service
72
3.12 Rack disassembly
Purpose: To disassemble racks.
Tools required: None.
Steps:
1. Remove the sorter, take away the rack cover
2. Take away the crossovers in sequence as follows
3. Put the chemical-proof cushion
4. Take out the racks in sequence as follows
N.B.: In order to avoid chemical inter-contamination, it is suggested to take out the rack
slowly in a sequence from STB to CD.
Chapter3 Service
73
3.13 Photo-receiver disassembly
Purpose: To disassemble photo-receiver.
Tools required: none.
Steps:
1. Before taking out the photo-receiver, pull out the aero-plug that connects to the
photo-receiver.
Aero plug
2. Move the photo-receiver away from the machine.
Fastener
Chapter3 Service
74
3.14 Divider disassembly
Purpose: To disassemble divider.
Tools required: screwdriver
Steps:
3.14.1 Unwind the paper, turn off the machine.
3.14.2 Open the door of exposure
3.14.3 Loose the screw and take it out.
When assembling the divider, just put the guide rail into the runner and make sure they in
position.
Chapter3 Service
75
3.15 How to replace ribbon cartridge
It is recommended to replace the ribbon cartridge when the back print becomes
dim.
Purpose: To replace ribbon cartridge
Tools required: screwdriver.
Steps:
1.
Open the door of exposure platform.
2.
Loose one screw and take out the diver (two screws)
3.
Take away the tension disc (two screws).
4.
Take out mounting rig (three screws)
5. Loose the thumb screw, take out the old ribbon cartridge and replace it with a
new one.
6. Put back the mounting rig.
N.B.: The distance between the pin and the upper steering deflector is around
0.4 mm. Put two pieces of paper between pin and upper steering deflector and fix
Chapter3 Service
the back printer, and then remove the paper.
7. Put back the tension disc.
8. Assemble back printer.
9. Put back transferring rack and close the door.
76
77
Chapter3 Service
3.16 Dryer rack disassembly
Purpose: To replace the dryer rack.
Tools required: screwdriver.
Steps:
1. Open the door of the dryer rack.
2. Loose two screws of the cover of the main motor.
Chapter3 Service
3. Pull out the dryer rack and poke up the black buckle as the illustration:
78
Chapter3 Service
79
3.17 Lens focus adjustment
Purpose: To adjust lens focus.
Tools required: Ellen key (could be found in the accessories of the machine), tapes.
Steps:
and loose the locking ring of the Lens.
1.
Open the printer door
2.
For each Lens there are 2 screws for locking the focus, unscrew the 2 screws by
Ellen key.
3.
Paste tape on the Lens below and above the locking ring, close the printer door and
send test print in PhotoSmart.
4.
Open the printer door, rotate the Lens at small increment and make test print again.
Make ring around test prints as the table below:
Test prints #
Angle of the Lens rotated
0
0
1
30 anticlockwise
2
30 clockwise
3
60 anticlockwise
4
60 clockwise
5
90 anticlockwise
6
90 clockwise
After the test prints comes out, mark the test prints immediately.
5.
Pick up the best test print.
Chapter3 Service
6.
Turn the Lens to the corresponding angle of the best test print.
7.
Screw down the 3 locking screws of the Lens and tighten the locking ring.
80
Chapter3 Service
81
3.18 Skew adjustment
Purpose: Adjust exposure head to correct angle of which the exposure image is parallel
with paper.
Tools required: Cross screw driver
Steps:
1.
Open the door of exposure head.
2.
There a 4 fixation screws (A) which fix the exposure head, and there 2 screws (B)
which lock the exposure head angle; loose all these 6 screws.
3.
Now exposure head can be rotated, try to rotate different angle and print test photo in
PhotoSmart, until satisfied.
4.
Screw down all these 6 screws.
If you only loose screw A without loosening screw B, then take out the exposure
head from the machine and put it back, the exposure head angle will not change.
Chapter3 Service
82
3.19 Image magnification calibration
Purpose: To calibrate the image magnification so that the image scale of photos and the
monitor preview is the same.
Steps:
1.
Print a test photo by PhotoSmart.
2.
Modify Linux Registry:
On Windows PC click Start, then Run, key in \\10.1.1.1\win-software then enter.
Open Iregedit.
Specify etc/lens/00x/magnification, note down the original value.
To enlarge the exposure image on the paper, decrease the value of
magnification (for example: -0.05); to reduce the exposure image on the paper,
increase the value of magnification (for example: +0.05); click Save now after
modify the value.
Specify etc/lens/000/magnification.
Modify the value to be the same as the value of etc/lens/001/magnification,
after modify the value, click Save now.
3.
Print test photo again, after photo coming out check magnification result, repeat the
above procedure until satisfied.
Chapter3 Service
83
3.20 LED assembly replacement
Precondition: The machine has been shut down.
Tools required: Short screw driver
Steps:
1.
On the Master-D103B PCB unplug the J4, J6, J10 and J11 plug.
2.
Open the door of exposure head, and then on the LED assembly remove the 2
fixation screws.
3.
Replace the LED assembly.
4.
Screw down the 2 fixation screws of the LED and plug in the J4 and J6 plugs to the
Master PCB.
5.
Redo morning test for all paper magazines.
Chapter3 Service
2.1 Morning setup
6.
Redo Uniformity Mask calibration.
2.7 Uniformity calibration
84
85
Chapter3 Service
3.21 Paper jam in cutter operation
Precondition: The machine has been shut down, paper is unwound.
Purpose: To remove the paper piece jammed inside the cutter.
Tools required: Cross screw driver
Steps:
1. Open the exposure platform door
2. Take out the upper guide from the entrance
Thumb screw
3. Cut the regulate part.
Chapter3 Service
86
87
Chapter4 Electrical Parts and Wiring Diagram
Chapter 4 Electrical parts and wiring diagram
This chapter describes the sensors and PCBs used in this machine and the wiring
diagram.
Chapter4 Electrical Parts and Wiring Diagram
4.1
ACControl-I102
J1
88
Chapter4 Electrical Parts and Wiring Diagram
89
Functions
Supply power to components that use AC 220V such as main processing motor, fans,
heaters, circulation pumps, replenishing pumps, control AC Contactor ON/OFF.
Adjustment for replacement
None
Disposition and description
Socket code
SN
Wire definition
Description
1
STBSUP
STB replenish pump control signal
2
BFSUP
BF replenish pump control signal
3
CDSUP
CD replenish pump control signal
4
STB3PUMP
STB3 circulation pump control signal
5
STB2PUMP
STB2 circulation pump control signal
6
STB1PIMP
STB1 circulation pump control signal
7
BFPUMP
BF circulation pump control signal
8
CDPUMP
CD circulation pump control signal
9
CABC
Sprinkling pump control signal
10
SORT-AC1
Standby
11
WASHS
Paper processor motor control signal
12
CDFANS
CD Cooling fan control system
13
STB4HS
STB4 heater control signal
14
STB3HS
STB3 heater control signal
15
STB2HS
STB2 heater control signal
16
STB1HS
STB1 heater control signal
17
BFHS
BF heater control signal
18
CDHS
CD heater control signal
19
DRYHS
Dryer heater control signal
J1
20
21
22
Chapter4 Electrical Parts and Wiring Diagram
Socket code
SN
Wire definition
Description
25
5V
5V power supply
26
5V
5V power supply
1
220V
AC220V Live wire
2
CD-P
CD circulation pump
3
BF-P
BF circulation pump
4
STB1-P
STB1 circulation pump
5
STB2-P
STB2 circulation pump
6
STB3-P
STB3 circulation pump
7
CD-S
CD replenish pump
8
BF-S
BF replenish pump
9
STB-S
STB replenish pump
23
24
J2
1
+5V
2
J3
Standby
3
DRYHS
4
1
220VIN
AC 220V live wire
DRY
Dryer heater
1
220V
AC220V Live wire
2
CDH
CD heater
3
BFH
BF heater
4
STB1H
STB1 heater
5
STB2H
STB2 heater
6
STB3H
STB3 heater
7
STB4H
STB4 heater
2
J4
3
4
J5
90
Chapter4 Electrical Parts and Wiring Diagram
91
Socket code
SN
Wire definition
Description
8
220V
AC 220V Live wire
1
220V
AC 220V Live wire
2
FAN
Standby
3
WASH
Paper processor motor
4
SORT1
Standby
5
CABC
Sprinkling pump
6
STB4-P
STB4 circulation pump
3
RELAY+
AC Contactor control signal +
4
RELAY-
AC Contactor control signal -
1
ACIN
AC 220V live wire
ACOUT
AC contactor control loop
J6
1
2
J7
J8
2
3
Chapter4 Electrical Parts and Wiring Diagram
WashControl-D107 PCB
J13
SW1
10
9
6
8
5
7
4
3
2
1
4.2
J11
92
Chapter4 Electrical Parts and Wiring Diagram
93
Functions
Receive temperature signal of working tanks and dryer from temperature sensors.
Receive level signal of working tanks, replenisher tanks and waste tanks from level
sensors.
Receive signal of sorter sensors.
Control temperatures of working tanks.
Adjustment for replacement
Set DIP switch to be the same as the previous board.
#
Factory default setting
1
OFF
2
OFF
3
OFF
4
OFF
5
OFF
6
OFF
7
OFF
8
ON
Re-adjust trimmers for temperature calibration.
2.4 Temperature calibration
Disposition and description
Socket code
SN
Wire definition
Description
GND
GND
1
2
J0
3
4
1
AC24 V1
2
AC24 V1
3
AC24 V2
4
AC24 V2
J1
AC 24V Power supply
1
J2
Main serial port
2
Chapter4 Electrical Parts and Wiring Diagram
Socket code
SN
Wire definition
Description
3
4
J3
J4
J5
J6
1
SLT1
2
SLR1
3
GND
1
SLT2
2
SLR2
3
GND
1
SLT3
2
SLR3
3
GND
1
+5V
2
STD2E
3
STD2A
Standby
Serial port2
Serial port3
Standby
+5V
J6A
STD3E
Standby
STD3A
+5V
J6B
STD4E
Standby
STD4A
I6C
J7
1
+5V
2
STD5E
3
STD5A
1
+5V
2
SRHE
3
SRHA
4
+5V
5
SR1E
Standby
Standby
94
Chapter4 Electrical Parts and Wiring Diagram
95
Socket code
J8
J9
J10
SN
Wire definition
Description
6
SR1A
1
WASHS
2
GND
3
GND
1
+5V
Power of sorter sensor
2
SR2E
Sorter sensor receiver
3
SR2A
Sorter sensor emitter
1
+5V
2
SR1E
3
SR1A
Standby
Standby
1
2
J12
Master Serial port
3
4
1
STBSUP
STB replenish pump control signal
2
BFSUP
BF replenish pump control signal
3
CDSUP
CD replenish pump control signal
4
STB3 PUMP
STB3 circulation pump control signal
5
STB2 PUMP
STB2 circulation pump control signal
6
STB1 PUMP
STB1 circulation pump control signal
7
BFPUMP
BF circulation pump control signal
8
CDPUMP
CD circulation pump control signal
9
CABC
Sprinkling pump control signal
10
SORT-AC1
Standby
11
WASHS
Paper processor motor control signal
12
CDFANS
CD cooling fan control signal
13
STB4HS
STB4 heater control signal
14
STB3HS
STB3 heater control signal
J13
Chapter4 Electrical Parts and Wiring Diagram
Socket code
96
SN
Wire definition
Description
15
STB2HS
STB2 heater control signal
16
STB1HS
STB1 heater control signal
17
BFHS
BF heater control signal
18
CDHS
CD heater control signal
19
DRYHS
Dryer heater control signal
STB4PUMP
STB4 circulation pump control signal
25
+5V
Power supply
26
+5V
Power supply
1
5V
CD temperature sensor 5V
2
CDT
CD temperature sensor signal
3
GND
CD temperature sensor shield
4
5V
BF temperature sensor 5V
5
BFT
BF temperature sensor signal
6
GND
CD temperature sensor shield
1
5V
STB1 temperature sensor 5V
2
STB1T
STB1 temperature sensor signal
3
GND
STB1temperature sensor shield
4
5V
STB2 temperature sensor signal
5
STB2T
STB2 temperature sensor signal
6
GND
STB2 temperature sensor shield
1
5V
STB3 temperature sensor 5V
2
STB3T
STB3 temperature sensor signal
3
GND
STB3 temperature sensor shield
4
5V
Dryer temperature sensor 5V
20
21
22
23
24
J14
J15
J16
Chapter4 Electrical Parts and Wiring Diagram
97
Socket code
J16A
SN
Wire definition
Description
5
DRYH
Dryer temperature sensor signal
6
GND
Dryer temperature sensor shield
1
+5V
STB4temperature sensor 5V
2
STB4T
STB4 temperature sensor signal
3
GND
STB4 temperature sensor shield
1
PACB
2
PACA
3
SR2B
4
SR2A
5
SR1B
6
SR1A
7
STBB
8
STBA
1
LSTB3
STB3 level sensor signal
2
GND
STB3 level sensor shield
3
LSTB2
STB2 level sensor signal
4
GND
STB2 level sensor shield
5
LSTB1
STB1 level sensor signal
6
GND
STB1 level sensor shield
7
LBF
BF level sensor signal
8
GND
BF level sensor shield
9
LCD
CD level sensor signal
10
GND
CD level sensor shield
1
WSTB
STB waste level sensor signal
2
GND
STB waste level sensor shield
3
SBF
BF waste level sensor signal
4
GND
BF waste level sensor shield
5
WCD
CD waste level sensor signal
Photo receiver motor
Sorter motor
J19
Standby
J20
J21
Chapter4 Electrical Parts and Wiring Diagram
Socket code
98
SN
Wire definition
Description
6
GND
CD waste level sensor shield
1
SSTB
STB replenishing level sensor signal
2
GND
STB replenishing level sensor shield
3
SBF
BF replenish level sensor signal
4
GND
BF replenish level sensor shield
5
SCD
CD replenish level sensor signal
6
GND
CD replenish level sensor shield
7
LSTB4
STB4 level sensor signal
8
GND
STB4 level sensor shield
J22
99
4.3
Chapter4 Electrical Parts and Wiring Diagram
CTRBoard-S102
CTRBoard-S102
Chapter4 Electrical Parts and Wiring Diagram
100
Functions
Supply power to paper loading step motor, exposure platform synch belt step motor,
and cutter motor.
Receive signal from paper inlet sensor, paper loading sensor, STA sensor, cutter
sensor, and start sensor.
Receive signal from paper magazine ID sensor.
Disposition and description
Socket code
J2
J3
SN
Wire definition
1
TXD
2
RXD
3
GND
1
RXD
2
TXD
3
GND
Description
STANDBY
Serial Communication11
1
AC24V1
24V power supply
AC24V2
24V power supply
1
GND
Divider Entrance Sensor GND
2
EntrySensor1
Divider Entrance Sensor Signal 1
3
EntrySensor2
Divider Entrance Sensor Signal 2
4
+5V
Divider Entrance Sensor Power Supply
1
GND
Divider Exit Sensor GND
2
ExitSensor1
Divider Exit Sensor Signal 1
3
ExitSensor2
Divider Exit Sensor Signal 2
4
+5V
Divider Exit Sensor Power Supply
1
GND
2
BPSensor1
3
BPSensor2
2
J4
3
4
J5
J6
J7
STANDBY
101
Chapter4 Electrical Parts and Wiring Diagram
Socket code
SN
Wire definition
4
+5V
1
GND
2
NC2Sensor1
J8
Description
STANDBY
3
NC2Sensor2
4
+5V
1
GND
Paper advance Encoder GND
2
GND
Paper advance Encoder GND
3
FDEncode2
Paper advance Encoder Signal
4
+5V
Paper advance Encoder Power Supply
1
GND
Platform Encoder GND
2
GND
Platform Encoder GND
3
PFEncode
Platform Encoder Signal
4
+5V
Platform Encoder Power Supply
1
GND
Paper Loading Sensor GND
2
LoadSensor1
Paper Loading Sensor Signal 1
3
LoadSensor2
Paper Loading Sensor Signal 2
4
+5V
1
GND
STA Sensor GND
2
CnSensor1
STA Sensor Signal 1
3
CnSensor2
STA Sensor Signal 2
4
+5V
STA Sensor Power Supply
1
GND
2
NC1Sensor
3
+5V
1
#4MagEcod1
2
#4MagEcod2
J10
J11
J12
J13
J14
Paper Loading Sensor Power Supply
STANDBY
STANDBY
J16
3
#4MagEcod3
4
#4MagEcod4
Chapter4 Electrical Parts and Wiring Diagram
Socket code
J17
J18
J19
102
SN
Wire definition
5
GND
1
#3MagEcod1
#3 cassette encode 1
2
#3MagEcod2
#3 cassette encode 2
3
#3MagEcod3
#3 cassette encode 3
4
#3MagEcod4
#3 cassette encode 4
5
GND
#3 cassette encode GND
1
#2MagEcod1
#2 cassette encode 1
2
#2MagEcod2
#2 cassette encode 2
3
#2MagEcod3
#2 cassette encode 3
4
#2MagEcod4
#2 cassette encode 4
5
GND
#2 cassette encode GND
1
#1MagEcod1
#1 cassette encode 1
2
#1MagEcod2
#1 cassette encode 2
3
#1MagEcod3
#1 cassette encode 3
4
#1MagEcod4
#1 cassette encode 4
5
GND
#1 cassette encode GND
1
GND
2
#4MagSensor1
3
#4MagSensor2
4
+5V
1
GND
#3 Cassette Sensor GND
2
#3MagSensor1
#3 Cassette Sensor Signal 1
3
#3MagSensor2
#3 Cassette Sensor Signal 2
4
+5V
#3 Cassette Sensor Power Supply
1
GND
#2 Cassette Sensor GND
2
#2MagSensor1
#2 Cassette Sensor Signal 1
3
#2MagSensor2
#2 Cassette Sensor Signal 2
4
+5V
#2 Cassette Sensor Power Supply
J20
Description
STANDBY
J21
J22
103
Chapter4 Electrical Parts and Wiring Diagram
Socket code
SN
Wire definition
Description
1
GND
#1 Cassette Sensor GND
2
#1MagSensor1
#1 Cassette Sensor Signal 1
3
#1MagSensor2
#1 Cassette Sensor Signal 2
4
+5V
#1 Cassette Sensor Power Supply
1
GND
Cutter Sensor GND
2
CutSensor1
Cutter Sensor Signal 1
3
CutSensor2
Cutter Sensor Signal 2
4
+5V
Cutter Sensor Power Supply
1
GND
2
MaskSensor1
3
MaskSensor2
4
+5V
1
GND
#1 Door Switch GND
2
DoorLock1
#1 Door Switch Signal
3
GND
#2 Door Switch GND
4
DoorLock2
#2 Door Switch Signal
1
GND
2
DividSensor1
3
DividSensor2
4
+5V
1
AC28V1
2
AC28V2
3
CUTA
4
CUTB
1
+5V
Power Supply
2
GND
GND
3
FDLCLK
Paper Advance Clock Signal
4
FDDIR
Paper Advance Clock Signal
J23
J24
J25
J26
J27
J28
J29
STANDBY
STANDBY
STANDBY
Chapter4 Electrical Parts and Wiring Diagram
Socket code
J30
J31
J32
J33
J34
104
SN
Wire definition
Description
5
FDLOCK
Paper Advance Lock Signal
1
+5V
Power Supply
2
GND
GND
3
PFCLK
Platform Motor Clock Signal
4
GND
Platform Motor Direction Signal
5
PFLOCK
Platform Motor Lock Signal
1
+5V
Power Supply
2
GND
GND
3
M1CLK
#1 Motor Clock Signal
4
M1DIR
#1 Motor Direction Signal
5
M1LOCK
#1 Motor Lock Signal
1
+5V
Power Supply
2
GND
GND
3
M2CLK
#2 Motor Clock Signal
4
M2DIR
#2 Motor Direction Signal
5
M2LOCK
#2 Motor Lock Signal
1
+5V
Power Supply
2
GND
GND
3
M3CLK
#3 Motor Clock Signal
4
M3DIR
#3 Motor Direction Signal
5
M3LOCK
#3 Motor Lock Signal
1
+5V
Power Supply
2
+5V
Power Supply
3
DPRINT1
Backprinter Output Signal 1
4
DPRINT2
Backprinter Output Signal 2
5
DPRINT3
Backprinter Output Signal 3
6
DPRINT4
Backprinter Output Signal 4
7
DPRINT5
Backprinter Output Signal 5
105
Chapter4 Electrical Parts and Wiring Diagram
Socket code
SN
Wire definition
Description
8
DPRINT6
Backprinter Output Signal 6
9
DPRINT7
Backprinter Output Signal 7
10
DPRINT8
Backprinter Output Signal 8
11
BPSEL1
Backprinter Control Choice A
12
BPSEL2
Backprinter Control Choice B
13
GND
14
GND
1
+5V
2
GND
3
M4CLK
4
M4DIR
5
M4LOCK
1
+5V
Power Supply
2
GND
GND
3
CUTCLK
Cutter Motor Clock Signal
4
CUTDIR
Cutter Motor Direction Signal
5
CUTLOCK
Cutter Motor Lock Signal
1
+5V
Power Supply
2
GND
GND
3
ENTRYCLK
Raiser Motor1 Clock Signal
4
GND
GND
5
ENTRYLOCK
Raiser Motor1 Lock Signal
1
+5V
2
GND
3
EXITCLK
4
GND
5
EXITLOCK
1
+5V
GND
J35
J36
J37
J38
J39
STANDBY
STANDBY
STANDBY
Chapter4 Electrical Parts and Wiring Diagram
Socket code
SN
Wire definition
2
GND
3
DIVIDCLK
4
DIVIDDIR
5
DIVIDLOCK
Description
STANDBY
106
4.4
Chapter4 Electrical Parts and Wiring Diagram
BPrintCPLD-S102
J4
J6
J3
J5
J7
107
Chapter4 Electrical Parts and Wiring Diagram
108
Disposition and description
Socket code
SN
Wire definition
1
A
2
B
3
C
4
D
1
A
Synchronous belt motor phase A
2
B
Synchronous belt motor phase B
3
C
Synchronous belt motor phase C
4
D
Synchronous belt motor phase D
1
A
#3 cassette motor phase A
2
B
#3 cassette motor phase
3
C
#3 cassette motor phase
4
D
#3 cassette motor phase
J1
J2
J3
Description
Standby
#
#
cassette motor phase A
cassette motor phase
J4
#
#
cassette motor phase
cassette motor phase
1
A
Paper-advancing motor phase A
2
B
Paper-advancing motor phase B
3
C
Paper-advancing motor phase C
4
D
Paper-advancing motor phase D
1
A
#2 cassette motor phase A
2
B
#2 cassette motor phase B
3
C
#2 cassette motor phase C
4
D
#2 cassette motor phase D
1
AC15V1
J5
J6
J7
Power supply
2
109
Chapter4 Electrical Parts and Wiring Diagram
Socket code
SN
Wire definition
3
AC15V2
1
A
2
B
3
C
4
D
1
BP1
Back printer pin1 Drive
2
BP2
Back printer pin2 Drive
3
BP3
Back printer pin3 Drive
4
BP4
Back printer pin4 Drive
5
BP5
Back printer pin5 Drive
6
BP6
Back printer pin6 Drive
7
BP7
Back printer pin7 Drive
8
BP+
9
BP+
1
BPP+
2
BPP+
3
BPP-
4
BPP-
1
+3.3V
Power supply + 3.3 V
2
DGND
DGND
3
+5V
Power supply + 5V
4
GND
Analog GND
5
GND
Analog GND
6
GND
Analog GND
7
VDD
Power supply of motor
8
VDD
Power supply of motor
1
CUTB
Cutter motor phase B
2
CUTA
Cutter motor phase A
J8
J9
J10
J11
J12
Description
Standby
Back printer pin Drive voltage
Back printer +
Back printer -
Chapter4 Electrical Parts and Wiring Diagram
Socket code
110
SN
Wire definition
3
AC24V2
4
AC24V1
1
CUT
Cutter control signal
2
BP1
Back printer pin1 control signal
3
BP2
Back printer pin2 control signal
4
BP3
Back printer pin3 control signal
5
BP4
Back printer pin4 control signal
6
BP5
Back printer pin5 control signal
7
BP6
Back printer pin6 control signal
8
BP7
Back printer pin7 control signal
9
BP8
Back printer pin9 drive control signal
10
BP9
Back printer pin1 control signal
11
BP10
Back printer pin2 control signal
12
BP11
Back printer pin3 control signal
13
BP12
Back printer pin4 control signal
14
BP13
Back printer pin5 control signal
15
BP14
Back printer pin6 control signal
16
BP15
Back printer pin7 control signal
17
BP16
Back printer pin9 drive control signal
18
M8_ENB
19
M8_CK
20
M8_DIR
21
M6_LOCK
#2 cassette motor brake control signal
22
M6_CLK
#2 cassette motor pulse control signal
23
M6_DIR
#2 cassette motor direction control signal
J14
Description
Power supply
standby
Paper-advancing motor brake control
24
25
M5_LOCK
signal
M5_CLK
Paper-advancing motor pulse control
111
Chapter4 Electrical Parts and Wiring Diagram
Socket code
SN
Wire definition
Description
signal
Paper-advancing motor direction control
26
M5_DIR
signal
27
M4_LOCK
#1 cassette motor brake control signal
28
M4_CLK
#1 cassette motor pulse control signal
29
M4_DIR
#1 cassette motor direction control signal
30
M3_LOCK
#3 cassette motor brake control signal
31
M3_CLK
#3 cassette motor pulse control signal
32
M3_DIR
#3 cassette motor direction control signal
33
M2_LOCK
Synchronous motor brake control signal
34
M2_CLK
Synchronous motor pulse control signal
Synchronous motor direction control
35
J17
J18
M2_DIR
signal
36
M1_LOCK
37
M1_CLK
38
M1_DIR
39
DGND
DGND
40
DGND
DGND
1
BP8
Back printer pin1 drive
2
BP9
Back printer pin2 drive
3
BP10
Back printer pin3 drive
4
BP11
Back printer pin4 drive
5
BP12
Back printer pin5 drive
6
BP13
Back printer pin6 drive
7
BP14
Back printer pin7 drive
8
BP+
9
BP+
1
BPP+
standby
Back printer pin drive voltage
Back printer motor +
Chapter4 Electrical Parts and Wiring Diagram
Socket code
SN
Wire definition
2
BPP+
3
BPP1-
4
BPP1-
Description
Back printer motor -
112
113
4.5
J1
Chapter4 Electrical Parts and Wiring Diagram
STEPPOWER-S101
J2
JP4
JP3
JP2
JP1
Chapter4 Electrical Parts and Wiring Diagram
Disposition and description
Socket code
SN
Wire definition
Description
AC32V1
Power Supply
AC32V2
Power Supply
1
2
J1
3
4
1
GND
GND
2
GND
J2
3
Power Supply
VDD
4
1
JP1
JP2
JP3
Power Supply
AC220V1
220V INPUT
3
AC220V2
220V OUTPUT
1
GND
PC GND
3
PC+12V
PC Power Supply
1
+24V
2
Magnet1
3
GND
1
GND
2
+12V
2
2
JP4
3
4
STANDBY
STANDBY
114
115
4.6
Chapter4 Electrical Parts and Wiring Diagram
Step Motor Driver_104
Step Motor Driver_104
J1
P2
Chapter4 Electrical Parts and Wiring Diagram
Disposition and description
Socket code
SN
Wire definition
Description
1
A
Motor Phase A
2
B
Motor Phase B
3
C
Motor Phase C
4
D
Motor Phase D
1
GND
GND
2
VDD
Power Supply 36V
1
VDD
2
VDD
3
GND
4
GND
5
VCC
Power Supply 3.3V
6
GND
GND
7
CLK
Clock Signal
8
DIR
Direction Signal
9
P.D
Lock Signal
10
H/F
Standby
P1
J1
Standby
Standby
P2
116
Chapter4 Electrical Parts and Wiring Diagram
117
PowerCtrl-I001
J1
AC15V2
AC15V1
AC9V1
AC9V2
J2
J3
KEY
KEY
GND
GND
J5
8
10
7
9
6
5
4
3
2
1
SW1
J6
SWTCH
SWTCH
B5V
B5V
J4
GND
RELAY
GND
ATX+
J7
GND
RXD
TXD
4.7
Chapter4 Electrical Parts and Wiring Diagram
Disposition and description
Socket code
J1
J2
SN
Wire definition
1
AC9V2
2
AC9V2
3
AC9V1
4
AC9V1
1
AC15V1
J6
J7
Power supply
Power supply
2
3
AC15V2
1
KEY
2
KEY
3
GND
4
GND
1
ATX+
2
GND
3
RELAY+
AC contactor control signal +
4
GND
AC contactor control signal GND
1
B5V
2
B5V
3
SWTCH
4
SWTCH
1
TXD
2
RXD
3
GND
J3
J4
Description
Boot-strap switch
Standby
Standby
Serial communication cable
118
Chapter4 Electrical Parts and Wiring Diagram
119
MASTER-D103B PCB
J1
4.8
J14
J15
J16
J10
J11
J12
J6
Chapter4 Electrical Parts and Wiring Diagram
Disposition and description
Socket code
J1
SN
Wire definition
1
AC24V1
2
Power supply
3
AC24V2
1
GND
2
5V
3
GND
4
20V
1
RED
Red light control signal
2
LEDS VCC
Power supply of LEDS
3
GND
GND
4
TERM
Temperature control signal
5
GREEN
Green light control signal
6
BLUE
Blue light control signal
J2
J4
7
J6
J7
J8
Description
Standby
Standby
8
VCC
Power supply
9
GND
GND
10
LS IMP1
Photo cell control signal
1
OUT FAN
Fan control signal
2
VCC
Power supply of fan
1
T1 A
2
T1 B
3
T1 NA
4
T1 NB
1
T2 A
2
T2 B
3
T2 NA
X-direction step motor drive
Y-direction step motor drive
120
121
Chapter4 Electrical Parts and Wiring Diagram
Socket code
SN
Wire definition
4
T2 NB
1
LT A
2
LT B
3
LT NA
4
LT NB
1
GND
2
T2 RST
3
5V
1
GND
2
T1 RST
3
5V
1
GND
2
LT RST
3
5V
1
GND
2
NC RST
3
5V
J9
J10
J11
J12
J13
Description
Lens turn-plate motor drive
y-direction step motor sensor
y-direction step motor sensor
Turn-plate sensor
standby
1
2
J14
3
standby
4
1
J15
2
Serial communication
3
1
J16
2
3
Serial communication
Chapter4 Electrical Parts and Wiring Diagram
4.9
LCD driver board Epson 14U
Disposition and description
Connector Name
function
DVI Port
Signal input; connect to DVI port of
Linux server video card.
50 pins socket
Signal output; connect to LCD.
4 pins socket
Switching Power supply input
10 pins socket
Programmed port
Functions
Translate signal from Linux PC video card to LCD.
Adjustment for replacement
Redo Morning setup for all paper magazines.
2.1 Morning setup
Redo uniformity calibration.
122
123
Chapter4 Electrical Parts and Wiring Diagram
2.7 Uniformity calibration
Don t touch the trimmers on board anytime unless you are requested and follow an
instruction. Otherwise it could cause serious photo problems.
Chapter4 Electrical Parts and Wiring Diagram
4.10 Sensors
124
125
Chapter4 Electrical Parts and Wiring Diagram
Illustration
Fig 4.1.1Receiver of photographic sensor
Fig 4.1.2 Transmitter of photographic sensor
Fig 4.1.. Paper magazine ID sensor
Fig 4.1.4 Level sensor
Chapter4 Electrical Parts and Wiring Diagram
Fig 4.2
Fig4.3
126
127
Chapter4 Electrical Parts and Wiring Diagram
Fig 4.4
Fig 4.5
Chapter4 Electrical Parts and Wiring Diagram
Fig 4.6
Fig 4.7
128
129
Chapter4 Electrical Parts and Wiring Diagram
Fig 4.8
You can test the function of the sensors in Labutil software.
Chapter4 Electrical Parts and Wiring Diagram
Description
Photo sensor name
Use
Paper magazine ID
photo sensor
For detecting paper magazine ID
Paper Inlet photo sensor
For detecting whether there is paper
Paper loading photo
sensor
For detecting if the paper is properly loaded
Cutter right photo sensor
For detecting cutter home position
Cutter left photo sensor
For detecting cutter home position
Exposure platform
counter photo sensor
For detecting the length of the paper cut
Backprinter photo sensor
For detecting whether the back printer is on or
off.
divider entrance photo
sensor
For detecting whether there is paper at the
entrance of divider
divider exit photo sensor
For detecting whether the paper comes into
the chemical or not
Temperature sensor
For detecting the temperature of CD, BF, STB
and dryer rack respectively.
Replenishing level
sensor
For detecting the level of CD,BF,STB
replenishing level respectively
Waste level sensor
For measuring the level of CD waste and BF
waste respectively
Sorter1 space pin sensor
For detecting the position where sorter1 stops
130
131
Chapter4 Electrical Parts and Wiring Diagram
4.11 Main source of power supply wiring diagram
Chapter4 Electrical Parts and Wiring Diagram
4.12 AC power supply wiring diagram
132
133
Chapter4 Electrical Parts and Wiring Diagram
4.13 Transformer wiring diagram
Chapter4 Electrical Parts and Wiring Diagram
4.14 Dryer wiring diagram
134
135
Chapter4 Electrical Parts and Wiring Diagram
4.15 Network sketch map
Connect
HUB
Dongle
Connect J15 of
Master board
Connect
liquid
crystal display
Chapter4 Electrical Parts and Wiring Diagram
136
Client computer Windows system
HUB
Densitometer
PS/2mouse
Dongle
Go J15 of Mast.
only LAB
board
software
PS/2keyboard
137
Chapter4 Electrical Parts and Wiring Diagram
4.16 Exposure part
Chapter4 Electrical Parts and Wiring Diagram
138
4.17 ACContrl-I002 wiring diagram
PE
PE
PE
PE
PE
PE
PE
PE
PE
PE
PE
PE
PE
2.0uF
PE
PE
2.0uF
PE
PE
2.0uF
PE
2.0uF
PE
2.0uF
PE
SPRAYING PUMP
AC Contactor
PE
139
Chapter4 Electrical Parts and Wiring Diagram
4.18 Washctrl-D107 wiring diagram
Chapter4 Electrical Parts and Wiring Diagram
140
4.19 CtrlBoard-S102 wiring diagram-1
Entry sensor of
divider rack
Exit sensor of
divider rack
STA sensor
Paper feeding encoder
Platform encoder
Cutter sensor
#3 cassette sensor
#1 cassette door switch
#2 cassette door switch
#2 cassette sensor
#1 cassette sensor
Chapter4 Electrical Parts and Wiring Diagram
141
4.20 CtrlBoard-S102 wiring diagram-2
Paper feeding motor
#1 cassette motor
#2 cassette motor
Platform motor
1
2
3
4
#3 cassette encoder
#3 cassette motor
1
2
3
4
#2 cassette encoder
Cutter motor
1
2
3
4
#1 cassette encoder
Cassette encoder
Divider motor
Chapter4 Electrical Parts and Wiring Diagram
4.21 PCB board wiring diagram
142
J1
GND
36V
StepMotor Driver_104
GND
GND
StepMotor Driver_104
36V
J1
36V
StepMotorDriver_104
36V
GND
36V
StepMotor Driver_104
GND
StepMotorDriver_104
36V
GND
GND
F1
J1
J1
J1
J1
T6.3 A
T3.1 5A
T2.5 A
StepMotor Driver_104
F2
T5A
F4
T5A
T5A
F5
F3
F6
36V
J1
10V/0.5A
StepMotorDriver_104
Small transformer
24V/5A
24V/8A
230V
220V
0V
120
240V
0V
220V
230V
42V/3A
0V
28V/8A
32V/8A
15V/4A
Big transformer
J2
J2
AC32V1
AC32V2
VDD
GND
AC32V1
AC32V2
STEPPOWER-S101
VDD
GND
STEPPOWER-S101
L5
N6
L3
N4
PE
J1
J1
J1
J2
J1
J1
J4
J1
AC9V2
AC9V1
AC15V1
AC15V2
AC24V1
AC24V2
AC24V1
AC24V2
AC24V1
AC24V2
AC24V1
AC24V2
PowerCtrl-I001
WashControl-D107
BPrintCPLD-S102
CTRBoard-S102
Master-D103
143
Chapter4 Electrical Parts and Wiring Diagram
4.22 Transformer wiring diagram
Chapter 5 Trouble shooting
This chapter describes how to solve the troubles.
145
Chapter 5 Trouble shooting
Prologue
Please check the error index for the error ID first, and then read the information of the
corresponding error ID for solving the problems.
The information of each error ID contains the possible reasons of the problem and the
corrective actions.
For more information, ask the distributor from whom you purchased the machine or report
to DOLI.
In most cases, problems are corrected through e-mail by our fully trained technical staff.
DOLI Technical Support can be reached at GMT 00:00-08:00, Monday through Friday.
E-mail address: [email protected]
Hotline: 0086 21 57648008
MSN: [email protected]
Skype: service_doli
We will need the following items for diagnosis:
Your machine number
A Brief description of the problems
Sample scan photos
We are committed to provide comprehensive after-sales support to assure the ongoing
success of our customers.
Chapter 5 Trouble shooting
5.1
Error index
Linux LCD Panel error messages
#
Description
003
Paper loading error
008
Cassette not setup
009
Blocked
030
Separator blocked
031
No connection with master
032
Tape failure
033
Display failure
034
Photo preparation failure
Photo problems
#
Description
700
Photo comes out not dry
701
Paper scratch
705
Photo comes out dirty
706
Image out of focus
707
Colour noise on the photo
708
Strong grid lines on the photo
709
Vertical lines on the photo
710
Colour or density Uniformity of the photo is no
good
711
Photos Chaos on sorter
712
White borders on the photo
713
Colour is very different with the monitor
preview
717
Paper length is shorter or longer than the
setting length of the corresponding format
718
Image magnification or scale does not match
the monitor preview
719
Photo overlapping
146
Chapter 5 Trouble shooting
147
Mechanical problems
#
Description
300
Paper has jammed in the cutter section
301
Paper can not be cut off
310
Replenishing pump doesn t work
311
Low replenishing flux
Electrical problems
#
Description
500
Linux recovery failure
501
Can not connect to printer
504
Processing solution doesn t warm up
505
Linux startup failure
Chapter 5 Trouble shooting
5.2
Corrective actions
003
1.
148
Paper loading error
The head of the paper roll is rugate.
Unwind paper and remove paper magazine.
Cut the rugate paper head with scissors.
Install paper magazine back onto machine.
2.
Paper has jammed in the cutter section.
300
Paper jam in cutter section
008
Cassette not setup
The current cassette has not been registered in Maintenance.
Run Maintenance.
Click Service, and then click cassettes.
Click New.
Click the number of the current cassette ID to register the current cassette.
009
Blocked
Replenish tank is low level, computer stop printing to avoid bad print quality.
Add replenish solution to the replenish tanks.
031
No connection with master
This message means no commutations between Linux PC and Master PCB.
1.
The processor has not been turned on.
Press the Drive button to turn the processor on.
2.
J15 or J16 plug of the Master PCB is loose.
Shut down the machine and check the J15 and J16 plug connection.
3.
The COM port plugs of Linux PC mother board are loose.
Shutdown the machine, on the Linux mother board check the COM port plugs
connections.
Chapter 5 Trouble shooting
149
4.
Master PCB is broken.
Replace Master PCB.
032
Tape failure
On Linux LCD panel Press C button.
033
1.
Display failure
J4 plug (supply power to LED) is disconnected or loose.
Plug in J4 plug.
2.
LED has is broke.
Replace LED.
3.20 LED assembly replacement
3.
Master D-103 PCB is broken.
Replace Master D-103 PCB.
034
Photo preparation failure
Paper has jam in raiser rack 1 or raiser rack 2.
Shut down machine, carefully check raiser rack 1 and raiser rack 2 and remove paper.
300
Paper jam in cutter section
3.21 Paper jam in cutter operation
301
Paper cannot be cut off
3.21 Paper jam in cutter operation
310
1.
Replenishing pump doesn t work
The power switch of the replenishing pump has been set to OFF.
On replenishing pump set power switch to ON.
Chapter 5 Trouble shooting
2.
150
Replenishing pump is broken.
Replace replenishing pump.
3.
ACControl PCB is broken.
Replace the ACControl-D101 PCB
311
1.
Low replenishing flux
Replenishing pump efficiency setup is not correct.
2.8 Replenishing system setup
2.
Regeneration doses setup is not correct.
2.8 Replenishing system setup
500
1.
Linux Recovery failure
The BIOS setting of Linux PC mother board is not correct.
Configure BIOS of Linux PC mother board.
3.3 Linux system backup and recovery
2.
Scratch on the CD or the CD is dirty.
Clean the CD.
3.
Motherboard model or video card model of Linux PC is not correct.
The hardware configuration of Linux PC cannot be changed to other models.
4.
Linux PC hard disk cable, CD-Drive cable, video card or memory bank are loose.
Check all these connections.
5.
The Linux hard disk or the Linux CD-Drive is broken.
Replace the hard disk or the CD-Drive.
501
Can not connect to printer
This message usually appears on the Windows PC monitor.
1.
The Linux PC has been shut down.
Chapter 5 Trouble shooting
151
Turn on the Linux PC and wait for Linux loaded.
2.
Network connection has been broken off.
Check network cables and connectors of HUB.
3.
IP address or Subnet mask of client PC is not correct.
Set IP address and Subnet mask of client PC.
3.4 Client PC setup
504
1.
Processing solution doesn t warm up
Fuse of heater has been broken.
Shut down machine and remove the back cover of the machine.
Check and replace fuse.
2.
Heater is broken.
Shut down machine, and use a multi meter to test the resistance between the
corresponding wire of AC Control PCB J4 plug and N6 wire.
Mark
definition
CDH
CD heater
BFH
BF heater
STB1H
STB1 heater
J5 plug of
ACControl
PCB
Chapter 5 Trouble shooting
STB2H
STB2 heater
STB3H
STB3 heater
STB4H
STB4 heater
152
The N6 wire can be found near the air switch:
If the test value is more than 400ohm then heater is broke.
Replace heater if it is broken.
3.
ACControl PCB is broke.
Replace ACControl PCB.
505
1.
Linux start-up failure
PCB and cable connection of Linux PC is loose during shipment.
Check Linux PC video card, memory bank shall be installed on the main board
properly, and the hard disk connection shall be good.
2.
Linux PC is affected by moisture.
Use a fan to dry Linux PC, and restart Linux PC after 15 minutes.
3.
Linux main board CMOS data is lost.
Connect a monitor and a keyboard to Linux PC main board. On keyboard press DEL
key when starting the Linux to enter CMOS, check the setting according to
requirement, and then save and exit.
Replace main board battery if necessary.
Chapter 5 Trouble shooting
153
3.3 Linux system backup and recovery
4.
Backup data and re-install Linux system and then restore data using Linux recovery
CD.
3.2 Data backup and restore
3.3 Linux system backup and recovery
700
1.
Photo comes out not dry
Working solution has not reached the setting temperature, so that dryer has not
started to work.
Wait for working solution temperature reach the setting temperature.
2.
Dryer temperature setting is too low.
Increase dryer temperature in Maintenance > Chemical setting > Temperatures .
3.
Dryer temperature is not correct.
Calibrate dryer temperature by LabUtil.
2.4 Temperature calibration
4.
Processing solution is dirty.
Dirty solution could cause sticky photos.
Clean or replace filters; clean racks and working tanks
3.6 Filter cleaning and replacement
3.8 Rack cleaning and examination
3.9 Check and clean working tanks and pipes
5.
Fuse of dryer is broken.
Shut down machine, remove back side cover of machine and then check and replace
the dryer fuse.
Chapter 5 Trouble shooting
6.
154
Dryer fan is broken.
Power supply of the dryer fan and main processing motor is parallel connection.
When racks are running, dryer fan shall run as well. Otherwise (if no airflow felt in the
dryer tank) dryer fan is broken.
Replace dryer fan.
7.
Dryer heater has been broken.
Shut down machine, and use a multi meter to test the resistance between the DRTT
wire of AC Control PCB J4 plug and N6 wire.
If the test value is around 220ohm then the dryer heater is OK.
If the test value is more than 500 ohm then the dryer heater is broken.
Chapter 5 Trouble shooting
155
Replace dryer heater if it is broken.
8.
ACControl PCB is broken.
Replace ACControl PCB.
701
1.
Paper scratch
Working solution is dirty.
Clean or replace filters; clean racks and working tanks
3.6 Filter cleaning and replacement
3.8 Rack cleaning and examination
3.9 Check and clean working tanks and pipes
2.
The edge of the crossover has been damaged.
Replace the damaged section of the cross over.
705
Photo comes out dirty
Working solution is dirty.
Clean or replace filters; clean racks and working tanks
3.6 Filter cleaning and replacement
Chapter 5 Trouble shooting
156
3.8 Rack cleaning and examination
3.9 Check and clean working tanks and pipes
706
1.
Image out of focus
Image of the source file is not sharp.
Try to apply 1 or 2 sharpness to the source file by PhotoSmart.
2.
Lens is out of focus.
Adjust focus of the lens.
Lens focus adjustment
707
1.
Colour noise on photos
Machine has not been start-up properly.
Shut down machine and start-up machine again properly.
Chapter 2 Maintenance > Prologue
2.
Linux PC video card is broken.
Replace the Linux PC video card.
708
Strong grid lines on photos
Re-calibrate twister 4.
2.5 Twister 4 calibration
709
Vertical lines on the photos
Uniformity shall be calibrated when Vertical lines appear on the photos, especially in light
or dark area.
2.7 Uniformity calibration
710
Uniformity of photo is not good
This problem can be identified easily on passport photos.
Chapter 5 Trouble shooting
157
Re-do Uniformity Mask calibration.
2.7 Uniformity calibration
712
1.
White borders on photos
Redo ABCD calibration for the corresponding format of photos.
2.2 Exposure centre (ABCD) calibration
2.
For 152x102mm or 127x89mm size, if white border still exist after ABCD calibration:
Check if paper length is too long.
Check double exposure centre.
2.3 Double Exposure Centre
3
Paper loading is broken.
Replace paper loading sensor.
713
Colour is very different from the monitor preview
2.9 Colour management-from monitor to photos
717
Paper length is longer or shorter than the setting length of
the corresponding format
In Maintenance -> formats, increase or decrease the format setting length by mm
manually, no need to change the format name.
718
Image magnification or scale does not match the monitor
preview
3.19 Image magnification calibration
719
Photo overlapping
Chapter 5 Trouble shooting
1.
Springs of the racks are loose.
Replace springs if it is broken.
3.8 Rack cleaning and examination
2.
Rubber sleeve of the racks is distorted.
Replace rubber sleeve.
3.7 Rack sleeve replacement
158
159
5.3
Chapter 5 Trouble shooting
LabUtil software
Click LabUtil icon to open the software (Usually go E:\DL-2410\LabUtil)
You can select either English of Chinese
You can choose the corresponding model for the machine
Chapter 5 Trouble shooting
160
Click button Connect to communicate with the software.
Note: 1. we recommend that you choose Window Socket (or COM1) which you need plug
out F15 plug on Master-D103B and insert PCF15 on it. 2. You need re-plug J15 back if the
test is finished.
Click button Connect to communicate with the software.
Chapter 5 Trouble shooting
161
After LAB connected successful information is displayed at the bottom bar, Linux system
will be shielded while any button of LCD display is being locked.
Function of main button Exposure DECK:
Exposure Time: Input numbers to simulate exposure LED is not on. Exposure
platform pause for a few seconds.
Repeat Count: Input the number of Repeat Count.
Paper Length: Input the length for current paper advancing
Paper space: Input numbers, it is the space between the two pieces of photo, e.g.:
2mm means the space in between photos is 2mm. This button valid only when
button Exposing Sheets is selected as double or Triple. The default is invalid.
Optical-axis Center: Input numbers and click.
Exposing Sheets: Select the sheets to exposure.
No Release for Prepare Paper: If this item is selected, the paper will pause on
exposure deck instead of going into processor.
Change Slot: Select the slot (paper cassette) you want and click button Change
Slot.
Paper Sensor Status: Test whether the sensors work normally. *01 means the
number of current cassette is 01, * means current cassette.
Test Cutter: Click this button and the cutter rotate once.
Test Carrier: Click this button and the divider runs a while
Sensor indicator description
Chapter 5 Trouble shooting
162
Type
With paper
Without paper
Correlation
Indicator light red
Indicator light green
Function of main button s of Processor:
Measure: Display current chemical temperature.
Setup Temp: Input the temperature you want to set, click button Setup
Temp.
Replenisher: Select the replenisher you want to test and click button Test.
Sorter Test: Click this button to start sorter and Sorter Homing Sensor
(indicator is red, when it stops, the indicator is green).
Main Motor: Click this button to start processing motor running within 1
minute while the indicator is red, when it stops, the indicator is green)
Chapter 5 Trouble shooting
163
Function of Program Timer:
Current Date/Time: The time of client computer.
LAB Date/Time: Time of Program timer.
Sync Time/Date: Synchronize the time of LAB Date/Time with that of
Current Date/Time.
Turn On/Time: Choose the day and input time, click button Setup to finish
setting.
Chapter 5 Trouble shooting
164
Change password
Click Firmware Updates menu, a dialogue box Pass Input will pop up. The initial
password is 1234 ; you can also customize the password.
Chapter 5 Trouble shooting
165
Firmware Updates
Select the PCB you want to update
Firmware Updates: You can check the version of the current PCB firmware and
that of the update; you can also check the versions of all current PCB firmware.
Chapter 5 Trouble shooting
166
Click button Update to update the firmware. (Better to restart the processor
button after one PCB firmware finishing updating).