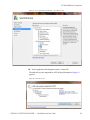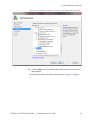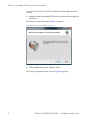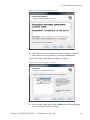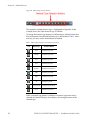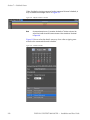
1
DISPLAY CONTENT
MANAGER
A MEDIAEDGE APPLICATION
Installation and User Guide
Software Version 1.10
February 18, 2010
DISPLAY CONTENT MANAGER — Installation and User Guide
2
Affiliate with the N.V. KEMA in The Netherlands
CERTIFICATE
Certificate Number: 510040.001
The Quality System of:
Thomson Inc, and its worLdwide Grass Valley division affiliates DBA
GRASS VALLEY
Headquarters
400 Providence Mine Rd
Nevada City, CA 95959
United States
15655 SW Greystone Ct.
Beaverton, OR 97006
United States
10 Presidential Way
Suite 300
Woburn, MA 01801
United States
Kapittelweg 10
4827 HG Breda
The Nederlands
7140 Baymeadows Way
Ste 101
Jacksonville, FL 32256
United States
2300 So. Decker Lake Blvd.
Salt Lake City, UT 84119
United States
Rue du Clos Courtel
CS 31719
35517 Cesson-Sevigné Cedex
France
1 rue de l’Hautil
Z.I. des Boutries BP 150
78702 Conflans-Sainte
Honorine Cedex
France
Technopole Brest-Iroise
Site de la Pointe du Diable
CS 73808
29238 Brest Cedex 3
France
40 Rue de Bray
2 Rue des Landelles
35510 Cesson Sevigné
France
Spinnereistrasse 5
CH-5300 Turgi
Switzerland
Brunnenweg 9
D-64331 Weiterstadt
Germany
Carl-Benz-Strasse 6-8
67105 Schifferstadt
Germany
Including its implementation, meets the requirements of the standard:
ISO 9001:2008
Scope:
The design, manufacture and support of video and audio hardware and software products and
related systems.
This Certificate is valid until:
This Certificate is valid as of:
Certified for the first time:
June 14, 2012
June 14, 2009
June 14, 2000
H. Pierre Sallé
President
KEMA-Registered Quality
The method of operation for quality certification is defined in the KEMA General Terms
And Conditions For Quality And Environmental Management Systems Certifications.
Integral publication of this certificate is allowed.
KEMA-Registered Quality, Inc.
4377 County Line Road
Chalfont, PA 18914
Ph: (215)997-4519
Fax: (215)997-3809
CRT 001 073004
Accredited By:
ANAB
DISPLAY CONTENT MANAGER — Installation and User Guide
4
DISPLAY CONTENT
MANAGER
A MEDIAEDGE APPLICATION
Installation and User Guide
Software Version 1.10
February 18, 2010
6
DISPLAY CONTENT MANAGER — Installation and User Guide
Contacting Grass Valley
International
France
United States/Canada
+800 8080 2020 or +33 1 48 25 20 20
24 x 7
Support Centers 24 x 7
Asia
+1 800 547 8949 or +1 530 478 4148
Hong Kong, Taiwan, Korea, Macau: +852 2531 3058 Indian Subcontinent: +91 22 24933476
Southeast Asia/Malaysia: +603 7805 3884 Southeast Asia/Singapore: +65 6379 1313
China: +861 0660 159 450 Japan: +81 3 5484 6868
Local Support
Australia and New Zealand: +61 1300 721 495
Central/South America: +55 11 5509 3443
Centers
(available
Middle East: +971 4 299 64 40 Near East and Africa: +800 8080 2020 or +33 1 48 25 20 20
during normal
Belarus, Russia, Tadzikistan, Ukraine, Uzbekistan: +7 095 2580924 225 Switzerland: +41 1 487 80 02
business hours)
S. Europe/Italy-Roma: +39 06 87 20 35 28 -Milan: +39 02 48 41 46 58 S. Europe/Spain: +34 91 512 03 50
Europe
Benelux/Belgium: +32 (0) 2 334 90 30 Benelux/Netherlands: +31 (0) 35 62 38 42 1 N. Europe: +45 45 96 88 70
Germany, Austria, Eastern Europe: +49 6150 104 444 UK, Ireland, Israel: +44 118 923 0499
Copyright © Grass Valley, Inc. All rights reserved.
This product may be covered by one or more U.S. and foreign patents.
Grass Valley Web Site
The www.grassvalley.com web site offers the following:
Online User Documentation — Current versions of product catalogs, brochures,
data sheets, ordering guides, planning guides, manuals, and release notes
in .pdf format can be downloaded.
FAQ Database — Solutions to problems and troubleshooting efforts can be
found by searching our Frequently Asked Questions (FAQ) database.
Software Downloads — Download software updates, drivers, and patches.
7
DISPLAY CONTENT MANAGER — Installation and User Guide
8
DISPLAY CONTENT MANAGER — Installation and User Guide
Contents
Preface. . . . . . . . . . . . . . . . . . . . . . . . . . . . . . . . . . . . . . . . . . . . . . . . . . . . . . . . . . . . . . . . . . . .
13
About This Manual . . . . . . . . . . . . . . . . . . . . . . . . . . . . . . . . . . . . . . . . . . . . . . . . . . . .
Display Content Manager Package Contents . . . . . . . . . . . . . . . . . . . . . . . . . . . . . .
Minimum System Requirements . . . . . . . . . . . . . . . . . . . . . . . . . . . . . . . . . . . . . . . .
Software Prerequisites . . . . . . . . . . . . . . . . . . . . . . . . . . . . . . . . . . . . . . . . . . . . . . . . .
Operating System . . . . . . . . . . . . . . . . . . . . . . . . . . . . . . . . . . . . . . . . . . . . . . . . . . .
Other Software . . . . . . . . . . . . . . . . . . . . . . . . . . . . . . . . . . . . . . . . . . . . . . . . . . . . . .
13
13
13
14
14
14
Section 1 — MediaEdge DCM Overview and Prerequisites
. . . . . . . . . . 17
MediaEdge Overview. . . . . . . . . . . . . . . . . . . . . . . . . . . . . . . . . . . . . . . . . . . . . . . . . .
Content Storage and Registration . . . . . . . . . . . . . . . . . . . . . . . . . . . . . . . . . . . . . .
Content Delivery . . . . . . . . . . . . . . . . . . . . . . . . . . . . . . . . . . . . . . . . . . . . . . . . . . . .
MediaEdge Streaming Capabilities. . . . . . . . . . . . . . . . . . . . . . . . . . . . . . . . . . . . .
Video-on-Demand (VOD). . . . . . . . . . . . . . . . . . . . . . . . . . . . . . . . . . . . . . . . . . .
Scheduled Playback . . . . . . . . . . . . . . . . . . . . . . . . . . . . . . . . . . . . . . . . . . . . . . . .
Live Broadcasting. . . . . . . . . . . . . . . . . . . . . . . . . . . . . . . . . . . . . . . . . . . . . . . . . .
Display Content Manager DCM Overview. . . . . . . . . . . . . . . . . . . . . . . . . . . . . . . .
Digital Signage Layouts . . . . . . . . . . . . . . . . . . . . . . . . . . . . . . . . . . . . . . . . . . . . . .
Supported Content Types. . . . . . . . . . . . . . . . . . . . . . . . . . . . . . . . . . . . . . . . . . .
Supported Playout Devices . . . . . . . . . . . . . . . . . . . . . . . . . . . . . . . . . . . . . . . . .
Other Notable DCM Features . . . . . . . . . . . . . . . . . . . . . . . . . . . . . . . . . . . . . . .
DCM Installation Prerequisites . . . . . . . . . . . . . . . . . . . . . . . . . . . . . . . . . . . . . . . . . .
Operating System . . . . . . . . . . . . . . . . . . . . . . . . . . . . . . . . . . . . . . . . . . . . . . . . . . .
Server Software . . . . . . . . . . . . . . . . . . . . . . . . . . . . . . . . . . . . . . . . . . . . . . . . . . . . .
Installing IIS and the FTP Server . . . . . . . . . . . . . . . . . . . . . . . . . . . . . . . . . . . . .
FTP Server Setup . . . . . . . . . . . . . . . . . . . . . . . . . . . . . . . . . . . . . . . . . . . . . . . . . .
17
18
18
19
19
20
20
20
20
22
23
24
24
24
24
26
41
Section 2 — DCM Software Installation. . . . . . . . . . . . . . . . . . . . . . . . . . . . . . . .
53
Software Prerequisites . . . . . . . . . . . . . . . . . . . . . . . . . . . . . . . . . . . . . . . . . . . . . . . . .
Operating System . . . . . . . . . . . . . . . . . . . . . . . . . . . . . . . . . . . . . . . . . . . . . . . . . . .
Other Software . . . . . . . . . . . . . . . . . . . . . . . . . . . . . . . . . . . . . . . . . . . . . . . . . . . . . .
Configurations Without MEDIAEDGE-SVS4 . . . . . . . . . . . . . . . . . . . . . . . . . . . . . .
Installation of the DCM Software on a PC. . . . . . . . . . . . . . . . . . . . . . . . . . . . . . .
Configurations Using MEDIAEDGE-SVS4 . . . . . . . . . . . . . . . . . . . . . . . . . . . . . . . .
Common Installation Procedures . . . . . . . . . . . . . . . . . . . . . . . . . . . . . . . . . . . . . .
Partial DCM Installation on Server. . . . . . . . . . . . . . . . . . . . . . . . . . . . . . . . . . . . .
Installation of DCM Client on Control PC. . . . . . . . . . . . . . . . . . . . . . . . . . . . . . .
Installation of All DCM Components on MediaEdge Server . . . . . . . . . . . . . . .
53
53
54
54
55
65
66
71
76
80
Section 3 — Getting Started with the DCM . . . . . . . . . . . . . . . . . . . . . . . . . . . .
89
Start the DCM Console. . . . . . . . . . . . . . . . . . . . . . . . . . . . . . . . . . . . . . . . . . . . . . . . . 89
DCM Console Overview . . . . . . . . . . . . . . . . . . . . . . . . . . . . . . . . . . . . . . . . . . . . . . . 91
Display Content Manager — Installation and User Guide
9
Contents
DCM Workflow . . . . . . . . . . . . . . . . . . . . . . . . . . . . . . . . . . . . . . . . . . . . . . . . . . . . . . 94
DCM Console Configuration . . . . . . . . . . . . . . . . . . . . . . . . . . . . . . . . . . . . . . . . . . . 96
Configure FTP Servers . . . . . . . . . . . . . . . . . . . . . . . . . . . . . . . . . . . . . . . . . . . . . . . 96
Configure Environment Settings . . . . . . . . . . . . . . . . . . . . . . . . . . . . . . . . . . . . . . 98
Configure Default Settings . . . . . . . . . . . . . . . . . . . . . . . . . . . . . . . . . . . . . . . . . . . 99
Close/Exit the DCM Console . . . . . . . . . . . . . . . . . . . . . . . . . . . . . . . . . . . . . . . . . . 106
10
Section 4 — Material Screen . . . . . . . . . . . . . . . . . . . . . . . . . . . . . . . . . . . . . . . . . .
107
Material Details. . . . . . . . . . . . . . . . . . . . . . . . . . . . . . . . . . . . . . . . . . . . . . . . . . . . . .
Material Type Display . . . . . . . . . . . . . . . . . . . . . . . . . . . . . . . . . . . . . . . . . . . . . . . .
Adjust Column Widths . . . . . . . . . . . . . . . . . . . . . . . . . . . . . . . . . . . . . . . . . . . . . . .
Change Material Type Display. . . . . . . . . . . . . . . . . . . . . . . . . . . . . . . . . . . . . . . . .
Change Display Style. . . . . . . . . . . . . . . . . . . . . . . . . . . . . . . . . . . . . . . . . . . . . . . . .
Manage Content Categories . . . . . . . . . . . . . . . . . . . . . . . . . . . . . . . . . . . . . . . . . . .
Select a Display Category . . . . . . . . . . . . . . . . . . . . . . . . . . . . . . . . . . . . . . . . . . .
Create a New Material Category . . . . . . . . . . . . . . . . . . . . . . . . . . . . . . . . . . . . .
Edit or Delete Categories . . . . . . . . . . . . . . . . . . . . . . . . . . . . . . . . . . . . . . . . . . . .
Assign Content to a Category . . . . . . . . . . . . . . . . . . . . . . . . . . . . . . . . . . . . . . . .
Register Material . . . . . . . . . . . . . . . . . . . . . . . . . . . . . . . . . . . . . . . . . . . . . . . . . . . .
Add Assets By Drag and Drop . . . . . . . . . . . . . . . . . . . . . . . . . . . . . . . . . . . . . . .
Add a Video Asset . . . . . . . . . . . . . . . . . . . . . . . . . . . . . . . . . . . . . . . . . . . . . . . . .
Edit Video Properties . . . . . . . . . . . . . . . . . . . . . . . . . . . . . . . . . . . . . . . . . . . . . . .
Add a Still Image Asset . . . . . . . . . . . . . . . . . . . . . . . . . . . . . . . . . . . . . . . . . . . . .
Edit Still Image Properties. . . . . . . . . . . . . . . . . . . . . . . . . . . . . . . . . . . . . . . . . . .
Create a New Ticker Asset . . . . . . . . . . . . . . . . . . . . . . . . . . . . . . . . . . . . . . . . . .
Edit Ticker Properties. . . . . . . . . . . . . . . . . . . . . . . . . . . . . . . . . . . . . . . . . . . . . . .
Add a Flash Asset . . . . . . . . . . . . . . . . . . . . . . . . . . . . . . . . . . . . . . . . . . . . . . . . . .
Edit Flash Properties . . . . . . . . . . . . . . . . . . . . . . . . . . . . . . . . . . . . . . . . . . . . . . .
Add a QuickTime Asset. . . . . . . . . . . . . . . . . . . . . . . . . . . . . . . . . . . . . . . . . . . . .
Edit QuickTime Properties . . . . . . . . . . . . . . . . . . . . . . . . . . . . . . . . . . . . . . . . . .
Add an HTML Asset . . . . . . . . . . . . . . . . . . . . . . . . . . . . . . . . . . . . . . . . . . . . . . .
Edit HTML Properties . . . . . . . . . . . . . . . . . . . . . . . . . . . . . . . . . . . . . . . . . . . . . .
Add an Audio Asset . . . . . . . . . . . . . . . . . . . . . . . . . . . . . . . . . . . . . . . . . . . . . . . .
Edit Audio Properties . . . . . . . . . . . . . . . . . . . . . . . . . . . . . . . . . . . . . . . . . . . . . .
Create a URI Asset . . . . . . . . . . . . . . . . . . . . . . . . . . . . . . . . . . . . . . . . . . . . . . . . .
Edit URI Properties. . . . . . . . . . . . . . . . . . . . . . . . . . . . . . . . . . . . . . . . . . . . . . . . .
Create a Serial Command . . . . . . . . . . . . . . . . . . . . . . . . . . . . . . . . . . . . . . . . . . .
Edit Serial Command Properties . . . . . . . . . . . . . . . . . . . . . . . . . . . . . . . . . . . . .
Create a Volume Asset . . . . . . . . . . . . . . . . . . . . . . . . . . . . . . . . . . . . . . . . . . . . . .
Edit Volume Properties . . . . . . . . . . . . . . . . . . . . . . . . . . . . . . . . . . . . . . . . . . . . .
Preview Material . . . . . . . . . . . . . . . . . . . . . . . . . . . . . . . . . . . . . . . . . . . . . . . . . . . .
Delete Material . . . . . . . . . . . . . . . . . . . . . . . . . . . . . . . . . . . . . . . . . . . . . . . . . . . . . .
Upload Registered Material to FTP Server. . . . . . . . . . . . . . . . . . . . . . . . . . . . . . .
Reset Upload Status . . . . . . . . . . . . . . . . . . . . . . . . . . . . . . . . . . . . . . . . . . . . . . . .
Download Material from FTP Server . . . . . . . . . . . . . . . . . . . . . . . . . . . . . . . . . . .
108
109
111
111
113
114
114
115
117
119
122
123
124
125
127
130
132
133
138
139
140
142
143
145
147
149
150
151
154
156
159
162
163
164
165
169
171
Section 5 — Layout Screen . . . . . . . . . . . . . . . . . . . . . . . . . . . . . . . . . . . . . . . . . . . .
173
Layout Details . . . . . . . . . . . . . . . . . . . . . . . . . . . . . . . . . . . . . . . . . . . . . . . . . . . . . . .
Manage Layout Categories . . . . . . . . . . . . . . . . . . . . . . . . . . . . . . . . . . . . . . . . . . . .
Open/Display Layouts by Category . . . . . . . . . . . . . . . . . . . . . . . . . . . . . . . . . .
Region Color Coding . . . . . . . . . . . . . . . . . . . . . . . . . . . . . . . . . . . . . . . . . . . . . . .
Create a New Layout Category . . . . . . . . . . . . . . . . . . . . . . . . . . . . . . . . . . . . . .
174
175
176
177
179
Display Content Manager — Installation and User Guide
Contents
Edit or Delete Categories . . . . . . . . . . . . . . . . . . . . . . . . . . . . . . . . . . . . . . . . . . . .
Create a Display Layout. . . . . . . . . . . . . . . . . . . . . . . . . . . . . . . . . . . . . . . . . . . . . . .
Define Layout Display Grid. . . . . . . . . . . . . . . . . . . . . . . . . . . . . . . . . . . . . . . . . .
Create a Display Region . . . . . . . . . . . . . . . . . . . . . . . . . . . . . . . . . . . . . . . . . . . . .
Copy and Paste a Region . . . . . . . . . . . . . . . . . . . . . . . . . . . . . . . . . . . . . . . . . . . .
Change Region Order . . . . . . . . . . . . . . . . . . . . . . . . . . . . . . . . . . . . . . . . . . . . . . .
Delete a Region . . . . . . . . . . . . . . . . . . . . . . . . . . . . . . . . . . . . . . . . . . . . . . . . . . . .
Undo a Region Operation . . . . . . . . . . . . . . . . . . . . . . . . . . . . . . . . . . . . . . . . . . .
Copy a Display Layout. . . . . . . . . . . . . . . . . . . . . . . . . . . . . . . . . . . . . . . . . . . . . . . .
Close a Layout . . . . . . . . . . . . . . . . . . . . . . . . . . . . . . . . . . . . . . . . . . . . . . . . . . . . . . .
Delete a Display Layout . . . . . . . . . . . . . . . . . . . . . . . . . . . . . . . . . . . . . . . . . . . . . . .
181
183
186
188
194
195
198
199
199
201
201
Section 6 — Playlist Screen . . . . . . . . . . . . . . . . . . . . . . . . . . . . . . . . . . . . . . . . . . .
203
Playlist Details . . . . . . . . . . . . . . . . . . . . . . . . . . . . . . . . . . . . . . . . . . . . . . . . . . . . . . .
Manage Playlist Categories . . . . . . . . . . . . . . . . . . . . . . . . . . . . . . . . . . . . . . . . . . . .
Open/Display Playlist by Category . . . . . . . . . . . . . . . . . . . . . . . . . . . . . . . . . . .
Create a New Playlist Category. . . . . . . . . . . . . . . . . . . . . . . . . . . . . . . . . . . . . . .
Edit or Delete Categories . . . . . . . . . . . . . . . . . . . . . . . . . . . . . . . . . . . . . . . . . . . .
Create a Playlist . . . . . . . . . . . . . . . . . . . . . . . . . . . . . . . . . . . . . . . . . . . . . . . . . . . . . .
Adjust the Playlist Time Scale . . . . . . . . . . . . . . . . . . . . . . . . . . . . . . . . . . . . . . . .
Assign Material to Playlist . . . . . . . . . . . . . . . . . . . . . . . . . . . . . . . . . . . . . . . . . . . . .
Material Color Coding . . . . . . . . . . . . . . . . . . . . . . . . . . . . . . . . . . . . . . . . . . . . . .
Adjust Region Column Width. . . . . . . . . . . . . . . . . . . . . . . . . . . . . . . . . . . . . . . . . .
Bin Window Display Settings . . . . . . . . . . . . . . . . . . . . . . . . . . . . . . . . . . . . . . . . . .
Copy a Playlist. . . . . . . . . . . . . . . . . . . . . . . . . . . . . . . . . . . . . . . . . . . . . . . . . . . . . . .
Edit a Playlist . . . . . . . . . . . . . . . . . . . . . . . . . . . . . . . . . . . . . . . . . . . . . . . . . . . . . . . .
Adjust Material Start Time and Length . . . . . . . . . . . . . . . . . . . . . . . . . . . . . . . .
Repeat a Component. . . . . . . . . . . . . . . . . . . . . . . . . . . . . . . . . . . . . . . . . . . . . . . .
Adjust Playlist Length . . . . . . . . . . . . . . . . . . . . . . . . . . . . . . . . . . . . . . . . . . . . . .
Cut, Copy and Paste Playlist Components . . . . . . . . . . . . . . . . . . . . . . . . . . . . .
Delete a Component . . . . . . . . . . . . . . . . . . . . . . . . . . . . . . . . . . . . . . . . . . . . . . . .
Undo a Component Operation . . . . . . . . . . . . . . . . . . . . . . . . . . . . . . . . . . . . . . .
Close a Playlist. . . . . . . . . . . . . . . . . . . . . . . . . . . . . . . . . . . . . . . . . . . . . . . . . . . . . . .
Delete a Playlist . . . . . . . . . . . . . . . . . . . . . . . . . . . . . . . . . . . . . . . . . . . . . . . . . . . . . .
Preview a Playlist . . . . . . . . . . . . . . . . . . . . . . . . . . . . . . . . . . . . . . . . . . . . . . . . . . . .
204
206
206
208
210
212
217
219
222
223
224
225
227
228
230
232
235
236
236
236
237
237
Section 7 — Schedule Screen . . . . . . . . . . . . . . . . . . . . . . . . . . . . . . . . . . . . . . . . .
239
Schedule Details . . . . . . . . . . . . . . . . . . . . . . . . . . . . . . . . . . . . . . . . . . . . . . . . . . . . .
Adjust the Schedule Time Scale . . . . . . . . . . . . . . . . . . . . . . . . . . . . . . . . . . . . . . . .
Select Schedule Date . . . . . . . . . . . . . . . . . . . . . . . . . . . . . . . . . . . . . . . . . . . . . . . . . .
Select Current Date . . . . . . . . . . . . . . . . . . . . . . . . . . . . . . . . . . . . . . . . . . . . . . . . .
Select Current Time. . . . . . . . . . . . . . . . . . . . . . . . . . . . . . . . . . . . . . . . . . . . . . . . .
Channel Management . . . . . . . . . . . . . . . . . . . . . . . . . . . . . . . . . . . . . . . . . . . . . . . .
Create a Playout Channel . . . . . . . . . . . . . . . . . . . . . . . . . . . . . . . . . . . . . . . . . . . .
Create a Command Channel . . . . . . . . . . . . . . . . . . . . . . . . . . . . . . . . . . . . . . . . .
Open a Channel . . . . . . . . . . . . . . . . . . . . . . . . . . . . . . . . . . . . . . . . . . . . . . . . . . . .
Adjust Channel Column Width. . . . . . . . . . . . . . . . . . . . . . . . . . . . . . . . . . . . . . .
Delete a Channel . . . . . . . . . . . . . . . . . . . . . . . . . . . . . . . . . . . . . . . . . . . . . . . . . . .
Update a Channel . . . . . . . . . . . . . . . . . . . . . . . . . . . . . . . . . . . . . . . . . . . . . . . . . .
View Channel Information. . . . . . . . . . . . . . . . . . . . . . . . . . . . . . . . . . . . . . . . . . .
Schedule Management . . . . . . . . . . . . . . . . . . . . . . . . . . . . . . . . . . . . . . . . . . . . . . . .
Assign Playlists to Playout Channel . . . . . . . . . . . . . . . . . . . . . . . . . . . . . . . . . . .
240
241
243
243
244
244
244
246
248
249
251
251
254
255
255
Display Content Manager — Installation and User Guide
11
Contents
12
Assign Commands to a Command Channel . . . . . . . . . . . . . . . . . . . . . . . . . . .
Bin Window Display Settings . . . . . . . . . . . . . . . . . . . . . . . . . . . . . . . . . . . . . . . .
Edit a Channel Schedule . . . . . . . . . . . . . . . . . . . . . . . . . . . . . . . . . . . . . . . . . . . .
Adjust Playlist Start Time and Length . . . . . . . . . . . . . . . . . . . . . . . . . . . . . . .
Repeat a Playlist . . . . . . . . . . . . . . . . . . . . . . . . . . . . . . . . . . . . . . . . . . . . . . . . .
Cut, Copy and Paste Playlists and Commands . . . . . . . . . . . . . . . . . . . . . . .
Delete a Playlist or Command. . . . . . . . . . . . . . . . . . . . . . . . . . . . . . . . . . . . . .
Undo a Component Operation . . . . . . . . . . . . . . . . . . . . . . . . . . . . . . . . . . . . .
Copy a Schedule . . . . . . . . . . . . . . . . . . . . . . . . . . . . . . . . . . . . . . . . . . . . . . . . . . .
Delete a Schedule . . . . . . . . . . . . . . . . . . . . . . . . . . . . . . . . . . . . . . . . . . . . . . . . . .
Export a Schedule . . . . . . . . . . . . . . . . . . . . . . . . . . . . . . . . . . . . . . . . . . . . . . . . . .
Copy Exported Schedule and Material . . . . . . . . . . . . . . . . . . . . . . . . . . . . . . . .
259
263
264
264
266
269
269
270
270
273
275
280
Section 8 — Target Screen . . . . . . . . . . . . . . . . . . . . . . . . . . . . . . . . . . . . . . . . . . . .
281
Target Object Details . . . . . . . . . . . . . . . . . . . . . . . . . . . . . . . . . . . . . . . . . . . . . . . . .
Target Object Display Area . . . . . . . . . . . . . . . . . . . . . . . . . . . . . . . . . . . . . . . . . .
Target Object Details Area. . . . . . . . . . . . . . . . . . . . . . . . . . . . . . . . . . . . . . . . . . .
Server Object Details. . . . . . . . . . . . . . . . . . . . . . . . . . . . . . . . . . . . . . . . . . . . . .
Group Object Details . . . . . . . . . . . . . . . . . . . . . . . . . . . . . . . . . . . . . . . . . . . . .
Client Object Details . . . . . . . . . . . . . . . . . . . . . . . . . . . . . . . . . . . . . . . . . . . . . .
Create a Server Object . . . . . . . . . . . . . . . . . . . . . . . . . . . . . . . . . . . . . . . . . . . . . . . .
Edit a Server Object . . . . . . . . . . . . . . . . . . . . . . . . . . . . . . . . . . . . . . . . . . . . . . . . . .
Create a Group Object . . . . . . . . . . . . . . . . . . . . . . . . . . . . . . . . . . . . . . . . . . . . . . . .
Edit a Group Object . . . . . . . . . . . . . . . . . . . . . . . . . . . . . . . . . . . . . . . . . . . . . . . . . .
Create a Client Object . . . . . . . . . . . . . . . . . . . . . . . . . . . . . . . . . . . . . . . . . . . . . . . .
Edit a Client Object. . . . . . . . . . . . . . . . . . . . . . . . . . . . . . . . . . . . . . . . . . . . . . . . . . .
Delete a Target Object . . . . . . . . . . . . . . . . . . . . . . . . . . . . . . . . . . . . . . . . . . . . . . . .
Manually Update Servers and Groups . . . . . . . . . . . . . . . . . . . . . . . . . . . . . . . . . .
282
283
285
285
287
288
288
291
293
299
301
303
304
304
Appendix A — Limitations . . . . . . . . . . . . . . . . . . . . . . . . . . . . . . . . . . . . . . . . . . . . .
309
Simultaneous Playback Limitations . . . . . . . . . . . . . . . . . . . . . . . . . . . . . . . . . . . .
HDMA-4000/HDMA-4100/STB3/STB4/STB4H . . . . . . . . . . . . . . . . . . . . . . .
SWT3-DS/SWT4 . . . . . . . . . . . . . . . . . . . . . . . . . . . . . . . . . . . . . . . . . . . . . . . . . . .
Overlapping Playlist Content . . . . . . . . . . . . . . . . . . . . . . . . . . . . . . . . . . . . . . . .
Layout Limitations . . . . . . . . . . . . . . . . . . . . . . . . . . . . . . . . . . . . . . . . . . . . . . . . . . .
HDMA-4000/HDMA-4100/STB3/STB4/STB4H . . . . . . . . . . . . . . . . . . . . . . .
SWT3/SWT4 . . . . . . . . . . . . . . . . . . . . . . . . . . . . . . . . . . . . . . . . . . . . . . . . . . . . . .
Layout Regions . . . . . . . . . . . . . . . . . . . . . . . . . . . . . . . . . . . . . . . . . . . . . . . . . . . .
Playlist Limitations . . . . . . . . . . . . . . . . . . . . . . . . . . . . . . . . . . . . . . . . . . . . . . . . . .
Schedule Limitations . . . . . . . . . . . . . . . . . . . . . . . . . . . . . . . . . . . . . . . . . . . . . . . . .
309
309
310
310
310
310
311
311
311
311
Index . . . . . . . . . . . . . . . . . . . . . . . . . . . . . . . . . . . . . . . . . . . . . . . . . . . . . . . . . . . . . . . . . . . . .
313
Display Content Manager — Installation and User Guide
Preface
About This Manual
This manual describes the installation and operation of the Display
Content Manager (DCM) software only. It is not a comprehensive MediaEdge system manual. Other components of a MediaEdge system such as
the MediaEdge-SVS4 server software, set top box hardware, SWT4 software playout application, encoders, etc. are discussed in manuals specific
to those products.
Display Content Manager Package Contents
The DCM package contains the following:
•
Software DVD-ROM in a sealed envelope - this disc contains all software for installing the DCM as described in DCM Software Installation
on page 53.
Note
Prior to opening the software disc envelope, please read the License Agreement. Opening the software envelope constitutes an acceptance of the terms
and conditions of the License Agreement
•
Installation and User Guide - this manual
•
License Agreement
Minimum System Requirements
Computers on which the DCM software will be installed must meet the following minimum system requirements:
•
CPU:
•
Intel® Pentium® 4 3 GHz or faster if not using playlist preview
•
Intel® Core2Duo 2 GHz or faster if using playlist preview.
Note
CPU must support the SSE2 instruction set. The DCM and Status Monitor
applications will not launch if the CPU does not support SSE2.
DISPLAY CONTENT MANAGER — Installation and User Guide
13
Preface
•
RAM:
•
1 GB or more with Windows® XP
•
2 GB or more with Windows® Vista
•
40 GB or more available hard drive space.
•
Windows® Vista Business/Enterprise/Ultimate (Service Pack 1 or
later), Windows® XP (Service Pack 3)
•
Internet Explorer 6.x or above
•
Graphics card with hardware-based DirectDraw overlay
•
Display resolution of 800x600 (SVGA)
Note
The recommended resolution is 1920x1080 or1920x1200 (WUXGA) for
viewing HD content and for playlist preview. All screen shots in this manual
were produced on a 1920x1200 pixel display.
•
100Mbps Ethernet network card
•
One free USB port
•
Soundcard
Software Prerequisites
Prior to installing the DCM software, verify that the recommended operating system and other necessary software is installed on any machine on
which the DCM will be installed. See DCM Installation Prerequisites on
page 24 for more information.
Operating System
The following Windows Operating Systems and Service Pack revisions are
recommended when using MediaEdge Server and DCM software:
•
Windows Server 2008 with SP2 or Windows Server 2008 R2 (MediaEdge SVS4 Servers)
•
Windows XP with SP3 (DCM/Control PCs)
•
Windows Vista with SP2 (DCM/Control PCs)
Other Software
Before proceeding with the DCM software installation, verify that Internet
Information Services (IIS) and an FTP server are properly installed and configured on your MediaEdge server or desktop PCs.
14
DISPLAY CONTENT MANAGER — Installation and User Guide
Preface
See Server Software on page 24 for more information on installing and configuring IIS and the FTP server.
If not already installed, SQL Server 2005 Express Edition will be installed
by the MediaEdge-SVS4 or Display Content Manager installers.
DISPLAY CONTENT MANAGER — Installation and User Guide
15
Preface
16
DISPLAY CONTENT MANAGER — Installation and User Guide
Section
1
MediaEdge DCM Overview
and Prerequisites
MediaEdge Overview
MediaEdge is a multi-channel, multi-location video delivery system using
standard TCP/IP networks and display devices. The flexible, modular
design of the MediaEdge System offers a cost-effective method for distributing video content to multiple PC and set-top box clients. Content
delivery capabilities include pre-programmed playback, live streaming of
video broadcasts and full-featured interactive video-on-demand services.
In order to accommodate various content distribution and playout scenarios, a MediaEdge system can be a simple system with local content
storage and playout to one or more devices or a multi-site system spanning
multiple world-wide time zones and encompassing many networks,
playout devices and content displays of various types.
A simple single-server MediaEdge network is illustrated in Figure 1.
DISPLAY CONTENT MANAGER — Installation and User Guide
17
Section 1 — MediaEdge DCM Overview and Prerequisites
Figure 1. Single Server MediaEdge Network
Set-top-box client
Set-top-box client
Set-top-box client
Live Encoder
(MVRD4000)
Live Encoder
(MVRD4000)
MediaEdge Server
DCM Control PC
Live Encoder (LEB)
Live Encoder (LEB)
Software client
Software client
Content Storage and Registration
Pre-encoded MPEG-2 (including HD) and MPEG-4 (H.264) content is
stored and registered on a MediaEdge server running MediaEdge-SVS4
server software. Live footage from HDV and analog video sources can also
be fed into the MediaEdge server; analog video being encoded into MPEG
format in real-time via the MediaEdge-LEB video encoding device or other
optional MPEG encoding solutions designed for MediaEdge.
Content Delivery
Once registered on the MediaEdge server, video content can be delivered
to various PCs on the network and displayed using MediaEdge-SWT4
client software. Content can also be distributed to MediaEdge-STB4 and
STB4H set-top boxes to be displayed on video boards, television monitors,
LCD screens and other display devices.
A multi-site MediaEdge system is illustrated in Figure 2. In this illustration,
a DCM Control PC is present in the Central MediaEdge Site. This single
18
DISPLAY CONTENT MANAGER — Installation and User Guide
MediaEdge Overview
instance of the DCM can manage content and digital signage layouts for all
MediaEdge servers and playout devices in the MediaEdge system
Figure 2. Multi-Site MediaEdge System
MediaEdge Streaming Capabilities
MediaEdge facilitates content delivery in the following three modes:
Video-on-Demand (VOD)
VOD client users may select video clips stored on the server for viewing,
either from a dynamically updating menu, or through direct channel
number selection via the remote control. The user can pause, stop and
resume viewing content at any time. Content chapter points can be created
for faster navigation, and clients can fast-forward or rewind video clips
during playback.
DISPLAY CONTENT MANAGER — Installation and User Guide
19
Section 1 — MediaEdge DCM Overview and Prerequisites
Scheduled Playback
Scheduled playback allows an unlimited number of users to view a pre programmed arrangement of multiple video clips. The MediaEdge server can
have multiple scheduled “channels” running simultaneously, with set
program times scheduled to run hourly, daily or monthly. MediaEdge settop box users can surf channels by simply using the remote control. MediaEdge software clients have the same functionality from within a Web
browser.
Live Broadcasting
MediaEdge can utilize the real-time encoding capability of MediaEdgeLEB4 encoding devices to transmit live external SD video sources such as
cameras, VCRs and DVD players as professional-quality MPEG-2 or MPEG
4 (H.264) streams to multiple clients with minimal delay. With this feature,
MediaEdge can retransmit externally broadcast sources such as television
and satellite feeds. Such content, once MPEG encoded, may also be
recorded for later viewing or scheduling. MediaEdge systems also support
live streaming of HD video from HDV cameras and decks when connected
to the MediaEdge server via IEEE 1394 FireWire. As with external SD video,
HDV footage can be streamed live or recorded for later use.
Display Content Manager DCM Overview
The Display Content Manger is a software tool that expands the feature set
of a MediaEdge system and provides support for full digital signage capabilities. Rather than simply playing video on a monitor, the DCM provides
a MediaEdge system with comprehensive information delivery capabilities
which include video, still images, ticker text (horizontal or vertical), time
and temperature updates, news feeds, etc.
Digital Signage Layouts
A wide variety of content and multiple digital signage layouts can be
managed and delivered to multiple playout devices on the MediaEdge network.
The digital signage layout shown in Figure 3 is an example of a multipleregion layout in which video, still images and scrolling ticker text are incorporated into a single display.
In this example, three display regions have been defined in which content
may be displayed; however, there is no relationship between the region
labels and any actual content. The same layout may be used to deliver a
variety of unique content to different playout devices.
20
DISPLAY CONTENT MANAGER — Installation and User Guide
Display Content Manager DCM Overview
Note
Although the region labels in this example indicate the support for scrolling
text (Ticker) and Flash animated video, both are not supported simultaneously during playout. See Appendix A-Limitations for more information concerning playback, scheduling and other DCM limitations.
Figure 3. Display Content Manager Sample Layout
As illustrated in Figure 4, multiple layouts can be defined and maintained
within the Display Content Manager application.
DISPLAY CONTENT MANAGER — Installation and User Guide
21
Section 1 — MediaEdge DCM Overview and Prerequisites
Figure 4. DCM Layout List
Layouts are organized by user-defined categories and playout devices
(product).
Supported Content Types
The following content types and formats may be displayed on layout
regions defined for a display monitor:
Video
MPEG-2 transport stream, MPEG-2 program stream and MPEG-4 (H.264)
(.MPG, .MPEG, M2P, .M2T, .MTS, M2TS).
Still Images
JPEG, BMP, GIF (transparent GIF supported), PNG (transparent PNG supported).
Text/Ticker
TXT, RSS (may be registered as Uniform Resource Identifier [URI] material).
22
DISPLAY CONTENT MANAGER — Installation and User Guide
Display Content Manager DCM Overview
Flash
SWF
Note
Animated Flash files up to version 7 are supported on hardware playout
devices.
QuickTime
MOV, QT, MPV, 3GP, 3GPP, 3G2.
Note
Supported by MEDIAEDGE-SWT4 software client only.
HTML
HTML, HTM.
Audio
WAV (PCM: 8/16/24 bit, 1/2/5.1 ch.), MP3
Uniform Resource Identifier
Any URI
Supported Playout Devices
The following playout devices are support by the DCM:
HDMA-4000/HDMA-4100
Plays SD/HD video transferred over the network and stored on an internal
hard drive.
Note
HDMA-4100 is required for playback of MPEG-4 (H.264) content.
MEDIAEDGE-STB3 DS/STB4/STB4H
Set-top box that plays MPEG-2 or MPEG-4 (H.264) SD/HD content
streamed from a MediaEdge server.
Note
Only the STB4 and STB4H support MPEG-4 (H.264) content
MEDIAEDGE-SWT3 DS/SWT4
Software client that enables a PC to act as an SD/HD playout device.
Note
Only the MediaEdge SWT4 client supports playback of QuickTime and MPEG4 (H.264) content.
DISPLAY CONTENT MANAGER — Installation and User Guide
23
Section 1 — MediaEdge DCM Overview and Prerequisites
Other Notable DCM Features
Automatic Update
The DCM may be configured to update program content and schedules at
specified dates and times. Manual update is possible any time.
Change Only Updates
When updating content, only the content that has changed is updated. This
minimizes the amount of data sent over the network and reduces the time
required to finish the updates.
DCM Installation Prerequisites
Prior to installing the DCM software, verify that the recommended operating system and other necessary software is installed on any machine on
which the DCM or SVS4 server software will be installed.
Operating System
The following Windows Operating Systems and Service Pack revisions are
recommended when using MediaEdge SVS4 server and DCM software:
•
Windows Server 2008 with SP2 or Windows Server 2008 R2 (MediaEdge SVS4 Servers)
•
Windows XP with SP3 (DCM/Control PCs)
•
Windows Vista with SP2 (DCM/Control PCs)
The recommended operating system and service packs must be installed
on the computer before proceeding with the installation of server software
and the DCM.
Server Software
The server software explained in this section must be installed and configured prior to installing the DCM software.
Note
24
A server is a computer on which the server software is installed. If MediaEdge
SVS4 server software is installed, the other server software components will
likely be installed on the same Windows Server 2008 or Server 2008 R2 computer as the MediaEdge SVS4 software. MediaEdge SVS4 server software is
not required for the DCM to be fully functional. If SVS4 software is not
installed, IIS, FTP Server and Database server software may be installed on
the Windows XP or Windows Vista computer that will host the DCM.
DISPLAY CONTENT MANAGER — Installation and User Guide
DCM Installation Prerequisites
Internet Information Services (IIS)
IIS 6.0 or above is recommended. Version 6.0 or above of IIS can be installed
on a computer running Windows XP, Windows Vista, Windows Server
2003, Windows Server 2008 or Windows Server 2008 R2.
Note
It is recommended that IIS 7.0 and FTP Services 7.5 be installed on Windows
Server 2008 or Windows Server 2008 R2.
Note
The operating system installation disc may be required.
See Installing IIS and the FTP Server on page 26 for more information.
FTP Server
The content and system files (SMIL files that correspond to configured
playlists and schedule files) are stored on the FTP server.
Note
Read and write access permissions to the FTP content directory are required.
See FTP Server Setup on page 41 for more information.
Database Server
The database server stores Display Content Manager information.
If a new instance of SQL Server 2005 is not already present on the server or
PC on which the DCM will be installed, SQL Server 2005 Express Edition
will be installed by the MediaEdge-SVS4 or Display Content Manager
installers.
MediaEdge Server
If using the MediaEdge-SVS4 server software, it should be installed and
configured before DCM installation. See the MediaEdge SVS4 manual for
instructions on installing that software.
The DCM installation will install the following MediaEdge server software:
•
DCM Download Service - downloads data from the FTP server
according to the DCM configuration and registers data in the MediaEdge database. Uses the DCM download.txt file.
•
DCM Redirect Service - redirects clients according to DCM scheduled
events. Uses the DCM schedule.xml file.
Note
Internet Information Services, FTP Server, Database Server and MediaEdge
Server can all be installed on a single computer. However, configurations in
which these servers are installed on separate computers are also supported
as long as the necessary connectivity and authentication between servers
exists.
DISPLAY CONTENT MANAGER — Installation and User Guide
25
Section 1 — MediaEdge DCM Overview and Prerequisites
Installing IIS and the FTP Server
Prior to installing IIS 7.0 and FTP Services 7.5 on a Windows 2008 or
Windows 2008 R2 server, verify that the Windows Firewall is disabled on
all profiles by following these steps:
1. From the Start menu, select Administrative Tools>Windows Firewall
with Advanced Security.
The Windows Firewall with Advanced Security dialog illustrated in
Figure 5 appears.
Figure 5. Windows Firewall with Advanced Security Dialog
2. Click the Windows Firewall Properties link.
The Firewall Properties Dialog shown in Figure 6 appears.
26
DISPLAY CONTENT MANAGER — Installation and User Guide
DCM Installation Prerequisites
Figure 6. Windows Firewall Properties Dialog
3. On the Domain Profile tab select Off from the Firewall state drop-down
list (see Figure 6) and click the Apply button.
4. Repeat the same steps on the Private Profile and Public Profile tabs.
5. When the Firewall state has been set to Off on all profiles, click the OK
button to close the Firewall Properties dialog.
6. In the Windows Firewall with Advanced security dialog, verify that the
firewall is Off on the Domain, Private and Public profiles as illustrated
in Figure 7.
DISPLAY CONTENT MANAGER — Installation and User Guide
27
Section 1 — MediaEdge DCM Overview and Prerequisites
Figure 7. Windows Firewall with Advanced Security Dialog
7. If the firewall is not off on any profile, repeat Step 2 and Step 3 above
on the appropriate profile tab.
With the firewall turned off on all profiles, IIS and FTP Services may be
installed and configured.
To install Internet Information Services (IIS) and FTP Services, do the following:
Note
These instructions apply when installing IIS 7.0 on the Windows Server 2008
R2 operating system. The procedure for other operating systems will be different. Differences when installing on Server 2008 are noted.
1. If the Server Manager is not already running, do one of the following to
start the Server Manager:
•
Click the Server Manager icon in the taskbar.
•
From the Start menu, select Administrative Tools>Server Manager.
The Server Manager shown in Figure 8 appears.
2. Select Roles from the Server Manager options on the left.
28
DISPLAY CONTENT MANAGER — Installation and User Guide
DCM Installation Prerequisites
Figure 8. Server 2008 R2 - Server Manager - Roles
3. From the Roles dialog, click the Add Roles link as shown in Figure 8.
4. The Before you Begin dialog illustrated in Figure 9 appears.
DISPLAY CONTENT MANAGER — Installation and User Guide
29
Section 1 — MediaEdge DCM Overview and Prerequisites
Figure 9. Before You Begin Dialog
Note
If the Skip this page by default option was selected during a previous role
installation, this dialog may not appear.
5. Click the Next button to continue.
6. The Select Server Roles dialog illustrated in Figure 10 appears.
30
DISPLAY CONTENT MANAGER — Installation and User Guide
DCM Installation Prerequisites
Figure 10. Server 2008 R2 - Server Roles
7. Select the Web Server (IIS) role.
If installing IIS on Server 2008, the Add features required for Web Server
(IIS) dialog depicted in Add Features Required for Web Server (IIS)
DialogFigure 11 may appear. If it does, click the Add Required Features button.
Figure 11. Add Features Required for Web Server (IIS) Dialog
DISPLAY CONTENT MANAGER — Installation and User Guide
31
Section 1 — MediaEdge DCM Overview and Prerequisites
8. Click the Next button.
The Web Server (IIS) dialog illustrated in Figure 12 appears.
Figure 12. Server 2008 R2 - Web Server (IIS)
9. Click the Next button.
The Select Role Services dialog shown in Figure 13 appears.
32
DISPLAY CONTENT MANAGER — Installation and User Guide
DCM Installation Prerequisites
Figure 13. Server 2008 R2 Server Manager - Select Role Services
10. In the Application Development section, select ASP.
The Add role services required for ASP? dialog illustrated in Figure 14
appears.
Figure 14. Add ASP Services
DISPLAY CONTENT MANAGER — Installation and User Guide
33
Section 1 — MediaEdge DCM Overview and Prerequisites
11. Click the Add Required Role Services button to add the required ASP
services.
12. From the Select Role Services dialog, select the following additional
services:
•
Windows Authentication in the Security section (see Figure 15).
Figure 15. Server 2008 R2 Server Manager - Select Role Services - Security
34
•
IIS Management Console in the Management Tools section (see
Figure 16).
•
FTP Server if installing IIS 7.0 on Windows Server 2008 R2 (see
Figure 16).
Note
If installing IIS on Server 2008, do not select the FTP Publishing Service, FTP
Server and FTP Management Console options. Selecting these options will
install FTP Services version 6. To Install FTP Services version 7.5 see Install
FTP Services 7.5 for IIS 7.0 on Windows Server 2008 on page 37.
Note
Services other than those specifically named above will also be selected.
DISPLAY CONTENT MANAGER — Installation and User Guide
DCM Installation Prerequisites
Figure 16. Server 2008 R2 Server Manager - Select Role Services - Management Tools and FTP
13. Click the Next button to proceed when all the necessary services have
been selected.
The Confirm Installation Selections dialog shown in Figure 17 appears.
DISPLAY CONTENT MANAGER — Installation and User Guide
35
Section 1 — MediaEdge DCM Overview and Prerequisites
Figure 17. Server 2008 R2 Server Manager - Confirm Installation Selections
14. Review the selections and click the Install button to proceed with the
installation of the selected server role services.
15. When installation is complete, the Installation Results dialog illustrated
in Figure 18 appears.
36
DISPLAY CONTENT MANAGER — Installation and User Guide
DCM Installation Prerequisites
Figure 18. Server 2008 R2 Server Manager - Installation Results
16. Click the Close button on the Installation Results dialog.
IIS 7.0 and FTP Services version 7.5 have been installed on Windows Server
2008 R2.
Proceed to FTP Server Setup on page 41.
Install FTP Services 7.5 for IIS 7.0 on Windows Server 2008
FTP Services 7.5 for IIS 7.0 may be downloaded from http://www.microsoft.com/downloads. Be sure to download the version that corresponds to
the version of Windows Server 2008 on which it will be installed;
ftp7_x86_75 for 32-bit systems and ftp7_x64_75 for 64-bit systems.
Note
This file will install FTP Services 7.5 on Windows Server 2008 only. It will not
install on Windows Server 2008 R2. FTP Services version 7.5 can be installed
on Windows Server 2008 R2 via the Server Manager Add Roles procedure
documented above.
DISPLAY CONTENT MANAGER — Installation and User Guide
37
Section 1 — MediaEdge DCM Overview and Prerequisites
To install FTP Service 7.5 for IIS 7.0 on Windows Server 2008, do the following:
1. Double click the downloaded FTP Services installation file to begin the
installation.
The Welcome screen illustrated in Figure 19 appears.
Figure 19. FTP Service 7.5 Install Welcome Screen
2. Click the Next button on the Welcome screen.
The License Agreement screen shown in Figure 20 appears.
38
DISPLAY CONTENT MANAGER — Installation and User Guide
DCM Installation Prerequisites
Figure 20. FTP Service 7.5 License Agreement Screen
3. On the End-User Licence Agreement screen, check the I accept the
terms of the License Agreement box and click the Next button.
The Custom Setup screen depicted in Figure 21 appears.
Figure 21. FTP Service 7.5 Custom Setup Screen
4. On the Custom Setup screen, click the Next button without changing
any of the default installation settings.
DISPLAY CONTENT MANAGER — Installation and User Guide
39
Section 1 — MediaEdge DCM Overview and Prerequisites
The Ready to Install screen illustrated in Figure 22 appears.
Figure 22. FTP Service 7.5 Ready to Install Screen
5. On the Ready to Install FTP Service screen, click the Install button.
When the installation is complete, the Completed screen shown in
Figure 23 appears.
Figure 23. FTP Service 7.5 Installation Completed
40
DISPLAY CONTENT MANAGER — Installation and User Guide
DCM Installation Prerequisites
6. Click the Finish button to exit the Setup Wizard.
FTP Services 7.5 for IIS 7.0 is now installed on Server 2008.
Proceed to FTP Server Setup.
FTP Server Setup
The instructions which follow document the process of configuring the FTP
Server to work with the DCM.
Note
The FTP server configuration procedures documented in this section may
differ depending upon the installed operating system. The instructions here
depict Windows Server 2008 R2 screens.
Verify Startup Type
Before beginning FTP server setup, verify that the Microsoft FTP Service is
set to automatic startup. To set the startup type, do the following:
1. From the Start menu, select Start>Administrative Tools>Services.
The Services dialog illustrated in Figure 24 appears.
DISPLAY CONTENT MANAGER — Installation and User Guide
41
Section 1 — MediaEdge DCM Overview and Prerequisites
Figure 24. Services Dialog.
2. If the Microsoft FTP Service startup type is not Automatic, right click on
the service and select Properties from the menu as illustrated in
Figure 25.
42
DISPLAY CONTENT MANAGER — Installation and User Guide
DCM Installation Prerequisites
Figure 25. Services Right-Click Menu - Properties
3. Select Automatic from the Startup Type drop-down list as shown in
Figure 26.
DISPLAY CONTENT MANAGER — Installation and User Guide
43
Section 1 — MediaEdge DCM Overview and Prerequisites
Figure 26. Microsoft FTP Service Startup Type Selection
4. If the FTP Service is not started, click the Start button to start the service.
5. Click the OK button to close the dialog and set the Microsoft FTP Service
startup type to automatic.
Configure the FTP Server
To configure the FTP server, do the following.
1. From the Start menu, select Administrative Tools>Internet Information
Services (IIS) Manager
The IIS Manager dialog shown in Figure 27 appears.
44
DISPLAY CONTENT MANAGER — Installation and User Guide
DCM Installation Prerequisites
Figure 27. Internet Information Services Manager
2. Click on the computer name to expand the tree.
3. Right click on Sites and select Add FTP Site from the menu as illustrated
in Figure 28.
DISPLAY CONTENT MANAGER — Installation and User Guide
45
Section 1 — MediaEdge DCM Overview and Prerequisites
Figure 28. IIS Manager - Add FTP Site
The Site Information dialog shown in Figure 29 appears.
46
DISPLAY CONTENT MANAGER — Installation and User Guide
DCM Installation Prerequisites
Figure 29. IIS - Add FTP Site - Site Information
4. Enter the desired FTP site name (for example: Default FTP Site).
5. Click the ... button to browse for or create a folder for FTP site content
directory.
6. Select an existing folder or click the Make New Folder button to create a
folder for the DCM FTP content directory as illustrated in Figure 30.
DISPLAY CONTENT MANAGER — Installation and User Guide
47
Section 1 — MediaEdge DCM Overview and Prerequisites
Figure 30. IIS Manager -Add FTP Site - Make New Folder
Note
If you wish to create an FTP upload directory specifically for the DCM, create
the folder under the ftproot folder.
7. Click the OK button to select the specified folder as the FTP content
directory.
The FTP Site Information dialog appears with the specified FTP site name
and content directory path as shown in Figure 31.
48
DISPLAY CONTENT MANAGER — Installation and User Guide
DCM Installation Prerequisites
Figure 31. IIS Manager - Add FTP Site - Site Information
8. Click the Next button to continue.
The Binding and SSL Settings dialog illustrated in Figure 32 appears.
DISPLAY CONTENT MANAGER — Installation and User Guide
49
Section 1 — MediaEdge DCM Overview and Prerequisites
Figure 32. IIS Manager - Add FTP Site - Bindings and SSL Settings Dialog
9. Specify the Binding and SSL information as follows:
•
Desired IP address for the FTP server from the drop-down list
•
FTP port number (default = 21)
•
Enable Virtual Host Names: not selected
•
Start FTP site automatically: selected
•
SSL: No SSL
10. Click the Next button to continue.
The Authentication and Authorization Information dialog illustrated in
Figure 33 appears.
50
DISPLAY CONTENT MANAGER — Installation and User Guide
DCM Installation Prerequisites
Figure 33. IIS Manager - Add FTP Site - Authentication and Authorization Dialog
11. Select the following Authentication and Authorization settings:
•
Authentication: Basic
•
Authorization: All users
•
Permissions: Read and Write selected.
12. Click the Finish button to create the FTP site with the specified settings.
As shown in Figure 34, the new FTP site appears in the IIS Manager.
DISPLAY CONTENT MANAGER — Installation and User Guide
51
Section 1 — MediaEdge DCM Overview and Prerequisites
Figure 34. Virtual Directory Access Permissions Dialog
13. Close the Internet Information Services (IIS) Manager.
FTP Server setup is complete.
52
DISPLAY CONTENT MANAGER — Installation and User Guide
Section
2
DCM Software Installation
This section describes the installation of the MediaEdge Display Content
Manager (DCM) software only. For detailed information regarding the
installation of MediaEdge-SVS4 Server software, see the MediaEdge-SVS4
User’s Guide.
Note
The Status Monitor application is installed with the DCM. Configuration and
use of the Status Monitor is not covered in this documentation.
MediaEdge video content managed by the Display Content Manager can
be mixed HD and SD and that same content may be managed and delivered to one or more displays as shown in Figure 35 on page 55 and
Figure 50 on page 66.
Software Prerequisites
Prior to installing the DCM software, verify that the recommended operating system and other necessary software is installed on any machine on
which the DCM will be installed. See DCM Installation Prerequisites on
page 24 for more information.
Operating System
The following Windows Operating Systems and Service Pack revisions are
recommended when using MediaEdge SVS4 server and DCM software:
•
Windows Server 2008 with SP2 or Windows Server 2008 R2 (MediaEdge SVS4 Servers)
•
Windows XP with SP3 (DCM/Control PCs)
•
Windows Vista with SP2 (DCM/Control PCs)
DISPLAY CONTENT MANAGER — Installation and User Guide
53
Section 2 — DCM Software Installation
Other Software
Before proceeding with the DCM software installation, verify that Internet
Information Services (IIS) and an FTP server are properly installed and configured on your MediaEdge server or desktop PCs.
See Server Software on page 24 for more information on installing and configuring IIS and the FTP server.
If needed, SQL Server 2005 Express Edition will be installed by the MediaEdge-SVS4 or Display Content Manager installers.
Configurations Without MEDIAEDGE-SVS4
If no MediaEdge-SVS4 Server is used, all Display Content Manager components (DCM Console, DCM Status Monitor, and Digital Signage DB) may
be installed on one or more PCs.
Note
The MediaEdge-DS Feature Expansion is installed on a SVS4 server only.
In this configuration, any of the following client devices may be used for
content playback:
•
HDMA-4000/HDMA-4000Sync/HDMA-4100
•
MediaEdge SWT3-DS or MediaEdge SWT4 (software client - operates
as browser plug-in)
A sample configuration with no MediaEdge SVS4 server and the HDMA4100 playback device is illustrated in Figure 35.
54
DISPLAY CONTENT MANAGER — Installation and User Guide
Configurations Without MEDIAEDGE-SVS4
Figure 35. MediaEdge Configuration with no SVS4 Server
Winter Wonderland welcomes you! We hope
HDMA-4100
HD Content
PC(s)
Windows XP or Windows Vista
Join us for a nature walk at 11am Frid
HDMA-4100
Software:
N
I
G
H
T
T
O
U
R
S
HDMA-4100
SQL Server 2005
IIS (FTP/WWW)
DCM Console
Status Monitor
Digital Signage DB
SD Content
N
I
G
H
T
T
O
U
R
S
HDMA-4100
Installation of the DCM Software on a PC
To install all components of the Display Content Manager on a PC on which
IIS has been configured with FTP and WWW services, follow these steps:
To install the DCM software, do the following:
1. Insert the DCM software DVD into a DVD drive on the computer on
which you wish to install the DCM client software.
The installation program will launch automatically and, after a few
moments preparing the installation, the welcome screen shown in
Figure 36 appears.
DISPLAY CONTENT MANAGER — Installation and User Guide
55
Section 2 — DCM Software Installation
Figure 36. DCM Installation Welcome Screen
Note
If the installation program does not start automatically, in Windows Explorer
double click the drive letter of the DVD drive (e.g. D:), open the DCM Install
folder and double click setup.exe. Alternatively, you may select Start>Run and
enter the following: D:\DCM Install\setup.exe where D: is replaced by the
actually drive letter of the DVD drive containing the DCM installation disc.
2. Click the Next button to proceed with the installation.
3. The Choose Destination Location dialog illustrated in Figure 37
appears.
56
DISPLAY CONTENT MANAGER — Installation and User Guide
Configurations Without MEDIAEDGE-SVS4
Figure 37. Choose Destination Location Dialog
A default installation location (C:\Program Files\Canopus\DisplayContentManager) is suggested. If you wish to accept this installation location,
proceed to Step 6.
4. If desired, click the Change button to select an installation folder other
than the default. The Choose Folder dialog illustrated in Figure 38
appears.
Figure 38. Choose Folder Dialog
5. Navigate to an existing folder in which you wish to install the DCM and
click the OK button to close the dialog.
DISPLAY CONTENT MANAGER — Installation and User Guide
57
Section 2 — DCM Software Installation
Note
A new folder cannot be created from this dialog. If you wish to install the DCM
in a folder other than the default, the folder must be created before opening
the Choose Folder dialog.
6. Click the Next button.
The Select Features Dialog shown in Figure 39 appears.
Note
By default, all DCM features are selected.
Figure 39. Select Features Dialog
7. Deselect the MEDIAEDGE-DS Feature Expansion and click the Next
button.
The SQL Server Instance Selection dialog illustrated in Figure 40 appears.
The Install SQL Server 2005 Express Edition Now radio button is selected.
58
DISPLAY CONTENT MANAGER — Installation and User Guide
Configurations Without MEDIAEDGE-SVS4
Figure 40. SQL Server Instance Selection Dialog
8. Click Next to install SQL Server 2005 Express Edition.
The SQL Server Installation dialog shown in Figure 41 appears.
Figure 41. SQL Server Installation Dialog
9. Enter the desired SQL Server Instance Name and login password as
illustrated in Figure 41.
DISPLAY CONTENT MANAGER — Installation and User Guide
59
Section 2 — DCM Software Installation
Note
Generally, in a Windows authenticated network, the sa login password is not
needed; however, in small networks without a domain controller and
Windows authentication to all networked computers, the sa login password
may be needed to access the DCM database.
10. Click Next to begin the SQL Server installation and instance creation
process.
The SQL Server Installing Prerequisites dialog shown in Figure 42 and the
SQL Server Setup Progress dialog shown in Figure 43 appear during the
SQL Server installation process.
Figure 42. SQL Server Installing Prerequisites Dialog
60
DISPLAY CONTENT MANAGER — Installation and User Guide
Configurations Without MEDIAEDGE-SVS4
Figure 43. SQL Server Setup Progress Dialog
When the SQL Server 2005 Express Edition setup is complete, the Select
Materials Path dialog illustrated in Figure 44 appears.
Figure 44. Select Materials Path Dialog
DISPLAY CONTENT MANAGER — Installation and User Guide
61
Section 2 — DCM Software Installation
11. Enter the folder path or click on the Browse button to browse for the
desired folder in which MediaEdge material (assets, content) are stored
on the server. These are the assets to be managed by the DCM.
Note
In order to save disk space, it is recommended that the material (asset) path
be the same as the folder specified as the FTP content directory. See Configure the FTP Server on page 44 for more information.
The Configure FTP Access dialog shown in Figure 45 appears.
Figure 45. Configure FTP Access Dialog
The FTP Server Name field will display the name of the Computer on
which the FTP server is installed.
Note
This is the computer name on which the DCM is being installed as all components are installed and configured on the same computer in this scenario.
12. Enter the FTP Server IP address in the IP Address field.
13. Enter the FTP Upload directory alias specified during FTP Server setup
(see Configure the FTP Server on page 44 for more information) in the
Upload Directory field.
14. Click the Check Connect button to verify the connection to the FTP Server.
If the connection information is correct, the confirmation in Figure 46
appears.
62
DISPLAY CONTENT MANAGER — Installation and User Guide
Configurations Without MEDIAEDGE-SVS4
Figure 46. FTP Server Connection Succeeded
If the FTP Server connection fails, the information dialog in Figure 47
appears.
Figure 47. FTP Server Connection Failed
If the connection fails, verify the server name, IP address and FTP directory
alias and check the connection again until the FTP connection is successful.
15. Click the OK button to close the information dialog.
16. Click the Next button.
The Ready to Install dialog shown in Figure 48 appears.
DISPLAY CONTENT MANAGER — Installation and User Guide
63
Section 2 — DCM Software Installation
Figure 48. Ready to Install the Program Dialog
17. Click the Install button to install the selected features.
Various status messages will appear during the installation.
When installation is complete, the dialog in Figure 49 appears.
Figure 49. Installation Complete Dialog
18. Click the Finish button to finish the installation.
64
DISPLAY CONTENT MANAGER — Installation and User Guide
Configurations Using MEDIAEDGE-SVS4
Configurations Using MEDIAEDGE-SVS4
The Display Content Manager (DCM) software may be installed on the
same computer as the MediaEdge server software or on a separate client
machine. The choice as to where to install DCM components depends upon
your MediaEdge network topology and usage requirements.
Note
A single instance of the DCM software can manage the content for one or
more MediaEdge servers. A separate DCM instance is not needed for each
MediaEdge server.
The computer on which the DCM client software is installed is referred to
as the Control PC.
Before beginning the DCM installation, determine where you wish to
install the DCM client software. If the DCM will be installed on a separate
Control PC, the software installation is a two-step process involving the
Control PC and the MediaEdge SVS4 server(s). Begin with the MediaEdge
SVS4 server(s).
Figure 50 depicts a MediaEdge system in which there is one MediaEdge
Server and one control PC managing the content for four set top boxes and
their output displays.
In this configuration, any of the following client devices may be used for
content playback:
•
HDMA-4000/HDMA-4000Sync/HDMA 4100
•
MediaEdge-STB3-DS/STB4/STB4H
•
MediaEdge SWT3-DS/SWT4 (software client - operates as browser
plug-in)
DISPLAY CONTENT MANAGER — Installation and User Guide
65
Section 2 — DCM Software Installation
Figure 50. MediaEdge Configuration with MediaEdge-SVS4 Server Software
MediaEdge Server
Windows Server 2008 or 2008 R2
MediaEdge STB4 or STB4H
Winter Wonderland welcomes you! We hope
HD Content
Software:
Join us for a nature walk at 11am Frid
MediaEdge-SVS4
SQL Server 2005
IIS (FTP/WWW)
Digital Signage DB
MediaEdge-DS Feature Expansion
MediaEdge STB4 or STB4H
N
I
G
H
T
DCM Control PC
Windows XP or Windows Vista
T
O
U
R
S
MediaEdge STB4
SD Content
N
I
G
H
T
Software:
DCM Console
Status Monitor
T
O
U
R
S
MediaEdge STB4
Common Installation Procedures
To install the DCM software, do the following:
1. Insert the DCM software DVD into a DVD drive on the computer on
which you wish to install the DCM client software. As explained above,
this can be a separate Control PC or on the same computer as an
instance of the MediaEdge SVS4 Server.
Note
If installing the DCM software on a separate control PC, begin the installation
on the MediaEdge SVS4 server(s).
The installation program will launch automatically and, after a few
moments preparing the installation, the welcome screen shown in
Figure 51 appears.
66
DISPLAY CONTENT MANAGER — Installation and User Guide
Configurations Using MEDIAEDGE-SVS4
Figure 51. DCM Installation Welcome Screen
Note
If the installation program does not start automatically, in Windows Explorer
double click the drive letter of the DVD drive (e.g. D:), open the DCM Install
folder and double click setup.exe. Alternatively, you may select Start>Run and
enter the following: D:\DCM Install\setup.exe where D: is replaced by the
actually drive letter of the DVD drive containing the DCM installation disc.
2. Click the Next button to proceed with the installation.
3. The Choose Destination Location dialog illustrated in Figure 52
appears.
DISPLAY CONTENT MANAGER — Installation and User Guide
67
Section 2 — DCM Software Installation
Figure 52. Choose Destination Location Dialog
A default installation location (C:\Program Files\Canopus\DisplayContentManager) is suggested. If you wish to accept this installation location,
proceed to Step 6.
4. If desired, click the Change button to select an installation folder other
than the default. The Choose Folder dialog illustrated in Figure 53
appears.
Figure 53. Choose Folder Dialog
5. Navigate to an existing folder in which you wish to install the DCM and
click the OK button to close the dialog.
68
DISPLAY CONTENT MANAGER — Installation and User Guide
Configurations Using MEDIAEDGE-SVS4
Note
A new folder cannot be created from this dialog. If you wish to install the DCM
in a folder other than the default, the folder must be created before opening
the Choose Folder dialog.
6. Click the Next button.
The Select Features Dialog shown in Figure 54 appears.
Figure 54. Select Features Dialog
By default, all DCM features are selected.
Client component installation options are as follows:
Install All DCM Components on MediaEdge Server
If installing the DCM software on the same computer as a MediaEdge SVS4
server, all DCM components should be selected as illustrated in Figure 54.
Proceed to Installation of All DCM Components on MediaEdge Server on
page 80 for instructions for performing this installation.
Install DCM on Separate Control PC
If the DCM client software will be installed on a separate Control PC that is
not hosting the MediaEdge SVS4 server, the client software is installed in
two steps.
1. Install the Digital Signage Database and MEDIAEDGE-DS Feature
Expansion on the MediaEdge Server as illustrated in Figure 55. See
Partial DCM Installation on Server on page 71
DISPLAY CONTENT MANAGER — Installation and User Guide
69
Section 2 — DCM Software Installation
Note
Deselect the DCM Application (this deselects the DCM Console and Status
Monitor).
Figure 55. DCM Software Installation on MediaEdge Server
2. Install the DCM Application only on the Control PC. Deselect the
Digital Signage Database and MEDIAEDGE-DS Feature Expansion as
illustrated in Figure 56. See Installation of DCM Client on Control PC on
page 76.
Figure 56. DCM Software Installation on Control PC
70
DISPLAY CONTENT MANAGER — Installation and User Guide
Configurations Using MEDIAEDGE-SVS4
Partial DCM Installation on Server
After beginning the installation by following the Common Installation Procedures on page 66, follow these steps to continue with the installation of the
Digital Signage Database and MEDIAEDGE-DS Feature Expansion on the
MediaEdge server:
1. Deselect the DCM Application in the Select Features dialog as shown in
Figure 57.
Figure 57. DCM Software Installation on MediaEdge Server
2. Click the Next button to continue with the installation.
The SQL Server Instance Selection dialog illustrated in Figure 58 appears.
DISPLAY CONTENT MANAGER — Installation and User Guide
71
Section 2 — DCM Software Installation
Figure 58. SQL Server Instance Selection Dialog
The SQL instance created during installation of the server software will be
highlighted and the “use installed SQL Server instance” radio button is
selected.
3. Click the Next button to proceed with the installation using the installed
SQL Server instance.
The Initialize Database dialog illustrated in Figure 59 appears.
Figure 59. Initialize Database Dialog
72
DISPLAY CONTENT MANAGER — Installation and User Guide
Configurations Using MEDIAEDGE-SVS4
4. Click the Yes button to initialize the database for the DCM and continue
the installation.
The Configure FTP Access dialog shown in Figure 60 appears.
Figure 60. Configure FTP Access Dialog
The FTP Server Name field will display the name of the MediaEdge server.
5. Enter the FTP Server IP address in the IP Address field
6. Enter the FTP Upload directory alias specified during FTP Server setup
(see Configure the FTP Server on page 44 for more information) in the
Upload Directory field.
7. Click the Check Connect button to verify the connection to the FTP Server.
If the connection information is correct, the confirmation in Figure 61
appears.
Figure 61. FTP Server Connection Succeeded
If the FTP Server connection fails, the information dialog in Figure 62
appears.
DISPLAY CONTENT MANAGER — Installation and User Guide
73
Section 2 — DCM Software Installation
Figure 62. FTP Server Connection Failed
If the connection fails, very the server name, IP address and FTP directory
alias and check the connection again until the FTP connection is successful.
8. Click the OK button to close the information dialog.
9. Click the Next button.
The Select Materials Path dialog illustrated in Figure 63 appears.
Figure 63. Select Materials Path Dialog
10. Enter the folder path or click on the Browse button to browse for the
desired folder in which MediaEdge material (assets, content) are stored
on the server. These are the assets to be managed by the DCM.
Note
In order to save disk space, it is recommended that the material (asset) path
be the same as the folder specified as the FTP content directory (see Configure the FTP Server on page 44for more information).
11. Click the Next button.
The Ready to Install dialog shown in Figure 64 appears.
74
DISPLAY CONTENT MANAGER — Installation and User Guide
Configurations Using MEDIAEDGE-SVS4
Figure 64. Ready to Install the Program Dialog
12. Click the Install button to install the selected features.
Various status messages such as those illustrated in Figure 65 may appear
during the installation process.
Figure 65. Installation Status Messages
When installation is complete, the dialog in Figure 66 appears.
DISPLAY CONTENT MANAGER — Installation and User Guide
75
Section 2 — DCM Software Installation
Figure 66. Installation Complete Dialog
13. Click the Finish button to finish the installation.
14. Proceed to the next section to install the DCM client software on the
Control PC.
Installation of DCM Client on Control PC
The DCM client software is installed on the Control PC after installing the
Digital Signage Database and MEDIAEDGE-DS Feature Expansion on the
MediaEdge SVS4 server(s). Follow the steps outlined in Common Installation
Procedures on page 66 and Partial DCM Installation on Server on page 71 before
proceeding with the DCM client installation on the Control PC.
To install the DCM client software on the Control PC, follow these steps:
Note
The installation procedures is identical regardless of Windows operating
system. The screens shown in this procedure are Windows XP screens.
1. Follow the steps in the Common Installation Procedures on page 66 until
the Select Features dialog appears.
2. Select the DCM application only. Make sure the Digital Signage and
MEDIAEDGE-DS Feature Expansion are deselected as shown in
Figure 67.
76
DISPLAY CONTENT MANAGER — Installation and User Guide
Configurations Using MEDIAEDGE-SVS4
Figure 67. Select Features Dialog -DCM Application Only
3. Click the Next button.
The Select Database Server dialog illustrated in Figure 68 appears.
Figure 68. Select Database Server Dialog
4. Enter the name of the desired database server or use the Browse button
to locate all available database server.
5. Click the Next button to continue.
DISPLAY CONTENT MANAGER — Installation and User Guide
77
Section 2 — DCM Software Installation
The Select Materials Path dialog illustrated in Figure 69 appears.
Figure 69. Select Materials Path Dialog
Enter the folder path or click on the Browse button to browse for the desired
folder in which MediaEdge material (assets, content) are stored on the
server. These are the assets to be managed by the DCM.
6. Click the Next button to continue.
The Ready to Install dialog shown in Figure 70 appears.
78
DISPLAY CONTENT MANAGER — Installation and User Guide
Configurations Using MEDIAEDGE-SVS4
Figure 70. Ready to Install the Program Dialog
7. Click the Install button to install the selected features.
Status messages such as those shown in Figure 71 may appear during the
installation.
Figure 71. Installation Status Messages
When installation is complete, the dialog in Figure 72 appears.
DISPLAY CONTENT MANAGER — Installation and User Guide
79
Section 2 — DCM Software Installation
Figure 72. Installation Complete Dialog
8. Click the Finish button to finish the installation of the DCM Client
software on the Control PC.
Installation of All DCM Components on MediaEdge Server
If desired, all DCM components may be installed on the computer hosting
the MediaEdge SVS4 Server; although, typically, it is preferable to install
the DCM on a separate Control PC.
To install the DCM on the MediaEdge SVS4 Server, do the following:
1. Follow the Common Installation Procedures on page 66 until the Select
Features dialog illustrated in Figure 73 appears.
80
DISPLAY CONTENT MANAGER — Installation and User Guide
Configurations Using MEDIAEDGE-SVS4
Figure 73. DCM Select Features Dialog
2. As shown in Figure 73, select for installation all DCM Application
options, the Digital Signage Database and the MediaEdge-DS Feature
Expansion.
3. Click the Next button to continue.
4. The Instance Selection dialog illustrated in Figure 74 appears.
Figure 74. SQL Server Instance Selection Dialog
DISPLAY CONTENT MANAGER — Installation and User Guide
81
Section 2 — DCM Software Installation
Usually, there will already be an SQL Server instance for MediaEdge
installed as illustrated in Figure 74. If this is the case, click the Next button
and proceed to Step 8 when the Select Materials Path dialog appears.
If no SQL Server Instance is installed, select the Instal SQL Server 2005
Express Edition now option as shown in Figure 75 and proceed to Step 5.
Figure 75. SQL Server Instance Selection Dialog
5. Click Next to install SQL Server 2005 Express Edition.
The SQL Server Installation dialog shown in Figure 76 appears.
82
DISPLAY CONTENT MANAGER — Installation and User Guide
Configurations Using MEDIAEDGE-SVS4
Figure 76. SQL Server Installation Dialog
6. Enter the desired SQL Server Instance Name and login password as
illustrated in Figure 76.
Note
Generally, in a Windows authenticated network, the sa login password is not
needed; however, in small networks without a domain controller and
Windows authentication to all networked computers, the sa login password
may be needed to access the DCM database.
7. Click Next to begin the SQL Server installation and instance creation
process.
The SQL Server Installing Prerequisites dialog shown in Figure 77 and the
SQL Server Setup Progress dialog shown in Figure 78 appear during the
SQL Server installation process.
DISPLAY CONTENT MANAGER — Installation and User Guide
83
Section 2 — DCM Software Installation
Figure 77. SQL Server Installing Prerequisites Dialog
Figure 78. SQL Server Setup Progress Dialog
When the SQL Server 2005 Express Edition setup is complete, the Select
Materials Path dialog illustrated in Figure 79 appears.
84
DISPLAY CONTENT MANAGER — Installation and User Guide
Configurations Using MEDIAEDGE-SVS4
Figure 79. Select Materials Path Dialog
8. Enter the desired folder path or click on the Browse button to browse for
the desired folder in which MediaEdge material (assets, content) are
stored on the server. These are the assets to be managed by the DCM.
Note
In order to save disk space, it is recommended that the material (asset) path
be the same as the folder specified as the FTP content directory. See Configure the FTP Server on page 44 for more information.
9. Click the Next button.
The Select Video Standard dialog shown in Figure 80 appears.
DISPLAY CONTENT MANAGER — Installation and User Guide
85
Section 2 — DCM Software Installation
Figure 80. Select Video Standard Dialog
10. Select the desired video standard and click the Next button.
The Specify Working Directory dialog illustrated in Figure 81 appears.
Figure 81. Specify Working Directory Dialog
11. Enter the desired directory path for storing material and log files.
The Ready to Install dialog shown in Figure 82 appears.
86
DISPLAY CONTENT MANAGER — Installation and User Guide
Configurations Using MEDIAEDGE-SVS4
Figure 82. Ready to Install the Program Dialog
12. Click the Install button to install the selected features.
Various status messages will appear during the installation including the
dialog illustrated in Figure 83 appears.
Figure 83. Setup Status Dialog
When installation is complete, the dialog in Figure 84 appears.
DISPLAY CONTENT MANAGER — Installation and User Guide
87
Section 2 — DCM Software Installation
Figure 84. Installation Complete Dialog
13. Click the Finish button to finish the installation.
88
DISPLAY CONTENT MANAGER — Installation and User Guide
Section
3
Getting Started with the DCM
After installation of the Display Content Manager, the DCMConsole application may be used to manage, distribute and schedule playout of MediaEdge content. This section contains information concerning the basic
operation and configuration of the DCMConsole application.
Note
Other aspects of a MediaEdge system such as the MediaEdge server software, set-top-box or software playout client, content recording devices, etc.
are not covered in this Installation and User Guide. Please refer to the documentation for those devices and applications for more information.
Start the DCM Console
To run the DCMConsole application, locate the DCMConsole icon on the
desktop (see Figure 85) and double-click the icon to launch the application.
The DCM installation procedures documented in Section 2-DCM Software
Installation create a desktop shortcut for the DCMConsole application.
Figure 85. DCMConsole Application Icon
If the shortcut icon does not appear on the desktop, do one of the following:
•
Select Start>All Programs>Canopus>DisplayContentManager>DCMConsole.
•
Select Start>Run and enter the path for the DCMConsole application
executable (MManager.exe) into the Open: field. You may also click the
Browse button and browse to the executable location.
Note
•
If the application was installed in the default folder, the executable path is
C:\Program Files\Canopus\DisplayContentManager\MManager.exe
Create a desktop shortcut for the DCMConsole application using standard Windows methods.
DISPLAY CONTENT MANAGER — Installation and User Guide
89
Section 3 — Getting Started with the DCM
After starting the DCMConsole, the application screen shown in Figure 86
appears.
Figure 86. DCMConsole Application
Note
The default navigation bar selection is Material with the Video material type
selected. When the DCMConsole is launched, or when the material type is
changed, registered material is loaded into the application. For a few seconds, the Loading dialog illustrated in Figure 87 will appear as the registered
content is loaded.
Figure 87. Loading Content
90
DISPLAY CONTENT MANAGER — Installation and User Guide
DCM Console Overview
DCM Console Overview
The DCM Console consists of five (5) primary screens and their associated
functions. Access to these screens and functions is through the Navigation
Bar shown in Figure 88.
Figure 88. DCM Console Navigation Bar
Selecting one of these five buttons causes the associated function screens,
tool bar and menu bar to be displayed.
Material Button
Opens the Material screen in which content to be managed by the DCM is
registered and transferred to the FTP Server. See Section 4-Material Screen
for detailed information regarding the Material screen.
Note
In this user guide, the terms material, content and assets are synonymous
and refer to video, still image, ticker/text, Flash, QuickTime, HTML, audio,
URI, command and volume files managed by the DCM.
Layout Button
Opens the Layout screen in which multi-region digital signage display
layouts are created and managed. These layouts may incorporate video,
stills, ticker text, Flash animations, QuickTime, HTML, audio, URIs and
control commands. See Section 5-Layout Screen for detailed information on
the Layout screen.
DISPLAY CONTENT MANAGER — Installation and User Guide
91
Section 3 — Getting Started with the DCM
Playlist Button
Opens the Playlist screen in which content playlists are created and managed. See Section 6-Playlist Screen for detailed information concerning the
Playlist screen.
Schedule Button
Opens the Schedule screen in which playout channels and schedules are
created and managed. See Section 7-Schedule Screen for detailed information
regarding the Schedule screen.
Target Button
Opens the Target screen in which servers and clients are registered, client
groups are created and managed and schedule update settings are specified. See Section 8-Target Screen for detailed information concerning the
Target screen.
Alternative Function Screen Access Methods
The following alternative methods of selecting the desired function screen
are also available:
Material Screen
Select Go>Material from the Menu bar or press the [CTRL]+[1] keys on
the keyboard.
Layout Screen
Select Go>Layout from the Menu bar or press the [CTRL]+[2] keys on the
keyboard.
Playlist Screen
Select Go>Playlist from the Menu bar or press the [CTRL]+[3] keys on the
keyboard.
Playlist Screen
Select Go>Schedule from the Menu bar or press the [CTRL]+[4] keys on
the keyboard.
Target Screen
Select Go>Target from the Menu bar or press the [CTRL]+[5] keys on the
keyboard.
Tool Bar and Status Bar
By default, the Tool Bar and Status Bar (at the bottom of the display screen)
are displayed in each of the five functional screens. If you want to enable/
disable either of these, select View from the Menu bar and click on the item
92
DISPLAY CONTENT MANAGER — Installation and User Guide
DCM Console Overview
you wish to enable or disable. If a check mark is present by the item, it is
enabled; if there is no check mark, it is disabled (see Figure 89).
Note
The Navigation bar, Go menu options and Tool Bar and Status bar toggles are
available from all five of the main function screens.
Figure 89. DCM Console View Menu
DCM Console Icon Menu
Clicking on the DCM Console Icon (highlighted in red) in the upper left
corner of the application window displays the menu illustrated in
Figure 90.
Figure 90. DCM Console Icon Menu
This menu is used to manage the DCM Console application window size
and position on the computer monitor.
DISPLAY CONTENT MANAGER — Installation and User Guide
93
Section 3 — Getting Started with the DCM
DCM Workflow
As illustrated in Figure 91, the five primary function screens are interdependent. Material must be registered and display layouts defined before
playlists can be created. Playlists must exist before playout and command
channels can have schedules created for them. Channels and schedules
must be defined before targets can be fully configured.
When initially configuring MediaEdge workflows in the DCM, the screens
should be accessed in the order in which they appear in the Navigation bar;
i.e. Material, Layout, Playlist, Schedule and Target. This is the order in
which these screens are documented in this User Guide.
94
DISPLAY CONTENT MANAGER — Installation and User Guide
DCM Workflow
Figure 91. DCM Workflow Diagram
DCM Workflow
2. Layout Screen
1. Material Screen
Register Content
Video
Still Image
Flash
QuickTime
HTML
Audio
URI
Create Content
Ticker
Command
Volume
Create MultiRegion Display
Layouts
Video
Still Image
Ticker
3. Playlist Screen
Combine material and
layouts into playlists for
playout devices
4. Schedule Screen
Create playout and
command channels
for playout devices;
assign playlists to channels
to create schedules
Playout Display
Playout Device
5. Target Screen
Create targets
(servers, groups,
clients) for receiving
content, channel
and schedule
updates
Playout Display
Playout Device
Before proceeding to Section 4-Material Screen, see the information below
concerning configuration of the DCM and verify that it is configured properly and according to your preferences.
DISPLAY CONTENT MANAGER — Installation and User Guide
95
Section 3 — Getting Started with the DCM
DCM Console Configuration
The DCM Console was configured during the installation process and, usually, this configuration does not need to be changed. However, if the
network is reconfigured, server names and IP addresses are changed, or,
FTP servers are added or removed from the system, the DCM configuration
may need to be updated to reflect these changes in order for it to continue
functioning properly.
Note
Configuring FTP Servers, Environment Settings and Default Settings can be
done from any of the five main functional screens.
Configure FTP Servers
To add, edit or delete an FTP Server in the DCM configuration, follow these
steps:
1. Select Option>FTP Server... from the Menu bar.
The FTP Server list dialog illustrated in Figure 92 appears.
Figure 92. FTP Server List Dialog
2. To delete an FTP Server, select the desired server name and click the
Delete button. To Add or Edit an FTP Server, proceed to Step 4.
The DCM Console FTP server delete confirmation dialog shown in
appears.
96
DISPLAY CONTENT MANAGER — Installation and User Guide
DCM Console Configuration
Figure 93. DCM Console FTP Server Delete Confirmation Dialog
3. Click the Yes button to confirm deletion of the selected FTP Server and
return to the FTP Server list dialog.
4. To add a new FTP Server, click the New button; to edit an existing FTP
Server definition, select the desired FTP Server and click the Edit button.
The FTP Server Settings dialog shown in Figure 94 appears.
Figure 94. FTP Server Settings Dialog
5. Enter or edit the FTP server details and click the Connection test button to
verify the connection to the FTP server.
6. If the DCM Console Cannot connect to FTP server dialog illustrated in
Figure 95 appears, click the OK button, verify the FTP server details and
make any necessary changes in the FTP Server Settings dialog.
Figure 95. FTP Server Connection Failed
DISPLAY CONTENT MANAGER — Installation and User Guide
97
Section 3 — Getting Started with the DCM
7. If the DCM Console FTP server connection succeeded, the dialog
shown in Figure 96 appears, click the OK button to close the dialog and
return to the FTP Server Settings dialog.
Figure 96. FTP Server Connection Succeeded
8. Click the OK button to close the FTP Server Settings dialog.
9. Return to Step 2 and perform additional FTP Server configuration
procedures as needed. Proceed to Step 10 when finished with FTP
Server configuration.
10. Click the Close button to close the FTP Server list dialog.
Configure Environment Settings
The DCM Console environment settings determine the local location to
which content is copied for uploading to the DCM database via FTP and
how the console application connects to the MediaEdge server and SQL
database.
The initial settings are determined during installation of the DCM Console
application. In most cases, these settings will not need to be changed unless
something in the MediaEdge or DCM environment has changed since the
installation.
The edit the environment settings, do the following:
1. Select Option>Configuration... from the Menu bar.
The Environment Settings dialog illustrated in Figure 97 appears.
98
DISPLAY CONTENT MANAGER — Installation and User Guide
DCM Console Configuration
Figure 97. DCM Console Environment Settings Dialog
2. Edit any of the information as needed.
•
The IP address of the local machine is generally not needed unless there
are multiple NICs in the machine and you need to specify an IP address
other than the one specified during installation.
•
To browse for a new material folder on the local machine, click the Settings... button next to the Folder: field.
•
The Database Server Name and Instance Name were specified during
installation. You may direct the DCM to a different server and/or database instance by changing this information.
3. When finished editing environment settings, click the OK button to close
the dialog.
Configure Default Settings
Default settings can be configured for Material and Playlists. The Material
defaults are applied when new material is added to the DCM. The Playlist
defaults are applied when new playlists are created.
To set Material and Playlist defaults, follow these steps:
1. Select Option>Default Settings... from the Menu bar.
The Default Settings dialog shown in Figure 98 appears.
2. If not already selected, select the Material tab.
DISPLAY CONTENT MANAGER — Installation and User Guide
99
Section 3 — Getting Started with the DCM
Figure 98. DCM Console Material Default Settings Dialog
Note
The Default button in the lower left corner of the Material tab may be used to
return all Material default values to the original values set by the DCM installation process.
The Material tab defaults are divided into three sections:
3. For each item, select the desired default value as explained below:
Length Defaults
Set defaults for the length of Still, Ticker, Flash, HTML and URI assets.
Note
100
Video, QuickTime and Audio assets have a playback time that is determined
by the asset file. The playback time can be adjusted to be less than the original
time; however, there is no default length for these assets. Serial Commands
and Volume assets do not have length settings.
DISPLAY CONTENT MANAGER — Installation and User Guide
DCM Console Configuration
Length is a numeric value and is adjusted by entering the desired length
with the keyboard or clicking the arrows to increment or decrement the
selected value. Length is expressed in hours:minutes:seconds
(HH:MM:SS).
Still Image Defaults
These defaults apply to Still Image assets only when they are registered in
the DCM.
Rotation
A still image may be rotated with respect to its current orientation.
Click the list button [V] on the Rotation drop-down to see the list of
choices for that value. Select the desired value from the list of choices.
See Figure 99 for Still Image Rotation choices.
Figure 99. Still Image Rotation Selection
Note
90-deg.(CW) is a clockwise rotation. 90-deg.(CCW) is a counter-clockwise
rotation.
Stretch
A still image may be stretched to fill the dimensions of a particular
viewing area. When stretched, the image may or may not have an
acceptable appearance based on the still image aspect ratio and orientation and the dimensions of the viewing area.
To change the default stretch setting for a still image, click the list
button [V] on the stretch drop-down and select ON or OFF (see
Figure 100) from the list as desired.
Figure 100. Still Image Stretch Selection
Ticker Defaults
These defaults apply to Ticker assets when they are created in the DCM.
DISPLAY CONTENT MANAGER — Installation and User Guide
101
Section 3 — Getting Started with the DCM
Text Color and Background (BG) Color
The default ticker text color and background color are selected by
clicking on the Text Color... and BG Color... buttons and using the Color
dialog illustrated in Figure 101.
Figure 101. Ticker Color Dialog
Select the desired color through any of the methods available in the
dialog and click the OK button to close the dialog.
Opacity
Ticker background color opacity is adjusted with a slider as illustrated
in Figure 102. The slider scale is from 0% to 100% opacity. For a completely transparent background, set opacity to 0%. For a completely
opaque background (nothing shows through), set the opacity to 100%.
Figure 102. Ticker Opacity Slider
Move the slider to the desired opacity setting.
Note
102
The opacity may also be set by entering the desired numeric opacity value
directly in the numeric entry box.
DISPLAY CONTENT MANAGER — Installation and User Guide
DCM Console Configuration
Font Size
The default font size is adjusted with a slider as shown in Figure 103.
The slider scale is from 10 point to 200 point font size.
Figure 103. Ticker Font Size Selection
Move the slider to the desired font size setting.
Note
The font size may also be set by entering the desired numeric font size value
directly in the numeric entry box.
Direction
The Direction setting determines the direction in which Ticker text will
scroll. To set a direction default, click the list button [V] on the Direction drop-down and select the desired value from the list of choices.
See Figure 104 for Ticker Direction choices.
Figure 104. Ticker Direction Selection
Speed
The Speed setting determines the speed at which Ticker text will scroll.
To set a speed default, click the list button [V] on the Speed drop-down
and select the desired value from the list of choices.
See Figure 105 for Ticker Speed choices.
Figure 105. Ticker Speed Selection
DISPLAY CONTENT MANAGER — Installation and User Guide
103
Section 3 — Getting Started with the DCM
Rotation
The Rotation changes the orientation of the Ticker text with respect to
its current orientation. To set a rotation default, click the list button [V]
on the Rotation drop-down and select the desired value from the list of
choices.
See Figure 106 for Ticker Rotation choices.
Figure 106. Ticker Rotation Selection
Note
90-deg.(CW) is a clockwise rotation. 90-deg.(CCW) is a counter-clockwise
rotation.
Font
The default ticker text font is selected by clicking on the Font Selection...
button and using the Font dialog illustrated in Figure 107.
Figure 107. Ticker Font Selection
Select the desired font from the font list and select the any desired font
style settings. Click the OK button to close the dialog.
104
DISPLAY CONTENT MANAGER — Installation and User Guide
DCM Console Configuration
Note
The font size setting in this dialog is ignored. The default Ticker font size is
set using the Font Size slider.
4. Click the Apply button to apply the Material defaults.
5. After setting the Material defaults, click on the Playlist tab in the
Default Settings dialog.
The dialog illustrated in Figure 108 appears.
Figure 108. DCM Console Playlist Default Settings
Note
The Default button in the lower left corner of the Playlist tab will return the
Playlist Length to the original default value set during the DCM Installation
process.
6. Set the desired Playlist Length default.
Length is a numeric value and is adjusted by entering the desired length
with the keyboard or clicking the arrows to increment or decrement the
selected value. Length is expressed in hours:minutes:seconds
(HH:MM:SS).
DISPLAY CONTENT MANAGER — Installation and User Guide
105
Section 3 — Getting Started with the DCM
7. Click the OK button to apply all current default settings and close the
Default Settings dialog.
Close/Exit the DCM Console
To close the DCM Console application, do one of the following:
106
•
Select File>Exit from the Menu bar.
•
Click the Close
tion window.
•
Press the [ALT]+[F4] keys on the keyboard.
icon in the upper right corner of the DCM applica-
DISPLAY CONTENT MANAGER — Installation and User Guide
Section
4
Material Screen
The Material screen is where content to be managed by the DCM is registered and transferred to the FTP Server.
When the Material button is selected from the Navigation bar, or, one of the
methods explained in Alternative Function Screen Access Methods on page 92
is used, the Material Screen appears with its associated display areas and
function bars as illustrated in Figure 109. These elements are used in the
management of assets recorded in the DCM database.
Figure 109. Material Screen
Note
Figure 109 depicts the Material Display Area with a material type (Video)
open. The Material Display Area will be blank when the Material Screen is first
accessed.
DISPLAY CONTENT MANAGER — Installation and User Guide
107
Section 4 — Material Screen
Material Details
Material in the DCM database is organized by material type. The supported
material types include the following:
Video
MPEG-2 transport stream, MPEG-2 program stream and MPEG-4 (H.264)
(.MPG, .MPEG, M2P, .M2T, .MTS, M2TS). See Add a Video Asset on page 124.
Still Images
JPEG, BMP, GIF (transparent GIF supported), PNG (transparent PNG supported). See Add a Still Image Asset on page 127.
Text/Ticker
TXT, RSS (may be registered as Uniform Resource Identifier [URI] material). See Create a New Ticker Asset on page 132.
Flash
SWF. See Add a Flash Asset on page 138.
Note
Animated Flash files up to Flash version 7 are supported.
QuickTime
MOV, QT, MPV, 3GP, 3GPP, 3G2. Supported by MediaEdge-SWT4 client
only. See Add a QuickTime Asset on page 140.
HTML
HTML, HTM. See Add an HTML Asset on page 143.
Audio
WAV (PCM: 8/16/24 bit, 1/2/5.1 ch.), MP3. See Add an Audio Asset on
page 147.
Uniform Resource Identifier
Any URI such as a web URL, UNC path, RSS feed, etc. See Create a URI
Asset on page 150.
Serial Commands
ASCII, can be specified as HEX (only supports sending). See Create a Serial
Command on page 154.
108
DISPLAY CONTENT MANAGER — Installation and User Guide
Material Type Display
Volume
Volume settings managed by the DCM. See Create a Volume Asset on
page 159.
Installing the DCM loads sample files of the Video, Still Image, Text/Ticker,
Flash, QuickTime, HTML, Audio and Volume content types into the DCM
database. This content may be used while learning how to work with the
DCM Console.
Material Type Display
When the DCM Console is launched for the first time, the Material screen
appears and content of the Video type is displayed. Subsequent launches of
the DCM Console may not display the video type if the material type was
changed prior to exiting the DCM Console. The last material type to be displayed will be the material type displayed when the DCM Console is next
started. For information on selecting the material type to display see Change
Material Type Display on page 111.
The number in parentheses next to the material type name indicates the
number of assets of that type currently registered in the DCM.
To see the details for a particular asset, select that asset from the material
display screen by clicking on the desired asset as shown in Figure 110.
Figure 110. Asset Selected in Video Type List
The selected asset is highlighted in blue.
The file properties and information for the selected asset appear in the
Material Properties Window and Material Information Window as illustrated in Figure 111.
DISPLAY CONTENT MANAGER — Installation and User Guide
109
Section 4 — Material Screen
Note
The information displayed in the Properties Window and Information
Window varies based on the selected material type.
Figure 111. Selected Asset Properties and Information
Material Properties Window (Video Material Type)
The Material Properties Window shows asset properties such as;
•
Short file name
•
Material category
•
Playback time (asset length)
•
Material type and file name
•
Volume setting
Material Information Window (Video Material Type)
The Material Information Window may contain the following information:
110
•
File format
•
Asset length
•
File size on disk
•
File size in pixels (horizontal x vertical)
•
Video bitrate
DISPLAY CONTENT MANAGER — Installation and User Guide
Adjust Column Widths
•
Audio Type
•
Audio bitrate
•
Audio sample rate
Adjust Column Widths
All column widths in the Material Display Area may be adjusted by dragging the column separator to the left or right until the desired column
width is displayed.
To adjust the column width, place the cursor on the separator between
column headers as illustrated in Figure 112 and drag to adjust the width as
desired.
Figure 112. Adjust Material Display Column Width
Note
Column widths are adjusted independently in the display area for each material type. Adjusting the columns in the Video Material Display Area does not
adjust the columns to those same widths for the display areas of other material types.
Figure 113 shows a Still Image Material Display Area in which the columns
widths have been adjusted to accommodate the longest entry in each
column.
Figure 113. Column Widths Adjusted for Still Image Display Window
Change Material Type Display
The Material Screen Tool bar provides a convenient way to change the
Material Type that is displayed in the Material Display Area. The Tool bar
material type selection buttons are shown in Figure 114.
DISPLAY CONTENT MANAGER — Installation and User Guide
111
Section 4 — Material Screen
Figure 114. Material Type Selection Buttons
The currently-selected material type is highlighted in light blue. In the
example above, the Video material type is selected.
To change the material type display to a different type, click the button icon
that corresponds to the desired material type as illustrated in Table 1. Alternatively, you may use the listed Menu bar method.
Table 1. Material Type Display Icons and Menu Alternatives
Icon
Display Type
Menu Bar Method
Video
View>Material type>Video
Still Image
View>Material type>Image
Ticker
View>Material type>Ticker
Flash
View>Material type>Flash
QuickTime
View>Material tupe>QuickTime
HTML
View>Material type>HTML
Audio
View>Material type>Audio
URI
Serial Command
Volume
View>Material type>URI
View>Material type>Command
View>Material type>Volume
When a material type button is clicked or a material type menu item is
selected, the Material Display Area displays all managed content of the
selected type.
112
DISPLAY CONTENT MANAGER — Installation and User Guide
Change Display Style
Change Display Style
The Material Screen Tool bar provides a convenient way to change the
display style of the Material Display Area. The Tool bar display style selection buttons are shown in Figure 115.
Figure 115. Display Style Selection Buttons
The currently-selected display style is highlighted in light blue. In the
example above, the Details display style is selected.
To change the display style in the Material Display Area, click the button
icon that corresponds to the desired display style as illustrated in Table 2.
Alternatively, you may use the listed Menu bar method.
Table 2. Display Style Icons and Menu Alternatives
Icon
Display Style
Thumbnails
Details
Menu Bar Method
View>Thumbnails
View>Details
The Details display style is illustrated in Figure 110 on page 109.
The Thumbnails style is shown in Figure 116.
Figure 116. Thumbnails Display Style
DISPLAY CONTENT MANAGER — Installation and User Guide
113
Section 4 — Material Screen
Manage Content Categories
Usually, when material of a certain type is displayed, all assets belonging
to that type are displayed in the Material Display Area. However, it is possible to limit the display of material to only those assets that correspond to
a specified category.
The default content categories are:
•
All (displays all content regardless of category)
•
None (a category to which content not belonging to any other category
may be assigned.)
•
Material Sample (displays all sample content included with the DCM
installation, unless it is assigned to a different category.)
Note
Unless sample content is assigned to a new category, selecting “All” or
“Material Sample” will result in the display of all included content.
Select a Display Category
To display only the content that has been assigned to a specific category,
click the list button [V] on the category selection drop-down (see
Figure 117) at the top of Material Display Area Material Display Area and
select the desired category from the list.
Figure 117. Category Drop-Down List
After selecting the desired category, only assets that have been assigned to
that category will be displayed.
114
DISPLAY CONTENT MANAGER — Installation and User Guide
Manage Content Categories
Create a New Material Category
New material categories can be created to which content managed by the
DCM may be assigned.
Note
Categories are not material type specific. All categories are available regardless of the displayed material type. If a category is created while viewing the
Video material type, that category is also available for the assignment and
display of all other material types.
Follow these steps to create a new material category:
1. Do one of the following:
•
Click the Category
button on the Tool bar.
•
Select File>Category... from the Menu bar.
Either action opens the Category List dialog box (see Figure 118) from
which you can create, edit and delete content categories.
Note
The default categories “All” and “None” cannot be edited or deleted and,
therefore, do not appear in the Category List dialog.
Figure 118. Material Category List
Note
The value in the Number column indicates how many assets (across all material types) are currently assigned to the associated category.
2. Click the New button.
The Category Settings dialog shown in Figure 119 appears.
DISPLAY CONTENT MANAGER — Installation and User Guide
115
Section 4 — Material Screen
Figure 119. Category Settings Dialog
3. Enter the desired category name and click the OK button.
The Category List dialog reappears with the new category added to the category list (see Figure 120).
Figure 120. New Category Added
4. If desired, repeat Step 2 and Step 3 to add more categories.
Note
See the next section for instructions on editing or deleting categories.
5. Click the Close button to exit the Category List dialog.
116
DISPLAY CONTENT MANAGER — Installation and User Guide
Manage Content Categories
Edit or Delete Categories
To edit or delete a category, follow these steps:
1. Do one of the following:
•
Click the Category
button on the Tool bar.
•
Select File>Category... from the Menu bar.
Either action opens the Category List dialog box (see Figure 121) from
which you can create, edit and delete content categories.
Note
The default categories “All” and “None” cannot be edited or deleted and,
therefore, do not appear in the Category List dialog.
Figure 121. Material Category List
2. Select the category you wish the edit or delete (the selected category
will be highlighted in blue).
3. Click the Edit or Delete button as desired.
Note
A category cannot be deleted to which assets are currently assigned. In order
to delete a category, all assets assigned to that category must be reassigned
to another category.
If Edit was selected, the Category dialog shown in Figure 122 appears.
DISPLAY CONTENT MANAGER — Installation and User Guide
117
Section 4 — Material Screen
Figure 122. Category Settings Dialog
4. Edit the category name as desired and click the OK button.
The category name is changed.
Note
Categories to which material has been assigned may be edited. The new category name will automatically appear in the properties window for any material assigned to that category.
If Delete was selected, the error message illustrated in Figure 123 appears if
attempting to delete a category to which material is currently assigned.
Figure 123. Category Delete Error
If the category to be deleted is empty, the confirmation prompt shown in
Figure 124 appears.
118
DISPLAY CONTENT MANAGER — Installation and User Guide
Manage Content Categories
Figure 124. Category Delete Confirmation
5. Click Yes to confirm deletion of the category.
6. Click the Close button to exit the Category List dialog.
Assign Content to a Category
Content managed by the DCM may be added to categories for display and
management purposes.
To add material to a category, do the following:
1. In the Material Display Area, select the asset to be assigned to a
category.
The Properties Window displays the attributes associated with the selected
asset, including the assigned category, as illustrated in Figure 125.
DISPLAY CONTENT MANAGER — Installation and User Guide
119
Section 4 — Material Screen
Figure 125. Properties Window
2. Click in the Category field.
The Category field is highlighted in blue and a list button appears on the
current category name.
3. Click the list button [V] on the category name to display the category
drop-down list as shown in Figure 126.
120
DISPLAY CONTENT MANAGER — Installation and User Guide
Manage Content Categories
Figure 126. Category List in Properties Window
4. Highlight the desired category from the drop-down list and click on the
category name.
The asset is assigned to the selected category as illustrated in Figure 127.
DISPLAY CONTENT MANAGER — Installation and User Guide
121
Section 4 — Material Screen
Figure 127. Asset Assigned to New Category
Register Material
Content managed by the DCM is called "registered material.” Registered
material is stored in a folder structure managed by the DCM and the appropriate records are added to the DCM database. The DCM folder structure
on the Control PC is illustrated in Figure 128.
Figure 128. DCM Folder Structure
122
DISPLAY CONTENT MANAGER — Installation and User Guide
Register Material
If an existing file (video, still image, audio, etc.) stored in a folder outside
this structure is registered in the DCM, it is copied to the appropriate folder
in the DCM folder structure and records are created in the DCM database.
If the added file is already stored in the DCM folder structure, the original
file is simply registered in the DCM database.
Content of the same material type as the content displayed in the Material
Display Area may be added to the DCM. Available material types are
video, still image, ticker, Flash, HTML, audio, URI, command and volume.
Note
For Video, Still Image, Flash, QuickTime, HTML and Audio types, this action
does not create a new file. It is used to add an existing file of the displayed
type to the DCM database for management and distribution by the DCM. For
example, if Video is the currently displayed material type, the Add an Asset
procedure allows you to specify the location of an existing video file of a supported format which you wish to add to the DCM for management purposes.
Registered Material is uploaded to one or more FTP servers for distribution
to the playout devices in the MediaEdge system. See Upload Registered
Material to FTP Server on page 165 for more information concerning this
operation.
Add Assets By Drag and Drop
Video, Still Image, Flash, QuickTime, HTML and Audio assets may be
dragged from a Windows Explorer view to the Material Display Area. Only
files that are of the same type as those currently displayed in the Material
Display Area may be added. For example, if video content is currently displayed in the Material Display Area, video files may be registered in the
DCM via drag and drop. To register files in this manner, do the following:
1. Open Windows Explorer
2. Navigate to the directory containing the file(s) you wish to register in
the DCM.
3. Select and drag the desired file(s) from Windows Explorer and drop
them on the Video Material Display Area.
Other methods of adding content to the DCM are explained below for each
material type.
DISPLAY CONTENT MANAGER — Installation and User Guide
123
Section 4 — Material Screen
Add a Video Asset
After switching the Material Display Area (see Change Material Type Display
on page 111 for more information) to the Video material type, follow these
steps to add new video content to the DCM:
1. Do one of the following:
•
Click the New
button on the Tool bar.
•
Select File>New from the Menu bar.
•
Press the [CTRL]+[N] keys on the keyboard.
The Select Video File dialog shown in Figure 129 appears.
Figure 129. Select Video File Dialog
Note
When a video asset is selected, a thumbnail and file attributes are displayed.
2. Browse to the folder containing the video asset you wish to add and
select that asset.
3. Click the Open button.
Note
124
The asset may also be added to the DCM by double clicking the desired asset.
DISPLAY CONTENT MANAGER — Installation and User Guide
Register Material
As illustrated in Figure 130, the selected asset is added and is displayed in
the Material Display Area.
Figure 130. Video Asset Added to DCM
The Properties and Information Areas display the attributes of the newly
added video file.
Edit Video Properties
All of the properties of a video asset may be set to a value other than the
original value.
To change the values associated with a video asset, click on the value(s) you
wish to change and enter the desired value via the methods explained
below:
DISPLAY CONTENT MANAGER — Installation and User Guide
125
Section 4 — Material Screen
Name
Click in the name field and enter the desired video file name (see
Figure 131).
Figure 131. Video Name Entry
Category
Click in the Category field and then click the list button [V] that appears in
the field to see the list of choices for that value. Select the desired value from
the list of choices.
See Figure 132 for an example. The choices that appear in this list are
dependent upon the Category names that have been created. See Create a
New Material Category on page 115 for more information.
Figure 132. Video Category Selection
Playback Time
Playback time is a numeric value and is adjusted by clicking the Playback
Time field and entering the desired playback time by using the keyboard or
the arrows to increment or decrement the selected value. Playback time is
expressed in hours:minutes:seconds (HH:MM:SS).
Note
In the case of a video file which has an original playback time based on the
length of the video file, the playback time may only be shortened. The specified playback time cannot exceed the original playback time.
See Figure 133 for an example.
Figure 133. Video Playback Time Entry
File
If desired, the file associated with a DCM database record may be changed
by browsing for a different file.
126
DISPLAY CONTENT MANAGER — Installation and User Guide
Register Material
Note
Only files not already registered in the DCM may be associated with an
existing DCM entry.
Volume
Volume with a slider as illustrated in Figure 134. The slider scale is from
0% to 50%. Each tick mark represents a 5% change in volume.
Figure 134. Video Volume Slider
Move the slider to the desired volume setting.
Add a Still Image Asset
After switching the Material Display Area (see Change Material Type Display
on page 111 for more information) to the Still Image material type, follow
these steps to add new still image content to the DCM:
1. Do one of the following:
•
Click the New
button on the Tool bar.
•
Select File>New from the Menu bar.
•
Press the [CTRL]+[N] keys on the keyboard.
The Select Still Image File dialog shown in Figure 135 appears.
DISPLAY CONTENT MANAGER — Installation and User Guide
127
Section 4 — Material Screen
Figure 135. Select Still Image File Dialog
Note
When a still image asset is selected, a thumbnail and file attributes are displayed.
2. Browse to the folder containing the still image asset you wish to add
and select that asset.
3. Click the Open button.
128
Note
The asset may also be added to the DCM by double clicking the desired asset.
Note
Due to limitations in hardware playout devices (HDMA-4000/HDMA-4100/
STB3 DS/STB4/STB4H), still images are limited to a maximum resolution of
2000x2000 pixels in order to avoid potential playout issues. If either dimension exceeds 2000 pixels (e.g. 2048x1536) the error message shown in
Figure 136 appears and the image cannot be registered in the DCM. If you
wish to add an image that is too large, it must be resized to meet the resolution limitations.
DISPLAY CONTENT MANAGER — Installation and User Guide
Register Material
Figure 136. DCM Console Image Too Big Error
If the selected image is within the resolution limitations, the asset is added
to the DCM, as illustrated in Figure 137, and is displayed in the Material
Display Area.
Figure 137. Still Image File Added to DCM
The Properties and Information Areas display the attributes of the newly
added still image file.
DISPLAY CONTENT MANAGER — Installation and User Guide
129
Section 4 — Material Screen
Edit Still Image Properties
All of the properties of a still image asset may be set to a value other than
the original value.
To change the values associated with a still image asset, click on the
value(s) you wish to change and enter the desired value via the methods
explained below:
Name
Click in the name field and enter the desired still image asset name (see
Figure 138).
Figure 138. Still Image Name Entry
Category
Click in the Category field and then click the list button [V] that appears in
the field to see the list of choices for that value. Select the desired value from
the list of choices.
See Figure 139 for an example. The choices that appear in this list are
dependent upon the Category names that have been created. See Create a
New Material Category on page 115 for more information.
Figure 139. Still Image Category Selection
Length
Length is a numeric value and is adjusted by clicking the Length field and
entering the desired length by using the keyboard or the arrows to increment or decrement the selected value. Length is expressed in hours:minutes:seconds (HH:MM:SS).
See Figure 140 for an example.
Figure 140. Still Image Length Entry
130
DISPLAY CONTENT MANAGER — Installation and User Guide
Register Material
File
If desired, the file associated with a DCM database record may be changed
by browsing for a different file.
Note
Only files not already registered in the DCM may be associated with an
existing DCM entry.
Rotation
A still image may be rotated with respect to its current orientation.
Click in the Rotation field and then click the list button [V] that appears in
the field to see the list of choices for that value. Select the desired value from
the list of choices.
See Figure 141 for Still Image Rotation choices.
Figure 141. Still Image Rotation Selection
Note
90-deg.(CW) is a clockwise rotation. 90-deg.(CCW) is a counter-clockwise
rotation.
Stretch
A still image may be stretched to fill the dimensions of a particular viewing
area. When stretched, the image may or may not have an acceptable
appearance based on the still image aspect ratio and orientation and the
dimensions of the viewing area.
To change the stretch setting for a still image, click in the Stretch field and
then click the list button [V] that appears to select ON or OFF (see
Figure 142) from the list as desired.
Figure 142. Still Image Stretch Selection
To verify the appearance of a stretched image, preview the image by
selecting Action>Preview... from the Menu bar.
DISPLAY CONTENT MANAGER — Installation and User Guide
131
Section 4 — Material Screen
Create a New Ticker Asset
Content of the same material type as the content displayed in the Material
Display Area may be added to the DCM. Available material types are
video, still image, ticker, QuickTime, Flash, HTML, audio, URI, command
and volume.
Note
Ticker, URI, command and volume files are created in the DCM rather than
adding existing files as with the other material types.
After switching the Material Display Area (see Change Material Type Display
on page 111 for more information) to the Ticker material type, follow these
steps to create a new ticker asset in the DCM:
1. Do one of the following:
•
Click the New
button on the Tool bar.
•
Select File>New from the Menu bar.
•
Press the [CTRL]+[N] keys on the keyboard.
A new Ticker asset is added to the DCM and is displayed in the Material
Display Area as shown in Figure 143.
Figure 143. Ticker Asset Added to the DCM
Default properties are assigned to the ticker asset as illustrated in
Figure 144. See Ticker Defaults on page 101 for more information on setting
ticker defaults.
132
DISPLAY CONTENT MANAGER — Installation and User Guide
Register Material
Figure 144. Default Ticker Properties
Edit Ticker Properties
All of the properties of a ticker asset may be set to a value other than the
defaults.
To change the values associated with a ticker asset, click on the value(s) you
wish to change and enter the desired value via the methods explained
below:
Text
For text fields, just click in the field and enter the desired text. The following are text entry fields:
Name
Click in the name field and enter the desired ticker name (see
Figure 145).
Figure 145. Ticker Name Entry
DISPLAY CONTENT MANAGER — Installation and User Guide
133
Section 4 — Material Screen
String
Click in the String field and enter the desired ticker text into the Edit
Ticker dialog. Click the OK button when finished (see Figure 146).
Figure 146. Ticker String Entry
Drop-Down Lists
For drop-down lists, click in the desired value field and then click the list
button [V] that appears in the field to see the list of choices for that value.
Select the desired value from the list of choices.
Category
See Figure 147 for an example. The choices that appear in this list are
dependent upon the Category names that have been created. See Create
a New Material Category on page 115 for more information.
Figure 147. Ticker Category Selection
Direction
The Direction setting determines the direction in which ticker text will
scroll.
See Figure 148 for Ticker Direction choices.
134
DISPLAY CONTENT MANAGER — Installation and User Guide
Register Material
Figure 148. Ticker Direction Selection
Speed
The Speed setting determines the speed at which ticker text will scroll.
See Figure 149 for Ticker Speed choices.
Figure 149. Ticker Speed Selection
Rotation
The Rotation setting changes the orientation of the Ticker text with
respect to its current orientation.
See Figure 150 for Ticker Rotation choices.
Figure 150. Ticker Rotation Selection
Note
90-deg.(CW) is a clockwise rotation. 90-deg.(CCW) is a counter-clockwise
rotation.
Sliders, Numeric Entry and Dialogs
The remaining ticker values are adjusted through sliders, numeric entry
and dialogs.
DISPLAY CONTENT MANAGER — Installation and User Guide
135
Section 4 — Material Screen
Length
Length (running time) is a numeric value and is adjusted by clicking the
Length field and entering the desired length by using the keyboard or
the arrows to increment or decrement the selected value. Length is
expressed in hours:minutes:seconds (HH:MM:SS).
See Figure 151 for an example.
Figure 151. Ticker Length Entry
Text/Background Color
The text color and background color are selected using the Color dialog
illustrated in Figure 152.
Figure 152. Ticker Color Dialog
Select the desired color through any of the methods available in the
dialog and click the OK button to close the dialog.
Opacity
Ticker background color opacity is adjusted with a slider as illustrated
in Figure 153. The slider scale is from 0% to 100% opacity. Each tick
mark represents a 10% change in opacity. For a completely transparent
background, set opacity to 0%.
136
DISPLAY CONTENT MANAGER — Installation and User Guide
Register Material
Figure 153. Ticker Opacity Slider
Move the slider to the desired opacity setting. For a completely opaque
background (nothing shows through), set the opacity to 100%.
Font Size
The font size is adjusted with a slider as shown in Figure 154. The slider
scale is from 10 point to 200 point font size. Move the slider to the
desired font size.
Figure 154. Ticker Font Size Selection
Font
The font for the ticker is selected using the Font dialog illustrated in
Figure 155.
Figure 155. Ticker Font Selection
Select the desired font from the font list and select the any desired font style
settings. Click the OK button to close the dialog.
DISPLAY CONTENT MANAGER — Installation and User Guide
137
Section 4 — Material Screen
Note
The font size setting in this dialog is ignored. The Ticker font size is set using
the Font Size slider.
Add a Flash Asset
After switching the Material Display Area (see Change Material Type Display
on page 111 for more information) to the Flash material type, follow these
steps to add new Flash content to the DCM:
1. Do one of the following:
•
Click the New
button on the Tool bar.
•
Select File>New from the Menu bar.
•
Press the [CTRL]+[N] keys on the keyboard.
The Select Flash File dialog shown in Figure 156 appears.
Figure 156. Select Flash File Dialog
Note
Flash files up through the current version may be registered and managed by
the DCM; however, only Flash files up to version 7 can be played by hardware
playout devices. Only .swf formats are supported.
2. Browse to the folder containing the Flash asset you wish to add and
select that asset.
138
DISPLAY CONTENT MANAGER — Installation and User Guide
Register Material
3. Click the Open button.
Note
The asset may also be added to the DCM by double clicking the desired asset.
As illustrated in Figure 157, the selected asset is added and is displayed in
the Material Display Area.
Figure 157. Flash Asset Added to DCM
The Properties and Information Areas display the attributes of the newly
added Flash file.
Edit Flash Properties
All of the properties of a Flash asset may be set to a value other than the
original value.
To change the values associated with a Flash asset, click on the value(s) you
wish to change and enter the desired value via the methods explained
below:
Name
Click in the name field and enter the desired Flash asset name (see
Figure 158).
Figure 158. Flash Name Entry
Category
Click in the Category field and then click the list button [V] that appears in
the field to see the list of choices for that value. Select the desired value from
the list of choices.
DISPLAY CONTENT MANAGER — Installation and User Guide
139
Section 4 — Material Screen
See Figure 159 for an example. The choices that appear in this list are
dependent upon the Category names that have been created. See Create a
New Material Category on page 115 for more information.
Figure 159. Flash Category Selection
Length
Length is a numeric value and is adjusted by clicking the Length field and
entering the desired length by using the keyboard or the arrows to increment or decrement the selected value. Length is expressed in hours:minutes:seconds (HH:MM:SS).
See Figure 160 for an example.
Figure 160. Flash Length Entry
File
If desired, the file associated with a DCM database record may be changed
by browsing for a different file.
Note
Only files not already registered in the DCM may be associated with an
existing DCM entry.
Add a QuickTime Asset
After switching the Material Display Area (see Change Material Type Display
on page 111 for more information) to the QuickTime material type, follow
these steps to add new QuickTime content to the DCM:
1. Do one of the following:
•
Click the New
button on the Tool bar.
•
Select File>New from the Menu bar.
•
Press the [CTRL]+[N] keys on the keyboard.
The Select QuickTime File dialog shown in Figure 161 appears.
140
DISPLAY CONTENT MANAGER — Installation and User Guide
Register Material
Figure 161. Select QuickTime File Dialog
Note
When a QuickTime asset is selected, a thumbnail and file attributes are displayed.
2. Browse to the folder containing the QuickTime asset you wish to add
and select that asset.
3. Click the Open button.
Note
The asset may also be added to the DCM by double clicking the desired asset.
As illustrated in Figure 162, the selected asset is added and is displayed in
the Material Display Area.
Figure 162. QuickTime Asset Added to DCM
DISPLAY CONTENT MANAGER — Installation and User Guide
141
Section 4 — Material Screen
The Properties and Information Areas display the attributes of the newly
added QuickTime file.
Edit QuickTime Properties
All of the properties of a QuickTime asset may be set to a value other than
the original value.
To change the values associated with a QuickTime asset, click on the
value(s) you wish to change and enter the desired value via the methods
explained below:
Name
Click in the name field and enter the desired QuickTime asset name (see
Figure 163).
Figure 163. QuickTime Asset Name Entry
Category
Click in the Category field and then click the list button [V] that appears in
the field to see the list of choices for that value. Select the desired value from
the list of choices.
See Figure 164 for an example. The choices that appear in this list are
dependent upon the Category names that have been created. See Create a
New Material Category on page 115 for more information.
Figure 164. QuickTime Category Selection
Length
Length is a numeric value and is adjusted by clicking the Length field and
entering the desired length by using the keyboard or the arrows to increment or decrement the selected value. Length is expressed in hours:minutes:seconds (HH:MM:SS).
See Figure 165 for an example.
142
DISPLAY CONTENT MANAGER — Installation and User Guide
Register Material
Figure 165. QuickTime Length Entry
File
If desired, the file associated with a DCM database record may be changed
by browsing for a different file.
Note
Only files not already registered in the DCM may be associated with an
existing DCM entry.
Add an HTML Asset
After switching the Material Display Area (see Change Material Type Display
on page 111 for more information) to the HTML material type, follow these
steps to add new HTML content to the DCM:
1. Do one of the following:
•
Click the New
button on the Tool bar.
•
Select File>New from the Menu bar.
•
Press the [CTRL]+[N] keys on the keyboard.
The Select HTML File dialog shown in Figure 166 appears.
DISPLAY CONTENT MANAGER — Installation and User Guide
143
Section 4 — Material Screen
Figure 166. Select HTML File Dialog
Note
A web page usually consists of HTML text files and linked objects (pictures,
graphics, etc.) referenced within the HTML text. To register an HTML file in
the DCM, add the HTML file(s) first and then add the referenced objects as
child materials in the Properties Window. URIs for child materials must be
registered as relative paths.
2. Browse to the folder containing the HTML asset you wish to add and
select that asset.
3. Click the Open button.
Note
The asset may also be added to the DCM by double clicking the desired asset.
As illustrated in Figure 167, the selected asset is added and is displayed in
the Material Display Area.
144
DISPLAY CONTENT MANAGER — Installation and User Guide
Register Material
Figure 167. HTML Asset Added to DCM
The Properties and Information Areas display the attributes of the newly
added HTML file.
Edit HTML Properties
All of the properties of an HTML asset may be set to a value other than the
original value.
To change the values associated with an HTML asset, click on the value(s)
you wish to change and enter the desired value via the methods explained
below:
Name
Click in the name field and enter the desired HTML asset name (see
Figure 168).
Figure 168. HTML Asset Name Entry
Category
Click in the Category field and then click the list button [V] that appears in
the field to see the list of choices for that value. Select the desired value from
the list of choices.
See Figure 169 for an example. The choices that appear in this list are
dependent upon the Category names that have been created. See Create a
New Material Category on page 115 for more information.
Figure 169. HTML Category Selection
DISPLAY CONTENT MANAGER — Installation and User Guide
145
Section 4 — Material Screen
Length
Length is a numeric value and is adjusted by clicking the Length field and
entering the desired length by using the keyboard or the arrows to increment or decrement the selected value. Length is expressed in hours:minutes:seconds (HH:MM:SS).
See Figure 170 for an example.
Figure 170. HTML Length Entry
File
If desired, the file associated with a DCM database record may be changed
by browsing for a different file.
Note
Only files not already registered in the DCM may be associated with an
existing DCM entry.
Child Material
HTML files usually contain references to linked objects such as graphics,
photos, icons, etc. These files need to be added as Child Material to the
parent HTML file.
To add the Child files, do the following:
1. Click in the Child Material field.
A ChildFile Settings dialog appears as shown in Figure 171.
Figure 171. HTML ChildFIle Settings Dialog
146
DISPLAY CONTENT MANAGER — Installation and User Guide
Register Material
2. Click the New button and browse to the folder location which contains
the child files for the selected parent HTML file.
3. Select all of the child files which you wish to associate with the parent
HTML file.
Note
In the Files of type: drop-down list, select All Files(*) in order to see the files
of all types that may exist in the child file folder.
4. Click the Open button to add all selected files.
5. The selected files appear in the ChildFile Settings dialog as illustrated
in Figure 172.
Figure 172. HTML Child Files Selected
6. Click the Close button to associate the selected child files with the
parent HTML file.
To preview the HTML asset, select Action>Preview from the Menu bar.
Add an Audio Asset
After switching the Material Display Area (see Change Material Type Display
on page 111 for more information) to the Audio material type, follow these
steps to add new Audio content to the DCM:
1. Do one of the following:
•
Click the New
button on the Tool bar.
•
Select File>New from the Menu bar.
•
Press the [CTRL]+[N] keys on the keyboard.
The Select Audio File dialog shown in Figure 173 appears.
DISPLAY CONTENT MANAGER — Installation and User Guide
147
Section 4 — Material Screen
Figure 173. Select Audio File Dialog
Note
When an audio asset is selected, audio file attributes are displayed.
2. Browse to the folder containing the audio asset you wish to add and
select that asset.
3. Click the Open button.
Note
The asset may also be added to the DCM by double clicking the desired asset.
As illustrated in Figure 174, the selected asset is added and is displayed in
the Material Display Area.
Figure 174. Audio Asset Added to DCM
148
DISPLAY CONTENT MANAGER — Installation and User Guide
Register Material
Note
Audio may be imbedded in a video file or played out as a separate file; However, there is only one audio decoder in the MediaEdge hardware playout
devices. Audio from a video asset may be played or audio from a separate
audio asset may be played, but, both cannot be played simultaneously.
The Properties and Information Areas display the attributes of the newly
added Audio asset.
Edit Audio Properties
All of the properties of an audio asset may be set to a value other than the
original value.
To change the values associated with an audio asset, click on the value(s)
you wish to change and enter the desired value via the methods explained
below:
Name
Click in the name field and enter the desired audio file name (see
Figure 175).
Figure 175. Audio Name Entry
Category
Click in the Category field and then click the list button [V] that appears in
the field to see the list of choices for that value. Select the desired value from
the list of choices.
See Figure 176 for an example. The choices that appear in this list are
dependent upon the Category names that have been created. See Create a
New Material Category on page 115 for more information.
Figure 176. Audio Category Selection
Playback Time
Playback time is a numeric value and is adjusted by clicking the Playback
Time field and entering the desired playback time by using the keyboard or
the arrows to increment or decrement the selected value. Playback time is
expressed in hours:minutes:seconds (HH:MM:SS).
DISPLAY CONTENT MANAGER — Installation and User Guide
149
Section 4 — Material Screen
Note
In the case of an audio file which has an original playback time based on the
length of the audio file, the playback time may only be shortened. The specified playback time cannot exceed the original playback time.
See Figure 177 for an example.
Figure 177. Audio Playback Time Entry
File
If desired, the file associated with a DCM database record may be changed
by browsing for a different file.
Note
Only files not already registered in the DCM may be associated with an
existing DCM entry.
Volume
Volume with a slider as illustrated in Figure 178. The slider scale is from
0% to 50%. Each tick mark represents a 5% change in volume.
Figure 178. Audio Volume Slider
Move the slider to the desired volume setting.
Create a URI Asset
Uniform Resource Identifiers (Web page URLs, RSS feeds, UNC paths, etc.)
may be added to the DCM database.
After switching the Material Display Area (see Change Material Type Display
on page 111 for more information) to the URI material type, follow these
steps to add new URI content to the DCM:
1. Do one of the following:
•
Click the New
button on the Tool bar.
•
Select File>New from the Menu bar.
•
Press the [CTRL]+[N] keys on the keyboard.
A new Uniform Resource Identifier (URI) asset is added to the DCM and is
displayed in the Material Display Area as shown in Figure 179. See Edit URI
Properties on page 151 for information on entering the URI data.
150
DISPLAY CONTENT MANAGER — Installation and User Guide
Register Material
Figure 179. URI Asset Added to the DCM
Edit URI Properties
All of the properties of a URI asset may be set to a value other than the original value.
To change the values associated with a URI asset, click on the value(s) you
wish to change and enter the desired value via the methods explained
below:
Name
Click in the name field and enter the desired URI asset name (see
Figure 180).
Figure 180. URI Name Entry
Category
Click in the Category field and then click the list button [V] that appears in
the field to see the list of choices for that value. Select the desired value from
the list of choices.
See Figure 181 for an example. The choices that appear in this list are
dependent upon the Category names that have been created. See Create a
New Material Category on page 115 for more information.
Figure 181. URI Category Selection
DISPLAY CONTENT MANAGER — Installation and User Guide
151
Section 4 — Material Screen
Length
Length is a numeric value and is adjusted by clicking the Length field and
entering the desired length by using the keyboard or the arrows to increment or decrement the selected value. Length is expressed in hours:minutes:seconds (HH:MM:SS).
See Figure 182 for an example.
Figure 182. URI Length Entry
URI
The Uniform Resource Identifier can be any standard Internet resource reference such as a web page URL, RSS feed, UNC path, etc. Anything that can
be entered into a browser to locate a resource on the Internet or local computer may be entered as a URI in the DCM.
Figure 183. URI Entry
Entering the example URI in Figure 183 into a browser results in the image
display illustrated in Figure 184
152
DISPLAY CONTENT MANAGER — Installation and User Guide
Register Material
Figure 184. URI Displayed in Browser
Previewing the URI within the DCM results in the image display illustrated
in Figure 185.
Figure 185. URI Previewed in DCM
DISPLAY CONTENT MANAGER — Installation and User Guide
153
Section 4 — Material Screen
Create a Serial Command
A command is a string of ASCII or HEX characters that can be issued
through a serial connection to control a device.
Serial commands are built by specifying the device vendor, the device
model and the ASCII or HEX commands to control the device in the desired
manner.
After switching the Material Display Area (see Change Material Type Display
on page 111 for more information) to the Command material type, follow
these steps to create a new serial command in the DCM:
1. Do one of the following:
•
Click the New
button on the Tool bar.
•
Select File>New from the Menu bar.
•
Press the [CTRL]+[N] keys on the keyboard.
The Create a new command dialog shown in Figure 186 appears.
If no vendors exist in Command Material Display Area, Vendor will be the
selected type.
Figure 186. Create a New Command - Vendor Dialog
2. Enter then name of the device vendor and click the OK button.
The vendor is added to the left pane in the Serial Command Material
Display Area as illustrated in Figure 187.
154
DISPLAY CONTENT MANAGER — Installation and User Guide
Register Material
Figure 187. Vendor Added to DCM
3. With the Vendor name selected, click the New
bar.
button on the Tool
The Create a new command dialog again appears.
4. Click on the Model radio button and enter the name of the device model
you wish to create as shown in Figure 188.
Figure 188. Create a New Command - Model Dialog
5. Click the OK button the add the model to the DCM and close the dialog.
The device model now appears under the vendor in the left pane of the
Serial Command Material Display Area as illustrated in Figure 189.
Figure 189. Model Added to DCM
DISPLAY CONTENT MANAGER — Installation and User Guide
155
Section 4 — Material Screen
6. With the Model name selected, click the New
button on the Tool bar.
The Create a new command dialog again appears.
7. Click on the Command radio button and enter a name for the command
as shown in Figure 190.
Figure 190. Create a New Command Dialog
8. Click the OK button the add the Command to the DCM and close the
dialog.
A blank command entry is created in the Command Material Display Area
as shown in Figure 191.
Figure 191. Serial Command Added to DCM
9. Proceed to Edit Serial Command Properties for information on creating a
serial command string.
Edit Serial Command Properties
All of the properties of a Serial Command asset may be set to a value other
than the original value.
To change the values associated with a Serial Command asset, select the
command from the Serial Command Display Window, click on the value(s)
156
DISPLAY CONTENT MANAGER — Installation and User Guide
Register Material
you wish to change in the Properties Window and enter the desired value
via the methods explained below:
Name
Click in the name field and enter the desired Serial Command name (see
Figure 192) if you wish to change the name previously entered.
Figure 192. Serial Command Name Entry
Model
Click in the Model field and then click the list button [V] that appears in
the field to see the list of choices for that value. Select the desired value from
the list of choices.
See Figure 193 for an example. The choices that appear in this list are
dependent upon the Model names that have been created. See Create a Serial
Command on page 154 for more information.
Figure 193. Serial Command Model Selection
Command
To enter the serial command for controlling the selected device click in the
Command field. The Edit Command dialog illustrated in Figure 194
appears.
DISPLAY CONTENT MANAGER — Installation and User Guide
157
Section 4 — Material Screen
Figure 194. Serial Command Edit Command Dialog
Enter the following information:
•
Command
The sequence of control characters that are issued to the device to cause
it to perform the desired action.
Note
•
Consult the documentation for the designated device to learn what command
sequences, formats and terminators are accepted for control of the device.
Code type
Serial codes may be issued as ASCII or HEX characters
•
Teminator
The special character (if any) that is needed to terminate a particular
command sequence
After entering the required information for the selected command, click the
OK button close the Edit command dialog.
Terminator
If you wish to change the terminator for the selected command, click in the
Terminator field and select a new terminator in the Edit command dialog
(see Figure 194).
Figure 195 shows a sample Serial Command Properties Window after all
data has been entered.
158
DISPLAY CONTENT MANAGER — Installation and User Guide
Register Material
Figure 195. Serial Command Properties Window
Create a Volume Asset
Volume assets are used to apply volume settings to material distributed
through the DCM. By default, the DCM contains the following volume
assets:
Volume 50
Sets volume of left and right channels at 50%.
Note
Volume settings are cumulative; 50% to the left channel and 50% to the right
channel is a 100% (maximum) volume setting.
Volume 40
Sets volume of left and right channels at 40%.
Volume 30
Sets volume of left and right channels at 30%.
DISPLAY CONTENT MANAGER — Installation and User Guide
159
Section 4 — Material Screen
Volume Mute
Mutes volume on both left and right channels.
Volume Mute Cancel
Cancels the mute and restores volume to the previous level.
The manner in which volume settings affect the volume level is determined
by the playout device as follows:
STB3-DS/STB4/STB4H/HDMA-4000/HDMA-4100
The volume setting specifies the decibel level of gain.
•
Volume 50: 0dB gain
•
Volume 40: -10 dB gain
•
Volume 30: -20db gain
•
Volume 20: -30dB gain
•
Volume 10: -40dB gain
SWT3-DS/SWT4
The volume setting adjusts the PC volume level through the PC operating
system with maximum volume specified by Volume 50 and minimum
volume level specified by Volume 0 (may or may not be mute depending
on PC OS volume settings).
After switching the Material Display Area (see Change Material Type Display
on page 111 for more information) to the Volume material type, follow these
steps to create a new Volume asset in the DCM:
1. Do one of the following:
•
Click the New
button on the Tool bar.
•
Select File>New from the Menu bar.
•
Press the [CTRL]+[N] keys on the keyboard.
The Volume Settings dialog shown in Figure 196 appears.
160
DISPLAY CONTENT MANAGER — Installation and User Guide
Register Material
Figure 196. Volume Settings Dialog
2. Enter the desired volume setting name.
Note
Unless the default Mute and Mute Cancel volume assets have been deleted,
there is no need to create volume assets of these types.
3. Set the volume level as desired for each channel.
Note
Left and Right channels can be adjusted independently by clicking on the
Adjust simultaneously checkbox to deselect this option. If this option remains
selected, adjusting one channel adjusts the other to the same level.
4. Click the OK button to close the Volume Settings dialog and add the
Volume asset to the DCM.
As shown in Figure 197, the volume asset is created and is displayed in the
Volume Material Display Area.
Figure 197. Volume Asset Added to DCM
DISPLAY CONTENT MANAGER — Installation and User Guide
161
Section 4 — Material Screen
Edit Volume Properties
All of the properties of a Volume asset may be set to a value other than the
original value.
To change the values associated with a Volume asset, select the asset from
the Volume Material Display Area, click on the value(s) you wish to change
in the Properties Window and enter the desired value via the methods
explained below:
Name
Click in the name field and enter the desired Volume asset name (see
Figure 198) if you wish to change the name previously entered.
Figure 198. Volume Asset Name Entry
Type, Left and Right
All of these values are edited in the Volume Settings dialog. When you click
on any of these fields, the Volume Setting dialog illustrated in Figure 199
appears.
Figure 199. Volume Settings Dialog
Edit the values as desired and click the OK button to close the dialog.
162
DISPLAY CONTENT MANAGER — Installation and User Guide
Preview Material
Preview Material
After making changes to the Properties of an asset, it is often useful to
preview that asset to verify the changes. Of course, any asset of most material types can be previewed at any time.
Assets may be previewed be selecting Action>Preview... from the Menu bar
or by right clicking on the desired asset and selecting Preview... from the
menu or pressing the [P] key on the keyboard (see Figure 200).
Figure 200. Right Click Menu - Preview
Figure 201 shows the attributes for a ticker in the Ticker Properties
Window.
Figure 201. Sample Ticker Asset Properties
Figure 202 shows what the Preview window displays when the ticker asset
is previewed.
DISPLAY CONTENT MANAGER — Installation and User Guide
163
Section 4 — Material Screen
Figure 202. Ticker Preview Window
Delete Material
To delete material of any type from the DCM, do the following:
1. Change the Material Type Display to the material type containing the
asset you wish to delete. See Change Material Type Display on page 111 for
more information.
2. From the Material Type Display, select the asset you wish to delete.
3. Do any of the following to delete the asset:
164
•
Click the Delete
button on the Tool bar.
•
Select Edit>Delete from the Menu bar.
•
Press the [DEL] key on the keyboard.
•
Right click on the asset and select Delete from the menu or press the [D]
key on the keyboard (see Figure 203).
DISPLAY CONTENT MANAGER — Installation and User Guide
Upload Registered Material to FTP Server
Figure 203. Right Click Menu - Delete
If the selected material can be deleted, the DCM Console delete confirmation dialog shown in Figure 204 appears.
Figure 204. DCM Console Delete Confirmation Dialog
4. Click the Yes button to confirm deletion of the selected asset.
Note
If the asset selected for deletion is used in a playlist, the error dialog illustrated in Figure 205 appears. Click the OK button to close the message. Clear
the asset from the indicated playlist if you wish to delete it and return to
Step 1. An asset may be used in more than one playlist.
Figure 205. DCM Console Delete Material Error Dialog
Upload Registered Material to FTP Server
Material registered in the DCM must be uploaded to one or more FTP
servers for distribution to the playout devices throughout the MediaEdge
system. Each playout device will download the necessary material from the
FTP server(s).
DISPLAY CONTENT MANAGER — Installation and User Guide
165
Section 4 — Material Screen
To upload registered material to an FTP server, follow these steps:
1. Select File>FTP>Upload from the Menu bar.
The FTP Server dialog shown in Figure 206 appears.
Figure 206. FTP Server Dialog
2. From the list of available FTP servers, select the FTP server(s) to which
to upload registered content and click the OK button.
Note
If more than one FTP server is displayed in the FTP Server dialog, all should
be selected in order to ensure that all content is properly uploaded.
The DCM Console upload confirmation dialog illustrated in Figure 207
appears.
Figure 207. DCM Console Upload Confirmation
3. Click the Yes button to begin the upload of registered content to the
selected FTP server(s).
During the upload process, several information dialogs such as those
shown in Figure 208 will appear.
166
DISPLAY CONTENT MANAGER — Installation and User Guide
Upload Registered Material to FTP Server
Figure 208. Uploading Process Information Dialogs
When the upload of registered content is complete, the Upload Result
dialog illustrated in Figure 209 appears.
Note
Depending upon the speed of the network and the amount and size of material to be uploaded, the upload process could take several minutes or several
hours. If new material is registered often, FTP upload times can be minimized
by performing this operation more frequently as only new registered material
not previously uploaded is uploaded in any FTP upload session.
DISPLAY CONTENT MANAGER — Installation and User Guide
167
Section 4 — Material Screen
Figure 209. FTP Upload Results Dialog
4. Review the results and verify that all content uploaded successfully,
then click the OK button to close the Upload Result dialog,
Content that has been successfully uploaded to an FTP Server will display
100% in the Upload Status column in the Material Display Area details
view as illustrated in Figure 210.
168
DISPLAY CONTENT MANAGER — Installation and User Guide
Upload Registered Material to FTP Server
Figure 210. DCM Material Upload Status
Reset Upload Status
If you want to force selected asset(s) to be uploaded again during the next
FTP upload session, the upload status of a particular asset may be reset.
This may be desirable if you know the original content has changed on disk
storage since it was last uploaded to an FTP server.
To reset the upload status of an asset, do the following:
1. Switch the Material Display Area to the material type containing the
asset for which you wish to reset upload status. See Change Material
Type Display on page 111 for more information.
2. Select the asset for which you wish to reset upload status. See
Figure 211.
DISPLAY CONTENT MANAGER — Installation and User Guide
169
Section 4 — Material Screen
Figure 211. Select Asset to Change Upload Status
3. Select Edit>Reset Upload Status from the Menu bar or right click on the
asset and select Reset Upload Status from the menu or press the [R] key
on the keyboard (see Figure 212).
Figure 212. Right Click Menu - Reset Upload Status
The DCM Console reset upload status confirmation dialog illustrated in
Figure 213 appears.
Figure 213. DCM Console Reset Upload Status Confirmation Dialog
4. Click the Yes button to reset the upload status of the selected asset.
As shown in Figure 214, the Upload Status of the selected asset is reset to
0% and the asset will be uploaded to the FTP server(s) during the next
upload session.
170
DISPLAY CONTENT MANAGER — Installation and User Guide
Download Material from FTP Server
Figure 214. Upload Status Reset
Download Material from FTP Server
Registered Material stored on an FTP server in the DCM folder structure
may also be downloaded to the local DCM folder structure on the DCM
Control PC. This may become necessary if files in the local DCM folder
structure are accidentally deleted. Downloading from the FTP server will
restore these files. In order to preview assets, they must exist in the local
DCM database and on the local hard drive.
Note
Only registered content that does not exist in the local DCM folder structure
will be downloaded. Files that are not registered in the DCM, but, exist in the
FTP server folder structure are not downloaded. FIles that exist in both locations are also not downloaded.
To download material from an FTP server, follow these steps:
1. Select File>FTP>Download from the Menu bar.
The FTP Server dialog shown in Figure 215 appears.
Figure 215. FTP Server Dialog
DISPLAY CONTENT MANAGER — Installation and User Guide
171
Section 4 — Material Screen
2. From the list of available FTP servers, select the FTP server(s) from
which you wish to download content and click the OK button.
The DCM Console download confirmation dialog illustrated in Figure 216
appears.
Figure 216. DCM Console Download Confirmation
3. Click the Yes button to begin the download of content from the selected
FTP server(s).
A Downloading progress dialog appears during the download process.
When the download of all missing files is complete, the Download Result
dialog illustrated in Figure 217 appears.
Figure 217. FTP Download Result Dialog
4. Click the OK button to close the dialog.
172
DISPLAY CONTENT MANAGER — Installation and User Guide
Section
5
Layout Screen
The Layout screen is where multi-region digital signage display layouts are
created and managed.
When the Layout button is selected from the Navigation bar, or, one of the
methods explained in Alternative Function Screen Access Methods on page 92
is used, the Layout Screen with its associated display areas and function
bars appears as illustrated in Figure 218. These elements are used in the
management of display screen layouts which determine the manner in
which content registered in the DCM will be displayed by playout devices.
Figure 218. Layout Screen
Note
Figure 218 depicts the Layout Display Area with a screen layout open. The
Layout Display Area will be blank when the Layout Screen is first accessed.
DISPLAY CONTENT MANAGER — Installation and User Guide
173
Section 5 — Layout Screen
Layout Details
Layouts are comprised of one or more regions in which content may be displayed. When a new layout is created, the overall dimensions of the display
area and of each content region are defined.
Figure 219 shows a display layout and the corresponding details that
define this layout.
Figure 219. Layout Detail
Layout Name
The name assigned to the layout when it is created. The name can be modified at any time.
Layout Category
The layout category to which the layout belongs. Categories are userdefined.
Layout Size
The overall width and height, in pixels, of the entire defined display area
(includes all regions).
Region Name
The name of the currently-selected region. This name is assigned when the
region is created.
174
DISPLAY CONTENT MANAGER — Installation and User Guide
Manage Layout Categories
Region Number
A sequential number that represents the selected region within the layout.
This number can be changed.
Region Position
The position of the upper left corner of the selected region within the
defined layout dimensions. In the example above, the upper left corner of
the Ticker region begins at a point 0 pixels horizontally from the left edge
and 930 pixels vertically from the top of the layout.
Region Size
The dimensions of the selected region beginning at the Region Position
coordinates. In the example above, the Ticker region is 1920 pixels horizontally by 150 pixels vertically beginning at position 0, 930 in the defined
layout.
Use Video Material
This checkbox is selected if video material may be displayed in the region.
Enable/Disable Region
All the defined regions are listed with their region number, assigned aspect
ratio (if any) and name. A check in the checkbox indicates the region is currently enabled within the layout. Removing the check mark disables the
region and no content can be displayed in that region of the layout.
Manage Layout Categories
When opening a layout for editing, it is possible to limit the layout list to
only those layouts that correspond to a specific layout category as well as a
specific playout device.
The default Layout categories are:
•
All (displays all layouts regardless of category)
•
None (a category to which layouts not belonging to any other category
may be assigned.)
•
Layout Sample1 (some of the sample layouts are assigned to this category)
•
Layout Sample2 (some of the sample layouts are assigned to this category)
DISPLAY CONTENT MANAGER — Installation and User Guide
175
Section 5 — Layout Screen
Open/Display Layouts by Category
To display only the layouts that are assigned to a specific category for a particular playout device, follow these steps.
1. Do one of the following:
•
Click the Open
button on the Tool bar.
•
Select File>Open... from the Menu bar.
The Layout List dialog illustrated in Figure 220 appears.
Figure 220. Layout List Dialog
2. Click the list button [V] on the Category selection drop-down and
select the desired category from the list.
Note
The category All displays all layouts for the selected Product (playout device)
and not necessarily all defined layouts managed by the DCM.
3. Click the list button [V] on the Product selection drop-down and select
the desired product (playout device) from the list.
After selecting the desired category and product, layouts that are assigned
to the selected category for the selected product will be displayed.
176
DISPLAY CONTENT MANAGER — Installation and User Guide
Manage Layout Categories
4. Select the desired layout from the Layout list and click the OK button to
open that layout.
Region Color Coding
Layout regions are color coded.
Selected Region
The selected region on all layouts, regardless of product type, is blue. See
Table 3.
Non-Selected Regions
The color of non-selected regions depends upon the Product (playout
device) to which the layout is assigned. See Table 3 for details.
Video Region
Region(s) for which the Use Video Material option is selected are yellow as
shown in Table 3.
Note
If a video-enabled region is selected, it will be blue instead of yellow. The
SWT3-DS and SWT4 support up to four video-enabled regions.
Table 3. Layout Region Color Coding
Color
Region
Product
Color Name
Non-Selected Video
All Products
Yellow
Selected Region
All Products
Blue
Non-Selected
Non-Video
HDMA-4000/MEDIAEDGE-STB3
Green
Non-Selected
Non-Video
MEDIAEDGE-SWT3-DS
Orange
Non-Selected
Non-Video
HDMA-4100/MEDIAEDGE-STB4/
MEDIAEDGE-STB4H
Light Gold
Non-Selected
Non-Video
MEDIAEDGE-SWT4
Pink
A sample layout for each product (playout device) is illustrated in
Figure 221.
DISPLAY CONTENT MANAGER — Installation and User Guide
177
Section 5 — Layout Screen
Figure 221. Region Color Coding
Note
178
Color coding applies to the layout thumbnails in the Layout List dialog as
well. The layout thumbnail color for each product is the same as the color for
that product’s non-selected, non-video regions.
DISPLAY CONTENT MANAGER — Installation and User Guide
Manage Layout Categories
Create a New Layout Category
New layout categories can be created to which layouts managed by the
DCM can be assigned.
Follow these steps to create a new layout category:
1. Do one of the following:
•
Click the Category
button on the Tool bar.
•
Select File>Category... from the Menu bar.
Either action opens the Category List dialog box (see Figure 222) from
which you can create, edit and delete layout categories.
Note
The default categories “All” and “None” cannot be edited or deleted and,
therefore, do not appear in the Category List dialog.
Figure 222. Layout Category List
Note
The value in the Number column indicates how many layouts (for all product/
playout devices) are currently assigned to the associated category.
2. Click the New button.
The Category Settings dialog shown in Figure 223 appears.
DISPLAY CONTENT MANAGER — Installation and User Guide
179
Section 5 — Layout Screen
Figure 223. Category Settings Dialog
3. Enter the desired category name and click the OK button.
The Category List dialog reappears with the new category added to the category list (see Figure 224).
Figure 224. New Category Added
4. If desired, repeat Step 2 and Step 3 to add more categories.
Note
See the next section for instructions on editing or deleting categories.
5. Click the Close button to exit the Category List dialog.
180
DISPLAY CONTENT MANAGER — Installation and User Guide
Manage Layout Categories
Edit or Delete Categories
To edit or delete a category, follow these steps:
1. Do one of the following:
•
Click the Category
button on the Tool bar.
•
Select File>Category... from the Menu bar.
Either action opens the Category List dialog box (see Figure 225) from
which you can create, edit and delete content categories.
Note
The default categories “All” and “None” cannot be edited or deleted and,
therefore, do not appear in the Category List dialog.
Figure 225. Layout Category List
2. Select the category you wish the edit or delete (the selected category
will be highlighted in blue).
3. Click the Edit or Delete button as desired.
Note
A category cannot be deleted to which layouts are currently assigned. In
order to delete a category, all layouts assigned to that category must be reassigned.
If Edit was selected, the Category Settings dialog shown in Figure 226
appears.
DISPLAY CONTENT MANAGER — Installation and User Guide
181
Section 5 — Layout Screen
Figure 226. Category Settings Dialog
4. Edit the category name as desired and click the OK button.
The category name is changed.
Note
Categories to which layouts have been assigned may be edited. The new category name will automatically appear in the Layout Details for any layout
assigned to that category.
If Delete was selected, the error message illustrated in Figure 227 appears if
attempting to delete a category to which layouts are currently assigned.
Figure 227. Layout Delete Error
If the category to be deleted is empty, the confirmation prompt shown in
Figure 228 appears.
182
DISPLAY CONTENT MANAGER — Installation and User Guide
Create a Display Layout
Figure 228. Layout Delete Confirmation
5. Click Yes to confirm deletion of the category.
6. Click the Close button to exit the Category List dialog.
Create a Display Layout
After switching to the Layout screen, follow these steps to create a new
display layout:
CAUTION All actions involved with creating or modifying a layout are automatically
saved. There is no “save” action in the DCM. This does mean, however, that
there is no way to go back to the previously saved version of a layout before
the modifications in a layout design session. Individual actions can be
undone, but, the layout cannot be restored to a “previously saved” state.
1. Do one of the following:
•
Click the New
button on the Tool bar.
•
Select File>New...>Layout... from the Menu bar.
The Create a New Layout dialog shown in Figure 229 appears:
DISPLAY CONTENT MANAGER — Installation and User Guide
183
Section 5 — Layout Screen
Figure 229. Create a New Layout Dialog
2. Enter the desired name for the new layout.
3. Click the list button [V] on the Category selection drop-down and
select the desired category from the list. See Figure 230.
Figure 230. Layout Category Drop-Down List
4. Click the list button [V] on the Product selection drop-down and select
the desired product (playout device) from the list. See Figure 231.
184
DISPLAY CONTENT MANAGER — Installation and User Guide
Create a Display Layout
Figure 231. Layout Product (Playout Device) Drop-Down List
5. If the MEDIAEDGE-SWT3-DS or MEDIAEDGE-SWT4 is the selected
product, click the Preset radio button if you wish to select from a list of
predefined size presets or the Size radio button if you wish to specify
the layout dimensions. If a hardware playout device is selected,
proceed to Step 7.
6. Enter the desired layout size from the Preset list by clicking the list
button [V] to display the preset sizes (see Figure 7) or by entering the
desired layout dimensions in the Size horizontal and vertical fields.
Figure 232. SWT3-DS and SWT4 Drop-Down List Selections
DISPLAY CONTENT MANAGER — Installation and User Guide
185
Section 5 — Layout Screen
Note
The hardware playout devices (HDMA-4000/HDMA-4100/STB3/STB4/
STB4H) have a fixed layout size of 1920x1080. Layouts for the SWT3/SWT4
may be any size from 480x480 to 1920x1920. Layout size is expressed in
horizontal pixels x vertical pixels.
7. Click the OK button to close the Create a New Layout dialog.
A blank white rectangle representing the new layout appears in the Layout
Display Area as shown in Figure 233.
Figure 233. New Layout in Layout Display Area
Define Layout Display Grid
A layout grid (see Figure 234) may be defined to assist in the process of
placing display regions within the layout dimensions. By default, this grid
is disabled.
186
DISPLAY CONTENT MANAGER — Installation and User Guide
Create a Display Layout
Figure 234. Layout Display Grid
Enable/Disable Grid
To enable or disable the layout grid display, select View>Show Grid from
the Menu bar (see Figure 235). This action toggles the display On or Off
depending on its current setting.
Figure 235. Show Grid Settings
If a check mark is displayed by Show Grid, the grid display is enabled; if no
check mark is present, grid display is disabled.
Change Grid Settings
The default grid settings display a 5x5 grid. A smaller number displays
more grid marks in a given area. A larger number displays fewer grid
marks.
DISPLAY CONTENT MANAGER — Installation and User Guide
187
Section 5 — Layout Screen
To change the grid settings, Select View>Grid Settings... from the Menu bar.
The Grid Settings dialog shown in Figure 236 appears.
Figure 236. Grid Settings Dialog
Set the width and height to the desired settings and click the OK button to
close the dialog.
Create a Display Region
Display regions are defined areas within the layout in which content of a
particular type may be displayed. Multiple regions can be created to display, for example, video, still images and a text ticker simultaneously.
Note
188
When creating a layout in which other display regions will be overlaid over a
full-screen video region (see Figure 237 for an example), create all the nonvideo regions first; then, create the video region full screen and move it to the
bottom layer. See Change Region Order on page 195 for more information on
ordering regions.
DISPLAY CONTENT MANAGER — Installation and User Guide
Create a Display Layout
Figure 237. Ticker and Still Regions Over Full-Screen Video
To create a region within a display layout follow these steps:
1. Do one of the following:
•
Click the New Region
•
Select File>New...>Region from the Menu bar.
•
Right click on a blank area within the layout and select New Region
from the menu or press the [R] key on the keyboard (see Figure 238).
Note
button on the Tool bar.
Every new region created using any of the above methods will be created in
the upper left corner with the same initial size.
Figure 238. Right Click Menu - New Region
•
Click on a desired corner location for a new region, hold down the left
mouse button and drag the cursor in a blank area of the layout to draw
a rectangle for the new region. Release the mouse button when you
have drawn the region as desired.
DISPLAY CONTENT MANAGER — Installation and User Guide
189
Section 5 — Layout Screen
A new region is created and its details appear in the Region Detail Area as
shown in Figure 238.
Figure 239. New Region and Settings
2. Adjust the region size as desired using one of the following methods:
Note
If you want the region to have a certain aspect ratio, you may assign that ratio
to the selected region by selecting Edit>Aspect-ratio>[aspect ratio] from the
Menu bar (see Figure 240) or by right-clicking on the region and selecting the
desired aspect ratio from the right-click menu.
Figure 240. Aspect Ratio Menu
190
DISPLAY CONTENT MANAGER — Installation and User Guide
Create a Display Layout
•
Position the cursor at the horizontal or vertical edge of the region.
When the cursor changes to the resize cursor, drag the region frame
until the desired size is reached (see Figure 241).
Note
If an aspect ratio has been assigned to a region, increasing or decreasing one
dimension of the region will automatically adjust the other region in order to
maintain the selected aspect ratio.
Figure 241. Drag to Change Region Size
•
Enter the desired horizontal and vertical size dimensions (in pixels) in
the Size boxes of the Region Detail Area (see Figure 242 ).
Figure 242. Change Region Size in Detail Area
The size may be changed by entering a pixel count from the keyboard or
using the UP and DOWN arrows on each field to increment or decrement
the numbers until the desired dimensions are displayed.
DISPLAY CONTENT MANAGER — Installation and User Guide
191
Section 5 — Layout Screen
Note
If an aspect ratio has been assigned to a region, increasing or decreasing the
horizontal dimension of the region will automatically adjust the vertical
dimension of the region in order to maintain the selected aspect ratio.
3. Adjust the region position as desired using one of the following
methods:
•
Place the cursor over the region and hold down the left mouse button.
When the cursor changes to the move cursor, drag the region to the
desired position within the layout (see Figure 243).
Figure 243. Drag to Change Region Position
•
Enter the desired horizontal and vertical position (in pixels) in the Position boxes of the Region Detail Area (see Figure 244).
Figure 244. Change Position in Region Detail Area
192
DISPLAY CONTENT MANAGER — Installation and User Guide
Create a Display Layout
Note
The position numbers are relative to the upper left corner of the layout (position 0,0) and specify the position of the upper left corner of the region area.
In this example, with a 1920x1080 pixel layout, moving the 720x480 region
to position 1200, 600 moves the region from the upper left corner to the
lower right corner of the layout as illustrated in Figure 245.
Figure 245. Region Positioning Details
4. Enter the desired name for the region by entering it in the Layout
Details Name field as shown in Figure 246.
Note
Region names do not limit the content that can be displayed in that region.
Region names can be anything; however, a region name of “Video” does not
designate that only video content can be displayed in that region. Most
content can be displayed in any region.
DISPLAY CONTENT MANAGER — Installation and User Guide
193
Section 5 — Layout Screen
Figure 246. Layout Region Name
5. If the region is one in which video material may be displayed, select the
Use video material option.
Note
Layouts for the HDMA-4000/MEDIAEDGE-STB3 and HDMA-4100/MEDIAEDGE-STB4/MEDIAEDGE-STB4H product type may contain only one video
region. Layouts for the MEDIAEDGE-SWT3-DS and MEDIAEDGE-SWT4 may
contain up to four video regions. If only one video region is allowed and a
video region has already been specified, video must be disabled in the specified region before it can be enabled in another region.
Note
A region defined to use video material may display material of any type,
including video; however, only region(s) for which the Use video material
option is selected may display video content.
6. Repeat Step 1 through Step 5 for any additional regions you wish to
create in the layout.
Note
As each new region is created, it becomes region number 1 and existing
regions are renumbered. There is a limit of 20 regions per layout.
Note
Although separate regions may be created in which you intend to place Ticker
and Flash material, it is not possible to playback both a Ticker and a Flash animation simultaneously. Only one or the other may be played in addition to
Video content.
Copy and Paste a Region
Existing regions within a layout may be copied and pasted on the layout.
After copying and pasting a region, it may be renamed, moved, resized, etc.
as desired.
To copy an existing region, do the following:
1. Select the region to be copied.
194
DISPLAY CONTENT MANAGER — Installation and User Guide
Create a Display Layout
2. Do one of the following:
•
Click the Copy
button on the Tool bar.
•
Select Edit>Copy from the Menu bar.
•
Press the [CTRL]+ [C] keys on the keyboard.
•
Right click on the region and select Copy from the menu or press the [C]
key on the keyboard.
3. To paste the copy on the layout, do one of the following:
•
Click the Paste
•
Select Edit>Paste from the Menu bar.
•
Press the [CTRL]+ [V] keys on the keyboard.
•
Right click on the layout and select Paste from the menu press the [P]
key on the keyboard.
Note
button on the Tool bar.
After copying a layout region, multiple copies may be pasted on the layout
using one of the above paste methods.
4. Rename, resize, move and reorder the layout regions as desired.
Change Region Order
Regions are assigned a region number in the order in which they are created. The region created last is always region number 1. As this does not
necessarily represent the way in which you may wish to number the
regions for management purposes, it is possible to change the region order.
Figure 247 represents a layout with multiple regions which you may wish
to reorder in the following manner:
•
The Video region is region number 1
•
The Ticker region is region number 2
•
The four Still/Flash regions are numbers 3-6 beginning with the region
at the top of the layout.
DISPLAY CONTENT MANAGER — Installation and User Guide
195
Section 5 — Layout Screen
Figure 247. Layout with Multiple Regions to Reorder
To change the order of a region,
1. Select the region you wish to reorder (the selected region will be blue).
2. Do one of the following:
•
Select Edit>Order>[reorder selection] from the menu bar (see
Figure 248).
Figure 248. Region Order Menu
•
196
Right click on the region and select Order>[reorder selection] from the
menu (see Figure 249) or press the [O] key on the keyboard and select
the [reorder selection] from the menu.
DISPLAY CONTENT MANAGER — Installation and User Guide
Create a Display Layout
Figure 249. Region Right Click Menu - Order
Select from the following choices to reorder the selected region:
•
Move to the Top - designate the region as region number 1
•
Move to the Bottom - Designate the region as the lowest numbered
region.
•
Move to the Front - Make the region number one higher than its current
number.
•
Move to the Back - Make the region number one less than its current
number.
Note
Any of the above actions will renumber all other regions (if needed) as well
as reordering the selected region.
3. Repeat Step 1 through Step 2 for all regions you wish to reorder.
After changing the order of regions in the manner described in this section,
the Region Details change as illustrated in Figure 250.
DISPLAY CONTENT MANAGER — Installation and User Guide
197
Section 5 — Layout Screen
Figure 250. Region Detail Before and After Reordering Regions
Note
In this example the four Still/Flash region names were also changed to reflect
their new order.
Note
Removing the check mark next to a region number removes that region from
the layout display. The region is not deleted, it is simply not displayed and the
area it occupies in the layout is available for creating another region.
Delete a Region
To delete a region from a display layout, select the region to be deleted and
follow these steps:
1. Do one of the following:
198
•
Click the Delete
button on the Tool bar.
•
Select Edit>Delete>Region from the Menu bar.
•
Press the [DEL] key on the keyboard.
•
Right click on the region and select Delete from the menu or press the
[D] key on the keyboard (see Figure 251).
DISPLAY CONTENT MANAGER — Installation and User Guide
Copy a Display Layout
Figure 251. Region Right Click Menu - Delete
The DCM Console delete confirmation dialog shown in Figure 252 appears.
Figure 252. DCM Console Delete Region Confirmation Dialog
2. Click the Yes button to confirm deletion of the selected region.
Undo a Region Operation
If you perform an operation such as deleting a region, pasting a copy of a
region, reordering a region, etc. in error, it is possible to undo these operations.
To undo an operation, do one of the following:
•
Select Edit>Undo from the Menu bar.
•
Press the [CTRL]+[Z] keys on the keyboard.
Note
Operations are undone in reverse order with the most recent operation being
reversed first. There are 10 levels of undo.
Copy a Display Layout
Another way to create a new layout is to copy an existing layout. This is
very useful if an existing layout is very similar the new layout you wish to
create. Copying this existing layout will allow you to simply make the necessary changes rather than creating the entire layout.
DISPLAY CONTENT MANAGER — Installation and User Guide
199
Section 5 — Layout Screen
To copy an exiting layout, do the following:
1. Open the layout you wish to copy (see Open/Display Layouts by Category
on page 176 for more information).
2. Select Action>Copy Layout... from the Menu bar.
The Copy Layout dialog illustrated in Figure 253 appears.
Figure 253. Copy Layout Dialog
3. Enter the desired name for the new layout and click the OK button.
The new layout appears in the display area. With the exception of the
layout name, the Layout and Region Details are a duplicate of the copied
layout (see Figure 254).
200
DISPLAY CONTENT MANAGER — Installation and User Guide
Close a Layout
Figure 254. New Layout Details
4. Make any desired changes to the new layout.
Close a Layout
Opening a new layout closes the previously opened layout. Alternatively,
you may select File>Close from the Menu bar to close the open layout and
display a blank Layout Display Area.
Delete a Display Layout
To delete a display layout from the DCM, follow these steps:
1. Open the display layout you wish to delete.
DISPLAY CONTENT MANAGER — Installation and User Guide
201
Section 5 — Layout Screen
2. Do one of the following:
•
Click the Delete Layout
button on the Tool bar.
•
Select Edit>Delete>Layout from the Menu bar.
The DCM Console delete layout confirmation dialog illustrated in
Figure 255 appears.
Figure 255. DCM Console Delete Layout Confirmation Dialog
3. Click the Yes button to confirm deletion of the selected layout.
CAUTION Deletion of a Layout cannot be undone. If you delete a layout and wish to
restore it, the layout will need to be recreated.
202
DISPLAY CONTENT MANAGER — Installation and User Guide
Section
6
Playlist Screen
The Playlist screen is where material and layouts are used to make playlists
for playout devices.
When the Playlist button is selected from the Navigation bar, or, one of the
methods explained in Alternative Function Screen Access Methods on page 92
is used, the Playlist Screen with its associated display areas and function
bars appears as illustrated in Figure 256. These elements are used to
combine material registered in the DCM with the available screen layouts
to create playlists.
Figure 256. Playlist Screen
Note
Figure 257 depicts the Playlist Display Area with a playlist open. The Playlist
Display Area will be blank when the Playlist Screen is first accessed.
DISPLAY CONTENT MANAGER — Installation and User Guide
203
Section 6 — Playlist Screen
Playlist Details
The playlist is where the material registered in the DCM and the screen
layouts that have been created come together to determine what content
will be displayed and how it will be displayed.
Figure 257 shows a playlist and the corresponding details that define this
playlist.
Figure 257. Playlist Detail
Playlist Name
The name assigned to the playlist when it is created. The name can be modified at any time.
Playlist Category
The playlist category to which the playlist belongs. Categories are userdefined.
204
DISPLAY CONTENT MANAGER — Installation and User Guide
Playlist Details
Playlist Length
The overall length of the entire playlist. Length is expressed in Hours:Minutes:Seconds (HH:MM:SS)
Playlist Layout
The name of the display layout assigned to the playlist. The layout is
assigned at the time the playlist is created. A layout thumbnail is also displayed.
Note
Layout thumbnails are color coded by product. Non-selected regions in
layouts for the HDMA-4000/MEDIAEDGE-STB3 product are green. Nonselected regions in layouts for the MEDIAEDGE-SWT-DS are orange. Nonselected regions for the HDMA-4100/MEDIAEDGE-STB4/STB4H are light
gold. Non-selected regions for the MEDIAEDGE-SWT4 are pink. The selected
region for all layouts is blue.
Component Material
The name of the playlist component currently selected in the Region Component list.
Component Type
The material type of the component currently selected in the Region Component list.
Component Start Time
The starting time (relative to the beginning of the playlist) of the playlist
component currently selected in the Region Component list.
Component Length
The length expressed in Hours:Minutes:Seconds (HH:MM:SS) of the playlist component currently selected in the Region Component list.
Component Repeat
The repeat setting of the playlist component currently selected in the
Region Component list.
Component Mute
Mute setting of the playlist component currently selected in the Region
Component list. If the component has audio, it may be muted or un-muted.
DISPLAY CONTENT MANAGER — Installation and User Guide
205
Section 6 — Playlist Screen
Region Components
The list of material files assigned to the layout region selected in the open
playlist.
Manage Playlist Categories
When opening a playlist for editing, it is possible to limit the playlist list to
only those playlists that correspond to a specific playlist category as well as
a specific playout device.
The default Playlist categories are:
•
All (displays all playlists regardless of category)
•
None (a category to which playlists not belonging to any other category
may be assigned.)
•
Playlist Sample (sample playlists are assigned to this category)
Open/Display Playlist by Category
To display only the playlists that are assigned to a specific category for a
particular playout device, follow these steps.
1. Do one of the following:
•
Click the Open
button on the Tool bar.
•
Select File>Open... from the Menu bar.
The Playlist List dialog illustrated in Figure 258 appears.
206
DISPLAY CONTENT MANAGER — Installation and User Guide
Manage Playlist Categories
Figure 258. Playlist List Dialog
Note
Playlist thumbnails are color coded based on the selected Product (playout
device). Playlist thumbnails for the HDMA-4000/MEDIAEDGE-STB3 product
are green. Playlist thumbnails for the HDMA-4100/MEDIAEDGE-STB4/MEDIAEDGE-STB4H are light gold. Playlist thumbnails for the MEDIAEDGE-SWTDS product are orange. Playlist thumbnails for the MEDIAEDGE-SWT4 are
pink.
2. Click the list button [V] on the Category selection drop-down and
select the desired category from the list.
Note
The category All displays all layouts for the selected Product (playout device)
and not necessarily all defined layouts managed by the DCM.
3. Click the list button [V] on the Product selection drop-down and select
the desired product (playout device) from the list.
After selecting the desired category and product, playlists that are assigned
to the selected category for the selected product will be displayed.
4. Select the desired playlist from the Playout list and click the OK button
to open that playlist.
DISPLAY CONTENT MANAGER — Installation and User Guide
207
Section 6 — Playlist Screen
Create a New Playlist Category
New playlist categories can be created to which playlists managed by the
DCM can be assigned.
Follow these steps to create a new playlist category:
1. Do one of the following:
•
Click the Category
button on the Tool bar.
•
Select File>Category... from the Menu bar.
Either action opens the Category List dialog box (see Figure 259) from
which you can create, edit and delete playlist categories.
Note
The default categories “All” and “None” cannot be edited or deleted and,
therefore, do not appear in the Category List dialog.
Figure 259. Playlist Category List
Note
The value in the Number column indicates how many playlists (for all
product/playout devices) are currently assigned to the associated category.
2. Click the New button.
The Category Settings dialog shown in Figure 260 appears.
208
DISPLAY CONTENT MANAGER — Installation and User Guide
Manage Playlist Categories
Figure 260. Category Settings Dialog
3. Enter the desired category name and click the OK button.
The Category List dialog reappears with the new category added to the category list (see Figure 261).
Figure 261. New Category Added
4. If desired, repeat Step 2 and Step 3 to add more categories.
Note
See the next section for instructions on editing or deleting categories.
5. Click the Close button to exit the Category List dialog.
DISPLAY CONTENT MANAGER — Installation and User Guide
209
Section 6 — Playlist Screen
Edit or Delete Categories
To edit or delete a category, follow these steps:
1. Do one of the following:
•
Click the Category
button on the Tool bar.
•
Select File>Category... from the Menu bar.
Either action opens the Category List dialog box (see Figure 262) from
which you can create, edit and delete content categories.
Note
The default categories “All” and “None” cannot be edited or deleted and,
therefore, do not appear in the Category List dialog.
Figure 262. Playlist Category List
2. Select the category you wish the edit or delete (the selected category
will be highlighted in blue).
3. Click the Edit or Delete button as desired.
Note
A category cannot be deleted to which playlists are currently assigned. In
order to delete a category, all playlists assigned to that category must be
reassigned.
If Edit was selected, the Category Settings dialog shown in Figure 263
appears.
210
DISPLAY CONTENT MANAGER — Installation and User Guide
Manage Playlist Categories
Figure 263. Category Settings Dialog
4. Edit the category name as desired and click the OK button.
The category name is changed.
Note
Categories to which playlists have been assigned may be edited. The new category name will automatically appear in the Playlist Details for any playlist
assigned to that category.
If Delete was selected, the error message illustrated in Figure 264 appears if
attempting to delete a category to which playlists are currently assigned.
Figure 264. Playlist Delete Error
If the category to be deleted is empty, the confirmation prompt shown in
Figure 265 appears.
DISPLAY CONTENT MANAGER — Installation and User Guide
211
Section 6 — Playlist Screen
Figure 265. Playlist Delete Confirmation
5. Click Yes to confirm deletion of the category.
6. Click the Close button to exit the Category List dialog.
Create a Playlist
After switching to the Playlist screen, follow these steps to create a new
playlist:
CAUTION All actions involved with creating or modifying a playlist are automatically
saved. There is no “save” action in the DCM. This does mean, however, that
there is no way to go back to the previously saved version of a playlist before
the modifications in a playlist design session. Individual actions can be
undone, but, the playlist cannot be restored to a “previously saved” state.
1. Do one of the following:
•
Click the New
button on the Tool bar.
•
Select File>New... from the Menu bar.
The Create a New Layout dialog shown in Figure 266 appears:
212
DISPLAY CONTENT MANAGER — Installation and User Guide
Create a Playlist
Figure 266. Create a New Playlist Dialog
2. Enter the desired name for the new playlist.
Note
Spaces are not allowed in Playlist names.
3. Click the list button [V] on the Category selection drop-down and
select the desired category from the list. See Figure 267.
DISPLAY CONTENT MANAGER — Installation and User Guide
213
Section 6 — Playlist Screen
Figure 267. Playlist Category Drop-Down List
4. Set the desired length for the playlist by entering the desired running
time in Hours:Minutes:Seconds (HH:MM:SS)
Note
The length is the total running time for this playlist. When playlist has finished, a new playlist will be run if scheduled.
5. Click the list button [V] on the Product selection drop-down and select
the desired product (playout device) from the list. See Figure 268.
214
DISPLAY CONTENT MANAGER — Installation and User Guide
Create a Playlist
Figure 268. Playlist Product Drop-Down List
6. From the list of available layouts for the selected category and product,
select the desired layout for this playlist. See Figure 269.
DISPLAY CONTENT MANAGER — Installation and User Guide
215
Section 6 — Playlist Screen
Figure 269. Playlist Layout Selection
7. Click the OK button to close the dialog and create the new playlist.
If you have a space in the playlist name, the error dialog in Figure 270
appears,
Figure 270. Space in Name Error Dialog
8. Click the OK button to remove the space(s) in the name and create the
playlist.
The new empty playlist appears in the Playlist Display Area as illustrated
in Figure 271.
216
DISPLAY CONTENT MANAGER — Installation and User Guide
Create a Playlist
Figure 271. New Empty Playlist
Adjust the Playlist Time Scale
When a new playlist is created, the DCM assigns the last selected time scale
increment to the Playlist Display Area.
If you wish to change the time scale increment in the Playlist Display Area,
use the Tool Bar Time Scale selection buttons illustrated in Figure 272.
Figure 272. Playlist Tool Bar - Time Scale Buttons
The currently-selected time scale increment is highlighted in light blue. In
the example above, the 5m (five minute) increment is selected.
DISPLAY CONTENT MANAGER — Installation and User Guide
217
Section 6 — Playlist Screen
To change the time scale increment, click the button icon that corresponds
to the desired increment as illustrated in Table 4. Alternatively, you may
use the listed Menu bar method or keyboard shortcut.
Table 4. Material Type Display Icons and Menu Alternatives
Icon
Increment
Menu Bar Method
Keyboard Shortcut
1 Second
View>Time Scale>1Sec.
[SHIFT]+[1]
5 Seconds
View>Time Scale>5Sec.
[SHIFT]+[2]
10 Seconds
View>Time Scale>10Sec.
[SHIFT]+[3]
15 Seconds
View>Time Scale>15Sec.
[SHIFT]+[4]
30 Seconds
View>Time Scale>30Sec.
[SHIFT]+[5]
1 Minute
View>Time Scale>1Min.
[ALT]+[1]
5 Minutes
View>Time Scale>5Min.
[ALT]+[2]
10 Minutes
View>Time Scale>10Min.
[ALT]+[3]
15 Minutes
View>Time Scale>15Min.
[ALT]+[4]
30 Minutes
View>Time Scale>30Min.
[ALT]+[5]
60 Minutes
View>Time Scale>60Min.
[ALT]+[6]
The time scale increment helps you position material in the playlist and
gives a visual indication of the length of the material as well as the length
of the playlist.
Figure 273 shows the new Playlist created above with a 30 Second time
scale increment rather than the 5 Minute increment initially assigned.
218
DISPLAY CONTENT MANAGER — Installation and User Guide
Assign Material to Playlist
Figure 273. New Playlist with 30 Sec. Time Scale Increment
Assign Material to Playlist
Playlists are linked to display layouts which determine the regions to
which material needs to be assigned for playout. In the example illustrated
in Figure 274, the layout assigned to the playlist has three regions; Video,
Still/Flash and Ticker. A column is created in the playlist that corresponds
to each layout region.
Figure 274. Playlist Layout Details
As shown in Figure 274, the selected region (Video - in this example), is
highlighted in blue in the layout thumbnail and in the playlist.
Details for the selected region appear in the Component Details Area.
DISPLAY CONTENT MANAGER — Installation and User Guide
219
Section 6 — Playlist Screen
Content is assigned to the playlist by following these steps:
1. Do one of the following:
•
Click the Show bin window
button on the Tool bar.
•
Select View>Bin Window from the Menu bar.
•
Right click on the Playlist Display Area and select Bin Window from the
menu or press the [B] key on the keyboard.
•
Press the [CTRL]+[B] keys on the keyboard.
The Material Bin Window shown in Figure 275 appears.
Figure 275. Material Bin Window
All of the material registered in the DCM is accessible in the Material Bin
Window. The material is organized by material type with a tab at the top of
the window for each material type.
The view style can be toggled between the details view shown in Figure 275
and the thumbnails view.
220
DISPLAY CONTENT MANAGER — Installation and User Guide
Assign Material to Playlist
2. Select the desired material view by using the Thumbnail
button in the Material Bin Window.
the Details
button and
3. Click the tab that represents the type of material you wish to assign to
a layout region in the playlist.
Note
Only region(s) for which the Use Video Material option has been enabled can
accept video material; however, content of any type can be assigned to these
regions. They are not limited to only video material.
4. Click the list button [V] on the Category drop-down list and select the
category for which to display available material.
5. Click and drag material from the Material Bin Window to the desired
playlist material column at the desired start time. Drag the asset within
the column to position it as desired.
Note
If you try to place a video asset in a region that has not been designated to
accept video material, the error dialog shown in Figure 276 appears. Click the
OK button to close the dialog. Then place the video asset in an appropriate
region.
Figure 276. Video Placement Error
6. When the asset is positioned at the desired location in the playlist, click
the left mouse button to anchor it at that point.
7. Click the Material Bin Window task bar item to reopen the window and
repeat Step 2 through Step 6 to add additional content to the playlist.
Note
If you do not want the Material Bin Window to minimize each time an asset
is assigned to the playlist, you can elect to keep the bin window on top of the
playlist until it is closed or to display it when it is minimized (see Bin Window
Display Settings on page 224 for more information).
8. When all the desired material is added to the playlist, click the X in the
upper right corner of the Material Bin Window to close this window.
When finished assigning material to the playlist, it may resemble the
example shown in Figure 277.
DISPLAY CONTENT MANAGER — Installation and User Guide
221
Section 6 — Playlist Screen
Figure 277. Material Added to Playlist
Material Color Coding
For easy identification of the type of assets in the playlist, each asset type is
represented by a specific color as indicated in Table 5.
Table 5. Material Type Color Coding
Color
222
Material Type
Color Name
Video
Yellow
Still Image
Orange
Ticker
LIght Green
Flash
Purple
QuickTime
Bright Pink
HTML
LIght Blue
DISPLAY CONTENT MANAGER — Installation and User Guide
Adjust Region Column Width
Table 5. Material Type Color Coding
Color
Note
Material Type
Color Name
Audio
Dark Pink
URI
Turquoise
The material types Serial Command and Volume are not added to playlists.
See Assign Commands to a Command Channel on page 259 for more information on the use of these material types.
Adjust Region Column Width
By default, the region columns have a fixed width which is automatically
set based on the number of region columns to be displayed.
If you want to adjust the width of individual columns, do the following:
1. Select View>Region Width>Variable from the Menu bar (see
Figure 278).
Figure 278. Playlist Region Column Width Menu
2. Place the cursor on the column separator in the column header. The
cursor changes to a resize cursor as shown in Figure 279.
DISPLAY CONTENT MANAGER — Installation and User Guide
223
Section 6 — Playlist Screen
Figure 279. Adjust Column Width
3. Drag the cursor to the left or right to decrease or increase the width of
the column to the left of the cursor.
Note
In the example above, dragging the cursor to the left decreases the width of
the Video column; dragging the cursor to the right increases its width. This
operation does not change the width of the Still/Flash column. If you increase
the width of the Video column, the column(s) to the right may be pushed out
of the Playlist Display Area. In this case, a horizontal scroll bar will appear at
the bottom of the display area.
Select View>Region Width>Fixed to return all columns to a fixed width
within the Playlist Display Area without a horizontal scroll bar.
Bin Window Display Settings
To change the way in which the Material Bin Window is displayed when
assigning assets to a playlist, select the desired display setting from the
view menu (see Figure 280).
Figure 280. Material Bin Window Display Settings
The choices are:
224
DISPLAY CONTENT MANAGER — Installation and User Guide
Copy a Playlist
Display Bin Window on Top
When the Material Bin Window is minimized and not visible, selecting this
option displays the Material Bin Window on top of the Playlist but does not
keep it on top.
Keep Bin Window on Top
This selection keeps the Material Bin Window on top of the Playlist while
positioning assets on the playlist. The Material Bin Window may be moved
if it is in the way. When clicking on the Playlist to position an asset, the
Material Bin Window appears transparent as illustrated in Figure 281.
Pressing the [CTRL]+[T] keys on the keyboard also sets the Bin Window
display settings to Keep Bin Window on Top.
Figure 281. Transparent Material Bin Window
Copy a Playlist
One way to create a new playlist is to copy an existing playlist. This is very
useful if an existing playlist is very similar the new playlist you wish to
create. Copying this existing playlist will allow you to simply make the necessary changes rather than creating the entire playlist.
DISPLAY CONTENT MANAGER — Installation and User Guide
225
Section 6 — Playlist Screen
To copy an existing playlist, do the following:
1. Open the playlist you wish to copy (see Open/Display Playlist by
Category on page 206 for more information).
2. Select Action>Copy Playlist... from the Menu bar.
The Copy Playlist dialog illustrated in Figure 282 appears.
Figure 282. Copy Playlist Dialog
3. Enter the desired name for the new layout and click the OK button.
The new playlist appears in the display area. With the exception of the
playlist name, the Playlist and Component Details are a duplicate of the
copied playlist (see Figure 283).
226
DISPLAY CONTENT MANAGER — Installation and User Guide
Edit a Playlist
Figure 283. New Playlist Details
4. Make any desired changes to the new playlist as explained in the next
section - Edit a Playlist.
Edit a Playlist
After assigning material to a playlist, it may be necessary to adjust the
length of one or more assets or even the playlist itself. It may be desirable
to have some assets play repeatedly until the end of the playlist is reached
or to play an asset, for example, three times before playing the next asset in
the list. You may wish to delete a playlist component or assign additional
material to the playlist.
DISPLAY CONTENT MANAGER — Installation and User Guide
227
Section 6 — Playlist Screen
Adjust Material Start Time and Length
To increase or decrease the length of an asset in the playlist, do the following:
1. Click on a component for which you wish to adjust the length.
All of the components (assets) that exist in the selected region columns
appear in the Components Detail Area as illustrated in Figure 284.
Figure 284. Selected Region Components
The current start time (24-hour clock) and length in Hours:Minutes:Seconds (HH:MM:SS) of each component is listed in the Start and Length columns.
2. In the Start: field of the Component Details area, enter the desired start
time for the selected component or use the Up/Down arrow keys to
increase or decrease the start time.
Note
Clock times are in a 24-hour format in which 1:00pm is 13:00, 2:00pm is
14:00, etc. Start times can only be changed if the playlist length is sufficient
to accommodate the asset in a new start time. See Adjust Playlist Length on
page 232 for more information.
3. Press the [ENTER] key to set the new length for the selected component.
4. In the Length: field of the Component Details Area, enter the desired
length for the selected component (see Figure 285) or use the Up/Down
arrow keys to increase or decrease the length.
228
DISPLAY CONTENT MANAGER — Installation and User Guide
Edit a Playlist
Figure 285. Adjust Component Length
Note
You cannot increase the length beyond the original creation playback time on
assets such as video, Flash and audio files. However, you can decrease the
length of these assets as illustrated in the example above.
5. Press the [ENTER] key to set the new length for the selected region
component.
As shown in Figure 286, the length of the selected Audio asset was reduced
from 00:01:00 (1 minute) to 00:00:45 (45 seconds).
Figure 286. Component Length Adjusted in Playlist
CAUTION Start time and length adjustments may leave gaps between material in a playlist. These gaps will result in a black display in the playlist for the length of
the gap. If this is not desired, adjust start time and length of adjacent assets
to eliminate the gap.
DISPLAY CONTENT MANAGER — Installation and User Guide
229
Section 6 — Playlist Screen
Alternative Methods
•
To change the start time, material objects can be dragged and dropped
to a new location in the playlist.
Note
•
If an asset is dropped in a location that overlaps another asset t, it will automatically be repositioned at the end of the overlapped asset.
To change the length of an asset, the top or bottom border of the
selected asset can be dragged to increase or decrease the length.
CAUTION If an asset border is dragged to a position that overlaps another asset, the
border is set at the end of the overlapped asset with no gap between assets.
Repeat a Component
Rather than adding a number of unique assets to a playlist, it may often be
desirable to repeat an asset a certain number of times or repeat as many
times as possible until the end of the playlist is reached.
To repeat a component in the playlist, do the following:
1. Click on the component for which you wish to assign a repeat value.
2. In the Component Details Area, click the list button [V] on the Repeat
drop-down to see the list of choices for that value (see Figure 287).
Figure 287. Playlist Component Repeat Drop-Down List
230
DISPLAY CONTENT MANAGER — Installation and User Guide
Edit a Playlist
3. Select the desired repeat value from the list as explained below:
None
Default repeat value assigned to all components when they are added to
the channel playlist. The component will play once and then the next component in the playlist is played.
For number of times and for duration settings determine the manner in
which the dragged lower border on the component object behaves as illustrated in Figure 288.
Figure 288. Adjust Component Object End Time by Dragging.
Note
The 1-minute increment in the “for number of times” setting above is a function of the original 1-minute length of the component. The component is
repeated in its entirety as many times as possible.
Note
The 15-second increment in the “for duration” example above is a function of
the time scale setting of 15S. If the time scale increment is 5S, the length of
the component can be increased in five-second increments.
For number of times
Component will repeat in its entirety as many times as possible based on
where your drag the lower border.
For example, if a component is 15-minutes in length and you drag the
bottom border of the component 48 minutes beyond its current ending
DISPLAY CONTENT MANAGER — Installation and User Guide
231
Section 6 — Playlist Screen
position, the end time will snap back to 45 minutes beyond the current end
time since that is the closest full 15-minute increment.
If the component length is reduced by dragging, the component end time
will also snap to the nearest full 15-minute increment.
For duration
Plays the component until the end of the one-day schedule or wherever the
end point is set based on dragging the component lower object border.
Note
The exact end time is based on the time scale increment. The end time border
snaps to the nearest increment (up to the end of the playlist) when the mouse
button is released.
Adjust Playlist Length
To avoid playing black at the end of the last component (unless that is desirable), either the length of components need to be adjusted to match the
length of the playlist, or the playlist needs to be adjusted to match the
length of the components.
Figure 289 shows a playlist in which the length of the components in each
region does not match up with the end of the playlist.
The playlist length is 00:05:30 and the material in the shortest column (Still/
Flash) ends at 00:04:15.
Figure 289. Playlist Length Longer Than Components
To adjust the playlist length, do the following:
1. In the Playlist Details Area, enter a new playlist length as illustrated in
Figure 290.
In this example, we’ll use the length of the shortest column (00:04:15).
232
DISPLAY CONTENT MANAGER — Installation and User Guide
Edit a Playlist
Figure 290. Adjust Playlist Length
The warning dialog illustrated in Figure 291 appears.
Note
This warning appears anytime the playlist length is adjusted, even if the playlist length is increased.
Figure 291. Shorten Playlist Warning
This warning indicates that any material that runs past the new end of the
playlist will be deleted, not simply shortened.
2. Click the Yes button to close the dialog and shorten the playlist length.
Note
If you click the Yes button on this dialog, the “Cooking” video will be deleted
from the Video column since it has an end time of 00:04:20 which is past the
end time specified for the playlist. The “Horses” URI material will also be
deleted as its end time is also past the specified end of the playlist.
The end result of changing the playlist length to 00:04:15 is shown in
Figure 292.
DISPLAY CONTENT MANAGER — Installation and User Guide
233
Section 6 — Playlist Screen
Figure 292. Playlist Shortened to 00:04:15
Note
If you add any asset to the playlist that exceeds the length of the playlist, it
will be truncated to fit the available time. For example, 55 seconds remain in
the Video column from the end of the HD-Content02 video to the end of the
playlist. If the Cooking video asset is added (total original length 1 minute) it
will be shortened to 55 seconds.
In many cases, it is better to adjust the length of those assets that can be
adjusted such that all columns end at the same time. Match the other assets
up with the end length of the Video column, as this is often the focus of the
display, and then shorten the playlist to this length. This is illustrated in
Figure 293.
Figure 293. Playlist Column Lengths Matched
In the example in Figure 293, the MediaEdgeCar audio asset was lengthened by five (5) seconds to a length of 00:00:50 and the Horses URI asset
was shortened by 15 seconds to a length of 00:00:50. This matched both
assets end times with the 00:04:20 end time of the last video in the video
column and the playlist was shortened to this length.
234
DISPLAY CONTENT MANAGER — Installation and User Guide
Edit a Playlist
Cut, Copy and Paste Playlist Components
When building a playlist, it is often desirable to copy an existing component to another location in the playlist, or to remove a component from its
current location and place it elsewhere in the playlist. The Cut, Copy and
Paste operations allow you to do this.
To cut or copy an existing component and paste it in another location in the
playlist, do the following:
1. Select the component to be copied.
2. Do one of the following:
•
Click the Copy
or Cut
button on the Tool bar.
•
Select Edit>Copy or Edit>Cut from the Menu bar.
•
Press the [CTRL]+ [C] (Copy) or the [CTRL]+ [X] (Cut) keys on the keyboard.
•
Right click on the component to be copied or cut and select Copy or Cut
from the menu or press the [C] (Copy) or [T] (Cut) key on the keyboard.
3. Click on the playlist at the position where you wish to place the copied
or cut component.
4. To paste the copied or cut component on the playlist, do one of the
following:
•
Click the Paste
button on the Tool bar.
•
Select Edit>Paste from the Menu bar.
•
Press the [CTRL]+ [V] keys on the keyboard.
•
Right click on the playlist and select Paste from the menu or press the
[P] key on the keyboard.
If there is not sufficient time left in the playlist to accommodate the playlist
component in the selected region, the error dialog shown in Figure 294 will
appear.
Figure 294. Component Paste Error
Note
After copying a playlist component, multiple copies may be pasted on the
playlist using one of the above paste methods.
DISPLAY CONTENT MANAGER — Installation and User Guide
235
Section 6 — Playlist Screen
Delete a Component
To delete a component from a playlist, select the component to be deleted
and follow these steps:
Do one of the following:
button on the Tool bar.
•
Click the Delete
•
Select Edit>Delete>Component from the Menu bar.
•
Press the [DEL] key on the keyboard.
•
Right click on the component and select Delete from the menu or press
the [D] key on the keyboard (see Figure 295).
Figure 295. Component Right Click Menu - Delete
Note
There is no confirmation prompt for deleting a playlist component.
Undo a Component Operation
If you perform an operation such as deleting a component, pasting a copy
of a component, cutting a component, etc. in error, it is possible to undo
these operations.
To undo an operation, do one of the following:
•
Select Edit>Undo from the Menu bar.
•
Press the [CTRL]+[Z] keys on the keyboard.
Operations are undone in reverse order with the most recent operation being reversed first.
There are 10 levels of undo.
Close a Playlist
Opening a new playlist closes the previously opened playlist. Alternatively, you may select File>Close from the Menu bar to close the open playlist and display a blank Playlist Display Area.
236
DISPLAY CONTENT MANAGER — Installation and User Guide
Delete a Playlist
Delete a Playlist
To delete a display layout from the DCM, follow these steps:
1. Open the playlist you wish to delete.
2. Do one of the following:
•
Click the Delete Playlist
button on the Tool bar.
•
Select Edit>Delete>Playlist from the Menu bar.
The DCM Console delete playlist confirmation dialog illustrated in
Figure 296 appears.
Figure 296. DCM Console Delete Playlist Confirmation Dialog
3. Click the Yes button to confirm deletion of the selected playlist.
CAUTION Deletion of a playlist cannot be undone. If you delete a playlist and wish to
restore it, the playlist will need to be recreated.
Preview a Playlist
A playlist can be previewed beginning at any point in the playlist. The
playlist preview displays the content assigned to the playlist in the layout
assigned to the playlist. It is an accurate preview (appearance and sound)
of a playlist on the intended playout device.
To preview a playlist do the following:
1. Select Action>Preview... from the Menu bar.
The Preview dialog illustrated in Figure 297 appears.
DISPLAY CONTENT MANAGER — Installation and User Guide
237
Section 6 — Playlist Screen
Figure 297. Playlist Preview Dialog
2. Enter the desired start time for the preview and click the OK button to
begin the preview.
As shown in Figure 298, the preview is displayed on your monitor.
Figure 298. Playlist Preview
To stop the playlist preview before the end of the playlist, press the [ESC]
key on the keyboard.
238
DISPLAY CONTENT MANAGER — Installation and User Guide
Section
7
Schedule Screen
The Schedule screen is where channels are defined for playout devices and
playlist assigned to those channels to create playout schedules.
When the Schedule button is selected from the Navigation bar, or, one of the
methods explained in Alternative Function Screen Access Methods on page 92
is used, the Schedule Screen with its associated display areas and function
bars appears as illustrated in Figure 299. These elements are used to add
defined playlists to schedules for various playout channels.
Figure 299. Playlist Screen
Note
Figure 299 depicts the Schedule Display Area with a schedule created by
assigning playlists to three channels. The Schedule Display Area will be blank
when it is first accessed.
DISPLAY CONTENT MANAGER — Installation and User Guide
239
Section 7 — Schedule Screen
Schedule Details
The schedule is where playlists which contain material are assigned to
playout channels which are assigned to playout devices. Command channels may also be created for sending serial commands and volume settings
to devices in the MediaEdge system.
Figure 300 shows a schedule for three playout channels and the corresponding detail that defines this schedule.
Figure 300. Schedule Detail
Date Selection Calendar
A calendar from which to select the date for playout of the scheduled playlist(s). See Select Schedule Date on page 243 for more information.
Playout Device
The playout device to which the selected channel has been assigned.
Channel Name
The name assigned to the selected channel.
Playlist Name
The name of the playlist selected in the list of playlists assigned to the
selected channel schedule.
240
DISPLAY CONTENT MANAGER — Installation and User Guide
Adjust the Schedule Time Scale
Playlist Start Time
The start time of the playlist selected in the list of playlists assigned to the
selected channel schedule.
Playlist Length
The length in Hours:Minutes:Seconds (HH:MM:SS) of the playlist selected
in the list of playlists assigned to the selected channel schedule.
Playlist Repeat
The repeat setting of the playlist selected in the list of playlists assigned to
the selected channel schedule.
Schedule Components
The list of playlist(s) assigned to the selected channel schedule.
As illustrated in Figure 301, if the time scale is set to an increment that
allows sufficient expansion of the playlist object in the schedule, playlist
details appear in the schedule as well. See Open a Channel on page 248 for
more information.
Figure 301. Playlist Details in Schedule
Adjust the Schedule Time Scale
When a new channel is created, or an existing channel is opened, the DCM
assigns the last selected time scale increment to the Schedule Display Area.
If you wish to change the time scale increment in the Schedule Display
Area, use the Tool Bar Time Scale selection buttons illustrated in Figure 302.
DISPLAY CONTENT MANAGER — Installation and User Guide
241
Section 7 — Schedule Screen
Figure 302. Schedule Tool Bar - Time Scale Buttons
The currently-selected time scale increment is highlighted in light blue. In
the example above, the 1m (one minute) increment is selected.
To change the time scale increment, click the button that corresponds to the
desired increment as illustrated in Table 6. Alternatively, you may use the
listed Menu bar method or keyboard shortcut.
Table 6. Material Type Display Icons and Menu Alternatives
Icon
Increment
Menu Bar Method
Keyboard Shortcut
1 Second
View>Time Scale>1Sec.
[SHIFT]+[1]
5 Seconds
View>Time Scale>5Sec.
[SHIFT]+[2]
10 Seconds
View>Time Scale>10Sec.
[SHIFT]+[3]
15 Seconds
View>Time Scale>15Sec.
[SHIFT]+[4]
30 Seconds
View>Time Scale>30Sec.
[SHIFT]+[5]
1 Minute
View>Time Scale>1Min.
[ALT]+[1]
5 Minutes
View>Time Scale>5Min.
[ALT]+[2]
10 Minutes
View>Time Scale>10Min.
[ALT]+[3]
15 Minutes
View>Time Scale>15Min.
[ALT]+[4]
30 Minutes
View>Time Scale>30Min.
[ALT]+[5]
60 Minutes
View>Time Scale>60Min.
[ALT]+[6]
The time scale increment helps you position playlists in the schedule and
gives a visual indication of the length of each playlist as well as the length
of the schedule.
242
DISPLAY CONTENT MANAGER — Installation and User Guide
Select Schedule Date
Select Schedule Date
Channel schedules are created for one 24-hour period at a time. Schedules
do not span multiple days. However, a daily schedule can be copied to as
many as 30 days, if desired. See Copy a Schedule on page 270 for more information.
In the Schedule Details area, select the desired date for the schedule by
selecting it from the calendar. See Figure 303.
Figure 303. Schedule Date Selection Calendar
In the example in Figure 303, August 25, 2009 is the date selected for the
schedule. The current date (August 21, 2009), if visible on the calendar, will
be outlined in red.
button or Next Month
button to change the
Click the Previous Month
month from which you wish to select a date for the schedule.
Note
Selecting a date from the calendar allows you to create a new channel
schedule on that date or view the existing channel schedule for the selected
date.
Select Current Date
When examining a schedule, it may be desirable to see the schedule for the
current date.
button on
To set the schedule to the current date, click the Move to Today
the Tool bar. As illustrated in Figure 304, when the Schedule Display
Window is showing the current date, a Today indicator appears next to the
date.
Figure 304. Today Indicator in Schedule Display Window
Note
An alternative method is to select Go>Today from the Menu bar.
DISPLAY CONTENT MANAGER — Installation and User Guide
243
Section 7 — Schedule Screen
The Schedule Display Window timeline is also reset with the current time
at the top of the time scale.
Select Current Time
To set the schedule to the current time, click the Move to the current time
button on the Tool bar. Alternatively, you can select Go>Current time from
the Menu bar.
Note
Moving to the current time adjusts the time scale to begin at the current time
on whatever date is currently displayed. If today’s date is August 21 and you
are setting the schedule for August 25, clicking Move to the current time,
adjusts the time scale for August 25.
As shown in Figure 305, if the schedule timeline is on the current date
(Today), a moving red line indicates the current time.
Figure 305. Timeline Cursor at Current Time
Regardless of the time at which playlists are inserted in the schedule or the
time range visible on the time scale, the current time is always visible in the
upper right corner of the Schedule Display Area.
Note
When scheduling playlists, the time at which a playlist will begin playing is
always local time. For example, if a playlist is scheduled to begin playing at
10:00:00 (10 AM), it will begin playing at that time in the time zone in which
the playout device is located. If the playout channel is assigned to playout
devices in San Francisco, Dallas, New York and London , the playlist will be
executed at 10 AM local time in the Pacific, Central and Eastern US time zones
and at 10 AM GMT in London.
Channel Management
The operations in this section deal with the management of playout and
command channels.
Create a Playout Channel
Before schedules can be assembled from the playlists, playout channels
must be created. Channels are created for playout devices. Multiple chan-
244
DISPLAY CONTENT MANAGER — Installation and User Guide
Channel Management
nels can be created for a playout device; however, at least one channel must
exist before a schedule can be created.
To create a new channel, follow these steps:
1. Set the schedule view to Channel by selecting View>Channel
Type>Channel from the Menu bar (this is the default view).
2. Do one of the following:
•
Click the New
button on the Tool bar.
•
Select File>New... from the Menu bar.
The Create a New Channel dialog shown in Figure 306 appears:
Figure 306. Create a New Channel Dialog
3. Enter the desired name for the new channel.
Note
Spaces are not allowed in channel names.
4. Click the list button [V] on the Product selection drop-down and select
the desired product (playout device) from the list. The new channel will
be associated with this type of playout device only. See Figure 307.
Figure 307. Channel Product Drop-Down List
5. Click the OK button to close the dialog and create the channel for the
selected product.
DISPLAY CONTENT MANAGER — Installation and User Guide
245
Section 7 — Schedule Screen
The new channel name appears at the top of the Schedule Display Area as
shown in Figure 308.
Figure 308. Channel Name in Schedule
6. Repeat Step 1 through Step 5 for any additional channels you wish to
create.
Note
With a channel created and open, a new channel can also be created by rightclicking on the channel name in the Schedule Display Area and selecting
New... from the menu or pressing the [N] key on the keyboard. See
Figure 309.
Figure 309. Channel Right Click Menu - New
Create a Command Channel
A command channel provides a mechanism for sending serial command
sequences or volume settings to a particular device at a particular time.
For example, it may be desirable to send a Display ON or Display OFF
command to a display in the MediaEdge system. For more information on
creating serial commands, see Create a Serial Command on page 154.
To create a command channel schedule, do the following.
1. On the calendar, select the date for the command channel schedule. See
Select Schedule Date on page 243 for more information.
2. Select View>Channel Type>Command Channel from the Menu bar as
shown in Figure 310.
246
DISPLAY CONTENT MANAGER — Installation and User Guide
Channel Management
Figure 310. Select Command Channel View
3. Do one of the following:
•
Click the New
button on the Tool bar.
•
Select File>New... from the Menu bar.
The Create a New Command Channel dialog shown in Figure 311 appears:
Figure 311. Create a New Command Channel Dialog
4. Enter the desired name for the new channel.
Note
Spaces are not allowed in command channel names.
5. Click the list button [V] on the Product selection drop-down and select
the desired product (playout device) from the list. The new command
channel will be associated with this playout device only.
6. Click the OK button to close the dialog and create the command channel
for the selected product.
The new command channel name appears at the top of the Schedule
Display Area as shown in Figure 312.
DISPLAY CONTENT MANAGER — Installation and User Guide
247
Section 7 — Schedule Screen
Figure 312. Command Channel Name in Schedule
7. Repeat Step 1 through Step 5 for any additional command channels
you wish to create.
Note
With a command channel created and open, a new command channel can
also be created by right-clicking on the channel name in the Schedule Display
Area and selecting Create New Command Channel... from the menu or
pressing the [N] key on the keyboard.
Open a Channel
To open an existing channel in order to add playlists to its schedule, follow
these steps:
1. Do one of the following:
•
Click the Open
button on the Tool bar.
•
Select File>Open... from the Menu bar.
The Channel List dialog shown in Figure 313 appears.
Figure 313. Channel List Dialog
248
DISPLAY CONTENT MANAGER — Installation and User Guide
Channel Management
Note
If the Schedule Display is in the Command Channel view, the Command
Channel List dialog will open to display available Command Channels.
2. Select any channels you wish to open.
3. Click the OK button to open the selected channel(s).
Note
If at least one channel is already open, additional channels can also be
opened by right clicking on the column header of an open channel, selecting
Open... from the menu or pressing the [O] key on the keyboard (see
Figure 314) and selecting the desired channel(s) to open from the Channel
List dialog.
Figure 314. Channel Right Click Menu - Open
Note
A open channel can be closed by right clicking on the channel column header,
selecting Open... from the menu or pressing the [O] key on the keyboard and
removing the check mark next to the desired channel name in the Channel
List dialog. Exiting the DCM Console application closes all open channels.
Adjust Channel Column Width
By default, the channel columns have a fixed width which is automatically
set based on the number of channels open.
If you want to adjust the width of individual channel columns, do the following:
1. Select View>Channel Width>Variable from the Menu bar (see
Figure 315).
DISPLAY CONTENT MANAGER — Installation and User Guide
249
Section 7 — Schedule Screen
Figure 315. Schedule Channel Width Menu
2. Place the cursor on the channel separator in the column header. The
cursor changes to a resize cursor as shown in Figure 316.
Figure 316. Adjust Channel Column Width
3. Drag the cursor to the left or right to decrease or increase the width of
the channel column to the left of the cursor.
Note
In the example above, dragging the cursor to the left decreases the width of
the HotelLobbyDisplays channel column. Dragging the cursor to the right
increases its width. This operation does not change the width of the HotelMarquees channel column. If the width of the HotelLobbyDisplays column is
increased, the column(s) to the right may be pushed out of the Schedule
Display Area. In this case, a horizontal scroll bar will appear at the bottom of
the display area.
Select View>Channel Width>Fixed to return all channel columns to a fixed
width within the Schedule Display Area without a horizontal scroll bar.
250
DISPLAY CONTENT MANAGER — Installation and User Guide
Channel Management
Delete a Channel
If you wish to delete a channel, do the following:
1. Right-Click on the Channel name at the top of the channel column.
2. Select Delete from the menu or press the [D] key on the keyboard (see
Figure 317).
Figure 317. Channel Right Click Menu - Delete
The DCM Console channel delete confirmation dialog shown in Figure 318
appears.
Figure 318. DCM Console Delete Channel Confirmation Dialog
3. Click the Yes button to confirm deletion of the channel.
Note
Deleting a channel from the schedule deletes the channel from the DCM database. It will no longer appear in the Channel List dialog when opening channels.
Update a Channel
Normally, channel updates occur automatically via the update schedule
defined for a server or group object in the Target Screen (seeCreate a Server
Object on page 288 and Create a Group Object on page 293 for more information). However; if the update is not scheduled to take place for several
hours (or days) and you have made changes to one or more channels (e.g.
added content to playlists, changed playlist start time, length, etc.) which
DISPLAY CONTENT MANAGER — Installation and User Guide
251
Section 7 — Schedule Screen
need to be updated before the scheduled time, a manual update can be initiated.
Note
Manual updates do not cancel any scheduled automatic channel updates.
These will still take place at the scheduled time.
To perform a manual channel update, do the following:
1. Select File>Update... from the Menu bar.
The Update Channel dialog illustrated in Figure 319 appears.
Figure 319. Update Channel Dialog
2. Select the playout and command channels which you wish to manually
update.
3. Click the OK button.
4. The DCM Console update confirmation dialog shown in Figure 320
appears.
252
DISPLAY CONTENT MANAGER — Installation and User Guide
Channel Management
Figure 320. DCM Console Update Confirmation Dialog
5. Click the Yes button to confirm the channel update.
When updates are complete, the DCM Console update finished dialog
shown in Figure 321 appears.
Figure 321. DCM Console Update Finished Dialog
6. Click the OK button to close the dialog.
CAUTION If significant changes have been made to a channel, such as adding large
content files to a playlist, the manual update must be performed with sufficient time in advance of the schedule playlist start time to allow the content
to be uploaded to playout devices. Numerous large files could take some time
to upload.
DISPLAY CONTENT MANAGER — Installation and User Guide
253
Section 7 — Schedule Screen
View Channel Information
To view group assignment information for the selected channel do one of
the following:
•
Select View>Information from the Menu bar.
•
Right click on the desired channel column header and select Information from the menu or press the [I] key on the keyboard (see Figure 322).
Figure 322. Channel Right Click Menu - Information
The Channel Information dialog illustrated in Figure 323 appears.
Figure 323. Channel Information Dialog
Click the Close button to close the dialog.
254
DISPLAY CONTENT MANAGER — Installation and User Guide
Schedule Management
Schedule Management
The operations described in this section deal with the management of
schedules assigned to playout channels and command channels.
Assign Playlists to Playout Channel
One or more playout channels need to be opened or created before creating
a schedule. A schedule may by created for multiple channels simultaneously by opening the desired channels.
After opening or creating all desired channels, playlists are assigned to a
channel by following these steps:
1. Do one of the following:
•
Click the Show bin window
button on the Tool bar.
•
Select View>Bin Window from the Menu bar.
•
Right click on the Playlist Display Area and select Bin Window from the
menu or press the [B] key on the keyboard.
The Playlist Bin Window shown in Figure 324 appears.
DISPLAY CONTENT MANAGER — Installation and User Guide
255
Section 7 — Schedule Screen
Figure 324. Playlist Bin Window
The view style can be toggled between the details view shown in Figure 324
and the thumbnails view.
2. Select the desired playlist view by using the Thumbnail
the Details
button in the Playlist Bin Window.
button and
3. If you wish to change the playlist category display, click the list button
[V] on the playlist category drop-down and select the desired category
from the list.
The Playlist Bin Window displays only those playlists assigned to the
selected category. See Figure 325.
256
DISPLAY CONTENT MANAGER — Installation and User Guide
Schedule Management
Figure 325. Playlist Bin - Playlists by Category
Note
Figure 325 shows the thumbnail view in the Playlist Bin Window.
4. Click and drag the desired playlist from the Playlist Bin Window to the
desired start time in the desired channel on the schedule.
Note
If you try to place a playlist that is assigned to a product (playout device)
other than the one to which the channel is assigned, the error dialog illustrated in Figure 326 appears. For example, if the open channels are for the
HDMA-4100/MEDIAEDGE-STB4/MEDIAEDGE-STB4H and MEDIAEDGESWT4 products, playlists that are green and orange cannot be added to these
channels as they correspond to other products.
DISPLAY CONTENT MANAGER — Installation and User Guide
257
Section 7 — Schedule Screen
Figure 326. Playlist Placement Error
5. When the playlist is positioned at the desired location in the schedule,
click the left mouse button to anchor it at that point.
6. Click the Playlist Bin Window task bar item to reopen the window and
repeat Step 2 through Step 5 to add additional playlists to the schedule.
Note
If you do not want the Playlist Bin Window to minimize each time a playlist is
assigned to the schedule, you can elect to keep the playlist bin window on top
of the schedule until it is closed or to display the bin window on top. See Bin
Window Display Settings on page 263 for more information.
7. When all the desired playlists are assigned to the schedule, click the X
in the upper right corner of the Playlist Bin Window to close this
window.
When finished assigning playlists to the schedule, it may resemble the
example shown in Figure 327.
Figure 327. Playlists Added to Schedule
258
DISPLAY CONTENT MANAGER — Installation and User Guide
Schedule Management
Note
This schedule consists of a single channel. Multiple channels can be opened
simultaneously when adding playlists to the schedule as illustrated in
Figure 328.
Figure 328. Multi-Channel Schedule
Assign Commands to a Command Channel
One or more command channels need to be opened or created before creating a command schedule. Schedules for multiple command channels
may be created simultaneously by opening the desired channels.
After opening or creating all desired command channels, serial commands
and volume commands are assigned to a command channel by following
these steps:
1. Do one of the following:
•
Click the Show bin window
button on the Tool bar.
•
Select View>Bin Window from the Menu bar.
•
Right click on the Playlist Display Area and select Bin Window from the
menu or press the [B] key on the keyboard.
The Command Bin Window shown in Figure 329 appears.
DISPLAY CONTENT MANAGER — Installation and User Guide
259
Section 7 — Schedule Screen
Figure 329. Command Bin Window - Command Tab
2. Select the Volume tab if you wish to assign a volume command to the
command channel schedule or the Serial Command tab if you wish to
assign a serial command to the command channel.
Figure 330 shows the Volume tab open in the Command Bin Window.
260
DISPLAY CONTENT MANAGER — Installation and User Guide
Schedule Management
Figure 330. Command Bin - Volume Tab
3. Click and drag the desired serial command or volume command from
the Command Bin Window to the desired start time in the desired
channel on the schedule.
4. When the command is positioned at the desired location in the
schedule, click the left mouse button to anchor it at that point.
5. Click the Command Bin Window task bar item to reopen the window
and repeat Step 2 through Step 5 to add additional playlists to the
schedule.
Note
If you do not want the Command Bin Window to minimize each time a
command is assigned to the schedule, you can elect to keep the Command
Bin Window on top of the schedule until it is closed or display the bin window
on top. See Bin Window Display Settings on page 263 for more information.
6. When all the desired command are assigned to the schedule, click the X
in the upper right corner of the Command Bin Window to close it.
DISPLAY CONTENT MANAGER — Installation and User Guide
261
Section 7 — Schedule Screen
When finished assigning command to the command channel schedule, it
may resemble the example shown in Figure 331.
Figure 331. Playlists Added to Schedule
Note
A command occupies one (1) second on the timeline. The time scale must be
set to 1Sec in order to see the command names in the schedule as illustrated
in Figure 331.
Figure 332 shows what the details area may show after assigning commands to the command channel schedule.
Figure 332. Command Details
262
DISPLAY CONTENT MANAGER — Installation and User Guide
Schedule Management
Bin Window Display Settings
To change the way in which the Bin Window is displayed when assigning
playlists or serial commands and volume settings to a schedule, select the
desired display setting from the view menu (see Figure 333) while the Playlist Bin Window is open.
Figure 333. Playlist Bin Window Display Settings
The choices are:
Display Bin Window on Top
When the Bin Window is minimized and not visible, selecting this option
displays the Bin Window on top of the schedule but does not keep it on top.
Keep Bin Window on Top
This selection keeps the Bin Window on top of the schedule while positioning playlists in the schedule. The Bin Window may be moved if it is in
the way. When clicking on the schedule to position a playlist, the Bin
Window appears transparent as illustrated in Figure 334.
Pressing the [CTRL]+[T] keys on the keyboard also sets the Bin Window
display settings to Keep Bin Window on Top.
DISPLAY CONTENT MANAGER — Installation and User Guide
263
Section 7 — Schedule Screen
Figure 334. Transparent Playlist Bin Window
Edit a Channel Schedule
After assigning playlists to channel, it may be necessary to adjust the length
of one or more playlists. It may be desirable to have some playlists play
repeatedly until the end of the schedule is reached or to play a playlist, for
example, three times before moving to the next playlist in the schedule. You
may wish to delete a playlist or assign additional playlists to the schedule.
Adjust Playlist Start Time and Length
To increase or decrease the length of a playlist in the schedule, do the following:
1. In the Schedule Display Area, click on the channel playlist for which
you wish to adjust start time or length.
All of the playlists that have been assigned to a channel appear in the Playlists Detail Area as illustrated in Figure 335.
264
DISPLAY CONTENT MANAGER — Installation and User Guide
Schedule Management
Figure 335. Selected Channel Playlists
The current start time (24-hour clock) and length in Hours:Minutes:Seconds (HH:MM:SS) of each playlist is listed in the Start and Length columns.
2. In the Start: field of the Playlist Details area, enter the desired start time
for the playlist or use the Up/Down arrow keys to increase or decrease
the start time.
Note
Clock times are in a 24-hour format in which 1:00pm is 13:00, 2:00pm is
14:00, etc.
3. Press the [ENTER] key to set the new length for the selected playlist.
Note
If the start time specified causes an overlap with the prior playlist, the error
dialog illustrated in Figure 336 appears. The specified start time can not be
earlier than the end time of the prior playlist.
Figure 336. Start Time Error Dialog
4. In the Length: field of the Playlist Details Area, enter the desired length
for the playlist or use the Up/Down arrow keys to increase or decrease
the length.
DISPLAY CONTENT MANAGER — Installation and User Guide
265
Section 7 — Schedule Screen
5. Press the [ENTER] key to set the new length for the selected playlist.
As shown in Figure 337, the start time of the selected playlist was changed
from 08:25:00 to 08:30:00 and its length was changed to 20 minutes
(00:20:00) from its original 10 minutes (00:10:00).
Figure 337. Playlist Start and Length Adjusted
CAUTION Start time and length adjustments may leave gaps between playlists. These
gaps will result in a black display in the channel for the length of the gap. If
this is not desired, adjust start time and length of adjacent playlists to eliminate the gap.
Alternative Methods
•
To change the start time, playlist objects can be dragged and dropped
to a new location in the channel.
Note
•
If a playlist object is dropped in a location that overlaps another playlist, it will
automatically be repositioned at the end of the overlapped playlist.
To change a playlist length, the top or bottom border of the selected
playlist can be dragged to increase or decrease the length.
Note
If a playlist border is dragged to a position that overlaps another playlist, the
border returns to the original location and no change in playlist length is
made.
Repeat a Playlist
Rather than adding a number of unique playlists to a playout channel
schedule, it may often be desirable to repeat a playlist a certain number of
times or repeat as many times as possible until the end of the daily schedule
is reached.
266
DISPLAY CONTENT MANAGER — Installation and User Guide
Schedule Management
To repeat a playlist in the channel schedule, do the following:
1. Click on the playlist for which you wish to assign a repeat value.
2. In the Playlist Details Area, click the list button [V] on the Repeat dropdown to see the list of choices for that value (see Figure 338).
Figure 338. Playlist Component Repeat Drop-Down List
3. Select the desired repeat value from the list as explained below:
None
Default repeat value assigned to all playlists when they are added to the
channel schedule. The playlist will play once and then the next playlist on
the schedule is played.
For number of times and for duration settings determine the manner in
which the dragged lower border on the playlist object behaves as illustrated in Figure 339.
DISPLAY CONTENT MANAGER — Installation and User Guide
267
Section 7 — Schedule Screen
Figure 339. Adjust Playlist Object End Time by Dragging.
Note
The 20-minute increment in the “for number of times” setting above is a function of the original 20-minute length of the playlist. The playlist is repeated in
its entirety as many times as possible.
Note
The 30-minute increment in the “for duration” example above is a function of
the time scale setting of 30M. If the time scale increment is 5M, the length of
the playlist can be increased in five-minute increments.
For number of times
Playlist will repeat in its entirety as many times as possible based on where
your drag the lower border.
For example, if a playlist is 15-minutes in length and you drag the bottom
border of the playlist 48 minutes beyond its current ending position, the
end time will snap back to 45 minutes beyond the current end time since
that is the closest full 15-minute increment.
If the playlist length is reduced by dragging, the playlist end time will also
snap to the nearest full 15-minute increment.
For duration
Play the playlist until the end of the one-day schedule or wherever the end
point is set based on dragging the playlist lower object border.
268
DISPLAY CONTENT MANAGER — Installation and User Guide
Schedule Management
Note
The exact end time is based on the time scale increment. The end time border
snaps to the nearest increment (up to the end of the one-day schedule) when
the mouse button is released.
Cut, Copy and Paste Playlists and Commands
When building a schedule, it is often desirable to copy an existing playlist
or command to another location in the schedule, or to remove a playlist or
command from its current location and place it elsewhere in the schedule.
The Cut, Copy and Paste operations allow you to do this.
To cut or copy an existing playlist or command and paste it in another location in the schedule, do the following:
1. Select the playlist or command to be copied.
2. Do one of the following:
•
Click the Copy
or Cut
button on the Tool bar.
•
Select Edit>Copy or Edit>Cut from the Menu bar.
•
Press the [CTRL]+ [C] (Copy) or the [CTRL]+ [X] (Cut) keys on the keyboard.
•
Right click on the playlist and select Cut or Copy from the menu or
press the [T] (Cut) or [C] (Copy) key on the keyboard.
3. Click on the schedule at the position where you wish to place the copied
or cut object.
4. To paste the copied or cut object, do one of the following:
•
Click the Paste
button on the Tool bar.
•
Select Edit>Paste from the Menu bar.
•
Press the [CTRL]+ [V] keys on the keyboard.
•
Right click on the schedule and select Paste from the menu or press the
[P] key on the keyboard.
If there is not sufficient time left in the schedule to accommodate the playlist the selected channel, it will be truncated to fit.
Note
After copying a playlist or command object, multiple copies may be pasted
on the schedule using one of the above paste methods.
Delete a Playlist or Command
To delete a playlist or command from a channel schedule, select the playlist
or command to be deleted and follow these steps:
DISPLAY CONTENT MANAGER — Installation and User Guide
269
Section 7 — Schedule Screen
Do one of the following:
button on the Tool bar.
•
Click the Delete
•
Select Edit>Delete>Schedule from the Menu bar.
Note
This option is not available for commands in a Command Channel.
•
Press the [DEL] key on the keyboard.
•
Right click on the playlist and select Delete from the menu or press the
[D] key on the keyboard (see Figure 340).
Figure 340. Playlist Right Click Menu - Delete
Note
There is no confirmation prompt for deleting a playlist or command from the
schedule.
Undo a Component Operation
If you perform an operation such as deleting a playlist, pasting a copy of a
playlist, cutting a playlist, etc. in error, it is possible to undo these operations.
To undo an operation, do one of the following:
•
Select Edit>Undo from the Menu bar.
•
Press the [CTRL]+[Z] keys on the keyboard.
Operations are undone in reverse order with the most recent operation being reversed first.
There are 10 levels of undo.
Copy a Schedule
Channel schedules are created for a single 24-hour period. They do not
span multiple days; however, an existing daily channel schedule can be
copied to other dates if it is desirable to repeat the same schedule for those
dates. A schedule may be copied to up to 30 days.
270
DISPLAY CONTENT MANAGER — Installation and User Guide
Schedule Management
To copy the daily schedule for a playout or command channel to other calendar dates, do the following:
1. From the Schedule Display Window on the date you wish to copy, select
the desired channel.
2. Select Action>Copy 1 day’s Schedule... from the Menu bar.
The Copy Schedule dialog illustrated in Figure 341 appears.
Figure 341. Copy Schedule Dialog
The selected channel name appears in the title of this dialog.
3. If you wish to copy the schedule for all channels from a particular date,
select the All Channels option.
4. Use one of the methods indicated in the dialog to selected the dates to
which you wish to copy the current day’s schedule.
•
Click on the first day and drag the mouse pointer to the last day to
which you wish to copy the schedule.
•
Click on the first day and then hold sown the [SHIFT] key and click on
the last day to which you wish to copy the schedule.
Figure 342 shows dates selected (August 27 to September 4) to which to
copy the schedule.
Note
In Figure 342, All Channels is selected which will copy the schedules for all
channels on the displayed schedule to the selected dates.
DISPLAY CONTENT MANAGER — Installation and User Guide
271
Section 7 — Schedule Screen
Figure 342. Schedule Copy Destination Dates Selected
5. Click the OK button.
The DCM Console copy confirmation dialog shown in Figure 343 appears
Figure 343. DCM Console Copy Schedule Confirmation Dialog
6. Click the Yes button to copy the currently displayed schedule to the
selected date(s).
WARNING Any schedules that exist for the selected copy destination date(s) will be
overwritten with the copied schedule. The prior schedule for that date can
not be recovered.
As illustrated in Figure 344, the displayed schedule is copied to the selected
dates.
272
DISPLAY CONTENT MANAGER — Installation and User Guide
Schedule Management
Figure 344. August 25 Schedule Copied to August 278
Delete a Schedule
Channel schedules are created for a single 24-hour period. They do not
span multiple days; however, an existing daily channel schedule may be
deleted for any date range on the calendar.
To delete the daily schedule for a playout or command channel for specific
calendar dates, do the following:
1. In the Schedule Display Area, select the channel for which you wish to
delete a schedule.
2. Select Action>Delete 1 day’s Schedule... from the Menu bar (see
Figure 345).
DISPLAY CONTENT MANAGER — Installation and User Guide
273
Section 7 — Schedule Screen
Figure 345. Action Menu - Delete 1 Day’s Schedule
The Delete 1 Day’s Schedule dialog illustrated in Figure 346 appears. The
name of the selected channel appears in the dialog title.
Figure 346. Delete 1 Day’s Schedule Dialog
3. If you wish to delete all channel schedules for the selected date, select
the All channels option.
4. Select the date range by specifying the Start and End dates for which
you wish to delete the daily schedule for the selected channel(s).
Note
As shown in Figure 347, clicking the [V] button displays a calendar from
which the desired dates may be selected.
Figure 347. Select Schedule Delete Dates
274
DISPLAY CONTENT MANAGER — Installation and User Guide
Schedule Management
The DCM Console delete schedule confirmation dialog shown in
Figure 348 appears.
Figure 348. DCM Console Delete Schedule Confirmation Dialog
5. Click the Yes button to confirm deletion of the selected schedule(s) for
the selected date range.
Export a Schedule
Schedule information can be exported from the DCM and copied directly
to the HDMA-4000/HDMA-4100 playout device.
To export a schedule from the DCM, do the following:
1. Select File>Export Schedule... from the Menu bar.
2. The Export Schedule dialog illustrated in Figure 349 appears.
DISPLAY CONTENT MANAGER — Installation and User Guide
275
Section 7 — Schedule Screen
Figure 349. Export Schedule Dialog
Both Playout Channels and Command Channels are listed in the dialog.
Those channels which are currently open and selected in the appropriate
Channel Type view have a check mark by their name.
3. If you wish to export a playout or command channel other than the one
selected, select the desired channel.
Note
A maximum of one playout and one command channel may be selected
simultaneously. If multiple playout or command channels exist, selecting one
will deselect any other playout or command channel that may have been
selected.
4. Click the Settings button and browse to the desired folder in which to
save the exported schedule. See Figure 350 for an example.
276
DISPLAY CONTENT MANAGER — Installation and User Guide
Schedule Management
Figure 350. Browse for Folder Dialog
Note
If you wish to create a new folder for the exported schedule, click the Make
New Folder button and create the desired folder.
5. Select the Repeat option if you wish to repeat the schedule for the
selected Start Date on all subsequent days.
The selected daily schedule will be repeated each day until the schedule is
updated.
Note
End Date selection is disabled when the Repeat option is selected as the End
Date s not used.
6. Select the desired start and end date by clicking the [V] button and
selecting the desired dates from the calendar (see Figure 351).
7. Select the Export Material option if you wish to also export the material
associated with the playlists on the selected channels.
DISPLAY CONTENT MANAGER — Installation and User Guide
277
Section 7 — Schedule Screen
Figure 351. Export Dates Calendar
8. Click the OK button.
The DCM Console export confirmation dialog shown in Figure 352
appears.
Figure 352. DCM Console Export Confirmation Dialog
278
DISPLAY CONTENT MANAGER — Installation and User Guide
Schedule Management
9. Click the Yes button to begin the export of the selected channels
schedules and, if applicable, associated material.
When the schedule has been exported, the confirmation dialog illustrated
in appears.
Figure 353. Export Finished Confirmation
10. Click the OK button to close the dialog.
A .txt file named schedule.txt (see Figure 354 for an example) is created in
the specified folder location.
DISPLAY CONTENT MANAGER — Installation and User Guide
279
Section 7 — Schedule Screen
Figure 354. Schedule.txt Example
If the Export Material Option was selected, folders containing the exported
material are also created in the designated export location.
Copy Exported Schedule and Material
Exported schedules and material may be copied directly to an HDMA-4000
or HDMA-4100 for playout.
See the appropriate playout device manual for the location and settings for
copying schedules and material exported from the DCM.
Exported content may be copied to the HDMA-4000/HDMA-4100 playlist
folder (this folder must first be shared) or directly to a USB drive. Both
playout devices are capable of playing content directly from a USB drive.
280
DISPLAY CONTENT MANAGER — Installation and User Guide
Section
8
Target Screen
The Target screen is where devices are defined to which schedules and
content will be distributed for playout.
When the Target button is selected from the Navigation bar, or, one of the
methods explained in Alternative Function Screen Access Methods on page 92
is used, the Target Screen with its associated display areas and function
bars appears as illustrated in Figure 355. These elements are used to define
servers, playout device groups, and playout device clients in the MediaEdge system to which material, layouts, playlists and schedules are
uploaded for playout.
The devices to be updated are update targets.
Figure 355. Target Screen
DISPLAY CONTENT MANAGER — Installation and User Guide
281
Section 8 — Target Screen
Note
Figure 355 depicts the Target Display Area with servers, groups and clients
added and a group selected. The Target Object Display Area will be blank
when it is first accessed.
Target Object Details
The physical components that comprise the MediaEdge system are defined
in the Target screen. The information that appears in the Target Object
Display Area and the Target Object Details Area depends upon the type of
target object that is selected in the Target Object Tree.
Figure 356 illustrates a sample Target Object Tree fully expanded to show
all defined objects.
Figure 356. Target Objects Tree
282
DISPLAY CONTENT MANAGER — Installation and User Guide
Target Object Details
Click the “-” to collapse a portion of the tree that is expanded. Click the “+”
to expand a portion of the tree that is collapsed.
The Target Object Tree is organized with server objects at the top level,
group objects on the next level(s) and client objects at the lowest levels. The
object icons are illustrated in Table 7.
Table 7. Target Object Types
Icon
Target Object Type
Server
Group
HDMA-4000 Client
HDMA-4100 Client
STB3 Client
STB4 Client
STB4H Client
SWT3-DS Client
SWT4 Client
The sections which follow describe the details displayed in the Target
Object Display Area and Target Object Details Area when server, group and
client objects are selected in the Target Object Tree.
Target Object Display Area
When an object is selected in the Target Object Tree, all objects associated
with the selected object are displayed in the Target Object Display Area. For
example, if a server object is selected, all groups associated with that server
are displayed (see Figure 357).
DISPLAY CONTENT MANAGER — Installation and User Guide
283
Section 8 — Target Screen
Figure 357. Server Object Selected in Target Object Tree
If a group object is selected, all subgroups and clients associated with that
group are displayed (see Figure 358).
Figure 358. Group Object Selected in Target Object Tree
If a client object is selected, nothing is displayed in the Target Object
Display Area as nothing is associated with a client (see Figure 359).
Figure 359. Client Object Selected in Target Object Tree
Regardless of the selected object type, the following information is displayed in the Target Object Display Area:
Note
Information in the Target Object Display Area is display only and cannot be
changed in this view. To change the details displayed in the display area,
select the desired object in the Target Object Tree and edit the details in the
Target Object Details Area.
Object Name
The name of the object assigned when the object is created.
Type
The object type (server, group client).
284
DISPLAY CONTENT MANAGER — Installation and User Guide
Target Object Details
Product
The product (playout device) type associated with the object.
Channel
The playout channel (if any) assigned to the object.
Note
A Parent Group and its child groups may have different playout channel
assignments.
Command Channel
The command channel (if any) assigned to the object.
Note
Groups may or may not have an assigned command channel depending on
system configuration.
IP Address
The IP address assigned to the object.
Note
Groups do not have an IP address as they do not represent a physical piece
of equipment in the MediaEdge system.
Target Object Details Area
The Target Object Details Area displays the details associated with the
target object selected in the Target Object Tree or the Target Object Display
area.
Server Object Details
A MediaEdge server is any computer in a MediaEdge system on which the
MediaEdge SVS3 or SVS4 server software has been installed. Figure 360
shows the details in the Target Object Details Area when a server object is
selected. This information is entered when a server object is created (see
Create a Server Object on page 288). This information can be edited at any
time (see Edit a Server Object on page 291).
DISPLAY CONTENT MANAGER — Installation and User Guide
285
Section 8 — Target Screen
Figure 360. Server Target Object Details
Name
The server object name.
IP Address
The IP address assigned to the server.
Shared Directory
The alias assigned to the shared content directory when the MediaEdge
server was installed.
Account
A Windows user account used to access the server.
Password
The password associated with the Windows user account.
Update Start Time
The time of day at which content, playlist and schedule updates will take
place on the scheduled day(s).
Update Length
The estimated length of the update period.
286
DISPLAY CONTENT MANAGER — Installation and User Guide
Target Object Details
Update Pattern
The scheduled update interval for the server.
Group Object Details
A group is a user-defined container for MediaEdge clients and provides a
way of organizing clients based on similar attributes. Figure 361 shows the
details in the Target Object Details Area when a group object is selected.
This information is entered when a group object is created (see Create a
Group Object on page 293). This information can be edited at any time (see
Edit a Group Object on page 299).
Figure 361. Group Target Object Details
Name
The name assigned to the group.
Server
The Server object with which the group is associated.
Parent Group
The parent group (if any) to which the group belongs.
Channel
The playout channel assigned to the group and its associated clients.
Command Channel
The command channel (if any) assigned to the group and its associated clients.
DISPLAY CONTENT MANAGER — Installation and User Guide
287
Section 8 — Target Screen
Delivery
The selected method of delivering content to playout devices.
Client Object Details
A client is a specific playout device in the MediaEdge system. Figure 362
shows the details in the Target Object Details Area when a client object is
selected. This information is entered when a client object is created (see
Create a Client Object on page 301). This information can be edited at any
time (see Edit a Client Object on page 303).
Figure 362. Client Target Object Details
Name
The name assigned to the client device.
Group
The group to which the client device is assigned.
Note
Playout and command channel assignments are inherited from the associated group object.
IP Address
The IP address assigned to the client device.
Create a Server Object
All MediaEdge servers must be defined before client groups and client
playout devices can be added. If your MediaEdge system does not have
any MediaEdge servers, you can begin by defining client groups for the
None (Local) server object.
288
DISPLAY CONTENT MANAGER — Installation and User Guide
Create a Server Object
To define a MediaEdge server, follow these steps:
1. Do one of the following:
•
Click the New server
button on the Tool bar.
•
Select File>New... >Server... from the Menu bar.
•
Right-Click on an existing target object in the Target Object Tree and
select New>Server... from the menu or press the [S] key on the keyboard
(see Figure 363).
Figure 363. Right-Click New Object Menu
The Create a New Server dialog shown in Figure 364 appears:
Figure 364. Create a New Server Dialog
2. Enter the desired name for the new server.
3. Enter the IP address assigned to the server.
Note
There is no lookup or validation of IP addresses in the MediaEdge system.
You must verify the correct IP address for each server and client in the
system.
DISPLAY CONTENT MANAGER — Installation and User Guide
289
Section 8 — Target Screen
4. Enter the folder alias assigned to the shared content/FTP directory at
the time the MediaEdge server was installed. See FTP Server Setup on
page 41 for more information.
5. Enter the account name and password on the server that has access to
the shared content/FTP folder.
Note
Enter the account name as either [computer name]\[user name] or [domain
name]\[user name].
Note
The account name password cannot be blank. A password for the specified
account must exist or no connection will be established.
6. Specify the desired start time (24-hour clock) at which scheduled
content, playlist and schedule updates will occur on this server.
7. Specify the estimated length (duration) of the updates.
Note
The specified Update Length does not guarantee that updates will finish
within this time or that they will last for this length of time. File transfers will
execute more slowly if a longer time is specified.
8. Click the Settings... button to select the desired update frequency.
The Update Pattern Settings dialog shown in Figure 365 appears.
Figure 365. Update Pattern Settings Dialog
The Daily setting allows selection of a daily interval (e.g.every 2 days,
every 4 days, etc.) or an update every weekday (Monday through Friday)
which will take place at the time scheduled in Step 6.
The Weekly update settings allows the selection of the day each week on
which the update will take place at the time scheduled in Step 6.
9. Click the OK button to close the Update Pattern Settings dialog.
10. Click the OK button on the Create a new server dialog to close the dialog
and create the server object.
290
DISPLAY CONTENT MANAGER — Installation and User Guide
Edit a Server Object
11. Repeat Step 1 through Step 10 for any additional servers you wish to
create.
Edit a Server Object
All of the details of a server object may be set to a value other than the original value.
To change the values associated with a server object, click on the value(s)
you wish to change in the Target Object Details Area and enter the desired
value as explained below:
Name
Click in the name field and enter the desired server name (see Figure 366).
Figure 366. Server Name Entry
IP Address
Click in the IP Address field and enter the desired IP address (see
Figure 367).
Figure 367. Server IP Address Entry
Note
Changing the IP address entry in this field does not change the IP address for
the device. The IP address for the server object should only be changed here
to reflect any changes that may have been made in the MediaEdge System
networking infrastructure.
Shared Directory
Click in the Shared Directory field and enter the desired shared directory
alias (see Figure 368).
Figure 368. Server Shared Directory Entry
Note
The shared directory alias was specified when the MediaEdge server was
installed. Unless the directory has been renamed and a new alias specified,
there is no reason to change the shared directory alias.
DISPLAY CONTENT MANAGER — Installation and User Guide
291
Section 8 — Target Screen
Account
Click in the Account field and enter the desired Windows user name used
to access the server (see Figure 369).
Figure 369. Server Account Name Entry
Note
The specified user name must have full administrative rights on the server.
Password
Click in the Password field and enter the password associated with the
account specified for server access (see Figure 370).
Figure 370. Server Password Entry
Update Start Time
Update Start Time is a numeric value and is adjusted by clicking the
Update Start Time field and entering the desired time by using the keyboard or the arrows to increment or decrement the selected value (see
Figure 371). Update Start Time is expressed in hours:minutes:seconds
(HH:MM:SS) on a 24-hour clock.
Figure 371. Server Update Start Time Entry
Update Length
Update Length is a numeric value and is adjusted by clicking the Update
Length field and entering the desired time by using the keyboard or the
arrows to increment or decrement the selected value (see Figure 372).
Update Length is expressed in hours:minutes:seconds (HH:MM:SS).
Figure 372. Server Update Length Entry
Update Pattern
The update pattern is changed by clicking in the Update pattern field. The
Update Pattern Settings dialog illustrated in Figure 373 appears.
292
DISPLAY CONTENT MANAGER — Installation and User Guide
Create a Group Object
Figure 373. Server Update Pattern Settings Dialog
Select the desired server update pattern and click the OK button.
The selected update pattern appears in the Update Pattern Setting field as
shown in Figure 374.
Figure 374. Server Update Pattern Settings
Create a Group Object
A group is a target to which channel schedules are delivered. There is a
direct relationship between channels and groups. At least one group must
be created for each channel; however, there can be more groups than channels.
To create a group, follow these steps:
1. Do one of the following:
•
Click the New group
button on the Tool bar.
•
Select File>New... >Group... from the Menu bar.
•
Right-Click on an existing target object in the Target Object Tree and
select New>Group... from the menu or press the [G] key on the keyboard (see Figure 375).
DISPLAY CONTENT MANAGER — Installation and User Guide
293
Section 8 — Target Screen
Figure 375. Right-Click New Object Menu
The Group Settings dialog shown in Figure 376 appears:
Figure 376. Group Settings Dialog
2. Enter the desired name for the new group.
3. Click the list button [V] on the Product selection drop-down and select
the desired product (playout device) from the list. The new group will
be associated with this type of playout device only. See Figure 377.
294
DISPLAY CONTENT MANAGER — Installation and User Guide
Create a Group Object
Figure 377. Group Product Drop-Down List
4. Click the list button [V] on the Server selection drop-down and select
from the list the server with which the group will be associated. See
Figure 378.
Figure 378. Group Server Drop-Down List
In the next step, the parent group is selected. Groups can be nested within
other groups, if desired, allowing for the grouping of similar clients under
a common parent group. A parent group is not required and a group may
simply be associated with a server rather than a parent group.
A parent group may simply be a container for other groups without any
channel associations.
Any child group created under an existing parent group will automatically
be associated with the same product type as its parent; however, playout or
command channels associations may be different for the parent and child
groups.
Note
When creating the first group(s) for each product/channel, the only available
selection will be “None.”
5. Click the list button [V] on the Parent Group selection drop-down and
select from the list the Parent Group with which the group will be
associated. If the group being created will not be associated with a
Parent group, select “None” from the list. See Figure 379.
DISPLAY CONTENT MANAGER — Installation and User Guide
295
Section 8 — Target Screen
Figure 379. Group Parent Group Drop-Down List
6. If you wish to associate a playout channel with this group, click the list
button [V] on the Channel selection drop-down and select from the list
the playout channel associated with this group. See Figure 380.
Note
Only the channels associated with the selected product type will be displayed.
Figure 380. Group Channel Drop-Down List
7. If you wish to associate a command channel with this group, click the
list button [V] on the Command Channel selection drop-down and
select from the list the command channel associated with this group.
See Figure 381.
Note
Only the command channels associated with the selected product type will be
displayed.
Figure 381. Group Command Channel Drop-Down List
8. Click the list button [V] on the Delivery selection drop-down and select
from the list the desired delivery method this group (see Figure 382).
Available delivery methods are explained below:
Figure 382. Group Delivery Drop-Down List
296
DISPLAY CONTENT MANAGER — Installation and User Guide
Create a Group Object
Video on Demand (VOD)
Content is downloaded on request in real time to the client (set-top box or
computer) requesting the content. VOD client users may select video clips
stored on the server for viewing, either from a dynamically updating menu,
or through direct channel number selection via the remote control. The user
can pause, stop and resume viewing content at any time. Content chapter
points can be created for faster navigation, and clients can fast-forward or
rewind video clips during playback.
Unicast
Unicast is a one-to-one connection between the client and the server as
illustrated in Figure 383. Unicast uses IP delivery methods such as Transmission Control Protocol (TCP) and User Datagram Protocol (UDP), which
are session-based protocols. When one or more clients connect using
unicast to a MediaEdge server, the client has a direct relationship to the
server. Each unicast client that connects to the server takes up additional
bandwidth. For example, if you have 10 clients all playing 100-kilobits per
second (Kbps) streams, those clients as a group are taking up 1,000 Kbps. If
you have only one client playing the 100 Kbps stream, only 100 Kbps is
being used.
Figure 383. Unicast Delivery
Unicast Delivery
MediaEdge Server
100
nt
clie
r
e
sp
Kbp
HDMA-4000/4100
100 Kbps per client
STB3/STB4/STB4H
10
0K
bp
sp
er
clie
nt
SWT3-DS/SWT4
Multicast
Multicast is a true broadcast. The multicast source relies on multicastenabled routers to forward the packets to all client subnets that have clients
listening. As illustrated in Figure 384, there is no direct relationship
DISPLAY CONTENT MANAGER — Installation and User Guide
297
Section 8 — Target Screen
between the clients and a MediaEdge server. The MediaEdge server generates a multicast file when the multicast session is first created. This file contains information that the client(s) need to listen for the multicast. This is
similar to tuning into a station on a radio. Each client that listens to the multicast adds no additional overhead on the server. In fact, the server sends
out only one stream per multicast station. The same load is experienced on
the server whether only one client or 1,000 clients are listening.
Multicast in large MediaEdge systems where all routers are multicastenabled can save quite a bit of bandwidth over unicast.
Figure 384. Multicast Delivery
Multicast Delivery
HDMA-4000/4100
MediaEdge Server
Multicast stream
100 Kbps stream
Multicast-enabled
Router
STB3/STB4/STB4H
SWT3-DS/SWT4
If the group was assigned to a MediaEdge server other than None(Local),
proceed to Step 13. Groups assigned to other servers inherit the update
schedule of the server and the Update Start Time, Update Length and
Update Pattern fields will be grayed out and inaccessible.
If the group was assigned to the None(Local) server object, proceed with
Step 9.
9. Specify the desired start time (24-hour clock) at which scheduled
content, playlist and schedule updates will occur for this group.
10. Specify the estimated length (duration) of the updates.
Note
The specified Update Length does not guarantee that updates will finish
within this time or that they will last for this length of time. File transfers will
execute more slowly if a longer time is specified.
11. Click the Settings... button to select the desired update frequency.
298
DISPLAY CONTENT MANAGER — Installation and User Guide
Edit a Group Object
The Update Pattern Settings dialog shown in Figure 385 appears.
Figure 385. Update Pattern Settings Dialog
The Daily setting allows selection of a daily interval (e.g.every 2 days,
every 4 days, etc.) or an update every weekday (Monday through Friday)
which will take place at the time scheduled in Step 6.
The Weekly update settings allows the selection of the day each week on
which the update will take place at the time scheduled in Step 6.
12. Click the OK button to close the Update Pattern Settings dialog.
13. Click the OK button on the Create a New Group dialog to close the
dialog and create the group object.
14. Repeat Step 1 through Step 13 for any additional groups you wish to
create.
Edit a Group Object
All of the details of a group object may be set to a value other than the original value.
To change the values associated with a group object, click on the value(s)
you wish to change in the Target Object Details Area and enter the desired
value as explained below:
Name
Click in the name field and enter the desired group name (see Figure 386).
Figure 386. Group Name Entry
DISPLAY CONTENT MANAGER — Installation and User Guide
299
Section 8 — Target Screen
Server
Click in the Server field and then click the list button [V] that appears in
the field to see the list of defined MediaEdge servers. Select the desired
server association from the list of choices (see Figure 387).
Figure 387. Group Server Association Selection List
Parent Group
If the selected group is a child group assigned a parent group, the parent
group association may be changed.
Click in the Parent Group field and then click the list button [V] that
appears in the field to see the list of available parent groups. Select the
desired parent group association from the list of choices (see Figure 388).
Figure 388. Group Parent Group Association Selection List
Channel
If a playout channel is assigned to the selected group, the associated
channel may be changed.
Click in the Channel field and then click the list button [V] that appears in
the field to see the list of available playout channels.
Select the desired playout channel association from the list of choices (see
Figure 389).
Figure 389. Group Playout Channel Association Selection List
300
DISPLAY CONTENT MANAGER — Installation and User Guide
Create a Client Object
Command Channel
If a command channel is assigned to the selected group, the associated
command channel may be changed.
Click in the Command Channel field and then click the list button [V] that
appears in the field to see the list of available command channels.
Select the desired command channel association from the list of choices (see
Figure 390).
Figure 390. Group Command Channel Association Selection List
Delivery
To change the delivery method associated with the selected channel, click
in the Delivery field and then click the list button [V] that appears in the
field to see the list of available delivery methods. A detailed explanation of
delivery methods begins on page 297.
Select the desired delivery method from the list of choices (see Figure 391).
Figure 391. Group Delivery Method Selection List
Create a Client Object
Creating client objects requires that at least one group for the client product
(playout device) type already exists in the DCM.
To define a MediaEdge client, follow these steps:
1. From the Target Objects pane, select the group to which the client object
will be assigned.
DISPLAY CONTENT MANAGER — Installation and User Guide
301
Section 8 — Target Screen
2. Do one of the following:
•
Click the New client
button on the Tool bar.
•
Select File>New... >Client... from the Menu bar.
•
Right-Click on an existing server or group object in the Target Object
Tree and select New>Client... from the menu or press the [C] key on the
keyboard (see Figure 392).
Figure 392. Right-Click New Object Menu
The Create a New Client dialog shown in Figure 393 appears:
Figure 393. Create a New Client Dialog
3. Enter the desired name for the new client.
4. Select a group to which to assign the client object, if other than the
group selected in Step 1.
Note
The product type of the selected group must match the product type of the
client being defined. In the example above, this is STB4.
5. Enter the IP address of the client device.
Note
There is no lookup or validation of IP addresses in the MediaEdge system.
You must verify the correct IP address for each server and client in the
system.
6. Click the OK button to close the Create a New Client dialog and create
the client object.
302
DISPLAY CONTENT MANAGER — Installation and User Guide
Edit a Client Object
Edit a Client Object
All of the details of a client object may be set to a value other than the original value.
To change the values associated with a client object, click on the value(s)
you wish to change in the Target Object Details Area and enter the desired
value as explained below:
Name
Click in the name field and enter the desired client name (see Figure 394).
Figure 394. Group Name Entry
Group
Click in the Group field and then click the list button [V] that appears in
the field to see the list of defined groups. Select the desired group association from the list of choices (see Figure 395).
Figure 395. Client Group Association Selection List
IP Address
Click in the IP Address field and enter the desired IP address (see
Figure 396).
Figure 396. Client IP Address Entry
Note
Changing the IP address entry in this field does not change the IP address for
the device. The IP address for the client object should only be changed here
to reflect any changes that may have been made in the MediaEdge System
networking infrastructure.
DISPLAY CONTENT MANAGER — Installation and User Guide
303
Section 8 — Target Screen
Delete a Target Object
To delete a target object from the Target Object Tree, do the following:
1. Select the object you wish to delete in the Target Object Tree.
Note
If you delete a server object, all groups and clients associated with that server
object will also be deleted. If you delete a group, all child groups and clients
associated with the selected group will also deleted.
2. Do one of the following:
•
Click the Delete
button on the Tool bar.
•
Select Edit>Delete from the Menu bar.
•
Press the [DEL] key on the keyboard.
•
Right click on the object and select delete from the menu or press the [D]
key on the keyboard (see Figure 397).
Figure 397. Right Click Menu - Delete
The DCM Console delete confirmation dialog shown in Figure 398 appears.
Figure 398. DCM Console Delete Confirmation Dialog
3. Click the Yes button to confirm deletion of the selected object.
Manually Update Servers and Groups
Normally, updates occur automatically via the update schedule defined for
server or group objects. However; if the update is not scheduled to take
place for several hours (or days) and you have made changes to one or
more channels (e.g. added content to playlists, changed playlist start time,
304
DISPLAY CONTENT MANAGER — Installation and User Guide
Manually Update Servers and Groups
length, etc.) which need to be updated before the scheduled time, a manual
update can be initiated.
Note
Manual updates do not cancel any scheduled automatic updates. These will
still take place at the scheduled time.
To perform a manual update, do the following:
1. Select File>Update... from the Menu bar.
The Update Settings dialog illustrated in Figure 399 appears.
Figure 399. Update Channel Dialog
Note
Not all groups appear in the Group section of this dialog. Only those groups
that have update schedules associated with them (because no update
schedule exists for the server with which the group is associated) appear in
the Group list. The update schedule is set at the server or group level, but,
not both.
DISPLAY CONTENT MANAGER — Installation and User Guide
305
Section 8 — Target Screen
2. Select the server(s) and group(s) for which you wish to initiate a
manual update.
3. Click the OK button.
4. The DCM Console update confirmation dialog shown in Figure 400
appears.
Figure 400. DCM Console Update Confirmation Dialog
5. Click the Yes button to confirm the server/group update.
The DCM Console update started dialog shown in Figure 401 appears.
306
DISPLAY CONTENT MANAGER — Installation and User Guide
Manually Update Servers and Groups
Figure 401. DCM Console Update Started Dialog
6. Click the OK button to close the dialog.
CAUTION If significant changes have been made to content, playlist or channels, such
as adding large content files, the manual update must be performed with sufficient time in advance of the schedule playlist start time to allow the content
to be uploaded to playout devices. Numerous large files could take some time
to upload.
DISPLAY CONTENT MANAGER — Installation and User Guide
307
Section 8 — Target Screen
308
DISPLAY CONTENT MANAGER — Installation and User Guide
Appendix
A
Limitations
This section documents the various limitations inherent in MediaEdge
playout devices and the Display Content Manager.
Simultaneous Playback Limitations
The number in () indicates the maximum number of files of the specified
type that can be played simultaneously on the indicated playout device.
HDMA-4000/HDMA-4100/STB3/STB4/STB4H
•
Video - (1)
•
Still Image - (1)
Note
Still images are limited to a maximum resolution of 2000x2000 pixels. If
either dimension exceeds 2000 pixels (e.g. 2048x1536) the image is too large
and should not be registered.
•
Ticker - (1)
•
Flash - (1)
Note
The DCM supports any version of Flash up through the latest version
depending upon the Flash player version installed on the Control PC; however, hardware playout devices support Flash files up to version 7 only.
•
HTML - (1)
•
Audio - (1)
Note
If a video asset contains audio, that video asset and a separate audio asset
cannot be played simultaneously as there is only one audio decoder present
in these hardware devices.
Note
A Ticker and a Flash animation cannot be played simultaneously.
DISPLAY CONTENT MANAGER — Installation and User Guide
309
Appendix A — Limitations
SWT3-DS/SWT4
•
Video - (4)
•
Still Image - (16)
•
Ticker - (2)
•
Flash - (4)
•
HTML - (4)
•
Audio - (4)
•
QuickTime - (4)
Note
QuickTime material is supported by SWT4 only.
Overlapping Playlist Content
Material can be registered in a playlist even if playback times overlap. For
example, even though a Ticker and a Flash animation cannot be played
simultaneously, they can exist in a playlist with overlapping times. In this
case, the material with the later start time takes precedence and will be
played. In other words, if a Ticker asset is in a playlist with a start time of
10:00:00 and a length of 30 minutes and a Flash animation is in the same
playlist with a start time of 10:15:00, the Flash file will be played at 10:15:00
and the Ticker will not be played.
Layout Limitations
HDMA-4000/HDMA-4100/STB3/STB4/STB4H
310
•
Layouts for these devices have a fixed size of 1920x1080 pixels.
•
Video playback is at a resolution of 1920x1080 pixels.
•
Image, Ticker, Flash, HTML have a playback resolution of 960x540
pixels and are zoomed to 1920x1080.
•
Video is played in the background. All other material types are layered
over video if the display regions overlap.
•
Tickers are played in the foreground. Ticker are layered over all other
material types if the display regions overlap.
DISPLAY CONTENT MANAGER — Installation and User Guide
Playlist Limitations
SWT3/SWT4
Any layout size between 480x480 and 1920x1920 may be specified.
Layout Regions
•
Up to 20 content regions may be defined per layout.
•
One video-enabled region may be defined for HDMA-4000/HDMA4100/STB3-DS/STB4/STB4H layouts.
•
Up to four video-enabled regions may be defined for SWT3/SWT4 layouts.
Playlist Limitations
•
The minimum playlist duration is 15 seconds.
•
The maximum playlist duration is 23 hours 59 minutes and 59 seconds.
•
Up to 1000 components can be specified in a playlist.
Schedule Limitations
•
The minimum schedule duration is 15 seconds.
•
The maximum schedule duration is 23 hours 59 minutes and 59 seconds.
•
Up to 1000 items can be specified in a daily playout schedule.
•
Up to 100 items can be specified in a daily command schedule.
DISPLAY CONTENT MANAGER — Installation and User Guide
311
Appendix A — Limitations
312
DISPLAY CONTENT MANAGER — Installation and User Guide
Index
A
add content
audio 147
Flash 138
HTML 143
QuickTime 140
serial command 154
still image 127
ticker 132
URI 150
video 124
volume 159
adjust column width
channel 249
material screen 111
playlist region 223
audio
add material 147
edit properties 149
supported file types 23, 108
B
bin window
display settings
playlist 224
schedule 263
C
categories
layout 175
material 114
playlist 206
channel
assign playlists to 255
command
assign commands to 259
create 246
delete 251
edit schedule 264
open 248
playout
create 244
update 251
view channel information 254
client object
create 301
details 288
edit 303
configuration
default settings 99
environment settings 98
FTP servers 96
content delivery method
video on demand 297
content delivery methods
multicast 297
unicast 297
video on demand 297
copy
commands 269
layout 199
playlist 225
playlist components 235
playlists 269
schedule 270
copy exported schedule 280
cut
commands 269
playlist components 235
playlists 269
D
DCM
application configuration 96
application overview 91
close application 106
configurations with SVS4 server 65
configurations without SVS4 server 54
exit application 106
full installation on server 80
installation on a PC 55
installation prerequisites 24, 53
Display Content Manager — Installation and User Guide
313
Index
launch application 89
material screen 107
overview 20
package contents 13
partial installation on server 71
playout devices 23
server software 24
supported content types 22
workflow 94
delete
channel 251
command from schedule 269
layout 201
material 164
playlist 237
playlist components 236
playlist from schedule 269
schedule 273
target object 304
display
layouts by category 176
material by category 114
material type 109
playlists by category 206
target objects 283
display grid, layout 186
documentation online 7
download material 171
F
E
installation of DCM on control PC 76
installation of DCM on server
full 80
partial 71
installation of the DCM on a PC 55
installing an FTP server 41
installing IIS 26
Internet Information Services
installation and configuration 26
edit
audio properties 149
channel schedule 264
client object 303
Flash properties 139
group object 299
HTML properties 145
playlist 227
QuickTime properties 142
serial command properties 156
server object 291
still image properties 130
URI properties 151
video properties 125
volume properties 162
export schedule 275
314
FAQ database 7
Flash
add material 138
edit properties 139
supported file types 23, 108
frequently asked questions 7
FTP Server
installation and configuration 41
G
Grass Valley web site 7
group object
create 293
details 287
edit 299
H
HTML
add content 143
child files 146
edit properties 145
supported file types 23, 108
I
L
launch the DCM 89
layout
change region order 195
close 201
copy 199
copy region 194
Display Content Manager — Installation and User Guide
Index
create 183
create region 188
delete 201
delete region 198
display grid 186
paste region 194
region color coding 177
undo operations 199
layout screen 91, 173
categories 175
create categories 179
create layout 183
delete categories 181
details 174
edit categories 181
limitations 309
layout 310
overlapping playlist content 310
playlist 311
schedule 311
simultaneous playback 309
edit ticker properties 133
edit URI properties 151
edit video properties 125
edit volume properties 162
manage categories 114
material type 109
preview material 163
register content 122
reset upload status 169
select display category 114
upload material to FTP server 165
material type display 109
change style 113
change type 111
MediaEdge
content delivery 18
content delivery methods 19
overview 17
minimum system requirements 13
M
online documentation 7
operating system recommendations 14
overview
DCM 20
MediaEdge 17
manual schedule updates 304
material screen 91, 107
add audio material 147
add Flash material 138
add HTML material 143
add QuickTime material 140
add still image material 127
add video material 124
assign content to category 119
create categories 115
create serial command material 154
create ticker material 132
create URI material 150
create volume material 159
delete categories 117
delete material 164
details 108
download material from FTP server 171
edit audio properties 149
edit categories 117
edit Flash properties 139
edit HTML properties 145
edit QuickTime properties 142
edit serial command properties 156
edit still image properties 130
O
P
paste
commands 269
playlist components 235
playlists 269
playlist
adjust column width 223
adjust length 232
adjust material time and length 228
adjust time scale 217
assign material to 219
bin window display settings 224
close 236
color coding 222
copy 225
create 212
cut, copy, paste components 235
delete 237
delete components 236
Display Content Manager — Installation and User Guide
315
Index
edit 227
preview 237
repeat settings 230
undo operations 236
playlist screen 92, 203
create categories 208
delete categories 210
details 204
edit categories 210
playout devices 23
preview
playlist 237
preview material 163
update channel 251
view channel information 254
serial command
create material 154
edit properties 156
server object
create 288
details 285
edit 291
software download from web 7
software package contents 13
still image
add material 127
edit properties 130
supported file types 22, 108
supported content types 22
system requirements, minimum 13
Q
QuickTime
add material 140
edit properties 142
supported file types 23, 108
T
R
register material 122
reset upload status 169
S
schedule screen 92, 239
adjust column width 249
adjust playlist time and length 264
adjust time scale 241
assign commands to command channel 259
assign playlists to channel 255
copy exported schedule 280
copy schedule 270
create channel 244
create command channel 246
cut, copy, paste playlists and commands 269
delete channel 251
delete playlist or command from schedule 269
delete schedule 273
details 240
edit channel schedule 264
export schedule 275
open channel 248
playlist repeat settings 266
select schedule date 243
316
target object
delete 304
target objects 282
target screen 92, 281
create client object 301
create group object 293
create server object 288
delete object 304
edit client object 303
edit group object 299
edit server object 291
group object details 287
manual updates 304
object details 282, 288
object display area 283
server object details 285
ticker
add material 132
create material 132
edit properties 133
supported file types 22, 108
time scale
playlist screen 217
schedule screen 241
Display Content Manager — Installation and User Guide
Index
U
undo 199, 236, 270
upload material 165
URI
create material 150
edit properties 151
V
video
add material 124
edit properties 125
supported file types 22, 108
volume
create material 159
edit properties 162
W
web site documentation 7
web site FAQ database 7
web site Grass Valley 7
web site software download 7
workflow diagram 95
Display Content Manager — Installation and User Guide
317
Index
318
Display Content Manager — Installation and User Guide