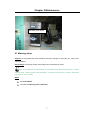
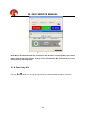
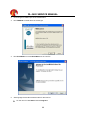
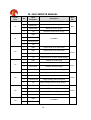
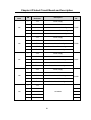
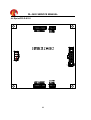
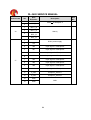
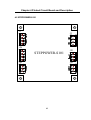
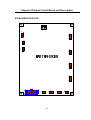
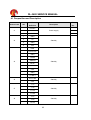
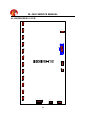
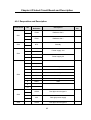
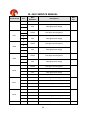
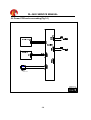
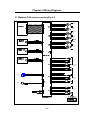
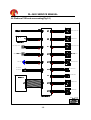
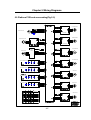
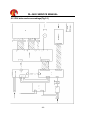
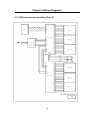
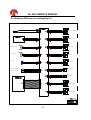
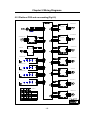
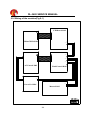
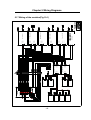
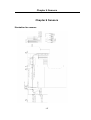
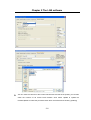
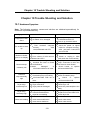
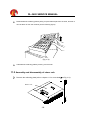
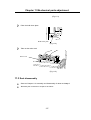
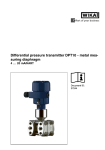
1
DL-3620
Service Manual
Dec, 2011
DL-3620 SERVICE MANUAL
Copyright 2011 Shanghai DOLI photographic equipment co., Ltd
All right reserved
The contents of this manual are subject to change without notice.
are registered trademarks of Shanghai Doli photographic equipment co., Ltd. in
DOLI and
China and/or other countries.
Pakon is registered trademarks of Pakon Inc.
If the pictures and figures are different from the machine, there may have
been modifications; customers should refer to their own machine.
Please check back with our training and service department for the latest
information of the machine, since any modification after the printing will not be
reflected in this manual.
Index
Index
Index .......................................................................................................................... 1
Chapter 1 Caution for work...................................................................................... 1
1.1 Countermeasure for static electricity when replacing and maintaining the electrical parts
........................................................................................................................................... 2
1.2 Handling chemicals ...................................................................................................... 2
1.3 Storage ........................................................................................................................ 3
Chapter 2 Maintenance............................................................................................. 5
Prologue............................................................................................................................. 5
2.1 Morning setup .............................................................................................................. 7
2.2 Exposure centre (ABCD) calibration ............................................................................. 8
2.3 Temperature calibration .............................................................................................. 10
2.4 Grid calibration ........................................................................................................... 12
2.5 Uniformity calibration.................................................................................................. 14
2.6 Replenishing system setup......................................................................................... 22
2.7 Colour management-from monitor to photos .............................................................. 26
Chapter 3 Service ................................................................................................... 34
Prologue........................................................................................................................... 34
3.1 DL-202Ps Densitometer ............................................................................................. 34
3.1.1 Installation........................................................................................................................ 34
3.1.2 Show densitometer test value........................................................................................... 43
3.1.3 Calibration........................................................................................................................ 44
3.1.4 Open help file................................................................................................................... 46
3.2 Data backup and restore ............................................................................................ 47
3.3 Linux system backup and recovery............................................................................. 50
3.4 Client PC setup .......................................................................................................... 57
Chapter 4 Printed Circuit Board and Description ................................................ 62
4.1 ACControl-I002 PCB .................................................................................................. 62
4.1.1 Disposition and Descrption ............................................................................................... 63
4.2 WashControl-D107 PCB............................................................................................. 66
4.2.1 Functions ......................................................................................................................... 67
1
DL-3620 SERVICE MANUAL
4.2.2 Adjustment for replacement ...............................................................................................67
4.2.3 Desposition and Desposition .............................................................................................69
4.3 CtrlBoard-S102 board................................................................................................. 74
4.3.1 Functions ..........................................................................................................................75
4.3.2 Disposition and description................................................................................................75
4.4 BprintCPLD-S102....................................................................................................... 82
4.4.1 Disposition and description................................................................................................83
4.5 STEPPOWER-S101................................................................................................... 85
4.5.1 Disposition and description................................................................................................86
4.6 Step Motor Driver_104 ............................................................................................... 87
4.6.1 Disposition and description................................................................................................88
4.7 PowerCtrl-I001 PCB ................................................................................................... 89
4.7.1 Desposition and Description..............................................................................................90
4.8 MASTER-D103B PCB ................................................................................................ 91
4.1 Desposition and Description.................................................................................................92
4.9 LEDDRIVER-Z101 PCB ............................................................................................. 94
4.9.1 Desposition and Description..............................................................................................95
Chapter 5 Wiring Diagrams .................................................................................... 99
5.1 AC power supply wiring diagram(As Fig.2-1) .............................................................. 99
5.2 AC power supply wiring diagram (Fig.2-2) ................................................................ 100
5.3 AC power supply wiring diagram (Fig.2-3) ................................................................ 101
5.4 AC power supply wiring diagram (Fig.2-4) ................................................................ 102
5.5 AC power supply wiring diagram (Fig.2-5) ................................................................ 103
5.6 Power PCB and surrounding(Fig.3-1)....................................................................... 104
5.7 Washctrl PCB and surrounding(Fig.4-1) ................................................................... 105
5.8 Platform PCB and surrounding(Fig.5-1).................................................................... 106
5.9 Platform PCB and surrounding(Fig.5-2).................................................................... 107
5.10 Platform PCB and surrounding(Fig.5-3).................................................................. 108
5.11 Master PCB and surroundings (Fig.6-1).................................................................. 109
5.12 DVI drive and surroundings(Fig.2-1)........................................................................110
5.13 LEDLamp and surroundings (Fig.2-2)...................................................................... 111
5.14 Platform PCB and surrounding(Fig.6-1)...................................................................112
5.15 Platform PCB and surrounding(Fig.6-2)...................................................................113
2
Index
5.16 Wiring of the machine(Fig.9-1) ................................................................................114
5.17 Wiring of the machine(Fig.10-1) ..............................................................................115
Chapter 6 Sensors .................................................................................................117
Illustration for sensors .....................................................................................................117
6.1 Type of sensor...........................................................................................................118
6.2 Sensor Function ........................................................................................................119
Chapter 7 Illustration for adjustable components ..............................................121
7.1 CPLD-S102 trimmer function for Backprint ................................................................121
7.2 WashCtrl-D107 trimmer function................................................................................121
7.3 Master-D103B trimmer function.................................................................................122
Chapter 8 Dip Switch Function.............................................................................123
8.1 CtrlBoard-S102 PCB Dip switch description ..............................................................123
8.2 WashCtrl-D107 PCB dip switch description ...............................................................123
8.3 StepMotorDrive_104 PCB dip switch description.......................................................123
Chapter 9 The LAB software.................................................................................125
Chapter 10 Trouble Shooting and Solution .........................................................133
10.1 Hardware Symptom.................................................................................................133
Chapter11 Mechanical parts adjustment .............................................................135
11.1 Assembly and Disassembly of collecting plate .........................................................135
11.2 Assembly and disassembly of raiser rack ................................................................136
11.3 Rack disassembly....................................................................................................137
11.4 Cleaning and Replacement of replenish pump unilaterial pump...............................138
11.5 Filter cleaning and replacement...............................................................................140
11.6 Replace the rubber sleeve on the rack bottom.........................................................142
11.7 Rack check-up and cleaning....................................................................................143
11.8 Check and clean chemical tank and pipe network ...................................................144
11.9 How to replace ribbon cartridge ...............................................................................145
Chapter 12 Mechanical Malfunction Removal .....................................................149
12.1 Raiser rack malfunction and solution .......................................................................149
12.2 Rack malfunction and resolvent...............................................................................149
3
DL-3620 SERVICE MANUAL
12.3 Paper scratch and Solution..................................................................................... 150
12.4 Waste pump malfunction and Resolvent................................................................. 150
12.5 Paper overlapping and resolvent ............................................................................ 151
12.6 Photo comes out not dry......................................................................................... 151
12.7 Back print dim......................................................................................................... 152
12.8 Processing solution doesn t warm up and solution.................................................. 152
12.9 No replenish flux and Solution ................................................................................ 153
4
Chapter 1 Caution for work
Chapter 1 Caution for work
For safe operation
General precautions
Prior to any part replacement or mechanical adjustment, be sure the air brake is
switched off.
Ground wires (green and yellow) are connected to the covers and units of the machine.
For reassembly, be sure to connect the ground wires as they were.
Be sure to perform an operation check after replacing or adjusting any parts (or units).
Precaution against electric shock
If any case you have to take care of wiring for the power such as moving the machine,
ask a qualified professional electrician to do so. Do not forget to ground the machine.
Pay attention to avoid shocks when performing troubleshooting, wiring checking, or
voltage/current measurement.
When replacing a fuse or PCB, be sure to switch off the air brake.
Precaution for operating rotary section
Be careful with your hands, hair, clothes, etc., not to be caught under the gear, chain, belt,
roller, fan and other rotating parts.
Do not remove the cover unless it is specified.
If your hand or the like is caught and you can not move, ask someone around you to turn
off the air brake at once.
1
DL-3620 SERVICE MANUAL
1.1 Countermeasure for static electricity when replacing and
maintaining the electrical parts
If an electronically charged human body touches electronic parts like PCBs, it may adversely
affect the electronic parts.
When handling the electronic parts, be sure to use static-dissipative conductive gloves to prevent
the components on the PCB from being damaged due to static electricity.
The static-dissipative conductive gloves are included in the spare parts of your machine.
When using the static-dissipative conductive gloves, be sure to turn off the air brake and
wait 15 seconds to carry out operation.
1.2 Handling chemicals
The work with the machine involves the handling of slightly poisonous, irritating and etching
substances, to apart from these, the user must ensure sufficient aeration. The air in industrial
workrooms should be exchanged at least 8 to 10 times per hour.
All photographic developers contain substances which may irritate the skin, the mucous
membrane and the eyes and which may cause allergic skin reactions affecting very sensitive
persons. For this reason, avoid long or repeated skin contact, especially with developer solutions.
For all jobs where photographic processing solutions may splash, e.g. preparing and filling in
chemical solutions, cleaning processing racks etc.:
Wear protective gloves; rinse all solutions that get on the skin with plenty of running
water.
Wear industrial glasses.
Wash with soap and rinse with lots of water after completion of work.
Storing chemicals and processing solutions in a safe place.
If a processing solution has been ingested accidentally, immediately rinse mouth with water, and
drink 2 or more cups of water and induce vomiting. Contact a physician as soon as possible, and
2
Chapter 1 Caution for work
follow physician s instructions.
If processing solution gets into eyes, immediately rinse them under running water for at least 15
minutes, and then contact a physician.
Processing solution stains on your clothing may result in discolouration or fading, when handling
processing solutions, wear clothing for work wear.
Photochemical are not allowed to be drained off into the public sewage system! Please obtain the
information about the regulations in force about the handling and correct disposal of chemistry
from the country s authorities in charge.
1.3 Storage
The chemicals should be stored and prepared according to the manufacture s information and
advice.
All Colour papers must always be stored in a cool and dry place.
The best storage temperature is between 2
and 10
.
Opened packages have to be stored at a relative humidity of 20-60%.
Storage at 20
over several days is possible without problems.
Storage temperatures above 30
should be avoided because they will cause visible alterations
after only a few days.
3
DL-3620 SERVICE MANUAL
4
Chapter 2 Maintenance
Chapter 2 Maintenance
This chapter contains items concerning maintenance necessary to make high quality prints.
Prologue
For a steady-going machine and making high quality prints, maintenance is very important.
Maintenance needs to be performed regularly. Otherwise unexpected problems could arise and
the lifespan of the machine could be shortened.
Daily maintenance
Start-up the machine in a sequence.
Spray some fresh water on the upper rollers of the processing racks and the cross-overs.
Morning test for all the paper magazines
Weekly maintenance:
ABCD calibration if necessary.
Change the STB water.
Clean the filters of the working tanks.
Clean the cross-overs.
Quarterly maintenance:
Uniformity calibration if necessary
Grid calibration if necessary
Clean the tanks if necessary.
Check the replenishing pumps, circulation pumps and the pipes to avoid potential
chemical leakage.
Machine start-up sequence:
1.
Turn on the Windows PC
5
DL-3620 SERVICE MANUAL
2.
Turn on the Drive power
3.
Turn on the Linux PC.
Improper start-up of the machine could cause unexpected problems of the photos.
Linux power button
Drive power button
6
Chapter 2 Maintenance
Windows power button
2.1 Morning setup
Purpose: To compensate the colour deviation caused by changes of chemicals, etc., keep colour
output stabilized.
Precondition: Processing solution temperature has reached the set value.
There are two different morning setups, for normal format we simply take method A---4 times
morning setup, for HQ format we take method B----16 times morning setup. (In factory, the default
HQ format is over 8 inches).
Steps:
Run PhotoSmart.
Complete the Morning Color calibration.
7
DL-3620 SERVICE MANUAL
2.2 Exposure centre (ABCD) calibration
Purpose: To calibrate the image exposure centre of the photo. In the case white border appears
on the photo, this calibration shall be performed for the corresponding formats of the photos.
Steps:
Open Maintenance.
Select cassette offset.
Select formats and then click Send Test, then computer will send test prints for the
formats you selected.
After the test prints coming out, key in the A0, B0, C0, D0 value of the test prints to the
corresponding format s dialog box.
8
Chapter 2 Maintenance
Click Save, click Send Test again, repeat the above step, until the deviation of A and C,
B and D value is within 2.
This calibration shall be done for each format and each cassette.
For example, if you have 2 cassettes with 152mm paper loaded which are cassette 01 and
cassette 02, you will need to do this calibration for the 152x102mm and 152x203mm formats etc
for both cassettes.
9
DL-3620 SERVICE MANUAL
2.3 Temperature calibration
Purpose: To set up the temperature for each working tank according to the requirement of the
processing solution, and calibrate the actual temperature of each working tank to be the same as
its monitor display.
Precondition: The temperature of the processing solution has reached the set value.
Tools required: Thermometer with 0.1
definition.
Steps:
Turn on the machine.
In DL-3620 machine Windows PC, go E: \ 3620 \3620, click
Measure the temperature of each tank by thermometer, and then adjust the appropriate
trimmers on the Washcontrol PCB to get the display temperature matching the actual
temperature which is read out of the thermometer.
Trimmer definitions of the Washcontrol PCB are as below:
10
Chapter 2 Maintenance
Trimmer
Definition
VR2
CD
VR3
BF
VR4
STB1
VR5
STB2
VR6
STB3
VR7
Dryer
VR8
Room Temp.
VR8A
STB4
Select DL-3620 in LAB Model and Linux socket.
Take precaution when measuring to avoid chemical inter-contamination, when
the thermometer, leave the thermometer in the tank.
11
reading
DL-3620 SERVICE MANUAL
2.4 Grid calibration
Purpose: To remove the strong grid lines of the photos which are printed by 3 times exposure
mode, in the case the grid lines appear on these photos after several months, this calibration shall
be performed.
Tools required:
Magnifier (at least 8X)
610mm glossy paper
Steps:
On the DL-3620 machine Windows PC run PhotoSmart.
1.
Run Maintenance and choose Grid Calibration.
2.
Select printing format 24 1/2 X5 in Select format of test print and lens in Select lens (lens
002) to expose.
3.
Click Send test to print a test print,
4.
Observe the printed test photo and change the value in LCD Move Steps accordingly.
5.
Click Save and repeat the above procedures until satisfied.
12
Chapter 2 Maintenance
13
DL-3620 SERVICE MANUAL
2.5 Uniformity calibration
Purpose: To calibrate the uniformity of colour or density to be the same at each district of the
photo; to remove the slight vertical lines on the photo.
If you print a photo from a neutral grey test film or a neutral grey test file, and the result is uniform
neutral grey at each district of the photo, then the density and uniformity of the photo shall be
good.
Usually there is a diffuser (mirror box) in film minilab, of which the function is to convert the
diffusive light emitted from halogen lamp to coherent light (parallel light), so as to get a uniform
neutral grey photo.
There is no diffuser in DL-3620. However the density uniformity result of the photo which is printed
from a neutral grey test file is perfect. This attributes to that DL-3620 adopts software control the
transmissivity of each LCD liquid crystal particle that is on LCD to simulation the effect of a
diffuser.
Mask file records the transmissivity correction of the LCD liquid crystal particles, of which the file
extension name is prn.
So the Mask file is a virtual diffuser.
Mask file is a total compensating result of exposure unit. There 4 lens in DL3620, so that there are
3 Mask files needed for printing.
14
Chapter 2 Maintenance
The Mask file shall be re-calibrated when the following event occurs:
Replace LED
Replace LCD
Replace lens
Slight vertical lines appear on the photos
Tools required:
A3 flatbed scanner which is with 24 bit colour and 500dpi scanning capability
Photoshop software
glossy paper
Format recommended: 610(623) x 660 (lens000), 457 x 508 (lens 001), other formats
bigger are also applicable.. (Resolution in scanning 500DPI)
Preconditions:
The scanner has been cleaned so that there is no dust or finger mark on it.
The Maintenance > Color Calibrations has been completed for the glossy paper.
The scanner has been calibrated if necessary.
The registry file and tabkor files are backup to windows PC already
The scanner calibration shall be performed only if the deviation of the colour or density between
the scan image and the scan object are big.
If scanner is good, you can skip this step by just selecting a scanner profile from the list.
Steps of scanner calibration:
1.
Finish the color calibration and create the right format for uniformity calibration first.( Format
recommended: 610(623) x 660 (lens000), 457 x 508 (lens 001), other formats bigger are also
applicable. (Resolution in scanning: 500DPI.) Use the Photoshop software to remove all the
dust and dots (not the signal points).
2.
Open the Tabkor Processor software(E:\DL-3620\Scanner)
15
DL-3620 SERVICE MANUAL
3. The main interface of the software as blew:
4. First choose the Lens 001
16
Chapter 2 Maintenance
Choose neuter mask and choose tabkor0 .
Scanner resolution: 500DPI and 2x2 (or 1x2) in Block(depend on your scanner, A4 scanner use
17
DL-3620 SERVICE MANUAL
2x2, A3 scanner use 1x2, recommend A3 scanner!), then click send test to send the unoformity
test photo.
5. Scan this photo (resolution: 500DPI) and save as *.bmp, then use the photoshop software to
remove the dust on the photo.(if you use the A4 scanner, you need scan the photo to four
parts.)
6. In the Tabkor processor software, choose File
Load scan bmp
First
Find 4 group of the red sign point on the corner of the uniformity photo, hold press Ctrl , and right
click the red sign point as the picture below:
.
Then it will show the rectangular line as the picture below:
18
Chapter 2 Maintenance
When you finish the fourth corner of red sign point, it will automaticlly show the mark points on the
picture:
19
DL-3620 SERVICE MANUAL
7. In the Tabkor processor software, File
Action
Calculate to calculate the date:
You can see the progressing in the lower right corner.
8. Then you need load second part and repeat step 6~7 (If you use A4 scanner, you need load
and process the shird part and the forth part also).
Then go to File
Action
Creat mask , you will see a dialog box as below:
Click send test to send the unoformity test photo again.
Calibration photo is sent, is it coming from the previous print?
YES
Click yes to send the calibration photo, then repeat the steps above until you see the color of the
uniformity calibration photo is equal.
9. When Lens 001 s uniformity finish, choose lens 000 to continue the calibration.
20
Chapter 2 Maintenance
10. Choose the last tabkor file for Lens 001 and click send test, repeat step 4 step 8 to finfish the
calibration.
11. Regarding to the Lens 002(24x36), you may need A2 scanner otherwise you can use the Lens
000 s tabkor file for lens 002.
If red border appears on the photo after scanning, check Clone stamp operation in
Photoshop, you may have to restart the calibration procedure from an early .prn file which
doesn t bring red border to the photos.
To restore an early .prn file to Linux PC before restarting the procedure:
Copy and paste the file into Linux PC \\10.1.1.1\tables folder from Windows PC (assume that
you have backup the early file to Windows PC).
Open Linux registry, specify etc/lens/001/tabkor, change the file name according to the file
you just copied, then click Save now.
Specify etc/lens/000/tabkor, change the file name according to the file you just copied, and
then click Save now.
The same is true for lens 001, at last copy lens 000 to 002. (000
001
002)
In factory, Uniformity Mask is calibrated by a special method-attach a special Lens below the lens
of DL-3620 to reduce the exposure image on the paper, this is the best way by which you don t
have to extend the border of the scan image by Photoshop, but focus adjustment is needed
during the factory procedure by a CCD camera. It is not possible and not necessary for user to
use the factory method, but in case of red border appear s and not possible to be avoided, factory
procedure shall be performed in stead of Photoshop method.
Please ask dealer for further information.
21
DL-3620 SERVICE MANUAL
2.6 Replenishing system setup
Purpose: Setup the replenishing system to meet the requirement of the chemistry instruction.
Tools required: Measuring cup/cylinder
Steps:
1.
Measure the flux of the CD replenishing pump.
Remove the left side cover of the machine, and then put the replenishing pipe outlet to
the Graduated cylinder or measuring cup.
Graduated
cylinder
Replenish hose
On Linux LCD panel, press any button of the top 4 buttons to enter following interface:
Press the button on the left to Pumps to enter the following interface:
22
Chapter 2 Maintenance
Press the button on the right to regenerations to enter the following interface:
Press the button on the left to developer to run CD replenishing pump 30 seconds.
The replenishing pump runs 30 seconds and then stops automatically for each time
test.
For the first time measurement, if there is a little air inside the pipe, throw away the
chemistry and then test again.
After the pump stops, repeat running the pump, all together run the pump for 5 times.
Carefully put the replenishing pipe outlet back to the tank, and then read out the total
chemistry value of the measuring cup.
Calculate the average value of the CD replenishing flux for 30 seconds by dividing the
total value by 5.
2.
Input the CD replenishing flux into Maintenance.
Run Maintenance, and select Chemical Setting.
Input the CD replenishing flux value in Developer and then click Save.
23
DL-3620 SERVICE MANUAL
3.
Repeat for BF.
4.
Repeat for STB.
5.
In Maintenance > Chemical Setting setup the Regeneration does value depending on the
chemical specification you are using.
6.
Please delete this section!! In Maintenance > Chemical Setting setup the Regeneration
24
Chapter 2 Maintenance
does value depending on the chemical specification you are using.
If the daily print quantity is small, and you want to keep the chemical active, the
Regeneration doses value could be increased a little bit.
25
DL-3620 SERVICE MANUAL
2.7 Colour management-from monitor to photos
Purpose: to ensure the colour of the photos look as close as its preview on the monitor.
Preconditions:
Calibration with Densitometer has been performed..
3.1 DL-202Ps Densitometer
Standard ambient light has been installed in the Studio.
It is recommended to use Philips true colour fluorescent lamp as the standard ambient
light of the studio, ask Philips sales and service people for more information about the
fluorescent lamp selection and installation.
Work flow:
1.
Calibrate monitor.
If the monitors colour fidelity is good and support sRGB colour management, set the monitor
to the sRGB mode.
26
Chapter 2 Maintenance
To see if the monitor s colour fidelity is good, Open Photoshop, the background of
Photoshop shall appear to be neutral grey.
If the monitor supports sRGB colour management, sRGB mode can be set in the monitor
adjustment menu that is usually under colour management.
sRGB is the working colour space of PhotoSmart and most digital camera.
If the monitor colour fidelity is not good (for example: old monitor) or it does not support sRGB
colour management, first on the monitor adjustment menu set the monitor colour
management to 6500K, and then create an ICC profile for the monitor by Adobe Gamma or
other software.
Refer to related books of Photoshop for Adobe Gamma.
2.
Register paper profiles.
Paper profiles have been created in the factory for each brand and built in the Linux PC. For
user, just select the correct paper profiles for the cassettes when register the cassettes, for
example: cassette 01 is loaded Kodak paper, so that you shall register cassette 01 as Kodak
band.
Run maintenance.
Select paper roll installation and then click Next.
Select cassette numbers for registration.
Select paper profile for the cassette number which you have just selected.
Complete other registrations.
If the paper profiles is deleted or lost by accidental error, the corresponding paper brand
will not be available in the list of Paper roll installation. In this case, backup all the
calibration data of the machine, reinstall Linux system with Linux recovery CD, and then
restore all the calibration data.
27
DL-3620 SERVICE MANUAL
28
Chapter 2 Maintenance
Data backup and restore
3.1
29
DL-3620 SERVICE MANUAL
Linux system backup and recovery
3.
Complete the morning setup.
2.1
30
Chapter 2 Maintenance
Morning setup
4.
Print sample photos; compare the colour between the photos and the monitor preview. If still
not satisfied, use Cassette balance or Master balance for ultimate control.
The colour could be managed from monitor to photos but they will not be 100% the same.
Photos and monitor interpret colour in different ways. Usually the photos are more brilliant
than the monitor preview since the photos belong to another colour space which is bigger
than sRGB and the colour has been transferred to a wider range than sRGB during the
printing and processing.
To use Cassette balance:
Run Maintenance.
Select Paper roll installation.
Select cassette number and then click Modify.
Change the values of C, M, Y, D, for example: + or -0.01.
Click Save.
To use Master balance:
Run Maintenance.
31
DL-3620 SERVICE MANUAL
Select Lens Calibration.
Change the values of C, M, Y, D, for example + or -0.01.
Click Save.
After modifying the values, print sample photos again and repeat the above procedure until
satisfied.
Cassette balance only affects the colour of the photos of the given cassette.
Master balance affects the colour of the photos of all the cassettes.
Neither Cassette balance nor Master balance affects the test prints of the morning setup.
Either Cassette balance or Master balance can be used for quick colour control especially
for black and white photos.
32
Chapter 2 Maintenance
33
DL-3620 SERVICE MANUAL
Chapter 3 Service
This chapter contains information for service personnel.
Prologue
Take some time to read the manual and study the machine until you understand everything well
before you perform the service.
Ask somebody for help if you are not confident with the things you are going to do to avoid serious
problems.
3.1 DL-202Ps Densitometer
3.1.1 Installation
The detail is as follows:
1. Insert the installation CD of DL-202Ps densitometer, click Densitometer.msi to begin
installation wizard.
2. Follow the installation wizard to complete installation.
34
Chapter 3 Service
3.
Connect densitometer to the computer. With a Beep sound and the green LED on, the
densitometer is detected by the computer (See Figure3-1).
Figure3-1
4.
Insert the CD into CD-ROM. Click Install from a list or a specific location (Advanced) and
click Next (See Figure 3-2)
Figure3-2
5.
Put a tick before Search removable media (floppy, CD-ROM ) and click Next, the system
will search installation drive; Or, put a tick before Include this location in the search and
click Browse to open densitometer drive path and click Next to search installation drive (See
35
DL-3620 SERVICE MANUAL
Figure 3-3)
Figure3-3
Click Continue Anyway (see Figure 3-4 and Figure 3-5)
Figure3-4
36
Chapter 3 Service
Figure3-5
Click Finish to finish installation of USB drive (see Figure 3-6)
Figure3-6
6.
System search again (see Figure 3-7)
37
DL-3620 SERVICE MANUAL
Figure3-7
7.
Click Install from a list or a specific location (Advanced) and click Next (see Figure 3-8)
Figure3-8
8.
Repeat step 5 until serial port drive installation finishes (see Figure3-9, Figure 3-10 and
Figure 3-11)
38
Chapter 3 Service
Figure3-9
Figure3-10
39
DL-3620 SERVICE MANUAL
Figure3-11
9.
Click Finish (see Figure 3-12)
Figure3-12
10. After finishing the above steps, densitometer drive installation is finished (see Figure 3-13)
Figure3-13
40
Chapter 3 Service
11. Check densitometer serial port in Device Manager
Right click My Computer and select properties (see Figure 3-14)
Figure3-14
Click Device Manager (see Figure 3-15)
Figure3-15
Click + before Ports (COM&LPT) and Universal Serial Bus controllers (see Figure 3-16)
41
DL-3620 SERVICE MANUAL
Figure3-16
As you can see from the above, serial port and USB drive of densitometer installation is finished.
Its serial port is COM3.
12. On the Windows PC, click Start, and then Run, and then key in \\10.1.1.1\winsoftware, and
then enter.
13. Run Config.
42
Chapter 3 Service
14. In Calibration port box, select the correct COM port number.
15. Click OK to close Config.
3.1.2 Show densitometer test value
1. Open DL-202Ps User Interface (Usually in Windows PC E:\DoLi\Densimeter or Windows
Desktop Start -> Programs-> Doli -> Densitometer).
43
DL-3620 SERVICE MANUAL
Figure3-17
2.
Click Open>>> on the right side to open a pull-down menu; Select the corresponding COM,
you will hear beep sound and LED turns red (duration: about 0.5 S) from green and turns
green again; A scroll bar pops up (keep scrolling) and corresponding information is displayed
in the primary interface; Communication between densitometer and its software is
established. (see Figure 3-18)
Figure3-18
Primary interface: After successful communication, you can see the name, version,
product ID and corresponding information on the top.
The respective value of red, green and blue LED will be displayed in their corresponding
areas.
The next line is for hardware testing. Click R-Led to turn on red LED, you can check from
the bottom hole; the same is true of G-Led and B-LED. Click Buzzer to beep and click
any button to stop. Click G-Indicator and B-Indicator to turn on top indicator.
3.1.3 Calibration
The bottom line is for calibration. It is used with a calibration strip when densitometer has
deviation
Input the three values into the boxes according to calibration strip in left-right sequence. Click
Send Refer-value (W) to save (densitometer beeps). Put the aperture on white test point, hold on
to densitometer for about 6 seconds, the indicator on densitometer will flash once, and then the
values will be shown up at the RGB colour blocks.
44
Chapter 3 Service
Figure3-19
Figure 3-20
Calibration strip
In calibration strip, the Test point is used for densitometer calibration; Calibration value is
the value of R, G and B of the test point. For the sake of getting correct color of photo, please
keep these areas clean! Keep calibration strip safe! Make sure no scratch!
When measuring, the hole of the densitometer base should be placed right in the middle of
Test point.
Check calibration: After finishing the above step, position the densitometer on the white test point.
When the densitometer beeps, check the values. If there is great deviation, it means the
densitometer is not correctly calibrated. Repeat the above steps; if there is still great deviation
(deviation within 001-002 is acceptable), you can restore factory data; Go to icon
, hold on
to Ctrl key and left key of mouse. A dialogue box will pop up in 5 seconds (see Figure 3-21). Click
OK.
45
DL-3620 SERVICE MANUAL
Figure 3-21
Note: When densitometer data are corrupted or the deviation is unacceptable, first restore
factory data. If fault still remains, change a new densitometer. We recommend you not to
restore factory data frequently.
3.1.4 Open help file
Left click Help (Hotkey: F1) to pop up help file which contains detailed operation instruction.
46
Chapter 3 Service
3.2 Data backup and restore
Purpose:
To backup the calibration data to prevent unexpected data loss.
To restore the calibration data in case unexpected data loss occur.
Backup data every time before and after a major calibration is performed.
Steps of data backup:
1. On DL-3620 machine Windows PC create a new folder, name data backup.
2. Backup Linux Registry.
On the DL-3620 machine Windows PC click Start.
Click Run.
Key in \\10.1.1.1\win-software, and then enter.
Run Iregedit.
On the left top of the window click Registry.
Click Export all
and then wait for a few seconds.
Specify data backup folder which you have just created, click OK.
3. Backup Mask files.
On DL-3620 machine Windows PC, click Start.
Key in \\10.1.1.1\tables and then enter.Select all .prn files.
47
DL-3620 SERVICE MANUAL
Copy and paste these files to data backup folder.
Steps of data restore:
1. Restore Linux Registry.
On DL-3620 machine Windows PC, click Start.
Click Run.
Key in \\10.1.1.1\win-software.
Run Iregedit.
On the left top of the window click Registry.
Click Import
.
Specify the data file which you have backed up in the data backup folder, click Open,
and then wait a second.
2. Restore Mask files.
On the DL-3620 machine Windows PC, click Start.
Key in \\10.1.1.1\tables and then enter.
Copy and paste the Mask files which you have backed up in the data backup folder
to \\10.1.1.1\tables folder.
3. Completion
Run Maintenance.
Click System:
48
Chapter 3 Service
Click Update date, and then wait 5 minutes.
49
DL-3620 SERVICE MANUAL
3.3 Linux system backup and recovery
Purpose:
To make a whole Linux system backup by creating a Linux recover CD.
To restore Linux system from Linux recovery CD.
Linux recovery CD is an image of the hard disk of Linux PC. It includes all of the calibration
data of the machine (Fig 3.4.1).
Precondition: Nero has been installed to the DL-3620 machine Windows computer.
Steps of Linux system backup:
Run maintenance.
Click System, and then click Create backup ISO.
50
Chapter 3 Service
Wait about 10 minutes; do not do anything to the machine.
On the DL-3620 Windows PC, click Start.
Click Run.
Key in \\10.1.1.1\queue and then enter.
Cut and paste the backup.iso file to Windows PC.
51
DL-3620 SERVICE MANUAL
Burn this file to a blank CD by Burn image
Steps of Linux system recovery:
Open the side panel of the machine.
52
of Nero.
Chapter 3 Service
Connect a keyboard and a monitor to the Linux Server motherboard.
Turn the Linux PC power on, on the keyboard press Delete key to enter BIOS interface (BIOS
interfaces could be different depending on the motherboard model). Check the following options:
53
DL-3620 SERVICE MANUAL
54
Chapter 3 Service
The Linux mother board has two COM port, it is set as:
COM1: 3F8/IRQ4
COM2: 3E8/IRQ3 (If necessory)
55
DL-3620 SERVICE MANUAL
Usually the BIOS of the Linux PC motherboard has been configured in the factory, only the
First Boot Device shall be re-configured after installing the external CD-Drive.
Steps:
Insert the Linux recovery CD to the CD-ROM of the Linux PC.
Press the Linux PC power button to turn Linux PC off.
Press the Linux PC power button again to turn Linux PC on.
Wait about 10 minutes, the Linux system will be recovered automatically, at this time you
can see the installation information on the Linux LCD Panel.
Finally you may be requested to enter a serial number, just press OK button on the Linux
LCD panel, and then wait till finish; If you see Clean up message, just wait 5 minutes
then go to next step.
Press the Linux PC power button to turn Linux PC off,
Press the Linux PC power button again to turn Linux PC on, and then eject the Linux
Recovery CD immediately (otherwise the Linux system will be recovered again).
56
Chapter 3 Service
3.4 Client PC setup
DL-3620 is a network printer. User can connect up to 253 clients PC to the Linux PC via network.
10.1.1.3
PhotoSmart is the only software which can send orders to the Linux PC for printing.
To setup PhotoSmart on each PC, a dongle (e.g. license) is needed.
The computers talk to each other by TCP/IP protocol on the network.
The IP address of the Linux PC is 10.1.1.3, and it is fixed and cannot be changed; the IP address
of client PC can be configured by user.
Purpose: To configure a new PC connected to DL-3620 machine for printing.
Precondition:
The network card has been setup on the new PC;
The new PC has been connected to the HUB via network cable.
57
DL-3620 SERVICE MANUAL
Things required:
A dongle for PhotoSmart
The dongle for PhotoSmart and the dongle for Linux PC are different and cannot be
exchanged.
Dongle driver
PhotoSmart setup program
vcredist_x86.exe
The dongle driver program HASP-64 and the PhotoSmart setup program can be found
in the DL-3620 folder of the DL-3620 machine Windows PC hard disk.
The name of the dongle driver setup program could not be HASP-64, and the name of
PhotoSmart setup program could be not as the technical upgrade. Ask the service
people for the latest information.
A spare USB2.0 port of the new PC motherboard.
Steps:
1.
Configure IP address for a new PC.
On the new PC, click Start and point to settings, then open Control panel.
Open Network connections
Highlight Local Area Connection, and right click mouse, then select Properties.
Highlight Internet Protocol (TCP/IP) and click Properties.
58
Chapter 3 Service
Select Use the following IP address:, set the IP address and the Subnet mask as the
illustration below:
Click OK.
59
DL-3620 SERVICE MANUAL
2.
Insert dongle to USB2.0 port of the motherboard.
3.
Run HASP-64 to install driver for the dongle.
4.
Run PhotoSmart to Install PhotoSmart on the new PC.
5.
Set language file and Doli minilab model for the new PC.
On the new PC click Start and then Programs.
60
Chapter 3 Service
Find Doli folder and PhotoSmart folder, and then enter PhotoSmartConfig.
Set Language file name to english.lng.
Select Machine type of current Doli minilab.
Click OK.
6.
Set User Accounts Control setting (For Windows 7)
On new PC click My Computer -> Control Panel -> User Accounts and Family Safty -> User
Accounts
Click User Accounts Control setting and set it to lowest.
61
DL-3620 SERVICE MANUAL
Chapter 4 Printed Circuit Board and Description
4.1 ACControl-I002 PCB
J1
62
Chapter 4 Printed Circuit Board and Description
4.1.1 Disposition and Descrption
Socket Code
SN
Wire
Definition
Description
1
STBSUP
STB replenish pump control signal
2
BFSUP
BF replenish pump control signal
3
CDSUP
CD replenish pump control signal
4
STB3PUMP
STB3 circulation pump control signal
5
STB2PUMP
STB2 circulation pump control signal
6
STB1PIMP
STB1 circulation pump control signal
7
BFPUMP
BF circulation pump control signal
8
CDPUMP
CD circulation pump control signal
9
CABC
Sprinkling pump control signal
10
SORT-AC1
Standby
11
WASHS
Paper processor motor control signal
12
CDFANS
CD Cooling fan control system
13
STB4HS
Standby
14
STB3HS
STB3 heater control signal
15
STB2HS
STB2 heater control signal
16
STB1HS
STB1 heater control signal
17
BFHS
BF heater control signal
18
CDHS
CD heater control signal
19
DRYHS
Dryer heater control signal
STB4-P
Standby
J1
20
21
22
23
24
63
Wire
No.
DL-3620 SERVICE MANUAL
Socket Code
J2
SN
Wire
Definition
Description
25
5V
Power Supply
26
5V
Power Supply
1
220V
AC220V Live wire
L5
2
CD-P
CD circulation pump
A0202
3
BF-P
BF circulation pump
A0203
4
STB1-P
STB1 circulation pump
A0204
5
STB2-P
STB2 circulation pump
A0205
6
STB3-P
STB3 circulation pump
A0206
7
CD-S
CD replenish pump
A0207
8
BF-S
BF replenish pump
A0208
9
STB-S
STB replenish pump
A0209
+5V
Power supply
DRYHS
Dryer heater signal
1
J3
2
3
4
Wire
No.
1
J4
2
Standby
3
4
1
220V
AC220V Live wire
L5
2
CDH
CD heater
A0502
3
BFH
BF heater
A0503
4
STB1H
STB1 heater
A0504
5
STB2H
STB2 heater
A0505
6
STB3H
STB3 heater
A0506
7
STB4H
Standby
8
220V
AC 220V Live wire
L5
1
220V
AC 220V Live wire
L5
J5
J6
64
Chapter 4 Printed Circuit Board and Description
Socket Code
SN
Wire
Definition
Description
2
3
Wire
No.
Standby
WASH
Paper processor motor
4
A0603
Standby
5
CABC
Sprinkling pump
6
STB4-P
Standby
1
A0605
Standby
2
J7
3
RELAY+
AC contactor control signal +
4
RELAY-
AC contactor control signal -
1
ACIN
AC 220V live wire
L3
ACOUT
AC contactor control loop
A0803
A7
J8
2
3
65
DL-3620 SERVICE MANUAL
4.2 WashControl-D107 PCB
J11
9
7
5
3
1
10
8
6
4
2
J13
SW1
66
Chapter 4 Printed Circuit Board and Description
4.2.1 Functions
Receive temperature signal of working tanks and dryer from temperature sensors.
Receive level signal of working tanks, replenisher tanks and waste tanks from level sensors.
Receive signal of sorter sensors.
Control temperatures of working tanks.
4.2.2 Adjustment for replacement
Set DIP switch to be the same as the previous board.
#
Factory default setting
1
OFF
2
OFF
3
OFF
4
OFF
5
OFF
6
OFF
7
OFF
8
ON
Re-adjust trimmers for temperature calibration.
2.3
67
DL-3620 SERVICE MANUAL
Temperature calibration
68
Chapter 4 Printed Circuit Board and Description
4.2.3 Desposition and Desposition
Socket Code
SN
Wire
Definition
Description
1
GND
2
J0
J1
J2
J3
J4
J5
J6
J6A
J6B
I6C
J7
Wire
No.
GND
GND
3
GND
4
GND
1
2
3
4
1
2
3
4
1
2
3
1
2
3
1
2
3
1
2
3
1
2
3
1
2
3
1
2
3
1
AC24V1
AC24V1
AC24V2
AC24V2
C0101
AC 24V Power Supply
C0104
Main Serial Communication
Standby
+5V
STD2E
STD2A
+5V
STD3E
STD3A
+5V
STD4E
STD4A
+5V
STD5E
STD5A
+5V
Serial communication 2
C4
Serial communication 3
C5
Standy
Standby
Standby
Standby
Standby
69
DL-3620 SERVICE MANUAL
Socket Code
J8
J9
J10
J12
J13
2
3
4
5
6
1
2
3
Wire
Definition
SRHE
SRHA
+5V
SR1E
SR1A
WASHS
GND
GND
1
+5V
Sorter sensor power supply
2
SR2E
Sorter sensor receiver
3
SR2A
Sorter sensor emitter
1
2
3
1
2
3
4
+5V
STD1E
STD1A
1
STBSUP
STB replenish pump control signal
2
BFSUP
BF replenish pump control signal
3
CDSUP
CD replenish pump control signal
4
STB3PUMP
STB3 circulation pump control signal
5
STB2PUMP
STB2 circulation pump control signal
6
STB1PUMP
STB1 circulation pump control signal
7
BFPUMP
circulation pump control signal
8
CDPUMP
CD circulation pump control signal
9
CABC
Sprinkling pump control signal
10
SORT-AC1
Standby
11
WASHS
Processor motor signal
12
CDFANS
CD cooling fan control signal
13
STB4HS
Standby
SN
Description
Wire
No.
Standby
Main Serial Communication
70
C9
C12
Chapter 4 Printed Circuit Board and Description
Socket Code
SN
Wire
Definition
Description
14
STB3HS
STB3 heater control signal
15
STB2HS
STB2 heater control signal
16
STB1HS
STB1 heater control signal
17
BFHS
BF heater control signal
18
CDHS
CD heater control signal
19
DRYHS
Dryer heater control signal
20
Wire
No.
Standby
21
22
STB4PUMP
Standby
25
+5V
Power Supply
26
+5V
Power Supply
1
5V
CD Temperature sensor 5V
2
CDT
CD Temperature sensor signal
3
GND
CD Temperature sensor sheild
4
5V
BF Temperature sensor 5V
5
BFT
BF Temperature sensor signal
6
GND
BF Temperature sensor shield
1
5V
STB1 temperature sensor 5V
2
STB1T
STB1 temperature sensor signal
3
GND
STB1 temperature sensor shield
4
5V
DC5V
5
STB2T
STB2 temperature sensor signal
6
GND
STB2 temperature sensor shield
1
5V
STB3 temperature sensor 5V
23
24
J14
C14
J15
J16
C15
71
C16
DL-3620 SERVICE MANUAL
Socket Code
J16A
J19
SN
Wire
Definition
Description
Wire
No.
2
STB3T
STB3 temperature sensor signal
3
GND
STB3 temperature sensor shield
4
5V
Dryer temperature sensor 5V
5
DRYT
Dryer temperature sensor signal
6
GND
Dryer temperature sensor shield
1
2
3
1
2
+5V
STB4T
GND
PACB
PACA
3
SR2B
Sort motor A
C1903
4
SR2A
Sort motor B
C1904
5
6
7
8
SR1B
SR1A
STBB
STBA
Standy
1
LSTB3
STB3 level sensor signal
2
GND
STB3 level sensor shield
3
LSTB2
STB2 level sensor signal
4
GND
STB2 level sensor shield
5
LSTB1
STB1 level sensor signal
6
GND
STB1 level sensor shield
7
LBF
BF level sensor signal
8
GND
BF level sensor shield
9
LCD
CD level sensor signal
10
GND
CD level sensor shield
1
WSTB
STB waste level sensor signal
2
GND
STB waste level sensor shield
3
WBF
BF waste level sensor signal
Standby
Standby
C20S3
C20S2
J20
C20S1
C20BF
C20CD
J21
72
C21
Chapter 4 Printed Circuit Board and Description
Socket Code
SN
Wire
Definition
Description
4
GND
BF waste level sensor shield
5
WCD
CD waste level sensor signal
6
GND
CD waste level sensor shield
1
SSTB
STB replenishing level sensor signal
2
GND
STB replenishing level sensor shield
3
SBF
BF replenish level sensor signal
4
GND
BF replenish level sensor shield
5
SCD
CD replenish level sensor signal
6
GND
CD replenish level sensor shield
7
8
LSTB4
GND
Standby (Short)
Wire
No.
C22
J22
73
DL-3620 SERVICE MANUAL
4.3 CtrlBoard-S102 board
CTRBoard-S102
74
Chapter 4 Printed Circuit Board and Description
4.3.1 Functions
Supply power to paper loading step motor, exposure platform synch belt step motor, and
cutter motor.
Receive signal from paper inlet sensor, paper loading sensor, STA sensor, cutter sensor, and
start sensor.
Receive signal from paper magazine ID sensor.
4.3.2 Disposition and description
Socket
Code
J2
J3
SN
Wire
Definition
1
TXD
2
RXD
3
GND
1
RXD
2
TXD
3
GND
Description
Wire
No.
STANDBY
Serial Communication11
BA03
AC24V1
24V power supply
BA401
AC24V2
24V power supply
BA404
1
GND
Carrier Entrance Sensor GND
2
EntrySensor1
Carrier Entrance Sensor Signal 1
3
EntrySensor2
Carrier Entrance Sensor Signal 2
4
+5V
Carrier Entrance Sensor Power Supply
1
GND
Carrier Exit Sensor GND
2
ExitSensor1
Carrier Exit Sensor Signal 1
3
ExitSensor2
Carrier Exit Sensor Signal 2
4
+5V
Carrier Exit Sensor Power Supply
1
2
J4
3
4
J5
BA5
BA6
J6
75
DL-3620 SERVICE MANUAL
Socket
Code
SN
Wire
Definition
Description
1
GND
Backprint sensor GND
2
BPSensor1
Backprint sensor signal 1
3
BPSensor2
Backprint sensor signal2
4
+5V
Backprint sensor Power supply
1
GND
2
NC2Sensor1
BA7
J7
J8
STANDBY
3
NC2Sensor2
4
+5V
1
GND
Paper advance Encoder GND
2
GND
Paper advance Encoder GND
3
FDEncode2
Paper advance Encoder Signal
4
+5V
Paper advance Encoder Power Supply
1
GND
Platform Encoder GND
2
GND
Platform Encoder GND
3
PFEncode
Platform Encoder Signal
4
+5V
Platform Encoder Power Supply
1
GND
Paper Loading Sensor GND
2
LoadSensor1
Paper Loading Sensor Signal 1
3
LoadSensor2
Paper Loading Sensor Signal 2
4
+5V
1
GND
STA Sensor GND
2
CnSensor1
STA Sensor Signal 1
3
CnSensor2
STA Sensor Signal 2
4
+5V
STA Sensor Power Supply
1
GND
2
NC1Sensor
J10
BA10
J11
J14
BA11
BA12
J12
J13
Wire
No.
Paper Loading Sensor Power Supply
STANDBY
76
BA13
Chapter 4 Printed Circuit Board and Description
Socket
Code
J16
J17
J18
J19
J20
3
Wire
Definition
+5V
1
#4MagEcod1
#4 cassette encode 1
2
#4MagEcod2
#4cassette encode 2
3
#4MagEcod3
#4 cassette encode 3
4
#4MagEcod4
#4 cassette encode 4
5
GND
#4cassette encode GND
1
#3MagEcod1
#3 cassette encode 1
2
#3MagEcod2
#3 cassette encode 2
3
#3MagEcod3
#3 cassette encode 3
4
#3MagEcod4
#3 cassette encode 4
5
GND
#3 cassette encode GND
1
#2MagEcod1
#2 cassette encode 1
2
#2MagEcod2
#2 cassette encode 2
3
#2MagEcod3
#2 cassette encode 3
4
#2MagEcod4
#2 cassette encode 4
5
GND
#2 cassette encode GND
1
#1MagEcod1
#1 cassette encode 1
2
#1MagEcod2
#1 cassette encode 2
3
#1MagEcod3
#1 cassette encode 3
4
#1MagEcod4
#1 cassette encode 4
5
GND
#1 cassette encode GND
1
GND
#4 Cassette Sensor GND
2
#4MagSensor
1
#4 Cassette Sensor Signal 1
3
#4MagSensor
2
#4 Cassette Sensor Signal 2
SN
Description
77
Wire
No.
BA16
BA17
BA18
BA19
BA20
DL-3620 SERVICE MANUAL
Socket
Code
4
Wire
Definition
+5V
#4 Cassette Sensor Power Supply
1
GND
#3 Cassette Sensor GND
2
#3MagSensor
1
#3 Cassette Sensor Signal 1
3
#3MagSensor
2
#3 Cassette Sensor Signal 2
4
+5V
#3 Cassette Sensor Power Supply
1
GND
#2 Cassette Sensor GND
2
#2MagSensor
1
#2 Cassette Sensor Signal 1
3
#2MagSensor
2
#2 Cassette Sensor Signal 2
4
+5V
#2 Cassette Sensor Power Supply
1
GND
#1 Cassette Sensor GND
2
#1MagSensor
1
#1 Cassette Sensor Signal 1
3
#1MagSensor
2
#1 Cassette Sensor Signal 2
4
+5V
#1 Cassette Sensor Power Supply
1
GND
Cutter Sensor GND
2
CutSensor1
Cutter Sensor Signal 1
3
CutSensor2
Cutter Sensor Signal 2
4
+5V
Cutter Sensor Power Supply
1
GND
Mask Sensor GND
2
MaskSensor1
Platform Mask Sensor 1
3
MaskSensor2
Platform Mask Sensor 2
4
+5V
Mask Sensor Power supply
1
GND
#1 Door Switch GND
SN
Description
J21
BA21
J22
J23
BA22
BA23
J24
J25
J26
Wire
No.
78
BA24
BA25
BA26
Chapter 4 Printed Circuit Board and Description
Socket
Code
J27
2
Wire
Definition
DoorLock1
#1 Door Switch Signal
3
GND
#2 Door Switch GND
4
DoorLock2
#2 Door Switch Signal
1
GND
2
DividSensor1
3
DividSensor2
4
+5V
1
AC28V1
AC28V power supply
2
AC28V2
AC28V power supply
3
CUTA
Phase A of Band mask motor A
4
CUTB
Phase A of Band mask motor A
1
+5V
Power Supply
2
GND
GND
3
FDLCLK
Paper Advance Clock Signal
4
FDDIR
Paper Advance Clock Signal
5
FDLOCK
Paper Advance Lock Signal
1
+5V
Power Supply
2
GND
GND
3
PFCLK
Platform Motor Clock Signal
4
GND
Platform Motor Direction Signal
5
PFLOCK
Platform Motor Lock Signal
1
+5V
Power Supply
2
GND
GND
3
M1CLK
#1 Cassette motor Clock Signal
SN
Description
STANDBY
J28
J29
J30
J31
Wire
No.
79
BA280
1
BA280
2
BA280
3
BA280
4
BA29
BA30
BA31
DL-3620 SERVICE MANUAL
Socket
Code
J32
J33
J34
4
Wire
Definition
M1DIR
#1 Cassette motor Direction Signal
5
M1LOCK
#1 Cassette motor Lock Signal
1
+5V
Power Supply
2
GND
GND
3
M2CLK
#2 Cassette motor Clock Signal
4
M2DIR
#2 Cassette motor Direction Signal
5
M2LOCK
#2 Cassette motor Lock Signal
1
+5V
Power Supply
2
GND
GND
3
M3CLK
#3 Cassette motor Clock Signal
4
M3DIR
#3 Cassette motor Direction Signal
5
M3LOCK
#3 Cassette motor Lock Signal
1
+5V
Power Supply
2
+5V
Power Supply
3
DPRINT1
Backprinter Output Signal 1
4
DPRINT2
Backprinter Output Signal 2
5
DPRINT3
Backprinter Output Signal 3
6
DPRINT4
Backprinter Output Signal 4
7
DPRINT5
Backprinter Output Signal 5
8
DPRINT6
Backprinter Output Signal 6
9
DPRINT7
Backprinter Output Signal 7
10
DPRINT8
Backprinter Output Signal 8
11
BPSEL1
Backprinter Control Choice A
12
BPSEL2
Backprinter Control Choice B
13
GND
14
GND
SN
Description
GND
80
Wire
No.
BA32
BA33
Chapter 4 Printed Circuit Board and Description
Socket
Code
J35
J36
J37
J38
J39
1
Wire
Definition
+5V
Power Supply
2
GND
GND
3
M4CLK
#4 Cassette motor Clock Signal
4
M4DIR
#4 Cassette motor Direction Signal
5
M4LOCK
#4 Cassette motor Lock Signal
1
+5V
Power Supply
2
GND
GND
3
CUTCLK
Cutter Motor Clock Signal
4
CUTDIR
Cutter Motor Direction Signal
5
CUTLOCK
Cutter Motor Lock Signal
1
+5V
Power Supply
2
GND
GND
3
ENTRYCLK
Raiser Motor1 Clock Signal
4
GND
GND
5
ENTRYLOCK
Raiser Motor1 Lock Signal
1
+5V
Power Supply
2
GND
GND
3
EXITCLK
Raiser Motor2 Clock Signal
4
GND
GND
5
EXITLOCK
Raiser Motor2 Lock Signal
1
+5V
2
GND
3
DIVIDCLK
4
DIVIDDIR
5
DIVIDLOCK
SN
Description
STANDBY
81
Wire
No.
BA35
BA36
BA37
BA38
DL-3620 SERVICE MANUAL
4.4 BprintCPLD-S102
J6
J3
J5
J7
J4
82
Chapter 4 Printed Circuit Board and Description
4.4.1 Disposition and description
Socket Code
SN
Wire
Definition
Description
Wire
No.
AC24V1
Power supply
K3
AC24V2
Power supply
K4
1
2
J1
3
4
1
BP+_A
2
BP+_A
3
BP7_A
Control signal for pin 7 of Backprint A
4
BP6_A
Control signal for pin 6 of Backprint A
5
BP5_A
Control signal for pin 5 of Backprint A
6
BP4_A
Control signal for pin 4 of Backprint A
7
BP3_A
Control signal for pin 3 of Backprint A
8
BP2_A
Control signal for pin 2 of Backprint A
9
BP1_A
Control signal for pin 1 of Backprint A
1
BP+_B
2
BP+_B
3
BP7_B
4
BP6_B
5
BP5_B
6
BP4_B
7
BP3_B
8
BP2_B
9
BP1_B
1
BPP+_A
Power supply for pins of Backprint A
J3
J4
Standy
J5
Motor + of Backprint A
2
BYJ
3
BPP+_A
83
BYJ
5
DL-3620 SERVICE MANUAL
Socket Code
3
Wire
Definition
BPP-_A
4
BPP-_A
1
BPP+_B
2
BPP+_B
SN
J6
Description
Motor
of Backprint A
Standy
3
BPP-_B
4
BPP-_B
1
+5V
2
+5V
3
IN0
Input signal 1 of Backprinit
4
IN1
Input signal 2 of Backprinit
5
IN2
Input signal 3 of Backprinit
6
IN3
Input signal 4 of Backprinit
7
IN4
Input signal 5 of Backprinit
8
IN5
Input signal 6 of Backprinit
9
IN6
Input signal 7 of Backprinit
10
IN7
Input signal 8 of Backprinit
11
A_SEL
Backprint_Select A
12
B_SEL
Backprint_Select B
13
GND
14
GND
DC5V power supply
J7
GND
84
Wire
No.
Chapter 4 Printed Circuit Board and Description
4.5 STEPPOWER-S101
J1
J2
JP4
STEPPOWER-S101
JP2
JP3
JP1
85
DL-3620 SERVICE MANUAL
4.5.1 Disposition and description
Socket
Code
Wire
Definition
Description
Wire
No.
AC28V1
Power Supply output
K1
AC28V2
Power Supply output
K2
GND
GND
GND
GND
Power Supply
VCC
Power Supply
VCC
AC220V1
220V INPUT
L1
3
AC220V2
220V OUTPUT
1
GND
PC GND
GND
3
PC+12V
PC Power Supply
PC12
V
1
+24V
2
Magnet1
3
GND
1
GND
2
+12V
SN
1
J1
2
3
4
1
GND
2
J2
3
VDD
4
1
JP1
JP2
JP3
JP4
2
2
STANDBY
STANDBY
3
4
86
Chapter 4 Printed Circuit Board and Description
4.6 Step Motor Driver_104
Step Motor Driver_104
J1
P2
87
DL-3620 SERVICE MANUAL
4.6.1 Disposition and description
Socket Code
1
Wire
Definition
A
Motor Phase A
2
B
Motor Phase B
3
C
Motor Phase C
4
D
Motor Phase D
1
GND
GND
GND
2
VDD
Power Supply 36V
VDD
1
VDD
2
VDD
3
GND
4
GND
5
VCC
Power Supply 3.3V
VCC
6
GND
GND
GND
7
CLK
Clock Signal
CLK
8
DIR
Direction Signal
DIR
9
P.D
Lock Signal
P.D
10
H/F
Standby
SN
Description
Wire
No.
P1
J1
Standby
Standby
P2
88
Chapter 4 Printed Circuit Board and Description
4.7 PowerCtrl-I001 PCB
J1
AC15V2
AC15V1
AC9V1
AC9V2
J2
J3
KEY
KEY
GND
GND
J5
8
10
7
9
6
5
4
3
2
1
SW1
SWTCH
SWTCH
B5V
B5V
J6
89
GND
RXD
TXD
J4
GND
RELAY
GND
ATX+
J7
DL-3620 SERVICE MANUAL
4.7.1 Desposition and Description
Socket Code
J1
J2
J3
J4
J6
J7
SN
Wire
Definition
1
AC9V2
2
AC9V2
3
AC9V1
4
AC9V1
1
AC15V1
Description
Wire
No.
D0101
Power supply
D0104
D0201
2
Power supply
3
AC15V2
1
KEY
2
KEY
3
GND
4
GND
1
ATX+
2
GND
3
RELAY+
AC contactor control signal +
4
GND
AC contactor control signal GND
1
B5V
2
B5V
3
SWTCH
4
SWTCH
1
TXD
2
RXD
3
GND
D0203
Boot-strap switch
D3
Standby
D4
Standby
Serial communication line
90
D7
Chapter 4 Printed Circuit Board and Description
4.8 MASTER-D103B PCB
J1
LCD POWER
J2
J14
CT
RS-PC
J15
LT-SM
J9
T2-SM
J8
J16
T1-SM
J7
RS-CON5
LT-RST
91
J10
FAN
J11
J12
J6
J4
LEDS
T1-RST
T2-RST
DL-3620 SERVICE MANUAL
4.1 Desposition and Description
Socket Code
SN
1
J1
1
2
3
4
1
2
3
4
5
J4
Description
6
Power supply
K6
AC24V2
GND
5V
Standby
GND
20V
RED
LEDS VCC
GND
TERM
GREEN
Standby
BLUE
7
8
9
10
1
J6
2
1
2
J7
3
4
1
J8
2
3
Wire
No.
K5
AC24V1
2
3
J2
Wire
Definition
VCC
GND
LS IMP1
OUT FAN
Standby
VCC
T1 A
T1 B
Standby
T1 NA
T1 NB
T2 A
Standby
T2 B
T2 NA
92
Chapter 4 Printed Circuit Board and Description
Socket Code
SN
4
1
2
J9
3
4
1
J10
2
3
1
J11
2
3
1
J12
2
3
1
J13
2
3
Wire
Definition
Description
Wire
No.
Lens turnplate motor drive
F9
T2 NB
LT A
LT B
LT NA
LT NB
GND
Standby
T2 RST
5V
GND
Standby
T1 RST
5V
GND
Lens turnplate sensor GND
LT RST
Lens turnplate sensor signal
5V
Lens turnplate sensor power supply
GND
Standby
F12
NC RST
5V
1
2
J14
3
Turnplate electromaganet
F14
Serial communication
F15
(PCF15)
Serial communication
F16
4
1
J15
2
3
1
J16
2
3
93
94
CN1
B
G
R
CN18
CN17
FAN1 FAN2
40V R_A1
40V
GND
CN5
CN11
40V G_A
CN15
40V B_A
CN6
40V R_A2
CN7
CN3
NTC
40V G_B
GND
5V
GND
12V
CN2
40V R_B1
CN12
CN14
40V B_B
CN8
40V R_B2
CN4
CN9
40V R_C1
CN13
40V G_C
CN16
CN19
B
G
R
40V B_C
CN10
40V R_C2
DL-3620 SERVICE MANUAL
4.9 LEDDRIVER-Z101 PCB
Chapter 4 Printed Circuit Board and Description
4.9.1 Desposition and Description
Socket Code
SN
Wire
Definition
Description
FAN2
Radiactor fan 2
FAN1
Radiactor fan 1
NTC
Standby
1
2
CN1
3
4
1
CN2
CN3
2
1
12V
2
GND
3
5V
4
GND1
Power supply 12V
Power supply 5V
1
2
CN4
3
R
Red signal
4
GND1
GND
5
G
Green signal
6
GND1
GND
7
B
Blue signal
8
GND1
GND
CON4
Red light control signal 1
40V
Red light power supply
CON4
Red light control signal 2
9
10
1
2
CN5
3
4
CN6
1
95
Wire
No.
DL-3620 SERVICE MANUAL
Socket Code
SN
Wire
Definition
Description
40V
Red light power supply
CON4
Red light control signal 3
40V
Red light power supply
CON4
Red light control signal 4
40V
Red light power supply
CON4
Red light control signal 5
40V
Red light power supply
CON4
Red light control signal 6
40V
Red light power supply
CON4
Green light control signal 1
40V
Green light power supply
CON4
Green light control signal 2
40V
Green light power supply
CON4
Green light control signal 3
2
3
4
1
2
CN7
3
4
1
2
CN8
3
4
1
2
CN9
3
4
1
2
CN10
3
4
1
2
CN11
3
4
1
2
CN12
3
4
CN13
1
96
Wire
No.
Chapter 4 Printed Circuit Board and Description
Socket Code
SN
Wire
Definition
Description
40V
Green light power supply
CON4
Blue light control signal1
40V
Blue light power supply
CON4
Blue light control signal2
40V
Blue light power supply
CON4
Blue light control signal3
40V
Blue light power supply
GND
Power supply GND
40V
Power supply
B
Blue light control signal
G
Green light control signal
R
Red light control signal
R
Red light control signal
G
Green light control signal
B
Blue light control signal
2
3
4
1
2
CN14
3
4
1
2
CN15
3
4
1
2
CN16
3
4
1
2
CN17
3
4
1
CN18
2
3
1
CN19
2
3
97
Wire
No.
DL-3620 SERVICE MANUAL
98
GND
Cooling fan of
Computer
99
PE
N6
L5
AC220V
J13
3
2
1
PE
N6
L5
PE
N6
J5 220V
J2 220V
J6 220V
PE
PE
PE
PE
L5
N6
N6
N6
L3
N4
L5
N6
PE
PE
J1
1
7
4
8
9
6
5
2
3
Circulation pump
SprIklying pump
Replenishing pump
Waste collect pump
Dryer
Heating bar
Big transformer
AC220V
Small transformer
L5
N6
N4
L3
L3
N4
Chapter 5 Wiring Diagrams
Chapter 5 Wiring Diagrams
5.1 AC power supply wiring diagram(As Fig.2-1)
SSR
SSR
F3.15A
F3.15A
F3
F4
100
F7
F6
F10A
F10A
Wash
F3.15A
F5A
F2
F5
F5A
F1
GND
PE
Temp.Relay
Temp.Relay
2.2uF
2.2uF
2.2uF
Heating wire 2
Heating wire 1
Dryer fan 2
Dryer fan 1
Processing motor
DL-3620 SERVICE MANUAL
5.2 AC power supply wiring diagram (Fig.2-2)
Chapter 5 Wiring Diagrams
5.3 AC power supply wiring diagram (Fig.2-3)
101
2.2uF
2.2uF
2.2uF
Fan
Fan
Fan
Paper adsorbbing morot 3
Paper adsorbbing motor 2
Paper adsorbbing motor 1
DL-3620 SERVICE MANUAL
5.4 AC power supply wiring diagram (Fig.2-4)
102
Chapter 5 Wiring Diagrams
5.5 AC power supply wiring diagram (Fig.2-5)
+3 /A1
1/L1
4 /A2 -
2/T1
+3 /A1
1/L1
4 /A2 -
2/T1
H1
H2
H3
H4
H5
2.2uF
2.0uF
2.2uF
2.2uF
Paper adsorbbing fan
2.2uF
Sprikling pump
AC contactor
103
DL-3620 SERVICE MANUAL
5.6 Power PCB and surrounding(Fig.3-1)
DRIVE START
104
Chapter 5 Wiring Diagrams
5.7 Washctrl PCB and surrounding(Fig.4-1)
CD Temp
sensor
BF Temp
sensor
STB1 Temp
sensor
STB2 Temp
sensor
STB3 Temp
sensor
DRY Temp
sensor
FS1
FS2
FS3
FS4
Work solution
level sensor
FS5
SE3
FS7
Sort sensor
FS8
Replenisher
level sensor
FS9
Sort motor
40uF
FS12
FS11
FS10
105
Waste level
sensor
DL-3620 SERVICE MANUAL
5.8 Platform PCB and surrounding(Fig.5-1)
+5V
Vo1
Vo2
Gnd
Divider entrance sensor
+5V
Vo1
Vo2
Divider exit sensor
Gnd
+5V
Vo1
Vo2
Paper feeding encoder
Platform backprint sensor
Gnd
+5V
Vo1
Vo2
Platform encoder
Paper loading sensor
Gnd
+5V
Vo1
Vo2
Cutter sensor
Platform START sensor
Gnd
No.1 door switch
#4 cassette sensor
No.2 door switch
#3 cassette sensor
+5V
Vo1
Vo2
#2 cassette sensor
Gnd
+5V
Vo1
Vo2
Gnd
106
#1 cassette sensor
Chapter 5 Wiring Diagrams
5.9 Platform PCB and surrounding(Fig.5-2)
#1 Cassette motor
Band mask motor
A806 model
#2 Cassette motor
Paper advance motor
A806 model
#3 Cassette motor
A806
model
Platform motor
)
(
#4 Cassette motor
#4 Cassette encoder
1
2
3
4
2
3
4
#3 Cassette encoder
1
Cutter motor
#2 Cassette encoder
1
2
3
4
Raiser motor 1
#1 Cassette encoder
1
2
3
4
Cassette No.
Raiser motor 2
107
DL-3620 SERVICE MANUAL
5.10 Platform PCB and surrounding(Fig.5-3)
AC24V1
AC24V2
#1 Ribbon motor
#1 Backprint motor
108
Chapter 5 Wiring Diagrams
Lens turnplate magnet
Lens turnplate home sensor
Lens turnplate motor
SE3
5.11 Master PCB and surroundings (Fig.6-1)
109
DL-3620 SERVICE MANUAL
5.12 DVI drive and surroundings(Fig.2-1)
110
Chapter 5 Wiring Diagrams
5.13 LEDLamp and surroundings (Fig.2-2)
111
DL-3620 SERVICE MANUAL
5.14 Platform PCB and surrounding(Fig.6-1)
+5V
Vo1
Vo2
Entrance sensor of divider
Gnd
+5V
Vo1
Vo2
Exit sensor of divider
Gnd
+5V
Vo1
Paper feeding encoder
Vo2
Backprint sensor
Gnd
+5V
Vo1
Platform encoder
Vo2
Base sensor
Gnd
+5V
Cutter sensor
Vo1
Vo2
Count sensor
Gnd
#1 cassette door sensor
#4 cassensor sensor
#2 cassette door sensor
#3 cassette sensor
+5V
Vo1
Vo2
#2 cassette sensor
Gnd
+5V
Vo1
Vo2
Gnd
112
#1 cassette sensor
Chapter 5 Wiring Diagrams
5.15 Platform PCB and surrounding(Fig.6-2)
#1 cassette motor
A806 model
#2 cassette motor
Paper feeding motor
A806 model
#3 cassette motor
Band motor
A806 model
)
(
#4 cassette encoder
#4 cassette motor
1
2
3
4
2
3
4
2
3
4
#3 cassette encoder
1
Cutter motor
#2 cassette encoder
1
#1 cassette encoder
Elevator motor 1
1
2
3
4
Cassette No.
Elevator motor 2
113
DL-3620 SERVICE MANUAL
5.16 Wiring of the machine(Fig.9-1)
CTRBoard-S102
BPrintCPLD-S102
J3
1
COM1
COM2
3
J4
1
J7
1
3
3
J12
1
COM1
4
COM3
J5
1
3
ACControl-I002
J4
1
WashControl-D107
J7
1
COM1
4
3
J16
1
PowerCtrl-I001
COM1
3
Master-D103
114
B
R
Y
115
T6.3A
J1
36V
GND
36V
J1
Step Motor Driver_104
GND
J1
Step Motor Driver_104
GND
36V
Step Motor Driver_104
GND
36V
J1
Step Motor Driver_104
GND
36V
J1
Step Motor Driver_104
GND
J1
36V
GND
36V
Step Motor Driver_104
J1
J1
GND
36V
Step Motor Driver_104
F1
24V/5A
10V/0.5A
T3.15A
F4
Step Motor Driver_104
O
Y
W
T5A
F5
24V/8A
T5A
T2.5A
70V/6A
0V
28V/8A
32V/8A
F3
F2
240V
230V
220V B
0V
0V
220V
230V
T5A
F6
Big transformer 15V/4A
J2
J2
AC24V1
AC24V2
J1
VDD
GND
AC24V1
AC24V2
J1
STEPPOWER-S101
VDD
GND
STEPPOWER-S101
L5
N6
L3
N4
PE
J1
J2
J1
J1
J4
J28
J1
AC9V2
AC9V1
AC15V1
AC15V2
AC24V1
AC24V2
AC24V1
AC24V2
AC24V1
AC24V2
AC28V1
AC28V2
AC24V1
AC24V2
A806 model
(
)
PowerCtrl-I001
WashControl-D107
BPrintCPLD-S102
CTRBoard-S102
Master-D103
Chapter 5 Wiring Diagrams
5.17 Wiring of the machine(Fig.10-1)
DL-3620 SERVICE MANUAL
116
Chapter 6 Sensors
Chapter 6 Sensors
Illustration for sensors
117
DL-3620 SERVICE MANUAL
6.1 Type of sensor
There are mainly three types of sensors
1
Infrared emitter and receiver
A
K
IS471
Fig.1 Infrared Emitter
2
Infrared Receiver
Cross correlation sensor,Slot-type sensor
Fig.4 Circuit On
Fig.3 Circuit Open
3
Reed Type Relay
Fig.5
Circuit
Fig.6 Circuit On
Open
118
Chapter 6 Sensors
6.2 Sensor Function
Sensor
Magazine ID
sensor
Paper Inlet
sensor
Paper loading
sensor
Cutter spacing
sensor
Cutter home
sensor
Platform START
sensor
Platform
backprinter
sensor
Use and type
For detecting paper width
Type: Reflective Photosensor
For detecting if paper available
Type: Reflective Photosensor
For detecting if paper loading ready
Type: correlation photosensor
For the cutter spacing
Type: Slot-type photosensor
For detecting home place of cutter
Type: Slot-type photosensor
For detecting paper length
Type: correlation photosensor
For checking whether backprint is on
Type: correlation photosensor
For detecting whether paper available in the
Divider
entrance of distributor
entrance sensor
Type: correlation photosensor
Divider exit
Check if paper already into processor
sensor
Type: correlation photosensor
Sensors respectively for measuring temp.s of
Temp. Sensor CD,BF,STB and dryer
Type:AD592 integrated thermosensor
Sensors respectively for measuring the
Replenish Level
waste level of CD,BF and STB
sensor
Type: Floater sensor
Detecting the level of CD, BF and STB waste
Waste Level
Type: floater sensor
sensor
Sorter Sensor
For detecting the STOP position of sorter
Type: slot-type photosensor
119
Position
Paper magazine
outlet
Paper magazine
inlet
Ahead of cutter
To the right of
cutter
To the left side of
cutter
Behind cutter
Behind platform
Distributor
entrance
Distributor exit
Respectively in
CD,BF,STB and
dryer tanks
Respectively in
CD,BF,and STB
tanks
Respectively at
the lid of waste
tank of CD,BF
and STB
Sorter limiter
Chapter 7 Illustration for adjustable components
Chapter 7 Illustration for adjustable components
7.1 CPLD-S102 trimmer function for Backprint
Trimmer
W1
W2
W3
W4
Function
Votage adjustement of Pins
for Backprint A
Votage adjustement of Pins
for Backprint B
Word deepth adjustment for
Backprint A
Word deepth adjustment for
Backprint B
Description
Set voltage to around 15V
Set voltage to around 15V
Adjust the word deepth on the
Backprint A
Adjust the word deepth on the
Backprint B
7.2 WashCtrl-D107 trimmer function
Trimmer
VR1
VR2
VR3
VR4
VR5
VR6
VR7
VR8
VR8A
Function
Temperature voltage
reference adjustment
CD temperature
adjustment
BF temperature
adjustment
STB1 temperature
adjustment
STB2 temperature
adjustment
STB3 temperature
adjustment
Dryer temperature
adjustment
Room temperature
adjustment
Description
Set VR1 0.273V
Adjust VR2 to make the actual
same as temperature displaying
Adjust VR3 to make the actual
same as temperature displaying
Adjust VR4 to make the actual
same as temperature displaying
Adjust VR5 to make the actual
same as temperature displaying
Adjust VR6 to make the actual
same as temperature displaying
Adjust VR7 to make the actual
same as temperature displaying
Adjust VR8 to make the actual
same as temperature displaying
Standby
121
temperature
temperature
temperature
temperature
temperature
temperature
temperature
DL-3620 SERVICE MANUAL
7.3 Master-D103B trimmer function
Trimmer
Function
VR1
Base voltage adjustment
VR2
LED protection
Description
Adjust VR1 to make base votage =5.0V
Adjust VR2to make the voltage =1.0V
122
Chapter 8 Dip Switch Function
Chapter 8 Dip Switch Function
8.1 CtrlBoard-S102 PCB Dip switch description
1
State
Upgrade
progamme
2
3
Standby Standby
4
5
6
7
Standby
Platform
encoder
Paper-delivering
encoder
ON
Compellent
upgrade
Without
code
Without code
OFF
Normal
upgrade
With code
With code
8
Machine
Model
DL-3620
8.2 WashCtrl-D107 PCB dip switch description
State
ON
1
2
Upgrade
programe
For measuring
sensor
Compellent
upgrade
Measurable
OFF
Manual
Unmeasurable
ON
Automatic
OFF
3
4
5
6
Standby Standby Standby Standby
7
Buzzer
8
Photorecei
ver
8.3 StepMotorDrive_104 PCB dip switch description
State
1
2
3
4
Description
Type 1
OFF
ON
ON
ON
Full step
Type 2
ON
OFF
ON
ON
Half step
Cutter
motor
Type 3
ON
ON
OFF
ON
Quarter
step
Cassette
motor
123
Location
DL-3620 SERVICE MANUAL
124
Chapter 9 The LAB software
Chapter 9 The LAB software
Click the icon
to open the software (Usually go C:\DL3620\LabUtil)
You can select either English or Chinese
You can choose the corresponding model for the machine .
125
DL-3620 SERVICE MANUAL
Select connect mode. Here we choose COM1 (Exchange cable F15 in Master-D103B board
to PCF15) instead of Linux Socket
Click button Connect to communicate with the software.
126
Chapter 9 The LAB software
Function of main buttons of Exposure DECK
Exposure Time: Input numbers to simulate exposure(the LED is not on), exposure
platform pause for a few seconds
Repeat Count: Input the number of Repeat Count.
Paper Length: Input the length for current paper advancing.
Paper Space: Input numbers, it is the space between the two pieces of photo, eg.: 2mm
means the space inbetween photos is 2mm. This button valids only when button
Exposing Sheets is selected as double or Triple. The default is unvalid.
Optical-axis Center: Input numbers and click
Exposing Sheets: Select the sheets to exposure.
No Release for Prepare Paper: If this item is selected, the paper will pause on exposure
deck instead of going into processor.
Change Slot: Select the Slot (paper magazine) you want and click button Change Slot.
Paper Sensor Status: Test whether the sensors work normally. *01 means the number of
current cassette is 01, * means current cassette.
Test Cutter: click this button and the cutter rotate once.
Sensor indicator description
Type
With paper
Without paper
correlation
Indicator light red
Indicator light green
127
DL-3620 SERVICE MANUAL
Function of main buttons of Processor
Measure: Display current chemical temperature
Setup Temp: Input the temperature you want to set, click button Setup Temp
Replenisher: Select the replenisher you want to test and click button Test.
Sorter Test: Click this button to start sorter and Sorter Homing Sensor(indicator is red,
when it stops, the indicator is green.).
Function of main buttons
128
Chapter 9 The LAB software
Current Data/Time: The time of upper computer.
LAB Date/Time: Time of Program timer.
Sync. Time/Date: synchronize the time of LAB Date/Time with that of Current Date/Time.
Turn On/Time: Choose the day and input time, click button Setup to finish setting.
Change password
Click Firmware Updates menu, a dialogue box Password Input will pop up. The initial
password is 1234 , you can also customize the password.
129
DL-3620 SERVICE MANUAL
Firmware Updates
Select the PCB you want to update
130
Chapter 9 The LAB software
You can check the versions of the current PCB firmware and that of the update; you can also
check the versions of all current PCB firmware. Click button Update to update the
firmware.(Better to restart the processor button after one PCB firmware finishing updating)
131
DL-3620 SERVICE MANUAL
132
Chapter 10 Trouble Shooting and Solution
Chapter 10 Trouble Shooting and Solution
10.1 Hardware Symptom
Note: The following symptom, causes and solution are obtained speculatively for
reference of professionals only.
Symptom
Equipment Power
Gone
PC unable to start
up
Monitor indicator
gone or no display
Chemical temp.
extremely low
Chemical
temp.extremely
high
Dryer temp.
exteremely low
Dryer temp.
extremely high
Cutter not working
1
2
1
2
Causes
No power with socket
Air switch off or damaged
ATX Power switch failure
Poor contactof computer
memory,
VGA
card,mainboard and CPU
1 Monitor power switch not on
2 Poor contact of VGA card on
mainboard and CPU
1.chemical temp. setting incorrect
2 chemical low level or floater
sensor deflective
3.heater
damaged
or
ACControl-I1002 out of order.
Solution
Check power system confirm if
it is AC220V and 50 HZ
2 Turn on or check air switch
1 Check ATX power switch
2 check the power on signal
cable for computer memory,
VGA card,main board,CPU
and ATX-SW
1 Turn on monitor power
2
Check or re-plug in VGA
card,check the room humidity
1 Properly set chemical temp.
2 Repl. chemicals to raise the
solvent level or check floater
3. Check heater or replace
ACControl-I002 PCB
1
1 Chemical temp. setting incorrect
2 Circulation pump not working
3 ACControl-I002 PCB out of
order
1.dryer temp. setting incorrect
2 dryer coil broken
3 dryer protector damaged
1
2
3
1 dryer temp. setting incorrect 2
AC control board defective
3 dryer fan not working
1 cutter motor cable broken
2 cutter motor malfunction
3 cutter sensor defective
1
2
3
1
2
3
133
1
2
3
Properly set chemical temp.
Check circulation pump
Check
or
replace
ACControl-I002 PCB
properly set dryer temp.
check dryer coil
check the protector(above the
tank)
properly set dryer temp.
Replace ACControl-I002 PCB
Check dryer fan.
check cutter motor cable
check cutter motor
check cutter sensor
DL-3620 SERVICE MANUAL
Scratcheds on
photo
1
2
paper magazine defective
processor rack defective
1
2
Incorrect sort
1
2
sort time setting incorrect
sorter malfunction
1
2
Photo dirty
1
2
processor racks dirty
chemical dirty
1
2
Processor racks malfunction
Paper jam in
processor
1 processor motor cable broken
2 processor chain broken
Processor motor not
3 processor motor defective
working
4 capicitor or processor motor
burned
Photo centring setting incorrect
Incorrect photo
centring
check paper magazine
check processor racks
reset sort time
check sorter cable or its
photosensor and limiter switch
wash and maitian racks
replace chemicals
Check processor rack
1check processor motor cable
2 replace processor chain
3 replace processor motor
4 replace capicitor of processor
motor
Reset photo centring
Magazines unable
to switch
1 System data setting incorrect
1 reset system data
2 malfunction of shifter between 2
check
magazien
magazines
shifter(e.g.:signal cable)
No paper feeding
1 cable or belt of paper feeding 1 check cable or belt of paper
motor broken
feeding step motor
2 paper feeding motor broken
2 check paper feeding step motor
Platform belt not
moving
1 cable or belt of paper feeding 1 check cable or belt of paper
motor broken
feeding step motor
2 paper feeding motor broken
2 check paper feeding step motor
Check the photosensor(eg: therer
Platform outlet photosensor out
is dirt on the sensor
of order
Backprint
inconstant
Repl. pump not
working
Waste overflow
without prompts
Paper uneven
1
2
3
repl. pump switch not on
Repl. flux settings too small
Repl. pump out of order
1
2
3
switch on repl. pump
set reasonable repl flux
check repl. pump
1 floater cable of waste broken
2 floater of waste tank broken
1
2
check the cable of floater
replace floater
1
2
1
2
check the vacuum fan cable
check vacuum fan
vacuum fan cable broken
vacuum fan broken
134
Chapter 11 Mechanical parts adjustment
Chapter11 Mechanical parts adjustment
Caution
For the sake of safety, switch off the machine before performing any
adjustment.Chemical spatters will probably injure your eyes,therefore it is recommended to
wear blinders and in case chemicals spatter into the eyes, wash with much water and see
doctor as well.Chemical will also injury your skin,so gloves and uniform must be worn during
operation. In case skin touches chemicals, wash with water immediately and furthermore
see doctor if necessary.
11.1 Assembly and Disassembly of collecting plate
The print exit of DL-3620 is consisted of a collecting plate, a backboard and a sorter
(Large format prints are received by collecting plate while small format prints are
received by sorter). Please refer to the following picture:
Collecting plate
Backboard
Sorter
(Fig.11-1)
135
DL-3620 SERVICE MANUAL
Disassemble the collecting plate by lifting it up and take it apart from the hook, and then it
can be taken off from the machine (As the following figure)
(Fig.11-2)
Assemble the collecting plate by hitching it to the hook.
11.2 Assembly and disassembly of raiser rack
Remove the collecting plate( refer to chapter 1.1 for more detail as Fig.11-3).
Rack Cover
136
Chapter 11 Mechanical parts adjustment
(Fig.11-3)
Poke the hold-down plate
Hold-down plate
(Fig.11-4)
Take out the raiser rack
Raiser rack
(Fig.11-5)
11.3 Rack disassembly
Same as Chapter 11.4 assembly and disassembly of raiser rack step 1
Take away the crossovers in sequence as follows
137
DL-3620 SERVICE MANUAL
(Fig.11-6)
Put the chemical-proof cushion.
Take out the racks in sequence as follows.
N.B.:In order to avoid chemical inter-contamination, it is suggested to take out the rack slowly in a
sequence from STB to CD.
Rack
Chemical-proof cushion
(Fig.11-7)
11.4 Cleaning and Replacement of replenish pump unilaterial pump
To prevent chemical running over when cleaning or replacing a unilateral valve, use a
container to contain the chemical during operation.
138
Chapter 11 Mechanical parts adjustment
Remove machine back cover.
Back cover
(Fig.11-8)
Wear glove for the sake of your hands.
Remove the fixation screws,and take out the replenishing pump.
Replenishing
Holder
Fixation Screw
(Fig.11-9)
Tweak out the cover of the replenishing pump, remove the inlet element and outlet
element (be care, chemical will run out.(As Fig. 11-10).
139
DL-3620 SERVICE MANUAL
Outlet
Outlet cover
Unilaterial valve
Unilaterial valve
Inlet cover
Inlet
(Fig.11-10)
Restore the inlet and outlet cover to the replenishing pump, make sure it is
tight. Make sure the unilateral valve has been installed to the correct
direction.
Screw down the fixation screws to restore the replenishing pump to the
machine.
Restore the back cover
11.5 Filter cleaning and replacement
Filter is used to filtrate the solvent coming up from ciculation pump. Dirty chemicals will
result in defective photos. Check filters once a week and when it is discovered that filters
are obviously dirty or chemicals are running unsmoothly, it is necessary to wash or
replace the filters
Take off the backside cover of a working tank, and take out the filter unit
carefully.
Clean the filter units bwith water or replace the filters.
140
Chapter 11 Mechanical parts adjustment
Back side cover
Filter
(Fig.11-11)
Caution: While taking filter out of heating tank, it must be slow, avoid the spattering of chemicals.
And do in sequence to prevent from incorrect location resulting in chemical contamination.
Check if filter core is clean. In case it is unnecessary to replace, then
Wash filter core in water and knock the core on hardware to shake off the dust
stuck on its inner side.
Dry the filter core
Put the filter in the original place
In case it is necessary to replace the filter core, then:
Take off the washer then move the core away from the shaft.
Clean the shaft.
Put the new core on the shaft then fix the washer
Install the filter in the original place
Filter Shaft
Filter Core
Washer
(Fig.11-12)
141
DL-3620 SERVICE MANUAL
11.6 Replace the rubber sleeve on the rack bottom
If the sleeve is discovered broken, distorted or attached with lots of debris, then it is
necessary to replace with a new one.Poor sleeve will create a overlapping of paper or
paper jamming.
Take out the rack with sleeve that needs replacement (refer to Section 1.5 Rack
disassembly for detail.
Diassemble the clips,gears and plastic bearings inside the sleeve, which are on the two
ends of the three rollers.(As Fig.11-13)
gear
Sleeve
C type ring
(Fig.11-13)
Remove the 3 rollers which are included inside the sleeve from the rack, and
then remove the sleeve.
Replace the sleeve, Reassemble the 3 rollers into the rack, restore bearings, gears and
C type rings.
Turn the double tooth gear anticlockwise to make sure the sleeve runs well.
142
Chapter 11 Mechanical parts adjustment
Sprocket
(Fig.11-14)
Restore rack to machine(N.B. Do it gently to prevent chemical splash)
11.7 Rack check-up and cleaning
Defective racks will cause scratch, paper edge dragging and paper jam.
Take out rack from working tank
Clean the racks and crossovers under running water with a soft sponge.
Processing racks must be regularily cleaned,the detailed steps are
Take out the
processing racks, clean them gently with a soft brush, especially the rollers,
gears and guides; make sure to wipe away the crystallization.
After processing for some time, the bottom rubber sleeve must be cleaned. Take out the
rubber sleeve,put it in water and clean it
refer to chapter 1.8 for more detail.
As per the Fig.11-15, check the performance one by one of the racks.
Raiser Rack
Loose springs
Roller broken
Roller distorted
Gear worn out
Bearing inbetween gears
broken
C-Fastener scaled off
Rubber sleeve on rack
bottom distorted and with too
much appendages
143
Rack
Dryer Rack
DL-3620 SERVICE MANUAL
Fig.11-15
Put back racks on their original locations.(Caution:Slowly put back the racks to avoid
overflow or spatter of chemicals.
Take off the chemical protective mat
Put back all the crossovers: the proper sequence from CD to STBs is Blue/Red/White
and the black end should be towards the console side.
Put back the racks lid.
Put back the processor cover
11.8 Check and clean chemical tank and pipe network
For the sake of convenience, this check can be performed while replacing chemical.
Remove collecting place (Refer to )
Take away the left side cover.(refer to Section 1.7 Filter cleaning and Replacement for
detail.
Check the interfaces of pipelines and chemical tanks to find out if there is any leakage.
Empty working solution
Empty all the chemicals according to the following steps:
Connect the waste valve to a container or the like with a pipe.(As Fig.11-16)
Turn on the chemical valve to empty the chemical
Pipe
Chemical
Valve
(Fig.11-16)
Take out the racks in chemical tank
refer to Section 1.5 Rack disassembly for more
detail.
Clean chemical tanks. Clean all the tanks with a hair brush, make sure to
144
Chapter 11 Mechanical parts adjustment
wipe off the crystallization and slag bonding.
Turn off the chemical valve after completely empty the chemical.
Restore the racks and the crossovers.
Refill working solution into chemical tanks by a siphon(As Fig.11-17)
Caution: Refill chemical starting from the tank nearest to dryer rack, i.e. from STB3 to CD,
pay attention not to spatter into other tanks, especially not into CD tank.
Siphon
Working solution barrel
(Fig.11-17)
Put back the rack cover
Restore left side cover
Install back photo-colleting plate
11.9 How to replace ribbon cartridge
It is recommended to replace the ribbon cartridge when the back print becomes dim.
Open the door of exposure platform.
Reverse the backprinter(AS Fig.11-19).
Remove the two fixation screws of backprinter assembly.
Take out backprinter(As Fig.11-20).
Remove the three fixation screws of mounting rig, and take it out(As Fig.11-19).
145
DL-3620 SERVICE MANUAL
(Fig.11-18)
(Fig.11-19)
146
Chapter 11 Mechanical parts adjustment
(Fig.11-20)
Ribbon
Thumb screw
Ribbon
(Fig.11-21)
Take off the thumb screws for fixing the ribbon catridge, and take it out. After finishing
the replacement, screw up the thumb screw.
Note
Ink ribbon must be put tidy and even.
Restore backprinter mounting rig.
Comment
The proper gap between printing head and upper roller should be the thickness of 2
pcs of paper inbetween printing head and upper roller, push upwards the holder(ribbon catridge)
147
DL-3620 SERVICE MANUAL
then tighten the screws. Finally take out the paper.
Restore backprinter section and close the door of exposure platform.
148
Chapter 12 Mechanical Malfunction Removal
Chapter 12 Mechanical Malfunction Removal
12.1 Raiser rack malfunction and solution
Take raiser rack(Refer to Section 11.4 Assembly and Disassembly of raiser rack for
detail)
Raiser rack malfunction and resolvent
Malfunction
Paper
track
deviation
Paper Jam
Cause
Solution
Flexibility of springs on each side is
different
Replace with two springs with
same flexibility
1
Unilaterial bearing defective
1
Change unilaterial bearing
2
Gear defective
2
Change gear
3
Steering deflector loose
3
Install it properly or tighten it
After malfunction removal, the following check is necessary
Put a piece of paper in the entrance, rotate the sprocket wheel, the papershold go
smmothly, otherwise, recheck the malfunction and solve it.Refer to DL-3620 Parts
Manual,DL-3020 Parts Manual for more detail.
12.2 Rack malfunction and resolvent
Take out the racks Section 1.5 Rack Disassembly for more details.
Rack malfunction and resolvent
Malfunction
Paper track
deviation
Cause
Flexibility of springs on each side is
different
1 The crossovers of the racks
unproperly installed.
Paper jam
2 Rubber sleeve on rack bottom
distorted and thus too loose.
149
Solution
Replace with two
springs with same
flexibility
1 Install properly all
the crossovers
2 Refer to Section 1.8
Replace the rubber
sleeve on the rack
DL-3620 SERVICE MANUAL
bottom for detail
3
gear unsuitable or deflective
3
replace gear
After malfunction removal, the following should be checked:
Put one piece of paper at the entrance, turn the knob to see whether the paper can go
smoothly, if not recheck the malfunction.Refer to DL-3620 Parts Manual,DL-3020 Parts
Manual for detail.
12.3 Paper scratch and Solution
Malfunction
Paper
Scratch
Cause
Resolvent
1
cassette outlet too rough
1
2
crossover and reck too dirty
2 clean crossover and
rack
3 dryer steering deflector and guide
umsmooth
3
smooth oulet
smooth their surface
After solve the problem of photo scratch, checking the following is necessary:
Print soveral photos to see whether there is scratch on the photos or not,if there is,
recheck the cause and solve it.Refer to DL3620 for detail.
12.4 Waste pump malfunction and Resolvent
Open the door (As Fig.12-1)
upper cover
Waste pump switch
Waste barrel door
150
Chapter 12 Mechanical Malfunction Removal
(Fig.12-1)
Waste pump malfunctiomn and resolvent
Malfunction
1
not
Waste pump
dosen t work
Note
Cause
waste pump disrepair or
Resolvent
1 replace waste
pump
2 waste pipe disrepair or not 2 replace waste pipe
If no time permitting, you can screw off the upper cover of waste barrel and draw off the
waste with a sucker.
12.5 Paper overlapping and resolvent
Malfunction
Cause
2 Rubber sleeve on rack
bottom or side springs
defective
3 Rack gear worn
4 Rack rubber sleeve worn
5 Divider sensor defective
Photo
overlapping
Resolvent
2 Replace rubber sleeve and side
springs
3
4
5
replace rack gear
replace rubber sleeve
replace divider sensor
12.6 Photo comes out not dry
Malfunction
Photo
comes out
not dry
Cause
1 dryer temperature setting not
correct
2
dryer fuse broken
3
STB working solution too dirty
4
Dryer fan malfunction
5 dryer electric stove wire
malfunction
Resolvent
1
reset dryer temperature
2
replace dryer fuse
3 replace STB working
solution
4 check wire connection or
replace dryer fan
5
replace electric stove wire
Print several photos to see if they are wet, otherwise recheck the malfunction(Refer to
DL-3620 Parts Manual,DL-3020 Parts Manual for more detail).
151
DL-3620 SERVICE MANUAL
12.7 Back print dim
Rewind the paper and switch off processor
Open the exposure platform door(As Fig.1-24)
Take out backprinter, loose the three fixation screws of ribbon catridge and
adjust the backprinter.
Malfunction
cause
1
Resolvent
print pin missing or not
1
replace print pin
2
back print voltage on
2 Increase back print
thelowside
voltage
3 Print head excessively close to
3 Adjust the distance
Back print dim
the paper
4 Replace ribbon,refer
to Section 1.11 How to
4 No ink
replace ribbon cartridge
for more details
After finishing adjustment print several photos to check up. If there is still print dim, you
need to recheck and remove the malfunction(Refer to DL-3620 Parts Manual,DL-3020
Parts Manual for more details.
12.8 Processing solution doesn t warm up and solution
Remove the left side cover(As Fig.12-2).
Left side upper cover cover
(Fig.12-2)
Check solution system
152
Chapter 12 Mechanical Malfunction Removal
Malfunction
Cause
1
Chemical
dosen t
warm up
2
heater is broken
1
replace heater
2
wash or replace filter(refer to
Section 1.7 filter cleaning
and replacement
3
replace circulation pump
4
refill working solution
filter is too dirty
3 circulation
malfunction
4
Resolvent
pump
working solution low level
12.9 No replenish flux and Solution
Check and wash replenish unilaterial valve, if spoiled, needs replacing.
Check replenish bellows attachment whther it is spoiled and there is air leakage, if it is, you
need to:
Since there will be chemical leakage, you need to prepare a clean and proper container.
Refert to step 1-4, chapter 1.6 cleaning and Replacement of replenish pump unilaterial
pump.
Take the unilaterial valves of oulet and inlet.
Remove two screws on the replenish pump outlet
They are with the two nut
.
Put out replenish bellows attachment,remove the three-way pipe and replace with a new
bellows attachment.
153
DL-3620 SERVICE MANUAL
bolt
nut
bellows attachment
Three-way pipe
(Fig.12-3)
Screw down the new replenish bellows attachment and three-way pipe,
screw the two screwas togehther with the two nuts (As Fig.12-3).
Put inside unilaterial valve, pay attention to its direction.
Fix the inlet and outlet of replenish pump (Note: there are arrow marks on inlet and
outlet of repl. Pump, do not mistake). Screw down the lid of repl. Pump.
Fix the repl. pump onto the holder with three screws.
154