1
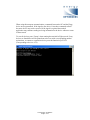
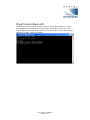
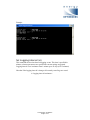
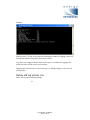
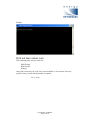
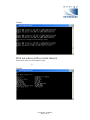
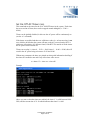
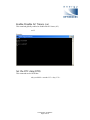
T +44 (0) 1472 266731
F +44 (0) 1472 360112
[email protected]
www.energyoptimizers.co.uk
Plogg – the Smart Energy meter Plug
Terminal Software User Guide
Commercial in Confidence
Copyright
This document contains proprietary information that is protected by copyright. This
document must not be reproduced, transcribed, stored, translated or transmitted, in
part or in whole, without the prior written approval of Energy Optimizers Ltd and
Diglis Design Limited.
ENERGY OPTIMIZERS LIMITED
Registered Office: ESTATE ROAD 1, SOUTH HUMBERSIDE INDUSTRIAL ESTATE, GRIMSBY DN31 2TA. UK
Registered in England. Reg No. 5367780
Introduction
This document serves as a guide to operating the Plogg power meter products. These
are electrical power metering and logging products aimed at the appliance level.
This document describes the main software features that can be configured using the
CLI (Command Line Interface) on the Plogg product using any of the three
communication modes, Bluetooth, Zigbee or RS232 direct serial connection.
The CLI supports many additional test features, these features are not described in this
document and are not intended to be used by the end user, and use of any features not
described in this document may result in data loss and/or damage to the device.
Communication Modes
There are three methods of communication with the Plogg module, these are:
- RS232 Serial (Direct cable connection)
- Bluetooth
- Zigbee
For all of these modes of communication the PloggTerminal.exe can be used.
This application should be launched with one of the following command line
parameters:
RS232 Serial:
PloggTerminal –s <serial port number>
Bluetooth:
PloggTerminal –b
Zigbee:
PloggTerminal –z <serial port number>
Where <serial port number> is the COM port number on the PC side.
Commercial in Confidence
Page 2 of 18
PloggTerminal (RS232 Serial Mode)
When running directly connected with a serial cable the terminal will output all
commands directly to the PC and all keyboard input is sent directly to the device. This
mode is the most reliable and ensures that the connection will be not be lost due to
signal or interference.
PloggTerminal (Zigbee)
When running in this mode the user must scan for nearby Zigbee devices, if any are
found the user can then select a device to then communicate with.
Commercial in Confidence
Page 3 of 18
When using this transport communication, commands between the PC and the Plogg
device are not guaranteed. If the signal to the device is lost then commands to/from
the meter device may not be executed, if the signal is regained the terminal
application may continue sending/receiving information to the device without a rescan
of the network.
To scan for devices press ‘Escape’ when running the terminal in Zigbee mode, if any
devices are found these will be printed out to the user with a corresponding number
against then, to connect to a particular device press the function keys F1-F12
(corresponding to devices 1-12).
Commercial in Confidence
Page 4 of 18
PloggTerminal (Bluetooth)
When running in this mode the user must scan for nearby Bluetooth devices, if any
are found the user can then select a device to then communicate with, note in this
mode all Bluetooth capable devices will be lists with their BT network address along
with their ‘Friendly’ name (if available).
Commercial in Confidence
Page 5 of 18
CLI functions
The CLI interface is used to configure the Plogg device, the commands that are
available are:
Command
?
,
Description
Print help
Repeat last command
s?
ss
st
si
sc
sr
sd
sln
sx
sm
sv
so
se
Show Meter Setup Commands
Set Tariff cost
Set Tariff times
Set logging interval
Print (and reset if required) accumulative costs
Reset KW/KVar Accumulators to zero
Print (and reset if required) logged values
Select items to be logged
Delete old log entries without printing
Print out max values
Print out all values as of this instant
Set AC ON/OFF timers
Enable/Disable AC timers
RT
RTDy.m.d
RTTh.m.s
Real Time Clock controls
Set the year month and day of the RTC
Set the hour minute and second of the RTC
Print Help (?)
This command prints the main CLI help page
Repeat Last Command (?)
This command repeats the last command sent.
Show Meter Setup Commands (?s)
This command shows all the meter setup commands
Commercial in Confidence
Page 6 of 18
Set Tariff cost (ss)
This command set the tariff cost for tariffs 0 and 1, without any parameters the current
settings are printed.
ss <tariff 0/1> <cost in pence per Kwh>
Example:
Set Tariff Times (st)
This command sets when the tariff time for tariff 0 is valid; when this tariff is not
valid tariff 1 is assumed.
When no parameters are given the current settings, current time and currently tariff
zone are printed.
st <start time for tariff 0>-<end time for tarrif 0>
Commercial in Confidence
Page 7 of 18
Example:
Set Logging interval (si)
This command sets the time between logging events. This time is specified in
minutes, when no parameters are specified the current settings are printed.
Logging interval is set in minutes from 1 minute up to 45 days (65535 minutes)
Note that if the logging interval is changes all currently stored logs are erased.
si <logging interval in minutes>
Commercial in Confidence
Page 8 of 18
Example
Print Accumulative Costs (sc)
This command prints and optionally resets the accumulative costs.
sc <1=reset>
Example:
Commercial in Confidence
Page 9 of 18
Reset KW/KVar Accumulators (sr)
This command resets KW/KVar Accumulators to zero.
sr
Example:
Print logged values (sd)
This command prints and optionally resets all logged values.
sd <1=reset>
Commercial in Confidence
Page 10 of 18
Example:
This command also shows the maximum number of items that can be logged
calculated by the remaining storage space and the number of items being logged.
Select logged values (sln)
Use this command to select items to be logged, available items are:
0 – Time Entry as date format from the RTC, support is from 2000 to 2063
1 – Last seconds wattage usage
2 – Cumulative wattage usage (since user reset or unit initialisation)
3 – Frequency (hz) of last seconds monitored value
4 – RMS voltage of last seconds monitored value
5 – RMS current of last seconds monitored value
6 – Unit on time (will wrap at 497 days) shown in seconds since CPU reset
7 – Reactive power of last seconds monitored value
8 – Cumulative reactive power (since user reset or unit initialisation)
9 – Phase angle V/I in degrees of last seconds monitored value
Run this command without any parameters to print out the items currently being
logged.
sln <list of items to be logged 0-9>
Commercial in Confidence
Page 11 of 18
Example:
Each log entry is 32 bits in size, therefore reducing the number of logging values will
increase the number of log entries that can be created.
Log entries are wrapped currently when no free space is available for logging; this
means old values will be lost to store new data.
Changing the values that are stored in each log (i.e. adding frequency) will erase all
old log values.
Delete old log entries (sx)
Delete old log entries without printing,
sx
Commercial in Confidence
Page 12 of 18
Example
Print out max values (sm)
This command prints out max values for:
RMS Voltage
RMS Current
Wattage
Along with a time entry for each, if any are unavailable (i.e. there haven’t been any
reported values yet) then this information is reported.
sm <1=reset>
Commercial in Confidence
Page 13 of 18
Example
Print out values at the current time(sv)
Print out all values as of this instant in time,
sv
Example
Commercial in Confidence
Page 14 of 18
Set On/Off AC Timers (so)
This command set the times for the 4 AC ON/OFF timers in the system. Each timer
has an on and an off time, these can be wrapped around midnight (i.e. 23:00 ->
02:00).
Timers can be globally disabled; in this case the AC power will be continuously on
(see the ‘se’ command)
If the timers are enabled and there are valid timer values (i.e. at least one time is not
set to 00:00 to 00:00) then the system will turn on the AC power when the RTC is
within any of the timers (0-3) that are found, if the RTC lies outside of all the timers
the AC power will be turned off.
Timers can overlap, i.e. timer 0 – 12:30 -> 18:00, timer 1 – 16:00 -> 20:00, this will
result in the AC power being on between 12:30 and 20:00
Without any parameters the times are printed out along with information detailing if
the timers are enabled or not and if any of the timer zones are on:
so <timer 0-3> <time on>-<time off>
Example
Above you can see that the timers are enabled, the timer ‘1’ is valid between 19002200, and the current time is 21:10 which indicates that timer 1 is valid.
Commercial in Confidence
Page 15 of 18
Enable/Disable AC Timers (se)
This command globally enabled or disabled the AC timers (0-3)
se 0/1
Example:
Set the RTC date (RTD)
This command sets the RTD date:
rtd<year 00-99>.<month 1-13>.<day 1-31>
Commercial in Confidence
Page 16 of 18
Example:
The above example sets the date to 2007 March 26th.
Set the RTC time (RTT)
This command sets the RTC time:
rtt<hour>.<minute>.<second>
Example:
The above example sets the time to 21:35:00
Commercial in Confidence
Page 17 of 18
Masc. device information
Maximum Logged Values
KHz and KVArh used for logging will support values up to 4294967.296Kwh, after
this they will wrap back to 0Khw
Unit up time will wrap after 497 days
RTC values are supported up to the year 2063
Current wattage and reactive power is supported up to 3515Kw/KVar
Unit startup
The unit will reset all settings if both the Ram settings are found to be corrupted as
well as the backup copy in EEPROM.
If the Ram settings are corrupted (but the EEPROM is intact) then all logging values
and unit settings will be retained, but the accumulative KVAR and KWh values will
reset back to 0.
On the device powering up, the unit up time will be reset to 0
Commercial in Confidence
Page 18 of 18