1
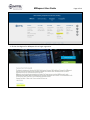
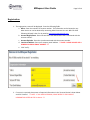
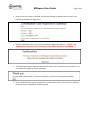
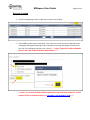
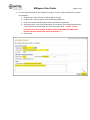
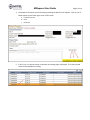
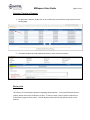
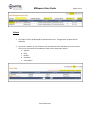
Version 3.2
April 2014
MiRequest User Guide
Mitel Networks, Inc.
MiRequest User Guide
Page 2 of 14
Table of Contents
Introduction ................................................................................................................................................................3
System Requirements.................................................................................................................................................3
Website Navigation ....................................................................................................................................................3
Registration ................................................................................................................................................................5
Registered User Login .................................................................................................................................................8
MiRequest Navigation ................................................................................................................................................9
Landing Page...........................................................................................................................................................9
Request Creation ................................................................................................................................................. 10
Opening/Viewing a Request ................................................................................................................................ 13
History List ........................................................................................................................................................... 13
Admin .................................................................................................................................................................. 14
MiRequest User Guide
Page 3 of 14
Introduction
Welcome to MiRequest, Mitel's self-service web application allowing you, the customer to take control of your
phone system requests. MiRequest allows you to create, monitor, and maintain all service requests submitted
through the application. The application also gives you the power to manage and designate user access to the
application within your organization.
For urgent/catastrophic requests or assistance with the MiRequest application, please contact our Customer
Care Team at 1-800-722-1301, and follow the below IVR Paths:
United States
Dial 2 then 5
Canada
English: Dial 2 then 1
French: Dial 2 then 2
System Requirements
For the best user experience, MiRequest requires a minimum Web browser of Internet Explorer 7.0 or Firefox
3.6. Other Web browsers may be used, but may not allow the application to function as designed. If you are
unsure of your current Web browser version, please click the 'Help' option in the browser menu and choose
'About'.
Website Navigation
To gain access to the MiRequest Application, the user must first register to gain access.
****NOTE: THE FIRST INDIVIDUAL TO REGISTER FOR MIREQUEST WILL BE AUTOMATICALLY
DESIGNATED AS THE ADMINISTRATOR FOR THE ACCOUNT. ****
1. Enter http://www.mitel.com in your web browser or use the shortcut by clicking CTRL on your keyboard
and click the link in this document to launch the Mitel website.
2. Scroll to the bottom of the webpage and select Customer Care under the Support Menu.
MiRequest User Guide
3. Click on the Register for MiRequest link to begin registration.
Page 4 of 14
MiRequest User Guide
Page 5 of 14
Registration
1. The registration screen will be displayed. Enter the following fields:
a. Bill to: Enter the main Bill-To account number. This information can be located on any
Mitel invoice or can be obtained by contacting Mitel Customer Care at 1-800-722-1301
following IVR path 2 then 5 or by emailing [email protected].
b. Account Region/State: Enter the two letter state abbreviation that is associated with the
account number.
c. Account Zip Code: Enter the zip code associated with the account number.
d. Your Email Address: Enter your company email address. ***NOTE: PLEASE DO NOT USE A
GENERIC OR GROUP EMAIL ADDRESS. ***
e. Click 'Verify'.
2. If no error is received, please enter all required information in the 'Personal Section' shown below
and click 'Confirm'. ***NOTE: IF YOU RECEIVE ERRORS, PLEASE REFER TO THE CONTACT
INFORMATION LISTED IN STEP 1a above. ***
MiRequest User Guide
Note: The following rules apply to password selection:
Is case-sensitive
Cannot contain any special characters (*, _, ^, %, $, #, @, !, etc.)
Cannot match user name
Page 6 of 14
MiRequest User Guide
Page 7 of 14
3. Once the 'Confirm' button is selected, the following message is displayed and an email is sent
requesting verification of registration.
4. Click the confirmation link in the email to continue the registration process. ***NOTE: THE
ADMINISTRATOR ACCOUNT IS ACTIVATED AFTER THE EMAIL ADDRESS IS CONFIRMED. ***
5. The following message is displayed once the confirmation link is selected in the email only if it is a
non-admin user registering for the application.
6. Once the Administrator approves registration, a confirmation email is sent to the user notifying
them that access to MiRequest has been granted.
MiRequest User Guide
Page 8 of 14
Registered User Login
1. Enter http://www.mitel.com in your web browser or use the shortcut by clicking CTRL on your
keyboard and click the link in this document to launch the Mitel website.
2. Scroll to the bottom of the webpage and select Customer Care under the Support Menu.
3. Click on the 'Login to MiRequest' link to begin accessing the application.
MiRequest User Guide
Page 9 of 14
4. The login prompt will be displayed. Enter the 'Username' and 'Password' provided during new user
registration.
5. You can also access the login prompt directly by clicking on the link below
https://www.ebiz.mitel.com/login.jsp.
MiRequest Navigation
Landing Page
Once a user is logged into MiRequest, the below screen is displayed. This is known as the landing page
and will display all open requests, if any exist.
MiRequest User Guide
Page 10 of 14
Request Creation
1. From the Landing Page, click the 'Add' link to create a new request.
2. The available system types are displayed. Click in the box next to the system requiring service.
A dialog box will appear displaying current maintenance coverage that applies to that system.
Click 'Ok' in this dialog box and then click 'Confirm'. ***NOTE: TO PROTECT OUR CUSTOMER'S
PRIVACY, WE HAVE CONCEALED NAME AND ADDRESS. ***
***NOTE: IF YOU NOTICE YOUR CURRENT COVERAGE IS NOT REFLECTED CORRECTLY, PLEASE
CONTACT MITEL CUSTOMER CENTRAL AT [email protected]. ***
MiRequest User Guide
Page 11 of 14
3. Fill in the applicable fields on the 'Notification Creation' screen. Fields marked with an asterisk
are mandatory.
a. Request Type: Select 'Service' or 'Move, Add, or Change'.
b. Incident Type: Select a type from the available drop down list.
c. Enter a PO number and Alternative Contact information if applicable
d. Short Description: Enter a brief description of the request. A more detailed description
can be entered in the area below the 'Short Description' field. ***NOTE: PLEASE
UTILIZE THE TEXT BOX TO ENTER AS MUCH DETAILED INFORMATION ABOUT THE
REQUEST SO MITEL CAN BETTER SERVE YOUR NEEDS.***
e. Click 'Create'
MiRequest User Guide
Page 12 of 14
4. The below confirmation screen will display providing the details of the request. Click on one of
below options on the lower right corner of the screen.
a. E-mail this to me
b. Print
c. Continue
5. If the 'Print' or 'Continue' option is selected, the Landing Page is displayed. The newly created
ticket will be available for viewing.
MiRequest User Guide
Page 13 of 14
Opening/Viewing a Request
1. To open/view a request, double click on the notification you would like to open/view from the
Landing Page.
2. The opened request provides updated comments, notes, and current status.
History List
The 'History List' tab displays information regarding closed requests. To view specific details about a
request, double click on the notification to open. To refine a search, enter a specific notification or
choose a date range and click search. This will display results based on the specific search criteria
entered.
MiRequest User Guide
Page 14 of 14
Admin
1. The 'Admin' link will be displayed for Administrator users. All registration requests will be
displayed.
2. To process a request, click in the box on the left side next to the individual you want to action.
Click on the associated link to update the status of the registration request.
a. Approve
b. Deny
c. Disable
d. Set Admin
e. Unset Admin
End of Document