1
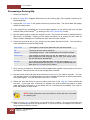
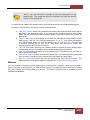
STOCK ORDERS Chapter 9 STOCK ORDERS CONTENTS Overview .......................................................................................... 3 Suppliers .......................................................................................... 3 Supplier Details .................................................................................... 3 General Tab .......................................................................................... 4 Financial Tab ........................................................................................ 6 History Tab ........................................................................................... 7 Doc Mgr Tab ......................................................................................... 8 Search Function .............................................................................. 9 How to Perform a Basic Supplier Search ............................................................... 9 Using Advanced Search Options ........................................................................... 9 How to Create a New Supplier ........................................................... 10 How to Change Supplier Details ....................................................... 10 Setting Up Supplier Categories ......................................................... 11 Ordering ......................................................................................... 12 Manual Orders .................................................................................... 13 Automatic Orders ............................................................................... 14 Automatic Order Setup.......................................................................................... 14 Making an Automatic Order .................................................................................. 15 Unfinished Orders .............................................................................. 16 How to Clear Back Orders ................................................................. 17 Viewing Order History........................................................................ 18 How to Print All Open Orders ............................................................ 18 Order Search Function ...................................................................... 19 How to Perform a Basic Order Search ................................................................. 19 How to Perform an Advanced Order Search ........................................................ 19 Packing Slip ................................................................................... 20 Converting an Order to a Packing Slip ............................................. 21 New Packing Slips.............................................................................. 21 Unfinished Packing Slips................................................................... 21 Processing a Packing Slip ................................................................. 22 HAIRLINKSQL User Manual v4.5 Updated 01/05/2012 1 Chapter 9 STOCK ORDERS Returns ............................................................................................... 23 Viewing Packing Slip History ............................................................ 24 Printing Barcode labels ..................................................................... 24 Invoices .......................................................................................... 25 Inwards Goods Search Function....................................................... 26 Converting an Order to a Invoice ...................................................... 26 Converting a Packing Slip to an Invoice........................................... 26 How to Create a New Invoice ............................................................. 27 Unfinished Invoices ........................................................................... 27 Processing a Invoice.......................................................................... 28 Returns ............................................................................................... 31 New ......................................................................................................................... 31 Use Old Invoice ...................................................................................................... 31 Viewing Invoice History ..................................................................... 32 Payments ....................................................................................... 33 Payment Run ...................................................................................... 33 One off Payment ................................................................................. 35 Print/Post Payments .......................................................................... 35 Refund................................................................................................. 36 Printing a Payment Due Report ......................................................... 36 Viewing Payment History................................................................... 37 Expenses........................................................................................ 38 Paying Expenses by Supplier ........................................................... 38 Paying Expenses by Expense Code ................................................. 39 How to Browse Expenses .................................................................. 39 2 HAIRLINKSQL User Manual v4.5 Updated 01/05/2012 STOCK ORDERS Chapter 9 OVERVIEW The Creditors module is used for purchasing Retail/Materials from suppliers, marking the products as received, updating stock levels and pricing, and paying the suppliers that you purchased goods or services from. SUPPLIERS Supplier Details The following three fields will always be shown on a Supplier file, regardless of the tab that you are in. Name This is the actual company name of the Supplier Code Abbreviation of the supplier name. An abbreviation used to easily identify or search for the supplier. This is not a unique ID of the supplier but works as an alias or common name. Status Current status of the supplier. There are only two available options to choose from, ‘Active’ or ‘Inactive’. Active is for suppliers that you currently use, Inactive is for suppliers you no longer buy from Fig. 9 - 1 HAIRLINKSQL User Manual v4.5 Updated 01/05/2012 3 Chapter 9 STOCK ORDERS General Tab The general tab will allow you to enter relevant details about the supplier. Please refer to Fig. 9 - 1, page 3. Postal/Delivery This section is divided into 3 tabs allowing you to enter the postal address - for all posted mail, the delivery address – for all delivered or couriered mail for the supplier. Street Num Enter only the number of the location or, if the supplier uses post office boxes then enter the post office box details. Street Refers to the street name. You can either type it in or select from the drop down list provided. Suburb Select the suburb from the pick list provided. HairlinkSQL allows you to add that suburb and the correlating city to the pick list if it is missing by pressing ‘Shift F2’ on the keyboard. City Once you have selected a particular suburb, HairlinkSQL automatically displays the city for you. Post Code Refers to the post code of the supplier. Distance This is how far a supplier is located from the clinic. Enter the figure in kilometres. GPS This refers to the map or grid reference for the physical location.. Note This field allows you to enter any notes such as the actual directions on how to get to the location – for your own reference. Contact Numbers: Voice / Fax / Cell Enter all the contact numbers for the supplier. The numbers do not have to be in any particular format but it is advisable to enter them in such a way that they can easily be read and where applicable, with the corresponding area codes. E-mail The supplier’s e-mail address. This is displayed in a purple colour, which signifies that you can automatically activate the mailbox and send an e-mail just by doubleclicking on the address. Web The supplier’s web address. This can be used in the same manner as the e-mail option. It activates your web browser and goes straight to the supplier’s website. Branch Based Contact Details 4 Rep Name Your particular Sales Representative or your main contact person for this supplier. Phone Phone number for the local branch of your supplier. Fax Fax number for the local branch of your supplier. HAIRLINKSQL User Manual v4.5 Updated 01/05/2012 STOCK ORDERS Chapter 9 Email Email address for the local branch of your supplier. Ebiz Type / Client Id / Connection These settings are used by CFL when setting up and configuring your EBIZ connection to this supplier Category Category 2 These relate to the reporting categories the supplier is under. This is a preset pick-list that can be customised to your requirements in pick-lists setup. 1 Account Balances / This section gives you a quick view of the amounts you owe your supplier. Accurate current, 30, 60 and 90 day balances for a particular supplier are displayed on this part of the screen. You are also able to perform account reconciliations by clicking on the button. HAIRLINKSQL User Manual v4.5 Updated 01/05/2012 5 Chapter 9 STOCK ORDERS Financial Tab This tab shows all of the financial information relating to the supplier’s account. This is also where you enter bank details for Direct Credit payments and general financial information about this suppliers account. Fig. 9 - 2 6 Account Type Type of account you have with the supplier, whether it is a ‘pay on the 20th of the month following, pay after a specified amount of time, or immediate payment account Def Due Day Default Due Day. The day of the month that payment will default to. Days Due In *Not implemented yet*. Account Ref Your account number according to the supplier’s computer system. Def Payment The default payment method for this supplier. Exempt GST Yes or No. Bank The bank that your supplier uses. This is used for any Direct Credit payments.The bank needs to be set up in Picklists before you can select a bank from the drop down list. Branch The branch of the bank that your supplier uses. Ac Num The suppliers bank account number. This should not include bank and branch numbers but should include the suffix, e.g. the highlighted number is the account number and a suffix 00 – 0000 - 0000000- 000. Ac Nam The name of the Bank Account, eg Beauty Fanatics. HAIRLINKSQL User Manual v4.5 Updated 01/05/2012 STOCK ORDERS Payee Ref 1/2/3 Chapter 9 Reference fields for Direct Credit payments. These are the Payee fields that will show both on your bank statement and the supplier’s. This should contain information like your company name, your Account number that the supplier knows you by, and any other relevant fields that your supplier may specify that they need to know. This is the only information they have to know that a Direct Credit payment is from your company and not someone else’s, so be clear about who you are here. Many companies include their account number with their supplier to reduce the chance of confusing the payment with another client of the supplier. History Tab This tab shows the purchase history for the supplier. It is split into four tabs. Each tab shows various histories. Disc / Penalty - *Not implemented yet*. Orders This tab shows all orders made for this supplier, the date the order was made, the status of the order, when the order is expected to arrive, the cost of the order and the staff member who made the order. Invoices This tab shows all invoices/refunds made for this supplier, the invoice number, the day the goods arrived or were sent back, the status of the invoice/refund, the type of transaction (invoice or refund), the order number the Invoice relates to (if any), the amount of the invoice, the staff member who processed the transaction, the supplier code, and whether the invoice has been paid, and if so, what the payment number. Payments This tab shows all the payments you have made to the supplier. It shows the payment number, the date the payment was made, the date the payment was actually due, the total of the payment, the status of the payment and the staff member who processed the payment. HAIRLINKSQL User Manual v4.5 Updated 01/05/2012 7 Chapter 9 STOCK ORDERS Doc Mgr Tab The document manager is for recording any sort of communication that you have had with your supplier. Fig. 9 - 3 This is broken down in to six sections: A: All N: Note P: Phone F: Fax L: Letter E: Email By clicking on each tab, you are given a listing of all entries made under each type of communication. 8 HAIRLINKSQL User Manual v4.5 Updated 01/05/2012 STOCK ORDERS Chapter 9 SEARCH FUNCTION The supplier search function is used in many areas of the program, for example when creating orders, searching for invoices or simply looking up supplier details. Regardless of what you are doing, when searching for a supplier the same search options and dialogue boxes are used throughout the program. How to Perform a Basic Supplier Search 1. From the main menu click on the ‘Creditors’ button. 2. From the creditors menu click on the ‘Suppliers’ button. Clicking on the supplier button will open a supplier search window. 3. Type in the first few letters of the supplier name or code. 4. Once you have entered the details, click ‘F12: Search’. 5. This will display a ‘Results’ window. You can scroll up and down with your arrow keys to highlight the supplier required. 6. Find the supplier you are looking for and click on ‘F12: Accept’. Using Advanced Search Options If you cannot find the supplier you need, or if there are too many results to search through, you can narrow your search by using the advanced search function. 1. Open up a normal supplier search screen and click on the ‘Advanced’ button. Number: The system generated number automatically assigned to this supplier. Name: The name of the supplier User Code: Alternative user defined search code. Cat1 / Cat2: The user defined categories the supplier is classed under. Status: Allows you to view Active only, Inactive only or either Active and Inactive clients. 2. The advanced supplier search form will now open. This form provides more options for you to search by such as the supplier number, category and the suppliers status. Once you enter a few details in any of the options provided, the program will list only the suppliers that match the details in the results window below. This generally reduces the list of suppliers to look through. 3. When you have highlighted the supplier you require, press ‘F12 Accept’, and the supplier record will now be displayed. HAIRLINKSQL User Manual v4.5 Updated 01/05/2012 9 Chapter 9 STOCK ORDERS How to Create a New Supplier 1. From the main menu click on the ‘Creditors’ button. 2. From the creditors menu click, on the ‘Suppliers’ button. This will open a supplier search window. 3. Click on the ‘F7: New’ button and a blank supplier record will be displayed. 4. Enter the relevant information for the supplier and once finished click on the tick button to save the new supplier record. How to Change Supplier Details 1. From the main menu click on the ‘Creditors’ button. 2. From the creditors menu click on the ‘Suppliers’ button and a supplier search window will open. 3. Search for the supplier. 4. Select a supplier and their supplier record will open. 5. Modify any of the information fields for the supplier and once finished click on the tick button to save the new supplier record. Fig. 9 - 4 10 HAIRLINKSQL User Manual v4.5 Updated 01/05/2012 STOCK ORDERS Chapter 9 Setting Up Supplier Categories Categories group clients, products or suppliers together for reporting purposes. You can then generate a report for a particular category to see their sales figures or profitability. See below for instructions on creating a new category. 1. Click on the ‘Options’ menu and select ‘Picklists Setup’. 2. Expand the client, product or supplier menu depending on what type of category you are setting up. 3. Double-click on category 1 or 2. If you are creating a product category you have an extra three categories to choose from. 4. If you are creating a new category click on the plus button at the bottom of the form. (If you are editing a category name just click on the name with the mouse and type in the new name.) 5. A blank line will be added at the bottom of the grid. Type in the name of the category and click on the red plus button to save. 6. When creating a new client, product or supplier record, or when editing an existing record you should now be to assign that record to a category. HAIRLINKSQL User Manual v4.5 Updated 01/05/2012 11 Chapter 9 STOCK ORDERS ORDERING HairlinkSQL allows you to track your inwards goods recording from order through to packing slip, then to Invoice and finally to payment. The following flow chart describes the process of ordering stock through HairlinkSQL. Fig. 9 - 5 12 HAIRLINKSQL User Manual v4.5 Updated 01/05/2012 STOCK ORDERS Chapter 9 Manual Orders 1. Click on the ‘Creditors’ button. 2. Click on the ‘Orders’ button and a menu will be displayed. 3. Click the ‘New Order’ selection. A supplier search window will pop open. 4. Search for the supplier. 5. Once you have selected a supplier, an order form will open. 6. Enter your staff ID and the store you are ordering for. 7. Press tab to move down to the ‘Prd_Num’ field or you can click on it with your mouse. This will open a goods & services search window to enable you to load the products onto the order. 8. Search for the product you wish to order. NOTE: All products with this supplier as the preferred supplier show in black text. If they are not the preferred supplier they will show in red. You can still , however, order products that are displayed in red text. 9. Once the item has been selected you are able to change the supplier code if you wish and the quantity ordered. Press the down arrow key to open a new search window for your next product. NOTE: If the supplier code is added or changed, it will give you the option of updating your product file for future use when ordering this product from this supplier. 10. Enter any notes for this order which will be printed on the bottom of the order. Once you have finished entering everything you need, you need to pick one of the following buttons at the bottom of the form. a. To finish the order click on ‘F12 : Finish’. b. To return to the order later by click on the ‘Save and Exit’ button. c. Click on the ‘SF10: Cancel’ button the cancel the order. HAIRLINKSQL User Manual v4.5 Updated 01/05/2012 13 Chapter 9 STOCK ORDERS Automatic Orders This feature requires some set up in the product file first as Automatic Ordering is taken from the preferred supplier on the product file, and uses the minimum and maximum stock levels for the product. Automatic Order Setup Advanced Automatic Ordering Automatic ordering can be setup in two different ways. You can have 1 min and max value that is used for the whole year, or you can have min and max values for each month if the order amount varies by season. To set up advanced automatic ordering go to Options | Setup | Product | and tick Advanced Ordering. Supplier Set Up Before automatic ordering can work, all the suppliers you wish to use must be created with a supplier record. See Supplier section for more information on creating suppliers. Product Set Up 1. Search for and open a product record you wish to use for automatic ordering. 2. On the ‘General’ tab in the ‘Preferred Supplier’ field select the supplier that this product will be ordered from when making automatic orders. 3. On the ‘Stock’ tab enter the ‘Min’ and ‘Max’ levels that you want to use to trigger automatic ordering. NOTE: A Min or Max of zero will exclude the product from Automatic Orders Fig. 9 - 6 14 HAIRLINKSQL User Manual v4.5 Updated 01/05/2012 STOCK ORDERS Chapter 9 Making an Automatic Order Make sure that there are no ‘Open’ orders as the system will not allow you to start automatic ordering. 1. Click on the ‘Creditors’ button. 2. Click on the ‘Orders’ button and select ‘Make Automatic Orders’. 3. The ‘Automatic Orders Window’ will open. Select your Staff ID, Order Date and Store. 4. Change the ‘Consider open/Batched Bills for Stock on Hand’ to ‘Yes’ if you would like to the stock on hand to include these bills. 5. Select the type of automatic order you wish to do. a. Make Order for a Preferred Supplier: This button will make an order for ONE supplier that you select based on the min and max values. b. Make Orders for Preferred Supplier(s): This button will make order for ALL Suppliers based on the min and max values. c. Make Order from Last Order: This button will make orders for ALL suppliers, but will order the same as you ordered last time on a previous order. 6. Once the orders have been created a box will saying ‘Finished Making Orders’. Click ‘OK’ to this prompt. 7. The ‘Unfinished Orders Search Window’ will now open where you can select your order. 8. Check the items on it and make any changes you require. Once you are happy with the order press ‘F12 Finish’ to complete the order process. Fig. 9 - 7 HAIRLINKSQL User Manual v4.5 Updated 01/05/2012 15 Chapter 9 STOCK ORDERS Unfinished Orders Use this menu item to find an order that you have opened but not yet finished. 1. Click on the ‘Creditors’ button. 2. Click the ‘Orders’ button and select ‘Unfinished Orders’. 3. An order search form will be shown on screen. 4. Search for the order you want to open. 5. Once an order is selected, an order form will appear on the screen. 6. Make any changes to your order, then finish your order, or save it again. Fig. 9 - 8 16 HAIRLINKSQL User Manual v4.5 Updated 01/05/2012 STOCK ORDERS Chapter 9 How to Clear Back Orders There may be times when you wish to clear the quantities on back order for certain products on order, or for all products on backorder. For example, if the supplier no longer stocks a particular item or if you wish to create a new order for that item. 1. Click on the ‘Creditors’ button. 2. Click the ‘Orders’ button and select ‘Clear Back Orders’. 3. The ‘Clear Back Orders’ window will open. Select the type of back orders you wish to clear. 4. The first back order matching your previous selection will open. 5. Click on ‘SF10 Clear Backorder’ and then ‘Yes’ to the prompt to cancel the order if you wish to cancel the back order. If you wish to view another back order use the scroll buttons at the bottom of the window. NOTE: If the order has been converted to an invoice, and the invoice has the status of ‘Open’, you cannot cancel the back order, until you have finished the invoice. A message will appear telling you to finish the invoice. You will need to go to ‘Unfinished Invoices’, and process the invoice before you can cancel the back order. Fig. 9 - 9 HAIRLINKSQL User Manual v4.5 Updated 01/05/2012 17 Chapter 9 STOCK ORDERS Viewing Order History This menu item allows you to look at any order that has been previously created. 1. Click on the ‘Creditors’ button. 2. Click on the ‘Orders’ button and then ‘Order History’. 3. An order search form will be shown on the screen. Search for the order. 4. The order should now appear on the screen for viewing. NOTE: The ‘Order History’ screen gives you the ability to view the orders but you cannot change any details on the orders. You do have the option of ‘SF10 : Cancel’ the order if it is still open, or you can ‘Print’ the order by using the buttons on the bottom of the form. You can also clear any items that may be on Back Order. How to Print All Open Orders 1. Click on the ‘Creditors’ button. 2. Click the ‘Orders’ button and select ‘Print All Open Orders’. 3. A window will open telling you how many orders there are to print and confirming that you wish to print them. 4. If you choose ‘Yes’ it will preview each order. 5. Click the ‘Print’ button to print off the order. 6. When you have printed them a confirmation box will ask you if you want to change the status of the orders to ‘Closed’. NOTE: If you choose ‘Yes’ to ‘Mark all the orders as closed’ you will not then be able to find them in ‘Unfinished Orders’. It will assume that once you have printed the order, you have finished the order and faxed or mailed it to the supplier. So if you wish to leave the order open after printing select ‘No’ when prompted. 7. If you say ‘Yes’, the order will now be marked as ‘Finished’ and ‘Printed’. 18 HAIRLINKSQL User Manual v4.5 Updated 01/05/2012 STOCK ORDERS Chapter 9 Order Search Function The order search function is used in many areas of the program, for example when viewing historical orders or searching for unfinished orders. Regardless of what you are doing, when searching for an order the same search options and dialogue boxes are used throughout the program. How to Perform a Basic Order Search 1. Open the ‘Order Search’ window. 2. If you know the order number, type that into the number field and press ‘F12 : Search’. 3. If a result is found click on ‘F12: Accept’ to go into that order. NOTE: To see a list of all available orders in the system, leave the ‘Number’ Filed blank, then click on the ‘F12: Accept’ button. How to Perform an Advanced Order Search If you don’t know the order number the advanced order search function can be used to expand the search options available. 1. Open up a basic ‘Order Search’ window and click on the ‘Advanced’ button. 2. An advanced order search form will open. You can now search by supplier, the staff member who entered the order or by a date range. 3. To search by a supplier or staff member click on the ‘…’ button next to the corresponding field. 4. A supplier or staff search form will open. Type the search details into the fields and click on ‘F12: Search’. 5. When the correct result is found click on the ‘F12: Accept’ button. 6. You will be taken back to the order search form. 7. To search by date range click on the date drop down menu and a calendar will appear. 8. Select date ranges required and any orders in between these dates that still satisfy the other search criteria will be found. 9. Once you have entered the entire search criteria click on the ‘F12: Search’ button and a list of matching results will be found. 10. Select the correct order and click on ‘F12: Accept’ to go into that order. HAIRLINKSQL User Manual v4.5 Updated 01/05/2012 19 Chapter 9 STOCK ORDERS PACKING SLIP The packing slip function enables you to update your stock on hand levels as soon as the goods arrive from the supplier and before their invoice arrives. You should only use this function if you have received the goods but the invoice is being sent later. Do not use packing slips if you already have the actual invoice. The following diagram shows the process flow of using a packing slip. Fig. 9 - 10 20 HAIRLINKSQL User Manual v4.5 Updated 01/05/2012 STOCK ORDERS Chapter 9 Converting an Order to a Packing Slip If you are using purchase orders, you can convert the order to a packing slip. This will eliminate the need to re-enter the items you have ordered. 1. Click on the ‘Creditors’ button. 2. Click on ‘Packing Slip’ and ‘Convert Order to Invoice’. 3. The Order Search window will appear. 4. Search for the order and select it. 5. The packing slip form should now appear on the screen for you to edit. New Packing Slips If you are not using purchase orders but wish to adjust only your stock levels when the goods arrive and not the pricing, you can just create a new packing slip. 1. Click on ‘Creditors’ button. 2. Click on the ‘Packing Slip’ button and then select ‘New Packing Slip’. 3. This form will list all the packing slips and orders that are open for that supplier. Each order or packing slip will show the supplier reference so you can tell if someone has already started entering a packing slip for this supplier. 4. If your new packing slip is not one of the ones listed, click ‘F7 New’. 5. The packing slip form should now appear on the screen to edit. Unfinished Packing Slips Use this menu item to find a packing slip that you have opened but not yet finished. 1. Click on ‘Creditors’. 2. Click on ‘Packing Slip’ and ‘Unfinished Packing Slip’. 3. Because the packing slip number is the same as the number used in an inwards goods invoice, the inwards goods search window will appear. 4. Search for the packing slip. 5. The packing slip form should now appear on the screen to edit. HAIRLINKSQL User Manual v4.5 Updated 01/05/2012 21 Chapter 9 STOCK ORDERS Processing a Packing Slip 1. Select your Staff ID. 2. Enter a ‘Supp Ref’ (Supplier Reference) for the Packing Slip (The supplier’s reference for the packing slip). 3. Change the ‘Arv Date’ if the goods arrived at a previous date. The arrival date will always default to today’s date. 4. If the supplier has combined two or more orders together in the packing slip you can add another order to the HairlinkSQL by clicking on the ‘SF6: Add Order’ button. 5. Sort the packing slip to match the supplier invoice. The current sort order is indicated by the fifth button, eg ‘Number’. Clicking on this button will allow you to change the sort order by Order number, Description or whether the order item has been verified. 6. Check the items that are on your screen are the goods that have arrived. You are able to enter information into the following fields. Sup Code The supplier’s code for the particular item can be entered. Str The store the item will be added to. Qty Arv The quantity arrived. This is defaulted to the number ordered. Bonus Arv The quantity of stock that you are not paying for. e.g. if you have bought five and received two for free, you would enter two into the bonus arrived field. BC Lbl If you wish to print barcode labels for this item change to ‘U’, to print out labels with the unit price, ‘P’ to print out labels with the pack price or ‘N’ to print out no labels. 7. Once an item in HairlinkSQL has been checked against the supplier invoice place a tick in the verified box. This shows the user it has already been checked. 8. Add any extra items that may have arrived but were not on the order if required. You can use the down arrow on keyboard when you have selected the last item to add more products to the packing slip. You can also click on the red ‘+’ button. 9. Where the item did not arrive you may either enter zero in the ‘Qty Arv’ field or delete the line item. If you enter zero it will ask you whether you wish to place the product on back order when you click finish, or if you delete the line, it will ask you immediately if you wish to place the product on back order. NOTE: Back Orders are only used when an order has been converted to a packing slip. 10. When you say ‘Yes’ to back order, a new order will be created. You may convert this new order to a packing slip when the goods arrive, or you may convert it straight to an invoice, if the goods arrive with the invoice. 22 HAIRLINKSQL User Manual v4.5 Updated 01/05/2012 STOCK ORDERS Chapter 9 NOTE: You are not able to change any pricing information on the packing slip. The prices are there for reference only from the current prices on the product file. 11. Notes can be made in the bottom panel, which will be printed on the finished packing slip. 12. Choose the next action to perform from the buttons below a. The ‘F12: Finish’ button will complete the packing slip and the stock levels will be adjusted by the quantity arrived. If you have put the quantity arrived at zero for any items, you will now get the above prompt asking if you wish to place the product on back order. b. The ‘F7: Barcodes’ button allows you to make the barcodes for the products on your packing slip, if the ‘BC Lbl’ field was changed to ‘U’ or ‘P’. You will be prompted to print the barcodes when you finish the packing slip, or if you say ‘No’, you can open a ‘Product Record’, go to the ‘Stock’ tab, press the ‘Barcodes’ button and view/print/delete all barcodes from there. c. The ‘F8: Old’ button will bring up a search screen to search for open packing slips. The packing slip you were editing will be automatically saved and exited. d. The ‘F9: New’ button will open up a new packing slip. The packing slip you were on will be saved and exited. e. The ‘SF10: Cancel’ button cancels the packing slip. If the packing slip is generated from an order, it will allow you to convert the order again at a later stage. f. The ‘F11: Save/Exit’ button will save the packing slip and exit this function. The packing slip will be available again for editing from ‘Unfinished Packing Slips’. Returns You are unable to process a return based upon a packing slip, therefore, when trying to add a return, it will pop up a warning. If you wish to make a return, you will first need to finish your Packing Slip, then convert your Packing Slip to an Invoice. The Return will then have to be done from the Inwards Goods Menu. HAIRLINKSQL User Manual v4.5 Updated 01/05/2012 23 Chapter 9 STOCK ORDERS Viewing Packing Slip History This menu item allows you to look at any packing slip that has been previously created. 1. Click on ‘Creditors’ button. 2. Click on ‘Packing Slip’ and ‘Packing Slip History’. 3. You can now enter the packing slip number you wish to view. If you don’t know the packing slip number you can enter the supplier name to get a list of all packing slips for that supplier. 4. Alternatively, you can just click on ‘Browse’ and it will open up the first packing slip in HairlinkSQL and you can use the navigation buttons to scroll through them all. 5. When viewing packing slip history you have the option to ‘SF10 Cancel’ the packing slip if it is open or ‘F7 Barcodes’ to make barcodes for items required by clicking the corresponding buttons at the bottom of the form. Printing Barcode labels This menu item is self-explanatory. Choose to print the barcode labels that are in your queue. 24 HAIRLINKSQL User Manual v4.5 Updated 01/05/2012 STOCK ORDERS Chapter 9 INVOICES The inwards goods invoice is used to update the financial aspects of the purchase to the suppliers file as well as the product file. It can also update the stock levels if the supplier invoice is entered directly or converted from an invoice but not when converted from a packing slip. The diagram below describes the process flow of an Invoice. Fig. 9 - 11 HAIRLINKSQL User Manual v4.5 Updated 01/05/2012 25 Chapter 9 STOCK ORDERS Inwards Goods Search Function 1. Type in the inwards goods number, supplier name or supplier reference number and click on the ‘F12: Search’ button. 2. Choose the correct inwards goods invoice and click on the ‘F12: Accept’ button. 3. The inwards goods invoice will now open on the screen. Converting an Order to an Invoice If you have already entered an order for the goods that you are about to invoice, but you have not used a packing slip, you can convert the order to an invoice. This will eliminate the need to re-enter the items you have ordered. This option will update suppliers, product stock levels as well as product prices if changed. 1. Click on the ‘Creditors’ button 2. Click on the ‘Invoice’ button and ‘Convert Order to Invoice’. 3. When you click on this option, it will give you the order search screen. 4. The invoice form should now appear on the screen with the converted order. See section ‘Processing an Invoice’ more information on completing the invoice. Converting a Packing Slip to an Invoice If you have used a packing slip when the goods arrived you HAVE TO convert the packing slip to an invoice. This will avoid adjusting stock figures twice and will eliminate the need to re-enter the items you have received. 1. Click on the ‘Creditors’ button. 2. Click on the ‘Invoice’ button and ‘Convert Packing Slip to Invoice’. 3. When you click on this option an inwards goods search screen will pop up. Remember a packing slip uses the same number sequence as inwards goods invoices, so you can either select by packing slip number or you can search by supplier to bring up the required packing slip. 4. The system will then convert the ‘Packing Slip’ into an ‘Inwards Goods Invoice’. 5. The packing slip form should now appear on the screen. 26 HAIRLINKSQL User Manual v4.5 Updated 01/05/2012 STOCK ORDERS Chapter 9 How to Create a New Invoice If you have not created an order or used a packing slip when the goods arrived, you can use this option to create a new inwards goods invoice. 1. Click on the ‘Creditors’ button 2. Click on the ‘Invoice’ button and ‘New Invoice’. 3. When you click on this option, HairlinkSQL will give you the supplier search screen for you to select the supplier. Once you have selected the supplier it will display a blank purchase invoice. 4. The invoice form should now appear on the screen. Unfinished Invoices Use this menu item to find an invoice that you have started but not yet finished. 1. Click on the ‘Creditors’ button. 2. Click on the ‘Invoice’ button and select ‘Unfinished Invoice’. 3. You will be given the inwards goods search window. 4. Search for the inwards goods invoice. 5. A new inwards goods invoice will be displayed. NOTE: Invoices shown in your list in red are refunds. HAIRLINKSQL User Manual v4.5 Updated 01/05/2012 27 Chapter 9 STOCK ORDERS Processing an Invoice 1. Open the order you want to process. 2. Select your Staff ID. 3. The ‘To Pay’ field is a cross-checked total with the ‘Total’ at the bottom of the invoice. You can enter the total cost of the supplier invoice to make sure that you have keyed in all the correct quantities and prices on the invoice lines. If the ‘To Pay’ field does not match the ‘Total’, an error box will appear when you try to finish the invoice. You must then check to see where the totals are different; whether a product has been missed off the bill, if the GST figure is different, or simply if freight was left off. 4. Enter a ‘Supplier Reference’ for the invoice. This is usually the supplier’s invoice number, or a number/date that will ensure you will know how this invoice relates to the supplier’s invoice. 5. Enter the ‘Arv Date’, this is the date the goods arrived and this field will default to today’s date. You are able to change it but make sure that you don’t change it to a date in a closed off month. If you have converted from a packing slip it will use the packing slip date. 6. ‘Due Date’ is the date that payment for this invoice is due. This is an excellent tool when the supplier has agreed on a delayed payment date. 7. ‘Inv Num’ is the invoice number that is automatically generated by the system. 8. ‘Ord Num’ is the number of the order that is being converted. 9. If the supplier has combined two or more orders together in the invoice you can add another order to the HairlinkSQL invoice by clicking on the ‘SF6: Add Order’ button. 10. Sort the packing slip to match the supplier invoice. The current sort order is indicated by the fifth button, eg ‘Number’. Clicking on this button will allow you to change the sort order by Order number, Description or whether the order item has been verified 11. Check all of the items on the invoice, and make sure that this is exactly what you have received. Adjust the items if necessary. Check all fields relevant to each item, and add any information. 28 Sup Code The supplier code for the particular item may be added/changed. Str The store into which you are adding the item (for multi-store systems only). Qty Arv The quantity arrived. This defaults to the number ordered. If you enter less than the number ordered when finishing the invoice you will be prompted to see if you want to place items on back order. Bonus Arv Any bonus stock that may have arrived in addition to the goods (i.e. Stock that you have received, but are not going to pay for). List (Excl) This is the standard price given by the supplier to all clients, excluding GST. If you receive a discount from the supplier, this is the price is before the discount. This defaults to the list price from the product file. If you change the list price, the sell price HAIRLINKSQL User Manual v4.5 Updated 01/05/2012 STOCK ORDERS Chapter 9 will be updated using the current mark up. Buy (Excl) This is the actual price you pay from the supplier, excluding GST. It is the list price less any discount you get from the supplier. This defaults to what is currently on the product file. If you change the buy price because the supplier has charged you a different price, it will only adjust the average cost for this product for profit calculations. It will NOT affect the sell price in any way. Sell (Incl) This is the sell price for this item, including GST. It is usually calculated by multiplying the list price by the mark up set in the product file. If the sell price is changed here, it will adjust the mark up and retain the list price. If the sell price is set to 0 (zero), it will retain the original sell price in your product file. Note: Change the sell price to zero when your list price has changed, but you wish to retain the sell price. BC Lbl If you wish to print barcode labels for this item change to ‘U’ to create labels with the unit price on them, ‘P’ for labels with the pack price on them or ‘N’ if you do not wish to generate a label. This is defaulted from product file under the ‘More’ tab and ‘Generate Barcode for this Product’ – ‘U’, ‘P’ or ‘N’. Buy Size The number of units in a pack when purchasing. defaulted to the ‘Buy Size’ on the product file. Unit Sell The sell price for each ‘unit’. If the goods come in a pack of 100, this would be the cost of 1 of the 100 purchased. This is defaulted to the unit sell on the product file. This price includes GST. Total Buy The total cost of purchasing these items. Qty x Buy Price = Total Buy. This is 12. Once an item in HairlinkSQL has been checked against the supplier invoice place a tick in the verified box. This shows the user it has already been checked. 13. Add extra products if required for any extra items you have received. Where the item did not arrive you may either enter zero in the ‘Qty Arv’ field or you can delete the line item altogether. If you enter less than the number ordered when finishing the Invoice you will be prompted to see if you want to place the items on back order. 14. Notes can be made in the bottom panel which will be printed on the finished invoice. 15. The buttons at the bottom are used to take you to your next action required. a. F12: Finish - This button will complete the invoice. Supplier balances are updated, stock levels will be adjusted by the amount arrived, and pricing will be updated on the product file if you have made any changes. b. F7: Barcodes – This button allows you to make the barcodes for the products on your Invoice, if the ‘BC Lbl’ field was changed to ‘U’ or ‘P’. You will be prompted to print the barcodes when you finish the invoice, or if you say ‘No’, you can open a product record, go to the ‘Stock’ tab, press the ‘Barcodes’ button and view/print/delete all barcodes from there. c. SF10: Cancel – This button cancels the invoice. If the invoice is generated from an order, it will allow you to convert the order again at a later stage. HAIRLINKSQL User Manual v4.5 Updated 01/05/2012 29 Chapter 9 STOCK ORDERS d. F11: Save/Exit – This button will save the invoice and exit this function. The Invoice will be available again for editing from ‘Unfinished Invoices’. Fig. 9 - 12 30 HAIRLINKSQL User Manual v4.5 Updated 01/05/2012 STOCK ORDERS Chapter 9 Returns Use this menu item when you wish to return an item and do a supplier refund. There are two options under this menu – ‘New’ and ‘Use Old Invoice’. New This facility allows you to create a new ‘Refund Invoice’ for a supplier. When you click this option you get the supplier search. 1. Click on the ‘Creditors’ button. 2. Click on the ‘Invoice’ button, ‘Returns’ then ‘New’. 3. Select the supplier required and a ‘Refund Invoice’ will open that looks just like an ordinary invoice. 4. Enter the items you wish to refund and then ‘F12 Finish’ as you would for a regular inwards goods invoice. The supplier balance and stock levels will be adjusted as a negative figure (credit) and in some areas, like invoice history the return will display in red. Use Old Invoice This facility allows you to refund an invoice already created and finished. 1. Click on the ‘Creditors’ button. 2. Click on the ‘Invoice’ button, ‘Returns’ then ‘Use Old Invoice’. 3. When you click on this item you will get the inwards goods search to enable you to select a specific invoice. The entire invoice will then be displayed as a refund. 4. Review the items on the invoice, make any changes that you wish and then click ‘F12 Finish’ as you would for a normal invoice. The supplier balance and stock levels will be adjusted as a negative figure (credit) and in some areas will display in red. HAIRLINKSQL User Manual v4.5 Updated 01/05/2012 31 Chapter 9 STOCK ORDERS Viewing Invoice History This menu item allows you to look at any invoice that has been previously created. When you select this item it will give you the inwards goods search screen where you can enter the Invoice number you wish to view. If you don’t know the invoice number you can enter the supplier name to get the list of invoices for that supplier to select from or you can click ‘Browse’ and it will open up the first invoice ever made in your system and you can use the navigation buttons to view all the invoices. When viewing invoice history you have the option to ‘SF10 Cancel’ the invoice if it is open or ‘F7 Barcodes’ to make barcodes for the items required. Printing Barcode Labels This option will open the ‘Barcode Labels Maintenance’ window. It will list all the barcodes currently saved in your queue, allowing you to delete any barcodes that may have been saved accidentally. From here you can print all barcode labels that are in the queue. 32 HAIRLINKSQL User Manual v4.5 Updated 01/05/2012 STOCK ORDERS Chapter 9 PAYMENTS This section covers payments to be made for purchases and expenses. Payment Run This option is used when you wish to make multiple payments to suppliers who have outstanding amounts owed. 1. Click on the ‘Creditors’ button. 2. Click on ‘Payments’ button and then select ‘Payment Run’. 3. The ‘Payment Run’ Screen will open. Select the date range of outstanding invoices due. 4. Each supplier has a default payment method so tick the payment methods you wish to include in this payment run. If you select Direct Credit check to make sure the path for the output file is correct. This is a customisable feature that is preset in the ‘Setup’. 5. Click on the ‘F5 Extract Suppliers for Payment Run’ button to get the following screen: 6. This screen will have all the suppliers who have invoices due in the period selected and meet the payment method criteria selected. 7. You will now need to review each supplier and select which invoices you wish to include in this payment run. To do this you need to double click on the supplier to get a list of unpaid invoices. 8. If you wish to change the amount to be paid for a particular invoice in this run you can do so in the ‘Pay this Run’ field. Once you have checked the invoices and adjusted the amount to be paid this month click on ‘F12 OK’. 9. The corrected ‘Paying’ amount will be displayed on the payment line for that supplier. Continue the above process for all of the suppliers in the payment run. 10. When you have finished you may print (VERY HIGHLY RECOMMENDED) out the details or a summary of the run by using the ‘F6 Print Details’ or ‘F7 Print Summary’ buttons on the bottom of the form. (See Fig. 9 - 13 and Fig. 9 - 14, page 34) 11. When you are ready to complete the payment run, you must select the ‘Payment Date’ before clicking on ‘F12 Make/Print Payments’. The system will then create payments for all the suppliers included in the payment run and generate a report and/or output file depending on the payment method used. 12. Now click ‘F12 Finish’. 13. The suppliers’ account balances will be adjusted if the payment date was in the current period or before. If you have entered the payment date later than the current open period it will not be processed by the background processor until the End of Month. HAIRLINKSQL User Manual v4.5 Updated 01/05/2012 33 Chapter 9 STOCK ORDERS Fig. 9 - 13 Fig. 9 - 14 34 HAIRLINKSQL User Manual v4.5 Updated 01/05/2012 STOCK ORDERS Chapter 9 One off Payment If you wish to pay only one supplier you can use this ‘One Off Payment’ facility. 1. Click on the ‘Creditors’ button from the main menu. 2. Click on ‘Payments’ then ‘One Off Payment’. 3. Search for the supplier you wish to pay and a payment screen will open. 4. Select the date range of the invoices you wish to pay and click on ‘F5 Extract Invoices to Pay’ button and the form will be populated with the outstanding invoices for that supplier. 5. Review each invoice and adjust the ‘Pay This Run’ amount as required. Notice that if there are refunds you may incorporate these in the payment to reduce the amount to pay. 6. When you are happy with the payment details enter a ‘Payment Date’ and any payment reference details you wish. Now click on ‘F12 Make/Print Payment’. The system will generate a payment for this supplier and it will adjust the supplier balances. 7. You have the option to post the payment now or later. If you answer ‘Yes’ to this confirm prompt you will be passed automatically to the ‘Print/Post Payments ‘process. Should you answer ‘No’ you can do this at a later stage. Print/Post Payments This facility is used if you have chosen not to ‘Post Payments’ for the Direct Credit payment method, when using the ‘One Off Payment’ option. 1. Also if there is a problem with creating the output file in the payment run process the system will leave unfinished payments in here so you can post and print them manually. 2. Click on the ‘Creditors’ button from the main menu. 3. Click on ‘Payments’ then ‘Print / Post Payments’. 4. When you click on this menu item you will get the following screen. 5. The system will list the payments that need to be posted. You have the option of changing the name of the output file and can either click ‘F12: Post All’ or ‘F11: Post Selected One’. The system will then produce the output file specified and will post the payment transaction to update the creditors balances. HAIRLINKSQL User Manual v4.5 Updated 01/05/2012 35 Chapter 9 STOCK ORDERS Refund If you are required to reverse a payment to a supplier for any reason you can use the creditor refund payment option. 1. Click on the ‘Creditors’ button. 2. Click on ‘Payments’ then ‘Refund’. 3. If you click on this menu item you will be given the supplier search screen. Enter the supplier, then search for the payment you wish to refund. 4. Once you have selected the payment you wish to refund, the system will display the screen below. 5. You need to enter in your ‘Staff ID’ and change the ‘Pmt Date’ from the default of today if required. You are not able to edit the details on the refund. The system just reverses the original payment. 6. Click on ‘F12: Finish’ to finish the refund. You will be prompted with the option to print out the refund payment if you wish. 7. You have the option to post the payment now or later. If you answer ‘Yes’ to this confirm prompt you will be passed automatically to the Print/Post Payments process. Should you answer ‘No’ you can do this at a later stage. 8. The system will then adjust the creditor balances and update the Amount Paid on the original invoice so they will appear again in the next payment run. Printing a Payment Due Report This option produces a report that lists all supplier invoices that are due in the specified date range. This is useful to see what payments are overdue or what payments are coming up. 1. Click on the ‘Creditors’ button. 2. Click on ‘Payments’ and then ‘Payment Due Report’. 3. A filter screen will open. Choose the date range for the report and a supplier. You can choose ‘All’ for the supplier. 4. Click on the ‘Next’ button and on the following form you can choose to either print of preview the report. 36 HAIRLINKSQL User Manual v4.5 Updated 01/05/2012 STOCK ORDERS Chapter 9 Viewing Payment History This option allows you do access all payments that have been made on the system. 1. Click on the ‘Creditors’ button. 2. Click on ‘Payments’ then ‘Payments History’. 3. When you click this option you will be given a search screen that will allow you to enter the payment number to go to the payment directly. 4. If you don’t know the payment number you can enter the supplier details and click ‘F12’. 5. You will then be given a screen with the list of payments for that supplier from which you can choose the payment. 6. You can also click ‘Browse’ and navigate your way through the payments with the navigation buttons at the bottom of the form. HAIRLINKSQL User Manual v4.5 Updated 01/05/2012 37 Chapter 9 STOCK ORDERS EXPENSES Paying Expenses by Supplier 1. Click on the ‘Creditors’ button and then on ‘Expenses’. 2. From the menu select ‘Pay Expense By Suppliers’. 3. A supplier search form will now open. Search for the supplier you wish to pay. 4. A goods and services search form will now open. Search for the expense you wish to pay. 5. An inwards goods invoice will now open on screen. 6. Enter your Staff ID. 7. Enter a supplier reference for the expense invoice if you wish in the ‘Sup Ref’ field. You can leave this field blank. 8. Enter the date on the supplier invoice in the ‘Sup Inv Date’ field. This will default to today’s date. 9. Enter the date that payment is due by in the ‘Pmt Due Date’ field. 10. Insert any other items as required on the expense invoice. 11. Choose how you wish to pay the expenses by choosing the payment method I the ‘How Paid’ field. 12. Enter your own payment reference in the ‘Pmt Ref’ field. You can leave this field blank. 13. To make the payment now tick the ‘F6 Make Payment Now’ check box and the payment will be made on the date entered in the ‘Pmt Date’ field. If this box is not ticked the invoice will need to be paid using the payment run function. 14. When you are happy with the invoice you can click on ‘F12: Finish’ to complete the invoice ‘SF10 Cancel’ to cancel the invoice. NOTE: You cannot save an expense invoice. 38 HAIRLINKSQL User Manual v4.5 Updated 01/05/2012 STOCK ORDERS Chapter 9 Paying Expenses by Expense Code 1. Click on the ‘Creditors’ button and then on ‘Expenses’. 2. From the menu select ‘Pay By Expense Code’. 3. A product search form will now open. Search for the expense you wish to pay. 4. A supplier search form will now open. Search for the supplier you wish to pay. 5. An inwards goods invoice will now open on screen. 6. Enter your Staff ID. 7. Enter a supplier reference for the expense invoice if you wish in the ‘Sup Ref’ field. You can leave this field blank. 8. Enter the date on the supplier invoice in the ‘Sup Inv Date’ field. This will default to today’s date. 9. Enter the date that payment is due by in the ‘Pmt Due Date’ field. 10. Insert any other items as required on the expense invoice. 11. Choose how you wish to pay the expenses by choosing the payment method I the ‘How Paid’ field. 12. Enter your own payment reference in the ‘Pmt Ref’ field. You can leave this field blank. 13. To make the payment now tick the ‘F6 Make Payment Now’ check box and the payment will be made on the date entered in the ‘Pmt Date’ field. If this box is not ticked the invoice will need to be paid using the payment run function. 14. When you are happy with the invoice you can click on ‘F12: Finish’ to complete the invoice ‘SF10 Cancel’ to cancel the invoice. NOTE: You cannot save an expense invoice. How to Browse Expenses The browse expenses function will let you view all the expenses you have entered into the system. 1. Click on ‘Creditors’ | ‘Expenses’ button then select ‘Browse Expenses’. 2. The product record will open for the first expense you have entered into the system. 3. Use the blue scroll buttons at the bottom of the product record to scroll through each expense. Alternatively you can click on the ‘Table View’ button and it open a form listing all the expenses in your system. HAIRLINKSQL User Manual v4.5 Updated 01/05/2012 39