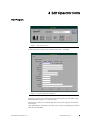
1
XtremeCT II User’s Guide Revision 2.4 TD-326 Rev. 2.4 / Date of Release June 16, 2015 © all rights reserved - SCANCO MEDICAL AG Fabrikweg 2 CH-8306 Bruettisellen Switzerland Content I Contact Information ................................................................................................ xi Manufacturer and Contact for Service or Support .................................................... xi Europe (Corporate Headquarter) ......................................................................... xi USA and Americas ...................................................................................................... xi II General Information ................................................................................................xii Purpose of this Document .................................................................................................. xii Typographic Conventions and Abbreviations ............................................................ xii Typographic Conventions ....................................................................................... xii Abbreviations .............................................................................................................. xii User’s Guide Updates .......................................................................................................... xii Target Group and Users Qualification ........................................................................... xii Intended Use ..........................................................................................................................xiii Software Licence Agreement ..........................................................................................xiii Transportation ........................................................................................................................xiii Installation, Reparation and Service ............................................................................. xiv Declaration of Conformity ................................................................................................. xv III Safety Information ................................................................................................... xvi User’s Responsibility ............................................................................................................. xvi First Usage .................................................................................................................... xvi Description of Warning Symbols ..................................................................................... xvi Labels Attached to the Equipment ..............................................................................xviii Labels on the Front of the Scanner: ...................................................................xviii Labels on the Back of the Scanner: ...................................................................xviii Electromagnetic Compatibility (EMC) .......................................................................... xix Active Implantable Devices and Body Worn Active Medical Devices .............. xx Background Radiation ........................................................................................................ xx 1 Start-up Procedure XtremeCT II ......................................................................1 Equipment .................................................................................................................................1 Turning On Equipment .........................................................................................................1 Starting Main Program XtremeCT II ...................................................................................2 2 Shutting Down XtremeCT II .................................................................................3 Exiting Main Program XtremeCT II ......................................................................................3 Shutdown of Computer ........................................................................................................4 Turning Off Equipment ..........................................................................................................5 XtremeCT II Version 2.4 ii 3 Program Overview .....................................................................................................6 4 Edit Operator Data ....................................................................................................7 Start Program ...........................................................................................................................7 Possibilities .................................................................................................................................8 Find ...................................................................................................................................8 Find Next .........................................................................................................................9 New ..................................................................................................................................9 Save/Update .................................................................................................................9 Exiting Operator Program ....................................................................................................9 5 Edit Patient Data ........................................................................................................10 Start Program .........................................................................................................................10 Possibilities ...............................................................................................................................11 Find .................................................................................................................................11 Find Next .......................................................................................................................12 New ................................................................................................................................12 Save/Update ...............................................................................................................12 Exiting Patient Program .......................................................................................................12 6 Measurements ..............................................................................................................14 Measurement Procedure ...................................................................................................14 Starting the Measurement Program ...............................................................................15 Selecting the Patient ...........................................................................................................16 Controlfiles (Measurement Protocol) .............................................................................17 Controlfile Types .........................................................................................................17 Selecting a Controlfile ..............................................................................................17 Creating a new Controlfile .....................................................................................18 Deleting a Controlfile ................................................................................................18 Locking a Controlfile .................................................................................................18 Modifying a Controlfile, Basic Mode ....................................................................18 Modifying a Controlfile, Advanced Mode ........................................................22 Precalibration .........................................................................................................................23 Positioning ...............................................................................................................................23 Scout-View ..............................................................................................................................23 General .........................................................................................................................23 Start- and End Position ..............................................................................................26 Angle ..............................................................................................................................26 Default Values .............................................................................................................26 100% [mm] ....................................................................................................................26 Start Scout-View .........................................................................................................26 Reference Line ............................................................................................................26 Print Scout-View ..........................................................................................................27 Save Scout-View ........................................................................................................27 OK ...................................................................................................................................27 Cancel ...........................................................................................................................27 Examples of Scout-View Modes ............................................................................28 Measurement .........................................................................................................................32 Start Measurement ....................................................................................................32 Cancel ...........................................................................................................................32 Patient Handling ...................................................................................................................32 Chair ...............................................................................................................................32 Cast ................................................................................................................................33 XtremeCT II Version 2.4 iii Reset .........................................................................................................................................37 7 Quality Control .............................................................................................................38 Phantom ..................................................................................................................................38 Daily Phantom Measurement (referred to as QC1) ..................................................38 Schedule .......................................................................................................................38 Mounting .......................................................................................................................38 Scanning .......................................................................................................................39 Evaluation .....................................................................................................................39 Determining the Reference Measurement ........................................................39 Weekly Phantom Measurement (referred to as QC2) ..............................................39 Schedule .......................................................................................................................39 Mounting .......................................................................................................................39 Scanning .......................................................................................................................39 Evaluation .....................................................................................................................39 Determining the Reference Measurement ........................................................39 Resolution phantom .............................................................................................................42 Schedule .......................................................................................................................42 Mounting .......................................................................................................................42 Scanning .......................................................................................................................42 Evaluation .....................................................................................................................42 Slice Sensitivity Profile Phantom ........................................................................................43 Schedule .......................................................................................................................43 Mounting .......................................................................................................................43 Scanning .......................................................................................................................43 Evaluation .....................................................................................................................44 Low Contrast Phantom .......................................................................................................45 Schedule .......................................................................................................................46 Mounting .......................................................................................................................46 Scanning .......................................................................................................................46 Evaluation .....................................................................................................................46 8 Evaluation .........................................................................................................................48 General ....................................................................................................................................48 Starting the Evaluation Program ......................................................................................48 Overview .................................................................................................................................48 Standard Patient Evaluation Overview .........................................................................50 Selection of Patient and Measurement ........................................................................52 Selection of Non-Archived Measurements ........................................................52 Selection of Measurements already Archived (Saved) ................................52 Load/Save Contours .................................................................................................53 Print/Save Images ......................................................................................................53 Header information ...................................................................................................54 Zoom ..............................................................................................................................54 Brightness Scaling .......................................................................................................54 Defining the ROI or VOI .......................................................................................................56 Drawing Icons ..............................................................................................................56 Drawing Contours ......................................................................................................56 Modifying Contours ...................................................................................................57 Moving/Scaling Objects ..........................................................................................57 Selecting Objects .......................................................................................................57 Deleting Graphical Objects ...................................................................................57 Copy/Cut/Paste/Replace Objects ......................................................................57 Creating a Volume of Interest ..........................................................................................58 Automatic Contouring .............................................................................................58 Range Selection .........................................................................................................59 Breakpoint (BP) ...........................................................................................................59 XtremeCT II Version 2.4 iv Global Scaling .............................................................................................................59 Delete ............................................................................................................................59 Invert ..............................................................................................................................59 Morphing ......................................................................................................................59 Color Coding in Image Selection Area ..............................................................60 Morphing Sequence Overview .............................................................................60 Evaluation 2D .........................................................................................................................62 ROI Selection ...............................................................................................................62 Segmentation ..............................................................................................................63 Printing out of the 2D-Histomorphometry Window ..........................................63 Starting Evaluation .....................................................................................................63 Evaluation 3D .........................................................................................................................64 Selecting an Evaluation Task ..................................................................................64 Defining VOI .................................................................................................................64 Segmentation ..............................................................................................................64 Starting Evaluation .....................................................................................................65 Advanced: Modifying Evaluation Scripts ...........................................................66 Importing Evaluation Scripts ...................................................................................66 Distance 3D ............................................................................................................................67 Print Images ............................................................................................................................68 Pointer/Ruler/Profile/Angle Tools .....................................................................................69 Pointer/Ruler/Profile/Angle Tools ...........................................................................69 9 3D-Display .........................................................................................................................70 Starting the 3D-Display Program ......................................................................................70 General 3D-Scene ................................................................................................................71 Selecting the Sample and the Measurement .............................................................71 Start/Stop .................................................................................................................................72 Visual Effects ...........................................................................................................................72 Observer .......................................................................................................................72 Light Source .................................................................................................................73 Other Effects ................................................................................................................73 Cutplane .......................................................................................................................74 Subdim ...........................................................................................................................74 Mode ..............................................................................................................................74 Object Values .............................................................................................................74 Object Properties .......................................................................................................75 Color Mixing .................................................................................................................77 Printing of 3D-Scenes ...........................................................................................................78 Calculating Animated 3D-Sequences ...........................................................................78 Presets ............................................................................................................................79 10 Data Management .................................................................................................81 Overview .................................................................................................................................81 Starting Program ...................................................................................................................81 Archiving / Deleting/Backup Data .................................................................................82 Selecting the Measurement ...................................................................................82 Selecting the File Type ..............................................................................................83 Selecting the Destination Device .........................................................................84 Selecting the Copy/Move Operation .................................................................84 Starting the Move/Copy Function ........................................................................85 Backup .....................................................................................................................................85 Operating System Backup ......................................................................................86 Device-Information ....................................................................................................87 Initialize ..........................................................................................................................87 Mount/Dismount ...................................................................................................................88 XtremeCT II Version 2.4 v 11 DECterm Based Programs .................................................................................89 General Guidelines ..............................................................................................................89 Reconstruction .......................................................................................................................89 IPL (Image Processing Language) ..................................................................................90 help .................................................................................................................................90 quit ..................................................................................................................................90 list .....................................................................................................................................90 read ................................................................................................................................91 aim_read ......................................................................................................................91 isq_to_aim .....................................................................................................................91 write ................................................................................................................................91 delete ............................................................................................................................91 examine ........................................................................................................................91 sup_divide ....................................................................................................................92 sub_get ..........................................................................................................................92 sub_pick ........................................................................................................................92 gauss_lp .........................................................................................................................93 threshold .......................................................................................................................93 gauss_seg and seg_gauss .......................................................................................93 adaptive_threshold ...................................................................................................93 fft_laplace_hamming ...............................................................................................94 norm_max .....................................................................................................................94 gobj_maskaimpeel_ow ............................................................................................94 cortex_maskoff ...........................................................................................................95 gobj_to_aim .................................................................................................................95 cut2d_shape_ow .......................................................................................................95 cl_ow_rank_extract ...................................................................................................96 cl_rank_extract ...........................................................................................................96 cl26_rank_extract .......................................................................................................96 cl_extract ......................................................................................................................96 cl_nr_extract ................................................................................................................96 cl_image .......................................................................................................................97 db_scanco_activate ................................................................................................97 tri_da_metric_db ........................................................................................................97 dt_object_param .......................................................................................................97 dt_background_param ...........................................................................................98 dt_mat_param ............................................................................................................98 dt_mat_output ............................................................................................................99 connectivity .................................................................................................................99 conn_nocl ....................................................................................................................99 conn_bgcl ....................................................................................................................99 voxgobj_scanco_param .......................................................................................100 vox_scanco_param ................................................................................................100 mil_param ...................................................................................................................100 milv1_param ..............................................................................................................100 histo ..............................................................................................................................100 scale_elsize .................................................................................................................101 ipscale_elsize .............................................................................................................101 noipscale_elsize ........................................................................................................101 scale_ow_elsize_noip ..............................................................................................102 set_value .....................................................................................................................102 concat .........................................................................................................................102 join_uncompress .......................................................................................................103 bounding_box_cut ..................................................................................................103 flip_aim ........................................................................................................................103 offset_add ..................................................................................................................103 offset_set .....................................................................................................................103 clear_offset ................................................................................................................104 fill_offset_mirror ..........................................................................................................104 convert_to_type .......................................................................................................104 xray ...............................................................................................................................104 msq_from_aim ...........................................................................................................104 XtremeCT II Version 2.4 vi from_aim_to_isq ........................................................................................................104 UCT_THREEDEE_BATCH ......................................................................................................105 Filename .....................................................................................................................105 PrintFilename .............................................................................................................105 Ambient ......................................................................................................................105 Shading .......................................................................................................................105 Size ................................................................................................................................105 Elevation/Rotation ...................................................................................................105 Copies ..........................................................................................................................105 UPAT_LIST ................................................................................................................................105 UCT_LIST ..................................................................................................................................106 WRITE_INFO ...........................................................................................................................106 12 Error Messages ............................................................................................................107 Appendix A Additional Information ............................................................................................110 Mouse Operation ................................................................................................................110 Elements of the Graphical User Interface ...................................................................110 Window / Dialog Box ..............................................................................................110 Push-Button ................................................................................................................110 Toggle-Button ............................................................................................................110 Radio-Button ..............................................................................................................110 Text-Field .....................................................................................................................110 Scroll-Bar .....................................................................................................................110 Option-Menu .............................................................................................................111 Pull-down-Menu ........................................................................................................111 Scaler ...........................................................................................................................111 Input / Change of the Header and Footer of the Print-Out .................................111 Appendix B Files Used and Created by MicroCT ...........................................................112 Directory Structure ..............................................................................................................112 [MICROCT] .................................................................................................................112 [MICROCT.DATA.SSSSSSSS.MMMMMMMM] .....................................................112 [MICROCT.DATA.SCOUTS] .....................................................................................113 [MICROCT.DATABASE] ............................................................................................113 [MICROCT.MAIN] ......................................................................................................113 [MICROCT.RESULTS] .................................................................................................113 [MICROCT.SCRATCH] ..............................................................................................113 [MICROCT.TIPS] .........................................................................................................113 [MICROCT.UIL] ...........................................................................................................113 [MICROCT.UTIL] .........................................................................................................113 [MICROCT.XDEFAULTS] ...........................................................................................113 Appendix C Logicals and Symbols ..............................................................................................114 Definition of Logicals and Symbols ...............................................................................114 Logicals ..................................................................................................................................115 Symbols .................................................................................................................................116 Appendix D 3D-Batch Evaluation XtremeCT II Version 2.4 .................................................................................................117 vii Batch Procedure .................................................................................................................117 Checking Status and Progress of Batch Jobs ............................................................117 Appendix E Explanation of Structural Indices ....................................................................118 MIL Method ...........................................................................................................................118 TRI Method ............................................................................................................................118 Connectivity Density ..........................................................................................................118 Structure Model Index .......................................................................................................119 Distance Transformation Methods ................................................................................119 Appendix F Checklists ............................................................................................................................120 Checklist for Measurements ............................................................................................120 Checklist for Evaluation ....................................................................................................120 Checklist for Shutdown .....................................................................................................120 Appendix G Specifications .................................................................................................................121 Operational Conditions ....................................................................................................121 Transport Conditions ..........................................................................................................121 Classification ........................................................................................................................121 Manufacturer Declaration of Conformity ...................................................................121 Specs for the XtremeCT II .................................................................................................122 Appendix H Glossary .................................................................................................................................124 Archive ........................................................................................................................124 Artifact .........................................................................................................................124 Backup ........................................................................................................................124 CT ..................................................................................................................................124 File .................................................................................................................................124 Harddisk .......................................................................................................................124 LUT (Look-Up-Table) .................................................................................................124 Optical Disk ................................................................................................................124 ROI ................................................................................................................................124 Scanner .......................................................................................................................124 Scout, Scout-View ....................................................................................................124 Shutdown ....................................................................................................................124 VOI ................................................................................................................................124 Zoom ............................................................................................................................124 Appendix I Preventive Maintenance ........................................................................................125 General ..................................................................................................................................125 Maintenance .............................................................................................................125 Accomplishment of Maintenance .....................................................................125 Maintenance Plan ..............................................................................................................125 Spare Parts ............................................................................................................................126 Disposal ..................................................................................................................................126 Cleaning ................................................................................................................................126 Equipment and Chair .............................................................................................126 XtremeCT II Version 2.4 viii Patient support ..........................................................................................................127 Contact Information for Service and Maintenance ...............................................128 Appendix J Site Planning and Installation .............................................................................129 Site Planning .........................................................................................................................129 Positioning of the Equipment ...............................................................................129 Electrical Installation ...............................................................................................130 Network Connections .............................................................................................131 Telephone ..................................................................................................................131 Miscellaneous ............................................................................................................131 Transportation ......................................................................................................................131 At the Loading Dock ...............................................................................................131 From the Loading Dock to the Final Room ......................................................132 Dimensions and Weights ..................................................................................................133 Dimensions .................................................................................................................133 Weights ........................................................................................................................133 Power Consumption/Heat Generation .......................................................................133 .......................................................................................................................................133 Installation .............................................................................................................................134 Personnel Qualification ..........................................................................................134 Checklist for Site Planning ................................................................................................135 Appendix K Radiation Safety ............................................................................................................136 Dose Statements .................................................................................................................136 PMMA Phantom .......................................................................................................136 Computed Tomography Dose Index (CTDI) ...................................................136 Effective Dose ...........................................................................................................137 Dose and Sensitivity Profile ....................................................................................137 System Performance ...............................................................................................138 Stray Radiation ..........................................................................................................139 Stray Radiation given in Air KERMA per Units ..................................................140 Stray Radiation given in Ambient Dose Equivalent per Measurement ..141 Appendix L Product Views, Indicators and Accessories .........................................143 Views .......................................................................................................................................143 Front ..............................................................................................................................143 Rear ..............................................................................................................................143 Indicators ...............................................................................................................................144 Safety Precautions ..............................................................................................................145 Radiation Protection Dosimeter ..........................................................................145 System Changes .......................................................................................................145 Accessories ...........................................................................................................................146 Appendix M SOPs ........................................................................................................................................147 SOP; Quality Control (daily and weekly) .....................................................................147 Goal ..............................................................................................................................147 Personnel ....................................................................................................................147 Tasks ..............................................................................................................................147 SOP; Scanning .....................................................................................................................148 Goal ..............................................................................................................................148 XtremeCT II Version 2.4 ix Personnel ....................................................................................................................148 Time Frame .................................................................................................................148 Tasks ..............................................................................................................................148 SOP; Evaluation ...................................................................................................................151 Goal ..............................................................................................................................151 Personnel ....................................................................................................................151 Time Frame .................................................................................................................151 Tasks ..............................................................................................................................151 SOP; Archiving .....................................................................................................................153 Goal ..............................................................................................................................153 Personnel ....................................................................................................................153 Time Frame .................................................................................................................153 Tasks ..............................................................................................................................153 Appendix N Warranty ..............................................................................................................................154 Manufacturer Declaration of Conformity ........................................................155 XtremeCT II Version 2.4 x I Contact Information Manufacturer and Contact for Service or Support Europe (Corporate Headquarter) SCANCO Medical AG Fabrikweg 2 CH-8306 Bruettisellen Switzerland Telephone Telefax URL e-mail general e-mail support e-mail sales +41-(0)44-805 98 00 +41-(0)44-805 98 01 www.scanco.ch [email protected] [email protected] [email protected] USA and Americas Scanco USA, Inc. 985 Old Eagle School Road Suite 511 Wayne, PA 19087 U.S.A.Telephone Telefax XtremeCT II Version 2.4 +1 (610) 688 14 40 +1 (610) 688 49 76 Contact Information xi II General Information Purpose of this Document The purpose of these instructions is to inform the user about the technical functioning of the equipment for the intended purpose, its safe operation, adjustment and user based maintenance. All the equipment manufactured and supplied by SCANCO MEDICAL AG has been tested and examined to ensure as far as reasonably practicable, that it is safe and without undue risk to the health when properly used. The condition under which our equipment will operate safely and without undue risk to health are specified in this User’s Manual and users should ensure that they fully understand the technical conditions regarding safe operating of the equipment and are conversant with and observe regulations and codes of practice which relate to X-Ray equipment. It is also the duty of the employer to ensure that this employees fully understand the regulation and operating instructions. Typographic Conventions and Abbreviations Typographic Conventions Within this manual special text formates will appear. Below you find the formate related meanings: Action performed by the operator Text which is entered by keyboard SOFTWARE BUTTONS ON THE COMPUTER SCREEN Cross references Hyper links Abbreviations • MB1: Mouse Button 1 - i.e. left Mouse button • MB2: Mouse Button 2 - i.e. middle Mouse button • MB3: Mouse Button 3 - i.e. right Mouse button User’s Guide Updates The latest release of this document may be obtained contacting SCANCO MEDICAL AG (See “Manufacturer and Contact for Service or Support” on page xi). Target Group and Users Qualification These instructions are intended for users who have been instructed by SCANCO MEDICAL AG or their authorized representatives. This equipment must be handled only by qualified people and in accordance with the operating instruction. Only trained and qualified personnel should have access to the equipment. XtremeCT II Version 2.4 General Information xii Intended Use Europe This computed tomography system is designed to measure the bone density and quantify the three-dimensional micro architecture of the bone at the human extremities. The equipment will be used in the diagnosis and treatment monitoring of osteoporosis. Canada This computed tomography system is designed to measure the bone density and quantify the three-dimensional micro architecture of the bone at the human extremities. The equipment will be used as adjunct to conventional methods for the diagnosis of osteoporosis and as treatment monitoring of osteoporosis. Contraindications Unborn children are particularly sensitive to X-rays. Even if the stray radiation of the XtremeCT II is very low, in general the measurement of pregnant women should be postponed. The result of a measurement will be affected if a high attenuating object, such as an implant, watch or jewelry is within the measurement area. If a fracture or an implant is in the planned measurement area, the contra lateral side should be evaluated. Radionuclides could influence the results. Therefore, before measuring a patient with incorporated radionuclides, the activity of these radionuclides and its effect to the result should be evaluated. Abuse The equipment is not intended and must not be used for whole body CT-measurements of infants. The equipment is not designed for emergency situations nor for life support. The equipment is not suitable for use in presence of a flammable anaesthetic mixture with air and oxygen or nitrous oxide. Software Licence Agreement The software described in this document is a part of the XtremeCT II and may not be copied onto a computer other than that delivered with the equipment. The operating system software OpenVMS/DECwindows Motif is licensed for this computer only, and may only be copied for safeguarding purposes! Transportation Crate Your equipment was delivered in a specially designed crate. This crate ensures, that your equipment is protected against physical damages while transportation. Please retain the material in case, the equipment should be moved for any reason. Please contact SCANCO MEDICAL AG for any relocation of the equipment. Transportation Locks For avoiding damages due to rough handling while transportation, special means must be taken. Please refer to the separate shipping instructions provided by SCANCO MEDICAL AG. XtremeCT II Version 2.4 General Information xiii Installation, Reparation and Service The system should only be installed and repaired by a trained and authorized person. Only authorized persons are allowed to service the system. Disclaimer SCANCO MEDICAL AG will not accept any claims for compensation for any damages incurred in connection with this equipment and software. SCANCO MEDICAL AG will not be liable for technical or editorial errors or omissions contained herein; nor for incidental or consequential damages resulting from the furnishing or use of this material. XtremeCT II Version 2.4 General Information xiv Declaration of Conformity With the CE mark SCANCO MEDICAL AG confirms compliance with the European directives stated below: Figure II-1 Declaration of conformity XtremeCT II Version 2.4 General Information xv III Safety Information THE FOLLOWING SAFETY INFORMATION APPEARS WITHIN THE USER’S GUIDE. READ THEM CAREFULLY BEFORE OPERATING THE UNIT AND FOLLOW THE INSTRUCTIONS. User’s Responsibility The user is obliged to read the following safety instructions before operating the equipment. The safety of both patient and operator was a major consideration in the design and manufacturing of this equipment. The equipment will function reliably when operated, maintained, and repaired according to the instructions in this manual. Misuse, however, could result in hazards to patient, operator and/or equipment. The unit should be carefully operated and the phantom measurement must be performed according the interval and procedure described in the chapter Preventive Maintenance. Operating system parameters may only be changed by an authorized person. First Usage Before the unit is first used, the Manufacturer or their official agent shall: - have fully tested the unit in the position in which it is to be used - have given full operational instructions for the unit to a responsible person. Description of Warning Symbols Following warning symbols are used within this user’s guide: XtremeCT II Version 2.4 WARNING! X-Rays may be present. Failure to observe this warning may result in personal injury. WARNING! Risk of electrical shock! Failure to observe this warning may result in personal injury, death, or equipment damage. WARNING! To avoid the risk of electrical shock, this equipment must only be connected to a supply mains with protective earth. Safety Information xvi WARNING! Laser light present! Do not stare directly into the laser beam! Caution! This symbol defines equipment or operator related information. Disregarding these information may result in personal injury or may lead to damage to equipment or loss of data. Note XtremeCT II Version 2.4 This symbol defines information, which requires elevated operator attention. Safety Information xvii Labels Attached to the Equipment Labels on the Front of the Scanner: Figure III-2 Caution X-Rays and Laser Figure III-3 Refer to User’s Guide Labels on the Back of the Scanner: Figure III-4 Caution X-Rays XtremeCT II Version 2.4 Safety Information xviii Figure III-5 Type Plate Electromagnetic Compatibility (EMC) This equipment has been tested and found to comply with the EMC limits for the Medical Device Directive 93/42/EEC (EN 55011 Class A and EN 606011-2). These limits are designed to provide reasonable protection against harmful interference in a typical medical installation. The equipment generates uses and can radiate radio frequency energy and, if not installed and used in accordance with these instructions, may cause harmful interference to other devices in the vicinity. However, there is no guarantee that interference will not occur in a particular installation. If this equipment does cause harmful interference with other devices, which can be determined by turning the equipment off and on, the user is encouraged to try to correct the interference by one or more of the following measures: • Reorient or relocate the receiving device • Increase the separation between the equipment • Connect the equipment into an outlet on a circuit different from that to which the other device(s) is connected • Consult the manufacturer XtremeCT II Version 2.4 Safety Information xix Active Implantable Devices and Body Worn Active Medical Devices Please be aware of the potential detrimental interaction of the X-rays with active implantable devices and body worn active medical devices. If a patient is wearing an active implantable device or a body worn active medical device in the region of interest or close to it, please check with the manufacturer of the device. Background Radiation The detector of the XtremeCT II is sensitive to X-rays and gamma rays. Therefore the equipment might be influenced by external X-ray or gamma ray sources. Please make sure that the background radiation does not exceed 10 µSv/h. XtremeCT II Version 2.4 Safety Information xx 1 Start-up Procedure XtremeCT II Equipment 1. Scanner 2. Workstation - computer, monitor, mouse and keyboard should be kept outside the patient environment and not be touched while touching the patient. 3. Casts - left arm cast, right arm cast, foot cast. 4. Phantom - KP70. Turning On Equipment 1. Turn the main switch (back side) and the turn the capture key (front top).The power on lamp lights up (front top). 2. Turn on peripheral devices such as optical disc drive, tape and printers. 3. Turn on computer and monitor. 1 Figure 1. Turning On Equipment It takes about 5 minutes before your computer is ready to start. Note XtremeCT II Version 2.4 The scanner must be switched on for at least 30 minutes before starting a measurement (warm-up of X-ray tube). Start-up Procedure XtremeCT II 1 Starting Main Program XtremeCT II Enter MICROCT as USERNAME and press the RETURN key. Then enter the required password and press the RETURN key again or click on the OK button. Figure 2. Login-Box XtremeCT II Version 2.4 Start-up Procedure XtremeCT II 2 2 Shutting Down XtremeCT II Exiting Main Program XtremeCT II To exit the control box click on the EXIT button with MB1: Figure 3. Exiting Main Program XtremeCT II To exit completely, click on the SESSION menu and select END SESSION in the Session Manager . Figure 4. Exiting the Session. XtremeCT II Version 2.4 Shutting Down XtremeCT II 3 Shutdown of Computer Enter SHUTDOWN as USERNAME and click on OK with MB1. Figure 5. Login-Box for Shutdown The computer closes all databases and programs, so that you can use all the programs again without problems the next time. Note XtremeCT II Version 2.4 Never switch the computer off without performing a correct SHUTDOWN! Only in this way it can be guaranteed that all data can be read again without problems. Shutting Down XtremeCT II 4 Wait approximately one minute, and then you can turn off the equipment as follows: Turning Off Equipment 1. 2. 3. 4. 5. XtremeCT II Version 2.4 Monitor Computer Optical disk and/or tape Printer Scanner Shutting Down XtremeCT II 5 3 Program Overview Figure 6. Control Box With the program MicroCT, the following can be done: 1. 2. 3. 4. Record or Change Operator Data (Editing). Record or Change Patient Data (Editing). Perform Measurements Evaluate Measurements • • • • Slicewise Evaluation 2D-Histomorphometry 3D-Histomorphometry Image Documentation 5. 3D-Display and 3D-Documentation 6. Data-Management • Archive/Delete Measurement Data • Weekly Database Backup 7. Exit XtremeCT II Main Program XtremeCT II Version 2.4 Program Overview 6 4 Edit Operator Data Start Program Figure 7. Edit Operator Data In the main menu click on the framed button EDIT... with MB1. Figure 8. Operator Registration Program Enter the operator data. Each field can be selected directly with MB1, using the RETURN key brings you to the next field. The operator number is automatically allocated by the program and cannot be changed. Upon finishing the data input, the data can be saved by clicking the SAVE/UPDATE button with MB1. XtremeCT II Version 2.4 Edit Operator Data 7 Note For a measurement, the program requires at least a name. The data can, however, be completed or changed at any time (i.e. address change, change of name because of marriage, etc.) by using FIND..., changing the data and then finally using UPDATE. Possibilities Find The following data window appears after clicking the FIND... button: Figure 9. Find Operator Click the data input field with MB1 and fill it in as required. Confirm your input by clicking the OK button. Upon entry of a number or of the complete entry of the operator’s name, the data will appear in the fields. If only the first few letters of a name are entered, then a list showing all operators starting with these letters will appear. Thus, if "J" is entered, the list will show all operators whose name starts with J, such as Joe Public, John Doe, etc. Figure 10. Select Operator Click on the desired name with MB1, and confirm the entry by clicking OK. XtremeCT II Version 2.4 Edit Operator Data 8 The following window appears if your entry does not exist in the database. Figure 11. Operator not Found The possibility now exists of changing or completing data. Always use the same spelling! Find Next By clicking the FIND NEXT button, the next operator in alphabetical or numerical search order will appear, depending on whether you entered the operators name or number while using FIND... New If you click on the NEW button, all fields become free, to enable a new operator data to be entered. Save/Update If you click on the SAVE button (labeled UPDATE in modifying mode), all input data for this operator will be saved/updated. Exiting Operator Program Click on the FILE button followed by either QUIT or EXIT. This will lead you back to the main menu. Using EXIT, any changes will be automatically saved, whereas with QUIT you can return to the main menu without saving the edited data. Figure 12. Exit Operator Program Note XtremeCT II Version 2.4 Always use the same spelling because the program is case sensitive! Edit Operator Data 9 5 Edit Patient Data Before starting a scan, a Patient number must be given to each Patient and a unique Patient number is assigned automatically. This number is the key to access all scan data and evaluation results concerning this patient. Start Program Edit Patient data by selecting the framed button. Figure 13. Edit Patient Data In the main menu click on the framed button with MB1. Figure 14. Patient Registration Program Enter the patient data. Each field can be selected directly with MB1; using RETURN brings you to the next field. The patient number is automatically allocated by the program and cannot be changed. XtremeCT II Version 2.4 Edit Patient Data 10 Upon finishing the data input, the data can be saved by clicking the SAVE button with MB1. Note For a measurement, the program requires at least a name. The data can, however, be completed or changed at any time by using FIND..., changing the data and then finally using UPDATE. Possibilities Find The following data window appears after clicking the FIND... button. Figure 15. Find Patient Click the data input field with MB1 and fill it in as required. Confirm your input by clicking the OK button. Upon entry of a number or of the complete entry of the patient’s name, the data will appear in the fields. If only the first few letters of a name are entered, then a list showing all patients starting with these letters will appear. Thus, if "J" is entered, the list will show all operators whose name starts with J, such as Joe Public, John Doe, etc. Figure 16. Select Patient XtremeCT II Version 2.4 Edit Patient Data 11 Click on the desired name with MB1, and confirm the entry by clicking OK. Note Always use the same spelling because the program is case sensitive! The following window appears if your entry does not exist in the database. Figure 17. Keyword not Found The possibility now exists of changing or completing data. Always use the same spelling! Find Next By clicking the FIND NEXT button, the next patient in alphabetical or numerical search order will appear, depending on whether you entered the patients name or number while using FIND... New If you click on the NEW button, all fields become free, to enable a new patient data to be entered. Save/Update If you click on the SAVE button (labeled UPDATE in modifying mode), all input data for this patient will be saved/updated. Exiting Patient Program Click on the FILE button followed by either QUIT or EXIT. This will lead you back to the main menu. Using EXIT, any changes will be automatically saved, whereas with QUIT you can return to the main menu without saving the edited data. XtremeCT II Version 2.4 Edit Patient Data 12 Figure 18. Exiting Patient Program XtremeCT II Version 2.4 Edit Patient Data 13 6 Measurements Measurement Procedure For a single scan, the general procedure to keep in mind is: • • • • Precalibrate Position patient Scout View Scan Detailed Procedure The following detailed procedure addresses the case of a standard scan protocol at 61µm, for the distal radius and tibia. In case of different protocol, some adaption may be needed. 1. Welcome the patient, give him/her initial information about the scanning operation a Explain the examination, scan procedure and duration. b Stress on the importance of stillness, no talking during scan. c Ask for dominant limb, non-dominant limb is usually scanned d Ask for fracture history, if non-dominant side had a fracture, scan the opposite limb e Ask to remove watch or bracelet that may cover the wrist. 2. Create or call the patient record in the Measurement Program 3. Prepare the patient for scan. Have the patient sit in the chair and set the limb in cast. a Radius positioning: Move out the armrest if possible b Tibia positioning: Lift the chair with the patient sitting on it 4. Select the appropriate control file, Radius/Tibia and Left/Right. 5. Check for the slider position: It must be completely out. 6. Precalibrate the scanner (This starts a 15 min timer). The patient should not be in front of the scanner at that time. 7. Approach the chair in front of the scanner. Attach the cast to the front hitch. 8. Slide the patient/chair inside the scanner. Ask for his/her comfort, try a few different position to find the most comfortable position. a Move the chair slightly back and forth b Radius: Rotate the chair, to find the most comfortable angle for the shoulder opening. c Tibia: Align the chair, facing the scanner d The backrest can move backwards, if the patient likes to lay back e Have the head of the patient laid on the back rest. A pillow may help here. 9. Perform Scout View to set the reference line. If necessary, enlarge the Scout View range to display fully the joint where the reference line will be set. 10.Scan 11.Wait for the scan preview to check on Motion Artifacts. a If there are Motion Artifacts, propose the patient to repeat scanning. Repeat #9 and #10: Scout View, Scan.* XtremeCT II Version 2.4 Measurements 14 b If there are no Motion Artifacts, take patient out of the scanner. Note The Precalibration starts a 15 min timer. It is NOT the maximum time you have to do your entire scan examination. It is only the time within which we consider the applied correction to be valid. The program will force you to Precalibrate again when time is out. Note Check on the Precalibration timer before doing a Scout View. If the timer is low (less than 2 minutes for example), Precalibrate again. This is to avoid the Precalibration timeout happening between the Scout View and Scan action. In this case you will be forced to take the patient out from the scanner, precalibrate, take the patient in again, and redo the Scout View. Note Do not repeat scanning the exact same site more than 3 times. Starting the Measurement Program To start the measurement program, you must first enter your name in the field OPERATOR. Then, on the main menu, select the icon with the scanner symbol by clicking on it with MB1: Figure 19. Start Measurement XtremeCT II Version 2.4 Measurements 15 The main window of the measurement program will open. Figure 20. Main Program Screen Selecting the Patient In the middle of your screen, the following input window appears: Figure 21. Input of Patient’s Name or Number Click on the input field and fill it in accordingly. Confirm your input by clicking the OK button. Note XtremeCT II Version 2.4 The program is case sensitive! Measurements 16 As in the patient registration program, a list now appears of all patients who correspond to your entry. Click on the patient that you require in the list and confirm with OK. If the desired name cannot be found in the database, the following question will appear: Figure 22. Confirmation You should now click on YES if you wish to enter the patient. The input page of the patient registration program appears See “Patient Registration Program” on page 10. Enter the corresponding data See “Edit Patient Data” on page 10. After you have chosen or entered a patient, the main measurement window appears. If the patient is not being measured for the first time, its earlier measurements will be displayed, with date and number of slices performed. Controlfiles (Measurement Protocol) Controlfile Types There are two types of controlfiles: • System-Defined (with fixed measurement protocols) • User-Defined types (can be altered by user) The system-defined controlfiles for patient- and quality control measurements should be used for patient- and quality control measurements. Selecting a Controlfile Select the correct measurement protocol (Controlfile) by clicking on one item of the list using MB1. Figure 23. Selecting a Controlfile XtremeCT II Version 2.4 Measurements 17 After the controlfile is selected, you can pre-calibrate the system be clicking PRECALIBRATION. Creating a new Controlfile If you want to define a new controlfile, click on NEW... and the controlfile definition box appears. For details on how to create a controlfile see “Modifying a Controlfile, Basic Mode” p. 18. Deleting a Controlfile If you have selected a user-defined controlfile, you can delete it by clicking on DELETE... You have to confirm the deletion of a controlfile. The controlfile is not actually deleted, but marked as invalid and does no longer appear in the list of controlfiles. Locking a Controlfile If you have created or modified a user-defined controlfile, you can lock it (change its type to system-defined) and hereby prevent its further modifications or deletion. Click on LOCK... for this purpose and confirm your action. Modifying a Controlfile, Basic Mode SCANCO MEDICAL AG recommends to use the system-defined controlfiles for patient- and quality control measurements. For other measurements you can alter its protocol before starting the measurements by clicking on MODIFY... : Figure 24. Modifying a Controlfile XtremeCT II Version 2.4 Measurements 18 Figure 25. Scout-View Explanation: 1. 2. 3. 4. Enter a meaningful name describing the measurement protocol. Display mode. Display mode of the controlfile, basic or advanced. Holder type. No selectable option for this scanner type. Scan mode. No selectable option for this scanner type. 5. Select the appropriate evaluation script by clicking on CHANGE... . Figure 26. Evaluation-Script-Selection 6. Energy and Current Settings, not selectable. 7. Filter, not selectable. XtremeCT II Version 2.4 Measurements 19 8. Select the appropriate calibration record by clicking on CHANGE... . Figure 27. Beam Hardening-Script-Selection 9. Scout-View/Scan-offset. Set the scan at an absolute position [mm], with an absolute offset relative to a landmark [mm] or relative to a landmark in % of a given length, i.e. arm or object length [%]. The offset can be as: • Distance (mm or %) from reference line to start of scan. • Distance (mm or %) from reference line to center of scan. • Distance (mm or %) from reference line to end of scan. 10.Start Position of Scout-View. This value appears in the Scout-View-Dialog Box as the default value and can be altered for each measurement individually. 11.End Position of Scout-View. This value appears in the Scout-View-Dialog Box as the default value and can be altered for each measurement individually. 12.Angle under which the Scout-View (radiograph) is taken. 0° is a radiograph from the side, 90° is a radiograph from the top. 13.There are 5 modes of the resolution option: Scan Mode Number of Projections / 180° Image Matrix Standard: 250 projections with 512 samples each 512 x 512 Medium: 500 projections with 1024 samples each 1024 x 1024 High: 750 projections with 1536 samples each 1536 x 1536 Native 3000 projections with 4608 samples each 4608 x 4608 Custom User defined up to 3000/180° up to 4608 x 4608 14.Diameter/ Field of View, not changeable. 15.Voxel size: When “Default Size” is selected, the voxel size is shown in the slider. The chosen voxel size is the reconstructed pixel size in the image data. After de-selecting the “Default Size”, you may select another voxel size of the reconstructed image, which is achieved by an interpolation during the reconstruction. It only makes sense to reduce the voxel size if binning equals 1 (Figure , “Modifying a Controlfile, Advanced Mode,” on page 22). 16.Choose the number of slices wished. On the right side an indicator shows the covered range in mm resulting from number of slices and current slice thickness. Below the range in mm, the number of stacks will be displayed together with the number of slices per stack. The number of slices per XtremeCT II Version 2.4 Measurements 20 stack will vary depending on the number of total slices so that the slices are always equally distributed over the minimum number of stacks necessary. 17.Relative position to Scout-View-Reference Line or the absolute position 0 mm (if Scout disabled). 18.Integration Time: For patient measurements the integration time is set to 43 ms and for the XtremeCT I compatible mode to 36 ms. A longer integration time leads to a higher Signal-to-Noise ratio. The reconstruction time is not affected by this value, but the measurement time and radiation. 19.Average Data, multiply the integration time with the chosen factor. The XtremeCT II is not designed to use the AVERAGE DATA OPTION. 20.The total number of slices, the resultant measurement time, the time current product and the CTDIvol for the actual setting of the measurements parameters are indicated. 21.After setting up your measurement protocol, you have to test the consistence of the protocol before you can use or save it by clicking on TEST. If this is successful and your initial controlfile was not locked, the buttons OK, SAVE AS NEW and SAVE get sensitive and you now can use the modified protocol for the next measurement only (by clicking on OK) or save it first (clicking on SAVE) and the clicking on OK to return to the main screen. If your initial controlfile was locked the SAVE button will not get sensitive. SAVE AS NEW can be used to store a modified protocol under a different name and number. XtremeCT II Version 2.4 Measurements 21 Modifying a Controlfile, Advanced Mode Figure 28. Modifying a Controlfile, advanced mode Explanation: 22.Number of Det-lines (for Scout-View). Defines how many lines on the detector shall be used during the Scout-View. Using all available lines provides faster Scout-Views but some faint horizontal lines might be seen between the stacks. Limit the number of lines to a small number to obtain Scout-Views without these artifacts but the time of the Scout-View will increase. 23.Number of Det-lines (for CT-scan). Defines how many lines of the detector that should be used. This number influences the number of slices within a stack. Limit the number of detection lines if the you see residual cone beam artifacts. 24.FOV/Scandiameter. Chose the diameter of the field of view (the number indicated is the size of the reconstructed area). This action is cropping the area of the detector. 25.Software binning factor of the pixels on the detector. 26.Hardware binning factor. 27.Samples: number of (possibly binned) pixels on the detector that are used for each slice (note: this number is given for the whole FOV, regardless of what is entered in 22). Proj/180°: number of projections taken per 180° turn of the sample. Before you now can perform either the SCOUT or SCAN procedure you have to PRECALIBRATE. XtremeCT II Version 2.4 Measurements 22 Precalibration With the PRECALIBRATE button you start the automatic self calibration of the system. If there is no valid calibration measurement you will not be able to start a SCOUT-VIEW or a measurement. A calibration measurement is valid for 15 minutes. Caution! The patient has to be completely out of the gantry during the calibration measurement. Positioning You can set the position of the measurement area with the help of the red line of light. The laser line indicates the position of the first tomographic section or a fixed offset from this position, depending on the control file setting. Do not use the light field to set the position for a standard patient measurement because this method is not as accurate as the Scout-View positioning mode. Scout-View General The Scout-View, comparable with a conventional radiograph, is used to determine the measurement area. On the Scout-View, a reference line has to be set. This reference line determines the position of the first/middle/last slice with a fixed offset from this line (in mm or %), depending on the controlfile settings. This reference line also determines how follow up measurement have to be performed. Therefore it must be positioned very carefully, by using it an anatomical landmark that can be used in the future to position the reference line at the same place. Only this way changes in bone density and microarchitecture can reliably be determined. Here are some indications as to how position the reference line. 1. The distal endplate of the Radius/Tibia is the region where the reference line must be set. Do not pay attention at the Ulna/Fibula ! 2. Visualize the broad white line defining the endplate 3. Look for a notch on the endplate. a Notch case: Place the reference line at the tip of the notch, on the upper side b No-notch case: Radius: visualize the curve between the two tips of the joint, place the line so that it crosses path with this curve at the middle height XtremeCT II Version 2.4 Measurements 23 Tibia: the plateau is flat in most cases, place the line along the plateau.. Figure 29. Scout-View of a Radius Figure 30. Scout-View of a Radius with “Notch” position marked (red cross) Figure 31. Scout-View of a Radius with Reference Lines XtremeCT II Version 2.4 Measurements 24 Figure 32. Scout-View of a Tibia with “Notch” position marked (red cross) Figure 33. Scout-View of a Tibia with “Notch” position marked (red cross) Figure 34. Scout-View of a Tibia with Reference Lines XtremeCT II Version 2.4 Measurements 25 Select SCOUT-VIEW...with MB1. If the Scan-Offset has been set in mm the following window will appear: Figure 35. Scout-View Start- / End-Position For an example of how this window changes when a Scan-Offset in % is selected see Figure 37 on page 29. You can now: 1. 2. 3. 4. 5. Determine start- and end-position for the Scout-View Set the angle of the Scout-View Perform the Scout-View Set the reference-line Save the Scout-View (this is done automatically for the first Scout-View of each patient (=reference Scout-View of reference measurement) Start- and End Position With the two scalers you can determine the extent of the Scout-View. The controlfile gives you default values, which you can change for a specific patient. The smaller the range the better you will see the details of the specimen. Angle Using this scaler you can rotate the gantry to perform the Scout-View from a different angle. This allows better visualizing structures not visible from one angle but from another (e.g. base plate of a joint). 0° is a radiograph from the side, 90° is a radiograph from the top. Default Values Sets the scalers to their initial positions. 100% [mm] If the ScoutView setting OFFSET [%] was selected in the Controlfile an additional row on the right hand side of the Scout-View GUI. Set here the given length of a reference object, e.g. arm length or object length. The relative offset in % of this object is calculated automatically. Start Scout-View Click on the SCOUT-VIEW button. The scanner now starts acquiring the Scout-View radiograph. You can interrupt the Scout-View at any position by clicking on the CANCEL button with MB1. Reference Line Click on the REFERENCE LINE button and then move the pointer to the current Scout-View at the upper right. The green reference line now follows the pointXtremeCT II Version 2.4 Measurements 26 er. As soon as MB1 is pressed, the line is fixed. You can correct the positioning of the line as often as you wish, by again clicking on the REFERENCE LINE button. As you move the reference line, you also can adjust the number of slices by pressing and holding the SHIFT key. Moving the pointer then adjusts the end of the scan (scan length, scan area). By releasing the SHIFT key, you can move the start line again. Clicking with MB1 sets both start- and end position. If you have chosen a locked controlfile, you will not be able to adjust the number of slices. To center a certain number of slices, move the reference line to the first landmark, than, press the ALT key and move the mouse-pointer to the second landmark. The reference line will be centered in between. Click with MB1 to fix this centered reference line. Print Scout-View Use this button to make a hardcopy of the image on the top right of your screen. You can choose between PostScript (sheet including patient name, number etc.) or Encapsulated PostScript and TIFF format (image data only, file only). Save Scout-View The reference Scout-View (first measurement) is automatically saved, and is shown for every follow-up measurement of the same patient. The function SAVE therefore is only used if the reference Scout-View for some reason cannot be used. OK When you have positioned the reference line as prescribed, click on the OK button to start an interactive measurement. This button also saves the ScoutView to disk. Cancel If you notice an error in your inputs (for example, wrong measurement protocol, wrong patient etc.), or if the Scout-View is unusable and you need to reposition the patient, you can use this function to return to the main window. Correct the errors and start again with the Scout-View. XtremeCT II Version 2.4 Measurements 27 Examples of Scout-View Modes In the examples below cases of Offset given in mm or % from the reference line to the start, center and end of the stack are shown. Relative offset [mm] from reference line to start of scan. The absolute offset is set to 22.0 mm. Figure 36. Example relative offset [mm] from reference line to start of scan. XtremeCT II Version 2.4 Measurements 28 Relative offset [%] from reference line to start of scan. The offset is set to 4% of 420 mm = 16.8 mm. Figure 37. Example relative offset [%] from reference line to start of scan. XtremeCT II Version 2.4 Measurements 29 Relative offset [%] from reference line to center of scan. The offset to the first slice is 2% of 420 mm, e.g. 10.2 mm (total scan length) / 2 = 3.3 mm. Figure 38. Example relative offset [%] from reference line to center of scan. XtremeCT II Version 2.4 Measurements 30 Relative offset [%] from reference line to center of scan. The offset to the first slice is -2% of 420 mm 10.2 mm (total scan length) / 2 = -18.6 mm. Figure 39. Example relative offset [%] from reference line to end of scan. XtremeCT II Version 2.4 Measurements 31 Measurement Click on the SCAN... button. The following window will appear: Figure 40. Start Measurement Start Measurement Click on the START MEASUREMENT button with MB1. The computer system first allocates the disk space needed for the measurement and then starts the measurement. The raw data (sinogram) of a measurement appear progressively. Cancel See cancel (above) of Scout-View. Patient Handling Do not put your hand or any object inside the bore unless attached to the cast slider. Caution! If any objects gets squeezed inside the bore, the gantry motor will be automatically stopped and an error will be indicated. Chair The XtremeCT II equipment requires a chair for the patient. The chair must be on wheels and be adjustable for the patient to sit in a comfortable position during the scan. It should be adjustable in height while the patient is sitting in the chair, have an adjustable backrest, dispose a wheel brake, have remov- XtremeCT II Version 2.4 Measurements 32 able armrests and have the possibility of securing the patient on the chair. It must also have enough load capacity to support the patient. Figure 41. Chair (Example Illustration) The equipment must only be operated by trained personnel. Caution! Care must be taken that the patient can not fall out of the chair, especially during the measurement. It must be ensured that there is always sufficient space between the user and the wall when moving - risk of crushing. The maximum load capacity of the chair must not be exceeded. Cast The patient has to be instructed that he has to sit completely quiet during the measurement. Any movement induce artifacts and may require a repeated scan. The blue light at the front of the gantry indicates the progress of the measurement. When the patient is seated, the arm or leg has to be placed into the appropriate cast. Pads of different sizes can be used to fit the patient as good and as XtremeCT II Version 2.4 Measurements 33 comfortable as possible. The patient must be fixed to the cast with the two Velcro. Figure 42. Leg Cast Figure 43. Hand Cast The measurement history is always displayed with date and measurement site. Check the selected measurement site with the measurement history and check the selected measurement site matches with the foot or arm you have prepared for the measurement. Ask about any possible fractures or implants in the measurement areas. If a fracture or an implant is within the planned measurement area, the contra lateral side should be measured. Check that the patient is not wearing any high attenuating object such as a watch or jewelry within the measurement area. XtremeCT II Version 2.4 Measurements 34 When the pre-calibration measurement is finished you can open the bore cover. Please use the handle. First fixate the cast in the front hitch. Figure 44. Cast in the Cast Slider Then gently slide the foot or arm of the patient into the bore until you can snap in the cast at the gantry. Check that the cast is positioned correctly and close the bore cover using the handle. Figure 45. Cast tightly in place Then you can start a SCOUT-VIEW and a SCAN. XtremeCT II Version 2.4 Measurements 35 After the measurement open the bore cover using the handle. Then you have to release the cast by raising the end of the cast which is pointing towards you a little bit and then pull gently the patient together with the cast out of the gantry. Make sure the pegs are entirely removed from the sockets before pulling the cast out Figure 46. Cast elevated. If the cast slider is in the outer most position you can release the cast using the cast release handle, then pull it out completely. After each measurement the cast should be cleaned using commercially available ethanol based disinfectant. Note XtremeCT II Version 2.4 Any high attenuating object such as a watch, jewelry or implants within the volume to be scanned will affect the results and have to be removed. Caution! It is not allowed to introduce a hand or foot of a patient into the bore if it is not fixed into the cast. Caution! During the whole scan procedure, the patient must be under surveillance of the operator. Measurements 36 Caution! Images are only for visual control! The numbers on the result sheet, not the images, have to be interpreted for a diagnosis. Reset Use this button to reset the gantry. XtremeCT II Version 2.4 Measurements 37 7 Quality Control Phantom Each system is delivered with its own set of phantoms, which are used to check its performances and stability. There are 4 phantoms in total: • The Quality Control phantom (QC phantom), which monitors for stability of density measurements and architectural parameters. • The resolution phantom, which serves to measure the MTF of a scan protocol. • The slice sensitivity profile phantom, which determines the resolution along the Z-axis of a scan protocol • A low contrast phantom, which may be used to determine the performances of low contrast imaging. Among them, only the QC phantom must be scanned on a regular basis by the operator. The resolution and the slice sensitivity profile phantom should be scanned at least once a year, during maintenance service for example. The QC Phantom is divided into two sections. The first section, referred as QC1, is optimized for testing the stability of the density measurement. The second section, referred as QC2, is used to check on the stability of architectural measurements. For each section, a dedicated locked controlfile has been defined for scanning. The evaluation of the QC Phantom is automated. Figure 47. Image Phantom Daily Phantom Measurement (referred to as QC1) Schedule It is very important to run the daily phantom measurement prior to the first measurement of a patient every day, and to compare the results with the reference phantom measurement. Mounting Push gently on the holder lever, and insert the QC phantom from the top. Then release the holder and slide the phantom in until the phantom pegs reach the dedicated location. XtremeCT II Version 2.4 Quality Control 38 Scanning Turn on the system and start the measurement program (You will have to wait for 30 minutes for the power up) Select the patient record to scan the phantom in (Usually Pat no.1 or “QC1 (Daily)”) Select the controlfile for the daily phantom measurement (QC1 - Daily Measurement) Perform the precalibration measurement (PRECALIBRATE) Start the measurement Evaluation Start the evaluation program and load the phantom measurement. Check that all sections are available. Then start the evaluation using the EVALUATION 3D button, and you will get a printout. Compare the measurement for Mean5 with the reference measurement Determining the Reference Measurement To set a reference value, one should average the Mean5 values over 20 measurements, ideally spread over 20 days. If you have a deviation of more than +/- 8 [mgHA/ccm] on Mean5, it might be beneficial to perform some repeated QC scans to check if the off-range value only due to statistical dispersion, or if it is a confirmed drift out of range. If the QC is out of range after 10 repeated QC, do not scan patients. Contact SCANCO MEDICAL AG. Weekly Phantom Measurement (referred to as QC2) Schedule The second section of the QC phantom needs to be scanned once a week Mounting See QC1 description Scanning See QC1 description, but select the appropriate patient record (Pat no.2), and controlfile “QC2 - Weekly Measurement” controlfile Evaluation The reconstruction of the measurement is longer than that of the daily measurement scan. Start the evaluation the same way as for QC1. Determining the Reference Measurement To set a reference value, one should average the Rod volumes values over 20 measurements, ideally spread over 20 days. If you have a deviation of more than 2%, do not scan patients. Contact SCANCO MEDICAL AG. XtremeCT II Version 2.4 Quality Control 39 Figure 48. Example of a Printout Sheet for the Daily QC1 Measurement XtremeCT II Version 2.4 Quality Control 40 Figure 49. Example of a Result Sheet for the Weekly QC2 Measurement All following task should be performed while logged as CALIBRATION user, not the usual user account. Note XtremeCT II Version 2.4 Those tasks are meant to be done during a maintenance service by a SCANCO engineer, or during an audit check performed by a qualified local staff Quality Control 41 Resolution phantom The resolution phantom is an Aluminium cylinder, which is machined with high precision on its ending tip. It is this part that must be scanned to determine the MTF of a scanning protocol. MTF is determined at the isocenter of the scanner, therefore the cylinder must be placed at the center of the mounting plate as illustrated below. Figure 50. Resolution Phantom Schedule We recommend measuring the resolution once per year. Mounting Pull the slider towards yourself, and detach the cast holder from the slider fixed by 1 screw. Replace it with the Resolution phantom, by inserting the 2 bottom pins into the slider. Then screw the bolt on the left side to fix its position. Scanning Use the control file defined for patient scanning for any one limb. There is no need to repeat the scan for each of the 4 predefined patient protocols. From a resolution and dose point of view, they are identical. It can be used also to check on the resolution of other scanning protocols that have different settings that may affect their resolution. Proceed as usual: precalibrate the scanner, and adjust the scout view region to make sure the end of the phantom is in your scout view. In the scout view, select the end of the phantom where the diameter is thinner. Figure 51. Scout View of the Resolution Phantom Evaluation Check in the evaluation program for completeness of reconstruction. Start the reconstruction manually by command line if needed. Check for the cylin- XtremeCT II Version 2.4 Quality Control 42 der shape and visibility (Figure 51 on page 42). Run the evaluation using: $ @UE:QC3_AUTO.COM <FILE_NAME.ISQ> All results are recapitulated in the ###.JOB file, which is generated in the measurement directory. It can be opened with any text editor. The result file may be transferred or printed for archiving or further analysis. The program detects situations in which the scan quality or threshold values might be borderline or insufficient. Take these warnings seriously and check the scan and the diameter estimates’ console output. At the end of the process, pull back the slider to you to remove the Resolution phantom from it. Then re-attach the Cast holder on it using the screw. Slice Sensitivity Profile Phantom This phantom is built as a plastic case, within which a metallic foil is included. This foil is inclined on purpose, and serves to measure the scanning sensitivity in the Z-axis. Figure 52. Slice Sensitivity Profile Phantom Schedule We recommend scanning the Slice Sensitivity Profile phantom once per year. Mounting Pull the slider towards yourself, and detach the cast holder from the slider fixed by 1 screw. Replace it by the slice sensitivity phantom on the slider adapter and place it on the cast slider. Scanning Measure the slice sensitivity phantom with a patient protocol, or any other scanning control file you want to investigate. XtremeCT II Version 2.4 Quality Control 43 Proceed as usual, precalibrate first, then start a scout view. The scanning region must include the two sides of the metallic foil. Figure 53. Scout View of the Slice Sensitivity Profile Phantom Evaluation Start the evaluation program, open your measurement and select the sectional image you want to analyze. If the image of the metal foil is not parallel to the y-axis you have to determine the angle between the metal foil and the yaxis. To rotate the images you have to reconstruct the measurement with an offset angle: The indicated angle is 6°. The reconstructed images needs to be rotated by 6° clockwise, this means the logical uct_reconstruction_offset_angle needs to be set to -6°. Figure 54. Offset angle with regards to y-axis $ def uct_reconstruction_offset $ uct_reconstruction <offset_angle> <file_name.rsq> /all /batch=4 Reload your measurement in the evaluation program and check that the image of the metal foil is now parallel to the y-axis in the sectional image you plan to analyze. Load all sectional images into the evaluation program and XtremeCT II Version 2.4 Quality Control 44 switch to the xz view. Determine the angle of the image of the metal foil to the y-axis in this view. The angle should be in the range of 5°. The indicated angle in the xz plane need to be measured to scale the element size of the slice sensitivity profile. Figure 55. Offset angle in the xz-plane Switch back to the xy view and select the evaluation script slice_sensitivity_profile. Place the VOI in the sectional image you selected to analyze. The Z-dimension of the VOI should be 1 and the y-dimension should be about 20 and the metal foil should be placed in the center of the VOI. Then start the evaluation. You will find in the directory of the measurement a text file which you can for example analyze in Excel. The column mean is the slice sensitivity profile. You have to scale the element size with the tangent of the angle you determined in the yz view to get the distance between two data points. Figure 56. Slice sensitivity profile of a measurement with standard patient protocol The full with half maximum of the slice sensitivity profile, which is also called the tomographic section thickness, should be below 220 µm for the standard patient protocols. The tomographic section thickness gives you an indication of the system sensitivity along the z-axis. Low Contrast Phantom This phantom consists of a PEI rod with rows of 8 mm, 4 mm, 2 mm and 1 mm holes. The PEI rod has to be placed in the provided container and then the container has to be filled with water and can then be placed in the hand cast. The PEI has a linear attenuation coefficient close to water and depending on the imaging parameters, holes of different sizes are detectable in the images. XtremeCT II Version 2.4 Quality Control 45 Schedule Because the standard application of the XtremeCT II is related to bone measurements, where low contrast detectability is not a concern, Scanco Medical has not a recommended measurement schedule for the low contrast phantom. Mounting The PEI rod has to be placed in the provided container and then the container has to be filled with water and can then be placed in the hand cast. Figure 57. Mounting of the low contrast phantom Scanning Proceed as usual : select the control file you need to check the low contrast for. Precalibrate and start the scout view Figure 58. Scout View of the low contrast phantom Place the scanning region on the scout view, then start scanning. Evaluation For low contrast detectability, the evaluation is qualitative and visual. Signal to noise ratio (SNR) is especially critical at this low density range. A scanning protocol can be adapted by augmenting the integration time for example to enhance the SNR. The better SNR, the better one can detect small structures with low contrast. XtremeCT II Version 2.4 Quality Control 46 Low contrast phantom measured with a patient protocol. The rows of the 8 mm, 4mm and 2mm holes can be seen quite clear, the row with the 1mm holes is difficult to recognize Figure 59. Low contrast phantom measured with a patient protocol. XtremeCT II Version 2.4 Quality Control 47 8 Evaluation General 2D- and 3D-histomorphometric evaluation can be performed on either a rectangular/ cubic volume or any irregular shaped ROI/VOI (Region/Volume Of Interest). The ROI/VOI is defined by a set of Graphical Objects (GOBJs), which can be contours or geometric objects such as rectangles or ellipses. The ROI/VOI has to be drawn on a slice-based method. The 3D-shape can be defined by either drawing objects on all consecutive slices or by creating a "hull" between any two slices (interpolating the intermediate slices, morphing). The defined ROI/VOI is stored to disk and will be reloaded once the measurement data is being reloaded. Exactly the same VOI thus can be re-evaluated at a later time. Starting the Evaluation Program Enter your name into the operator field (See p. 15) and click with MB1 on the button with the evaluation graphs in the main program: Figure 60. Start Evaluation Overview With the evaluation program you can perform the following functions: • view slices (XY, XZ, YZ) view/enlarge (zoom) document (print) convert (EPS, TIFF, DICOM) distance measurements measure angles display histograms view profiles (linear attenuation coefficients along lines) examine linear attenuation coefficient at cursor position • define and analyze ROI (Region Of Interest, 2D) ROI with different shapes (rectangle, ellipse, contour) analyze ROI (attenuation coefficient, determine area) • histomorphometric evaluation (2D & 3D) create data set for 3D-Display/Animation/3D-Histo XtremeCT II Version 2.4 Evaluation 48 Figure 61. Overview Evaluation Program 1. Drawing Symbols (Icon Box): By clicking on these symbols, the function, which will be applied, is selected. These functions can only be used in the Main Window (4). See “Defining the ROI or VOI” on page 56 2. Orthogonal View Selection, Main Window: Selection of orthogonal view in the Main Window. Note: as per default, only 16 slices are loaded first, the XZ and YZ views are interpolated. It is recommended to use LOAD (10) in XY mode first to load all the slices first before switching to XZ or YZ. For large data sets this can be a rather time consuming operation. 3. Image Information Controls: Temporarily hide the contour, the scale bar or the sample info for printing e.g. 4. .Main Window: In this field, the image being operated on (current picture) is shown. As soon as the mouse pointerr moves in this field, and MB1 is pressed and/or is held down, the drawing function selected in field 1 takes place. 5. Overview Window: In this field a certain number of slices are displayed, normally 16: Clicking with MB1 on an image in this field, it will become the current image and is displayed large in field 4. 6. Orthogonal Selection Overview Window: Selection of orthogonal views in 2D or 3D or Scout-View. 7. Brightness Scaling: Changing the brightness scaling causes all images to be reloaded. While being reloaded, all images are displayed at a fixed brightness scale, so you can compare brightness values visually. Clicking the arrow pointing up makes the images brighter whereas the arrow down makes the images darker. To return to the original display (all images at the most possible brightness), click on the button again. 8. Color lookup table: Click with MB1 in this field to change the color lookup table for the display of the images. By repeated mouse clicks with MB1 you will return to the original black & white display. 9. Pointer/Histogram/Profile/Ruler/Angle Tools and Tasks: Click on a button for a tool and move the mouse pointer into the Main Window (4). Read the results in the Information Area (12) or in the Evaluation Information Window (13). See “Pointer/Ruler/Profile/Angle Tools” on page 69. See “EvaluXtremeCT II Version 2.4 Evaluation 49 ation 3D” on page 64 for the T... button. 10.Slice Selection Slider: LOAD to preload all images for a fast access to those. 11.Image Selection Area: Moving the cursor in this field and clicking with MB1 causes the indicated image to be shown in field 4. You also can enter a slice number by using the keyboard or click on arrows to more troughs multiple slices one by one. 12.Information Area: Information window showing coordinates of cursor, size of ROI and distance, density and area calculations. 13.Evaluation Information Window: Printing, 2D/3D-histomorphometry, 3Ddistance measurements. Caution! The brightness scaling (7) does not affect any evaluation, but only the display on the screen! Standard Patient Evaluation Overview • Start evaluation program • Select patient and measurement • Call up 3D evaluation window with clicking on the T..., and start the “Automatic contouring” task. • To check the status of the contouring job, which runs in batch mode in the background, type $ QUE in a terminal. Contouring tasks are tagged with “AUTOK” in the job name. • Load the contour to check it and correct if necessary. Save modifications to the contour. Check that all images of the measurement are available Check images for artifacts caused by the motion of the patient • Call up 3D evaluation window with clicking on the T... button and start the “XtremeCT II Standard Analysis…” task. • To check the status of the 3D evaluation, which runs in batch mode in the background, type $ QUE in a terminal. Evaluation tasks are tagged with “UPAT_DT61” in the job name. • Take the result sheet from printer, or check on the PDF files created in the measurement directory, depending on the printing settings. Caution! XtremeCT II Version 2.4 The user has to supervise the contouring and if a single or more sections are missing, do not start an evaluation. Wait until all sections are reconstructed. Evaluation 50 XtremeCT II Version 2.4 Caution! Images are only for visual control! The numbers on the result sheet, not the images, have to be interpreted for a diagnosis. Note While a contour/evaluation task is being executed as a batch job, one can submit other contouring tasks. Those additional tasks will just go in the queue. Note As alternative to the automatic contouring one can use the tools built in the evaluation program to draw contours, using either the semi-automatic snake algorithm (See “Automatic Contouring” on page 58) or Morph features (See “Morphing” on page 59) Evaluation 51 Selection of Patient and Measurement Selection of Non-Archived Measurements After starting the evaluation program, you will see the following input window: Figure 62. Evaluation: Selection of Patient and Measurement On the left hand side you see all the samples whose measurements have not yet been archived. Click on the desired sample with MB1, and all the available measurements of this sample will appear on the right-hand side. After you have clicked on a measurement, and confirmed with the OK button, an overview of the images belonging to this measurement will be loaded and appear on the screen. Per default only the original image file (ISQ file) for each measurement is displayed. By using the toggle buttons at the lower left side, one can chose to display AIM files or All Files. If you later need to choose other measurements, click on the FILE button followed by SELECT MEASUREMENT... Figure 62 on page 52. Selection of Measurements already Archived (Saved) If you want to select a measurement that has already been archived, interrupt the above procedure using the button CANCEL and click on the FILE button followed by SELECT OLD MEASUREMENT... : Figure 63. Select Old Measurement Enter the name or number of the patient see “Input of Patient’s Name or Number” p. 16. The input window shown in See ‘Figure 62. Evaluation: Selection of Patient and Measurement” on page 52 now appears again. Click the XtremeCT II Version 2.4 Evaluation 52 patient and the measurement as described above. You will then be asked to put the corresponding tape with the archived images into the tape drive.. Note If you stored the data to tape, you will first have to restore the data to the hard disk before you can re-evaluate it! Load/Save Contours Contours that you have drawn for a measurement are saved as geometrical object (GOBJ files). Clicking on the menu FILE followed by LOAD GOBJ... will open the window below. Using the option add allows you to concatenate multiple GOBJ files. Figure 64. Load GOBJ The menu save GOBJ AS will allow you to give specific filenames (e.g. C0040915_CORTEX.GOBJ). Print/Save Images Clicking on the menu FILE followed by print... opens three selectable options, print MAIN WINDOW..., print overview WINDOW... or print evaluation WINDOW.... After selecting one of these options the Print Menu will appear. Format PostScript is used to print out paper sheets. Format EPS or TIFF is used to get the image into a file. When generating TIF files, you can choose the di- XtremeCT II Version 2.4 Evaluation 53 rectory (e.g. Scratch, Measurement Directory or a predefined directory for Export) where to save your files. Figure 65. Print Menu Header information By clicking on Header Information the parameters used for the scan and that were given in the controlfile are displayed. Zoom If you have to correct your contour you can display part of the screen enlarged. To do this, click on the menu point ZOOM and choose the enlargement factor in the submenu (ZOOM 2x to ZOOM 20x). In the current image a green frame appears, which shows the screen section which will be enlarged, and which can be moved with the mouse. Click with MB1, and the section displayed will be enlarged. If you wish to have another section enlarged, choose the menu point ZOOM once more and so on. With ZOOM RESET you will return to the normal display. It is also possible to zoom by click and drag with MB2 directly in the image. Click and drag with MB3 to move the view within the window. SHOW LEFT WINDOW and SHOW RIGHT WINDOW opens a window and shows the image from the main window or the overview window in 1024 x 1024 pixel resolution. Click on CANCEL to close it. Brightness Scaling Usually, all slices are shown at the slice-wise maximum brightness. However, this can lead to a difference in brightness between slices which prevents you from visually comparing the bone values to other bone measurements. By XtremeCT II Version 2.4 Evaluation 54 clicking on the button above the color scale, the images will be displayed in a unified norm (fixed scale): maximal normal Figure 66. Brightness Scaling You can achieve the same effect with the menu OPTIONS followed by Brightness: Figure 67. Options Brightness-Scaling XtremeCT II Version 2.4 Evaluation 55 Defining the ROI or VOI Drawing Icons By clicking on the buttons shown alongside, you can: 1. Draw Contour: Draw contours in the counter clockwise direction. All contours are automatically closed! A contour drawn clockwise excludes the region inside the contour. 2. Correct Contour: The contour to be corrected must be crossed at two points. The part lying in between these crossing points will be replaced by a new contour segment (counter clockwise drawing direction!) 3. Correct with Straight Line: The contour to be corrected must be crossed at two points. The part lying in between these crossing points will be replaced by a new segment. 4. Draw Rectangle/Square Contour. By holding down the SHIFT button while drawing the contour remains square. 5. Draw Ellipse/Circle Contour. By holding down the SHIFT button while drawing the contour remains a circle. 6. Delete Contour: Deletes one contour of the current image by crossing over it with the MB1. 7. Delete All Contours: Deletes all contours of the current image slice. 8. Delete Contours of All Images: Deletes all contours of all images. 9. Move (MB1)/Scale (MB2) contours. 10.Open Contouring Subwindow. Also possible with double click on main window or via menu TASKS. Figure 68. Drawing Icons Drawing Contours Choose the slice where you want to draw a contour by clicking on the appropriate field or by entering its number. Then, click on one of the drawing options (CONTOUR, CIRCLE/ELLIPSE, or SQUARE/RECTANGLE Button, Button 1, 4 or 5). XtremeCT II Version 2.4 Note You can get circles/squares by using SHIFT / MB1. Without the SHIFT modifier, you can also draw ellipses/rectangles. Note Drawing a contour has to be performed counter clockwise! Evaluation 56 Modifying Contours You can modify contours by clicking on Button 2 or 3. Then, draw over the contour you want to modify. You have to keep the same drawing direction (counter clockwise). The original contour has to be crossed at least twice. The part between the first and last crossings will be replaced by the new drawing. Moving/Scaling Objects By clicking on the Button 9, you select the Scale/Move mode. You can grab the objects by moving the pointer on one of the eight handles. By clicking and holding MB1 you can move the object around. By clicking and holding MB2, you can scale the objects. Note By using SHIFT / MB2 the scaling will be constraint, which means that the scale factor will be equal for both horizontal and vertical direction. Selecting Objects Click on the MOVE / SCALE BUTTON (9). Then, use the repeated SHIFT / MB1 to select the individual object you want to select. By using ALT / MB1, you select all objects of one slice. Deleting Graphical Objects You can delete a single object by clicking on Button 6. Strike over the object you want to have deleted by using MB1. By clicking on Button 7, you delete all objects of the current active slice. By clicking on Button 8, you can delete all graphical objects of all slices. Copy/Cut/Paste/Replace Objects To copy an object first select the object (“Selecting Objects” p. 57) then in the Edit menu click Copy or click CTRL-C. Same procedure is used for the Cut option. Using Paste from the Edit menu pastes the object in a selected slice as an additional object. The Replace function replaces the existing object in the current slice with the previously copied or cut object. Figure 69. The Edit menu XtremeCT II Version 2.4 Evaluation 57 Creating a Volume of Interest Drawing objects on all slices is very time consuming. To create a volume, you can get a quicker result by one of the following graphical methods. Click on the C... button or click on menu TASKS followed by CONTOURING... for these tasks: Figure 70. Contouring The following window appears. For patient scans, the automatic contouring with ITERATE FORWARDS is usually performed. For ex vivo scans, morphing contours (MORPH) might be a good option. Figure 71. Contouring Subwindow Automatic Contouring Once you have drawn an object, its shape can be automatically adapted to the surface of the bone. The object to start from (hand drawn contour) should approximately match the form of the bone. To start the automatic contouring, click on the button ITERATE FORWARDS OR ITERATE BACKWARDS. The finding of the contour can be influenced by: 1. Object to start from: The closer the hand drawn object to the real contour, the better the adaption. 2. The value INNER VALUE should be set to the approximately value of bone (see threshold setting in 2D/3D Evaluation) 3. The value OUTER VALUE should be set to the approx. value of soft tissue (see threshold setting in 2D/3D Evaluation) 4. Number of Iterations: Usually, the ITERATION 1X is sufficient. If the shape of the bone changes very rapidly, choose 2X or 3X. If you select the FORWARDS OR BACKWARDS range, the program automatically moves to the next slice after it has finished the contouring on the current slice. XtremeCT II Version 2.4 Evaluation 58 Range Selection The following actions are performed on a RANGE. You select the range by clicking on one of the options: • Current: image in main window only • Range: start and end of range are defined by BreakPoints (BPs), Reference slices (green objects) • Forwards: range starts at current slice and extends forwards • Backwards: range starts at current slice and extends backwards • All: entire volume The slice numbers which will be affected are indicated below the range options (e.g. 17..34). See ‘Figure 71. Contouring Subwindow” on page 58. Breakpoint (BP) If you choose RANGE in range selection, the range is defined by breakpoints. Any slice containing a hand drawn object becomes a reference slice (or BP). Slice 1 and the last slice of your volume are also considered as BPs. You can have as many BPs as you like. The whole volume is then divided into different ranges, each extending from one BP to the next BP. You choose the range by clicking at any slice in your range. You can modify any slice to be a reference slice by clicking on the SET BP button, you can remove a reference slice from the BP-list by clicking on CLEAR BP and you can reset all BP by clicking on CLEAR ALL BP. Note The range extends from the previous BP (not included in the range) to the next BP (included)! Global Scaling You can scale objects in the selected range by setting the range, the X- and YScale factor and then clicking on the APPLY button. Delete You can delete objects in a range by setting the range and then clicking on the DELETE button. Invert You can invert objects in a range by setting the range, selecting an object and then clicking on the INVERT button. Morphing To create a VOI, you can "morph" or extrude the missing objects between two reference slices. The program interpolates the slices in between. To create complex shapes, repeat the morphing step for different ranges. Hand-drawn XtremeCT II Version 2.4 Evaluation 59 contours are automatically taken as BP’s, but you may use the SET BP, CLEAR BP and RANGE functions for to alter the proposed ranges. Note Morphing only occurs between matching number of objects. If you have two objects in the first slice, you also need 2 objects in the last slice of your range. The first drawn object in the first slice is morphed to the first drawn object in the last slice. The second drawn object to the second drawn object and so on. Color Coding in Image Selection Area The color coding helps you in the process of morphing objects. Breakpoints are marked green, morphed slices are marked red. If slices are marked yellow a re-morphing is necessary because one of the reference objects was modified. Figure 72. Color Coding in Image Selection Area Morphing Sequence Overview 1. 2. 3. 4. 5. 6. 7. 8. 9. Click on 1st slide which should be included in VOI Draw object (hand drawn or geometric shape) Click on last slice which should be included in VOI Draw new object in this slice Open the Contouring menu as shown above (C...) Click on RANGE (selects your VOI inside of your selected slices) Click on MORPH (extends the shapes inside of your selected slices) Click on CANCEL (closes the Contouring dialog box) Start either 2D or 3D-Evaluation as in previous versions Tip: Move forwards in your slices while you are morphing and the Range / BP-System automatically selects the correct range. Following drawing is an example of how to create a complex 3D-shape: XtremeCT II Version 2.4 Evaluation 60 If you want to create the following VOI, you have to define 3 reference slices: Figure 73. Creating a VOI XtremeCT II Version 2.4 Evaluation 61 Evaluation 2D Note: This function is not applicable for patient scans. Only use for specimen scans. Click on menu TASKS and choose EVALUATION 2D... : Figure 74. 2D-Evaluation The following window appears at the lower right: Figure 75. 2D-Histomorphometry ROI Selection If you have drawn any objects before, a white bounding box appears around all your objects. If you have not drawn any contours, a default-sized box appears in the middle of the image. The bounding box delimits the valid area for the evaluation. You can move the ROI around by clicking (and dragging) on one of the selection points using MB1, or you can resize it by clicking on one of the selection points using MB2. You can also set or adjust the position or size of the ROI by directly entering the coordinates and dimensions using the keyboard. Additionally you can select the number of slices which will be analyzed. With the scaler SLICES you decide how many of them will be processed. With the START Z and DIM Z you select the range of the evaluation. 2D evaluation will start with slice START Z and continue to slice START Z + DIM Z, while processing SLICES in total, equally distributed. XtremeCT II Version 2.4 Evaluation 62 Note If you set SLICES to 1, only the first slice will be processed, no matter how large your DIM Z is set! Segmentation Using the scalers SIGMA, SUPPORT and THRESHOLD, you can change the segmentation parameters. Once you have found your optimal settings, keep them constant for a series of evaluations. Printing out of the 2D-Histomorphometry Window The next selection affects printing. Set the NUMBER OF COPIES to how many copies of each result sheet you would like to obtain. The toggle buttons PRINT LIST and PRINT SHEET affect the result sheet output. PRINT LIST will create a summary report for all processed slices including the mean values of all slices (filename of summary report is HISTO_2D_xxx.DAT, where xxx is the measurement number. The file is located in the directory with the logical name equivalent UCT_HISTO_RESULTS, see Appendix). PRINT SHEET creates an individual sheet for each slice showing the main image and the 2D-histomorphometric values on it. Keep in mind that these sheets are very large in size and could fill your hard disk if you process all slices of your measurement (200 or more...). Starting Evaluation If you have checked all your settings, click on START EVALUATION. Caution! XtremeCT II Version 2.4 The evaluation will only be performed inside of both: a) your objects/contours (green/red) b) the bounding box (white) The bounding box in its default size contains all your objects and thus does not further limit the ROI/VOI. Evaluation 63 Evaluation 3D Click on the T... button or click on menu TASKS followed by EVALUATION 3D... : Figure 76. 3D-Evaluation The following window appears at the lower right: Figure 77. 3D-Evaluation Subwindow Selecting an Evaluation Task By clicking on SELECT, an Evaluation Task can be chosen from the list of currently available scripts. For the standard patient evaluation, ‘XtremeCT II Standard Patient Analysis, 61 µm’ is preselected. This task is usually preselected for patient scans. For ex vivo scans, you may choose other Tasks. See below for more info of about the Evaluation Scripts. Defining VOI If you have drawn any graphical objects before, a white bounding box around all your objects appears on the screen. If you have not drawn any contours, a default sized box appears in the middle of the image. The bounding box delimits the valid area for the evaluation. You can move the VOI around by clicking (and dragging) on one of the selection points using MB1, or you can resize it by clicking on one of the selection points using MB2. You can also define or adjust the position or dimension of the VOI by directly entering the coordinates/sizes using the keyboard. Segmentation For the standard patient analysis, all the settings are fixed and cannot be changed by the user. If the script is not locked, the proposed segmentation values can be modified. For ex vivo scans with ex vivo Evaluation Scripts, XtremeCT II Version 2.4 Evaluation 64 choose SIGMA and SUPPORT of the Gauss filter and lower and upper THRESHOLD to binarize (segment) your image. After clicking on Preview, the Main Window shows the result of the segmentation, and the Evaluation Window shows the histogram of the gray-scales and the volume fraction of the segmented object(s). Toggling between preview and grayscale allows you to fine tune the segmentation parameters. . Note The histogram and the volume fractions that are shown in the Evaluation Window are computed on what is visible in the Main Window and inside of the contour- if you zoom in on a region, only the histogram of the zoomed region is shown! If your chosen script can handle multiple objects click on the radio buttons numbered 1 to 4 (Object 1 to Object 4) to change the settings for the different objects. The unit selector to the right of the radio buttons allows you to specify in which units the threshold is given. Order of Precedence: in most scripts, if multiple objects are selected and their thresholds are overlapping, object 1 wins, then object 2, then object 3, then object 4. Starting Evaluation The green objects indicate the VOI which will be used for the 3D-evaluation. The VOI is further delimited by the white bounding box. The volume inside of the white bounding box will be written to disk. Everything outside the bounding box will neither be evaluated nor be displayed in 3D. If you have found your VOI, click on START EVALUATION and the evaluation immediately starts as a batch process (this means that you can now exit the program or launch a second evaluation). The batch job will run in the background. Type $ QUE in a terminal to see if it is still running. Caution! XtremeCT II Version 2.4 The evaluation will only be performed inside of both: a) your objects/contours (green/red) b) the bounding box (white) The bounding box in its default size contains all your objects and thus does not further limit the ROI/VOI. Evaluation 65 Advanced: Modifying Evaluation Scripts In the menu Scripts, the available Evaluation Scripts can be modified - mainly for ex vivo scans. Do not change the script used for the standard patient analysis!. Figure 78. Modifying Scripts, Basic Mode Name of Script: Enter a meaningful name for your Evaluation Script Help Text: Enter a short help text for the script Project Name: Enter a short Project name (less than 15 letters) for your evaluation script. This project name will also be used in the filename of the result .txt file in disk1:[microct.results] Eval/IPL/User-Script Filenames: Enter the names of the programs that you wish your evaluation script to call. Changing them is recommended for advanced users only. Object 1 to 4: Enter the default segmentation parameters if required by the script (Gauss and Threshold) for your current Project. Those values will be used when you then start the script unless you override them manually by entering them through the GUI in Figure 77, “3D-Evaluation Subwindow,” on page 64 before starting the 3D evaluation. At the end, save or save as new or cancel your changes. Importing Evaluation Scripts More Evaluation Scripts are available in the menu Scripts, Import. E.g. ‘Convert to Dicom’ and ‘Convert to TIF’ scripts are available to be imported into your currently available Evaluation Scripts. XtremeCT II Version 2.4 Evaluation 66 Distance 3D Click on menu TASKS followed by DISTANCE 3D... : Figure 79. Distance 3D The following window appears: Figure 80. Distance Measurement Select the 1st slice you want to set a marker. Then click on GET POINT A using MB1 and move the cursor to the main window. As you move the cursor, the coordinates appear in the window at A. If you have found your Position A, click using MB1. Proceed the same way for Point B. You also can manually enter coordinates using the keyboard. The distance from Point A to Point B is displayed in the window every time you click in the main window or enter coordinates using the keyboard. Two green markers indicate the positions. Use CANCEL to terminate 3D-Distance measurements. XtremeCT II Version 2.4 Evaluation 67 Print Images Click on menu TASKS followed by PRINT IMAGES... : Figure 81. Print Images The following input window appears: Figure 82. Print Images, Details With the toggle buttons on the left side, you can choose how many images per sheet you want to have printed. The size of each printed image is dependent on this value. Then, select the requested images by clicking on the button with the corresponding number using MB1. Alternatively, if you press the button 4 or 16, either 4 or 16 images are selected, equally distributed over the whole number of slices. The button ALL selects all images, while the button NONE clears all selections. Confirm your selection with PRINT B/W. The images will appear after a few minutes. If you have a color printer defined, you may print on that specific printer by clicking on the PRINT COLOR button. XtremeCT II Version 2.4 Evaluation 68 Note Do not switch off your computer (SHUTDOWN) before you have received all the prints! Pointer/Ruler/Profile/Angle Tools Pointer/Ruler/Profile/Angle Tools By clicking on the buttons shown alongside, you can: 1. Show Image Values at Cursor Position. 2. Show Histogram of image within the region of interest. 3. Show Profile along a user defined line. The start- and end-point of the line can be moved using MB1. 4. Determine Distances between two points in the image along a line. The start- and end-point of the line can be moved using MB1. 5. Determine Angles. The angle between two edges of a triangle. The vertices of the triangle can be moved using MB1. 6. Open 3D-Evaluation window. Figure 83. Pointer/Ruler/Profile/Angle Tools XtremeCT II Version 2.4 Evaluation 69 9 3D-Display Starting the 3D-Display Program Enter your name into the operator field and click with MB1 on the button with the 3D-symbol in the main program: Figure 84. Start 3D-Display Figure 85. Main Program Screen XtremeCT II Version 2.4 3D-Display 70 General 3D-Scene The 3D-Scene is as follows: Figure 86. 3D-Scene There is an observer who moves around in the scene and looks at an object which is positioned at the origin. The observer is at a specific elevation (angle) and looking either from above, below or straight on the object. He also moves around the object, which is given by his rotation angle. The light source is given relative to the observer. So if the observer moves, the light source also moves. Standard values are 20° higher and 20° to the right from the observer position. Selecting the Sample and the Measurement If you start the program, the selection window appears automatically. If you want to choose another sample after displaying the first one, click on the menu FILE and then OPEN.... This following window appears: Figure 87. Selecting the Sample and the Measurement First, choose the type of data by clicking on either SEGMENTED, ALL FILES or ANIMATION. Then click on the sample you want to display. If there is data of the corresponding type available, it appears on the right side. Click on the measurement you want to display. The data is loaded after you confirmed your choice with OK. To display the data, click on the START-button at the bottom left of the screen. XtremeCT II Version 2.4 3D-Display 71 Start/Stop Start the calculation of the 3D-Scene by clicking on the START button. You can interrupt the calculations by clicking on the STOP button. Figure 88. Start/Stop Calculation Alternatively, you also can click with MB1 into the main window to start/stop the calculation and the display. In ANIMATION mode, they start/stop the animation. Visual Effects Observer By changing the ROTATION, ELEVATION and ROLL of the observer, you change the angle from which you look at the object. You can also move the object horizontally by changing the value for TRANSLATION H and/or vertically by changing the value for TRANSLATION V. Figure 89. Observer Alternatively, you also can click with MB1 into the main window and as you move the cursor up and down, you change the ELEVATION, if you move left or right, you change the ROTATION. If you release MB1, the calculation starts. If you click with MB3 into the main window and as you move the cursor up and down, you can change the TRANSLATION H and the TRANSLATION V. If you click on MB1 while iterating the views, you interrupt, and can then change the observer settings again by click-and-drag. By holding down the SHIFT button the coordinates of the object where the mouse is pointing are displayed. XtremeCT II Version 2.4 3D-Display 72 By holding down the CTRL button and then move the mouse, the distance is measured between the initial position and new position on the object where the mouse is pointing. Light Source By changing the ROTATION and ELEVATION of the light source, you change the effect of shades on the object. The values are relative to the observer position. Figure 90. Light Source The scaler AMBIENT LIGHT affects the shading of the object, where 0% means direct lighting only and 100% means ambient lighting only. The values in between are a mixture of both light source types. The scaler SHADOWS affects the translucency of the shadow. Other Effects By changing the SCALE-FACTOR, you enlarge the object or make it appear smaller. The PERSPECTIVE scaler lets you change the visual effect as if you moved to the object or further away. The scale hereby is modified in a way that the size is not affected. MB2 for Scaling within Window Figure 91. Other Effects Alternatively, you also can click with MB2 into the main window and as you move the cursor up and down, you change the scaling. XtremeCT II Version 2.4 3D-Display 73 Cutplane To perform a virtual cut through the displayed object, align the scaler between -100% and +100 %. 0 is an exact cut through the middle of the object, parallel to the monitor layer. Figure 92. Cutplane Subdim Click on menu SUBDIM to open the following subwindow. Changing the scalers allows you to perform virtual cuts through the object along the principal axis of the image volume. Figure 93. Subdimensioning Mode There are five different display modes available as are listed in the figure below.. Figure 94. Display modes Object Values Click on menu OPTIONS followed by VALUES... to open the following subwindow. You can change the brightness of the displayed image and the color lookup table. You may want to enter Zero for 'Min' for better contrast. To further increase brightness, enter a lower 'Max' value than proposed. Click on the color bar to toggle between different colors. Click on OK and click into the XtremeCT II Version 2.4 3D-Display 74 main image for a new image build-up. To change the color look up table, click on the colorbar. Figure 95. Object Values Object Properties Click on menu OPTIONS followed by OBJECT/DISPLAY PROPERTIES... to open the following subwindow. This allows you to show or hide objects, to change its colors, etc. Find a more detailed description on our Webpage (FAQ). Figure 96. Object Properties 1. The two sliders at the top selects different objects in the aim file, if a segmented file is opened there are only two objects where number 0 is the background, number 1 is the segmented object. If the opened volume contains pixels with different values, they will be shown in bins, 1 to about 255. With the sliders you can select e.g. 1 to 80. This then corresponds to XtremeCT II Version 2.4 3D-Display 75 2. 3. 4. 5. 6. XtremeCT II Version 2.4 all the pixels with a relatively low gray-scale value (the numbers and the corresponding threshold numbers are displayed just below the sliders). Once a range has been selected the display properties of those values can be altered, see points below for options. Display properties of object within the selected range. Show: Display objects in range as a solid object. Transparent/Join: Joins all selected objects into one transparent object. Transparent/Separate: Each object is displayed as separate objects but are transparent. Transparency slider: Regulates the percentage of transparency. Hide: Hides all objects within the range. Surface Object color: Each object within the given range is displayed in the color given in the colorbar below. By clicking on the colorbar the color mixing window (see below) opens and a different color can be selected. Value color: Each object is colored according to its value in the AIM-file. The color map can be changed using Object Value interface, Figure 95, “Object Values,” on page 75. Face Colors the artificial cutfaces at the boundary of the bounding box or along the defined cutplanes. Like surface: Uses the same surface color as for the rest of the object Object color: Uses the same surface color as for the rest of the object. Face color: Uses a user defined color for the face. This color can be changed by clicking on the colorbar that appears when you select this option. Value color: The face is colored according to the value of the object that is saved in the file. The color lookup table can be changed using the Object Values interface, Figure 95, “Object Values,” on page 75. Change the color of the ambient and direct light using left and middle color button. Change the color of th background by clicking on the right color button. The slider is active for transparent objects where it regulates how many transitions between objects (or object/air) that are displayed. Printing options. Clicked toggle buttons are information that will be printed in the 3D window. Options: Print Name, Print LUT (Look up table), Print Scale, Print Company. 3D-Display 76 Color Mixing Clicking on a color bar in the object properties subwindow opens the color mixing subwindow which allows you to toggle between different colors. Figure 97. Color Mixing for color model: Picker. 1. Color model: Picker: Use the interface as described in the points 2 - 4. HLS: Adjust the sliders for Hue, Lightness and Saturation to obtain the color of your choice. RGB: Adjust the sliders for Red, Green and Blue to obtain the color of your choice. Browser: Browse through a list of colors to select a predefined color. Grayscale: Adjust the level of gray by using the slider. 2. Select the color pallet: Spectrum, Pastels, Vivids, Earthtones. 3. The color interpolator. To mix two colors first select one color in the pallet above and click on the color bucket in the left corner, then select another color in the pallet and click on the colorbucket in the right corner. When you click Smear, you will get a range of color tones interpolated between the two selected colors. The range of interpolated colors can then be made lighter/darker using the arrows on the left side or warmer/cooler using the arrows on the right side. 4. Scratch pad: By clicking here you can saved the generated colors for later use. XtremeCT II Version 2.4 3D-Display 77 Printing of 3D-Scenes After you have a 3D-Display on the screen, you can send it to a printer or save it as a EPS or TIFF file. Choose the menu FILE and PRINT... . The following window appears: Figure 98. Printing of 3D-Scenes First, choose the type of printout you want by clicking on one of the PRINT FORMAT options: PostScript®, EPS or TIFF if available. Then, choose the printer attached and the corresponding button PRINTER, FILE or BOTH. If saving to TIFF you can choose the location (directory) now: e.g. to Scratch, or Export as defined in microct_setup_user.com or to the measurement directory on the data disk. The color of the output can be set to different values. Choose COLOR or B/W. Then, set the PRINT FILE to your wishes and click on OK. Calculating Animated 3D-Sequences Click on menu OPTIONS followed by ANIMATION... . The following window appears. To save the image sequence, the toggle button AUTO PRINT must be activated previously in Figure 98 on page 78. To make an animation, turn your 3D object into the initial position desired for the animation and click GET SETTINGS A. Then adjust the settings of your object to its end position and click GET SETTINGS B. When you move the object using the sliders (Rotation, Elevation, Translation etc.) you need to push the button START to display the changes. On the sliding bar below you can select the number of frames that you would like to create between the initial and the end position. XtremeCT II Version 2.4 3D-Display 78 Before you click START CALCULATION you need to set up the auto-print mode. To do so, go to the Print menu and choose print to TIF and to File and enter the beginning of a file name, e.g. DK0:[MICROCT.DATA]test_ . The program will append _0000.TIF, _0001.TIF etc afterwards. Click on the AUTO PRINT box followed by OK. Transfer those TIF files to your PC, and combine the sequences in the program that you are using to convert the TIF files to AVI or MOV files (like Windows Movie Maker 2, or Quick Time Pro, or Adobe Premiere etc.). The order in the above list can also be reversed: You can first set up the autoprint, and then go into the Animation menu, choose start and end settings, and hit START ANIMATION. The positions A and B can be freely chosen: e.g. with subdim, you can first take everything (A), then slide it back to nothing (B). You can even slowly change the color of an object. Or slowly hiding objects: in the OBJECT PROPERTIES choose TRANSPARENT/SEPARATE for object, but change the Transparency from 0.0 (A) to 1.0 (B) If you want to create a movie with different sections, e.g. first rotate the object around, then slowly make the object transparent, then cut in: Do this in multiple sections with the 3D program, e.g. first create Auto-Print files 'rotation_0000 to rotation_0200', then 'transp_0000 to transp_0050', and then 'cut_0000 to cut_0100'. Make sure ALL the settings from the last view of the previous section match those of the first view of the next section so you get smooth transitions. To save the settings A and B for the film to reuse on another sample, click SAVE PRESETS FILE. A dialog box will open where you can define folder and file name for the file. The file should be saved in .DAT format. The AUTO PRINT box can also be used without the Animation Menu: Activate it, like above, with sys$scratch:test_ only the beginning of filename. Click OK. Then, whenever a 3D image is completely built-up (so when you are happy with a view and you do not interrupt the build-up), automatically a TIF file is generated, numbered sequentially. Figure 99. Animation Settings Presets Under the PRESETS menu it is possible write the currently applied settings from the 3D window to a .DAT file or to open a previously written file with presets. By clicking on APPLY PRESET A and APPLY PRESET B (only activated if two XtremeCT II Version 2.4 3D-Display 79 sets of presents are defined in the file) the settings defined in the opened file are applied. Figure 100. Preset menu XtremeCT II Version 2.4 3D-Display 80 10 Data Management Overview • Archive RAW data and image data to tape, local disk, remote server via NFS or FTP or USB drives formatted for VMS. • Copy files to USB disk formatted for Windows using FAT 32. • Delete measurement data while keeping the sample information in database. • Formatting (initializing) of VMS (FAT32) Hard drives • Determining capacity (free blocks) of the hard disk • Backup of all databases and programs to optical disk or tape (full backup) Starting Program Click with MB1 on the diskette symbol: Figure 101 Start Archiving Program XtremeCT II Version 2.4 Data Management 81 Archiving / Deleting/Backup Data Figure 102. Archiving Program Selecting the Measurement In the upper left hand side, samples are listed depending on which toggle button has been selected. CURRENT (ON DISK): Lists all samples that either have measurements that have not yet been archived, or have not yet been deleted. CURRENT (WITH RAW): shows a list all the above samples with the additional condition that the RAW-datafile of the sample is still available on the disk. ALL: Lists all samples including archived samples. Information about where the samples are stored (which tape or which disk) is then displayed next to the sample. By entering the sample name, part of the sample name or the sample number in the FILTER text box only sample containing the given text string will appear in the list. XtremeCT II Version 2.4 Data Management 82 The list of samples can then be ordered according to sample number, sample name or measurement number according to which toggle button is clicked. Figure 103. Selecting Measurement Choose the corresponding measurement by clicking with MB1. You can now either archive these measurements or delete them. To select multiple data use CTRL and select the measurements with MB1. To select several consecutive measurements use SHIFT and select the first and last sample with MB1. To get the data of archived measurements back to your local hard disk, click on SELECT OLD MEASUREMENT... and then you are prompted to enter the name or number of the sample you want. Enter its name or number and all measurements of that sample appear. Select the desired measurement by clicking on it using MB1. After you have performed a copy/move operation, you can click on UPDATE LIST, as this is not performed immediately because of performance reasons. Selecting the File Type If you have selected the measurement, you have to select the files you want to copy or move. Click on the button RAW (raw data, *.RSQ) or IMA (Images, *.ISQ, GOBJs, *.=GOBJ and VOI, *.AIM, .DCM, .TIF etc) on the left. For double security, do not archive raw data and images on the same tape. Depending on the destination device, with IMA selected, you also have to select images, AIMs or everything (except RAW, which are handled separately) for the following operation. Figure 104. Selecting File Type XtremeCT II Version 2.4 Data Management 83 Selecting the Destination Device Click on the DEVICE button, and the list of all available devices appears. Select the appropriate: 1. Hard Disk 2. CD-R 3. DVD-R 4. Tape (Streamer) 5. Waste Basket Figure 105. Selecting destination device Depending on where the source files reside, you cannot choose all devices, e.g., if the files are on the hard disk, you cannot choose the hard disk as a destination device. The list of devices depends on which devices are available on your system and can also include NFS, FTP, DK1 etc. If you want to delete any measurements, you choose the waste basket as the destination device. If you want to archive or copy some files, choose the tape device. Selecting the Copy/Move Operation If you choose the COPY function, the files are copied to the destination device, but will still be available at the original device. When using the copy command for the image files it is possible to copy different types of files separately. By clicking on the SELECT toggle button the choice of ISQ, AIM, GOBJ, DCM, TIFF, TXT,COM and SCV files appear. One or several of these file-types can then be selected. Figure 106. Selecting File Type for copying If you choose MOVE, the original is deleted after successful copy operation and the database entry is updated with information about the new location. If you want to delete any measurement data, choose MOVE and WASTE BASKET. If a copy of the data already has been transferred to another device, this can be seen within the parenthesis behind the name of the data. XtremeCT II Version 2.4 Data Management 84 General Guidelines for daily operations Archiving: use MOVE to Tape Restore: use COPY to Hard Disk (from Tape) Starting the Move/Copy Function Click on the START... button to execute the desired function. If your destination device is a tape, you first have to mount the corresponding tape manually see “Mount/Dismount” p. 88. After your confirmation, the images of the selected measurement will be copied/ moved to the destination device. If you want to view these images later again (in the evaluation program), you will be asked to put in the appropriate tape. If you archive or backup the images on tapes, you first have to copy or move them back from tape to disk to be able to re-evaluate them. Backup Under some circumstances it is possible that a hard disk can crash, which makes it impossible to read sample data, old measurement results or ScoutViews again. Such defects are extremely unlikely, but are disastrous for follow-up studies, as previous measurement results cannot be read any more. You should therefore regularly make a copy of your databases (data security), preferably once a week. A pop up window will open every time a weekly backup is needed. Please, do not ignore this warning. You can backup your database to either tape or local disk. If you use the tape drive, you can add many backups to the same tape. You should use a tape specially reserved for this purpose. With tapes, we recommend you to use two tapes, alternating between them! Note Use a new tape for this purpose. Only tapes initialized with label BACKUP will be accepted Caution! Do not store your backup disks or tapes in the same room as the equipment, better still, not in the same building! (Danger of fire, water damage etc.!) Before you start a backup procedure, you should terminate all other programs or applications (such as measurement program, evaluation program etc.). Otherwise, some files might be locked by those applications and therefore not be saved. XtremeCT II Version 2.4 Data Management 85 To start the backup operation, insert the optical disk or the tape and click on the DB BACKUP TO DISK DK0 or DB BACKUP TO TAPE button: Figure 107. Backup Options Then confirm the following question whether you inserted the appropriate disk or tape. A safety copy of all databases will then be made. The procedure can be done in interactive or in batch mode. Operating System Backup Every six month a pop up window occurs with a reminder to perform a backup of the operating system. The backup should then be made as soon as possible. In order to perform the backup make sure that no jobs are running or pending in the queue before starting, and that all other users are logged off. Log in to the calibration account Type in the DECterm window: $ set proc/priv=bypass $ r um:uct_b Push either the button OS BACKUP TO DISK DK0 or mount the specific OS backup tape and push the OS BACKUP TO TAPE button. Exit the Backup Program and log out of the calibration account. After a successful OS backup the message above will not appear for the next six months. XtremeCT II Version 2.4 Data Management 86 Device-Information Figure 108. Device Information Initialize All media (data carriers) must be initialized (formatted) before they can be used for the first time. In doing this, every tape will be given a label. The same as above has to be performed for tapes as well, but tapes are onesided media only and the label is limited to 6 letters. Caution! XtremeCT II Version 2.4 When initializing, all data which could already be on the medium will be lost! Data Management 87 Mount/Dismount Before tapes can be used, they must first be mounted by the system (made accessible to the user), and, after use, they will be dismounted. This has to be done manually for tapes because of performance reasons. XtremeCT II Version 2.4 Data Management 88 11 DECterm Based Programs General Guidelines To start one of the following programs, you need access to a terminal session window either directly on the machine or via the network (telnet, rlogin, set host etc.) You can start the programs by typing a shortcut (or symbol). The following table summarizes the names, functions and location of the programs. Symbol/Command Program Name/Location Function $ UCT_RECONSTRUCTION UM:UCT_RECONSTRUCTION.EXE 2D-Slice-Reconstruction $ IPL UM:IPL_SCANCO_M.EXE 3D-Segmentation / 3D-Evaluation $ UCT_THREEDEE_BATCH UM:UCT_RAY_BATCH.EXE Program to print 3D-Result-Sheet $ UCT_LIST UM:UCT_LIST.EXE DB-Query (3D-Histo) $ UPAT_LIST UM:UPAT_PRINT_LIST.EXE DB-Query (3D-Histo) $ WRITE_INFO UM:UCT_WRITE_INFO.EXE DB-Query (Sample-Info) Reconstruction If for any reason (e.g. insufficient disk space) the slice-reconstruction is not finishing, or you have destroyed the Slice-data (*.ISQ) but still have the RAWdata (*.RSQ) somewhere, you can reconstruct the missing slices with this program. There is no shortcut for this program. Start it using the following command: $ RUN UCT_RECONSTRUCTION Raw-Data-File: DISK3:[BRUNO.DATA.00000033.00000680]C0000372.RSQ SliceSelection: N (1 slice) or N:M (from:to) or A (all) SliceNr. [0...222] (Neg. to stop):17:34 You first have to give the input filename, which is the *.RSQfile. Then, you define which or how many slices to reconstruct. You can give the following values: • A This means, reconstruct ALL slices • N Enter one value, then this slice will be reconstructed and you will be asked again. To end the program, enter a negative value. • N:M Reconstruct a range (from slice n to m), so enter e.g. 5:19. Note XtremeCT II Version 2.4 Most programs operated in the terminal start counting the slices at Ø, while the standard user programs start counting at slice 1. You might have to adjust for this difference of 1. DECterm Based Programs 89 IPL (Image Processing Language) This program is used to execute the 3D-segmentation and different morphometric evaluations, e.g. MIL (Mean Intercept Length), DT (Distance Transformation), TRI (Triangulation), SMI (Structure Model Index) etc. The concept of this program is: You work with multiple objects in memory. One object is usually the input for a procedure, whereas the result will be the next object. You can delete objects (internally, in memory only). You can also read and write objects from/to disk. Each object has to be given an internal name, such as input, output, segmented or just a, b, c etc. Once launched in interactive mode, you can execute the commands below. Each command takes a few arguments which usually have a default value. By pressing the return key, the value is entered. If you have to enter values for all coordinates (x, y and z), you can either give all three values separated by a space or just enter one value, which is then applied to all coordinates. If the order of the arguments is known by heart, you can supply them in the correct order together with the command, e.g. ’gauss in out’ and then press return to be asked the next arguments. IPL commands may be abbreviated. The procedure name list is searched against your input, and IPL takes the first command that matches the abbreviation (execute ’help’ to see the list and search order). There is no ’ambiguous command’ warning. Note IPL only accepts lower case input! Note In the standard evaluation (Start Evaluation 3D...), IPL is operated in batch mode. Then the two dots (..) in the last IPL line of the batch-command file are very important. DO NOT DELETE OR FORGET THEM! At the IPL start-up in ’batch mode’, the whole string is read up to the two dots, and then commands in the string are executed. one by one. On the other hand, in interactive mode IPL executes the commands immediately. To exit interactive IPL, use ’quit’. help Gives the list of all available procedures or a short description of a procedure if ipl> ’help xxxx’ is typed. quit Quits the program ipl> quit (or q) list Lists all objects currently in memory or lists all procedures, optionally only items starting with beginning_with. ipl> list XtremeCT II Version 2.4 -objects [true] > -procedures [false] > -beginning_with [] > DECterm Based Programs 90 read Reads an object from disk. The file type has to be *.aim. By reading an object from disk, you have to give it an internal name. ipl> read -name [in] > a -filename [default_file_name] > DISK3:[DATA]C0000372.AIM -type [aim] > -uncompress [true] > aim_read Shortcut for reading an AIM from disk. The file type has to be *.aim. By reading an object from disk, you have to give it an internal name. Same function as read, but type and uncompress are assumed to be aim and true. ipl> aim -name [in]> a -filename [default_file_name] > DISK3:[DATA]C0000372.AIM or on one line only: ipl> aim in DISK3:[DATA]C0000372.AIM isq_to_aim Reads an .ISQ from disk and puts the requested volume of interest into memory as an aim object. The volume of interest is given by pos (upper left corner) and dim (dimension of aim object). ipl> isq -aim_name [in] > a -isq_filename [default_file_name]>DISK3:[DATA]C0000372.ISQ -pos [0 0 0] -dim [-1-1-1] >210 210 210 >150 240 0 write Writes an object to disk. The file type should be *.aim. You can compress segmented files using run_length or binary compression. Default is binary, but for gray scale images the compress type is always switched internally to none. ipl> write -name [default_name] > a -filename [default_file_name] > DISK3:[DATA]XYZ.AIM -compress_type [bin] > r delete This command is used to delete an internal object, i.e. to free memory. ipl> delete -name [] > a examine Use this command to examine different things of an object and show the results on the screen. Possible values are: geometry, histogram, statistics, number, log, and z_mean_max (mean and max values of each slice along z-axis). ipl> examine XtremeCT II Version 2.4 -input [default_name] > a -item [geometry] > !> dim 504 122 223 !> off 0 0 0 !> pos 266 308 0 DECterm Based Programs 91 . . sup_divide This command is used to subdivide an object into smaller objects. This is helpful in examining only a small part of the complete object or for segmenting the whole object using small subobjects to save memory. You can either define the subvolume(s) by entering the number of subvolumes (supdim, in all directions) or their size in pixels (subdim). suppos is the offset of the object in pixels in local coordinates. If you leave the value at -1, the object(s) will be centered. testoff is used for overlapping the small subobjects in case of a procedure such as a gauss-filter. If supdim_numbers is not a divisor of the original object’s dimensions, a few voxels may be discarded, at most subdim_number voxels per direction x, y or z. ipl> sup_divide -input [in] > a -supdim_numbers [-1-1-1]> 4 -testoff_pixels [0 0 0] > 2 -suppos_pixels_local [-1-1-1]> -subdim_pixels [-1-1-1]> Note If you plan to subsequently use a gauss-filter on the object, testoff must be equal to the support in the gauss-filter sub_get Extracts a sub volume that has the position and size as entered by pos and dim The flag global_pos_flag controls whether pos is the global position (given by the original measurement) or the local position in the input object. ipl> sub_get -input [in] > a -output [sub] > s -pos [0 0 0] >10 30 10 -dim [0 0 0] >120 -global_pos_flag [false] > sub_pick Is an older version of sub_get, that needs previous execution of sup_divide to enter the positions and sizes in the grid. subpos_numbers is the (0-based) position in numbers in the suppos-grid. ipl> sub_pick XtremeCT II Version 2.4 -input [in] > a -output [sub] > s -subpos_numbers [0 0 0] > DECterm Based Programs 92 gauss_lp This is the command to gauss-filter an object. The shape of the filter can be given using sigma and support. You have to give an internal name for the output object. Figure 109. Gauss ipl> gauss -input [in] > a -output [gauss] > b -sigma [1.000000] > 1.2 -support [2] > threshold Using this command, you can binarize an object. All voxels below lower_in_perm and above upper_in_perm will be set to value 0, the rest (the object) will be given a value of value_in_range, usually 127. The values for the lower and upper threshold are given in 1/1000, covering the whole range of the data values (0 to 32767 for gray scale AIMs, -128 to 127 for char AIMs). ipl> thresh -input [gauss] > b -output [th] > c -lower_in_perm [300] > 220 -upper_in_perm [1000] > -value_in_range [127] > gauss_seg and seg_gauss Use this command to do the gauss_lp and the threshold in one step. This saves memory and reduces the computing time. However, you have no access to the intermediate object. ipl> gauss_seg (or seg) -input [in] > a -output [seg] > b -sigma [1.000000] > 1.2 -support [2] > -lower_in_perm [300] > 220 -upper_in_perm [1000] > 1000 -value_in_range [127] > adaptive_threshold Using this command, you can find out which threshold leads to the best segmentation of the bone. The program examines the BV/TV parameter at different threshold values (given by first_threshold, last_threshold and nr_steps). It then tries to find the threshold with the least change, which it XtremeCT II Version 2.4 DECterm Based Programs 93 considers to be the best choice. At the end, this value is applied to the input and written to the output object using the value_in_range as in threshold. ipl> adaptive_thresh -input [gauss] > a -output [th_adp] > c -first_threshold [400] > 300 -nr_steps [30] > 50 -value_in_range [127] > fft_laplace_hamming Segmentation of an object based on zero crossing of second derivative. The second derivative is calculated in the fourier domain by applying a w2 filter, for noise smoothing a Hamming filter is simultaneously applied. To ensure that regions with high attenuation are segmented as foreground, the original image is added with variable weight 1–laplace_epsilon. The result is an object of type ’float’ that has to be normed to ’short’ again with norm_max. Redim_pow2 can be used to simultaneously interpolate the object to a new voxel size by fourier interpolation in powers of 2 (redim_pow2 = 2 -> 4 times interpolation). Laplace_epsilon controls the weight of the curvature image, the higher the epsilon, the more ’edge enhanced’ the image appears. Lp_cut_off_freq is the Hamming filter lowpass frequency in units half the Nyquist frequency: 0.5 is a filter rolling off to 0 just at the Nyquist boundary. Hamming_amp is the amplitude of the Hamming filter, its default is best not varied. ipl> fft_laplace -input [in] >in -output [lh] >out -redim_pow2 [0 0 0] > -laplace_eps [0.900000] > -lp_cut_off_freq [0.400000] > -hamming_amp [1.000000] > norm_max Norm_max has to be applied after fft_laplace_hamming to convert the ’float’ values to ’short’ again. max in the input will be set to the maximal possible value of the chosen data output type type_out (32767 for short), as will all values above max. The values from zero to max will be scaled to the data range available for the output data type. With ’examine lh histo’ the histogram of the fft_laplace output can be viewed, and a suitable max can thus be chosen, normally a value at the upper end of the main distribution. The range of the fft_laplace output can vary greatly for different types of objects, since the curvature can be very different. It is advised, however, to use the same value for max for one type of sample, i.e. within one study population. The value is not very crucial, as long as it is above the respective value that is thresholded afterwards to produce a binary image. ipl> norm -input [lh] > -output [norm] > -max [50000.000000] > -type_out [short] > gobj_maskaimpeel_ow Performs a masking of an object with a GOBJ (or a AIM-mask, needs more memory and time with AIM, though). Voxels outside the mask are set to Zero. Peel_iter gives the number of two-dimensional peel iteration applied to the contours. The operation is working directly on the object, i.e. it is overwriting Zeros on it. NB: Gobj_maskaimpeel_ow may be repeatedly used on the same object, but using a smaller peel_iter number does not restore the region set to Zero anymore, i.e. while trying out different peel_iters, go from small XtremeCT II Version 2.4 DECterm Based Programs 94 numbers upwards. The relative volume of the mask is stored in the proceeding log, which may be shown with ’examine in log’ afterwards. ipl> gobj_mask -input_output [in] >in -gobj_filename [default_file_name] >U0001977.GOBJ -peel_iter [0] > cortex_maskoff Expert function. Combines a GOBJ contour (e.g. the outer bone contour) with a cortex-segmentation mask. The resulting AIM-mask is then the region inside the GOBJ, but without the cortex, i.e. only the trabecular region. The input is a GOBJ file and a volume that should represent the cortex: input_mask. This input_mask has to be produces with seg_gauss beforehand (e.g. with a high sigma 10.0 and support 6, and an appropriate threshold 150 or 300.) cortex_ peel_iter gives a minimal cortex thickness, i.e. the minimal boundary of the outer contour that is excluded in the mask. A component labeling is performed for every slice for the cortex ( cl_cortex in percent) and then for the inner mask ( cl_inner in percent), in the example below, fro every slice only parts of the cortex that take up more than 50% are considered for the slicewise exclusion, and then only parts making up more than 60% are taken for the mask. ipl> cortex_mask -input_mask [in] > -gobj_filename [default_file_name] >u0001234.GOBJ -output [out] > -cortex_peel_iter [5] > -cl_cortex [10.000000] >50. -cl_inner [10.000000] >60. gobj_to_aim Produces a solid, filled volume from a GOBJ file, i.e. the inside of the GOBJ mask. This function is needed if the element-size (voxel size) of the original volume or segmented volume has been changed with scale_el_size, e.g. to make the voxels cubic. Then the GOBJ produced on the original ISQ file does not match anymore, but the AIM-mask produced with gobj_to_aim can be scaled to the appropriate voxel size (scale with integrate false), written to disk and then used in gobj_maskaimpeel_ow. Also any other IPL commands can be applied to the AIM-mask like to any other binary volume. ipl> gobj_to_aim -gobj_filename [default_file_name] >U0001977.GOBJ -output [out] >out -peel_iter [0] > cut2d_shape_ow Cut a two-dimensional ellipse, circle, or rectangle extended along the z-axis from an object and set all points lying outside to zero. The size of the shape type_of_shape is adjusted to the biggest size lying within the x-y plane, if -1 is chosen for halfaxes_x_y, otherwise to the given size (may overlap the boundary). cutborder controls whether the border of the shape is set to zero (true) or not (false). The operation is overwriting, i.e. the input object is altered! ipl> cut2d_shape XtremeCT II Version 2.4 -input_output [in] > -type_of_gobj [circle] > -halfaxes_x_y [-1-1] > -midpos_x_y [-1-1] > -cutborder [false] > DECterm Based Programs 95 cl_ow_rank_extract Component labeling (CL) of a segmented image. Faces have to touch for voxels to be considered connected, i.e. a voxel can have 6 connected neighbors. Extracts the regions with the given rank in the size ordered table. Overwrites the input. Usually used with rank 1 to 1 to remove any small noisy speckles not connected to the main structure. connect_boundary controls whether the whole boundary of the box containing the object acts as a connector of surface points. ipl> cl -input_output [seg] > a -first_rank [1] > -last_rank [1] > -connect_boundary [false] > -value_in_range [127] > cl_rank_extract Same as above, but not overwriting the input. Uses more memory. ipl> cl_rank -input [seg] > -output [cl] > -first_rank [1] > -last_rank [1] > -connect_boundary [false] > -value_in_range [127] > cl26_rank_extract Similar as above, but also voxels only touching by an edge are considered connected. ipl> cl26_rank -input [seg] > -output [cl] > -first_rank [1] > -last_rank [1] > -connect_boundary [false] > -value_in_range [127] > cl_extract Same as cl_rank_extract, but extracting according to fractional volume of components. Not available with connect_boundary flag. ipl> cl_extract -input [seg] > -output [cl] > -lo_vol_fract_in_perc [1] > -up_vol_fract_in_perc [1] > -value_in_range [127] > cl_nr_extract Same as cl_rank_extract, but extracting according to number of voxels of components. Not available with connect_boundary flag. ipl> cl_nr_extract -input XtremeCT II Version 2.4 [seg] > -output [cl] > -min_number [10] > -max_number [0] > -value_in_range [127] > DECterm Based Programs 96 cl_image Gives the component labeled image as output, with value 127 for biggest connected part, 126 for second biggest etc. ipl> cl_image -input [seg] > -output [cl] > db_scanco_activate Activates (or deactivates) the database for writing all subsequent evaluation results into it. It stays activated until db_scanco_activate false is entered. ipl> db_scanco_activate -write [true] > tri_da_metric_db This command triangulates a segmented object and calculates object volume and surface as well as the structure model index (SMI). Using the plate model, trabecular number, thickness and separation are derived. Tri_da_metric_db uses the contours of a GOBJ or AIM-mask if it finds the GOBJ filename in the proceedings log. Otherwise, the whole box region is evaluated. The results are written into the database ( db), if the database was activated, see db_scanco_activate. You should usually not modify the default values of the arguments ip_sigma, ip_support, ip_threshold, interpolate, nrave_ iter, t_dir_radius, epsilon. The output is an object with nr_views different 3D views of the triangulated object. This output may be written to disk with ’msq_from_aim’ and viewed with the 3D-Display program. ipl> tri -input [th] >seg -output [tri] > -gobj_filename [gobj_from_log] > -peel_iter [-1] > -ip_sigma [2.000000] > -ip_support [1] > -ip_threshold [64] > -interpolate [true] > -nr_ave_iter [0] > -t_dir_radius [2] > -epsilon [1.200000] > -size_image [512 512] > -scale_image [0.700000] > -edges [false] > -nr_views [0] > dt_object_param Calculates the mean thickness of the structure with the distance transformation (DT) method by filling largest spheres into the object and calculating their mean diameter (volume weighted mean). Mean thickness and standard deviation are written to the database, if activated. The output object shows the spheres fitting inside the structure with the voxel values being their diameter in voxel units. Dt_object_param uses the contours of a GOBJ or AIMmask if it finds the GOBJ filename in the proceedings log. Roi_radius_factor controls whether only a sphere is evaluated or the whole region (default). DT also works with GOBJ-masked objects. The epsilons are used for suppressing artefacts due to rough surfaces. You should usually not modify the default values. (For very coarse voxel sizes above 100 µm, assign_epsilon 0.9 may be chosen.) Histogram_or_screen controls whether a histogram of the thickness distribution is written to a text file and/or shown on the screen. ipl> dt_obj XtremeCT II Version 2.4 DECterm Based Programs 97 -input [in] > -output [out] > -gobj_filename [gobj_from_log] -peel_iter [-1] -roi_radius_factor [10000.0] > -ridge_epsilon [0.900000] > -assign_epsilon [1.800000] > -histofile_or_screen [none] >samp012_thickness.tab dt_background_param Calculates the mean separation of the structure with the distance transformation (DT) method by filling largest spheres into the background of the object and calculating their mean diameter (volume weighted mean). Mean separation and standard deviation are written to the database, if activated. The output object shows the spheres fitting inside the background with the voxel values being their diameter in voxel units. Dt_background_param uses the contours of a GOBJ or AIM-mask if it finds the GOBJ filename in the proceedings log. Roi_radius_factor controls whether only a sphere is evaluated or the whole region (default). DT also works with GOBJ-masked objects. The epsilons are used for suppressing artefacts due to rough surfaces. You should usually not modify the default values. (For very coarse voxel sizes above 100 µm, assign_epsilon 0.9 may be chosen.) Histogram_or_screen controls whether a histogram of the thickness distribution is written to a text file and/or shown on the screen. ipl> dt_back -input [in] > -output [out] > -gobj_filename [gobj_from_log] -peel_iter [-1] -roi_radius_factor [10000.0] > -ridge_epsilon [0.900000] > -assign_epsilon [1.800000] > -histofile_or_screen [none] > dt_mat_param Calculates the mean trabecular number of the structure with the distance transformation (DT) method by filling largest spheres into the background of the mid axis transformed object (-> mat) and calculating their mean diameter (volume weighted mean). Mean number and standard deviation are written to the database, if activated. The output object shows the spheres fitting in between the mid axis structure with the voxel values being their diameter in voxel units. Dt_mat_param uses the contours of a GOBJ or AIM-mask if it finds the GOBJ filename in the proceedings log.Roi_radius_factor controls whether only a sphere is evaluated or the whole region (default). DT also works with GOBJ-masked objects. The epsilons are used for suppressing artefacts due to rough surfaces. You should usually not modify the default values. (For very coarse voxel sizes above 100 µm, assign_epsilon 0.9 may be chosen.) Histogram_or_screen controls whether a histogram of the thickness distribution is written to a text file and/or shown on the screen. ipl> dt_mat XtremeCT II Version 2.4 -input [in] > -output [out] > -gobj_filename [gobj_from_log] -peel_iter [-1] -roi_radius_factor [10000.0] > -ridge_epsilon [0.900000] > -assign_epsilon [1.800000] > -histofile_or_screen [none] > DECterm Based Programs 98 dt_mat_output Performs the mid axis transformation of the structure and saves the mid axes in the output. ipl> dt_mat_output -input [in] > -output [out] > -ridge_epsilon [0.900000]> connectivity Calculates the connectivity density of a segmented object, according to Odgaard and Gundersen (Bone 14:173182; 1993). To insure that only one connected object and one connected background is evaluated, a component labeling and extraction of the dominant component is performed for both the foreground and the background. Use conn_nocl and conn_bgcl if you wish no component labeling or only a background component labeling/extraction, e.g. if a component labeling is already incorporated into the segmentation. Note The component labeling and extraction changes the input volume! ipl> connectivity - in_out [in] > conn_nocl Calculates the connectivity density of a segmented object without prior component labeling. If the object consists of more than one unconnected part, you would have to add the number of components minus one to the connectivity, and then calculate the connectivity density. Likewise, if the background is made up of more than one part, you would have to add the number of background components minus one. ipl> conn_nocl -in_out [in] > conn_bgcl Calculates the connectivity density of a segmented object with only component labeling and extraction of the background. If the object consists of more than one unconnected part, you would have to add the number of components minus one to the connectivity, and then calculate the connectivity density. Note The component labeling and extraction changes the input volume! ipl> conn_bgcl -in_out XtremeCT II Version 2.4 [in] > DECterm Based Programs 99 voxgobj_scanco_param Evaluates a segmented image for the fraction of voxels set and writes result to the database (if activated). For gray scale (original) images, mean attenuation coefficient is written to database. The object is masked again with the given GOBJ or AIM-mask. By default, the GOBJ filename is taken from the proceedings log (last occurrence of a GOBJ filename). If the GOBJ file is not found, vox_scanco_param (see below) is applied. Peel_iter controls the number of 2D peel iterations for the mask. By default, peel_iter is taken from the proceedings log. ipl> vox -input seg -gobj_filename gobj_from_log -peel_iter -1 vox_scanco_param Evaluates a segmented image for the fraction of voxels set and writes result to the database (if activated). For gray scale (original) images, mean attenuation coefficient is written to database. If the proceedings log of the object contains a GOBJ mask operation, the relative volume of the masked region is incorporated into the calculation. ipl> vox_scanco seg mil_param This command executes the MIL-calculations (Mean Intercept Length, Parfitt). You should usually not modify the default values. If the database is activated, the result of the calculations are written to the evaluation-database. ipl> mil_param -input [default_name] > a -ray_plane_scale [2.000000] > -roi_radius_factor [1.000000] > -t_dir_ortho [no] > -t_dir_ortho_nr [8] > -t_dir_radius [2] > -fabric_tensor [yes] > milv1_param This command executes the MIL-calculations in its first version (different border handling). You should usually not modify the default values. If the database is activated, the result of the calculations are written to the evaluation database. ipl> milv1 -input [default_name] > a -ray_plane_scale [2.000000]> -roi_radius_factor [1.000000]> -t_dir_ortho [no] > -t_dir_ortho_nr [8] > -t_dir_radius [2] > -fabric_tensor [yes] > histo Gives a histogram of an object. With the default arguments same effect as ’examine in histo’. Optionally, the histogram is shown from from_val to to_val, default from minimal value to maximal value found in input volume. Optionally, a tabulated version of the histogram is printed to a file (given with fileout_or_screentab) or the screen (fileout_or_screentab screen, in addition to the bar-column representation) with the number of bins given with nr_bins_in_tab. The number of bins in the bar-column representation is not affected by nr_bins_in_tab! XtremeCT II Version 2.4 DECterm Based Programs 100 ipl> histo -input [in] > rat -fileout_or_screentab [none] > my_histo.tab -from_val [-1] > 1500 -to_val [-1] > 3000 -nr_bins_in_tab [-1] > scale_elsize Using this command you can change the voxel size of your object. down_scale enlarges the voxel size (reduces the resolution), up_scale makes the voxel size finer. Non-integer scaling can either be given directly, e.g. with down_scale 1.5; or with a combination of down_scale 3 and up_scale 2. The effect is exactly the same, the latter may just save you a division by hand. The integrate flag controls whether averaging of voxels is done in down-scaling (and potential interpolation of partial voxels) and whether interpolation is done in upscaling. It is suggested to use integrate true for gray-scale images, but integrate false for binary segmented images to preserve the binary status. Otherwise a subsequent thresholding operation may be needed to ensure a binary image again. Scale_elsize automatically selects among the below described procedures ipscale_elsize and noipscale_elsize, according to whether there are frac- tional voxels who may then be interpolated ( ip): For integer down-scalings noipscale is chosen, for non-integer down-scalings and any up-scalings ipscale is chosen. The exception is non-averaging scaling of binary objects always with noipscale to maintain the binary status, if the integrate flag is put on false. If a GOBJ mask is used for the evaluation of an object, the GOBJ mask has to be transformed into an AIM-mask with gobj_to_aim, and this AIM-mask can then be scaled to the same voxel size as the original object. Use integrate false for the mask scaling to preserve the binary status of the mask (alternatively, after masking with integrate true, perform a threshold operation to produce a binary mask again). ipl> scale -input [in] > a -output [sca] > x -down_scale [2.000 2.000 2.000] > -up_scale [1.000 1.000 1.000] > -integrate [true] > ipscale_elsize One constituent of scale_elsize. If the new voxel grid is not a integer multiple of the original voxel grid, then the new values lying between old voxels points are interpolated ( ip), and depending on the integrate flag also averaged over the voxel volume. The center flag controls whether the center of the object is still in the center of the scaled object, or whether the upper left top corner is also the beginning of the scaled object (center false). The computation time and memory needed is larger than for noipscale_elsize. ipl> ipscale_elsize -input [in] >a -output [sca] >b -down_scale [2.000 2.000 2.000] >1 -up_scale [1.000 1.000 1.000] >2 -center [false] > -integrate [true] > noipscale_elsize Scales the objects without interpolating non-integer voxel locations in the scaled object, but takes nearest neighbor approach. Computational faster and uses less memory, but nearest neighbor choice may create less accurate scaling. Does not account for fractional voxels for non-integer scaling, even if XtremeCT II Version 2.4 DECterm Based Programs 101 average flag is true, e.g. for down_scale 2.6 and average true, only 2 voxels are averaged (per direction). ipl> noipscale -input [in] > a -output [sca] x -down_scale [2.000 2.000 2.000] > -up_scale [1.000 1.000 1.000] > -average [true] > scale_ow_elsize_noip Same as noipscale_elsize, but overwrites input. Saves memory. Does not work for increasing resolution, since output memory would have to be bigger than input memory. ipl> noipscale -input_output [in] > a -down_scale [2.000 2.000 2.000] > -up_scale [1.000 1.000 1.000] > -average [true] > set_value With this command you can set the value of all non-zero voxels of a segmented object to a given value and all zero voxels to another. Useful for inverting foreground/background of the object and for producing a negative image (value_object -127). ipl> set_val -input [in] > -value_object [127] > -value_background [0] > concat Concatenates two objects. Common_region_only: if two objects with unequal dimensions or unequal positions are chosen, this flag controls whether the region common to both objects is taken; or whether the box region surrounding both objects is produced. Add_not_overlay: Controls whether voxel values of second object are added to the first object - with overflow taken care of, i.e. 60+90=127+50=127 for char images; or whether non-zero values are laid over the first object, useful for mapping the segmented image onto the original gray-scale data. Make_edge: controls whether edges are made of second object (or first, if second is gray scale and first is char). The second object can be shifted with shift_ofin2 and turned in the x-y plane with turnangle. Turnpoint_global is tried to be set to the original rotation center of the scanner, i.e. for 512x512 images to 256,256 etc. The turned image2 is mapped into the same box as image2, thus for larger angles the image may be cut at the boundary if there is not enough free space left around the object to contain the turned image2. Subtraction of two binary images can be performed by a combination of /set_value of input2 to -127 and then concat it with input1, flag add true. ipl> concat -input1 [in] > a -input2 [in1] > b -output [out] > c -common_region_only [true] > -add_not_overlay XtremeCT II Version 2.4 [true] > -make_edge [false] -shift_ofin2 [0 0 0] > > -turnangle [0.000000] > -turnpoint_global [-1-1] > DECterm Based Programs 102 join_uncompress This operation joins two segmented volumes directly while reading and uncompressing from the disk, thus only needs the memory of the output volume once. It may be useful if concat does not work because of too small virtual memory. The compressed files are read from disk and the uncompressing is done directly into the correct memory location in the output. The volumes may be overlapping, but then the respective part of file2 is overwritten (including zeros) onto file1. Note Join_uncompress only works for compressed files on disk and only works for volumes with the same dimensions in x and y direction! ipl> /join -file1 [file1] > rat_seg_part1.aim -file2 [file2] > rat_seg_part2.aim -output [out] > -shift_ofin2_z [0] > bounding_box_cut This operation determines the smallest box around the object of non-zero voxels. An additional boundary can be chosen with border. z_only controls if only the bounding box in z direction is determined and cut out with a given border. ipl> /bounding_box_cut -input1 [in] > -output [out] > -z_only [false] > -border [0 0 0] > flip_aim Flips an object to a side, i.e. x, y and z direction are switched according to new_xydir (NB: it is not necessarily a proper rotation of the object in 3D space!). The new x direction is the first letter given in new_xydir, the new y direction is the second letter, the new z direction is the remaining direction. ipl> flip_aim -input [in] > a -output [out] > f -new_xydir [yz] > xz offset_add Changes the offset around the object. The offset is the same for the beginning and the end for one direction (voxels run from +off.x to dim.xoff. x), but may be different for the different directions x, y and z. The offset is then disregarded in subsequent image processing or statistical examinations. ipl> offset_add -input [in] > a -add_offset [0 0 0] > 0 0 4 offset_set Changes the offset around the object, independent of what it was before. ipl> offset_set -input XtremeCT II Version 2.4 [in] > b DECterm Based Programs 103 -new_offset [0 0 0] > 2 2 1 clear_offset Sets all voxels in the (optionally new) offset to zero. ipl> offset_set -input [in] > b -new_offset [-1-1-1] > 2 2 1 fill_offset_mirror Fills the offset of an object with the mirrored values just to the inside of the offset. May be used after operations that ’steal’ from the image, e.g. gauss-filter. Be aware that voxel information is just duplicated and that values calculated afterwards can be biased. ipl> fill_offset_mirror -input [in] > in convert_to_type This converts objects from one input type to another, e.g. a ’char’ image to a ’short’ image. The output type is given by out_type. ipl> convert_to_type -input [in] > -output [out] > -out_type [short] > xray Produces a virtual (linear) X-ray image of the object along the z-axis (flip the object with ’flip_aim’ first for other desired orientations). The output is a ’char’ image. The voxel values (for every x and y) are added along the z-axis from startslice for number_of_slices, and the sum is either normalized with the largest occurring voxelsum (fixed_norm_char false) or to a fixed norm for binary input volumes (fixed_norm_char true). ipl> xray -input [in] > -output [out] > -startslice [0] > -number_of_slices [16] > -fixed_norm_char [true] > msq_from_aim Write an object in memory to disk in the .MSQ format, e.g. to view it with the 3D-Display program. ipl> msq -aim_name [out] > -msq_filename [default_file_name] > from_aim_to_isq Write an object in memory to disk in the .ISQ format, e.g. to produce a GOBJ with the Evaluation program again. The object will be at its original (global) position. ipl> from_aim_to_isq -aim_name [out] > -isq_filename [default_file_name] > For an extensive discussion of the obtained structural indices see Appendix see “Explanation of Structural Indices” p. 118. XtremeCT II Version 2.4 DECterm Based Programs 104 UCT_THREEDEE_BATCH Use this program to recreate a 3D-result-sheet including the 3D-image and the histomorphometry-values calculated by IPL. Filename Enter the correct filename of the sample/measurement you want. It MUST have a filename of *_SEG.AIM. The file is usually located in the following directory: DK0:[MICROCT.DATA.ssssssss.mmmmmmm], where s is the 8-digit sample number and m is the 8-digit measurement number. PrintFilename You can enter any valid filename for the intermediate storage of the resulting PostScript-File. We recommend a filename like SYS$SCRATCH:filename.PS. Ambient This value corresponds to the scaler of Ambient Light in the interactive 3DDisplay-Program. The value can be from 0 to 100%, here to be entered as a value between 0.0 and 1.0. Shading A value of 1 will lead to shadows, a value of 0 not. Size This value determines the quality of the 3D-image but also affects the calculation time. Elevation/Rotation These two numbers define the position of the observer relative to the object in degrees. Copies Enter a value between 0 and 9, and the corresponding number of copies will be printed. At the end of printing, the result file (printfilename) will be deleted. If you enter a value of 0, the file will neither be printed nor be deleted afterwards, but is kept on the hard-disk. This option can be used to print it on a different printer later. UPAT_LIST upat_list accesses, analyses and outputs evaluation data from XtremeCT II scans. Analysis involves optional matching of common slices between baseline and follow-up measurements, and calculation of percentage variations of evaluation values over time series. No data is saved in the evaluation databases. Three modes are supported by upat_list to simplify automatic selection of default parameters. You can delimit the range of your samples being listed by entering the measurement number range. $> upat_list Program: upat_print_list V1.9 Started: 11-AUG-2010 11:12:13.14 Mode (1 = list, 2 = print, 3 = show) [1]: choose 1, 2 or 3 First patient # (found 1-120) [1]: Last patient # (found 1-120) [120]: Site (RL RR R* TL TR T* CU *) [*]: * is wildcard, any site Start of measurement period [15-MAY-2009]: End of measurement period [25-MAR-2010]: Maximum # of follow-ups (0-19) [19]: XtremeCT II Version 2.4 DECterm Based Programs 105 Template file [UPAT_LIST_SHEET]: Output filename: [SYS$SCRATCH:UPAT_PAT_1_TO_120_ALL_SITES.TXT]: The resulting data is written to the file given in Output-File. The output file is written into SYS$SCRATCH unless user specifies an alternative directory. UCT_LIST Use this program for ex vivo measurements only. Once you have measured many biopsies, you might want to have all your results in table form to include them into a spreadsheet program. You can delimit the range of your samples being listed by entering the measurement number range. $> uct_list Template-File [UCT_3D_LIST_SHEET]: Output-File [SYS$SCRATCH:UCT_EVAL.TXT]: From Meas. # [0]:300 To Meas. # [0]:400 The resulting data is written to the file given in Output-File. The template file input- field can be used for different types of report. You can modify the files using a text editor. If you start the program by entering a measurement number as parameter, you will get the information of that specific measurement on the screen: $ uct_list 43 Processing measurement 43 Measurement-Nr :43 Measurement-Date :15AUG1994 09:01 Filename :C0000007 Sample-Name :Koller Bruno Sample-Nr :1 Date of Birth :06-SEP-1994 MIL --------------------------------------------------------BV : 1.7211 TV : 5.0782 BS : 35.4409 BV/TV : 0.3389 BS/BV : 20.5926 Tb.Th : 0.0971 ... WRITE_INFO Once you have measured many biopsies, you might want to have all information about filenames, archiving data (directories, tape labels etc.) in table form. You can delimit the range of your samples being listed by entering the sample numbers and/or the sample names. $> write_info Sample Index from [ 0]: 13 Sample Index to [ 0]: 64 Sample Name from [ ]: S Sample Name to [ ]: T The logical UCT_DB_INFO usually points to the resultant text file which is usually in sys$scratch. XtremeCT II Version 2.4 DECterm Based Programs 106 12 Error Messages The most common error messages (caused by insufficient or incorrect information for a measurement) are self-explaining. Unforeseen system error messages are explained in the alphabetic list below. All error messages must be acknowledged with MB1. If the error is only a "WARNING", you can continue working. If the error is "FATAL" however, the program will then be terminated, as a continuation is impossible (can also occur by "ERROR"). Italic text shows what you can do yourself against the error. If there is no italic text after the error message, contact SCANCO MEDICAL AG. Creating directory Write error on the hard disk. Creating operator logical Operating personnel cannot be registered. Try starting the program again. Decoding Measurement Nr. Measurement number invalid. Decoding Sample or Patient Nr. Sample or Patient number invalid. Decoding Site Measurement site invalid. Decoding Slice Number Image number invalid. Deleting indexed Record An entry in the database cannot be deleted. Disk must have a name Diskette was not initialized (formatted). Initialize the diskette. Encoding Slice Number Image number invalid. End of file. No more records available There are no further entries to be read in the database, as you have reached the end. File Read Error A tomogram cannot be read. Usually appears only when a measurement was interrupted or if the images belonging to a measurement have been deleted. Freeing logical unit number ... General database error. Getting Binary Time The time cannot be determined. Getting current date/time The time cannot be determined. Getting free logical unit number General database error. Getting number of free blocks Free space on a storage device cannot be determined Getting volume name The label of a storage device cannot be determined. Keyword not found An entry in the database cannot be found, for example, when looking for a sample or patient who has not yet been registered, or whose name has been spelt incorrectly. XtremeCT II Version 2.4 Error Messages 107 Name contains a wrong character Names of data media can only use the letters A - Z or the numbers 0 - 9, but no spaces or special characters. No Controlfile selected You have not yet selected a controlfile (Measurement site and cast) No Sample- or Patientname You have not yet entered a sample’s or patient’s name No Sample- Patientnumber You have not yet selected a sample or patient No images available The pictures for the measurements cannot be read. Have you selected a valid measurement? Have you possibly deleted its images? No logical unit number free General database error. No operator selected For measurement and evaluation, the field OPERATOR must be filled in with a valid name. Check in the sample or patient registration program whether the operator has been accidentally entered as a patient or as a physician (operator must be a member of the staff). No scout-scans performed Number of slices = 0 is not allowed Not enough disk space left Hard disk is full. First delete or archive other measurements. Not enough space on disk Optical disk is full. Use new optical disk. Not more than 15 characters The label of a diskette or an optical disk may not be longer than 15 characters. In addition, no special characters or spaces may be used. Opening database file General database error. Opening filename General database error. Opening scanner datafile Scanner calibration data cannot be opened. Opening slicename file Slicename-file cannot be opened. Reading Slice Number General database error. Reading filename General database error. Reading indexed record An entry in the database is not found, for example when looking for a sample or patient who has not been entered or has been spelt incorrectly. UM:FULL_BACKUP.COM General error by weekly backup. Selected operator is not an operator You have attempted to enter an invalid person as the operator (for example a patient or doctor). If this is not the case, check with the sample or patient recording program whether the STAFF button is pressed. Unable to translate logical General program error Unknown error Error for unknown reason XtremeCT II Version 2.4 Error Messages 108 Unlocking indexed record General database error. Updating indexed record General database error. Error Messages 83 Writing Slice Number General database error. Writing data General database error. Writing filename General database error. Writing indexed record General database error. Wrong Volume (label) Wrong diskette or optical disk has been loaded. copying files General database error. deleting filename General database error. dismounting device Error while dismounting a diskette or optical disk. End the program and start again from new. Possibly check with the archiving program whether the storage device is still "mounted". Normally, both optical disks and diskettes are "dismounted". freeing context of lib$find_file General database error. get device information The specifications of a storage device could not be determined getting free luno General database error. initializing device (label) Diskette or optical disk could not be initialized. Check whether the "Write-Protect" switch is correctly set. Diskettes must be of the HIGH DENSITY (HD) format, DD or ED diskettes are not allowed. mounting device (label) Diskette or optical disk could not be "mounted". Check with the archiving program. (see dismount) PC formatted diskettes are not readable on your computer without formatting. opening file General database error. reading Scanner data General database error. starting init command Initialization / formatting error. writing scanner data General database error. XtremeCT II Version 2.4 Error Messages 109 Appendix A: Additional Information Mouse Operation MB1 means left mouse button. MB2 is the middle mouse button. Usually, all actions are performed using MB1, except for scaling a ROI or VOI in the evaluation program. Elements of the Graphical User Interface Window / Dialog Box All windows have a frame. The active window (in which your switch commands are carried out) has a dark frame, and the inactive windows have light frames. You can move the windows around the screen by clicking on the top bar using MB1 and dragging it to the desired position. To iconize a window, click on the small rectangle on the top right. To restore the window from the icon, double click on the icon using MB1. All error messages must first be acknowledged with OK or CANCEL before you can make other entries. This is also the case with most of the other input windows (for example, finding a patient, Scout-View, measurements, etc.). Push-Button Click with MB1 on the button. The function which describes the button will be carried out. Toggle-Button Selection: The button can either be pressed or not. (with MB1) Radio-Button Selection: Only one button can be pressed (with MB1) Text-Field Click on the field with MB1 and then enter the text. Scroll-Bar Click on the bar in the middle with MB1. Hold MB1 pressed and move the mouse. The field next to the scroll bar moves. The length of the scroll-bar corresponds to the whole field, the length of the bar corresponds to the displayed area. XtremeCT II Version 2.4 110 Option-Menu Selection: Click on the menu with MB1 and all the possibilities then appear. You can now make your choice with MB1. Pull-down-Menu Selection: Click on the menu with MB1 and all the possibilities appear. You can now make your choice with MB1. Scaler Click on the scaler with MB1. Hold the key pressed and move the mouse. The input values change. If the scaler is surrounded by a rectangle click on it to make it active) you also can use the LEFT and RIGHT ARROW keys to change the value. By using CTRL/ARROW, you can change the values in larger steps. Input / Change of the Header and Footer of the Print-Out On the result sheets the name of the physician or hospital appears at the top and bottom of the sheet. You may have either the default output sheets or customized ones. If you have the standard sheets, you can change the header and footer. Choose the operator registration program and find the number 1. At the top of the sheet appear the fields Name and Address 1, at the bottom of the sheet the fields Address 2, Zip-Code and City. XtremeCT II Version 2.4 111 Appendix B: Files Used and Created by MicroCT Directory Structure The directory structure is as follows: MICROCT|--DATA----|--00000001--|--00000048 | | |--00000049 | | |--00000050 | | |--00000051 | | | |--00000005--|--00000065 | | |--00000066 | | |--00000067 | | | |--00000007--|--00000129 | | | | | |--SCOUTS |--00000130 | |-DATABASE |-MAIN |-RESULTS |-SCRATCH |-TIPS |-UIL |-UTIL |-XDEFAULTS The directories [MICROCT.DATA...] reside on DISK2, all other directories are located on DISK1. [MICROCT] -LOGIN.COM User definitions -MICROCTXXXX.COM MicroCT definitions -MICROCT_DATABASE.COM Database logicals [MICROCT.DATA.SSSSSSSS.MMMMMMMM] Main measurement directory, where SSSSSSSS (8 digits) is the sample number and MMMMMMMM (8 digits) is a consecutive measurement number (unique for one database). In these directories, the following files can be found: Cxxxxxxxx.RSQ Raw Data (Sinogram sequence) Cxxxxxxxx.ISQ Image Data (Slice sequence) Cxxxxxxxx.AIM VOI of Image data Cxxxxxxxx_SEG.AIM Binarized VOI Cxxxxxxxx.MSQ Animated 3D-Sequence (not always present) where xxxxxxx is a consecutive 7-digit number (unique number for scanner) XtremeCT II Version 2.4 112 [MICROCT.DATA.SCOUTS] ssssssssccc.SCV compressed Scout-Views where ssssssss is the 8-digit sample number and ccc is the 3-digit controlfile number. [MICROCT.DATABASE] UCT_CONTROLFILES_nnn.DAT Controlfile-DB UCT_EVALUATIONS_nnn.DAT Evaluation-DB UCT_MEASUREMENTS_nnn.DAT Measurement-DB UCT_OPERATORS_nnn.DAT Operator-DB UCT_SAMPLES_nnn.DAT Sample-DB UCT_SCANNER_xxxx.DAT Scanner calibration UCT_SLICENAME_xxxx.DAT Slicenumber UCT_ZIP_CODES_nnn.DAT Zip-Codes (operator) where nnn is the name of the customer and xxxx is the scanner SN. [MICROCT.MAIN] contains all programs and command-procedures needed for operating the system. [MICROCT.RESULTS] Contains the summary-files of 2D-Histomorphometric evaluations. The file names are HISTO_2D_xxx.DAT, where xxx is the measurement number. [MICROCT.SCRATCH] All temporary files for evaluation and printing are stored to this directory. Content can be deleted at any time. [MICROCT.TIPS] Sample documents describing OpenVMS-tasks as well as actions to perform interactive segmentation etc. [MICROCT.UIL] User Interface Description Directory. Files define the look of the programs. If available, subdirectories for different language variants. The template files for printing (*.PS) also are located in this directory. [MICROCT.UTIL] This directory contains Utility-Programs mainly used by Service Personnel. [MICROCT.XDEFAULTS] Directory containing settings for X-Windows-Environment. XtremeCT II Version 2.4 113 Appendix C: Logicals and Symbols Definition of Logicals and Symbols The logicals and symbols used by MICROCT are defined in the following files: • • • • • XtremeCT II Version 2.4 SYS$STARTUP:SCANCO_SYLOGICALS.COM (Systemwide) DISK1:[MICROCT]LOGIN.COM (Process/Job) DISK1:[MICROCT]MICROCT_SETUP.COM (Process/Job) DISK1:[MICROCT]MICROCT_SETUP_USER.COM (Process/Job) DISK0:[MICROCT_COMMON]MICROCT_SETUP_COMMON.COM(Process/Job) 114 Logicals Logical MICROCT_SCSI UCT_ACQ_LINE DISK0 DISK1 DISK2 DK0 MO0 FD0 TP0 SYS$LOGIN SYS$SCRATCH UM/SCM UU/SCU UCTD/SCD UCT_MEASUREMENT_DATA SCANCO_SCOUT_DATA UCT_HISTO_RESULTS UCT_BATCH_MEASUREMENT UCT_MEASUREMENT_QUEUE UCT_RECONSTRUCTION UCT_RECONSTRUCTION_QUEUE UCT_RECONSTRUCTION_FILE UCT_RECONSTRUCTION_SCALING UCT_BEAMHARD_FACTOR UCT_BEAMHARD_POWER UCT_EVALUATION UCT_RAY_VOLUMESIZE SCANCO_DEF_PRINTER SCANCO_BW_PRINTER SCANCO_COL_PRINTER SCANCO_PS_PRINTER UCT_EVALUATION_SHEET UCT_HISTO_2D_SHEET UCT_RAY_SHEET UCT_SINGLE_IMAGE_SHEET UCT_ONE_IMAGE_SHEET UCT_FOUR_IMAGES_SHEET UCT_SIXTEEN_IMAGES_SHEET UCT_3D_LIST_SHEET UCT_3D_SINGLE_SHEET UCT_CONTROLFILES_DATABASE UCT_MEASUREMENT_DATABASE UCT_EVALUATION_DATABASE UCT_SAMPLE_DATABASE UCT_SCANNER_DATA UCT_SLICE_NAME_FILE SCANCO_PATIENT_DATABASE SCANCO_ZIP_CODE_DATABASE UCT_DB_RESULTS UCT_DB_INFO UCT_BACKUP_COMMANDFILE XtremeCT II Version 2.4 Meaning SCSI-Controller SCSI-Controller System-Disk User-Disk Data-Disk Data-Disk Magneto-optical drive Floppy-Drive Streamer Tape Login Directory Scratch Directory Directory for Programs Directory for Interface and PrintingDirectory for Database-Files Measurement Main Directory Scout-View-Directory Directory for 2D_Hist. Results Batch-Measurement-Script Measurement Batch Queue Slice Reconstruction Image Reconstruction Batch Queue Reconstruction Command ProceReconstruction scaling factor Beamhardening Correction Beamhardening Correction 3D-Evaluation Batch-Template Min. Volume-Size in MB for linear Default Printer Queue B/W Printer Queue Color Printer Queue PostScript-Printer Queue Template for 3D-Histomorph. EvalTemplate for 2D-Histomorph. EvalTemplate for Ray-Tracing Template for Main-Image Template for image printing (1) Template for image printing (4) Template for image printing (16) Template for Listing of 3D-parameTemplate for Display of 3D-paramControlfiles-DB Measurement-DB 3D-Evaluation-DB Samples-DB Scanner Calibration Data Current Slice number OperatorDB Zip-Codes-DB (operators) Result-File of DB 3D-histo-query Result-File of DB Infor-query Command-Procedure for offline Default Value Type SCANCO_DEF_PRINTER S P S S S P S S S P P P J P P P P P P P P P P P P P P P P P P UU:UCT_EVALUATION_EN.PS P UU:UCT_HISTO_2D_EN.PS P UU_UCT_RAY_EN.PS P UU:UCT_SINGLE_IMAGE_EN.PS P UU:UCT_ONE_IMAGE_EN.PS P UU:UCT_FOUR_IMAGES_EN.PS P UU:UCT_SIXTEEN_IMAGES_EN.PS P DKB100 MICROCT_SCSI DKA0 DKA0 DKA100 DKA100 WDB200 DVA0 MKC500 DISK1:[MICROCT] DISK1:[MICROCT.SCRATCH] DISK1:[MICROCT.MAIN] DISK1:[MICROCT.UIL] DISK1:[MICROCT.DATABASE] DK0:[MICROCT.DATA.] DISK1:[MICROCT.DATA.SCOUTS] DISK1:[MICROCT.RESULTS] UM:UCT_BATCH_MEASUREMENT.COM SYS$BATCH UM:FAN_RECONSTRUCTION.EXE SYS$SLOW UM:UCT_RECONSTRUCTION.COM 4096 system dependent system dependent UM:UCT_EVALUATION_V4.COM 500000000 (=500 MB) DL3500_PS DL3500_PS TEK_PS UU:UCT_3D_LIST.TXT P UU:UCT_3D_SINGLE.TXT P UCTD:UCT_CONTROLFILES_cust.DAT P UCTD:UCT_MEASUREMENTS_cust.DAT P UCTD:UCT_EVALUATIONS_cust.DAT P UCTD:UCT_SAMPLES_cust.DAT P UCTD:UCT_SCANNER_xxxx.DAT P UCTD:UCT_SLICENAME_xxxx.DAT P UCTD:UCT_OPERATORS_cust.DAT P UCTD:UCT_ZIP_CODES_cust.DAT P SYS$SCRATCH:RESULTS.TXT P SYS$SCRATCH:INFO.TXT P SYS$SCRATCH:ARCHIVE.COM P 115 Symbols Symbol Meaning Default Value UCT Foreign command for Main Program $UM:UCT_MAIN.EXE UCT_BACKUP Foreign command for Backup Program $UM:UCT_B.EXE UCT_EVALUATION Foreign command for 3D-Evaluation Program $UM:UCT_K.EXE UCT_LIST Foreign command for DB-QueryProgram $UM:UCT_LIST.EXE UCT_MEASUREMENT Foreign command for Measurement Program @UM:UCT_MEASUREMENT.COM UCT_MOVIE Foreign command for AnimationProgram $UM:UCT_MOVIE.EXE UCT_SAMPLE Foreign command for Sample Edit Program $UM:UCT_A.EXE UCT_THREEDEE Foreign command for Interactive 3D-Display $UM:UCT_RAY.EXE UCT_THREEDEE_BATCH Foreign command for Batch 3D-Display $UM:UCT_RAY_BATCH.EXE UCT_UTILITIES Foreign command for Tools Program $UM:UCT_M.EXE IPL Foreign command for Segmentation Program $UM:IPL_SCANCO_M.EXE /INTER SCANCO_SUBMIT_COMMAND How to submit batch jobs SUBMIT/NOPRINT/QUE=SYS$FAST / LOG=SYS$SCRATCH SCANCO_ANSI_PRINT_COMMAND How to print text files PRINT/QUE=DL3500/DELETE SCANCO_PS_PRINT_COMMAND How to print PostScript files PRINT/QUE=SCANCO_PS_PRINTER/DELETE WRITE_INFO Create Informational Report $UM:UCT_WRITE_INFO.EXE XtremeCT II Version 2.4 116 Appendix D: 3D-Batch Evaluation Batch Procedure As soon as you click START EVALUATION... in the Evaluation Program, the command procedure UCT_EVALUATION (logical name, see above for current file specification) is submitted using the symbol SCANCO_SUBMIT_COMMAND. After having selected an Evaluation Script, a job with name EVAL_PROJECT_SSSSSSSS_MMMMMMMM is started, where PROJECT is the project name as defined in the Evaluation Script, e.g. ‘XTEVAL’. The batch job also creates a .LOG file in the Scratch directory with that name. If the Evaluation is started without having selected any scripts, a job with name UCT_EVALUATION or UPAT_EVALUATION_XX is started, where XX depends on the measurement site in the body. The batch job also creates a .LOG file in the Scratch directory with that name. Checking Status and Progress of Batch Jobs To check whether batch jobs are running, enter one of the following commands: $ QUE or to see more details: $ SHOW ENTRY $ SHOW ENTRY/FULL $ SHOW SYSTEM/BATCH To check the progress or status of a batch job, you have to take a look at the batch log file in SYS$SCRATCH. Either double click on the log file in the Session Manager or use the following command: $ TYPE/PAGE SYS$SCRATCH:UCT_EVALUATION_XXXX.LOG with correct xxxx.log filename. You also can omit the /PAGE qualifier and use F1 (toggle for Hold Screen) to check the file. XtremeCT II Version 2.4 117 Appendix E: Explanation of Structural Indices (for Ex Vivo Measurements) MIL Method With the original MIL method, test lines are traced through the segmented volume and the intercepts are counted. The test-line length is then divided to give the mean intercept length. The MIL method as implemented in the IPL module works only for a sphere within the volume of interest. MIL is used to determine the surface to volume ratio (BS/BV), and then assuming a platemodel of bone, trabecular number Tb.N, thickness Tb.Th and separation Tb.Sp can be derived. The distribution of the MILs is taken to determine the principal directions of the MIL ellipsoid and the Degree of Anisotropy. Further literature: H.J.G. Gundersen, T.B. Jensen, R. Østerby. Distribution of membrane thickness determined by lineal analysis. J Microsc 1978;113:2743. TRI Method TRI is used to triangulate the surface of the segmented object, and calculate the volume of the enclosed tetrahedrons and the surface of the triangles. It is a more direct way to get to the surface to volume ratio (BS/BV) than with the MIL method. Still assuming a platemodel of bone, Tb.N, Tb.Th and Tb.Sp can be calculated. To calculate the principal directions of the MIL ellipsoid and the Degree of Anisotropy, the area of the surface triangles are projected onto a directional surface distribution (skalar product of areaweighted normal vector with the directions of the direction distribution), which is the inverse of the directional MILs. Artificial boundaries at the edge of cubic or conforming (GOBJ produced) volumes of interest are not counted in the calculation, i.e. boundary problems are taken care of. Further literature: T. Hildebrand, A. Laib, R. Müller, J. Dequecker, P. Rüegsegger. Direct 3-D morphometric analysis of human cancellous bone: microstructural data from spine, femur, iliac crest and calcaneus. J Bone Miner Res 1999;14(7):116774. Connectivity Density Connectivity density Conn.D. is calculated with the Conn-Euler method of Odgaard et al. Their boundary/edge problem suppression is applied on the surfaces of cubic AIMs, but not on the possibly artificial surface of contoured (GOBJ) determined volumes. Usually, conforming volume of interests are much larger than cubic ones, so the boundary problem has a much smaller effect. For measurements of intact bones, we propose to calculate the connectivity of the complete bone (incl. cortex), or to put an artificial cortex around the spongiosa again with the help of the GOBJ. (create mask.aim from GOBJ with /gobj_to_aim, concat with segmented object with /concat -input1 seg input2 mask -output shelled_seg -common true -add true -make_edge true, / cl shelled_seg, then /gobj_maskaimpeel_ow shelled_seg again to calculate relative masked volume, then calculate connectivity with /conn_nocl shelled_seg). Further literature: XtremeCT II Version 2.4 118 A. Odgaard, H.J.G. Gundersen. Quantification of connectivity in cancellous bone, with special emphasis on 3-D reconstruction. Bone 1993;14:173-182. Structure Model Index With this index the structural appearance of trabecular bone is quantified. The triangulated surface is dilated in normal direction by an infinitesimal amount, and the new bone surface and volume is calculated. By this, the derivative of the bone surface (dBS/dr) can be determined. The SMI is then dBS BV ---------dr SMI = 6 ---------------------2 BS and relates the convexity of the structure to a model type. Ideal (flat) plates have an SMI of 0 (no surface change with dilation of the plates), whereas ideal cylindrical rods have an SMI of 3 (linear increase in surface with dilation of rods). Round spheres have an SMI of 4. Values below 0 can come from ’air bubbles’ within the bone ( concave structure gives negative dBS/dr). Artificial boundaries at the edge of the volume of interest are not included in the calculation and thus suppressed. Further literature: T. Hildebrand, P. Rüegsegger. Quantification of bone microarchitecture with the structure model index. Comp Meth Biomech Biomed Eng 1997;1:15-23. Distance Transformation Methods By distance transformation, the calculation of the metric distance of every bone (object) voxel to the nearest bone-air (background) surface is understood. These distances can be imagined as the radius of a sphere with centre in this voxel that fits inside the structure. Then redundant spheres are removed -’ big sphere eats small encompassed spheres’. The result is the mid axes transformed structure with the centres of maximal spheres filling the structure completely. To calculate Tb.Th*, each voxel then gets the value of the radius of the maximal sphere it sits in, and twice the mean value of all structure voxels then is the mean thickness. To calculate Tb.Sp*, the same procedure is performed for the background of the structure, i.e. object (bone) and background (air) are switched. To calculate Tb.N*, the spacing of the mid axes is calculated as for Tb.Sp*. Then the inverse of the mean spacing is Tb.N*. Further literature: T. Hildebrand, P. Rüegsegger. A new method for the model independent assessment of thickness in threedimensional images. J Microsc 1997;185:6775. T. Hildebrand, A. Laib, R. Müller, J. Dequecker, P. Rüegsegger. Direct 3-D morphometric analysis of human cancellous bone: microstructural data from spine, femur, iliac crest and calcaneus. J Bone Miner Res 1999;14(7):116774. XtremeCT II Version 2.4 119 Appendix F: Checklists Checklist for Measurements • • • • • • • Switch on Equipment (30 Minutes before first measurement) Start main program Enter sample’s data Start measurement program Insert sample/sample holder Choose/Define/Modify measurement protocol (controlfile) Perform Scout-View define Scout-View region perform Scout-View measurement if OK, set reference line • Perform Measurement (batch or interactive mode) • Remove sample Checklist for Evaluation • • • • • • • • • • • • • Switch on equipment (printer, optical disk and computer) Start the main program Select evaluation program Select sample and measurement Click on EVALUATION Click on DEFINE VOI Draw volume of interest Position VOI using MB1 (move) or MB2 (scale) or enter values directly with keyboard. Check Dimensions of VOI (should be equal) Rectangles indicate VOI for 3D-Display Circles indicate VOI for 3D-Histomorphometric Evaluation Click on START EVALUATION Exit program Checklist for Shutdown • • • • • XtremeCT II Version 2.4 Exit from the main program (click on EXIT button) (optional) End Session using Session Manager Enter "Shutdown" as Username, press RETURN twice Wait approximately one minute Switch off equipment 120 Appendix G: Specifications Operational Conditions Ambient conditions: +10°C to +30°C +20°C to +25°C (recommended room temperature) Temperature variations: maximum 3°C / h Relative air humidity: 30-75% Atmospheric pressure: 70- 106 kPa Before starting the system it must have stayed within the above conditions for 2 hours. Caution! Measurements outside the temperature ranges can cause inaccuracies! Dust, smoke: Operate the equipment in a clean environment. Accumulations of dust or other particles can damage sensitive parts. SCANCO MEDICAL AG recommends a smoking prohibition in the area of the scanner. Vibrations: Vibrations can have negative influence on results. Place the scanner on a flat and stable surface free from vibrations. Transport Conditions Ambient conditions: -40°C to +70°C (water loop must be empty for temperatures below 0°C. In any case, after a transport, it must be checked that no air is in the water pump) Relative air humidity: 10 - 100% , non condensing Atmospheric pressure: 50- 106 kPa IEC/UL 60601-1 Stationary equipment Class I with applied part type B Classification Complies with ANSI/AAMI ESB60601-1 (2005), CAN/CSA-C22.2 No. 60601-1 (2008), IEC 60601-1-3, IEC 60601-2-28, IEC 60601-2-44. Manufacturer Declaration of Conformity This medical device meets the provisions of the Medical Device Directive 93/42/EEC and the basic requirements according to Annex II.3 XtremeCT II Version 2.4 121 Any change on the configuration of the XtremeCT II-System leads to loss of the CE conformity according the Medical Device Directive 93/42/EEC Figure 110. CE-Mark Specs for the XtremeCT II Field of view: 140 mm Max. scan length: 200 mm Resolution 10% MTF: 5 lp/mm (patient protocol) > 8.5 lp/mm (non patient protocol) Reproducibility of density measurement: < 0.3% CV (Phantom) Default voxel size: 61 µm isotropic Image matrix: 2304 x 2304 (for a default patient measurement) max. native image matrix 4608 x 4608 (Voxel size 31 µm) Stack height, single rotation:up to 10 mm Detector size: 4608 x 400 [pixels], 221 mm x 19.5 mm X-ray tube: Nominal voltage: 68 kVp DC (± 1%) Nominal current: 1.47 mA (± 1%) Nominal power: 0.1 kW Maximal voltage: 70 kVp DC with up to 1.42 mA Maximal current: 2 mA with up to 50 kVp Linearity of radiation output with mAs: 1% Maximal power: 0.1 kW Focal spot size : 60 µm (EN12543-3) 0.1 x 0.1 mm (IEC60336) Filter: Target: W Mode of operation: Continuous operation Tube window: 0.3 mm Beryllium Cooling: closed loop water cooling 0.2 mm Cu + 1 mm Al (Equivalent filtration 6.7 mm Al @ 68 kVp) XtremeCT II Version 2.4 First half value layer: 4.5 mm Al @ 68 kVp Light field: Class 2M Laser, P = 1 mW CW, lambda = 635 nm, Light field position: according to reference line settings (± 1 mm) CTDIw: 10.5 mGy (for a default patient measurement) Effective dose: 5 µSv (for a default patient measurement) Weight gantry: 605kg Size gantry (H x W x D): 1.48 m x 1.38 m x 1.15 m 122 Beam geometry: small angle cone beam Measurement time per stack:2 min (for a default patient measurement) Power input: 100-240 VAC; 50-60 Hz; 10 A Main Circuit Breaker: 10 A characteristic D (inductive load) Computer: Itanium Workstation with OpenVMS Note XtremeCT II Version 2.4 Specifications are subject to change without notice. 123 Appendix H: Glossary Archive Move measurement data from internal hard disk to tape or external hard disks. It is recommended to do this regularly to prevent the disks from getting full. Always archive the .RSQ and .ISQ on different tapes. Artifact Error in the exposure, caused by, for example, a sample holder being too large, movement of the sample during the measurement, malfunction of the equipment etc. Visible in the form of lines, light or dark areas or stripes in the image. Backup Safety copy of the databases and programs from internal hard disk to tape or disk. It is recommended that a backup is made once a week. CT Abbreviation for Computed Tomography. File Collection of related data in a computer, for example, letters, a tomogram etc. Harddisk Fixed internal storage device of high capacity. Here are stored all the programs, all patient data, all Scout-Views and all images which have not been archived. Cannot be exchanged by the user! LUT (Look-Up-Table) Color scale, normally adjusted to the gray tone scale. Optical Disk Removable storage device with large capacity. The images are archived on this device. A separate optical disk is kept as a safety copy of the complete system. (see Backup) ROI Region Of Interest Scanner Measuring unit, in this case a tomograph. Scout, Scout-View Overview image, comparable to a radiograph. Shutdown Program for ending the operating system. Ensures that all data and programs in the computer can be read again without problem at the next operation. VOI Volume Of Interest Zoom Magnify XtremeCT II Version 2.4 124 Appendix I: Preventive Maintenance General Maintenance Due to use of the equipment and environmental influence, the equipment needs maintenance in regularly intervals. By entering into a service agreement with SCANCO MEDICAL AG you maintain the value and safety of your Xray equipment. The user is responsible for the adherence of maintenance schedule. Implication of Lack in Maintenance The lack of preventive maintenance may lead to reduced instrument performance of your instrument or falsification of results. Accomplishment of Maintenance Maintenance consists of tests which the user can perform, and maintenance which is performed by SCANCO MEDICAL AG or by persons explicitly authorized by SCANCO MEDICAL AG. Maintenance Plan For continued reliable and safe operation of your equipment, yearly maintenance is strongly recommended.Maintenance and repairs must be entered in Table 1: Interval Operation Daily Tests (QC1) • Before each use the user must be sure that the unit and its accessories are in good working order and the appropriate accessories are present. Inspection by the user • Defective indication lights, damaged components, labels and warning signs. Inspection by the user • Irregularity of the display (flickering, breakdown). Inspection by the user • System start-up test with QC phantom (daily QC, See “Quality Control” on page 33) • In case of operational defects or other deviations from normal opera- tional behavior occur, switch off the equipment and inform the Service Organization. Weekly Tests (QC2) • test with QC phantom (Geometry QC, See “Quality Control” on page 33) • Once a week the system should be turned off so that the shutter fail save test will run during the next start up. Monthly Performance • If no scans were made over a longer period, please perform a test with the QC phantom (as described in weekly tests) at least once a month to conserve the stability and the durability of the X-ray tube. • Once a month the main switch should be turned off so that the safety relay will be tested during the next start up. XtremeCT II Version 2.4 125 Table 1: Interval Operation Yearly Maintenance • Have the X-ray unit serviced by SCANCO MEDICAL AG at least once a year. Heavily used X-ray equipment might need maintenance more frequently. All the necessary maintenance, including the safety tests for the purpose of preventing hazards and the necessary settings for optimum image quality and minimum exposure to radiation, is performed in order to meet regulatory requirements. After Service and/or Maintenance Visits • Perform a daily and a weekly test with QC phantom (see above). the medical device logbook, including the following data: • Type and scope of work, • If necessary, details of any change to settings or the working zone, • Data, person performing the work, signature. Spare Parts Caution! The replacement of spare parts not supported by SCANCO MEDICAL AG or the replacement of spare parts by unauthorized people could negatively affect the functionality of the XtremeCT II and leads to the loss of the CE conformity according to the Medical Device Directive 93/42/EEC and may no longer be conform to relevant standards. Replacement of computer should be made in agreement with SCANCO MEDICAL AG. Caution! The equipment contains low quantities of several materials which may be hazardous to the environment if not disposed correctly. Please consider local regulation and contact SCANCO MEDICAL AG before disposal of equipment or X-ray tube. Disposal Cleaning Equipment and Chair For outside cleaning use soft materials moistened with water only. • Equipment must be turned off before making any cleaning action. Clean it by using cotton cloth and don't use abrasive detergent. Do not use organic solvent or any kind of detergent containing any kind of organic solvent. • Do not utilize spray, it can penetrate into the equipment and damage the electronics inside. • Ensure that no water or other liquids can enter the X-ray equipment. This precaution prevents electrical short-circuits and corrosion forming on components. XtremeCT II Version 2.4 126 • To disinfect the equipment, we recommend using water based solutions (connecting cables by wiping only!). We recommend to not utilizing aggressive detergent based on Alcohol. • If you perform room sanitation with an atomizer, you must first switch-off the X-ray equipments capture key. When the X-ray equipment has cooled down, cover it carefully with a plastic sheet. When the mist of disinfectant has subsided, you can remove the plastic sheets and disinfect the X-ray equipment by wiping. Caution! Shut down properly and turn-off capture key before cleaning. Never spill liquids on or in the equipment! Caution! Never use any corrosive, solvent or abrasive detergents or polishes! Patient support The patient support consists of carbon fibre jacket equipped with a cushion made of neoprene (chloroprene rubber) and PUR (Polyurethane). For cleaning please keep in mind: • The method of disinfection used must comply with the legal regulations and guidelines regarding sanitation. • The material should be cleaned by wiping it with a moistened cloth. • You may disinfect the accessories by wiping only using use water based solutions. • After cleaning and disinfecting the equipment, let it dry for sufficient time in respect to the used agents. Caution! XtremeCT II Version 2.4 If you use disinfectants which form explosive mixtures of gases, these must first have evaporated before you switch the X-ray equipment on again. 127 Contact Information for Service and Maintenance SCANCO Medical AG Fabrikweg 2 CH-8306 Bruettisellen Switzerland Telephone Telefax URL e-mail general e-mail support e-mail sales XtremeCT II Version 2.4 +41-(0)44-805 98 00 +41-(0)44-805 98 01 www.scanco.ch [email protected] [email protected] [email protected] 128 Appendix J: Site Planning and Installation Site Planning A recommended room layout is shown in the figure below. Figure 111. Site Planning Positioning of the Equipment To handle the patient we recommend having a free area in front of the gantry of at least 2 m and 1 m at each side of the gantry (area 2 m x ~3.5 m). The computer workstation and the chair of the operator should be placed outside of this area, so the operator is not exposed to avoidable radiation (for radiation levels, see Appendix K, Radiation Safety). To be able to service the equipment, the gantry should be at least 1 m away from the wall (at the back) and on each side at least 0.5 m of clearance is needed. If it is not possible to give this minimal clearance, a pallet mover needs to be provided by the customer for each service. Because of air circulation a free space of at least 0.3 m is needed at the back. There is an emergency stop on the front panel of the gantry. A second emergency stop, provided with a 5 m long cable, can be installed at a convenient place, where it can be easily reached by the operator while he is sitting by the computer. If you expect to need a longer cable for the second emergency stop, please contact SCANCO MEDICAL AG before the installation. The gantry is connected to the computer via a fibre optic link. The provided fibre optic cable will be 5 m long. If you need a longer cable, please contact SCANCO MEDICAL AG before the installation. XtremeCT II Version 2.4 129 Electrical Installation The customer is responsible for the compliance of required electrical installations with local regulations. Gantry: The XtremeCT II will be permanently installed and a certified electrician is allowed only to connect a system like this to the power line. Therefore the customer needs to make sure that an electrician is available during the installation to connect the system to the power line. The XtremeCT II has at the back side a junction box with a PG16 cable gland. The clamping range of the cable gland is 10 to 14 mm. One end of the cable has to be connected by an electrician to the DIN rail terminal block which is located in the junction box of the system. The other end has to be permanently connected to the power line. Permanently connected means that a tool is needed to disconnect the system. Figure 112. Electrical installation Note, the system will be delivered without the main supply cable, the cable has to be provided by the electrician (e.g. 3 x 1.5 mm2 flexible). Computer: The computer with its standard periphery will need five power outlets with protective earth connection (110 VAC or 230 VAC; two for the workstation, one for the monitor, one for the tape drive, one for the media converter). Additional power outlets will be needed if e.g. a printer or a disk tower will be installed. (For some customized workstation setups instead the 110 VAC power outlets a 208 VAC or 230 VAC power outlet will be needed). The required power cords for the computer will be supplied by SCANCO MEDICAL AG. Extension cords or power strips have to be supplied by the customer. External Indicators: If external indicators (e.g. an illuminated sign “X-ray On”) are needed, please contact SCANCO MEDICAL AG to discuss this option before the delivery of the XtremeCT II Version 2.4 130 equipment, because in some cases modifications of the equipment and additional electrical installations are needed. Network Connections If data will be needed to be transferred to any other computer, a computer network will be needed. It is highly recommended to have the computer network ready before the installation of the equipment. One network port per workstation is required, two are recommended. One more network port is required if a printer is installed (normally, a printer is not supplied by SCANCO MEDICAL AG). RJ45 cables have to be supplied by the customer. Please have your following network information available during the installation of the equipment: • • • • • • • Two IP addresses for the computer workstation Hostname for the workstation Domain name of your network Gateway (Router) IP address Subnet Mask Dynamic Name Server (DNS) IP address(es) Printer IP address and name Telephone A phone near the workstation is recommended (for communication with SCANCO MEDICAL AG in case of any support or any problems with the equipment). Miscellaneous A table for the computer workstation and a chair for the operator must be provided by the customer. It is recommended that the surface of the floor is smooth and hard. A carpet is not recommended, because the handling and moving of the patient chair will get difficult. The whole equipment, depending on the computer and its peripheries, will consume about 1200 W to 1700 W, which will be dissipates as heat. In a small room, this can increase the room temperature significantly, if no cooling or ventilation is provided. It is recommended to run the equipment not above 25°C and it is mandatory to have a stable room temperature. For the radiation safety, the installation must follow national regulations. Therefore the customer is responsible for proper room shielding or additional protection for the operator if this is a requirement of the national regulations. As the stray radiation is very low outside of a 3 m x 3 m area in front of the scanner, in most countries, no room shielding is required. Transportation At the Loading Dock When receiving the equipment, please check the tilt watch and the shock watch for red indicators (or have the receiving group updated with this information). These watches are mounted on the wooden box, in which the XtremeCT II is shipped. If one of those indicators is red: • Do not refuse shipment • Make notation on delivery receipt before signing • Inform SCANCO MEDICAL AG XtremeCT II Version 2.4 131 During the installation, the system will be checked carefully. If there is a defect because of rough handling, it will help determining the responsibilities. From the Loading Dock to the Final Room The system will be delivered to the loading dock. Generally the system will then stay there until a service engineer of SCANCO MEDICAL AG is on site and helps with the unpacking and the transportation of the equipment within the building. A regular pallet lifter is needed to move it around. Note Do not remove the XtremeCT II from the wooden carrier box yourself! Do not remove any parts of the XtremeCT II yourself! The gantry cannot be disassembled, although a few parts can be detached. During transportation, the size of the gantry can be as minimal as 148 cm high, 132 cm wide and 90 cm deep. Before delivery, please ensure that all doors, corners, elevators, etc. along the transportation route are sufficiently large. If there are steps, doorsteps or stairs, tools or auxiliary material and specialized movers have to be provided to move the gantry over these obstacles. The customer is responsible to ensure that the load capacity of the floor is sufficient to support the weight of this equipment. Please keep the wooden carrier box, as it may serve for future shipments. XtremeCT II Version 2.4 132 Dimensions and Weights Dimensions (H x W x D) [cm] (H x W x D) [in] XtremeCT II Scanner 148 x 138 x 115 cm 59” x 55” x 46” Workstation * 50 x 30 x 80 cm 20” x 12” x 32” Tape Drive * 8 x 23 x 30 cm 3.1” x 10” x 12” TFT Monitor * 50 x 56 x 25 cm (24”) 20” x 22” x 37” (24”) Disk Tower (optional) * 56 x 30 x 62 cm 22” x 12” x 25” Weight [kg] Weight [lb] XtremeCT II Scanner 605 kg 1334 lb Workstation * max. 30 kg max. 66 lb Tape Drive * 5 kg 11 lb TFT Monitor * 9 kg 20 lb Disk Tower (optional) * max. 30 kg max. 66 lb Weights * current devices at date of going to press (January 2012) Workstation: HP Integrity rx2800 i2 Tape Drive: HP Ultrium 5 SAS TFT Monitor: HP L2475w Disk Tower: HP Storage Works MSA60 Power Consumption/Heat Generation Gantry: ~ 400W Computer: ~ 1200W (rx2800 i2) Monitor: ~ 40W Tape drive: ~ 40W Further options, i.e. disk tower, leads to additional power consumption. Caution! XtremeCT II Version 2.4 To assure adequate circulation of air for cooling, make sure that the instrument is located at least 30 cm away from walls on each side of the equipment. 133 Installation Personnel Qualification Installation of the equipment must be carried out only by SCANCO MEDICAL AG or specially authorized personnel. Caution! XtremeCT II Version 2.4 Improper installation can lead to malfunction! Installation instructions must be followed in detail. Improper installation will void any warranty claims! 134 Checklist for Site Planning Electrical Installation • Emergency Stop (if a cable length of 5 m is not sufficient, please contact SCANCO Medical before shipping) • Connection to Power for Gantry (permanent) • Check that sufficient and suitable electrical outlets for computer and periphery are available (how many, voltage, power rating) • Fibre Optic Cable between Computer and Gantry (if a cable length of 5 m is not sufficient, please contact SCANCO Medical before shipping) • Computer Network (One network port per standard workstation is required, two are recommended.) • • • • Patch Cables RJ45 (check that the right length is available) External Indicator (if necessary, contact SCANCO Medical before shipping) Telephone Electrician (availability during installation, power cable for the gantry must be provided by the electrician) Room Layout • Area to Handle the Patient • Positioning of Operator (radiation, view to patient). • Positioning of Computer Workstation (cable length, power outlet) • Distances from Walls (servicing, air circulation) • Estimate whether the temperature of the room will remain within the desired range due to heating generated from the equipment. Miscellaneous • Table for Computer Workstation • Chair for Operator • Room Temperature with Dissipated Heat • Surface of the Floor • Load Capacity of the Floor • Local Radiation Safety Regulations Transportation • Check Tilt Watch and Shock Watch while Receiving • Pallet Lifter • Check Transportation Route from Loading Dock to the Room • Special Transportation Gear if needed XtremeCT II Version 2.4 135 Appendix K: Radiation Safety Dose Statements PMMA Phantom A PMMA phantom corresponding to IEC 60601-2-44 but with a diameter of 100mm was used for the dose measurements. The diameter of the phantom was changed, because the field of view of the XtremeCT II is only 140 mm. The phantom was positioned in that way that the center position is in the center of rotation and the 0 deg position is in a vertical line above the center of rotation. Figure 113. PMMA Phantom Top View Computed Tomography Dose Index (CTDI) The CTDI of the XtremeCT II was measured with the following imaging parameters: Tube voltage: 68 kVp Tube current: 1.47 mA Integration time: 43 ms Number of projections: 900 Projections/180° Time current product: 71 mAs These parameters are the values used in the standard predefined controlfiles for tibia and radius measurements. The following values have been measured with a ionization camber. CTDI100 (center) =10.02 mGy CTDI100 (0 deg) =15.25 mGy CTDI100 (90 deg) =10.70 mGy CTDI100 (180 deg) =6.20 mGy CTDI100 (270 deg) =11.09 mGy CTDIW = CTDIvol =10.55 mGy CTDI100 (peripheral) =10.81 mGy CTDIW = 1/3 CTDI100 (center) +2/3 CTDI100 (peripheral) CTDI100 (peripheral) = (CTDI100 (0°)+CTDI100 (90°)+CTDI100 (180°)+CTDI100 (270°))/4 XtremeCT II Version 2.4 136 CTDIfree air =11.37 mGy Due to the very low dose rate the accuracy of the measurement is limited to ± 30%. The CTDIvol is linear to the mAs product. If the measurement parameters are changed, the new CTDIvol is automatically calculated with the formula CTDIvol [mGy] = 0.064 * Time current product (expressed in mAs). The CTDIvol will be displayed, when the imaging parameters are changed and before a measurement is initiated. Effective Dose The effective dose for one XtremeCT II standard measurement with 71 mAs is below 5 µSv. For comparison: the effective dose of a Dual-X-ray-Absorptiometry (DXA) measurement is between 0.1 and 75 µSv. ("Sources and effects of ionizing radiation", 2000 Report to the General Assembly of the United Nations Scientific Committee on the Effects of Atomic Radiation (UNSCEAR), annex D: "Medical radiation exposures") Dose and Sensitivity Profile With an X-ray sensitive film the dose profile along the Z-axis at the center of rotation has been measured. The dose profile is independent of the selected parameters. The sensitivity profile for the center of rotation has been measured for the patient protocol and for a highest resolution protocol (1x1 binning and 1500 projections per 180°). Patient protocol: 209 µm Highest resolution protocol: 144 µm Figure 114. Dose / Sensitivity Profile There is only one beam collimation and in this beam collimation the geometric efficiency in z-direction is 83%. The geometric efficiency is dependent on XtremeCT II Version 2.4 137 the used pixel in detector height. Below 323 used pixels the geometric efficiency will drop of below 70%. Figure 115. Geometric efficiency System Performance The system performance is measured for two protocols (patient protocol, highest resolution protocol) with a homogeneous PMMA cylinder with a diameter of 100 mm. The two protocols are the patient protocol and a highest resolution protocol (1x1 binning, 1500 projections per 180°, 600 ms integration time, 4x data average). The values are in milligram hydroxyapatite per cubic centimeter [mg HA/ccm]. This is the standard unit used in the XtremeCT II but it can also measure in Hounsfield units [HU]. XtremeCT II Version 2.4 Patient Protocol Highest Resolution Protocol mean CT number 16.3 mg HA/ccm 11.2 mg HA/ccm Noise ±141.5 mg HA/ccm ±42.1mg HA/ccm Uniformity 0° +0.4 mg HA/ccm +5.5 mg HA/ccm Uniformity 90° +0.0 mg HA/ccm +4.9 mg HA/ccm Uniformity 180° +0.6 mg HA/ccm +4.7 mg HA/ccm Uniformity 270° +0.4 mg HA/ccm +4.9 mg HA/ccm MTF (center; 10%) 92.5 µm 49.1 µm MTF (off center; 10%) 112.6 µm 64.6 µm Tomographic Section Thickness 209 µm 144 µm 138 Figure 116. Modulation Transfer Function (MTF) for all Combinations Stray Radiation Between measurements: On the XtremeCT II the high voltage is continuously applied to the X-ray tube and the emission of X-rays is controlled with a shutter. When the shutter is closed the emitted radiation does not exceed 0.25 µGy/h at any accessible location. During measurements: The stray radiation is measured in accordance to IEC 60601-2-44 in the horizontal and the vertical planes which cross at the axis of rotation of the scanner. The dose is given in Air KERMA per mAs [nGy/mAs] and in the ambient dose equivalent, H*(10) per measurement [µSv]. For the stray radiation measurement a cylindrical PMMA phantom with a diameter of 100 mm was used. One standard measurement including patient positioning, reference measurements and the measurement itself takes about 15 minutes. The weekly or monthly dose of the stray radiation can be calculated with the given data and the expected patient throughput. Example: Point D3 has 0.09 µSv/measurement Assuming 5 measurements per hours Dose/h = 5 measurements/h x 0.09 µSv/measurement = 0.45 µSv/h XtremeCT II Version 2.4 139 Test setup: Figure 117. Horizontal and Vertical Planes for Measurements Stray Radiation given in Air KERMA per Units The dose values in nGy/mAs for the horizontal plane: 1 2 3 4 5 6 7 8 9 A B C D E F G H I 0.096 0.192 0.287 0.192 0.096 0.192 0.287 0.192 0.096 0.096 0.192 0.383 0.383 0.096 0.383 0.383 0.192 0.096 0.096 0.192 0.479 0.862 0.192 0.862 0.479 0.192 0.096 0.096 0.096 0.383 1.820 0.575 1.820 0.383 0.096 0.096 0.000 0.000 0.192 1.437 2.683 1.437 0.192 0.000 0.000 0.000 0.000 0.000 0.000 0.000 0.000 0.000 0.000 0.000 0.000 0.000 0.000 0.000 0.000 0.000 0.000 0.000 0.000 0.000 0.000 0.000 0.000 0.000 0.000 0.000 0.000 0.000 0.000 0.000 0.000 The dose values in nGy/mAs for the vertical plane: b c d e f 0.096 0.287 0.287 0.096 0.096 1 0.096 0.287 0.575 0.096 0.287 2 0.096 0.192 1.054 0.192 0.479 3 0.096 0.096 1.150 0.575 1.150 4 0.096 0.096 0.575 2.683 0.575 5 0.000 0.000 6 0.000 0.000 7 0.000 0.000 0.000 0.000 0.000 8 0.000 0.000 0.000 0.000 0.000 9 XtremeCT II Version 2.4 140 Stray Radiation given in Ambient Dose Equivalent per Measurement The dose is measured with the following parameters: Tube voltage: 68 kVp Tube current: 1.47 mA Integration time: 43 ms Number of projections: 900 Projections/180° Time current product: 71 mAs The ambient dose equivalent in µSv/measurement for the horizontal plane: 1 2 3 4 5 6 7 8 9 A B C D E F G H I 0.01 0.02 0.03 0.02 0.01 0.02 0.03 0.02 0.01 0.01 0.02 0.04 0.04 0.01 0.04 0.04 0.02 0.01 0.01 0.02 0.05 0.09 0.02 0.09 0.05 0.02 0.01 0.01 0.01 0.04 0.19 0.06 0.19 0.04 0.01 0.01 0.00 0.00 0.02 0.15 0.28 0.15 0.02 0.00 0.00 0.00 0.00 0.00 0.00 0.00 0.00 0.00 0.00 0.00 0.00 0.00 0.00 0.00 0.00 0.00 0.00 0.00 0.00 0.00 0.00 0.00 0.00 0.00 0.00 0.00 0.00 0.00 0.00 0.00 0.00 The ambient dose equivalent in µSv/measurement for the vertical plane: 1 2 3 4 5 6 7 8 9 b c d e f 0.01 0.03 0.03 0.01 0.01 0.01 0.03 0.06 0.01 0.03 0.01 0.02 0.11 0.02 0.05 0.01 0.01 0.12 0.06 0.12 0.01 0.01 0.06 0.28 0.06 0.00 0.00 0.00 0.00 0.00 0.00 0.00 0.00 0.00 0.00 0.00 0.00 0.00 0.00 Figure 118. The Dose Distribution in the Horizontal Plane XtremeCT II Version 2.4 141 Figure 119. The Dose Distribution in the Vertical Plane XtremeCT II Version 2.4 142 Appendix L: Product Views, Indicators and Accessories Views Front Figure 120. Front of Equipment Rear Figure 121. Rear of Equipment XtremeCT II Version 2.4 143 Indicators Illuminated indicators, indicating action in progress: 1. Power On 2. X-Ray Tube On 3. X-Rays are Emitted (Shutter Open) 4. Laser Active 1 2 4 3 Figure 122. Indicators 5. Progress Lights / Error Lights (when flashing) Figure 123. Indicators XtremeCT II Version 2.4 144 Safety Precautions General This pQCT instrument generates X-rays. The system was tested for radiation leakage at the factory and conforms with regulatory requirements under normal operating conditions. It is dangerous for any person to operate this equipment without having appropriate training which have included instruction in the means for using X-Ray radiation without hazard to patient, user and surroundings. The user must be aware of all regulations and requirements that may be applicable governing the installation and use of equipment producing ionizing radiation for medical purpose. Do not operate your instrument if it is physically damaged. The damage of the scanner-housing may lead to uncontrolled emitted stray-radiation! In case of damage, the system must be inspected by SCANCO MEDICAL AG or authorized personnel prior to using it again. Do not remove any covers or panels giving access to live parts. Any cover requiring the use of a tool for its removal can be assumed to be in this category. Safety circuits must neither be removed nor modified. WARNING! X-rays may be present. Failure to observe this warning may result in personal injury. WARNING! Risk of electrical shock! Failure to observe this warning may result in personal injury, death, or equipment damage. Radiation Protection Dosimeter Operating personnel working regularly with the instrument is strongly recommended to wear radiation protection dosimeter which must be analyzed in a regular manner. System Changes The user is not allowed to change any hardware configuration nor any protected software settings including process quotas for system parameters. XtremeCT II Version 2.4 145 Safety Components 1. Capture Key: The scanner works only if the capture key is present and activated (green lamp is lit). 2. Gantry Stop: Pushing the Gantry Stop button will immediately interrupt the gantry movement and turn off the X-Ray tube 3. Avoid Exposure Laser radiation is emitted from this aperture. Figure 124. Safety Components 4. Main switch: Must be turned on before turning the capture key. Figure 125. Safety Components Accessories 1. 2. 3. 4. XtremeCT II Version 2.4 Right arm cast Left arm cast Foot cast Quality control phantom (KP70) 146 Appendix M: SOPs SOP; Quality Control (daily and weekly) Goal This documents lists and describes the necessary procedures for daily and weekly quality control. Personnel XtremeCT II operators. Tasks Login (Username) You can use any valid account name (typically MICROCT) to perform the QC measurements. Daily QC The quality control for density has to be performed once every day. It has to be performed and checked before a patient is scanned. Weekly QC The quality control for mechanical stability has to be performed once every week. It has to be performed and checked before a patient is scanned. Procedure Checklist • Select QC1 or QC2 sample name • Select QC1 or QC2 controlfile • Insert Phantom • Precalibrate • Perform scan • Wait until all images reconstructed • Click EVALUATION 3D... and START EVALUATION • Compare results from printout Acceptance Limits QC1 limits: Mean5 has to be within ± 8 mg HA/ccm of reference value. QC2 limits: Rod volume ± 2% of the reference value Reference value: Each scanner must have its own reference values for QC1 and QC2 defined after installation. Those reference values must be calculated as average value of repeated QC1/QC2 scans every day for 2 week after delivery, or after an Xray tube/detector change. Cases when values are off limit: It may happen that phantom results are off limits, simply due to statistical phenomenon. When you obtain off limit value, repeat QC scans 2-5 times, to check on the drift consistency. If values remain off, contact SCANCO Medical AG. Plot the QC curves every month to catch slower drifts (even before they would reach the ± 8 mg HA/ccm deviation) XtremeCT II Version 2.4 147 SOP; Scanning Goal This documents lists and describes the necessary procedures for a patient scan. Personnel XtremeCT II operators. Time Frame This procedure should be performed at each patient scan. Tasks Patient Instructions It is very important that the patient is instructed properly to ensure good image quality: • Allow the patient to talk only before the real scan (e.g. during positioning or scout-view) • To stay still and quiet for the duration of the actual measurement (2 min) • To not move any part of the body during this time • To not talk • To watch the scan progress indicator only Login (Username) Use any valid username (typically MICROCT) and the corresponding password if you want to measure patients. In case of another username/account used, you should notice as you won’t find the patient-IDs registered. Ensure correct ID/controlfile is selected Check the Patient ID and date of birth. For the baseline scan, make sure the correct side (L/R) is chosen: non-dominant wrist (e.g. left for right-handed patients) and use same side for lower leg. If there is a history of prior fracture at these sites, scan the other limb. For follow-up scans: Check ID and date of birth. Check also in the measurement history frame for past scans, use the same controlfiles for follow up measurements. Precalibration The XtremeCT II requires a precalibration before a measurement can be performed. It is a requirement that this is performed before each patient scan and without the patient in the machine. Casts The arm/leg should be positioned inside the cast in a way that the patient feels comfortable. Radius positioning: Set the forearm in the cast, and strap the Velcro. Deflate the cushion with plastic beads using the provided air-pump. Tibia positioning: Select the proper padding sizes for the foot and thigh support. Chair Move the patient on the chair towards the system and adjust height and position. Make sure the patient feels comfortable, and then lock the wheels. XtremeCT II Version 2.4 148 Scout-View/Reference Line Before starting the Scout View, instruct the patient to stay still for the next 23 minutes, not move any-thing and to not talk. If the patient moves between Scout-View and Scan, the reference line set during Scout View will be meaningless. Make sure the joint space is fully visible. One can enlarge the scout view by adjusting the Start or End sliders position, and redo the scout-view. Set reference line according to the following examples Here are some indications as to how position the reference line. 1. The distal endplate of the Radius/Tibia is the region where the reference line must be set. Do not pay attention at the Ulna/Fibula! 2. Visualize the broad white line defining the endplate 3. Look for a notch on the endplate. a Notch case: Place the reference line at the tip of the notch, on the upper side b No-notch case: Radius: visualize the curve between the two tips of the joint, place the line so that it crosses path with this curve at the middle height Tibia: the plateau is flat in most cases, place the line along the plateau Figure 126. Scout-View/Reference Line Examples: Figure 127. Example for Radius, good example on the left, bad on the right XtremeCT II Version 2.4 149 Figure 128. Example for Tibia, good example on the left, bad on the right It is important that for follow-up scans, the reference line is set the exact same way as on the reference measurement. Do not try to match the mm (scale), but to achieve a visually similar result. Scan Start the actual scan. Image Quality Check After a patient scan, check its quality visually on the small image on the top right. Use the following examples to decide if a scan has to be repeated or not: Figure 129. Example for Image Quality, good on the left, acceptable in the middle and not acceptable on the right In case of not acceptable quality, rescan the patient. Make sure before that the patient sits comfortably, and tell her/him to relax. You are allowed to perform 3 attempts per visit, 3 each for radius and tibia. However, try to get a good scan in the first attempt, as it will get more and more difficult the longer the patient has to sit with the arm or leg inside the machine. Procedure Checklist • Ensure QC scan was successful today • Ensure you are logged in at the correct account (typically MICROCT) • Select patient record (check DB entry: Patient ID and name) • Check handedness (compare with scans of last visit) • Select correct controlfile (Radius/Tibia, L/R) • Precalibrate • Select cast and position patient • Inform patient that scan will start now and last for 3 minutes • Perform scout-view • Set reference line • Start scan • Check image quality, repeat if necessary (max. of 3 attempts) • Remove patient XtremeCT II Version 2.4 150 SOP; Evaluation Goal This documents lists and describes the necessary procedures for a standard evaluation of a patient scan. Personnel XtremeCT II operators. Time Frame This procedure should be performed after each patient visit. Tasks Image Quality Check After loading the images, check the image quality visually. Not acceptable scans should not be analyzed. Figure 130. Example for Image Quality, good on the left, acceptable in the middle and not acceptable on the right Contouring To determine the volume of interest, click the 3D-Evaluation button. Select Evaluation Script : “Autocontour Largest Bone (Radius or Tibia)”, then start the task. Alternatively, one can use the tools built in the evaluation program to draw contours, using either the semi-automatic snake algorithm or Morph features. Whichever way you define your contour, it needs to be check visually. If the contour matches the edge of the bone one can start the actual Evaluation immediately. If a correction has to be done on a range of slices 1. Determine the starting and ending slices numbers of that range 2. Correct the contour at the first slice of that range. a Start the iteration process until the last slice of the range b Correct the last slice of that range, then Morph in between XtremeCT II Version 2.4 151 Figure 131. Example for matching of contours, good on the left, acceptable in the middle and not acceptable on the right Starting the Evaluation When you reached satisfaction with your contour, one can start the actual Evaluation task. Click the 3D-Evaluation button (T… ) Check that Evaluation Script : “XtremeCT II – Standard Patient Analysis 61um” is selected, then click Start Evaluation. Check Result Sheet On the printout, check the common region number. It should be > 70%. If it is less or the parameters differ (changes > a few percent), ensure the scan was performed on the same side (L/R) and the patient-ID was chosen right. Load previous scan and compare the images visually. If wrong side was measured, patient has to be rescanned. Procedure Checklist • Select measurement • Check image quality • Click 3D Evaluation • Start Contouring Task • Open contouring window • Check on the contours on all slices • Apply manual corrections • Close contouring window • Click 3D Evaluation (T...) • Check volume of interest • Start 3D Evaluation • Take result sheet and check common region XtremeCT II Version 2.4 152 SOP; Archiving Goal This documents lists and describes the necessary procedures for archiving data. Personnel XtremeCT II operators. Time Frame This procedure must be performed at least weekly. Tasks Initializing of Tapes (Formatting) Tapes have to be formatted using the following naming: RAWxxx and IMAxxx, where xxx indicate consecutive numbers starting 001. Archiving RAW Data All RAW data (RSQ files) have to be archived daily as soon as all images (individual sections) have been checked. Use the RAWxxx tapes for RAW data and archive them using the MOVE option in the backup/archiving tool. Archiving IMA Data All IMA data (ISQ, AIM, GOBJ, etc. excl. RSQ) have to be archived when you run out of disk space or have finished the study. Use the IMAxxx tapes for IMA data and archive them using the MOVE option in the backup/archiving tool. This will remove the data from the hard drive. Image data will be accessible only if one does a COPY or MOVE from Tape to DISK afterwards. Weekly Backup SCANCO MEDICAL AG recommends to perform a weekly data backup. Under some circumstances it is possible that a hard disk can crash, which makes it impossible to read patient data, old measurement results or Scout-Views again. You should therefore regularly make a copy of your databases. The weekly backup has to be started manually (as described in the manual). Choose the function DB BACKUP TO TAPE within the backup program to perform a backup once per month and the function DB BACKUP TO DISK DK0 to perform a backup the remaining weeks. Important, close all the scanner related programs before starting. Procedure Checklist • Initialize/Format tapes if needed • MOVE RAW data daily • MOVE IMA data as soon as images no longer needed • Perform Weekly Backup Weekly! XtremeCT II Version 2.4 153 Appendix N: Warranty Limited Warranty Statement This Limited Warranty defines the restrictions and warranty period that apply to the SCANCO MEDICAL AG products that you have purchased. Contact SCANCO MEDICAL AG if you have questions about this Limited Warranty. Terms of the Warranty SCANCO MEDICAL AG warrants that the product you have purchased from SCANCO MEDICAL AG or from a SCANCO MEDICAL AG authorized reseller is free from defects in materials or workmanship under normal use during the Warranty Period. The warranty period commences on the date of installation and ends 12 month after the date of installation. Your installation protocol, showing the date of installation of the product is your proof of the date of installation. This warranty is transferable to anyone who subsequently purchases the product from you. This Limited Warranty does not include expendable parts. Should the product require service during the term of the Limited Warranty, covered by this warranty statement, SCANCO MEDICAL AG will repair or replace the defective part(s) with new part(s), or at SCANCO MEDICAL AG's discretion a used part(s) that meets or exceeds the performance specifications for new parts. In some cases, SCANCO MEDICAL AG will ship a new user replaceable part(s) directly to you, or at SCANCO MEDICAL AG's discretion a used part(s) that meets or exceeds the performance specification for new parts. All exchanged parts and products replaced under this warranty will become the property of SCANCO MEDICAL AG. SCANCO MEDICAL AG is not responsible for any handling fees, import duties, or tariffs. This Limited Warranty extends only to products initially purchased from SCANCO MEDICAL AG or from a SCANCO MEDICAL AG authorized reseller. This Limited Warranty does not extend to any product that has been damaged or rendered defective • as a result of accident, misuse, or abuse • by operation outside the usage parameters stated in the product's user documentation • by the use of parts not manufactured or sold by SCANCO MEDICAL AG • by modification of the product • as a result of service by anyone other than SCANCO MEDICAL AG or a SCANCO MEDICAL AG authorized service provider SCANCO MEDICAL AG is not responsible for damage to or loss of any programs, data, or removable storage media. SCANCO MEDICAL AG is not liable for any damages caused by the product or the failure of the product to perform, including any lost profits, lost savings, incidental damages, or consequential damages. SCANCO MEDICAL AG is not liable for any claim made by a third party or made by you for a third party. Limitations of Remedy: EXCEPT AS EXPRESSLY SET FORTH IN THIS WARRANTY, SCANCO MEDICAL AG MAKES NO OTHER WARRANTIES, EXPRESS OR IMPLIED, INCLUDING ANY IMPLIED WARRANTIES OF MERCHANTABILITY AND FITNESS FOR A PARTICULAR PURPOSE. SCANCO MEDICAL AG EXPRESSLY DISCLAIMS ALL WARRANTIES NOT STATED IN THIS LIMITED WARRANTY. ANY IMPLIED WARRANTIES THAT MAY BE IMPOSED BY LAW ARE LIMITED TO THE TERMS OF THIS EXPRESS LIMITED WARRANTY. XtremeCT II Version 2.4 154 This limitation applies whether damages are sought, or a claim made, under this warrant by or as a tort claim (including negligence and strict product liability), a contract claim, or any other claim. This limitation cannot be waived or amended by any person. This limitation of liability will be effective even if SCANCO MEDICAL AG or an authorized representative of SCANCO MEDICAL AG has been advised by you of the possibility of any such damages. This limitation of liability, however, will not apply to claims for personal injury. Manufacturer Declaration of Conformity This medical device meets the provisions of the Medical Directive 93/42/EEC and the basic requirements according to Annex II.3 If you have further questions regarding the applicable national or international standards, please address them to your SCANCO MEDICAL AG. Any change on the configuration of the XtremeCT II-System leads to loss of the CE conformity according the Medical Directive 93/42/EEC XtremeCT II Version 2.4 155 List of Figures Figure Figure Figure Figure Figure Figure Figure Figure Figure Figure Figure Figure Figure Figure Figure Figure Figure Figure Figure Figure Figure Figure Figure Figure Figure Figure Figure Figure Figure Figure Figure Figure Figure Figure Figure Figure Figure Figure Figure Figure Figure Figure Figure Figure Figure Figure Figure Figure Figure Figure Figure Figure Figure Figure II-1 III-2 III-3 III-4 III-5 1. 2. 3. 4. 5. 6. 7. 8. 9. 10. 11. 12. 13. 14. 15. 16. 17. 18. 19. 20. 21. 22. 23. 24. 25. 26. 27. 28. 29. 30. 31. 32. 33. 34. 35. 36. 37. 38. 39. 40. 41. 42. 43. 44. 45. 46. 47. 48. 49. Declaration of conformity ......................................................................... xv Caution X-Rays and Laser .................................................................... xviii Refer to User’s Guide ............................................................................ xviii Caution X-Rays .................................................................................... xviii Type Plate ............................................................................................... xix Turning On Equipment ..............................................................................1 Login-Box ..................................................................................................2 Exiting Main Program XtremeCT II .............................................................3 Exiting the Session. ...................................................................................3 Login-Box for Shutdown ............................................................................4 Control Box ...............................................................................................6 Edit Operator Data ....................................................................................7 Operator Registration Program ...................................................................7 Find Operator ............................................................................................8 Select Operator ..........................................................................................8 Operator not Found ...................................................................................9 Exit Operator Program ...............................................................................9 Edit Patient Data .....................................................................................10 Patient Registration Program ...................................................................10 Find Patient .............................................................................................11 Select Patient ...........................................................................................11 Keyword not Found ..................................................................................12 Exiting Patient Program ...........................................................................13 Start Measurement ..................................................................................15 Main Program Screen ...............................................................................16 Input of Patient’s Name or Number ..........................................................16 Confirmation ...........................................................................................17 Selecting a Controlfile ..............................................................................17 Modifying a Controlfile .............................................................................18 Scout-View ..............................................................................................19 Evaluation-Script-Selection ......................................................................19 Beam Hardening-Script-Selection ............................................................20 Modifying a Controlfile, advanced mode ...................................................22 Scout-View of a Radius ............................................................................24 Scout-View of a Radius with “Notch” position marked (red cross) .............24 Scout-View of a Radius with Reference Lines ...........................................24 Scout-View of a Tibia with “Notch” position marked (red cross) ................25 Scout-View of a Tibia with “Notch” position marked (red cross) ................25 Scout-View of a Tibia with Reference Lines ...............................................25 Scout-View Start- / End-Position .............................................................26 Example relative offset [mm] from reference line to start of scan. ..............28 Example relative offset [%] from reference line to start of scan. .................29 Example relative offset [%] from reference line to center of scan. ..............30 Example relative offset [%] from reference line to end of scan. ..................31 Start Measurement ..................................................................................32 Chair (Example Illustration) .....................................................................33 Leg Cast ..................................................................................................34 Hand Cast ...............................................................................................34 Cast in the Cast Slider .............................................................................35 Cast tightly in place .................................................................................35 Cast elevated. ..........................................................................................36 Image Phantom ........................................................................................38 Example of a Printout Sheet for the Daily QC1 Measurement ...................40 Example of a Result Sheet for the Weekly QC2 Measurement ...................41 XtremeCT II Version 2.4 156 Figure Figure Figure Figure Figure Figure Figure Figure Figure Figure Figure Figure Figure Figure Figure Figure Figure Figure Figure Figure Figure Figure Figure Figure Figure Figure Figure Figure Figure Figure Figure Figure Figure Figure Figure Figure Figure Figure Figure Figure Figure Figure Figure Figure Figure Figure Figure Figure Figure Figure Figure Figure Figure Figure Figure Figure Figure Figure 50. 51. 52. 53. 54. 55. 56. 57. 58. 59. 60. 61. 62. 63. 64. 65. 66. 67. 68. 69. 70. 71. 72. 73. 74. 75. 76. 77. 78. 79. 80. 81. 82. 83. 84. 85. 86. 87. 88. 89. 90. 91. 92. 93. 94. 95. 96. 97. 98. 99. 100. 101 102. 103. 104. 105. 106. 107. Resolution Phantom ................................................................................42 Scout View of the Resolution Phantom .....................................................42 Slice Sensitivity Profile Phantom ..............................................................43 Scout View of the Slice Sensitivity Profile Phantom ...................................44 Offset angle with regards to y-axis ...........................................................44 Offset angle in the xz-plane ......................................................................45 Slice sensitivity profile of a measurement with standard patient protocol .45 Mounting of the low contrast phantom .....................................................46 Scout View of the low contrast phantom ..................................................46 Low contrast phantom measured with a patient protocol. ........................47 Start Evaluation ......................................................................................48 Overview Evaluation Program ..................................................................49 Evaluation: Selection of Patient and Measurement ...................................52 Select Old Measurement ..........................................................................52 Load GOBJ ..............................................................................................53 Print Menu ..............................................................................................54 Brightness Scaling ...................................................................................55 Options Brightness-Scaling ......................................................................55 Drawing Icons ..........................................................................................56 The Edit menu .........................................................................................57 Contouring ..............................................................................................58 Contouring Subwindow ............................................................................58 Color Coding in Image Selection Area .......................................................60 Creating a VOI .........................................................................................61 2D-Evaluation .........................................................................................62 2D-Histomorphometry .............................................................................62 3D-Evaluation .........................................................................................64 3D-Evaluation Subwindow .......................................................................64 Modifying Scripts, Basic Mode .................................................................66 Distance 3D .............................................................................................67 Distance Measurement ............................................................................67 Print Images ............................................................................................68 Print Images, Details ................................................................................68 Pointer/Ruler/Profile/Angle Tools ............................................................69 Start 3D-Display ......................................................................................70 Main Program Screen ...............................................................................70 3D-Scene .................................................................................................71 Selecting the Sample and the Measurement .............................................71 Start/Stop Calculation .............................................................................72 Observer ..................................................................................................72 Light Source ............................................................................................73 Other Effects ...........................................................................................73 Cutplane .................................................................................................74 Subdimensioning .....................................................................................74 Display modes .........................................................................................74 Object Values ..........................................................................................75 Object Properties .....................................................................................75 Color Mixing for color model: Picker. ........................................................77 Printing of 3D-Scenes ..............................................................................78 Animation Settings ..................................................................................79 Preset menu ............................................................................................80 Start Archiving Program ...........................................................................81 Archiving Program ...................................................................................82 Selecting Measurement ............................................................................83 Selecting File Type ...................................................................................83 Selecting destination device .....................................................................84 Selecting File Type for copying .................................................................84 Backup Options .......................................................................................86 XtremeCT II Version 2.4 157 Figure 108. Device Information ...................................................................................87 Figure 109. Gauss ......................................................................................................93 Figure 110. CE-Mark ................................................................................................122 Figure 111. Site Planning .........................................................................................129 Figure 112. Electrical installation .............................................................................130 Figure 113. PMMA Phantom Top View ......................................................................136 Figure 114. Dose / Sensitivity Profile ........................................................................137 Figure 115. Geometric efficiency ...............................................................................138 Figure 116. Modulation Transfer Function (MTF) for all Combinations ......................139 Figure 117. Horizontal and Vertical Planes for Measurements ...................................140 Figure 118. The Dose Distribution in the Horizontal Plane ........................................141 Figure 119. The Dose Distribution in the Vertical Plane ............................................142 Figure 120. Front of Equipment ...............................................................................143 Figure 121. Rear of Equipment .................................................................................143 Figure 122. Indicators ..............................................................................................144 Figure 123. Indicators ..............................................................................................144 Figure 124. Safety Components ................................................................................146 Figure 125. Safety Components ................................................................................146 Figure 126. Scout-View/Reference Line ....................................................................149 Figure 127. Example for Radius, good example on the left, bad on the right ..............149 Figure 129. Example for Image Quality, good on the left, acceptable in the middle and not acceptable on the right 150 Figure 128. Example for Tibia, good example on the left, bad on the right .................150 Figure 130. Example for Image Quality, good on the left, acceptable in the middle and not acceptable on the right 151 Figure 131. Example for matching of contours, good on the left, acceptable in the middle and not acceptable on the right 152 XtremeCT II Version 2.4 158 Index Numerics E 2D Evaluation ........................................ 62 2D-Reconstruction ................................. 89 3D Result Sheet reprinting ...................................... 105 3D-Display ............................................. 69 3D-Effects LightSource ..................................... 73 Observer .......................................... 72 Perspective ...................................... 73 Scaling ............................................ 73 3D-Evaluation .................64, 116, 117, 118 3D-Histomorphometry ............................ 90 Ending Program ..................................9, 12 Enlarge .............................................53, 54 Error Messages .....................................107 Evaluation ........................................47, 48 Starting 2D .......................................62 Starting 3D .......................................65 Evaluation Methods ......................117, 118 EXIT ...................................................9, 12 Extruding ...............................................59 A Adaptive Threshold ................................ 93 Adjusting Scan Range ............................ 27 Animation Sequence Calculating ...................................... 78 B Backup .................................................. 85 Brakepoints ........................................... 59 C Checklists ............................................ 120 Color Mixing .......................................... 76 Color Scale ........................................... 124 Component Labeling .............................. 96 Concatenate AIMs ................................ 102 Connectivity ........................................... 99 Connectivity Density .................... 119, 120 Contouring ....................................... 58, 62 Controlfile .............................................. 17 Creating a Volume ................................. 58 Cutplane ................................................ 74 D Data security ......................................... 85 Database activating ......................................... 97 query 3D-values ..................... 105, 106 query evaluation data ............ 105, 106 query measurement info ................ 106 Deleting Objects ..................................... 57 Density scaling ................................. 54, 56 Device-Information ................................. 87 Diameter ................................................ 20 Directory Structure .............................. 112 Dismount (See also Mount) .................... 88 Distance Measurement 3D ................................................... 67 Drawing Contours ......................................... 56 Objects ............................................ 56 Drawing Icons .................................. 56, 69 DT Distance Transformation .......... 90, 119 F File .......................................................124 Fixed Threshold ......................................93 Flip AIMs ..............................................103 Format ...................................................87 G Gauss-Filter ............................................93 Global Delete ..........................................59 Global Scaling .........................................59 Glossary ...............................................124 gobj_mask ..............................................94 Graphical User Interface .......................110 GUI .......................................................110 H Harddisk ..............................................124 Header and Footer ................................111 Histograms ...........................................100 Histomorphometry 3D ....................................................64 I Initialize ..................................................87 Interactive Measurement .........................32 Interpolating ...........................................59 IPL ..........................................................90 L Load GOBJ .............................................53 Logicals (OpenVMS) ..............................114 Login-Box .................................................2 LUT ......................................................124 M Magnify ..................................................53 MB1 .....................................................110 Measurement ....................................13, 14 Interactive Mode ...............................32 Measurement time ..................................21 MIL Mean Intercept Length ..............90, 118 MIL Calculations ...................................100 Modifying Objects ...................................57 Morphing ................................................59 Mount (See also Dismount) .....................88 Mouse ...................................................110 Moving/Scaling .......................................57 O Object Properties .................................... 75 Object Values ......................................... 74 Objects Deleting ........................................... 57 Drawing ........................................... 56 Modifying ......................................... 57 Moving/Scaling ................................ 57 Selecting .......................................... 57 Operational conditions ......................... 121 Operator ............................................ 7, 15 Optical Disk ......................................... 124 P Password ................................................. 2 Position .................................................. 20 Print Images ........................................... 68 Printing 2D-Histomorphometry ..................... 63 Printout ............................................... 111 Program Overview ................................ 5, 6 Q Quit ................................................... 9, 12 R Range .................................................... 59 Reconstruction ....................................... 89 Reference Line ........................................ 26 Region of Interest ................................... 56 Resolution .............................................. 20 ROI ................................................ 56, 124 Defining ........................................... 62 S Safety Copy ............................................ 85 Sample ................................................... 10 Scaling Voxelsize .................................. 101 Scan Range ............................................ 26 Scout-View ............................................. 23 Segmentation ....................... 63, 64, 93, 94 2D ................................................... 63 3D ................................................... 64 modifying parameters ............ 117, 118 Segmentation Program ........................... 90 Selecting Objects .................................... 57 Shutdown ................................................ 4 Shutting Down ..................................... 2, 3 Slice-Reconstruction .............................. 89 SMI Structure Model Index ............. 90, 118 Specifications ....................................... 121 Starting MicroCT Programs ...................... 2 Startup ................................................ 1, 6 Subdim .................................................. 74 Symbols (OpenVMS) ............................. 114 Symbols in IPL ..................................... 105 T Tape ....................................................... 88 Terminal Programs ................................. 89 Threshold adaptive ........................................... 93 fixed ................................ 93, 117, 118 TRI Triangulation Method ...............90, 118 Turning On Equipment .............................1 U UCT_LIST .....................................105, 106 V VOI .................................................56, 124 Defining ...........................................64 Volume of Interest ..................................56 W Window ................................................110 X X-Ray Tube ...............................................1 Z Zoom ......................................................53