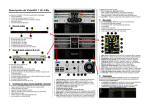
1
e-mix
User Manual
Version 5.7
©2011 cbl electronics inc. switzerland. e-mix is a product of cbl electronics inc. e-mix is a registered trademark of cbl electronics inc. All rights reserved.
Table of Contents
Getting Started ...................................................................................................... 6
Requirements ..................................................................................................... 6
Installation ......................................................................................................... 6
First start ............................................................................................................ 6
Connecting the mp1200 console with e-mix....................................................... 9
Program Description ............................................................................................ 10
Introduction...................................................................................................... 10
Player Display ................................................................................................... 11
Effect ...................................................................................................................11
BPM .....................................................................................................................11
Pitch Range ..........................................................................................................11
Elapsed/Remain ....................................................................................................11
Key Lock (Master Tempo) ......................................................................................11
Waveform .............................................................................................................11
Functions ..............................................................................................................11
Player Controls ................................................................................................. 12
Loading a Player....................................................................................................12
Play/Pause ............................................................................................................12
Cue ......................................................................................................................12
Cue1, Cue2 and Cue3 ............................................................................................12
Time ....................................................................................................................12
Loop.....................................................................................................................13
Tap BPM ...............................................................................................................13
Pitch Fader ...........................................................................................................13
Key Lock (Master Tempo) ......................................................................................13
Sync .....................................................................................................................13
Wheel...................................................................................................................13
Shuttle .................................................................................................................14
Playlist .............................................................................................................. 14
Functions ..............................................................................................................14
e-mix User Manual
2
Adding Tracks to the Playlist...................................................................................15
Quick Search .........................................................................................................15
Manipulating the Playlist ........................................................................................15
Navigator .......................................................................................................... 15
Navigation Buttons ................................................................................................15
LOAD ...................................................................................................................15
BACK ....................................................................................................................16
Mixer ................................................................................................................. 16
Introduction ..........................................................................................................16
PFL ......................................................................................................................16
Master ..................................................................................................................16
Gain .....................................................................................................................16
Equalizer ..............................................................................................................17
Channel fader .......................................................................................................17
Mix Now ...............................................................................................................17
Crossfader ............................................................................................................17
Changing the Crossfader Preset (home and pro editions only) ...................................17
EFX ......................................................................................................................17
FST ......................................................................................................................17
PFL Split ...............................................................................................................18
Split / Talk over.....................................................................................................18
Jingles ..................................................................................................................18
Automix ............................................................................................................ 19
Autoplay ...............................................................................................................19
Autofade (home and pro editions only)....................................................................19
Beatsync (pro edition only).....................................................................................19
Shuffle (home and pro editions only).......................................................................19
Repeat (home and pro editions only) ......................................................................19
Summary ..............................................................................................................19
Beatmix Display (home and pro editions only) ................................................. 20
Video ................................................................................................................. 20
Playback ...............................................................................................................20
e-mix User Manual
3
Mix (pro edition only).............................................................................................20
Effects (pro edition only) ........................................................................................21
Monitor Player (home and pro editions only) ................................................... 21
Database ........................................................................................................... 21
Introduction ..........................................................................................................21
Adding Tracks to the Database ...............................................................................21
Load and Load All ..................................................................................................21
Searching the Database (home and pro editions only) ..............................................22
Sorting a Column...................................................................................................22
Quick Search .........................................................................................................22
Cover Art (home and pro editions only) ...................................................................22
Artist / Album / Genre View ....................................................................................22
Lists View .............................................................................................................23
Groups View .........................................................................................................24
Database Management ..........................................................................................25
Editing the Meta-Information (Tags) .......................................................................25
Effects ............................................................................................................... 27
Introduction ..........................................................................................................27
Available Effects (pro edition) .................................................................................27
Jingle Player ..................................................................................................... 28
Loading a Jingle ....................................................................................................28
Jingle Settings (home and pro edition only) .............................................................28
Bypass Jingle Mixer Knob .......................................................................................28
Saving and Loading the Jingle Settings (home and pro edition only) ..........................28
Equalizer ........................................................................................................... 29
Channel Equalizer Settings .....................................................................................29
Master Equalizer (home and pro edition only) ..........................................................29
Saving and Loading the Equalizer Settings (pro edition only) .....................................29
Compressor and Limiter (pro edition only) ...............................................................29
Recorder (home and pro editions only) ............................................................ 30
Recording .............................................................................................................30
Ripper (home and pro editions only) ................................................................ 30
e-mix User Manual
4
Introduction ..........................................................................................................30
Getting CD Information ..........................................................................................30
Ripping a CD .........................................................................................................30
Ripper Settings......................................................................................................30
Access the Program Options ............................................................................. 31
General options................................................................................................. 32
Player options ................................................................................................... 33
Audio Out Options ............................................................................................. 34
WDM / DirectSound ...............................................................................................34
ASIO (home and pro editions only) .........................................................................34
Audio In Options ............................................................................................... 35
WDM / DirectSound ...............................................................................................35
ASIO (home and pro editions only) .........................................................................35
Ripper Options .................................................................................................. 36
Automix Options ............................................................................................... 38
Autofade...............................................................................................................38
Autofade + Beatsync (Beatmix) ..............................................................................38
Video Options.................................................................................................... 39
MIDI Controller Options ................................................................................... 40
Skin Options...................................................................................................... 40
Troubleshooting ................................................................................................... 41
FAQ (Frequently Asked Questions) ................................................................... 41
What Soundcards are supported? ...........................................................................41
There is no sound..................................................................................................41
The audio quality is poor (drop-outs, noise, etc.) .....................................................41
What is a DirectShow codec/decoder? .....................................................................41
There is no video...................................................................................................41
Getting the latest Software .............................................................................. 42
Support and Contact Details ............................................................................. 42
Buying the Software ............................................................................................ 42
Buying the e-mix mp1200 console ....................................................................... 42
e-mix User Manual
5
Getting Started
Requirements
-
Windows XP/Vista/7
-
CPU > 1.6 GHz
-
256 MB of Memory (RAM)
-
USB 1.1 port for console
Installation
Place the CD into the CD-ROM drive, start the installation program and follow the
instructions. You can download the newest software from http://www.e-mix.com.
First start
When you start the program, a window will inform you how many days you have left to
activate the software. If you already have a license key, you can activate the software now.
If you do not have a license key yet, please press the “Buy here” button to get one. After
you have activated the software, the window will not show up again.
To activate the e-mix software please follow these steps:
Step 1: Press activate to start the activation process.
e-mix User Manual
6
Step 2: Choose whether you want to activate the software online (Internet connection
required) or offline.
Step 3: Enter your personal data. Please enter the license key correctly (case sensitive;
distinguish between Zero and O).
e-mix User Manual
7
Step 4: If you have chosen the offline activation mode, you will see this window. Now click
on the link under Step 1 and fill in the form.
e-mix User Manual
8
Please enter the serial number correctly (case sensitive; distinguish between Zero and O).
The Installation ID can be found under Step 2 in the window above.
After pressing OK, you will see the activation key that you please fill in under Step 3 in the
window above. You can copy the key by using “Copy” and “Paste”. If you enter the key
manually, make sure that you use the correct numbers and letters (case sensitive;
distinguish between Zero and O, I and l, etc.).
Press “Finish” and e-mix should now be activated.
The very first time you start e-mix a dialog box is displayed where you can chose your audio
out settings for each player. We recommend that you use “DirectSound”. The other
technologies offer lower latencies but they are not supported by every soundcard.
Connecting the mp1200 console with e-mix
Now connect the mp1200 console with a USB port of your notebook or PC. Windows will
automatically install the required drivers.
After you have connected the mp1200 console you can start the e-mix software. You should
now be able to control the software with the console.
e-mix User Manual
9
Program Description
Introduction
e-mix is an easy-to-use mixing software that offers you two players, a mixer, a playlist, a
powerful database, video support and much more features. The software can be used
together with the mp1200 controller, which can be connected to your PC or notebook by
USB. This combination gives you the “touch and feel” of a conventional DJ equipment and
the ability to easily manage and play your digital audio tracks on your PC and notebook.
Status Display
Player Display
Beatmix Display
Playlist
Player
Navigator
Database
Mixer
e-mix User Manual
10
Player Display
Effect
In the upper left corner you see the
current effect followed by the values of
the parameters.
BPM
The software automatically calculates
the BPM value (auto BPM) and displays
it in the upper right corner. The user can additionally set up a manual BPM value by using
the “TAP” button. To toggle between the auto and the manual BPM value, just click on the
text “Auto” or “Manual”.
Pitch Range
You can change the range of the pitch fader by clicking on the text showing the current
pitch range (e.g. 8%). Right to the pitch range, you see the actual pitch value.
Elapsed/Remain
You can toggle the time between remain and elapsed. Just click on the text “Remain” or
“Elapsed”.
Key Lock (Master Tempo)
You can toggle between Key Lock (Master Tempo) and Pitch. Just click in the text “Key”.
If Key Lock (Master Tempo) is enabled, then the pitch will not be affected when you change
the tempo of a song.
Waveform
The Waveform gives you a visual overview of the complete track. The cue points are marked
with vertical lines.
Functions
Context menu
Description
Save BPM Value
Saves the current BPM value in the database
Sync
see Sync in the Player Controls chapter
Load file...
Load a file into the Player
e-mix User Manual
11
Player Controls
Shuttle
Wheel
Loading a Player
You can use the “L”, “R” or “Load” buttons of
the Navigator to load a player. Just select a
track in the playlist and press “L”, “R” or
“Load”. You can also use the playlist function
“Load in Player” or you can Drag & Drop a track
from the playlist, from the database or from
Windows Explorer onto a player.
Play/Pause
Starts and stops the audio file.
Cue
When you press “CUE” while the player is paused then the current position is stored (cue
point). If you press “CUE” in play mode, than the player stops and jumps to the stored cue
point.
If the current position is the cue position and you press “CUE” again, then the player will
start playing until you release the “CUE” button (Cue-Play). Cue-Play can be disabled in the
Program Options.
Cue1, Cue2 and Cue3
You can use these buttons to store up to three cue points. If you press one of the buttons,
then the current position is saved and the button lights up red. If you press the same button
again, the player will stop and jump to the stored position. If you want to delete a cue point,
then call up the context menu of the Player or the Player Display and select “Clear Cue
Point”.
All cue points are saved in the database (only if the track is already stored in the database)
and automatically restored when you load the track again.
Time
You can toggle the time between remain and elapsed. Just click on the “TIME” button.
e-mix User Manual
12
Loop
Press “Loop A” to set the start position of a loop. This can be done during play and in pause
mode. After setting the loop start you can press “Loop B” to set the loop end. The player will
start looping. To exit the loop press “Loop B” again.
Tap BPM
The software automatically calculates the BPM value. But in some case it can be useful to
adjust the BPM manually. This can be done with the “TAP BPM” button. When the Player is
playing just press the “TAP BPM” button to the rhythm of the music. You can stop at any
time. The BPM value is shown in the Player Display. There you can also switch back to the
“auto” BPM value determined by the software (see Player Display).
If you only want to change the first beat of a song (see Beatgrid) then press “TAP BPM” only
once. The first beat will then be set to the current position.
If you press the “TAP BPM” button longer than half a second, the BPM value currently
displayed in the Player Display will be saved in the database (only if the track is already
stored in the database). In doing so the BPM value will automatically be converted into
normal playing speed (0% pitch).
Pitch Fader
Use the pitch fader to change the tempo of a song. The range of the fader can be set to a
maximum of ±100%. See the Player Display chapter on how to change the range.
If you change the tempo of a song then the pitch will also change. You can enable the “Key
Lock / Master Tempo” feature to avoid this.
Key Lock (Master Tempo)
Press the “TEMP” button to toggle between Key Lock (Master Tempo) and Pitch.
If Key Lock/Master Tempo is enabled, then the pitch will not be affected when you change
the tempo of a song.
Sync
Pressing the “SYNC” button will match the BPM value of the player to the BPM value of the
other player. This is done by changing the pitch.
If the “Beatsync” function is active (see Automix), then the beats are also synchronised. This
means that the first beat of one track is matched to the first beat of the other.
Wheel
The wheel can be used for searching, scratching and pitchbending:
Vinyl (Scratch) effect
e-mix User Manual
Playing
Turning the wheel will...
13
Off
No
search the audio track slowly
Off
Yes
pitchbend (temporary change the pitch)
On
-
Scratch
During search, you will hear the audio at the current position playing in a small loop. The
length of this loop can be adjusted in the Program Options.
Shuttle
Turning the Shuttle will search the audio track fast. The more you turn the shuttle the faster
it will search.
Playlist
Functions
Shortcut key
Context menu
Description
Control-P
Play in monitor
Plays the selected track in Monitor Player
Double click
Play in monitor
Plays the double clicked track in Monitor Player
Control-L
Load in player
Loads the selected track into a free player
Control-1
Load in player 1
Loads the selected track in player 1
Control-2
Load in player 2
Loads the selected track in player 2
Control-A
Select all
Selects all tracks
Control-U
Move up
Moves the selected tracks(s) one up
Control-D
Move down
Moves the selected tracks(s) one down
Control-C
Copy
Creates a copy of the selected track(s) at the end of
the playlist
Control-R
Remove
Removes the selected tracks(s) from playlist
Delete
Remove
Removes the selected tracks(s) from playlist
Control-S
Save playlist...
Saves the playlist in the database (LISTS)
Control-I
Import list..
Imports a playlist (m3u format)
e-mix User Manual
14
Shortcut key
Context menu
Description
Control-E
Export list...
Exports the list to the m3u format or creates a text (txt)
or a comma-separated values (csv) file for printing or
further processing
Control-F
Add files...
Adds file(s) to the playlist
Adding Tracks to the Playlist
To add a track from the database to the playlist you can press the “LOAD” or the “LOAD
ALL” button in the database. You can also use the “Add files...” function in the playlist, the
“Load in playlist” function in the database or you can Drag & Drop the track(s) from the
database or from Windows Explorer into the playlist.
Quick Search
You can jump directly to a particular entry in a column by first clicking on the respective
column and by then typing in the search text on the keyboard.
Manipulating the Playlist
For manipulations within the Playlist, you can use the functions “Move”, “Copy” and
“Remove”. You can also use Drag & Drop to change the order of the playlist entries.
Navigator
The Navigator allows users of the mp1200 console to call the most
important functions of the software directly from the console without
the usage of keyboard and mouse.
With the Navigator you can access the playlist (“PL”), the database
(“DB” and “?”) and the effect settings (“EFX”). If you press “DB” or
“EFX” several times, you can set the cursor to the desired window
within the database or within the effect settings.
Navigation Buttons
The navigation buttons (Left, Right, Up, Down) have the same function as the cursor keys
on the keyboard. However, the “L” and “R” buttons have some additional functionality: if
you have selected a track in the playlist or in the Tracklist of the database, then “L” or “R”
will load it directly into the corresponding player.
LOAD
The “LOAD” button has the same function as the return key on the keyboard. However, the
button has some additional functionality: if you have selected a track in the playlist, then
e-mix User Manual
15
“LOAD” will load it into a free player. If you have selected a track in the database, then
“LOAD” will add it to the playlist.
BACK
The “BACK” button (only available on the mp1200 console) opens and closes the context
menu. Use the up and down arrows to navigate within the context menu and press the
“LOAD” button to select an entry. Pressing “BACK” again will close the context menu.
Mixer
Introduction
The Mixer has four stereo channels and up to seven possible sources (Player One, Player
Two, Jingle Player and up to four external inputs).
The sources Player one, Player two and Jingle Player are each only at your disposal on the
respective channel on the mixer. The external inputs (called virtual inputs) are available on
all four channels, but can each only be active on one channel.
The selection is made with the drop-down lists below the respective channel. The settings of
the audio inputs can be changed in the Program Options.
PFL
With the “PFL” knob, you can set the volume of the monitor output. Pressing one of the
“PFL” buttons will route the corresponding audio signal to the monitor output.
Master
With the “MASTER” knob, you can set the volume of the master output.
Gain
The “GAIN” knob sets the gain (input volume) of a channel.
e-mix User Manual
16
Equalizer
With the equalizer knobs you can adjust the high-, mid-, and low-tone input sounds. The
equalizer parameters (range, cut-off, kill, etc.) can be set in the Equalizer window (see the
Equalizer chapter). There you will also find the equalizer knobs for the microphone channel.
Channel fader
Adjusts the channel output volume.
Mix Now
Press the “Mix Now” button to start an automatic mix (see Automix chapter) according to
the current states of the “Autofade” and “Beatsync” buttons in the Status Display:
Autofade Beatsync
When you press the “Mix Now” button, then...
Off
Off
the paused player starts.
Off
On
the paused player starts in sync.
On
Off
the paused player starts and the tracks will be faded in/out.
On
On
the paused player starts and the tracks will be faded in/out in sync.
If there are already two playing tracks, then the “Mix Now” button has no function. Pressing
the “Mix Now” button during a mix will cancel the mix.
Crossfader
Adjusts the sound mix volume of the two channels. The “ON/OFF” button switches the
crossfader on and off.
Changing the Crossfader Preset (home and pro editions only)
You can change the crossfader curve and save your own presets. Press the right mouse
button on the crossfader to pop up the context menu. You can now select one of the
presets or you can customize them.
EFX
With the “EFX” button, you can activate and deactivate the effects for the channel (see the
Effects chapter).
FST
With the “FST” button, you can enable the fader-start function. When you now open the
channel fader, the player automatically starts playing.
e-mix User Manual
17
PFL Split
If the “PFL SPLIT” knob it is turned to the left then you hear the output from all channels
where PFL is switched on. As you turn it to the right the signal of the master output fades
and becomes louder the more you turn it to the right (only if PFL on the master channel is
active).
Split / Talk over
The “SPLIT” knob allows you to lay the microphone signal over all other input channels so
that you can reduce the level of all other input channels in one go in shifting up the
microphone channel fader (talk over). If the “SPLIT” knob is on position 0, the microphone
channel will work like all the other channels.
Jingles
The software can play up to nine jingles at the same time. Press one of the numerical
buttons to start and stop a jingle. The “MENU” button will open a window where you can
select the jingles and assign them to the numerical buttons (see the Jingle Player chapter).
e-mix User Manual
18
Automix
Autoplay
If “Autoplay” is active, the software automatically starts the
other player when the end of a song is reached. The software
also loads the next song from the playlist into the “free”
player. This allows you to play a complete playlist seamlessly
and without user interaction. Press the “Mix Now” button of the mixer to start the next track
before the end of the current track is reached.
Autofade (home and pro editions only)
If “Autofade” is active, the software will fade out the expiring song and fade in the following
song (autofade). The parameters of the fades can be set in the Program Options under
Automix. If “Autoplay” is active then the autofade is done automatically. If “Autoplay” is off
then you can trigger the autofade manually by starting (play) the paused player.
Beatsync (pro edition only)
If “Beatsync” is active, the “Autoplay” and “Autofade” functions will be beat synchronous.
This means that the first beat of one track matches to the first beat of the other. The
parameters of the beat synchronous automix can be set in the Program Options under
Automix.
Shuffle (home and pro editions only)
If “Shuffle” is active, the tracks of the Playlist will be loaded in random order into the player.
Repeat (home and pro editions only)
If “Repeat” is active, the Playlist is repeated automatically as soon as all of its tracks have
been played.
Summary
Autoplay
Autofade Beatsync
When the end of a
song is reached, then…
When the play button
is pressed, then…
Off
Off
Off
the player stops.
the player starts.
Off
Off
On
the player stops.
the player starts in sync.
Off
On
Off
the player stops.
the player starts and the
tracks will be faded
in/out.
e-mix User Manual
19
Autoplay
Autofade Beatsync
When the end of a
song is reached, then…
When the play button
is pressed, then…
Off
On
On
the player stops.
the player starts and the
tracks will be faded
in/out in sync.
On
Off
Off
the other player starts.
the player starts.
On
Off
On
the other player starts in
sync.
the player starts.
On
On
Off
the other player starts
and the tracks will be
faded in/out in sync.
the player starts.
On
On
On
the other player starts
and the tracks will be
faded in/out in sync.
the player starts.
Beatmix Display (home and pro editions only)
The Beatmix display shows the bass frequencies of the waveform of the tracks that are
loaded in the players. It also shows the beats and measures of the music. Each beat is
displayed by a small rectangle. The first beat is highlighted by a broader rectangle.
The Beatmix display helps you to mix two tracks in sync. The rectangles that display the
beats of the two tracks need to be adjusted so that they lay exactly over each other.
Video
Playback
The software is able to play videos. Before you can use the video feature, you must enable
it in the Program Options. When you now load a video into a player you should see it in the
Status Display.
Mix (pro edition only)
The videos are automatically mixed together based on the crossfader and the channel faders
of the mixer. During an automatic mix the videos are mixed according to the Automix
settings.
To see the mixed video output you can enable “Show video window” in the Program
Options. There you can also select an output device (Beamer, TV, Monitor etc.) for the
mixed video.
e-mix User Manual
20
Effects (pro edition only)
There are several transition effects. You can select them in the drop-down list in the Status
Display.
Monitor Player (home and pro editions only)
The Monitor Player allows you to pre listen
to the music tracks in the database and the
playlist. The loading of a track into the
Monitor Player is conceivably easy. All you
have to do is double-click with the mouse on the desired track.
If the music track currently playing in the Monitor Player is loaded into a player, the Monitor
Player will stop playing automatically.
Database
Introduction
Overview Window
The database allows you to quickly search
and browse your music archive. In the
upper window, called the Overview Window,
you can change between different views
(Artist, Album, Genre, Lists and Groups). In
the window below, the Tracklist, you see
the list of the tracks.
If you see a track with a red background,
then the software was unable to open it.
See the Troubleshooting chapter for details.
Adding Tracks to the Database
Tracklist
To add a track to the database you can
press the “EDIT DB” button. Then select
“ADD DIR” or “ADD FILE”. See the Database
Management chapter for details.
You can also Drag & Drop the track(s) from
Windows Explorer into the Overview
Window or the Tracklist.
Load and Load All
When you press the “LOAD” button, the selected tracks will be added to the end of the
playlist. The “LOAD ALL” buttons adds all tracks in the Tracklist to the playlist.
e-mix User Manual
21
Searching the Database (home and pro editions only)
When you enter a text into the search text field, the Tracklist will only show those tracks
that match to the search text. In the drop-down list right to the search text field, you can
limit the search to a single field.
Example: if you want to see all tracks that contain the text “test”, then select “All” in the
Overview Window and enter “test” into the search text field.
Sorting a Column
To sort a column just click on the column header. A small arrow will show the sorting order.
Quick Search
You can jump directly to a particular entry in a column by first clicking on the respective
column and by then typing in the search text on the keyboard.
Cover Art (home and pro editions only)
If e-mix finds a bitmap (PNG, JPG, BMP or GIF) in the directory where the tracks of an
album are stored, it shows the bitmap as Cover Art in the Overview Window. If there are
several bitmaps in the same directory, it chooses the one that matches best with the album
name.
When you press the “ALBUM” button, you can switch between the Cover Art view and the
list view.
You can use our free “e-mix Cover Downloader” to manually or automatically download
Cover Art from the internet.
Artist / Album / Genre View
When you press the “ARTIST”, “ALBUM” or “GENRE” button, the Overview Window will show
a list of all artists, albums or genres. When you select one of the list entries, the Tracklist
will show all the matching tracks.
This table shows all the functions available in the Tracklist:
Shortcut key
Context menu
Description
Control-P
Play in monitor
Plays the selected track in Monitor Player
Double click
Play in monitor
Plays the double clicked track in Monitor Player
Control-L
Load in playlist
Adds the selected track(s) to the playlist
Control-A
Select all
Selects all tracks
Delete
Remove from
database
Removes the selected tracks(s) from database
e-mix User Manual
22
Shortcut key
Context menu
Description
Shift-Delete
Delete track
Deletes the selected tracks(s) on the hard disc (use
with caution)
Control-I
Import list..
Imports a playlist (m3u format)
Control-E
Export list...
Exports the list to the m3u format or creates a text (txt)
or a comma-separated values (csv) file for printing or
further processing
Control-F
Add files...
Adds file(s) to the database
Control-H
Hide console
Hides the console (player and mixer) and shows the
Tracklist instead.
Lists View
When you press the “LISTS” button, the Overview Window will show all the lists stored in
the database. These are saved playlists, jingle settings, automatically generated lists (played
list, recently played, etc.) and any iTunes database.
This table shows all the functions available in the Overview Window:
Shortcut key
Context menu
Description
Control-R
Rename list
Renames the selected list
Delete
Delete list
Removes the selected list from the database
This table shows all the functions available in the Tracklist:
Shortcut key
Context menu
Description
Control-P
Play in monitor
Plays the selected track in Monitor Player
Double click
Play in monitor
Plays the double clicked track in Monitor Player
Control-L
Load in playlist
Adds the selected track(s) to the playlist
Control-A
Select all
Selects all tracks
Delete
Remove from list
Removes the selected tracks(s) from the current list
Control-I
Import list..
Imports a playlist (m3u format)
Control-E
Export list...
Exports the list to the m3u format or creates a text (txt)
or a comma-separated values (csv) file for printing or
further processing
Control-F
Add files...
Adds file(s) to the database
Control-H
Hide console
Hides the console (player and mixer) and shows the
Tracklist instead.
e-mix User Manual
23
Groups View
When you press the “GROUPS” button, the Overview Window will show the group structure.
You can create your own groups and add tracks to a group.
This table shows all the functions available in the Overview Window:
Shortcut key
Context menu
Description
Control-N
New group
Creates a new group below the selected group
Control-R
Rename group
Renames the selected group
Delete
Delete group
Removes the selected group from the database
Control-A
Add items...
Adds items to the selected group
You have two possibilities to add a track to a group:
Select the group and press Control-A or select "Add items..." in the context menu.
You can search for the desired tracks in the database now. Select the tracks and
press the "ADD" or "ADD ALL" button. You can also press Control-G or select "Add to
group" in the context menu.
The other possibility is to search for the desired tracks in the database first. Then
press the "GROUPS" button, select the tracks and drag them onto the desired group
with Drag & Drop.
You can arrange a particular group in the tree structure as you wish. To do so you have to
mark the group and move it to the desired position with Drag & Drop.
This table shows all the functions available in the Tracklist:
Shortcut key
Context menu
Description
Control-P
Play in monitor
Plays the selected track in Monitor Player
Double click
Play in monitor
Plays the double clicked track in Monitor Player
Control-L
Load in playlist
Adds the selected track(s) to the playlist
Control-A
Select all
Selects all tracks
Delete
Remove from
group
Removes the selected tracks(s) from the current group
Control-I
Import list..
Imports a playlist (m3u format)
Control-E
Export list...
Exports the list to the m3u format or creates a text (txt)
or a comma-separated values (csv) file for printing or
further processing
Control-F
Add files...
Adds file(s) to the database
Control-H
Hide console
Hides the console (player and mixer) and shows the
Tracklist instead.
e-mix User Manual
24
Database Management
When you press the “EDIT DB” button, you
can manage the database and edit the
meta-information of the tracks.
The “ADD DIR” button allows you to add all
the audio files in a directory (including
subdirectories) to the database.
With the “ADD FILE” button, you can select
the audio files you want to add.
When you press the “SYNC DB” button, the
software reads the Meta-Information from
the audio files and updates the database.
Missing audio files will be removed from the
database. Use this function with caution.
The “DEL DB” button (basic edition only)
will delete all the contents of the database.
Use this function with caution!
With the “NEW DB” button you can create a
new empty database.
The “LOAD DB” function loads an existing database, and the “SAVE DB” button saves the
current database (e.g. to create a backup copy).
Editing the Meta-Information (Tags)
Many audio formats (e.g. mp3, wma and Ogg Vorbis) offer the possibility to save additional
information (meta-information) such as the name of the artist, the title, the name of the
album, the genre etc. in the audio file. The database reads this information and shows it.
The software offers a comfortable editor to change this meta-information. To use this editor
you first have to select the tracks to work on in the database so that they appear in the
Tracklist. Now press the “EDIT DB” button and the tracks currently located in the Tracklist
will be displayed in tabular form.
You are given the possibility to work on the individual fields by clicking on the desired field
with the mouse or by navigating the field with one of the following keys:
Key
Function
Up
Jumps to field above
Down
Jumps to field below
Tab
Jumps to the next field (right)
e-mix User Manual
25
Key
Function
Shift-Tab
Jumps to the previous field (left)
After having selected the field, you are in the editing mode. You have the editing
possibilities known from the Windows text fields at your disposal here. You can also call
them up through the context menu (right mouse button).
You can actuate the entry with the Enter key or the Cursor keys. Changes will be saved in
the database. If you do not want to take the changes, you can cancel by pressing Escape.
Please note that you cannot edit all the information, e.g. “Length” and “Bitrate”. Those fields
are therefore not selectable. In changing the path, you have to make sure that the
respective directory exists already. The software does not create new directories.
Furthermore, the file extension must not be changed, as the file would otherwise not be
recognized as an audio file anymore.
e-mix User Manual
26
Effects
Introduction
e-mix offers you a range of pleasantsounding effects. There are two different
types of effects: player effects and
channel effects.
Each player effect can be switched on and
off with the “ON/OFF” button. The
channel effects can also be switched on
and off with the “ON/OFF” button or with
the “EFX” buttons of the mixer.
You can also use the Navigator to select
an effect. Press the “EFX” button to toggle
between the effects. With “Up” and
“Down” you can select an effect and with
the “LOAD” button you can activate it.
Available Effects (pro edition)
Name
Description
Scratch
This effect simulates scratching with a turntable. You can use the wheel for
scratching.
Start / Brake
Starting and pausing a player will slowly increase (start) or decrease (brake)
the tempo like a turntable. The duration of the start and brake can be set
with the sliders.
Loop
When you activate this effect, the player will automatically create a loop with
the chosen duration in beats.
Reverse
If you activate this effect, then the sound will be played backwards.
Flanger
This effect gives a sort of floating waviness to the sound. The sliders change
the depth and volume of the effect.
Phaser
The phaser changes the sound so that the feeling of motion is noticeable in
it.
Reverb
This effect gives your sound a wide surround feeling and relocates you in a
hall of your choice according to your needs. The hall size and effect
proportion can be altered.
Delay
The delay effect is similar to an echo. The intervals of this repetition and the
decay of the repetition are controlled by the sliders.
e-mix User Manual
27
Jingle Player
Loading a Jingle
Every jingle player can be loaded with a
song of your choice. Just press the eject
button to select an audio track.
Jingle Settings (home and pro
edition only)
For every jingle, you can set the volume
and enable the loop function.
Bypass Jingle Mixer Knob
This function allows you to use the Jingle
Player even if a virtual input is assigned to
the Jingle channel of the mixer.
Saving and Loading the Jingle
Settings (home and pro edition
only)
You can save the current jingle settings (jingle, loop and volume) in the database. Just press
the “SAVE...” button and enter a name. You can load the settings at any time by pressing
the “LOAD...” button. With the “CLEAR” button, you can unload the jingle players and reset
the settings. This has no influence on the saved jingle settings.
e-mix User Manual
28
Equalizer
Channel Equalizer Settings
Area definitions:
The “Range” and “Cut-Off” values for High
and Low can be defined for each Player
channel. You can restore the default
settings by pressing the “Default” button.
Kill (pro edition only):
If “Kill” is active, and you turn one of the
equalizer knobs to the left, this will
attenuate the frequency range even more.
Activate mid:
You can chose to use the Gain knob to
control the mid equalizer. If this option is
turned off, there is no mid equalizer
available.
Microphone Channel Equalizer:
Here you can adjust the gain, high, mid
and low settings of the mic channel.
Master Equalizer (home and
pro edition only)
You can activate or deactivate the Master
Equalizer with the “ON/OFF” button.
The Sliders allow you to match the
frequency response of each of the 10
frequency areas.
Saving
and
Loading
the
Equalizer Settings (pro edition
only)
You can save the equalizer settings into a file. Just press the “SAVE...” button. To load the
settings press “LOAD...”. The “DEFAULT” button resets the settings to a linear frequency
response.
Compressor and Limiter (pro edition only)
Press the “COMP...” button to open the compressor and limiter settings.
e-mix User Manual
29
Recorder (home and pro editions only)
Recording
When you press the record button, the audio
output of the Master Channel is recorded.
The Master Equalizer settings are being
ignored. Pressing the stop button will stop
the recording and the audio data is written to a file. You can specify the format of the file
(mp3, Wave, Ogg Vorbis etc.) in the Program Options.
Ripper (home and pro editions only)
Introduction
You can import your songs directly from the
CD into the database with the ripper. To be
able to rip a CD, you have to select the
Ripper Tab and put a CD into the disc drive.
The Ripper then automatically reads in the
available tracks. Additionally, it displays the
title information (CD text) if it is saved on the
CD.
Getting CD Information
If there is no CD text available, you can try to
retrieve the information from the FreeDB
database on the Internet. To do so, press the
“FreeDB” button. The software will now
connect to the FreeDB server and displays
the respective information, if it is available.
You can edit this information manually.
Ripping a CD
You can now choose one or more title(s) from the track list and then press the “START”
button. The chosen tracks will be copied onto your hard drive and inserted into the
database. You can select all tracks by pressing Control-A. To stop the ripping process press
the “CANCEL” button.
Ripper Settings
The ripper offers you a number of settings that you will find in the Program Options. There
you can choose the desired encoder, the quality settings, the file name settings, etc.
e-mix User Manual
30
Access the Program Options
In the Program Options, you can tailor the software to your personal needs. To access the
Program Options click on the small logo in the upper left corner of the software window.
You can also press “Alt-Space” on your keyboard or the “Menu” button in the Status Display.
Now select the “Options...” entry in the menu.
e-mix User Manual
31
General options
Updates: Here you can choose how often emix should automatically search for new
updates. You can start an Update check
manually by pressing „Check now‟.
Proxyserver: Activate the “Use manual proxy
settings” option if you want to set the
proxyserver settings. When the option is
deactivated, e-mix will take the settings from
the Internet Explorer.
Language: You can change the language of
the e-mix user interface. If you chose a new
language you have to restart e-mix so that the
changes become effective.
Jingleplayer: If "Cue-Play behaviour" is
active, a jingle will be played only as long as
you press the play button. As soon as you release the button, the jingle stops.
Playlist: If the option „Remove played tracks” is active, the played tracks will automatically
be removed from the playlist; i. e. by loading a track in one of the two players, the prior
loaded track will be marked as played and thus removed from the playlist.
If the option is inactive, all tracks will remain in the playlist.
Cover art: If "Search for cover art" is active, then e-mix searches for cover art images on
your hard drive automatically every time you start up the software. On older computers, this
can lead to performance issues. If you do encounter degraded performance on your system,
you should disable this option.
Track analysis: If "Enable track analysis" is activated, the tracks are analysed in the
database in the background. In doing so, the BPM value and the normalisation information
will be determined and saved in the database. This action takes place in the background and
does not affect the operation of the software.
As the analysis of a track last several seconds, the information is not immediately at your
disposal for all tracks.
Recorder: With “Change...” you can set the recording format for the recorder.
e-mix User Manual
32
Player options
Seek mode – Frame loop: This defines the
size of the frame that will be played in an
endless loop in search mode. The default value
is 200ms.
This setting does not affect the already loaded
title in the players, but it will affect the tracks
that follow.
Autoload: You can set here whether the next
track of the playlist shall be loaded
automatically into one of the player right after
having played a previous track. In doing so,
the new track will only be loaded, and not
directly started.
Enable AutoCue: If AutoCue is active, the
Cue Point 0 will automatically be set at the
position where the specified threshold is
exceeded for the first time. Thus, quiet intros at the beginning of a song can be skipped.
Normalisation: Depending on the recording, the volume of the tracks can heavily vary.
With the normalisation, all tracks will be played at the same volume. You can activate the
normalisation with “Use replay gain”. The original audio files are not change at
normalisation. For the normalisation to work, the “Track analysis” function in the General
Options has to be activated.
Pitch: Here you can set the range of the pitch fader.
Pitchbend: Here you can set the maximum tempo change while pitchbending.
Cue buttons: The option "Activate Cue-Play" allows you to preview a particular Cue Point.
To do so you first have to jump to the respective Cue Point with a Cue button. Then you
have to press the same Cue button again and hold it down. The track will now be played
from the Cue Point on. As soon as you release the Cue button, the player will stop and jump
back to the Cue Point position.
The option "Set Cue point when Play" sets the Cue point 0 to the current play position when
the player is in pause mode and you hit the play button.
e-mix User Manual
33
Audio Out Options
WDM / DirectSound
Technology: Here you can choose whether
you want to use “DirectSound”, “Kernel
Streaming” or “Windows Audio Streaming API”.
We recommend that you use “DirectSound”.
Internal Mixer: Enable this when you want to
use the internal mixer of e-mix.
Master output: This is where you can select
your master output from a list of equipment at
your disposal.
Monitor output: This is where you can select
your monitor output from a list of equipment at
your disposal.
Latency: The settings “Low”, “Mid” and “High”
allow you to change the buffer size of the
Soundcard. We recommend using the “Low”
setting. This however requires a fast computer.
ASIO (home and pro editions only)
Device Info: Select an ASIO device for
output.
Control panel: A dialog box will be opened
where you can adjust the settings of your ASIO
device. Some ASIO devices do not have a
control panel.
Device information: Shows
about the selected device.
information
Master output: Select the output channels for
master output. Note that the left and the right
channel must be selected.
Monitor output: Select the output channels
for monitor output. Note that the left and the
right channel must be selected.
e-mix User Manual
34
Audio In Options
WDM / DirectSound
Here you can assign the physical audio inputs
of the mp1200 console and of the soundcard(s)
to the virtual inputs of the software.
Select the desired soundcard under device first.
Then select the input channel. Most
soundcards offer a Line-in and a microphone
input.
The “Source name” can be chosen freely. It
helps you to identify the sources on the mixer.
If you would like to reduce the microphone
latency, than try to enable the “Direct” option
(if available). This will bypass the microphon
channel equalizer.
ASIO (home and pro editions only)
Here, you can assign the physical audio inputs
of the ASIO device(s) to the virtual inputs of
the software.
Select the left and right ASIO input channel. If
you want to use a device that only needs one
channel (e.g. a microphone) you only need to
select the left channel and activate the "Mono"
checkbox. The sound of this input device will
then be heard on both the left and the right
channel.
The “Source name” can be chosen freely. It
helps you to identify the sources on the mixer.
e-mix User Manual
35
Console Options
Please note that these options are only available when our e-mix mp1200 console is
connected.
Backlight: This will allow you to enable the
backlight of the buttons on the mp1200
console. Use the slider to adjust the brightness
of the backlight.
Navigator Buttons: Here you can assign
functions to the navigator buttons of the
mp1200.
Pitchfader Calibration: Here you can
calibrate the mid position of the pitch faders.
e-mix User Manual
36
Ripper Options
Encoder: You can choose the desired output
format of the ripper.
Destination root folder: Choose the target
folder for the ripper here. All files created with
the ripper will be stored in this directory. Make
sure that the folder is not write protected.
Create subfolder(s): Choose the structure of
the folder that should be created by the ripper
here. Available are:
None: Does not create any folders.
Artist only: Creates a folder named after the
artist of the CD.
Album only: Creates a folder named after the
album (CD).
Artist/Album: Creates a folder named after the artist of the CD. This folder obtains a
subfolder named after the album (CD).
Artist - Album: Creates a folder named after the artist and the track, separated with a dash
Filename options: Choose the model of naming for the files created by the ripper.
“Add Track#” inserts the playing number of the title on the CD at the beginning of the file
name.
Compilation Disc: If you have put on a CD on which every song is recorded by a different
artist (e.g. a top 10 hits CD), the artists' names might be saved with the tracks (e.g. track 1
/ artist X). If you activate the option, the ripper recognises this combination of track and
artist information and saves it correctly into the database.
e-mix User Manual
37
Automix Options
Fade out – Threshold: The fading out process in Automix is started at the position of the
first falling below the quoted level.
Fade out – Time: The length of the mix is indicated in seconds for the Automix feature. It
is indicated in measures for the Beatmix.
Fade in – Threshold: The fading in process in Automix is started at the position of the first
excess of the quoted level.
Fade in – Time: Length of the fading in process of the Automix in seconds. It is indicated
in measures for the Beatmix.
Autofade
Fade in – Delay: Quotes the difference between the reach of the Fade out Threshold and
the moment the Fade in starts.
Autofade + Beatsync (Beatmix)
Duration – Beatmix: The duration of the whole Beatmix procedure in measures.
Duration - Bass Crossfade: The duration in measures when the bass frequencies of the
two tracks are crossfaded.
Maximum synchronisation pitch: This is the maximum tempo difference of two songs
that is accepted by the beatmix function. If the difference is bigger, the beatmix function
will not synchronise the tempo of the songs.
e-mix User Manual
38
Video Options
Video: This enables the video support.
Video output device: If there are more than
one video output devices available, then you
can select here the desired output device for
the full screen output video. If there is an
output device missing, make sure that you
have selected “Extend desktop on this monitor”
in the Windows display settings.
Show video window: This will show an
additional window with the output video.
Show cover art for audio files: When
playing a track without video this will show any
cover art in the video window instead.
Show metainfo: Shows metainfo (artist, title,
album, year) of the current track in the video
window.
Show cover art: Shows the cover art of the current track in the lower left corner of the
video window.
Show metainfo of the next track: Shows the metainfo of the next loaded track in the
upper right corner of the video window.
Show genre/comment: Show genre and/or comment of the current track.
Font: Select a font for the metainfo.
Size: Size of the metainfo and cover art in percent of the window height.
e-mix User Manual
39
MIDI Controller Options
Here you can select an external controller to
control the software.
With the e-mix mp1200 console, you are able
to control the software without the need of a
mouse or keyboard. Owners of our software
can obtain the mp1200 console for a very
attractive price. For orders and information,
please contact [email protected].
Skin Options
Controller Skin: Here you can choose one of
our controller skins.
Skin: Here you can select the basic skin of the
software. Additional skins are coming soon.
List Colour Preset: These are colour presets
for the playlist and the database lists. If you
select “None” then the colors of windows will
be used.
e-mix User Manual
40
Troubleshooting
FAQ (Frequently Asked Questions)
What Soundcards are supported?
The software works in principle with all DirectSound-compatible soundcards. Should you
experience problems with a Soundcard, you should make sure that you obtain the very
latest driver for your soundcard. In most cases, you will be able to find the most recent
drivers on the manufacturers‟ websites.
There is no sound
If you do not get any sound, check that all the loudspeaker regulators are on high and that
the outlet channels are correctly set. Take a look at the level meters as well. Make also sure
that you have the newest soundcard drivers installed. On some systems, there is also no
sound after resuming from standby mode. This is caused by system drivers and not by our
software. In this case, you should reboot your system.
The audio quality is poor (drop-outs, noise, etc.)
Make sure that you have the installed the newest audio drivers. Try to set the latency to
high and the technology to DirectSound in the Program Options. Also, disable any power
management functions that may slow down the CPU.
What is a DirectShow codec/decoder?
DirectShow codecs are required to load and play audio and video files. For the common
audio and video formats, the DirectShow codecs are already installed. If you try to load an
audio or video file that is not supported by the installed DirectShow codecs you will get an
error message. In this case, you must install a DirectShow decoder that supports the audio
or video format. You can download them for free here:
http://www.e-mix.com/video
There is no video
Make sure that you have enabled the video features in the Program Options. Also try to
reload the videos into the players. If there is still no video, you may have to install a
DirectShow decoder for the video format. You can download them for free here:
http://www.e-mix.com/video
e-mix User Manual
41
Getting the latest Software
We regulary release free updates of our software with new features, improvements and
bugfixes. They are free and can be found in the download section of our website:
http://www.e-mix.com
Support and Contact Details
Information, contact details and answers referring your problem can be found on our
website:
http://www.e-mix.com
It is important that you quote the current program edition and version you are using when
you send us an enquiry.
Of course, we are always happy to receive your suggestions, advice and improvement proposals regarding e-mix and/or this manual.
Buying the Software
If you want to buy the software, please visit http://www.e-mix.com. There you will also find
all the details of the different editions and free trial downloads.
Buying the e-mix mp1200 console
The e-mix mp1200 console can be bought in our webshop under http://www.e-mix.com.
Owners of our software can obtain the mp1200 console for a very attractive price. For more
information, please contact [email protected].
e-mix User Manual
42