1
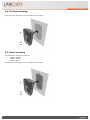
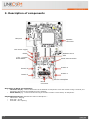
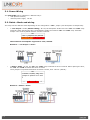
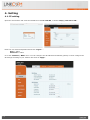
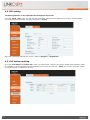
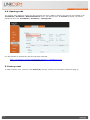
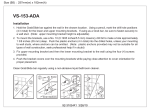
Link IP iDP
Quick User Guide
v1
Please find the latest version of the manual and firmware at :
www.linkcom.fr
Index
!
1.#Physical#install#...................................................................................................................#3!
1.1.#Opening#the#door#phone#.......................................................................................................#3!
1.2.#Dismounting#of#nameplate#...................................................................................................#3!
2.#Wall#mounting#....................................................................................................................#3!
2.1.#Dimension#..................................................................................................................................#3!
2.2.#Surface#mounting#....................................................................................................................#4!
2.3.#Flush#mounting#........................................................................................................................#4!
3.#Description#of#components#............................................................................................#5!
3.1.#Power#Wiring#............................................................................................................................#6!
3.2.#Relais#:#Mode#and#wiring#.......................................................................................................#6!
4.#Setting#...................................................................................................................................#7!
4.1.#IP#setting#....................................................................................................................................#7!
4.2.#SIP#setting#..................................................................................................................................#8!
4.3.#Call#buttons#setting#.................................................................................................................#8!
4.4.#Opening#code#............................................................................................................................#9!
5.#Factory#reset#.................................................................................................................................#9!
1. Physical install
1.1. Opening the door phone
Using the tool provided, unscrew the screw, as shown below and remove the cover:
1.2. Dismounting of nameplate
Remove the 4 screws of the transparent protection. Make the appropriate changes on the nameplate and mount the
protection using 4 screws.
2. Wall mounting
2.1. Dimension
Height: 182mm
Width: 104mm
Depth:: 22mm
p.3$|$9$
2.2. Surface mounting
Using 3 screws and plugs, fix the doorphone to the wall:
2.3. Flush mounting
The dimensions of the flush part are:
•
Height: 182mm
•
Width: 104mm
•
Depth: 22mm
Using 3 screws and plugs, fix the doorphone to the wall:
p.4$|$9$
3. Description of components
LAN port
Speaker
connector
12V Power supply
Relais
Disabled norm
LED
« JP1 » jumper :
Relais Mode
Reset and IP button
Button 4
Button 2
Button 3
Button 1
LED for nameplate
Micro
connector
Description of Reset and IP buttons:
•
IP button IP (#) : Used to determine the IP address of doorphone. Press the button during 5 seconds, the
doorphone announces the IP address on the speaker.
•
Reset button (*) : Press the button during 5 seconds to make a reset factory of doorphone.
Handicapped norm LED : indicate the status of doorphone :
•
Green LED : Ringing.
•
Blue LED : In call
•
Red LED : door opening
p.5$|$9$
3.1. Power Wiring
The Link IP iDP can be supplied in 2 different ways :
•
PoE (802.3at Class 3)
•
External power supply 12V DC
3.2. Relais : Mode and wiring
The relay has two different mode depending on the configuration « JP1 » jumper (see description of components):
•
« 12V Output » mode (default setting): At rest, the doorphone sends 12V to the "NC" and "COM" relay
terminals. When opening the door, the doorphone sends 12V between "NO" and "COM" relay terminals.
Jumper "JP1" must be placed between 2 and 3 terminals :
JP1
The 2 jumpers are placed
1
2
3
4
The maximum consumption supported is 12V / 500mA.
Wirind in « 12V Output » mode :
•
« Relay» mode : At rest, the "NC" and "COM" relay terminals are short-circuited. When opening the door,
the "NO" and "COM" terminals are short-circuited.
The 2 jumpers are positioned between terminals 1 and 2, then 3 and 4. (default):
JP1
« Relais » mode, only one
jumper is placed on 2 and
3
1
2
Wiring in « Relais » mode :
p.6$|$9$
3
4
4. Setting
4.1. IP setting
Open the web browser and enter the IP address of the IP Link iDP, in default "http://192.168.1.250".
Enter the user name and password and click "Logon"» :
User = admin
Password = admin
Go to the "Network / WAN" menu. You can configure the IP address automatically (DHCP) or fixed. Configure the
IP settings according to your network and click on "Apply":
p.7$|$9$
4.2. SIP setting
The SIP registration is not required if the doorphone call in P2P.
Go to the "VoIP / SIP" menu to enter the SIP registration settings (Server Address, server port, Authentication
User and password, Password, SIP User) and click on "Apply" :
If the SIP registration settings are correct, "Status" changes to "Registered".
4.3. Call buttons setting
Go to the "DoorPhone / Function Key" menu. For each button, configure the phone number that should be called.
It is possible to set an IP address as the destination in the case of a P2P call. "Value 2" is to enter a second number
in case of the first is unanswered or busy.
p.8$|$9$
4.4. Opening code
The opening code (DTMF) to trigger the relay and open the door is "55" by default. This code can be modified in the
"DoorPhone / DoorPhone / Remote Password" menu. The Opening time , 5 seconds by default, can also be
changed in the menu "DoorPhone / DoorPhone / opening time" :
It is also possible to activate the relay through http command:
http://<IP-Adresse>/cgi-bin/ConfigManApp.com?key=F_LOCK&code=xxxx
The code corresponds to the "Remote Password".
5. Factory reset
To make a factory reset, press the reset button (#) during 5 seconds (see description component page 5)
p.9$|$9$