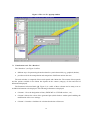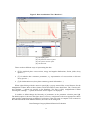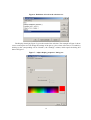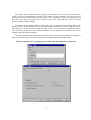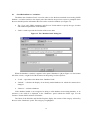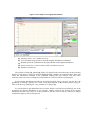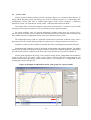
1
JANIS USER’S GUIDE January 2004 NUCLEAR ENERGY AGENCY ORGANISATION FOR ECONOMIC CO-OPERATION AND DEVELOPMENT TABLE OF CONTENTS 1. What is JANIS? ........................................................................................................................ 5 1.1 Introduction ..................................................................................................................... 5 1.2 What’s new in version 2.0 ............................................................................................... 5 2. Content of the JANIS CDs ....................................................................................................... 6 3. Requirements and compatibility ............................................................................................. 7 4. Installation................................................................................................................................. 7 5. Starting JANIS.......................................................................................................................... 8 6. Troubleshooting ........................................................................................................................ 8 7. General overview ...................................................................................................................... 9 7.1 The “Browser” window ................................................................................................... 9 7.2 Navigation tools: The Chart of the Nuclides and Nuclide Explorer ............................. 9 7.3 Visualisation tools: The “Renderer” .............................................................................. 12 Data structure: JANIS database ............................................................................................. 17 8.1 Importing data from a standard format to create a database ........................................ 18 8.2 “Load/Reload/Remove” a database ................................................................................ 21 8.3 Viewing data directly from a file..................................................................................... 22 JANIS features through examples .......................................................................................... 22 9.1 Cross-sections and resonance parameters...................................................................... 22 9.1.1 Pointwise data ..................................................................................................... 22 9.1.2 Weighting of pointwise cross-sections................................................................. 25 9.1.3 Groupwise data ................................................................................................... 29 9.1.4 Comparison of data from different sources......................................................... 30 9.1.5 Comparison with experimental data (EXFOR) ................................................... 31 9.1.6 Computation ........................................................................................................ 33 9.1.7 Cross-section uncertainties ................................................................................. 35 9.2 Energy distributions ........................................................................................................ 36 9.3 Angular distributions ...................................................................................................... 38 9.4 Energy-angle distributions.............................................................................................. 40 8. 9. 3 9.5 Decay data........................................................................................................................ 41 9.5.1 Decay general data ............................................................................................. 41 9.5.2 Decay path........................................................................................................... 42 9.5.3 Spectral data........................................................................................................ 43 Fission yields ................................................................................................................... 44 10. The Search tool ......................................................................................................................... 46 10.1 Searching Evaluated (ENDF) data................................................................................. 46 10.1.1 General ENDF search......................................................................................... 46 10.1.2 Resonance search ................................................................................................ 47 10.1.3 Decay data search ............................................................................................... 47 10.2 “EXFOR Search”............................................................................................................ 48 10.3 “CINDA Search”............................................................................................................. 49 10.3.1 "CINDA Search" Dialog Box Options................................................................. 49 10.3.2 The "CINDA Search" history box........................................................................ 50 10.3.3 Sorting of CINDA retrieval results...................................................................... 50 10.3.4 Accessing linked papers/abstracts....................................................................... 50 11. Live update................................................................................................................................ 50 12. Customisation ........................................................................................................................... 51 12.1 General............................................................................................................................. 51 12.2 Options for the display of the Chart of the Nuclides...................................................... 51 12.3 The “Renderer” panel options ........................................................................................ 53 13. Saving the displayed data to the disk...................................................................................... 54 13.1 Saving tabular data ......................................................................................................... 54 13.2 Saving plots...................................................................................................................... 54 13.3 Saving textual information ............................................................................................. 54 14. Printing options ........................................................................................................................ 54 15. References ................................................................................................................................. 55 16. Acknowledgements ................................................................................................................... 55 9.6 4 1. What is JANIS? 1.1 Introduction Nuclear data are fundamental to the development and application of all nuclear sciences and technologies. The knowledge of these data is then required for all applications where radioactive materials and nuclear fuels are present. This represents a wide range of applications. Nuclear data are thus needed for a variety of users including reactor and fuel cycle physicists, engineers, biologists and physicians. Nuclear data involve radioactive decay properties, fission yields and interaction data over a wide energy range and for different projectiles (cross-sections, resonance parameters, energy and angular distributions…). These data are structured into standardised formats to allow their exchange among users and their treatment with specialised computer codes. Specific formats exist for experimental data (EXFOR), evaluated data (ENDF, ENSDF) or processed data (PENDF, GENDF) and relational databases are used to store and disseminate the data. However, the quantity of data required is so large that it is not always easy for an end-user to access the information needed for his specific application. Java-based Nuclear Information Software (JANIS) is a display program designed to facilitate the visualisation and manipulation of nuclear data. Its objective is to allow its user to access numerical values and graphical representations without prior knowledge of the storage format. It offers maximum flexibility for the comparison of different nuclear data sets. JANIS is the successor to JEF-PC, a software developed in the eighties and nineties by the OECD Nuclear Energy Agency, the CSNSM-Orsay and the University of Birmingham. Basically, all the features available under JEF-PC were reproduced (cross-section display in pointwise and groupwise format, decay data and fission yield display) and several others were added (resonance parameters, energy and angle distributions, cross-section uncertainties…). Additionally, all the former limitations were removed (number of data sets displayed, etc.) and the new software is more flexible and ergonomic. JANIS users can view their own evaluated or processed data starting from any ENDF formatted file or from GENDF libraries. JANIS runs on almost all computer operating systems (UNIX, Windows, Macintosh). 1.2 What’s new in version 2.0 The first version of JANIS (1.0), released in October 2001, was used by more than 700 users around the world. Important feedback was accumulated and improvements were added to the software. These improvements targeted the following areas: • Management of the data through a relational database. One of the limitations of JANIS-1.0 was its structure of data. The basic data (contained in the original ENDF and EXFOR files) had to be converted into an internal structure (serialised Java objects). This option allowed a very quick access to the data. However, the data could not be easily updated and the structure was highly dependent on the classes used to generate the data. In particular, the structure of data became obsolete when these classes were updated. To solve this problem, a new strategy was implemented in JANIS-2.0. The software now accesses directly to the text files (eventually zipped in order to reduce the required storage) and the table of contents of these files (the ENDF dictionary for instance) is contained in a relational database. This enables both quick access to the data and a better separation between the methods (classes) and the data itself. 5 2. • Access to the full EXFOR files. The first version of JANIS accessed the EXFOR data through the computational files, i.e. only numerical experimental data was accessible. In the new version, the user can access the full EXFOR work, including the comment section. • Access to the CINDA database and link between CINDA and EXFOR. Basically, the features of CD-CINDA were implemented in JANIS and a link to the EXFOR works was added. • Access to NUBASE data. • Generalisation of the computational features available in conjunction with interaction data; these features (such as linear combinations, ratios of data) were restricted to cross-section data. It is now possible to perform more advanced combinations such as a product of cross-sections with energy and angular distribution. • Access to centralised data (available on the NEA server) through the Java servlet technology. Content of the JANIS CDs The Java software and a selection of recent nuclear data were packaged to produce the new release JANIS-2.0. This selection of data includes: • evaluated nuclear data libraries processed at 300°K (ENDF/B-VI.8, JEF-2.2, JEFF-3.0, JENDL-3.3); • experimental data (EXFOR); • bibliographical data (CINDA); • nuclear structure data NUBASE-97. All this data could fit on a single CD-ROM. Consequently, two CD-ROMs were produced and some information was duplicated to ensure an easy manipulation of the data. Both CD-ROMs contain the software, the documentation and the necessary scripts to run the software. In addition, the first CDROM contains all the evaluated nuclear data libraries, the experimental data (EXFOR) and the NUBASE-97 nuclear structure data. The second CD-ROM contains the bibliographical data (CINDA), the experimental data (EXFOR) and the nuclear structure data NUBASE-97. The two CD-ROMs have a similar structure: • Directory “data”: contains the basic files, e.g. evaluated files, EXFOR works, etc. • Directory “databases” contains the relational databases. • Directory “software” contains the JANIS and database executable jar files. • Directory “java” contains the Java runtime environment for Windows and Linux. Due to the lack space on the first CD-ROM this directory is only available on the second CD-ROM. • Files “janis.bat” and “janis.sh” are the executable files to be used for running the software. 6 • Directory “documentation” contains the users’ manual (file janis-2.0_manual.pdf). The relational database management system used within Janis is the Java Mckoi SQL database (see http://mckoi.com/database/). 3. Requirements and compatibility To use JANIS, the only main requirement is to run an operating system (OS) which has developed a Java Virtual Machine (all modern OS have a Java runtime environment). The Java Runtime Environment (jre) version 1.4 or higher is required to run JANIS. The minimum required hardware configuration is considered to be: 4. • processor 350 MHz; • 128 Mbytes of RAM (N.B. the performances depends strongly on the available RAM, hence 256 Mbytes or more is preferable); • monitor with a resolution of 800 × 600, 256 colours; • CD-ROM drive. Installation If you do not have jre version 1.4 then it can be installed from the second CD-ROM under directory java, where executable files are provided for the installation of Java on Windows, Macintosh and LINUX. The Java web site (http://www.java.sun.com) provides additional runtimes for free download. Other UNIX operating system developers (e.g. Digital, IBM…) have developed their own versions of the Java Runtime Environment. Once Java has been installed, JANIS can be run directly from the CD-ROM or installed on the hard-drive. Users may choose between: • running JANIS directly from the CD-ROM (no further installation is required); • installing the software onto the computer (~3 Mbytes required) and accessing the databases on the CD-ROM or from the web; • installing the software on the computer, along with one or more databases (N.B. ~300 Mbytes are required per database, however it should be noted that on PCs using large disks with a FAT16 file system, the size can be around 900 Mbytes!)1. The choice between these options depends on the available disk space on your computer and on the expected performance. The best speed performance is obtained with the last option. 1 This increase in size is due to the minimum amount of disk space which is allocated per memory address on large disks (>1 GB or so). Depending on the actual disk capacity this can be much larger than the size of the actual files and so more disk space is allocated than is actually used. 7 To install the software on your hard drive: 5. • Create a directory where you want to install JANIS, e.g. C:\JANIS. • Copy the relevant contents of the JANIS CD-ROM to this directory, i.e. directories help and groups, files janis.jar and janis.bat (or janis.sh if you are running on the UNIX system). • The databases can eventually be copied to the same drive, or to any other drive, including those on a network. Starting JANIS On all operating systems, the command to run JANIS is: java -jar Janis.jar This command is reproduced in the files janis.bat and janis.sh with additional options to select the database driver, hence to run JANIS: • On Windows, double click on janis.jar or janis.bat. • On UNIX, execute the file janis.sh. You have now started JANIS. Warning (Windows only): When executing the janis.bat file, a DOS window appears at start-up and remains active while the software is running. This window should not be closed; otherwise the software will terminate. 6. Troubleshooting The execution files (.bat or .sh) assume that the Java command is in the users command path. If this is not the case, the program will not run. Hence the Java command must be added to this path or alternatively you may change the execution command to specify the complete path to your Java executable. For instance, if Java is installed in the directory: E:\Mycomputer\Program Files\JavaSoft\jre1.4\bin then this path should be added (with double quotes) before the first word java in the relevant execution file. JANIS runs better with the Java runtime environment version 1.4 or higher. If you are using jre-1.2, you may experience some problems with the size of the windows and panels. To check the Java version installed on your computer, type the command: java –version in a DOS, UNIX… command window. 8 7. 7.1 General overview The “Browser” window If the program has correctly started then the first window to appear (the “Browser”) should have the components shown in Figure 1. Figure 1. The “Browser” window upon starting JANIS [1] [2] [7] [3] [4] [5] [6] [1] The Menu bar. [2] Legend for the Chart of the Nuclides: Depends on the category of data displayed. [3] Nuclide Explorer: Elements available in the database are displayed by ascending Z number. Expand one element to see the corresponding isotopes. [4] Database Explorer: All loaded databases are displayed here. The category of data and the evaluation name are given. The selection of one evaluation (highlighted text) causes the display of the appropriate Chart of the Nuclides. [5] Zoom level control. [6] Zoom scroll bar. [7] The Chart of the Nuclides: Provides access to nuclides contained in the selected database. Empty if no database. 7.2 Navigation tools: The Chart of the Nuclides and Nuclide Explorer Different navigation tools are available to select a particular nuclide for accessing its nuclear properties. Position the cursor (left mouse button click) on one area of the chart and move the zoom scroll bar [6] to the right (or choose another value for the zoom level [5]). 9 A zoom of the chart for the Z range 45-48 and the A range 105-108 is shown in Figure 2. The zoom level can be increased further. Depending on the category of data selected, some nuclear properties are displayed for each nuclide (here for radioactive decay data the half-life, decay modes and branching ratios are shown). Figure 2. Details of the Chart of the Nuclides showing radioactive nuclides properties [1] [3] [1] [2] [1] Diagonal displacement of the Chart of the Nuclides. [2] Horizontal scroll bar. [3] Vertical scroll bar. The Chart of the Nuclides can be navigated using the following means: • Keyboard arrows. • Horizontal and vertical scroll bars. • Diagonal displacement buttons. • Mouse displacement. Select any position on the chart and move the mouse while holding down the left button. Any displacement of the Chart of the Nuclides can easily be done in this way. The properties of a single nuclide can be shown at a higher zoom level by right-clicking on the corresponding cell. An enlarged square containing information on the selected nuclide will appear as shown in Figure 3 for 108Ag. 10 Figure 3. Details for one particular nuclide (108Ag) The Chart of the Nuclides is not the only available tool for accessing the properties of one nuclide. The Nuclide Explorer ([3], see Figure 1) provides an alternative navigation tool. Expand the directory corresponding to one element and select the desired isotope. The “Go To” option (Ctrl+G, or via the Menu “Tools/Go To”) opens a dialog box in which the user can specify one or more parameters (symbol, A, Z, name, N) as shown in Figure 4. There is a full correspondence between the three parts: • the content of the selected evaluation; • the Chart of the Nuclides displayed; • the Nuclide Explorer content. The Chart of the Nuclides and Nuclide Explorer are two means for the selection of a nuclide. Furthermore, once the selection is made with one of these means, the second means is automatically updated. Double-click on the selected nuclide (on the Nuclide Explorer tree or on the Chart of the Nuclides) to access the complete properties of this nuclide. 11 Figure 4. The “Go To” pop-up window 7.3 Visualisation tools: The “Renderer” The “Renderer” (see Figure 5) offers: • different ways of representing the nuclear data for a particular nuclide (e.g. graphical, tabular); • provides tools for the manipulation and comparison of different nuclear data sets. The main window is composed of three main panels and a Menu bar. The content of these panels and the options available in the Menu bar depend on the context (category of data and kind of information displayed). The Parameter Selection Panel ([2], Figure 5) is a table of three columns and as many rows as available information to be displayed. The following information is displayed: • Column 1: Gives the designation of data, (ENDF MT no., EXFOR work no., etc.). • Column 2: Shows the colour of the generated plot (which links to another panel enabling the modification of the curve settings. • Column 3: Contains a checkbox for selection/deselection of data sets. 12 Figure 5. Data visualisation: The “Renderer” [4] [1] [3] [2] [1] The display panel [2] The parameter selection panel [3] The options selection panel [4] The Menu bar There are three different ways of representing the data: • [P] for graphical plots: cross-sections, energy and angular distributions, fission yields, decay spectra…; • [T] for tabular data: resonance parameters, x,y representation of cross-sections or discrete decay spectra…; • [I] for information text (decay data constants, general information…). When right-clicking with the mouse in panel [2], a pop-up menu offers several features for the manipulation of data. Most of these features will be described in more detail later. The “Unselect all” and “Settings…” options are specific to the Renderer. The first is fairly straightforward. When selecting the “Settings…” option, the window seen in Figure 6 is displayed. It enables to define/change the hierarchy of parameters in the parameter selection panel [2]. The default option is shown in the figure above, however, it might not be the most appropriate choice when specific comparisons are performed. For instance, if the user wants to compare cross-sections for the same nuclide but with different libraries, the order can be changed to: Base/Datatype/Category/Material/Reaction/Evaluation 13 Figure 6. Definition of levels in the selection tree The Display Panel ([1], Figure 5) gives the result of the selection. The example in Figure 5 shows a cross-section plot. One can change the settings of the plot (e.g. the colour of the line) or of a table by clicking on the corresponding cell in Column 2, the “Settings” column, which opens the dialog box shown in Figure 7. Figure 7. “Adjust display properties” dialog box 14 The “Name” field corresponds to the string given in the legend for a curve or the column title for a table. This can be automatically inserted by the software or entered manually. For data given with error bars (cross-section uncertainties, fission yields…) the “Parameters” field controls the display of these error bars. The colour of the curve is chosen in the “Color” field with three choices of colour panels (Swatches, HSB and RGB). The format of the Options Selection Panel ([3], Figure 5) depends on the Display Panel ([1], Figure 5) and on the data displayed. For the example shown in Figure 5 the “Plotter” field shows the x and y limits, etc. It can be used to change the scales of the x or y axes (linear or logarithmic) and to enter new limits for the two scales. Other information can be displayed in this panel; this will be expanded upon through the examples. The “More” button in the Options Selection Panel allows the more general options of the graph or table to be altered. Figure 8 shows the dialog boxes for tabulated data and graphical data. Figure 8. Dialog boxes for changing general table (top) and graph (lower) properties 15 Under the “Strings” tab (common to both) the title of the table or graph can be specified. This can be constructed automatically by JANIS as a combination of strings giving the type of data, the nuclide, the evaluation name and the location. Alternatively, manual specification of the table and graph titles can be entered in the free text box when the “Manual” option is selected. No title is displayed when the “show title” checkbox is not selected. The settings panel for a graph contains three other tabs: • The “Axis” tab controls the drawing of x and y axes and gridlines. • The “Colors” tab allows colours for different areas to be altered. • The “Drawing order” tab controls the drawing orders (foreground, background) for multiple curve graphs. Saving tabulated data Tables can be saved to disk using the option “File/Save” on the Menu bar ([4], Figure 5). The dialog window shown in Figure 9 appears where one can specify the file name and location (“Browse” button) and other options, including the choice of column separator. The default column separator is a comma. Figure 9. Dialog box for “File/Export” All tables can be sorted according to one of its columns. The default sort is by ascending order of the parameter in the first column. Click on the cell corresponding to the name of another parameter to sort the table accordingly. An important component of any plotting package is its zoom capability. JANIS offers different ways of zooming: • With the mouse: While maintaining the mouse button pressed, draw a rectangle in the plot area. The plotter will use the co-ordinates of the rectangle corners to calculate xmin, xmax, ymin and ymax. A click on the right mouse button will cause the plotter to go back to the previous zoom level. • By specifying the values of xmin, xmax, ymin and ymax in the Parameter Selection Panel. A right click on xmin, xmax, ymin or ymax will return the plot to the previous zoom level. 16 8. Data structure: JANIS database JANIS-2.0 can access the data in various ways, depending on how it is structured. The main options are listed below: • Access to data supplied with the JANIS CD-ROMs. This will be referred to as “Local janis” or “local CINDA”. • Access to JANIS data available on the NEA server. This will be referred to as “Remote Union”. • Access to users’ data contained in text files (typically a single or a set of ENDF files). The data contained in the JANIS CD-ROMs is basically split into two parts. Directory “data” contains several categories of data such as evaluation libraries, EXFOR and NUBASE files. The basic data is contained in separate text files which can be compressed to reduce the storage size. Typically, a text file contains an ENDF material or a collection of EXFOR works for a given target nuclide. Directory “databases” contain one or several relational databases specially designed to either include the whole content of bibliographical data (CINDA) or to provide the JANIS software with dictionaries that enables rapid access to the text files contained in the “data” directory. The databases are constructed with JANIS (see the import option in Section 8.1). In principle, these databases are connected when the software is launched. Two CD-ROMs were necessary to include all data. The first CD-ROM contains a collection of evaluated data files, NUBASE data and experimental data (EXFOR). The second CD-ROM contains the bibliographical CINDA data and a second copy of the EXFOR data. To access the data contained in the “Remote NEA database”, an Internet connection is required. Furthermore, since a large quantity of information is transferred, a high-speed Internet connection is preferable. JANIS enables an automatic connection to the “Remote Union”. This is performed using the servlet technology. Thus in principle, one can access the data simply by launching the JANIS.jar file. However, depending on the configuration of the firewalls in the users’ computer environment, this option might not work automatically. Please contact the JANIS development team ([email protected]) for troubleshooting. JANIS can also access data contained in a user’s file. This can typically be used to view the data contained in an ENDF-6 formatted file (or processed file in PENDF or GENDF format) which contains a single material or a collection of materials. This is performed using the Menu option “File/Open” which allows to browse the user’s directories and specify the target file to be opened. This option is offered for users who want to view the data without necessarily storing the structure of the data on a hard-drive for further use. If the user wants to use the data frequently, it is better to import it into a database and use it as a local database (see the import option in Section 8.1). Whatever the option used, JANIS structures the data in a hierarchical way (Type of data/Dataset/ Category) as shown below: Database name (location on the local or network disk or on the Internet) Type of data (e.g. neutron interaction data, decay data) Data set (typically an evaluation, e.g. ENDFB67 or experimental data EXFOR) Category (e.g. cross-sections, angular distribution…) 17 Typical examples are given here: POINT2000 Interaction data (incident neutron) 300K Energy angle distributions (data of File 6 in the ENDF format) Energy distributions (data of File 5 in the ENDF format) Angular distributions (data of File 4 in the ENDF format) Cross-sections (data of Files 3, 2, 1 and 33 in the ENDF format) Figure 10 displays the structure as seen by a file system explorer. Figure 10. Data structure of a typical JANIS database The Chart of the Nuclides and the Nuclide Explorer are dynamically constructed from the content of the selected category of data. A number of operations are possible with regard to the database as described in the following sections. 8.1 Importing data from a standard format to create a database The Menu option (“Tools/Import”) allows the conversion of data from one of the original formats to the JANIS database format. The original formats supported are: the ENDF format (including the PENDF format and hybrid ENDF+PENDF), the GENDF format (as prepared by NJOY), the computational format of EXFOR used at the NEA and NUBASE. A database may contain different categories of data and/or many evaluations. For instance, a user may create a database from all the information contained in one evaluated file (general purpose, decay data, fission yields) or a database specific to one category, but with different evaluation sources, etc. The source files are selected from a local or network drive using the appropriate “Browse” button (see Figure 11). If the files are grouped in a directory, and the name of the directory is given, the code will automatically select all files contained in that directory. File selection options allow multiple selections using the “Ctrl” and “Shift” buttons, in conjunction with the mouse, as in standard Windows selections. One file may contain any number of materials ranging from a single material up to a complete ENDF tape containing many hundreds. 18 Figure 11. The “Tools/Import” dialog box As explained in the beginning of this section, several options are available to convert the original data to a structure readily usable by JANIS. The import procedure is slightly different depending on whether the user is simply interested in temporarily viewing the content of a file without storing the resulted structure on a hard disk or whether he wants to create a permanent database. Let us examine the latter case. The import function parses the original files and stores the information in a Java relational database management system (RDBMS) called Mckoi. The amount of data stored in the database also depends on the kind of data. For CINDA and NUBASE the whole amount of data is stored in the database tables. Thus the original data files are not needed after the import stage. For other kinds of data, namely ENDF and EXFOR, only partial information is stored in the database; the remaining data is extracted from the original data files whenever needed. Figure 11 shows an example of import for ENDF data files. The import options are explained in the following starting from the bottom of the panel and going backwards: • ENDF is the format of the original files. • In the field “Library” the user may give a name of his choice to designate the set of data being imported. For instance, if the user is importing the whole set of an evaluation data library (e.g. JEF-2.2), then the same label might be used to qualify the library. • The “Path” field should contain a valid path to an existing directory where the database will be created. In this example if directory “db_test” does not exist under “C:\user\janis\databases\”, the import will generate a window error message. • The “User” and “Password” fields provide the means to control the access to the database. The default value for both fields is “janis”. • The URL field is composed of the name of the driver (“jdbc:mckoi:local:”) and the absolute path to the database configuration file which will be created by the import function. In this example, the absolute path is “//C:/user/janis/databases/db_test/db.conf”. Note that this path is the same as the one provided in the “Path” field except that two forward slashes “//” are added in the beginning and the forward slash “/” is used in stead of the backward slash. “db.conf” is the file name of the database configuration file and the user might make a different choice. 19 • The two fields “Driver” and “Type” describe the interface between the Java software and the relational database. The old structure of data used in JANIS-1.0 is one of the choices available in the field “Type”. The recommended options are shown in Figure 11. • The remaining field “Source files” allows the user to select the directory where the original data files are contained. In this example, we selected directory JEF_22 contained in the CD-ROM under directory “data”. This directory contains two sub-folders (“HENDF” and “INTER”). JANIS will automatically import all information contained in these two sub-folders and create a database with multiple categories of data according to the content of the files. The “Tools/Import” option can also be used to update an existing database (add a new evaluation library or a new category of data). The procedure is similar to that described above. The only restriction is that the source data files of different libraries should have a common root directory e.g. “D:\janis\data\JEF_22” “D:\janis\data\JEFF_30”. In this example, the path given in the load dialog box should be “D:\janis\data\”. During the “Import” operation a window (see Figure 12) shows the progress status including the file currently being imported, material, file, reaction and also a warning section where messages are printed. These warnings are reported in a file (date_time.err) created during the import operation. The Chart of the Nuclides shown is automatically updated after the successful addition of data for each nuclide and the file date_time.stats provides complete information on all imported data. Figure 12. Status of the “Import” process Notes: The category of data is automatically determined from the original files. Importing a single ENDF material takes between a few seconds and 30 seconds depending on the content of the file (30 seconds is typically the time needed to import pointwise cross-sections and energy, angle and energy-angle distributions for nuclides such as 238U). Importing a whole pointwise library may take about one hour. 20 8.2 “Load/Reload/Remove” a database The Menu item “Database/Load” is used in order to view the data contained in an existing JANIS database. A window similar to the import panel described in the previous section is prompted where the user should input the information that was used to create the database (see Figure 13). • The “Type” and “JDBC parameters and file root” fields enable to specify the type, location and connection parameters of the database. • “Path” is used to provide the location of the source data. Figure 13. The “Database/load” dialog box When the database is loaded, it appears in the panel “Databases” ([4] on Figure 1 to the bottom left of the screen.) A right click with the mouse in this panel gives three options: • “Load” – equivalent to the Menu item “Database/Load”. • “Reload” – refreshes the display of an already loaded database for which the contents have changed. • “Remove” – unloads a database. If the database loaded is not recognised as being a valid database (non-existing database, or its structure is not valid) it is displayed in the “Databases” panel without the folder sign. Use the “Remove” button folder structure to unload it. The Chart of the Nuclides and Nuclide Explorer display the content of the category selected by the user in the “Databases” panel. This category is highlighted. 21 8.3 Viewing data directly from a file The “Import” and “Load” operations discussed above are recommended when the user is dealing with an important number of nuclides and for which he wants to keep the data on the disk for repeated accesses to the database. Otherwise, the option “File/Open” is preferable when the user wants to view the data contained in a file without necessarily storing the interpreted file to the disk. In this case, the original file is typically an ENDF material, an output of a processing code or an EXFOR work. A pop-up window is opened when the “File/Open” Menu option is selected. This enables selection of the file from the appropriate location on the disk. The data contained in the original file will then be interpreted by JANIS and converted to a database and stored in the user’s temporary directory. This database will be deleted upon exiting JANIS. When the original file contains data for more than one material, or when different data types are present (e.g. cross-section, angular and energy distributions) the data selection list in the “Renderer” will show a structure reflecting the various data categories. 9. JANIS features through examples The “General information” parameter contains a summary description of the evaluation work (source of data, analysis method…) and a dictionary of available files and reactions. This is taken directly from the ENDF file (MF=1, MT=451). Integral data are also available. The utility code INTER-6.12 was used to calculate integral parameters such as thermal and fast neutron averaged cross-sections, resonance integrals, etc., from pointwise cross-section data. The output listings of the INTER code are contained on the JANIS CD-ROM for all available libraries and the integral parameters were incorporated in the database during the “import” procedure. The data are thus accessible through JANIS. 9.1 Cross-sections and resonance parameters Some aspects of cross-section display were discussed in the section concerning the “Renderer”. Both pointwise and groupwise cross-section data can be displayed and compared. Experimental data from the EXFOR database can be plotted (numerical values) and displayed in text form (entire EXFOR work, including the comment section) . Examples will be given here for the three categories of cross-sections. 9.1.1 Pointwise data Evaluated data files usually give cross-sections for different reactions (MT in the ENDF format) over an energy range, which goes from the reaction threshold (or 10–5 eV for reactions with positive Q value). In the resonance energy range, resonance parameters are usually given from which the cross-section can be constructed and Doppler broadened at different temperatures. So in a typical evaluation file, the cross-section is set to zero in the resonance range pending its construction by a processing code. Apart from the resonance range, the cross-section is described in a pointwise mode (successive values of energy and cross-section) with an interpolation mode between the points. The interpolation mode can be constant, linear-linear, log-log, lin-log or log-lin. JANIS correctly interprets all these interpolation modes and plots cross-sections as described in the evaluation. When the cross-sections are processed, the resonance part is reconstructed and the cross-sections are linearised on the whole (energy points are added between the initial grid in order to allow an accurate linear 22 Figure 14. Example plot of a pointwise cross-section [4] [1] [3] [2] [1] The display panel [2] The parameter selection panel [3] The options selection panel [4] The Menu bar representation of the data up to a certain precision). The result of that is a pointwise file which covers the whole energy range and represents the cross-section at a certain temperature (see an example in Figure 14). This format of data is more appropriate for users who are interested in viewing and comparing cross-sections. The databases distributed with JANIS contain a combination of processed and evaluated data. In fact, the cross-sections were constructed and Doppler broadened to 300 K. The original cross-sections in the evaluation are then replaced with these constructed data, thus forming a hybrid file containing both resonance parameters and constructed cross-sections. Resonance data can be displayed in tabular format (see Figure 15) where: • E0 (eV) is the resonance energy. • l is the orbital momentum. • I is the target nucleus spin. • J is the compound nucleus spin. • gammaT, gammaN, gammaG and gammaF (eV) are the resonance widths. • sigma0(T) is the cross-section at E0, where the width used is the square root of the total width squared and the Doppler width squared [calculated at a temperature T to be specified in the Options Selection Panel ([3] in Figure 5) at the right of the screen. 23 Resonance data can also be plotted to show sigma0(E0) as a function of E0 (see Figure 16). Figure 15. Example of tabulated resonance parameters Figure 16. Example plot of resonance parameters Notes: The formalism used to represent the resonance parameters in the evaluation file (File 2) is given in the right-hand side panel (Reich-Moore in this example). The temperature in Kelvin is also shown and is used to compute the Doppler width which is combined with the total width for the calculation of sigma0(T). The user can enter a new value for the temperature and confirm by pressing the “Enter” key on the keyboard. 24 Cross-sections can also be represented using the graphical and tabular modes (the tabular mode is shown in Figure 17 and an example of the graphical mode was shown in Figure 14). The reaction Q value is given in the right-hand side panel, and in the graphical mode other information is available: • The energy range for the two axes (xmin, xmax and ymin, ymax). These values can be changed in order to control the zoom level (press the “Enter” key for confirmation). A click on the panel close to “xmin=”, “xmax=”, “ymin=” or “ymax=” will cause the plot to come back to the automatic zoom level. • A checkbox close to x sqrt(X). If this checkbox is crossed, the quantity displayed is then sigma(E) * sqrt(E) as a function of E (where sigma is the selected cross-section). This parameter is used to study the behaviour of cross-sections at thermal energies. • The “Weighting” button, enabling to calculate a groupwise cross-section. This item will be described in more detail later. Figure 17. Example of tabulated cross-section data 9.1.2 Weighting of pointwise cross-sections JANIS offers various options for cross-section averaging. When a cross-section is selected from the Parameter Selection Panel, the “Weighting” button appears in the right-hand side panel (Options Selection Panel). When this button is pressed the dialog box shown in Figure 18 appears. Two tabs are available for entering the group structure and weighting spectrum descriptions. 25 Figure 18. The “Weighting” dialog box (“Group” tab) Group structure Two options are available: • “Uniform in log”: In which the user specifies the minimum energy limit and the number of groups per decade. • “File defined”: Allows the user to enter a multi-group energy structure defined in a text file. The user needs to specify the location of a file (extension .gst for instance) where the first line is of the form: neutron group structure......anl 27 group The string “anl 27 group” located after six dots will be used to identify the group structure. The remaining lines of the file have the following format: Ng Emin Emax where Ng is an integer group number (not used by JANIS) and Emin and Emax are the energy limits of the groups. Examples of group structures are available in the directory “Group” of the JANIS installation. Note that no blank lines are allowed after the one describing the last group. Spectrum definition The second tab of the “Weighting” dialog box (see Figure 19) enables the definition of the weighting flux spectrum. 26 Figure 19. The “Weighting” dialog box (“Spectrum” tab) The available options are: • “Constant spectrum”: The constant is to be specified by the user. • “XY spectrum”: Allows the user to use a hyperfine flux structure to take into account effects such as self-shielding. The flux can result, for instance, from a hyperfine slowing-down calculation. The user needs to specify the location of a text file containing the weighting flux definition f(E). Each line of this file contains a value of Ei and fi separated by blank(s). A continuous weighting function f(E) is constructed by assuming a linear-linear interpolation between successive values of (Ei,fi). Note that no blank lines are allowed after the last (Ei,fi) values. • “PWR spectrum”: Details are given below. • “General spectrum”: Details are given below. The “PWR spectrum” and “General spectrum” are defined using the following components: • A Maxwellian spectrum used at thermal energies: Where θ,th = kT is the thermal energy to be specified in eV: E χ(E ) = C1 .E .exp − θ ,th • A slowing-down component defined as: χ( E ) = • (1) (2) C2 E A fission spectrum characterised by θ,fis the fission temperature in eV: E χ(E ) = C3 . E .exp − θ , fis 27 (3) • A fusion component of the neutron spectrum as in the d(T,4He)n reaction characterised by a fusion energy and a fusion temperature, both to be defined in eV: ( 0.5 χ(E ) = C 4 .exp − θ , fus E − E fus (4) ) 2 The “PWR spectrum” uses components (1), (2) and (3) as given in the following formula: E C1 .E .exp − θ , th C2 χ( E ) = E χ(E ) = C . E .exp − E 3 θ , fis for E ≤ E max ,th for E max ,th < E ≤ E max ,epi for E > E max ,epi This is equivalent to IWT=4 in NJOY. The user needs to specify the following energy limits: • Emax,th where components (1) and (2) join. • Emax,epi where components (2) and (3) join. C2, the constant value of the slowing-down component, is set to 1. C1 and C3 are calculated by the continuity conditions at Emax,th and Emax,epi: C1 = 1 E E 2 max,th exp − max,th θ ,th and C 3 = 1 3 E max,epi E 2 exp − θ , fis The “General spectrum” uses all the components as given in the following formula: E C1 .E .exp − θ , th C2 χ( E ) = E χ(E ) = C . E .exp − E 3 θ , fis for E ≤ E max ,th for E max ,th < E ≤ E max ,epi + C 4 .exp − 0.5 θ , fus ( This is equivalent to IWT=6 in NJOY. The following energy limits need to be specified: • Emax,th where components (1) and (2) join. • Emax,epi where components (2) and (3) join. • Emax,fis where components (3) and (4) are equal. 28 E − E fus ) 2 for E > E max ,epi C2, the constant value of the Maxwell thermal spectrum is set to 1. C1 and C3 are calculated by the continuity conditions at Emax,th and Emax,epi (as above) and C4, the constant value of the fusion spectrum is calculated such that spectra (3) and (4) are equal at Emax,fus. Components (3) and (4) are added for E > Emax,epi. The averaged cross-sections are calculated using the following definition: σ = g ∫ σ(E ).χ(E )dE g ∫ χ(E )dE g where g is an energy interval. 9.1.3 Groupwise data Multi-group cross-sections can also be generated using processing codes which offer additional features for use in transport codes. As discussed in the previous paragraph, multi-group cross-sections are obtained by integrating the pointwise cross-sections over pre-defined energy intervals using a weighting flux. The weighting flux is either described by the user or calculated by the processing code. A smooth weighting flux, as described in the previous paragraph, is valid for nuclides without resonance structure. For resonant nuclides however, the flux must be representative of the mixture in which the resonant nuclide is contained. This can be calculated by solving the neutron slowing-down equation for the resonant nuclide. This equation contains a term called the background cross-section (or dilution) that characterises the contribution of non-resonant nuclides. The equation is solved for different values of the background cross-section. The result is a GENDF file containing, for each value of the background cross-section, the corresponding flux and cross-sections of the resonant nuclide. Figure 20 shows an example of the 238U multi-group cross-section at different backgrounds. A tabular format representation of the cross-sections is also available (not shown). Figure 20. Example of a multi-group cross-section for 238U 29 9.1.4 Comparison of data from different sources JANIS offers a flexible means for comparing data (cross-sections or any other parameters). Starting from one nuclide (reference nuclide), the user can compare with another nuclide contained in the same library or with a nuclide from a different database. There are two ways to access the “Compare” feature. One is through the Menu option “Tools/Compare” and the other one is by selecting a reaction and right-clicking with the mouse and selecting “Compare…”. Either action will open a dialog window called “Compare Explorer” (see Figure 21) showing the list of databases already loaded in JANIS and three buttons: • “Add to list”: Adds the selected component(s) to the bottom of the list in the Parameter Selection Panel of the reference nuclide for comparison. Multiple selection is possible using the “Ctrl” and “Shift” keys along with the mouse. The user can expand any database to see all existing nuclides and expand further displaying the list of reactions for a single nuclide. Data can be added for a single reaction or for all reactions of a specific nuclide. • “Load base…”: Used to add a database not already loaded in JANIS if the data of interest are not already in a loaded database. A dialog box opens allowing the user to choose a database for loading. • “Close”: Closes the dialog box and returns to the “Renderer” following the addition of data. The selected reactions will be added at the bottom of the list and can be displayed as usual. Figure 21. The “Compare Explorer” window 30 9.1.5 Comparison with experimental data (EXFOR) The comparison between evaluated and experimental data can be made using the “Tools/Compare” Menu item and selecting the EXFOR library in the “Compare Explorer” window or using the option “Searches/EXFOR”. This latter option can also be accessed by selecting a reaction and right-clicking with the mouse. With the “Tools/Compare” option, the user needs to select the EXFOR works he wants the data to be compared with (Figure 22). Figure 22. Selection of EXFOR works The “Searches/EXFOR” option (Figure 23) provides more flexibility by allowing the user to search in the experimental database for data satisfying criteria such as the energy range, the year the experiment was performed and the reaction definition (particle, product or process…). 31 Figure 23. Result of an EXFOR search Once the experimental works are selected, they can be added to the reference nuclide’s list using the “Open Results” button. Back to the renderer window, the experimental data can either be plotted or the EXFOR work displayed as text as shown in Figure 24. This is performed by highlighting the EXFOR work, right-clicking with the mouse and selecting “Display EXFOR File”. Figure 24. Display of the full EXFOR file 32 9.1.6 Computation JANIS offers different options for manipulating cross-sections. The Menu option “Tools/ Computations…” allows simple arithmetic operations to be performed with basic data. An example is shown in Figure 25. Here the aim is to define eta as the ratio of neutron production cross-section (nu-bar times fission cross-section) and absorption cross-section (fission plus capture). By placing the cursor in the Equation field and using the mouse to select the appropriate reactions in the tree-list, the user can form a simple equation. The operators (“+”, “-”, “*” and “/”) and the parentheses can be entered using the keyboard. Figure 25. The computation window The “Apply” button causes the operation to be performed and the result added in the Renderer window for plotting. When all operations are performed, the “Close” goes back to the Renderer window. By default, the result of the operation is added to the first parameter in the equation (here, to nu-bar). The “Save” button enables the operation to be saved for further use. For example, the equation for eta can be established for one fissile nuclide (say 235U) and applied for another fissile nuclide (e.g. 239Pu) or a different evaluation file. The “Save” button also enables the default level under which the operation is displayed in the Renderer (“Anchor node”) to be changed. In the example shown in Figure 26, the user can choose to save eta under fission, capture or nu-bar. Figure 26. Selection of the level at which an operation is saved 33 Suppose the result was saved under the fission cross-section; to apply the equation to another nuclide, select its fission cross-section, right click with the mouse (or choose the Menu option “Tools/Computation” and select the label of the equation (here “Eta”). This causes the operation to be performed and added to the reaction list under the appropriate anchor (see Figure 27). The operation is saved after quitting the software and can be accessed when JANIS is launched later. Figure 27. Application of a pre-defined operation In the “Computation” window, a tab called “Pool” displays the list of operations saved by the user. A checkbox for each equation in the “Pool” allows the user to control whether he wants the equation to be automatically performed or not. If the “Auto” checkbox is selected, the result of the equation will always be displayed when the basic components are present. In the example presented in Figure 28, every time a fissile nuclide is explored, eta will be calculated and saved under the appropriate anchor. Figure 28. Automatic application of a pre-defined operation 34 Note that a computed cross-section can be re-used to build other equations. Also, the “Computation” and “Compare” options can be combined to produce: • macroscopic cross-sections for a mixture of nuclides; • ratio of cross-sections of different isotopes. 9.1.7 Cross-section uncertainties Experimental data are always given with associated uncertainties. Evaluated data, however, may or may not include covariance data. The current version of JANIS uses the covariance data on neutron cross-section contained in File 33 to derive cross-section uncertainties. Note however that since the uncertainties are displayed for pointwise cross-sections, the component of the uncertainty related to average cross-sections (LB=8 in ENDF File 33) is not taken into account. When uncertainties are available, the cross-section is displayed with error bars. The user may choose not to display the error bars for a specific curve. This is done using the settings (see [2] in Figure 14) of the appropriate curve. In the dialog box shown in Figure 29, the “Parameters” field gives the choice of showing or not the error bars and the preferred mode of uncertainty representation. Figure 29. Definition of plot properties 35 9.2 Energy distributions The energy distribution gives the probability of emission of a secondary particle at a given energy E′. This probability also depends on the energy E of the incident particle ([2] in Figure 30), and it is generally represented as p(E → E′). Figure 30 shows an example of an energy distribution for secondary particles. Energy distributions are given in the ENDF format in File 5. Different methods may be used in the evaluation for the representation of the energy distribution (tabulated function or analytical expression). The method used in the evaluation is shown in the display window ([3] in Figure 30). Figure 30. Example of an energy distribution for secondary particles [1] [2] [3] [4] [1] [2] [3] [4] Selection of the x axis variable (E′ or E). Incident energy E. Method used in the evaluation to represent the energy distribution. Reaction selection list By default, the distribution is displayed for the first tabulated incident energy. The list of incident energies E at which the distribution is tabulated in the evaluation is shown in the field indicated by [2] in Figure 30. The panel for incident energy selection has the form of a table with an empty last row. When selected, this empty row enables to enter a new incident energy by either selecting it from the scroll panel or inputting a real number with the keyboard. The entry is validated by hitting the “Enter” button. The energy distribution corresponding to the new value is added to the graph and a new empty row is added at the end of the table. Note that for energies between tabulated values, JANIS constructs the distribution by interpolating according to the interpolation law specified in the evaluation. 36 The scroll list [2] and field [3] (in Figure 30) depend on the selected reaction (highlighted line in the list of items to be displayed). If the reaction is selected (highlighted) but not displayed (display option not selected for this reaction) the content of fields [2] and [3] may not correspond to the quantity displayed. This might be confusing if the user tries to change the values of the incident energy in field [2] while the corresponding reaction is not displayed. As the secondary energy distribution depends on the incident particle energy, the user might be interested in knowing how the probability of emitting a particle at a certain energy E′ depends on the incident energy E. This can be done by changing the x axis variable to E (energy) [1]. The energy distribution may be represented in the evaluation as the combination of partial energy distributions: p(E → E' ) = ∑ p (E ) f (E → E' ) k k k where pk is the fractional probability and fk the fractional distribution. This is typically the case for energy distributions of reactions with multiple incident particles or for delayed neutron distribution for which the distributions are given for several precursor families. Figure 31 gives an example of delayed neutron distribution represented by six fractional distributions (one for each precursor family). The list of items to be displayed shows several quantities such as “Energy differential cross-section”, “Energy distribution” and six folders corresponding to the six families. For each precursor family, three rows are available in the reactions list corresponding to the fractional probability, the delayed neutron energy distribution and the product of the fractional probability and the energy distribution. Figure 31 shows the plot of delayed neutron energy distribution for two precursor families. Figure 31. Example of a delayed neutron energy distribution represented by six fractional distributions 37 The partial energy distributions might be combined according to the formula above to form the overall delayed neutron energy distribution. JANIS provides under each component the fraction of delayed neutrons in the family multiplied by the energy distribution of the family. It also provides the summation of these weighted energy distributions (row entitled “Energy distribution” and located just above the folder of the first partial spectrum (“component #1/6”). Figure 32 shows the combined distribution and the contribution of each group to the overall distribution. Figure 32. Example of a multiple-component energy distribution 9.3 Angular distributions Angular distributions of secondary particles are given in File 4 of the ENDF format as f(µ,E), where µ is the cosine of the angle between the incident and emergent particles and E is the energy of the incident particle. The distribution may be defined in either centre-of-mass or laboratory systems. This frame of reference is shown in field [4] (see Figure 33). f may be given as a tabulated function of µ, as an expansion of Legendre polynomials or as a constant value over the whole energy range when the distribution is isotropic. The representation used in the evaluation is shown in field [3] (Figure 33). In some cases, the representation used for the same reaction changes over the energy range. In such a case, JANIS will show the two representations in the display selection list. The incident energy points E at which the distribution is tabulated are given in panel [2] which has the form of a table with an empty last row. When selected, this empty row enables a new incident energy to be entered either by selecting it from the scroll panel or inputting a real number with the keyboard. The entry is validated by hitting the “Enter” button. The angular distribution corresponding to the new value is added to the graph and a new empty row is added at the end of the table. Note that for energies between tabulated values, JANIS constructs the distribution by interpolating according to the interpolation law specified in the evaluation, the default value being the first tabulated point. 38 Figure 33. Example of an angular distribution [1] [2] [3] [4] [5] [1] [2] [3] [4] [5] Selection of the x axis variable (mu or E). List of incident energy points at which the angular distribution is tabulated. Method used in the evaluation for the representation of the angular distribution. Frame of reference: Centre of masse (CM) or Laboratory system. Reaction selection list. The contents of fields [2], [3] and [4] (Figure 33) depend on the selected reaction on the selection item list. Even when a reaction is selected (highlighted but a display not requested) these fields will reflect the information contained in the evaluation displayed for this reaction. This may cause confusion when a user tries to change this information for a reaction which is not displayed. As the angular distribution depends on the incident particle energy, the user can plot how the probability of emitting a particle at a certain cosine angle depends on the incident particle energy E. This can be done by changing the x axis variable to E (energy) [1]. It is also possible to plot differential cross-sections. When a reaction has an anisotropy law in the evaluation (the angular distribution is not isotropic), JANIS constructs the product of the angular distribution and the cross-section. It is thus possible to plot the cross-section as a function of energy for different angles as shown in Figure 34. 39 Figure 34. Example of differential cross-sections 9.4 Energy-angle distributions The distribution in energy and angle of the reaction products is described in File 6 of the ENDF file. It provides an alternative and more accurate representation of the reaction products’ characteristics compared to the separate representations using energy distribution (File 5) and angular distribution (File 4). The double-differential cross-section σ i (µ , E , E ′) is related to the energy-angle distribution f i (µ , E , E ′) by: σ i (µ , E , E ′) = σ(E ) ⋅ y i (E ) ⋅ f i (µ , E , E ′) 2π where E is the incident energy, E′ the energy of the product emitted with cosine µ, σ(E) is the reaction cross-section and yi(E) the product yield. The energy-angle distribution and the yield can be displayed by JANIS (see Figure 35). Different representations for the energy-angle distributions are used in the evaluations (shown in the field “Representation” at the bottom of the Parameter Selection Panel). The incident energy is always given in the laboratory system while secondary energy and angle may be given in the centre-of-mass or laboratory systems (this information is also given in the Parameter Selection Panel). The energy-angle distribution has three independent variables which can be plotted along the x axis. As JANIS can only plot one at a time, the distribution is plotted as a function of one variable whilst fixing the other two. The varying parameter is selected in the “X:” list (see Figure 35, field [1]). The choices are: “Energy (incident)”, “Secondary energy” and “Cosine of the angle”. The values of the other two parameters (for example E and µ if the variable is E′) are fixed using fields [2] and [3]. The general layout and the functionalities of the panel are similar to the ones studied in the previous sections for “Energy distribution” and “Angular distributions”. 40 Figure 35. Example of an energy-angle distribution [1] [2] [3] [4] [5] [1] [2] [3] [4] [5] 9.5 Selection of the x axis variable (E′, µ or E). List of incident energy points E at which the energy-angle distribution is tabulated. Choice of the µ (or E′) values. Method used in the evaluation for the representation of the energy-angular distribution. Frame of reference for the variables. Decay data All the information contained in the evaluation files (ENDF format) is available through JANIS. As for the other categories of data, the display is composed of plots (e.g. spectra), text fields (decay general data, general information) and tabular formats (spectra). The “General information” parameter contains a summary description of the evaluation work (source of data, analysis method…) and a dictionary of available files and reactions. This is taken directly from the ENDF file (MF=1, MT=451). 9.5.1 Decay general data The “Decay general data” is a summary of important decay properties of the nuclide. It contains the mass of the nuclide, its excitation energy, the spin and parity, the half-life, the mean decay energies and decay modes. The mean decay energies are given for three families of emitted particles: • all electron-related radiation such as beta-, beta+, conversion electrons, Auger, etc.; • all electromagnetic radiation such as gamma rays, X-rays and annihilation radiation; • all heavy charged particles and delayed neutrons (alpha, protons, fission products…). For each decay mode, the corresponding Q value, branching ratio and nuclide produced are given. 41 9.5.2 Decay path The “decay path” (also called the decay chain) shows the path followed by a particular nuclide toward the line of stability (see Figures 36 and 37). The decay chain is constructed from the information available in the library (half-life, decay modes, branching ratios). The decay path is produced in both tabular (Figure 36) and graphical (Figure 37) formats. The nuclide under study is represented with its symbol in red and is located at the top right of the screen. The end of the chain has a bold frame when it is identified as a stable nuclide. Figure 36. Example of a decay path in tabular format Figure 37. Example of a decay path in graphical format 42 If required information for continuing the chain is not available in the evaluation (nuclide produced by the decay mode not available in the evaluation) the frame is left empty. The chain may be represented on either (A,Z) or (N,Z) axes, which can be interchanged by clicking on the appropriate button (“switch to N/Z” or “switch to A/Z”). A scroll bar exists to control the zoom level of the graph. 9.5.3 Spectral data Discrete and/or continuous spectra are given in the evaluated file for each type of emitted particle. Discrete spectra Discrete spectra are represented in JANIS using tabular and graphical formats. The tabular format gives the following information: • energy of the emitted particle and the corresponding uncertainty; • relative and absolute line intensities and their associated errors; • for gamma and X-ray spectra, internal conversion (total, K-shell and L-shell) coefficients and internal pair formation coefficients are also given for each line; • for electron capture and/or positron spectra, the type of transition is given for each line (allowed, first or second forbidden, unique or non-unique) as well as the positron intensity. The discrete spectrum plot gives the absolute line intensity (ordinate) and the energy of emitted particle (abscissa). The right-hand panel provides complementary information such as: • the number of lines; • the sum of intensities (calculated); • the average decay energy and associated error; • the normalisation factor (ratio between the absolute and relative intensities). Continuous spectra Continuous spectra are given in plot format. The spectra are given piece-wise in the evaluations and are reconstructed by JANIS using the interpolation laws given in the evaluation. Additional information is given in the right-hand panel (average energy of the emitted particle and associated error, normalisation factor and associated error). 43 9.6 Fission yields Fission yield data depend on the projectile causing the fission (e.g. neutron-induced fission), its energy and the fissioning system. Fission may also occur as a radioactive process, i.e. without projectile. Consequently, fission yield data in JANIS might appear under several categories: “radioactive data/fission yields” (for spontaneous fission yields), “interaction data/neutron incident”… The content of the selection list depends on the nature of the nuclide, i.e. whether it is the nuclide undergoing fission (parent nuclide) or if it is produced by fission (product nuclide). For parent nuclides, there are general information available [taken from the section (File 1, MT=451) of the evaluation which contains brief documentation of the evaluation and a dictionary with the available reactions], independent fission yields and cumulative fission yields. The independent fission yield of a particular nuclide and its associated excitation energy state is the proportion of this nuclide directly produced by fission prior to delayed neutron, beta decay, etc. Cumulative yields account for all decay branches after fission including delayed neutron emission. Independent and cumulative yields are displayed in both tabular and graphical formats. The tabular format gives the yield for all products (isotope, excitation energy state) while the graphical representation gives the fission yield as a function of the chain mass (sum of yields for a given mass number A). Fission yields depend on the energy of the neutron causing fission. Independent and cumulative yields are thus given for typical values of the neutron spectrum (thermal neutron-induced, fast neutron-induced and high-energy neutron-induced fission). An example of an independent fission yields graph is shown in Figure 38. Figure 38. Example of independent fission yields graph for a parent nuclide 44 For product nuclides (fission products), the production yield for different fissioning systems can also be displayed (Figure 39) when a specific product is selected from the chart of nuclides. This information is not initially contained in the evaluation, but JANIS constructs it from the parents’ fission yield information. The information is also available as independent or cumulative yields and at typical energies of the neutron-inducing fission. Figure 39. Example of fission yield graph for a product nuclide It is also possible to display the fission yields for a set of nuclides with similar properties (same mass number, chain mode or same charge number, charge mode). The graph in Figure 40 shows a comparison between 235U and 239Pu fission yields for fission products of mass 90. Figure 40. Comparison of yields for products of a given mass 45 10. The Search tool Three search capabilities are included in JANIS. They concern general ENDF reaction searches, resonance parameters, decay data, experimental data (EXFOR) and bibliographical references (CINDA). The search tool can be accessed from the menu option “Tools/Search” in the Renderer by clicking on the right button of the mouse. In both cases, the search panels are similar. However, when accessing the search tool by right-clicking on the mouse, some search fields are automatically filled (e.g. when selecting a specific reaction in the Renderer, the EXFOR search will be launched with the corresponding target and reaction fields). The search is performed through all the loaded databases. Consequently, multiple results might be obtained when information is contained in several loaded databases. This occurs in particular with the local and remote databases. If the user wants to restrict the search to a specific database, the other databases should be unloaded prior to starting the search. 10.1 Searching Evaluated (ENDF) data 10.1.1 General ENDF search This tool enables the user to search through the loaded databases for specific information. The available search fields are shown Figure 41. This concerns Z, A, State, Datatype, and Libraries which corresponds to the those available in the loaded databases, followed by the ENDF file (MF) and reaction (MT). Note that among the files available in the library, only those treated by JANIS are available (MF=1-6, 8, 9, 10, 31-35 and 40). Consequently, a search with MF=13 will lead to a blank result although photon production data might be available in a the selected evaluated nuclear data library. Figure 41. The ENDF search dialog box Once the search is performed, the list of results can be saved on a file (button “Save results…”). Specific results, corresponding to one or several rows can be displayed. The user must first select the desired rows and press the “Open results” button. 46 10.1.2 Resonance search This tool allows nuclides to be found which contain neutron-induced cross-section resonances in a specified energy range. The tool can help the detection of the contribution from specific nuclides (e.g. impurities) when analysing experimental data. The search is made through the processing of resonance parameters given in the original ENDF data (File 2). Note that if a nuclide is described in the evaluation using pointwise cross-sections without resonance parameters, its resonance structure will not be detected through this search tool. Options are available to choose the evaluation through which the search is performed, the nuclides to be included in the search, etc. (see Figure 42). Figure 42. The “Resonances search” dialog box 10.1.3 Decay data search This option allows to search for radioactive nuclides which satisfy specified decay and spectral properties. The search can be done by specifying the half-life range and/or the energies and intensities for alpha and photon lines (see Figure 43). The results are given in a tabular format that can be saved to a file or sorted according to the output columns. 47 Figure 43. The decay data search dialog box 10.2 “EXFOR Search” This tool (Figure 44) allows the user to perform a comprehensive search through the experimental data (EXFOR). Search parameters include the target nuclide, the energy range, the laboratory and the year the experiment was performed, the reaction specifiers and the data type (cross-sections, angular distributions…). Figure 44. The “EXFOR Search” dialog box 48 10.3 “CINDA Search” The CINDA Search tool (Figure 45) allows the user to perform a comprehensive search of the bibliographic database CINDA (Computer Index of Neutron DAta). The CINDA database contains single-line bibliographic information on neutron-induced reaction data, as well as some data on spontaneous and gamma-ray-induced reactions. The database is essentially a complete reference list of all neutron-induced experiments carried out throughout the world, but also includes many theoretical and evaluation references. Direct links are provided to the collated experimental data in EXFOR. Where possible links are also provided to the original papers/abstracts where these have been made available on the World Wide Web by the original publishers. Figure 45. “CINDA Search” dialog box The CINDA Search tool is opened via the Menu item “Tools/Search/CINDA”. The user can then enter information into any or all of the fields shown. Drop-down menus in many of the fields allow to choose from the list of available parameters. For users not familiar with the codes used in CINDA further information on the format of the database can be found via the links provided on the NEA website CINDA search page at http://www.nea.fr/cinda/cindaora.cgi where links are provided to the various “dictionaries” of journal codes, etc. 10.3.1 “CINDA Search” dialog box options The various functions of the CINDA Search facility are accessed by clicking on the available buttons at the right-hand side of the dialog box as described below: • “Search”: Launches the database search once the required parameters for the different fields have been selected/entered. • “Reset”: Resets all fields to blank. 49 • “Open results”: After selecting a number of EXFOR lines, this button opens a “Renderer” window containing the data selected ready for plotting. Multiple lines are selected using the Shift and/or Ctrl keys along with mouse clicks as usual. • “Save results…”: Allows the retrieved CINDA lines to be saved to a file for use in different software, e.g. the data can be exported into a Comma Separated File (CSV) for later use in a spreadsheet/word processor. Note that the file name and column separator are specified by the user in the “Export” pop-up dialog box which appears. • “Print”: Allows the retrieved CINDA lines to be printed. • “Close”: Closes the CINDA search dialog box. • A useful tip: Use key “F5” to reset a single field composed of a drop-down menu. 10.3.2 The “CINDA Search” history box Previous searches performed on the CINDA database can be recalled by selecting them from the drop-down list. These can then be refined by adding further parameters in other fields or modified by changing the relevant field parameter as required. 10.3.3 Sorting of CINDA retrieval results The retrieved results from a CINDA search can be re-ordered by clicking on the required column header, e.g. Date, Laboratory, etc. The default sort order is by element, isotope, quantity and laboratory. Note however that CINDA uses a blocking system for different references relating to the same work which will be lost following a sort, e.g. EXFOR entries are blocked with the relevant publication. 10.3.4 Accessing linked papers/abstracts Where publishers have made papers/abstracts available directly via the WWW the reference code is shown in red in the CINDA results box. Double clicking on the reference code will launch the user’s Internet browser and attempt to connect to the publisher’s site. If problems arise in launching the user’s Internet browser then one should check the entry under “internet.browser” in the “janis_settings.txt” file. Under Windows this is stored in the user’s folder under the “Documents and Settings” folder on the system disk. A typical complete entry for a Windows machine is shown below: internet.browser=C:\Program Files\Internet Explorer\iexplore.exe 11. Live update Changes will continue to be made to the software after the publication of official versions. A live update option enables the user who has a web connection to automatically check for updates and download the necessary files from the NEA web site. However, as this option replaces the old versions 50 of the files, they should not have a read-only status. Thus, running this option requires the file “Janis.jar” to be installed on a hard drive with a write permission. This option is not activated by default. To run the live update at each start-up or at regular time intervals, see the next section for details. To run the live update instantaneously, choose the menu option “File/Check update…”. Each time a new version of the software is available on the NEA web site, the program downloads it and replaces the old version. The old version is not deleted but rather renamed. The user is advised to clean-up his “software” directory after an update by deleting the file named “JANIS.jar.bckDate_and_time”. 12. Customisation The default values of many options can be changed in order to better satisfy the user’s preferences. This is done through the Menu item “File/Preferences” which contains several tabs as described in the following sections. Any change of these options should be confirmed by pressing the button “Save” followed by “OK”. 12.1 General The first tab “General” enables to select several options (see Figure 46). The “Live Update” option described in the previous paragraph can automatically be launched at start-up if the corresponding box is checked. The default internet browser can be selected. Finally, the path to the directory containing the full “EXFOR” files can also be specified. Figure 46. The “File/Preferences” dialog box (“General” tab) 12.2 Options for the display of the Chart of the Nuclides 51 The background colour of the Chart of the Nuclides can be changed using the “Chart” tab available under the Menu item “File/Preferences” (Figure 47). The preferred zoom at start-up for the Chart of the Nuclides can also be chosen. 52 Figure 47. The “File/Preferences” dialog box (“Chart” tab) 12.3 The “Renderer” panel options Two default features can be customised (see Figure 48). The first option controls the refresh of display when new panes are added. The second option concerns the maximum number of elements in a scroll list. Figure 48. The “File/Preferences” dialog box (“Renderer” tab) 53 13. Saving the displayed data to the disk The user may wish to use the result of the JANIS display outside the software. All forms of output can be saved to the disk. The format of the output file depends on the type of information displayed. 13.1 Saving tabular data Tabular data generated by JANIS can be saved to disk while maintaining the column format. When the option “File/Save” is selected while the “Renderer” shows tabular data, a pop-up window is displayed (Figure 49). It allows the user to select the output file name and the column separator, i.e. the character to be inserted between the contents of two successive cells. The default column separator is a tab. Figure 49. The “Janis - Export” pop-up window 13.2 Saving plots Plots generated by JANIS can also be saved to disk using the following formats: ps (postscript), eps (encapsulated postscript) and png (Portable Network Graphics), the latter being ideal for use in many Microsoft Windows applications. 13.3 Saving textual information Textual information can also be saved to disk. The formats available for the output file are: txt (unformatted text) and rtf (rich text format). 14. Printing options The “File/Print” option enables to print the information displayed in the “Renderer” panel. Note however that the settings of the printer can not be changed through the properties of the printer. The menu option “File/Print Setup” should be used instead. 54 15. References The format of the evaluated nuclear data files (the ENDF-6 format) is described in the following manual: ENDF-102: Data Formats and Procedures for the Evaluated Nuclear Data FILE ENDF-6, Report BNL-NCS-44945-01/04-Rev; an electronic version (in pdf format ) is available at the site: http://www.nndc.bnl.gov/nndcscr/documents/endf/ The ENDF/B-VI.8 data used in the JANIS-2.0 CD-ROM was taken from: Cullen, Dermott E., “POINT 2003: Temperature Dependent ENDF/B-VI, Release 8 Cross Section Library, Report UCRL-ID-127776, Rev. 2. The JENDL-3.3 data used in the JANIS-2.0 was taken from the JENDL-3.3 CD-ROM distributed by JAERI. The EXFOR format is described in the following report: EXFOR Basics: A Short Guide to the Nuclear Reaction Data Exchange Format, Report BNL-NCS-63380-2000/05-Rev; a pdf version is available at http://www.nndc.bnl.gov/nndcscr/documents/exfor/. The content of the CINDA database is described in the CINDA 2003 book, a publication of the OECD/Nuclear Energy Agency, ISBN 92-64-02144-2, ISSN 1011-2545. The NUBASE file describing nuclear data properties was taken from: Audi, G., et al., Nuclear Physics A, Vol. 624, pp. 1-124 (1997); an electron version can be obtained at http://wwwcsnsm.in2p3.fr/AMDC/nubase/nubtab97.asc. 16. Acknowledgement A team of computer software students (see the list below) belonging to the Aquitaine Electronique et Informatique, a Bordeaux-based Junior Enterprise, developed the first version of JANIS. Nicolas Soppera was certainly the most active contributor to the project, and he continued to work on the development of JANIS-2.0 during his stay at the NEA in 2003. Ergun Tuncay and Mark Kellett contributed with the CINDA search part. Ali Nouri has been in charge of the project since the beginning and contributed to the specifications and testing. JANIS benefited from the useful feedback provided by several users. Emmeric Dupont (CEA Cadarache) and Christopher Dean (Serco Assurance) made important contributions to the testing of beta versions and suggested many improvements. 55 JANIS DESIGN AND DEVELOPMENT TEAM N. Soppera, A. Nouri, P. Nagel, E. Tuncay OECD Nuclear Energy Agency (www.nea.fr/janis) N. Soppera, A. Ahite, B. Taton, J. Patrouix, F. Lecompagnon, C. Cunin, O. Rioland and L. D’Eurveilher Aquitaine Electronique Informatique (www.enseirb.fr/aei) 56