1
User’s Guide
_ Preface
_ Introduction
_ Using the CD-ROM
Starting the Program
Various Elements of the CD-ROM
Useful Techniques for the Exercises
User Interface in the Exercises
_ The Games
Classifying Sounds
Graphic Representations of Sound
Identifying Sound Events
Sound Morphing
Musical Theme Morphing
Music Puzzle
Acoustic Spaces
Locating a Sound Source
Sound Sources in Motion
Synchronizing Sound and Image
_ Installing the
Macintosh
PC
CD-ROM
_ Credits
This CD-ROM consists of educational games created and
developed within the context of Ircam's workshops. They were
essayed at length with both children and adolescents in order to
achieve a balance between play and study, and to develop
informed mechanisms for listening, memorizing and recognizing.
While the pedagogical tools are fairly standard — quizzes,
puzzles, classifications, etc. — the originality of the approach lies
particularly in the quality and relevance of the musical material
offered, borrowed variously from art music, popular music and
sound effects.
Thanks to tools developed at Ircam in music research, you will
find gradual progressions, paradoxes and precision spatialization.
The games have three levels, the most challenging of which can be
fairly subtle. . . .
_ musiques tangibles
is the second CD-ROM in the
musiques tangibles collection, which consolidates hyptique.net's
titles in the musical domain, bringing the most varied fields of
contemporary music creation to a wider public, both amateur and
professional.
_ hyptique.net
hyptique.net's intention is to promote interactive creation.
"Interactivity is a new form of expression? The aesthetic arising
from it, while inscribed in our artistic tradition, asks new questions,
and acts decisively on the evolution —not to say mutation — of the
surrounding cultural discourse. Our goal is to reveal this change
and to display its logic."
– Pierre Lavoie
_ Introduction
10 Listening Games is the result of several years of educational
experience with Ircam's youth workshops. A musical theory of
sounds, it’s geared to training the ear for a more refined and
nuanced perception of auditory phenomena. The user learns
listening, recognition, memorization and the manipulation of specific
characteristics of acoustic and electronic sounds. Timbre, auditory
space, morphing and fragmentation are the subjects of the
exercises, rather than the objects of traditional solfege, such as pitch
and rhythm. The CD-ROM has 10 exercises, most of which have
three levels of difficulty. Classifying and combining are the two
underlying pedagogical principles. Thus, for every exercise, the
user explores a particular sound quality, progressively refining it
through a process of listening and evaluation. With the automatic
correction feature, users can assess their progress at different
stages of their work.
For Whom Is This CD-ROM Intended?
This CD-ROM, for both learning and play, is for children 8
years old and up. It is designed to be used in two ways:
individually, with the help of the internal guide; or in a group,
accompanied by a teacher or a presenter.
What's on this CD-ROM?
The CD-ROM presents 10 exercises, organized as follows:
Identifying sounds, 3 exercises
Classifying Sounds: classify sounds by timbre (3 levels).
Graphic Representation of sound: match sounds with
images (frequency spectrum and amplitude envelopes) (3 levels).
Identifying Sound Events: match the sounds to the
appropriate descriptive terms (3 levels).
Organizing sounds, 3 exercises
Sound Morphing: reconstruct a gradual transition between
two timbres (3 levels).
Musical Theme Morphing: reconstruct a gradual transition
between two musical themes (3 levels)
Music Puzzle: rebuild a music sequence from its fragments (3
levels)
Placing sounds in space, 3 exercises
Acoustic Spaces: classify sounds by their reverberations (3
levels)
Locating a Sound Source: classify sounds spatially (right,
left, in front, behind) (3 levels).
Sound Sources in Motion: classify sounds by their
movements (from left to right, from in front to behind, etc.) (3
levels)
Relating sound and image, 1 exercise
Synchronizing Sound and Image: match a visual animation
with a sound sequence (1 level).
How was this CD-ROM produced?
This CD-ROM was produced by Ircam's Pedagogy
Department.
Ircam (Institut de recherche et coordination acoustique/musique)
combines scientific research labs with music creation studios. The
ensuing continual dialogue between researchers and designers
constitutes the originality and the richness of the Institute. One of
the most fertile areas of this interaction is the development of
composition software. Sound synthesis, computer-assisted
composition, and musician-computer interactivity are three domains
in which Ircam has made significant contributions since its founding.
The mission of the Pedagogy Department is to train
composers, researchers, technicians, teachers, students and
schoolchildren in computer music, relying mainly on the music
creation programs developed at Ircam.
These programs have enabled us to design the 10 exercises
which make up this CD-ROM. They have been tested and
improved in numerous youth education workshops.
User's Guide
The guide provides information on several levels.
First:
• a description of the general mechanics for handling the CD-ROM
(Using the CD-ROM).
For each exercise:
• a statement of the goal of the exercise (Objective) and how to
proceed, together with explanations of the underlying ideas
(Performing the Exercise);
• suggestions for learning enhancement through a related activity
(Educator's Tips).
For some of the exercises, a didactic supplement for technical
subjects (Going Further).
And also:
• help for installing the CD-ROM (Installing the CD-ROM)
Using the CD-ROM
Starting the program
If Quicktime 3 (or higher) is already installed on your
computer, you can start the application by double-clicking on the
file "démarrage" for Macs or the “start.exe” file for PCs.
The page "Exercises" appears after a brief introduction.
Various Elements of the CD-ROM
Tabs found at the bottom of the screen control access to
various aspects of the CD-ROM.
♦ "Exercises" Screen: if you have just opened the application, this
screen is already active. If you are in another part of the CDROM, click on the menu tab "Exercices" at the bottom of the
screen.
The screen displays a series of doors, each door
corresponding to an exercise. As the mouse is positioned over each
of the doors, the name of the exercise and its icon are displayed at
the top of the screen. To open an exercise, click on one of the
doors.
The level of difficulty appears in the upper right. To change
the level of difficulty, click on the desired level (1, 2 or 3) on the left
side of the screen.
.
To open the “Mode d’emploi,” which describes the
underlying working principles of the exercises, click on the blue
door on the left of the screen.
♦ "Guide d'utilisation" (User's Guide): to go to this feature of the
CD-ROM, click on the tab "Guide d'utilisation" found in the menu
on the bottom of the screen. Thereafter, to access an exercisespecific user's guide, click on the exercise name in the list
displayed on-screen.
♦ "Credits" screen: click on the “Credits” tab to consult the list of
people who contributed to making this CD-ROM.
♦ Quitting: click on the tab "Quitter" to quit the application.
Useful Techniques for the Exercises
♦ Playing a sound: double-click on these icons. A “double-click” is
produced by pressing the mouse button twice in rapid
succession. The speed of the double-click is a parameter you can
set in MacOS (control panel/mouse) and in Windows
(configuration panel/mouse). Just click on the sound to stop it
from playing.
♦ Moving a sound: often the sound icons must be moved around
the workspace, for which you use the "drag and drop"
technique. To bring (or "drag") the icon representing the sound
to its desired place, click on the image you want to move, and
hold down the mouse button while moving the mouse. Release
the mouse button only when the icon is where you want it
placed (this is the "drop").
User Interface in the Exercises
All of the exercises have the same interface displayed at the
bottom of the screen.
♦ Opening the user's guide from an exercise: click on the button
"Guide d'utilisation" at the bottom right of the screen to open
help for the exercise underway.
♦ Volume control: during any exercise, you can regulate the
sound level. Move the mouse so that the cursor is on the
bottom left of the screen. A fader will appear under the cursor.
Moving it up or down raises or lowers the volume.
♦ Levels of difficulty: the level of difficulty for the exercise that’s
open is displayed in a small box on the right side of the screen.
♦ Quitting the exercise: click on the button “Retour au menu” to
go back to “Exercises” and choose another activity.
♦ Answer key: when you have completed an exercise, a robot will
appear at the bottom of the screen. Click on it to see the right
answers. Misplaced elements will be shown in the correct places;
the robot disappears ; and you can try the exercise again. Some
of the exercises (Sound Morphing, Musical Theme Morphing and
Music Puzzle) have three levels, matched with three colors (blue,
orange and pink). In these cases, each layer has its own
correcting robot, which is color-coded.
Once back at "Exercises," check the small diodes over the doors.
A red LED means that you finished this level of the exercise with
no errors. If the LED is green, this means that when you quit
the exercise there were still some mistakes remaining.
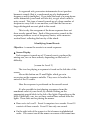
Classifying Sounds
Objective: to classify sounds by families, according to their timbres
and their origins.
Screen Display
(Level 1 display)
To the right of the screen is the sound pool. The same
sounds, of various natures, are used in Levels 1 and 2. For Level 3,
there are only instrumental sounds.
The left side of the screen displays the empty spaces reserved
for the diverse families to be recognized. This side varies with the
level of difficulty.
Performing the Exercise
The point is to classify the sounds from the pool in the
appropriate families:
Level 1
Level 2
Level
3
Percussive sounds
Woodwinds
Percussion
Natural sounds
Human sounds
Strings
Instrumental sounds
Synthesized sounds
Natural Sounds
Human Sounds
Strings
Non-percussive sounds Instrumental Sounds
Woodwinds
Synthesized Sounds
Percussion
♦ In Level 1, the user must distinguish between percussive and
non-percussive sounds. A percussive sound is principally
characterized by a short attack. Conversely, a non-percussive
sound has a slower attack.
♦ In Level 2, the classification is further refined. In addition to the
two categories described previously, the user must determine
whether the sound is natural (that is, sounds from nature),
human (a human product), instrumental (produced by an
acoustic musical instrument such as the violin or clarinet), or
synthesized (produced by an electronic musical instrument or on
a computer).
♦ In Level 3, instrumental sounds must be ascribed to their
respective families, strings, woodwinds and percussion, while
maintaining the distinction between percussive and nonpercussive sounds.
Careful! "Percussive sound" does not necessarily mean the sound is
produced by a percussion instrument. In effect, any musical
instrument generally has several possible playing modes. Let's take
the cymbal as our example. If you hit this instrument with a
drumstick, you get a percussive sound. However, if you rub it
with brushes, the resulting sound is non-percussive. Nonetheless,
the cymbal is a member of the percussion family.
Educator’s Tips
Encourage the students to invent other possible categories of
sound classification — e.g., pleasant/unpleasant, long/short,
sustained/non-sustained (refer to the exercise "Graphic
Representations of Sound," under the heading "Going Further").
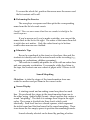
Graphic Representations of Sound
Objective: to match a sound with two forms of graphic
representation: the amplitude envelope and the sonogram.
Screen Display
(Level 1 screen)
On the left side of the screen is the pool of 10 sounds from
various sources (including a baby's cry, a mosquito's flight,
xylophone notes). Using the program AudioSculpt (Ircam) we've
produced two graphic representations for each. They are located
in two columns on the right of the screen.
♦ In the first (left-hand) column , each image represents an
amplitude envelope, which can be related to the volume of the
sound the ear perceives. The horizontal axis indicates time, the
vertical axis shows volume.
♦ In the second (right-hand) column, each image represents a
sonogram: with a sonogram, the frequency content of a sound
can be visualized. The horizontal axis shows time, and the
vertical axis reflects the frequency scale. The amplitude of each
frequency is represented by color intensity — the deeper the
color, the greater the amplitude; the lighter the color, the
weaker the amplitude.
Correspondingly, color at the bottom of the graph means that
the sound contains low frequencies. Color at the top of the
graph means that the sound has high frequencies.
Performing the Exercise
In this exercise, the appropriate images are lined up with the
corresponding sounds, by using the mouse. A good working
technique is to enlarge each image and examine it while listening
carefully to each sound from the sound pool.
Educator’s Tips
Ask the students to listen to the sounds, then draw them.
Encourage them to represent each parameter (pitch, amplitude,
length) separately, then to find a way to represent the timbre (for
example, using colors).
Going Further
In what follows, we will use examples taken from the exercise to
clarify the concepts of the amplitude envelope and the sonogram.
Sound distribution by level of difficulty:
Level 1
Level 2
Level 3
Slide whistle 1
Sneeze
Spoons
Slide whistle 2
Bells
Harp
Xylophone
Nightingale
Techno drums
Xylophone+casseroles Xylophone
Vibraphone
Baby’s cry
Explosion
Washing machine
Drums
Yodel
Electronic Noise 1
3 Clarinet notes
Violin chords
Clarinet (normal)
Bird
Mosquito
Clarinet fluttertone
Child’s laugh
Woman’s voice
Electronic noise 2
Jew’s harp
Clarinet glissando
River
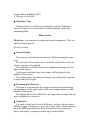
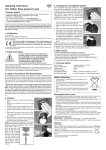
The amplitude envelope
An amplitude envelope represents sound volume over time.
On the first level of the exercise, enlarge this image of the amplitude
envelope for the sound "Xylophone."
(Amplitude envelope for the sound "Xylophone")
What do you see?
You can count eight similar succeeding events. Each element
is characteristic of a percussive sound. They appear at regular
intervals on-screen.
This means that the events in the sequence follow one
another in a regular rhythm. When we want to find the sound
corresponding to this image, we need to look in the sound pool for
a sequence of eight successive percussive sounds, evenly spaced.
There is only one — the sound "Xylophone."
By analyzing this example, we can bring out two elementary
ideas contained in the amplitude envelope: the idea of the sound
event, and the idea of rhythm.
The shape of each event on the graph allows us to refine the
analysis.
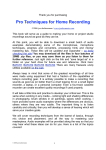
♦ Percussive and Non-Percussive Envelopes
A percussive sound is one whose attack is very short. A nonpercussive sound, on the other hand, is characterized by its gradual
attack. By observing the shape of the amplitude envelope, it's
possible to identify the category a sound belongs to.
{Typical envelope for a percussive sound}
♦ The example above illustrates the case of a percussive, nonsustained sound. It’s the sound of a xylophone key tapped by a
mallet. The energy transmitted to the key by the mallet
dissipates rapidly, hence the rapid decline of the amplitude
envelope.
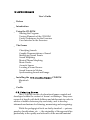
{Typical envelope for a non-percussive sound}
♦ Here we have the case of a sustained sound. It’s the graphic
representation of the sound “three clarinet notes.” The
musician's breath in the clarinet compensates for the loss of
energy, "sustaining" the sound over time. The result is a longer
amplitude envelope.
Sonograms
Remember the data visible on a sonogram:
♦ the horizontal axis represents time;
♦ the vertical axis shows frequencies from 20 Hertz to 20,000
Hertz ;
♦ the amplitude : each frequency over time is symbolized by a
color scale running from lightest to darkest. The absence of
color at a given moment means that there is no frequency
present in the sound at that instant.
The sonogram also conveys information already found in the
amplitude envelope, i.e. , the number of sound events and the
rhythm.
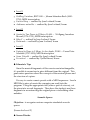
♦ Sonogram of a harmonic instrumental sound.
Let's look at the sonogram for a sequence of clarinet notes.
{Sonogram of the sound "3 clarinet notes'}
The graph shows a series of horizontal and parallel lines. This
type of sonogram is termed harmonic. It is made up of what’s
called a fundamental frequency and other frequencies called
harmonic.
The fundamental frequency corresponds to the lowest
frequency. It gives the sound’s pitch. The harmonics are multiples
of this frequency, hence the regular placement of horizontal lines on
the sonogram. The amplitude of each harmonic differs from one
instrument to the next, allowing the ear to distinguish the sound of
a violin from a clarinet. The amplitude of the fundamental and
harmonic frequencies constitute one of the essential aspects of a
sound's timbre.
In this example, the three clarinet notes emitted are lower and
lower. The three notes are shown on the sonogram. We see
clearly that the fundamental and the harmonics are reduced
proportionally.
♦ Sonogram of a slide whistle
The slide whistle is a rudimentary instrument, made up of a
whistle and a small tube stopped up at one end. By pushing or
pulling on a lever connected to the stopper, the length of the tube
changes. This modifies the sound pitch. Listen to the first sound of
Level 1 of the exercise. You hear the sound of a whistle whose
pitch diminishes over time (the tube length was increased).
{Sonogram of the sound "slide whistle 1"}
♦ What can we notice on the sonogram of the slide whistle?
The image is made up of a series of lines characteristic of
instrumental notes – the fundamental and its harmonics. Over time
these lines come closer together: in effect, the progressive decline
of the fundamental causes the progressive diminution of the
interval separating the harmonics. This sonogram clearly
demonstrates the transition from a high note to a low note.
♦ Sonogram of percussion instruments
Here is the sonogram of a percussive sequence.
{Sonogram of the sound "drum"}
As a general rule, percussion instruments do not produce
harmonic sounds (that is, sounds made up of a fundamental
frequency and its multiples). If we strike the head of a snare drum
with a drumstick (your hand will also do), we get what's called a
noisy sound. This type of sound is made up of a large number of
frequencies very close to one another, such that the ear can no
longer distinguish an exact pitch in the sound.
This is why the sonogram of the drum sequence does not
show evenly-spaced lines. Each of the percussive sounds in the
sequence produces a sort of frequency cluster, with a massive
vertical front reflecting the brevity of the attack.
Identifying Sound Events
Objective: to name the events in a sound sequence.
Screen Display
Each sequence is made up of 12 sound events, produced by
mixing one, two or three sounds, depending on the level of
difficulty.
{screen for Level 2}
The icon for playing a sequence is found on the left side of the
screen.
Above this button are 12 small lights which go on in
succession as the sequence unfolds. They serve to localize the
arrival of the 12 events.
Here the sequence is positioned on the seventh event
It's also possible to start playing a sequence from the
numbered event of your choice, by double-clicking on the
appropriate purple block to the left of the lights. Depending on the
level of difficulty, one, two or three vertical lines extend from the
lights. These lines are for placing the names.
♦ Here we're in Level 3. Event 9 comprises two sounds. Event 10
consists of three sounds. Event 11 has only one sound.
♦ On the right side of the screen is a list of names in alphabetical
order. You cannot see all the names on-screen at the same time.
To access the whole list, position the mouse near the arrows and
the list contents will scroll.
Performing the Exercise
The user plays a sequence and then picks the corresponding
name from the list of sound events.
Careful! There are more names than there are sounds to identify in the
sound sequence.
If you're unsure or if you've made a mistake, you can put the
names back in the list to the right. The order of the names from left
to right does not matter. Only the order from top to bottom
counts when answers are checked.
Educator’s Tips
Record a soundtrack in the street or elsewhere, then ask the
students to identify each of the noises found on the recording (e.g.,
a passing car, pedestrians, children screaming).
This exercise is readily adaptable for work with an entire class
and one computer workstation. For example, while they listen to
the tape, the students can use a sheet of paper with 12 boxes to fill
in.
Sound Morphing
Objective: to take the stages of the transformation from one
sound to another and put them in the correct order.
Screen Display
A starting sound and an ending sound are placed on each
line. We produced five stages in the transformation from one to
the other, using AudioSculpt (Ircam): taken together this creates a
sound "morphing." The idea is to arrange these steps in the right
order. The screen is divided into three levels which work
identically. Each level has two colored squares, which represent
the initial sound and the final sound in the sound morphing. These
icons frame the five empty spaces to position the remaining sounds.
Sounds already selected can be heard by pushing a button.
The sound pool, containing the transformation steps for each
of the levels, is on screen-right.
Performing the Exercise
The user aligns the transformation stages in the right order so
as to reconstruct a continuous movement from the first sound to
the last sound.
Educator’s Tips
Using AudioSculpt (Ircam), create other multiple-step sound
morphs from the sounds the students have chosen.
More generally, you can also address the theme of sound
transformation: use AudioSculpt with the students to make other
sound transformations (such as inverted sounds, transpositions,
filters).
Musical Theme Morphing
Objective: to reconstruct the movement from one musical theme to
another.
Screen Display
With the computer, transitions were effected between various
musical themes from works by well-known composers. The
number of steps for each transition varies with the level of
difficulty.
{Level 1 screen}
The screen is divided into three levels which work identically.
Each level contains two icons for playing the initial theme and the
final theme. These icons frame five empty spaces where the user
will put each of the remaining sounds.
Sounds already in place can be heard by selecting the button
located above the spaces.
The sound pool, containing the various stages of the
transition, is found on screen-right.
Performing the Exercise
Listen carefully to each sound from the pool and position it so as
to obtain a progressive transformation from one musical theme to
the other.
The final theme (to the right) remains the same inside any
given level. On the first level, there are five steps to get from one
theme to the other. On the more advanced levels, the transition is
achieved in six and seven steps respectively.
Sequences
The chart below shows the distribution of musical excerpts by
composer, in the corresponding levels of difficulty.
Level
Level 1
Level 2
Level 3
Initial Theme
Bach
Boulez
Baboni Schilingi
Baboni Schilingi
Beethoven
Bach
Boulez
Chopin
Baboni Schilingi
Final Theme
Beethoven
Chopin
Bach
The titles of the works selected, by composer (MIDI transcriptions),
are as follows:
Johann Sebastian Bach (1685-1750)
Sonata in E Minor for violin and piano (BWV 1023) – Level 1
Invention for Two Voices no.4 in D Minor (BWV 775) – Level 2
Prelude in B flat Major (BWV 560) – Level 3
Ludwig von Beethoven (1770-1827)
Sonata no. 17 in D Minor, op. 31 no. 2 (transposed in A Minor)
Frederic Chopin (1810-1849)
Etude no.1 in C Major, op.10
Pierre Boulez (1925)
Structures pour deux piano, deuxième livre
Jacopo Baboni Schilingi (1971)
Musique du Roi Beau
Educator’s Tips
Starting with two well-known melodies, ask the students to
write or to play on an instrument a hybrid melody created by
combining them.
Music Puzzle
Objective: to reconstruct a sequence from its fragments. This is a
kind of musical puzzle.
(Level 1 screen)
Screen Display
The screen is divided into three levels, all functioning the same
way.
The left side of the screen shows a button which allows for the
whole sequence to be played.
The sequence is divided into seven fragments arranged to the
right of the screen.
As the user classifies them, the sounds will be placed in the
middle of the screen.
This button plays the elements already in position; the sequence
is read from left to right.
Performing the Exercise
The idea is to reconstruct the original sequence by positioning
the fragments in the right order in the seven empty spaces in the
middle of the screen.
The higher the level of difficulty, the longer the excertps and the
more irregular the crosscuts.
Sequences
For each of the three levels of difficulty, we have chosen three
different types of sequences: first, an excerpt from a classical piano
piece (in MIDI transcription); then an extract from a pop music
piece; and finally, a sequence made up of sound effects.
♦ Level 1
Goldberg Variations, BWV.988 — Johann Sebastian Bach (16851750); MIDI transcription.
Fast and Easy — realized by Jean Lochard/Ircam
Ambiances naturelles — realized by Jean Lochard/Ircam
♦ Level 2
Sonata for Two Pianos in D Major, K.448 — Wolfgang Amadeus
Mozart (1756-1791); MIDI transcription.
Baby-C — realized by Jean Lochard/Ircam
Promenade — realized by Jean Lochard/Ircam
♦ Level 3
Fantasy for Piano in F Minor, for four hands, D 940 — Franz Peter
Schubert (1797-1828); MIDI transcription.
Senza Virtuelle — realized by Jean Lochard/Ircam
En voiture! — realized by Cyrille Brissot/Ircam
Educator’s Tips
Since the musical fragments of this exercise are interchangeable,
it’s possible to reconstruct a piece different from the original. This
game raises questions about the concepts of the musical phrase and
the structure of a piece.
It's easy to create a music puzzle with a MIDI sequencer. Load a
MIDI file (a piece of music the computer can read) into the
program. Using the appropriate tool (often a pair of scissors), cut
the piece into several fragments. Then have the students use these
fragments in reconstructing the original piece or in building other
melodies.
Acoustic Spaces
Objective: to recognize various computer-simulated acoustic
spaces.
{Screen for Level 2}
Screen Display
In this exercise, we used a program called Spat (Ircam), made
for simulating different specific acoustic spaces. First we chose
sounds recorded in neutral acoustics (that is, without
reverberation), and then we simulated their propagation in several
different acoustic spaces: bathroom, living room, concert hall,
church.
The numberof acoustic spaces increases with the level of
difficulty.
On-screen, each acoustic space is symbolized by a "streetlight;"
their numbers vary from three to five depending on the level of
difficulty.
♦ Distribution of acoustic spaces by difficulty level
Environment Neutral Bathroom Living Room Concert Hall
Church
Level 1
x
x
x
Level 2
x
x
x
x
Level 3
x
x
x
x
x
♦ By double-clicking on a "streetlight," you can listen to the base
sound, as a point of reference, in order to get to know each
auditory space. The first "streetlight" corresponds to a neutral
sound, stripped of reverberation; the remainder of the
streetlights go from the smallest room to the largest.
Careful! This does not mean the least reverberating to the most
reverberating. Reverberation varies a lot depending on the material used to
cover the walls of the acoustic space (see "Going further").
♦ On the right side of the screen is the sound pool, divided into
four levels. Each one has a sound processed to reflect the
acoustic spaces found in that level of difficulty.
Performing the Exercise
You must listen to each sound, identify the acoustic space in
which it's diffused, and then place it under the correct streetlight.
Educator’s Tips
Using a tape recorder and microphone, go with the students to
record diverse sounds (percussion, voice) in various places (the
entryway, the classroom, the courtyard). Have the students listen
carefully in each of these places, their eyes shut, so as to
"photograph" the sonic environment.
Once back in the classroom, try to identify each of the places you
visited by listening to the sounds recorded in various environments
and perhaps also by comparing them to sounds already played in
the classroom for reference.
Going Further
To produce the sounds for this exercise, we used the Spat
program (Ircam), which, among other features, makes it possible to
simulate very realistically the environment of a room whose
characteristics the user selects. In the following paragraphs, you
will find fuller explanations of propagating sounds in a given space.
♦ An overview of sound propagation
The origin of a sound is a physical phenomenon. A sound
source (such as a violin or a speaker) creates a local disturbance in
atmospheric pressure. This disturbance gradually spreads in the
air, giving rise to a sound wave. Picture a stone thrown in the
water for a useful image of the way a sound wave is propagated.
The ear perceives the acoustic wave and sends data to the
brain, allowing us to identify the nature of the sound wave. The
speed of a sound wave depends on the temperature, the pressure
and the density of the surroundings in which it is diffused. In the
air, the speed is between 320 and 340 meters per second.
♦ Sound trajectory between its source and the listener
When a sound source emits a sound, it is propagated in all
directions in the space. This is called radiating. A listener only
receives a fraction of the energy the source puts out, that portion
which radiates in his or her direction.
♦ Reflection on a surface
When a sound wave strikes a surface, the angle of its reflection
is equal to its angle of incidence, just like light on a mirror.
{A sound wave striking a wall: the incident angle
(1) and the angle of reflection (2) are equal}
The wave suffers an energy loss which varies according to
the material the wall is made of. The material is called "reflective" if
the wave undergoes a small energy loss. It is "absorbent" if there's
a marked energy loss. In this case, the reflected wave is practically
nonexistent.
♦ Sound diffusion in a room
There are numerous phenomena of sound wave propagation
and reflection in any given room.
Let's take the example of a theater, and examine the sound's
trajectory between a musician playing onstage and a listener seated
in the hall.
----> direct sound
----> early reflections
----> example of multiple reflections
{Sound's trajectory in a theater: the direct sound, some early
reflections and a radiant undergoing multiple reflections are
pictured.}
The musician plays an instrument:
• The listener first perceives the direct sound coming from
the instrument. The direct sound is the one which takes
the shortest path between the musician and the audience
member.
• The listener then perceives the sound waves coming from
the reflections against the walls.
♦ Impulse Response
To identify the features of a concert hall, the response to an
impulse signal is studied. This consists of sending a very short
signal (often a pistol shot) from the stage, and recording the
received signal at various specific points in the hall.
♦ Graphic representation of an impulse response
{Chart> Intensity. Time (1)Direct sound (2) Early reflections
(3)Multiple reflections against the walls}
When t=0, a short sound is transmitted from the stage.
Direct sound is received at time t1, a function of the sound's
speed in the hall and of the distance separating the sound source
from the listener.
Thereafter, a series of signals reaches the audience member
starting at time t2: these are the early reflections. They
correspond to the radiants with only one reflection against the
walls. Their length (t2 - t1), the time between direct sound
reception and reception of early reflections, is the principal
parameter allowing the listener to grasp the size of a space.
Effectively, the more voluminous the hall, the greater the length.
The third part of the signal received starting from time t3 is
more confused. It's made up of radiants having undergone several
successive reflections against the walls. These late reflections are
received in such short lapses of time that the ear is no longer able to
distinguish one from the next.
The sum of all these reflections constitutes the reverberation,
which depends on the hall's volume and on the materials used in
covering the walls.
To describe hall acoustics, we often speak of the Time of
Reverberation (TR). This is the length between the emission of a
brief sound in the hall and its quasi-complete extinction.
♦ Simulating an acoustic space
Computers are now powerful enough to simulate artifical
acoustic spaces very realistically. They are capable of reproducing a
sound's multiple reflections against the walls by using delay lines.
In practice, in order to use Spat to reproduce the acoustics of a
hall or other space, the computer must first have a recording of the
hall's impulse response. The recording is analyzed by a program
which furnishes the principal parameters for simulating the
reverberation (pre-reception length of the early reflections, time of
reverberation). Then the simulation is refined by ear, by comparing
the artificial reverberation with the original impulse response and
modifying the Spat's internal parameters.
♦ Time of Reverberation (TR) of the environments of this
exercise
Environment
Neutral environment
Bathroom (*)
Living room
Concert hall
Church
TR in seconds
-01.445
0.550
2.187
4.365
(*) A bathroom, whose wall are tiled, reverberates more than a
living room, despite its smaller size.
Locating a Sound Source
Objective: to locate the origin of a sound source.
Screen Display
At screen-right you will find a pool of sounds spatialized with
Spat (Ircam), which allows you to control the position of sounds in
a simulated acoustic space. We have selected four different
localizations. This way, a listener with headphones can hear a
sound source placed to the left, to the right, in front, or behind.
These four localizations are represented onscreen. They are
arranged around a head as seen from above.
Performing the Exercise
First, determine where the sounds in the pool are situated, then
put them in the right places with respect to the head.
Careful! For this exercise, you must use headphones. Make sure that
you're wearing the headphones correctly! (L over the left ear, R over the
right ear)
Educator’s Tips
Blindfold one student at a time, who will identify the location of
a sound source and then track its movements as precisely as
possible (refer to the following exercise). Have the other students
produce the sounds.
Sound Sources in Motion
Objective: to identify the movements of two sound sources mixed
into a single sequence.
Screen Display
Using Spat (Ircam) to control sound movement in a simulated
acoustic space, various sound sequences were processed. Each has
two sounds in motion and can be classified in six categories
combining elementary directions: in front, behind, left, right – all
with the listener as reference point.
Careful! This exercise can be performed with a pair of speakers, but
perceiving the movement of the sound sources is easier with headphones (be
sure to place the earpiece L over the left ear, R over the right).
Performing the Exercise
The idea is to classify the sequences by the sounds’
movements, as represented by the following icons:
♦ Front-Back Movements
the two sounds move apart toward the rear
the two sounds cross*
the two sounds draw closer together toward the front
♦ Right-Left Movements
both sounds move toward the left
the two sounds cross*
both sounds move toward the right
*Movements starred with an asterisk are not found in Level 1 of
the exercise. The sequences to be sorted are arranged screenright.
Synchronizing Sound and Image
Objective: to find adequate synchronization between an image
and a sound.
Screen Display
This exercise offers five episodes of Charles Perrault's Little Red
Riding Hood, loosely interpreted. We created three sound
sequences variously synchronizing image and sound for each
episode. All of these sequences are positioned on the right side of
the screen. Double-click on a given sequence to play it, framed
center-screen.
Performing the Exercise
There is only one correct solution for synchronizing each episode
of the story with its corresponding sound sequence. This is the
sequence that must be brought into the frame located to the left of
the screen.
At the end of the exercise, a button lights up. Double-click on
this button to see the whole story.
Educator’s Tips
There are programs on the market that make it easy to create
short animations, combining images with sound, easily.
Prepare a brief video sequence and a sound palette ahead of
time. Ask the students to develop diverse sound illustrations by
playing with sound-image sychronizations.
Installing the CD-ROM
Macintosh Installation
Minimum system requirements:
Mac PowerPC 200 MHz
System 8.1
14" screen thousands of colors
8x CD-ROM drive or faster
32 Mbytes RAM (8 Mbytes free)
QuickTime 3 or higher
Installing the CD-ROM:
Turn on your computer and insert the CD-ROM into the
drive. Double-click on the "10 jeux d’écoute" icon that appears on
the desktop. A window will open with various files:
“Lisez-moi” ("Read me"): this has last-minute information; read
this before proceeding any further.
“Démarrage” ("Getting started"): this launches the application.
Careful! — The 10 Listening Games CD-ROM requires prior
installation of QuickTime 3 (or higher) on your computer!
If you do not have QuickTime (delivered with Mac OS 8.5),
you can use the installer provided on the CD-ROM. Or you can
download the latest version for free from the Apple site at the
following address:
http://www.apple.com/fr/quicktime/
With QuickTime, your system can read digital sounds and
videos.
PC Installation
Minimum system requirements:
Pentium PC 200 MHz
Windows 95 or higher
14" screen thousands of colors
8x CD-ROM drive or faster
32 Mbytes RAM
QuickTime 3 or higher
16-bit sound card, SoundBlaster compatible
CD-ROM installation
After opening Windows 95/98, insert the CD-ROM 10
Listening Games into the drive.
Open the workstation. Click on the CD-ROM icon. A new
window will open with these files:
“Lisez-moi” ("Read me"): this has last-minute information; read
this before proceeding any further.
“Démarrage” ("Getting started"): this launches the application.
Careful! — The 10 Listening Games CD-ROM requires prior
installation of QuickTime 3 (or higher) on your computer!
If you do not have QuickTime, you should copy the installation
program from the CD-ROM onto your hard drive, then launch it.
Or you can download the latest version for free from the Apple site
at the following address:
http://www.apple.com/fr/quicktime/
QuickTime lets your system read digital sounds and videos.
Ateliers Ircam
♦ CD-ROM
Project Director: Marie-Hélène Serra
Conception/Realization: Jacopo Baboni Schilingi, J-F Rey
Assistant for Production and Manual: Jean Lochard
Computer Development: Jean-Noël Lafargue
Graphic Design: Jean-François Rey
Contributors: Cyrille Brissot, Thierry Coduys, Eric Daubresse, Catherine
Marchand, Régis Msallam, Olivier Pasquet, Emmanuel Perrier, Olivier
Warusfel
Production Support: Nathalie Beaufranc, Laurent Gaveau
Publication Coordinator: Olivier Koechlin, Hyptique
Commercial usage prohibited.
Authorization for professional use must be granted by Ircam {telephone (331) 44 78 49 59}.
For students, activity leaders and teachers in the music sector, Ircam offers
educational workshops thematizing ideas explored in this CD-ROM, as well
as other topics in music and new technologies.
For more information, please call (33) 01 44 78 48 17 or 01 44 78 48 23.
♦ MANUAL
This manual may not be copied, in part or in whole, without the prior
written permission of Ircam.
This manual was authored by Jean Lochard, under the supervision of MarieHélène Serra.
Graphic Design for the Manual: Jean-François Rey
Printing and modeling: Desgrandchamps
© Ircam, 2000.
Éditions hyptique.net
All rights reserved