1
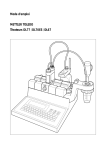
Operating Instructions
METTLER TOLEDO
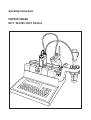
DL77 / DL70ES / DL67 Titrators
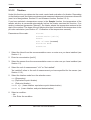
SEL
RESE
T
SE L
EXIT
RUN
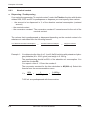
1. INSTALLATION
2. EDITOR
3. ANALYSIS
4. AUXILIARY FUNCTIONS
5. DOCUMENTATION
6. USER LEVEL
7. REMOTE CONTROL
8. Designations – Explanations – Examples
9. Error messages and malfunctions
10. Applications
11.
Installation instructions, Technical data, Accessories
12. Index, Certificates & Declarations
Introduction
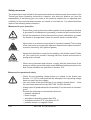
Safety measures
The titrators have been tested for the experiments and intended purposes documented in the
Tutorial and these Operating Instructions. However, this does not absolve you from the
responsibility of performing your own tests of the products supplied by us regarding their
suitability for the methods and purposes you intend to use them for. You should therefore
observe the following safety measures.
Measures for your protection
– Ensure that you plug the power cable supplied into a receptacle outlet that
is grounded! In the absence of grounding, a technical fault could be lethal.
Risk of electric
shock
– Switch the instrument off and disconnect the power cable before you open
the housin or change blown fuses! An electric shock could be lethal.
– Never work in an environment subject to explosion hazards! The housing
of the instrument is not gas tight (explosion hazard due to spark formation,
corrosion caused by the ingress of gases).
Risk of explosion
– Always test the titration vessel for firm seating in the titration head! If it falls
off, you could injure yourself if working with toxic titrants and solvents or
strong acids or bases.
Risk of corrosion
– When using chemicals and solvents, comply with the instructions of the
producer and the general lab safety rules! Additional safety precautions for
Karl Fischer titrations are described in Section 10.2.
Measures for operational safety
Caution
02/93
11/97
– Check the set operating voltage before you switch on the titrator (see
Section 11.1.5)! The instrument will be damaged if the operating voltage
does not match the line voltage.
– Use only fuses of the specified type if you need to change them!– Have
the instrument serviced only by METTLER TOLEDO Service!
– Always wipe off splashed liquids immediately! The instrument is not waterproof.
– Exclude the following environmental influences:
• powerful vibrations,
• direct sunlight,
• atmospheric humidity greater than 80%,
• temperatures below 5 °C and above 40 °C,
• powerful electric or magnetic fields!
METTLER DL77/DL70ES/DL67
1
Introduction
2
METTLER DL77/DL70ES/DL67
02/93
Introduction
Introduction
The DL77, DL70 ES, and DL67 METTLER titrators are microprocessor-controlled analytical
instruments that provide accurate and reproducible results thanks to their built-in intelligence.
With these titrators, you can perform end point, equivalence point and pH-stat titrations,
measure pH/mV and temperature, and determine TAN/TBN and p/m values. With the aid of
a polarization current source, you can determine water contents by the Karl Fischer method
(>2 mg H2O/sample). You can perform conductivity measurements and conductometric
titrations with an appropriate non-Mettler unit equipped with an analog output.
All titrators have a maximum of four inputs for electrodes, two for temperature sensors and
three 24-V outputs for stirrer, pump or valve attachments. They have a maximum of four
RS232C/CL interfaces, enabling you to connect a series of peripheral instuments:
- an attached METTLER balance transfers the sample weight automatically,
- a printer records the desired results,
- a color terminal serves as a second display and can be used for remote control, or a PC/robot
can interchange data with the titrator, and
- with an attached METTLER Sample Changer, each titrator is turned into a titration system
for the automatic analysis of whole series of samples.
How the three titrators differ from each other
DL77:
Two titrations can be executed simultaneously and two sample changers can be
connected. Neither the DL70ES nor the DL67 allow this.
DL77/
DL70ES:
These titrators can control a maximum of four burette drives, the DL67 two.
These instruments know the most important titrants and all METTLER sensors,
whereas the DL67 knows one titrant and one sensor.
With both titrators a maximum of 10 titration methods can be entered in a list and
processed in succession. With the DL67 one method can be entered at a time.
While a titration is running, you can develop and save a new method, or you can
enter sample data for the next titration method. This is not possible with the DL67.
02/93
METTLER DL77/DL70ES/DL67
3
Introduction
Operating
concept
What information will you find where?
1.
The TUTORIAL, provided with the standard equipment, will help you to overcome any
inhibitions you may have with regard to the new instrument. You will get to know the
function keys, the keypad and the display. Using a stored method for an acid-base titration,
you will perform your first analysis.
2.
These Operating Instructions provide a complete description of the concept and operating characteristics of the three titrators.
The operating concept and a compilation of the key combinations follow this introduction.
3.
The RS232C Interface Description, i.e., a detailed description of the communication between titrator and computer, is provided with the standard equipment (since June, 1999).
Note: These Operating Instructions apply to software version 3.0 or 3.1.
The organization of the Operating Instructions
The organization is based on a modular principle. This allows supplementation or the interchange of individual sections or pages: new text sections carry the date of issue (in the footer
on every page).
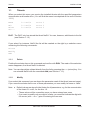
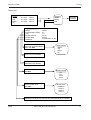
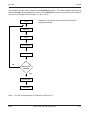
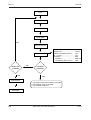
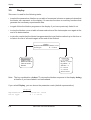
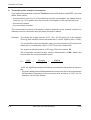
The operating concept of the titrator
The operation of the titrator is menu driven. What does this mean?
The titrator handles various tasks:
It stores, for instance, titrant names with the corresponding concentrations; it knows that it must
terminate the titration after an equivalence point has been found; it rinses burettes and can
provide records of stored data on an attached printer.
We call the listing of these various tasks a menu. Each task is subdivided further. If you select
a task from the main menu you are shown a new set of tasks – the submenu – from which you
can select another task. We refer to this as a menu tree when the main menu branches into
submenus and these in turn into additional submenus.
4
METTLER DL77/DL70ES/DL67
05/99
02/93
Introduction
02/93
METTLER DL77/DL70ES/DL67
5
Introduction
6
METTLER DL77/DL70ES/DL67
02/93
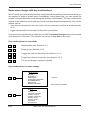
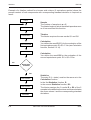
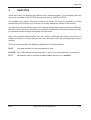
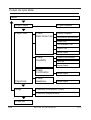
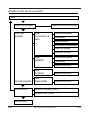
Key combinations
Introduction
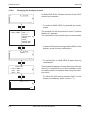
Rapid menu change with key combinations
In the Tutorial, you have already become acquainted with several key combinations which you
can employ to obtain a certain menu immediately. Using these keys, you can reduce the
number of keystrokes before and during the titrations considerably. The key combinations
consist of the index key and a letter key which must be pressed simultaneously. Key combinations exist to
• jump from a submenu into the main menu or from a submenu into that of another branch,
or to
• trigger commands for the burette or the printer (see below)
If you press a key combination in a submenu, the DL70 stores all changes that you have made
up to this point in the menu. The selector bar can be on any line of the menu.
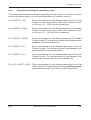
Key combinations for commands
+ U
Rinse burette (see Section 4.1.1)
+ Y
Rinse tip (see Section 4.1.2)
+ L
Trigger line feed on the printer (see Section 1.8.1)
+ P
Trigger form feed on the printer (see Section 1.8.1)
+ C
The current display is printed (copied!)
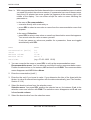
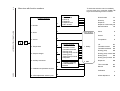
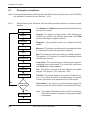
Key combinations for menu change
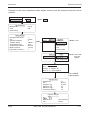
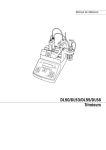
+ M
+ I
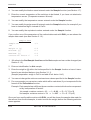
02/93
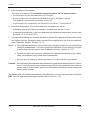
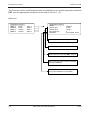
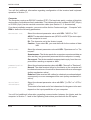
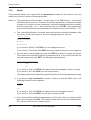
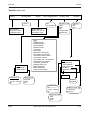
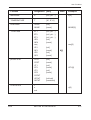
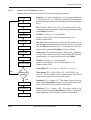
MAIN MENU
INSTALLATION
EDITOR
ANALYSIS A
ANALYSIS B*
AUXILIARY FUNCTIONS
DOCUMENTATION
USER LEVEL
REMOTE CONTROL
* only DL77
only if computer is installed
Installation
Titrants
Sensors
Temperature sensors
Auxiliary reagents
Auxiliary instruments
Auxiliary values
Titration stands
Peripherals
Miscellaneous
METTLER DL77/DL70ES/DL67
7
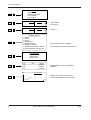
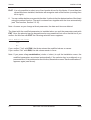
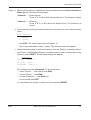
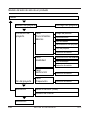
Introduction
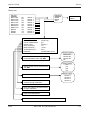
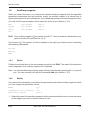
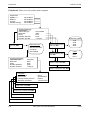
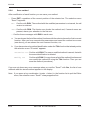
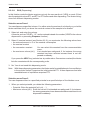
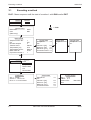
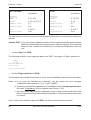
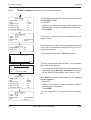
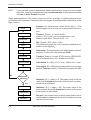
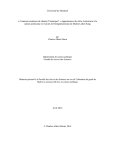
Key
combinations
Editor
Method ID
METTLER methods
User methods
New method
+ E
Method
+ A
Method
+ B
+ F
1
2
3
4
5
6
7
8
A
A
Method
Add
BB
Auxiliary functions
Burette
Stirrer
Sensor
Temperature
Sample changer
Auxiliary instrument
Calibration temperature sensors
Offset adjustment sensor inputs
*DL67: Load
A: only DL77
only DL77
only if sample changer is installed
only if temperature option has been built in
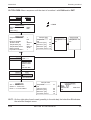
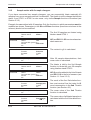
Documentation
Print
Data transfer
Memory copy
+ D
+ S
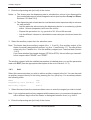
Method
Add*
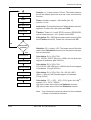
No.
1/1
1/2
1/3
mV
ID2
Wt./vol.
0.0000 g
0.0000 g
0.0000 g
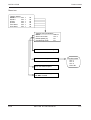
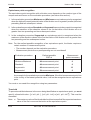
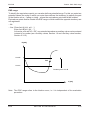
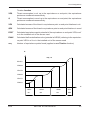
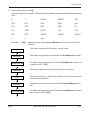
Sample data list for the current method
(example)
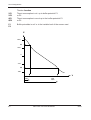
E –V curve
Display of the method function for the
current method (Titration function active)
+ T
mL
8
METTLER DL77/DL70ES/DL67
02/93
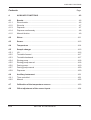
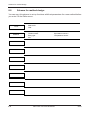
INSTALLATION
INSTALLATION
Contents
Page
1.
INSTALLATION ...........................................................................................
1-3
1.1
Titrants ........................................................................................................
1-4
1.1.1
Delete ...........................................................................................................
1-4
1.1.2
Modify ...........................................................................................................
1-4
1.1.3
Add ...............................................................................................................
1-8
1.2
Sensors .......................................................................................................
1-9
1.2.1
Delete ........................................................................................................... 1-10
1.2.2
Modify ........................................................................................................... 1-10
1.2.3
Add ............................................................................................................... 1-14
1.3
Temperature sensors ................................................................................. 1-15
1.4
Auxiliary reagents ...................................................................................... 1-17
1.4.1
Delete ........................................................................................................... 1-17
1.4.2
Modify ........................................................................................................... 1-17
1.4.3
Add ............................................................................................................... 1-18
1.5
Auxiliary instruments ................................................................................ 1-20
1.5.1
Delete ........................................................................................................... 1-20
1.5.2
Modify ........................................................................................................... 1-20
1.5.3
Add ............................................................................................................... 1-21
1.6
Auxiliary values .......................................................................................... 1-23
1.7
Titration stands .......................................................................................... 1-25
1.8
Peripherals .................................................................................................. 1-28
1.8.1
Printer ........................................................................................................... 1-28
1.8.2
Balance ........................................................................................................ 1-30
1.8.3
System ......................................................................................................... 1-32
1.8.4
Sample changer ........................................................................................... 1-35
02/93
METTLER DL77/DL70ES/DL67
1-1
INSTALLATION
INSTALLATION
Page
1.9
Miscellaneous ............................................................................................. 1-36
1.9.1
Format date/time .......................................................................................... 1-36
1.9.2
Enter date/time ............................................................................................. 1-36
1.9.3
Language ..................................................................................................... 1-37
1.9.4
Record header ............................................................................................. 1-37
1.9.5
Titrator ID ..................................................................................................... 1-37
1.9.6
Routine level ................................................................................................ 1-38
1.9.7
Audio signal .................................................................................................. 1-39
1.9.8
Analysis parameters ..................................................................................... 1-40
1-2
METTLER DL77/DL70ES/DL67
02/93
INSTALLATION
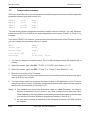
1.
INSTALLATION
INSTALLATION
In order to perform titrations the titrator must be acquainted with the titrants and their
concentration, the sensors with their possible unit of measurement, and the solvents that it can
dispense by means of pumps. It must know the burette drive on which the burette is located,
the input to which the sensor is connected and what output carries the stirrer. It needs the
names of the attached units such as a balance or printer in order to transfer data. In this menu
you enter and store the names of all chemical and mechanical resources: you install them.
The most common titrants, solvents and all METTLER sensors are already installed in the
titrator. Not only can you delete these resources or modify their parameters, but you also have
the possibility to install new ones.
List of resources
Titrants
Sensors
Temperature sensors
Auxiliary reagents
Auxiliary instruments
Auxiliary values
Titration stands
Peripherals
Miscellaneous
Caution: All resources needed for the METTLER methods stored in the application data
base are installed accordingly. If you delete one of these, the titrator will wait until
start of titration of a METTLER method before outputting the error message that the
resource is not installed.
DL67: Only the titrant and the sensor for METTLER method M001 are stored in the DL67.
02/93
METTLER DL77/DL70ES/DL67
1-3
Titrants
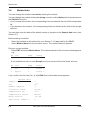
1.1
INSTALLATION
Titrants
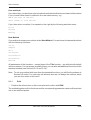
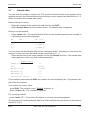
When you select this menu you receive the installed titrants with the specified parameters
concentration and burette drive. (You will find the menu tree depicted at the end of Section
1.1.2.)
NaOH
HCl
HClO4
etc...
0.1 mol/L
0.1 mol/L
0.1 mol/L
Drive 3
Drive 3
Drive 3
DL67: The DL67 only has stored the titrant NaOH. You can, however, add titrants to the list
(see Section 1.1.3).
If you select, for instance, NaOH the list will be masked on the right by a selection menu
containing the following commands:
Delete
Modify
Add
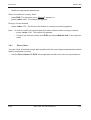
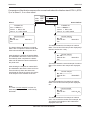
1.1.1
Delete
Position the selector bar on this command and confirm with RUN. The mask of the selection
menu disappears, the titrant NaOH is deleted.
Note: You can also delete a titrant directly from the list by pressing the <–> (minus) key. You
can reinstall NaOH with the command Add (see Section 1.1.3).
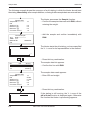
1.1.2
Modify
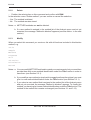
If you select this command you are shown the parameter mask of the titrant (see next page).
If you move the selector bar to one of these parameters you can modify its name or value.
Note: a. Default values are stored in the titrator for all parameters, e.g. for the concentration
of the titrant 0.1 mol/L, for the titer 1.0.
• These values will be overwritten once you have entered new ones.
• If you want to modify only one digit of a value, you must first indicate the digit with
the cursor (with → or ←) prior to entering the new one.
1-4
METTLER DL77/DL70ES/DL67
02/93
INSTALLATION
Titrants
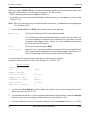
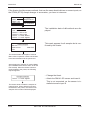
Note: b. With many parameters the titrator has selection or recommendation menus in which
you need only select the values or names. If a parameter has one of these menus,
each time it is selected an arrow symbol (➡) appears at the extreme right in the
middle of the display. You can either accept the value or name following the
parameter or:
in the case of Recommendation,
– overwrite directly with a new entry or
– press SEL to select a new value or name from the recommendation menu that
appears.
in the case of Selection,
– press SEL to select a new value or name from the selection menu that appears.
You cannot enter the value or name yourself.
If only two names or values are possible for a parameter, these are toggled
automatically with SEL.
Name
Concentration [mol/L]
Titer
Burette volume
Burette drive
Date/time
NaOH
0.1
1.0
10 mL
Drive 3
(e.g.: 07–06–1992 12:20)
1. You can overwrite the name or press SEL to call up the recommendation menu:
Recommendation menu: You can select a new titrant from the recommendation menu.
Position the selector bar on, for instance, HCl and confirm with RUN. The recommendation
menu disappears and HCl follows Name.
2. Enter the concentration [mol/L]
3. Enter the titer only if you know its value. If you determine the titer of the titrant with the
titrator, its value is entered here together with the date automatically (see Titer function,
Section 2.3.16).
4. Select the burette volume from the selection menu:
Selection menu: You press SEL, position the selector bar on, for instance, 5 mL in the
selection menu and confirm with RUN. The selection menu disappears and 5 mL now
follows burette volume.
5. Select the burette drive from the selection menu.
02/93
METTLER DL77/DL70ES/DL67
1-5
Titrants
INSTALLATION
DL67: It is only possible to select one of two burette drives for this titrator. If more than two
drives have been installed, the titrator will recognize each of the first two (counting from
left to right).
6. You can neither delete nor overwrite the date. It refers to the titer determination of the titrant
using the method function Titer and is entered here together with the time automatically
(see Titer function, Section 2.3.16).
Note: As soon as you change a titrant parameter, the date and time are deleted.
The titrant with the modified parameters is installed when you quit the parameter mask with
EXIT. Here, the selector bar can be positioned on any parameter, but not on the title line.If you
confirm the title line with EXIT the following selection menu appears:
Save modifications?
Yes
No
If you confirm "Yes" with RUN, the titrator stores the modified values or names.
If you confirm "No" with RUN, the old values remain in force.
Note: If you press a key combination (<index + letter>) to quit the Installation menu, the
modified parameters are stored automatically if the selector bar is positioned on a
parameter line. If it is positioned on the title line, the selection menu "Save modifications?"
appears again (see above).
1-6
METTLER DL77/DL70ES/DL67
02/93
INSTALLATION
Titrants
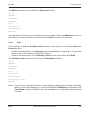
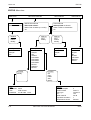
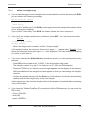
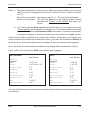
Menu tree
Titrant
NaOH
HCl
HClO4
etc.
0.1 mol/L
0.1 mol/L
0.1 mol/L
Selection
Delete
Modify
Add
Drive 3
Drive 3
Drive 3
Titrant parameters
Name
Concentration [mol/L]
Titer
Burette volume
Burette drive
Date/time
The titrant
is deleted
NaOH
0.1
1.0
10 mL
Drive 3
(07-06-1992 12:20)
Enter new name or select
entry from recommendation
menu with SEL
Titrant names
NaOH
HCl
HClO4
etc.
Enter new concentration
Enter new titer or let it be
entered through titration
Select another burette
with SEL
Select another drive
with SEL
Burette volume
1 mL
5 mL
10 mL
20 mL
Burette drive
Drive 1
Drive 2
Drive 3
Drive 4
Date/time is entered only through titer determination by the titrator!
02/93
METTLER DL77/DL70ES/DL67
1-7
Titrants
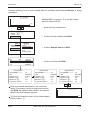
1.1.3
INSTALLATION
Add
Select this command if you wish to add a titrant to the titrant list, for instance NaOH of
concentration 1.0 mol/L or with a different burette volume, or a new titrant. You can also add
a titrant directly to the list by pressing the <+> (plus) key. You are always shown the following
mask:
Name
Concentration [mol/L]
Titer
Burette volume
Burette drive
Date/time
NaOH
0.1
1.0
10 mL
Drive 3
00–00–0000
00:00
1. Select the titrant from the recommendation menu or enter the one you wish to install.
Note: If you install, for example, several NaOH solutions of the same concentration, you must
provide each name with a different flag to allow the titrator to distinguish between them,
e.g. NaOH/1.
2. Enter the concentration [mol/L].
3. Enter the titer only if you know its value. If you determine the titer with the titrator, its value
together with the date is entered here automatically (see Titer function, Section 2.3.16).
4. Select the burette volume from the selection menu.
5. Select the burette drive from the selection menu.
6. The date together with the time for the newly installed titrant is entered here automatically
only after the titer has been determined (see Titer function, Section 2.3.16).
The titrant with the appropriate parameters is installed when you quit the parameter mask with
EXIT (see the appropriate description at the end of Section 1.1.2).
1-8
METTLER DL77/DL70ES/DL67
02/93
INSTALLATION
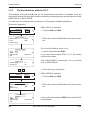
1.2
Sensors
Sensors
When you select this menu you are shown the installed sensors with the specified parameters
unit of measurement and the sensor input. (You will find the menu tree depicted at the end of
Section 1.2.2.)
DG111-SC
pH
Sensor 1
(Combined pH electrode – aqueous medium)
DG101–SC
pH
Sensor 1
(Combined pH electrode for small volumes in a
small titration vessel – aqueous medium)
DG113–SC
mV
Sensor 1
(Combined glass electrode with movable sleeve
frit – nonaqueous medium)
DG114–SC
mV
Sensor 1
(Combined glass electrode with movable sleeve
frit – aqueous medium)
DG115–SC
mV
Sensor 1
(Combined glass electrode with sleeve frit –
aqueous medium)
DM140–SC
mV
Sensor 2
(Combined platinum ring electrode – redox
titrations)
DM141–SC
mV
Sensor 2
(Combined silver ring electrode – argentometry)
DM142
mV
Sensor 1
(Double-pin platinum electrode – voltametry)
DP550
% T
Sensor 2
(Phototrode – transmission measurements at
550 nm)
DP660
% T
Sensor 2
(Phototrode – transmission measurements at
660 nm)
DL67: Only sensor DG111-SC is stored in the DL67. You can, however, add sensors to the
list (see Section 1.2.3).
Note: There is no need to install a reference electrode as it is part of the installed measuring
electrode at input sensor 1. The input for the reference electrode is marked (see Section 11.1.4).
If you select DG111-SC, for instance, the list is masked on the right by a selection menu
containing the following commands:
Delete
Modify
Add
02/93
METTLER DL77/DL70ES/DL67
1-9
Sensors
1.2.1
INSTALLATION
Delete
Position the selector bar on this command and confirm with RUN. The mask of the selection
menu disappears, the DG111-SC sensor is deleted.
Note: You can also delete a sensor directly from the list by pressing the <–> (minus) key. You
can reinstall the DG111-SC with the Add command (see Section 1.2.3).
1.2.2
Modify
If you select this command you are shown the parameter mask of the sensor in which you can
change the parameter values:
Name
Unit of measurement
Sensor input
Zero point [Unit]
Slope [mV/Unit]
Temperature [°C]
Date/time
DG111-SC
pH
Sensor 1
7.0
–59.16
25.0
(e.g.: 02–06–1992 10:15)
1. Select the sensor name from the recommendation menu or enter the one you wish to install
in place of the DG111-SC sensor.
2. Select the unit of measurement suitable for the sensor from the selection menu. Within a
method you can later again choose between the selected unit of measurement and "mV"
in the functions Measure, Titration and pH/mV-stat (see Section 2.3.4/ 12/13).
1-10
mV:
Either there is no other unit of measurement suitable for the sensor, or you
require only mV.
If you select the unit mV for a sensor, the calibration parameters zero point,
slope and temperature are ignored by the titrator.
pH:
After you select pH you then enter the calibration parameters for a pH electrode
or you let the titrator do it (see notes a. and b. on page 1-12).
pM:
M represents any cation. After you select pM you then enter the calibration
parameters for a pM electrode or you let the titrator do it (see notes a. and b.
on page 1-12).
pX:
X represents any anion. After you select pX you then enter the calibration
parameters for a pX electrode or you let the titrator do it (see notes a. and b.
on page 1-12).
METTLER DL77/DL70ES/DL67
02/93
INSTALLATION
Sensors
%T:
After you select %T you then enter the calibration parameters of a phototrode
(unit of measurement: transmission, see Operating Instructions "Phototrode").
A:
After you select A you then enter the calibration parameters of a phototrode
(unit of measurement: transmission. The absorption (A = -log T) is calculated,
see Operating Instructions "Phototrode").
µS/cm:
After you select µS/cm you then enter the calibration parameters of the conductivity cell.
mS/cm:
After you select mS/cm you then enter the calibration parameters of the conductivity cell.
Note: Conductivity measurements and conductivity titrations can be performed using a
conductometer equipped with an analog output.
3. Select the sensor input from the selection menu.
Notes: a. In the standard configuration of the titrator you have the sensor 1 and sensor 2 input
available. You should select the sensor 1 input for all glass electrodes as this has
the highest input resistance (see Rear view of the titrator, Section 11.1.4 and
Technical data, Section 11.2.1).
b. For technical reasons, only the "low resistance" sensor input 2 may be selected for
phototrodes (see Rear view of the titrator, Section 11.1.4 and Technical data,
Section 11.2.1).
Caution: The RS option has an additional "low resistance" sensor input, the temperature
option an additional high resistance sensor input (see Sections 11.1.6 and 11.1.7).
Depending on the installation manner, the "low resistance" input may, for example,
be either sensor 3 or sensor 4! (See Rear view of the titrator, Section 11.1.4 and
Technical data, Section 11.2.1).
4. Enter the zero point of the sensor:
The zero point of a sensor is the measured value at which it displays 0 mV potential (zero
point of electrode assembly).
• For the zero point of a pH electrode this is pH0 with unit pH.
• For the zero point of an ion-selective electrode this is pM0 with the unit pM, or pX0 with
the unit pX.
• The zero point of the phototrode is normally 0% T (100% T = 1000 mV).
• The zero point of a conductivity cell is normally 0 µS/cm or 0 mS/cm.
02/93
METTLER DL77/DL70ES/DL67
1-11
Sensors
INSTALLATION
5. Enter the slope of the sensor.
The slope of a sensor is the potential change in mV per unit of measurement.
• For the slope of a pH electrode the unit is: mV/pH.
• For the slope of an ion-selective electrode the unit is: mV/pM or mV/pX.
• The slope of a phototrode is normally 10 mV/ %T.
• For the slope of a conductivity cell the unit is: mV/µS*cm-1 or mV/mS*cm-1.
6. Enter the temperature: The actual calibration temperature is either
• defined by you when starting a calibration method (see Section 3.1) or
• measured automatically if you have attached and installed a temperature sensor (see
Sections 1.3, 2.3.2 and 2.3.17).
7. You can neither delete nor overwrite the date. It refers to the calibration of the sensor using
the method function Calibration and is entered here together with the time automatically
(see Calibration function, Section 2.3.17).
Notes: a. The calibration parameter values of the titrator installed in the factory are theoretical
values for a new sensor. You have to perform a calibration of your sensor if you wish
to determine accurate values (see Calibration function, Section 2.3.17).
b. When a pH, pM or pX sensor is calibrated the calibration parameters (zero point,
slope, temperature) are entered here automatically.
c. As soon as you change a sensor parameter, the date and time are deleted.
Caution: Do not transfer the calibration data obtained for glass electrodes attached to sensor
input 1 (or for the temperature option sensor input) to the electrodes you attach to
sensor input 2 (or the sensor input of the RS option)! Recalibrate these sensors to
obtain correct values!
The sensor with the modified parameters is installed when you quit the parameter mask with
EXIT (see the appropriate description at the end of Section 1.1.2).
1-12
METTLER DL77/DL70ES/DL67
02/93
INSTALLATION
Sensors
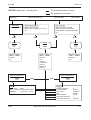
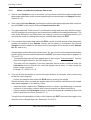
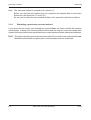
Menu tree
Sensors
DG111-SC
DG101-SC
DG113-SC
DG114-SC
DG115-SC
DM140-SC
DM141-SC
DM142
DP550
DP660
pH
pH
mV
mV
mV
mV
mV
mV
%T
%T
Selection
Delete
Modify
Add
Sensor 1
Sensor 1
Sensor 1
Sensor 1
Sensor 1
Sensor 2
Sensor 2
Sensor 1
Sensor 2
Sensor 2
Sensor parameters
Name
Unit of measurement
Sensor input
Zero point [unit]
Slope [mV/unit]
Temperature [°C]
Date/time
The sensor is
deleted
DG111-SC
pH
Sensor 1
7.0
-59.16
25.0
(02-06-1992 10:15)
Enter new name or select entry from
recommendation menu with SEL
Select another unit of measurement
with SEL
Select another input with SEL
Enter new zero point or let it be
entered through calibration
Sensor names
DG111-SC
DG101-SC
DG113-SC
etc.
Units of meas.
mV
pH
pM
etc.
Sensor inputs
Sensor 1
Sensor 2
Sensor 3
Sensor 4
Enter new slope or let it be entered
through calibration
Enter new temperature
Date/time is entered only through calibration by the titrator!
02/93
METTLER DL77/DL70ES/DL67
1-13
Sensors
1.2.3
INSTALLATION
Add
Select this command if you wish to add a sensor to the sensor list, for instance a
DG111-SC sensor with different calibration parameters or a sensor not yet installed. You can
also add a sensor directly to the list by pressing the <+> (plus) key. You are always shown the
following mask:
Name
Unit of measurement
Sensor input
Zero point [Unit]
Slope [mV/Unit]
Temperature [°C]
Date/time
DG111-SC
mV
Sensor 1
7.0
–59.16
25.0
00–00–0000
00:00
1. Select the sensor name from the recommendation menu or enter the name of the sensor
you wish to install.
Note: If you install, for example, several DG111-SC sensors, you must provide each name
with a different flag to allow the titrator to distinguish between them, e.g. DG111/2.
2. Select the unit of measurement suitable for the sensor from the selection menu.
3. Select the sensor input from the selection menu.
4. Enter the zero point of the sensor.
5. Enter the slope of the sensor.
6. Enter the temperature.
(see explanation of the parameters and note under Modify).
7. The date together with the time for the newly installed sensor is entered here automatically
only after the sensor has been calibrated (see Calibration function, Section 2.3.17).
The sensor with the appropriate parameters is installed when you quit the parameter mask with
EXIT (see the appropriate description at the end of Section 1.1.2).
1-14
METTLER DL77/DL70ES/DL67
02/93
INSTALLATION
1.3
Temperature sensors
Temperature sensors
When you select this menu you are shown the installed temperature sensors with the specified
parameters sensor type and sensor unit:
TEMP
TEMP
TEMP
TEMP
A
B
C
D
Pt100
Pt100
Pt1000
Pt1000
Temp
Temp
Temp
Temp
1
2
1
2
You can neither delete a temperature sensor nor add a new one to the list. You can, however,
install several Pt100 or Pt1000 at the same temperature sensor input (Temp 1 or Temp 2), for
example.
If you select TEMP A, for instance, you are shown the parameter mask of the Pt sensor in which
you can change the parameter values or names:
Name
TEMP A
Sensor type
Pt100
Sensor input
Temp 1
Zero point [°C]
0.0
Date/Time
00–00–0000
00:00
1. You can not change the sensor name: The line will be skipped when the selector bar is
moved.
2. Select the sensor type with SEL: "Pt100" or "Pt1000" (see Section 11.1.7).
3. Select the sensor input with SEL: "Temp 1" or "Temp 2" (see Section 11.1.4).
4. Enter the zero point of the Pt sensor.
The zero point of a Pt sensor is the deviation of a measured value from a reference value,
such as 0 °C for an ice bath.
5. You can neither delete nor overwrite the date. It refers to the calibration of the Pt sensor
using the auxiliary function Calibration temperature sensors and is entered here together
with the time automatically (see Section 4.7).
Notes: a. The installed zero point is the theoretical value for a new Pt sensor. You have to
perform a calibration of your sensor if you wish to determine an accurate value.
When calibrating, the zero point is automatically entered here together with the date
(see auxiliary functionCalibration temperature sensors, Section 4.7).
b. As soon as you change a parameter of the temperature sensor, the date and time
are deleted.
02/93
METTLER DL77/DL70ES/DL67
1-15
Temperature sensors
INSTALLATION
The Pt sensor with the modified parameters is installed when you quit the parameter mask with
EXIT (see the appropriate description at the end of Section 1.1.2).
Menu tree
Temperature sensors
Pt100
TEMP A
Pt100
TEMP B
Pt1000
TEMP C
Pt1000
TEMP D
Temp 1
Temp 2
Temp 1
Temp 2
Temperature sensors
Name
Sensor type
Sensor input
Zero point [°C]
Date/time
TEMP A
Pt100
Temp 1
0
00-00-0000 00:00
The name cannot be changed
Select the other type with SEL: Pt1000
Select the other input with SEL: Temp 2
Enter new zero point or let it be entered
through calibration!
Date/time is entered only through
zero-point calibration by the titrator
1-16
METTLER DL77/DL70ES/DL67
02/93
INSTALLATION
1.4
Auxiliary reagents
Auxiliary reagents
When you select this menu you receive the installed auxiliary reagents with the specified
parameters dispensing rate and auxiliary output. An auxiliary reagent is a solvent that is
dispensed using a time-controlled device, e.g. a diaphragm pump or an electromagnetic valve.
(You will find the representation of the menu tree at the end of Section 1.4.3).
H2O
CH3OH
CHCl3
etc.
250 mL/min
250 mL/min
250 mL/min
Aux.2
Aux.2
Aux.2
DL67: Only auxiliary reagent H2O is stored in the DL67. You can, however, add auxiliary reagents to the the list (see Section 1.4.3).
If you select H2O, for instance, the list is masked on the right by a selection menu containing
the following commands:
Delete
Modify
Add
1.4.1
Delete
Position the selector bar on this command and confirm with RUN. The mask of the selection
menu disappears, the auxiliary reagent H2O is deleted.
Note: You can also delete an auxiliary reagent directly from the list by pressing the <–> (minus)
key. You can reinstall H2O with the command Add (see Section 1.4.3).
1.4.2
Modify
If you select this command you are shown the parameter mask of the auxiliary reagent in which
you can change the parameter values:
Name
Dispensing rate [mL/min]
Auxiliary output
H2O
250
Aux.2
1. Select the name of the auxiliary reagent from the recommendation menu or enter the name
of the reagent you wish to install in place of H2O.
02/93
METTLER DL77/DL70ES/DL67
1-17
Auxiliary reagents
INSTALLATION
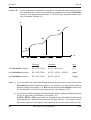
2. Enter the dispensing rate [mL/min] of the device.
Notes: a. The titrator uses the dispensing rate to calculate the volume to be dispensed for
time-controlled pumps or electromagnetic valves (see functions Pump and Rinse,
Sections 2.3.8 and 2.3.9).
b. The dispensing rate of each device must be determined experimentally in advance
for each solvent:
– Add the particular solvent using the dispensing device to a measuring cylinder
within 1 minute (stopwatch) and note the volume.
– Repeat this procedure for, e.g. periods of 20, 30 and 40 seconds.
– Use the different volumes to calculate the mean value per minute and enter this
value.
3. Select the auxiliary output from the selection menu.
Note: The titrator has three auxiliary outputs (Aux. 1, 2 and 3). One auxiliary output of the
titrator is normally assigned to the stirrer, e.g. Aux. 1 (see Section 1.7). You should thus
select only Aux. 2 and/or Aux. 3 for this auxiliary reagent (see Technical data, Section
11.2.2).
If you have attached the sample changer (ST20A or ST20), this unit offers you two additional outputs called "RINSE" and "DOSE".
The auxiliary reagent with the modified parameters is installed when you quit the parameter
mask with EXIT (see the appropriate description at the end of Section 1.1.2).
1.4.3
Add
Select this command when you wish to add an auxiliary reagent to the list. You can also add
an auxiliary reagent directly to the list by pressing the <+> (plus) key. You are always shown
the following mask:
Name
Dispensing rate [mL/min]
Auxiliary output
H2O
250
Aux.2
1. Select the name from the recommendation menu or enter the reagent you wish to install.
Note: If you install several auxiliary reagents with the same name, you must provide each one
with a different flag to allow the titrator to distinguish between them, e.g. H2O/2.
2. Enter the dispensing rate [mL/min] of the device.
1-18
METTLER DL77/DL70ES/DL67
02/93
INSTALLATION
Auxiliary reagents
3. Select the auxiliary output from the selection menu.
The auxiliary reagent with the appropriate parameters is installed when you quit the parameter
mask with EXIT (see the appropriate description at the end of Section 1.1.2).
Menu tree
Auxiliary reagents
250 mL/min
H2O
250 mL/min
CH3OH
250 mL/min
CHCl3
etc.
Selection
Delete
Modify
Add
Aux. 2
Aux. 2
Aux. 2
The auxiliary reagent
is deleted
Auxiliary reagent parameters
Name
H2O
Dispensing rate [mL/min] 250
Auxiliary output
Aux. 2
Enter new name or select
entry from recommendation
menu with SEL
Reagent names
H2O
CH3OH
CHCl3
etc.
Enter new dispensing
rate
Select another auxiliary
output with SEL
02/93
Aux/reagent
Aux. 1
Aux. 2
Aux. 3
ST20 DOSE
ST20 RINSE
METTLER DL77/DL70ES/DL67
1-19
Auxiliary instruments
1.5
INSTALLATION
Auxiliary instruments
When you select this menu you are shown the installed auxiliary units with the specified
parameter auxiliary output. Auxiliary instruments can be pumps, dispensers, valves or relays
that have a 24 V connector. They are controlled by the titrator; the actual function of the units
is unknown to the titrator.
Pump
Dispenser
Valve
Aux.3
Aux.3
Aux.3
If you select pump, for instance, the list is masked on the right by a selection menu containing
the following commands:
Delete
Modify
Add
1.5.1
Delete
Position the selector bar on this command and confirm with RUN. The mask of the selection
menu disappears, the auxiliary unit pump is deleted.
Note: You can also delete an auxiliary instrument directly from the list by pressing the
<–> (minus) key. You can reinstall "Pump" with the command Add (see Section 1.5.3).
1.5.2
Modify
If you select this command you are shown the parameter mask of the auxiliary instrument in
which you can change the parameter values:
Name
Auxiliary output
Pump
Aux.3
1. Select the name from the recommendation menu or enter the name of the device you wish
to install in place of the pump.
2. Select the auxiliary output from the selection menu.
Note: If you have attached the sample changer (ST20A or ST20) this unit offers you an additional auxiliary output called "DISPENSER" (a relay make contact), see note in Section
1.4.2.
1-20
METTLER DL77/DL70ES/DL67
02/93
INSTALLATION
Auxiliary instruments
The auxiliary instrument with the modified parameters is installed when you quit the parameter
mask with EXIT (see the appropriate description at the end of Section 1.1.2).
Menu tree
Auxiliary instruments
Aux. 3
Pump
Aux. 3
Dispenser
Aux. 3
Valve
•
•
Selection
Delete
Modify
Add
The auxiliary
instrument
is deleted
Auxiliary instrument parameters
Name
Pump
Auxiliary output
Aux. 3
Enter new name or select
entry from recommendation
menu with SEL
Select another auxiliary
output with SEL
1.5.3
Instrument names
Pump
Dispenser
Valve
Aux/instrument
Aux. 1
Aux. 2
Aux. 3
ST20 DOSE
ST20 RINSE
ST20 DISPENSER
Add
Select this command when you wish to add an auxiliary instrument to the list. You can also add
an auxiliary instrument directly to the list by pressing the <+> (plus) key. You are always shown
the following mask:
Name
Auxiliary output
Aux.3
1. Select the name from the recommendation menu or enter the name of the device you wish
to install.
02/93
METTLER DL77/DL70ES/DL67
1-21
Auxiliary instruments
INSTALLATION
Note: If you install several auxiliary instruments with the same name, you must provide each
one with a different flag to allow the titrator to distinguish between them, e.g. Pump/2.
2. Select the auxiliary output from the selection menu.
The auxiliary instrument with the appropriate parameters is installed when you quit the
parameter mask with EXIT (see the appropriate description at the end of Section 1.1.2).
1-22
METTLER DL77/DL70ES/DL67
02/93
INSTALLATION
1.6
Auxiliary values
Auxiliary values
When you select this menu you are shown 20 auxiliary value memories: H1 - H20. You can
assign results of a titration such as blank values and potentials to these memories using the
Auxiliary value function. These are then entered automatically here together with the date
(see Section 2.3.15).
Auxiliary value 1 = H1, Auxiliary value 2 = H2, etc..
You can also enter numeric values here as an auxiliary value and you can then call up these
under different functions.
As auxiliary value H1 the ZnSO4 solution with the concentration of 0.1 mol/L is stored that is
used as volumetric solution for the titer determination of EDTA (see METTLER method M007,
Section 10).
H1
H2
etc.
c(ZnSO4)
1.0
0.1
You can neither delete H1 to H20 nor add "H21" to the list. If you select H1, for instance, you
are shown the following parameter mask:
Auxiliary value
ID-text
Value
Date/time
H1
c(ZnSO4)
0.1
00–00–0000
00:00
1. You can not change the name H1: The line will be skipped when the selector bar is moved.
2. Modify eventually the identification text.
3. Modify the value (do not modify it, if you use method M007!).
4. You can not enter the date. It refers to the determination of the auxiliary value using the
method function Auxiliary value and is entered here together with the time automatically
(see Section 2.3.15).
Notes: a. You can delete the data of an auxiliary value only by overwriting it or letting the
titrator overwrite it through the Auxiliary value function.
b. You receive no warning from the titrator if you overwrite an auxiliary value. If you
make full use of the auxiliary value memory you should print out a list of its values
occasionally (see Section 5.1.2).
c. If you modify an auxiliary value parameter, the date/time is deleted.
02/93
METTLER DL77/DL70ES/DL67
1-23
Auxiliary values
INSTALLATION
The auxiliary value with the modified parameters is installed when you quit the parameter mask
with EXIT (see the appropriate description at the end of Section 1.1.2).
Menu tree
Auxiliary values
c(ZnSO4)
H1
1.0
H2
1.0
H3
etc.
0.1
Auxiliary value parameters
H1
Auxiliary value
c(ZnSO4)
ID text
0.1
Value
00-00-0000 00:00
Date/time
The name cannot be changed
Enter new ID-Text or let it be
entered through titration
Enter new value or let it be
entered through titration
Date/time is entered only through
titration by the titrator by means of
the method function Auxiiliary value
1-24
METTLER DL77/DL70ES/DL67
02/93
INSTALLATION
1.7
Titration stands
Titration stands
When you select this menu you are shown the names of six possible titration stands with the
specified parameters stirrer connection and default speed. The names of the titration stands
are permanently installed, in other words you can not modify them.
Stand 1
Stand 2
ST20 1
ST20 2
Free stand
Auto stand
Aux.
Aux.
Aux.
Aux.
Aux.
Aux.
1
1
1
1
1
1
50
50
50
50
50
50
Stand 1
is the titration stand you receive with the standard equipment of the titrator.
The associated stirrer is installed at auxiliary output Aux. 1.
Stand 2
is the second titration stand of a dual titration stand. The associated stirrer
is installed at auxiliary output Aux. 1.
ST20 1
is the first sample changer titration stand. The associated stirrer is installed
at auxiliary output Aux.1.
ST20 2
is the second sample changer titration stand. The associated stirrer is installed at auxiliary output Aux.1.
Free stand
is a titration stand that you have set up independently of the titration stands
mentioned, e.g. if you attach a stirrer to a stand. The associated stirrer is
installed at auxiliary output Aux. 1.
Auto stand
is the name of the titration stand at which you can run a sample series without ever being asked to insert the next sample (see Section 3.1.3). The
associated stirrer is installed at auxiliary output Aux.1.
With this stand you can, for example, use a robot to change the samples.
DL70ES/DL67: "ST20 2" is not listed, as you can not connect a second sample changer.
DL77:
02/93
When two sample changers are connected, one must be a ST20A (see Section 1.8.4).
METTLER DL77/DL70ES/DL67
1-25
Titration stands
INSTALLATION
You can neither delete a titration stand nor add a new one to the list. If you select Stand 1, for
instance, you are shown the following parameter mask:
Name
Stirrer connection
Default speed [%]
Conditioning mode
Stand 1
Aux.1
50
Fix
1. You can not change the name of the titration stand: The line is skipped when the selector
bar is moved.
2. From the selection menu select the stirrer connection to which you wish to attach the stirrer
for titration stand 1.
If you stir with a stirrer that is not attached to the titrator, select here Not to DL: The waiting
times specified under the Stir function are always adhered to within the method. However,
you yourself are responsible for the stirring (see Stir function, Section 2.3.3).
3. Enter the default speed [0-100%] of the stirrer:
• 0 –> the stirrer is inactive;
• 100 –> the stirrer operates at maximum speed.
4. Select the type of conditioning for the Conditioning function: "Fix" or "Flexible" (pertains
only to stand ST20 1 or ST20 2).
Fix:
The ST20A (ST20) conditions with the parameters designated in the Conditioning
function (see Section 2.3.10).
Flexible: The ST20A (ST20) conditions every time it finds a conditioning beaker on the
turntable.
Note: The titration stand in use is always recorded.
1-26
METTLER DL77/DL70ES/DL67
02/93
INSTALLATION
Titration stands
Menu tree
Titration stands
Stand 1
Stand 2
ST20 1
ST20 2
Free stand
Auto stand
Aux. 1
Aux. 1
Aux. 1
Aux. 1
Aux. 1
Aux. 1
50
50
50
50
50
50
Titration stand parameters
Stand 1
Name
Aux. 1
Stirrer connection
50
Default speed [%]
Fix
Conditioning mode
The name cannot be changed
Select another output with SEL
Enter new default speed
Aux/titrn stand
Aux. 1
Aux. 2
Aux. 3
Not to DL
Select other conditoning mode
with SEL: Flexible
02/93
METTLER DL77/DL70ES/DL67
1-27
Peripherals
1.8
INSTALLATION
Peripherals
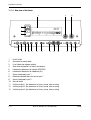
When you select this menu you are shown the names of the units you can attach to the titrator
via the RS232C or CL interface. When you receive the titrator no unit is installed.
Printer
Balance
System
Sample changer
1.8.1
Not
Not
Not
Not
installed
installed
installed
installed
Printer
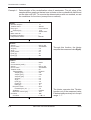
If you wish to attach a printer you have to install it. Select Printer and you are shown the following parameter mask:
Status
Not installed
Printer type
LX800
Paper
Fanfold
Paper format
81/2 * 11"
Automatic form feed
No
Frame lines
Straight
Baud rate
2400
Parity
Even
Number data bits
8 bits
Number stop bits
1 stop bit
1. Select the status with SEL: "Not installed" or "Installed".
2. Select the printer type from the selection menu:
• LX800
(EPSON ESC/P command language)
• HP Deskjet
(HP PCL III command language)
• DICONIX 180si
(extended IBM Proprinter command language)
• IBM
(IBM Proprinter command language)
• Diabolo 630
(ASCII characters).
3. Select the paper with SEL: "Fanfold" or "Single sheet".
• Single sheet: - A form feed is forced at the end of a page.
- If you select Yes for "Automatic form feed" (see Parameter 5), a header
and a footer will be printed on each page of the record.
1-28
METTLER DL77/DL70ES/DL67
02/93
INSTALLATION
Peripherals
Caution: Do not activate the printer's line feed or form feed functions if you have selected
"Automatic form feed" for the "Single sheet" paper mode! On the titrator the
following key combinations will activate the printer functions:
<index + L> causes a line feed,
<index + P> causes a form feed.
4. Select the paper format from the selection menu:
• DIN A4 (width = 21 cm, length = 29,7 cm)
• 81/2 * 11" (width = 81/2 inches, length = 11 inches)
• 81/2 * 12" (width = 81/2 inches, length = 12 inches)
5. Select the automatic form feed with SEL: "Yes" or "No".
• Yes: The printer inserts a form feed at the end of each document.
• No: Each document is separated from the next by a space of 2 lines.
6. Select the frame lines for the record from the selection menu:
• Straight: The printout will be framed with continuous lines.
• Dotted: The printout will be framed with dashed lines; the printing proceeds at twice the
previous rate.
• None (no frame): Printing proceeds fastest with this parameter.
7. Select the baud rate from the selection menu:
• 1200
• 2400
• 4800
• 9600.
8. Select the parity from the selection menu:
• Even
• Odd
• None.
9. Select the data bits with SEL: "8 bits" or "7 bits".
10. Select the stop bits with SEL: "1 stop bit" or "2 stop bits".
Attach the printer to the data output with the designation "Printer". The connection cable is part
of the standard equipment of the titrator (see Section 11.3: Accessories).
02/93
METTLER DL77/DL70ES/DL67
1-29
Peripherals
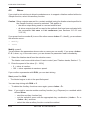
1.8.2
INSTALLATION
Balance
If you wish to attach a balance you have to install it. Select Balance and you are shown the
following parameter:
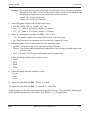
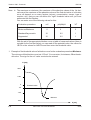
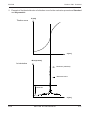
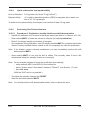
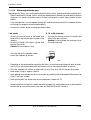
Transmission mode Select from the selection menu
• Unidirectional
• Bidirectional
• Not installed
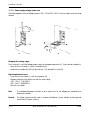
• Unidirectional: In the case of the weight request the balance transfers the current
weight value (without stability detector) continuously and this is
displayed by the titrator. You must confirm this display with RUN for
the value to be accepted.
Data to titrator
Titrator
• Bidirectional:
Balance
Configuration: "Send Cont."
In the case of the weight request the balance transfers the current
weight value when the titrator requests it and this value is then
displayed by the titrator (with stability detector).
On AM, PM and AT balances the weight limits are superimposed on
the balance display (see Section 3.1.1).
The titrator accepts the weight value when you press either the RUN
or the transfer key of the balance.
Command from titrator
Titrator
Balance
Configuration: "Send Stable"
("Send on Transfer")
Data to Titrator
Note:
1-30
a. You can attach every METTLER balance fitted with a CL interface. The data output
of the attached balance must be configured as follows:
• Baud rate:
2400
• Parity:
even
• Operating mode:
"Send Cont." for unidirectional transmission mode
"Send Stable" ("Send on Transfer") for bidirectional
transmission mode.
METTLER DL77/DL70ES/DL67
02/93
INSTALLATION
Peripherals
Notes: b. With AT balances, the following settings are important:
• Unit:
Prt
• Int-FACE:
SENd
bd
PAr
HS
on
g
S.Stb
2400
-EOFF
print/transfer command on
balance unit in g
transmission mode: standby
baud rate: 2400
parity: even
handshake (XON/XOFF) off
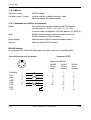
c. With AB, PB and PR balances, the LC-CL cable must be configured as follows:
position 7
2
0
0
7
6
5
7
4
6
4
0
1
4
5
7
2
3
1
2
3
6
• Right switch:
1
3
• Middle switch: position 3
5
• Left switch:
position 4
d. You can also attach SARTORIUS balances with the converter cable RS-CL/
CL-RS (see Accessories, Section 11.3); for this you must select Bidirectional as
the transmission mode. We have tested the following balances:
• BA 3100 P
• E 12000 S
• A 200 S
• MC1 LC 220 S
• MC1 RC 210 P
The data output of the attached balances must be configured as follows:
•
•
•
•
•
12/93
02/93
Data output:
Baud rate:
Parity:
Stop bit:
Weight unit:
ext. print command / irrespective of stability
2400
even
1
g
METTLER DL77/DL70ES/DL67
1-31
Peripherals
1.8.3
INSTALLATION
System
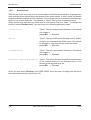
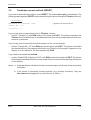
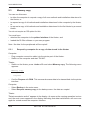
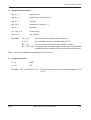
If you wish to attach a terminal or a computer you must first install these devices. Select
System and you are shown the following parameters:
Instrument type
Not installed
Baud rate
4800
Parity
Even
Number data bits
8 bits
Number stop bits
1 stop bit
1. Select the instrument type from the selection menu:
• Color terminal
• Monochrome term.
• Computer
• Not installed.
2. Select the baud rate from the selection menu:
• 1200
• 2400
• 4800
• 9600.
3. Select the parity from the selection menu:
• Even
• Odd
• None.
4. Select the number of data bits with SEL: "7 bits" or "8 bits".
5. Select the number of stop bits with SEL: "1 stop bit" or "2 stop bits".
Terminal
You can use a terminal of the type DEC VT340 or DEC VT241 as a color terminal. As a B/W
terminal a DEC VT330 or DEC VT240 terminal can be used. The cable with order number
201507 can be used as connection cable (see Section 11.3: Accessories).
The terminal should be configured as follows:
• Baud rate:
4800 or 9600 baud
• Parity:
even
• Number data bits:
8
• Number stop bits:
1
1-32
METTLER DL77/DL70ES/DL67
02/93
INSTALLATION
Peripherals
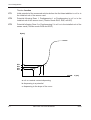
You will find additional information regarding configuration of the terminal and keyboard
operation in Section 7.2.
Computer
The computer requires an RS232C interface (DTE). The baud rate, parity, number of data bits
and number of stop bits are freely selectable. The cables with order numbers 201507 (25 pin)
or 201508 (9 pin) can be used as connection cable (see Section 11.3: Accessories).
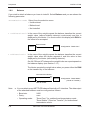
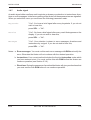
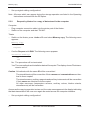
If you have installed a computer, you must confirm the line "Instrument type ... Computer" with
RUN to define the following parameters:
Character set
Select the relevant parameter value with SEL: "ASCII" or "DL".
ASCII: The standard character set (HEX 20 to HEX 7E) for text output
to the computer is used.
DL: The character set in the titrator is used.
Caution: If you select DL, you must define 8 for the number of data
bits!
Send mode
Select the relevant parameter value with SEL: "Spontaneous" or "On
request".
Spontaneous: The titrator sends the computer requests and data as
soon as they are generated (assumes that the computer is ready).
On request: The titrator awaits the appropriate inquiry from the computer before sending a request or data.
Communication
protocol
Select the relevant parameter value with SEL: "Normal" or "Reduced".
Normal: The data received either by the titrator or the computer will
be checked and errors found will be announced with error messages
(safety mechanism active).
Reduced: Data received will neither be checked nor acknowledged,
consequently no error messages will be sent (safety mechanism inactive).
Start/end
characters
Select the relevant parameter value with SEL: "{/<CR>" or "<STX>/
<ETX>".
These start of text and end of text characters for telegrams to be sent
depend on the input possibilities of your computer.
You will find additional information regarding communication between the titrator and the
computer in Section 7.1 and in the Operating Instructions provided with the RS option.
02/93
METTLER DL77/DL70ES/DL67
1-33
Peripherals
INSTALLATION
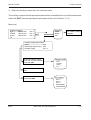
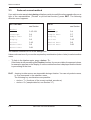
Peripherals: Menu tree for system with computer
Peripherals
Printer
Balance
System
Sample changer
Not installed
Not installed
Not installed
Not installed
System parameter
Instrument type
Baud rate
Parity
Number data bits
Number stop bits
Select instrument
type with SEL
Not installed
4800
Even
8 bits
1 stop bit
Instrument type
Color terminal
Monochrome term.
Computer
Not installed
Select another baud
rate with SEL
Select another parity
with SEL
System parameters
Instrument type
Baud rate
Parity
Number data bits
Number stop bits
Computer
4800
Even
8 bits
1 stop bit
Baud rate system
1200
2400
4800
9600
Parity
Even
Odd
None
Select "7 bits" with SEL
Select "2 stop bits" with SEL
Computer
Character set
Send mode
Communication protocol
Start/end characters
ASCII
Spontaneous
Normal
<STX>/<ETX>
Select "DL" with SEL
Select "On request" with SEL
Select "Reduced" with SEL
Select "{/<CR>" with SEL
1-34
METTLER DL77/DL70ES/DL67
02/93
INSTALLATION
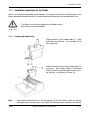
1.8.4
Peripherals
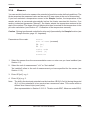
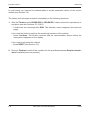
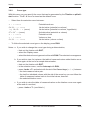
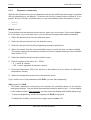
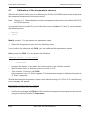
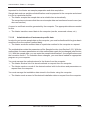
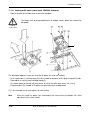
Sample changer
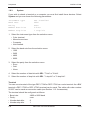
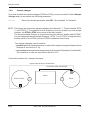
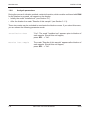
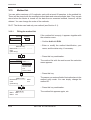
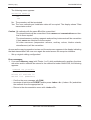
If you wish to attach the sample changer (ST20A or ST20) you have to install it. Select Sample
changer and you are shown the following parameter:
Status
Select the relevant parameter with SEL: "Not installed" or "Installed".
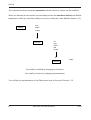
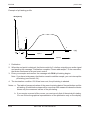
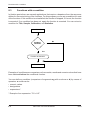
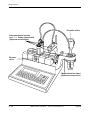
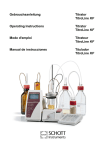
DL77: This titrator can control two sample changers (see Section 1.7: Titration stands "ST20
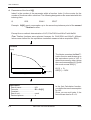
1" and "ST20 2"). The condition for this is that you must use at least one new sample
changer, the ST20A (ST20 is the name of the older model).
The second sample changer is connected to the first with the "dublex cable ST20A".
You can designate the two sample changers ("ST20 1" und "ST20 2") using the identification switch of the ST20A (see the ST20A installation instructions).
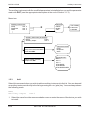
Two sample changers can be used for
• parallel titrations of a sample series on each of the sample changers (Analysis A and
Analysis B, see Section 3.14).
• successive determinations of sample series with a total of 40 samples ("unattended").
The conditions for this are described in Section 3.15.
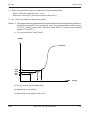
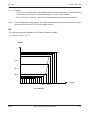
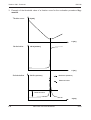
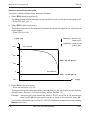
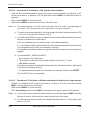
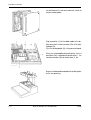
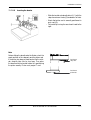
Connection scheme for 2 sample changers
Duplex cable ST20A to ST20/ST20A
Connection cable ST20/ST20A
Titrator
ST20A
ST20 or ST20A
02/93
METTLER DL77/DL70ES/DL67
1-35
Miscellaneous
1.9
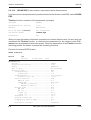
INSTALLATION
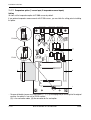
Miscellaneous
When you select this menu you are shown the various submenus and parameters whose
values or names you can or must select or specify:
Date/time format
Enter date/time
Language
Record header
Titrator ID
Routine level
Audio signal
Analysis parameters
1.9.1
Date/time format
You are offered several ways to write the date and time. If you wish to modify the existing
formats, select this parameter and you are shown the following parameters:
Date format
Select the new format from the selection menu.
Time format
Select the other format with SEL.
Note: If you modify the format after one month, for example, the new format will be adopted
for all previously stored data.
1.9.2
Enter date/time
In the course of time you may possibly need to reset the dates. When you select this line you
are shown the following parameters:
Day
Month
Year
Hour
Minute
1-36
Enter the appropriate data.
METTLER DL77/DL70ES/DL67
02/93
INSTALLATION
1.9.3
Miscellaneous
Language
The titrator understands and outputs English, German, French, Italian, and Spanish. Select
this parameter if you wish to change the current language and you are shown the following
parameter:
Active language
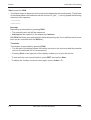
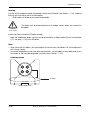
1.9.4
Select the new language from the selection menu.
Record header
Select this parameter if you wish to enter a text that should appear on every record of a titration
method. You are shown the following parameter mask:
You have these two lines available for entry.
Text:
Text:
1.9.5
Titrator ID
Select this parameter if you wish to enter an identification for your titrator – it will appear in
every record header. You are shown the following parameter:
Titrator ID
02/93
Enter an identification.
METTLER DL77/DL70ES/DL67
1-37
Miscellaneous
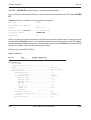
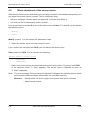
1.9.6
INSTALLATION
Routine level
With the aid of this menu you set up a precondition that determines whether all people who
work with the titrator should also have access to the main menus, in other words be allowed
to delete installation data or modify methods. If, for example, you have temporary staff who can
perform only routine analyses, it is practical to "block" their access to several menus.
When the titrator is delivered you have access to all menus, they are "open". To change this
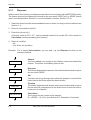
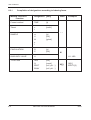
situation, select Routine level. You are shown the following parameter mask:
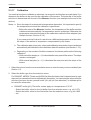
Installation
"Open": The user has access to this menu. If he should
not access it,
press SEL: → "Blocked".
Editor
"Open": The user is allowed to develop, modify, delete,
and print out methods in the Editor menu. If he should
be allowed to only print out the stored methods
press SEL: → "Blocked".
Documentation
"Open": The user has access to this menu. If he should
not access it,
press SEL: → "Blocked".
Analysis: Modify parameters "Open": The user is allowed to modify the parameters
of the current method in the Analysis menu. If he
should not be allowed to do so,
press SEL: → "Blocked".
When you now select Routine in the USER LEVEL menu the user no longer has access to
the menus blocked here (see Section 6).
1-38
METTLER DL77/DL70ES/DL67
02/93
INSTALLATION
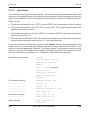
1.9.7
Miscellaneous
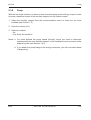
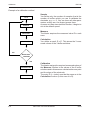
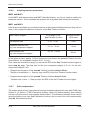
Audio signal
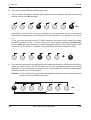
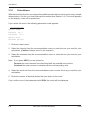
An audio signal either confirms each keystroke or draws your attention to instructions, directions or error messages. In the factory setting of the titrator, all these parameters are signalled.
When you select this menu you are shown the following parameter mask:
Keystroke
"Yes": You hear a brief signal after every keystroke. If you do not
wish to hear this,
press SEL: → "No".
Results
"Yes": You hear a brief signal after every result that appears on the
display. If you do not wish to hear this,
press SEL: → "No".
Messages
"Yes": Your attention is drawn to error messages, directions and
instructions by a signal. If you do not wish to hear this,
press SEL: → "No".
Notes: a. Error messages: You must confirm each error message with RUN and rectify the
error. Otherwise the titrator will not continue with the desired operation.
b. Instructions: Your current method includes the function Instruction under which
you have entered a text. You must confirm this with RUN before the titrator can
continue operation (see Section 2.3.6).
c. Directions: During the sequence of a method the titrator will give you directions that
you must confirm with RUN before it can continue operation.
02/93
METTLER DL77/DL70ES/DL67
1-39
Miscellaneous
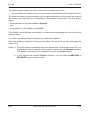
1.9.8
INSTALLATION
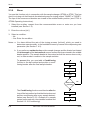
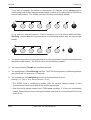
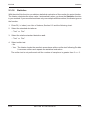
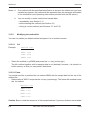
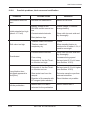
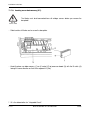
Analysis parameters
During the course of a titration method, certain information, which must be confirmed with RUN
for the titration to proceed, will appear on the display:
• Initially the mask "Installed are" (see Section 3.1).
• After the titration the mask "Results of this sample" (see Section 3.1.3).
These two masks can be excluded to accelerate the titration course. If you select this menu,
you are shown the following parameter mask:
Installation data
"Yes": The mask "Installed are" appears prior to titration of
each sample. Should this not happen,
press SEL: → "No".
Results last sample
The mask "Results of this sample" appears after titration of
each sample. Should this not happen,
press SEL: → "No".
1-40
METTLER DL77/DL70ES/DL67
02/93
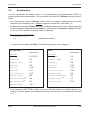
EDITOR
EDITOR
Contents
Page
2.
EDITOR .......................................................................................................
2-3
2.1
2.1.1
2.1.2
2.1.3
Select methods ..........................................................................................
Print .............................................................................................................
Delete ..........................................................................................................
Modify ..........................................................................................................
2-5
2-6
2-7
2-7
2.2
2.2.1
2.2.2
2.2.3
2.2.4
2.2.5
2.2.6
Select functions ......................................................................................... 2-8
Cut ............................................................................................................... 2-8
Copy ............................................................................................................ 2-8
Paste ............................................................................................................ 2-8
Add .............................................................................................................. 2-9
Modify .......................................................................................................... 2-10
Save method ................................................................................................ 2-11
2.3
2.3.1
2.3.2
2.3.3
2.3.4
2.3.5
2.3.6
2.3.7
2.3.8
2.3.9
2.3.10
2.3.11
2.3.12
2.3.12.1
Functions ....................................................................................................
Title ..............................................................................................................
Sample .........................................................................................................
Stir ...............................................................................................................
Measure .......................................................................................................
Temperature ................................................................................................
Instruction ....................................................................................................
Dispense ......................................................................................................
Pump ...........................................................................................................
Rinse ............................................................................................................
Conditioning .................................................................................................
Auxiliary instrument .....................................................................................
Titration ........................................................................................................
DOS (Titration mode: dispensing) ...............................................................
02/93
METTLER DL77/DL70ES/DL67
2-14
2-14
2-15
2-18
2-20
2-22
2-23
2-24
2-25
2-26
2-27
2-31
2-32
2-34
2-1
EDITOR
EDITOR
Page
2.3.12.2
2.3.12.3
2.3.12.4
2.3.12.5
2.3.13
2.3.14
2.3.15
2.3.16
2.3.17
2.3.18
2.3.19
2.3.20
2-2
EQP (Titration mode: equivalence point determination) ..............................
Predispensing ..............................................................................................
DYN (Titrant addition) ..................................................................................
INC ((Titrant addition) ..................................................................................
EQU (Measure mode) ..................................................................................
TFIX (Measure mode) ..................................................................................
Threshold (Equivalence point recognition) ..................................................
EQP range (Equivalence point recognition) .................................................
Termination criteria ......................................................................................
Evaluation criteria ........................................................................................
EP (Titration mode: end point determination) ..............................................
Predispensing ..............................................................................................
Continuous (Titrant addition) .......................................................................
Dynamic (Titrant addition) ............................................................................
End point mode ............................................................................................
Tendency .....................................................................................................
Maximum volume .........................................................................................
LEARN EQP (Learn titration: equivalence point determination) ..................
LEARN EP (Learn titration: end point determination) ..................................
pH/mV-stat ...................................................................................................
Calculation ...................................................................................................
Auxiliary value ..............................................................................................
Titer ..............................................................................................................
Calibration ....................................................................................................
Statistics ......................................................................................................
Record .........................................................................................................
Sync .............................................................................................................
METTLER DL77/DL70ES/DL67
2-36
2-39
2-40
2-41
2-42
2-44
2-45
2-49
2-51
2-51
2-53
2-53
2-54
2-55
2-56
2-57
2-57
2-58
2-60
2-62
2-66
2-70
2-71
2-72
2-75
2-77
2-81
02/93
EDITOR
2.
EDITOR
EDITOR
In this menu you develop titration methods, which you can store. You can modify or delete
these methods or print them out.
A complete titration method comprises sample preparation, dispensing of auxiliary solutions,
stirring and waiting times, the titration itself, calculation of the result and statistics and a record.
In the titrator these substages are defined as functions that are executed in succession in
an analysis. Within a method you can not only modify these functions, but also cut them out
of the defined sequence and hence delete them or paste them in at a different place. You can
also add a new function to a method. Virtually all functions can occur more than once in a
method (see Section 8.5.1).
List of all functions:
02/93
Title
Sample
Stir
Measure
Temperature
Instruction
Dispense
Pump
Rinse
Conditioning
Auxiliary instrument
Titration
pH/mV-stat
Calculation
Auxiliary value
Titer
Calibration
Statistics
Record
Sync
METTLER DL77/DL70ES/DL67
2-3
EDITOR
EDITOR
The individual functions comprise parameters whose values or names can be modified.
When you develop a new method you are always shown the standard method with default
parameters, which you can then modify to suit your needs (see: New Method, Section 2.1).
Method
print
delete
modify
Function
cut
copy
paste
add
modify
Parameter
modify
You modify a method by changing its functions.
You modify a function by changing its parameters.
You will find the representation of the Editor menu tree at the end of Section 2.2.
2-4
METTLER DL77/DL70ES/DL67
02/93
EDITOR
Select methods
2.1
Select methods
You are shown the following submenu in the Editor menu:
Method ID
METTLER methods
User methods
New method
Under method ID you can call up all stored methods,
under METTLER methods only those in the application data base,
and under user methods only those methods available in the user data memory.
Method ID
The method identification is a 4-character, alphanumeric identifier of a method. If you know it,
select Method ID (see Title function, Section 2.3.1).
Enter the method ID and confirm with RUN. The entry will be masked by the following selection
menu:
Print
(Delete)
appears only after ID entry of a user method
Modify
Note: It is possible to enter an asterisk (∗) or a question mark (?) after the first, second or
third letters/numbers of the method ID:
∗: replaces all subsequent letters/numbers. For example, x∗: results in the display of
all methods with an ID beginning with this letter or number.
?: replaces one letter or number within the ID. For example, xy?z will result in the
display of all methods with an ID containing these three letters/numbers.
METTLER methods
When you select this option you receive a list of all methods stored in the application data base
with the identification and the name of the method:
M001 Acid content
M002 Titer of NaOH (0.1 mol/L)
etc.
If you select M001, for instance, the method is masked on the right by the following selection
menu:
Print
Modify
02/93
METTLER DL77/DL70ES/DL67
2-5
Select methods
EDITOR
User methods
If you select this, you are shown a list of methods with the identification and name of the method
if you yourself have stored a method in the user data memory, e.g.
KM59 pH–stat of Gerusil
UB33 H3PO4 in cola drinks
If you then select a method, it is masked on the right by the following selection menu:
Print
Delete
Modify
New Method
If you wish to develop a new method, select New Method. You are shown the standard method
with the following functions:
Title
Sample
Stir
Titration
Calculation
Statistics
Record
All parameters of the functions – except those of the Title function – are defined with default
values or names. You can accept or modify these; you can also add additional functions to this
standard method (see Sections 2.2.3 and 2.2.4).
Note: To set up a method with more than the standard functions, you will find the scheme in
Section 8.8 useful. You can copy this scheme and use it to design the method, which
you can then enter in this menu.
2.1.1
Print
– Position the selector bar on this command and confirm with RUN.
The method together with its functions and the corresponding parameter values will be printed
out on an attached printer.
2-6
METTLER DL77/DL70ES/DL67
02/93
EDITOR
2.1.2
Select methods
Delete
– Position the selector bar on this command and confirm with RUN.
In the selection menu "Delete method" you can confirm or cancel the selection:
– Yes: The method is deleted.
– No: The method remains stored.
Notes: a. METTLER methods can not be deleted.
b. If a user method is entered in the method list of the Analysis menu and not yet
executed, the message "Method is blocked" appears (see also Note c. in the next
section).
2.1.3
Modify
When you select this command you receive a list with all functions included in this titration
method, e.g.
Title
Sample
Measure
Dispense
Stir
Titration
Calculation
Record
Notes: a. You can modify METTLER methods to match your requirements, but you must then
provide them with a new method identification under the Title function in order to
save them (see Section 2.3.1).
b. If you modify a user method or simply wish to copy it and keep the original, you must
give it a new method identification under the Title function (see Section 2.3.1).
c. If you select a user method that is entered in the method list of the Analysis menu
and not yet executed, the message "Method is blocked" appears. To modify this
method, you have to give it a new method identification under the Title function. The
method in the method list remains unchanged (see Sections 3.1 and 3.13).
02/93
METTLER DL77/DL70ES/DL67
2-7
Select functions
2.2
EDITOR
Select functions
When you select the Title function, you are shown this selection menu on the right of the
display:
Modify
You can only modify the Title function since the storage and call options require that it is always
first in the sequence of functions.
If you select the Measure function you are shown the following selection menu on the right of
the display.
Cut
Copy
Paste
Add
Modify
2.2.1
Cut
–
Position the selector bar on the command and confirm with RUN. (You can also cut a
function directly from the list by pressing the <–> (minus) key.)
The Measure function is deleted at this location.
However, it is stored in a buffer memory so that you can paste it in elsewhere if appropriate
(see Section 2.2.3).
The function remains stored until you either cut or modify another function.
2.2.2
Copy
If you merely wish to copy the Measure function in order to paste it in elsewhere,
– position the selector bar on this command and confirm with RUN.
The Measure function remains at this location and is also stored in a buffer memory so that
it can be pasted in elsewhere.
The function remains stored until you either cut or modify another function.
2.2.3
Paste
You now wish to paste in the cut (or copied) Measure function before the Stir function:
– Position the selector bar on the Stir function and press the <=> (equals) key.
2-8
METTLER DL77/DL70ES/DL67
02/93
EDITOR
Select functions
The Measure function now follows the Dispense function:
Title
Sample
Dispense
Measure
Stir
Titration
Calculation
Record
You can paste a function only if you have first cut or copied it. Since the Measure function is
still stored, you can also paste it in ahead of the Titration function, for instance.
2.2.4
Add
You would like to add the Auxiliary value function to the method, in this case before the
Record function:
– Position the selector bar on the Record function and press the <+> (plus) key. You are now
shown a list of all functions (except Title function).
– Position the selector bar on the Auxiliary value function and confirm with RUN.
The Auxiliary value function now follows the Calculation function:
Title
Sample
Dispense
Measure
Stir
Titration
Calculation
Auxiliary value
Record
Note: If you select an improper sequence when pasting or adding the functions, the titrator
sends you an error message (e.g. you can not place the Statistics function before the
Calculation function). However, the error message is not outputted until the method
is saved.
02/93
METTLER DL77/DL70ES/DL67
2-9
Modify functions
2.2.5
EDITOR
Modify
This command shows you a mask with the parameters needed for the function. You can
modify the values or names of these parameters.
Notes: a. The parameters of all functions – except those of the Title function – are defined
by default values or names. These are overwritten as soon as you enter a new value
or name. If you wish to correct a parameter, indicate the appropriate letter (number)
with the cursor (with → or ←), then enter the new one. With SEL, other parameters
may be selected from the recommendation or selection menus (see Section 1.1.2).
b. The method identification, formulae and conditions are checked immediatly after
their entry. If they are incorrect, an error message appears, such as:
Error No.3
Wrong formula
Modify
Terminate
If you confirm "Modify" with RUN, you can change the entry.
If you confirm "Terminate" with RUN, the most recently saved prior entry appears.
c. As soon as you quit a parameter mask with EXIT the values or names are stored.
The selector bar must be located on a parameter here. If you confirm the title line
of a parameter mask with EXIT, the following mask appears:
Save modifications?
Yes
No
If you confirm "Yes" with RUN, the titrator stores the changed values or names.
If you confirm "No" with RUN, the old remain stored.
The display then shows either the method functions or the master parameter mask.
d. If you press a key combination (<index + letter>) to quit the Editor menu, the
following selection menu appears:
Save?
Yes
No
If you confirm "Yes" with RUN, the titrator stores the changed method.
If you confirm "No" with RUN, the old values remain stored.
e. If you do not wish to modify the parameters of a function, after you have checked
them, quit the mask with Exit. The location of the selector bar is immaterial here.
The values of this function remain stored.
2-10
METTLER DL77/DL70ES/DL67
02/93
EDITOR
2.2.6
Save method
Save method
After modification of each function you can save your method.
–
Press EXIT, regardless of the current position of the selector bar. The selection menu
"Save"? appears:
No: Confirm with RUN: The method with the modified parameters is not saved, the old
version is retained.
Yes: Confirm with RUN: The titrator now checks the method and, if several errors are
present, draws your attention to the first one.
– Confirm these messages with RUN in each case.
a. You are shown the list of the method functions with the selector bar on the first incorrect
function. After you have corrected its parameters and saved the method once more
(see above) you are shown the next incorrect function, etc.
b. If you have entered a method identification under the Title function that already exists,
the selection menu "ID exists" appears:
Overwrite ID: Confirm with RUN: The new or modified method is saved, that with
the same identification is deleted.
Modify ID:
Confirm with RUN: You are shown a list of the method functions and
can modify the method ID using the Title function. Then you can
save the method (see above).
If you are not shown any error message when you confirm "Save?" with Yes, the list of user
methods with the stored method appears in the display.
Note: If you press a key combination (<index + letter>) in the function list to quit the Editor
menu, the selection menu "Save?" always appears first.
02/93
METTLER DL77/DL70ES/DL67
2-11
Menu tree
EDITOR
EDITOR: Menu tree
Method ID
Method ID GR41
Method
Print
Modify
Modify method
Title
GR41
Sample
etc.
Function
Modify
2-12
New method
User methods
KM59 pH-stat of Gerusil
UB33 H3PO4 in Cola drinks
etc.
METTLER methods
M001 Acid content
M002 Titer of NaOH (0.1 mol/L)
etc.
Method
Print
Delete
Modify
Title
Method ID
Title
Date/time
User methods
METTLER methods
Method ID
Method
Print
Delete
Modify
Modify method
Title
M001
Sample
Stir
Titration
Calculation
Calculation
Calculation
Calculation
Record
Statistics
Record
Modify method
Title
KM59
Sample
etc.
New method
Title
Sample
Stir
Titration
Calculation
Statistics
Record
Function
Cut
Copy
Paste
Add
Modify
Sample
Number samples
Titration stand
Entry type
ID1
Molar mass M
Equivalent number z
Temperature sensor
M001
Acid content
31-08-1992 13.40
METTLER DL77/DL70ES/DL67
2
Stand 1
Volume U
HCl
36.46
1
Manual
02/93
EDITOR
Menu tree
The method/function is saved
EDITOR: Menu tree – the way back
The method is not saved
Method ID
Method ID
Method ID GR41
User methods
METTLER methods
RUN
RUN
Save?
No
Yes
Save?
No
Yes
Modify method
Title
GR41
Sample
etc.
Modify method
Title
AE38
Sample
Stir
Titration
Calculation
Record
Statistics
Record
Save modifications?
No
Yes
User methods
KM59 pH-stat of Gerusil
UB33 H3PO4 in Cola drinks
AE38 NaOH in regeneration bath
etc.
METTLER methods
M001 Acid content
M002 Titer of NaOH (0.1 mol/L)
etc.
RUN
RUN
RUN
Save?
No
Yes
Modify method
Title
KM59
Sample
etc.
RUN
Title
Method ID
AE38
Title NaOH in regeneration bath
Date/time
10-10-1992 12.28
02/93
New method
Save modifications?
No
Yes
Sample
Number samples
Titration stand
Entry type
ID1
Molar mass M
Equivalent number z
Temperature sensor
METTLER DL77/DL70ES/DL67
3
Stand 1
Weight m
B233/1
40.00
1
Manual
2-13
Title
2.3
EDITOR
Functions
All functions whose parameters you wish to modify have to be selected by the operation
described under Sections 2.1 and 2.2. The following explanations of all functions and their
parameters thus "take place" under the command "Modify function" (see above representation of menu tree).
2.3.1
Title
This function serves to identify the titration method. It must always be first in a method and is
the only function that can occur only once in a method. You need to define its parameters.
You call up the stored method in question using the method identification. The function has no
significance for the progress of the titration.
1. Enter the method ID: letters and/or number, max. 4 characters, e.g. B101.
2. Enter a title for the method: e.g. "NaCl in butter".
3. Date and time are entered here automatically when you save a new or modified method.
You can neither clear nor overwrite this information.
Notes: a. You must adhere to the upper case or lower case notation of the identification during
entries, otherwise the titrator outputs an error message.
b. You can not use any method identifications that start with upper case M as they are
reserved for METTLER methods.
c. Asterisks (∗) and question marks (?) are not allowed in the method identification!
2-14
METTLER DL77/DL70ES/DL67
02/93
EDITOR
2.3.2
Sample
Sample
With the aid of this function you determine the parameters that are needed for the entry of the
sample data such as weight or volume, and whether the temperature of the sample should be
meaured.
Parameters of the mask:
Number samples
Titration stand
Entry type
ID1
Molar mass M
Equivalent number z
Temperature sensor
1. Enter the number of samples n.
You can change n before and after the start of the method (see Section 3.1). A parameter
value of n = 3, for instance, tells you that you have to titrate at least three samples, e.g. in
a titer determination.
2. Select the titration stand at which you wish to determine the samples from the selection
menu (see Section 1.7).
You can change the titration stand before the start of the method (see Section 3.1).
3. Select the type of entry from the selection menu:
a. Weight m
– Enter the lower weight limit [g].
– Enter the upper weight limit [g].
b. Volume U
– Enter the lower volume limit [mL].
– Enter the upper volume limit [mL].
The actual weight or volume are not entered until the samples are prepared or the
titrator requests the amount after the start of the method (see Section 3.1).
If you violate this specified upper or lower limit you will be given a notice.
c. Fixed volume U
– Enter the volume [mL].
You can not change this entry before the start of the method!
02/93
METTLER DL77/DL70ES/DL67
2-15
Sample
EDITOR
4. Enter an initial identification: ID1 (number or name for all samples of this Sample function).
5. Enter the molar mass M.
The auxiliary value "Hj" can be entered instead of the number, provided that the molar
mass has been stored here (see Section 1.6).
You can change the molar mass M before the start of the method (see Section 3.1).
6. Enter the equivalent number z.
For one Sample function you can enter only one molar mass M and one equivalent number z for your calculation. If your sample contains several substances that have to be
determined in the titration through equivalence points, you must enter their molar mass and
equivalent number in constant C under the Calculation function (see Section 2.3.14).
7. Select the temperature sensor from the selection menu if you have attached one (see
Section 1.3); if not, select "Manual". The temperature entered before starting the method
will then be used during the run (see Section 3.1).
With the aid of this parameter, the temperature of the sample solution is automatically
determined or acquired, respectively, before the start of the functions Measure, Titration
and pH/mV-stat. The slope of the pH electrode is then corrected for the temperature in the
pH value calculation (see Section 1.3: Temperature sensors and Section 4.7: Calibration
of the temperature sensors).
Important
The Sample function fulfills two additional tasks within the method sequence:
1. It provides the titrator with information regarding which titration stand is used for titration.
The titration stand is linked with the stirrer connection and the default speed (see Section
1.7).
As soon as the titrator has executed the Sample function, it starts to stir at the default
speed.
If there is no Sample function in a method, the titrator does not stir as it has no information
regarding the titration stand. (A method with the Stir function but without the Sample
function can not be saved for this reason!)
In this case you can enter the command to stir via the auxiliary function Stirrer (see Section
4.2).
2. For the titrator the function is the identifier for the start of a series (n > 1), in other words
all functions that lie between the Title function and the Sample function will not be executed after titration of the first sample.
2-16
METTLER DL77/DL70ES/DL67
02/93
EDITOR
Sample
The identifier for the end of a series is the Statistics function. The titrator repeats all functions
within the loop Sample/Statistics n times. If the Statistics function is missing in your method,
only the first sample will be titrated, i.e. n is set to 1.
Example of a sample series performed with the
standard method.
TITLE
SAMPLE
STIR
TITRATION
CALCULATION
No
Series size
reached?
Yes
STATISTICS
RECORD
Note: You will find examples of methods in Section 8.7.
02/93
METTLER DL77/DL70ES/DL67
2-17
Stir
2.3.3
EDITOR
Stir
With the aid of this function you determine the stirring or waiting times and specify new stirring
speeds.
Caution: It is essential that the Stir function is preceded by a Sample function within a method
(see Sample function, page 16: Important).
1. Enter the speed of the stirrer [%]:
• 0 –> stirrer is inactive;
• 100 –> stirrer operates at maximum speed.
2. Enter the time [s]:
• "0" means that the titrator will not wait at all,
• "10" that it will wait 10 s before it starts the next function: It then stirs at the specified speed
in each case. The running stir time is displayed.
3. Select a condition:
– No.
– Yes: Enter the condition.
Notes: a. You can set a condition for most of the functions. If this is met, the function is
executed; if it is not met the function will be skipped (see Functions with a condition,
Section 8.3 and an additional example under the Record function, Section 2.3.19).
If you have not selected a condition the function is executed.
b. The speed you have specified applies to all following functions up to the next
Sample or Stir function.
c. However, during a titration you can change the specified speed (see Section 3.10).
Example A:
If you would like to continue stirring for some time after sample addition to
dissolve a solid before the titrator starts the next function, you must add the Stir
function after the Sample function.
Speed = e.g.: 60
Time = e.g.: 30.
The titrator stirs for 30 s at 60% maximum speed before it processes the next
function. It continues to stir at this speed until the next Sample or Stir function.
2-18
METTLER DL77/DL70ES/DL67
02/93
EDITOR
Example B:
Stir
If you would like to wait after the sample addition before starting stirring and
before the titrator starts the next function, set
Speed = 0
Time = e.g. 30.
The titrator will not stir for 30 s before processing the next function. This must
be a second Stir function to ensure that the titrator starts to stir:
Speed = e.g.: 70
Time = 0.
The titrator stirs at 70% maximum speed and immediately begins to process the
next function (see example in Section 8.7.1).
02/93
METTLER DL77/DL70ES/DL67
2-19
Measure
2.3.4
EDITOR
Measure
You can use this function to measure the potential of a solution under defined conditions. The
titrator acquires the measured value as raw result E (see notes at the end of this section).
If you have selected a temperature sensor in the Sample function, the temperature of the
sample solution is measured automatically before the titrator executes this function. If no
sensor is attached (parameter "Manual"), the titrator adopts the temperature entered at the
start of the method. The slope of the pH electrode is then corrected for the temperature in the
pH value calculation (see Section 4.7: Calibration of the temperature sensors).
Caution: Stirring is performed under this function only if preceded by the Sample function (see
Sample function, page 16: Important).
Parameters of the mask:
Sensor
Unit of meas.(urement)
∆E [mV]
∆t [s]
t(min) mode
t(max) [s]
Condition
1. Select the sensor from the recommendation menu or enter one you have installed (see
Section 1.2).
2. Select the unit of measurement: "mV" or "As installed".
"As installed" refers to the unit of measurement you have specified for the sensor (see
Section 1.2.2).
3. Enter ∆E [mV]: e.g. 1.
4. Enter ∆t [s]: e.g. 2.
Note: The drift in the electrode potential must be less than ∆E/∆t (0.5 mV/s) during the period
∆t (2 s) if the potential is to be acquired as a measured value. This occurs within a
defined time interval t(min) and t(max).
(See representation in Section 2.3.12.2: Titration mode EQP, Measure mode EQU).
2-20
METTLER DL77/DL70ES/DL67
02/93
EDITOR
Measure
5. Select t(min) from the following menu:
a. Fix: Enter t(min) [s]: e.g. 3.
Instead of a fixed time you can select a condition: The measured value must be greater
or less than a specified set value.
b. E > (greater than) set value: Enter set value [mV, pH, …].
c. E < (less than) set value: Enter set value [mV, pH, …].
6. Enter t(max) [s]: e.g. 30.
Note: If you select 5b (5c) the titrator will start the next function only when the measured
potential E is greater (less) than the set value and the drift condition is satisfied, but at
the latest after t(max).
7. Select a condition:
– No.
– Yes: Enter condition.
Notes: a. The Measure, Temperature, Dispense, Titration and pH-stat functions generate
raw results (see List of designations, Section 8.1).You can
– print these out as such on an attached printer (see Section 2.3.19 and Section
8.1.1 for exceptions).
– incorporate them in the calculation (see Examples of formulae, Section 8.6.1).
– save as a result if you have assigned them to the result R, e.g. R = E (see Section
2.3.14).
b. At the end of a titration only the final results are shown on the display of the titrator,
the raw results can only be printed out.
c. The titrator stores raw results up to the titration of the next sample within a loop (see
Section 8.5.7).
02/93
METTLER DL77/DL70ES/DL67
2-21
Temperature
2.3.5
EDITOR
Temperature
You can use this function to measure the temperature of a solution under defined conditions.
The titrator acquires the measured value as raw result T (see Note a. in Section 2.3.4).
Parameters of the mask:
Sensor
Unit of meas. (urement)
∆T [°C, °F, K]
∆t [s]
t(min) mode
t(max) [s]
Condition
1. Select the temperature sensor from the selection menu (see Section 1.3).
2. Select the unit of measurement from the selection menu: "°C", "°F" or "K".
3. Enter ∆T [°C, °F, K]: e.g. 0.02.
4. Enter ∆t [s]: e.g. 2.
Note: The temperature drift must be less than ∆T/∆t (0.01 °C/s) during the period ∆t (2 s) if
the temperature is to be acquired as a measured value. This occurs within a defined
time interval t(min) and t(max).
5. Select t(min) from the following menu:
a. Fix: Enter t(min) [s]: e.g. 3.
Instead of a fixed time you can select a condition: The measured value must be greater
or less than a specified set value.
b. T > (greater than) set value: Enter set value [°C, °F, K].
c. T < (less than) set value: Enter set value [°C, °F, K].
6. Enter t(max) [s]: e.g. 30.
Note: If you select 5b (5c) the titrator will start the next function only when the measured
temperature is greater (less) than the set value and the drift condition is satisfied, but
at the latest after t(max).
7. Select a condition:
– No.
– Yes: Enter condition.
2-22
METTLER DL77/DL70ES/DL67
02/93
EDITOR
2.3.6
Instruction
Instruction
This function allows you to intervene manually in the sequence of the titration method, in other
words the method is interrupted. The entered text appears at the desired position during the
current method in the display and is supported audibly. The method does not continue until you
confirm the instruction with RUN.
1. Enter the instruction.
2. Select a condition:
– No.
– Yes: Enter the condition.
02/93
METTLER DL77/DL70ES/DL67
2-23
Dispense
2.3.7
EDITOR
Dispense
With the aid of this function you dispense a specified volume of titrant with a METTLER burette.
The titrator acquires the dispensed volume as the raw result VDISP [mL] or QDISP [mmol]
(see List of designations, Section 8.1 and the Measure function, Section 2.3.4).
1. Select the titrant from the recommendation menu or enter one that you have installed (see
Section 1.1).
2. Enter its concentration [mol/L].
3. Enter the volume [mL].
A formula, such as "R1 + 0.5", can be entered instead of a number (R1 is the result of a
Calculation function preceding this function).
4. Select a condition:
– No.
– Yes: Enter the condition.
Example: For a simple back titration, you can add, e.g. the Dispense function to the
standard method:
SAMPLE
Sample
You have added your sample to the titration vessel and started the
titration. The titrator immediately starts to stir.
DISPENSE
Dispense
The titrator dispenses the amount of the selected titrant and acquires
the raw result QDISP.
STIR
Stir
You have set a long stirring time to allow the sample to react with the
titrant before the titrator starts the back titration.
TITRATION
Titration
The titrator starts the back titration with a second titrant and acquires
the raw result Q (consumption of the titrant in mmol up to the equivalence point or endpoint).
CALCULATION
2-24
Calculation
The formula for the content of the sample:
R = (QDISP – Q) ∗ C/m (see Section 8.6: Examples of formulae).
METTLER DL77/DL70ES/DL67
02/93
EDITOR
2.3.8
Pump
Pump
With the aid of this function you select a time-controlled pump at an auxiliary output in order
to pump a specified volume of an auxiliary reagent into the titration vessel.
1. Select the auxiliary reagent from the recommendation menu or enter one you have
installed (see Section 1.3)
2. Enter the volume [mL].
3. Select a condition:
– No.
– Yes: Enter the condition.
Notes: a. You have defined the pump speed [mL/min], which you need to determine
experimentally for each auxiliary reagent, in the Installation menu by means of the
dispensing rate (see Section 1.4.2).
b. If you attach the pump tubing to the wrong connectors, you will evacuate instead
of dispensing.
02/93
METTLER DL77/DL70ES/DL67
2-25
Rinse
2.3.9
EDITOR
Rinse
You use this function only in connection with the sample changer (ST20A or ST20). This has
a built-in rinsing unit that controls the attached pump for rinsing (output "RINSE" or "DOSE").
The tips of the sensors and burettes are rinsed in the middle beaker position (see ST20 or
ST20A Operating Instructions).
1. Select the auxiliary reagent from the recommendation menu or enter one you have
installed (see Section 1.4).
2. Enter the volume [mL].
3. Select a condition:
– No.
– Yes: Enter the condition.
Notes: a. You have defined the rate of the rinsing process [mL/min], which you need to
determine experimentally, in the Installation menu by means of the dispensing rate
parameter (see Section 1.4.2).
b. If you perform a method series on the sample changer and the titrator has titrated
the last sample of the last method, sensor and burette tip are rinsed in the middle
beaker position. The sample beaker is then raised so that the sensor does not dry
out, in other words it remains in the sample solution.
To prevent this, you must add a Conditioning
function to the last method and position a conditioning beaker after the final sample beaker.
TITRATION
CALCULATION
RINSE
No
Series size
reached?
The Conditioning function must then be after the
loop of the last method so that the titrator does not
perform conditioning after every sample determination (see Section 2.3.2: Example of a sample
series performed with the standard method and
Section 2.3.10:Conditioning).
2-26
METTLER DL77/DL70ES/DL67
Ja
STATISTICS
CONDITIONING
02/93
EDITOR
2.3.10
Conditioning
Conditioning
You use this function only in connection with the sample changer (ST20A or ST20). You
determine how often and how long a sensor is kept in a solution with stirring between individual
samples or series to clean it or ensure its operational reliability.
1. Enter the interval (number of samples): e.g. 3.
2. Enter the time [s]: e.g. 60 → After three titrated samples conditioning is performed for
60 s. The running conditioning time is displayed.
3. Rinse: Should electrodes and burette tips be rinsed after conditioning?
– No.
– Yes: Select the auxiliary reagent from the recommendation menu or enter one you have
installed (see Section 1.3).
Enter the volume [mL].
Caution: If you select this parameter the beaker can overflow after some time if you have
inserted only one conditioning beaker in the turntable but condition the sensor
after every sample.
4. Select a condition:
– No.
– Yes: Enter the condition.
Notes
When installing the sample changer titration stand you can select Fix or Flexible as conditioning mode (see Section 1.7).
Fix:
The ST20A (ST20) conditions with the parameters specified in this function (see
below: Note 2).
Flexible: The ST20A (ST20) conditions whenever it finds a conditioning beaker (see below:
Note 3). When titrating, in non-aqueous media for example, this mode allows you
to place additional conditioning beakers where ever necessary during the method
run.
1. Conditioning samples are marked on the sample turntable by red plugs.
02/93
METTLER DL77/DL70ES/DL67
2-27
Conditioning
EDITOR
2. You have selected Fix as conditioning mode:
a. You can follow the above example and insert and mark a beaker with the conditioning
solution after every third sample:
C
C
etc.
If you wish to condition the sensor on completion of a sample series, you must ensure that
the number of samples can be divided by the interval number, e.g. samples = 9, interval
= 3.
If, e.g. you have entered interval = 3 with 5 samples, the sensor and burette tips remain
in the fifth sample solution. To prevent this, you must add an additional Conditioning
function after the loop and insert a conditioning beaker after the last sample beaker (see
Section 2.3.2: Example of a sample series performed with the standard method).
C
+
C
b. You can insert and mark only one beaker with conditioning solution. If this does not directly
follow the third sample, the ST20A searches for this conditioning beaker by rotating
backward. It then conditions the sensor for 60 s. Afterwards, the sample turntable again
rotates forwards to the fourth sample.
Caution: There must be no empty positions between the titration vessel of the last titrated
sample and the conditioning beaker!
C
2-28
etc.
METTLER DL77/DL70ES/DL67
02/93
EDITOR
Conditioning
If you wish to condition the sensor on completion of a sample series, always place a
conditioning beaker after the last sample beaker (number of samples must be divisible by
the interval number!): The ST20A sees the following conditioning beaker:
C
C
If, e.g. you have entered interval = 3 with 5 samples, you must add an additional Conditioning function after the loop and place a conditioning beaker after the last sample
beaker:
+
C
C
c. You have entered 4 for the interval but have erroneously placed a conditioning beaker after
the third sample beaker. The ST20A omits the conditioning beaker!
3. You have selected Flexible as conditioning mode:
a. The method has no Conditioning function: The ST20A recognizes a conditioning beaker
and conditions the sensor for 10 seconds.
b. The method has a Conditioning function with parameters such as
Interval = 4, Time = 30 s, Rinse volume = 5 mL.
• The ST20A finds a conditioning beaker after the second sample beaker. It then
conditions and rinses according to the defined parameters.
• After the fourth sample beaker the ST20A must condition. If it finds no conditioning
beaker, it searches for one by turning backwards (see Note 2b.). It conditions for 30 s and
rinses 5 mL.
02/93
METTLER DL77/DL70ES/DL67
2-29
Conditioning
EDITOR
c. If you would like to condition at liberty during the run, but for a certain time and with a defined
rinse volume,
– add a Conditioning function to the method and
– set the interval to 60, for example, and set the time and rinse volume.
The ST20A must not condition during the sample series if this is done. (Note: you can not
designate more than 60 samples to a method).
2-30
METTLER DL77/DL70ES/DL67
02/93
EDITOR
2.3.11
Auxiliary instrument
Auxiliary instrument
You can use this function to control an auxiliary instrument (dispenser, relay, electromagnetic
valve, etc.) that is attached to a 24 V auxiliary output of the titrator.
1. Select the name of the auxiliary instrument from the recommendation menu or enter one
you have installed (see Section 1.5).
2. Enter the time [s]: It indicates how long the voltage should be applied at the auxiliary output.
A formula may be entered instead of a number, for example, "H5/2" (H5 is a time increment
which has been saved as an auxiliary value, see Section 1.6).
3. Select a condition:
– No.
– Yes: Enter the condition.
02/93
METTLER DL77/DL70ES/DL67
2-31
Titration
2.3.12
EDITOR
Titration
Under this function you determine the mode, control and evaluation of a titration. Depending
on the titration mode, the titrator acquires several measured values and volumes as raw results
(see List of designations, Section 8.1 and Measure function, Section 2.3.4).
If you have selected a temperature sensor in the Sample function, the temperature of the
sample solution is measured automatically before the titrator executes this function. If no
sensor is attached (parameter "Manual"), the titrator adopts the temperature entered at the
start of the method. The slope of the pH electrode is then corrected for the temperature in the
pH value calculation (see Section 4.7: Calibration of the temperature sensors).
Parameters of the mask:
Titrant
Concentration [mol/L]
Sensor
Unit of meas.(urement)
Titration mode
Condition
1. Select the titrant from the recommendation menu or enter one you have installed (see
Section 1.1).
2. Enter its concentration [mol/L].
3. Select the sensor from the recommendation menu or enter one you have installed (see
Section 1.2).
4. Select the unit of measurement: "mV" or "As installed".
"As installed" refers to the unit of measurement you have specified for the sensor (see
Section 1.2.2).
5. Select the titration mode from the selection menu.
DOS (Dispensing)
EQP (Equivalence point titration)
EP (End point titration)
LEARN EQP (Learn titration: equivalence point determination)
LEARN EP (Learn titration: end point determination)
6. Select a condition:
– No.
– Yes: Enter the condition.
2-32
METTLER DL77/DL70ES/DL67
02/93
EDITOR
Titration
Titration: Menu tree
Titrant
Sensor
Concentration
Unit of measurement
Titration mode
Condition
mV
As installed
Titration mode
DOS
EQP
EP
LEARN EQP
LEARN EP
Condition
No
Yes
Enter c
Enter name or
select from recommendation menu
Enter name or
select from recommendation menu
DOS
Dispensing 1
Dispensing 2
EQP
Predispensing 1
Predispensing 2
Titrant addition
Measure mode
Threshold
EQP range
Maximum volume [mL]
Termination at potential
Termination after n EQPs
Termination at slope
Termn after nom. consumption
Combined termn criteria
Evaluation procedure
Steepest jump only
Buffer potential 1
Buffer potential 2
Stop for reevaluation
EP
Predispensing
Titrant addition
End point mode
Tendency
Maximum volume [mL]
Enter mL
Dispensing 1
mL
% nom. content
No
Dispensing 2
Potential
Slope
No
Positive
Negative
Predispensing
mL
% nom. content
No
Addition mode: EP
Continuous
Dynamic
End point mode
EPA
EPR
EPS
02/93
METTLER DL77/DL70ES/DL67
2-33
Titration: DOS
2.3.12.1
EDITOR
DOS (Dispensing)
In this titration mode the titrator acquires not only the raw results mL (VEQ) or mmol (Q) but
also the potential values ET1 and ET2 or ET3 before and after dispensing. The titrator recognizes four different dispensing modes.
Selection menu Dose 1
You can dispense a specified volume. You either enter the number of mL directly or you let the
titrator calculate this if you know the nominal content of the sample to be titrated.
1. Select mL and enter the volume.
A formula, such as "VDISP ∗ 1.2", can be entered instead of a number (VDISP is the volume
dispensed in a preceding Dispense function).
2. Select % nominal content (see Section 8.6.3); you must enter the following values here:
• the metered amount in % of the nominal consumption
• the nominal content
• the conversion constant
You can select this constant from the recommendation
menu.
• the maximum volume [mL]. It is intended as a safeguard: If, for instance, the wrong
constant has been selected excess titrant is not dispensed needlessly.
If you press the HELP key (selector bar is positioned on Conversion constant) the titrator
lists the constants with the corresponding units.
3. No: You do not need this dispensing mode.
Note: With these dispensing parameters the titrator waits for establishment of an equilibrium
in the solution before it acquires the initial potential ET1. It then dispenses and after
reestablishment of equilibrium acquires ET2.
Selection menu Dose 2
You can dispense either to a specified potential or a specified slope of the titration curve.
1. When you select potential you obtain the following parameters:
• Potential: Enter the potential [mV, pH, …].
• Maximum volume [mL]: Enter the volume. It is intended as a safeguard: If, for instance,
the wrong parameters have been selected excess titrant is not
dispensed needlessly.
2-34
METTLER DL77/DL70ES/DL67
02/93
EDITOR
Titration: DOS
2. When you select the slope you obtain the following parameters:
• Slope: Enter the slope [mV, pH,…/mL].
• Maximum volume [mL]: Enter the volume (see point 1).
3. No: You do not need this dispensing mode.
Notes: a. With these dispensing parameters the titrator dispenses dynamically with equilibriumcontrolled acquisition of the measured value (see representation under Section
2.3.12.2: Titration mode EQP: Measure mode EQU): It acquires the potential
values ET1 and ET3.
b. You can link Dose 1 with Dose 2.
E [mV]
ET3
ET3
ET2
ET1
c
b
a
V [mL]
a: mL or nominal content dispensing
b: dispensing to a potential
c: dispensing to the slope of the curve
02/93
METTLER DL77/DL70ES/DL67
2-35
Titration: EQP
2.3.12.2
EDITOR
EQP (Equivalence point titration)
The equivalence point is the point at which exactly the same number of equivalents of titrant
and analyte have reacted. In most cases it is virtually identical to the inflection point of the
titration curve. This inflection point is recognized (EPOT = equivalence point potential) and the
equivalence point calculated (VEQ or Q = mL or mmol consumption up to the equivalence
point).
With this titration mode the titrator also determines the half neutralization value EHNV as a raw
result.
Parameters of the mask:
Predispensing 1
Predispensing 2
Titrant addition
Measure mode
(Equivalence point recognition):
.................................................
Threshold
EQP range
(Termination criteria):
..................................
..................................
..................................
..................................
..................................
Maximum volume [mL]
Termination at potential
Termination after n EQP´s
Termination at slope
Termn (ination) after nom.(inal) consumption
Combined termn (ination) criteria
(Evaluation criteria):
................................
................................
................................
................................
Evaluation procedure
Steepest jump only
Buffer potential 1
Buffer potential 2
Stop for reevaluation
2-36
METTLER DL77/DL70ES/DL67
02/93
EDITOR
02/93
METTLER DL77/DL70ES/DL67
2-37
EDITOR
2-38
METTLER DL77/DL70ES/DL67
02/93
EDITOR
Titration: EQP: Predispensing
A predispensing shortens the titration time. The titrator recognizes four predispensing
modes.
Selection menu Predispensing 1
Under this selection menu you can predispense a certain volume. You either enter the number
of mL directly or you let the titrator calculate this if you know the nominal content of the sample
to be titrated.
1. Select mL and enter the volume.
A formula, such as "VDISP ∗ 1.2", can be entered instead of a number (VDISP is the volume
dispensed in a preceding Dispense function).
2. Select % nominal content (see Section 8.6.3); you must enter the following values:
• the metered amount in % of nominal consumption
• the nominal content
• the conversion constant. You can select this constant from the recommendation menu.
If you press the HELP key (selector bar is positioned on Conversion constant) the titrator
lists the constants with the corresponding units.
3. No: You do not need this kind of predispensing.
Note: The titrator dispenses the titrant in three steps (4/7, 2/7, 1/7 of the specified volume),
which allows optimum calculation of the volume increment added when a dynamic
titration follows. It acquires the potential values ET1 and ET2 (see titration mode DOS,
Section 2.3.12.1).
Selection menu Predispensing 2
You can predispense to either a specified potential or a specified slope of the titration curve.
1. Enter the potential [mV, pH, ...].
2. Enter the slope [mV, pH, .../mL].
3. No: You do not need this kind of predispensing.
Notes: a. The titrant addition in this predispensing mode follows the selected parameters of
the main titration, however, the increments are greater. The titrator also registers
the measured values quicker and acquires the potential values ET1 and ET3 (see
titration mode DOS, Section 2.3.12.1).
b. You can link Predispensing 1 with Predispensing 2.
02/93
METTLER DL77/DL70ES/DL67
2-39
Titration: EQP: DYN
EDITOR
Selection menu Titrant addition
You can select the dynamic (DYN) or incremental (INC) addition mode. You can not decide
the optimum addition mode for your titration until you know what type of titration curve you
have.
DYN
The volume increment added by the titrator changes within the defined limits ∆V(min) and
∆V(max). This should lead to a constant potential difference ∆E per increment.
E [mV]
∆E ~ ∆E(set)
∆E5
∆E4
∆E3
∆V4
∆V3
V [mL]
1. Enter ∆E(set) [mV]: e.g. 10.
2. Select the limits ∆V and enter ∆V(min) (smallest increment) and ∆V(max) (largest increment) as absolute or relative values:
a. Absolute
– Enter ∆V(min) [mL]: e.g. 0.05 (see following page).
– Enter ∆V(max) [mL]: e.g. 0.3.
Notes: a. The smallest increment, that the titrator can add, is 1/5'000 of the burette volume:
1 mL burette –> 0.0002 mL
5 mL burette –> 0.001 mL
10 mL burette –> 0.002 mL
20 mL burette –> 0.004 mL
b. If no predispensing takes place, the titrator adds the first two volume increments
with ∆V(min).
2-40
METTLER DL77/DL70ES/DL67
02/93
EDITOR
2
Titration: EQP: INC
b. Relative
– Enter ∆V(min) [%dosVol]: refers to the volume already dispensed, in other words the
minimum set increment increases during the course of the titration.
– Enter ∆V(max) [%buVol]: refers to the burette volume and remains constant.
Note: If no predispensing takes place, the titrator calculates and dispenses first two volume
increments relative to 10% of the burette volume.
INC
The volume increment added by the titrator remains constant.
1. Enter ∆V [mL], e.g. 0.1.
E [mV]
∆E14
∆E13
∆E12
V [mL]
∆V12
∆V14
∆V = constant
02/93
METTLER DL77/DL70ES/DL67
2-41
Titration: EQP: EQU
EDITOR
Selection menu Measure mode
You can select the equilibrium controlled (EQU) or time controlled (TFIX) measured value
acquisition. This determines the waiting time between addition of the increments. Using EQU
the waiting time is variable, using TFIX it is constant. You can not decide the optimum measure
mode for your method until you know the reaction time of the components and the response
time of the sensor used.
EQU
Before the titrator accepts a measured value, equilibrium must be established in the solution.
The following parameters are responsible for the equilibrium
∆E
potential change of the solution
∆t
within a time
Time limits between the increments are the parameters
t(min)
minimum time
t(max)
maximum time
As soon as the potential change of the solution is smaller than the specified equilibrium
(∆E/∆t), the titrator will acquire the measured value and add the next increment.
This can be established at the earliest at t(min) and should be established at the latest at
t(max). At t(max) the measured value is acquired at all events even if the equilibrium condition
has not yet been met.
Examples for equilibrium conditions
fast titrations
(acid-base titrations
in aqueous media)
slow titrations
(precipitation titrations
in non-aqueous media)
1. Enter ∆E [mV]:
1
0.5
2. Enter ∆t [s]:
1
2
3. Enter t(min) [s]:
3
4
4. Enter t(max) [s]:
15
30
Notes: a. When measuring in EQU, increment addition is rapid in the flat segment of the
titration curve and slow in the steep segment.
b. The titrator acquires the time and the titrant volume together with the potential.
These measured values can be printed after the sample has been titrated (see
Section 2.3.19: Record).
2-42
METTLER DL77/DL70ES/DL67
02/93
EDITOR
Titration: EQP: EQU
E [mV]
164
163
162
∆t = 2 s
161
∆E = 1 mV
a
160
159
∆t = 2 s
158
a
∆E = 1 mV
t(min)
157
156
155
b
154
t (min)
153
b
152
Increment addition
151
Increment addition
t [s]
0
1
t(min)
5 0
1
t(min)
5
7
a: The defined equilibrium condition has not been satisfied.
t(min): The equilibrium condition has not been satisfied after 3 s.
b: The equilibrium condition has been satisfied after 5.4 or 6.9 s for the first time.
02/93
METTLER DL77/DL70ES/DL67
2-43
Titration: EQP: TFIX
EDITOR
TFIX
After each increment addition the titrator waits for the time you have defined before it accepts
the measured value.
1. Enter ∆t [s].
E [mV]
Measured value
Measured value
Measured value
Measured value
Increment addition
Increment addition
Increment addition
t [s]
∆t1 = 3 s
2-44
∆t2 = 3 s
METTLER DL77/DL70ES/DL67
∆t3 = 3 s
02/93
EDITOR
Titration: EQP: Threshold
Equivalence point recognition
The equivalence point recognition with a titration curve depends on the reaction type of the
components and hence on the evaluation procedure (see below this section).
1. In the evaluation procedures Maximum and Minimum an equivalence point is recognized
when the highest (lowest) potential value of the titration curve is greater (smaller) than two
preceding and two subsequent values.
2. In the evaluation procedures Standard and Asymmetric an equivalence point is recognized
when the maximum of the absolute values of the 1st derivative of the titration curve is
greater than two preceding and two subsequent values.
3. In the evaluation procedure Segmented an equivalence point is recognized when the
maximum of the absolute values of the 2nd derivative of the titration curve is greater than
two preceding and two subsequent values.
Note: For the earliest possible recognition of an equivalence point, the titrator requires a
certain number of measurement points.
• The number depends on the evaluation procedure.
• Measurement points from a predispensing are not considered!
Evaluation procedure
Earliest possible
EQP at
Measurement
points necessary
Minimum/Maximum
4th measurement point
6
Standard
4th measurement point
6
Asymmetric
4th measurement point
10
Segmented
5th measurement point
8
An example for the evaluation procedure Minimum: If the third measurement point lies
in the vicinity of the lowest potential value, it will not be recognized as an equivalence
point.
You must or can assist the recognition using two parameters.
Threshold
To prevent small disturbances in the curve being identified as an equivalence point, you must
specify a threshold value: ([+/-mV, pH...], [mV, pH.../mL] or [mV, pH.../mL2]). This must be
exceeded.
Note: a. The maximum value of the threshold should not exceed half the expected maximum
value of the first or second derivative at the equivalence point.
02/93
METTLER DL77/DL70ES/DL67
2-45
Titration: EQP: Threshold
EDITOR
Note: b. The maximum or minimum, the maximum of the absolute values of the 1st derivative and the maximum of the absolute values of the 2nd derivative of a titration
curve all depend on so many factors (solvent, concentration, sensor, type of
reaction, etc.) that you can not define the "right" threshold value until you have
performed the first titration.
You can enter one of the following values for this:
Evaluation procedure
Minimum/Maximum
mV
pH/pM/pX
0
%T
0
0
Standard/Asymmetric
10
0.2
1
Segmented
10
0.2
1
With the aid of the appropriate titration curve or table of measured values (there is
no table for the 2nd derivative) you can read off the potential value, the values for
∆E/∆V or the values for ∆2E/∆V2 and then enter the threshold value.
1. Example of the threshold value of a titration curve for the evaluation procedure Minimum:
The minimum of this titration curve is at -150 mV. You can enter, for instance, -30 as threshold value. The sign for the mV value must also be entered.
E [mV]
+200
+ 100
0
Threshold value
-30
-100
Minimum
-200
V [mL]
2-46
METTLER DL77/DL70ES/DL67
02/93
EDITOR
Titration: EQP: Threshold
2. Example of the threshold value of a titration curve for the evaluation procedures Standard
and Asymmetric:
E [mV]
Titration curve
V [mL]
∆E/∆V [mV/mL]
1st derivative
Maximum (absolute)
Measured value
Threshold
V [mL]
02/93
METTLER DL77/DL70ES/DL67
2-47
Titration: EQP: Threshold
EDITOR
3. Example of the threshold value of a titration curve for the evaluation procedure Segmented:
Titration curve
E [mV]
V [mL]
1st derivative
∆E/∆V [mV/mL]
V [mL]
2nd derivative
2 ∆V22[mV/mL
22
∆
∆ E/
E/∆V [mV/mL ] ]
Maximum (absolute)
Measured value
Threshold value
V [mL]
2-48
METTLER DL77/DL70ES/DL67
02/93
EDITOR
Titration: EQP: EQP range
EQP range
To identify the equivalence point you can also define a potential range. For this you enter two
potential values (the order in which you enter them defines the tendency) to specify the part
of the titration curve – falling or rising – where the equivalence point should be located.
Equivalence points that lie outside this EQP range or which exhibit the opposite tendency are
not registered.
– No.
– Yes: Enter limit A [mV, pH,....].
Enter limit B [mV, pH,....].
A formula, such as "H2 + 50", or a potential stored as an auxiliary value can be entered
instead of a number (see Auxiliary values, Section 1.6 and Auxiliary value function,
Section 2.3.15).
E [mV]
Limit B
EQP
Limit A
Tendency from A to B
V [mL]
Note: The EQP range refers to the titration curve, i.e. it is independent of the evaluation
procedure.
02/93
METTLER DL77/DL70ES/DL67
2-49
Titration: EQP: Termination criteria
EDITOR
Termination criteria
You can determine when a titration should be terminated by selecting six different parameters.
The titrator can abort the titration, either
• after the first of the selected criteria is satisfied or
• after all selected criteria are satisfied.
• An exception is the maximum volume: the titration is always terminated immediately once
this has been reached!
Maximum volume
You must enter the maximum volume [mL]. It is intended as a safeguard: If the titration is faulty
excess titrant is not dispensed needlessly as the titration is always aborted.
Select Termination at potential:
The titrator terminates the titration at the specified potential.
– No.
– Yes: Enter the potential [mV, pH, ...].
A potential stored as an auxiliary value Hj or a formula can be entered instead of a
number (see Auxiliary values, Section 1.6 and Auxiliary value function, Section
2.3.15).
Select Termination after n EQPs:
The titrator terminates the titration after a certain number of equivalence points n have been
found.
– No.
– Yes: Enter n.
Select Termination at slope:
The titrator terminates the titration when the slope of the titration curve falls below a specified
value. The slope of the curve must exceed this absolute value once then fall below it twice to
lead to termination.
– No.
– Yes: Enter the slope [mV, pH, .../mL].
Select Termination after nominal consumption:
The titrator terminates the titration when the added volume is, e.g. 10% above the nominal
consumption up to the equivalence point (see Section 8.6.3).
– No.
– Yes: Enter the termination volume in % of the nominal consumption.
Enter the nominal content.
Enter the conversion constant or select it from the recommendation menu.
If you press the HELP key (selector bar is positioned on Conversion constant) the titrator lists the constants with the corresponding units.
2-50
METTLER DL77/DL70ES/DL67
02/93
EDITOR
Titration: EQP: Evaluation criteria
Select Combined termination criteria:
The titration is terminated only after all the specified criteria have been fulfilled (exception:
maximum volume, see above).
Evaluation criteria
You determine which type of calculation should be used to calculate the equivalence point
found and select the jump of a titration curve or potential values that you wish to have
evaluated. You can combine these parameters.
Evaluation procedures
You can choose the procedure which is suitable for the titration curve from several calculation
modes (see Section 8.4).
Standard
Asymmetric
Segmented
Minimum
Maximum
Evaluation procedure for all S-shaped titration curves
Evaluation procedure for S-shaped, highly asymmetric titration curves
Evaluation procedure for titration curves with individual sections (segmented curve)
Determination of the minimum of a titration curve
Determination of the maximum of a titration curve
Select Steepest jump only:
– No.
– Yes: Only the steepest jump of the titration curve is evaluated by the titrator.
Select Buffer potential 1:
When a buffer potential is selected the titrator not only evaluates any equivalence points
present but also the titrant consumption in mmol (QP1, QP2) or mL (VP1, VP2) up to the
attainment of these potential values (see List of designations, Section 8.1).
– No.
– Yes: Enter buffer potential 1 [mV, pH, ...].
A potential stored as an auxiliary value Hj or a formula can be entered instead of a
number (see Auxiliary values, Section 1.6 and Auxiliary value function, Section
2.3.15).
Select Buffer potential 2:
– No.
– Yes: Enter buffer potential 2 [mV, pH, ...] (see buffer potential 1).
Caution: If you have selected P1 and/or P2, the titrator checks all termination criteria – except
maximum volume – only when the appropriate buffer potentials P1 and/or P2 have
been reached.
With the selection of both buffer potentials, you also define the tendency (from P1
to P2) and the order: If the titrator first finds P2, it will no longer search for P1.
02/93
METTLER DL77/DL70ES/DL67
2-51
Titration: EQP: Evaluation criteria
EDITOR
Select Stop for reevaluation:
The Titration function is interrupted during the run as soon as termination criteria and the
specified condition are fulfilled. This enables you to modify parameters for the equivalence
point recognition (threshold value, EQP range) and for the evaluation (buffer potentials P1 and
P2). All data will be reevaluated with the modified parameters (see Section 3.5).
– No.
– Yes: Enter a condition, for example "neq = 0" (no equivalence point found), see Functions
with a condition, Section 8.3.
2-52
METTLER DL77/DL70ES/DL67
02/93
EDITOR
Titration: EP: Predispensing
2.3.12.3 EP (End point titration)
With this titration mode you titrate to a specified value of the selected unit of measurement.
Caution: Before an end point titration you should calibrate the appropriate sensor!
Parameters of the mask:
Predispensing
Titrant addition
End point mode
Tendency
Maximum volume [mL]
Selection menu Predispensing
Predispensing shortens the time of titration: Under this selection menu you can predispense
a defined volume. You either enter the number of mL directly or you let the titrator calculate
this if you know the nominal content of the sample to be titrated.
1. Select mL and enter the volume.
A formula, such as "VDISP ∗ 1.2", can be entered instead of a number (VDISP is the volume
dispensed in a preceding Dispense function).
2. Select % nominal content (see Section 8.6.3); here you must enter the following values:
• the metered amount in % of the nominal consumption
• the nominal content
• the conversion constant.
You can select this constant from the recommendation
menu.
If you press the HELP key (selector bar is positioned on Conversion constant) the titrator
lists the constants with the corresponding units.
3. No: You need no predispensing.
Notes: a. With subsequent continuous titrant addition, the titrator dispenses the volume in
one step. It acquires the potential values ET1 and ET2 (see Section 2.3.12.1: Titration mode DOS).
b With subsequent dynamic titrant addition, the titrator dispenses the volume in three
steps (4/7, 2/7, 1/7 of the specified volume), which allows optimal calculation of the
increment to be added. It acquires the potential values ET1 and ET2.
02/93
METTLER DL77/DL70ES/DL67
2-53
Titration: EP: Continuous
EDITOR
Selection menu Titrant addition
You select the continuous or dynamic titrant addition.
Continuous
The titrator dispenses the titrant slowly at first then at maximum rate up to a specified control
band [mV, pH,…]. Within the control range the rate diminishes exponentially. In the vicinity of
the end point it adds the increment that you define (the smallest increment that the titrator can
dispense is 1/5'000 of the burette volume).
It measures the initial potential ET1 after 1-3 s and acquires a measured value every 5 seconds
for the table of measured values.
1. Enter control band [mV, pH, ...]: e.g. 250.
2. Enter delay [s]: e.g. 15.
This is the time from attainment of the end point up to the definitive termination of the
titration. If the potential falls below that of the end point during this time, the titrator adds
additional increments.
3. Enter ∆V(min) [mL] : e.g. 0.01.
This is the smallest increment, to be added near the titration end point.
E [mV – pH]
Start of the control range
+200
4
+ 100
5
6
Control band = 250 mV (4.3 pH)
0
7
8
End point
-100
9
-200
10
V [mL]
2-54
METTLER DL77/DL70ES/DL67
02/93
EDITOR
Titration: EP: Dynamic
Dynamic
The conditions that apply to the dynamic titrant addition are the same as those for DYN of the
equivalence point titration EQP (see Section 2.3.12.2).
1. Enter ∆E(set) [mV]: e.g. 10.
2. Enter ∆V(min) [mL] (smallest volume increment): e.g. 0.05.
3. Enter ∆V(max) [mL] (largest volume increment): e.g. 0.3.
If no predispensing is performed, the titrator dispenses the first two volume increments with
∆V(min).
The measured value acquisition is equilibrium controlled (see Section 2.3.12.2: Titration
mode EQP: Measure mode EQU). You must therefore enter the following parameters:
4. ∆E [mV] : e.g. 1.
5
∆t [s] : e.g. 2.
6. t(min) [s] : e.g. 3.
7. t(max) [s] : e.g. 30.
This equilibrium condition applies only in the end point range defined by the following
formula:
EP range = EP ± {1.5 ∗ ∆E(set)}.
Example: If the end point is -30 mV, the condition thus applies for above values of -15 to
-45 mV.
Outside this range the following applies: ∆E (outside) = 4 ∗ ∆E.
If the endpoint is reached, the following applies: ∆E = ∆E/2.
8. Enter delay [s] : e.g. 15.
This is the time from attainment of the end point up to the definitive termination of the
titration. If the potential falls below that of the end point during this time, the titrator adds
additional increments.
02/93
METTLER DL77/DL70ES/DL67
2-55
Titration: EP: End point mode
EDITOR
Selection menu End point mode
You have a choice between three end point titrations.
1. Select EPA (absolute end point):
The absolute end point is the end point value relative to zero on the electrode signal scale.
– Enter EPA (mV, pH, ...).
2. Select EPR (relative end point):
The relative end point is the difference between the electrode signal at the start and end
of the titration.
– Enter EPR (mV, pH, ...).
E [mV – pH]
TENDENCY positive (mV)
negative (pH)
TENDENCY negative (mV)
positive (pH)
Start potential
+ 300
3
+ 200
4
EPR = 310 mV (pH 5.2)
+ 100
5
6
0
7
End potential
EPA = - 30 mV (pH 7.5)
8
-100
V [mL]
3. Select EPS (other end point):
– Enter the end point, e.g. H2:
This end point can be stored as auxiliary value Hj and you can call it up here (see Auxiliary
value function, Section 2.3.15 and Auxiliary values, Section 1.6).
Example: Assuming you have stored the value of "EPOT of H3PO4 at 1st equivalence
point" under H2 and you would now like to titrate to this potential, enter H2.
You can also enter a formula, such as "E + 200" (E is the measured potential of a preceding
Measure function).
2-56
METTLER DL77/DL70ES/DL67
02/93
EDITOR
Titration: EP: Tendency
Tendency
A titration exhibits a positive or negative potential or pH change (see illustration). This has to
be specified by you.
–
Select "Positive" or "Negative".
Caution: A positive potential change means a negative pH change!
Maximum volume
You must enter the volume [mL]. It is intended as a safeguard: If the titration is faulty excess
titrant will not be dispensed needlessly.
02/93
METTLER DL77/DL70ES/DL67
2-57
Titration: LEARN EQP
2.3.12.4
EDITOR
LEARN EQP (Learn titration: equivalence point determination)
If you are not sure what parameters you should enter for the titration mode EQP, select LEARN
EQP.
Titration function: selection of the parameters (example)
Titrant
AgNO3
Concentration [mol/L]
0.01
Sensor
DM140-SC
Unit of meas.(urement)
As installed
Titration mode
LEARN EQP
Condition
No
When you start the method, the titrator executes one function after the other. As soon as it has
completed the Titration function, it calculates the parameters for the titration mode EQP,
stores them and sends the data to the printer. While the parameters of the Titration function
are being printed, the titrator executes the remaining functions.
Printout of a learned EQP titration.
LEARN TITRATION
Method
1e2
Version
30-Sep-1992
10:14
Titration [1]
Titrant ...................................
Concentration [mol/L] .....................
Sensor ....................................
Unit of meas. .............................
Titration mode ............................
Predispensing 1 .......................
Volume [mL] ........................
Predispensing 2 .......................
Potential [mV, pH, ...] ............
Titrant addition .....................
∆E(set) [mV] .......................
Limits ∆V ........................
∆V(min) [%dosVol] ..............
∆V(max) [%buVol] ...............
Measure mode ..........................
∆E [mV] ............................
∆t [s] .............................
t(min) [s] ........................
t(max) [s] ........................
Threshold .............................
Maximum volume [mL] ...................
Termination after n EQPs ..............
n = ...............................
Evaluation procedure ..................
2-58
AgNO3
0.05
DM141-SC
As installed
EQP
mL
0.5
To potential
-16.5
DYN
8.0
Relative
0.5
4.0
EQU
0.5
2.0
20.0
100.0
10.0
10
Yes
1
Standard
METTLER DL77/DL70ES/DL67
02/93
EDITOR
Titration: LEARN EQP
The titrator always titrates the entire volume of the burette used. Thus
– you must select the weight/volume of your sample in accordance with the burette volume.
The titrator calculates the parameters from the response behavior of the sensor, the shape of
the titration curve and with due consideration of the burette volume used. You thus always
obtain
• the relative limits {∆V(min), ∆V(max)} of the dynamic titrant addition DYN
and
• the parameters of the measure mode EQU.
If the titrator finds more than one equivalence point, it calculates the parameters for the one
with the steepest jump.
If the titrator finds no equivalence point, it interrupts the method. You are shown an error message (see Section 3.4).
Notes: a. Since the titrator immediately stores the parameters of the titration mode EQP, you
can titrate a series of samples with the same content (n > 1 in the Sample function).
The statistics calculation then discards the result of the first sample!
b. If your method has several Titration functions, you can select LEARN EQP or
LEARN EP for each titration mode.
c. The earliest possible equivalence point will be recognized if it lies in the vicinity of
the sixth measurement point (measurement points from a pretitration are not
considered, see Equivalence point recognition, page 2-45). If the equivalence point
lies in the vicinity of the fifth point, for instance, it will not be recognized.
02/93
METTLER DL77/DL70ES/DL67
2-59
Titration: LEARN EP
2.3.12.5
EDITOR
LEARN EP (Learn titration: end point determination)
If you are not sure what parameters you should enter for the titration mode EP, select LEARN
EP.
Titration function: selection of the parameter (example)
Titrant
NaOH
Concentration [mol/L]
0.1
Sensor
DG111-SC
Unit of meas.(urement)
As installed
Titration mode
LEARN EP
Condition
No
When you start the method, the titrator executes one function after the other. As soon as it has
completed the Titration function, it calculates the parameters for the titration mode EP, stores
them and sends the data to the printer. While the parameters of the Titration function are being
printed, the titrator executes the remaining functions.
Printout of a learned EP titration.
LEARN TITRATION
Method
Ber
Version
LEARN TITRATION
30-Nov-1992
12:53
Titration [1]
TitrantNaOH
Concentration [mol/L] .....................
Sensor ....................................
Unit of meas. .............................
Titration mode ............................
Predispensing .........................
Volume [mL] ........................
Titrant addition .....................
∆E(set) [mV] .......................
∆V(min) [mL] .......................
∆V(max) [mL] .......................
∆E [mV] ............................
∆t [s] .............................
t(min) [s] ........................
t(max) [s] ........................
Delay [s] ........................
End point mode ........................
Potential [mV, pH, ...] ............
Tendency ..............................
Maximum volume ........................
2-60
0.1
DG111-SC
As installed
EP
mL
1.0
Dynamic
8.0
0.05
0.15
0.5
0.5
2.0
20.0
0
EPA
6.568
Positive
20
METTLER DL77/DL70ES/DL67
02/93
EDITOR
Titration: LEARN EP
The titrator always titrates the entire volume of the burette used. Thus
– you must select the weight/volume of your sample in accordance with the burette volume.
The titrator calculates the parameters from the response behavior of the sensor, the shape of
the titration curve and with due consideration of the burette volume used. You thus always
obtain
• the parameters of the titrant addition Dynamic
and
• the parameter of the endpoint mode EPA.
If the titrator finds more than one endpoint, it calculates the parameters for the one with the
greatest slope.
The titrator always specifies its tendency at a detected endpoint.
If the titrator finds no endpoint, it interrupts the method. You are shown an error message (see
Section 3.4).
Notes: a. Since the titrator immediately stores the parameters of the titration mode EP, you
can titrate a series of samples with the same content (n > 1 in the Sample function).
The statistics calculation then discards the result of the first sample!
b. If your method has several Titration functions, you can select LEARN EQP or
LEARN EP for each titration mode.
02/93
METTLER DL77/DL70ES/DL67
2-61
pH/mV-stat
2.3.13
EDITOR
pH/mV-stat
You use this function to perform a pH-stating. You determine the parameters which assure the
constancy of a potential value, which lead to the termination of the pH-stating and which are
used in the evaluation. The titrator acquires the following raw results (see Measure function,
Section 2.3.4):
a. The titrant consumption in mL (VTOT) or mmol (QTOT) up to termination of the pH-stating.
b. The titrant consumption in mL (VT1, VT2) or mmol (QT1, QT2) up to the attainment of the
specified time limits t1 and t2.
c. The mean consumption in mL/min (VSTAT) or mmol/min (QSTAT) within the time limits t1
and t2 (see Section 8.1).
d. The correlation coefficient CSTAT; this results from the calculation of the mean consumption
through linear regression (see Section 8.1: List of designations).
If you have selected a temperature sensor in the Sample function, the temperature of the
sample solution is measured automatically before the titrator executes this function. If no
sensor is attached (parameter "Manual"), the titrator adopts the temperature entered at the
start of the method. The slope of the pH electrode is then corrected for the temperature in the
pH value calculation (see Section 4.7: Calibration of the temperature sensors).
Parameters of the mask:
Titrant
Concentration [mol/L]
Continuous addition
Sensor
Unit of meas.(urement)
Pretitration
End point (pH-stat)
Control range [mV]
Tendency
(Termination criteria):
..................................
..................................
..................................
..................................
Maximum volume [mL]
t(min) [s]
t(max) [s]
Minimum consumption [mL]
Time span [s]
(Evaluation criteria):
................................
Time limit t1 [s]
Time limit t2 [s]
(Data storage):
Time interval [s]
Condition
2-62
METTLER DL77/DL70ES/DL67
02/93
EDITOR
pH/mV-stat
1. Select the titrant from the recommendation menu or enter one you have installed (see
Section 1.1).
2. Enter its concentration [mol/L].
3. Select continuous addition:
This parameter allows a pH-stating, in which more titrant than will fit in one burette volume
is consumed, to be performed without interruption. For this purpose you use the same
titrant. You must, however, rename it and install it on another drive (see Section 1.1.3).
As soon as the contents of the first burette have been dispensed, the second begins
dispensing. Thus the time required to refill the first burette can be bridged over.
– No.
– Yes: Enter the titrant "2" you have installed.
Enter its concentration [mol/L].
4. Select the sensor from the recommendation menu or enter one you have installed (see
Section 1.2).
5. Select the unit of measurement: "mV" or "As installed".
"As installed" refers to the unit of measurement you have defined for the sensor (see
Section 1.2.2).
6. Pretitration
You select the pretitration if your solution does not yet have the value of the potential you
need for the pH-stating.
– Yes: Enter control band [mV, pH, ...] (see Section 2.3.12.3: Titration mode EP).
– No.
7. End point (pH-stat)
From the selection menu select the absolute or other end point and define the potential
value that should be kept constant during the pH-stating.
– EPA : Enter mV, pH, ... value (see Section 2.3.12.3: Titration mode EP).
– EPS : Enter the end point (see Section 2.3.12.3: Titration mode EP).
8. Control range
As a control range you define a potential value that controls the end point range: The
smaller this value, the faster the titrator reacts to a deviation from the potential value of the
defined end point potential.
Enter control range [mV]: e.g. 2.
9. Select the tendency: "Positive" or "Negative" (see Section 2.3.12.3: Titration mode EP).
The choice of tendency refers to the added titrant. The actual reaction investigated by pHstating always leads to a change in the opposite direction!
02/93
METTLER DL77/DL70ES/DL67
2-63
pH/mV-stat
EDITOR
10. Enter the termination criteria:
a. Maximum volume [mL]: e.g. 40. The entry is intended as a safeguard: If the titration is faulty
excess titrant will not be added needlessly.
b. Minimum time t(min) [s]: e.g. 600.
c.
Maximum time t(max) [s]: e.g. 1800.
d. Minimum consumption [mL]: e.g. 0.05.
e. Time span [s]: e.g. 120.
The titration is terminated when not more than 0.05 mL titrant is consumed within a time
interval of 120 s. This condition can be effective at the earliest after 600 s. After 1800 s the
titration is terminated even if the condition has not been met.
11. Enter the time limits for the evaluation:
a. Time limit t1 [s]: e.g. 300
b. Time limit t2 [s]: e.g. 1200
Note: The time limits are not restricted to the values t1 and t2 entered here. You can calculate,
for instance in additional Calculation functions
• the titrant consumption between different time limits with R = QSTAT (100, 200).
• the titrant consumption up to a different time limit with R = VT (200).
• the correlation coefficient between different time limits with R = CSTAT (300, 600).
In this manner after a pH-stating you can use Calculations in the Analysis menu to
define new time limits for results (see Section 3.12).
12. Enter the time interval [s] for the data storage: e.g. 10.
The current measured value and the associated volume are stored every 10 s. The titrator
can store and print out maximum 300 measured values.
If you have entered an interval that is too small, the titrator first eliminates the values of
the pretitration after 300 measured values. If the limit of 300 measured values is exceeded
again, the titrator shortens the number by half after 300 measured values by leaving every
second measured value in the memory. At the same time it automatically doubles the time
interval.
13. Select a condition:
– No.
– Yes: Enter the condition.
2-64
METTLER DL77/DL70ES/DL67
02/93
EDITOR
pH/mV-stat
Example of pH-stating profile
∆V/∆t [mL/s]
3
2
4
t [s]
1
t(min)
t(max)
1: Pretitration
2: When the end point is attained, the titrator waits for 5 s before outputting an audio signal
and sending the message "Pretitration complete: Please add sample". In the meantime,
the titrator continues to stir and exert control.
3: Enter your sample and confirm the message with RUN: pH-stating begins.
Note: If you have to take away the titration vessel to add the sample, you can interrupt the
pH-stating (see Section 3.4).
4: The termination condition ∆V/∆t has been met, the pH-stating is aborted.
Notes: a. The table of measured values of the record contains data of the pretitration and the
pH-stating. If both titration steps call for more than 300 measured values the titrator
stores only the measured values of the pH-stating.
b. If you require a record of the curves, you receive only that of the actual pH-stating.
You can follow the graphical representation of the pretitration only on the display.
02/93
METTLER DL77/DL70ES/DL67
2-65
Calculation
2.3.14
EDITOR
Calculation
With the aid of this function you can calculate one result R for each sample.
Parameters of the mask:
Result name
Formula
Constant
Result unit
Decimal places
Condition
1. Enter the result name: e.g. NaOH.
2. Select the formula from the recommendation menu or enter the one you need for your
calculation.
3. Select the constant from the recommendation menu or enter the one you need for your
calculation.
4. Select the result unit from the recommendation menu or enter the one you need for your
calculation.
5. Enter the number of places after the decimal point that you require in the result.
6. Select a condition:
– No.
– Yes: Enter the condition.
Notes: a. You have a completely free selection of parameters 2-4 and you can interlink all
available parameters and numeric values (see Sections 8.6.1 and 8.6.2).
b. The following operations are available for calculations:
• Addition:
+
• Subtraction:
–
• Multiplication:
∗
• Division:
/
• Logarithm to the base 10:
lg(x)
• Logarithm to the base e:
ln(x)
• Exponential to the base 10:
pw(x)
• Exponential to the base e:
ex(x)
• Square:
sq(x)
• Square root:
sr(x)
2-66
METTLER DL77/DL70ES/DL67
02/93
EDITOR
Calculation
Notes c. If you press HELP you are shown for
Formula the most common formulae listed with the possible units and for
Constant the most common constants with the corresponding units.
d. You can have the formula as well as the constant stored as an auxiliary value and
enter here as Hj: e.g. R(Ri) = H(Hj) or C(Ci) = H(Hj) (see Auxiliary values, Section
1.6 and Use of indexes, Section 8.2).
e. The titrator checks your entries when you quit the parameter mask with EXIT.
If you have entered a wrong formula or constant, you will immediatly be sent an error
message (see Section 2.2.5: Modify functions, Note b.).
If you have defined raw results (such as R = QDISP) which the titrator can not know,
as a Dispense function did not precede this Calculation function, you will not be
sent an error message until you try to save the method.
Example A:
If you require, for instance, from an NaOH solution that you titrate with HCl not
only the wt% NaOH as the result, but also the mmol consumption of HCl and
the potential value of the equivalence point, you must specify three calculation
functions for this method (see Section 8.1: List of designations, Section 8.2: Use
of indexes, and method M001 in the Tutorial).
Formula
Constant
Unit
1st Calculation function:
R1 = Q
Delete C with CE
it is not needed
[mmol]
2nd Calculation function:
R2 = EPOT
Delete C with CE
it is not needed
[mV]
3rd Calculation function :
R3 = Q ∗ C/m
for C = M/(10 ∗ z)
[%]
02/93
METTLER DL77/DL70ES/DL67
2-67
Calculation
EDITOR
Example B:
For the calculation of a titration curve with 3 equivalence points (acidic mixture
of 3 substances) you also have to define the parameters of three Calculation
functions. The respective constants C1, C2 and C3 are then also needed (see
Use of indexes, Section 8.2).
E
R3
R2
R1
V
Q1
Q2
Q3
Formula
Constant
Unit
1st Calculation function:
R1 = Q1 ∗ C1/m
for C1 = M/(10 ∗ z)
[%]
2nd Calculation function:
R2 = Q2 ∗ C2/m
for C2 = (60.01 ∗ 1000)/1
[ppm]
3rd Calculation function:
R3 = Q3 ∗ C3/m
for C3 = 53.5/1
[mg/g]
Notes: a. You must enter the molar mass M and the equivalent number z of the 2nd and 3rd
Calculation functions as numeric values or insert as Hj if you have stored these as
auxiliary values (see Section 1.6). M and z are defined in the Sample function only
for the calculation of the first equivalence point (see Section 2.3.2).
b. If you do not know the number of the equivalence points, instead of defining indexes
for Q you can have Q identified by a condition, e.g.
Q (200 < EPOT < 300) means that the Q used for the calculation is that whose
equivalence point potential lies between 200 and 300 mV. If the titrator finds 2
equivalence points in this region it calculates the first one (see also Section 8.6.4).
2-68
METTLER DL77/DL70ES/DL67
02/93
EDITOR
Calculation
Notes: c. The titrator stores results until you start a new titration method or switch off the
titrator.
d. If you terminate a titration with RESET, all data recorded up to this point are
evaluated. Non-calculable results (R) are then set to zero (0). If you were to abort
the above titration shortly before the attainment of the second equivalence point,
for instance, you would receive the result R1, but not R2 and R3.
02/93
METTLER DL77/DL70ES/DL67
2-69
Auxiliary value
2.3.15
EDITOR
Auxiliary value
Auxiliary value is an assignment function. The result (R or Ri) or its calculated mean value
(x or x[i]) or a raw result of the titration method is assigned to the auxiliary value Hj and entered
automatically with the date in the auxiliary value memory (see Section 1.6 and Use of Indexes,
Section 8.2).
20 auxiliary value memories are available.
As an auxiliary value you can store, for instance:
• the blank value of a titration with the formula: "H5 = x" (example)
• a raw result, determined under the Dispense, Measure, Temperature, Titration and pH/mVstat functions with the formula: "H6 = VEQ" (example).
You can call up these auxiliary values for the functions
• Titration (value for EPS, values for buffer potentials P1 and P2),
• pH/mV-stat (value for EPS), and
• Calculation.
1. Enter an identification text: e.g. "Blank of DMF".
2. Enter the formula:
"H(Hj) = x(x[i])", if you determine the auxiliary value with more
than one sample, n > 1 and in this case the calculated mean
value is assigned to the Auxiliary value.
Enter the formula:
"H(Hj) = R(Ri)" only if you determine the auxiliary value with one
sample: n = 1.
Enter the formula:
"H (Hj) = E" only if a Measure function precedes the Auxiliary
value function.
As a formula you can also enter, for instance:
"H (Hj) = x[i] + QDISP" or
"H (Hj) = VTOT * 1.5).
3. Select a condition:
– No.
– Yes: Enter the condition.
2-70
METTLER DL77/DL70ES/DL67
02/93
EDITOR
2.3.16
Titer
Titer
Titer is an assignment function: The result (R or Ri) or its calculated mean value (x or x[i]) of
the titration of a titrant is assigned to the titer by the formula t = R1 or t = x[i] and entered
automatically with the date in the appropriate location of the titrant memory (see Section 1.1.2
and Use of indexes, Section 8.2).
1. Select the titrant to which you wish to assign the titer from the recommendation menu or
enter one you have installed.
2. Enter its concentration [mol/L].
3. Enter the formula t =
Enter the formula t =
"x" ("x[i]") if you determine the titer with more than one sample,
n > 1 and in this case the calculated mean value is assigned to
the titer.
"R" ("Ri") only when you determine the titer with one sample:
n = 1.
4. Select a condition:
– No.
– Yes: Enter the condition.
Example of a method for the titer determination of a titrant with a
primary standard: n = 3.
TITRATION
CALCULATION
Calculation
You define the following result: R (or Ri) = m/(VEQ ∗ c ∗ C);
C = M/(1000 ∗ z)
STATISTICS
Statistics
The mean value of the result R (or Ri) is calculated for the 3
samples (see Statistics function, Section 2.3.18).
TITER
Titer
The calculated mean value is assigned to the titer by the formula
t = x or (x[i]).
RECORD
02/93
METTLER DL77/DL70ES/DL67
2-71
Calibration
2.3.17
EDITOR
Calibration
You use this function to calibrate an electrode: its zero point and its slope are calculated. You
determine the buffers to be used for the calibration of the sensor. The potential of the buffer
solutions is determined with the aid of the Measure function (see example at the end of the
section).
Notes: a. Since the slope of an electrode is temperature dependent, it is important to specify
the temperature at which the calibration is performed.
• Before the start of the Measure function, the temperature of the buffer solution
is determined automatically if a temperature sensor is attached. Otherwise the
temperature entered at the start of the calibration method will be adopted (see
Sample function, Section 2.3.2).
If you measure the pH value of a solution at a different temperature at a later date,
the slope of the sensor is temperature compensated by the titrator.
b. The calibration data (zero point, slope and calibration temperature) are transferred
automatically with the date to the installation data of the sensor (see Section 1.2.2).
c. Depending on the number of buffers measured, the titrator performs the following
calibration:
• With one buffer sample (n = 1) it calculates the zero point of the sensor. The slope
remains unchanged.
• With several samples (n > 1) it calculates the zero point and the slope of the
sensor.
1. Select the sensor from the recommendation menu or enter the one you have installed (see
Section 1.2).
2. Select the buffer type from the selection menu:
For DIN/NIST, MERCK Titrisol and INGOLD buffers the titrator has 8 values stored in each
case and you can select these to calibrate pH electrodes. You can enter the values of buffer
solutions you have chosen yourself under "pH, pM, pX (free selection)" to calibrate pH or
ion-selective electrodes.
a. DIN/NIST buffer [pH]: The buffer values apply to a temperature of 25 °C.
– Select the buffer value for the 1st buffer from the selection menu, e.g. pH 1.679.
– Select the buffer value for the 2nd buffer from the selection menu, e.g. pH 6.865
– etc..
2-72
METTLER DL77/DL70ES/DL67
02/93
EDITOR
Calibration
b. MERCK Titrisol buffer [pH]: The buffer values apply to a temperature of 20 °C.
– Select the buffer value for the 1st buffer from the selection menu, e.g. pH 4.
– Select buffer value 2 for the 2nd buffer from the selection menu, e.g. pH 7.
– etc..
c. INGOLD buffer [pH]: The buffer values apply to a temperature of 25 °C.
– Select the buffer value for the 1st buffer from the selection menu, e.g. pH 4.6.
– Select the buffer value for the 2nd buffer from the selection menu, e.g. pH 9.21.
– etc..
d. pH, pM, pX buffers. You have a free choice of maximum eight buffer values.
– Enter the value for the 1st buffer.
– Enter the value for the 2nd buffer.
– etc..
3. Enter Ri (i = index): see Use of indexes, Section 8.2.
4. Enter the minimum slope [mV/unit] , e.g. 53.
5. Enter the maximum slope [mV/unit] , e.g. 61.
Notes: a. The stored buffer values, types a, b. and c, apply to the specified temperature. If you
calibrate at another temperature, these buffer values will be temperature-corrected
automatically and recorded on the printout.
b. You have specified 3 MERCK Titrisol buffers in a calibration method:
first buffer: pH 4,
second buffer: pH 7,
third buffer: pH 9.
When you measure these 3 solutions the order is immaterial. If you measure only
2 solutions, however, you must measure the first and second buffer (pH 4 and
pH 7) in that order otherwise you will obtain wrong calibration data!
If you measure with buffer solutions whose values you have entered under point 2d,
you must keep to the order defined there!
c. If, in a pH calibration, with e.g. these 3 buffer types you obtain a slope that exceeds
the limits you defined, the calibration data of the appropriate sensor are not
entered. The error message "Data not acquired" appears on the record.
02/93
METTLER DL77/DL70ES/DL67
2-73
Calibration
EDITOR
Example of a calibration method
Sample
You define only the number of samples, that is the
number of buffers which you use to calibrate the
electrode, e.g. n = 3. You can leave all other parameters as they are, the titrator ignores them.
As soon as it has executed this function, it begins to
stir at the default speed.
TITLE
SAMPLE
MEASURE
Measure
The titrator acquires the measured value E in each
case.
CALCULATION
Calculation
You define a result: R = E. This stores the 3 measured values of the 3 buffer solutions.
No
Series size
reached?
Yes
CALIBRATION
RECORD
2-74
Calibration
The titrator assigns the acquired measured values of
the Measure function to the values of the 3 buffer
solutions and in this manner calculates the zero point
and the slope of the electrode.
The entry Ri (i = index) must be the same as in the
Calculation function (in this case it is R).
METTLER DL77/DL70ES/DL67
02/93
EDITOR
2.3.18
Statistics
Statistics
With the aid of this function you obtain a statistical evaluation of the results of a series titration.
The titrator calculates the mean value x automatically when you have the Statistics function
in your method. If you nevertheless titrate only one sample with this method, the titrator ignores
the function.
1. Enter Ri (i = index): see Use of Indexes, Section 8.2 and the following chart.
2. Select the standard deviation s:
– "Yes" or "No".
3. Select the relative standard deviation srel:
– "Yes" or "No".
4. Select outlier test
– No.
– Yes: The titrator checks the results in accordance with an outlier test following Grubbs.
It removes outliers and repeats the statistical evaluation.
The outlier test is not performed until the number of samples n is greater than 3: n > 3.
02/93
METTLER DL77/DL70ES/DL67
2-75
Statistics
EDITOR
Example of a titration method for a known acid mixture (2 equivalence points) where the
percent content of both components with corresponding standard deviation is required as
result:
TITLE
Sample
The number of samples is n = 5.
The titrator begins to stir at the default speed as soon
as it has executed this function.
SAMPLE
TITRATION
CALCULATION
CALCULATION
Titration
The titrator acquires the raw results Q1 and Q2.
Calculation
You define the result R (R1) for the evaluation of the
first equivalence point: R = Q1 ∗ C1/m (see Calculation
function, Section 2.3.14).
Calculation
You define the result R2 for the evaluation of the
second equivalence point: R2 = Q2 ∗ C2/m.
No
Series size
reached?
Yes
STATISTICS
STATISTICS
RECORD
2-76
Statistics
The entry Ri (i = index) must be the same as in the
Calculation function:
In the first Statistics function, R,
in the second Statistics function, R2.
The titrator assigns the 5 results R or R2 of the 5
samples to the statistics functions and thus calculates
the mean values x and the corresponding standard
deviations.
METTLER DL77/DL70ES/DL67
02/93
EDITOR
2.3.19
Record
Record
With the aid of this function you determine what data should be recorded where.
Notes: a. If in your method a Record function follows the Statistics function the titrator
records only the selected parameters of the last sample of a titration. If you add a
Record function before the Statistics function, the titrator records the selected
parameters of all samples (see following).
b. If your method has two or more Titration functions and you would like to have a
record of the table of measured values and curve of the first (second or third)
titration, a Record function must follow the Titration function as the titrator stores
only the measured values of the last Titration function (see Examples of methods,
Section 8.7.2).
The titrator stores the raw results of all functions up to the titration of the next sample
within a loop (see Section 8.5.7).
1.
Output unit
In the selection menu choose between:
Printer
Computer
Printer + Computer
Note: Printer is stored as the default parameter (the printer you have installed, see Section
1.8.1).
If you have not installed a printer and/or computer, the function can not be executed.
However, you can leave it in the method since in this case it neither triggers an error
message nor influences the titration.
If you have installed a printer and/or computer, but have not connected it or switched
it on,
• the titrator waits until you switch on the printer and starts to transfer its data,
• the computer sends an appropriate error message.
2.
Short form method
Would you like a record of the method in short form?
Select "Yes" with SEL.
3.
Sample data
Would you like a record of all sample data (ID1, ID2,
molar mass, equivalent number, weight/volume,
correction factor) of the completed titration method?
Select "Yes" with SEL.
02/93
METTLER DL77/DL70ES/DL67
2-77
Record
EDITOR
4.
Raw results last sample
Would you like a record of all raw results such as
VEQ or VDISP of the last sample?
Select "Yes" with SEL.
5.
Results last sample
Would you like a record of all results of the last
sample?
Select "Yes" with SEL.
6.
All results
Would you like a record of all results of the completed
titration method?
Select "Yes" with SEL.
7.
Table of measured values
Would you like a record of the table of measured
values of the last sample?
Select "Yes" with SEL.
8.
E – V curve
Would you like a record of the titration curve potential
vs volume of the last sample?
Select "Yes" with SEL.
9.
∆E/∆V – V curve
Would you like a record of the 1st derivative of the
titration curve potential vs volume of the last sample?
– (The ordinate scale is linear.)
Select "Yes" with SEL.
10. log ∆E/∆V – V curve
Would you like a record of the 1st derivative of the
titration curve potential vs volume of the last sample?
– (The ordinate scale is logarithmic.)
Select "Yes" with SEL.
11. ∆2E/∆V2 – V curve
Would you like a record of the 2nd derivative of the
titration curve potential vs volume of the last sample?
– (The ordinate scale is linear.)
Select "Yes" with SEL.
12. E – t curve
Would you like a record of the titration curve potential
vs time of the last sample?
Select "Yes" with SEL.
13. V – t curve
Would you like a record of the titration curve volume
vs time of the last sample?
Select "Yes" with SEL.
14. ∆V/∆t – t curve
Would you like a record of the titration curve of the 1st
derivative volume vs time of the last sample?
Select "Yes" with SEL.
2-78
METTLER DL77/DL70ES/DL67
02/93
EDITOR
Record
15. Select a condition:
– No.
– Yes: you are shown the following mask:
Condition
Termination after record
If you select "Condition", you must enter a condition.
If you select "Termination after record", you have two possibilities:
– "No" or "Yes".
With this termination parameter you can abort a method when the defined condition is
satisfied.
Example
In your method the number of samples is n = 3.
You wish to abort the method when the titrator finds no equivalence point in one of the
samples but would like to use a recorded table of measured values or titration curve for
possible determination of the reason for this.
The condition in this case is neq = 0 (see Section 8.1: List of designations and Section 8.3:
Functions with a condition).
Your method should comprise the following functions for this:
Title
Sample
Stir
Titration
Calculation
Record (function with condition: table of measured values and titration curve are selected.)
Statistics
Record
02/93
METTLER DL77/DL70ES/DL67
2-79
Record
EDITOR
TITLE
SAMPLE
STIR
TITRATION
No
CALCULATION
Cond. RECORD
Series size
reached?
Yes
No
Record
Output unit .............................. Printer
Table of measured values ....... Yes
E - V curve .............................. Yes
Condition ................................. Yes
Condition .............................. neq = 0
Termination after record ....... Yes
Condition
satisfied?
Yes
STATISTICS
1. The table of measured values is recorded.
2. The titration curve is recorded.
3. The method is aborted.
RECORD
2-80
METTLER DL77/DL70ES/DL67
02/93
EDITOR
2.3.20
Sync
Sync
Under this function you specify the parameters for the synchronization of the titrator with an
external control unit. The synchronization takes place via the system interface.
1. Select the synchronization mode:
– "Send" or "Send/Wait".
a. In the synchronization mode Send the titrator transmits the numeric code you have
defined to the external control unit and then begins to process the next method function
immediately.
b. In the synchronization mode Send/Wait the titrator transmits the numeric code you
have defined to the external control unit and then waits until this sends back the same
code. Only then does the titrator start to process the next method function.
2. Enter the code: A number between 1 and 32!
3. Enter a comment in the space foreseen for it.
This comment appears on the display when the function is executed.
4. Select a condition:
– No.
– Yes: Enter the condition.
Notes: a. You will find additional information regarding the communication between the
titrator and the external control unit in Section 7.
b. Two titrators can also be synchronized by means of the system interface using the
SYNC function (see Operating Instructions "RS232C Interface Description" provided with the RS option).
c. With the DL77, it is possible to use the SYNC function to synchronize the two
method lists in Analysis menus A and B (see Operating Instructions "RS232C
Interface Description" provided with the RS option).
02/93
METTLER DL77/DL70ES/DL67
2-81
ANALYSIS
ANALYSIS
Contents
Page
3.
ANALYSIS ..................................................................................................
3.1
3.1.1
3.1.2
3.1.3
3.1.4
Executing a method .................................................................................. 3-4
Notes on weight entry .................................................................................. 3-9
Notes on method and sample data mask ..................................................... 3-10
Titration sequence ........................................................................................ 3-12
Restarting a previously executed method ................................................... 3-14
3.2
Terminate current method (RESET) ....................................................... 3-15
3.3
Fade out current method .......................................................................... 3-16
3.4
Interrupt current method .......................................................................... 3-17
3.5
Reevaluation .............................................................................................. 3-19
3.6
Modify current method ............................................................................. 3-21
3.7
Sample data .............................................................................................. 3-23
3.8
3.8.1
Method data ............................................................................................... 3-26
Record data ................................................................................................. 3-27
3.9
3.9.1
3.9.2
Display ....................................................................................................... 3-28
Representation ............................................................................................ 3-29
Curve type ................................................................................................... 3-30
3.10
Stirrer ......................................................................................................... 3-31
3.11
Records ...................................................................................................... 3-32
3.12
Calculations ............................................................................................... 3-34
02/93
METTLER DL77/DL70ES/DL67
3-3
3-1
ANALYSIS
ANALYSIS
Page
3.13
3.13.1
3.13.2
3.13.2.1
3.13.2.2
3.13.3
3.13.3.1
3.13.3.2
3.13.3.3
Method list ..................................................................................................
Filling the method list ...................................................................................
Modifying the method list .............................................................................
Cut ................................................................................................................
Paste ............................................................................................................
Processing the method list ...........................................................................
Single method ..............................................................................................
List once .......................................................................................................
List continuous .............................................................................................
3.14
3.14.1
3.14.2
Parallel titrations with the DL77 ............................................................... 3-42
Notes on parallel titrations ............................................................................ 3-43
Changing the Analysis menus ...................................................................... 3-44
3.15
Sample series with 2 sample changers ................................................. 3-45
3-2
METTLER DL77/DL70ES/DL67
3-35
3-35
3-36
3-36
3-36
3-37
3-37
3-37
3-40
02/93
ANALYSIS
3.
ANALYSIS
ANALYSIS
Under this menu you perform the titration with a selected method. The necessary data are
stored as a method in the EDITOR and as resources in INSTALLATION.
You prepare your sample, titrate and receive the result. You have the possibility to effect
entries during the titration or to interrupt it to modify parameter values of the method.
You can enter the methods you wish to run with the sample data weight or volume in advance;
the titrator then calls up the methods in succession and performs the titrations with your help.
An attached sample changer automates this operation.
After every sample determination you can perform additional calculations and print out
measured values or curves that you have not specified under the corresponding method
function.
This menu demonstrates the differing capabilities of the three titrators:
DL67:
Only one method can be processed at a time.
DL70ES: Up to 10 methods can be entered in a list and run automatically in succession.
DL77:
02/93
10 methods can be entered in each of two lists and run in parallel.
METTLER DL77/DL70ES/DL67
3-3
Executing a method
3.1
ANALYSIS
Executing a method
DL67: Menu sequence until the start of a method - with RUN and/or EXIT
Method
Method
Load
Method entry
Method ID
User
(Data entry)
Method data
Sample function No.
ID1
Number samples
Titration stand
Temperature [°C]
Temperature sensor
Molar mass M
Equivalent number z
= RUN
M001
MM
1
HCl
3
Stand 1
25.0
Manual
36.46
1
Sample data
Sample No. 1/2
etc.
Sample data
Sample No.
1/1
ID2
Volume U [mL]
5.0
Minimum [mL]
4.0
Maximum [mL] 6.0
Correction factor f 1.0
Sample data
Sample No. 1/3
etc.
EXIT
Method
M001 MM
Method
Load
Start
Sample data
Method data
Cut
Record data
Installed are
Aux. 1: Stand 1
Sensor 1: DG111-SC
Drive 3: 0.1 mol/L NaOH
3-4
Sample data
Sample No.
ID2
Volume U [mL]
Minimum [mL]
Maximum [mL]
Correction factor f
Current sample
1/1
No. 1/1
5.0
4.0
6.0
1.0
Method/ ID1
ID2
METTLER DL77/DL70ES/DL67
M001/HCl
02/93
ANALYSIS
Executing a method
DL77/DL70ES: Menu sequence until the start of a method - with RUN and/or EXIT
Method
Method
Add
Method entry
Method ID
User
(Data entry)
Method data
Sample function No.
ID1
Number samples
Titration stand
Temperature [°C]
Temperature sensor
Molar mass M
Equivalent number z
= RUN
M001
MM
1
HCl
3
Stand 1
25.0
Manual
36.46
1
Sample data
Sample No.
1/1
ID2
Volume U [mL]
5.0
Minimum [mL]
4.0
Maximum [mL] 6.0
Correction factor f 1.0
Sample data
Sample No. 1/2
etc.
Sample data
Sample No. 1/3
etc.
EXIT
Method
Method
Add
M001 MM
Start
Sample data
Method data
Cut
Record data
Method
M001 MM
Start
Single method
List once
List continuous
Installed are
Aux. 1: Stand 1
Sensor 1: DG111-SC
Drive 3: 0.1 mol/L NaOH
Sample data
Sample No.
ID2
Volume U [mL]
Minimum [mL]
Maximum [mL]
Correction factor f
Current Sample
1/1
No. 1/1
5.0
4.0
6.0
1.0
Method/ ID1
ID2
M001/HCl
DL77: On the right side of each mask (possibly in the side bar) the letter A or B indicates
the selected Analysis menu.
02/93
METTLER DL77/DL70ES/DL67
3-5
Executing a method
ANALYSIS
When you select ANALYSIS, the method list appears together with the selection menu (see
diagram of the sequence on the previous pages). The list is either
• blank, indicating that you must add a method, or
• it contains one or several methods already, indicating that you can start one of them (see
Section 3.13).
DL67: Since you can store only one method in the method list, you load this method (see page
3-8: Caution DL67).
–
Confirm Add (Load) with RUN: The method entry mask appears.
Method ID
Enter the identification ID of the desired method.
If no method with the specified identification is stored in the titrator and
you have installed a computer, the method will be requested from the
computer and added to the method list (see Operating Instructions
provided with the RS option).
User
Enter your name and press RUN.
(Data entry)
appears only, if you have installed a computer. For further details about
the communication between the titrator and computer, see Section 7.1
and the Operating Instructions provided with the RS option.
You are shown the method data mask with the following parameters:
(example: determination of CaCI2, see Sections 3.1.2 and 3.1.3)
Method data
Sample function No.
ID1
Number samples
Titration stand
Temperature [°C]
Temperature sensor
Molar mass M
Equivalent number z
1
Ca457
3
Stand 1
25.0
Manual
110.99
2
1. 1 refers to the first Sample function within the method. You can not change this specification (see also Section 3.1.2).
2. You entered identification 1, which applies to all samples of this method, under the Sample
function. Here, you can modify or delete this entry (see Section 2.3.2).
3. You can modify the number of samples entered under the Sample function (n = 1 to 60).
3-6
METTLER DL77/DL70ES/DL67
02/93
ANALYSIS
Executing a method
4. You can modify the titration stand entered under the Sample function (see Section 1.7).
5. Enter the current temperature of the solutions to be titrated, if you have not attached a
temperature sensor (Temperature sensor: Manual).
6. You can modify the temperature sensor entered under the Sample function.
7. You can modify the molar mass M entered under the Sample function, for example if you
have to determine MgCI2 instead of CaCI2.
8. You can modify the equivalent number entered under the Sample function.
If you confirm one of the parameters of the method data mask with RUN, you are shown the
sample data mask (see also Section 3.1.2):
Sample data
Sample No.
ID2
Weight m [g]
Minimum [g]
Maximum [g]
Correction factor f
1/1
0.0
0.1
0.2
1.0
1. 1/1 refers to the first Sample function and the first sample and can not be changed (see
Section 3.1.2).
2. Enter an identification for this sample.
3. Enter the weight m [g] within the limits specified in the Sample function or have it transferred by an attached balance (see Section 3.1.1).
(Sample preparation: weigh in CaCI2 and add 40 mL deion. H2O).
4. You can not change the minimum and maximum values specified in the Sample function.
5. For every sample you can enter a value which will be calculated, if you incorporate f in the
formula of the Calculation function.
Example: Each sample has a different,known moisture content,which can be compensated by incorporation of factor f.
1st sample: moisture content = 4% –> f = 0.96 –> R = Q * C/(m*f)
2nd sample: moisture content = 3% –> f = 0.97 –> R = Q * C/(m*f)
Once you have confirmed the entries with RUN, you will be shown the sample data mask for
the second, then the third sample, in order to enter the weight, before the following selection
menu appears:
02/93
METTLER DL77/DL70ES/DL67
3-7
Executing a method
ANALYSIS
DL77/DL70ES
DL67
see Section
Method
Add
Start
Sample data
Method data
Cut
Record data
3.1,3.13.1
3.1,3.1.4,3.13.3
3.7
3.8
3.12.2.1
3.8.1
see Section
Method
Load
Start
Sample data
Method data
Cut
Record data
3.1,3.13.1
3.1.4
3.7
3.8
3.12.2.1
3.8.1
You can select all menus or execute all commands of this selection menu before starting the
method.
Caution DL67: If you now confirm Load, the titrator will automatically load the same method.
Modified method data and entered sample data are deleted! The command
allows a "new" method to be loaded if you modify the identification of the old
one.
–
Confirm Start with RUN.
The following selection menu appears (not on the DL67, see page 3-4: Menu sequence):
Start
Single method
List once
List continuous
–
Confirm Single method with RUN.
You are shown the installed resources, to check if your installation matches this information.
Notes: a. If you have not installed any resources, you are shown the error message
"Installation data missing for" (e.g. 1 mol/L AgNO3).
b. If you have excluded the appearance of "Installation data" in Analysis parameters,
the mask "Installed are" will not appear (see Section 1.9.8).
c. Up to this mask, EXIT or a key combination (index + letter) can be used to leave the
menu sequence before the start of the actual titration. Values entered up to this point
are saved.
If you confirm the installation data with RUN, the titrator will process the method.
3-8
METTLER DL77/DL70ES/DL67
02/93
ANALYSIS
3.1.1
Executing a method
Notes on weight entry
a. If you violate the upper or lower weight limits, but nevertheless confirm this entry with RUN,
you are shown the following message:
Entry outside limits
Modify entry
Save entry
If you confirm "Modify entry" with RUN you are again shown the sample data mask to allow
you to change the weighing.
If you confirm "Save entry" with RUN, the titrator follows the menu sequence.
b. If you have the weight transferred by a balance, press SEL. You are shown the mask
Weight
0.00000 → (0.13460)
Accept weight
– When the weight value is stable, confirm "Accept weight".
If the weight is below the minimum, three minus signs (- - -) appear after "Weight", if it is
above the maximum three plus signs (+ + +) are displayed. You can modify the weighing
or confirm it (see Note a).
c. If you have selected the bidirectional transmission mode, you can accelerate the entry
process:
– Press SEL at the weight entry "0.0000" in the first sample data mask.
The sample number, e.g. no. 1.1 is faded in on AT, AM, and PM balances.
– Press the TARA key, so that the current weight appears on the display of the balance.
With these balances the weight limits also appear so that you can change the weight if
need be.
– Confirm the weight transfer with the Print key of the balance: the titrator automatically
readies itself for the weight entry of the next sample.
In this manner you can enter the weight values of all samples of a method without pressing
a key of the titrator.
d. If you have the "Mettler DataPac-M" connected to AM or PM balances, you can enter the
ID2 on this.
– Press <CLEAR>,
– enter lD2,
– press <ENTER>.
02/93
METTLER DL77/DL70ES/DL67
3-9
Executing a method
3.1.2
ANALYSIS
Notes on method and sample data mask
a. If there is no Sample function in a method, you are shown neither the method data mask,
the sample data mask nor the request regarding the current sample (see Sample function,
Section 2.3.2).
b. If the method has two Sample functions the method data mask reappears after confirmation with RUN. In this case a 2 follows Sample function No..
c. If you have selected "Fixed volume" in the Sample function and have specified the volume,
only ID2 and the correction factor can be entered or modified in the sample data mask. The
entry limits "Minimum" and "Maximum" are missing. If you do not need these entries, you
can skip this mask by quitting the previous method data mask with EXIT.
d. If you confirm the sample data mask with RUN, a mask for each sample of the designated
number of samples in this Sample function will be shown in succession (for several
Sample functions, masks for the other function’s samples will be shown as well: Sample
No. 2/1 and so on).
Sample data need not be entered at this point. You can circumvent the sample data masks
by leaving the previous method data mask with EXIT (see menu sequences on pages 3-4,
3-5 und 3-11).
• The sample data mask will then appear prior to the request "Current sample". You can
enter the weight/volume for the first sample only.
• The mask will not reappear if you have specified results within a method under the
Calculation function that do not need the weight/volume entry, in other words the
titrator needs no entries.
Example: R = VEQ or R = Q
e. If you must enter the weight or volume during the titration, for example, when no time may
be lost by back-weighing,
– confirm the sample data mask with RUN without entering the weight.
Since the titrator does not need the sample data until it performs calculations, the sample
data mask reappears in the display, either
• when the titrator reaches the Titration function in which a predispensing to nominal
content or a termination criterion after nominal content has been specified or
• when it reaches the Calculation function in which the weight m is needed for the result
(see Examples of methods, Section 8.7.1).
You also have the possibility to fade out the titration with EXIT and enter the weight in the
selection menu Sample data (see Sections 3.3 and 3.7).
3-10
METTLER DL77/DL70ES/DL67
02/93
ANALYSIS
Executing a method
Example of the menu sequence when weight volume must be entered during the active
method:
Method
Method entry
Method ID
User
(Data entry)
Method data
Sample function No.
ID1
Number samples
Titration stand
Temperature [°C]
Temperature sensor
Molar mass M
Equivalent number z
Method
Add*
*DL67: Load
CALC
UB
1
Ca457
3
Stand 1
25.0
Manual
110.99
2
EXIT
Method
CALC UB
Method
Add*
Start
Sample data
Method data
Cut
Record data
Method
CALC UB
Start
Single method
List once
List continuous
*DL67: Load
DL67: This mask
does not
appear
Installed are
Aux. 1: Stand 1
Sensor 2: DM141-SC
Drive 3: 0.1 mol/L AgNO3
The method
is processed
Sample data
Sample No.
ID2
Weight m [g]
Minimum [g]
Maximum [g]
Correction factor f
1/1
B1012
0.1346
0.1
0.2
1.0
Current sample
No. 1/1
Method/ ID1
ID2
02/93
METTLER DL77/DL70ES/DL67
CALC/Ca457
B1012
3-11
Executing a method
3.1.3
ANALYSIS
Titration sequence (excerpt of the described method)
Sample data
Sample No.
ID2
Weight m [g]
Minimum [g]
Maximum [g]
Correction factor f
1/1
B1012
0.1346
0.1
0.2
1.0
The titrator processes the method and has reached
the Sample function:
– Enter ID2.
– Weigh in the sample and enter the weight for the
first sample or have it transferred by a balance.
– Press RUN.
Current Sample
No. 1/1
Method/ ID1
ID2
CALC/Ca457
B1012
Stir function
Wait time [s]
Speed [%]
mV
The titration vessel must now be attached to the
titration stand.
The titrator stirs at 80% maximum speed and waits
30 s (CaCI2 is dissolved during this time).The running time is shown.
30
80
The titrator processes the Titration function.
E – V curve
mL
Results of this sample
CALC Ca determination
Sample 1/1
R1/1
= 29.46 % CaCl2
Sample data
Sample No.
ID2
Weight m [g]
Minimum [g]
Maximum [g]
Correction factor f
1/2
B1013
0.1405
0.1
0.2
1.0
Current sample
No. 1/2
Method/ ID1
ID2
3-12
The first sample has been titrated. You are shown
the result of this sample.
• If you have excluded "Results of this sample" from
appearing using Analysis parameters, the titrator will skip this information (see Section 1.9.8).
With RUN the sample data mask for the second
sample appears:
– Enter ID2.
– Weigh in the sample, enter the weight or have it
transferred by a balance.
– Press RUN.
You are "requested“ to insert the second sample,
etc.
CALC/Ca457
B1013
METTLER DL77/DL70ES/DL67
02/93
ANALYSIS
Executing a method
Notes: a. The titrator acquires the running time for each processed method as the raw result
TIME (see List of designations, Section 8.1 and Karl Fischer Titrations, Section
10.2.7):
Start of time acquisition: see diagram page 3-11: "The method is processed".
End of time acquisition: The result list appears on the display (single method)
provided that "Results of this sample" has been confirmed.
b. If you have specified Auto stand as the titration stand in your method, the mask
"Current sample" will not appear in the titration run. This means that the next sample
determination will be started without a RUN confirmation. It is either not necessary
to change the sample, or it will be changed by a robot driven by the Sync function.
At the end of a titration method you are shown the results for all samples on the display only
when the titrator has transferred all data to the printer (only when the method has Record as
its last function). During this operation the message "Output unit writing record" appears.
Note: All results of a learn titration are marked on the display with an exclamation mark (!).
If you confirm the result list with RUN, the selection menu appears:
DL77/DL70ES
DL67
see Section
Method
Add
Start
Sample data
Display
Records
Calculations
Method data
Cut
Record data
3.1/3.13.1
3.1/3.1.4/3.1 3.3
3.7
3.9
3.11
3.12
3.8
3.13.2.1
3.8.1
see Section
Method
Load
Start
Sample data
Display
Records
Calculations
Method data
Cut
Record data
3.1/3.1.4
3.1/3.1.4
3.7
3.9
3.11
3.12
3.8
3.13.2.1
3.8.1
You can select all menus or execute all commands of this selection menu before starting the
next method.
02/93
METTLER DL77/DL70ES/DL67
3-13
Executing a method
ANALYSIS
Note: The executed method is marked by an asterisk (*).
Before you start the next method you can reexamine the sample data or have them
printed out (see Sections 3.7 and 3.8.1).
As soon as you start the next method all data of the executed method are deleted.
3.1.4
Restarting a previously executed method
If you select the previously used method and confirm Start, the titrator reloads this method
automatically. In doing this, stored modified method data are retained, whereas sample data
entered for the previous series are deleted and must be reentered forthe subsequent samples.
DL67: The titrator reloads a previously executed method if you confirm this method with Load.
Modified method data and previously entered sample data are all deleted.
3-14
METTLER DL77/DL70ES/DL67
02/93
ANALYSIS
3.2
Terminate method
Terminate current method (RESET)
If you wish to terminate the method, press RESET. The titrator interrupts it immediately. The
following mask appears (RESET was pressed during the second sample’s Titration function):
Terminate
ANALYSIS A*; Method: CALC
Sample No. 1/2
Titration [1]
(* appears only with the DL77)
If you simply wish to terminate the (first) Titration function,
– confirm "Titration [1]" with RUN and quit the mask with EXIT: The titrator terminates the
Titration function definitively; the subsequent functions of this sample determination are,
however, processed.
If you simply wish to terminate the determination of the current sample,
– confirm "Sample No. 1/2" with RUN and quit the mask with EXIT: The titrator terminates
the determination of this sample definitively and "Results of this sample" appears on the
display. You are asked for the third sample with RUN.
If you wish to terminate the method,
– confirm "ANALYSIS A; Method: CALC" with RUN and quit the mask with EXIT: The titrator
terminates the method definitively and you are shown the results calculated up to this point
on the display.
Notes: a. If data have been transferred to the connected output unit already, these are printed
out/written.
b. If the titrator is executing several activities (e.g. auxiliary functions), they are
interrupted and displayed, too (see Section 4, Note c.).
02/93
METTLER DL77/DL70ES/DL67
3-15
Fade out method
3.3
ANALYSIS
Fade out current method
If you wish to enter sample data during a titration or wish to modify the stirrer speed or the curve
type of the representation (Titration or pH/mV-stat function), press EXIT. The following
selection menu appears:
DL77/DL70ES
DL67
see Section
Method
Add
Interrupt
Sample data
Display
Stirrer
Method data
Record data
3.1/3.13.1
3.4
3.7
3.9
3.10
3.8
3.8.1
see Section
Method
Interrupt
Sample data
Display
Stirrer
Method data
Record data
3.4
3.7
3.9
3.10
3.8
3.8.1
The titration continues to run in the background.
It also continues to run if you use the required key combination (index + letter) to select another
menu.
–
To fade in the titration again, press <index + T>:
If the titrator is still processing the Titration function, the curve or table of measured values,
for example, appears on the display; if not the method function is displayed that the titrator
is processing at the time.
DL67: Jumping to other menus are impossible during a titration. You can only select menus,
i.e. the commands in the selection menu.
The following key combinations are possible:
• <index + T> (functions of the current method, see above)
• <index + S> (sample data list, see Section 3.7).
3-16
METTLER DL77/DL70ES/DL67
02/93
ANALYSIS
3.4
Interrupt method
Interrupt current method
If you select Interrupt in the selection menu "Method", the titrator discontinues the function it
is currently processing. The following selection menu appears:
DL77/DL70ES
DL67
see Section
Method
Add
Continue
Sample data
Display
Stirrer
Records
Calculations
Method data
Modify methoda.
Reevaluationa., b.
Record data
3.1/3.13.1
see below
3.7
3.9
3.10
3.11
3.12
3.8
3.6
3.5
see Section
Method
Continue
Sample data
Display
Stirrer
Records
Calculations
Method data
Modify methoda.
Reevaluationaa., b.
Record data
see below
3.7
3.9
3.10
3.11
3.12
3.8
3.6
3.5
3.8.1
3.8.1
a.
If you interrupt a METTLER method, the menus "Modify method"“ and "Reevaluation" are
missing. This also applies to methods stored only in the computer (see Method ID, Section
3.1).
b.
"Reevaluation" appears only when you interrupt a user method during a Titration (EQP)
function for which a possible predispensing has been completed.
You can select or execute all menus or commands of the selection menu. To continue titration
– confirm Continue with RUN.
The functions Titration, pH/mV-stat, Dispense, Measure, or Temperature are continued
from the point at which they were interrupted!
Caution: The remaining functions are repeated!
Example: In the Stir function, the solution is stirred for the specified time, regardless of the time stirred before the interruption.
02/93
METTLER DL77/DL70ES/DL67
3-17
Interrupt method
ANALYSIS
In most cases you interrupt the determination to modify parameter values of the current
method (see Section 3.6).
The titrator itself interrupts a titration immediately in the following situations:
1. After the Titration mode LEARN EQP or LEARN EP if it has not found an equivalence or
end point (see also Sections 2.3.12.4/5).
– Confirm the error message with RUN: The selection menu reappears (see previous
page).
If you wish the titrator to perform the remaining functions of the method,
– select Continue: The titration resumes and the representation shown before the
interruption reappears on the display.
If you wish to terminate the method,
– press RESET (see Section 3.2).
2. During a Titration function if the condition for the specified parameter Stop for reevaluation is satisfied (see next section).
3-18
METTLER DL77/DL70ES/DL67
02/93
ANALYSIS
3.5
Reevaluation
Reevaluation
You can reevaluate the titration curve in an equivalence point determination (EQP) by
modifying the titration parameters. This is possible only while the Titration function is active.
Either
• you interrupt the current Titration function after a possible predispensing has been
completed (the selection menu "Method" appears immediately, see below), or
• the titrator interrupts the Titration function right before the end, when the condition specified
for the parameter Stop for reevaluation is fulfilled (see Evaluation criteria, Section
2.3.12.2). In this case the following mask is displayed:
Reevaluation necessary
Titration [1]
neq = 0
–
(specified condition)
Confirm this message with RUN. The following selection menu appears:
DL77/DL70ES
DL67
see Section
Method
Add
Continue
Sample data
Display
Stirrer
Records
Calculations
Method data
Modify methoda.
Reevaluationa.
Record data
a.
3.1/3.13.1
3.4
3.7
3.9
3.10
3.11
3.12
3.8
3.6
3.5
3.8.1
see Section
Method
Continue
Sample data
Display
Stirrer
Records
Calculations
Method data
Modify methoda.
Reevaluationa.
Record data
3.4
3.7
3.9
3.10
3.11
3.12
3.8
3.6
3.5
3.8.1
If you interrupt a METTLER method, the menus "Modify method" and "Reevaluation" are
missing. This also applies to methods stored only in the computer (see Method ID, Section
3.1).
02/93
METTLER DL77/DL70ES/DL67
3-19
Reevaluation
–
ANALYSIS
Select Reevaluation. The following parameter mask appears:
Reevaluation
Threshold
EQP range
Steepest jump only
Buffer potential 1
Buffer potential 2
–
Modify the appropriate parameters and quit the mask with EXIT.
The following selection menu appears:
Save
Permanent
Temporary
No
Permanent: The modified values of this Titration function are saved permanently in this
method.
Temporary: The modified values of this Titration function are saved only until the end of
the current method.
No:
You save none of the changes.
If you confirm "Permanent" or "Temporary" with RUN, the titrator will reevaluate the titration
curve. The printer simultaneously prints out this Titration function with the modified parameters. The selection menu "Method" reappears. (If your modifications still satisfy the specified
condition, the message "Reevaluation necessary" reappears.)
–
Confirm Continue with RUN.
On the display appears
• the representation of the Titration function shown before the interruption (if additional
dispensing, for example, is necessary, due to the changed parameters) or
• the next function the titrator must process.
Note: To evaluate the consequences of your modification, you can
• inspect the curve or table of measured values and print it out (Display or Records
menu, see Sections 3.9 and 3.1 1).
• check the new raw results of the Titration function by assigning these to Rx or Cx,
e.g. Rx = VEQ oder Cx = VP1 (Calculations menu, see Section 3.12).
3-20
METTLER DL77/DL70ES/DL67
02/93
ANALYSIS
3.6
Modify method
Modify current method
You have interrupted the current method and selected "Modify method". You are shown all
method functions. In these functions you can modify only the numeric parameter values, no
other parameter values or names can be selected or modified.
–
Quit the parameter mask, in which you have modified a value with EXIT.
–
To continue the titration, press <index + A>.
The following selection menu appears:
Save
Permanent
Temporary
No
Permanent: The modified values are saved permanently in this method.
Temporary: The modified values are saved until the start of the next titration method.
No:
You save none of the changes.
After confirmation of a parameter, the selection menu "Method" reappears.
– Confirm Continue with RUN.
The representation shown before the interruption reappears on the display and at the same
time, the printer automatically prints out the entire method with the modified values.
Note: In the sample determination that is interrupted, the changes apply only to the functions
that the titrator has not yet begun to process. Exceptions are the Titration and pH/mVstat functions.
1st example: Dispense function
If you interrupt the method during this function and change the volume then continue
the method, the titrator dispenses the difference of the volume defined in the original
method.
Example: defined volume →
dispensed at interruption →
modified volume →
"Continue method":
the titrator dispenses →
02/93
5 mL
2 mL
7 mL
3 mL
METTLER DL77/DL70ES/DL67
3-21
Modify method
ANALYSIS
2nd example: Titration function
If you interrupt the method during this function, with an EQP titration you can modify, for
example, the value for the maximum volume or the potential value for the titration
termination if this termination criterion has been specified within the method.
With an EP titration you can modify, for instance, the time for the delay if the titrant
addition Continuous has been specified in the method.
3rd example: pH/mV-stat function
If you interrupt the method during this function, you can modify, for example, the value
for the control range, the volume for the minimum consumption or the time for the
specified termination criteria.
You can not change the numeric parameter values of the Sample function!
3-22
METTLER DL77/DL70ES/DL67
02/93
ANALYSIS
3.7
Sample data
Sample data
You can enter the weight or volume, the ID2, and the correction factor for all samples of the
methods stored in the method list before and during a current method (see also Section 3.1.2:
Notes on method and sample data mask).
Before starting a method:
– Select the method in the method list (not valid for the DL67).
– Select Sample data from the selection menu: The sample data list appears.
During a current method:
– Press <index + S>: The sample data list of the current method appears (see example of
a pH-stating on the following page).
No.
1/1
1/2
I/3
ID2
Wt./vol.
0.0000 g
0.0000 g
0.0000 g
You may enter the identification ID2 and the correction factor f, whereas you must enter the
weight or volume for each individual sample (see Section 3.1.1).
– Select the first line of this mask (sample 1 of the first Sample function): The sample data
mask appears in which you enter these parameters:
Sample data
Sample No.
ID2
Weight m [g]
Minimum [g]
Maximum [g]
Correction factor f
1/1
G/324
0.1456
0.1
0.2
1.0
If you confirm a parameter with RUN, the mask for the second sample (No. 1/2) appears, then
that of the third sample.
If no method is running, either
- press RUN: The selection menu "Method" appears, or
- press <index + A>: The method list appears.
For a running method,
- press <index + T>: The function the titrator is currently processing appears.
The procedure for entering sample data from other methods during a titration is described in
Section 3.13.3.3.
02/93
METTLER DL77/DL70ES/DL67
3-23
Sample data
ANALYSIS
The following example shows the sequence of a pH-stating in which the titrator should start
the stating immediately after sample addition, meaning thatthe sample data are entered later.
Sample data
Sample No.
ID2
Weight m [g]
Minimum [g]
Maximum [g]
Correction factor f
The titrator processes the Sample function.
– Confirm the sampie data mask with RUN, without
entering the weight.
1/1
0.0
0.0
0.2
1.0
– Add the sample and confirm immediately with
RUN.
Current sample
No. 1/1
Method/ ID1
ID2
mL
KM58/Ger.
The titrator starts the pH-stating; you have specified
the V - t curve for its representation in the method.
V – t curve
s
+ S
No.
1/1
1/2
1/3
ID2
Sample data
Sample No.
ID2
Weight m [g]
Minimum [g]
Maximum [g]
Correction factor f
mL
– Press this key combination.
Wt./vol.
0.0000 g
0.0000 g
0.0000 g
1/1
G/324
0.1456
0.0
0.2
1.0
The sample data list appears.
– Confirm this line with RUN.
The sample data mask appears.
– Enter ID2 and weight.
+ T
– Press this key combination.
V – t curve
If the stating is still running, the V -t curve of the
pH/ mV-stat function is displayed again. Otherwise
the function the titrator is processing appears.
s
3-24
METTLER DL77/DL70ES/DL67
02/93
ANALYSIS
Sample data
Notes: a. If, for instance, the titration beaker containing sample No. 1 has fallen over,
reselect the first line of the sample data list and overwrite weight or volume with
the new value in the sample data mask.
b. During the titration you can modify only the data of the samples that have not yet
been titrated.
c. You can not modify sample data of a method already executed.
d. With <index + S>, the sample data list for the current method is always shown.
If no method is running, the sample data list of the method list’s first method is
shown.
02/93
METTLER DL77/DL70ES/DL67
3-25
Method data
3.8
ANALYSIS
Method data
You can change the method data before starting the method.
You can change the number of samples during a current method before the titrator processes
the Statistics function.
• If you increase the number, the corresponding lines are added at the end of the sample data
list.
• If you decrease the number, the corresponding lines are deleted at the end of the sample
data list.
You can then enter the data of the added number of samples in the Sample data menu (see
Section 3.7).
Before starting a method:
– Select the method in the method list, see Section 3.13 (not valid for the DL67).
– Select Method data from the selection menu: The method data list appears.
During a current method:
– Press EXIT and select Method data: The method data list of the current method appears,
e.g.:
No ID1
Samp.
Stand
2+
1
Ca
3
Stand 1
If one method has two or more Sample functions, these will also be listed, such as:
No
1
2
ID1
Ca2+
Mg/Ca
Samp.
3
5
Stand
Stand 1
Stand 1
If you confirm the first line (No. 1) with RUN, the method data mask appears:
Method data
Sample function No.
ID1
Number samples
Titration stand
Temperature pC]
Temperature sensor
Molar mass M
Equivalent number z
3-26
1
Ca2+
3
Stand 1
25.0
Manual
110.99
2
METTLER DL77/DL70ES/DL67
02/93
ANALYSIS
–
Method data
Modify the appropriate parameters.
When no method is running, either
– press RUN: The selection menu "Method" appears, or
– press <index + A>: The method list appears.
During a current method,
– press <index + T>: The function the titrator is currently processing appears.
Note: In order to modify the method data from other methods while running a method,
– press <index + A>: The method list appears.
– Confirm the desired method with RUN and select Method data in the selection
menu.
3.8.1
Record data
You can check all entered sample data together with the most important associated method
data by requesting a record.
– Confirm Record data with RUN: All sample data stored in the memory are printed out.
02/93
METTLER DL77/DL70ES/DL67
3-27
Display
3.9
ANALYSIS
Display
This menu is used for the following tasks:
• to select the parameters titration curve, table of measured values or measured values that
the titrator can represent on the display if it executes functions or auxiliary functions that
generate the necessary experimental data.
• to again follow the titration progress on the display if you have previously faded it out.
• to view the titration curve or table of measured values of the last sample once again at the
end of its determination.
• to view the results that the titrator has generated during a titration method up to this time or
to fade in the list of all results again at the end of the method.
Display
Representation
Titration curve
Curve type
E – V curve
Curve type
E – V curve
∆E/∆V – V curve
log ∆E/∆V – V
∆2E/∆V2 – V
E – t curve
V – t curve
∆V/∆t -t curve
Representation
Titration curve
Measured values
Table of values
Results
Note: The key combination <index + T> returns the titration sequence to the display during
a titration if you have faded it out beforehand.
If you select Display, you are shown the parameter mask (default representation)
Display
Representation
Titration curve
Curve type
E - V curve
3-28
METTLER DL77/DL70ES/DL67
02/93
ANALYSIS
3.9.1
Display
Representation
With this menu you can specify whether the measured values, the table of measured values
or a titration curve should appear during the titration. Titration curve is stored as the default
parameter.
Since the display has room for only one type of representation, you can select the one you wish
to follow or view before, during or after the titration (see selection menu "Method" in Sections
3.1.3, 3.3 and 3.4).
You can change these three representations on the display during and after a titration with
the aid of the Cursor keys ( ← / → ).
Note: If you have attached a terminal (see Peripherals, Section 1.8.3), measured values,
table of measured values andthe titration curve appear on the screen simultaneously.
–
Select from the selection menu between
Titration curve
Measured values
Table of values
Results
1. Titration curve: The curve selected in the Curve type menu is displayed (see next section).
2. Measured values: The measured value pair V[mL] and E (the specified unit of measurement) is displayed.
3. Table of measured values: The measured value pair V [mL] and E (the specified unit of
measurement) is displayed with the last five pairs of values.
4. The list of the results generated up to this point appears on the display (only if you did
interrupt the method!).
–
To follow the selected representation, press RUN.
02/93
METTLER DL77/DL70ES/DL67
3-29
Display
3.9.2
ANALYSIS
Curve type
With this menu you can specify the curve that can be generated by the Titration or pH/mVstat function. The E - V curve is stored as the default curve.
–
Select from the selection menu between:
E - V curve
∆E/∆V - V curve
log ∆E/∆V - V (curve)
∆2E/∆V2 - V (curve)
E - t curve
V - t curve
∆V/∆t - t curve
–
Potentialvsvolume
1st derivative (potential vs volume)
1st derivative (potential vs volume, logarithmic)
2nd derivative (potential vs volume)
Potential vs time
Volume vs time
1st derivative (volume vs time)
To follow the selected curve type on the display, press RUN.
Notes: a. If you wish to change the curve type during a determination,
– fade out the titration with EXIT,
– select the Display menu.
– select the desired curve type and confirm with RUN: The selected curve appears.
b. If you wish to view, for instance, the table of measured vaiues orthe titration curve
once again at the end of a sample determination,
– fade out the titration with EXIT,
– in the selection menu, confirm Interrupt with RUN,
– press <index + T> and select with the aid of the Cursor keys ( ← / → ) between
• the last measured value pair.
• the last five tabulated values; with the aid of the arrow key you can follow the
table of measured values back to the initial values, however.
• the selected titration curve.
c. If you wish to view the table of measured values or the titration curve once again
at the end of a method,
– press <index + T> (see Note b.)
3-30
METTLER DL77/DL70ES/DL67
02/93
ANALYSIS
3.10
Stirrer
Stirrer
You can change the stirrer speed during a currently running or interrupted method (see
Sections 3.3 and 3.4).
If you confirm Stirrer with RUN, the following parameter mask appears (example):
Stirrer
Speed [%]
Status
80
On
If you change the speed and confirm it with RUN, the stirrer then stirs at the specified speed
until the next Sample or Stir function.
If you wish to switch off the stirrer, select Status with SEL → Off. It remains switched off
• until the next Sample or Stir function or
• until you select status On.
02/93
METTLER DL77/DL70ES/DL67
3-31
Records
3.11
ANALYSIS
Records
With the aid of this function you can generate an additional record on the printer at the end of
every sample determination. For this, you must interrupt the method (see Section 3.4)
If you select this menu, the following parameter mask appears:
1.
Short form method
Would you like a record of the method in short form?
Select "Yes" with SEL.
2.
Sample data
Would you like a record of all sample data (ID1, ID2,
molar mass, equivalent number, weight/volume,
correction factor) of the last sample?
Select "Yes" with SEL.
3.
Raw results last sample
Would you like a record of all raw results such as
VEQ or VDISP of the last sample?
Select "Yes" with SEL.
4.
Results last sample
Would you like a record of all results of the last
sample?
Select "Yes" with SEL.
5.
All results
Would you like a record of all previously generated
results?
Select "Yes" with SEL.
6.
Table of measured values
Would you like a record of the table of measured
values of the last sample?
Select "Yes" with SEL.
7.
E - V curve
Would you like a record of the titration curve potential vs volume of the last sample?
Select "Yes" with SEL.
8.
∆E/∆V - V curve
Would you like a record of the 1st derivative of the
titration curve potential vs volume of the last sample?
- (The ordinate scale is linear.)
Select "Yes" with SEL.
9.
log ∆E/∆V - V curve
Would you like a record of the 1st derivative of the
titration curve potential vs volume of the last sample?
- (The ordinate scale is logarithmic.)
Select "Yes" with SEL.
3-32
METTLER DL77/DL70ES/DL67
02/93
ANALYSIS
Records
10. ∆2E/∆V2 - V curve
Would you like a record of the 2nd derivative of the
titration curve potential vs volume of the last sample?
- (The ordinate scale is linear.)
Select "Yes" with SEL.
11. E - t curve
Would you like a record of the titration curve potential vs time of the last sample?
Select "Yes" with SEL.
12. V - t curve
Would you like a record of the titration curve volume
vs time of the last sample?
Select "Yes" with SEL.
13. ∆V/∆t - t curve
Would you like a record of the titration curve of
the1st derivative volume vs time of the last sample?
Select "Yes" with SEL.
If you confirm one of the parameters with RUN, the data are printed out.
02/93
METTLER DL77/DL70ES/DL67
3-33
Calculations
3.10
ANALYSIS
Calculations
With the aid of this function you can perform additional calculations at the end of every sample
determination. For this, you must interrupt the method (see Section 3.4). The result appears
on the display; it can not be printed out.
If you select this menu, the following parameter mask appears:
Calculations
Result name
Formula Rx =
Constant Cx =
Result unit
Decimal places
1. Enter the result name.
2. Select the formula from the recommendation menu or enter the one you need for your
calculation. (Caution: Always enter Cx as constant!)
3. Select the constant from the recommendation menu or enter the one you need for your
calculation.
Note: If you press HELP you are shown for
Formula the most common formulae listed with the possible units and for
Constant the most common constants with the corresponding units.
4. Select the result unit from the recommendation menu or enter the one you need for your
calculation.
5. Enter the number of decimal places that you desire in the result.
If you confirm one of the parameters with RUN, the result will be displayed.
3-34
METTLER DL77/DL70ES/DL67
02/93
ANALYSIS
3.13
Method list
Method list
You can add a maximum of 10 methods, each with at most 60 samples, to the method list.
These will be stored with the modified method data and entered sample data. They remain
stored when the titrator is turned off; the data from an executed method, however, will be
deleted. You can change the order of the methods.
DL67: The titrator can load only one method (see Section 3.1).
3.13.1
Filling the method list
Method
Method
Add
If the method list is empty, it appears together with
the selection menu.
– Confirm Add with RUN.
Method entry
Method ID
User
(Data entry)
––––
+ A
M001
– Press this key combination.
Method
Method
Add
roro
Start
Sample data
Method data
Cut
Record data
+ A
M001
M002
02/93
Method list
roro
roro
The method list with the entries and the selection
menu appears.
– Press this key.
+
Method entry
Method ID
User
(Data entry)
– Enter or modify the method identification, your
name, and the data entry, if necessary.
M001
roro
The names you entered forthe first method are in the
method entry mask. You can simply change the
method ID.
– Press this key combination.
The method list appears again, etc.
METTLER DL77/DL70ES/DL67
3-35
Method list
Notes: a.
b.
3.13.2
ANALYSIS
If no method with the specified identification is stored in the titrator and you have
installed a computer, the method will be requested from the computer and added
to the method list (see Operating Instructions provided with the RS option).
You can modify or enter method and sample data
• immediately (see Section 3.1)
• before starting the method (see Section 3.1)
• during a current method (see Sections 3.7 and 3.8).
Modifying the method list
You can cut (delete) an added method and paste it in at another location.
3.13.2.1
Cut
Example:
–
Method list
MOO1 roro
M002 roro
CALC roro
KM58 roro
Select the method (e.g KM58) and press the <–> key (minus sign).
The 4th method together with its sample data is cut (deleted), however, it is stored in a
buffer memory so that you can paste it elsewhere.
3.13.2.1 Paste
You would now like to position the cut method KM58 with its sample data on the top of the
method list:
– Select method "M001" and press the <=>key (equals sign): The former 4th method is now
the 1st method.
Method list
KM58 roro
MOO1 roro
M002 roro
CALC roro
Caution: Bear in mind the sequence of the sample beakers if you execute these commands!
3-36
METTLER DL77/DL70ES/DL67
02/93
ANALYSIS
3.13.3
Method list
Processing the method list
If you confirm one of the methods with RUN, you can start, e.g. activate, it with the selection
menu below:
Start
Single method
List once
List continuous
3.13.3.1
Single method
Select Single method if you
• have stored only one method or
• wish to perform only that method selected among several stored methods.
The executed method is marked with an asterisk (*). As soon as you start another method, all
data from the executed method will be deleted. If you select the executed method and confirm
Start, the titrator will reload this method (see Restarting a previously executed method,
Section 3.1.4).
3.13.3.2
List once
Select List once if you wish to perform several stored methods in succession. Here it is
immaterial which method you have selected: The titrator begins with the method at the start
of the method list.
• The method currently running is marked in the method list with ">".
• At the end of a processed list, only the final method, marked with an asterisk (*), will be saved.
It will be deleted once you start a newly entered list.
Notes: a. If you are working at titration stand 1, 2 or a free stand, the sample data mask
appears only if you have not yet entered the weight (volume) of the samples. You
must confirm the mask "Current sample" for every sample.
b. If you use the auto stand, the mask "Current sample" will not appear. This means
that the next sample determination will be started without a RUN confirmation.
Thus you can assign the sample changes for each method to a robot.
c. If you have attached the sample changer, the titrator titrates the samples of all
methods without the need for you to intervene. A requirement here is that
• all sample data have been entered,
• the methods use the same resources or that their installation data are specified
on different drives (titrants) and inputs (sensors), see comparison of the titration
sequences on the next page.
02/93
METTLER DL77/DL70ES/DL67
3-37
Method list
ANALYSIS
Comparison of the titration sequence for several methods at the titration stand ST20 1 (ST20
2) or at Stand 1, 2 or a free stand.
ST20 1
Method
Start
M001 roro
Single method
M002 roro
List once
KvE1 roro
List continuous
Stand 1/2/Free
Installed are
Aux. 1: ST20 1
Sensor 1: DG111-SC
Drive 3: 0.1 mol/L NaOH
Installed are
Aux. 1: Stand 1
Sensor 1: DG111-SC
Drive 3: 0.1 mol/L NaOH
Current sample
No. 1/1
Method/ ID1
M001/HCl
ID2
Current sample
No. 1/1
Method/ ID1
M001/HCl
ID2
The titrator titrates all samples in method
M001. After completion it waits until all data
have been transferred to the printer and
The titrator titrates the first sample of method
M001. The results of this sample are displayed (if
desired, see Section 1.9.8).
Current sample
No. 1/2
Method/ ID1
M001/HCl
ID2
starts titrating the samples in Method M002
(the installation data are the same as for the
first method). After completion the titrator
waits until all data have been transferred to
the printer and
starts titrating the samples of method KvE1
(the installation data are the same as for the
second method). When the titrator has
transferred all data to the printer, the results
of all samples of this method are shown.
The titrator titrates the second sample of method
M001. The results of this sample are displayed,
etc..
Current sample
No. 1/1
Method/ ID1
M002/KHP
ID2
The titrator titrates the first sample of method
M002. The results of this sample are displayed,
etc..
Note
The mask "Current sample" is shown for
each sample. It is, however, confirmed by
the titrator.
Current sample
No. 1/1
Method/ ID1
KvE1/H2SO4
ID2
The titrator titrates the first sample of method
KvE1. You receive the results of this sample, etc..
The results of all samples of this method are
displayed at the end.
3-38
METTLER DL77/DL70ES/DL67
02/93
ANALYSIS
Method list
If the titrator should process methods, that use the same burette drives or sensor inputs, on
the ST20A (ST20) sample changer in succession, you have to intervene:
Method
M001 roro
M002 roro
CALC roro
Start
Single method
List once
List continuous
The installation data of all methods are displayed.
Installed are
Aux. 1: ST20 1
Sensor 1: DG111-SC
Sensor 2: DG141-SC
Drive 3: 0.1 mol/L NaOH
Drive 3: 0.1 mol/L AgNO3
This mask appears for all samples but is confirmed by the titrator.
Current sample
No. 1/1
Method/ ID1
ID2
M001/HCl
The titrator titrates all samples of method
M001. After completion it waits until all data
have been transferred to the printer and
starts titrating the samples of method M002
(the installation data are the same as for the
first method). When the titrator has transferred all data to the printer, the following
request appears:
Change resources
Drive 3: 0.1 mol/L AgNO3
The titrator starts to titrate the samples of
method CALC. When all data have been
transferred to the printer, the results of all
samples of this method will be displayed.
02/93
– Change the titrant.
– Attach the DM141-SC sensor and insert it.
This is not requested, as the sensor is installed at sensor input 2.
METTLER DL77/DL70ES/DL67
3-39
Method list
3.13.3.3
ANALYSIS
List continuous
Select List continuous if you wish to repeat the listed methods once or several times.
• When the titrator has completed the first method, it moves it to the end of the method list.
All data of the method data mask remain stored (ID1, number samples, titration stand,
temperature, temperature sensor, molar mass, and equivalent number). You can modify
these (see Section 3.8).
All data of the sample data mask are deleted (ID2, weight/volume and correction factor) as
soon as the titrator starts the second method.
If you have defined a fixed volume in the Sample function, this remains stored.
Enter all data that you have to modify and/or new data you have to save during the titration of
the following methods (see scheme on the next page).
• When the titrator has completed the second method, it also moves it to the end of the method
list, etc..
• The method currently running is marked in the method list with ">".
You close the List continuous procedure with RESET.
If the titrator has no sample data for the method to be processed, the sample data mask will
be shown.
– Press RESET. In the menu that appears (example)
Terminate
ANALYSIS A*; Method: RM35
(* appears only with the DL77)
– confirm "Method: RM35" with RUN and quit the mask with EXIT. List continuous is
terminated definitively.
This most recently "started" method is marked with an asterisk (*) and remains stored, together
with all "shifted" methods, without sample data. Should you now restart List continuous, the
titrator would begin with method RM35.
3-40
METTLER DL77/DL70ES/DL67
02/93
ANALYSIS
Method list
Example showing how to enter sample data for methods while List continuous is being
processed.
mV
E – V curve
Method M001 is running. To enter the sample
data for method HPO4,
mL
+ A
– press this key combination.
Method list
> M001 roro
HSO4 roro
HPO4 roro
Method
> M001 roro
HSO4 roro
HPO4 roro
No.
1/1
1/2
1/3
ID2
Sample data
Sample No.
ID2
Weight m [g]
Minimum [g]
Maximum [g]
Correction factor f
– Confirm the last method with RUN.
Method
Add
Sample data
Method data
Cut
Record data
Wt./vol.
0.0000 g
0.0000 g
0.0000 g
1/1
PS/389A
2.4871
2.0
3.0
1.0
– Confirm Sample data with RUN.
– Confirm first line with RUN.
Sample data
Sample No.
ID2
Weight m [g]
Minimum [g]
Maximum [g]
Correction factor f
Sample data
Sample No.
ID2
Weight m [g]
Minimum [g]
Maximum [g]
Correction factor f
1/2
PS/389B
2.543
2.0
3.0
1.0
1/3
PS/389C
2.2671
2.0
3.0
1.0
+ T
Enter the second identification, the correction
factor (if necessary) and the weight and confirm
with RUN: the sample data mask for the second,
then for the third sample appears.
To follow the titration course of the method again,
press <Index + T>.
02/93
METTLER DL77/DL70ES/DL67
mV
E – V curve
mL
3-41
Parallel titrations
3.14
ANALYSIS
Parallel titrations with the DL77
Two Analysis menus A und B exist for the simultaneous execution of methods. They are
equivalent in terms of their build-up and functionality, meaning that you can start titration under
ANALYSIS A or ANALYSIS B.
You can store 10 methods with a maximum of 60 samples in both method lists.
Procedure (example):
Method
Method
Add
Method entry
M001
Method ID
MM
User
(Data entry)
A
A
A
Current sample
No. 1/1
A
Method/ ID1
ID2
M001/HCl
Stir function
Wait time [s]
10
Speed [%]
50
– Enter the method identification and your name,
etc..
If you use the titration stand 1 or 2,
– confirm this mask with RUN.
If you use titration stand ST20 1 or 2, the titrator
confirms this mask.
A
The method M001 is processed. You can switch
over to ANALYSIS B.
– Press this key combination.
+ B
Method
ANALYSIS A is selected.
– Confirm Add with RUN.
Method
Add
Method entry
Method ID
CALC
User
MM
(Data entry)
B
B
ANALYSIS B is selected.
– Confirm Add with RUN.
B
– Enter the method identification and your name,
etc..
B
CALC/Ca457
If you confirm this mask with RUN, the method CALC
is processed.
Current sample
No. 1/1
Method/ ID1
ID2
3-42
METTLER DL77/DL70ES/DL67
02/93
ANALYSIS
3.14.1
Parallel titrations
Notes on parallel titrations
a. All resources (titrants, sensors, auxiliary instruments, etc.), i.e., all the associated drives,
inputs and outputs that are reserved for active methods under ANALYSIS A can not be
used for methods under ANALYSIS B! Active
• is either a running Single method or
• are all methods that have been started with the commands List once or List continuous!
b. Parallel titrations can be, for example, performed with titration stand ST20 1 (Sample
series) and Stand 1 (Karl Fischer).
Using two connected sample changers you can, for example, determine two sample series
in parallel (ST20 1 and ST20 2, see Section 1.8.4).
c. The running method's functions Record are executed sequentially:
• Should the titrator first process a Record function under ANALYSIS B, then these data
will be printed out first.
• If the titrator reaches a Record function under ANALYSIS A a short time thereafter, it will
wait with the method processing until the data under ANALYSIS B have been printed out.
d. You can change from one Analysis menu to the other at anytime using the key combination
<index + A> or <index + B> respectively (see example on the next page).
e. The Sync function can be used to coordinate methods in the method lists of Analysis
menus A and B by their chronological sequence. For this you need the RS option as well
as an RS short circuit plug (see Sync, Section 2.3.20 and Operating Instructions provided
with the RS option).
02/93
METTLER DL77/DL70ES/DL67
3-43
Parallel titrations
3.14.2
mV
ANALYSIS
Changing the Analysis menus
In ANALYSIS B the Titration function of the CALC
method is processed.
E – V curve
B
mL
– To switch to ANALYSIS A, press this key combination.
+ A
Method
Method
Add
> M001 MM
Interrupt
Sample data
Display
Stirrer
Method data
Record data
A
– In order to follow the running method M001 on the
display, press this key combination.
+ T
mV
The method list with the selection menu ("method
faded out") appears.
You can select or execute all menus or commands.
E – V curve
A
mL
– To switch back to ANALYSIS B, press this key
combination.
+ B
Method list
> CALC MM
AlC3 MM
Brom MM
B
+ T
mV
The method list appears if more than one method is
stored. You can select one of the methods in order
to modify method or sample data using the selection menu.
– To follow the still running method CALC on the
display immediately, press <index + T>.
E – V curve
B
mL
3-44
METTLER DL77/DL70ES/DL67
02/93
ANALYSIS
3.15
Sample series with 2 sample changers
Sample series with 2 sample changers
If you have connected two sample changers, you can sequentially titrate maximally 40
samples from one or several methods "unattended". The titrator is told to change the titration
stand - from ST20 1 to ST20 2 or vice versa - only via the Sample function of a method (see
Section 2.3.2).
Example for one method with 40 samples: Only the functions in which parameters must be
modified are shown. Parameters in the Stir and Rinse functions (these are not shown in the
scheme) should not be modified!
20
ST20 1
SAMPLE
Number samples
Titration stand
etc.
TITRATION
HCl
Titrant
Concentration [mol/L] 0.1
DG111-SC
Sensor
etc.
CALCULATION Results
Formula
Constant
etc.
Base
R=Q∗C/U
C=M/z
etc.
The first 20 samples are titrated using
titration stand ST20 1.
HCI and DG11 1-SC are stored as standard resources.
The content in g/L is calculated.
STATISTICS
Ri (i=index)
etc.
R1
After 20 sample determinations, their
mean value is calculated.
SAMPLE
Number samples
Titration stand
etc.
20
ST20 2
The titrator is told by the 2nd Sample
function to titrate the next 20 samples
using titration stand ST20 2.
TITRATION
Titrant
HCl-2
Concentration [mol/L] 0.1
Sensor
DG111-2
etc.
CALCULATION Results
Formula
Constant
etc.
STATISTICS
Ri (i=index)
etc.
CALCULATION Results
Formula
Constant
etc.
02/93
Base
R2=Q[2]∗C/U
C=M/z
etc.
HCI-2 must be added to the list of titrants
and DG111-2 to the list of sensors (see
Section 1.1.3 and 1.2.3).
The result of the 2nd Calculation function must receive 2 as the index for Q:
mmol consumption in the 2nd Titration
function (see Section 8.2).
R2
The mean value of the 2nd Titration
function is calculated.
Base
R3=(x+x[2])/2
The mean value of all titrated samples is
calculated with the 3rd Calculation function.
METTLER DL77/DL70ES/DL67
3-45
Sample series with 2 sample changers
ANALYSIS
If you wish to run several methods on both sample changers with List once, one of the
methods must be used to initiate the change from one stand to the other in each case. An
example:
The first two methods are acid content determinations, thus neither titrant nor sensor must be
changed.
Method list
HAC1 dabru
HSO4 dabru
CALC dabru
Method data
Sample function No.
ID1
Number samples
Titration stand
Temperature [°C]
Temperature sensor
Molar mass M
Equivalent number z
Method data
Sample function No.
ID1
Number samples
Titration stand
Temperature [°C]
Temperature sensor
Molar mass M
Equivalent number z
Method data
Sample function No.
ID1
Number samples
Titration stand
Temperature [°C]
Temperature sensor
Molar mass M
Equivalent number z
3-46
1
AA23
10
ST20 1
25.0
Manual
60.05
1
Ten samples from method HAC1 are titrated
using titration stand ST20 1.
Seven samples from method HSO4 are titrated.
1
SA/666
7
ST20 1
25.0
Manual
98.07
2
1
Ca/k34
15
ST20 2
25.0
Manual
110.99
2
Titration stand ST20 2 is activated by the Sample
function of method CALC. The 15 samples are
titrated.
METTLER DL77/DL70ES/DL67
02/93
AUXILIARY FUNCTIONS
AUXILIARY FUNCTIONS
Contents
Page
4.
AUXILIARY FUNCTIONS ............................................................................
4-3
4.1
Burette .........................................................................................................
4-6
4.1.1
Rinse burette ................................................................................................
4-6
4.1.2
Rinse tip .......................................................................................................
4-7
4.1.3
Dispense ......................................................................................................
4-7
4.1.4
Dispense continuously .................................................................................
4-8
4.1.5
Manual titration .............................................................................................
4-9
4.2
Stirrer .......................................................................................................... 4-11
4.3
Sensor ......................................................................................................... 4-12
4.4
Temperature ............................................................................................... 4-14
4.5
Sample changer ......................................................................................... 4-16
4.5.1
Lift ................................................................................................................ 4-16
4.5.2
Turntable forward ......................................................................................... 4-17
4.5.3
Turntable backward ...................................................................................... 4-17
4.5.4
Rinsing pump ............................................................................................... 4-18
4.5.5
Rinsing pump manual .................................................................................. 4-18
4.5.6
Dosing pump ................................................................................................ 4-19
4.5.7
Dosing pump manual ................................................................................... 4-20
4.5.8
Dispenser ..................................................................................................... 4-20
4.6
Auxiliary instrument .................................................................................. 4-21
4.6.1
Time-controlled ............................................................................................ 4-21
4.6.2
Manual ......................................................................................................... 4-22
4.7
Calibration of the temperature sensors ................................................... 4-23
4.8
Offset adjustment of the sensor inputs ................................................... 4-24
02/93
METTLER DL77/DL70ES/DL67
4-1
AUXILIARY FUNCTIONS
4-2
METTLER DL77/DL70ES/DL67
02/93
AUXILIARY FUNCTIONS
4.
AUXILIARY FUNCTIONS
AUXILIARY FUNCTIONS
With the aid of this menu you can rinse burettes, perform manual titrations, start the stirrer,
measure the pH or temperature of solutions, operate the sample changer manually and pump
solvents. These auxiliary functions are independent of a titration method, but they can support
or expand it.
The menu:
Auxiliary functions
1
Burette
2
Stirrer
3
Sensor
4
Temperature
5
Sample changer
6
Auxiliary instrument
7
Calibration temperature sensors
8
Offset adjustment sensor inputs
As with all menus of the titrator you can select this menu and its submenus by moving the
selector bar and confirming with RUN.
Since you have to select the menu and the auxiliary functions frequently, there is a faster way:
• Use the key combination <index + F> to obtain the menu.
• For the auxiliary functions themselves, numeric keys take over the function of the selector
bar and the RUN key. You press only the key with the function number that precedes every
auxiliary function.
If you know the function number you can already press the corresponding keys in any menu
(see menu representation on the following page).
Note: The lines "4 Temperature" and "7 Calibration temperature sensors" appear only if you
have inserted a temperature option; the line "5 Sample changer" appears when you
have installed an ST20A (ST20), see Sections 11.1.7 and 1.8.4.
02/93
METTLER DL77/DL70ES/DL67
4-3
Auxiliary functions
1 Burette
1
1
2
3
4
5
Burette
Rinse burette
Rinse tip
Dispense
Dispense cont.
Man. titration
1
2
3
4
5
Rinse burette
11
Rinse tip
12
Dispense
13
Dispense continuously 14
Manual titration
METTLER DL77/DL70ES/DL67
2 Stirrer
3 Sensor
2
AUXILIARY FUNCTIONS
4-4
To obtain the selection menu immediately
from any other menu, press the <index + F>
key then the following function numbers:
Menu tree with function numbers
Aux. function
15
Stirrer
2
Sensor
3
Temperature
4
3
+ F
4 Temperature
5 Sample changer
7 Calibration temperature sensors
02/93
8 Offset adjustment sensor inputs
5
1
2
3
4
5
6
7
8
Sample changer
Lift
Turntable forward
Turntable backward
Rinsing pump
Rinsing pump manual
Dosing pump
Dosing pump manual
Dispenser
1
2
3
4
5
6
7
8
6
Auxiliary instrument
1 Time-controlled
2 Manual
7
8
1 Modify
51
Turntable forward
52
Turntable backward
53
Rinsing pump
54
Rinsing pump manual 55
Dosing pump
56
Dosing pump manual 57
2 Start
1
2
Lift
Dispenser
58
Time-controlled
61
Manual
62
Calibration
7
Offset adjustment
8
AUXILIARY FUNCTIONS
6 Auxiliary instrument
4
AUXILIARY FUNCTIONS
AUXILIARY FUNCTIONS
Notes: a. With the following key combinations, the two auxiliary functions Rinse burette and
Rinse tip can be executed even faster;
<Index+U> → Rinse burette
Press 1, 2, 3, or 4 to select the burette drive: The burette is rinsed.
<Index+Y> → Rinse tip
Press 1, 2, 3, or 4 to select the burette drive: The burette tip is
rinsed.
b. Once one of the auxiliary functions has been executed, you can quit the selection
menu
Aux. function
1 Modify
2 Start
– with EXIT: The next higher menu will appear, or
– with a key combination (index + letter): The selected menu will appear.
c. Should several auxiliary functions be active, such as "Sensor" at titration stand 1
and "Stirrer" and "Burette/Dispense" at titration stand 2, and you would like to stop
all three, press RESET. The following display will appear:
Terminate
Sensor
Sensor 1
Stirrer
Aux. 1
Dispense
Drive 3
All functions are now interrupted. To terminate them
– select "Sensor ..." and confirm with RUN,
– confirm "Stirrer ..." with RUN,
– confirm "Dispense ..." with RUN and
– quit the mask with EXIT.
You are shown the display in which you have pressed RESET.
02/93
METTLER DL77/DL70ES/DL67
4-5
Burette
4.1
AUXILIARY FUNCTIONS
Burette
If you rinse burettes or burette tips or wish to dispense a certain volume, select this auxiliary
function. You can press 1 in the Auxiliary functions menu, when in any other menu <index +
F>, then 1.
You are shown the following submenu:
1
Rinse burette
Drive 3
2
Rinse tip
Drive 3
3
Dispense
Drive 3
4
Dispense cont. (inuously)
Drive 3
5
Man. (ual) titration
NaOH
DG111-SC
Caution: Only two burette drives can be active simultaneously!
Burettes reserved for a certain method cannot be selected. This applies to
• the burettes in use for a current method and
• all burettes that will be used in the methods that have been activated with the
commands List once or List continuous (see Sections 3.13.3.2 and 3.13.3.3).
4.1.1
Rinse burette
To execute this function, from within any menu
– press the key combination <index + U> and
– enter the burette drive: 1, 2, 3, or 4:
The titrator delivers 1 burette volume. The piston of the burette moves below the zero
position so that air bubbles that "hide" in the stopcock are sucked out and then expelled.
–
To stop the operation, press RUN or 3.
–
To obtain the Auxiliary functions menu again, press <index + F>.
4-6
METTLER DL77/DL70ES/DL67
02/93
AUXILIARY FUNCTIONS
4.1.2
Burette
Rinse tip
To execute this function from within any menu
– press the key combination <index + U> and
– enter the burette drive: 1, 2, 3, or 4:
5% of the burette volume is dispensed to avoid possible diffusion effects with the solvent
or crystallization in or at the tip of the dispensing tube.
You can repeat the operation with RUN.
–
To obtain the Auxiliary functions menu again, press <index + F>.
4.1.3
Dispense
With the aid of this function you can dispense a fixed volume. To execute it, press function
number 3. If you press 1 3 in the Auxiliary functions menu you are immediately shown the
selection menu.
1
Modify
2
Start
Modify: press 1.
You are shown the parameters whose value or name you can change. If you press, <index
+ F> 1 3 1 when, e.g. in the main menu, you are shown the parameter mask immediately.
1. Select the burette drive from the selection menu.
2. Select the burette volume from the selection menu.
3. Enter the volume [mL].
If you confirm one of the parameters with RUN, you can start dispensing.
Start: press 2 or RUN.
• The titrator dispenses the specified volume.
You can stop dispensing with RUN or 3.
–
To obtain the Auxiliary functions menu again, press <index + F>.
02/93
METTLER DL77/DL70ES/DL67
4-7
Burette
4.1.4
AUXILIARY FUNCTIONS
Dispense continuously
With the aid of this function you can dispense continuously and follow the change in potential
with the dispensing on the display. To execute the function, press function number 4. If you
press 1 4 in the Auxiliary functions menu you are immediately shown the selection menu:
1
Modify
2
Start
Modify: press 1.
You are shown the parameters whose value or name you can change. If you press <index +
F> 1 4 1 when, e.g. in the main menu, you are shown the parameter mask immediately.
1. Select the burette drive from the selection menu.
2. Select the burette volume from the selection menu.
3. Enter the rate [mL/min] at which dispensing should be performed.
4. Select the sensor from the recommendation menu or enter the one you have installed.
The sensor acquires the measured values in the unit of measurement you have installed
(see Section 1.2.2).
5. Select the titration stand from the selection menu.
6. Enter the speed of the stirrer [0 – 100%]:
• 0 → stirrer is inactive;
• 100 → stirrer operates at maximum speed.
7. Enter the temperature [°C] of the solution to be measured (if you have not attached a
temperature sensor).
8. Select the temperature sensor from the selection menu.
If you confirm one of the parameters with RUN, you can start dispensing.
Start: press 2 or RUN.
• The titrator dispenses continuously and acquires the potential values of the solution
undergoing change. You can follow the measured values mL and mV (pH,…) on the display
(in the selection menu "Aux. function" you can select the display with 4 while dispensing).
–
To stop the dispensing, confirm the display with RUN and press 3.
–
To obtain the Auxiliary functions menu again, press <index + F>.
4-8
METTLER DL77/DL70ES/DL67
02/93
AUXILIARY FUNCTIONS
Burette
Note: If you carry on with the continuous dispensing, but wish to process other menus in the
meantime, quit the display with the appropriate key combination (index + letter).
– To follow the measured values later on the display, press <index + F>1 4 4.
4.1.5
Manual titration
With the aid of this function you can titrate manually and follow the change in potential with the
dispensing on the display. To execute the function, press function number 5. If you press 1 5
in the Auxiliary functions menu you are immediately shown the selection menu:
1
Modify
2
Start
Modify: press 1.
You are shown the parameters whose value or name you can change. If you press <index +
F> 1 5 1 when, e.g. in the main menu, you are shown the parameter mask immediately.
1. Select the titrant from the recommendation menu or enter the one you have installed (see
Section 1.1).
2. Enter its concentration [mol/L].
3. Select the sensor from the recommendation menu or enter the one you have installed (see
Section 1.2).
4. Select the unit of measurement: "mV" or "As installed".
"As installed" refers to the unit of measurement you have defined for this sensor (see
Section 1.2.2).
5. Select the titration stand from the selection menu.
6. Enter the speed of the stirrer [0 – 100%]:
• 0 → stirrer is inactive;
• 100 → stirrer operates at maximum speed.
7. Enter the temperature [°C] of the solution to be measured (if you have not attached a
temperature sensor).
8. Select the temperature sensor from the selection menu.
If you confirm one of the parameters with RUN, you can start manual titration.
02/93
METTLER DL77/DL70ES/DL67
4-9
Burette
AUXILIARY FUNCTIONS
Start: press 2 or RUN.
• The titrator begins to dispense and increases the dispensing rate continuously. The left part
of the display shows the measured values mL and mV, (pH,...), in the right part the following
selection menu appears:
Interrupt
Terminate
Interrupt
Dispensing is interrupted by pressing RUN.
• The potential value will still be measured.
• Interrupt will be replaced in the display by Continue.
With RUN the titrator proceeds with the lowest dispensing rate, thus, addition near the end
point can be controlled with the RUN key.
Terminate
The titration is terminated by pressing RUN.
• The left part of the display shows the results (volumes in mL and mmol and the potential
value in the selected unit of measurement).
• Pressing Print in the right part of the display enables you to print the results.
–
To start with the next manual titration, press EXIT and confirm Start.
–
To obtain the Auxiliary functions menu again, press <index + F>.
4-10
METTLER DL77/DL70ES/DL67
02/93
AUXILIARY FUNCTIONS
4.2
Stirrer
Stirrer
If you wish to stir solutions to dissolve substances or to support a titration method without a
Sample function, select this auxiliary function.
Caution: Stirrer outputs reserved for a certain method (using the titration stand specified in
the Sample function) cannot be selected. This applies to
• the stirrer output being used in a current method and
• all stirrer outputs that will be used in the methods that have been activated with
the commands List once or List continuous (see Sections 3.13.3.2 and
3.13.3.3).
If you press function number 2 (in one of the other menus <index + F>, then 2), you are shown
the selection menu:
1
Modify
2
Start
Modify: press 1.
You are shown the parameters whose value or name you can modify. If you press <index +
F> 2 1, when, e.g. in the main menu, you are shown the parameter mask immediately.
1. Select the titration stand from the selection menu.
The titrator now knows which stirrer it has to control (see Titration stands, Section 1.7).
2. Enter the speed of the stirrer [0 – 100%]:
• 0 → stirrer is inactive;
• 100 → stirrer operates at maximum speed.
If you confirm a parameter with RUN, you can start stirring.
Start: press 2 or RUN.
• The titrator begins to stir at the specified speed.
You can stop stirring with RUN or 3.
–
To obtain the Auxiliary functions menu again, press <index + F>.
Note: If you wish to execute another auxiliary function (e.g. Dispense) or a method which
utilizes Stirrer
– start this auxiliary function first,
– quit the selection menu with the appropriate key combination (<index + F> or
<index + A>), and then
– select the other auxiliary function or start the method.
02/93
METTLER DL77/DL70ES/DL67
4-11
Sensor
4.3
AUXILIARY FUNCTIONS
Sensor
With the aid of this function you can measure potential values of solutions (mV, pH, %T, etc.).
The measured values can be printed out.
Caution: You can measure simultaneously with only two sensors!
Sensors reserved for a certain method cannot be selected. This applies to
• the sensors being used in a current method and
• all sensors that will be used in the methods that have been activated with the
commands List once or List continuous (see Sections 3.13.3.2 and 3.13.3.3).
If you press function number 3 (in one of the other menus <index + F>, then 3), you are shown
the selection menu:
1
Modify
2
Start
Modify: press 1.
You are shown the parameters whose value or name you can modify. If you press <index +
F> 3 1, when, e.g. in the main menu, you are shown the parameter mask immediately.
1. Select the sensor from the recommendation menu or enter the one you have installed (see
Section 1.2).
2. Select the unit of measurement: "mV" or "As installed".
"As installed" refers to the unit of measurement you have defined for this sensor (see
Section 1.2.2).
3. Select the titration stand from the selection menu.
The titrator now knows which stirrer it has to control (see Titration stands, Section 1.7).
4. Enter the speed of the stirrer [0 – 100%]:
• 0 → stirrer is inactive;
• 100 → stirrer operates at maximum speed.
5. Enter the temperature [°C] of the solution to be measured (if you have not attached a
temperature sensor).
6. Select the temperature sensor from the selection menu.
7. Select record: "Yes" or "No". → Yes: the measured values are recorded.
8. Enter ∆t [s] : e.g. 10. → A measured value will be recorded every 10 seconds.
If you confirm one of the parameters with RUN, you can measure the potential of the solution.
4-12
METTLER DL77/DL70ES/DL67
02/93
AUXILIARY FUNCTIONS
Sensor
Start: press 2 or RUN.
• The titrator starts to measure the potential of the solution. The measured values appear on
the display and are recorded.
–
To stop the measurement, confirm the mask with RUN and press 3.
–
To obtain the Auxiliary functions menu again, press <index + F>.
Note: If you continue the measurement but in the meantime wish to process other menus, quit
the display with the appropriate key combination (index + letter). Printout of the measured values continues.
– To follow the measured values later on the display, press <index + F> 3 4.
02/93
METTLER DL77/DL70ES/DL67
4-13
Temperature
4.4
AUXILIARY FUNCTIONS
Temperature
With the aid of this function you can measure temperature values of solutions (°C, °F or K). The
measured values can be printed out.
Caution: Temperature sensors reserved for a certain method cannot be selected. This
applies to
• the temperature sensor being used in a current method and
• all temperature sensors that will be used in the methods that have been activated
with the commands List once or List continuous (see Sections 3.13.3.2 and
3.13.3.3).
If you press function number 4 (in one of the other menus <index + F>, then 4), you are shown
the selection menu:
1
Modify
2
Start
Modify: press 1.
You are shown the parameters whose value or name you can modify. If you press <index +
F> 4 1, when, e.g. in the main menu, you are shown the parameter mask immediately.
1. Select the temperature sensor from the selection menu.
2. Select the unit of measurement from the selection menu.
3. Select the titration stand from the selection menu.
The titrator now knows which stirrer it has to control (see Titration stands, Section 1.7).
4. Enter the speed of the stirrer [0 – 100%]:
• 0 → stirrer is inactive;
• 100 → stirrer operates at maximum speed.
5. Select record: "Yes" or "No". → Yes: the measured values are recorded.
6. Enter ∆t [s] : e.g. 10. → A measured value will be recorded every 10 seconds.
If you confirm one of the parameters with RUN, you can measure the temperature of the
solution.
Start: press 2 or RUN.
• The titrator starts to measure the temperature of the solution. The measured values appear
on the display and are recorded.
–
4-14
To stop the measurement, confirm the mask with RUN and press 3.
METTLER DL77/DL70ES/DL67
02/93
AUXILIARY FUNCTIONS
–
Temperature
To obtain the Auxiliary functions menu again, press <index + F>.
Note: If you continue the measurement but in the meantime wish to process other menus, quit
the display with the appropriate key combination (index + letter). Printout of the measured values continues.
– To follow the measured values later on the display, press <index + F> 4 4.
02/93
METTLER DL77/DL70ES/DL67
4-15
Sample changer
4.5
AUXILIARY FUNCTIONS
Sample changer
With the aid of this function you control the sample changer (titration stand ST20 1 or ST20 2)
and its attached auxiliary units.
DL70ES/DL67: You cannot select "ST20 2", as a second sample changer can not be connected.
If you press function number 5 (in one of the other menus <index + F>, then 5), you are shown
the following menu:
1
2
3
4
5
6
7
8
Lift
Turntable forward
Turntable backward
Rinsing pump
Rinsing pump manual
Dosing pump
Dosing pump manual
Dispenser
4.5.1
Lift
If you wish to change the lift position, press function number 1. If you press 5 1 in the Auxiliary
functions menu you are immediately shown the selection menu:
1
Modify
2
Start
Modify: press 1. You are shown the parameter mask.
1. Select the sample changer: "ST20 1" or "ST20 2".
If you confirm the selection with RUN, you can change the lift position.
Start: press 2 or RUN.
If you press <index + F> 5 1 2 when, e.g. in the main menu, you can change the lift position
immediately.
• If the lift is in the topmost position, in moves to the middle position.
• If it is in the middle position, it moves to the lowest position.
• If it is in the lowest position, it returns to the topmost position.
–
4-16
To obtain the Auxiliary functions menu again, press <index + F>.
METTLER DL77/DL70ES/DL67
02/93
AUXILIARY FUNCTIONS
4.5.2
Sample changer
Turntable forward
If you wish to move the turntable forward, press function number 2. If you press 5 2 in the
Auxiliary functions menu, you are immediately shown the selection menu.
1
Modify
2
Start
Modify: press 1. You are shown the parameter mask.
1. Select the sample changer: "ST20 1" or "ST20 2".
2. Enter the number of positions the turntable should move forward.
If you confirm the entry with RUN, you can move the turntable.
Start: press 2 or RUN.
If you know what number is stored for the positions (and the ST20), you can, e.g. when in the
main menu immediately move the turntable forward with <index + F> 5 2 2.
• The turntable moves forward by the specified number of positions.
–
To obtain the Auxiliary functions menu again, press <index + F>.
4.5.3
Turntable backward
If you wish to move the turntable backward, press function number 3. If you press 5 3 in the
Auxiliary functions menu you are shown the selection menu immediately.
1
Modify
2
Start
Modify: press 1. You are shown the parameter mask.
1. Select the sample changer: "ST20 1" or "ST20 2".
2. Enter the number of positions the turntable should move backward.
If you confirm the entry with RUN, you can move the turntable.
02/93
METTLER DL77/DL70ES/DL67
4-17
Sample changer
AUXILIARY FUNCTIONS
Start: press 2 or RUN.
If you know what number is stored for the positions (and the ST20), you can, e.g. when in the
main menu immediately move the turntable backward with <index + F> 5 3 2.
• The turntable moves backward by the specified number of positions.
–
To obtain the Auxiliary functions menu again, press <index + F>.
4.5.4
Rinsing pump
If you wish to perform rinsing for a certain time, press function number 4. If you press 5 4 in the
Auxiliary functions menu you are immediately shown the selection menu.
1
Modify
2
Start
Modify: press 1.
You are shown the parameter mask. If you press <index + F> 5 4 1 when, e.g. in the main
menu, you are shown this mask immediately.
1. Select the sample changer: "ST20 1" or "ST20 2".
2. Enter the time [s] during which the pump attached to the sample changer should perform
rinsing.
The specified time is an empirical value.
If you confirm the entry with RUN, you can start rinsing.
Start: press 2 or RUN.
• The pump rinses for the specified time.
–
To obtain the Auxiliary functions menu again, press <index + F>.
4.5.5
Rinsing pump manual
If you wish to interrupt a rinsing process manually, press function number 5. If you press
5 5 in the Auxiliary functions menu you are immediately shown the selection menu.
1
Modify
2
Start
4-18
METTLER DL77/DL70ES/DL67
02/93
AUXILIARY FUNCTIONS
Sample changer
Modify: press 1. You are shown the parameter mask.
1. Select the sample changer: "ST20 1" or "ST20 2".
If you confirm the entry with RUN, you can start rinsing.
Start: press 2 or RUN.
If you press <index + F> 5 5 2 when, e.g. in the main menu, you can start the rinsing process
immediately.
• The pump rinses until you stop the process with RUN or 3.
–
To obtain the Auxiliary functions menu again, press <index + F>.
4.5.6
Dosing pump
If you wish to dispense for a certain time, press function number 6. If you press 5 6 in the
Auxiliary functions menu you are immediately shown the selection menu.
1
Modify
2
Start
Modify: press 1.
You are shown the parameter mask. If you press <index + F> 5 6 1 when, e.g. in the main
menu, you are shown it immediately.
1. Select the sample changer: "ST20 1" or "ST20 2".
2. Enter the time [s] during which the pump attached to the sample changer should perform
dispensing.
The specified time is an empirical value.
If you confirm the entry with RUN, you can start dispensing.
Start: press 2 or RUN.
• The pump dispenses for the specified time.
–
To obtain the Auxiliary functions menu again, press <index + F>.
02/93
METTLER DL77/DL70ES/DL67
4-19
Sample changer
4.5.7
AUXILIARY FUNCTIONS
Dosing pump manual
If you wish to interrupt a dispensing operation manually, press function number 7. If you press
5 7 in the Auxiliary functions menu you are immediately shown the selection menu.
1
Modify
2
Start
Modify: press 1. You are shown the parameter mask.
1. Select the sample changer: "ST20 1" or "ST20 2".
If you confirm the selection with RUN, you can start dispensing.
Start: press 2 or RUN.
If you press <index + F> 5 7 2 when, e.g. in the main menu, you can start the dispensing
process immediately.
• The pump dispenses until you stop the process with RUN or 3.
–
To obtain the Auxiliary functions menu again, press <index + F>.
4.5.8
Dispenser
If you have attached a dispenser to the "DISPENSER" output of the sample changer, press
function number 8. If you press 5 8 in the Auxiliary functions menu you are immediately shown
the selection menu.
1
Modify
2
Start
Modify: press 1. You are shown the parameter mask.
1. Select the sample changer: "ST20 1" or "ST20 2".
If you confirm the selection with RUN, you can start dispensing.
Start: press 2 or RUN.
If you press <index + F> 5 8 2 when, e.g. in the main menu, you can start the dispensing
process immediately.
• The relay at the "DISPENSER" output closes for 0.5 s, thereby starting the dispensing.
You can repeat the process with RUN.
–
4-20
To obtain the Auxiliary functions menu again, press <index + F>.
METTLER DL77/DL70ES/DL67
02/93
AUXILIARY FUNCTIONS
4.6
Auxiliary instrument
Auxiliary instrument
With the aid of this function you can control a pump, a dispenser, an electromagnetic valve or
a relay attached to an auxiliary output of the titrator. There is no need to install these auxiliary
instruments if you do not include them in a method.
If you press function number 6 (in one of the other menus <index + F>, then 6), you are shown
the following menu:
1
Time-controlled
2
Manual
4.6.1
Time-controlled
If the auxiliary instrument has to perform its function at a certain time, press function number
1. If you press 6 1 in the Auxiliary functions menu, you are immediately shown the selection
menu:
1
Modify
2
Start
Modify: press 1.
You are shown the parameters whose value or name you can change. If you press, <index
+ F> 6 1 1 when, e.g. in the main menu, you are shown the parameter mask immediately.
1. Select the auxiliary output from the selection menu.
2. Enter the time [s]. This is the time during which the voltage of 24 V should be applied to
the auxiliary output.
With the aid of a pump or dispenser you can dispense exact volumes if you know the
dispensing rate for the particular solvent.
If you confirm one of the parameters with RUN, you can activate the instrument.
Start: press 2 or RUN.
• At the auxiliary output the voltage of 24 V is applied for the specified time.
You can repeat the operation with RUN.
–
To obtain the Auxiliary functions menu again, press <index + F>.
02/93
METTLER DL77/DL70ES/DL67
4-21
Auxiliary instrument
4.6.2
AUXILIARY FUNCTIONS
Manual
If you wish to stop the function of the auxiliary unit manually, press function number 2. If you
press 6 2 in the Auxiliary functions menu you are immediately shown the selection menu:
1
Modify
2
Start
Modify: press 1. You are shown the parameter mask.
1. Select the auxiliary output from the selection menu.
If you confirm the entry with RUN, you can activate the instrument.
Start: press 2 or RUN.
If you know what auxiliary output is stored, you can, e.g. when in the main menu immediately
start the function of the auxiliary instrument with <index + F> 6 2 2.
• The voltage of 24 V remains applied to the auxiliary output until you stop the operation with
RUN or 3.
–
4-22
To obtain the Auxiliary functions menu again, press <index + F>.
METTLER DL77/DL70ES/DL67
02/93
AUXILIARY FUNCTIONS
4.7
Calibration temperature sensors
Calibration of the temperature sensors
With the aid of this function you can calibrate your Pt100 or Pt1000 sensors to be certain that
the measured temperature values are correct.
Note: Section 11.1.7 describes how to set the temperature options for use of either the Pt100
or Pt1000 sensors.
If you press function number 7 (in one of the other menus <index + F>, then 7), you are shown
the following menu:
1
Modify
2
Start
Modify: press 1. You are shown the parameter mask.
1. Select the temperature input from the selection menu.
If you confirm the selection with RUN, you can calibrate the temperature sensor.
Start: press 2 or RUN. You are shown the following:
Immerse sensor in ice water
Continue
Terminate
–
–
–
Immerse the sensor in ice water (we recommend to use a Dewar vessel!).
Wait for some time, so that the sensor can cool to 0 °C.
Then confirm "Continue" with RUN.
In the selection menu "3 Stop" appears. The temperature sensor is calibrated as soon as
"2 Start" reappears.
Should the measured temperature value not lie within the range of -2 °C to +2 °C, the following
error message will appear:
Measured value out of limits
Measured value not stored
–
Confirm the message with RUN and first check the temperature value given by the sensor
using the auxiliary function Temperature.
02/93
METTLER DL77/DL70ES/DL67
4-23
Offset adjustment sensor inputs
4.8
AUXILIARY FUNCTIONS
Offset adjustment of the sensor inputs
With the aid of this function and the short circuit plug included in the standard equipment, you
can adjust the sensor inputs yourself. This is necessary when
• the error message "Sensor inputs not adjusted" is shown (see Note) or
• you insert a RS or temperature option yourself.
If you press function number 8 (in one of the other menus <index + F>, then 8), you are shown
the following menu:
1
Modify
2
Start
Modify: press 1. You are shown the parameter mask.
1. Select the sensor input from the selection menu.
If you confirm the selection with RUN, you can adjust the sensor input.
Start: press 2 or RUN. You are shown the following:
Insert short circuit plug
Continue
Terminate
–
Insert short circuit plug in the selected sensor input and confirm "Continue" with RUN.
In the selection menu "3 Stop" appears. The sensor input is adjusted as soon as
"2 Start" reappears.
Note: The error message "Sensor inputs not adjusted" will appear for adjusted sensor inputs
when system data have been deleted from the user data memory.
Measure: – Switch titrator off and on again: the system data will be restored.
– Adjust sensor inputs.
4-24
METTLER DL77/DL70ES/DL67
02/93
DOCUMENTATION
DOCUMENTATION
Contents
Page
5.
DOCUMENTATION ..................................................................................... 5-3
5.1
Print ............................................................................................................. 5-3
5.1.1
Methods ....................................................................................................... 5-3
5.1.3
Installation data ............................................................................................ 5-4
5.2
Data transfer ............................................................................................... 5-5
5.2.1
Method ......................................................................................................... 5-5
5.2.2
Installation data ............................................................................................ 5-6
5.3
Memory copy .............................................................................................. 5-7
5.3.1
Request by computer for a copy of data stored in titrator ............................ 5-7
5.3.2
Request by titrator for a copy of data stored in computer ............................ 5-8
5.3.3
Request by Titrator 1 for a copy of data stored in Titrator 2 ......................... 5-9
02/93
METTLER DL77/DL70ES/DL67
5-1
DOCUMENTATION
5-2
METTLER DL77/DL70ES/DL67
02/93
DOCUMENTATION
5.
Print
DOCUMENTATION
In this menu you have the possibility to
• print out the methods and installation data stored in the titrator,
• load the methods or installation data stored in a computer or a second titrator into the titrator,
and
• copy all stored user methods and installation data either from the titrator to the computer
or the converse or from one titrator to another titrator.
Menu:
Print
Data transfer
Memory copy
5.1
Print
If you select Print, the following menu appears:
METTLER methods
User methods
Installation data
You can print out the stored methods and installation data.
5.1.1
Methods
If you select User methods, for example, you are shown a list with the method identification
and the title of the methods you have stored.
Notes: a. Under the command Print in the Editor menu, you receive a printout of each
method with its functions and parameters (see Section 2.1.1).
b. If you wish to terminate the documentation, press RESET. Since the printer loads
data into its memory instantly, the documentation is not interrupted immediately.
If the titrator is not performing any other task, the following mask is displayed:
Terminate
Documentation
Printer
– Confirm "Documentation Printer" with RUN and quit the mask with EXIT: The
documentation is terminated definitively.
02/93
METTLER DL77/DL70ES/DL67
5-3
Print
5.1.2
DOCUMENTATION
Installation data
You can print out the following installed resources (see Section 1):
Titrants
Sensors
Temperature sensors
Auxiliary reagents
Auxiliary instruments
Auxiliary values
Titration stands
Peripherals
Miscellaneous
1. If you select Titrants you obtain a list of the installed titrants with the corresponding
parameters.
2. If you select Sensors you obtain a list of the installed sensors with the corresponding
parameters.
3. If you select Temperature sensors you obtain a list of the installed Pt sensors with the
corresponding parameters.
4. If you select Auxiliary reagents you obtain a list of the installed auxiliary reagents with
the corresponding parameters.
5. If you select Auxiliary instruments you obtain a list of the installed auxiliary instruments
with the corresponding parameters.
6. If you select Auxiliary values you obtain a list of the stored auxiliary values with the corresponding parameters.
7. If you select Titration stands you obtain a list of the titration stands with the corresponding
parameters.
8. If you select Peripherals you obtain a list of all peripheral units with the corresponding
parameters.
9. If you select Miscellaneous you obtain a list of all submenus with the corresponding
parameter values, names or text.
5-4
METTLER DL77/DL70ES/DL67
02/93
DOCUMENTATION
5.2
Data transfer
Data transfer
You can use this menu to transfer the methods and installation data which you have stored in
the computer to the titrator. For this, you must have
• attached the computer to the computer interface,
• installed it under Peripherals in the Installation menu, and
• loaded the DLWin software or your own program.
Computer:
– Switch on the computer and start "DLWin".
Titrator:
– Switch on the titrator, press <Index + D> and select Data transfer. The following menu
appears:
Data transfer
Method
Installation data
It is also possible to transfer the methods and installation data you have stored in Titrator 1 to
Titrator 2. For this, you must have
• installed a computer in the Installation menu for both instruments, and
• connected the instruments via their computer interfaces using the printer cables interconnected by a null modem.
–
Switch on both titrators and select Data transfer in the second titrator (see above).
Note: A null modem is not included in the standard equipment. The required pin assignment
of the connector is thus shown in Section 11.2.11.
5.2.1
Method
You would like to transfer a method to the titrator.
– Confirm Method with RUN: the method identification mask appears.
– Enter the ID of the desired method and confirm with RUN.
The message "Data transmission active" appears. The method is added as a user method, the
method identification mask then reappears.
Caution: A method with the same ID will be overwritten!
02/93
03/99
METTLER DL77/DL70ES/DL67
5-5
Data transfer
DOCUMENTATION
Error messages:
1. If the method is not stored in the computer, the following message appears:
Computer: Sequence error
Order code
Error code
(E033 / E037 / E054) *
– Confirm the message with RUN.
* Error code E033: User data memory full
Error code E037: Working data memory full (too many resources in a block)
Error code E054: RESET has been pressed on the titrator which receives the data.
2. If a method with the same ID is active or is stored in the method list (ANALYSIS), the
following error message appears on the computer:
Command not possible
Terminate all actions.
Delete all methods in
method list (ANALYSIS)
– Confirm the error message with RUN,
– terminate the method with RESET and/or press <Index + A> (<Index + B>) and delete
the method from the appropriate list.
– Return to the documentation menu with <Index + D>.
5.2.2
Installation data
For example, you would like to transfer the list of titrants to the titrator.
– Confirm Installation data with RUN: the list of all resources appears.
– Confirm Titrants with RUN.
The message "Data transmission active" appears.
• Titrants stored in the titrator will be overwritten if their names and concentrations are identical to those transferred. All other titrants remain stored.
• Sensors, auxiliary reagents and auxiliary instruments stored in the titrator will be overwritten
if their names are identical to those transferred.
• All other resources (temperature sensors, auxiliary values, titration stands, peripherals,
miscellaneous) will be overwritten.
Error message
If the installation data are not stored in the computer, the message "Computer: Sequence
error" appears (see above: Error message 1).
5-6
METTLER DL77/DL70ES/DL67
02/93
DOCUMENTATION
5.3
Memory copy
Memory copy
You can use this menu
• to allow the computer to request a copy of all user methods and installation data stored in
the titrator, or
• to request a copy of all methods and installation data stored in the computer by the titrator,
or
• to request a copy of all methods and installation data stored in the first titrator by a second
titrator.
You do not require an RS option for this.
You must have
• attached the computer to the printer interface of the titrator, and
• loaded the DLWin software or your own program.
Note: No data for the peripherals will be copied!
5.3.1
Request by computer for a copy of data stored in the titrator
Computer:
– Plug computer connection cable into the printer port of the titrator.
– Switch on the computer and start "DLWin".
Titrator:
– Switch on the titrator, press <Index + D> and select Memory copy. The following menu
appears:
Memory copy
Prepare
Request
–
Confirm Prepare with RUN. This command causes data to be transmitted via the printer
interface.
Computer:
– Select Backup in the main menu.
– Select Request memory copy in the backup menu: the data are copied.
Titrator:
"Data transmission active" appears in the display. As soon as the copying operation is at an
end, the main menu appears in the display indicating that data transmission will now once
again be routed across the computer interface.
03/99
02/93
METTLER DL77/DL70ES/DL67
5-7
Memory copy
–
DOCUMENTATION
Set up original cabling configuration!
Note: All errors which can appear during the storage operation are listed in the Operating
Instructions enclosed with the RS option.
5.3.2
Request by titrator for a copy of data stored in the computer
Computer:
– Plug computer connection cable into the printer port of the titrator.
– Switch on the computer and start "DLWin".
Titrator
– Switch on the titrator, press <Index + D> and select Memory copy. The following menu
appears:
Memory copy
Prepare
Request
–
Confirm Request with RUN: The following menu appears:
Overwrite memory?
No
Yes
No: The procedure will be terminated.
Yes: The user methods and installation data will be copied. The display shows "Data transmission active".
Caution: All methods with the same ID will be overwritten!
The stored titrants will be overwritten if their names and concentrations are identical to those copied!
The stored sensors, auxiliary reagents and auxiliary instruments will be overwritten
if their names are identical to those copied.
All other resources (temperature sensors, auxiliary values, titration stands,
miscellaneous) will be overwritten.
As soon as the copying operation is at an end, the main menu appears in the display indicating
that data transmission will now once again be routed across the computer interface.
–
5-8
Set up original cabling configuration!
METTLER DL77/DL70ES/DL67
05/96
02/93
DOCUMENTATION
Memory copy
Error messages:
1. If you select Memory copy while methods and/or auxiliary functions are active and/or
methods are stored in the method list under ANALYSIS, the following appears:
Command not possible
Terminate all actions.
Delete all methods in
method list (ANALYSIS)
– Confirm the error message with RUN,
– terminate all activities with RESET, and/or press <Index + A> (<Index + B>) and delete
the methods from the appropriate list.
– Return to the documentation menu with <Index + D>.
2. When the user data memory is full, the computer displays an appropriate error message.
5.3.3
Request by Titrator 1 for a copy of data stored in Titrator 2
A memory copy from one titrator to the other is possible only if you interconnect the two printer
cables using a null modem (see Note on page 5-5).
–
Switch on both titrators.
Titrator 2:
– Press <Index + D> and select Memory copy. In the menu
Memory copy
Prepare
Request
–
confirm Prepare with RUN: This command causes data to be transmitted via the printer
interface.
Titrator 1:
– press <Index + D> and select Memory copy. In the menu
Memory copy
Prepare
Request
–
confirm Request with RUN.
02/93
METTLER DL77/DL70ES/DL67
5-9
Memory copy
DOCUMENTATION
The following menu appears:
Overwrite memory?
No
Yes
No: The procedure will be terminated.
Yes: The user methods and installation data will be copied. The display shows "Data
transmission active".
Caution: All methods with the same ID will be overwritten!
The stored titrants will be overwritten if their names and concentrations are identical to those copied!
The stored sensors, auxiliary reagents and auxiliary instruments will be overwritten
if their names are identical to those copied.
All other resources (temperature sensors, auxiliary values, titration stands,
miscellaneous) will be overwritten.
As soon as the copying operation is at an end, the main menu appears in the display indicating
that data transmission will now once again be routed across the computer interface.
–
Set up original cabling configuration!
Error messages:
1. If you select Memory copy (with Titrator 1 or 2) while methods and/or auxiliary functions
are active and/or methods are stored in the method list under ANALYSIS, the following
appears:
Command not possible
Terminate all actions.
Delete all methods in
method list (ANALYSIS)
– Confirm the error message with RUN,
– terminate all activities with RESET and/or press <Index + A> (<Index + B>) and delete
the methods from the appropriate list.
– Return to the documentation menu with <Index + D>.
5-10
METTLER DL77/DL70ES/DL67
02/93
DOCUMENTATION
Memory copy
2. If errors appear during the storage operation, Titrator 2 shows the following message:
Computer: Sequence error
Order code
Error code
(E033 / E037 / E054) *
– Confirm the message with RUN.
* Error code E033: User data memory full
Error code E037: Working data memory full (too many resources in a block)
Error code E054: RESET has been pressed on the titrator which receives the data.
02/93
METTLER DL77/DL70ES/DL67
5-11
USER LEVEL
Contents
6.
02/93
Page
USER LEVEL ...............................................................................................
METTLER DL77/DL70ES/DL67
6-3
6-1
USER LEVEL
6-2
METTLER DL77/DL70ES/DL67
02/93
USER LEVEL
6.
USER LEVEL
In the Installation menu under Routine level you have blocked the menus that should be
inaccessible to employees (see Section 1.9.6). With the aid of this menu you can implement
this selection.
You are shown the following parameter mask:
User level
Expert
– Press SEL: →
Routine.
If you quit this menu with EXIT, the menus you blocked under Routine level are now no longer
accessible or their access is limited.
Only the accessible menus appear in the display under MAIN MENU; under the Editor menu,
the METTLER and user methods are accessible for a printout only; under the Analysis menu,
the submenu Modify method is missing.
The USER LEVEL menu is no longer visible.
To redisplay it:
– position the selector bar on the title line MAIN MENU and enter E X P.
All menus reappear on the display.
If you wish to switch over to Expert,
– select USER LEVEL and press SEL.
If you wish to make modifications in one of the menus but do not switch from routine level,
– select the menu and modify parameters in the submenu.
As soon as you confirm the title line of the menu (e.g. Installation or Editor) or press <Index
+ M>, only the accessible menus appear in the main menu: The blocked menus are opened
only temporarily.
02/93
METTLER DL77/DL70ES/DL67
6-3
REMOTE CONTROL
Contents
7.
Page
Remote control ...........................................................................................
7-3
REMOTE CONTROL (menu) ......................................................................
7-3
7.1
Communication between titrator and computer .....................................
7-5
7.1.1
Overview ......................................................................................................
7-5
7.1.2
Introduction ..................................................................................................
7-5
7.1.2.1
LIMS tasks ...................................................................................................
7-5
7.1.2.2
Administration of instrument-specific data ...................................................
7-6
7.1.2.3
Backup of instrument-specific data ..............................................................
7-7
7.1.2.4
Control of sequences (automation) ..............................................................
7-7
7.2
Configuration of the terminal (DEC VT340) .............................................
7-9
02/93
METTLER DL77/DL70ES/DL67
7-1
REMOTE CONTROL
7-2
METTLER DL77/DL70ES/DL67
02/93
REMOTE CONTROL
7.
Remote control
This section describes the REMOTE CONTROL menu, provides an overview of the communication between titrator and computer and explains the configuration of an attached terminal.
REMOTE CONTROL (menu)
You can use this menu for exclusive control of the titrator by a computer, in other words you
can neither enter data in the titrator nor initiate activities. For this, you must have
• installed the computer in the installation menu under Peripherals, and
• loaded the DLWin software or your own program.
Note: You will find further details in the Operating Instructions "RS232C Interface Description"
enclosed with the RS option.
Computer:
– Switch on the computer and start "DLWin".
Titrator:
– Confirm REMOTE CONTROL in the main menu with RUN and
– select On with SEL.
– Quit the mask with EXIT. The following "MAIN MENU" appears:
MAIN MENU
ANALYSIS A
ANALYSIS B*
(* appears only with the DL77)
REMOTE CONTROL
Note: If, e.g. auxiliary functions are active or methods are entered in the method list of the
Analysis menu, the following error message will be shown:
Command not possible
Terminate all actions.
Delete all methods in
method list (ANALYSIS)
– Confirm the error message with RUN,
– terminate all activities with RESET and/or press <Index + A> (<Index + B>) and delete the methods from the appropriate list.
– Press <Index + M> and again select REMOTE CONTROL.
03/99
02/93
METTLER DL77/DL70ES/DL67
7-3
REMOTE CONTROL
To follow the entries and commands of the computer on the titrator display, you can use the
following keys and key combinations:
• Arrow keys
• RUN
• EXIT
• Index + M →
Main menu
• Index + A
→
Method list of Analysis menu A
• Index + B
→
Method list of Analysis menu B
• Index + S
→
Sample data list
• Index + T
→
Display of the active function of a current method
To switch off the remote control when you have finished,
– select Off in the REMOTE CONTROL menu.
7-4
METTLER DL77/DL70ES/DL67
02/93
Communication: Titrator
REMOTE
<–>CONTROL
Computer
7.1
Communication between titrator and computer
7.1.1
Overview
If you have attached and installed a computer, the titrator is able to receive and process data
in a specific format from this external device or send data to the outside world.
You can attach all devices which fulfill the specifications described below. Possible devices
include any type of computer, from the simple hand-held computer up to a mainframe. The
titrator can thus also be integrated in relatively large systems.
In Section 7.1.2, we refer to the use of the system titrator <–> computer.
The functions available for the communication and the prerequisites for data interchange
between the titrator and computer are described in the Operating Instructions enclosed with
the RS option.
7.1.2
Introduction
Computers are finding increasing use in labs in the chemical industry. In association with an
analytical instrument, they undertake the following tasks:
•
•
•
•
LIMS tasks (Laboratory Information Management System)
Administration of instrument-specific data
Backup of instrument-specific data
Control of sequences (automation).
7.1.2.1
LIMS tasks
At present, there exist neither standards, directions nor rules that define the tasks of a LIMS.
It has become apparent, however, that the following tasks can be handled by most LIMSs:
• Generation and administration of work sheets
• Sample observation (from sampling up to archiving of the data obtained)
• Sample preparation (e.g. weighing)
• Data acquisition (online or via a keyboard)
• Archiving and administration of results and measured values
• Record generation.
03/99
02/93
METTLER DL77/DL70ES/DL67
7-5
Communication:
REMOTE CONTROL
Titrator <–> Computer
Important for the titrator are sample preparation and data acquisition:
Sample data such as weight and identification must be prepared in the computer and stored
in a file in a particular format.
→ The titrator accepts the sample data at a suitable time automatically.
The computer must ensure that the correct sample data are transferred in each case (see
also next section).
A record or certificate must be generated by the computer. The appropriate data are needed
for this.
→ The titrator transfers record data to the computer (results, measured values, etc.).
7.1.2.2
Administration of instrument-specific data
In order for you to enter sample data on the computer, you must be familiar with the given basic
conditions from the method (method data).
→ The titrator sends the method data of a particular method to the computer on request.
The method data contain the parameters of the Sample function (see Section 2.3.2). With the
method data, the same parameters as in the method data mask can be changed (see Section
3.1). With the sample data, you can enter the sample identification 2, the weight/volume and
the correction factor f. To undertake these changes, you must have loaded an appropriate
program on your computer.
You must manage the methods stored in the titrator from the computer:
→ The titrator sends a list of its stored methods on request from the computer.
→ The titrator sends a record of the desired method with its functions and parameters on
request from the computer.
You must manage the installation data stored in the titrator using the computer:
→ The titrator sends a record of the desired installation data on request from the computer.
7-6
METTLER DL77/DL70ES/DL67
02/93
REMOTE
Communication: Titrator
<–>CONTROL
Computer
7.1.2.3
Backup of instrument-specific data
All instrument-specific data decisive for an analysis must be stored in a central unit. Such data
can pertain to methods or installation and may be changed only in the titrator (e.g. in the
EDITOR). On the one hand this meets GLP (Good Laboratory Practice) demands, on the other
hand problems with different versions of a method (date/time) can be avoided if several
titrators are attached to the computer.
→ It is possible to interchange methods and installation data between the computer and the
titrator.
7.1.2.4
Control of sequences (automation)
A method must be started in the computer (remote control)
→ The remote control can be switched on and off in the REMOTE CONTROL menu of the
titrator (status "On" or "Off").
On: The titrator is controlled exclusively by the computer. You can use the titrator only to
follow the progress of the analysis (shortened menu).
Off: The Analysis working area is accessible from the computer and by you from the
titrator. As long as methods are entered and processed, the working area remains
reserved for the respective "Master".
With the DL77 you can start a method in working area A from the computer and at
the same time one in working area B from the titrator.
→ Methods are added in the computer to the method list of the titrator. The method is started
with "List once" if a method is not already running. The sequence of the methods can then
be synchronized only with the computer.
→ Entries which need a method during an analysis are requested from the computer by the
titrator (e.g. "Current sample").
→ The sequence status (e.g. "List processed") and the error status (e.g. "Short circuit") is sent
to the computer.
The most important auxiliary functions must be initiated at the computer. These are
→ Rinsing a burette
→ Dispensing
→ Measuring a potential (steady state)
→ Stirring
→ Auxiliary instrument (time-controlled)
→ Entering a titer
→ Entering an auxiliary value.
This results in a wide range of additional remote control possibilities.
02/93
METTLER DL77/DL70ES/DL67
7-7
Communication:
REMOTE CONTROL
Titrator <–> Computer
External operations should be synchronized with the sequence of an analysis. This synchronization is explained in what follows with the aid of a few examples:
1. When you work at the computer, your attention must be drawn to any result calculated
during the analysis that lies outside the limits.
→ The titrator sends an appropriate signal to the computer. The computer shows you the
message corresponding to this signal.
2. In addition to the titrator, the computer controls, e.g. a robot. The task of the robot is to insert
the samples in the titrator.
→ The titrator has to tell the computer when the next sample should be inserted and wait
until this has happened (Request to continue). The computer for its part knows when
the robot has inserted the sample and informs the titrator of this so that it can continue
the analysis (Allow titrator to continue).
To allow several titrators to be attached to a low-end computer, the titrator can be so configured
that it will transmit data to the computer only when this sends the appropriate inquiry (polling).
7-8
METTLER DL77/DL70ES/DL67
02/93
Configuration
REMOTE
of the
CONTROL
terminal
7.2
Configuration of the terminal (DEC VT340)
You have attached the terminal to the titrator and have installed it (see Section 1.8.3). To
configure it:
–
Switch off the titrator,
–
switch on the terminal and wait until the message VT340 OK is displayed.
–
Press the Set-Up key: the SET-UP DIRECTORY is displayed.
a. If you have already configured the terminal for other connections, first select Recall
Factory Default Settings to reactivate the default configuration parameters.
b. If you have not used the terminal before, you can modify the default parameters immediatly.
–
Select General Set-Up and modify the following parameter:
Terminal mode
–
–
VT300-8bit
Select Display Set-Up and modify the following parameters:
Scrolling
jump
Status Display
host writable
Select Communications Set-Up and modify the following parameters:
Transmit Speed
9600 *
Receive XOFF Point
512
Character Format
8 bits, even parity *
* These parameters must correspond to the entered installation data!
–
Select Keyboard Set-Up and modify the following parameter:
Keypad mode
numeric:
if the keys of the numeric keypad (at extreme
right of keypad) should be active.
application:
if "key combinations" should replace the numbers of the numeric keypad (see following
page).
–
Select Save Current Settings to save the modified parameters.
–
Press the Set-Up key to quit the SET-UP DIRECTORY.
–
Switch on the titrator: the terminal display is now activated by the titrator.
02/93
METTLER DL77/DL70ES/DL67
7-9
REMOTE CONTROL
Configuration
of the terminal
If you have switched off both instruments,
– first switch on the terminal, then switch on the titrator.
You can use the keypad of the teminal to operate the titrator. The keys are assigned as follows:
RUN
→
Do
EXIT
→
F17
RESET
→
F20
SEL
→
Select
CE
→
Remove
HELP
→
Help
i
→
Find
↑+⇑
→
Prev. Screen
↑+⇓
→
Next Screen
If you have saved application as a parameter for the numeric keypad, the numbers are
assigned to the following key combinations of the titrator:
7-10
+ M
→
0
(MAIN MENU)
+ I
→
1
(INSTALLATION menu)
+ E
→
2
(EDITOR menu)
+ A
→
3
(ANALYSIS A menu)
+ D
→
4
(DOCUMENTATION menu)
+ F
→
5
(AUXILIARY FUNCTIONS menu)
+ S
→
6
(Sample data list)
+ T
→
7
(Display of the current method)
+ B
→
8
(ANALYSIS B menu)
+ U
→
,
(Rinse burette)
+ Y
→
.
(Rinse tip)
+ L
→
PF1
(Line feed on the printer)
+ P
→
PF2
(Form feed on the printer)
METTLER DL77/DL70ES/DL67
02/93
Designations – Explanations – Examples
Contents
Page
8.
Designations – Explanations – Examples ...............................................
8-3
8.1
8.1.1
List of designations ...................................................................................
Compilation of the raw results ......................................................................
8-3
8-9
8.2
8.2.1
Use of indexes ............................................................................................ 8-10
Compilation of designations according to indexing forms ............................ 8-14
8.3
Functions with a condition ........................................................................ 8-16
8.4
8.4.1
8.4.2
8.4.3
8.4.4
Evaluation procedures ..............................................................................
Standard .......................................................................................................
Asymmetric ..................................................................................................
Segmented ...................................................................................................
Minimum/maximum ......................................................................................
8-20
8-20
8-21
8-22
8-23
8.5
8.5.1
8.5.2
8.5.3
8.5.4
8.5.5
8.5.6
8.5.7
Restrictions in method development and execution ..............................
Maximum number of functions per method ..................................................
Maximum number of samples ......................................................................
Maximum number of methods in the method list of the Analysis menu .......
Maximum number of equivalence points per method ..................................
Maximum number of measurement points per Titration function .................
Maximum number of results per method ......................................................
How long does the titrator store data? .........................................................
8-24
8-24
8-24
8-25
8-25
8-25
8-25
8-25
8.6
8.6.1
8.6.2
8.6.3
8.6.4
Examples of formulae ................................................................................
Results .........................................................................................................
Constants .....................................................................................................
Nominal content ...........................................................................................
Formulae for limiting the equivalence point ..................................................
8-26
8-26
8-27
8-28
8-31
8.7
Examples of methods ................................................................................ 8-32
8.8
Scheme for method design ....................................................................... 8-36
02/93
METTLER DL77/DL70ES/DL67
8-1
Designations – Explanations – Examples
8-2
METTLER DL77/DL70ES/DL67
02/93
Designations – Explanations
List of designations
– Examples
8.
Designations – Explanations – Examples
In this section you will find additional information, explanations and examples that supplement
the EDITOR section.
8.1
List of designations
This list shows you the abbreviations of all designations of the parameters and of the raw
results determined by the titrator and their definition. You must adhere to the upper case or
lower case notation of the designations during entries, otherwise the titrator outputs an error
message.
c
Titrant
Nominal concentration of the titrant in mol/L (Dispense, Titration, pH/mV-stat,
Calculation functions)
The actual equivalent concentration (ACTUAL value) of the titrant, the product of
the nominal concentration c and titer t in mol/L, is calculated automatically by the
titrator.
U
Sample function
Sample volume in mL (for the Calculation function)
m
Sample weight in g (for the Calculation function)
M
Molar mass in g/mol (for the Calculation function)
z
Equivalent number: number of reaction entities of the sample compared to the
titrant (for the Calculation function)
Note: The notation z* of DIN standard 32 625 has not been used for the titrator for
technical reasons.
f
Correction factor (for the Calculation function)
E
Measure function
Measured value in mV or in the installed unit of the sensor used
T
Temperature function
Measured temperature in °C, °F or K of the Pt sensor used
VDISP
Dispense function
Total dispensed volume in mL
QDISP
Total dispensed amount of substance in mmol
02/93
METTLER DL77/DL70ES/DL67
8-3
Designations
List
of designations
– Explanations – Examples
ET1
Titration function
Initial potential of the measured solution before the first titrant addition in mV or in
the installed unit of the sensor used
ET2
Potential following Dose 1, Predispensing 1 or Predispensing in mV or in the
installed unit of the sensor used (Titration mode DOS, EQP, and EP)
ET3
Potential following Dose 2 or Predispensing 2 in mV or in the installed unit of the
sensor used (Titration mode DOS and EQP)
E [mV]
ET3
ET3
ET2
ET1
c
b
a
V [mL]
a: mL or nominal content dispensing
b: dispensing to a potential
c: dispensing to the slope of the curve
8-4
METTLER DL77/DL70ES/DL67
02/93
Designations – Explanations
List of designations
– Examples
VEQ
Titration function
Titrant consumption in mL up to the equivalence or end point; the equivalence
points are numbered consecutively
Q
Titrant consumption in mmol up to the equivalence or end point; the equivalence
points are numbered consecutively
VEX
Calculated excess of the titrant in equivalence point or end point titrations in mL
QEX
Calculated excess of the titrant in equivalence point or end point titrations in mmol
EPOT
Calculated equivalence point potential of the equivalence or end point VEQ in mV
or in the installed unit of the sensor used
EHNV
Calculated half neutralization value (potential at VEQ/2) referring to the equivalence point VEQ in mV or in the installed unit of the sensor used
neq
Number of equivalence points found (applies to one Titration function)
E
neq = 3
3
EPOT3
EHNV3
EPOT2
2
EHNV2
EPOT1
1
EHNV1
V
VEQ1
Q1
02/93
VEQ2
VEQ3
VEX
Q2
Q3
QEX
METTLER DL77/DL70ES/DL67
8-5
Designations
List
of designations
– Explanations – Examples
VP1
VP2
Titration function
Titrant consumption in mL up to buffer potential P1
or P2
QP1
QP2
Titrant consumption in mmol up to the buffer potential P1
or P2
P1
P2
Buffer potentials in mV or in the installed unit of the sensor used
E
+200
P1
+100
0
-100
P2
-200
VP1
QP1
8-6
V
VP2
QP2
METTLER DL77/DL70ES/DL67
02/93
Designations – Explanations
List of designations
– Examples
VTOT
pH/mV-stat function
Total dispensed volume in mL
QTOT
Total amount of substance dispensed in mmol
VT1
VT2
VT
Titrant consumption in mL up to time limit t1 or t2
QT1
QT2
QT
Titrant consumption in mmol up to time limit t1 or t2
CSTAT
Correlation coefficient of the regression lines between t1 and t2 of the V – t curve
Titrant consumption in mL up to a different time limit
Titrant consumption in mmol up to a different time limit
V
VTOT
QTOT
VT2
QT2
VT1
QT1
t
t1
12/93
02/93
t2
METTLER DL77/DL70ES/DL67
8-7
Designations
List
of designations
– Explanations – Examples
VSTAT
pH/mV-stat function
Mean titrant consumption in mL/min within the time limits t1 and t2
QSTAT
Mean titrant consumption in mmol/min within the time limits t1 and t2
∆V/∆t
VSTAT
QSTAT
t
t1
t2
R
Calculation function
Calculated result
C
Calculation constant
t
Titer function
Titer
H
Auxiliary function
Auxiliary value
x
Statistics function
Mean value
s
Standard deviation
srel
Relative standard deviation in %
TIME
Current method
Elapsed time of a current method in seconds (see Sections 3.1.3 and 10.2.7).
8-8
METTLER DL77/DL70ES/DL67
02/93
Designations – Explanations
List of designations
– Examples
8.1.1 Compilation of the raw results
Method / Function
Raw results
Current method
TIME
no
MEASURE
E
yes
TEMPERATURE
T
yes
DISPENSE
VDISP, QDISP
yes
TITRATION
ET1
no
ET2, ET3
no
VEQ, Q
yes
VEX, QEX
yes
EPOT
yes
EHNV
no
neq
yes
P1, P2
no
VP1, QP1
no
VP2, QP2
no
VTOT, QTOT
yes
VT1, QT1
no
VT2, QT2
no
VT, QT
no
VSTAT, QSTAT
yes
CSTAT
no
pH/mV-STAT
Printed, if "Raw results last
sample" is selected in the
Record function
Note: To obtain the raw results, which are not printed out by default
– assign them to the result R, e.g. R = QP1, R = VT1.
12/93
02/93
METTLER DL77/DL70ES/DL67
8-9
Designations
Use
of indexes
– Explanations – Examples
8.2
Use of indexes
Since functions can occur more than once within a method, and also parameters can appear
repeatedly within a function, the parameter designation must be qualified by indexes.
The titrator recognizes 4 different indexing forms:
1. Parameters without index
The following designations are associated with these parameters:
c
t
m
z
f
TIME
U
M
The parameters always refer to the current titrant, the current sample, or the current
method.
2. Parameters of the form Xi
All parameters used without bracketed index have no meaningful connection with the
method function. The following designations are associated with this indexing form:
R
Example:
C
R3
H
third result (see example under indexing form 4)
Note: R = R1 applies, in other words the index 1 can be omitted. This also applies to the
indexing forms under points 3 and 4.
8-10
METTLER DL77/DL70ES/DL67
02/93
Designations – Explanations
Use–of
Examples
indexes
3. Parameters of the form X[j]
Index j is the function counter. The following designations are associated with this indexing
form:
E
T
VDISP
QDISP
ET1
ET2
ET3
VEX
QEX
neq
VP1
VP2
QP1
QP2
P1
P2
VTOT
QTOT
VT1
VT2
QT1
QT2
VSTAT
QSTAT
CSTAT
x
s
srel
Example:
E[2]
SAMPLE
MEASURE
CALCULATION
DISPENSE
The titrator executes this function: it starts to stir.
The titrator acquires the raw result E of the first Measure function.
To obtain the measured value E of the first Measure function as
a result, set R1 = E[1].
The titrator dispenses the particular volume of a titrant.
STIR
The titrator stirs for a defined time before it has to measure the
potential of the solution.
MEASURE
The titrator acquires the raw result E of the second Measure function.
CALCULATION
02/93
Measured value of the second Measure function (excerpt from a
method)
To obtain the measured value E of the second Measure function
as a result, set R2 = E[2].
METTLER DL77/DL70ES/DL67
8-11
Designations
Use
of indexes
– Explanations – Examples
4. Parameters of the form Xi[j]
Index i is the number of the parameter within a function. Index j is the counter for the
number of functions within a method. The following designations are associated with this
indexing form:
Q
VEQ
EHNV
EPOT
Example: Q2[2] mmol consumption up to the second equivalence point of the second
Titration function.
Excerpt from a method: determination of HCl, CH3COOH und NH4Cl with NaOH
(Two Titration functions were selected, because for CH3COOH and NH4Cl, different
values were defined for the equilibrium controlled measured value acquisition EQU.)
Titration
E [mV]
The titrator executes the first Titration function and titrates up to
the equivalence point of HCl. It
determines among other things
the mmol consumption Q1[1] and
the mmol excess QEX[1].
EQP1
V [mL]
QEX[1]
Q1[1]
Calculation
Result name ........................
Formula ...............................
Constant ..............................
Result unit ...........................
Decimal places ....................
8-12
Q1[1] ≡ Q
QEX[1] ≡ QEX.
HCl
R1 = Q1[1]
mmol
4
METTLER DL77/DL70ES/DL67
In the first Calculation function,
you define the mmol consumption
for HCl.
Since you can omit index 1, the
formula can also be R = Q.
02/93
Designations – Explanations
Use– of
Examples
indexes
Titration
E [mV]
EQP1
EQP2
V [mV]
Q1[2]
Q2[2]
Calculation
Result name ........................
Formula ...............................
Constant ..............................
Result unit ...........................
Decimal places ....................
Calculation
Result name ........................
Formula ...............................
Constant ..............................
Result unit ...........................
Decimal places ....................
02/93
The titrator executes the second
Titration function. It determines
among other things the mmol
consumption Q1[2] up to the first
equivalence point (CH3COOH),
then the mmol consumption Q2[2]
up to the second equivalence
point (NH4Cl).
CH3COOH
R2 = Q1[2] + QEX[1]
mmol
4
NH4Cl
R3 = Q2[2]
mmol
4
METTLER DL77/DL70ES/DL67
In the second Calculation function, you define the mmol consumption for acetic acid.
You take into account here the
titrated excess of the first Titration function.
In the third Calculation function,
you define the mmol consumption
for NH4Cl.
8-13
Designations
Use
of indexes
– Explanations – Examples
8.2.1
Compilation of designations according to indexing forms
Method / Resource/
Function
Designation [Unit]
Current method
TIME
[s]
Titrant
c
[mol/L]
Index
Examples
t
––
SAMPLE
m
[g]
U
[mL]
M
[g/mol]
z
f
CALCULATION
R
[g]
C
[mL]
AUXILIARY VALUE
H
TITRATION
VEQ
[mL]
Q
[mmol]
EPOT
[mV, pH ...]
EHNV
[mV, pH ...]
8-14
Xi
H1...H20
METTLER DL77/DL70ES/DL67
Xi[j]
Q2[1]
EPOT1[2]
02/93
Designations – Explanations
Use– of
Examples
indexes
Function
Designation [Unit]
MEASURE
E
[mV, pH ...]
TEMPERATURE
T
[°C, °F, K]
DISPENSE
VDISP
[mL]
QDISP
[mmol]
ET1
[mV, pH ...]
ET2
[mV, pH ...]
ET3
[mV, pH ...]
VEX
[mL]
QEX
[mmol]
TITRATION
Index
E[3]
QDISP[2]
neq
pH/mV-STAT
Examples
neq[3]
VP1
[mL]
QP1
[mmol]
VP2
[mL]
QP2
[mmol]
VTOT
[mL]
QTOT
[mmol]
VT1
[mL]
QT1
[mmol]
VT2
[mL]
QT2
[mmol]
X[j]
QT1[2]
CSTAT
STATISTICS
VSTAT
[mL/min]
QSTAT
[mmol/min]
x
s
s[3]
srel
02/93
METTLER DL77/DL70ES/DL67
8-15
Designations
Functions
with– aExplanations
condition – Examples
8.3
Functions with a condition
In titration praxis there are several applications that require a departure from the sequence
defined in the series listing of the functions. For this purpose you can set a condition for most
of the functions. If this condition is not satisfied, the function is skipped; if it is met, the function
is executed. If no condition has been set, again the function is executed. You can not set a
condition for Title, Sample, Calibration, and Statistics.
Con. FUNCTION
No
Conditon
satisfied?
Yes
Function is executed
FUNCTION
Examples of conditions are comparisons of raw results, results and numeric values that have
been obtained before the conditional function.
You can define a condition (comparison of argument arg with a value a or b) by means of
operators. a and b can be
• numeric values
• designations
• expressions*
* Example of an expression: "R1 + H5"
8-16
METTLER DL77/DL70ES/DL67
02/93
Designations –Functions
Explanations
with–aExamples
condition
a. Comparison operators
arg > a
greater than
arg >= a
greater than or equal to (≥)
arg = a
equal to
arg <= a
less than or equal to (≤)
arg < a
less than
a < arg < b
in the range
arg <> a
not equal to
Examples:
R1 > 4.2
the first result should be greater than 4.2.
E < 7.0
the potential should be smaller than pH 7.0.
R2 = H4
the second result should equal auxiliary value 4.
R1 + H5 > E[2] the expression (first result plus auxiliary value 5) should be
greater than the potential of the second Measure function.
Note: You will find additional examples in Section 8.6.4.
b. Logical operators
a ! b
AND
a ? b
OR
Example: (R1 < 0.0) ? (R1 > 10)
02/93
the first result should lie outside the range from 0.0
to 10.
METTLER DL77/DL70ES/DL67
8-17
Designations
Functions
with– aExplanations
condition – Examples
Example 1: Determination of the neutralization value of wastewater: The pH value of the
samples differs greatly so that we have to titrate on the one hand with NaOH and
on the other with HCl. To execute the determinations with one method, we set
the conditions for functions (excerpt from a method):
Sample
Number samples .....................................
Titration stand .........................................
Entry type ................................................
Volume [mL] .......................................
ID1 ..........................................................
Molar mass M .........................................
Equivalent number z ...............................
Temperature sensor ................................
10
Stand 1
Fixed volume
10.0
Waste water
0.0
1
Manual
Measure
Sensor ....................................................
Unit of meas. ...........................................
∆E [mV] ...................................................
∆t [s] ........................................................
t(min) mode .............................................
t(min) [s] ..................................................
t(max) [s] .................................................
DG111-SC
As installed
0.5
2.0
Fix
20
300
Titration
Titrant ......................................................
Concentration [mol/L] ..............................
Sensor ....................................................
Unit of meas. ...........................................
Titration mode .........................................
Titrant addition ...................................
∆E(set) [mV] ..................................
∆V(min) [mL] .................................
∆V(max) [mL] ................................
∆E [mV] .........................................
∆t [s] ..............................................
t(min) [s] ........................................
t(max) [s] .......................................
Delay [s] ........................................
End point mode ..................................
Potential [mV, pH, ...] ....................
Tendency ...........................................
Maximum volume [mL] .......................
Condition .................................................
Condition ............................................
NaOH
0.1
DG111-SC
As installed
EP
Dynamic
8.0
0.02
0.1
0.5
0.5
2.0
20.0
15
EPA
7.0
Positive
40.0
Yes
1<E<7
8-18
Through this function, the titrator
acquires the measured value E(pH).
The titrator executes this Titration
function only if the measured value
E determined previously is in the pH
range 1 - 7.
METTLER DL77/DL70ES/DL67
02/93
Designations –Functions
Explanations
with–aExamples
condition
Calculation
Result name ............................................
Formula ...................................................
Constant .................................................
Result unit ...............................................
Decimal places .......................................
Condition .................................................
Condition ............................................
Acidity
R = Q ∗ C/U
C = 1000
mmol/L
2
Yes
1<E<7
Titration
Titrant ......................................................
Concentration [mol/L] ..............................
Sensor ....................................................
Unit of meas. ...........................................
Titration mode .........................................
Titrant addition ...................................
∆E(set) [mV] ..................................
∆V(min) [mL] .................................
∆V(max) [mL] ................................
∆E [mV] .........................................
∆t [s] ..............................................
t(min) [s] ........................................
t(max) [s] .......................................
Delay [s] ........................................
End point mode ..................................
Potential [mV, pH, ...] ....................
Tendency ...........................................
Maximum volume [mL] .......................
Condition .................................................
Condition ............................................
HCl
0.1
DG111-SC
As installed
EP
Dynamic
8.0
0.02
0.1
0.5
0.5
2.0
20.0
15
EPA
7.0
Negative
40.0
Yes
7 < E < 14
The titrator executes this Titration
function only if the measured value
E determined previously is in the pH
range 7 - 14.
Calculation
Result name ............................................
Formula ...................................................
Constant .................................................
Result unit ...............................................
Decimal places .......................................
Condition .................................................
Condition ............................................
Basicity
R2 = Q[2] ∗ C2/U
C2 = 1000
mmol/L
2
Yes
7 < E < 14
The titrator calculates the neutralization value through the mmol consumption of acid.
The titrator calculates the neutralization value through the mmol consumption of base
Example 2: In METTLER method M002, Titer is a conditional function:
Titer
Titrant ......................................................
Concentration [mol/L] ..............................
Formula
t = ............................
Condition .................................................
Condition ............................................
02/93
NaOH
0.1
x
Yes
0.9 < x < 1.1
The titrator enters the calculated
mean value x of the Statistics function in the installation data of the
titrant only if it lies in the range 0.9 1.1.
METTLER DL77/DL70ES/DL67
8-19
Evaluation
procedures
Designations
– Explanations – Examples
8.4
Evaluation procedures
The titrator has various procedures to determine the equivalence points of a titration curve
accurately:
• Standard
• Asymmetric
• Segmented
• Minimum/maximum
8.4.1
Standard
You use this procedure for all S-shaped titration curves. The evaluation is effected with the aid
of an iterative procedure (nonlinear regression) [1]. The titration of a strong acid with a strong
base is used as a mathematical model. The determined equivalence point in this model always
lies in the vicinity of the inflection point.
At least five measurement points around the inflection point are used for the evaluation. In
addition the slope from measurement point to measurement point must increase or decrease.
If this condition is not met, this iterative procedure can not be employed. In such cases the
determination relies on interpolation of the inflection point of the titration curve. You will be
given an appropriate warning in the result record.
E
Inflection point
V
8-20
METTLER DL77/DL70ES/DL67
02/93
Evaluation –procedures
Designations – Explanations
Examples
8.4.2
Asymmetric
With markedly asymmetric curves the standard procedure can lead to a systematic error. The
difference between the true equivalence point and the inflection point can then be greater than
the precision normally achievable. For such cases the titrator is equipped with an evaluation
method following Tubbs [2].
This empirical approximation method is an old established procedure for the evaluation of
asymmetric titration curves recorded in an analog fashion. It can also be used for digital
determinations of titration curves [3]. The result of the Tubbs evaluation is closer than the
inflection point to the true equivalence point.
The evaluation procedure is based on the following considerations:
Both branches of the titration curve possess a circle of curvature with minimum radius that can
be drawn in. The ratio of the two radii is determined by the asymmetry of the curve. The
intersection point of the straight line connecting the midpoints M1 and M2 of the circles with the
titration curve represents the sought-after equivalence point. Theoretical considerations show
that the true equivalence point with asymmetric titration curves is always between the inflection
point and that branch of the titration curve with the greater curvature (the smaller circle of
curvature). The result of the Tubbs evaluation approaches the true equivalence point very
closely when the course of the titration curve is regular and allows calculation of the two
branches.
E
M2
Intersection point EQP
M1
V
For the evaluation at least 6 measured points on either side of the inflection point in the region
of greatest curvature are needed. If the shape of titration curve does not allow calculation of
the circles of curvature, the titrator calculates the equivalence point according to the standard
procedure. You will be given an appropriate warning in the result record if this is the case.
02/93
METTLER DL77/DL70ES/DL67
8-21
Designations
Evaluation
procedures
– Explanations – Examples
8.4.3
Segmented
Various indication methods (e.g. photometry, conductometry and amperometry) generate
titration curves with linear or approximated linear sections (segmented curves). The titrator
also evaluates such curves for you.
E
The evaluation procedure used is
based on the following consideration:
Titration curve
The first derivative of a segmented
curve displays the typical shape of an
S-shaped curve whose inflection point
represents a good approximation of
the equivalence point.
V
∆E/∆V
1st derivative
V
22
22
∆∆ E/∆V
E/∆V
2nd derivative
V
8-22
The evaluation of segmented curves
is performed with the Standard procedure but the calculated data of the
first derivative are used rather than
the data points of the titration curve.
The equivalence point is thus recognized not with the aid of the calculated
first derivative but by using the calculated second derivative. The threshold for the equivalence point recognition also refers to data of the second
derivative.
The individual sections do not need to
be exactly linear. Decisive for an exact determination of the equivalence
point is the presence of a distinct
break between the individual sections
of the titration curve.
METTLER DL77/DL70ES/DL67
02/93
Designations – Explanations
Evaluation –procedures
Examples
8.4.4
Minimum/maximum
The result of this evaluation is the calculated minimum (maximum) from the measurement
points of the titration. The classic example of a titration curve with a minimum is the
determination of surfactants using photometric indication.
The minimum (maximum) is calculated by a polynomial approximation of the titration curve in
the region of the minimum (maximum). The equivalence point is determined directly from the
data of the titration curve.
[1] K. Waldmeier und W. Rellstab, Fres.Z.Anal.Chem., 264, 337, (1973)
[2] C.F. Tubbs, Anal. Chem., 26, 1670 (1954)
[3] S. Ebel, E. Glaser, R. Kantelberg und B. Reyer, Fres. Z. Anal. Chem., 312, 604 (1982)
02/93
METTLER DL77/DL70ES/DL67
8-23
Designations – Explanations – Examples
Restrictions
8.5
Restrictions in method development and execution
8.5.1
Maximum number of functions per method
The maximum possible number for a particular function that you can add to a method is listed
in the following Table. The number depends on the method size in each case: for example, you
can not assemble the total of these functions to form a method as the main memory of the
titrator is too small.
Function
Maximum number / method
Title ........................................................................................................... 1
Sample ...................................................................................................... 4
Stir ............................................................................................................ 6
Measure ................................................................................................... 10
Temperature ............................................................................................. 10
Instruction ................................................................................................ 10
Dispense ................................................................................................... 6
Pump ........................................................................................................ 6
Rinse ......................................................................................................... 6
Conditioning .............................................................................................. 6
Auxiliary instrument .................................................................................. 6
Titration ..................................................................................................... 6
pH/mV-stat ................................................................................................ 2
Calculation ............................................................................................... 12
Auxiliary value .......................................................................................... 20
Titer ........................................................................................................... 2
Calibration ................................................................................................. 2
Statistics ................................................................................................... 6
Record ...................................................................................................... 8
Sync ......................................................................................................... 20
8.5.2
Maximum number of samples
DL77:
The sample data for a maximum of 600 samples can be entered in the method list
of Analysis menu A as well as in that of Analysis menu B.
You can enter 60 sample data per method!
DL70ES: The sample data for a maximum of 600 samples can be entered in the method list
of the Analysis menu.
You can enter 60 sample data per method!
DL67:
8-24
This titrator can store the sample data of maximum 60 samples.
METTLER DL77/DL70ES/DL67
02/93
Designations – Explanations Restrictions
– Examples
8.5.3
Maximum number of methods in the method list of the Analysis menu
DL77:
A maximum of 10 methods can be entered in the method list of Analysis menu A
as well as in that of Analysis menu B.
DL70ES: A maximum of 10 methods can be entered in the method list of the Analysis menu.
DL67:
One method can be entered.
8.5.4
Maximum number of equivalence points per method
The titrator can determine maximum 16 equivalence points per method (titration mode EQP)
distributed among one or several Titration functions. (If the method has, for example, several
Sample functions, a maximum of 16 equivalence points will be determined, distributed among
these Sample functions. Should more than 16 equivalence points be present, the rest will not
be determined. The method, however, will be continued.
8.5.5
Maximum number of measurement points per Titration function
The titrator can store 300 measurement points per Titration function; it then terminates the
function.
8.5.6
Maximum number of results per method
The titrator can store 180 results per method; it then terminates the method.
Example: If you titrate 30 samples with a method, the titrator can store 6 results for each
individual sample.
8.5.7
How long does the titrator store data?
1. Measured values of the Titration or pH/mV-stat function
The titrator stores the measured values until the next Titration or pH/mV-stat function.
2. Raw results
The titrator stores all raw results up to the titration of the next sample within a loop. If the
method has several Sample functions, the raw results of the sample titrated most recently
within the loop will be stored.
3. Results
The titrator stores all results up to the start of the next method.
02/93
METTLER DL77/DL70ES/DL67
8-25
Designations
Examples
of formulae
– Explanations – Examples
8.6
Examples of formulae
8.6.1
Results
R = Q ∗ C/m (standard formula)
C = f (M, z, unit)
Content of a sample with weighing:
%, – ppm, – mg/g, – TAN [mg KOH/g], –
mol/kg, – mmol/g
R = Q ∗ C/U (standard formula)
C = f (M, z, unit);
Content of a sample solution
g/L, – ppm, – % [g/mL], – mg/L, – g/100mL,
mol/L, – mmol/L
R = m/(VEQ ∗ c ∗ C)
Titer determined using primary standard
R = U/(VEQ ∗ c ∗ C)
Titer determined with volumetric solution
R = Q∗C
Content per sample (m = 1)
R=Q
mmol consumption as result
R = VEQ
mL consumption as result
R = VEQ/m
mL/g as result
R = (QDISP – Q) ∗ C/m
Back titration:
QDISP: dispensed amount of substance in mmol
of the Dispense function
Q: mmol consumption up to the equivalence point
or end point of the Titration function (titration
mode EQP or EP).
R = (Q – Hj) ∗ C/m
Solvent blank value incorporated in the calculation (blank value stored as Hj)
R = (Q/m – Hj) ∗ C
Matrix blank value incorporated in the calculation
[mmol/g] (matrix blank value stored as Hj)
R = ET1 [2]
Initial potential of the second Titration function as
result
R = E [3]
Measured value of the third Measure function as
result
R = pw(–E) ∗ 1000
Anion concentration in mmol/L (measured by
means of an ion-selective electrode)
8-26
METTLER DL77/DL70ES/DL67
02/93
Designations – Explanations
Examples –ofExamples
formulae
8.6.2
a.
b.
c.
02/93
Constants
Weight of sample known
Unit
C = M/z
mg/g
C = M/(10 ∗ z)
%
C = M ∗ 1000/z
ppm
C = 1/z
mol/kg (mmol/g)
C = 56.1
TAN or TBN (mg KOH/g)
C = M/(1000 ∗ z)
titer
Volume of sample known
Unit
C = M/(z ∗ 10 ∗ d) where (d = density)
% [g/mL]
C = M ∗ 1000/z
mg/L
C = (M ∗ 1000)/(z ∗ d)
ppm
C = 1000
mmol/L
C=1
mol/L
C = M/z
g/L
C = M/(10 ∗ z)
g/100 mL
C = 1/Hj ∗ z
titer (the concentration of the
volumetric solution is stored as
auxiliary value Hj)
Volume and weight of sample unknown
Unit
C = M/z
mg
C = 1/z
mmol
METTLER DL77/DL70ES/DL67
8-27
Designations
Examples
of formulae
– Explanations – Examples
8.6.3
Nominal content
a. Dispensing / Predispensing
If you select the parameter "% nominal content" under the Titration function with titration
modes DOS, EQP and EP to predispense or dispense you must specify three values:
–
the amount to be dispensed in % of the absolute nominal consumption (metered
amount)
– the nominal content
– the conversion constant: The conversion constant C converts mmol to the unit of the
nominal content.
The volume that is predispensed or dispensed depending on the nominal content of a
substance is calculated from the following formula:
% of absolute nominal consumption
100%
∗
nominal content of sample
conversion constant
∗
weight or volume
c∗t
Example 1: You determine the titer of a 0.1 mol/L NaOH solution with potassium hydrogen phthalate (M = 204.2 g/mol) and weigh in 0.1954 g.
The predispensing should be 80% of the absolute mL consumption. You
enter the number 80.
You expect a titer of 1. Enter the number 1.
The conversion constant for the titer calculation is: M/(1000 ∗ z). Select this
formula from the recommendation menu.
V=
80%
∗
100%
1
0.2042 g/mol
0.1954 g
∗ 0.1 mol/L
7.665 mL are predispensed with these entries.
8-28
METTLER DL77/DL70ES/DL67
02/93
Designations – Explanations
Examples –ofExamples
formulae
Example 2: You determine the % content of 0.085 g NaCl (M = 58.44 g/mol) with
0.1 mol/L AgNO3 (titer = 0.992).
The predispensing should be 85% of the absolute mL consumption. Enter the
number 85.
You expect a nominal content of 100%. Enter the number 100.
The conversion constant for this content determination is: M/(10 ∗ z).
Select this formula from the recommendation menu.
V=
85%
100%
∗
100%
5.844 g/mol
0.085 g
0.0992 mol/L
∗
12.46 mL AgNO3 are predispensed with these entries.
Example 3: You determine the content in g of 5 mL of a KOH solution (M = 56.11 g/mol)
with 0.1 mol/L HCl (titer = 0.981).
The predispensing should be 90% of the absolute mL consumption. Enter the
number 90.
You expect a nominal content of 5 g KOH/L. Enter the number 5.
The conversion constant for this content determination is: M/z. Select this
formula from the recommendation menu.
V=
90%
100%
∗
5 g/L
56.11g/mol
5 mL
0.0981 mol/L
∗
4.088 mL HCl are predispensed with these entries.
Example 4: You determine the active substance of a tablet with 1 mol/L NaOH (titer =
1.026). The amount of active substance is specified with 20 mmol/tablet. The
sample weight is thus 1.
The predispensing should be 70% of the absolute mL consumption. Enter the
number 70.
You expect a nominal content of 20 mmol. Enter the number 20.
The conversion constant for this content determination is 1.
V=
70%
100%
∗
20 mmol
1
∗
1
1.026 mol/L
13.65 mL NaOH are predispensed with these entries.
02/93
METTLER DL77/DL70ES/DL67
8-29
Designations
Examples
of formulae
– Explanations – Examples
b. Termination after nominal consumption
If you select this parameter under the Titration function with titration mode EQP, you must
define three values:
– the termination volume in % of the absolute nominal consumption; the added volume
must be, e.g. 10% greater than the nominal consumption to the equivalence point
– the nominal content
– the conversion constant.
The volume that is used as a termination criterion depends on the nominal content of a
substance and is calculated using the same formula as above.
Example: You titrate the weight percent of Cl- (M = 35.45 g/mol) of a salt solution
(0.924 g) that contains various chlorides with 0.1 mol/L AgNO3 (titer = 0.992).
You would like to abort the titration when you have titrated to 10% above the
expected mL consumption, that is 110%. Enter the number 110.
You expect a chloride fraction of 50 mg/g. Enter the number 50.
The conversion constant for this content determination is M/z. Select this
formula from the recommendation menu.
V=
110%
100%
∗
50 mg/g
35.45 g/mol
∗
0.924 g
0.0992 mol/L
14.45* mL AgNO3 are titrated with these entries before the titration is terminated.
* If the calculated amount falls between two increments, the next increment will
still be added. Depending on the increment size, a volume of 14.47 mL, for
example, can thus be titrated.
8-30
METTLER DL77/DL70ES/DL67
02/93
Designations – Explanations
Examples –
ofExamples
formulae
8.6.4
Formulae for limiting the equivalence point
To calculate the consumption of titrant for a specific equivalence point in a titration curve with
several equivalence points, you can have Q identified by a condition, such as:
R1 = Q(EPOT > -50)
Titrant consumption up to the 1st equivalence point of the 1st
Titration function. Equivalence points with a potential under
-50 mV (e.g. -51...-300) will not be considered.
R1 = Q(EPOT > -50)[2]
Titrant consumption up to the 1st equivalence point of the 2nd
Titration function. Equivalence points with a potential under
-50 mV (e.g. -51...-300) will not be considered.
R1 = Q(EPOT ~ 100)[2]
Titrant consumption up to the 1st equivalence point of the 2nd
Titration function. The equivalence point with a potential value
closest to 100 will be determined.
R1 = Q(EPOT ~ P1)
Titrant consumption up to the 1st equivalence point of the 1st
Titration function. The equivalence point lying closest to the
buffer potential P1 will be determined.
R1 = Q(EPOT ~ H11)
Titrant consumption up to the 1st equivalence point of the 1st
Titration function. The equivalence point lying closest to the
auxiliary value stored under H11 will be determined.
R1 = Q(P1 < EPOT < 300)
Titrant consumption up to the 1st equivalence point of the 1st
Titration function. The equivalence point lying within the range
of the buffer potential P1 and 300 mV will be determined.
02/93
METTLER DL77/DL70ES/DL67
8-31
Designations
Examples
of methods
– Explanations – Examples
8.7
Examples of methods
Note: Numerous applications performed with the DL70 titrator (predecessor to the DL70ES)
are available in brochures (see Section 11.3.2).
8.7.1
Series titration with functions that the titrator performs before the actual sample
addition
The Sample and Statistics functions are the identifiers for
the loop of a series.
TITLE
SAMPLE
DISPENSE
Sample: You specify all parameters. After starting the
method you confirm the sample data mask with RUN
without entering the weight (volume).
Dispense: The specified volume of a titrant should be
added.
MEASURE
Measure: The titrator should acquire the measured value
E in accordance with the specified conditions.
STIR
INSTRUCTION
Stir: The titrator should not stir when you add the sample:
The speed = 0%, the time = 0 so that it immediately starts
with the next function.
Instruction: The entered request "Add sample" appears
supported by an audio signal. You confirm the instruction
with RUN after sample addition.
STIR
TITRATION
Stir: The titrator must stir and first dissolve the added
sample: The speed = 70%, the time = 30 s.
CALCULATION
Titration: The titrator starts to execute the Titration function. If you have specified a predispensing to nominal
content, the titrator first requests entry of the weight.
Series size
reached?
Calculation: If you have not yet entered the weight, the
titrator requests the values when it executes this function.
No
Yes
STATISTICS
Note: If you add a Calculation function with R = m after the
Instruction function, the titrator requests the weight
immediately.
RECORD
8-32
METTLER DL77/DL70ES/DL67
02/93
Designations – Explanations
Examples –ofExamples
methods
8.7.2
Method with 2 Titration functions
Determination of the acetic acid and chloride contents in ketchup
TITLE
SAMPLE
Sample: n = 3, lower weight limit = 1.0 g, upper weight limit
= 3.0 g, M = 60.01, z = 1. (Always enter the molar mass and
the equivalent number of the substance that is determined
first.)
Stir: Speed = 80%, time = 60 s: The titrator stirs for 60 s
to ensure proper suspension of the ketchup before starting
the Titration function.
STIR
TITRATION
Titration: Titrant = 0.1 mol/L NaOH,
sensor = DG111-SC, unit of measurement = mV,
titration mode EQP.
RECORD
INSTRUCTION
TITRATION
CALCULATION
CALCULATION
Record: If you wish to have a record of the titration curve
and the table of measured values of this titration, you must
add the Record function here. The titrator will not store
these data if a second Titration function follows.
Instruction: The inputted request "Add H2SO4" appears.
The pH of the solution must be lowered for the chloride
determination. Confirm the instruction with RUN.
Titration: Titrant = 0.1 mol/L AgNO3,
sensor = DM141-SC, unit of measurement = mV,
titration mode EQP.
Calculation: R = Q ∗ C/m, C = M/(10 ∗ z), unit = %.
No
Series size
reached?
Yes
STATISTICS
STATISTICS
Calculation: R2 = Q[2] ∗ C2/m, C2 = 3.55 (M/(10 ∗ z)),
unit = %. (The constant for the determination of chloride
must now be entered as numerical value.)
Statistics: Ri (i = index) = R. The mean value of the first
result (first Calculation function) of the three determinations of the acetic acid content is calculated.
Statistics: Ri (i = index) = R2. The mean value of the
second result (second Calculation function) of the three
determinations of the chloride content is calculated.
RECORD
02/93
METTLER DL77/DL70ES/DL67
8-33
Designations
Examples
of methods
– Explanations – Examples
8.7.3
If your sample contains substances whose determination requires a new sample
each time, compile a method that comprises submethods, in other words a method
with two or more Sample functions.
Single determination of Ca2+ content, the sum of Ca2+ and Mg2+ in drinking water with the
calculation of the American, French and German degree of hardness and the calculation of the
Mg2+ content.
Sample: n = 3, fixed volume = 50 mL, M = 40.08, z = 1. The
titrator begins to stir as soon as it has executed this function.
TITLE
SAMPLE
TITRATION
Titration: Titrant = 1.0 mol/L NaOH,
sensor = DG111-SC, unit of measurement = pH,
titration mode DOS. Titration to pH = 12.
Stir: Speed = 80%, time = 120 s.
The titrator should stir for 2 min to ensure complete precipitation of the Mg(OH)2.
STIR
INSTRUCTION
Instruction: The inputted request "Add indicator solution"
appears. Confirm the instruction with RUN.
TITRATION
Titration: Titrant = 0.1 mol/L EDTA, sensor = DP660/550,
unit of measurement = mV, titration mode EQP.
CALCULATION
Calculation: R = Q[2] ∗ C/U, C = M ∗ 1000/z, unit = mg/L.
CALCULATION
Calculation: R2 = Q[2] (titrant consumption in mmol of the
second Titration function). Delete the constant with CE.
No
Series size
reached?
Yes
STATISTICS
STATISTICS
RECORD
8-34
Statistics: Ri (i = index) = R. The mean value of the first
result (first Calculation function) of the three Ca2+ determinations is calculated.
Statistics: Ri (i = index) = R2. The mean value of the
second result (second Calculation function) for the mmol
consumption is calculated.
Record: If you wish to have a record of the titration curve
and the table of measured values for this titration you must
add the function here.
METTLER DL77/DL70ES/DL67
02/93
Designations – Explanations
Examples –ofExamples
methods
SAMPLE
PUMP
Sample: n = 3, fixed volume = 50 mL. The titrator starts to
stir at the default speed as soon as it has executed the
function.
Pump: Auxiliary reagent = NH3 buffer (pH 10),
volume = 5 mL.
INSTRUCTION
TITRATION
CALCULATION
Instruction: The inputted request "Add indicator solution"
appears. Confirm the instruction with RUN.
Titration: Titrant = 0.1 mol/L EDTA, sensor = DP660/550,
unit of measurement = mV, titration mode EQP.
Calculation: R3 = Q[3] (titrant consumption in mmol of the
third Titration function). Delete the constant with CE.
No
Series size
reached?
Yes
STATISTICS
CALCULATION
CALCULATION
CALCULATION
CALCULATION
RECORD
Statistics: Ri (i = index) = R3. The mean value of the third
result (third Calculation function) for the mmol consumption is calculated.
Calculation: R4 = x[3] ∗ C2/U,
C2 = 100.09 ∗ 1000/1 (MCaCO3 ∗ 1000/z for the American
degree of hardness: ppm CaCO3).
Calculation: R5 = x[3] ∗ C3/U,
C3 = 100.09 ∗ 100/1 (MCaCO3 ∗ 100/z for the French degree
of hardness: 10 mg CaCO3/L).
Calculation: R6 = x[3] ∗ C4/U, C4 = 56.08 ∗ 100/1
(MCaO ∗ 100/z for the German degree of hardness:
10 mg CaO/L).
Calculation: R7 = (x[3] – x[2]) ∗ C5/U gives the Mg2+content, C5 = 24.31 ∗ 1000/z;
x[3] is the mean value of the 3rd Statistics function
x[2] is the mean value of the 2nd Statistics function.
Note: You must enter numerical values for the constants
of these 4 calculation functions.
02/93
METTLER DL77/DL70ES/DL67
8-35
Designations
Scheme for method
– Explanations
design – Examples
8.8
Scheme for method design
You can copy this scheme to set up functions with their parameters for a new method before
you enter it in the Editor menu.
TITLE
PROBE
SAMPLE
8-36
Method ID:
Title:
Number samples:
Titration stand:
Entry type:
ID1:
Molar mass M:
Equivalent number z:
Temperature sensor:
METTLER DL77/DL70ES/DL67
02/93
Designations Scheme
– Explanations
for method
– Examples
design
02/93
METTLER DL77/DL70ES/DL67
8-37
Error messages and malfunctions
Contents
Page
9.
Error messages and malfunctions ............................................................. 9-3
9.1
Error messages of the titrator ......................................................................... 9-3
9.2
Other errors and malfunctions ........................................................................ 9-5
02/93
METTLER DL77/DL70ES/DL67
9-1
Error messages and malfunctions
9-2
METTLER DL77/DL70ES/DL67
02/93
Error messages and malfunctions
9.
Error messages and malfunctions
9.1
Error messages of the titrator
The titrator sends you messages regarding errors that you can rectify yourself. Four such
messages draw your attention to this section:
1. EEPROM inserted wrongly (EEPROM = user data memory)
For some reason or other, you have inserted the user data memory in which the installation
data are stored into the second IC socket (see Section 11.1.8: Illustration IC socket (2)).
Measure: – Switch off the titrator and disconnect from power supply.
– Insert the user data memory into the first IC socket.
2. Faulty data deleted
a. The titrator has saved only parts of a method if, e.g. during storage of this method the
power failed. It deletes this method completely. It is also possible that several methods
have been deleted.
Measure: – Confirm the message with RUN.
– Check whether your methods have been deleted and reenter if necessary.
b. The titrator has saved only parts of parameters of a resource if, e.g. during storage of
these parameters the power failed. It deletes the entire list of this resource (e.g. all
titrants or all sensors).
Measure: – Confirm the message with RUN.
The titrator now loads the standard list of the resource, e.g. all titrants
stored in the titrator on delivery.
– Check what list has been changed:
If the user data memory is too small, the titrator stores only the titrants
for which it has space.
If the memory is full, the titrator does not store any titrant. In this case,
you must delete other installation data or one of your methods to create
memory space.
– Then switch the titrator off and on again.
– Check that all resources are again present.
If you are frequently shown the error message, you should contact METTLER service.
02/93
METTLER DL77/DL70ES/DL67
9-3
Error messages and malfunctions
3. Storage not possible
a. The titrator can not assign the titer, auxiliary value or the calibration parameters to the
appropriate resources as their list is missing (titrant, sensors or auxiliary values).
Measure: – Confirm the message with RUN.
– Check whether the list of the resource has been deleted.
– Switch the titrator off then on again: The titrator reloads the standard list
of the corresponding resource, e.g. all the titrants stored in the titrator on
delivery.
If the user data memory is too small, the titrator stores only the titrants
for which it has space.
If the memory is full, the titrator does not store any titrant. In this case,
you must delete other installation data or one of your methods to create
memory space.
– Then switch the titrator off and on again.
– Check that all resources are again present.
b. The titrator cannot, for example, save data if the user data memory is full. This is
possible
• for auxiliary reagents you want to add in INSTALLATION,
• for a method you create in EDITOR,
• for sample data you want to enter in the method list for methods in ANALYSIS,
• for "permanently" saving a modification of a currently running method,
• for "permanently" saving the evaluation criteria of the Titration function of a currently
running method (parameter: "Stop for reevaluation").
Measure: – Confirm the message with RUN.
– Delete method or installation data, or insert a second user data memory.
c. The titrator is controlled by a computer and is performing a learn method. The EQP
or EP parameters of the Titration function are not saved by the titrator.
Measure: – Confirm the message with RUN.
– Always perform a learn method with a method stored in the titrator!
If you are frequently shown the error message, you should contact METTLER service.
4. Memory faulty
Parts of the user data memory are faulty.
Measure: – Call METTLER service to have the memory changed.
In the meantime, you can continue working with the titrator.
9-4
METTLER DL77/DL70ES/DL67
02/93
Error messages and malfunctions
9.2
Other errors and malfunctions
The following is a listing of faults and malfunctions which are not reported by the titrator and
should help you rectify many of the possible malfunctions yourself thereby reducing your
dependency on the METTLER service.
Note: Before you call METTLER service, please print out the system information, which
provides details of the equipment configuration of the titrator, and inform the service
of these:
press
↑
+
! ∗ : The information will be printed out.
Fault
Possible cause
Corrective measure
No display on
titrator
Instrument not
connected to power
Plug in instrument
Fuse defective
Check fuse and
replace if necessary
A few dots of the
display are missing
Call METTLER service
The display does not
match the key pressed
Call METTLER service
Stirrer will not stir
Sensors can block stirrer
at the titration stand
Check placement of
sensors
Units attached to the
outputs are inoperative
Auxiliary instrument
defective
Check instrument at
another auxiliary output
Call METTLER service
Transfer error to
attached peripheral
Peripheral faulty
Check attached units
for proper functioning
Unit (printer, balance,
terminal) at serial interface does not respond
Unit not switched on
Switch on unit
Wrong installation data
Wrong configuration
(switch settings)
Installation data and
configuration must match
(see Section 1.8)
02/93
METTLER DL77/DL70ES/DL67
9-5
Error messages and malfunctions
Fault
Possible cause
Burette does not move
to zero position when
instrument switched on
Wrong potential or
pH values
Corrective measure
Check burette drive
at another station
Burette drive faulty
Call METTLER service
Electrode defective
Check electrode (see
electrode sheet)
Check installation data
Use new electrode
No dispensing, titrant
discharged from
stopcock or piston
9-6
Burette tip blocked
Clean burette tip
Follower cam at burette
stopcock installed wrongly
Insert follower cam correctly (see Section 11.1.2.3)
METTLER DL77/DL70ES/DL67
02/93
Karl Fischer
Applications
methods
Contents
Page
10.
Applications ............................................................................................... 10-3
10.1
List of the METTLER methods ................................................................. 10-4
10.2
Water determination according to Karl Fischer ..................................... 10-5
10.2.1
Safety measures ......................................................................................... 10-5
10.2.2
Startup ......................................................................................................... 10-5
10.2.3
10.2.3.1
Description of the four Karl Fischer methods .............................................. 10-7
MFK1 KF Titration ...................................................................................... 10-7
10.2.3.2
MFK2 KF Drift Determination ..................................................................... 10-7
10.2.3.3
MFK3 KF Standby Titration ........................................................................ 10-8
10.2.3.4
MFK4 KF Titer with Na-Tartrate ................................................................. 10-8
10.2.4
Limits of detection and reproducibility ......................................................... 10-9
10.2.5
10.2.5.1
Performing Karl Fischer titrations ................................................................ 10-9
Procedure A: Pretitration, standby titration and drift determination............. 10-9
10.2.5.2
Procedure B: Pretitration, drift and titer determination ................................ 10-10
10.2.5.3
Procedure C: Pretitration, drift determination and titration
of a single sample ....................................................................................... 10-10
10.2.5.4
Titration of series ......................................................................................... 10-11
10.2.6
Adapting function parameters ..................................................................... 10-12
10.2.7
Drift compensation ...................................................................................... 10-12
10.2.8
Possible problems, their cause and rectification ......................................... 10-13
10.2.9
A few examples of results ........................................................................... 10-14
Application sheets ....................................................................................... M001 - M016
MKF1 - MKF4
02/93
METTLER DL77/DL70ES/DL67
10-1
Karl Fischer methods
10-2
METTLER DL77/DL70ES/DL67
02/93
Applications
Karl Fischer
methods
10.
Applications
In this section you will find application sheets for all methods that we have developed and
stored in the titrator as METTLER methods. The four methods you need to determine moisture
by the Karl Fischer method are described in greater detail.
Methods M002 - M016 include the calibration of pH electrodes and titer determinations which
you should always perform before you analyze your samples with the appropriate titrant. At
the same time, these methods serve as a model for the development of your own methods:
• You can examine the parameters of the individual functions.
• You can adopt control parameters of the Titration function such as titrant addition and
measure mode for the same titration reaction by either modifying the METTLER method and
storing it as a user method or developing a new method with the aid of the standard method
(see Sections 2.1 and 2.1.3).
02/93
METTLER DL77/DL70ES/DL67
10-3
Karl Fischer methods
Applications
10.1
List of the METTLER methods
M001: Acid Content
M002: Titer of NaOH (0.1 mol/L)
M003: Titer of HCl (0.1 mol/L)
M004: Calibration pH Electrode
M005: Titer of HClO4 (0.1 mol/L)
M006: Titer of AgNO3 (0.1 mol/L)
M007: Titer of EDTA (0.1 mol/L)
M008: Titer of Fe(ll) (0.1 mol/L)
M009: Titer Na2S2O3 (0.1 mol/L)
M010: Titer of TBAH (0.1 mol/L)
M011: Titer 1/2 H2SO4 (0.1 mol/L)
M012: Titer of CPC (0.01 mol/L)
M013: Titer of KMnO4 (0.1 mol/L)
M014: Titer of EGTA (0.1 mol/L)
M015: Titer Ce(SO4)2 (0.1 mol/L)
M016: Titer of 1/2 I2 (0.1 mol/L)
MKF1: KF Titration
MKF2: KF Drift Determination
MKF3: KF Standby Titration
MKF4: KF Titer with Na-Tartrate
10-4
METTLER DL77/DL70ES/DL67
02/93
Karl Fischer methods
10.2
Water determination according to Karl Fischer
You can use the titrator for the reliable determination of the water content of substances when
it is greater than 2 mg H2O per sample.
10.2.1
Safety measures
All Karl Fischer reagents are readily inflammable solutions. They are toxic:
• Do not inhale and avoid skin contact!
• On skin contact, immediately wash off with copious amounts of water!
• On eye contact, immediately irrigate with copious amounts of water, then consult a
physician!
10.2.2
Startup
You will find general explanations regarding burettes and titration stand in Section 11.1. This
section deals only with specific points.
Accessories
The Karl Fischer accessories are listed in Section 11.3, page 11-36.
Burette
In METTLER methods MKF1 - MKF4, a 5 mL burette is installed on burette drive 3 for the Karl
Fischer titrant.
– To protect the titrant against moisture, mount the drying tube holder in the opening of the
burette holder,
– fill the drying tube with molecular sieves or some other drying agent and position on the
drying tube holder (see Accessories, page 11-30).
Caution: KF titrants evolve gas (SO2) especially at elevated temperatures, causing bubbles
to form in the tubing as well as in the burette (stopcock). For this reason you should
rinse burettes prior to titration!
Titration head
–
–
Always insert the electrode and burette tip diagonal to each other so that the solution is
thoroughly mixed before its potential is measured by the electrode.
To dispense the KF solvent, take the appropriate measures (see Section 10.2.3.4: Note
a.).
02/93
METTLER DL77/DL70ES/DL67
10-5
Karl Fischer methods
– Insert the gas inlet if you wish to titrate under a dry inert gas.
– Insert the septum stopper if you wish to add liquids using a syringe.
– Close the remaining openings with stoppers.
The weighing spoon is used to add solids.
The drain cock serves to empty the titration vessel.
Double-pin platinum electrode
–
–
Attach the electrode to the polarization current source DK102A.
Attach a triaxial cable to the current source and plug it into sensor input 1 (sensor input 2
is less suitable).
Polarization current source
–
–
–
Switch on the current source only when the platinum tips of the electrode are completely
covered by solvent.
Never set the current higher than 1 µA. Normally, 0.2 – 0.5 µA suffice.
It is important to have an initial potential of at least -170 mV! (If not, set a higher
current.)
Always switch off the current source when not in use!
Karl Fischer reagents
With METTLER methods MKF1 - MKF4, we have worked with the pyridine-free KF reagents
from Riedel-de Haen (HYDRANAL®), Merck, Fluka and J.T. Baker (ReAquant®) and used
both one- and two-component reagents.
Solvents
With the one-component reagent, methanol is used as the solvent. To improve the solubility
of samples, we also used solvent mixtures of methanol with chloroform, formamide, toluene
or 1-decanol. In these mixtures the proportion of methanol should be greater than 50%
(exception: with chloroform, greater than 20%).
In the case of the two-component reagent, the KF solvent is used as solvent. Again, we have
added other solvents such as methanol, chloroform, formamide, toluene and 1-decanol. The
proportion of KF solvent should be above 50% in these mixtures.
10-6
METTLER DL77/DL70ES/DL67
02/93
Karl Fischer methods
10.2.3
Description of the four Karl Fischer methods
Four methods are stored in the titrator for the KF titration:
10.2.3.1
MKF1 KF Titration
For the titration of the solvent (pretitration) or for the titration of a sample
This method has two Titration functions:
First Titration function
Rough titration for the rapid titration of 80 - 90% of the water content of a solvent or sample.
• Titration to absolute end point with dynamic titrant addition (see Section 2.3.12.3). The
absolute end point (EPA) is –5.0 mV.
• The wait time between the increments is 2 - 4 s, the increment size 0.08 - 0.2 mL.
Second Titration function
Fine titration for titration of the water content of the solvent or sample.
• Titration to absolute end point with dynamic titrant addition. The absolute end point (EPA)
is –5.0 mV.
• The wait time between the increments is 7 - 7.5 s, the increment size 0.015 - 0.02 mL.
We have selected the parameters for both Titration functions so that the use of different
solvents has no appreciable influence on the titration progress.
No titrant consumption in the second Titration function (fine titration) means overtitration in
the first Titration function. The display then shows you how to proceed with the message
Overtitrated!: You must set the EPA of the first Titration function lower!
10.2.3.2
MKF2 KF Drift Determination
With solution titrated to dryness, a small titrant consumption can always be detected, and this
is due to moisture diffusing into the system. You must measure and store this drift in order to
take it into account in the content calculation of a sample.
The MKF2 method contains two Titration functions, separated by a wait time of ten minutes.
The first Titration function is used to titrate the solution to dryness, the second Titration
function to determine the drift, which is then stored under auxiliary value H20.
Note: a. The drift value depends on the tightness of the titration stand and the atmospheric
moisture and can be between 10 and 100 µg/min.
02/93
METTLER DL77/DL70ES/DL67
10-7
Karl Fischer methods
Note: b. We have selected a drift determination time of 10 minutes as a compromise between
speed and accuracy: With 10 minutes the relative standard deviation of the drift is
5%, with 5 minutes 12%.
Caution: Do not select this method to titrate water in fresh solvent!
10.2.3.3
MKF3 KF Standby Titration
For the continuous titration of ingressing moisture
The method contains an mV-stat function that maintains the potential at –20 mV. This potential
is an empirical value which, irrespective of titrants, solvents and samples, keeps the titration
vessel dry.
The stating is limited (55 h). To perform a titration or drift determination, you must always terminate the standby titration with RESET.
Caution: Do not select this method to titrate water in fresh solvent!
10.2.3.4
MKF4 KF Titer with Na-Tartrate
Titer determination of the KF titrant with sodium tartrate • 2 H2O
The method contains the same two Titration functions as method MKF1 and also the Titer
function, which is used to store the determined value in the parameter mask of the titrant.
Notes: a. Dispensing of the solvent is not defined in the MKF1 and MKF2 methods. If your
titrator has two (several) burette drives, we advise
– installing the KF solvent for a 20 (10) mL burette,
– adding the Dispense function to MKF1 or MKF2 and storing this as a user
method.
You thus above all avoid ingress of moisture into the titration vessel through
solvent addition.
b. As a calibration substance you can also use deionized H2O or a standard water
solution of 5 mg H2O/mL (modify parameters of the Sample function and the fifth
Calculation function accordingly!):
H2O: by means of a microliter syringe approx. 10 µL, accurate to at least 0.5%.
Standard water solution: approx. 2 mL, accurate to at least 0.5%.
10-8
METTLER DL77/DL70ES/DL67
02/93
Karl Fischer methods
10.2.4
Limits of detection and reproducibility
Limit of detection: 0.6 mg water (for titrant "5 mg H2O/mL").
Reproducibility:
<1% relative standard deviation (RSD) for samples with a water content of 15 - 25 mg/sample.
To achieve this reproducibility, the sample must contain at least 15 mg water.
10.2.5
Performing Karl Fischer titrations
10.2.5.1
Procedure A: Pretitration, standby titration and drift determination
–
–
–
–
Add 40 mL methanol or KF solvent to the titrant vessel (see Note a. in Section 10.2.3.4).
Start method MKF1 to titrate the solvent to dryness (so-called pretitration).
Enter 1 for sample weight and number of samples.
On completion of the pretitration, start KF standby titration MKF3 to condition the titration
vessel: A newly installed titration vessel is still not completely dry after the pretitration.
Note: If the titration vessel is already conditioned, you can immediately perform the drift
determination MKF2.
–
Allow method MKF3 to run until the drift is stable. This normally takes 2 hours. We
recommend letting the standby titration run overnight.
Note: For the standby titration to follow the pretitration automatically,
– enter methods MFK1 and MFK3 in the method list,
– select titration stand "Auto stand" instead of "Stand 2" (see Section 1.7) and
– start List once.
(With the DL67 this is not possible.)
–
–
Terminate the standby titration with RESET.
Start the drift determination MKF2.
Note: You should perform drift determinations fairly often to check the value.
02/93
METTLER DL77/DL70ES/DL67
10-9
Karl Fischer methods
10.2.5.2
–
–
–
Procedure B: Pretitration, drift and titer determination
After the first drift determination, empty the titration vessel, add 40 mL methanol or KF
solvent (see Note a. in Section 10.2.3.4) and start method MKF1 to titrate the solvent to
dryness.
Start method MKF2 to check the drift.
Start method MKF4 to determine the titer of the KF titrant.
Notes: a. The concentration of the KF titrant has been set at 5 mol/L, corresponding to
5 g H2O/L. (The titrator does not recognize the unit g/L for titrants.)
b. To achieve good reproducibility, the initial weight of sodium tartrate should be 0.09
- 0.12 g ±0.1 mg (see also Section 10.2.4).
c. In the titer determination, you must take into account the limited solubility of sodium
tartrate in methanol and chloroform:
In 40 mL methanol you can perform max. 4 titer determinations.
In 1:1 mixtures of chloroform/methanol the titer determination with sodium tartrate
is not possible since it does not completely dissolve.
The solubility of sodium tartrate is very good in the KF solvent of the two-component
reagent.
d. If methods MKF1, MKF2 and MKF3
• are entered in the method list,
• "Auto stand" is defined as the titration stand (see Section 1.7) and
• List once is started,
the titrator executes the pretitration followed by the drift determination. Afterwards
it will start the standby titration.
– To determine the titer after this, terminate the standby titration with RESET.
(For the DL67 this is not possible.)
10.2.5.3
–
–
–
Procedure C: Pretitration, drift determination and titration of a single sample
Add 40 mL methanol or KF solvent (see Note a. in Section 10.2.3.4) and start method
MKF1 to titrate the solvent to dryness.
Start method MKF2 to check the drift.
Then immediately start method MKF1 to determine the water content of the sample.
Notes: a. If you interrupt the individual determinations, you should start the MKF3 standby
titration to ensure that the titrant vessel remains free from water.
b. To achieve good reproducibility, the sample should contain 15 - 25 mg water (see
Section 10.2.4).
10-10
METTLER DL77/DL70ES/DL67
02/93
Karl Fischer methods
Notes: c. The stirring time and speed of the Stir function in method MKF1 are 10 s and 50%,
respectively. If a longer stirring time or a higher speed are necessary, you must
change both parameters and save the method as a user method.
d. If methods MKF1, MKF2 and MKF3
• are entered in the method list,
• "Auto stand" is defined as the titration stand (see Section 1.7) and
• List once is started,
the titrator executes the pretitration followed by the drift determination. Afterwards
it will start the standby titration.
– To titrate a sample after this, terminate the standby titration with RESET.
(For the DL67 this is not possible.)
10.2.5.4
Titration of series
The MKF1 method also allows a sample series to be run:
– After the start of the MKF1 method, enter the number of samples.
– Perform the individual titrations of the series in succession.
Notes: a. The time interval between the individual titrations must be as small as possible
since some moisture can always diffuse into the titration vessel during this time and
the drift can be compensated only by calculation.
b. You can not change the solvent within a series. The number of samples of a series
depends on the capacity of the solvent: With unproblematic samples (no interference
by the matrix), it is approx. 100 mg H2O/20 mL solvent, depending on the solvent
used. Attainment of the capacity limit is shown by a slowdown in the reaction rate.
02/93
METTLER DL77/DL70ES/DL67
10-11
Karl Fischer methods
10.2.6
Adapting function parameters
MKF2 and MKF3
In the MKF2 drift determination and MKF3 standby titration, you do not need to modify any
parameter values. These methods are optimum for all pyridine-free titrants and solvents.
MKF1 and MKF4
If the titrator overtitrates in your determinations or the complete titration takes too long, all you
have to do is adapt the absolute end point of the first Titration function.
Karl Fischer reagent
EPA range of the
first Titration function
Recommended
EPA value
low reaction rate
–5 to –2 mV
–3 mV
moderate reaction rate,
e.g. one-component reagent
–10 to –5 mV
–5 mV
high reaction rate,
e.g. two-component reagent
–25 to –15 mV
–20 mV
In the optimum case, approx. 0.08 mL titrant are consumed in the second Titration function
(fine titration). An acceptable range is 0.04 - 0.2 mL.
If the value lies outside this range, you can set the EPA of the first Titration function higher or
lower step by step. The step size for the one-component reagent is 2 mV, for the twocomponent reagent 5 mV.
• Reagent consumption of the second Titration function below 0.04 mL:
Danger of overtitration –> Step by step, set EPA of the first Titration function lower.
• Reagent consumption of the second Titration function above 0.2 mL:
Titration time >4 min –> Step by step, set EPA of the first Titration function higher.
10.2.7
Drift compensation
The titrator acquires the running time for each processed method as the raw result TIME (see
Section 3.1.3: Note a.). TIME is saved as auxiliary value H19 "before starting" (see method)
and as H18 at the end of each sample determination. The difference between these values
gives the titration time (see 3rd Calculation function) and is used in the drift compensation
(see 4th Calculation function).
10-12
METTLER DL77/DL70ES/DL67
02/93
Karl Fischer methods
10.2.8
Possible problems, their cause and rectification
Problems
The titration does not
start
Initial potential too high
(above -170 mV)
Possible cause
Measures
DK102A not switched on
Switch on DK102A
Battery voltage of the
DK102A current source too
low
Check voltage, if need be
change battery
Contaminated electrode
Clean with chromic acid and
dry thoroughly
Bent platinum tips
Drift value too high
Overtitrated
Long titration time
(sluggish approach to
end point)
Infinite pretitration
02/93
Titration vessel not closed
Check
Titration vessel not
completely dry
Allow standby titration to
continue for a further 1-2 h, if
need be overnight
Contaminated electrode
Clean with chromic acid and
dry thoroughly
Poor mixing
Increase stirring speed
End point of the first Titration function too high
Set end point 2 (5) mV lower
(see Section 10.2.6).
End point of the first Titration function too low
Set end point 2 (5) mV higher
(see Section 10.2.6)
Slow water loss from the
sample
Pulverize sample or perform
external extraction
Reaction of the sample with
KF reagent (side reaction)
Direct titration not possible
Method MKF2 or MKF3
selected for the pretitration
Select method MKF1
METTLER DL77/DL70ES/DL67
10-13
Karl Fischer methods
Problems
Poor reproducibility
Possible cause
Measures
Initial weight too low
Sample should contain at
least 15 mg water
Drift changes drastically
Perform drift determination
more frequently
Long wait times between the
titrations without standby
titration
First value of a series
always too low or too
high
Series after a standby
titration
Start a drift determination
before a series*
* Explanation:
The MKF1 and MKF3 methods do not have the same Titration functions (KF titration:
dynamic EP; standby titration: mV-stat). The end point level is thus not identical. As a
consequence, after a standby titration the first value of a series can differ.
10.2.9
A few examples of results
Titration with one-component reagent (EPA of the first Titration function: –5 mV),
Drift: 38 µg/min
Titer determination with sodium tartrate:
n = 2
x = 1.07233
RSD = 0.4%
Titration: 10 µL water
n = 4
x = 9.97 mg
RSD = 0.4%
Titration: 0.03 g cognac
n = 6
x = 61.15 %
RSD = 0.5%
Titration with two-component reagent (EPA of the first Titration function: –20 mV),
Drift: 40 µg/min
Titer determination with sodium tartrate:
n = 2
x = 1.0704
RSD = 0.9%
Titration: 10 µL water
n = 5
x = 9.94 mg
RSD = 0.4%
10-14
METTLER DL77/DL70ES/DL67
02/93
Contents
Page
11.1
11.1.1
11.1.2
11.1.2.1
11.1.2.2
11.1.2.3
11.1.2.4
11.1.3
11.1.4
11.1.5
11.1.6
11.1.7
11.1.8
Installation instructions for the titrator .............................................................. 11-3
Inserting the burette drive ................................................................................... 11-3
DV1001, DV1005, DV1010, DV1020 burettes .................................................... 11-5
Equipping the burette ........................................................................................ 11-6
Inserting the burette ........................................................................................... 11-7
Maintaining the burette parts .............................................................................. 11-8
General notes ................................................................................................... 11-9
Equipping the titration stand ............................................................................. 11-10
Rear view of the titrator .................................................................................... 11-12
Power supply voltage, power fuse .................................................................... 11-14
Inserting an RS option ..................................................................................... 11-15
Setting and inserting a temperature option ......................................................... 11-16
Inserting a user data memory (IC) .................................................................... 11-18
11.2
11.2.1
11.2.2
11.2.3
11.2.4
11.2.5
11.2.6
11.2.7
11.2.8
11.2.9
11.2.10
11.2.11
11.2.12
Technical data ............................................................................................... 11-19
Measurement system ...................................................................................... 11-19
Auxiliary outputs ............................................................................................. 11-20
Burette drive modul ......................................................................................... 11-20
Interchangeable burettes .................................................................................. 11-20
Propeller stirrer .............................................................................................. 11-20
Keypad .......................................................................................................... 11-21
Display .......................................................................................................... 11-21
Titration modes............................................................................................... 11-21
Method concept .............................................................................................. 11-22
Memory ......................................................................................................... 11-22
Attachment possibilities for peripherals .............................................................. 11-23
Additional data ............................................................................................... 11-24
11.3
11.3.1
11.3.2
Accessories ................................................................................................... 11-25
Standard equipment ........................................................................................ 11-27
Optional accessories ....................................................................................... 11-28
03/03
METTLER TOLEDO DL77/DL70ES/DL67
11-1
11-2
METTLER TOLEDO DL77/DL70ES/DL67
03/03
Installation instructions
11.1
Installation instructions for the titrator
The aim of the following descriptions and drawings is to help you assemble the individual parts of the
titrator and become acquainted with all interfaces and inputs and outputs for electrodes and stirrer.
The titrator must be disconnected from all voltage sources
before you remove the baseplate!
Risk of
electric shock
11.1.1 Inserting the burette drive
Plug connection (1a) of ribbon cable (1) – both
connections are identical – into connector (2) of
the burette drive.
Place the burette drive on the third opening of the
instrument – press ribbon cable (1) downward
slightly to allow it to be led through the lower housing slot later – and fasten with screw (3).
Note
03/03
Please place the burette drive on the 3rd opening: For the first titration, which you perform
according to the instructions given in the tutorial, the 3rd burette drive is defined in the method.
METTLER TOLEDO DL77/DL70ES/DL67
11-3
Installation instructions
Lay the titrator on its side and undo the 4 screws to
remove the baseplate.
Plug connection (1) of the ribbon cable of the burette drive into the third connector (2c) of the digital board (3).
(4) is the analog board, (5) is the processor board.
When you install additional burette drives, the first
connector (2a) is allocated to burette drive 1, the
second connector (2b) to burette drive 2, etc.
Screw on the baseplate and place the burette guides
on the free openings.
11-4
METTLER TOLEDO DL77/DL70ES/DL67
03/03
Installation instructions
11.1.2 DV1001, DV1005, DV1010, DV1020 burettes
The 5, 10 and 20 mL burettes differ only in the size of their cylinder, centering ring and piston, whereas
the 1 mL burette has a different construction: its piston is longer, piston guide and cylinder holder
''replace'' the centering ring of the other burettes. Instead of the locking screw, its glass cylinder is
fastened with an O-ring and a knurled nut.
1 mL burette
5 / 10 / 20 mL burette
Connection tubing
Knurled nut
O-ring
Stopcock
Stopcock
Locking screw
Cylinder holder
Glass cylinder
Piston
Piston rod
Piston guide
Protection tube
Piston
Lip seals
Piston rod
Burette housing
03/03
METTLER TOLEDO DL77/DL70ES/DL67
Centering ring
11-5
Installation instructions
11.1.2.1
Equipping the burette
– Lay gasket on bottle and screw on burette holder.
– Insert stopper (or a drying tube with holder).
Caution: If you use a stopper as protection for the titrant, always use the stopper with flat side!
Otherwise a partial vacuum forms in the bottle (order no. 23646).
– Push suction tubing into the bottle - slide the red PVC tubing over the fitting as kink protection - and
fasten other end to left connection of burette head.
– Screw dispensing tubing into connection at right and place burette tip in tip holder.
Suction tube
Dispensing tube
Tip holder
Burette assembled
Stopper
Burette holder
Gasket
1 L bottle
11-6
METTLER TOLEDO DL77/DL70ES/DL67
Fitting
03/03
Installation instructions
11.1.2.2
Inserting the burette
– Slide the burette onto burette drive 3 (1) with the
stop of arrestment knob (2) located on left side.
– Check that piston rod is correctly positioned in
push rod (3).
– Fix burette by turning the arrestment knob to the
right.
Note
Before sliding the burette onto the titrator, check the
exact position of the stopcock and the piston rod.
If the piston has been pushed too far into the cylinder, carefully take it out a short way. Then press
the burette onto the burette holder thus positioning
the piston exactly. Piston must project 7 mm!
Position of
stop cock
Position of
piston rod
03/03
METTLER TOLEDO DL77/DL70ES/DL67
11-7
Installation instructions
11.1.2.3
Maintaining the burette parts
Depending on the titrant, you should clean the burette cylinder, piston, stopcock and tubing relatively often.
– Slide the burette off the titrator, invert it so that the stopcock points towards you and carefully take out
the piston; this causes the burette contents to flow out through the suction tubing (waste or titrant
bottle!).
– In the same position, turn the stopcock through 90° clockwise and any liquid in the stopcock will flow
out through the dispensing tubing (waste bottle!).
– Unscrew the suction, dispensing and connection tubing.
1 mL burette
– Unscrew the knurled screw of the burette and
remove the O-ring from the glass cylinder using
tweezers.
– Unscrew the holder of the glass cylinder and
take out the cylinder.
Caution:Do not misplace O-ring!
5, 10, or 20 mL burette
– Unscrew the locking screw of the burette and
take out the glass cylinder.
Caution: Do not misplace the centering ring of
the burette housing!
– Press the cam of the stopcock inward
and lift the stopcock up and out.
Cam
• Depending on the contamination caused by the titrant, rinse cylinder and tubing with acids or deionized H2O then with ethanol and finally dry the parts with oil-free compressed air or vacuum.
• Rinse the stopcock with solvents or deionized H2O only! Then dry it with oil-free com-pressed air.
• Never place O-rings in organic solvents!
• Never attempt to remove any crystals in the cylinder by scratching with a hard object! Pipe cleaners or
Q tips™ are more suitable.
• Never put the parts in a drying oven whose temperature is above 40 °C!
– Replace the piston if it leaks or is badly scored at the edge. Pay special attention to crystal formation
between the lip seals of the piston if you work with NaOH/KOH and KF solutions!
11-8
METTLER TOLEDO DL77/DL70ES/DL67
03/03
Installation instructions
11.1.2.4
General notes
You can remove air bubbles at the piston surface by taking the burette out of the guide and lightly tapping
its base. This causes the air bubbles to rise to the top. Then flush the burette.
You can remove air bubbles in the tubes by tapping the tubes with your fingers while titrant is being
siphoned off or dispensed. If this does not help, undo the suction tube so that the titrant flows back into
the bottle, screw it on again and rinse the burette (air purging). In obstinate cases undo both tubes, rinse
with deionized H2O and ethanol and dry using oil-free compressed air or vacuum.
Titrants such as KMnO4 or KOH in MeOH can easily crystallize in the tip of the burette and block it. If you
have no immediate use for a titrant, it is best to empty and clean the dispensing tube: Unscrew connection to let the titrant flow out. Check the threaded connection and wipe off any drops.
KF titrants evolve gas (SO2) especially at elevated temperatures, causing bubbles to form in the tubing
as well as in the burette (stopcock). For this reason burettes should be rinsed prior to titration!
03/03
METTLER TOLEDO DL77/DL70ES/DL67
11-9
Installation instructions
11-10
METTLER TOLEDO DL77/DL70ES/DL67
03/03
Installation instructions
11.1.3 Equipping the titration stand
– Screw on titration arm (1) with knurled screw (2).
– Insert stirring rod (3) and attach propeller stirrer (4) from below to rod.
– Press spacing ring (5) into titration head, place clamping ring (6) in threaded ring (7) and screw in
place.
– To install a titration vessel, turn the threaded ring half a turn to the left, attach the vessel and tighten
threaded ring.
– Always make sure that the titration vessel is firmly seated in the titration head! When
working with toxic solvents, strong acids or bases, you could suffer injury if the titration
vessel drops out.
Risk of
corrosion
– Insert burette tip (8) and electrode (9) diagonally opposed – this ensures better control in the titration
– and close the remaining openings with stoppers (11 & 12).
(10): This opening is intended for the rinsing bottle connection.
(13) is the electrode holder.
03/03
METTLER TOLEDO DL77/DL70ES/DL67
11-11
Installation instructions
11.1.4 Rear view of the titrator
4
5
6
1
2
3
7
1
2
3
4
5
6
7
8
9
10
11
12
13
11-12
8
9
10
11
12
13
14
15
16
17
18
19
On/off switch
Connector for power cable
Fuse holder and voltage selector
Sheet with designations of inputs and outputs
Interface for attachment of a printer (RS232C)
Interface for attachment of a balance (CL)
Sensor (electrode) input 1
Reference electrode input for sensor input 1
Sensor (electrode) input 2
Ground socket
Auxiliary output 1 (for attachment of stirrer, pump, valve or relay)
Auxiliary output 2 (for attachment of stirrer, pump, valve or relay)
Auxiliary output 3 (for attachment of stirrer, pump, valve or relay)
METTLER TOLEDO DL77/DL70ES/DL67
03/03
Installation instructions
RS option (see Section 11.1.6)
14 Sensor (electrode) input 3
15 Interface for attachment of a Sample Changer (RS232C)
16 Interface for attachment of a terminal or computer (RS232C)
Temperature option (see Section 11.1.7)
17 Sensor (electrode) input 4
18 Temperature sensor input: Temp 1 (Pt1000 or Pt100)
19 Temperature sensor input: Temp 2 (Pt1000 or Pt100)
Note
03/03
Insertion of the two options can also be reversed; the sensor inputs will then be counted from
left to right (Sensor 1…Sensor 4).
It is important for you to know that
• the sensor input for the RS option is "low resistance",
• the sensor input for the temperature option is high resistance (see Technical data, Section
11.2.1, and Sensors, Section 1.2.2, page 1-11).
METTLER TOLEDO DL77/DL70ES/DL67
11-13
Installation instructions
11.1.5 Power supply voltage, power fuse
The titrator operates within a voltage range of 100 - 120 or 220 - 240 V. The fuse holder serves as range
selector.
Changing the voltage range.
The instrument is set to the voltage range shown by the opposing arrows (3). If you have to change this,
– lever out the fuse holder (1) with a screwdriver (2),
– rotate the fuse holder by 180°(4) and reinsert. This activates the fuse (5).
Replacing defective fuses.
– Lever out the fuse holder (1) with a screwdriver (2).
– Replace the active fuse (6) by one with the same rating.
100 - 120 V: T1.6 L250 V
220 - 240 V: T800L250 V
– Reinsert fuse holder.
Note
The standard equipment includes a set of spare fuses for the voltage you specified when
ordering the titrator.
Caution
The titrator should not be used in a power distribution system without a direct ground
connection (IT power system).
11-14
METTLER TOLEDO DL77/DL70ES/DL67
03/03
Installation instructions
11.1.6 Inserting an RS option (sensor input, 2 RS232C interfaces)
– Slide the burette off the titrator and unscrew the baseplate.
The titrator must be disconnected from all voltage sources before you remove the
baseplate!
Risk of
electric shock
7
This description applies in case you insert the RS option first (see next section).
– Push in protrusions (1) of three plugs (2) with a screwdriver and push out the plugs using your thumbs.
– Place option in housing next to analog board (3).
– First fasten option to housing with two screws (4a & b) then with three screws (4c, d & e).
– Plug connection (5) of cable of RS option into connector (6) of analog board.
(7) is the connector for the next option (see next section).
Note
03/03
When you install this option, you should adjust the sensor input (see Section 4.8: Offset
adjustment of the sensor inputs).
METTLER TOLEDO DL77/DL70ES/DL67
11-15
Installation instructions
11.1.7 Temperature option (1 sensor input, 2 temperature sensor inputs)
Setting
We have set the temperature option to Pt1000 sensors by default.
If you perform temperature measurements with Pt100 sensors, you must alter the setting prior to installing
the option.
Pt1000
4
3
Pt100
2
6
5
1
– Remove all double jumpers on the pin bases (1, 2, 3, 4) and replug one pin to the right of the original
position: the option is now set for Pt100 sensors.
(5) is the connection cable, (6) the connector for the next option.
11-16
METTLER TOLEDO DL77/DL70ES/DL67
03/03
Installation instructions
Inserting
Insertion of the temperature option corresponds to that of the RS option (see Section 11.1.6), implying
that you can insert either one or the other option.
–
Slide burettes off titrator and unscrew the baseplate.
The titrator must be disconnected from all voltage sources before you remove the
baseplate!
Risk of
electric shock
In case you have inserted the RS option already,
– place the temperature option next to it and plug connection of ribbon cable (5) into the connector
((7), see page 11-15) of the RS option.
Notes
• When you install this option, you should adjust the sensor input (see Section 4.8: Offset adjustment
of the sensor inputs).
• To connect temperature sensors from other manufacturers, you can obtain a Lemo cable plug (4 pin)
and solder on the corresponding cable (see Accessories, Section 11.3.2).
Soldering scheme
2
1
3
4
Shielding
Pt100/Pt1000 sensor
03/03
METTLER TOLEDO DL77/DL70ES/DL67
11-17
Installation instructions
11.1.8 Inserting a user data memory (IC*)
The titrator must be disconnected from all voltage sources before you remove the
baseplate!
Risk of
electric shock
– Slide burettes off titrator and unscrew the baseplate.
– Carefully place user data memory (1) on IC socket (2) of processor board (3) with the IC notch (4)
facing the same direction as that of the adjacent IC (4a).
* IC is the abbreviation for "Integrated Circuit".
11-18
METTLER TOLEDO DL77/DL70ES/DL67
03/03
Technical data
11.2
Technical data
11.2.1 Measurement system
End point indication
Potentiometrically
Photometrically (with DP550/DP660)
Conductometrically (non Mettler unit with analog output)
Temperatur e compensation
for pH/ pM/ pX measurement
Temperatur e input via keypad or by means of a temperatur e sensor
Amplifier range
±2000 mV
Resolution
0.1 mV, 0.002 pH (pM, pX)
Maximum permissible error
0.1%
Zero point drift (+10 -> 35 °C)
<40 µV/ °C
Sensor input 1 and sensor inputof the temperature option*
Triaxial socket (LEMO)
• Offset current
<1 pA (20 °C)
• Input impedance
>5*1012 Ω (protected up to 1000 V capacitively)
Reference electrode input (ref.)
Banana socket 4 mm
• Input impedance
>3*107 Ω (protected up to 1000 V capacitively)
Sensor input 2 and sensor inputof the RS option*
Triaxial socket (LEMO)
• Offset current
<30 pA (20 °C)
• Input impedance
>5*109 Ω (protected up to 1000 V capacitively)
Temperature sensor inputs (Temp 1/Temp 2) of the temperatur
e option
• Range
-20 °C…120 °C
• Resolution
0.1 °C
• Maximum permissible error
0.2 °C
• Measurement principle
Four terminal resistance measurement: Pt1000 (standard) or Pt100
* The sensor number of the option depends upon its installation (see Sections 11.1.4, 11.1.6 and 11.1.7).
03/03
METTLER TOLEDO DL77/DL70ES/DL67
11-19
Technical data
11.2.2 Auxiliary outputs (Aux.1, Aux.2, Aux.3)
Operating modes
Mode 1
Mode 2
For stirrer
Other auxiliary instruments
Voltage range
Mode 1
Mode 2
0 – 18 V / 150 mA
24 V / 500 mA
Each output is electronically protected against overload.
11.2.3 Burette drive module
With DC motor
Number burettes
Maximum 4
Resolution
1 / 5000 of burette volume (0.2, 1, 2 and 4 µL)
Maximum permissible error
<0.3% relative to the respective burette volume of 5, 10, and 20 mL
Filling time
20 s
Delivery time
Minimum 20 s
11.2.4 Interchangeable burettes
Number burettes
Maximum 4
Volumes
1, 5, 10 and 20 mL
Materials in contact with titrant
Fluoroplastic, borosilicate glass, ceramics
11.2.5 Propeller stirrer
Maximum speed
No-load operation:
In water:
around 4000/min
around 3500/min
Power consumption
Pnominal:
Ptypical:
<4 W
1.2 W at 12 V
11.2.6 Keypad
Material
Polyester , splashproof
11.2.7 Display
Liquid cristal display
with graphics, 6 lines, 36 characters per line,
capability 64 * 256 pixels, backlit
Languages
English, German, French, Spanish, Italian
11-20
METTLER TOLEDO DL77/DL70ES/DL67
03/03
Technical data
11.2.8 Titration modes
Equivalence point titration
Dynamic or incremental titrant addition
Equilibrium controlled or time controlled measured value acquisition
Evaluation models for symmetric, asymmetric and segmented titration curves, determination of the minimum or maximum of a titration
curve, determination of the half neutralization value.
End point titration
Continuous or incremental titrant addition to absolute or relative end
point
Learn titration
pH-stating
Karl Fischer titration
Water deter mination (>2 mg H 2O/sample)
11.2.9 Method concept
Flexible sequence through a combination of discrete substages (function) to a method. A particular
substage can occur more than once and each is processed in succession.
Functions
Title, Sample, Stir , Measur e, Temperatur e, Instr uction, Dispense,
Pump, Rinse, Conditioning, Auxiliar y instr ument, Titration, pH/mV stat, Calculation, Auxiliar y value, Titer , Calibration, Statistics, Recor d,
Sync
Conditional functions
Execution of the functions only if condition is met
Result calculation
Comprehensive calculation of results in the desired unit from all available experimental results, intermediate results and calculated results
Statistical evaluation
Determination of mean value, standard deviation and relative standard deviation, outlier test following Grubbs.
Additional functions
Burette (rinse bur ette, dispense: fixed volume or continuously ,
manual titration)
Stirrer (stirring and dissolution)
Sensor (mV , pH,… measur ement with r ecord of measur ed values)
Temperature (°C, °F, K measurement with record of measured values)
Sample Changer
Auxiliary instrument (operation of an auxiliary device; fixed time or
manual)
Calculations (additional calculations of results at the end of every
sample determination)
Records (additional record at the end of every sample determination)
Calibration of the temperature sensors
Offset adjustment of the sensor inputs
03/03
METTLER TOLEDO DL77/DL70ES/DL67
11-21
Technical data
11.2.10 Memory
Data base ( EPROM)
METTLER methods
User data memory ( EEPROM)
Customer methods, installation and analysis data
Memory for approx. 50 standard methods
11.2.11 Attachment possibilities for peripherals
Balance
Serial by bit current loop data interface for all METTLER balances
with data output CL, 03, 011, 012, 016, 017, 018, 040
A converter cable is available for SARTORIUS balances (CL-RS/RS-CL)
Printer
RS232C interface for various commercial graphics printers with
RS232C interface with XON/XOFF protocol.
Sample Changer
Attachment also via RS232C interface (available as option)
Computer
Attachment also via RS232C interface
RS232C interface
Pin assignment of the socket of the titrator and the connectors or sockets of the available cables:
Computer (DTE)
Connection socket of the titrator
7
8
6
Cables with ME-No. :
3
1
5
4
2
Shielding
TxD
RxD
GND
DSR
DTR
RTS
CTS
11-22
1
2
3
6
8
4
200495
(25 pin,
male)
1
2
3
7
6
20
METTLER TOLEDO DL77/DL70ES/DL67
201507
(25 pin,
female)
1
2
3
7
6
20
4
5
201508
(9 pin,
female)
1
3
2
5
6
4
7
8
03/03
Technical data
Null modem
Connector (RS232) for 2 printer cables
Connections
D-sub sockets, 25 pin, both female
Shielding
1
2
3
7
6
20
TxD
RxD
GND
DSR
DTR
1
2
3
7
6
20
Additional connections in the connector are allowed.
11.2.12 Additional data
Housing
Polyester
Titration stand
Polypropylene
Dimensions
Width: 360 mm, depth: 400 mm, height: 260 mm
Weight
approx. 11.5 kg with one burette drive
Power supply
100 - 120 V or 220 - 240 V, ± 10%
Fuse rating
T1,6L250V/ T800L250V
Frequency
50 / 60 Hz
Power consumption
600 mA / 300 mA
Ambient conditions
Ambient temperatare
+5 °C … +40 °C
Atmosperic humidity
Maximum relative atmospheric humidity of 80% for temperatures up to
31 °C, decreasing linearly to 50% relative atmospheric humidity at 40 °C.
Use
indoors
Overvoltage category
II
Pollution degree
2
04/04
METTLER TOLEDO DL77/DL70ES/DL67
11-23
Technical data
FCC Rules and Radio Interference Regulations
This equipment has been tested and found to comply with the limits for a Class A digital device, pursuant
to both Part 15 of the FCC Rules and the radio interference regulations of the Canadian Department of
Communications. These limits ar e designed to pr ovide r easonable pr otection against har mful inter fer ence when the equipment is operated in a commercial environment. This equipment generates, uses
and can radiate radio frequency energy and, if not installed and used in accordance with the instruction
manual, may cause harmful interference to radio communications. Operation of this equipment in a
residential area is like to cause harmful interference in which case the user will be required to correct the
interference at his own expense.
11-24
METTLER TOLEDO DL77/DL70ES/DL67
03/03
Accessories
11.3
Accessories
All the instrument's components and working aids for the titrator that form part of
• the standard equipment and
• the optional accessories
are listed here.
Each part that is listed with an order number can be ordered from METTLER TOLEDO.
09/2002
METTLER TOLEDO
DL77/DL70ES/DL67
11-25
Accessories
Propeller stirrer
Interchangeable burette
incl. 1 L brown glass bottle
(Optional accessories)
Burette
drive
SEL
RESE
T
SE L
EXIT
Manual titration stand
(Optional accessories)
RUN
11-26
METTLER TOLEDO
DL77/DL70ES/DL67
09/2002
Accessories
11.3.1
Standard equipment
1)
DL70ES: one burette drive
[1]
1)
DL77: two burette drives
[2]
(interchangeable burettes: see Optional accessories)
[3]
One electrode holder
(manual titration stand: see Optional accessories)
[4]
One propeller stirrer incl. 2 stirring rods
[5]
One built-in RS option
[6]
One built-in temperature option
[7]
One serial/parallel converter
Order No.
One
One
One
One
One
One
One
One
One
One
One
One
One
1)
set of Operating Instructions (DL77/DL70ES/DL67)in
Tutorial
in
RS232C Interface Description
power cable
in
set of microfuses
in
connection cable for a printer
Phillips screwdriver No. 2
tube of silicone grease
electrode cable (SC-LEMO-60)
short circuit plug
connection cable for a computer
CD LabX light titration software
set of Operating Instructions (LabX light)
in
accordance with your order
accordance with your order
709165
accordance with your order
accordance with your order
200495
73072
71300
89601
25868
201508
51106330
accordance with your order
As of June 1999, METTLER TOLEDO will no longer manufacture the DL67.
09/2002
METTLER TOLEDO
DL77/DL70ES/DL67
11-27
Accessories
11.3.2
Optional accessories
The numbers enclosed in parentheses refer to the purchase order, e.g., of an interchangeable
burette. In case of additional orders, some parts are available only in multipack form or in
minimum quantities.
Order No.
[1] Burette drive
DV90
[2] Interchangeable burettes
Interchangeable burette, complete
1
5
10
20
mL
mL
mL
mL
DV1001
DV1005
DV1010
DV1020
comprising:
1 L brown glass bottle (1)
71296
Burette holder
23645
Piston (1)
11-28
METTLER TOLEDO
DV1001
DV1005
DV1010
DV1020
DL77/DL70ES/DL67
51107535
51107115
51107116
51107117
09/2002
Accessories
Order No.
1)
Stopcock (1) with valve disk
made of
PTFE (light-gray)
ceramic (dark-brown)
51107537
51107525
1)
Both valve disks are chemically resistant. For 24-hour use with titrants that
have a tendency to cristallize out, we recommend the ceramic disk.
Light protection tube (1)
23644
Dispensing tube (1) with siphon tip
70 cm
25687
Suction tube (1)
83 cm
25688
Gasket (1)
for 1 L brown glass bottle
min. order quantity: 5
Tip holder (1) for burette tip
Stopper ST 14.5 (1)
HCl
c=
Date:
mol/L
HCl
c=
Date:
mol/L
NaOH
c=
Date:
mol/L
NaOH
c=
Date:
AgNO3
c=
Date:
mol/L
1/2 H2SO4
c=
Date:
mol/L
1/2 H2SO4
c=
Date:
mol/L
mol/L
AgNO3
c=
Date:
mol/L
KF
c=
mg H2O/mL
Date:
KF
c=
mg H2O/mL
Date:
c=
Date:
mol/L
c=
Date:
mol/L
c=
Date:
mol/L
c=
Date:
mol/L
c=
Date:
mol/L
c=
Date:
mol/L
c=
Date:
mol/L
c=
Date:
mol/L
c=
Date:
mol/L
c=
Date:
mol/L
c=
Date:
mol/L
c=
Date:
mol/L
c=
Date:
mol/L
c=
Date:
mol/L
c=
Date:
mol/L
c=
Date:
mol/L
c=
Date:
mol/L
c=
Date:
mol/L
c=
Date:
mol/L
c=
Date:
mol/L
c=
Date:
mol/L
c=
Date:
mol/L
c=
Date:
mol/L
c=
Date:
mol/L
c=
Date:
mol/L
c=
Date:
mol/L
c=
Date:
mol/L
c=
Date:
mol/L
c=
Date:
mol/L
c=
Date:
mol/L
c=
Date:
mol/L
c=
Date:
mol/L
c=
Date:
mol/L
c=
Date:
mol/L
c=
Date:
mol/L
c=
Date:
mol/L
c=
Date:
mol/L
c=
Date:
mol/L
c=
Date:
mol/L
c=
Date:
mol/L
c=
Date:
mol/L
c=
Date:
mol/L
c=
Date:
mol/L
c=
Date:
mol/L
c=
Date:
mol/L
c=
Date:
mol/L
c=
Date:
mol/L
c=
Date:
mol/L
c=
Date:
mol/L
c=
Date:
mol/L
09/2002
23960
min. order quantity: 5
Set of labels (1)
METTLER TOLEDO
23981
23646
51107506
DL77/DL70ES/DL67
11-29
Accessories
Order No.
Dispensing tube with siphon tip
100 cm
25961
Drying tubewith cover
23961
Drying tube holder
23915
Molecular sieve 250 g
71478
Gas inlet
23721
Siphon tip set
Adapter for bottles by:
set of 5
23240
Merck, DE
Fisher, US
23774
23787
[3] Titration stand
11-30
Manual titration stand, complete
51108760
Electrode holder
51108730
METTLER TOLEDO
DL77/DL70ES/DL67
09/2002
Accessories
Order No.
Dual titration stand, complete
DV92
comprising:
09/2002
Propeller stirrer incl. 2 stirring rods (see [4] below) and
Angle bracket (1)
25655
Spacing ring (1)
23842
Clamping ring (1)
25653
Threaded ring (1)
25652
Knurled screw (2)
25650
Electrode holder (2)
min. order quantity: 5
25654
Stopper ST 14.5 (3)
min. order quantity: 5
23451
Stopper ST 7.5 (2)
min. order quantity: 5
23452
METTLER TOLEDO
DL77/DL70ES/DL67
11-31
Accessories
Order No.
Titration vessel 100 mL
polypropylene (2)
set of 1400
101974
Additional glassware and auxiliary components for the titration stand:
Titration vessel 100 mL
polypropylene, red
set of 1400
25777
Titration vessel 80 mL, glass
set of 20
101446
Titration vessel 250 mL, glass
set of 10
23515
Titration vessel 5-20 mL, glass
23516
Thermostatable titration vessel 80 mL, glass
23517
Plastic cover for titration vessels
Heat exchanger for thermostating
incl. adapter with taper joint
Rinsing unit, complete
with titration head insert and stoppers
for unused openings in titration head
1 set of stoppers for rinsing unit
11-32
METTLER TOLEDO
DL77/DL70ES/DL67
set of 20
51108481
23834
23821
101230
09/2002
Accessories
Order No.
[4] Propeller stirrer
incl. 2 stirring rods
25736
Propeller stirring rod
101229
Micropropeller stirring rod
(for titration vessel 23516)
655073
Caution:
Propeller stirrers for the DL40/DL21/DL25 titrators cannot be used!
Microfuse
T1,6 L250V for 100 – 120 V
set of 3
18560
T800L250V for 220 – 240 V
set of 3
20182
Operating
Instructions
German
English
French
705093
705094
705095
Tutorial
German
English
French
Spanish
Italian
705096
705097
705098
705163
705164
Memo card
German
English
French
Spanish
Italian
709160
709161
709162
709163
709164
09/2002
METTLER TOLEDO
DL77/DL70ES/DL67
11-33
Accessories
Order No.
Sensors
Combined pH electrode for
titrations in aqueous solutions
DG111-SC
Combined pH electrode for small volumes
in small titration vessels in aqueous solutions
DG101-SC
Combined glass electrode with movable sleeve
frit for titrations in nonaqueous solutions
DG113-SC
Combined glass electrode with movable sleeve
frit for titrations in aqueous solutions
DG114-SC
Combined glass electrode with sleeve
frit for titrations in aqueous solutions
DG115-SC
Combined platinum ring electrode for
redox titrations
DM140-SC
Combined silver ring electrode for
argentometric titrations
DM141-SC
Phototrode (incl. power supply unit,
cable length 70 cm),
for color-indicated titrations
Transmission measurement at 555 nm (green)
DP550
Transmission measurement at 660 nm (red)
DP660
11-34
METTLER TOLEDO
DL77/DL70ES/DL67
09/2002
Accessories
Order No.
Ion selective measuring electrodes
• Fluoride ISE
• Chloride ISE
• Nitrate ISE
• Sodium ISE
• Potassium ISE
• Lithium ISE
• Ammonia GSE
• Ammonium ISE
• Magnesium ISE
• Cyanide ISE
• Sulfide ISE
• Calcium ISE
• Copper(II) ISE
• Bromide ISE
• Fluoroborate ISE
• Silver ISE
• Cadmium ISE
• Iodine ISE
• Barium ISE
• Surfactant sensitive electrode
Reference electrode for
• ion selective electrodes
• surfactant sensitive electrode
DX219
DX235
DX262
DX223
DX239
DX207
DX217
DX218
DX224
DX226
DX232
DX240
DX264
DX280
DX287
DX308
DX312
DX327
DX337
DS500
51089931
51089933
51089934
51089930
51089932
51107673
51107677
51107679
51107684
51107681
51107675
51107683
51107678
51107671
51107676
51107682
51107672
51107680
51107674
51107670
DX200
Inlab 301
51089935
52000128
Triaxial cable(electrode cable with LEMO connector)
Cable SC-LEMO-60
length 60 cm
Cable SC-LEMO-100
length 100 cm
Cable SC-LEMO-160
length 160 cm
1)
(DIN-LEMO) to attach
Adapter cable
electrodes with a DIN connector to the titrator
1)
89601
89602
51108034
89600
If sensors with DIN connectors are attached to the titrator via the adapter cable, the
advantages offered by the triaxial cable – high level of protection against electrostatic
interference – are lost in part. When using sensors with a very high resistance, e.g.,
DG113 in nonaqueous solutions, we advise against use of the adapter cable.
09/2002
METTLER TOLEDO
DL77/DL70ES/DL67
11-35
Accessories
Order No.
Temperature sensors
Pt1000 sensor
DT1000
LEMO cable connector (4 pin)
for temperature sensors (non-METTLER)
88321
Accessories for Karl-Fischer titrations
Double-pin platinum electrode
DM143-SC
Electrode cable (SC/ Banana)
(Length: 1 m)
51108061
Polarization current source
on off bat.
test
DK102A
METTLER DK102A
1
2
0,5
3
5
0,2
10
µA
External titration stand
11-36
METTLER TOLEDO
DV705
DL77/DL70ES/DL67
03/2003
Accessories
Order No.
Peripherals
Mettler-Toledo balances with data output
AG, AM, PM, AT,
AX, AB, PB, PR
Adapter cable for balances with options 03,
011 and 040 (between option and cable 214101)
42931
Converter cable for SARTORIUS balances
RS/CL-CL/RS
106024
Connection cable for AX, AM, PM, AT balances
214103
LC-CL cable for AG, AB, PB, PR balances
229130
Sample Changer
Rondo 60
Double cable connecting DL77 with two Rondo 60's51108305
Sampler system
Sampler system
QUANTO aliquot
QUANTO direct
Olivetti Artjet printer
EU version
US version
51190985
51190986
DR42
OU
T
OU 1
T
OU 2
T
OU 3
T
IN 4
1
IN
2
ON
TBox (control of external devices via TTL-I/O)
OUT 1
OUT 2
24 VDC 1.2 A
OUT 3
100-240 V
50/60 Hz
unfused
max. 9 A
OUT 4
TBox DR42
09/2002
METTLER TOLEDO
DL77/DL70ES/DL67
11-37
Accessories
Order No.
Connection cable (RS232C) for computer
(DTE, 9-pin, female)
201508
Connection cable (RS232C) for computer/terminal
(DTE, 25-pin, female)
201507
LabX professional titration software (incl. Operating Instructions)
English
51106300
German
51106302
LabX multi titration software (incl. Operating Instructions)
English
51106310
German
51106312
Miscellaneous
[5] RS option: 2 RS232C (DCE) interfaces
plus 1 sensor input
incl. the Operating Instructions:
"RS232C Description Interface"
English
[6] Temperature option: 2 inputs for Pt sensors
plus 1 sensor input
11-38
25690
709165
25872
Cable connector 8-pin (DIN)
to be prepared as an RS short circuit plug
(for the DL77 to synchronize methods)
89144
User data memory
25817
Adapter cable (DIN connector-banana sockets)
25914
METTLER TOLEDO
DL77/DL70ES/DL67
09/2002
Accessories
Order No.
Peristaltic pump SP250
with Novoprene tubes and hose clamps
51108016
Adapter cable (mini DIN/ RCA)
(Length: 0.5 m)
51108350
Novoprene tubes for SP250 (1x1 m + 10x120 mm)
Fluorosilicone elastomer tubes (5x120 mm)
51190969
51108149
Dispensing unit DU200
EU version
US version
51370200
51370210
Connection cable DU200 / DL7x
51370511
Sampling unit SU24
51108018
Auxiliary output expander AOE06
51108019
Heating system
[7]
03/2003
DH100
Serial/parallel converter
METTLER TOLEDO
DL77/DL70ES/DL67
51108024
11-39
Accessories
Order No.
METTLER TOLEDO literature and brochures
Basics of Titration
51725008
Fundamentals of Titration
704153
Guide to pH Measurement
51300047
Guide to Ion Selective Measurement
51300075
Guide to Conductivity and Dissolved Oxygen
51724716
DL70 Application Brochure 1 (18 Customer methods)
724492
DL70 Application Brochure 2 (Various methods)
724557
DL70 Application Brochure 3 (TAN and TBN)
724559
DL7x Application Brochure 4 (Gold and Silver)
724613
DL7x Application Brochure 5 (Determinations in Water)
51724634
DL7x Application Brochure 6 (Direct Measurement with
Ion Selective Electrodes)
51724646
DL7x Application Brochure 7 (Incremental Techniques with
Ion Selective Electrodes)
51724648
DL7x Application Brochure 8 (Standardization of Titrants I)
51724650
DL7x Application Brochure 9 (Standardization of Titrants II)
51724652
DL7x Application Brochure 13 (Nitrogen Determination
by Kjeldahl Digestion)
51724769
DL7x Application Brochure 14 (Good Labatory Practice
in the Titration Lab)
51724908
DL7x Application Brochure 15 (Guidelines for Result Check, Method Validation
and Instrument Certification)
51724910
DL7x Application Brochure 16 (Validation of Titration Methods)
51724912
11-40
METTLER TOLEDO
DL77/DL70ES/DL67
03/2003
Index
Index
∆E
end point titration 2-55
equivalence point titration 2-42
measure function 2-20
∆E(set)
end point titration 2-55
equivalence point titration 2-40
∆t
end point titration 2-55
equivalence point titration 2-42
measure function 2-20
temperature function 2-22
Absorption 1-11
Accessories
optional accessories 11-28
standard equipment 11-27
ANALYSIS 3-3
ANALYSIS A
changing to ANALYSIS B 3-44
parallel titrations 3-42
ANALYSIS B
changing to ANALYSIS A 3-44
parallel titrations 3-42
Analysis parameters
"Installed are" 1-40, 3-8
"Results of this sample" 1-40, 3-12
Applications sheets 10-15
Asterisk (∗)
method identification 2-5, 2-14
previously executed method 3-14
Asymmetric (evaluation procedure)
equivalence point recognition 2-45
evaluation criteria 2-51
explanation 8-21
Audio signal 1-39
Automation 7-7
Auto stand 1-25, 3-13
Aux. 1/2/3 (auxiliary outputs) 1-18, 1-20,
1-26
AUXILIARY FUNCTIONS
menu 4-3
menu tree 4-4
02/93
Auxiliary instrument(s)
adding 1-21
auxiliary function 4-21
deleting 1-20
function 2-31
installing 1-22
menu tree 1-21
modifying 1-20
Auxiliary outputs
auxiliary instrument 1-20
auxiliary reagents 1-18
stirrer 1-26
Auxiliary reagents
adding 1-18
deleting 1-17
installing 1-19
menu tree 1-19
modifying 1-17
Auxiliary value(s)
entering 1-23
entry through determination 1-23
function 2-70
menu tree 1-24
Auxiliary value memory 1-23, 2-70
Back titration (example) 2-24
Balance(s)
configuration (METTLER) 1-30
configuration (SARTORIUS) 1-31
connection 11-23
connection cable 11-37
installing 1-30
Baud rate
balances 1-30, 1-31
printer 1-29
system 1-32
Bidirectional transmission mode 1-30, 3-9
Buffer potential 1 2-51, 8-6, 8-9
Buffer potential 2 2-51, 8-6, 8-9
Buffer solutions
DIN/NIST buffer 2-72
Ingold buffer 2-73
Merck Titrisol buffer 2-73
METTLER DL77/DL70ES/DL67
12-1
Index
Burette
air bubbles 11-9
equipping 11-7
inserting 11-8
installation instructions 11-5
Karl Fischer titrations 10-5
maintaining 11-5, 11-8
menu 4-6
rinsing 4-6
Burette drive
inserting 11-3
selecting 1-5
Burette volume
selecting 1-5
smallest increment 2-40
C (constant) 2-67, 8-8
c (nominal concentration) 8-3
c ∗ t (actual concentration) 8-3
Calculation(s)
designations 8-3, 8-8
formulae 8-26
function 2-66
indexes 8-10
recalculation 3-34
Calculation operations 2-66
Calibration data
determination 2-72
entry through calibration 1-12
for sensor inputs 1-12
theoretical values 1-12
Calibration
function 2-72
sensors 2-72
temperature sensors 4-23
Calibration method 2-74
Character set 1-33
Code (sync fct.) 2-81
Comment (sync fct.) 2-81
Communication protocol 1-33
Communication: titrator <-> computer
introduction 7-5
overview 7-5
Comparison operators 8-17
12-2
Computer
connection 11-23
connection cable 11-38
installing 1-33
Concentration [mol/L] 1-5, 8-3
Conditioning (function) 2-27
Condition for functions 8-16
Conditioning mode
fix (explanation) 2-27
flexible (explanation) 2-27
selecting 1-26
Conductivity measurement 1-11
Conductometer 1-11
Constants
calculation function 2-66
calculations menu 3-34
examples 8-27
Continuous (titrant addition) 2-54
Continuous addition (pH/mV-stat fct.) 2-63
Control band 2-54
Control range 2-63
Conversion constant 8-28
Correction factor 3-7
Correlation coefficient 2-62, 2-64
CSTAT (correlation coefficient) 2-62, 8-7,
8-9
Cursor keys
during entry 1-4, 2-10
during titration 3-29
Curve type (display) 3-30
Data administration 7-6
Data backup 7-7
Data bits
printer 1-29
system 1-32
Data entry (LIMS) 3-6
Data storage (pH/mV-stat fct.) 2-64
Data transfer
installation data 5-6
method 5-5
Date
entering 1-36
selecting format 1-36
METTLER DL77/DL70ES/DL67
02/93
Index
Date specification
auxiliary values 1-23
methods 2-14
sensors 1-12
temperature sensors 1-15
titrants 1-6
Decimal places 2-66, 3-34
Default speed 1-26, 2-16
Default values 1-4, 2-10
Delay 2-54, 2-55
Designations
compilation 8-14
explanation 8-3
Dispense
auxiliary function 4-7
function 2-24
Dispenser (sample changer) 4-20
Dispense continuously 4-8
Dispensing rate 1-18
Display (analysis menu) 3-28
DK102A (polarization current source) 10-6
DOCUMENTATION 5-3
DOS (dispense) 2-34
Dose 1 2-34
Dose 2 2-34
Dosing pump (sample changer) 4-19
Dosing pump manual (sample changer)
4-20
Drift compensation 10-12
Drift
Karl Fischer titrations 10-7
potential measurement 2-20
temperature measurement 2-22
DYN (titrant addition EQP) 2-40
Dynamic (titrant addition EP) 2-55
EHNV (half neutralization value) 2-36, 8-5
Electrodes (METTLER) 1-9
E (potential) 2-20, 8-3
EDITOR
menu 2-3
menu tree 2-12, 2-13
02/93
End point mode (EP)
EPA 2-56
EPR 2-56
EPS 2-56
End point mode (pH-stat)
EPA 2-63
EPS 2-63
End point range 2-55
End point titration 2-53
EP (end point titration) 2-53
EPA (absolute end point) 2-56, 2-63
EPOT 2-36, 8-5
EPR (relative end point) 2-56
EPS (other end point) 2-56, 2-63
EQP (equivalence point titration) 2-36
EQP range 2-49
EQU (equilibrium controlled measure
mode) 2-42
Equilibrium controlled measured value
acquisition 2-42, 2-55
Equivalence point(s)
explanation 2-36, 8-20
formulae for limiting 8-31
maximum number/method 8-25
Equivalence point recognition
EQP titration 2-45
LEARN EQP 2-59
Equivalence point titration
menu tree 2-37
titration mode 2-36
Equivalent number
calculation function 2-68
entering 2-16
modifying 3-7
Error messages
data transfer 5-5
learn titration 3-18
memory copy 5-9, 5-10
remote control 7-3
with reference to Section 9.1 9-3
ET1 2-34, 2-35, 2-39, 2-53, 8-4
ET2 2-34, 2-39, 2-53, 8-4
ET3 2-35, 2-39, 8-4
METTLER DL77/DL70ES/DL67
12-3
Index
Evaluation criteria
pH/mV-stat function 2-64
titration function 2-51
Evaluation procedure
explanation 8-20
titration function 2-45, 2-51
EXIT key 1-6, 2-10, 2-11, 3-8, 3-10, 3-16
Expert 6-3
f (correction factor) 3-7, 8-3
Fix (conditioning mode) 2-27
Fixed volume
sample data mask 3-10
sample function 2-15
Flexible (conditioning mode) 2-27
Formulae
auxiliary value function 2-70
calculation function 2-66
calculations menu 3-34
constants 8-27
for limiting the equivalence point 8-31
nominal consumption 8-30
nominal content 8-28
results 8-26
titer function 2-71
Form feed 1-29
Frame lines (printout) 1-29
Free stand 1-25
Function(s)
adding 2-9
copying 2-8
cutting 2-8
deleting 2-8
explanation 2-3
list 2-3
maximum number/method 8-24
modifying 2-10, 2-14
pasting 2-8
selecting 2-8
Function number 4-3
Functions with a condition
examples 2-79, 8-18, 8-19
explanation 8-16
Fuse (replacement) 11-14
12-4
H (auxiliary value) 1-23, 2-70, 8-8
Half neutralization value 2-36
HELP key 2-39, 2-53, 2-67, 3-34
ID1 (identification 1)
entering 2-16
modifying 3-6
ID2 (identification 2) 3-7
INC (titrant addition EQP) 2-41
Indexes 8-10
Indexing forms
compilation 8-14
examples 8-10, 8-11, 8-12
Index key 7
Inflection point 8-20
Information
enter key: see Tutorial
ikey: see Tutorial
operating instructions 4
system 9-5
Initial potential 2-34
INSTALLATION 1-3
Installation data
printing 5-4
Installation instructions 11-3
Instruction (function) 2-23
Interchangeable burettes: see burette
Interrupting (method) 3-17
Interval (conditioning fct.) 2-27
Karl Fischer methods
burette 10-5
drift compensation 10-12
drift determination 10-7
standby titration 10-8
titer with Na-tartrate 10-8
titration 10-7
Karl Fischer reagents 10-6
Karl Fischer titrations
performing 10-9
limits of detection 10-9
reproducibility 10-9
results (examples) 10-14
safety measures 10-5
METTLER DL77/DL70ES/DL67
02/93
Index
Key combinations
compilation 7
Language 1-37
Learn titration
LEARN EP 2-60
LEARN EQP 2-58
results 3-13
Lift (sample changer) 4-16
Limits ∆V 2-40
LIMS 7-5
Line feed 1-29
List continuous 3-40
List once 3-37
Logical operators 8-17
Loop 2-17
M (molar mass) 2-16, 2-68, 3-7, 8-3
m (weight) 2-15, 3-7, 8-3
Malfunctions
general comments 9-5
Karl Fischer titrations 10-13
Manual
auxiliary instrument 4-22
temperature entry 2-16, 3-7
Manual titration
interrupting 4-10
modifying 4-9
starting 4-10
terminating 4-10
Maximum (evaluation procedure)
equivalence point recognition 2-45
evaluation criteria 2-51
explanation 8-23
Maximum volume
end point titration 2-57
pH/mV-stat function 2-64
termination criterium 2-50
titration mode DOS 2-34
Mean value 2-75
Measure (function) 2-20
Measure mode (EQP titration) 2-42
Measured values
displaying 3-29
storage 2-64, 8-25
02/93
Measurement points (measured values)
for equivalence point recognition 2-45,
2-59
maximum number/titration fct. 8-25
Memory copy
computer/titrator 5-7
titrator 1/titrator 2 5-9
titrator/computer 5-8
Menu (explanation) 4
Menu change
with key combinations 7
Menu sequences
example for sample data entry 3-11
method M001 3-4, 3-5
Menu tree (explanation) 4
Menu trees
auxiliary functions 4-4
auxiliary instruments 1-21
auxiliary reagents 1-19
auxiliary values 1-24
editor menu 2-12, 2-13
equivalence point titration 2-37
overview (DL77) 5
sensors 1-13
system with computer 1-34
temperature sensors 1-16
titrants 1-7
titration function 2-33
titration stands 1-27
Method (ANALYSIS)
adding 3-6
cutting 3-36
deleting 3-36
executing 3-4
fading out 3-16
interrupting 3-17
loading 3-6, 3-8
modifying 3-21
pasting 3-36
recording 3-32
restarting 3-14
starting 3-8
terminating 3-15
time acquisition 3-13
METTLER DL77/DL70ES/DL67
12-5
Index
Method (EDITOR)
copying 2-7
deleting 2-7
explanation 2-3
modifying 2-7
printing 2-6
recording 2-77
saving 2-11
selecting 2-5
Method (selection menu)
method completed 3-13
method faded out 3-16
method interrupted 3-17, 3-19
starting method 3-8
Method data
menu 3-26
modifying (before starting method) 3-6,
3-26
modifying (during current method) 3-26
printing 3-27
Method data list 3-26
Method data mask
notes 3-10
Methods
development (design scheme) 8-36
examples 8-32
maximum number/method list 8-25
printing (list) 5-3
Method ID
entering 2-14, 3-6
explanation 2-5
modifying 2-11
overwriting 2-11
Method list
filling 3-35
modifying 3-36
processing 3-37
Method series 2-26
with 2 sample changers 3-46
titration sequences 3-38, 3-39
METTLER methods
list 10-4
memory 11-22
selecting 2-5
12-6
Minimum (evaluation procedure)
equivalence point recognition 2-45
evaluation criteria 2-51
explanation 8-23
Miscellaneous (menu) 1-36
Moisture determination 10-5
Molar mass
calculation function 2-68
entering 2-16
modifying 3-7
neq (number of equivalence points) 8-5
New method 2-6
Nominal content
dispensing 8-28
predispensing 8-28
Null modem
pin assignment 11-24
Number samples
entering 2-15
modifying 3-6
Numeric keys 4-3
Offset adjustment 4-24
Operating concept 4
Outlier test 2-75
Output unit 2-77
P1/P2 8-6, 8-9
Paper (printer)
fanfold 1-28
single sheet 1-28
Paper format 1-29
Parallel titrations
notes 3-43
procedure 3-42
Parity
balances 1-30
printer 1-29
system 1-32
Peripherals (menu ) 1-28
pH-stating (example) 2-65
pH/mV-stat (function) 2-62
pH measurement 4-12
METTLER DL77/DL70ES/DL67
02/93
Index
Piston
assembling 11-5
inserting 11-5
Potential measurement 4-12
Power fuse 11-14
Power supply voltage 11-14
Predispensing 1 2-39
Predispensing 2 2-39
Predispensing
end point titration 2-53
equivalence point titration 2-39
Pretitration 2-63
Printer
connection 11-23
connection cable 11-27
Diabolo 1-28
DICONIX 180si 1-28
HP Deskjet 1-28
IBM 1-28
installing 1-28
LX800 1-28
Pt100 sensor 1-15
Pt1000 sensor 1-15
Pump (function) 2-25
Q 2-36, 8-5
QDISP 2-24, 8-3
QEX 8-5
QP1/QP2 8-6, 8-9
QSTAT 2-62, 8-8
QT 8-7, 8-9
QT1/QT2 2-62, 8-7, 8-9
QTOT 2-62, 8-7
Question mark (?) 2-5, 2-14
R (result) 2-66, 8-8
Raw results
compilation 8-9
explanation 2-21
recording 2-78, 3-32, 8-9
storage 8-25
Rear view of the titrator 11-12
Recalculation 3-34
Recommendation menu 1-5
Record (function) 2-77
02/93
Records (analysis menu) 3-32
Record header 1-37
Reevaluation 2-52, 3-19
Reference electrode 1-9
Relative standard deviation 2-75
REMOTE CONTROL 7-3
Remote control 7-7
Representation (display) 3-29
RESET
auxiliary functions 4-5
current method 3-15
documentation 5-3
list continuous 3-40
Resources
deleting 1-3
explanation 1-3
list 1-3
Result(s)
displaying 3-29
examples 2-67, 2-68, 8-26
Karl Fischer titrations 10-14
learn titration 3-13
maximum number/method 8-25
R 2-66, 2-69
recording 2-78, 3-32
Ri 2-75
sample data mask 3-10
storage 8-25
units 2-67, 2-68, 8-26
Result list 3-13
Result units 2-66, 3-34
Rinse
conditioning function 2-27
function 2-26
Rinse tip 4-7
Rinsing pump (sample changer) 4-18
Rinsing pump manual (sample changer)
4-18
Routine 6-3
Routine level 1-38
RS232C interface
pin assigment 11-23
RS option
accessories 11-38
inserting 11-15
METTLER DL77/DL70ES/DL67
12-7
Index
s (standard deviation) 2-75, 8-8
Safety measures
for your protection 1, 10-5, 11-3, 11-11
for operational reliability 1
Sample (function) 2-15
responsibility 2-16
Sample changer
auxiliary function 4-16
connection 11-23
connection cable 11-38
connection scheme 1-35
installing 1-35
method series 3-46
sample series 3-45
titration sequences 3-38, 3-39
Sample data
entering (before starting method) 3-7,
3-23
entering (during current method) 3-10,
3-23
entering (for "List continuous") 3-41
menu 3-23
printing 3-27
recording 2-77, 3-32
Sample data list 3-23, 3-25
Sample data mask
notes 3-10
Samples
maximum number 8-24
Sample series
example 2-17
sample function 2-16
statistics function 2-17
with 2 sample changers 3-45
Save
measured values (pH/mV-stat fct.) 2-64
methods 2-11
modified "current" method 3-21
parameters 2-10
reevaluation 3-20
resources 1-3, 1-6
with key combinations 7
Scheme (method design) 8-36
12-8
Segmented (evaluation procedure)
equivalence point recognition 2-45
evaluation criteria 2-51
explanation 8-22
SEL key 1-5, 2-10
Selection menu 1-5
Send mode 1-33
Sensor(s)
adding 1-14
auxiliary function 4-12
deleting 1-10
installing 1-14
menu tree 1-13
modifying 1-10
overview 1-9
Sensor input(s)
adjusting 4-24
calibration data 1-12
for glass electrodes 1-9, 1-11
for phototrodes 1-9, 1-11
for temperature sensors 1-15
RS option 1-11
temperature option 1-11
Series: see sample or method series resp.
Single method 3-37
Slope (sensor)
calculation 2-72
entry through calibration 1-12
explanation 1-12
pH calibration 2-73
theoretical value 1-12
Software version 4
Speed
entering 1-26, 2-18
modifying 3-31
srel (rel. standard deviation) 2-75, 8-8
ST20A (ST20) sample changer 1-35
ST20 1/ST20 2 1-25
Standard (evaluation procedure)
equivalence point recognition 2-45
evaluation criteria 2-51
explanation 8-20
Stand 1/2 1-25
Standard deviation 2-75
Start/end character 1-33
Statistics (function) 2-75
METTLER DL77/DL70ES/DL67
02/93
Index
Status
remote control 7-3
stirrer 3-31
Steepest jump only 2-51
Stir (function) 2-18
Stirrer
analysis menu 3-31
auxiliary function 4-11
Stirrer connection 1-26
Stop bits
printer 1-29
system 1-32
Stop for reevaluation 2-52
Submethods 8-34
Sync (function) 2-81
Synchronization mode 2-81
System 1-32
T (temperature) 2-22, 8-3
t (titer) 2-71, 8-8
t(max)
end point titration 2-55
equivalence point titration 2-42
measure function 2-21
pH/mV-stat function 2-64
temperature function 2-22
t(min)
end point titration 2-55
equivalence point titration 2-42
measure function 2-21
pH/mV-stat function 2-64
temperature function 2-22
Table of measured values
displaying 3-29
recording 2-78, 3-32
Technical data
auxiliary outputs 11-20
burettes 11-20
burette drive module 11-20
display 11-21
general data 11-24
keypad 11-21
measurement system 11-19
memory 11-22
propeller stirrer 11-20
02/93
Temperature
auxiliary function 4-14
entering 1-12, 3-7
entry through calibration 1-12
function 2-22
measuring 1-12, 2-16, 2-20, 2-22, 2-32,
2-62, 2-72, 3-7, 4-14
Temperature compensation 2-16, 2-72
Temperature option
accessories 11-38
inserting 11-17
setting 11-16
Temperature sensor(s)
calibrating 4-23
Lemo cable plug 11-17
menu tree 1-16
modifying 3-7
selecting 2-16
Pt100 1-15
Pt1000 1-15
Tendency
end point titration 2-57
EQP range 2-49
LEARN EP 2-61
pH/mV-stat function 2-63
Terminal
configuration 7-9
connection 11-23
installing 1-32
key assignment 7-10
Terminate: see RESET
Termination
after n EQP's 2-50
after nominal consumption (example)
8-30
after record 2-79
at combined criteria 2-51
at maximum volume 2-50
at potential 2-50
at slope 2-50
Termination criteria
pH/mV-stat function 2-64
titration function 2-50
TFIX (time increment measure mode) 2-44
Threshold 2-45
METTLER DL77/DL70ES/DL67
12-9
Index
Threshold value
evaluation procedure minimum 2-46
evaluation procedure segmented 2-48
evaluation procedure standard/asymmetric 2-47
TIME 3-13, 8-8, 10-12
Time-controlled (auxiliary instrument) 4-21
Time acquisition (method) 3-13
Time
auxiliary instrument function 2-31
conditioning function 2-27
entering 1-36
selecting format 1-36
stir function 2-18
Time interval 2-64
Time limits 2-64
Time span 2-64
Time specification
auxiliary values 1-23
methods 2-14
sensors 1-12
temperature sensors 1-15
titrants 1-6
Titer
determination (method excerpt) 2-71
entering 1-5
entry through titer determination 1-5
function 2-71
Title (function) 2-14
Title line (parameter mask) 1-6, 2-10
Titrants
adding 1-8
deleting 1-4
installing 1-8
menu tree 1-7
modifying 1-4
Titrant addition
end point titration 2-54
equivalence point titration 2-40
Titration
function 2-32
menu tree 2-33
12-10
Titration curves
1. derivative 2-47, 2-48, 8-22
2. derivative 2-48, 8-22
displaying 3-29
recording 2-78, 3-32
Titration mode 2-32
Titration sequences
comparison (stand 1/ST20 1) 3-38
excerpt of a standard method 3-12
on the sample changer 3-39
pH-stating 3-24
Titration stand(s)
equipping 11-11
importance 2-16
installation data 1-25
menu tree 1-27
modifying 3-7
selecting 2-15
Titration time 3-13, 8-8, 10-12
Titrator ID 1-37
Transmission 1-11
Transmission mode
bidirectional 1-30
unidirectional 1-30
Turntable (sample changer)
backward 4-17
forward 4-17
U (volume) 2-15, 8-3
Unidirectional transmission mode 1-30
Units 2-67, 8-27
Units of measurement
potential 1-10, 1-11
temperature 2-22
User data memory
accessories 11-39
inserting 11-18
technical data 11-22
USER LEVEL 6-3
User methods 2-6
METTLER DL77/DL70ES/DL67
02/93
Index
VDISP 2-24, 8-3
VEQ 2-36, 8-5
VEX 8-5
Voltage range 11-14
Volume
entering 3-7
selecting 2-15
Volume limits
at volume entry 3-9
entering 2-15
VP1/VP2 8-6, 8-9
VSTAT 2-62, 8-8
VT 2-64, 8-7, 8-9
VT1/VT2 2-62, 8-7, 8-9
VTOT 2-62, 8-7
Water determination 10-5
Weight
entering 3-7
selecting 2-15
transferred by balance 3-9
Weight limits
at weight entry 3-9
entering 2-15
in the sample data mask 3-7
x (mean value) 2-75, 8-8
z (equivalent number) 2-16, 2-68, 3-7, 8-3
Zero point (sensor)
calculation 2-72
entry through calibration 1-12
explanation 1-11
theoretical value 1-12
Zero point (temperature sensor)
entry through calibration 1-15
explanation 1-15
theoretical value 1-15
02/93
METTLER DL77/DL70ES/DL67
12-11
Index
12-12
METTLER DL77/DL70ES/DL67
02/93
Index
ISO 9001 certificate for METTLER TOLEDO
The Mettler-Toledo GmbH company, Greifensee, was examined and evaluated in 1991 by the Swiss
Association for Quality and Management Systems (SQS), and was awarded the ISO 9001 certificate.
This certifies that Mettler-Toledo GmbH, Greifensee, has a quality management system that conforms
with the international standards of the ISO 9000 series.
Repeat audits are carried out by the SQS at intervals to check that the quality management system is
operated in the proper manner and is continuously updated in relation to changes brought about.
Certificado ISO 9001 para METTLER TOLEDO
La firma Mettler-Toledo GmbH, Greifensee, ha sido inspeccionada por la Asociación Suiza para
Sistemas de Calidad y Gestión (SQS), habiendo obtenido el certificado ISO 9001. Esto acredita que
Mettler-Toledo GmbH, Greifensee, dispone de un sistema de gestión de calidad que cumple las
normas internacionales (ISO serie 9000).
Con motivo de las inspecciones de repetibilidad por parte de la SQS, se comprueba periódicamente
si el sistema de gestión de calidad se manipula correctamente y se ajusta de modo continuo.
Certificato ISO 9001 per la METTLER TOLEDO
Il sistema di garanzia della qualità della Società Mettler-Toledo GmbH, Greifensee, è certificato ISO
9001 sin dal 1991 dall'Associazione Svizzera per Sistemi di Qualità e di Gestione (SQS), e così
fornisce la dimostrazione che il suo sistema Garanzia di Qualità soddisfa i massimi requisiti.
Il sistema della garanzia della qualità Mettler-Toledo viene verificato periodicamente SQS, dando così
evidenza di un continuo aggiornamento e corretta gestione.
02/93
03/99
METTLER DL77/DL70ES/DL67
12-13
Index
Declaration of System Validation
We herewith inform you that the products/systems:
DL67, DL70ES, DL77
including software and accessories were developed, tested and successfully validated according to the
international ISO9001:1994 based Life cycle rules of Mettler-Toledo GmbH, Analytical.
Life cycle checkpoint details were reviewed and approved by the Project Supervisory Group (PSG). The
products/systems were tested to meet functional and performance specifications and release criteria at
release to shipment. In order to support GLP and validation requirements, we will make the following
documents available to an authorized, governmental or regulatory agency for inspection.
•
•
•
•
•
•
•
•
•
•
Product Guidelines
Performance Specifications
Documentation Plan
Software Specifications
Quality Plan
Project Management System
Test Plan
Customer Requirements
Review Reports
Source Code
Mettler-Toledo GmbH, Analytical will maintain possession of all documents and their reproductions and
may require a non-disclosure agreement to be provided by those requiring access to these documents.
Schwerzenbach,
March 1999
12-14
Dr. Bernhard Grob
General Manager
Business Unit Analytical
METTLER DL77/DL70ES/DL67
Dr. Urs Spitz
Manager Business Area
Titration
03/99
02/93
Index
Product Life Cycle Model
Ideas
Project Study
Project Start
Project Release
Phase:
Basic Know how
Product Guidelines
Performance Specifications
Quality Plan
Documentation Plan
Project Plan
Review Report
Phase:
Feasibility
Software Specifications
Test Plan
Review Report
Phase:
Confirmation
Review Report
Project End
Phase:
Readiness
Review Report
Usage
Customer Complaints (CRIS)
Customer Requirements
Phase out
02/93
03/99
METTLER DL77/DL70ES/DL67
12-15
Index
Déclaración de validación del sistema
Por la presente le informamos que los productos/sistemas
DL67, DL70ES, DL77
incluido el software y los accesorios, han sido desarrollados, probados y verificados con éxito de acuerdo
con las reglas sobre ciclo de vida de producto de Mettler-Toledo GmbH, Analytical. Estas reglas se basan
en la norma 9001:1994.
Los puntos de control de proyecto han sido comprobados y ratificados por el grupo de Control de Proyecto
(Project Supervisory Group o PSG). La comprobación de los productos/sistemas se ha realizado antes
de su entrega. Como apoyo a las exigencias GLP y de validación, ponemos el siguiente material a
disposición de las personas autorizadas para su examen:
• Imagen del producto
• Especificaciones
• Documentación del proyecto
• Especificaciones del software
• Plan de calidad
• Directiva Gestión de Proyecto
• Plan de ensayos
• Datos del servicio postventa y de deseos del cliente
• Protocolos de revisión
• Código fuente
Mettler-Toledo GmbH, Analytical, conservará la propiedad de todo el material y sus reproducciones y
llegará a un acuerdo de confidencialidad con quienes quieran examinar este material.
Schwerzenbach,
Marzo 1999
12-16
Dr. Bernhard Grob
General Manager
Business Unit Analytical
METTLER DL77/DL70ES/DL67
Dr. Urs Spitz
Manager Business Area
Titration
03/99
02/93
Index
Modelo del ciclo de vida de un producto
Ideas
Estudio del proyecto
Comenzio del
proyecto
Encargo del proyecto
Fase:
Cococimientos
básicos
Imagen del producto
Especificaciones
Plan de calidad
Documentación del proyecto
Plan del proyecto
Protocolo de revisión
Fase:
Viabilidad
Especificaciones del software
Plan de ensayos
Protocolo de revisión
Fase:
Verificación
Protocolo de revisión
Fin del proyecto
Fase:
Preparación
Protocolo de revisión
Utilización
Servicio técnico (CRIS)
Deseos del cliente
Sustitución
02/93
03/99
METTLER DL77/DL70ES/DL67
12-17
Index
Dichiarazione di validazione del sistema
Con la presente Vi informiamo che i prodotti/sistemi
DL67, DL70ES, DL77
inclusi software e accessori sono stati sviluppati, controllati e validati secondo le regole tecniche
relative al ciclo vita dei prodotti della Mettler-Toledo GmbH, Analytical. Queste regole si basano sulle
norme ISO 9001:1994.
I dettagli di controllo del progetto sono stati verificati ed approvati dall'organo di supervisione del
progetto (PSG: Project Supervisory Board). I prodotti/sistemi sono stati controllati e verificati prima
della fornitura. Per soddisfare le richieste di validazione e GLP i seguenti documenti sono messi a
disposizione per la visione da parte di personale autorizzato:
•
•
•
•
•
•
•
•
•
•
Specifiche del prodotto
Linee direttive
Documentazione del progetto
Specifiche del software
Sistema di qualità
Disposizioni per la gestione del progetto
Piano dei test
Dati del servizio clientela/esigenze dei clienti
Rapporti di revisione
Codice originale
La Mettler-Toledo GmbH, Analytical, rimarrà in possesso di tutti i documenti e di tutte le loro copie e
contrarrà un accordo di discrezione con coloro che desiderassero visionare tali documenti.
Schwerzenbach,
Marzo 1999
12-18
Dr. Bernhard Grob
General Manager
Business Unit Analytical
METTLER DL77/DL70ES/DL67
Dr. Urs Spitz
Manager Business Area
Titration
03/99
02/93
Index
Modello di ciclo vita di un prodotto
Idee
Studio del progetto
Inizio del
progetto
Realizzazione del progetto
Fase:
Conoscenze di
base
Specifiche del prodotto
Linee direttive
Sistema di qualità
Documentazione del progetto
Sistema del progetto
Rapporto di revisione
Fase:
Fattibilità
Specifiche del software
Piano dei test
Rapporto di revisione
Fase:
Conferma
Rapporto di revisione
Fine del progetto
Fase:
Disponibilità
Rapporto di revisione
Utilizzazione
Servizio clientela (CRIS)
Esigenze dei clienti
Sostituzione
02/93
03/99
METTLER DL77/DL70ES/DL67
12-19
To protect your METTLER TOLEDO product’s future:
METTLER TOLEDO Service assures the quality, measuring accuracy and
preservation of value of all METTLER TOLEDO products for years to come.
Please send for full details about our attractive terms of service.
Thank you.
Printed on 100% chlorine-free paper, for the sake of our environment.
*P705094*
Subject to technical changes and to the availability
of the accessories supplied with the instruments.
© Mettler-Toledo GmbH 1993, 1995, 1996, 1997, 1998, 1999, 2002, 2003, 2004 ME-705094E Printed in Switzerland 0404/2.12
Mettler-Toledo GmbH, Analytical, Sonnenbergstrasse 74, CH-8603 Schwerzenbach
Tel. ++41 1 806 77 11, Fax ++41 1 806 73 50, Internet: http://www.mt.com