1
IcePRO 3.0 User’s Manual
Page 1 of 57
** IcePRO 3.0 **
User ’s manual
IcePRO 3.0 User’s Manual
I.
Page 2 of 57
What is IcePRO ? ............................................................................................................... 4
a) Why ? ................................................................................................................................. 4
b) What ? ................................................................................................................................ 4
c) How ? ................................................................................................................................. 4
d) Compatibility ..................................................................................................................... 6
II. Configuration ..................................................................................................................... 7
a) Sites .................................................................................................................................... 7
b) Databases ........................................................................................................................... 7
III.
Getting started ................................................................................................................ 8
a) Applications, versions, environments ................................................................................ 8
b) Root directory .................................................................................................................... 9
c) Create your first environment .......................................................................................... 10
d) Using your environment .................................................................................................. 12
e) Databases and connections............................................................................................... 13
f) Register sources ................................................................................................................ 14
g) And now ? ........................................................................................................................ 16
IV.
Managing applications ................................................................................................. 16
a) Sources ............................................................................................................................. 16
b) Modules............................................................................................................................ 17
c) Versions............................................................................................................................ 17
d) Development environment............................................................................................... 21
e) Sources exchange between sites....................................................................................... 22
f) Application deployment ................................................................................................... 24
V. IcePRO-ADE interactions ................................................................................................ 28
a) ADE Tools ....................................................................................................................... 28
b) IcePRO Compiler............................................................................................................. 29
c) “Compile on save” feature ............................................................................................... 31
d) Saving files....................................................................................................................... 31
e) Moving or renaming files................................................................................................. 32
f) Automatic file backup ...................................................................................................... 33
g) First level history records................................................................................................. 33
h) Sources screen.................................................................................................................. 34
i) Consistency control........................................................................................................... 34
VI.
Evaluation..................................................................................................................... 35
a) Source analysis................................................................................................................. 35
b) Uses.................................................................................................................................. 37
c) Unused objects ................................................................................................................. 40
d) Call hierarchy................................................................................................................... 41
e) Field search ...................................................................................................................... 42
f) Version statistics............................................................................................................... 44
g) Session analysis ............................................................................................................... 44
VII. Creation ........................................................................................................................ 48
a) Skeleton............................................................................................................................ 48
b) Constants.......................................................................................................................... 50
c) Source generation............................................................................................................. 51
d) Functions libraries............................................................................................................ 51
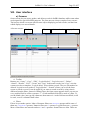
VIII. User interface ............................................................................................................... 52
a) Screens ............................................................................................................................. 52
b) Exporting to Excel ........................................................................................................... 55
IcePRO 3.0 User’s Manual
Page 3 of 57
c) Creating buttons ............................................................................................................... 56
d) Login ................................................................................................................................ 57
IcePRO 3.0 User’s Manual
Page 4 of 57
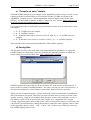
I. What is IcePRO ?
a) Why ?
There is no doubt that Progress development environment is one of the best you can find on
the market. Powerful language, strong and efficient database and so on. If you use it, you like
it. But it is not enough to produce high quality applications and maintain them at low cost.
IcePRO helps you to develop, to manage, to evaluate and to deploy your applications.
b) What ?
IcePRO is a software workshop created to help Progress developer teams to manage Progress
applications. It is divided in three parts:
Intervention: Manage source code, applications versions, multi sites configurations.
Deploy updates. Keep history of modifications, document them.
Creation: Source code generator.
Evaluation: Analyze your sources code and queries, analyze your applications while
running (profiler).
c) How ?
IcePRO is fully developed in Progress 4GL. Thus, it is integrated to your usual Progress
environment. By installing IcePRO, you get one shortcut on your desktop to work with all
your applications, in different configurations if needed (production, tests,…). Using this
shortcut, a new menu appears in Progress ADE tools (AppBuilder, Procedure Editor,
procedure windows).
IcePRO comes with a database. This database is not needed for the deployment. There is no
part of IcePRO you need to deploy with your application.
IcePRO 3.0 User’s Manual
Page 5 of 57
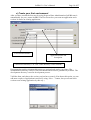
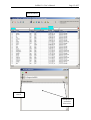
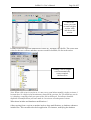
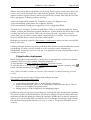
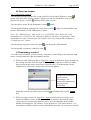
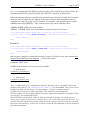
A unique
shortcut lets you
access to all your
applications,
versions,
environments,…
A new menu
appears in your
usual tools.
IcePRO 3.0 User’s Manual
d) Compatibility
IcePROV930setup.exe : Progress 9.1, undefined code page.
IcePROV9ISO30setup.exe: Progress 9.1, ISO8859-1 code page.
IcePROV1030setup.exe: Progress10.1, undefined code page.
IcePROV10ISO30setup.exe: Progress10.1, ISO8859-1 code page.
According to Progress r-code compatibility, you may run
IcePROV1030setup.exe / IcePROV10ISO30setup.exe with 10.X releases
and
IcePROV9ISO30setup.exe / IcePROV9ISO30setup.exe with 9.X releases
without any warranty.
Page 6 of 57
IcePRO 3.0 User’s Manual
Page 7 of 57
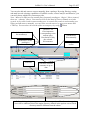
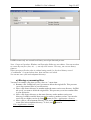
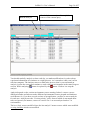
II. Configuration
a) Sites
IcePRO is able to work in a multi sites environment. You can have several development
teams, home workers, mobile users. Each site works with its own IcePRO database and must
have a unique site number. When needed, each site can send/receive updates to/from other
sites to synchronize modified sources and their histories. Each source registered on a site
receives a unique ID containing the site number. So, you can not exchange sources between
sites with the same site number. When you install IcePRO, a default site named DEMO is
created with number 1. If you install IcePRO on more than one site in order to synchronize
sources, you have to change the name and number for each site.
Home worker
Site number=2
Development team
Site Number=1
Sources
local database
One network
database
Mobile user
Site number=3
local database
b) Databases
IcePRO is provided with V9 or V10 database and its definition file (df). In the default
configuration, this database is installed as a local database in the IcePRO installation directory
with the file IcePRO.pf (parameter file) which is used for the connection.
For a developer team, use this database or the df file to create a network database and modify
IcePRO.pf according to the new database connection parameters (-S, -H,…).
For home workers or mobile users, you can keep the default local database. If they need to run
several instances of IcePRO at the same time (for instance, a development session and a
IcePRO 3.0 User’s Manual
Page 8 of 57
runtime session), you need to run a local server for the database (by using proserve). In this
case, just remove the “-1” parameter in IcePRO.pf file.
Note : If you have to reinstall IcePRO on a computer, keep in mind that the installation
process can override an existing local database and parameter file. If you uninstall IcePRO,
the local database and parameter file can be deleted. Unless you use a network database, be
sure to have a backup of your local database before proceeding. Even if you use a network
database, IcePRO uses the local IcePRO.pf file to connect it. Always make a backup of this
file before proceeding.
All IcePRO tables names have a trailing “_” character (appli_, version_, …) to avoid
conflict with other connected databases. All IcePRO files are located in “al” subdirectory.
Do not use such subdirectories with your application to avoid conflict.
III.Getting started
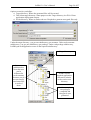
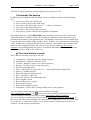
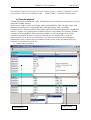
a) Applications, versions, environments
These are the essential concepts. Application is the top level management unit. For each
application, you may create several versions. For each version, you may create several
environments.
An application is defined by a name and a description.
A version is defined by the application to which it belongs, a name (or number: 1.0, 2.1,…),
a description, a root directory, and the list of the customers who use it.
An environment is defined by the user to who it belongs, the application and version for
which it was created, the root directory (can be different from the version root directory, but
points to it), the propath value, and the database connection parameters.
Application
Name
Description
Version
Name/Number
Root directory
CustB,CustD
…
Environment
User
Root directory
Propath
Database connections
Version
Name/Number
Root directory
CustA, custC,…
Environment
User
Root directory
Propath
Database connections
IcePRO 3.0 User’s Manual
Page 9 of 57
b) Root directory
The version root directory is the physical local or network directory where all application
files can be found. IcePRO considers that a file belongs to a version only if it can find it in
this directory or subdirectories.
The UNC (that is \\hostname\path) must be used for the version root directory in a network
environment. However, if you use IcePRO in a stand alone database configuration, UNC is
not required.
You can choose only the first application version root directory. When you add a version, its
root directory is automatically defined (and created) as a subdirectory of the first version.
The subdirectory name is the version name/number:
This example shows IcePRO
application. All files of the
first version are under IcePRO
directory. Other files are in
their respective directories:
1.1, 1.2, 1.1.2, 1.3 or 2.0.
IcePRO automatically reproduces the subdirectories structure of the version n in the directory
of the version n+1.
IcePRO 3.0 User’s Manual
Page 10 of 57
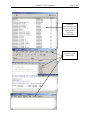
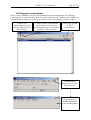
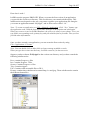
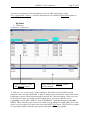
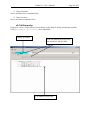
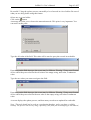
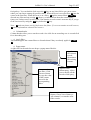
c) Create your first environment
After you have created the first user by using Progress Data Administration (IcePRO runs it
automatically for you), restart IcePRO. The first screen lets you create an application and a
version. It can be an existing application:
Version name/number
Application name and
description
Version root directory. Use UNC if the directory is on a network..
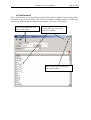
Documentation and development directories are optional and can be typed later. The
documentation directory receives Word documents about sources generated by IcePRO. The
development directory is used in development process.
Valid the form, and choose the version you just have created. (Note that at this point, you can
add more couples of applications/versions by using “New…” button, but you can not add a
version to an existing application by this way.)
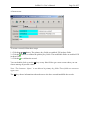
IcePRO 3.0 User’s Manual
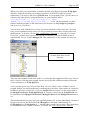
Describe your
environment. Note that
this field is used to sort
your environment list.
Checked: IcePRO
runs Progress
Desktop.
Unchecked:
IcePRO runs the
startup procedure
you have defined.
Generally, that is the procedure you use
to run your application. It is used if you
don’t check the box “Run Desktop”, so
IcePRO runs your application instead of
Progress desktop. It is also used to run
real time session analysis.
Page 11 of 57
This root directory means how you
access to the files. Use a network drive,
not UNC. The path can be different
from the version root because you use a
network drive different from other
users. However, the conversion in
UNC must match the version root
directory.
This the environment propath. [root]
is an alias to the root directory. You
add path using it:[root]\<your path>.
Never use full pathname.
Use this editor to type your
database(s) connection parameters:
-db mybase1 –S mysrv1 –H
myhost1
-db mybase2…
You can not use session startup
parameters here (–d dmy, -s,…)
because the progress session is
already running.
IcePRO 3.0 User’s Manual
Page 12 of 57
d) Using your environment
Once you have finished to provide the informations about you application, the following
screen appears. It will be the entry point for all the applications you manage with IcePRO. As
each environment belongs to a user, you can only see the environments you have created.
Choose your
environment. You can
also use double-click or
the return key.
Cancel. Using it, you can leave
the session or run a Progress
session without any environment.
(IcePRO is still connected)
Create, copy, modify
or delete
environments.
IcePRO menu
appears now in ADE
tools menu bar.
You can run IcePRO
main screen using
IcePRO menu-item
in the IcePRO menu.
IcePRO 3.0 User’s Manual
Page 13 of 57
e) Databases and connections
IcePRO database contains a DATABASE table and a CONNECTION table. From IcePRO
main screen, you can manage:
Applications by using the menu File->General->Applications
Databases by using the menu File->General->Databases
Connections by using the menu File->Application->Connections
Application
Name
Description
Database
Name
Description
Logical name
Connection
Database name
Application name
It allows you to describe the relationship between applications and databases. IcePRO needs
this information for analysis, code generation and compilation purpose. Be sure to keep
consistence between the real database connections (defined in your environments) and the
connection table. When you run a session, IcePRO verifies that all needed databases are
connected. A warning is displayed if one or more databases are not connected.
Example:
Application: MyAppli
Databases: MyBase1, MyBase2 (these are logical name)
Connections: (MyAppli,MyBase1), (MyAppli,MyBase2).
For each environment using MyAppli, you must provide “–db MyBase1 –db MyBase2”
connection parameters.
Note : You can use every name you want in the database table. But the logical name must
match your connection parameters. That is, you can create a database record where
Name=”DBName” and Logical Name=”DBLogName”, then create an environment which
connects to a physical database named “DBPhys”. In this case, you must provide “-db
DbTest –ld DBLogName” (see Progress help for more information about –ld parameter).
Testing a WebClient application is a case where you do not provide any database connection
parameter. IcePRO displays a warning. Just ignore it.
Do not create database or connection which refers to the IcePRO database.
IcePRO 3.0 User’s Manual
Page 14 of 57
f) Register sources
A source is a file needed by your application, not only 4LG. These files are defined by their
extensions. In the default configuration, IcePRO provides this types:
Source type
BMP
ICO
INC
OCX
PRL
PROC
UDF
WIN
WRX
Description
Image files
Image files
Includes
OCX files
Report Builder library
Procedure
User defined function (RB)
Screens
WRX files
Extension
bmp
ico
i
ico
prl
p
udf
w
wrx
To add, remove or edit source types, use menu File->General->Sources types. For instance,
you may want to manage batch files, ini files, or even exe files.
For each type, you choose if the files are compilable, and if the file date must be used to
detect modifications.
Compilable files : All file which can be compile in .r file. For instance, .p file must be
compiled, includes have not to be compiled.
Use file date: As IcePRO is integrated with ADE Tools, it detects all modified files edited in
Appbuilder, Procedure Editor and Procedure Window. There is no need to use file date to
detect them. On the contrary, for the files modified with other tools (e. g. PRL files, .exe, …),
IcePRO must use file date in order to determine if a file was modified.
Note : Do not create a type for the “.r” extension.
Register a file means IcePRO records it in its database. There are two conditions for a file to
be registered: It must be in the version root directory and its extension must be defined in the
source types.
There are several ways to register a file:
When you save it for the first time with ADE tools.
While application analysis.
When you run the IcePRO search file function.
.
.
The last case is useful if you start to manage an existing application. Run the Sources
management program File->Application->Sources.
IcePRO 3.0 User’s Manual
Page 15 of 57
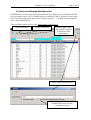
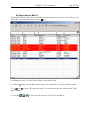
Search sources
Launch the
search.
Add/Remove
excluded
directories.
IcePRO 3.0 User’s Manual
Page 16 of 57
g) And now ?
You can work as you usually do with the ADE Tools and benefit from IcePRO features.
In the next pages of this manual, you will find two kinds of menu references. The references
beginning with ADE->IcePRO refer to the IcePRO menus added to Appbuilder, Procedure
Editor and Procedure Windows (ADE->IcePRO->IcePRO runs IcePRO main screen,
ADE->IcePRO->Compile runs IcePRO application compiler). Other references refer to
IcePRO main screen menu (File->General->Applications runs Application management
screen).
IV. Managing applications
a) Sources
File->Application->Sources
A source (or a file) is defined by:
Application : The application to which it belongs.
Version : The application version
Location : Relative path to the version root directory.
Name : File name without path nor extension.
Extension : File name extension (without the dot).
Note : A source has also an internal number which is unique through all sites.
Other informations:
Description : This allows you to shortly describe the source in IcePRO database.
Module : Module application to which the file belongs.
Type : Defined by its extension.
Compile on save : This purpose allows you to automatically compile 4LG when you
save it in the Procedure Editor or a Procedure Window (even .p files).
History : Tells IcePRO to track the source modifications and manipulations.
Thin client – Server Side/Client Side : Helps you to generate WebClient package.
Access: Access are defined at module or source level. Access work by using Progress
CAN-DO syntax. If a user has no right on module or source, it can not save the source
from ADE tools, nor modify data in IcePRO source screen.
Modified/Created/Analyzed: Date, hour and user. Note that “Creation” means creation
in IcePRO database. For file created with ADE while IcePRO was running, this is also
the user who has created the file.
The folder “General” also has a free text zone where you type any information.
History folder : Shows source history, that is : What ? (modification, creation,
analysis, send, receive, …), Who ? When ? With which product (IcePRO,
EDT=Procedure Editor, UIB=AppBuilder or PRC=Procedure Window). When you
modify a source by using ADE, IcePRO ask you to describe what you have done (One
record per day).
Table, Index and Includes/Calls folders are useful informations collected by IcePRO
when you run an analysis.
IcePRO 3.0 User’s Manual
Page 17 of 57
Note that a source is not necessarily a Progress 4GL file. It may be any file located under he
version root directory with an extension defined in the list of source types. Typically, you
define source types in a manner that all files required to deploy your application are
registered.
Once registered, you can perform the following actions with a source:
Document: Create a Word document to type any relevant information. Documents are
saved in the version document directory.
Static and dynamic analysis (4GL sources only): Which tables, fields, index are used,
inclusion tree, call tree,…
Track modifications (ADE tools only) : You can describe all modifications you have
made when you close a source after having saved it.
Rename or move file (ADE tools only) : When you use “Save as…” in AppBuilder,
Procedure Editor or Procedure Window, IcePRO can delete original file. This prevents
you to leave unused files in your application directories.
Synchronize source between multiple sites.
Put a source in a Development environment : A copy a the file is created in a
particular directory where you can modify it.
Put a source to a higher version : A copy of the file is created in a higher version root
directory.
Search r-code Database references : Useful when working on WebClient applications
to check that client side programs does not make direct database access.
Compile it : The target directory depends on the version you are managing.
Create deployment packages, upgrade packages.
Create XRef, listing, and debug files for debugging purpose.
Search a particular source by using the filters available in the source program
management.
b) Modules
File->Application->Module
Module is optional but useful. With modules, you can:
Quickly search files by using this criteria.
Make deployment packages by using this criteria.
Define access rights : Unless it has its own rights defined, a file inherits from the
rights of the module to which it belongs. Use the field “Access” to define access
rights.
Isolate customers specific sources.
c) Versions
File->Application->Versions
IcePRO allows you to manage versions. What does it mean ?
A same file can exist in different versions.
You are able to compile and/or run any version at any time by using your IcePRO
environments.
You can maintain all versions of an application.
IcePRO 3.0 User’s Manual
Page 18 of 57
How does it work ?
IcePRO uses the progress PROPATH. When you create the first version of an application,
you provide the version root directory. This root directory can contain subdirectories. This
subdirectories tree depends on the way you want to organize your applications file. Imagine
you create an application named “MyAppli”, and its first version called “1.0.”
Note : To create an application, use File->General->Application. Click “New” button, type
the application code, valid the form a first time, then type its description and valid again.
When you create a record in IcePRO database, the process is always in two phases. First, you
type fields corresponding to the primary key and you valid the form a first time. Then you can
provide other informations.
Once you have created your application, you can create the first version by using
File->Application->Versions.
Note: You can double click on blue fields to choose among available records.
When you type the version root directory, IcePRO creates it if it does not exist.
Suppose you have chosen E:\MyAppli as the version root directory and you have created the
following subdirectories:
Proc: contains Progress .p files
Inc: Contains Progress .i files.
Screen: Contains Progress .w files.
Trig: Contains triggers.
Exe: Contains some executable files or DLL.
Picture: contains three subdirectories named bmp, ico and jpeg. These subdirectories contain
the different format files.
IcePRO 3.0 User’s Manual
Page 19 of 57
When you create your environment, remember that the alias [Root] represents E:\MyAppli
directory. Suppose now that your startup procedure is LOGIN.W located in “screen”
subdirectory, you have to add at least [root]\Screen to you propath. Then, you can choose to
reference any other files by using subdirectory in your programs, that is
{inc\myinclude.i}, run proc\myproc.p, LOADIMAGE(“Picture\bmp\Mypicture.bmp”), … or not. On the one hand, you have
finished with the propath, on the other hand, you also have to add [root]\proc, [root]\inc,…
and so on. It is your choice.
You can now work with the first version, and create hundreds of files in the tree. You may
have several customers using version 1.0 and you want to create a new version with some
modifications. To do that, you run File->Application->Versions to create the 2.0 version.
First of all, you have not to choose the version root directory because IcePRO creates it
automatically for you. It is E:\MyAppli\2.0. This subdirectory is also created if it does not
exist.
All subsequent versions are
located in the first version
directory.
Then, the environment which refers to the 1.0 version has been duplicated. The copy refers to
the 2.0 version, with the same propath, but the [root] alias has a different value because the
V2.0 root directory is E:\MyApply\2.0.
As it is not the goal to copy all your files from 1.0 to 2.0, there is also a “hidden” part of
propath. Indeed, for each propath entry containing the [root] alias, other entries are created by
IcePRO to previous versions. So, if you see [root]\Screen in version 2.0, the real propath is
E:\MyAppli\2.0\Screen, E:\MyAppli\Screen. If you have a third version, [root]\Screen will
be equivalent to E:\MyAppli\3.0\Screen,E:\MyAppli\2.0\Screen, E:\MyAppli\Screen and so
on.
This mechanism allows you to run your application under Vn version immediately, because if
Progress session can not find a file in E:\MyAppli\n, it will find it automatically in
E:\MyAppli\n-1 or E:\MyAppli\n-2, … It means that you only have to move files which have
to be modified from a version to another. To do this, use File->Application->Sources.
IcePRO 3.0 User’s Manual
Page 20 of 57
Choose the
source you want
to send to higher
version, click,
and choose the
version.
IcePRO creates the required subdirectories on the fly, and then copy the file. The source now
exists for the two versions, and there are two records in IcePRO, one for each version.
Sending a file to a higher
version automatically
creates required
subdirectories
Note: When a file exists in version n, it is not a very good idea to modify it in the version n-1
because there is a high risk of inconsistency between the versions. So, if IcePRO lets you do
it, it displays a warning when you open such a file in ADE tools. You always should to
duplicate all modifications you have made in a version to all subsequent versions.
What about includes and databases modifications ?
Often, moving from a version to another involves deep modifications, as database schema or
include files. This can affect the whole application. For instance, modifying the database
IcePRO 3.0 User’s Manual
Page 21 of 57
schema can prevent you to run r-code from previous version because of CRC. In this case,
you just have to compile your application by using IcePRO compiler
ADE->IcePRO->Compile
Note: You must have defined the databases and connections
(File->General->Database and File->Application->connections) before you can use IcePRO
compiler.
The IcePRO compiler put the r-code files in the right directory according the environment you
are currently running. It creates all required subdirectories. Compiling files under
environment which refers to 2.0 version will create all subdirectories which does not exist in
E:\MyAppli\2.0 directory. If a file does not exist in version 2.0, the 1.0 version will be
compiled in its place and the r-code will be generated in E:\MyAppli\2.0. When compiling in
2.0, all existing includes in 2.0 version are used. This allows you to always be able to run one
of the available version of your application.
d) Development environment
When you create a version, you can fill a field named “Development directory”. This
directory must be a subdirectory of the version root directory. This development directory can
be used to put files in it before modification. If you put a file in development environment,
IcePRO copies this file in the development directory. If this directory is E:\MyAppli\2.0\Dev
and you put E:\MyAppli\2.0\Screen\login.w, you will get this file:
E:\MyAppli\2.0\DEV\Screen\login.w.
To test your modification while you are modifying your source, create a development
environment where you define a propath containing this directory before all others:
If the default version path is [root]\Screen, create en environment with this propath:
[root]\Dev\Screen, [root]\Screen. This way, this environment will run the modified source
instead of the original version.
There are several advantages to use development environment:
All others developers are alerted when they try to open the original source.
You keep you original file available.
Your modification does not affect other environments/developers.
Note: To put/get a file in/from development environment run
File->Application->Sources, and use / buttons.
When a file exists in development environment, it is not a very good idea to modify the
original version because there is a high risk of inconsistency between the versions of the file.
So, if IcePRO lets you do it, it displays a warning when you open such a file in ADE tools.
You can not save a new file in the development directory with ADE tools. A file manually put
in development directory is never registered.
IcePRO 3.0 User’s Manual
Page 22 of 57
e) Sources exchange between sites
IcePRO allows you to synchronize sources between sites. When you are working with ADE
tools, each time you save a file, IcePRO flags it as modified. That is, it must be sent to other
sites. For files modified with other tools (exe files, pictures, …), IcePRO can check the file
date to detect modification.
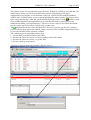
You send files to other sites by using Intervention->Send sources
Click to send files
Click to check files
Check to apply “send”
and “check” actions to
all the files of the
current query.
Click to launch options screen
Check to enable IcePRO to detect
modified files using file date.
(configured by type)
IcePRO 3.0 User’s Manual
Page 23 of 57
The options screen let you define the target directory. It must be a different one each time you
send sources, unless you delete its content after each use. Depending on the types
configuration (use file date or not) and state of the box “Search for files modified without
ADE at start”, IcePRO begins or not to search modified files when it starts. For Progress 4LG
files, it uses internal flag. After that, all the modified files are listed. Use the
button to send
files. IcePRO duplicates the application tree to send the files, that is you can get several
subdirectories under your target directory. The best is to use a zip tool to convert the whome
tree in a single zip file in order to send it easily to other sites.
The button clears the list of the modified files. Never use it before you are sure you have
received all files from other sites. Indeed, when you receive files, IcePRO compare these files
to your own modified files to detects conflicts.
The exchange process must follow these steps:
1. All sites send its modified files to each other.
2. All sites run “Receive sources” to check conflicts, and resolve them.
3. All sites run “Receive sources” to get the files.
4. All sites check its own sources.
You receive files by using Intervention->Receive sources
IcePRO 3.0 User’s Manual
Page 24 of 57
When a site receives files from another site (by using zip file sent by email or any other way),
it saves it on a local or network drive, then runs this program. The first action is to run the
Options screen to type the directory where received files are located. After that, the list of the
files to get appears. Following cases are possible:
A file was created on the remote site. It appears in green. It is flagged as new.
A file was modified on the remote site. It appears in black.
A file was modified on both sites. It appears in red. It is flagged modified.
The third case is a conflict. You have to deal with it. There is no particular method to resolve
conflict. Conflict just should never appear, but they do. At this moment, the first action to take
is to back up your own local file. Then, you can receive file with “Ask before override”
option, thus, you can choose to not override a particular file in a conflict. Or you can choose
to receive all files then to restore one of the backed up files.
Remember to check all your files (Intervention->Send sources) when you have received files
from all other sites.
Exchange between sites does not only synchronize files. Sources records and histories are also
synchronized. If a new version is created on a site, receiving sources from this site
automatically creates the version on your site, as it duplicates all your environment records to
use this new version.
f) Application deployment
Before using sources deployment for a version, this version must have at least one customer.
(customer can be your own company, internal departments,…).
To add customers, run File->General->Customers and insert a record.
To add customer to a version, run File->Application->Versions, edit the version by using
button.
button, and add customers by using
Note : When you add a customer to a version, this customer is removed from any previous
version.
You can generate various types of deployment packages by using
Intervention->Application deployment
r-code and no compilable files: to be delivered to customers
Preprocessed/encrypted sources: to be compiled on other platforms such as Unix or
Linux or to be compiled on customers sites.
Debug, listing or X-Ref compilation for debugging purpose
IcePRO can help you to prepare you packages by searching the files which must be included.
The search is based on file modifications, but this not a simple test to detect which files were
modified since the last update provided to the customer. IcePRO uses its analysis features in
order to give you all required files, modified or not. For instance, modifying a single include
file can result in large update because a lot of .p or .w use it. The process also takes care of
versions.
IcePRO 3.0 User’s Manual
Page 25 of 57
You can also add and remove sources manually from a package. By using filtering, sorting
and multi records selecting capabilities of IcePRO screens, sources analysis and histories, you
can easily know which files you must provide.
Note : Most of IcePRO screens contain filters frequently working as “Begins” filters (some of
these are “contains” filters). You can also click on the head of browse columns to sort the
records. A first click results in an ascending sort. A second click results in a descending sort.
When you add sources manually, you can select several sources by using your mouse and
button.
CTRL key. You can select all records of the current query by using
Search the required files
for customer(s)
Send file(s) to the
package(s)
Files list
Checked : All
files/customers
corresponding to the
current query.
Not checked: Only
the selected
file/customer.
Add/Remove
files manually
Run options
screen
Check the selected
customer as up to
date
Define which packages to generate, and where to put them. The directories typed
here will be subdirectories in the target directory defined in the options screen. Each
directory must be different from the others.
IcePRO 3.0 User’s Manual
Page 26 of 57
Options screen let you define:
Target directory: Where the generated files will be created.
Thin client target directory: Same purpose as the Target directory in a Web Client
application deployment context.
Xcode directory: Where to find xcode.exe. Required to generate encrypted files only.
Under the target directory, you get one subdirectory per customer. Under each customer
subdirectory, you get one subdirectory per package. Under each package subdirectory,
IcePRO put each application source in the required subdirectory:
Target directory
Customers
subdirectories.
Note that trees
can be
different for
each customer
because you do
not necessarily
send same files
to each of
them.
IcePRO creates
required application
directories relative
to the version root
directory
In this example,
two packages
(compiled and
encrypted) were
generated.
IcePRO 3.0 User’s Manual
Page 27 of 57
Lets describe each package:
1. Sources
Files are copied.
2. Compiled
Files are compiled. The files which are not compilable (.exe, .bmp, …) are just copied.
3. Preprocess
Files are preprocessed, that is all includes references are substituted by their contents and all
preprocessors (&SCOPED-DEFINE, &GLOBAL-DEFINED) are replaced by their value.
Such files can be compiled as is because includes files are not required anymore.
4. Encrypted
Files are encrypted by using Xcode Progress utility. If you check the box “Preprocess before
encryptation” in the options screen, sources are preprocessed first. All files which are not
compilable are copied.
Encrypted files can be compiled with Progress runtime environments (Client Networking)
instead of development environments (Provision, OpenEdge or 4LG development).
5. XRef
File are compiled with -XREF option for debugging purpose. The files which are not
compilable are ignored. See Progress documentation for more information about XREF
compiler option.
6. Debug
File are compiled with -DEBUG option for debugging purpose. The files which are not
compilable are ignored. See Progress documentation for more information about DEBUG
compiler option.
7. Listing
File are compiled with -LISTING option for debugging purpose. The files which are not
compilable are ignored. See Progress documentation for more information about LISTING
compiler option.
8. Thin client
This is a variant of the compiled package. A thin client application using Progress Web Client
technology includes two kind of files: client side files (included r-code files, pictures, …),
which stand or run on the client machines and server side files (often only r-code files) which
run on a server machine using Progress appserver session. It may be useful to generate these
r-code files in separated directories. Thin client package is generated in the same way as
compiled package but in separate target directories and sub directories. Not compilable files
are also just copied. You use IcePRO source record thin client properties, “Thin client –
Client side” and “Thin client – Server side” to tell IcePRO on which side a file must reside.
Note that a file can be simultaneously “Server side” and “Client side”.
Note : All packages are created according to version requirements as long as you use IcePRO
to find which files are required for a customer. Especially, propath can be different depending
on the customer version and IcePRO environment used. So, be very careful when you add files
manually because IcePRO let you the entire choice concerning these files and you will be able
IcePRO 3.0 User’s Manual
Page 28 of 57
to add files from any version. Keep in mind that adding “Vn” file version to a customer using
“Vn+1” version while the “Vn+1” version of the same file exists, can result in inconsistent
package.
Files which are under development environment are never proposed by IcePRO until they are
put again in production environment.
Correctly define source types “compilable” property is very critical.
It is essential to keep analysis up to date. (see “Evaluation” part of this manual)
IcePRO considers that your files are free of compilation errors while generating packages.
Prospective compilation errors will be silent and will result in incomplete or absent files.
The encrypted option includes some limitations due to Progress Xcode utility:
Xcode utility can not override an existing file. So, before re-generate an encrypted
package, be sure to remove all existing encrypted files.
Xcode utility can be unable to deal with string parameters longer than 120
characters. Path files resulting in such strings may not be generated.
Remember to check the customer after your package has been created. Only the files which
were included in the package will disappear for the next use.
V. IcePRO-ADE interactions
a) ADE Tools
Using IcePRO modifies the behaviour of:
AppBuilder
Procedure Editor
Procedure Windows
Propath editor
Appbuilder, Procedure Editor and Procedure Windows get a new entry in their menu bar:
IcePRO : Runs the IcePRO main screen/
Informations : Displays IcePRO informations about the current file.
Opened sources : Lists all the opened files. “See” button bring the selected file in
foreground.
Execute : To run a Progress executable file.
Compile : Runs IcePRO compiler
Document : Opens or creates a Word document for the current source.
Personal : Run <IcePRO install directory>\PROCED\Adecomm\perso.p. This source
comes with IcePRO. You can customize it.
Compile on save (Procedure Editor and Procedure Windows only) : This is a togglebox. It corresponds to the “Compile on save in editors” property of a source record.
See “Compile on save feature” below for more informations.
** IcePRO – Sinfoni ** [Application name / version]/user: This not a real menu-item
because it trigs no action. It is a way to quickly know in which Application/Version
you are working.
About IcePRO : About box.
IcePRO 3.0 User’s Manual
Page 29 of 57
Propath editor: IcePRO runs its own propath editor instead of Progress propath editor. This
allows you to use the alias [root] instead of real path.
Note : IcePRO menus and IcePRO Propath editor are added dynamically by using Progress
API, without modifying any of the original Progress files. You can always use your Progress
products without IcePRO. You can install any Progress service pack over IcePRO.
Always use the [root] alias, never use the literal value of the version root directory.
Since propath is dynamically managed by IcePRO, modifying propath in windows registry
has no effect in IcePRO environments.
You can not modify propath with IcePRO propath only for the current session. Any
modification is saved immediately. This is because IcePRO gives you the possibility to create
as many environments as you need, each of these having its own propath. To work with
alternative propath, just duplicate an existing environment and modify it according to your
needs.
b) IcePRO Compiler
ADE->IcePRO->Compile
Note : You have to correctly define Database(s) (File->General->Database) and
connection(s) (File->Application->Connections) before using IcePRO compiler.
Sources based compilation / Physical files based compilation
.
Tables CRC based
compilation
Compilation log display
Compile
Choose
physical file
Includes based
compilation
IcePRO 3.0 User’s Manual
Page 30 of 57
In all compilation modes, the r-code files are always saved under the current environment
version root directory. For instance, compiling a Vn source in Vn+1 environment put the rcode under the Vn+1 root directory (or subdirectory if needed), and not under Vn root
directory. If needed, subdirectories are created on the fly in Vn+1 to reflect Vn tree. The rcodes databases references are recorded in the source record.
Sources based compilation: Type a source name without any reference to its path. In
this mode, IcePRO queries all source records of your application corresponding to this
name and compile them. The character “*” is allowed everywhere in the source name
(several times if needed). IcePRO uses the Progress “MATCHES” syntax to find
records. IcePRO implement a version priority mechanism. It searches sources in
descending version order, beginning from the current environment version. If a source
exists for more than one versions, only the first source found is compiled (that is the
highest version). Trying to compile Vn+1 source which does not exist in Vn version
while you are working in Vn environment has no effect. These mechanisms allow you
to run any version of your application at any time. Note that you can always compile
sources by using original Progress compiler, but none of these mechanisms will be
implemented, so you have to deal with versions, target directories and propath
manually. This can be a very hard task in a multi versions context.
Physical files based compilation: Type a file including its full or relative path (“*” is
not allowed). By using full path, you know which source is compiled. By using
relative path, the file is searched in the propath. On the contrary to the “Source based
compilation”, version priority is not implemented. That is, you can compile a Vn-1
source in a Vn environment, even if the Vn source exists or compile a Vn+1 source in
a Vn environment. As the r-code files are however saved in the current environment
version directory, be sure of what you are doing when using this compilation.
Includes based compilation: Click and choose one or more include files (by using
mouse and CTRL key), then launch the compilation. IcePRO uses its analysis
capabilities to retrieve all compilable files which use the include files you have
chosen. Thus, you can compile quickly all sources affected by an include
modification.
Tables CRC based compilation: Select database, then click and choose one or more
tables (by using mouse and CTRL key), then launch the compilation. IcePRO uses its
analysis capabilities to retrieve all compilable files which use the tables you have
chosen. Thus, you can compile quickly all sources affected by a database schema
modification.
Note : Includes and tables CRC based compilation rely on application analysis. To be
efficient, the analysis must be up to date.
While compiling, the full pathname of the files are display, so you can know which physical
files are compiled.
IcePRO considers all not compilable sources as possible include files. Do not be surprised to
see other files than ” .i” in the include files list.
IcePRO 3.0 User’s Manual
Page 31 of 57
c) “Compile on save” feature
A default IcePRO behaviour is to compile source immediately after saving it, even if you are
working with the Procedure Editor or a Procedure Window. IcePRO also replaces the
AppBuilder “compile on save” default mechanism, which compiles source in the same
directory. As the IcePRO compiler, IcePRO “Compile on save” feature always saves r-code
under the current environment version root directory.
Let’s name S the source version and E, the environment version. You save the source, what
can happen ?
S > E : IcePRO does not compile.
S = E : IcePRO compiles.
S < E and the same source exists in version S’ with E ≤ S’ < S: IcePRO does not
compile.
S < E and there is no source in version S’ with E ≤ S’ < S : IcePRO compiles.
This reproduces the version priority mechanism of the IcePRO compiler.
d) Saving files
The first time you save a file with ADE tools under IcePRO environment, it is registered.
IcePRO displays a screen where you have to choose the application module to which the
source belongs (to create modules, runs File->Application->Modules).
IcePRO registers the source only if you save it under one of the version root directories. A
source record is created in IcePRO database. The source version is given by this directory. A
first level record history is created where creation date, hour and user are recorded.
When you save a registered source, a first level history record is created where modification
date, hour and user are stored. This history record is created when you close your file. Thus,
opening a source, saving it several times, then closing it, creates only one history record. A
new history record will be created if you open it again, save it again and close it again.
Closing a registered source after saving it also creates a second level history record where you
can describe you modifications, change the module to which the source belongs, and its “thin
client” properties, that is “Server – side”, “Client –side”, both or none. When you close you
file, IcePRO displays this screen:
IcePRO 3.0 User’s Manual
Page 32 of 57
IcePRO creates only one second level history record per date and per user.
Note : Progress Procedure Windows and Procedure Editor are text editors. You can use them
to create any text files (.bat, .ini, …), not only 4LG sources. This way, you can use history
features.
When you open a file then close it without having saved if, a first level history record
“Consultation” is created where date, hour and user are stored.
You can not save a file in development directory.
e) Moving or renaming files
You move or rename a file when you use “Save as..” menu item.
Rename a file: IcePRO ask you if you want to delete the original file. This prevents
you to leave unused files in your directories.
Move a file from a directory to another under the same version root directory: IcePRO
ask you if you want to delete the original file. This prevents you to leave unused files
in your directories.
Move a file from a directory to the same directory under another version root
directory: IcePRO considers that you send a source to another version. You can also
button in File->Application->Sources.
send a file to a higher version by using
Move a file to a development directory: This action is not allowed since you can not
button in
create files in development directory. To do it, use
File->Application->Sources.
IcePRO 3.0 User’s Manual
Page 33 of 57
All of these actions create the corresponding first level history record.
f) Automatic file backup
IcePRO creates a backup of each file which can be overridden or deleted in the following
way:
You save a file by using ADE tools.
You override a file by using ADE tools.
You delete a file after using “Save as…” to move or rename it.
You receive files from another site.
You delete a file by using Sources screen.
You retrieve a source from the development environment.
The backup directory is C:\IcePROSrcBkp, that is backup are located on the local system.
Under this directory, IcePRO creates one directory per application, then one directory per
version, then reproduces your application tree. The naming convention is Year1.month1.day1Year2.month2.day2-number-name.ext where Year1, month1, day1 represents the current date,
Year2, month2, day2 represents the OS file date, number is the internal source number, and
name.ext is the original file name. This allows you to get one backup per day and per
computer as an existing backup file is never overridden. Remember this feature. It can help
you to save precious time in case of file loss.
g) First level history records
This is the list of history records you can find:
Consultation : Open and close file without saving it.
Modification : Open save and close a file.
Creation : Register a source (save, search, analysis)
Replace : Override a file by using save menu.
Put in development mode
Move : Move a file by using “Save as…” menu and delete the original file.
Analysis : IcePRO analysis.
Retreived from development mode
Sent : Send file to other sites.
Received : Receive file from another site
Sent to higher version
Received from lower version
Sent to lower version
Received from higher version
Generation : Create a file by using IcePRO source code generator.
You can consult sources histories first and second levels by using
button to see source details and select History folder.
File->Application->Sources. Use
You can search for first level histories by using Intervention->Sources histories.
You can search for second level histories by using Intervention->Sources modifications. In
this screen, the filter corresponding to the “Description” column use CONTAINS syntax, that
is you can use “*” character to replace end of words, and any combination of words, !(or
operator), & (and operator) and brackets.
IcePRO 3.0 User’s Manual
Page 34 of 57
h) Sources screen
File->Application->Sources
You can open a Progress source file or any text file in a Procedure Window by using
button. The check box “Display absents” displays records for which there is no existing
button to delete these records.
physical file in gray. Use the
You can open or create Word documents by using
button.
You can search database references in r-code files by using
use the “DB references” and “DB required” filters.
(apply to current filters), and
Note : The “DB References” filter works as a “CONTAINS” filter. Retrieved r-code
informations are r-code file, CRC, languages, database references, and codepage. These
informations are also retrieved when you compile sources by using IcePRO compiler or
“Compile on save” feature.
You can analyze a progress source by using
You can modify consistency control by using
. (see next part of this manual).
.
i) Consistency control
As a source can exist under several versions, consistency control helps you to open the right
source versions under the right environment versions.
When you open a physical file by using File->Open in ADE tools, Icepro searches all
the existing versions of the file, and let you choose the right one. It does not matter
that you choose the source in the first version directory or in subsequent version
subdirectories. If several versions exist, this screen appears:
IcePRO selects the most
logical version
according to your
current environment and
version priority
mechanism.
Select the version you want to open, and click
key).
(or double click or press Return
When you open a source by using File->Open in ADE tools or by using “open”
feature in IcePRO screens, IcePRO controls the consistency between the source
version and you current environment version. You can customize how IcePRO
handles inconsistencies. For instance, if you open/save a V2.0 source under a V1.0
environment, IcePRO can ask you for confirmation, prevents you to open/save the file
IcePRO 3.0 User’s Manual
Page 35 of 57
or process your request without any warning. You configure this behaviour by using
in the sources screen.
Open/Save with warning is the default. That is IcePRO ask you for confirmation before
opening/saving the file.
VI. Evaluation
a) Source analysis
Evaluation->Sources analysis
Note : You can also analyze a progress source by using
in File->Application->Sources.
This is one of the most useful features. Analysis allows you to get the following informations
for each compilable source:
Which includes are used ?
Which calls are done to other sources ?
Which tables are used ? How ? (that is access, update, delete, create, search or reference)
Which fields are used ? How ? (that is access, update, or reference)
Which indexes are used ? Is it in an efficient way ?
IcePRO 3.0 User’s Manual
Run the analysis
Page 36 of 57
Check this box to analyze all compilable
sources of the current query.
You should run daily analysis (at least each day you make modifications) in order to keep
consistent informations (for instance as a night process). As it can take a while, run it on an
efficient computer. The analyzer runs as a multi tasks process, that is you can launch an
analysis, iconize the screen and continue to work with your environment in the same Progress
button is replaced by the
button. Click on it to stop the
session. While analyzing,
analysis.
Analysis depends on the version environment you are running. Indeed, a source can use
different includes and indexes under different environments because propath and databases
are different. So, if you have several versions of an application, you have to run an analysis
for each one. Analysis uses the “Version priority” rules. Sources which do not match these
rules are ignored (for instance, sources in version Vn+1 are not analyzed under a Vn
environment).
The box “Only sources modified since the last analysis” means sources which were modified
or using includes which were modified.
IcePRO 3.0 User’s Manual
Page 37 of 57
You can see a summary of the informations retrieved while analysing by using
File->Application->Sources. Complete informations are available in Evaluation menus as
described below.
b) Uses
Table uses
Evaluation->Tables uses
Header: Database, table
and analyzed sources
Lines: Kind of use, physical sources
and line number.
A “table use” is a set of records, header and lines. The header record identifies which
analyzed source is using which table. A table is usually used several times in the same source.
Furthermore, the use can be made through an include file. The lines display all the uses, and
in which sources they are written. In the example above, you can see that the source
s_pf_mod.p uses the table “DEPOT” from “HARMONIC” database through the sto_edit.i
include. That is that the source code is not written in s_pf_mod.p but in sto_edit.i. To see that
source code, just right click on the line record and choose Open menu. The file will be opened
in a procedure window with the cursor positioned on the correct line number.
IcePRO 3.0 User’s Manual
Page 38 of 57
The kinds of use are ACCESS, SEARCH, UPDATE, DELETE, CREATE, REFERENCE.
ACCESS : A record is read.
DELETE : A record is deleted.
UPDATE : A record is updated.
CREATE : A record is inserted.
REFERENCE : Reference to the table without read/write.
Field uses
Evaluation->Field uses
This is the same feature as Table uses, but at field level. The kinds of uses are REFERENCE,
UPDATE and ACCESS.
Index uses
Evaluation->Index uses
Right click to see the 4GL
source.
Fields in the
selected
index
The index used is selected by default.
You can look at other ones to verify the
relevance of the used index.
If “yes”, this
indicates a
possible bug or
non relevant index
use.
In addition to header and line records, the screen displays all the indexes of the current table,
and the fields used in each one. Temp-table indexes are not displayed.
IcePRO 3.0 User’s Manual
Page 39 of 57
If a FIND statement uses ROWID, the primary index will be displayed as the used index. If a
statement uses RECID, you will find the word “RECID” instead of an index name.
Index mistake flag indicates a possible bug or non relevant index use. Usually, this is because
the fields used as criteria are not indexed. In this case, Progress uses the primary index. It
could also be caused by a bug in 4GL statement. For instance, your application uses a table
ORDER and a table ORDER_L. They contain respectively orders and orders lines.
ORDER.ORDER-NUM is the order number.
ORDER_L.ORDER-NUM is the order number in the lines table. If you write :
FIND ORDER WHERE ORDER.ORDER-NUM = “050900001” NO-LOCK NO-ERROR.
FOR EACH ORDER_L WHERE ORDER.ORDER-NUM = ORDER.ORDER-NUM EXCLUSIVE-LOCK:
END.
DELETE ORDER_L.
Instead of
FIND ORDER WHERE ORDER.ORDER-NUM = “050900001” NO-LOCK NO-ERROR.
FOR EACH ORDER_L WHERE ORDER_L.ORDER-NUM = ORDER.ORDER-NUM EXCLUSIVE-LOCK:
END.
DELETE ORDER_L.
then Progress compiles it without any message. However, in the first case, the statement will
delete all the order lines in the database… because the criteria
ORDER.ORDER-NUM = ORDER.ORDER-NUM
returns the TRUE value.
IcePRO analysis helps you to prevent such a mistake.
Include uses
Evaluation->Include uses
Displays all include files.
Source uses
Evaluation->Source uses
Displays all calls.
Note : IcePRO analysis is a compile time analysis. Dynamic queries, dynamic buffers and
dynamic calls (that is RUN VALUE(<file-name>). ) are not handled. These cases can be
handled in a different way by the “Session analysis” which is a runtime analysis.
IcePRO relies on Progress XRef compilation. This introduces some limitations:
The line number can be an approximation and some temp-table statements are omitted. These
are Progress Xref compilation issues.
When IcePRO records a table, index or field use through an include, an include use or a
source use, it registers this source or include file if it is not already registered. However, it is
possible that your application uses files that can not be registered because they are not under
the version root directory. In this case, IcePRO records the full pathname of the file instead of
the relative pathname.
IcePRO 3.0 User’s Manual
Page 40 of 57
The database names used are those you have created in Files->General->Databases, not the
logical names. The reserved database name “_TEMP-TABLE” is used for the temp-tables.
c) Unused objects
Unused objects shows the tables, index, includes and sources which were not detected as used
during the IcePRO analysis.
These screens make a search in real time when you launch them. This can take a while with
databases containing a lot of tables and index, and applications with a lot of files.
Dynamic queries, dynamic buffers and dynamic calls are not detected during the compile time
analysis, so there is no guaranty that an unused object is really unused. For instance, IcePRO
considers all non compilable files as potential includes, so all non progress files will be
considered as unused includes. If you never run analysis, all objects will be “unused”.
On the contrary, if an object is not listed here, you can be sure that it is used somewhere.
Informations always concern the environment version you are using. An unused object in
version N can be used in version N+1.
Unused tables and index
Unused tables
Unused index
IcePRO 3.0 User’s Manual
Page 41 of 57
Unused includes
Shows all unused non compilable files.
Unused sources
Shows all unused compilable files.
d) Call hierarchy
Displays a call tree of the current version based on the analysis. Keep in mind that dynamic
calls (RUN VALUE (file-name)) are not handled.
Startup procedure
You can limit the deep by using
the check box and the slider
(Call number/Total calls)
IcePRO 3.0 User’s Manual
e) Field search
Page 42 of 57
This is a screen where you can search in which tables a field is defined. You can also replace
its content in one or several tables. The search is not based on IcePRO analysis. IcePRO just
searches the field through the database metaschema (_File and _Field tables).
Type a field name and click
the “Search button”
Select one or several tables
(click+CTRL key) or use the
“Select all” button.
Run a replace process through
one or more tables
IcePRO 3.0 User’s Manual
Page 43 of 57
Be careful ! Using the replace process can modify a lot of records in a lot of tables. Be sure of
what you are doing before using this feature.
Select one or several tables.
button
Click on the
A message box asks you to choose the transaction mode. This point is very important. You
can cancel at this point.
Type the old value of the field. This value will be used to query the records in each table.
Depending on the field data type, the screen may be different. Warning ! Using cancel button
do not cancel the process but set the old value to the empty string, null value, or unknown
value.
Type the new value you want to assign to the field.
Depending on the field data type, the screen may be different. Warning ! Using cancel button
do not cancel the process but set the new value to the empty string, null value or unknown
value.
A screen displays the update process, and how many records were updated for each table.
Note : This tool should not be used on a production database, unless you have a reliable
backup. The process can be very long, especially if the field you are modifying is not indexed,
IcePRO 3.0 User’s Manual
Page 44 of 57
because it is used as a criteria. Depending on the transaction mode chosen, you may need to
have a high –L parameter set.
f) Version statistics
Evaluation->Statistics
This screen summarizes the analysis informations for the current environment version. The
most important field is the percentage of right index uses. It gives you the global performance
of your application. However, keep in mind that dynamic queries are not handled.
g) Session analysis
Evaluation->Session analysis
The IcePRO session analyzer is a profiler. It analyzes your programs at runtime. Each
executed statement is timed with a precision of a microsecond. The time the programs wait
for user inputs is ignored.
To use the IcePRO session analyzer, the application startup procedure must be defined. As
IcePRO runs a new progress session, be sure that this new session will be able to connect to
the required databases, that is a server is running for each one (IcePRO database is not
concerned).
button, type a title and
To run a session analysis, create a session analysis record by using
valid a first time. By default, the box “Listings” is checked. This way, IcePRO creates a
listing source for each program ran, allowing you to get time for each executed statement.
Without listing sources, analysis run faster and need less space disk, but you get only time for
each block program. The time spent to create the listing sources is ignored. After the first
validation the session parameters which will be used appear in the “Session parameters”
editor. These parameters are based on the current session parameters. You can modify all of
them but not the “-p” value. The session analysis propath will be the same as the current
IcePRO environment. Valid a second time. IcePRO runs a new Progress session by using the
application startup procedure.
When the new session is running, use all the programs you want to be analyzed. IceRPO will
wait until this session ends, that is it will not respond until the analyzed session executes a
QUIT statement. Be sure to have such a statement in your application, or you may loose
control on your IcePRO session.
When the analyzed session ends, the IcePRO analyzer begins to collate data after a delay
which can be in seconds or minutes, depending on the number of programs you have ran and
their complexity. Be patient.
Then, in the “General” folder, you can see the list of all blocks or programs which were
called, total time, average time of each call, total number of calls, percentage of total session
time, percentage per call, average overhead and the corresponding registered sources (or a “?”
for unregistered sources). As you can sort data by clicking on every column header (one click
= ascending sort, a second click = a descending sort), you can now find the blocks or
programs which have spent the longest time during the session. Time is displayed in seconds,
with 6 decimals (microseconds).
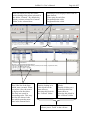
IcePRO 3.0 User’s Manual
Session
parameters.
The folder “Details” shows
informations about the source
corresponding to selected
block or program.
Page 45 of 57
Deep, height and time are
parameters used to display
the call tree.
Check it to get
time for each
statement.
To see details about a source, select a block or program, then click on the “Details” folder.
IcePRO 3.0 User’s Manual
Here are displayed only the blocks
which belong to the source selected in
the folder “General”. By default, the
block you have selected in “General”
folder is also selected here.
Time spent for each line:
This is the list of the lines
which were executed. When
you select a line, the source
is displayed in the editor.
The lines are sorted in
descending order. This way,
the first line shown is the
line which spent the most
time in the current block.
Page 46 of 57
Selecting a block displays three kinds of
data about it :
Time spent for each line.
Programs/blocks caller
Programs/blocks called
Shows the caller(s).
Double clicking on a
caller block has the
same effect as
selecting this block in
the “General” folder.
Shows the called
blocks.
Double clicking on a
called block has the
same effect as
selecting this block in
the “General” folder.
Double clicking on these browses
allows you to “walk” in the call tree.
IcePRO 3.0 User’s Manual
Page 47 of 57
You can see a graphical view of the call tree in the folder “Call tree”.
Deep: Limits the deep of the call tree. “0” means there is no limit.
Height: Limits the number of lines displayed. “0” means there is no limit.
Time: Limits the time allowed to create the tree.
You can modify the default values then use the
button to apply them.
A call to a registered “.w” is symbolized by the Progress Appbuilder icon.
A call to a registered “.p” is symbolized by the Progress Procedure Editor icon.
A call to a user interface trigger is symbolized by .
A call to an internal procedure is symbolized by .
A recursive call is symbolized by
A end of tree caused by the deep or eight limit is symbolized by
A end of tree caused by the time limit is symbolized by
All other cases (unregistered sources, unknown extensions…) are symbolized by
IcePRO 3.0 User’s Manual
Page 48 of 57
VII. Creation
IcePRO source code generator was written before the Progress Version 9 was released. Yet,
dynamic queries and buffers did not exist. Keep in mind that all you can do with IcePRO
source code generator can probably done by using dynamic queries and dynamic buffers in a
better way. Unless you have to build V8, V7 or V6 Progress applications, you should use
dynamic code. However, if you find something which can not be done with dynamic code, let
us know…
a) Skeleton
File->Skeletons
Source code generation is based on skeletons, that is, text files written in Progress 4GL where
some parts of the code were replaced by the IcePRO generation language. This language
contains five kinds of words.
Data: <BASE>, <FILE>, <FIELD>. Data are replaced by their value.
Instructions: <BEGINB>, <BEGIN>, <BEGINF>, <END>, <AFIELD>…
Instructions allow you to repeat code blocks.
Properties: <FILE-NUM>, <FIELD-TYPE>, <FIELD-VIEW-AS>,
<FIELD-FORMAT>… Properties are related to database objects or to the source code
itself.
Constants : <USERID>, <TODAY>, <TIME>, <SRC>, <LIBRARY>… There are
predefined constants. You can also define your own local or global constants.
Functions: /#f_caps()#/, /#f_length()#/ ... Functions are stored in libraries. A library is
a Progress 4GL source where you write your functions.
Example:
DEF TEMP-TABLE tt_count NO-UNDO
FIELD TABLE-NAME AS CHAR FORMAT “x(30)”
FIELD NUM-RECORD AS INT FORMAT “>>>>>>>>9”
INDEX PK IS PRIMARY UNQUE TABLE-NAME.
<BEGIN>
/* Counts the records in table <FILE> */
CREATE tt_count.
ASSIGN tt_count.TABLE-NAME = “<FILE>”.
SELECT COUNT(*) INTO tt_count.NUM-RECORD FROM <FILE>.
<END>
When you run IcePRO source code generator, you have to choose a skeleton, databases, tables
and fields. Suppose you choose the tables SUPPLIER and CUSTOMER. You will get this
code:
DEF TEMP-TABLE tt_count NO-UNDO
FIELD TABLE-NAME AS CHAR FORMAT “x(30)”
FIELD NUM-RECORD AS INT FORMAT “>>>>>>>>9”
INDEX PK IS PRIMARY UNQUE TABLE-NAME.
/* Counts the records in table SUPPLIER */
CREATE tt_count.
ASSIGN tt_count.TABLE-NAME = “SUPPLIER”.
SELECT COUNT(*) INTO tt_count.NUM-RECORD FROM SUPPLIER.
/* Counts the records in table CUSTOMER */
CREATE tt_count.
ASSIGN tt_count.TABLE-NAME = “CUSTOMER”.
SELECT COUNT(*) INTO tt_count.NUM-RECORD FROM CUSTOMER.
IcePRO 3.0 User’s Manual
Page 49 of 57
The best way to learn about source code generation language is to look at the “CHECK”
sample skeleton.
All skeleton files and libraries have to be saved in
<IcePRO install directory>\PROCED\AL\ske directory. Skeleton file must have a “.ske”
extension. You write or modify skeleton files in Progress Procedure Editor or Procedure
Windows. In order to use a skeleton, create a skeleton record in the IcePRO database.
The skeleton code must
match the skeleton file
name. If the skeleton file is
<file-name>.ske, the code
must be <file-name>.
Overview of the
file. You can not
modify the file
here.
Library (optional).
Prefix. (optional).
Target directory relative to
the root version directory.
To open the skeleton file or
the library
Suffix. (dot and
extension).
File name can be any combination of literal strings and
[<BASE[n[,m]]>] [<FILE[n[,m]]>] [<FIELD[n[,m]]>]
IcePRO 3.0 User’s Manual
Page 50 of 57
b) Constants
There are three kinds of constants:
Global build-in constants
These are predefined constants which you can use in every skeletons.
<USERID>: IcePRO database current user
<TODAY>: Current date
<TIME>: Current time.
<LOC>, <SRC>, <EXT> : Location, source and extension of the file you are generating.
<APPLI>: Application.
<VERSION>: Version.
<SQE>: Skeleton name.
<LIBRARY>: Library name.
Global constants
Globals constants are those you define by using Creation->Constant. It can be a multi
lines text.
Local constants
You can declare local constants in the skeleton file:
<CONST> <CONT-NAME> Hello world !
Each time IcePRO source generator will find <CONST-NAME>, it will replace it by the
string “Hello world !”. You can override any global constant by defining a local one.
IcePRO 3.0 User’s Manual
Page 51 of 57
c) Source generation
Creation->Source generation
This screen allows you to add databases, tables and fields names by using
Name of the file which will be generated.
The name is based on skeleton data and
databases/tables/fields currently chosen.
Check the box “Lock” to type another
name.
buttons.
Sort
databases/tables/fields.
Target directory
d) Functions libraries
You can write functions libraries. A library is a Progress 4GL program saved under the
<IncePRO-Install-Dir>\Proced\Al\Ske directory. It must contain CHARACTER functions
receiving one CHARACTER parameter. For instance:
FUNCTION f_caps RETURNS CHAR (pi_param AS CHAR):
RETURN CAPS(pi_param).
END.
Any occurrence of “/#f_caps(hello world !)#/” will be replaced by “HELLO
WORLD !”
IcePRO 3.0 User’s Manual
Page 52 of 57
VIII. User interface
a) Screens
Some screens let you create, update, and delete records in IcePRO database while some others
are designed for special IcePRO purposes. The first ones are always couples of two screens :
The browse which is a screen with a browse object displaying several records, and the form
which displays one record details.
A browse screen:
Toolbar
Filters
Column header
Apply filters
Toolbar
Buttons are “Create”, “Copy”, “Edit”, “Logical delete”, “Logical recover”, “Delete”,
“Search”, “Details”, “Exit”. “Create” and “Copy” both create records, but “Copy” uses the
current record as a template. “Logical delete” do not delete records. They are just marked as
deleted. Logical recover undoes a “Logical delete”. “Search” allows you to use the form
screen to search a record. It can be useful if you want to search records by using criteria
different from the filters. Instead of filling filters, the form screen appears where you can use
every enabled field as a filter (operator “=”). Each modified field will be used as a filter. To
use the blank value, just type any character, then remove it. As the field was modified, it will
be used, even if it contains blank value.
Filters
Filters let you make queries. Most of character filters use BEGINS operator while some of
them use CONTAINS operator. Numeric filters use ≥ operator. Logical filters use = operator.
Most of date filters are intervals and use ≤ and ≥ operators. Some filters are blue. These are
IcePRO 3.0 User’s Manual
Page 53 of 57
foreign keys. You can double click or use the F5 key on any blue field to get a new screen
where you can choose among all possible values. When the focus is not on a filter, F8 puts the
cursor in the first filter. When the focus is on a filter, F8 applies current filters. CTRL-F8
discards any filter and any sorting. F9 shows you informations about the current query :
Query text, indexes used, records count. Note that the records count is accurate only if you go
to the last record by using the End key before the F9 key.
Note : F9 and sort feature work if the browse has filters. If a screen contains several browses,
F9 shows informations about all the browses.
Column header
Column headers allow you to sort the records. One click for an ascending sort. A second click
for a descending sort.
Apply filter
This button applies the current filters or discards them if they are already applied (=CTRLF8).
Popup menu
A right click on the main browse drops a popup menu like this.
One menu-item
per filter. Click
on one of them
to copy the value
of the current
record in the
corresponding
filter.
Applies to
the selected
record,
shortcuts to
the existing
buttons.
Applies to the
current query. Allow
you to modify all the
records of the query.
One menu-item per numeric
column. Choose one of them (or
“All columns”) to sum the value
of the records.
IcePRO 3.0 User’s Manual
Page 54 of 57
A form screen:
To create a record, follow these steps:
or
button. The primary key fields are enabled. Fill in these fields.
1. Click the
2. Click the button to validate the primary key fields. The modifiable fields are enabled. Fill
in these fields.
3. Click the to validate the record.
You can double click or use the F5 key on any blue field to get a new screen where you can
choose among all possible values.
Note : The character “Space” is not allowed in primary key fields. These fields are convert to
upper case.
The F6 key shows informations about the users who have created/modified the records.
IcePRO 3.0 User’s Manual
Page 55 of 57
b) Exporting to Excel
All records of a query in a browse with filters can be exported to excel, to a CSV file or to an
ASCII file. Just select the browse, an use F7 key.
1. Select which fields you want to export by double clicking on them. A selected field appears
in a different colour. To select all the fields, do not select at all.
2. Click on
. Only selected fields will be kept. For each field, you will get a data column.
and
3. Use
name’ column.
4. Click the
,
to move fields up and down. You can also modify the values in the ‘Field
or
to send records to Excel, CSV file or ASCII file.
IcePRO 3.0 User’s Manual
Page 56 of 57
c) Creating buttons
In the IcePRO main menu, each user can create its own shortcut buttons to the menu items.
Right double
click anywhere
to create a button
and get the
buttons screen.
This is a copy of the menu.
Just select a menu item to
link it to the button.
Delete an existing button.
Modify label, image or tooltip for an existing button.
Modify the size
and the position.
1. Right double click anywhere in the IcePRO main screen.
2. Choose a menu item in the copy of IcePRO main menu.
3. Always modify the position of the button. Do not let it in the left corner. Modify its size if
needed. When you have finished with size and position, left click anywhere on IcePRO main
screen to get focus on buttons screen. Exit this screen.
4. To modify or delete an existing button, just right click on it.
IcePRO 3.0 User’s Manual
Page 57 of 57
d) Login
You can use –U userid [-P password] parameters in the IcePRO.pf file to provide the userid to
IcePRO. This way, the login screen does not appear, and there is no need for the user to type
its userid/password.
See Progress documentation for more informations about these parameters.