1
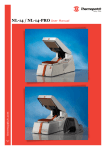
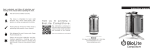
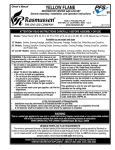
Europe’s leading manufacturer of Golf course equipment.
Ball picker installation/user/maintenance manual
M-series, for model:
21M
Oxland b.v.
Instructions for use Ballpicker – English version 1.1
Page 2 of 16
Contents
1
General information
1.1
1.2
1.3
1.4
2
6
7
Conditions
Design and function
4.1
Oxland b.v.
General
Instructions for use Ballpicker – English version 1.1
Installation step by step
Maintenance
6.1
6.2
6.3
6.4
Machine management
3.1
4
General
Compliance with requirements
Remaining risks
Permitted use
Prohibited use
Operational reliability
Installation
5.1
Safety instructions
2.1
2.2
2.3
2.4
2.5
2.6
3
Introduction
Description
Contact
Technical data
5
General
Maintenance intervals and instructions
What to do with possible malfunctions
Function tests
Replacement parts
7.1
Parts list
Page 3 of 16
1. General information
1.1
Introduction
Congratulations on your new Oxland product. We hope that you will pick more balls than ever with your new high quality ball picker.
In this instruction manual you will find all the information for the proper use and maintenance of the ball picker.
Note: Be sure to read and understand these instructions before using the ball picker.
Not reading the instruction manual could result in damage to the ball picker and/or shortening of its lifespan. Every user of the ball picker must read and
understand these instructions first.
Nothing about this instruction manual may be reproduced unless by written approval of Oxland.
This ball picker has a warranty for one year. Read the guarantee conditions carefully and keep them in a save place. If there are any questions or problems,
please contact your dealer.
One Year Warranty
Oxland b.v. hereby warrants the materials and function of its product specified in this instruction manual for a period of one year after delivery.
This guarantee only applies to the original purchaser. It also only covers parts which the manufacturer, after inspection, finds to be faulty. Repair or
replacement of parts is to be carried out by an authorised representative of the manufacturer. The manufacturer further warrants that the equipment
supplied conforms to the accompanying product description.
The guarantees specified in this agreement constitute the manufacturer’s only liability to the buyer. The manufacturer disclaims liability for any
commitments beyond the limitations of the guarantee certificate.
The manufacturer further disclaims all liability for any commitment that may be given by any unauthorised person in connection with the sale of the
equipment. The guarantee does not apply to equipment that has been repaired or parts replaced by any person/company not specifically authorised to do
so by the manufacturer. The manufacturer’s guarantee liability also does not apply in cases where the equipment is misused, is damaged by
negligence/accident or is handled contrary to the accompanying Instructions for Use. Finally, the manufacturer is under no circumstances financially
liable for damage that may arise in connection with the sale or repair of the equipment, or injury to a third party in connection with its use.
Oxland b.v.
Instructions for use Ballpicker – English version 1.1
Page 4 of 16
1.2
Description
This manual describes the 21M ballpicker.
The 21M is a small ballpicker for the difficult accessible areas on the driving range. This model is equipped with Tour disc, which is a high quality disc made
of lightweight plastic.
1.3
Contact
For information or questions about your ball picker, please contact Oxland.
You can also contact Oxland for other golf course equipment.
Oxland b.v.
Marconiweg 5
NL-3899 BR Zeewolde
The Netherlands
Tel.: +31-36-5219290
Fax +31-36-5219299
Email: [email protected]
Http://www.oxland.com
Oxland b.v.
Instructions for use Ballpicker – English version 1.1
Page 5 of 16
1.4
Technical data
Oxland b.v.
General
No. of sections
Capacity
21M
1
800
Dimensions
Height (approx.) cm (inch)
Width (approx.) cm (inch)
Length (approx.) cm (inch)
Approx. total weight, with Tour discs empty kg. (lbs.)
Approx total weight, with Tour discs, fully loaded kg. (lbs.)
105 (42)
85 (34)
120 (48)
30 (70)
65 (145)
Instructions for use Ballpicker – English version 1.1
Page 6 of 16
2. Safety instructions
2.1
General
Safety precautions are a combination of measures implemented during the design stage and those that must be taken by the user. The Machine is designed
to function as a ball picker. It is designed to be adjusted and maintained without causing danger to anyone, when such tasks are carried out under the
conditions described in this instruction manual. The purpose of these safety precautions are to prevent all risk of accidents during the expected service life of
the machine, including assembly and dismantling, even if such risks do arise as a result of abnormal situations.
Parts and accessories, which are not approved by us, could lead to personal injury and/or damage to the machine and reduce the reliability of the machine.
Use only recommended Oxland parts and accessories for safety reasons. Those parts and accessories are made especially for our ball pickers. If you need
original parts or accessories please contact Oxland.
We are not liable for any damage or injury caused by parts and accessories that are not approved by Oxland.
2.2
Compliance with requirements
2.3
Remaining risks
2.4
Permitted use
Oxland ballpickers comply with the personal safety requirements for ball handling.
Whenever applicable:
• When servicing, cleaning or repairing the ball picker, be aware of the sharp edges on the ball picker (e.g. ball guides).
The ball picker may only be used on the driving range. It may only be used when it is assembled and mounted according to this instruction manual.
2.5
•
•
•
•
•
2.6
Prohibited use
Never overload the ball picker by filling more balls than the capacity listed for the ball baskets in the technical data chapter of this instruction manual.
Never transport persons or goods on the ball picker. This could result in personal injury and/or damage to the ball picker.
Never use the ball picker for long distance transportation or for transporting anything other than balls picked up on the driving range.
Modifications to the mechanical functions of the ball picker may only be carried out after consultation with Oxland.
Avert large holes on the driving range during the picking of balls.
Operational reliability
For increased operational reliability and service life, we recommend the following:
• Park the ball picker in a covered area when not in use
• Never overload the ball picker by filling more balls than the capacity listed for the ball baskets in the technical data chapter of this instruction manual.
Oxland b.v.
Instructions for use Ballpicker – English version 1.1
Page 7 of 16
3. Machine management
3.1 Conditions
Anyone doing maintenance on the ball picker must first understand these instructions. If a person has not done any work and/or maintenance for a period of
more than three months on a ball picker, the instruction manual must be re-read before doing any work on the ball picker.
4. Design and function
4.1 General
The Oxland ball pickers are designed and build for fast en reliable ball picking.
Every section is made of galvanised steel on which the tour discs are mounted on an axle with bearing blocks.
When using the ball picker on the driving range the balls will be caught between the tour discs and then transported directly into the baskets. Once a ball
picking job is finished, the baskets can be taken out from the sections by hand.
5. Installation
Make sure all the parts you need for the ball picker are present by checking the part list as listed in chapter 7.1 on this manual.
If you miss any parts, please contact Oxland and give them the article number(s) of the missing part(s).
To assemble the ball picker the following tools are required:
Wrenches no. 13 and 17
Oxland b.v.
Instructions for use Ballpicker – English version 1.1
Page 8 of 16
5.1 Installation step by step
When you get your ball picker, step 1 is probably already done.
In case there is some damage, step 1 can be done as follows:
Step 1
Install the axle with tour discs
Parts:
Article No.
900131
900144
900122
900143
900140
Pos.
A
B
C
D
E
F
Description
BP-axle 820
BP-bearing block V58
BP-Bearing 6302-RS
BP-tour disc
BP-washer M16
BP-outer axle 726
numbers
1
2
2
17
6
1
Start with one BP-tour disc (900143), a bearing block V58 (900144) with a BP-bearing 6302 RS(900122) and the outer axle (900140) (F).
Put the bearing block assy into the BP-tour disc. The outer axle (900140) will fit on the bearing block assy.
After this you can slide the 16 tour discs (900146) on the outer axle (900140). Finish it by putting the other bearing block and the axle on the BP-outer axle.
Tips:
-
Before sliding the tour discs, make sure the slanting side of the BP-end disc is pointed toward the outer axle. Make sure that you put all the tour discs
in the right way. There is a pin on one side of the tour disc and a hole on the other side. Make sure the pins and holes are always aligned.
When it is difficult to slide the discs on the disc holder put some Teflon spray on the outer axle for easier sliding.
Oxland b.v.
Instructions for use Ballpicker – English version 1.1
Page 9 of 16
Step 2: Assembly of a section
Parts:
Article No.
900129
900128
900130
Pos.
A
B
C
Axle assemble from step 1
F
Description
BP-frame M1 complete
BP-Baskets
BP-Swivel castor assy
numbers
1
2
1
1
Install the complete axle (F) from step 1 into the frame M1 (900129) (A) with 2 bolts (M8x30), 2 washers (M8) and adhesive (loctite) for fasting the bolts. (for
disconnecting make the adhesive warm, then turn the bolt loose). Next, place the swivel castor assy (900130) (C) on the main connector (4 x M10x20), but
before placing make sure the bearings of the wheels are greased. Finish the section by putting the basket’s (B) into the frame.
Tips:
-
Use adhesive (loctite) for the two M8x30 bolts, and allow the adhesive to harden (min. 4 hours) !
Make sure that the tour discs are positioned in line with the inlets of the frame.
Assemble the ball guides correctly on the frame.
Oxland b.v.
Instructions for use Ballpicker – English version 1.1
Page 10 of 16
Step 3: Install the pushrod
Parts:
Article No.
900170
Assemble from step 2
Pos.
A
B
Description
BP-Handle
numbers
1
1
Install the BP-handle (900170) (A) on the assembled frame from step 2 with 4 bolts (M8x30), 8 rings (M8) and 4 nyloc nuts (M8)
Oxland b.v.
Instructions for use Ballpicker – English version 1.1
Page 11 of 16
21M
Oxland b.v.
Instructions for use Ballpicker – English version 1.1
Page 12 of 16
6. Maintenance
6.1
General
6.2
Maintenance intervals and instructions
A
B
C
Every pick-up run
Every month
Every season
For a long and good life span you have to check the ball picker regular. Any malfunction that will be discovered on an early stage will be easier to correct. If
you have checked the ball picker regularly then the malfunctions and breakdowns can be minimised. We will give you some tips about malfunctions and what
to do when they appear.
Maintenance intervals
1
1.1
1.2
1.3
1.4
1.5
1.6
1.7
1.8
Maintenance intervals and instructions
21M
Any object that could have become lodged between the Tour- discs should be removed after every pick-up.
These could be stones, broken balls, pinecones etc., which can damage your ball picker or short the life span.
After pick-up hose down the baskets and discs to remove gravel or sand that could accumulate and cause
corrosion of the metal parts and unnecessary wear and tear on the bearings and discs.
Clean the ball picker at least ones a month when they using artificial fertiliser on the driving range.
Check that all locking nuts are secure and there are no broken discs
Check the tyre pressure of the Swivel castor assy (900130). Tyre pressure: 2 Bar or 30 Psi
In the winter the ball picker must be totally cleaned stored in a frost-free storage area.
Lubricate nuts and bolts and check if they are rusty or damaged, if they are, replace them.
Check the wheel bearings if they are dry, grease them.
Oxland b.v.
Instructions for use Ballpicker – English version 1.1
A
B
C
X
X
X
X
X
X
X
X
Page 13 of 16
6.3 What to do with possible malfunctions
The ball picker does not pick up the balls
Check that:
A section is damaged.
All baskets are correctly placed in the sections.
The Tour-discs are undamaged and securely fastened.
The grass on the driver range is too long so that is covers the balls
The ball picker does not roll properly
Check that:
The wheels are undamaged.
The roller bearings are undamaged.
Nothing has become lodged in the picker roller or on the wheels.
The ball baskets are undamaged.
The ball picker is not damaged, resulting in any of its parts scraping on the ground.
6.4 Function tests
Test the ball picker after repairing or maintenance. Check if the ball picker is functioning correctly by test driving without balls in the baskets.
Oxland b.v.
Instructions for use Ballpicker – English version 1.1
Page 14 of 16
7. Replacement parts
7.1
parts list
If you need spare parts because of damaging or wear and tear etc, you can contact Oxland for new parts. To prevent mistakes please always use part nos.
when ordering.
A = Picture of article
B = Article code
A
C = Description
D = Quantity 21M
B
D
A
B
C
D
Frame
M1
1
900170 Handle
1
Swivel
900130 castor
assy
1
900122 Bearing
2
Castor
tube
900135
R20x8x1
30mm
1
900144
900129
900132
Oxland b.v.
C
Tyre and
rim assy
Instructions for use Ballpicker – English version 1.1
Bearing
2
block V58
900146 Tour disc 17
Page 15 of 16
A
B
C
D
Rim
900133 bearing
bush
Outer
axle
900140
50x50726
Oxland b.v.
A
B
C
900128 Basket
1
Instructions for use Ballpicker – English version 1.1
900131
Center
axle 820
D
2
1
Page 16 of 16
Fastening parts
A
Oxland b.v.
C
D
Nut M8 Nyloc
4
Nut M10 Nyloc
4
Bolt M8x30
6
Bolt M10x20
4
Washer M8
10
Washer M16
6
Instructions for use Ballpicker – English version 1.1