1
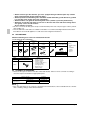
Not recommendable but in case of emergency
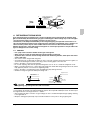
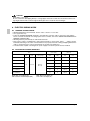
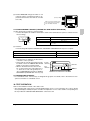
You must use a torque wrench but if you are obliged to install the unit without a torque wrench, you may
follow the installation method mentioned below.
After the work is finished, make sure to check that there is no gas leak.
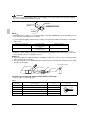
When you keep on tightening the flare nut with a spanner, there is a point where the tightening torque
suddenly increases. From that position, further tighten the flare nut the angle shown below:
Table 2
Pipe size
Further tightening angle
Recommended arm length of tool
φ 6.4 (1/4”)
60 to 90 degrees
Approx. 150mm
φ 9.5 (3/8”)
60 to 90 degrees
Approx. 200mm
φ 12.7 (1/2”)
30 to 60 degrees
Approx. 250mm
φ 15.9 (5/8”)
30 to 60 degrees
Approx. 300mm
φ 19.1 (3/4”)
20 to 35 degrees
Approx. 450mm
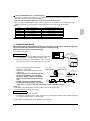
7. DRAIN PIPING WORK
〈〈Rig
the drain pipe as shown below and take measures against condensation. Improperly rigged pip〈〈
ing could lead to leaks and eventually wet furniture and belongings.〉〉
〉〉
〈〈Insulate
the drain hose inside the building.〉〉
〉〉
〈〈
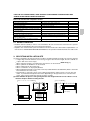
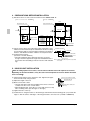
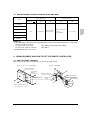
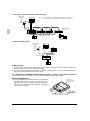
(1) Install the drain pipes.
Attached drain hose
CS-40-125EMHPK
5 cm or
more
5 cm or
more
Bottom of unit
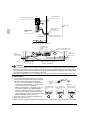
• Keep piping as short as possible and slope it downwards
so that air may not remaine trapped inside the pipe.
• Keep pipe size equal to or greater than that of the connecting
pipe (Vinyl pipe of 25 mm nominal diam. and 32 mm outer diam.)
100mm
or more
• Use the attached drain hose and clamp.
Clamp metal
Large sealing pad
Tighten the clamp firmly.
(Attached with unit)
(Attached with unit)
Clamp metal
• Insulate the clamp metal with the attached
sealing pad.
Drain hose
• There is negative pressure inside the unit
Drain hose
4mm or less
relative to atmospheric pressure when
the unit is running, so be sure to provide
drain frap on the drain outlet. (See the figure)
• In order to prevent foreign matter from
building up inside the piping, you should
avoid curves as much as possible, and arrange so the trap can be cleaned.
NOTE
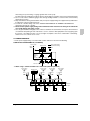
• If installing central drain piping, install according to the following right figure.
(Install a drain trap for each indoor unit.)
CS-200·250EMHPK
• A drain pipe need not be installed.
• The diameter of the piping is the same as that of the connecting pipe (PS1B), and should be kept equal
to or greater than that of the connecting pipe.
(2) After piping work is finished, check drainage flows smoothly.
English
8