Transcript
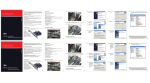
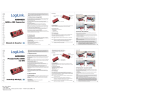
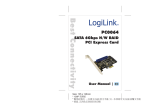
English
2.2 System Requirements:
• IBM PC/AT Compatible
• The available Mini PCIe Slot on the Motherboard
• Windows XP (SP2/SP3), Windows Vista/7
• 1 x OPC0056 USB3.0 PCIe Card
• 1 x CD Driver
• 1 x User Manual
2.0 Introduction:
3.0 Hardware Installation
Thanks for your purchasing of OPC0056 USB3.0 PCIe card and let it lead you to the
fastest transmitting speed world for the USB peripherals.
Step 1: Turn off your PC, unplug the Power Cord and open the Case of PC.
Step 7: The driver has been
setup successfully.
Please click ”Finish”
and restart PC.
Step 4: Replace the computer chassis cover, reconnect the Computer Power Cord
and turn on your PC.
4.0 Software Installation:
4.1 Windows XP(sp2 & sp3), Windows Vista , and Windows 7
1
2
2.1 Spezifikationen
Geben Sie das Gerät am Ende der Lebensdauer nicht in den normalen
Hausmüll. Bringen Sie es zum Recycling zu einer offiziellen Sammelstelle. Auf
diese Weise helfen Sie die Umwelt zu schonen.
3
4
Schritt 1: Beenden Sie den
Windows Hardware
Assistenten mit
"Cancel/Abbrechen".
Schritt 5: Sie haben hier die
Möglichkeit einen
anderen Speicherort
auszuwählen.
Wollen Sie den
standardmäßig
vorgegebenen
Ordner behalten,
klicken Sie auf
„Next“.
Schritt 3: Setzen Sie die OPC0056 in einen freien PCIe-Slot Ihres Computers.
Achten Sie dabei auf den korrekten Einbau der PCIe Karte im Slot.
Befestigen Sie abschließend das Slotblech der OPC0056 entsprechend
mit dem Gehäuse Ihres Computers. Hinweis: Für den Betrieb der Karte
muss die zusätzliche Stromversorgung angeschlossen sein. Hierzu
verwenden Sie bitte das entsprechende Kabel Ihres PC-Netzteils.
Schritt 2: Legen Sie die
beiliegende CD in
ein entsprechendes
CD/DVD Laufwerk.
Schritt 6: Klicken sie auf
„Install“ um den
Installationsvorgang
zu starten.
USB3.0:
• 2 Port USB 3.0 A Female
• Kompatibel zur USB 3.0 Spezifikation Rev 1.0
• Kompatibel zur USB 3.0 (5Gbps), USB2.0 (480Mbps) und USB1.1 (12Mbps)
Spezifikation
• Unterstützt die USB Legacy Funktion
• USB Bus Power/Self Power
• Unterstützt den Anschluss an das interne Netzteil des Computers um jeden USB
Port mit maximal 900mA pro Port zu versorgen
Setzen Sie das Gerät nicht direktem Sonnenlicht oder hohen Temperaturen aus, da
dieses sonst ebenfalls beschädigt werden kann oder sich die Nutzungsdauer
verkürzt.
Stellen Sie das Produkt nicht in der Nähe von Wärmequellen wie Heizkörpern oder
anderen Wärme erzeugenden Geräten auf.
Setzen Sie das Gerät nicht Regen, Wasser, Nässe oder hoher Luftfeuchtigkeit aus.
Stellen Sie es nicht im Badezimmer oder in der Küche neben einem Wasch- oder
Spülbecken auf und vermeiden Sie auf alle Fälle direkten Kontakt mit Wasser.
Versuchen Sie nicht das Gerät zu öffnen.
Verwenden Sie beim Einbau keine Gewalt.
Befestigen Sie das Slotblech mit der dafür vorgesehenen Schraube an Ihrem
Computergehäuse.
2.2 Systemvoraussetzungen
• IBM PC/AT kompatibel
• Ein freier, funktionierender PCIe Slot auf dem Mainboard
• Windows XP (SP2/SP3)/Vista/7
Herzlichen Glückwunsch zum Kauf der OPC0056!
Lesen Sie die Anweisungen und Warnhinweise in dieser Bedienungsanleitung
sorgfältig durch, bevor Sie das Produkt zum ersten Mal verwenden. Bei
Nichtbeachtung kann es zu Beschädigungen des Gerätes kommen.
2.3 Packungsinhalt
2.0 Einführung
3.0 Hardware Installation
Wir gratulieren Ihnen zum Kauf der USB 3.0 PCI Express Karte OPC0056.
Diese Karte bietet Ihnen die zurzeit schnellste Übertragungsrate in Verbindung mit
USB Peripherie Geräten.
USB 3.0 bietet
Ihnen eine
Übertragungsrate
von bis zu 5Gbps,
sofern USB 3.0 kompatible
Geräte verwendet werden.
Zusätzlich ist jedoch eine
Abwärtskompatibilität gegeben, so
dass auch USB 2.0 und USB 1.1
Geräte weiterhin unterstützt werden.
Die OPC0056 wird über einen
entsprechenden PCI Express Slot mit dem
Computer verbunden.
Schritt 1: Schalten Sie Ihren Computer aus, trennen Sie diesen vom Stromnetz und
öffnen Sie das Computergehäuse.
• 1 x OPC0056 USB 3.0 PCIe Karte
• 1 x CD-ROM (Treiber)
• 1 x Bedienungsanleitung
5
Schritt 2: Entfernen Sie das entsprechende Slotblech am Computergehäuse.
Allgemein:
• Kompatibel zur PCI-Express Revision 2.0
• Plug & Play und Hot Swappable
• Windows XP/Vista/7
1.0 Sicherheitshinweise
Deutsch
Step 3: Please double click
”Setup.exe” as
below.
Step 4: Select “I accept the
terms of the license
agreement” and
click “Next” to
continue.
This PCIe
card has PCI
Express® bus
interface, and it is
applicable for PCI
Express solution for host
PC system. The USB3.0 PCIe
card works up to 5Gbps for data
transfer when USB3.0 compliant
peripherals, while maintaining
compatibility with existing USB peripheral
devices.
* 100P 雪銅紙
* 拉頁,分兩本手冊,一本德文英文手冊,另一本西班牙文波蘭文手冊
* 兩面,四色彩色印刷
Step 8: When you can find “NEC Electronics USB 3.0 Host Controller “and “NEC
Electronics USB 3.0 Root Hub “ in the “Computer Management” as below. It
means you have successfully installed OPC0056, and connect it to the USB
3.0 device.
Step 6: Please click “Install”
to continue.
Step 2: Please insert the
driver CD into
CD-ROM
Step 3: Plug USB 3.0 PCIe Card in Mini PCIe Slot and install the bracket screw that
secures the card to the computer chassis. Note: For the operation of the
card, the additional power supply has to be connected. For this purpose,
please use the appropriate cable from your PC power supply.
2.3 Package Contents:
Please carefully review this User Manual so that you can take full advantage of all
the capabilities the CnMemory PCI Express Card offers.
Size: 105 x 148mm
Step 5: Please click “Next”
to continue.
USB3.0
• 2 Port USB 3.0 A female
• Compliant with USB3.0 Specification Rev 1.0
• Compliant with USB3.0 (5Gbps), USB2.0 (480Mbps), and USB1.1 Specification
• Supports USB legacy function
• USB Bus Power/Self Power
• Supports External Power Socket in order to supplier power for each USB3.0
Connector up to 900Ma Max/port
Don’t place the Device into direct Sunlight or in Places with high Temperature. This
can damage it or shorten his average useful Life.
Don’t place the Device in the near of Heat Sources, like Radiators or other heat
producing Devices.
Don’t expose the Device to Rain, Water, Wetness or high Humidity.
Don’t place it in the Bathroom or the Kitchen in the near of a Sink. Avoid the direct
Contact with Water.
Don’t try to open the Device.
Don’t use any violence on the parts during installation.
Congratulations on the purchase of the USB3.0 PCI Express Card OPC0056!
Instructions for installing and configuring this product can be found in this manual.
Before you install and use this product, please read this manual carefully for full
exploiting the functions of this product.
OPC0056 Bedienungsanleitung
USB3.0 PCI Express Karte
Step 1: Find the Windows
Hardware Wizard
as below:
General:
• Compliant with PCI-Express Revision 2.0
• Fully Plug & Play and Hot Swappable
• Supports Windows XP/Vista/7
1.0 Safety Instructions
OPC0056 User Manual
USB3.0 2-Port PCI-Express Card
Step 2: Remove the mini PCIe slot cover as below.
2.1 Specification:
Do not throw the appliance away with the normal household waste at the end
of its life, but hand it in at an official collection point for recycling. By doing this
you will help to preserve the environment.
Schritt 8: Nach erfolgreicher Installation erscheinen im Gerätemanager unter dem
Punkt „USB-Controller“ die Punkte
- “NEC Electronics USB 3.0 Host Controller” und
- “NEC Electronics USB 3.0 Root Hub”
Schritt 4: Bestätigen Sie die
Lizenzbedingungen
mit „I accept the
terms of the license
agreement“ und
fahren Sie mit “Next”
fort.agreement” and
click “Next” to
continue.
Schritt 7: Schließen Sie die
Installation mit
einem Klick auf
„Finish“ ab und
starten Sie Ihren
Computer neu.
Das CE-Zeichen bestätigt, dass dieses Produkt die Hauptanforderungen der Richtlinie
2004/108/EC des Europäischen Parlaments und des Europarates über
Telekommunikations- und Endgeräte bezüglich der Sicherheit und der Gesundheit der
Benutzer und hinsichtlich elektro- magnetischer Störungen einhält. Die CE Konformität
wurde nachgewiesen. Die entsprechenden Erklärungen sind beim Hersteller hinterlegt.
4.0 Software Installation
4.1 Windows XP (SP2/SP3), Windows Vista und Windows 7
2
6
Schritt 3: Ein Doppelklick auf
die Datei „setup.exe“
startet den
Installationsvorgang.
Schritt 4: Schließen Sie das Computergehäuse, verbinden Sie den Computer mit
dem Stromnetz und schalten diesen an.
1
The CE mark confirmed that this product meets the main requirements of the
Directive 2004/108/EC of the European Parliament and the Council of Europe
concerning telecommunications and terminals regarding the Safety and health of
users and of electro-magnetic interference compliance. The CE has been
demonstrated. These statements are deposited by the manufacturer.
3
4
5
6