1
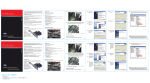
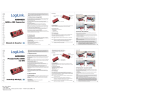
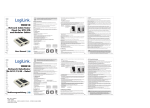
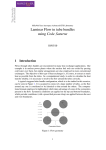
Size: 84 x 118.4mm * 100P 雪銅紙 * 分兩本手冊, 以騎馬釘裝訂成冊, 一本德文(在前)英文手冊, 另一本西班牙文(在前)波蘭文手冊 * 兩面, 四色彩色印刷 Do not throw the appliance away with the normal household waste at the end of its life, but hand it in at an official collection point for recycling. By doing this you will help to preserve the environment. 1.0 Safety Instructions Put the Device always on a stable and straight Surface. In case of falling it can be damaged. Don’t place the Device into direct Sunlight or in Places with high Temperature. This can damage the Device or shorten his average useful Life. Don’t place it in the near of Heat Sources, like Radiators or other heat producing Devices. Don’t expose the Device to Rain, Water, Wetness or high Humidity. Don’t place it in the Bathroom or the Kitchen in the near of a Sink. Avoid the direct Contact with Water. Don’t try to open the Device. Prior to the first use of our product make a backup of your data. We are not liable for any loss of data, unless you can accuse us intention or gross negligence. In any case, liability for loss of data is limited to the effort that is necessary to restore from existing backup copies. Congratulations to the Purchase of Logilink Internet Camera! Please read the Manual and Safety Instructions before using the product for the first time. Otherwise damage can be the result. -1- 2.0 Introduction 2.1 Specification Camera/Image: - Dual Mode: MPEG4 and Motion-JPEG Image Video - Multiple Profiles: Output M-JPEG and MPEG4 at the same time - Multi-area Motion Detection - Provides Fixed Focus Lens, F = 2.8 - Supports Up to 30 fps Video Frame Rate - High Speed Hardware-Based Image Compression HTTP/Utility: - Includes easy-to-use Viewer & Recorder utility - Provide Admin utility, Camera Viewer & WEB browser Management - Supports Wireless 802.11b/g/n Standard (for WC0041 only) - View multiple cameras simultaneously - Up to 16 at a time - Supports 4 additional user accounts for viewing camera - Manual/Schedule/Cycle Record, Video playback/ Forward/ Pause/ Stop - Auto sending Video by E-mail and FTP - Firmware Upgradeable - Supports Windows 2000/XP/Vista/7 2.2 package contents 1 x Internet Camera (WC0040)/ Wireless 11N Internet Camera (WC0041) 1 x Power Adapter 1 x Camera Stand accessory kit 1 x 100cm Category 5 Ethernet Cable 1 x User Manual 1 x CD (Including Manual/Utility/Driver) -2- 2.3 System Requirement OS System: Windows 2000, XP + SP2, Server 2003, Vista32/64, Win7 CPU: Intel Pentium III 750MHz above or Intel Celeron 1GHz above Memory Size: 128MB (256MB recommended) VGA Card Resolution: 800 x 600 or above 3.0 Hardware Installation 3.1 LED and Focusing The Camera head and its focus ring allow you to modify the aim and focus of the Camera. To adjust the Camera’s focus, rotate the dark focus ring. There are two LEDs indicating the camera status and networking status. Antenna Green (Wireless WC0041 Only) Steady: System is ready Blinking: System is booting. Blue Steady: LAN is connected. Blink: WLAN is activated. Focusing LENs LED Green: Status LED Blue: WLAN Status -3- 3.2 Camera Ports The Camera features two ports and a button. WPS Button: click for WPS function (wireless model) or reset function or hold for more than 5 seconds to reset the camera settings to factory default value. Power Jack: Connect to power adapter for power supply with 5V DC. LAN Jack: Connect to your local area network by network cable. Stand hole Power Jack 5V DC LAN port WPS Reset to Default -4- 3.3 Installation Procedure 1. Connect the Internet Camera to your network by attached the network cable from the switch/router to the LAN port of the Internet Camera. 2. Connect the power adapter to the Internet Camera and plug the power adapter to power outlet. The Internet Camera will be powered on. When the Internet Camera is ready, the Green LED will light. Note: It is highly recommended to use the power adapter shipped with the Internet Camera, do NOT use any other power adapter from any sources. -5- 4.0 Software Installation Follow the simple steps below to run the Install Wizard to guide you quickly through the Installation process. The following installation is implemented in Windows XP. The installation procedures in Windows 2000/XP/Server 2003/Vista/Win7 are similar. 1. Insert the provided CD into your CD-ROM drive. The “Autorun.exe” program should be executed automatically. If not, run “Autorun.exe” manually from “Autorun” folder in the CD. 2. The Install Wizard will show three selections, select the program you want to install or click “Exit” to install the program later. The following installation steps are the demonstration of “Install Administrator Utility” and ‘’Install 16 Chan Camera Viewer’’. -6- 3. Click ‘’Install Administrator Utility’’ and when the following window appears, click ‘Next’. 4. You can specify the destination folder of software installation. You can just use the default folder, and click ‘Next’ to continue. -7- 5. If you need installation program to create a desktop icon or a quick launch icon for you, click all items you need here, and click ‘Next’ to continue. 6. Here lists all options you chose in previous steps, if everything’s correct, click ‘Install’ to start installing procedure, or click ‘Back’ to go back to previous step to modify installing settings. -8- 7. The installing procedure will take some time, please be patient. 8. When you see this window, it means the software installing procedure is complete. Please click ‘Finish’ to finish the procedure (IP camera surveillance software will start after you click ‘Finish’ button, if you want to start it later, uncheck ‘Launch IP Cam Surveillance Software’ box). -9- 9. After finished the installation of Administrator Utility, please go back to wizard page and click ‘’Install 16 Chan camera viewer’’, the system will start running viewer installation and the procedures are similar to the installation of administration utility. 10. When the installation is completed. Please run ”Administrator Utility“. On the Internet Camera first page, the cameras found in the network are listed. Choose the one you want to configure and click “Setting Wizard” to proceed. - 10 - 11. Please enter the default password “1234” and click “OK” to login to the IP setup page. 12. Internet Camera is working through the network (TCP/IP Protocol). The IP address setting must be correct, or you cannot access to the camera. The wizard program will detect the IP address status of your network automatically and suggest a free IP address for the Camera. You can accept the suggested value or enter the value manually. If you enter the value manually, please be aware that the “Subnet Mask” must be the same for both the camera and the PC. Click “OK” to apply the configuration. - 11 - Or select ‘’DHCP’’ to obtain an auto IP setting from DHCP server and click ‘’OK’’ to apply the configuration. 13. Click ‘IP Cam Surveillance Software’ icon from desktop, quick launch bar, or start menu to start the IP camera surveillance software. - 12 - 14. Please click ‘System configure’ button and a popup menu will appear Please select ‘Configure Cameras’ to configure cameras 15. In this table you can configure all cameras you wish to connect. Up to 16 cameras can be connected simultaneously, choose the camera you want to connect on the ‘’Camera Search’’ list and click ‘’Select’’ to add it into the channel you want to view then click ‘’ok’’ - 13 - 16. The IP Cam Viewer will pop out and the video will show on the channel you choose automatically. Congratulations!! You have settled the camera successfully. The CE mark confirmed that this product meets the main requirements of the Directive 2004/108/EC and 2006/95/EC of the European Parliament and the Council of Europe concerning telecommunications and terminals regarding the Safety and health of users and of electro-magnetic interference compliance. The CE has been demonstrated. These statements are deposited by the manufacturer. - 14 -