1
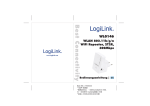
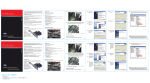
Size: 105 x 148mm * 100P 雪銅紙 * 騎碼釘, 一本德文(在前)英文手冊, 另一本西班牙文(在前)波蘭文手冊 * 兩面, 正四色反四色彩色印刷 According to the European WEEE directive, electrical and electronic equipment must not be disposed with consumers waste. Its components must be recycled or disposed apart from each other. Otherwise contaminative and hazardous substances can pollute our environment. You as a consumer are committed by law to dispose electrical and electronic devices to the producer, the dealer, or public collecting points at the end of the devices lifetime for free. Particulars are regulated in national right. The symbol on the product, in the user's manual, or at the packaging alludes to these terms. With this kind of waste separation, application, and waste disposal of used devices you achieve an important share to environmental protection. 1.0 Safety Instruction Put the Device always on a stable and straight Surface. In case of falling it can be damaged. Don’t place the Device into direct Sunlight or in Places with high Temperature. This can damage the Device or shorten his average useful Life. Don’t place it in the near of Heat Sources, like Radiators or other heat producing Devices. Don’t expose the Device to Rain, Water, Wetness or high Humidity. Don’t place it in the Bathroom or the Kitchen in the near of a Sink. Avoid the direct Contact with Water. Don’t try to open the Device. Prior to the first use of our product make a backup of your data. We are not liable for any loss of data, unless you can accuse us intention or gross negligence. In any case, liability for loss of data is limited to the effort that is necessary to restore from existing backup copies. Congratulations to the Purchase of UA0156! Please read the Manual and Safety Instructions before using the product for the first time. Otherwise damage can be the result. -1- 2.0 Introduction The LogiLink Cassette to Digital converter is designed to rediscover old songs with by turning cassette into MP3 files to use on your computer, iPod or in the car. Cassette to Digital is a portable handheld USB cassette player that works with all kinds of cassettes. It has an easy-to-use USB connection for converting the music on your cassettes into MP3 files. You can load the songs onto your portable music player, or record them onto a CD and listen in your car. Its portable size allows it to fit in virtually any bag and enables you to play and transfer music anywhere. It runs on battery or USB power when connecting to your computer for flexible operation. This powerful yet easy -to-use program guides you through transferring your Music and even can integrate with your iTunes Music library. In addition to transferring your cassettes, Tape to Digital has an audio output that enables you to listen on your stereo, headphones, or other speaker systems for hours of enjoyment! 2.1 Specification: Rediscover your old cassette tapes on the go Convert tapes and cassettes to MP3 to playback on iPods/MP3 players or burn to CD Can be used as Walkman player Compact and portable design Powered by USB power or batteries (not included) Comes with EZ Tape Converter software to guide you through transfer Audio output enables you to listen on your stereo, headphones or other speaker systems Compatible with Windows ME/2000/XP/Vista/7 2.2 Technical Specification MP3 bit Rate: 64-320 kbps Audio output: 3.5mm stereo jack (headphones) -2- Power: 3V (2x AA batteries) or USB connection Headphones: impedance 32 Ohm, frequency range 100-20 KHz, harmonic distortion <1,5% Recommended duty cycle: 90 min operation / 30 min OFF 2.3 System Requirements Windows 7 / VISTA / XP / 2000 / ME IBM PC/AT compatible computer with 800 MHz processor or higher Hard disc memory: 70MB (for software), 4GB (for audio editing) RAM 256 MB / CD ROM drive / USB interface 2.4 Package Contents 1 x Cassette to Digital Converter 1 x USB cable 1 x CD-ROM 1 x User Manual 3.0 Installation 3.1 Description of parts -3- 1. Eject: Slide this switch to open the cassette holder. 2. Volume: Adjusts the volume of the headphones and USB connection 3. Headphones: You can connect 1/8” headphones here 4. USB Connection: Use the included USB cable to connect UA0156 to your computer. For transferring your recordings to your computer, we provided a software package on the included CD. 5. Play: Press to play the tape 6. Stop: Press to stop the tape. 7. FF/REW: Press to fast forward or rewind the cassette. Note that these buttons will become “reversed ” when the tape changes direction. 8. DIR: Select the direction of cassette playback. This is useful if you want to play the other side of the tape without ejecting it. 9. Play Mode: Select what the cassette does when it reaches the end of a side. When you set to the “loop” icon, the tape will automatically switch direction and begin playing the opposite side when one side is finished. When you set to the single arrow icon, the cassette will simply stop when a side is finished. 3.2 Inserting/Replacing the batteries You can power the UA0156 via either USB power from your PC or batteries. For inserting the batteries, slide back switch 1 to open the UA0156. Open the battery compartment and insert 2 x AA batteries (making sure the battery is correctly aligned.) and replace the battery compartment. 3.3 Hardware Installation The UA0156 doesn’t need any driver installation. Windows OS will install the driver automatically. Please connect audio capture USB connector into your computer’s free USB2.0 port. The system will note “Found new hardware.” Please wait for a -4- Moment until system will note “The device is ready to use”. Please check hardware installing correctly. Right click “My Computer” and select “Properties”, and select “Hardware” option, please click “Device Manager” key. Then, please click “Sound, video and game controllers”, then you will find the Device name –“USB Audio Device”. 3.4 Software Installation Insert the CD (supplied) into the CD drive and follow the on-screen instructions. Once the software is installed, you can start to transfer your audio. Please insert software CD in your CD drive, and double click ”My Computer” And “USB Cassette” CD icon. Please double click “audacity” to install software, and click or select “Next” , ”I accept the agreement ” and/or “ finish” to finish the software Installation. -5- 4.0 Operation Maybe you need to pull the UA0156 device and plug it into your computer again. 1. Double click “audacity” icon on your computer’s desktop, please select your Language first, then click ”OK”. 2. Please click “Edit” key on the software panel, and select “Preferences”. 3. Please select recording device to be “USB Audio Device”, and channels to be “2 (Stereo)”. And select ”Play other tracks while recording new one” and “Software Play through (Play new track while Recording it)”, then click “OK”. -6- 4. Now, we start to record analogue audio to be digital MP3 format file. Please click red record key to start recording audio that you wanted. And when you want to finish, please click yellow stop key. 5. At first time, we need to do more steps if we want to export as MP3 file. Click “File”, and select “Export As MP3”. -7- 6. You need to give one file name and location now. 7. Maybe you still need to write some information. 8. Now, you can get MP3 file through your analogue audio device. You can use the file for your iPod by iTunes. CE Declaration: This device corresponds to EU directive 2004/108/EC: With the CE sign Logilink®, a registered trademark of the 2direct GmbH ensures, that the product is conformed to the basic standards and directives. These standards can be requested online on www.logilink.com. All trademarks and registered brands are the property of their respective owners. -8-