1
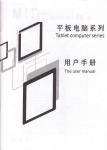
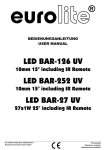
BEDIENUNGSANLEITUNG
USER MANUAL
ARC M/S
DMX-controller
Für weiteren Gebrauch aufbewahren!
Keep this manual for future needs!
© Copyright
Nachdruck verboten!
Reproduction prohibited!
Inhaltsverzeichnis
Table of contents
1. EINFÜHRUNG ............................................................................................................................................... 3
2. SICHERHEITSHINWEISE............................................................................................................................. 3
3. BESTIMMUNGSGEMÄßE VERWENDUNG................................................................................................. 4
4. GERÄTEBESCHREIBUNG........................................................................................................................... 5
5. SETUP ........................................................................................................................................................... 8
6. BEDIENUNG ................................................................................................................................................. 9
7. PROBLEMBEHEBUNG ................................................................................................................................ 9
8. REINIGUNG UND WARTUNG...................................................................................................................... 9
9. TECHNISCHE DATEN .................................................................................................................................. 9
1. INTRODUCTION ......................................................................................................................................... 11
2. SAFETY INSTRUCTIONS .......................................................................................................................... 11
3. OPERATING DETERMINATIONS.............................................................................................................. 12
4. DESCRIPTION OF THE DEVICE ............................................................................................................... 13
5. SETUP ......................................................................................................................................................... 16
6. OPERATION ............................................................................................................................................... 17
7. PROBLEM CHART ..................................................................................................................................... 37
8. CLEANING AND MAINTENANCE ............................................................................................................. 37
9. TECHNICAL SPECIFICATIONS................................................................................................................. 37
Diese Bedienungsanleitung gilt für die Artikelnummern 51834335, 51834340
This user manual is valid for the article numbers 51834335, 51834340
Das neueste Update dieser Bedienungsanleitung finden Sie im Internet unter:
You can find the latest update of this user manual in the Internet under:
www.futurelight.com
2/38
00033924.DOC, Version 1.0
BEDIENUNGSANLEITUNG
ARC-M/S
DMX-controller
Lesen Sie vor der ersten Inbetriebnahme zur eigenen Sicherheit diese Bedienungsanleitung
sorgfältig durch!
Alle Personen, die mit der Aufstellung, Inbetriebnahme, Bedienung, Wartung und Instandhaltung dieses
Gerätes zu tun haben, müssen
- entsprechend qualifiziert sein
- diese Bedienungsanleitung genau beachten
- die Bedienungsanleitung als Teil des Produkts betrachten
- die Bedienungsanleitung während der Lebensdauer des Produkts behalten
- die Bedienungsanleitung an jeden nachfolgenden Besitzer oder Benutzer des Produkts weitergeben
- sich die letzte Version der Anleitung im Internet herunter laden
1. EINFÜHRUNG
Wir freuen uns, dass Sie sich für einen FUTURELIGHT ARC-M/S entschieden haben. Wenn Sie
nachfolgende Hinweise beachten, sind wir sicher, dass Sie lange Zeit Freude an Ihrem Kauf haben werden.
Nehmen Sie den ARC-M/S aus der Verpackung.
2. SICHERHEITSHINWEISE
Dieses Gerät hat das Werk in sicherheitstechnisch einwandfreiem Zustand verlassen. Um diesen Zustand zu
erhalten und einen gefahrlosen Betrieb sicherzustellen, muss der Anwender unbedingt die Sicherheitshinweise und die Warnvermerke beachten, die in dieser Bedienungsanleitung enthalten sind.
Unbedingt lesen:
Bei Schäden, die durch Nichtbeachtung dieser Bedienungsanleitung verursacht werden, erlischt der
Garantieanspruch. Für daraus resultierende Folgeschäden übernimmt der Hersteller keine Haftung.
Bitte überprüfen Sie vor der ersten Inbetriebnahme, ob kein offensichtlicher Transportschaden vorliegt.
Sollten Sie Schäden am Gehäuse entdecken, nehmen Sie das Gerät nicht in Betrieb und setzen sich bitte
mit Ihrem Fachhändler in Verbindung.
Halten Sie das Gerät von Hitzequellen wie Heizkörpern oder Heizlüftern fern.
3/38
00033924.DOC, Version 1.0
Das Gerät darf nicht in Betrieb genommen werden, nachdem es von einem kalten in einen warmen Raum
gebracht wurde. Das dabei entstehende Kondenswasser kann unter Umständen Ihr Gerät zerstören. Lassen
Sie das Gerät solange uneingeschaltet, bis es Zimmertemperatur erreicht hat!
LEBENSGEFAHR!
Lassen Sie den elektrischen Anschluss nur vom autorisierten Fachhandel ausführen!
Der Aufbau entspricht der Schutzklasse III. Das Gerät darf niemals ohne einen geeigneten Transformator
betrieben werden.
Der Installateur muss sicherstellen, dass ausreichend dimensionierte Klemmen, Leitungen und Verbinder
verwendet werden!
Alle geltenden Vorschriften zur Elektroinstallation müssen unbedingt eingehalten werden!
Gerät bei Nichtbenutzung und vor jeder Reinigung vom Netz trennen.
Beachten Sie bitte, dass Schäden, die durch manuelle Veränderungen an diesem Gerät verursacht werden,
nicht unter den Garantieanspruch fallen.
Kinder und Laien vom Gerät und der Batterie fern halten!
Im Geräteinneren befinden sich keine zu wartenden Teile. Eventuelle Servicearbeiten sind ausschließlich
dem autorisierten Fachhandel vorbehalten!
3. BESTIMMUNGSGEMÄßE VERWENDUNG
Bei diesem Gerät handelt es sich um einen DMX-Controller, mit dem sich DMX-gesteuerte Lichteffekte,
Scheinwerfer etc. in Diskotheken, auf Bühnen etc. ansteuern lassen. Dieses Produkt ist für den Anschluss
an 10-24 V AC/DC, 50/60 Hz Gleichspannung oder Wechselspannung zugelassen und wurde ausschließlich
zur Verwendung in Innenräumen konzipiert.
Batterien sind Sondermüll und müssen als solche entsorgt werden. Soll das Gerät entsorgt werden, muss
zuerst die Batterie entnommen werden. Die leere Batterie können Sie fachgerecht im Elektrofachhandel in
den dafür vorgesehenen Sammelbehältern entsorgen.
Achten Sie beim Einlegen der Batterie auf die richtige Polung.
Lassen Sie Batterien nicht offen herumliegen, es besteht die Gefahr, dass diese von Kindern oder
Haustieren verschluckt werden. Suchen Sie im Falle eines Verschluckens sofort einen Arzt auf!
Ausgelaufene oder beschädigte Batterien können bei Berührung mit der Haut Verätzungen verursachen,
benutzen Sie deshalb in diesem Fall geeignete Schutzhandschuhe.
Achten Sie darauf, dass die Batterien nicht kurzgeschlossen, nicht ins Feuer geworfen und nicht aufgeladen
werden können. Es besteht Explosionsgefahr.
Vermeiden Sie Erschütterungen und jegliche Gewaltanwendung bei der Installation oder Inbetriebnahme des
Gerätes.
Achten Sie bei der Wahl des Installationsortes darauf, dass das Gerät nicht zu großer Hitze, Feuchtigkeit
und Staub ausgesetzt wird. Vergewissern Sie sich, dass keine Kabel frei herumliegen. Sie gefährden Ihre
eigene und die Sicherheit Dritter!
Das Gerät darf nicht in einer Umgebung eingesetzt oder gelagert werden, in der mit Spritzwasser, Regen,
Feuchtigkeit oder Nebel zu rechnen ist. Feuchtigkeit oder sehr hohe Luftfeuchtigkeit kann die Isolation
reduzieren und zu tödlichen Stromschlägen führen. Beim Einsatz von Nebelgeräten ist zu beachten, dass
das Gerät nie direkt dem Nebelstrahl ausgesetzt ist und mindestens 0,5 m von einem Nebelgerät entfernt
4/38
00033924.DOC, Version 1.0
betrieben wird. Der Raum darf nur so stark mit Nebel gesättigt sein, dass eine gute Sichtweite von
mindestens 10 m besteht.
Die Umgebungstemperatur muss zwischen -5° C und +45° C liegen. Halten Sie das Gerät von direkter
Sonneneinstrahlung (auch beim Transport in geschlossenen Wägen) und Heizkörpern fern.
Die relative Luftfeuchte darf 50 % bei einer Umgebungstemperatur von 45° C nicht überschreiten.
Dieses Gerät darf nur in einer Höhenlage zwischen -20 und 2000 m über NN betrieben werden.
Verwenden Sie das Gerät nicht bei Gewitter. Überspannung könnte das Gerät zerstören. Das Gerät bei
Gewitter allpolig vom Netz trennen (Netzstecker ziehen).
Nehmen Sie das Gerät erst in Betrieb, nachdem Sie sich mit seinen Funkionen vertraut gemacht haben.
Lassen Sie das Gerät nicht von Personen bedienen, die sich nicht mit dem Gerät auskennen. Wenn Geräte
nicht mehr korrekt funktionieren, ist das meist das Ergebnis von unfachmännischer Bedienung!
Soll das Gerät transportiert werden, verwenden Sie bitte die Originalverpackung, um Transportschäden zu
vermeiden.
Beachten Sie bitte, dass eigenmächtige Veränderungen an dem Gerät aus Sicherheitsgründen verboten
sind.
Der Serienbarcode darf niemals vom Gerät entfernt werden, da ansonsten der Garantieanspruch erlischt.
Wird das Gerät anders verwendet als in dieser Bedienungsanleitung beschrieben, kann dies zu Schäden am
Produkt führen und der Garantieanspruch erlischt. Außerdem ist jede andere Verwendung mit Gefahren, wie
z. B. Kurzschluss, Brand, elektrischem Schlag, etc. verbunden.
4. GERÄTEBESCHREIBUNG
4.1 Features
Komfortabler Architekturcontroller
• 512 DMX-Kanäle
• 1 Master, bis zu 12 Slaves
• Jede Art von DMX-Geräten (Leuchten, LED-Effekte etc.) kann angesteuert werden
• Komfortable Einstellung verschiedener Parameter
• Eingebaute Uhr (batteriegepuffert)
• 999 Szenen
• 999 Programme mit je 99 Steps
• 99 Tagesprogramme mit je 128 Steps
• 99 Wochenprogramme mit je 7 Steps
• 99 Monatsprogramme mit je 31 Steps
• Spezialprogramm mit 1 Step
• Gleichzeitig steuerbare Events: 12 Programme, 12 Tagesprogramme, 12 Wochenprogramme und 12
Monatsprogramme
• PC-Anschluss über USB
• Installation nur durch professionelle Installateure oder Elektrofachkräfte
5/38
00033924.DOC, Version 1.0
4.2 Geräteübersicht
Übersicht über die Bedienelemente
1. DISPLAY: 2x16 Zeichen LCD-Display; Helligkeit und Kontrast können über das Menü eingestellt
werden.
2. DONW-UP, ESC, ENTER: Menüsteuerung, Datenauswahl
3. EVENT 1-12: vorprogrammierte Events können mit den Event-Tasten gestartet werden. Wenn die
LED nicht leuchtet, wurde dieser Taste kein Event zugewiesen. Bei roter LED ist ein Event
zugewiesen. Bei gelber LED läuft der zugewiesene Event.
4. USB-Anschluss: für Software-Updates und für das Kopieren von Daten.
Anschlüsse und Stecker:
PC USB Anschluss:
Für Standard USB-Kabel
6/38
00033924.DOC, Version 1.0
Rückseite:
Anschluss für Netz,
DMX und Slave
USB-Anschluss
BATTERIE- 3V
Batterie:
Die eingebaute Uhr läuft auch nach einem Netzausfall batteriegepuffert weiter. Sobald die Batterie
schwächer wird, blinkt das Uhr-Symbol im Display.
Anschlussklemme::
Spannungsversorgung:
Dieses Gerät lässt sich mit Gleich- und Wechselstrom betreiben. Deshalb ist die Polarität nicht so wichtig.
Die Mindestanforderung an die Spannungsversorgung ist 10-24 V.
7/38
00033924.DOC, Version 1.0
5. SETUP
5.1 Befestigung
Vergewissern Sie sich vor der Montage, dass die Montagefläche mindestens die 5-fache Punktbelastung
des Eigengewichtes des Gerätes aushalten kann.
Der Installationsort muss so gewählt werden, dass das Gerät absolut plan an einem festen, erschütterungsfreien, schwingungsfreien und feuerfesten Ort befestigt werden kann. Mittels Wasserwaage muss überprüft
werden, dass das Gerät absolut plan befestigt wurde.
Das Gerät muss außerhalb des Handbereichs von Personen installiert werden.
Die Festigkeit der Installation hängt entscheidend von der Befestigungsunterlage (Bausubstanz, Werkstoff)
wie z. B. Holz, Beton, Gasbeton, Mauersteine ab. Deshalb muss das Befestigungsmaterial unbedingt auf
den jeweiligen Werkstoff abgestimmt werden. Erfragen Sie die passende Dübel/Schraubenkombination von
einem Fachmann unter Angabe der max. Belastbarkeit und des vorliegenden Werkstoffes.
Das Gerät muss immer über alle Befestigungslöcher angebracht werden. Verwenden Sie geeignete
Schrauben und vergewissern Sie sich, dass die Schrauben fest mit dem Untergrund verbunden sind.
Vorgehensweise:
Schritt 1: An der Bodenplatte des Gerätes befinden sich die Löcher zur Installation.
Schritt 2: Halten Sie das Gerät mit der Bodenplatte an die Stelle, wo es installiert werden soll.
Schritt 3: Markieren Sie Ihre Bohrlöcher mit einem Bleistift oder einem geeigneten Werkzeug.
Schritt 4: Bohren Sie die Löcher.
Schritt 5: Halten Sie das Gerät mit der Bodenplatte in der gewünschten Position und schrauben Sie es
fest.
5.2 Anschluss ans Netz
LEBENSGEFAHR!
Lassen Sie den elektrischen Anschluss nur vom autorisierten Fachhandel ausführen!
Um das Gerät ans Netz anzuschließen, müssen Sie es zuvor an einen geeigneten Transformator anbringen.
Schließen Sie das Gerät über den Transformator ans Netz an.
5.3 Anschluss an den Projektor
Achten Sie darauf, dass die Adern der Datenleitung an keiner
Stelle miteinander in Kontakt treten. Die Geräte werden
ansonsten nicht bzw. nicht korrekt funktionieren.
Die Verbindung zwischen Controller und Projektor sowie zwischen den einzelnen Geräten muss mit einem
zweipoligen geschirmten Kabel erfolgen.
Aufbau einer seriellen DMX-Kette:
Verbinden Sie den DMX-Ausgang des ARC-M/S mit dem DMX-Eingang des nächsten Gerätes. Verbinden
Sie immer einen Ausgang mit dem Eingang des nächsten Gerätes bis alle Geräte angeschlossen sind.
8/38
00033924.DOC, Version 1.0
Achtung: Am letzten Projektor muss die DMX-Leitung durch einen Abschlusswiderstand abgeschlossen
werden. Dazu wird ein 120 Widerstand in einen XLR-Stecker zwischen Signal (–) und Signal (+) eingelötet
und in den DMX-Ausgang am letzten Gerät gesteckt.
6. BEDIENUNG
Der Controller nimmt den Betrieb auf sobald Sie die Spannungsversorgung herstellen.
Bitte führen Sie immer zuerst einen Software-Update auf die neueste Version durch.
Bitte beachten Sie die Menübeschreibung im englischen Teil dieser Anleitung.
7. PROBLEMBEHEBUNG
PROBLEM:
Gerät lässt sich nicht anschalten.
URSACHE:
Die Anschlussleitung ist nicht
angeschlossen.
Keine Signalausgabe.
Blackout aktiv.
LÖSUNG:
Überprüfen Sie die
Anschlussleitung und eventuelle
Verlängerungsleitungen.
Deaktivieren Sie den Blackout
durch Drücken der Blackout-Taste.
8. REINIGUNG UND WARTUNG
Das Gerät sollte regelmäßig von Verunreinigungen wie Staub usw. gereinigt werden. Verwenden Sie zur
Reinigung ein fusselfreies, angefeuchtetes Tuch. Auf keinen Fall Alkohol oder irgendwelche Lösungsmittel
zur Reinigung verwenden!
Im Geräteinneren befinden sich außer der Batterie keine zu wartenden Teile. Wartungs- und Servicearbeiten
sind ausschließlich dem autorisierten Fachhandel vorbehalten!
Um die Batterie auszutauschen, beachten Sie bitte die Hinweise unter "Einlegen/Wechseln der Batterie".
Sollten einmal Ersatzteile benötigt werden, verwenden Sie bitte nur Originalersatzteile.
Sollten Sie noch weitere Fragen haben, steht Ihnen Ihr Fachhändler jederzeit gerne zur Verfügung.
Einlegen/Wechseln der Batterien
Bitte beachten Sie auch die Hinweise unter Bestimmungsgemäße Verwendung.
Öffnen Sie das Gehäuse.
Werden verbrauchte Batterien ausgetauscht, entfernen Sie zunächst die verbrauchten Batterien aus dem
Batteriefach.
Ausgelaufene oder beschädigte Batterien können bei Berührung mit der Haut Verätzungen verursachen,
benutzen Sie deshalb in diesem Fall geeignete Schutzhandschuhe.
9/38
00033924.DOC, Version 1.0
ACHTUNG!
Explosionsgefahr bei unsachgemäßem Auswechseln der Batterien.
Nur durch denselben oder einen entsprechenden, vom Hersteller empfohlenen Typ ersetzen.
Verbrauchte Batterien nach den Anweisungen des Herstellers beseitigen.
Legen Sie die Batterie ein und achten Sie auf die richtige Polung.
Schließen Sie das Gehäuse wieder.
Im Interesse einer langen Batterielebensdauer sollten nur Alkaline-Typen verwendet werden.
ENTSORGUNGSHINWEIS
Alte und verbrauchte Batterien bitte fachgerecht entsorgen.
Diese gehören nicht in den Hausmüll!
Bitte bei einer Sammelstelle in Ihrer Nähe abgeben
9. TECHNISCHE DATEN
999 Szenen
999 Programme mit je 99 Steps
99 Tagesprogramme mit je 128 Steps
99 Wochenprogramme mit je 7 Steps
99 Monatsprogramme mit je 31 Steps
Spezialprogramm mit 1 Step
Gleichzeitig steuerbare Events: 12 Programme, 12 Tagesprogramme, 12 Wochenprogramme und 12
Monatsprogramme
Spannungsversorgung:
Gesamtanschlusswert:
Maße (BxTxH):
Gewicht:
10-24 V AC/DC, 50/60 Hz
2,4 W
230 x 30 x 75 mm
0,75 kg
Bitte beachten Sie: Technische Änderungen ohne vorherige Ankündigung und Irrtum vorbehalten.
07.03.2008 ©
10/38
00033924.DOC, Version 1.0
USER MANUAL
ARC-M/S
DMX-controller
CAUTION!
Keep this device away from rain and moisture!
Unplug mains lead before opening the housing!
For your own safety, please read this user manual carefully before you initially start-up.
Every person involved with the installation, operation and maintenance of this device has to
- be qualified
- follow the instructions of this manual
- consider this manual to be part of the total product
- keep this manual for the entire service life of the product
- pass this manual on to every further owner or user of the product
- download the latest version of the user manual from the Internet
1. INTRODUCTION
Thank you for having chosen a FUTURELIGHT ARC-M/S. If you follow the instructions given in this manual,
we are sure that you will enjoy this device for a long period of time.
Unpack your ARC-M/S.
2. SAFETY INSTRUCTIONS
This device has left our premises in absolutely perfect condition. In order to maintain this condition and to
ensure a safe operation, it is absolutely necessary for the user to follow the safety instructions and warning
notes written in this user manual.
Important:
Damages caused by the disregard of this user manual are not subject to warranty. The dealer will
not accept liability for any resulting defects or problems.
Please make sure that there are no obvious transport damages. Should you notice any damages on the
casing, do not take the device into operation and immediately consult your local dealer.
Keep away from heaters and other heating sources!
If the device has been exposed to drastic temperature fluctuation (e.g. after transportation), do not switch it
on immediately. The arising condensation water might damage your device. Leave the device switched off
until it has reached room temperature.
11/38
00033924.DOC, Version 1.0
DANGER TO LIFE!
The electric connection must only be carried out by a qualified electrician!
This device falls under protection-class III. The device always has to be operated with an appropriate
transformer.
The installer must always make sure to connect suitable terminals, connectors and cables!
All valid instructions concerning the electric installation be adhered!
Always disconnect from the mains, when the device is not in use or before cleaning it.
Please note that damages caused by manual modifications on the device or unauthorized operation by
unqualified persons are not subject to warranty.
Keep away children and amateurs from the device and the battery!
There are no serviceable parts inside the device. Maintenance and service operations are only to be carried
out by authorized dealers.
3. OPERATING DETERMINATIONS
This device is a DMX-controller for controlling DMX-effects or spots in discotheques, on stages etc. This
product is allowed to be operated with a direct voltage of 10-24 V AC/DC, 50/60 Hz and was designed for
indoor use only.
Batteries are hazardous waste which need to be disposed of appropriately. If the device is to be disposed,
the battery has to be removed first.
Make sure that the poles are correct when inserting the battery.
Never let batteries lying around openly as there is the danger that these can be swallowed by children or
domestic animals. Immediately consult a doctor when batteries are swallowed!
Leaking or damaged batteries can cause irritations when getting into contact with the skin. In this case use
appropriate protective gloves.
Make sure that the battery cannot be short-circuited, thrown into the fire and be charged. There is a danger
of explosion.
Do not shake the device. Avoid brute force when installing or operating the device.
When choosing the installation-spot, please make sure that the device is not exposed to extreme heat,
moisture or dust. There should not be any cables lying around. You endanger your own and the safety of
others!
This device must never be operated or stockpiled in sourroundings where splash water, rain, moisture or fog
may harm the device. Moisture or very high humidity can reduce the insulation and lead to mortal electrical
shocks. When using smoke machines, make sure that the device is never exposed to the direct smoke jet
and is installed in a distance of 0.5 meters between smoke machine and device. The room must only be
saturated with an amount of smoke that the visibility will always be more than 10 meters.
The ambient temperature must always be between -5° C and +45° C. Keep away from direct insulation
(particularly in cars) and heaters.
The relative humidity must not exceed 50 % with an ambient temperature of 45° C.
This device must only be operated in an altitude between -20 and 2000 m over NN.
12/38
00033924.DOC, Version 1.0
Never use the device during thunderstorms. Over voltage could destroy the device. Always disconnect the
device during thunderstorms.
Operate the device only after having familiarized with its functions. Do not permit operation by persons not
qualified for operating the device. Most damages are the result of unprofessional operation!
Please use the original packaging if the device is to be transported.
Please consider that unauthorized modifications on the device are forbidden due to safety reasons!
Never remove the serial barcode from the device as this would make the guarantee void.
If this device will be operated in any way different to the one described in this manual, the product may suffer
damages and the guarantee becomes void. Furthermore, any other operation may lead to dangers like shortcircuit, burns, electric shock, etc.
4. DESCRIPTION OF THE DEVICE
4.1 Features
Comfortable architectural controller
• 512 DMX-channels
• 1 Master, up to 12 Slaves
• All kind of DMX-equipment (luminaires, LED-effects etc.) can be controlled
• Comfortable adjustement of different parameters
• Built-in clock with battery backup
• 999 scenes
• 999 programs with 99 steps each
• 99 daily programs with 128 steps each
• 99 weekly programs with 7 steps each
• 99 monthly programs with 31 steps each
• Special program with 1 step
• Simultaneously controllable events: 12 programs, 12 daily programs, 12 weekly programs and 12 monthly
programs
• PC-connection via USB
• Installation only by professional installers or electricians
13/38
00033924.DOC, Version 1.0
4.2 Overview
Overview on the control elements
1. DISPLAY: 2x16 character LCD display, the brightness and contrast of background light can be set in
menu; by moving any of the control devices, information on changes is displayed.
2. DONW-UP, ESC, ENTER: Menu control, data selection
3. EVENT 1-12: pre-coded events can be started on them, if the led does not burn, there is no event
assigned to the button, if it is red, there is, but it is not started, if it is yellow, the event assigned is
running.
4. USB port: is located at the side of the equipment for software updating and data copying.
Connectors and plugs:
PC USB connector:
Cable to be used: standarized cable
14/38
00033924.DOC, Version 1.0
Rear panel
Connect for Power,
DMX, and slave
USB connector
BATTERY- 3V
Battery:
After power off will the exact time and date not forgotten by the controller. If the battery is discharged, then
on the display will blink the ’clock’ icon.
Connecor plugs::
Power supply:
The controller can be operated from a power supply of AC and DC types, therefore the linking is not
sensitive to polarity. The controller should be operated only from such a power supply, which is of 10-24
voltage and can be loaded.
15/38
00033924.DOC, Version 1.0
5. SETUP
5.1 Attachment
Before attaching the device, make sure that the installation area can hold a minimum point load of 5 times
the device's weight.
The device must only be installed absolutely planar at a vibration-free, oscilation-free and fire-resistant
location. Make sure that the device is installed absolutely planar by using a water-level.
The device must be installed out of the reach of people.
The durability of the installation depends very much on the material used at the installation area (building
material) such as wood, concrete, gas concrete, brick etc. This is why the fixing material must be chosen to
suit the wall material. Always ask a specialist for the correct plug/screw combination indicating the maximum
load and the building material.
The device must always be installed via all fixation holes. Do only use appropriate screws and make sure
that the screws are properly connected with the ground.
Procedure:
Step 1: On the baseplate, there are the holes for the installation.
Step 2: Hold the baseplate onto the location where the device is to be installed.
Step 3: Mark the boreholes with a pen or a suitable tool.
Step 4: Drill the holes.
Step 5: Hold the baseplate in the desired position and tighten it.
5.2 Connection with the mains
DANGER TO LIFE!
The electric connection must only be carried out by a qualified electrician!
In order to connect the device to the mains, you have to first install an appropriate transformer.
Connect the device to the mains with the transformer.
5.3 DMX-512 connection with the projector
The wires must not come into contact with each other, otherwise
the fixtures will not work at all, or will not work properly.
Only use a stereo shielded cable in order to connect the controller with the fixture or one fixture with another.
Building a serial DMX-chain:
Connect the DMX-output of the ARC-M/S with the DMX-input of the nearest projector. Always connect one
output with the input of the next fixture until all fixtures are connected.
resistor
Caution: At the last fixture, the DMX-cable has to be terminated with a terminator. Solder a 120
between Signal (–) and Signal (+) into a 3-pin XLR-plug and plug it in the DMX-output of the last fixture.
16/38
00033924.DOC, Version 1.0
6. OPERATION
The controller starts running as soon as you connect the power supply.
Please do always update this controller to the latest software version.
REVIEW
The controller is able to control channel 512 DMX, it is capable of sliding all its channels during a preprogrammed period. It can be connected with 12 so-called slave, or master equipment.
It is necessary to read through the manual and to handle the controller at the same time in order to use the
controller. Should any questions arise, please turn to the manufacturer or the distributor via email. Here you
can announce any remarks or suggestions you experienced. Your question will be answered via email or the
software corrected by us will be uploaded on our website, where you can download and install the upgraded
version as the controller software can be updated free of charge. In case you wish to check the updated
state of your controller software, enter the menu, select menu point SOFTWARE VERSION under menu
point INFORMATION. On entering, the version number of the controller software and the date of its release
can be read on the display. Please compare the version number with that of producer’s or that can be found
on the distributor’s website, and if necessary, update the controller software following the steps written down
in section SOFTWARE UPDATE
INSTALLATION
After connecting the power supply, LED of the B.OUT switch is flashing, marking the standby. After pressing
the B.OUT button, the LEDs of the controller turn on, and the logging-in text can be seen on the display for
some seconds, then the controller moves to automatic mode.
If the caption “SOFTWARE UPGRADE IS NECESSARY” can be read on the display after turning on, the
controller can be used only after software upgrade.
It may occur if the connection is cut off during the software upgrade or there is a power failure, so the
upgrade is interrupted.
SOFTWARE UPGRADE
ATTENTION! The software runs only with Windows operating systems.
Follow described in the items listed below step by step to make the software upgrade:
1. Connect the controller and the computer with the USB cable.
2. Connect the controller to the power supply.
3. Start the computer, download the upgrading software from the home page of the dealer or
manufacturer (ldm.exe) and the latest version of the controller software (*.bin).
4. Launch the software upgrading program (ldm.exe). After the first startup the controller offers the
change of the most important settings: Select a language, then click on the ‘OK’ button.
5. The software starts connecting automatic, the LED’s of the controller go out.
6. If the setting and the connection are settled, the data of the controller appear in the panel (type, etc.).
7. If the setting is not settled, the software warns you to check the connection, the accurate port setting,
then try it again.
nd
8. In case of proper connection click on the icon ‘Opening the file’ (1 icon), find the file to be
downloaded into the controller (*.dat), then acknowledge the selection with the ‘Select’ button.
17/38
00033924.DOC, Version 1.0
9. Click on the ‘Download’ icon or select the Setting/Start data downloading, downloading starts.
10. The state of downloading can be followed on the appearing process-marker, if it is finished, the
caption ‘Downloading is ready’ appears, press the ‘OK‘ button.
11. Terminate the connection, close application then the controller restarts automatically, the upgrade is
finished.
THE RIGHT TIME
One of the most important tasks of the controller is to start the preset events exactly at the given time.
Therefore it is necessary that the controller would know the right time. There is a button section in it, which
ensures that it would not forget the preset time in case of power-supply voltage failures and would show the
right time.
Clock icon
If the clock icon appears flashing on the display, it means that the date and the time have not been set. One
of the reasons for this can be that the battery in the controller might be flat, so after the power-supply voltage
stops the controller is unable to operate its internal clock. Replace the battery, and after that it is necessary
to set the time.
Setting the date and the time
By pressing ENTER, you can enter the editing state of date and time. During setting the date and the time
the clock icon can be constantly seen on the display.
UP-DOWN – The just flashing parameter can be increased or decreased.
ENTER – Switching to the next parameter (Year, month, day, day of the week, hour, minute, second)
ESC – Saving the set date and time, switching back to date-time display mode
CHANNEL CONTROL
The controller controls all the 512 channels, so it is not necessary to set the dmx addresses in it.
After switching the controller on, it enters automatic mode. In order to prepare a light programme and to run
it on its own equipment, it is necessary to make some adjustments; that is the controller needs to be
configured. The configuration of the controller is advised to be executed as follows:
-
Check the version number of the controller and if you find a newer version on the distributor’s or the
manufacturer’s website, download it and update the controller, see: section SOFTWARE VERSION,
SECTION SOFTWARE UPDATE
Select language, in which the controller displays messages on the screen; see: section LANGUAGE
SELECTION.
Set the contrast and the brightness of the display, in case for example it shines too brightly or the texts
are displayed dimly: see: section DISPLAY SETTING.
Set the brightness of LEDs to the needed value, see: section LED SETTING.
Entering Scene editing - see: SCENE EDITING – check if by setting the values of the channels,
whether the brightness is controlled or not.
After the settings it is possible to write images, sequences, weekly, monthly and special programmes, and in
automatic mode all events can be started. After the controller has been started, the controller enters the
automatic mode. Here the preset events can be launched as well as you can enter the menu, from where
you can enter modes to implement various settings.
WORD-PROCESSING
In the menu of the controller certain labels, texts can be specified, modified at various places. These can be
always modified according to the same system.
The buttons used for word processing and their functions:
18/38
00033924.DOC, Version 1.0
-
UP-DOWN buttons: the just flashing character position can be placed left or right, thus selecting the
character to be modified.
1, 7 buttons: to select upper case (A-Z)
2, 8 buttons: to select lower case (a-z)
3, 9 buttons: to select numbers (0-9)
4, 10 buttons: to select among all the characters to be displayed
12 button: to insert space character, to push the cursor automatically to the right
ESC or ENTER: to exit the word processor
There are several references to this paragraph in the manual.
MENU SYSTEM
The controller management is practical to start with getting to know the menu system as well as the available
settings it provides. After connecting the power supply of the controller the controller enters the automatic
mode. From here the controller enters the menu in 3 seconds after the buttons ESC and ENTER are
simultaneously held pressed down.
In the upper row of the display the name and number of the current menu point can be read and in the
bottom row the denomination of the menu point. With the UP-DOWN buttons you can select among menu
points. By pressing ENTER you can enter the current menu point, by pressing ESC you can re-enter the
automatic mode.
ARCHITECTURE OF THE MENU SYSTEM:
- 1. EVENTS
- 1. Scene
- 1. Edit
- 2. Mask
- 3. Name
- 2. Sequence
- 1. Edit
- 2. Name
- 3. Day program
- 1. Edit
- 2. Name
- 4. Week program
- 1. Edit
- 2. Name
- 5. Month program
- 1. Edit
- 2. Name
- 6. Special program
- 1. Edit
- 2. Name
- 2. FUNCTION BUTTON
- 1. Event selection
- 2. Name
- 3. CHANNEL GROUPPE
- 1. Groupping
- 2. Name
- 4. CUSTOMIZE
- 1. Select language
- 2. Display backlight
- 3. Display contrast
- 4. LED setup
- 5. Menü code
- 5. INFORMATION
- 1. Working time
- 2. Software version
(Selection of the language of the texts shown on the display)
(Setting of the display intensity)
(Setting of the contrast)
(LED-ek fényerejének beállítása)
(Setting menu code, or switch off)
(Working time counter)
(Version number and date of the controller software)
19/38
00033924.DOC, Version 1.0
- 3. Controller data
(Serial number and manufacturing date of the controller)
MENU SYSTEM – MENU CODE ENTERING
If the menu code is activated, on entering the menu it must be given to be able to enter the menu. This can
be done with the buttons 1-12, and after entering the code, the button ENTER must be pushed. In case of
providing wrong code the controller gives a warning, and after pushing the ESC button the code entering can
be restarted.
If you have forgotten the code, knowing the serial number of the controller you can enter a PIN code. You
can display the serial number by pressing the button DOWN in the upper row of the display during code
entering. Give the code that appears here to the manufacturer of the distributor of the controller, who will
send you back the PIN code belonging to the controller.
You can enter the PIN code also with the buttons 1-12, but before pressing the button ENTER the button
DOWN must be pressed and kept pushed down! After this the controller enters the menu. In such a case it is
advisable to turn the menu code off, or to modify it in order not to have any problems during the next entry.
MENU 5/5 – INFORMATION 3/3 – CONTROLLER DATA
Menu # UP/DOWN # Information # ENTER # Controller data # ENTER
In the upper line of the display the serial number of the controller can be read, in the lower line the
manufacturing date (day, month, year) can be read.
You can log off from the menu item by pressing down the ESC.
MENÜ 5/5 – INFORMATION 3/2 - SOFWARE VERSION
Menu # UP/DOWN # Information # ENTER # Software version # ENTER
In the upper line of the display the version number of the controller software, in the lower line the date of the
software version publication can be read (day, month, year).
You can log off from the menu item by pressing down the ESC.
MENÜ 5/5 – INFORMATION 3/1 – WORKING TIME
Menü # UP/DOWN # Information # ENTER # Working time # ENTER
MENÜ 5/4 – CUSTOMIZE 5/5 - MENU CODE
Menü # UP/DOWN # Customize # ENTER # Menu code # ENTER
20/38
00033924.DOC, Version 1.0
It is possible to protect controller data with menu code. If you want to protect your data against illegal person
you should activate menu code. After activation if you want to step in menu system from automata mode you
should first give the code and then you can reach menu and setup.
Activate menu code select SETUP menu MENZU code position.
If you see in the lower line ‘off’ then the code is not activated yet. With push ESC button you can step back.
After pushing ENTER you have to typ the new code.
With the 1-16 button you can type the new code it can be max. 6 characters. By ESC button you can step
back. When the code is given press ENTER.
Give the new code again and press ENTER.
When the new and repeated code not equal then the controller will show a warning, and you have to try
again. Press ESC and start do it again.
When the new and repeated code are equal the controllel will ask about saving code. By ESC you can leave
it without saving, but by ENTER the code will save.
Now the code is activated (on) so from automata mode required to type code if you want to step in menu
system. The activated code can be inactivated by push ENTER button.
MENÜ 5/4 – CUSTOMIZE 5/4 – LED SETUP
Menü # UP/DOWN # Customize # ENTER # LED setup # ENTER
21/38
00033924.DOC, Version 1.0
The intensity of the LED’s can be set to optimal value in this menu item due to the existing light conditions in
the different application areas. The set value of the total LED light illumination can be seen in the upper line,
which can be seen on the LED’s of the 1-12 buttons as well. This value can be set by UP-DOWN button.
If no modification has been made in the menu item, then by pressing the ESC button the controller returns to
the setup menu, if any modification has been made, the controller asks for the confirmation of saving the
modification.
By pressing down the “cancel” (DOWN) button the controller remains in the menu item, by pressing the “no”
button (ESC) the controller returns to the menu without saving the modifications, while by pressing the “yes”
button (ENTER) the controller saves the modification and returns to the menu in this way.
MENÜ 5/4 – CUSTOMIZE 5/3 – DISPLAY CONTRAST
Menü # UP/DOWN # Customize # ENTER # Display contrast # ENTER
The contrast of the display can be set to optimal value in this menu item due to the existing light and
temperature conditions in the different applications areas. In the upper line the set value of the background
illumination can be seen. This value can be set by the UP-DOWN buttons.
If no modification has been made in the menu item, then by pressing the ESC button the controller returns to
the setup menu, if any modification has been made, the controller asks for the confirmation of saving the
modification.
By pressing down the “cancel” (DOWN) button the controller remains in the menu item, by pressing the “no”
button (ESC) the controller returns to the menu without saving the modifications, while by pressing the “yes”
button (ENTER) the controller saves the modification and returns to the menu in this way.
MENÜ 5/4 – CUSTOMIZE 5/2 – DISPLAY BACKLIGHT
Menü # UP/DOWN # Customize # ENTER # Backlight # ENTER
The intensity of the display can be set to optimal value in this menu item due to the existing light and
temperature conditions in the different applications areas. In the upper line the set value of the background
illumination can be seen. This value can be set by the UP-DOWN buttons
Auto off means, if this parameter is on, then the backlight will be switch off automatic in 30sec after the last
pushing of buttons. Then when the first pushing is happen the backlight get back immediately.
22/38
00033924.DOC, Version 1.0
If no modification has been made in the menu item, then by pressing the ESC button the controller returns to
the setup menu, if any modification has been made, the controller asks for the confirmation of saving the
modification.
By pressing down the “cancel” (DOWN) button the controller remains in the menu item, by pressing the “no”
button (ESC) the controller returns to the menu without saving the modifications, while by pressing the “yes”
button (ENTER) the controller saves the modification and returns to the menu in this way.
MENÜ 5/4 – CUSTOMIZE 5/1 – LANGUAGE SELECTION
Menü # UP/DOWN # Customize # ENTER # Language selection # ENTER
When entering, the name of the actual language can be read in the lower line of the display, it can be
changed by the UP-DOWN buttons. At present five languages can be selected: Hungarian, English, German,
Dutch, French
If the UP-DOWN button has not been pressed, the controller returns to the setup menu by pressing the ESC
button down, if any modification has been made, the controller asks for the confirmation of saving the
modification.
By pressing down the “cancel” (DOWN) button the controller remains in the menu item, by pressing the “no”
button (ESC) the controller returns to the menu without saving the modifications, while by pressing the “yes”
button (ENTER) the controller saves the modification and returns to the menu in this way.
MENU 5/3 – CHANNEL GROUPING
The controller maximising the possibilities provided by the dmx standard is able to control 512 channels.
These channels are advised to be grouped, thus making their setting easier. In this menu point 99 groups
can be created, in each group you can determine which of the 512 channels to be included. One channel
can belong to several groups! Each group can be named, so during editing you can select easily the group
you need.
Example:
In the four corners of a window we place a three-colour (RGB) LED each. We wish to create a spectrum of
various kinds, one-colour but also mixed images. The table shows which colour of the LED is controlled on
which dmx channel by the controller:
Left upper
Left lower
Right upper
1.
2.
3.
Red
Green
Blue
4.
5.
6.
Red
Green
Blue
7.
8.
9.
Red
Green
Blue
23/38
DMX
channel
number
Controlled unit
DMX
channel
number
Controlled unit
DMX
channel
number
Controlled unit
00033924.DOC, Version 1.0
Right lower
10.
11.
12.
Red
Green
Blue
DMX
channel
number
Controlled unit
To this task it is advisable to create several groups:
Name
All
Left upper
Left lower
Right upper
Right lower
All red
All green
All blue
Channels
1-12
1-3
4-6
7-9
10-12
1,4,7,10
2,5,8,11
3,6,9,12
Comment
All channel take part
The left upper corner RGB channels
The left lower corner RGB channels
The right upper corner RGB channels
The right lower corner RGB channels
In all corner only red LED
In all corner only green LED
In all corner only blue LED
CHANNEL GROUPING 2/2 – DENOMINATION
Menu I UP/DOWN I Channel grouping I ENTER I Denomination I ENTER
In the upper line you can see the number of the selected group in a range from 1 to 99, while in the bottom
line you can see the name of the group. With the buttons UP-DOWN one group out of 99 can be selected.
When the group, whose name you wish to modify, is selected press the button ENTER.
The cursor begins flashing in the first character of the bottom row. Here you have to modify the text
according to the steps written down in section WORDPROCESSING. When you have finished wordprocessing, press the ESC or ENTER-button whe the controller comes back to group selection mode.
If you do not want to make more changes, press the ESC button, and if there have been any modifications,
the controller asks for the confirmation of saving the modifications
By pressing the button cancel (UP or DOWN) the controller stays in the menu point, by pressing the button
no (ESC) the controller comes back to the menu without saving the modifications, while by pressing the
button yes (ENTER) the controller saves the modifications, and comes back to the menu.
CHANNEL GROUPING 2/1 – GROUPING
Menu # UP/DOWN # Channel grouping # ENTER # Grouping # ENTER
In the upper row the number of the selected group in a range from 1 to 99 can be seen, in the bottom row the
name of the group can be found. With the buttons UP-DOWN you can select a group out of the 99. When the
group, in which we wish to group channels, is selected press the button ENTER.
24/38
00033924.DOC, Version 1.0
If after the tag ’CH:’ there is a sign ’---’, it means that currently there is no channel belonging to the group. If
there is a number there, that channel is allocated to the group. With the buttons UP-DOWN you can see
which channels belong to the group.
The meaning of buttons:
- 1-9: giving digits between 1-9
- 10: giving the digit 0
- 11: switching to the range “from…, to…”
- 12: delete button
- ENTER : acceptance button
Adding a channel to the group:
With the buttons 1-10, you can enter a channel number ranged from 1 to 512.
Press ENTER, the selected channel will be added to the group.
Adding several consecutive channels to the group:
With the buttons 1-10, you can enter a channel number ranged from 1 to 512.
Press the button 11 (“from….to”), the cursor moves to the other side.
Give the number of the last channel that you would like to add.
Press ENTER, the selected range will be added to the group.
Adding all the (512) channels to the group:
With the button 1 enter the first channel
Press the button 11 (“from…to”).
Press ENTER, all the channels will be added to the group.
Deleting one channel from the group:
With the buttons 1-10, you can enter a channel number ranged from 1 to 512.
Press the button 12 (delete), the selected channel will be deleted from the group.
Deleting several consecutive channels from the group:
With the buttons 1-10, you can enter a channel number ranged from 1 to 512.
Press the button 11 (“from….to”), the cursor moves to the other side.
Give the number of the last channel that you would like to delete.
Press the button 12 (delete), the selected channel range will be deleted from the group.
Deleting all the (512) channels from the group:
With the button 1 enter the first channel
Press the button 11 (“from…to”).
Press the button 12 (delete), all the channels will be deleted from the group.
By pressing the button ESC you can come back to group selection mode..
If you do not want to make more changes, press the ESC button, and if there have been any modifications,
the controller asks for the confirmation of saving the modifications
By pressing the button cancel (UP or DOWN) the controller stays in the menu point, by pressing the button
no (ESC) the controller comes back to the menu without saving the modifications, while by pressing the
button yes (ENTER) the controller saves the modifications, and comes back to the menu.
25/38
00033924.DOC, Version 1.0
MENU 5/2 – FUNCTION KEY
The button 1-12 available on the controller can be programmed, that is the end-user can set which event to
take place by pressing them. Besides this, the 12 buttons available on the so-called “slave” device, which is
an accessory device that is available, can be set here. Each button can be named to be more easily
identifiable.
FUNCTION BUTTON 2/1 – NAME
Menu # UP/DOWN # Function # ENTER # Name # ENTER
In the upper line you can see the number of the selected group in a range from 1 to 99, while in the bottom
line you can see the name of the group. With the buttons UP-DOWN one group out of 99 can be selected.
When the group, whose name you wish to modify, is selected press the button ENTER.
The cursor begins flashing in the first character of the bottom row. Here you have to modify the text
according to the steps written down in section WORDPROCESSING. When you have finished wordprocessing, press the ESC or ENTER-button whe the controller comes back to group selection mode.
If you do not want to make more changes, press the ESC button, and if there have been any modifications,
the controller asks for the confirmation of saving the modifications
By pressing the button cancel (UP or DOWN) the controller stays in the menu point, by pressing the button
no (ESC) the controller comes back to the menu without saving the modifications, while by pressing the
button yes (ENTER) the controller saves the modifications, and comes back to the menu.
FUNCTION BUTTON 2/1 – SELECTING EVENT
Menu # UP/DOWN # Function # ENTER # Selecting event # ENTER
In the upper row the number of the selected device (master, slave 1-12) can be seen, next to it the number
of the pushbutton of the selected device. In the bottom row the event belonging to the button as well as its
number can be seen. With the UP-DOWN buttons you can select among the data standing after the flashing
colon.
Events to be selected:
Event
Scene
Sequence
Day program
Week program
Month program
Special program
Number
1-999
1-999
1-99
1-99
1-99
1-99
Comment
Stage scene
Linked stage scenes
Daily repeated event
Weekly repeated events
Monthly repeated events
Yearly repeated events
26/38
00033924.DOC, Version 1.0
If you do not want to make more changes, press the ESC button, and if there have been any modifications,
the controller asks for the confirmation of saving the modifications
By pressing the button cancel (UP or DOWN) the controller stays in the menu point, by pressing the button
no (ESC) the controller comes back to the menu without saving the modifications, while by pressing the
button yes (ENTER) the controller saves the modifications, and comes back to the menu.
MENU 5/1 – EVENTS 6/1 – SCENE
Menu # UP/DOWN # Events # ENTER # Scene # ENTER
In a scene it can be given which channels out of the 512 ones would be participants (masking), and to each
participating channel a value can be stored, which will be written on the dmx output during the a scene
invitation. Altogether 999 scenes can be stored in the Architectural dmx-512 controller; each of these can be
named to be more easily identifiable.
SCENE 3/3 – NAME
Menü # UP/DOWN # Event # ENTER # Scene # ENTER # Name # ENTER
In the upper line you can see the number of the selected event in a range from 1 to 999, while in the bottom
line you can see the name of the group. With the buttons UP-DOWN one event out of 999 can be selected.
When the event, whose name you wish to modify, is selected press the button ENTER.
The cursor begins flashing in the first character of the bottom row. Here you have to modify the text
according to the steps written down in section WORDPROCESSING. When you have finished wordprocessing, press the ESC or ENTER-button whe the controller comes back to group selection mode.
If you do not want to make more changes, press the ESC button, and if there have been any modifications,
the controller asks for the confirmation of saving the modifications
By pressing the button cancel (UP or DOWN) the controller stays in the menu point, by pressing the button
no (ESC) the controller comes back to the menu without saving the modifications, while by pressing the
button yes (ENTER) the controller saves the modifications, and comes back to the menu.
SCENE 3/2 – MASKING
Menu # UP/DOWN # Events # ENTER # Scene # ENTER # Masking # ENTER
27/38
00033924.DOC, Version 1.0
In the upper row the number of the selected scene between 1 and 999 can be seen, in the bottom row the
name of the scene can be found. With the buttons UP-DOWN you can select one particular scene of the
999. When you have selected the scene, whose mask you would like to modify, press the button ENTER.
The scene mask has to be made according to the steps written down in section ’CHANNEL GROUPING –
GROUPING’.
If you do not want to make more changes, press the ESC button, and if there have been any modifications,
the controller asks for the confirmation of saving the modifications
By pressing the button cancel (UP or DOWN) the controller stays in the menu point, by pressing the button
no (ESC) the controller comes back to the menu without saving the modifications, while by pressing the
button yes (ENTER) the controller saves the modifications, and comes back to the menu.
SCENE 3/1 – EDITING
Menu # UP/DOWN # Events # ENTER # Scene # ENTER # Editing # ENTER
In the upper row the number of the selected scene from 1 to 999 can be seen, in the bottom row the name of
the scene can be found. With the buttons UP-DOWN you can select one particular scene of the 999. When
you have selected the scene, which you would like to edit, press the button ENTER.
If you have selected such a scene, to which a channel has not been masked beforehand, you cannot
enter its editing mode, as there is no channel belonging to it!
The letter ‘S’ on the left-hand side of the upper row means soft time. It can be set if this scene is loaded how
long its channels it should take to reach the saved values from the current position with a constant change.
This time can be set even from 0m 0s to 99m 99s with a 1-s step.
On the right hand side of the upper row you can select among the groups given under the GROUPING
menu. If you select a group here, on the left hand side of the bottom row of the display you can select among
the channels given in the selected group, thus making the management of the many channels easier.
On the right hand side of the bottom row of the display the current value of the just selected – and on the left
hand side of the bottom row of the display to be seen – channel can be seen.
Always the parameters standing after the flashing colon can be set with the buttons UP-DOWN. While setting
the soft time the buttons 1-7 are also at help, with which the value of time can be set. If you press the buttons
UP and DOWN simultaneously and hold them pressed down in any parameter setting, the value switches
back to the basic position, so it will be reset:
Parameter
Setting soft time
Group selection
Effect by pushing UP-DOWN simultaneously
Soft time will be set at 0m 0s
Group will not be active, that is all channels of the scene can be chosen
28/38
00033924.DOC, Version 1.0
Channel selection
Setting value
’All’ mode turns on, that is when setting the value the values of all the active
channels will be modified at the same time
It set the active channels to the value 0
To the next parameter you can always go by the button ENTER. The channel values will be constantly
displayed on the dmx output, so the settings can be constantly seen on the attached devices as well.
If you do not want to make more changes, press the ESC button, and if there have been any modifications,
the controller asks for the confirmation of saving the modifications
By pressing the button cancel (UP or DOWN) the controller stays in the menu point, by pressing the button
no (ESC) the controller comes back to the menu without saving the modifications, while by pressing the
button yes (ENTER) the controller saves the modifications, and comes back to the menu.
MENU 5/1 – EVENTS 6/2 – SEQUENCE
Menu # UP/DOWN # Events # ENTER # Sequence # ENTER
The controller is capable of running Sequences. A sequence is made up of all the scenes; it can be given
which scene to call one after the other and at what interval. A sequence can be 99 steps maximum.
SEQUENCE 2/2 – NAME
Menu # UP/DOWN # Events # ENTER # Sequence # ENTER # Name # ENTER
In the upper line you can see the number of the selected event in a range from 1 to 999, while in the bottom
line you can see the name of the group. With the buttons UP-DOWN one event out of 999 can be selected.
When the event, whose name you wish to modify, is selected press the button ENTER.
The cursor begins flashing in the first character of the bottom row. Here you have to modify the text
according to the steps written down in section WORDPROCESSING. When you have finished wordprocessing, press the ESC or ENTER-button whe the controller comes back to group selection mode.
If you do not want to make more changes, press the ESC button, and if there have been any modifications,
the controller asks for the confirmation of saving the modifications
If you do not want to make more changes, press the ESC button, and if there have been any modifications,
the controller asks for the confirmation of saving the modifications
By pressing the button cancel (UP or DOWN) the controller stays in the menu point, by pressing the button
no (ESC) the controller comes back to the menu without saving the modifications, while by pressing the
button yes (ENTER) the controller saves the modifications, and comes back to the menu.
29/38
00033924.DOC, Version 1.0
SEQUENCE 2/1 – EDITING
Menu # UP/DOWN # Events # ENTER # Sequence # ENTER # Editing # ENTER
In the upper row the number of the selected event between 1 and 999 can be seen, in the bottom row its
name can be seen. With the buttons UP-DOWN you can select an event. If you have selected the event,
which you would like to edit, press the button ENTER.
The letter ‘S’ on the left-hand side of the upper row means soft time. It can be set if the scene in the step is
loaded how long its channels it should take to reach the saved values from the current position with a
constant change. This time can be set even from 0m 0s to 99m 99s with a 1-s step.
The letter ‘T’ on the right hand side of the upper row means image switching/framing time. It can be given at
what interval the sequence steps should follow each other.
On the left hand side of the bottom row the number of steps can be read, this can be set between 1 and 99,
and on the right hand side of the bottom row of the display the number of the scene assigned to the given
step.
Always the parameters standing after the flashing colon can be set with the buttons UP-DOWN. While setting
the soft- and step time the buttons 1-7 are at help, with which the value of time can be set. If you press the
buttons UP and DOWN simultaneously and hold them pressed down in any parameter setting, the value
switches back to the basic position, so it will be reset:
Parameter
Setting soft time
Setting step time
Step selection
Scene selection
Effect by pressing UP-DOWN simultaneously
Soft time will be set at 0m 0s
Step time will be set at 0m 0s
The number of steps will be set at 1.
The scene assigned to the step will be changed to 001
To the next parameter you can always go by the button ENTER. The channel values will be constantly
displayed on the dmx output, so the settings can be constantly seen on the attached devices as well.
MENU5/1 – EVENTS 6/3 – DAILY PROGRAM
Menu # UP/DOWN # Events # ENTER # Daily program # ENTER
In a daily programme, it can be given, in which second of the minute of the current 24-hour which scene
would be downloaded, or which scene would be started or stopped. In a daily programme 128 times can be
set. Should it be too scarce, and somebody would like to give more times on a given day, he/she can make
more daily programmes (one let us say between 0-12, and another between 12-24), as simultaneously even
12 daily programmes can be run.
If you do not want to make more changes, press the ESC button, and if there have been any modifications,
the controller asks for the confirmation of saving the modifications
30/38
00033924.DOC, Version 1.0
DAILY PROGRAMME 2/2 – NAME
Menü # UP/DOWN # Event # ENTER # Daily program # ENTER # Name # ENTER
In the upper line you can see the number of the selected event in a range from 1 to 999, while in the bottom
line you can see the name of the group. With the buttons UP-DOWN one event out of 999 can be selected.
When the event, whose name you wish to modify, is selected press the button ENTER.
The cursor begins flashing in the first character of the bottom row. Here you have to modify the text
according to the steps written down in section WORDPROCESSING. When you have finished wordprocessing, press the ESC or ENTER-button whe the controller comes back to group selection mode.
If you do not want to make more changes, press the ESC button, and if there have been any modifications,
the controller asks for the confirmation of saving the modifications
If you do not want to make more changes, press the ESC button, and if there have been any modifications,
the controller asks for the confirmation of saving the modifications
By pressing the button cancel (UP or DOWN) the controller stays in the menu point, by pressing the button
no (ESC) the controller comes back to the menu without saving the modifications, while by pressing the
button yes (ENTER) the controller saves the modifications, and comes back to the menu.
DAILY PROGRAMME 2/1 – EDITING
Menu # UP/DOWN # Events # ENTER # Daily programme # ENTER # Editing # ENTER
In the upper row the number of the selected event between 1 and 999 can be seen, in the bottom row its
name can be seen. With the buttons UP-DOWN you can select an event. If you have selected the event,
which you would like to edit, press the button ENTER.
The letter ‘L’ on the left hand side of the upper row means the number of step. Altogether there are 128
steps in a daily programme, which means that 128 different times can be assigned to a daily programme,
and you can also set which event to start or stop relating that time.
On the right hand side of the upper row the time relating to the step can be seen in the form of hour, minute,
second.
On the left hand side of the bottom row you can select among the events assigned to the step, these can be
either Scene, or Sequence.
On the right hand side of the bottom row the number of the event selected to the step can be set. If the
selected event is Sequence, there is a further parameter as well, with which you can set whether the
selected sequence would start or stop at the given time.
31/38
00033924.DOC, Version 1.0
Always the parameters standing after the flashing colon can be set with the buttons UP-DOWN. While setting
the step number and step time the buttons 1-7 and 2-8 are also at help, with which the values of hour and
minute can be set. If you press the buttons UP and DOWN simultaneously and hold them pressed down in
any parameter setting, the value switches back to the basic position, so it will be reset:
Parameter
Step number selection
Setting step time
Event selection
Event number selection
Effect by pressing UP-DOWN simultaneously
Step number will be set at 1.
Step time will be set at 0h 0m 0s
Event number will be set at 1
To the next parameter you can always go by the button ENTER.
If you do not want to make more changes, press the ESC button, and if there have been any modifications,
the controller asks for the confirmation of saving the modifications
By pressing the button cancel (UP or DOWN) the controller stays in the menu point, by pressing the button
no (ESC) the controller comes back to the menu without saving the modifications, while by pressing the
button yes (ENTER) the controller saves the modifications, and comes back to the menu.
MENU 5/1 – EVENTS 6/4 – WEEKLY PROGRAMME
Menu # UP/DOWN # Events # ENTER # Weekly programme # ENTER
In a weekly programme you can give it can be given, which daily programmes would be present on the days
of the week (from Monday to Sunday). For example, if on weekdays and at weekends you would like to run
st
different daily programmes, the 1 daily programme must be assigned from Monday to Friday, while to
nd
Saturday and Sunday the 2 one must be assigned.
WEEKLY PROGRAMME 2/2 – NAME
Menü # UP/DOWN # Event # ENTER # Weekly program # ENTER # Name # ENTER
In the upper line you can see the number of the selected event in a range from 1 to 99, while in the bottom
line you can see the name of the group. With the buttons UP-DOWN one event out of 99 can be selected.
When the event, whose name you wish to modify, is selected press the button ENTER.
The cursor begins flashing in the first character of the bottom row. Here you have to modify the text
according to the steps written down in section WORDPROCESSING. When you have finished wordprocessing, press the ESC or ENTER-button whe the controller comes back to group selection mode.
If you do not want to make more changes, press the ESC button, and if there have been any modifications,
the controller asks for the confirmation of saving the modifications
If you do not want to make more changes, press the ESC button, and if there have been any modifications,
the controller asks for the confirmation of saving the modifications
32/38
00033924.DOC, Version 1.0
By pressing the button cancel (UP or DOWN) the controller stays in the menu point, by pressing the button
no (ESC) the controller comes back to the menu without saving the modifications, while by pressing the
button yes (ENTER) the controller saves the modifications, and comes back to the menu.
WEEKLY PROGRAMME 2/1 – EDITING
Menu # UP/DOWN # Events # ENTER # Daily programme # ENTER # Editing # ENTER
In the upper row the number of the selected event between 1 and 999 can be seen, in the bottom row its
name can be seen. With the buttons UP-DOWN you can select an event. If you have selected the event,
which you would like to edit, press the button ENTER.
On the left hand side of the upper row the letter ’L’ means the number of step, which is altogether 7, and
they are signed by the abbreviations of the days of the week.
On the left hand side of the bottom row the daily program relating to the current day can be selected.
Always the parameters standing after the flashing colon can be set with the buttons UP-DOWN. If you press
the buttons UP and DOWN simultaneously and hold them pressed down in any parameter setting, the value
switches back to the basic position, so it will be reset:
Parameter
Step number selection
Event number selection
Effect by pressing UP-DOWN simultaneously
Step number will be set at Monday.
Event number will be set at 1
To the next parameter you can always go by the button ENTER.
If you do not want to make more changes, press the ESC button, and if there have been any modifications,
the controller asks for the confirmation of saving the modifications
By pressing the button cancel (UP or DOWN) the controller stays in the menu point, by pressing the button
no (ESC) the controller comes back to the menu without saving the modifications, while by pressing the
button yes (ENTER) the controller saves the modifications, and comes back to the menu.
MENU 5/1 – EVENTS 6/5 – MONTHLY PROGRAMME
Menu # UP/DOWN # Events # ENTER # Monthly programme # ENTER
33/38
00033924.DOC, Version 1.0
In a weekly programme it can be given, which daily programmes on the days of a month would be present.
MONTHLY PROGRAMME 2/2 – NAME
Menü # UP/DOWN # Event # ENTER # Weekly program # ENTER # Name # ENTER
In the upper line you can see the number of the selected event in a range from 1 to 99, while in the bottom
line you can see the name of the group. With the buttons UP-DOWN one event out of 99 can be selected.
When the event, whose name you wish to modify, is selected press the button ENTER.
The cursor begins flashing in the first character of the bottom row. Here you have to modify the text
according to the steps written down in section WORDPROCESSING. When you have finished wordprocessing, press the ESC or ENTER-button whe the controller comes back to group selection mode.
If you do not want to make more changes, press the ESC button, and if there have been any modifications,
the controller asks for the confirmation of saving the modifications
If you do not want to make more changes, press the ESC button, and if there have been any modifications,
the controller asks for the confirmation of saving the modifications
By pressing the button cancel (UP or DOWN) the controller stays in the menu point, by pressing the button
no (ESC) the controller comes back to the menu without saving the modifications, while by pressing the
button yes (ENTER) the controller saves the modifications, and comes back to the menu.
MONTHLY PROGRAMME 2/1 – EDITING
Menu # UP/DOWN # Events # ENTER # Monthly programme # ENTER # Editing # ENTER
In the upper row the number of the selected event between 1 and 99 can be seen, in the bottom row its
name can be seen. With the buttons UP-DOWN you can select an event. If you have selected the event,
which you would like to edit, press the button ENTER.
On the left hand side of the upper row the letter ’L’ means the number of step, which is altogether 31.
On the left hand side of the bottom row the daily programme can be selected to the current day.
Always the parameters standing after the flashing colon can be set with the buttons UP-DOWN. If you press
the buttons UP and DOWN simultaneously and hold them pressed down in any parameter setting, the value
switches back to the basic position, so it will be reset:
34/38
00033924.DOC, Version 1.0
Parameter
Step number selection
Event number selection
Effect by pressing UP-DOWN simultaneously
Step number will be set at 1
Event number will be set at 1
A To the next parameter you can always go by the button ENTER.
If you do not want to make more changes, press the ESC button, and if there have been any modifications,
the controller asks for the confirmation of saving the modifications
By pressing the button cancel (UP or DOWN) the controller stays in the menu point, by pressing the button
no (ESC) the controller comes back to the menu without saving the modifications, while by pressing the
button yes (ENTER) the controller saves the modifications, and comes back to the menu.
MENU 5/1 – EVENTS 6/6 – SPECIAL PROGRAMME
Menu # UP/DOWN # Events # ENTER # Special programme # ENTER
In a special programme it can be given, which programme on a given day of a given month would be
present.
SPECIAL PROGRAMME 2/1 – NAME
Menü # UP/DOWN # Event # ENTER # Special program # ENTER # Name # ENTER
In the upper line you can see the number of the selected event in a range from 1 to 99, while in the bottom
line you can see the name of the group. With the buttons UP-DOWN one event out of 99 can be selected.
When the event, whose name you wish to modify, is selected press the button ENTER.
The cursor begins flashing in the first character of the bottom row. Here you have to modify the text
according to the steps written down in section WORDPROCESSING. When you have finished wordprocessing, press the ESC or ENTER-button whe the controller comes back to group selection mode.
If you do not want to make more changes, press the ESC button, and if there have been any modifications,
the controller asks for the confirmation of saving the modifications
If you do not want to make more changes, press the ESC button, and if there have been any modifications,
the controller asks for the confirmation of saving the modifications
By pressing the button cancel (UP or DOWN) the controller stays in the menu point, by pressing the button
no (ESC) the controller comes back to the menu without saving the modifications, while by pressing the
button yes (ENTER) the controller saves the modifications, and comes back to the menu.
SPECIAL PROGRAMME 2/1 – EDITING
35/38
00033924.DOC, Version 1.0
Menu # UP/DOWN # Events # ENTER # Special programme # ENTER # Editing # ENTER
In the upper row the number of the selected event between 1 and 999 can be seen, in the bottom row its
name can be seen. With the buttons UP-DOWN you can select an event. If you have selected the event,
which you would like to edit, press the button ENTER.
On the left hand side of the upper row the letter ’L’ means the date, which can be set in the form of month
and day.
On the left hand side of the bottom row the daily programme can be selected to the current day.
Always the parameters standing after the flashing colon can be set with the buttons UP-DOWN. If you press
the buttons UP and DOWN simultaneously and hold them pressed down in any parameter setting, the value
switches back to the basic position, so it will be reset:
Parameter
Step number selection
Event number selection
Effect by pressing UP-DOWN simultaneously
Date will be set at 01.01
Event number will be set at 1
To the next parameter you can always go by the button ENTER.
If you do not want to make more changes, press the ESC button, and if there have been any modifications,
the controller asks for the confirmation of saving the modifications
By pressing the button cancel (UP or DOWN) the controller stays in the menu point, by pressing the button
no (ESC) the controller comes back to the menu without saving the modifications, while by pressing the
button yes (ENTER) the controller saves the modifications, and comes back to the menu.
AUTOMATIC MODE
The controller enters the automatic mode after being switched on. Here with the buttons UP-DOWN you can
choose between the right time display and the currently running event display.
EVENT START
Events can be started in two different ways: with function keys or with the four buttons below the display.
With the button ENTER parameter can be selected; with the buttons UP-DOWN the values of the current
parameter can be selected. If the colon flashes before the event number, by pressing ENTER the current
36/38
00033924.DOC, Version 1.0
event will be started or stopped if it has been running. The current status of the selected event can be read
at the end of the row.
The scenes cannot be started or stopped; they can only be loaded!
Maximum 12 of an event type can be started simultaneously; this however satisfies all demands necessary
for the most complicated tasks as well.
By pressing buttons 1-12 the events assigned to the buttons can also be started. If a bottom is red, the
assigned task is not running, if it is yellow, the assigned task is already running.
7. PROBLEM CHART
PROBLEM:
No power.
CAUSE:
The power is not connected.
No signal output.
Blackout-mode activated.
REMEDY:
Check the connection cable and any
extension-cables.
Switch off blackout by pressing the
Blackout-button.
8. CLEANING AND MAINTENANCE
DANGER TO LIFE!
Disconnect from mains before starting maintenance operation!
We recommend a frequent cleaning of the device. Please use a soft lint-free and moistened cloth. Never use
alcohol or solvents!
There are no servicable parts inside the device except for the battery. Maintenance and service operations
are only to be carried out by authorized dealers.
In order to replace the battery please refer to "Inserting/exchanging battery".
Should you need any spare parts, please use genuine parts.
Should you have further questions, please contact your dealer.
Inserting/Replacing the batteries
Please refer to the explanations under Operating Determinations.
Open the housing.
If replacing the batteries, remove the old batteries from the battery compartment.
Leaky or damaged batteries might cause cauterisation when in contact with the skin; therefore, use suitable
protective gloves.
Caution!
Danger of explosion when batteries are replaced improperly.
Only replace by the same type or similar types recommended by the manufacturer.
Remove empty batteries in accordance with the instructions of the manufacturer.
Insert the batteriy and make sure that the poles are correct.
Close the housing again.
37/38
00033924.DOC, Version 1.0
In order to have a long battery life, you should only use alcaline batteries.
BATTERY DISPOSAL NOTICE
Please dispose of old and used batteries properly.
Batteries are hazardous waste and should not be disposed of with regular domestic waste!
Please take old and used batteries to a collection center near you.
9. TECHNICAL SPECIFICATIONS
Controlled channels:
Number of scene:
Number of sequence:
Number of day program:
Number of week program:
Number of month program:
Number of special program:
Events can be run at same time:
Channel soft time:
512 / all can be softed
999
999 / 99 step
99 / 128 time
99 / 7 step
99 / 31 step
99 / 1 step
12 Seq, 12 Daypr, 12 Weekpr 12 Monthpr
0sec – 99min 99sec / 1sec steptime
Power supply:
Power consumption:
Dimensions (WxDxH):
Weight:
10-24 V AC/DC, 50/60 Hz
2.4 W
230 x 30 x 75 mm
0.75 kg
Please note: Every information is subject to change without prior notice. 07.03.2008 ©
38/38
00033924.DOC, Version 1.0