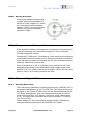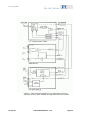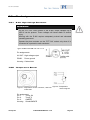
1
PZ236E User Manual E-482 High-Performance Piezo Amplifier/Controller Release: 1.1.0 Date: 25.10.2012 This document describes the following product: ■ E-482.00 PICA High-Power Piezo Driver/Controller, Energy Recovery, 1050 V, 6 A, 19'' © Physik Instrumente (PI) GmbH & Co. KG Auf der Römerstr. 1 ⋅ 76228 Karlsruhe, Germany Tel. +49 721 4846-0 ⋅ Fax: +49 721 4846-1019 [email protected] ⋅ www.pi.ws Physik Instrumente (PI) GmbH & Co. KG is the owner of the following company names and trademarks: PI®, PIC®, PICMA®, PILine®, PIFOC®, PiezoWalk®, NEXACT®, NEXLINE®, NanoCube®, NanoAutomation® The following designations are protected company names or registered trademarks of third parties: LabVIEW The products described in this manual are in part protected by the following patents: US-Patent No. 6,950,050 Copyright 1999–2012 by Physik Instrumente (PI) GmbH & Co. KG, Karlsruhe, Germany. The text, photographs and drawings in this manual enjoy copyright protection. With regard thereto, Physik Instrumente (PI) GmbH & Co. KG reserves all rights. Use of said text, photographs and drawings is permitted only in part and only upon citation of the source. First printing 25.10.2012 Document Number PZ236E BRo, Release 1.1.0 E-482_User_PZ236E_110.doc Subject to change without notice. This manual is superseded by any new release. The newest release is available for download at www.pi.ws (http://www.pi.ws). About this Document Users of this Manual This manual is designed to help the reader to install and operate the E-482 High-Performance Piezo Amplifier/Controller. It assumes that the reader has a fundamental understanding of basic servo systems, as well as motion control concepts and applicable safety procedures. The manual describes the physical specifications and dimensions of the E-482 High-Performance Piezo Amplifier/Controller as well as the installation procedures which are required to put the system into operation. Conventions The notes and symbols used in this manual have the following meanings: WARNING Calls attention to a procedure, practice or condition which, if not correctly performed or adhered to, could result in injury or death. CAUTION Calls attention to a procedure, practice, or condition which, if not correctly performed or adhered to, could result in damage to equipment. NOTE Provides additional information or application hints. Any optional elements which might be mentioned in this documentation are described in their own manuals. Current releases can be downloaded from the PI Website as PDF files (http://www.pi.ws), obtained from your Physik Instrumente sales engineer or from [email protected] (mailto:[email protected]). Contents 1 Introduction 1.1 1.2 1.3 1.4 1.5 2 Overview ........................................................................................... 3 Intended Use ..................................................................................... 4 Safety Precautions............................................................................. 5 Additional Equipment ......................................................................... 6 Unpacking ......................................................................................... 8 Operation 2.1 2.2 2.3 Bipolar Piezo Actuators ...................................................................... 13 Unipolar Piezo Actuators .................................................................... 13 Wiring Example................................................................................... 14 Temperature Sensor Connection ..................................................... 14 Control Signal Generation................................................................ 14 2.7.1 2.7.2 2.7.3 2.8 Front and Rear Panel Elements ......................................................... 10 Output Voltage Range ........................................................................ 11 Line Voltage Connection .................................................................. 12 Actuator Connection ........................................................................ 13 2.5.1 2.5.2 2.5.3 2.6 2.7 9 Calibrated System ............................................................................. 9 Setup ................................................................................................. 9 Operating Elements ......................................................................... 10 2.3.1 2.3.2 2.4 2.5 3 Analog Operation ................................................................................ 14 Remote Control via Computer Interface ............................................. 15 Output Voltage Manipulation .............................................................. 15 Modes of Operation ......................................................................... 16 2.8.1 2.8.2 Open-Loop Operation ......................................................................... 16 Closed-Loop Operation ...................................................................... 16 2.9 First Operation ................................................................................. 17 2.10 Zero-Point Adjustment (with E-509 only).......................................... 18 2.11 Protection Against Overheating ....................................................... 20 3 Maintenance 3.1 3.2 22 AC Power and Line Power Fuses .................................................... 22 Cleaning .......................................................................................... 23 4 Software Download 24 5 Troubleshooting 25 6 Customer Service 26 7 Technical Data 27 7.1 7.2 7.3 7.4 7.5 Specifications .................................................................................. 27 Frequency Response Diagram ........................................................ 28 Block Diagram ................................................................................. 30 Signal Path with Servocontroller and PC-Interface Modules ............ 31 Pin Assignments .............................................................................. 33 7.5.1 7.5.2 8 2-Pin High-Voltage Connector ............................................................ 33 Temperature Sensor ........................................................................... 33 Appendix 8.1 8.2 34 Protective Air Quality Requirements ................................................ 34 How to Measure the Amplifier Output .............................................. 34 Introduction 1 Introduction 1.1 Overview The E-482 high-power piezo amplifier/controller is specifically designed for dynamic operation of high-capacitance PICA piezo actuators. The E-482 is based on a novel design combining pulse width modulation and energy recovery. Instead of dissipating the reactive power in heat sinks, this energy is temporarily stored in inductive elements. Only the active power used by the piezo actuator has to be delivered. The energy not used by the actuator is returned to the amplifier and reused as supply voltage via a step-up transforming process. A peak sink and source current of up to 6000 mA is possible. Selectable Output Range The output range can be set to positive or bipolar, and provides a voltage swing of 1050 V in open-loop operation. Open-Loop and Closed-Loop Operation E-482 amplifiers can be used to drive open- and closed-loop piezo positioning systems. For open-loop piezo operation the amplifier output voltage is determined by the analog signal at the Control In socket combined with the DC-offset potentiometer setting. Open-loop operation is ideal for applications where the fastest response and the highest bandwidth are essential. Here, commanding and reading the target position in absolute values is either not important or carried out by an external feedback loop. The control signal can be adjusted by various settings. Optional Servo Controller Upgrade The E-482.00 allows easy installation of an optional E-509 sensor- / servo-controller module for closed-loop piezo position control. In this mode the amplifier is slaved to the E-509 servo controller. Depending on the attached piezo mechanics and feedback sensor, positioning accuracy and repeatability in the nanometer range and below are feasible. Computer Control Control via PC by installing the E-517 digital piezo controller operation module is also possible. Optionally digital control via a D/A converter is possible. For several D/A boards from National Instruments PI offers a corresponding LabVIEW driver set which is compatible with the PI General Command Set (GCS), the command set used by all PI controllers. A further option includes the patented Hyperbit technology providing enhanced system resolution. www.pi.ws E-482 PZ236E Release 1.1.0 Page 3 Introduction Thermal Piezo Protection Circuit The E-482 features a temperature sensor input and control circuit to shut down the amplifier if the connected piezo actuator exceeds a maximum temperature threshold. 1.2 Intended Use Based on their design and realization, E-482 High-Performance Piezo Amplifier/Controllers are intended to drive capacitive loads, in the present case, piezoceramics (“piezo actuators”). E-482 must not be used for applications other than stated in this manual, especially not for driving ohmic (resistive) or inductive loads. If upgraded with an E-509 servo-control module, E-482 can be operated in closed-loop mode using a position sensor (SGS or capacitive sensors). Appropriate sensors are provided by PI and integrated in the mechanics according to the mechanics product specifications. Other sensors may be used as position sensors only with permission of PI. Observe the safety precautions given in this User Manual. E-482s meet the following ambient conditions and classifications: ■ Indoor use only ■ Max. altitude for operation 2000 m ■ Operating temperature range 5 °C to 40 °C ■ Storage temperature range 0 °C to +70 °C ■ Shipping temperature range -25 °C to +85 °C ■ www.pi.ws Max. relative humidity 80 % for temperatures up to 31 °C, decreasing linearly to 50 % relative humidity at 40 °C ■ Line voltage fluctuations not greater than ±10% of the line voltage ■ Transient overvoltages as typical for public power supply ■ Overvoltage category: II ■ Protection class: I ■ Degree of pollution: 2 Note: The nominal level of the transient overvoltage is the standing surge voltage according to the overvoltage category II (IEC 60364-4-443). E-482 PZ236E Release 1.1.0 Page 4 Introduction 1.3 Safety Precautions Read this User Manual before operating the E-482. Always keep the User Manual safe and close to the described device. In case of loss or damage to the instructions, please order a new copy from your PI distributor or download one from www.pi.ws (http://www.pi.ws). Also keep and add all further information (e.g. extended instructions or Technical Notes) to the User Manual. WARNING On the “PZT Out” Lemo socket of the E-482, output voltages up to 1050 V can be present. These voltages will cause death or serious injury. Working with the E-482 requires adequately trained and educated operating personnel. Operate the piezo actuator on the “PZT Out” socket only when it is connected to a protective earth conductor. WARNING Connect the AC power cord of the E-482 to the wall socket (100 to 120 V ~ or 220 to 240 V ~). Two new line power fuses are required when changing the supply voltage. See p. 22 for more information. To disconnect the system from the power supply completely, remove the power plug from the wall socket, or remove the power cord from the E-482. Install this unit near the AC outlet and such that the AC power plug can be reached easily. WARNING Changing the output voltage range requires opening the case and must be carried out by authorized, qualified personnel only. Disconnect unit from power supply completely before opening the case. www.pi.ws E-482 PZ236E Release 1.1.0 Page 5 Introduction CAUTION Place the E-482 in a location with adequate ventilation to prevent internal heat build-up. Allow at least 10 cm (4 inches) clearance from the top and the rear of the unit and 5 cm (2 inches) from each side. The device needs to be installed horizontally. Vertical mounting prevents internal convection. Never cover the ventilation slots as this will impede ventilation. CAUTION Exposing piezo actuators to voltages too far outside their operating range will destroy the active element in the actuator. When changing the output voltage range, make sure that both the polarity and the voltage as seen by the piezo actuator are within the allowable range. CAUTION If the temperature of the piezo actuator is too high (see the tutorial on www.pi.ws for details), the piezo ceramics can depolarize. Depolarization reduces the available travel range and force of the actuator. Forced cooling of the piezo actuator is recommended. Optionally the PICA piezo actuators P-212, P-216, P-225 and P-235 can be ordered with the P-177.50 option "Dynamic applications (with E-481): temperature sensor and protective air for PICA HVPZT". For protective-air quality requirements see p. 34. All components must be designed for high temperatures (i.e. also cables). Adherence to the application notes given in Section 2.11 on p. 20 is recommended. 1.4 Additional Equipment The E-482 is upgradable with a servo-control module (E-509), and/or a digital piezo controller operation module (E-517, E-515 for display only). These modules come installed directly in the E-482 case. If the servo module and a piezo actuator are ordered with the system, your E-482 will be fully calibrated before being shipped. www.pi.ws E-482 PZ236E Release 1.1.0 Page 6 Introduction Contact your PI sales engineer or write [email protected], if you want to upgrade your E-482. Any additional modules are described in their own separate manuals. The following products are available: www.pi.ws E-509.C1A, E-509.S1 Sensor / Servo-Controller Module for capacitive or SGS position sensors respectively, 1 channel to eliminate drift and hysteresis from positioning operations. E-517.i1 Digital Piezo Controller Operation Module; 24-bit D/A; TCP/IP, USB, RS-232, IEEE 488 (GPIB); 1 Channel; displays the current voltage and, if servo-module also present, the position of the PZT. DLL, COM, LabVIEW; convenient interactive user interface software for host PC is provided. E-515.01 Display Module for PZT Voltage and Position, 1 channel E-500.ACD CD with Driver Set for Analog Controllers, available free of charge upon request Computer control can be implemented using a DAC-board in a PC to generate the analog input signal. PI offers a LabVIEW driver set which can be used with certain D/A boards. This driver set is compatible with the PI General Command Set (GCS) LabVIEW driver set available for all newer controllers from PI. The PI Analog Controller drivers support all D/A converter boards from National Instruments that are compatible with DAQmx8.3. LabVIEW compatibility is given from version 7.1 upwards. Connection of a sensor monitor signal from a sensor- or servo-module (e.g. E-509) is required. The driver set is also available for download from the PI website. E-500.HCD Access to HyperBit Functionality for Enhanced System Resolution (Supports certain D/A boards.) PI’s patented Hyperbit technology for providing position resolution higher than that of the D/A board is in the E-500.ACD driver set. Activating Hyperbit requires purchase of the password, which can be obtained from PI under Order No. E-500.HCD. E-482 PZ236E Release 1.1.0 Page 7 Introduction 1.5 Unpacking Unpack the E-482 High-Performance Piezo Amplifier/Controller with care. Compare the contents against the items covered by the contract and against the packing list. The following components are included: E-482.00 Amplifier 3763 Line cord 000016103 Dummy plug for the temperature sensor socket (LEMO FFA.OS.303.CLAC32) PZ236E User manual (this document) E500T0011 Technical Note for GCS LabVIEW driver set Inspect the contents for signs of damage. If parts are missing or you notice signs of damage, contact PI immediately. Save all packing materials in case the product need be shipped again. www.pi.ws E-482 PZ236E Release 1.1.0 Page 8 Operation 2 Operation 2.1 Calibrated System If a controller with an included servo module is ordered together with a piezo actuator, the system will be fully calibrated at PI according to your specifications before being shipped, and will come with a calibration information sheet. NOTES Calibration should only be done by qualified authorized personnel after consultation with PI. If you inform PI about your application, your E-482s will be fully calibrated before being shipped. It is usually not necessary for you to do anything more than adjust the zero point before operating the system. Do not interchange controller (whole devices or individual modules) and/or piezo stages if they are matched and calibrated together. Respect the assignment of the piezo actuators to the individual controller channels, as indicated by the serial numbers on the labels affixed to the devices. With multi-axis stages respect the channel/axis assignments indicated by the cable labeling 2.2 Setup CAUTION Place the E-482 in a location with adequate ventilation to prevent internal heat build-up. Allow at least 10 cm (4 inches) clearance from the top and the rear of the unit and 5 cm (2 inches) from each side. The device needs to be installed horizontally. Vertical mounting prevents internal convection. Never cover the ventilation slots as this will impede ventilation. The E-482 amplifier is suitable for mounting in a 19’’ rack. www.pi.ws E-482 PZ236E Release 1.1.0 Page 9 Operation 2.3 Operating Elements 2.3.1 Front and Rear Panel Elements Figure 1: E-482 front panel www.pi.ws Element Function DC Offset 10-turn potentiometer for DC Offset (see p. 14 for details) PZT Out LEMO socket, high-voltage output for the piezo actuator (pinout on p. 33, further details on p. 11 and p. 15). The maximum voltage swing is 1050 V. PZT Out/100 BNC socket, monitor output for the voltage of the high-voltage output: 100 V output voltage correspond to 1 V monitor voltage Current. Mon. 1A ≙ 1V BNC socket, monitor output for the current of the high-voltage output: 1 A output current corresponds to 1 V monitor voltage Power LED, steady green during operation E-482 PZ236E Release 1.1.0 Page 10 Operation Element Function Overtemp LED, lights up red if the temperature on the connected temperature sensor exceeds 120 °C, the high-voltage output is then deactivated (p. 25) Offset Toggle switch, inverts the sign of the DC-offset voltage (see p. 14 for details) Input Toggle switch, inverts the sign of the amplifier input signal (see p. 15 for details) Control In BNC socket for external analog control signal, 11 V max. input swing in the range of -10 to +10 V (see p. 14 for details) Measurement category I Temp Sensor In LEMO socket for a PT1000 temperature sensor (p. 14) or dummy plug, max. 4 V input Measurement category I The controls of the optional servo-control (E-509) and PC interface/display (E-517, E-515) modules are described in their own separate manuals. The following elements are located on the rear side of the E-482: 2.3.2 Line voltage connection (p. 12) Line power fuses (p. 22) On/off switch Output Voltage Range CAUTION Exposing piezo actuators to voltages too far outside their operating range will destroy the active element in the actuator. When changing the output voltage range, make sure that both the polarity and the voltage as seen by the piezo actuator are within the allowable range. The output voltage range is preset at the factory. If no output voltage range was specified with the order, the range is 0 to www.pi.ws 1050 V E-482 PZ236E Release 1.1.0 Page 11 Operation The following output voltage ranges are available on request: -260 to -525 to +780 V +525 V Changing the output voltage range of the E-482 must be done by PI service personnel only. Contact your Physik Instrumente sales engineer or write to [email protected] if you need to change the output voltage range. NOTES The polarity of the output voltage can be inverted using the “Input” toggle switch on the E-482 front panel, see p. 15 for details. 2.4 Line Voltage Connection WARNING Connect the AC power cord of the E-482 to the wall socket (100 to 120 V ~ or 220 to 240 V ~). To disconnect the system from the power supply completely, remove the power plug from the wall socket, or remove the power cord from the E-482. Install this unit near the AC outlet and such that the AC power plug can be reached easily. Unless you request otherwise, upon delivery the E-482 will be set up for the voltage predominant in your country, either 100 to 120 V ~ / 50 — 60 Hz or 220 to 240 V ~ / 50 — 60 Hz To adapt the E-482 to a different line voltage, the two line power fuses must be replaced. See “AC Power and Line Power Fuses” (p. 22) for instructions and for the required fuse types. www.pi.ws E-482 PZ236E Release 1.1.0 Page 12 Operation 2.5 Actuator Connection WARNING On the “PZT Out” socket of the E-482, output voltages up to 1050 V can be present. These voltages will cause death or serious injury. Working with the E-482 requires adequately trained and educated operating personnel. Operate the piezo actuator on the “PZT Out” socket only when it is connected to a protective earth conductor. NOTE The piezo actuator should have a minimum electrical capacitance of 1 µF (small signal value). If the electrical capacitance of the piezo actuator is less than 1 µF or if the E-482 is operated without load, the performance of the E-482 is decreased, and the output can be instable. Connect your piezo actuator to the “PZT Out” socket of the E-482 amplifier. If you order the actuator and controller together, and/or provide PI with sufficient information about your application, the actuator connector will be wired as required. If you are connecting other actuators or wiring your own connector, read the discussion of actuator type carefully and any documentation that came with the actuator. 2.5.1 Bipolar Piezo Actuators Here the output voltage swing is so chosen that the actuator sees both negative and positive high voltages. The output always has one lead at 0 V, and here the other is in a zero-crossing range, commonly·±500·V. 2.5.2 Unipolar Piezo Actuators The notation of “positive” and “negative” polarity of piezo actuators does not refer to their direction of motion. Unipolar piezos of any polarity will elongate when a higher voltage is applied to their (+) than to their (-) terminal. “Positive” and “negative” refers to the sign of the voltage on the core of the cable. All standard PI piezo actuators with 2-conductor LEMO connectors have positive polarity. www.pi.ws E-482 PZ236E Release 1.1.0 Page 13 Operation 2.5.3 Wiring Example In the wiring example shown at right, a “positive” piezo is connected so as to have 0 to +1050 V applied. To achieve this, the positive terminal (possibly labeled “+1050 V”) is connected to the variable HV-Out and the negative terminal to PGND. 2.6 Temperature Sensor Connection E-482 amplifier modules are equipped with a temperature monitoring circuit to avoid overheating of the connected mechanics. It can be used with PT1000 temperature sensors. Connect the PT1000 to the “Temp Sensor In” Lemo socket on the front panel of the E-482 (connection details on p. 33). When the mechanics connected to the E-482 does not feature a temperature sensor, the included dummy plug (order No. 000016103) must be used. When a temperature of 120 °C is detected on the mechanics, the E-482 temperature monitoring circuit deactivates the high-voltage output of the amplifier (“PZT Out” socket), and the red “Overtemp” LED on the front panel lights up. See p. 20 for how to proceed in this case. 2.7 Control Signal Generation 2.7.1 Analog Operation The E-482 can be operated by an analog control signal (“CONTROL OUT” in the signal path diagram on p. 32). The CONTROL OUT signal is the sum of the signal on the “Control In” BNC socket and the offset voltage set with the “DC Offset” potentiometer. Due to the constant amplifier gain of 100, the range of the CONTROL OUT signal is 1/100 of the output voltage range (p. 11). The signal may not have an active swing more than 11 V wide, or 10 V for Servo ON. Output voltage (if in open-loop mode) or actuator position (closed-loop mode) are directly proportional to the CONTROL OUT signal. www.pi.ws E-482 PZ236E Release 1.1.0 Page 14 Operation ”Control In” signal An external voltage can be applied to the “Control In” BNC socket. The signal applied to the “Control In” BNC socket can also be generated using a DAC-board in a PC. PI offers a LabVIEW driver set which can be used with certain D/A boards. This driver set is compatible with the PI General Command Set (GCS) LabVIEW driver set available for all newer controllers from PI. In addition, PI’s patented Hyperbit technology for providing position resolution higher than that of the D/A board is in the E-500.ACD driver set (see “Additional Equipment” p. 6). “DC Offset” potentiometer Depending on the position of the potentiometer, a DC voltage between 0 and 10 V is made available. If you require a constant DC-offset (e.g. 0), make sure the knob stays at the required position. Due to the constant gain of 100, the range of the CONTROL OUT signal is set to 1/100 of the output voltage range (p. 11). If the signal on the “Control In” BNC socket does not already have a range of 1/100th of the desired output voltage range, the following adjustments can be made in order to be able to use the full output voltage range: ■ ■ Shift with DC Offset: Use the DC-offset potentiometer to add a constant to the “Control In” signal so that CONTROL OUT is 1/100 of the desired output. The possible offset runs from 0 to 10 V or 0 to -10 V, depending on the offset polarity. Reverse the offset polarity: The “Offset” toggle switch changes the sign of the DC-offset voltage. “pos” provides offsets from 0 to 10 V, “neg” offsets from 0 to -10 V. For closed-loop operation with an E-509 servo-control module, CONTROL OUT must be in the 0 to 10 V range. 2.7.2 Remote Control via Computer Interface E-482 models equipped with an E-517 digital piezo controller operation module can be controlled from a host computer via TCP/IP, USB, RS-232 or IEEE488 interface. See the E-517 User Manual for details. 2.7.3 Output Voltage Manipulation You can invert the polarity of the output voltage by inverting the polarity of the amplifier input signal (AMPLIFIER IN in the signal path diagram on p. 32; the output voltage is labeled “PZT HV OUT” there). To do this, use the “Input” toggle switch on the E-482 front panel: www.pi.ws E-482 PZ236E Release 1.1.0 Page 15 Operation ■ ■ “inv” means that the polarity of the AMPLIFIER IN signal is inverted. Example: +1 V will be changed to -1 V and then amplified by 100 so that the output voltage will be -100 V. “norm” means that the polarity of the AMPLIFIER IN signal is not inverted. Example: +1 V will stay unchanged, and the resulting output voltage will be +100 V. Note that depending on the system configuration, AMPLIFIER IN can result from different sources: ■ ■ ■ No E-517 computer interface/display module and no E-509 servo-controller module present: AMPLIFIER IN is identical with the CONTROL OUT signal (= analog operation). E-517 computer interface/display module present: AMPLIFIER IN can result from CONTROL OUT (= analog operation) or from control input sent from a host computer via TCP/IP, USB, RS-232 or IEEE488 interface (= remote control via computer interface). E-509 servo-controller module present: Notch filter and slew rate limiter are applied to the CONTROL OUT or the control input sent from a host computer. AMPLIFIER IN is the result but in addition depends on the mode of operation: o Closed-loop operation: corrections are applied by the P-I servo-loop. o Open-loop operation: no corrections by the P-I servo-loop. 2.8 Modes of Operation 2.8.1 Open-Loop Operation All E-482 versions can be operated in open-loop mode. Open-loop operation means that any control input provided by the user determines the output voltage directly. 2.8.2 Closed-Loop Operation Closed-loop operation requires a position sensor and a servo module (e.g. E-509). Closed-loop operation means that the user commands the piezo position. The output voltage required to reach this target position is calculated internally by the servo-loop, based on the given target and the feedback of the position sensors (see E-509 User Manual PZ77E). www.pi.ws E-482 PZ236E Release 1.1.0 Page 16 Operation Note: In closed-loop operation up to 10% of the output voltage range may be required for compensating nonlinearity and drift. 2.9 First Operation The following instructions refer to analog operation (p. 14) of the system. If your E-482 is equipped with an E-517 digital piezo controller operation module and you want to control the system via the computer interface, perform only steps 1 to 3 of the instructions below and then operate the system as described in the E-517 User Manual. www.pi.ws 1 Make sure that the E-482 is connected to line power but powered down—line cord socket and On/Off switch are on the rear panel, see “Line Voltage Connection” p. 11) for details. 2 If your piezo actuator is equipped with a PT1000 temperature sensor, connect it to the “Temp Sensor In” socket of the E-482. If no temperature sensor is present, connect the included dummy plug (Part No. 000016103). 3 Make sure that the “Input” toggle switch on the E-482 front panel is in the “norm” position (i.e. the polarity of the output voltage ist not inverted). 4 Connect the piezo actuator to the E-482 “PZT Out” high-voltage output and to a protective earth conductor. 5 For closed-loop systems (E-509 servo module present; see also the E-509 User Manual): 5.1 Connect the sensor cable to the corresponding socket on the servo module. 5.2 Deactivate servo-control (set “SERVO” toggle switch on the servo module “OFF”). 5.3 If you are using the sensor monitor signal, connect your appropriate electronics to the SENSOR MONITOR socket on the servo module. 6 Turn the DC offset potentiometer full counterclockwise (CCW) If a negative DC-offset is required: set the DC offset to negative polarity with the “Offset” toggle switch. 7 Power up the E-482 using the On/Off switch on the rear panel. The green “Power” LED will light up. 8 Command the first motion of the piezo actuator by turning the offset potentiometer full clockwise (CW) to run the actuator over the nominal travel range, then turn the potentiometer back full CCW E-482 PZ236E Release 1.1.0 Page 17 Operation If an E-517 digital piezo controller operation module or an E-515 display module is installed, watch the voltage and, if an E-509 servo module is present, the position on the display to check whether the system is operating properly. Make sure that the full voltage swing is attained. 9 When an E-509 servo module is installed, the sensor monitor signal will show a voltage from about 0 to 10 V proportional to the piezo extension. Example: A piezo actuator with a nominal travel of 100 µm shows a sensor monitor signal of 1.5 V at 15 µm. For an actuator with 30 µm nominal travel, 1.5 V at sensor monitor would correspond to 4.5 µm (15% of 30 µm) 10 If an external analog signal is used, connect the signal source to the “Control In” BNC socket. If the signal range is not 1/100 of the output voltage, adjustments can be made (see p. 14). If you have a closed-loop system, follow up by performing a zero-point adjustment. 2.10 Zero-Point Adjustment (with E-509 only) The zero-point adjustment of the E-509 servo module becomes necessary when the application conditions (particularly load, temperature) of the piezo actuator have changed. Proper zero-point adjustment of the sensor ensures that the full output voltage swing can be used in closed-loop operation without reaching the output voltage limits of the amplifier and causing an overflow condition (see E-509 User Manual, PZ77E). Equipment needed: For zero-point adjustment in analog operation, an adjustable voltage source is needed which is able to output 1/100 of the selected output voltage range. Furthermore, a precision voltmeter is required. If an E-517 digital piezo controller operation module is present in the system, zero-point adjustment can be performed without additional equipment; see the E-517 user manual for further information. Adjustment is possible in “Online” mode (= remote control from PC) as well as in “Offline” mode (= analog operation) (p. 15). However, “offline” and “online” modes must not be mixed during the adjustment. How to perform zero-point adjustment in analog operation: 1 www.pi.ws Make sure the piezo actuator is mounted in the same way and with the same load as during normal operation in the application. E-482 PZ236E Release 1.1.0 Page 18 Operation 2 Make sure that the external analog control signal is 0 V and turn the DC offset potentiometer full CCW. 3 Set the SERVO toggle switch on the front panel of the servo module to OFF. 4 Connect a voltmeter to the SENSOR MONITOR socket of the servo module. 5 Power up the system. 6 Turn the offset potentiometer full clockwise and than back full counterclockwise (0 V) to exercise the piezo actuator. 7 Adjust the ZERO potentiometer on the servo module until a sensor-monitor signal of 0 V is measured by the voltmeter on the SENSOR MONITOR socket of the servo module. 8 Switch to closed-loop operation (SERVO ON). CAUTION If your piezo actuator starts oscillating (humming noise), immediately switch to open-loop operation (SERVO OFF)! The actuator can be irreparably damaged by resonant oscillation. Adjust the settings of the servo control parameters (potentiometers on E-509 servo module; see E-509 User Manual) before switching to closed-loop operation again. If a display module is present, the position display of the piezo actuator will now jump to “0”. Connect a voltmeter to the monitor signal on the “PZT Out/100” BNC socket, or watch the output voltage on the display module, if present. Adjust the ZERO potentiometer on the E-509 module to obtain the following value for the output voltage at the zero point of the sensor: Output voltage range Output value at zero point 0 to 1050 V 25 V -260 to +780 V -200 V -525 to +525 V -450 V (positive piezo polarity) +450 V (negative piezo polarity) This is the output value corresponding to the low end of the piezo actuator travel range. www.pi.ws E-482 PZ236E Release 1.1.0 Page 19 Operation To check the output voltage range, command the maximum extension with either a DC voltage on “Control In” or with the “DC Offset” potentiometer, or a combination of the two. In doing so, read the monitor signal on the “PZT Out/100” BNC socket, or watch the output voltage on the display module, if present. If the full output voltage range is attainable, the zero-point adjustment is finished. If not, repeat the adjustment with a slightly different value for the zero point. 2.11 Protection Against Overheating CAUTION If the temperature of the piezo actuator is too high (see the tutorial on www.pi.ws for details), the piezo ceramics can depolarize. Depolarization reduces the available travel range and force of the actuator. Forced cooling of the piezo actuator is recommended. Optionally the PICA piezo actuators P-212, P-216, P-225 and P-235 can be ordered with the P-177.50 option "Dynamic applications (with E-481): temperature sensor and protective air for PICA HVPZT". For protective-air quality requirements see p. 34. All components must be designed for high temperatures (i.e. also cables). Adherence to the application notes given below is recommended. To protect the system against overheating, the high-voltage output on the “PZT Out” socket of the E-482 is deactivated automatically in the following cases: ■ ■ A PT1000 temperature sensor connected to the E-482 detects a temperature of 120 °C on the mechanics. In this case, the red “Overtemp” LED on the front panel lights up. The internal temperature sensor of the E-482 detects a temperature of 85 °C at the electronics. In this case, the red “Overtemp” LED on the front panel does not light up. If the high-voltage output has been deactivated, the piezo actuator will no longer move. www.pi.ws E-482 PZ236E Release 1.1.0 Page 20 Operation Proceed as follows when the high-voltage output has been deactivated: 1. Turn off the E-482 for a cooling phase. 2. Wait until the temperature has dropped on the mechanics and/or inside the electronics. This can take several minutes. 3. Power up the E-482 again. APPLICATION NOTES To avoid overheating of the piezo actuator, you can reduce the maximum operating frequency and output voltage. The maximum operating frequency and output voltage (travel) depend on operating conditions such as thermal coupling (single- or double-ended, with or without air cooling) length-to-diameter ratio and, of course, on the driving waveform. The maximum possible frequency for a particular system should be determined after the system is set up with the defined operating conditions by slowly running the system up to the point where the controller performs a thermal shutdown. It is important to take proper account of the time constant of the PT1000 temperature sensor, the mechanical characteristics of the system, and the amplifier parameters. Permanent deactivation of the high-voltage output due to overheating may indicate hardware failure. www.pi.ws E-482 PZ236E Release 1.1.0 Page 21 Maintenance 3 Maintenance WARNING Before cleaning the E-482, changing the AC fuses and removing or installing modules, disconnect it from the power supply completely. To do this, remove the power plug from the wall socket, or remove the power cord from the E-482. 3.1 AC Power and Line Power Fuses Unless otherwise requested, the unit will be set up for the power predominant in your country. New line-power fuses are required when changing the supply voltage. CAUTION Both fuses are active and have to be checked if there is a fault and replaced when changing the supply voltage. Figure 3: Fuse carrier Indication of valid voltage value must be located here. Figure 2: Position of the line fuses and fuse carrier, only one of two fuses visible www.pi.ws E-482 PZ236E Release 1.1.0 Page 22 Maintenance To access the line power fuses, proceed as follows: 1 Switch off the E-482 and remove the line cord. 2 Wait a minute to be sure that any residual voltage has dissipated. 3 Carefully pull out the fuse carrier (see figures above) using a tool with a small flat tip, e.g. a flat-bladed screwdriver. 4 Be sure to replace both fuses with fuses of the type appropriate for the new voltage: 220 to 240 V ~: 2 x 2 A HT, 250 V AC 100 to 120 V ~: 2 x 4 A HT, 250 V AC H = High breaking T = Time lag Note that IEC fuses are cited: other fuse standards may require higher nominal current rating. 3.2 5 Rotate the fuse carrier so that the valid voltage setting (“110-120 V” or “220-240 V”) can be read in normal orientation (see Figure 2 on p. 22 for the required location of the valid voltage indication). 6 Reinstall the fuse carrier. Cleaning The outside surface of the case can be cleaned using mild detergents or disinfectant solutions. Organic solvents must not be used. www.pi.ws E-482 PZ236E Release 1.1.0 Page 23 Software Download 4 Software Download Updated releases of GCS LabVIEW drivers for analog controllers from PI and the corresponding manuals are available for download at www.pi.ws. You need a password for the download. This password is provided in a Technical Note delivered with the controller (E500T0011). To download from the PI Website, proceed as follows: www.pi.ws 1 On the www.pi.ws front page, click on Manuals, Software, ISO Statements in the Resources section on the left. 2 Select Software & Manuals on PI Support Server from the list that pops up. 3 On the “PI Download Server” page, enter the Username and the Password which are provided in the separate Technical Note and click on “Login”. 4 Click on the “E Piezo Drivers & Nanopositioning” category 5 Click on “E-500” 6 Click on “Software” (if you click on “Documents” you will get the latest manuals) 7 Click on the latest CD-Mirror (includes the manual versions that were with the release) or on the latest update zip file. E-482 PZ236E Release 1.1.0 Page 24 Troubleshooting 5 Troubleshooting Positioner does not move. Cables not connected properly: ■ Check the connecting cables. ■ Note the required voltage range for the analog signal at “Control In”. The control input range is basically one one-hundredth of the output voltage (see p. 14 for more information). The “Overtemp” LED lights. ■ The connected PT1000 temperature sensor is reporting 120 °C and the high-voltage output has thus been shut off. Turn off the controller. Wait until the temperature has dropped before powering the controller up again. www.pi.ws E-482 PZ236E Release 1.1.0 Page 25 Customer Service 6 Customer Service Still having problems? Call your PI representative or write to [email protected]; please have the following information about your system ready: www.pi.ws ■ Product codes and serial numbers of all products in the system ■ Current firmware version of the controller (if present) ■ Software version of drivers and / or host software (if present) ■ Operating system on host PC (if present) E-482 PZ236E Release 1.1.0 Page 26 Technical Data 7 Technical Data 7.1 Specifications E-482.00 Function Power amplifier with energy recovery, for PICA high-voltage PZTs Amplifier Output voltage 0 to 1050 V Available on request: -260 to -525 to +780 V +525 V Amplifier channels 1 Average reactive current 2A Peak current, <5 ms 6A Amplifier bandwidth, small signal Amplifier bandwidth, large signal Ripple, noise 0 to 10 kHz 2 kHz (1 µF) Current limitation Short-circuit-proof Voltage gain +100 Control input voltage Servo off: ±1/100 of selected output range Servo on: 0 to 10 V 100 kΩ/1 nF Input impedance Piezo actuator capacitance limitation 400 Hz (5 µF) 300 mVRMS < 2000 mVP-P (100 nF) 1 µF (min); 17 μF (max) Interface and operation www.pi.ws Output voltage socket LEMO EGG.0B.701.CJL1173 Control input socket BNC Piezo actuator temperature sensor DC Offset LEMO socket; high voltage output is automatically deactivated if piezo actuator temperature is 120 °C 10-turn pot., adds 0 to +10 V or -10 to 0 V to Control In E-482 PZ236E Release 1.1.0 Page 27 Technical Data Miscellaneous Operating voltage 7.2 Overvoltage category 100 to 120 or 220 to 240 V ~, 50 — 60 Hz (fuse change required) II Protection class I Operating temperature range +5 to +40 °C Storage temperature range 0 to +70 °C Shipping temperature range -25 to +85 °C Altitude for operation Max. 2000 m Mass 10.4 kg Dimensions 288 x 450 x 158 mm + handles Frequency Response Diagram Figure 4: E-482, operating limits with various piezo loads. Values shown are capacitance in nanofarads www.pi.ws E-482 PZ236E Release 1.1.0 Page 28 Technical Data NOTE The piezo actuator should have a minimum electrical capacitance of 1 µF (small signal value). If the electrical capacitance of the piezo actuator is less than 1 µF or if the E-482 is operated without load (“Open” curve in the above diagram), the performance of the E-482 is decreased, and the output can be instable. www.pi.ws E-482 PZ236E Release 1.1.0 Page 29 Technical Data 7.3 Block Diagram Figure 5: E-482 Block diagram www.pi.ws E-482 PZ236E Release 1.1.0 Page 30 Technical Data 7.4 Signal Path with Servocontroller and PC-Interface Modules The block diagram below shows the signal path for E-482 closed-loop versions upgraded with an E-517 digital piezo controller operation module. The E-482 open-loop versions and models without E-517 module are equipped with dummy modules instead. The purpose of these dummies is to complete the internal circuitry and the front panel of the chassis. CAUTION If your E-482 contains dummy modules: Do not operate the E-482 when the dummy modules are removed. Without the dummy module(s), the system will malfunction because no control signal can be fed into the amplifier module due to the broken circuit. www.pi.ws E-482 PZ236E Release 1.1.0 Page 31 Technical Data Figure 6: Interconnections between E-517 digital piezo controller operation module, power amplifier (E-482) and E-509 servo module www.pi.ws E-482 PZ236E Release 1.1.0 Page 32 Technical Data 7.5 Pin Assignments 7.5.1 2-Pin High-Voltage Connector WARNING On the “PZT Out” Lemo socket of the E-482, output voltages up to 1050 V can be present. These voltages will cause death or serious injury. Working with the E-482 requires adequately trained and educated operating personnel. Operate the piezo actuator on the “PZT Out” socket only when it is connected to a protective earth conductor. Type: LEMO EGG.0B.701.CJL.1173 Pin assignments: HV OUT: High-voltage output PGND: Power ground Housing: Cable shield 7.5.2 Temperature Sensor Figure 7: Temperature sensor connector, view from Figure 8: Temperature sensor diagram solder side Pin assignment: Pin 1: Temp_SA Pin 2: Temp_S Pin 3: GND/PE Housing: Shield/GND/PE www.pi.ws E-482 PZ236E Release 1.1.0 Page 33 Appendix 8 Appendix 8.1 Protective Air Quality Requirements Optionally the PICA piezo actuators P-212, P-216, P-225 and P-235 can be ordered with the P-177.50 option "Dynamic applications (with E-481): temperature sensor and protective air for PICA HVPZT". The protective air must meet the following requirements: Temperature at least 3 C° (5.5 F°) above dew point Residual oil content < 0.03 mg/m³, measured at 7 bar (102 psi) and 20°C (68°F) Particulates < 0.01 mg / m3 These requirements can generally be met by running compressed air conformant to ISO 8573.1 Quality Class 4 through a dryer and microfilter with 99.9999% effectiveness. Maximum pressure in the translator must not exceed 0.5 bar (7.3 psi). 8.2 How to Measure the Amplifier Output The innovative, efficient circuitry of the E-482 reduces power consumption and heat dissipation, especially in dynamic applications. Working with an internal switching frequency of 50 kHz, charge is transferred to the piezo actuator using low-loss PWM techniques. The ripple of the amplifier output is < 2000 mVpp at 10 kHz. But when measuring the amplifier output signal with low sampling rate and small bandwidth (e.g. with a digital oscilloscope), aliasing will occur and distort the measurement result. In digital signal processing, aliasing refers to an effect that the signal reconstructed from samples is different than the original continuous signal when the sampling rate is too low. With the E-482 amplifier output, this means that a low-frequency signal seems to be measured which is not present at all. Example: When a 91 Hz signal is sampled with 100 Hz sampling rate, the result seems to be a 9.1 Hz signal (see figure below). www.pi.ws E-482 PZ236E Release 1.1.0 Page 34 Appendix Fig. 1: Signal digitization with too low sample rate (time in 1/100 s): Original signal = 91 Hz and sampling rate = 100 Hz; the result is mistaked as a 9.1 Hz signal (“Alias”) To avoid aliasing, the sampling rate must be at least twice as high as the highest frequency in the signal to be sampled (according to the Nyquist–Shannon sampling theorem). I.e. with an amplifier switching frequency of 50 kHz, the sampling rate must be 100 kHz or higher. If the sampling rate provided by your oscilloscope is not high enough, use a low-pass filter at the oscilloscope input to eliminate frequencies above 50 kHz. Alternatively, you can use an analog oscilloscope or perform high-resolution measurements in the lower frequency range. When following those instructions, you will obtain valid measurement results. www.pi.ws E-482 PZ236E Release 1.1.0 Page 35