1
Device for PV Plant Monitoring and Load Management
SUNNY HOME MANAGER in Sunny Portal
User Manual
HoMan_Portal-BA-BEN112610 | Version 1.0
EN
Table of Contents
SMA Solar Technology AG
Table of contents
1
Information on this Manual. . . . . . . . . . . . . . . . . . . . . . . . . 7
2
2.1
2.2
Safety . . . . . . . . . . . . . . . . . . . . . . . . . . . . . . . . . . . . . . . . . . 9
Intended Use. . . . . . . . . . . . . . . . . . . . . . . . . . . . . . . . . . . . . . . . 9
Safety Precautions. . . . . . . . . . . . . . . . . . . . . . . . . . . . . . . . . . . 11
3
3.1
3.2
3.3
Product Description . . . . . . . . . . . . . . . . . . . . . . . . . . . . . . 12
Sunny Home Manager . . . . . . . . . . . . . . . . . . . . . . . . . . . . . . . 12
SMA Radio-controlled Socket. . . . . . . . . . . . . . . . . . . . . . . . . . 15
Sunny Portal . . . . . . . . . . . . . . . . . . . . . . . . . . . . . . . . . . . . . . . 16
4
4.1
4.2
4.3
Getting Started . . . . . . . . . . . . . . . . . . . . . . . . . . . . . . . . . . 17
Registering the Sunny Home Manager in the Sunny Portal. . . . 17
Logging In and Out of Sunny Portal . . . . . . . . . . . . . . . . . . . . . 17
Setting the Language . . . . . . . . . . . . . . . . . . . . . . . . . . . . . . . . 17
5
User Interface of the Sunny Home Manager Plant . . . . . 18
6
6.1
6.2
Page and Drop-down Menu . . . . . . . . . . . . . . . . . . . . . . . 19
"Plant Selection" and "Plant List" . . . . . . . . . . . . . . . . . . . . . . . . 19
"My Sunny Home Manager Plant" . . . . . . . . . . . . . . . . . . . . . . 20
6.2.1
"Plant Profile". . . . . . . . . . . . . . . . . . . . . . . . . . . . . . . . . . . . . . . . . . . . . . . . . 20
6.2.2
"Current Status and Forecast" . . . . . . . . . . . . . . . . . . . . . . . . . . . . . . . . . . . . 21
6.2.3
"Energy Balance" . . . . . . . . . . . . . . . . . . . . . . . . . . . . . . . . . . . . . . . . . . . . . 23
6.2.4
"Load Balance and Control" . . . . . . . . . . . . . . . . . . . . . . . . . . . . . . . . . . . . . 25
6.2.5
6.2.6
"Energy and Power" . . . . . . . . . . . . . . . . . . . . . . . . . . . . . . . . . . . . . . . . . . . 26
"Annual Comparison" . . . . . . . . . . . . . . . . . . . . . . . . . . . . . . . . . . . . . . . . . . 27
6.2.7
"Plant Monitoring" . . . . . . . . . . . . . . . . . . . . . . . . . . . . . . . . . . . . . . . . . . . . . 27
6.2.8
"System Logbook" . . . . . . . . . . . . . . . . . . . . . . . . . . . . . . . . . . . . . . . . . . . . . 29
6.3
6.4
"Performance Ratio" . . . . . . . . . . . . . . . . . . . . . . . . . . . . . . . . . 30
"Report". . . . . . . . . . . . . . . . . . . . . . . . . . . . . . . . . . . . . . . . . . . 30
2
HoMan_Portal-BA-BEN112610
User Manual
SMA Solar Technology AG
Table of Contents
6.4.1
"Daily Report" . . . . . . . . . . . . . . . . . . . . . . . . . . . . . . . . . . . . . . . . . . . . . . . . 30
6.4.2
"Monthly Report". . . . . . . . . . . . . . . . . . . . . . . . . . . . . . . . . . . . . . . . . . . . . . 30
6.5
6.6
6.7
"Devices". . . . . . . . . . . . . . . . . . . . . . . . . . . . . . . . . . . . . . . . . . 30
"Sensors" . . . . . . . . . . . . . . . . . . . . . . . . . . . . . . . . . . . . . . . . . . 30
"Configuration" . . . . . . . . . . . . . . . . . . . . . . . . . . . . . . . . . . . . . 31
6.7.1
"Plant Properties" . . . . . . . . . . . . . . . . . . . . . . . . . . . . . . . . . . . . . . . . . . . . . . 31
6.7.2
"System Presentation" Page. . . . . . . . . . . . . . . . . . . . . . . . . . . . . . . . . . . . . . 31
6.7.3
"Device Overview" Page . . . . . . . . . . . . . . . . . . . . . . . . . . . . . . . . . . . . . . . . 31
6.7.4
"Report Configuration" . . . . . . . . . . . . . . . . . . . . . . . . . . . . . . . . . . . . . . . . . 33
6.7.5
"User Management" . . . . . . . . . . . . . . . . . . . . . . . . . . . . . . . . . . . . . . . . . . . 33
6.8
"User Info/Logout" . . . . . . . . . . . . . . . . . . . . . . . . . . . . . . . . . . 33
6.8.1
"User Information" . . . . . . . . . . . . . . . . . . . . . . . . . . . . . . . . . . . . . . . . . . . . . 33
6.8.2
"Logout". . . . . . . . . . . . . . . . . . . . . . . . . . . . . . . . . . . . . . . . . . . . . . . . . . . . . 33
7
7.1
Page Settings . . . . . . . . . . . . . . . . . . . . . . . . . . . . . . . . . . . 34
Performing Settings on the Diagram . . . . . . . . . . . . . . . . . . . . . 34
7.1.1
Setting the Display Period . . . . . . . . . . . . . . . . . . . . . . . . . . . . . . . . . . . . . . . 34
7.1.2
Saving Diagram Data . . . . . . . . . . . . . . . . . . . . . . . . . . . . . . . . . . . . . . . . . . 34
7.1.3
Printing Diagram Data. . . . . . . . . . . . . . . . . . . . . . . . . . . . . . . . . . . . . . . . . . 35
7.1.4
Enlarging the View . . . . . . . . . . . . . . . . . . . . . . . . . . . . . . . . . . . . . . . . . . . . 35
7.1.5
Showing and Hiding Legends . . . . . . . . . . . . . . . . . . . . . . . . . . . . . . . . . . . . 35
7.2
7.3
7.4
Sorting the Plant List . . . . . . . . . . . . . . . . . . . . . . . . . . . . . . . . . 35
Showing and Hiding SMA Radio-controlled Sockets . . . . . . . . 35
Publishing Pages . . . . . . . . . . . . . . . . . . . . . . . . . . . . . . . . . . . . 36
7.4.1
Releasing Pages for Viewing in Sunny Portal . . . . . . . . . . . . . . . . . . . . . . . . 36
7.4.2
Presenting Sunny Portal Pages on the Internet . . . . . . . . . . . . . . . . . . . . . . . 37
8
8.1
8.2
8.3
8.4
Device Settings . . . . . . . . . . . . . . . . . . . . . . . . . . . . . . . . . . 38
Filtering the "Device Overview" Page . . . . . . . . . . . . . . . . . . . . 38
Calling up the Properties of a Device . . . . . . . . . . . . . . . . . . . . 38
Calling up the Parameters of a Device . . . . . . . . . . . . . . . . . . . 39
Updating Parameters . . . . . . . . . . . . . . . . . . . . . . . . . . . . . . . . 39
User Manual
HoMan_Portal-BA-BEN112610
3
Table of Contents
8.5
8.6
8.7
8.8
SMA Solar Technology AG
8.9
8.10
8.11
8.12
Reading the Software Package Version . . . . . . . . . . . . . . . . . . 40
Configuring the Energy Meter . . . . . . . . . . . . . . . . . . . . . . . . . 40
Setting the Data Request Interval . . . . . . . . . . . . . . . . . . . . . . . 41
Activating / Deactivating the Automatic Software Update
for the Sunny Home Manager . . . . . . . . . . . . . . . . . . . . . . . . . 42
Entering the Phase. . . . . . . . . . . . . . . . . . . . . . . . . . . . . . . . . . . 42
Entering the Generator Power . . . . . . . . . . . . . . . . . . . . . . . . . 43
Changing the Device Name . . . . . . . . . . . . . . . . . . . . . . . . . . . 44
Changing a Device's Description . . . . . . . . . . . . . . . . . . . . . . . 44
9
9.1
9.2
Load Control . . . . . . . . . . . . . . . . . . . . . . . . . . . . . . . . . . . . 45
Safety when Configuring SMA Radio-controlled Sockets. . . . . 45
Configuring SMA Radio-controlled Sockets. . . . . . . . . . . . . . . 46
9.2.1
Requirements. . . . . . . . . . . . . . . . . . . . . . . . . . . . . . . . . . . . . . . . . . . . . . . . . 46
9.2.2
Procedure . . . . . . . . . . . . . . . . . . . . . . . . . . . . . . . . . . . . . . . . . . . . . . . . . . . 46
9.2.3
Activating/Deactivating Data Collection . . . . . . . . . . . . . . . . . . . . . . . . . . . 46
9.2.4
Selecting the Load Types. . . . . . . . . . . . . . . . . . . . . . . . . . . . . . . . . . . . . . . . 47
9.2.5
Entering the Load Name . . . . . . . . . . . . . . . . . . . . . . . . . . . . . . . . . . . . . . . . 47
9.2.6
Entering the Power Consumption . . . . . . . . . . . . . . . . . . . . . . . . . . . . . . . . . 48
9.2.7
9.2.8
Enter the Maximum Program Operating Time. . . . . . . . . . . . . . . . . . . . . . . . 48
Entering the Minimum Switch-on Time. . . . . . . . . . . . . . . . . . . . . . . . . . . . . . 48
9.2.9
Entering the Minimum Switch-off Time. . . . . . . . . . . . . . . . . . . . . . . . . . . . . . 49
9.2.10
Configuring the Time Period . . . . . . . . . . . . . . . . . . . . . . . . . . . . . . . . . . . . . 49
9.3
9.4
Setting the Operating Mode of the SMA Radio-controlled
Socket . . . . . . . . . . . . . . . . . . . . . . . . . . . . . . . . . . . . . . . . . . . . 51
Controlling the Loads using SMA Radio-controlled Sockets . . . 53
9.4.1
Controlling "Program-controlled" Loads . . . . . . . . . . . . . . . . . . . . . . . . . . . . 53
9.4.2
Controlling "Not Program-controlled" Loads . . . . . . . . . . . . . . . . . . . . . . . . . 54
10
10.1
Plant Management. . . . . . . . . . . . . . . . . . . . . . . . . . . . . . . 55
Adding Devices to the Plant/Replacing Devices. . . . . . . . . . . . 55
4
HoMan_Portal-BA-BEN112610
User Manual
SMA Solar Technology AG
10.2
10.3
10.4
Table of Contents
10.5
10.6
Activating/Deactivating Devices. . . . . . . . . . . . . . . . . . . . . . . . 56
Replacing the Sunny Home Manager . . . . . . . . . . . . . . . . . . . 57
Reassigning the Sunny Home Manager After Resetting the
Sunny Home Manager Plant . . . . . . . . . . . . . . . . . . . . . . . . . . 58
Deleting a Device from the Sunny Portal . . . . . . . . . . . . . . . . . 59
Deleting the Sunny Home Manager plant . . . . . . . . . . . . . . . . 60
11
11.1
11.2
Plant Monitoring. . . . . . . . . . . . . . . . . . . . . . . . . . . . . . . . . 61
Plant Monitoring Options . . . . . . . . . . . . . . . . . . . . . . . . . . . . . 61
System Logbook . . . . . . . . . . . . . . . . . . . . . . . . . . . . . . . . . . . . 62
11.2.1
Calling up and Filtering Messages . . . . . . . . . . . . . . . . . . . . . . . . . . . . . . . . 62
11.2.2
Confirming Messages . . . . . . . . . . . . . . . . . . . . . . . . . . . . . . . . . . . . . . . . . . 63
11.3
Reports . . . . . . . . . . . . . . . . . . . . . . . . . . . . . . . . . . . . . . . . . . . 64
11.3.1
Report Overview . . . . . . . . . . . . . . . . . . . . . . . . . . . . . . . . . . . . . . . . . . . . . . 64
11.3.2
Configuring Reports . . . . . . . . . . . . . . . . . . . . . . . . . . . . . . . . . . . . . . . . . . . 65
11.3.3
Creating a Report for a Specific Date. . . . . . . . . . . . . . . . . . . . . . . . . . . . . . 67
11.4
11.5
Setting the Communication Monitoring. . . . . . . . . . . . . . . . . . . 67
Setting the Inverter Comparison . . . . . . . . . . . . . . . . . . . . . . . . 69
12
12.1
12.2
12.3
12.4
Plant Settings . . . . . . . . . . . . . . . . . . . . . . . . . . . . . . . . . . . 70
Entering the String Properties . . . . . . . . . . . . . . . . . . . . . . . . . . 70
Changing Plant Data . . . . . . . . . . . . . . . . . . . . . . . . . . . . . . . . 71
Changing the Plant Name . . . . . . . . . . . . . . . . . . . . . . . . . . . . 72
Setting the Plant Power . . . . . . . . . . . . . . . . . . . . . . . . . . . . . . . 72
12.4.1
Manually Entering the Plant Power . . . . . . . . . . . . . . . . . . . . . . . . . . . . . . . . 72
12.4.2
Having the Plant Power Calculated. . . . . . . . . . . . . . . . . . . . . . . . . . . . . . . . 73
12.5
12.6
Changing the Plant Description. . . . . . . . . . . . . . . . . . . . . . . . . 73
Changing Operator Data . . . . . . . . . . . . . . . . . . . . . . . . . . . . . 74
12.7
12.8
Changing/Deleting the Plant Image . . . . . . . . . . . . . . . . . . . . . 74
Feed-in Tariff, Self-Consumption Tariff and Electricity Tariff. . . . 76
User Manual
HoMan_Portal-BA-BEN112610
5
Table of Contents
SMA Solar Technology AG
12.9
12.10
12.11
12.12
12.13
Setting the Optimization Target . . . . . . . . . . . . . . . . . . . . . . . . 77
Entering CO2 Avoided . . . . . . . . . . . . . . . . . . . . . . . . . . . . . . . 78
Calculating the Predicted Annual Yield. . . . . . . . . . . . . . . . . . . 79
Setting the Monthly Distribution of the Predicted Annual Yield. 80
Editing the Data Releases . . . . . . . . . . . . . . . . . . . . . . . . . . . . . 81
13
13.1
13.2
13.3
13.4
13.5
User Management . . . . . . . . . . . . . . . . . . . . . . . . . . . . . . . 82
Users and User Rights . . . . . . . . . . . . . . . . . . . . . . . . . . . . . . . . 82
Creating a New User . . . . . . . . . . . . . . . . . . . . . . . . . . . . . . . . 83
Deleting Users. . . . . . . . . . . . . . . . . . . . . . . . . . . . . . . . . . . . . . 84
Changing User Rights . . . . . . . . . . . . . . . . . . . . . . . . . . . . . . . . 84
Changing User Information. . . . . . . . . . . . . . . . . . . . . . . . . . . . 84
14
14.1
14.2
Password Information . . . . . . . . . . . . . . . . . . . . . . . . . . . . 85
Selecting Secure Passwords . . . . . . . . . . . . . . . . . . . . . . . . . . . 85
Required Passwords . . . . . . . . . . . . . . . . . . . . . . . . . . . . . . . . . 85
14.2.1
Sunny Portal Password . . . . . . . . . . . . . . . . . . . . . . . . . . . . . . . . . . . . . . . . . 85
14.2.2
Plant Password . . . . . . . . . . . . . . . . . . . . . . . . . . . . . . . . . . . . . . . . . . . . . . . 85
14.3
Changing Passwords . . . . . . . . . . . . . . . . . . . . . . . . . . . . . . . . 86
14.3.1
Changing the Sunny Portal Password . . . . . . . . . . . . . . . . . . . . . . . . . . . . . . 86
14.3.2
Changing the Plant Password . . . . . . . . . . . . . . . . . . . . . . . . . . . . . . . . . . . . 87
14.4
Lost Password . . . . . . . . . . . . . . . . . . . . . . . . . . . . . . . . . . . . . . 87
14.4.1
Forgotten Sunny Portal Password . . . . . . . . . . . . . . . . . . . . . . . . . . . . . . . . . 87
14.4.2
Forgotten Password. . . . . . . . . . . . . . . . . . . . . . . . . . . . . . . . . . . . . . . . . . . . 87
15
Troubleshooting . . . . . . . . . . . . . . . . . . . . . . . . . . . . . . . . . 88
16
Contact . . . . . . . . . . . . . . . . . . . . . . . . . . . . . . . . . . . . . . . . 93
6
HoMan_Portal-BA-BEN112610
User Manual
SMA Solar Technology AG
1
1 Information on this Manual
Information on this Manual
Validity
This manual applies to the following products:
• HM-BT-10.GR2 from software package 1.00.0.R
• BT-SOCKET-10 from software package 12.12.100.R
• Sunny Portal
Target Group
This manual is intended for end users.
Additional Information
Additional information is available at www.SMA.de/en:
Document title
Document type
Sunny Home Manager
Installation manual (document available in
German only)
Performance ratio - Quality factor for the PV plant Technical information
Symbols
Symbol
Explanation
%"/(&3
Indicates a hazardous situation which, if not avoided, will result in death
or serious injury.
8"3/*/(
Indicates a hazardous situation which, if not avoided, could result in death
or serious injury.
$"65*0/
Indicates a hazardous situation which, if not avoided, could result in minor
or moderate injury.
/05*$&
Indicates a situation that can result in property damage if not avoided.
Indicates information that is important for a specific topic or objective,
but is not safety-relevant.
☐
Indicates a requirement for meeting a specific goal.
☑
Desired result.
✖
A problem that could occur.
User Manual
HoMan_Portal-BA-BEN112610
7
SMA Solar Technology AG
1 Information on this Manual
Typography
Typography
Usage
"Light"
Example:
• Inverter display messages
• The value can be read in the
"Energy" field.
• Elements in a software user
interface
• Connections
Bold
• Elements to be selected
• Select Settings.
• Elements to be entered
• Enter 10 in the "Minutes" field.
>
• Several elements that are to
be selected
• Select Settings > Date.
[Button/key]
• Button or key to be selected or
pressed
• Select [Next].
Nomenclature
The following nomenclature is used in this manual:
Complete designation
Short form in this manual
®
SMA radio-controlled socket with Bluetooth
Wireless Technology
SMA radio-controlled socket
SMA Bluetooth® Piggy-Back,
SMA Bluetooth® Piggy-Back Plus
SMA Bluetooth Piggy-Back
SMA Bluetooth® Wireless Technology
Bluetooth
Abbreviations
8
Abbreviation Designation
Explanation
AC
Alternating Current
-
DC
Direct Current
-
PV
Photovoltaics
-
SSL
Secure Sockets Layer
Protocol for transmitting coded data via
the internet
URL
Uniform Resource Locator
-
HoMan_Portal-BA-BEN112610
User Manual
SMA Solar Technology AG
2
2 Safety
Safety
2.1 Intended Use
Sunny Home Manager
The Sunny Home Manager is a device for monitoring PV plants and for controlling loads in
households with PV plants. For this purpose, the Sunny Home Manager carries out the following tasks:
• Reading out energy meter data and data from SMA inverters with Bluetooth communication
interfaces
• Sending data to the Sunny Portal
• Providing support in increasing the self-consumption rate
The Sunny Home Manager is not splash-proof.
• Only use the Sunny Home Manager indoors.
Additional Information for France
In France, outdoor use of the Sunny Home Manager is forbidden, due to the legal restrictions
regarding Bluetooth transmitting power.
The Sunny Home Manager must only be used with supported devices (see installation manual of the
Sunny Home Manager).
It is not permitted to convert the Sunny Home Manager or install component parts.
Only use the Sunny Home Manager in accordance with the information provided in the enclosed
documentation. Any other use can result in personal injury or property damage.
The enclosed documentation is an integral part of this product.
• Read and adhere to the documentation.
• Keep the documentation in a convenient place at all times for future reference.
User Manual
HoMan_Portal-BA-BEN112610
9
SMA Solar Technology AG
2 Safety
SMA Radio-controlled Socket
The SMA radio-controlled socket supports load control in households with the
Sunny Home Manager. For this purpose, the SMA radio-controlled socket carries out the following
tasks:
• Converting control commands of the Sunny Home Manager
• Measuring the energy consumption of the connected electrical loads
• Improving the wireless connection between Bluetooth devices
The SMA radio-controlled socket is not splash-proof.
• The SMA radio-controlled socket is only to be used indoors.
Additional Information for France
In France, outdoor use of the SMA radio-controlled socket is forbidden, due to the legal
restrictions regarding Bluetooth transmitting power.
It is not permitted to convert the SMA radio-controlled socket or install component parts, as the
conversion or the installation of component parts can lead to property damage or injury.
Only use the SMA radio-controlled socket in accordance with the information provided in the
enclosed documentation. Any other use can result in personal injury or property damage.
• Do not connect any medical devices to the SMA radio-controlled socket.
• Do not connect any loads to the SMA radio-controlled socket that require a continuous power
supply (e.g. refrigerator, freezer).
• Do not connect any loads to the SMA radio-controlled socket that can cause injuries or fires if
switched on unintentionally and while unattended (e.g. iron).
• Only connect loads to the SMA radio-controlled socket that are suitable for the voltage and
power range of the SMA radio-controlled socket (see the installation manual of the
Sunny Home Manager).
• Only connect the SMA radio-controlled socket to properly installed socket-outlets with a
protective contact.
The enclosed documentation is an integral part of this product.
• Read and adhere to the documentation.
• Keep the documentation in a convenient place at all times for future reference.
Sunny Portal
The Sunny Portal is an Internet portal with the following functions:
• Visualizing the PV plant data and the data from the SMA radio-controlled socket.
• User interface for configuring the Sunny Home Manager and SMA radio-controlled sockets.
The enclosed documentation is an integral part of this product.
• Read and adhere to the documentation.
• Keep the documentation in a convenient place at all times for future reference.
10
HoMan_Portal-BA-BEN112610
User Manual
SMA Solar Technology AG
2 Safety
2.2 Safety Precautions
Danger to Life by Connecting Medical Devices
Connecting medical devices while unattended can result in life-threatening situations.
• Do not connect any medical devices to the SMA radio-controlled socket.
Risk of Injury and Fire due to Unintentional and Unattended Switching on of Loads
Loads that are unintentionally activated via an SMA radio-controlled socket can cause injuries and
fires (e.g. iron).
• Do not connect any loads to the SMA radio-controlled socket that can cause damage if
switched on unintentionally and while unattended (e.g. iron).
Damage to Loads
Frequently switching a load on and off can damage it.
• Ask the load manufacturer whether the load is suitable for control via an
SMA radio-controlled socket.
• Do not connect any loads to the SMA radio-controlled socket that require a continuous power
supply.
User Manual
HoMan_Portal-BA-BEN112610
11
SMA Solar Technology AG
3 Product Description
3
Product Description
3.1 Sunny Home Manager
The Sunny Home Manager is a device for monitoring PV plants and for controlling loads in
households with PV plants. For this purpose, the Sunny Home Manager carries out the following tasks:
• Reading out energy meter data and data from Bluetooth devices
• Sending data to the Sunny Portal
• Providing support in increasing the self-consumption rate
Reading out Energy Meter Data and Data from Bluetooth Devices
The Sunny Home Manager reads the data of the connected energy meter and Bluetooth devices. The
Sunny Home Manager establishes the wireless connection to the Bluetooth devices via Bluetooth. The
Sunny Home Manager is connected to the energy meters via cables.
Sending Data to the Sunny Portal
The Sunny Portal acts as a user interface of the Sunny Home Manager. The Sunny Home Manager
sends the data read out to the Sunny Portal. The Sunny Home Manager establishes the connection to
the Sunny Portal via a router.
Support in Increasing the Self-consumption Rate
Self-consumption means the consumption of PV power produced at the site where you are generating
power.
In every household, there is "natural" self-consumption, as electrical loads are operated while PV
power is produced (e.g. oven) and because certain electrical loads continuously consume power
(e.g. refrigerator, devices in standby mode). If the PV plant produces a lot of PV power, it is possible
that only a part of the PV power will be self-consumed. The residual PV power is fed into the power
distribution grid.
A higher self-consumption rate can be achieved if electrical loads are specifically switched on when
residual PV power is available.
The following functions of the Sunny Home Manager make it possible to increase the
self-consumption rate:
Function
Explanation
Creating a yield
forecast
The Sunny Home Manager receives location-based weather forecasts via
the Internet and uses them to create yield forecasts for the PV plant.
12
HoMan_Portal-BA-BEN112610
User Manual
SMA Solar Technology AG
Function
3 Product Description
Explanation
Creating a load profile The Sunny Home Manager detects how much energy is typically
consumed at certain times in a household and uses this to create a load
profile of the household.
To create the load profile, the following energy meters must be connected
to the Sunny Home Manager:
• Feed-in meter and consumption meter
or
• Bidirectional meter for grid feed-in and purchased electricity
Controlling SMA radio- Specific electrical loads connected to SMA radio-controlled sockets can
controlled sockets
be switched on and off by the Sunny Home Manager. For this purpose,
the Sunny Home Manager uses the yield forecast and the load profile to
determine favorable points in time for increasing the self-consumption rate.
Sending energy meter
data to Sunny Backup
systems
If a Bluetooth Piggy-Back Offgrid is installed in the Sunny Backup, the
Sunny Home Manager can send the energy meter data to the
Sunny Backup system.
At a suitable point in time, the Sunny Backup activates the charge or
electric discharge of the batteries:
• If residual PV power is available, it is stored in the batteries.
• If no PV power is available, the Sunny Backup activates the electric
discharge of the batteries and the energy can be used.
User Manual
HoMan_Portal-BA-BEN112610
13
SMA Solar Technology AG
3 Product Description
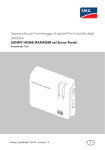
Figure 1:
PV plant with Sunny Home Manager (example)
Position
Designation
A
PV modules
B
Sunny Portal
C
PV inverter
D
Sunny Home Manager
E
Router
F
PV generation meter
G
Feed-in meter and consumption meter or bidirectional meter for grid feed-in and
purchased electricity
H
Power distribution grid
I
Sunny Backup
K
SMA radio-controlled socket
L
Battery
M
Electrical load
14
HoMan_Portal-BA-BEN112610
User Manual
SMA Solar Technology AG
3 Product Description
3.2 SMA Radio-controlled Socket
The SMA radio-controlled socket supports load control in households with the
Sunny Home Manager. For this purpose, the SMA radio-controlled socket carries out the following
tasks:
• Converting control commands of Sunny Home Manager
• Measuring the energy consumption of the connected electrical loads
• Improving the wireless connection between Bluetooth devices
Converting Control Commands of Sunny Home Manager
The Sunny Home Manager can switch the radio-controlled socket on and off. As a result, specific
electrical devices can be switched on if there is a lot of PV power available, for example.
The points in time at which the Sunny Home Manager switches the radio-controlled socket on or off
depend on the configuration of the SMA radio-controlled socket.
Measuring the Energy Consumption of the Connected Electrical Loads
The SMA radio-controlled socket measures the energy consumption of the connected electrical loads.
Improving the Wireless Connection between Bluetooth Devices
If the distance between Bluetooth devices is too great or obstructions interfere with the Bluetooth
connection, the SMA radio-controlled socket can be used as a repeater. This closes the dead zone.
User Manual
HoMan_Portal-BA-BEN112610
15
3 Product Description
SMA Solar Technology AG
3.3 Sunny Portal
The Sunny Portal is an Internet portal with the following functions:
• Visualizing the PV plant data and the data from the SMA radio-controlled socket.
• User interface for configuring the Sunny Home Manager and SMA radio-controlled sockets.
The Sunny Portal receives the PV plant data and the data from the radio-controlled socket. The
Sunny Portal transmits settings made on the Sunny Home Manager and SMA radio-controlled
sockets via the Sunny Portal to the Sunny Home Manager. The Sunny Home Manager transmits the
settings to the SMA radio-controlled sockets.
System requirements:
☐ Internet access
☐ JavaScript is activated in the web browser.
Supported web browsers:
• Google Chrome from version 14.0
• Microsoft Internet Explorer from version 8
• Mozilla Firefox from version 5
• Opera from version 11.0
• Safari from version 5.0
Recommended screen resolution:
• Minimum 1 024 pixels x 768 pixels
SMA devices:
• Sunny Home Manager
• Recommended: SMA radio-controlled sockets
Energy meter:
SMA Solar Technology AG recommends connecting at least the following energy meters to the
Sunny Home Manager:
• 1 feed-in meter and 1 consumption meter
or
• 1 bidirectional meter for grid feed-in and purchased electricity
16
HoMan_Portal-BA-BEN112610
User Manual
SMA Solar Technology AG
4
4 Getting Started
Getting Started
4.1 Registering the Sunny Home Manager in the Sunny Portal.
You must register the Sunny Home Manager in the Sunny Portal using the Plant Setup Assistant
(see the installation manual of the Sunny Home Manager).
4.2 Logging In and Out of Sunny Portal
Logging into Sunny Portal
Requirement:
☐ The Sunny Home Manager is registered in the Sunny Portal (see the installation manual of the
Sunny Home Manager).
1. Open www.SunnyPortal.com.
2. In the "Login" area, enter the e-mail address in the "E-mail" text field.
3. Enter the Sunny Portal password in the "Password" text field.
4. Activate the SSL checkbox to transmit the encrypted login data.
5. Activate the "Remain logged in" checkbox to stay logged in for your next Sunny Portal visits.
This way, you remain logged into Sunny Portal until you log out using the user interface.
6. Select [Login].
Logging Out of Sunny Portal
When you log out of Sunny Portal using the user interface, you protect your PV plant against
unauthorized access.
• Select [Logout] in the header.
or
• Select User Info/Logout > Logout in the page and drop-down menu.
4.3 Setting the Language
1. In the user interface header, move the mouse pointer on
.
☑ A drop-down menu opens.
2. Select the desired language.
User Manual
HoMan_Portal-BA-BEN112610
17
SMA Solar Technology AG
5 User Interface of the Sunny Home Manager Plant
5
User Interface of the Sunny Home Manager Plant
Accessing the User Interface of the Sunny Home Manager Plant
If you have only created 1 plant in the Sunny Portal, you automatically access the user interface of
the Sunny Home Manager plant after you log into Sunny Portal.
If you have several plants in the Sunny Portal, you must access the user interface of the
Sunny Home Manager plant after you log into Sunny Portal.
1. Log into Sunny Portal (see Section 4.2).
2. Select Plant Selection > "My Sunny Home Manager plant" in the page and drop-down
menu.
☑ The user interface of the Sunny Home Manager plant opens.
A
B
C
Figure 2:
User interface of the Sunny Home Manager plant in Sunny Portal
Position
Designation
A
Header
Explanation
• Select the user interface language
• Log out of Sunny Portal
B
Content area
• Content of the selected page
C
Page and drop-down
menu
• Access to the various pages and menus of the
Sunny Home Manager plant
18
HoMan_Portal-BA-BEN112610
User Manual
SMA Solar Technology AG
6
6 Page and Drop-down Menu
Page and Drop-down Menu
6.1 "Plant Selection" and "Plant List"
The following is required to display the menu item and page:
☐ Your e-mail address is assigned to more than 1 plant in Sunny Portal.
"Plant Selection" Menu Item
Under the "Plant Selection" menu item, you can select the desired plant (see Section 5 "User Interface
of the Sunny Home Manager Plant", page 18).
"Plant List" Page
The following data is shown for each plant:
• Plant power in kWp
• Total yield so far
• Total yield for the following time periods:
– Current day
– Previous day
– Current month
• Specific plant yield (kWh/kWp) for the following time periods:
– Current month
– Current year
By default, the plant list is always sorted in ascending order according to the specific plant yield. You
can also sort the plant list by other values and in descending order (see Section 7 "Page
Settings", page 34).
User Manual
HoMan_Portal-BA-BEN112610
19
SMA Solar Technology AG
6 Page and Drop-down Menu
6.2 "My Sunny Home Manager Plant"
6.2.1 "Plant Profile"
The Sunny Portal compiles the plant profile from information that you can enter in different
Sunny Portal pages.
The following information can be displayed in the plant profile:
Information
Configuration
"Location"
See Section 12.2 "Changing Plant Data", page 71
"Operator"
See Section 12.6 "Changing Operator Data", page 74
"Commissioning"
See Section 12.2 "Changing Plant Data", page 71
"System power"
See Section 12.4 "Setting the Plant Power", page 72
"Annual Production"
See Section 12.11 "Calculating the Predicted Annual Yield", page 79
"CO2 avoided"
See Section 12.10 "Entering CO2 Avoided", page 78
"Modules"
See Section 12.4 "Setting the Plant Power", page 72
"Angle of inclination"
See Section 8.10 "Entering the Generator Power", page 43
"Tracking"
"Inverter"
The Sunny Portal receives this information from the devices.
"Communication"
"Description"
See Section 12.5 "Changing the Plant Description", page 73
Plant image
See Section 12.7 "Changing/Deleting the Plant Image", page 74
20
HoMan_Portal-BA-BEN112610
User Manual
SMA Solar Technology AG
6 Page and Drop-down Menu
6.2.2 "Current Status and Forecast"
The data displayed depends on the connected energy meter types. The data can only be completely
displayed if at least the following energy meter types are connected to the Sunny Home Manger:
• Feed-in meter
• Consumption meter
"Current Status" Area
The following is required to display the "Current status" area:
☐ The data request interval must be set to "Automatic" (see Section 8.7 "Setting the Data Request
Interval", page 41).
In the "Current status" area, the following current PV plant data is displayed:
• PV power
• Grid feed-in
• Self-consumption
• Purchased electricity
• Consumption
• Self-consumption rate
The animated graphic visualizes the following current data:
• Grid feed-in
• Purchased electricity
• Self-consumption
"Forecast and Recommended Action" Area
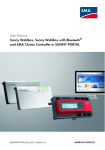
The "Forecast and recommended action" diagram visualizes the following information:
• Weather forecast for the current date
• Expected PV power
• Tariff for the electricity purchased from the power distribution grid
Tip: Click the diagram and holding the left mouse button pressed, move the mouse left or right. This
allows you to select another time period.
User Manual
HoMan_Portal-BA-BEN112610
21
SMA Solar Technology AG
6 Page and Drop-down Menu
A
B
D
Figure 3:
C
"Forecast and recommended action" diagram (example)
Position
Explanation
A
Weather forecast
B
Suitable time for manually switching on loads.
The Sunny Home Manager takes the following information into consideration for
the recommended action:
• Weather forecast
• Expected energy consumption of the household and loads connected to the
SMA radio-controlled sockets.
• Reimbursement (see Section 12.8 "Feed-in Tariff, Self-Consumption Tariff and
Electricity Tariff", page 76)
• Electricity tariff (see Section 12.8 "Feed-in Tariff, Self-Consumption Tariff and
Electricity Tariff", page 76)
• Optimization target (see Section 12.9 "Setting the Optimization
Target", page 77)
• Azimuth angle and angle of inclination (see Section 12.1 "Entering the String
Properties", page 70)
22
HoMan_Portal-BA-BEN112610
User Manual
SMA Solar Technology AG
6 Page and Drop-down Menu
Position
Explanation
C
Tariff for the electricity purchased from the power distribution grid
• Red: Expensive
• Green: Good value. If you have only entered 1 electricity tariff, green is
always displayed.
• Other colors: electricity tariffs between the most expensive and the lowest
electricity tariff
D
Expected PV power
6.2.3 "Energy Balance"
The following is required to display the page:
☐ At least 1 consumption meter or 1 feed-in meter is connected to the Sunny Home Manager.
The data on the page can only be completely displayed if at least the following energy meter types
are connected to the Sunny Home Manger.
• Feed-in meter
• Consumption meter
The "Energy balance" page consists of the following tabs:
Tab
Content
"Current"
The following is required to display the tab:
☐ The data request interval must be set to "Automatic" (see Section 8.7 "Setting
the Data Request Interval", page 41).
The tab shows the following current data:
• Current grid feed-in
• Current self-consumption
• Current generated PV power
• Current purchased electricity
• Current consumption
"Day"
• Daily yield
• Grid feed-in on one day
• Self-consumption on one day
• Purchased electricity on one day
• Daily consumption
• Self-consumption rate on one day
User Manual
HoMan_Portal-BA-BEN112610
23
6 Page and Drop-down Menu
Tab
"Month"
SMA Solar Technology AG
Content
• Monthly yield
• Total monthly grid feed-in and grid feed-in on the days of a month
• Total monthly self-consumption and self-consumption on the days of a month
• Total monthly purchased electricity and purchased electricity on the days of
a month
• Monthly consumption
• Monthly self-consumption rate
"Year"
• Annual yield
• Total annual grid feed-in and grid feed-in in the months of a year
• Total annual self-consumption and self-consumption in the months of a year
• Total annual purchased electricity and purchased electricity in the months of
a year
• Annual consumption
• Self-consumption rate of a year
"Total"
• Total yield
• Total grid feed-in
• Total self-consumption
• Total purchased electricity
• Total consumption
• Total self-consumption rate
24
HoMan_Portal-BA-BEN112610
User Manual
SMA Solar Technology AG
6 Page and Drop-down Menu
6.2.4 "Load Balance and Control"
The following is required to display the page:
☐ SMA radio-controlled sockets are configured in the Sunny Home Manager plant
(see Section 9.2 "Configuring SMA Radio-controlled Sockets", page 46).
The page consists of the following tabs:
Tab
Content
"Current"
The following is required to display the tab:
☐ The data request interval must be set to "Automatic" (see Section 8.7 "Setting
the Data Request Interval", page 41).
The tab shows the following current data:
• Power consumption of the connected loads
• Current operation mode of the SMA radio-controlled sockets (see Section
9.3 "Setting the Operating Mode of the SMA Radio-controlled
Socket", page 51)
• Thick lines in the diagram: set time periods (see Section 9.2.10 "Configuring
the Time Period", page 49)
Tip: You can select the SMA radio-controlled sockets that the diagram is to display
(see Section 7.3 "Showing and Hiding SMA Radio-controlled Sockets", page 35).
"Day"
• Power consumption of the connected loads on the selected day
• Last set operating mode of the SMA radio-controlled socket
• Thick lines in the diagram: set time periods (see Section 9.2.10 "Configuring
the Time Period", page 49)
• History of each SMA radio-controlled socket: If 1 SMA radio-controlled
socket was already configured for various loads,
is displayed under the
diagram on the left of the SMA radio-controlled socket icon. By clicking the
icon, the history of all loads is displayed for those that were configured for
the SMA radio-controlled socket.
Tip: You can select the SMA radio-controlled sockets that the diagram is to display
(see Section 7.3 "Showing and Hiding SMA Radio-controlled Sockets", page 35).
"Month"
• Power consumption of the connected loads on the days of a month
• Total power consumption of the connected loads in the selected month
• History of each SMA radio-controlled socket: If 1 SMA radio-controlled
socket was already configured for various loads, is displayed under the
diagram on the left of the SMA radio-controlled socket icon. By clicking the
icon, the history of all loads is displayed for those that were configured for
the SMA radio-controlled socket.
Tip: You can select the SMA radio-controlled sockets that the diagram is to display
(see Section 7.3 "Showing and Hiding SMA Radio-controlled Sockets", page 35).
User Manual
HoMan_Portal-BA-BEN112610
25
6 Page and Drop-down Menu
Tab
"Year"
SMA Solar Technology AG
Content
• Power consumption of the connected loads in the months of a year
• Total power consumption of the connected loads in the selected year
• History of each SMA radio-controlled socket: If 1 SMA radio-controlled
socket was already configured for various loads, is displayed under the
diagram on the left of the SMA radio-controlled socket icon. By clicking the
icon, the history of all loads is displayed for those that were configured for
the SMA radio-controlled socket.
Tip: You can select the SMA radio-controlled sockets that the diagram is to display
(see Section 7.3 "Showing and Hiding SMA Radio-controlled Sockets", page 35).
"Total"
• Power consumption of the connected loads in the individual years
• Total power consumption of the connected loads
• History of each SMA radio-controlled socket: If 1 SMA radio-controlled
socket is already configured for various loads, is displayed under the
diagram on the left of the SMA radio-controlled socket icon. By clicking the
icon, the history of all loads is displayed for those that were configured for
the SMA radio-controlled socket.
Tip: You can select the SMA radio-controlled sockets that the diagram is to display
(see Section 7.3 "Showing and Hiding SMA Radio-controlled Sockets", page 35).
6.2.5 "Energy and Power"
The following is required to display the page:
☐ No consumption meter and no feed-in meter is connected to the Sunny Home Manager.
The page consists of the following tabs:
Tab
Content
"Day"
• Trend of the PV power over the day
"Month"
• Total yield on the days of a month
• If activated on the "Plant Properties" page: average expected yield (see
Section 12.11 "Calculating the Predicted Annual Yield", page 79)
"Year"
• Total yield in the months of a year
• If activated on the "Plant Properties" page: average expected yield (see
Section 12.11 "Calculating the Predicted Annual Yield", page 79).
"Total"
• Total yield of the previous years
• If activated on the "Plant Properties" page: average expected yield (see
Section 12.11 "Calculating the Predicted Annual Yield", page 79)
26
HoMan_Portal-BA-BEN112610
User Manual
SMA Solar Technology AG
6 Page and Drop-down Menu
6.2.6 "Annual Comparison"
Tab
"Total Yield"
Content
• Yield trend of the previous years
• Average yield trend of the previous years
• If activated on the "Plant Properties" page: average
expected yield (see Section 12.11 "Calculating the
Predicted Annual Yield", page 79).
"Specific Plant Yield"
The specific plant yield is a key figure for describing a PV plant's
quality. Plant-specific factors, such as location, angle of
inclination, shading, module and inverter types are taken into
consideration to calculate the specific plant yield. The specific
plant yield enables you to compare various PV plants at various
locations.
• Trend of the specific plant yield of each previous year
• Average trend of the specific plant yield of the previous
years
• If activated on the "Plant Properties" page: average
expected yield (see Section 12.11 "Calculating the
Predicted Annual Yield", page 79).
6.2.7 "Plant Monitoring"
The page can display the following information:
• Plant configuration
• Communication monitoring
• Inverter comparison
Plant Configuration
The following is required to display the information:
☐ You have detected new Bluetooth devices with the Configuration Assistant that have not yet
been added to the Sunny Home Manager plant (see Section 10.1 "Adding Devices to the
Plant/Replacing Devices", page 55).
You access the Configuration Assistant through the plant configuration. Using the Configuration
Assistant, you can add new devices to the plant or replace devices.
User Manual
HoMan_Portal-BA-BEN112610
27
SMA Solar Technology AG
6 Page and Drop-down Menu
Communication Monitoring
Communication monitoring displays the current communication status between the
Sunny Home Manager and the Sunny Portal. If the Sunny Home Manager does not communicate
with the Sunny Portal for longer than the time set, the Sunny Portal displays an error and notifies you
by e-mail (see Section 11.4 "Setting the Communication Monitoring", page 67).
The communication monitoring status is displayed with the following symbols:
Symbol
Status
Explanation
Deactivated
Communication monitoring is not set
(see Section 11.4 "Setting the Communication
Monitoring", page 67).
OK
Communication with Sunny Portal is OK.
The time of last contact is displayed.
Error
Communication with Sunny Portal is interrupted.
The "Details" link provides you with detailed
information on the time of last contact.
The error is displayed until it is cleared.
If the error is not cleared, the Sunny Portal sends
another e-mail reminder up to 3 days after the
first e-mail was sent.
E-mail reminder is
activated.
Clicking the bell icon stops the sending of
reminder e-mails for the current error.
If a new error occurs, the e-mail reminder is sent
again.
28
HoMan_Portal-BA-BEN112610
User Manual
SMA Solar Technology AG
6 Page and Drop-down Menu
Inverter Comparison
The following is required to display the information:
☐ There are at least 2 inverters in the PV plant.
The Sunny Portal can recognize possible yield losses via the inverter comparison. If the specific yield
of an inverter deviates strongly from the average yield of all inverters, Sunny Portal can inform you
via e-mail (see Section 11.5 "Setting the Inverter Comparison", page 69).
Symbol
Status
Explanation
Deactivated
The inverter comparison is not activated
(see Section 11.5 "Setting the Inverter
Comparison", page 69).
OK
The yields of the monitored inverters are within
the configured range. The total yield of the last
day for all inverters is displayed.
Error
The specific yield is outside of tolerance for at
least 1 monitored inverter. You can read the
following using the "Details" link:
• The level of the specific yield of the
affected inverters
• The level of the average value of all
monitored inverters
6.2.8 "System Logbook"
The page shows messages on the PV plant status. The following message types are available:
• Info
• Warning
• Failure
• Error
The messages help you to identify plant failures, for example. The number of unconfirmed messages
comes after the colon of the page name.
Example: Display of unconfirmed Messages
"System logbook: 5" means that there are 5 unconfirmed messages.
You can filter and confirm messages that you have read (see Section 11.2 "System
Logbook", page 62).
User Manual
HoMan_Portal-BA-BEN112610
29
6 Page and Drop-down Menu
SMA Solar Technology AG
6.3 "Performance Ratio"
The following is required to display the page:
☐ A Sunny SensorBox is in your Sunny Home Manager plant.
The performance ratio is a site-dependent measure of the quality of a PV plant that is independent of
location (for information on the performance ratio, see technical information "Performance ratio Quality factor for the PV plant" at www.SMA.de/en).
The page displays the following PV plant data:
• Mean values of performance ratio of the day of a month
• Mean values of performance ratio of the months of a year
6.4 "Report"
6.4.1 "Daily Report"
The page displays the following inverter data:
• Table with daily yield, monthly yield, annual yield
• Diagram with the development of the meter reading over the hours of a day
The page can be send along with a "Daily info report" (see Section 11.3.2 "Configuring
Reports", page 65).
6.4.2 "Monthly Report"
The page displays the following inverter data:
• Table with monthly yield and annual yield
• Diagram with the development of the meter reading over the days of a month
The page can be sent along with a "Monthly info report" (see Section 11.3.2 "Configuring
Reports", page 65).
6.5 "Devices"
A page with the respective inverter data for each inverter is displayed under the menu item "Devices":
• Diagram with the development of the meter reading in the months of a year
• Diagram with the mean value of power of one day in hours
6.6 "Sensors"
The following is required to display the menu item:
☐ A Sunny SensorBox is in your Sunny Home Manager plant.
A page with the measured values of the respective Sunny SensorBox is displayed for each
Sunny SensorBox under the menu item "Sensors".
30
HoMan_Portal-BA-BEN112610
User Manual
SMA Solar Technology AG
6 Page and Drop-down Menu
6.7 "Configuration"
6.7.1 "Plant Properties"
The page consists of the following tabs:
Tab
Content
"Plant Data"
Displays the general data on the PV plant. You can configure
plant settings using this tab (see Section 12 "Plant
Settings", page 70).
"Operator"
Displays the operator's contact information.
"Parameters"
Displays the following data:
• Reimbursement
• Electricity tariff
• Optimization target
• CO2 avoided
• Expected yield
• If a Sunny SensorBox is in your Sunny Home Manager
plant: performance ratio
"Data releases"
Displays to which extent SMA Solar Technology AG or third
parties may use your data. You can edit the data releases using
this tab (see Section 12.13 "Editing the Data
Releases", page 81).
6.7.2 "System Presentation" Page
You have the following options with the "System Presentation" page:
• Send a link to your released pages to third parties (see Section 7.4.1 "Releasing Pages for
Viewing in Sunny Portal", page 36).
• Incorporate the "Plant profile" page in other websites.
6.7.3 "Device Overview" Page
The page consists of the following tabs:
• "Device Overview"
• "Overview of New Devices"
User Manual
HoMan_Portal-BA-BEN112610
31
SMA Solar Technology AG
6 Page and Drop-down Menu
"Device Overview"
The tab displays information on all your PV plant's Bluetooth devices.
A
B
C
Figure 4:
D
E
F
G
H
I
K
"Device Overview" tab
Position
Designation
Explanation
A
Filter
Text fields and drop-down lists for filtering the device overview (see
Section 8.1 "Filtering the "Device Overview" Page", page 38).
B
Device list
-
C
"Device Name"
Device name
D
"Serial Number"
Serial number of device
E
"Product Group"
Product group of the device, e.g., Sunny Home Manager,
Sunny Boy 3000
F
"Data Collection"
Displays whether the data of this device is to be used on your
Sunny Portal pages (see Section 10.2 "Activating/Deactivating
Devices", page 56)
G
"Monitoring"
Displays whether the communication monitoring or the inverter
comparison is activated ( ) or deactivated ( ) for the devices
(see Section 11 "Plant Monitoring", page 61).
H
"Properties"
Opens tab with device properties (see Section 8.2 "Calling up the
Properties of a Device", page 38).
You can perform settings on the devices using the "Properties" tab.
I
"Parameters"
Opens the "Parameters" tab with the device parameters (see
Section 8.3 "Calling up the Parameters of a Device", page 39).
K
"Logbook"
Opens "System Logbook" tab with the messages for this device
(see Section 11.2.1 "Calling up and Filtering
Messages", page 62).
32
HoMan_Portal-BA-BEN112610
User Manual
SMA Solar Technology AG
6 Page and Drop-down Menu
"Overview of New Devices"
Using this tab, you can add new Bluetooth devices to the plant or replace devices with the
Configuration Assistant (see Section 10.1 "Adding Devices to the Plant/Replacing
Devices", page 55).
6.7.4 "Report Configuration"
The page displays whether and which types of reports you have e-mailed by Sunny Portal
(see Section 11.3 "Reports", page 64).
6.7.5 "User Management"
The following is required to display the page:
☐ You are an "Installer" or "Plant Administrator" (see Section 13 "User Management", page 82).
The page displays all users who are created for the Sunny Home Manager plant
(see Section 13.2 "Creating a New User", page 83).
6.8 "User Info/Logout"
6.8.1 "User Information"
The following is required to display the page:
☐ You are an "Installer" or "Plant Administrator" or "Standard User" (see Section 13 "User
Management", page 82).
The page displays the data of the logged in user.
The following changes are possible:
• Change user data (see Section 13.5 "Changing User Information", page 84)
• Change Sunny Portal password (see Section 14.3.1 "Changing the Sunny Portal
Password", page 86)
6.8.2 "Logout"
Using the "Logout" menu item, you can log out of the Sunny Portal user interface
(see Section 4.2 "Logging In and Out of Sunny Portal", page 17).
User Manual
HoMan_Portal-BA-BEN112610
33
SMA Solar Technology AG
7 Page Settings
7
Page Settings
7.1 Performing Settings on the Diagram
7.1.1 Setting the Display Period
Depending on the diagram, you can set various display periods. The control for setting the display
period is below the diagram.
• If there is a scroll bar below the diagram, click the
blue arrow and keeping the left mouse button
pressed, set the period.
• If there is a date and arrow icon below the diagram, set the date using the arrow icons or a
calendar:
– To set the date using the arrow icons, browse
backwards using
and browse forward using
and set the desired date.
– To set the date using a calendar, click the date
between the arrow icons and select the desired
date.
• If there are drop-down lists between the arrow
icons, select the desired time period in the dropdown lists.
7.1.2 Saving Diagram Data
You can save diagram data as csv files.
Requirement:
☐ You are an "Installer" or "Plant Administrator" (see Section 13.1 "Users and User
Rights", page 82).
1. If there is a gearwheel icon
gearwheel icon and select
on the right below the diagram, move the mouse pointer on the
in the drop-down menu.
2. If there are 2 icons on the right below the diagram, select
.
3. Select [Save].
4. Select the destination directory.
5. Select [Save].
34
HoMan_Portal-BA-BEN112610
User Manual
SMA Solar Technology AG
7 Page Settings
7.1.3 Printing Diagram Data
1. Move the mouse pointer on
on the right under the diagram.
☑ A drop-down menu opens.
2. Select
.
3. Select [Print].
4. Select the desired printer and select [Print].
7.1.4 Enlarging the View
• If
is on the right below the diagram, move the mouse pointer on
• If there are 2 icons on the right below the diagram, select
and select
.
.
7.1.5 Showing and Hiding Legends
You can show and hide the diagram legends on the inverter pages below the menu item "Devices".
1. Move the mouse pointer on
on the right under the diagram.
☑ A drop-down menu opens.
2. To hide the legend, select
3. To show the legend, select
.
.
7.2 Sorting the Plant List
By default, the plant list is always sorted in ascending order according to the specific plant yield. You
can also sort the plant list by other values and in descending order.
• To sort the list by another value, click another blue value in the list's header.
• To sort the list in descending order, click the blue value in the header again.
7.3 Showing and Hiding SMA Radio-controlled Sockets
• To show the SMA radio-controlled socket data in the diagram on the "Load balance and
control" page, activate the checkbox below the diagram next to the name of the SMA radiocontrolled socket.
• To hide the SMA radio-controlled socket data in the diagram on the "Load balance and control"
page, deactivate the checkbox below the diagram next to the name of the SMA radiocontrolled socket.
User Manual
HoMan_Portal-BA-BEN112610
35
7 Page Settings
SMA Solar Technology AG
7.4 Publishing Pages
7.4.1 Releasing Pages for Viewing in Sunny Portal
If pages are released for viewing in the Sunny Portal, other Sunny Portal users can view the pages.
You can release the following pages for viewing in Sunny Portal:
• "Plant profile"
• "Energy balance"
• "Load balance and control"
• "Energy and Power"
• "Annual Comparison"
Requirement:
☐ You are an "Installer" or "Plant Administrator" (see Section 13.1 "Users and User
Rights", page 82).
1. Select the desired page in the page and drop-down menu.
2. In the content area, select the ["Page Name"] under ["Configuration"].
3. Activate the Also release page on www.sunnyportal.com checkbox in the "Approval"
area.
4. To send the page by e-mail, select Send the website via E-mail, enter the recipient's e-mail
address, select [Send E-mail] and .
5. Select [Save].
36
HoMan_Portal-BA-BEN112610
User Manual
SMA Solar Technology AG
7 Page Settings
7.4.2 Presenting Sunny Portal Pages on the Internet
Each of your Sunny Portal pages has its own URL. Using these URLs, you can set a link to your
Sunny Portal page on other websites.
You can link other websites to the following pages:
• "Plant profile"
• "Energy balance"
• "Load balance and control"
• "Energy and Power"
• "Annual Comparison"
Requirement:
☐ You are an "Installer" or "Plant Administrator" (see Section 13.1 "Users and User
Rights", page 82).
1. Select the desired page in the page and drop-down menu.
2. In the content area, select the ["Page Name"] under ["Configuration"].
3. To see a preview of the page, select Open page in a new window.
4. Copy the URL from the text field "URL of the Page" to the clipboard.
5. Copy the URL from clipboard to a program for creating websites (e.g., Microsoft Office
Frontpage) or integrate it into your own website through a so-called inline frame.
User Manual
HoMan_Portal-BA-BEN112610
37
SMA Solar Technology AG
8 Device Settings
8
Device Settings
8.1 Filtering the "Device Overview" Page
You can find individual devices more easily if you filter the device overview.
Requirement:
☐ You are a "Standard User", "Installer" or "Plant Administrator" (see Section 13.1 "Users and User
Rights", page 82).
1. Select Configuration > Device Overview in the page and drop-down menu,
2. Set one or more of the following filters:
Text field or drop-down list
Explanation
"Device Name"
Complete name of the device or part of the device name
"Serial Number"
Complete serial number of the device or parts of the serial
number
"Devices"
Searched device class, e.g. "Photovoltaic inverter",
"Sunny Home Manager".
"Data Collection"
• "All": activated or deactivated devices are searched
for.
• "Active": only activated devices are searched for.
• "Deactivated": only deactivated devices are searched
for.
3. Select [Refresh]. Tip: You can sort the devices in the device overview in ascending or descending
order by clicking a blue entry in the table head ("Device Name", "Serial Number",
"Product Group", "Data Collection").
4. To delete the filter, select [Reset].
8.2 Calling up the Properties of a Device
The tab with the device properties displays information on each device.
Depending on the device and the device settings, various device properties can be displayed on this
tab.
Requirement:
☐ You are a "Standard User", "Installer" or "Plant Administrator" (see Section 13.1 "Users and User
Rights", page 82).
1. Select Configuration > Device Overview in the page and drop-down menu,
2. Select
38
in the device line and the "Properties" column.
HoMan_Portal-BA-BEN112610
User Manual
SMA Solar Technology AG
8 Device Settings
8.3 Calling up the Parameters of a Device
The parameters of a device are described in the respective device manual. You can only read the
parameters of the device on this page, you cannot change them. If you want to change the
parameters, use the Sunny Explorer software (see Sunny Explorer help). You can obtain the
Sunny Explorer for free in the download Section of www.SMA.de/en.
Requirement:
☐ You are a "Standard User", "Installer" or "Plant Administrator" (see Section 13.1 "Users and User
Rights", page 82).
1. Select Configuration > Device Overview in the page and drop-down menu.
2. Select
in the device line and the "Parameters" column.
☑ You can read the parameters in the parameter list.
✖ The displayed parameters are not current?
Device parameters may have been changed using the Sunny Explorer software, but due to
connection problems, the changes are not displayed in the Sunny Portal.
• Update parameters (see Section 8.4).
3. To display the parameter changes, select
in the "History" column.
8.4 Updating Parameters
It makes sense to update the parameters in the following case:
• Device parameters were changed using the Sunny Explorer software, but the changes are not
displayed in the Sunny Portal.
Requirement:
☐ You are an "Installer" or "Plant Administrator" (see Section 13.1 "Users and User
Rights", page 82).
1. Select Configuration > Device Overview in the page and drop-down menu.
2. Select [Update parameters].
3. Select
in the device line and the "Parameters" column.
☑ You can read the current parameters in the parameter list.
✖ The current parameters are still not displayed in the parameter list?
The time after which the current parameters are displayed depends on the set data request
interval (see Section 8.7). The Sunny Home Manger may have not yet transferred the
updated parameters to the Sunny Portal.
• Call up the parameter list again later.
User Manual
HoMan_Portal-BA-BEN112610
39
SMA Solar Technology AG
8 Device Settings
8.5 Reading the Software Package Version
Requirement:
☐ You are a "Standard User", "Installer" or "Plant Administrator" (see Section 13.1 "Users and User
Rights", page 82).
1. Select Configuration > Device Overview in the page and drop-down menu.
2. Select
in the device line and the "Parameters" column.
☑ You can read the software package version in the parameter list.
8.6 Configuring the Energy Meter
Requirement:
☐ You are an "Installer" or "Plant Administrator" (see Section 13.1 "Users and User
Rights", page 82).
1. Call up the device properties of the Sunny Home Manager (see Section 8.2 "Calling up the
Properties of a Device", page 38).
2. Select [Edit].
☑ The menu for setting the device properties opens.
3. In the drop-down lists located in the "Meter Change" area, select the energy meter type that is
connected to the respective meter input:
• If the connected energy meter has a D0 interface, select D0.
• If the connected energy meter has a D0 interface and is a bidirectional meter, select D0 in
the "Meter input 1" drop-down list and activate the Bidirectional meter
(Supply and feed-in) checkbox.
☑ The "Meter input 2" area is not available.
• If the connected energy meter has a S0 interface, select S0 and enter the pulses and meter
reading of the energy meter in the "S0 pulses / kWh" and "Meter reading" text fields
(see the energy meter manual).
• If no energy meters are connected to the Sunny Home Manager, select no meter in the
"Meter input 1", "Meter input 2" and "Meter input 3" drop-down lists.
4. Select [Save].
40
HoMan_Portal-BA-BEN112610
User Manual
SMA Solar Technology AG
8 Device Settings
8.7 Setting the Data Request Interval
The data request interval defines how often the Sunny Home Manager sends data to the Sunny Portal
and how often it requests data from the Sunny Portal.
The Sunny Portal can only display current Sunny Home Manager data and switch SMA radiocontrolled sockets if the data request interval is set to "Automatic".
SMA Solar Technology AG only recommends setting the data request interval to "Hourly" or "Daily"
if you can establish the Internet connection using a GSM modem. Depending on your GSM tariff, you
will therefore avoid additional costs.
Requirement:
☐ You are an "Installer" or "Plant Administrator" (see Section 13.1 "Users and User
Rights", page 82).
1. Call up the device properties of the Sunny Home Manager (see Section 8.2 "Calling up the
Properties of a Device", page 38).
2. Select [Edit].
☑ The menu for setting the device properties opens.
3. In the "Data request interval" area, select the desired option Automatic, Hourly or Daily:
Checkbox
Meaning
"Automatic"
The Sunny Home Manager updates data on the "Current status and
forecast" pages and on the "Current" tab within a few seconds. The
Sunny Home Manager sends data that is displayed on other pages to the
Sunny Portal between a few minutes and up to a maximum of 15 minutes.
If electrical loads are controlled by SMA radio-controlled sockets, you
must activate the Automatic option.
"Hourly"
The Sunny Home Manager sends data to the Sunny Portal hourly and
requests data from the Sunny Portal.
Settings made on the Sunny Portal are sent to the Sunny Home Manager
in less than 60 minutes.
"Daily"
The Sunny Home Manager sends data to the Sunny Portal every 24 hours
and requests data from the Sunny Portal.
Settings made on the Sunny Portal are sent to the Sunny Home Manager
in less than 24 hours.
4. Select [Save].
User Manual
HoMan_Portal-BA-BEN112610
41
8 Device Settings
SMA Solar Technology AG
8.8 Activating / Deactivating the Automatic Software Update for
the Sunny Home Manager
If the automatic software update is activated, the Sunny Portal regularly checks whether there are
update files for the Sunny Home Manager. If there are update files, they are automatically
downloaded and the Sunny Home Manager software is updated.
Requirement:
☐ You are an "Installer" or "Plant Administrator" (see Section 13.1 "Users and User
Rights", page 82).
1. Call up the device properties of the Sunny Home Manager (see Section 8.2 "Calling up the
Properties of a Device", page 38).
2. Select [Edit].
☑ The menu for setting the device properties opens.
3. To activate the automatic software update, activate the Active checkbox in the
"Automatic search for updates" area.
4. To deactivate the automatic software update, deactivate the Active checkbox in the
"Automatic search for updates" area.
5. Select [Save].
8.9 Entering the Phase
The Sunny Portal can display the phase to which each inverter is connected in the device properties.
To display the phase, you must enter the phase.
Requirement:
☐ You are an "Installer" or "Plant Administrator" (see Section 13.1 "Users and User
Rights", page 82).
1. Select the inverter's device properties (see Section 8.2 "Calling up the Properties of a
Device", page 38).
2. Select [Edit].
☑ The menu for setting the device properties opens.
3. In the "Phase" area, activate the option of the phase to which the inverter is connected.
4. Select [Save].
42
HoMan_Portal-BA-BEN112610
User Manual
SMA Solar Technology AG
8 Device Settings
8.10 Entering the Generator Power
The generator power is the maximum power of the PV modules that are connected to 1 inverter.
Procedure:
• Calculate the string properties using the generator power (see Section 12.1 "Entering the String
Properties", page 70).
or
• Enter the generator power manually
SMA Solar Technology AG recommends calculating the generator power using the string properties.
A string describes a group of series-connected PV modules. Normally, a PV plant is made up of
multiple strings. Each string has specific properties, such as deviation to south (azimuth) or the roof's
angle of inclination.
Entering the string's properties provides the following advantages:
• The Sunny Portal can determine the generator power more precisely.
• The Sunny Home Manager can output more exact yield forecasts and control loads more
efficiently.
Enter the Generator Power Manually
You can find out the connected generator power present on each inverter from your installer.
Using the generator power, the Sunny Portal can calculate the power of your PV plant
(see Section 12.4.2 "Having the Plant Power Calculated", page 73).
Requirement:
☐ You are an "Installer" or "Plant Administrator" (see Section 13.1 "Users and User
Rights", page 82).
1. Call up the inverter's properties (see Section 8.2 "Calling up the Properties of a
Device", page 38).
2. Select [Edit].
☑ The menu for setting the device properties opens.
3. In the "Generator power" area, enter the generator power in the "kWp" text field.
4. Select [Save].
User Manual
HoMan_Portal-BA-BEN112610
43
8 Device Settings
SMA Solar Technology AG
8.11 Changing the Device Name
The serial number of the device is displayed as the default device name.
Requirement:
☐ You are an "Installer" or "Plant Administrator" (see Section 13.1 "Users and User
Rights", page 82).
Device name requirements:
☐ The maximum length of the device name is 20 characters.
1. Select the device properties of the Bluetooth device (see Section 8.2 "Calling up the Properties
of a Device", page 38).
2. Select [Edit].
☑ The menu for setting the device properties opens.
3. Enter a device name in the "Device Name" or "Name of load" text field.
4. Select [Save].
8.12 Changing a Device's Description
With the exception of the SMA radio-controlled sockets, you can enter any description for each
device. The device description is displayed in "Device Properties".
Requirement:
☐ You are an "Installer" or "Plant Administrator" (see Section 13.1 "Users and User
Rights", page 82).
1. Call up the device properties of the SMA device (see Section 8.2 "Calling up the Properties of
a Device", page 38).
2. Select [Edit].
☑ The menu for setting the device properties opens.
3. Enter a description in the "Description" text field.
4. Select [Save].
44
HoMan_Portal-BA-BEN112610
User Manual
SMA Solar Technology AG
9
9 Load Control
Load Control
9.1 Safety when Configuring SMA Radio-controlled Sockets
8"3/*/(
Danger to life by disconnecting medical devices
Unintentionally disconnecting medical devices can result in life-threatening situations.
• Do not connect any medical devices to the SMA radio-controlled socket.
8"3/*/(
Risk of injury and fire due to unintentional and unattended switching on of loads.
Loads that are activated unintentionally and while unattended via an SMA radio-controlled socket
can cause injuries and fires (e.g. iron).
• Do not connect any loads to the SMA radio-controlled socket that can cause damage if
switched on unintentionally.
/05*$&
Damage to loads.
Frequently switching a load on and off can damage certain loads.
• Ask the load manufacturer whether the load is suitable for being controlled via an SMA radiocontrolled socket or a timer.
• Configure the SMA radio-controlled sockets so that the loads connected to them are not
switched on or off more frequently than the load manufacturer specifies.
• Do not connect any loads to the SMA radio-controlled socket that require a continuous power
supply.
User Manual
HoMan_Portal-BA-BEN112610
45
SMA Solar Technology AG
9 Load Control
9.2 Configuring SMA Radio-controlled Sockets
9.2.1 Requirements
☐ You have already registered your SMA radio-controlled sockets in the Sunny Portal
(see Section 10.1 "Adding Devices to the Plant/Replacing Devices", page 55).
☐ The lower horizontal LED of the SMA radio-controlled sockets lights up blue.
☐ The data request interval must be set to "Automatic" in the Sunny Portal (see Section 8.7 "Setting
the Data Request Interval", page 41).
☐ The animated graphic on the "Current status and forecast" page displays the current data.
☐ You are an "Installer" or "Plant Administrator" (see Section 13.1 "Users and User
Rights", page 82).
9.2.2 Procedure
Procedure
See
1
Activate/deactivate data collection
Section 9.2.3
2
Select the load types
Section 9.2.4
3
Enter the load name
Section 9.2.5
4
Enter the power consumption
Section 9.2.6
5
Enter the maximum program operating time
Section 9.2.7
or
6
Enter the minimum switch-on time and switch-off time
Section 9.2.8
Configure time period
Section 9.2.10
9.2.3 Activating/Deactivating Data Collection
You can set whether or not the Sunny Portal is to accept data from the SMA radio-controlled socket.
If you would like to control loads using the SMA radio-controlled socket, you must activate the data
collection.
If you deactivate the data collection, no SMA radio-controlled socket data is displayed in the
Sunny Portal and you cannot control any loads using the SMA radio-controlled socket. All
SMA radio-controlled socket data recorded up to this time remains in the Sunny Portal.
• To activate the data collection, activate the "Active" checkbox.
• To deactivate the data collection, deactivate the "Active" checkbox.
46
HoMan_Portal-BA-BEN112610
User Manual
SMA Solar Technology AG
9 Load Control
9.2.4 Selecting the Load Types
1. Call up the SMA radio-controlled socket properties (see Section 8.2 "Calling up the Properties
of a Device", page 38).
2. Select [Edit].
☑ The menu for setting the device properties opens.
3. Select the type of the connected loads from the "Type of load" drop-down list:
Type of load
Explanation
"program-controlled - self-configured"
The connected loads run through the fixed,
defined programs and may not be interrupted
while the program is running.
"program-controlled - dish washer"
The connected load is a dish washer.
"program-controlled - washing machine"
The connected load is a washing machine.
"not program-controlled - self-configured"
The connected load does not run through any
fixed, defined programs and may be
interrupted during operation, e.g. pond
pump.
"only measure"
Only the power consumption of the
connected device is to be measured.
State of the SMA radio-controlled socket after load operation and interrupted
connection
Depending on the load type, the SMA radio-controlled socket can either be switched on or
switched off after load operation.
• "Program-controlled" load type: switched on
• "Not program-controlled" load type: switched off
The SMA radio-controlled socket also switches into the respective state if the connection
between the Sunny Home Manager and the SMA radio-controlled socket is interrupted for
more than 15 minutes. In this case, you must then reset the SMA radio-controlled socket to the
"Automatic" operating mode (see Section 9.3).
9.2.5 Entering the Load Name
You can identify the SMA radio-controlled socket and the connected loads in the
Sunny Home Manager plant using the load names.
• Enter a load name in the "Name of load" text field, e.g. Washing machine basement.
User Manual
HoMan_Portal-BA-BEN112610
47
SMA Solar Technology AG
9 Load Control
9.2.6 Entering the Power Consumption
The power consumption is the power typically required by a load for operation (see load manual).
Requirement:
☐ The type of the connected load is "program-controlled" or "not program-controlled".
• Enter the power of the connected load in the "Power consumption" text field.
9.2.7 Enter the Maximum Program Operating Time
The maximum program operating time is the time that a program-controlled load requires for its
longest program. The maximum program operating time defines the latest time a load must be
switched on so that its longest program can be completed within the specified time limits.
Example: Maximum Program Operating Time for a Washing Machine
You have defined a time slot from 10:00 a.m. to 6:00 p.m. for your washing machine (see
Section 9.2.10 "Configuring the Time Period", page 49), i.e., your washing machine's washing
cycle is to be completed by 6:00 p.m.
The longest washing cycle of your washing machine lasts 3 hours. You therefore enter at least
3 hours as the maximum program operating time when configuring the SMA radio-controlled
socket. In this case, the washing machine starts at the latest 3 p.m. so that the longest washing cycle
can be completed. For a shorter duration of the washing cycle that is actually selected, the
Sunny Home Manager still focuses on the maximum program operating time.
Requirement:
☐ The type of the connected load is "program-controlled".
• Enter the maximum program operating time for the connected load in the
"Max. program operating time" text field (see the load manual).
9.2.8 Entering the Minimum Switch-on Time
The minimum switch-on time is the minimum time that the connected load must remain switched on, for
example, to complete its starting sequence or complete an operating cycle.
Requirement:
☐ The type of the connected load is "not program-controlled - self-configured".
Delayed activation for several loads possible
Some loads may not operate immediately after switching on the SMA radio-controlled socket,
e.g. heat pumps for water storage tanks. Immediate activation can only be ensured for the
SMA radio-controlled socket, but not for the connected loads.
• Enter the minimum switch-on time in the "Minimum switch-on time" text field. Take into
consideration the possible delays with the connected load when it starts.
48
HoMan_Portal-BA-BEN112610
User Manual
SMA Solar Technology AG
9 Load Control
9.2.9 Entering the Minimum Switch-off Time
The minimum switch-off time is the minimum time the connected load must remain switched off, for
example, to prevent overheating or enable restarting.
Requirement:
☐ The type of the connected load is "not program-controlled - self-configured".
• Enter the minimum switch-off time in the "Minimum switch-off time" text field.
9.2.10 Configuring the Time Period
The time period defines during which time the Sunny Home Manager can switch on the SMA radiocontrolled socket. You can set several time periods for each SMA radio-controlled socket.
A time period from 8:00 a.m. to 6:00 p.m. is set by default. The time period is displayed as a blue
column on the time scale.
Changing the Time Period
1. Select [Configure time period].
2. Select the time period on the time axis.
☑ The time period turns dark blue.
3. Click the start or end of the time period and keeping the left mouse button pressed, set the time
period.
4. Select [End configuration].
5. Select [Save].
User Manual
HoMan_Portal-BA-BEN112610
49
SMA Solar Technology AG
9 Load Control
Setting the Device Operating Time
The device operating time defines how long a load that is not program-controlled is to operate during
a time period.
Requirement:
☐ The type of the connected load is "not program-controlled - self-configured".
1. Select [Configure time period].
2. Select the time period on the time axis.
☑ The time period turns dark blue.
3. Using the scroll bar in the "Device operating time: x minutes", set how long the load is to operate
within the time period.
4. Select [End configuration].
5. Select [Save].
Sub-dividing the Time Period
You can sub-divide individual time periods into shorter time periods. This way, you can control a load
so that it does not continuously operate within a time period, but operates at intervals.
Example: Sub-dividing a Time Period
A pond pump is to operate every 2 hours for 45 minutes in the time period from 10:00 a.m. to
6:00 p.m.
Requirement:
☐ The type of the connected load is "not program-controlled - self-configured".
1. Select [Configure time period].
2. Select the time period that is to be subdivided on the time axis.
☑ The time period turns dark blue.
3. Select Sub-divide
and carry out the settings:
• Set the duration of the subsection in the "Device operating time per period" drop-down list.
• Set the the desired period repetitions on the scroll bar.
• Select [Sub-divide].
☑ The time period is displayed with the set periods on the time axis.
4. Select [End configuration].
5. Select [Save].
50
HoMan_Portal-BA-BEN112610
User Manual
SMA Solar Technology AG
9 Load Control
Adding a Time Period
1. Select [Configure time period].
2. Select Add time period
.
☑ A new time period is displayed in dark blue on the time axis.
3. Click the start or end of the time period and keeping the left mouse button pressed, set the time
period.
4. Select [End configuration].
5. Select [Save].
Deleting/Resetting the Time Period
You can only delete time periods that you have added yourself. You cannot delete the standard time
period.
1. Select [Configure time period].
2. To delete an individual time period, select the time period.
☑ The time period turns dark blue.
3. Select Delete time period
.
4. To reset the settings for the time period, select Reset settings
.
5. Select [End configuration].
6. Select [Save].
9.3 Setting the Operating Mode of the SMA Radio-controlled
Socket
You have the following options for setting the operating mode of the SMA radio-controlled socket:
• Set the operating mode using the Sunny Portal
or
• Set the operating mode via the sensor button on the SMA radio-controlled socket
(see the Sunny Home Manager installation manual)
User Manual
HoMan_Portal-BA-BEN112610
51
SMA Solar Technology AG
9 Load Control
Setting the Operating Mode using the Sunny Portal
Requirements:
☐ The SMA radio-controlled socket is configured for the connected load
(see Section 9.2 "Configuring SMA Radio-controlled Sockets", page 46).
☐ The lower horizontal LED of the SMA radio-controlled socket lights up blue.
☐ The data request interval must be set to "Automatic" in the Sunny Portal (see Section 8.7 "Setting
the Data Request Interval", page 41).
☐ You are an "Installer" or "Plant Administrator" (see Section 13.1 "Users and User
Rights", page 82).
1. Select Load balance and control in the page and drop-down menu.
2. Select the Current tab.
3. Move the mouse pointer on the operating mode in the "Operating mode" column in the line of
the desired SMA radio-controlled socket.
☑ A drop-down menu opens.
4. Select the desired operating mode.
Operating mode
Explanation
"Automatic"
This cannot be set for the "only measure" load type.
The SMA radio-controlled socket is controlled by the
Sunny Home Manager. Depending on the current control command of
the Sunny Home Manager, the SMA radio-controlled socket is either
switched on or switched off in this mode.
"switch on"
The SMA radio-controlled socket is not controlled by the
Sunny Home Manager.
The SMA radio-controlled socket is switched on. The connected load
can draw power.
"switch off"
The SMA radio-controlled socket is not controlled by the
Sunny Home Manager.
The SMA radio-controlled socket is switched off. The connected load
cannot draw any power.
5. Wait until the selected operating mode is displayed on the Sunny Portal user interface.
52
HoMan_Portal-BA-BEN112610
User Manual
SMA Solar Technology AG
9 Load Control
9.4 Controlling the Loads using SMA Radio-controlled Sockets
9.4.1 Controlling "Program-controlled" Loads
The Section illustrates an example of a washing machine to describe how you can control
"program-controlled" loads using SMA radio-controlled sockets.
1. Make sure that the load can be controlled using the SMA radio-controlled socket:
• Ask the load manufacturer whether the load is suitable for control via an SMA radiocontrolled socket or a timer.
2. Connect the washing machine to the SMA radio-controlled socket.
3. Configure the SMA radio-controlled socket for the washing machine
(see Section 9.2 "Configuring SMA Radio-controlled Sockets", page 46).
4. Set the operating mode of the SMA radio-controlled socket to "switch on"
(see Section 9.3 "Setting the Operating Mode of the SMA Radio-controlled Socket", page 51).
Power supply to the washing machine is now enabled.
5. Load the washing machine with laundry.
6. Set the desired program on the washing machine.
7. Start the washing machine.
8. Set the operating mode of the SMA radio-controlled socket to "Automatic" (see Section 9.3).
☑ The SMA radio-controlled socket switches to "switch off" mode and is switched on by the
Sunny Home Manager within the set time period.
✖ The Sunny Home Manager does not switch the SMA radio-controlled socket on?
You may have set the SMA radio-controlled socket to "Automatic" at the beginning of the
time period, e.g. the time period starts at 1:00 p.m. and you have set the SMA radiocontrolled socket to "Automatic" after 1:00 p.m. If the washing cycle cannot be completed
within the time period due to the maximum program operating time, the
Sunny Home Manager only switches the SMA radio-controlled socket on within the next
time period.
• To set the connected load to start immediately, set the operating mode of the SMA radiocontrolled socket to "switch on" (see Section 9.3 "Setting the Operating Mode of the
SMA Radio-controlled Socket", page 51).
☑ After the washing machine stops operating, the SMA radio-controlled socket switches to
"switch on" mode.
User Manual
HoMan_Portal-BA-BEN112610
53
SMA Solar Technology AG
9 Load Control
9.4.2 Controlling "Not Program-controlled" Loads
The Section illustrates an example of a pond pump to describe how you can control a
"not program-controlled" load using SMA radio-controlled sockets.
1. Connect the pond pump to the SMA radio-controlled socket.
2. Configure the SMA radio-controlled socket for the pond pump (see Section 9.2 "Configuring
SMA Radio-controlled Sockets", page 46).
3. Set the operating mode of the SMA radio-controlled socket to "Automatic"
(see Section 9.3 "Setting the Operating Mode of the SMA Radio-controlled Socket", page 51).
☑ The Sunny Home Manager switches the SMA radio-controlled socket on within the set time
period.
✖ The Sunny Home Manager does not switch the SMA radio-controlled socket on?
You may have set the SMA radio-controlled socket to "Automatic" after the beginning of the
time period, e.g. the time period starts at 1:00 p.m. and you have set the SMA radiocontrolled socket to "Automatic" after 1:00 p.m. If the load does not have the set device
operation time available within the time period, the Sunny Home Manager only switches the
SMA radio-controlled socket on within the next time period.
• To set the connected load to start immediately, set the operating mode of the SMA radiocontrolled socket to "switch on" (see Section 9.3) and switch on the load.
☑ After the pond pump stops operating, the SMA radio-controlled socket switches to
"Automatic - switch off" mode. The pond pump is restarted during the next time period.
4. If the pond pump is not to start during the next time period, set the SMA radio-controlled socket
to "switch off" mode (see Section 9.3 "Setting the Operating Mode of the SMA Radio-controlled
Socket", page 51).
54
HoMan_Portal-BA-BEN112610
User Manual
SMA Solar Technology AG
10 Plant Management
10 Plant Management
10.1 Adding Devices to the Plant/Replacing Devices
If a new Bluetooth device is added to your PV plant or if you replace a Bluetooth device with another
one (device replacement), you must detect the new Bluetooth device with the Sunny Home Manager.
The Configuration Assistant in the Sunny Portal helps you detect new Bluetooth devices, add them to
the Sunny Home Manager plant and replace Bluetooth devices.
If you would like to replace the Sunny Home Manager, you must use the Plant Setup Assistant
(see Section 10.3 "Replacing the Sunny Home Manager", page 57).
Requirements:
☐ The NetID of the PV plant is set on the new Bluetooth device.
☐ The standard password 1111 or the plant password of the existing plant is set for the new
Bluetooth device.
☐ The new Bluetooth device is in operation.
☐ The Bluetooth LED on the new inverter or Bluetooth Piggy-Back or Bluetooth Piggy-Back Offgrid
in the new inverter lights up blue.
☐ The data request interval is set to "Automatic" (see Section 8.7).
☐ You are an "Installer" or "Plant Administrator" (see Section 13.1 "Users and User
Rights", page 82).
Device replacement: Do NOT delete the old Bluetooth device!
If you delete the Bluetooth device that you would like to replace from the Sunny Portal, all the
data of the Bluetooth device will be permanently deleted.
• To receive the data of the old Bluetooth device in the Sunny Portal, do not delete the old
Bluetooth device.
1. Open www.SunnyPortal.com.
2. Log into Sunny Portal (see Section 4.2).
3. Select Plant Selection > "My Sunny Home Manager plant" in the page and drop-down
menu.
4. If you would like to replace a Bluetooth device in the Sunny Portal, deactivate the old Bluetooth
device (see Section 10.2).
5. Select Device Overview > Overview of New Devices in the page and drop-down menu.
User Manual
HoMan_Portal-BA-BEN112610
55
SMA Solar Technology AG
10 Plant Management
6. Select [Update devices]. The Sunny Home Manager then searches for new Bluetooth devices
within range.
☑ After a maximum of 1 minute, all new Bluetooth devices within range are displayed.
✖ None or not all of the Bluetooth devices are displayed?
• Refer to troubleshooting (see Section 15).
7. To add a Bluetooth device, select
8. To replace a Bluetooth device, select
in the line of the Bluetooth device.
in the line of the new Bluetooth device.
☑ The Sunny Home Manager connects to the new Bluetooth device. Page 2 of the Configuration
Assistant opens.
✖ Page 2 of the Configuration Assistant does not open, but the error message "Connection failed"
is displayed?
A password other than 1111 or other than the plant password of the existing plant is set for the
new Bluetooth device.
• Temporarily change the plant password of the existing plant to the password of the new
Bluetooth device (see Section 14.3.2 "Changing the Plant Password", page 87).
9. Follow the Configuration Assistant instructions.
Replacing an inverter
It can take up to 20 minutes to replace an inverter using the Configuration Assistant.
☑ The new device is displayed under "Configuration > Device Overview".
10. Just as you previously previously changed the plant password of the existing plant to the
password of the new Bluetooth device, reset the old plant password
(see Section 14.3.2 "Changing the Plant Password", page 87).
10.2 Activating/Deactivating Devices
In the following cases, you must deactivate Bluetooth devices in the Sunny Portal:
• You have removed a Bluetooth device from your PV plant
or
• You no longer want to display a Bluetooth device in the Sunny Portal
or
• You would like to replace the Bluetooth device in the Sunny Portal with another one
(see Section 10.1 "Adding Devices to the Plant/Replacing Devices", page 55)
The data of the deactivated Bluetooth device remains in the Sunny Portal.
56
HoMan_Portal-BA-BEN112610
User Manual
SMA Solar Technology AG
10 Plant Management
Requirement:
☐ You are an "Installer" or "Plant Administrator" (see Section 13.1 "Users and User
Rights", page 82).
1. Select the device properties of the Bluetooth device (see Section 8.2 "Calling up the Properties
of a Device", page 38).
2. Select [Edit].
☑ The menu for setting the device properties opens.
3. To deactivate the Bluetooth device in the Sunny Portal, deactivate the Active checkbox in the
"Data collection" area.
4. To activate the Bluetooth device in the Sunny Portal, activate the Active checkbox in the
"Data collection" area.
5. Select [Save].
10.3 Replacing the Sunny Home Manager
Requirements:
☐ The PV plant's NetID is set in the Sunny Home Manager (see the installation manual of the
Sunny Home Manager).
☐ The new Sunny Home Manager is connected to the router (see the installation manual of the
Sunny Home Manager).
☐ The new Sunny Home Manager is supplied with power (see the installation manual of the
Sunny Home Manager).
☐ You are a "Plant Administrator" (see Section 13.1 "Users and User Rights", page 82).
1. Open www.SunnyPortal.com and select Plant Setup Assistant
or
Open www.SunnyPortal.com/Register
☑ The Plant Setup Assistant opens.
2. Select [Next].
☑ The "User registration" opens.
3. Activate the I am already registered in Sunny Portal checkbox.
4. Enter the e-mail address and the Sunny Portal password in the "E-mail Address" and "Password"
text fields.
5. Select [Next].
☑ The "Identify device" page opens.
6. Enter the serial number and the registration ID of the Sunny Home Manager in the
"Serial Number" and "Registration ID" text fields.
User Manual
HoMan_Portal-BA-BEN112610
57
10 Plant Management
SMA Solar Technology AG
Reading out the serial number and registration ID
You can read out the serial number and the registration ID at the following locations:
• On the type label at the rear of the Sunny Home Manager
• On the cover at the supplied CD
7. Select [Identify].
☑ The Sunny Portal checks whether the serial number and registration ID match the connected
Sunny Home Manager.
✖ The Plant Setup Assistant does not find the Sunny Home Manager with the serial number
and registration ID?
• Refer to troubleshooting (see Section 15 "Troubleshooting", page 88).
8. Select [Next].
☑ The Plant Setup Assistant lists all your Sunny Home Manager plants.
9. Activate the Replace communication product checkbox.
10. Activate the checkbox of the Sunny Home Manager plant whose Sunny Home Manager you
would like to replace.
11. Select [Next].
12. Select [Finish].
10.4 Reassigning the Sunny Home Manager After Resetting the
Sunny Home Manager Plant
Once you have completely reset the Sunny Home Manager (see the installation manual of the
Sunny Home Manager), you must reassign the Sunny Home Manager to your
Sunny Home Manager plant in the Sunny Portal.
Otherwise, the Sunny Portal will not accept any data from the Sunny Home Manager.
You have the following options for reassigning the Sunny Home Manager to your
Sunny Home Manager plant:
• Reassign the Sunny Home Manager via the Sunny Portal access
or
• Reassign the Sunny Home Manager using the Plant Setup Assistant (see the installation manual
of the Sunny Home Manager)
58
HoMan_Portal-BA-BEN112610
User Manual
SMA Solar Technology AG
10 Plant Management
Reassigning the Sunny Home Manager via the Sunny Portal Access
Requirement:
☐ You are an "Installer" or "Plant Administrator" (see Section 13.1 "Users and User
Rights", page 82).
1. Log into Sunny Portal (see Section 4.2).
2. Select Plant Selection > "My Sunny Home Manager plant" in the page and drop-down
menu.
☑ The following window opens: "Sunny Home Manager has been reset".
3. To delete the Sunny Home Manager and all the Sunny Home Manager data from the
Sunny Portal, select [Delete from the plant].
4. To continue using the Sunny Home Manager in this Sunny Home Manager plant, select
[Use in this plant].
10.5 Deleting a Device from the Sunny Portal
Requirement:
☐ You are an "Installer" or "Plant Administrator" (see Section 13.1 "Users and User
Rights", page 82).
)
Device data is deleted permanently
If you delete a device, all the data of that device is deleted permanently.
• Check whether it is sufficient to deactivate the device (see Section 10.2 "Activating/
Deactivating Devices", page 56).
1. Select the device properties of the Bluetooth device (see Section 8.2 "Calling up the Properties
of a Device", page 38).
2. Select [Delete].
☑ A window containing a security question opens.
3. Select [Delete] to delete the device permanently.
User Manual
HoMan_Portal-BA-BEN112610
59
10 Plant Management
SMA Solar Technology AG
10.6 Deleting the Sunny Home Manager plant
Requirement:
☐ You are an "Installer" or "Plant Administrator" (see Section 13.1 "Users and User
Rights", page 82).
If you delete the Sunny Home Manager plant, all plants and their data are deleted permanently.
1. Select Configuration > Plant Properties in the page and drop-down menu.
2. Select [Edit].
3. Select [Irretrievably delete plant] in the "Plant Data" area.
☑ A security question opens.
4. Select [Yes] to permanently delete the Sunny Home Manager plant.
Assigning the Sunny Home Manager to another plant
To assign the Sunny Home Manager to another plant, you must completely reset the
Sunny Home Manager (see the installation manual of the Sunny Home Manager).
60
HoMan_Portal-BA-BEN112610
User Manual
SMA Solar Technology AG
11 Plant Monitoring
11 Plant Monitoring
11.1 Plant Monitoring Options
Monitoring:
Option in the Sunny Portal
See
Events of the plant
System Logbook
Section 11.2
You can view messages for events of your PV plant.
Report Configuration
Section 11.3
You receive e-mails with the events of your plant.
Yield, power,
CO2 avoided
Report Configuration
Inverter yields
Inverter comparison
You receive e-mails with the data of your PV plant.
Section 11.5
You will be notified by e-mail if the specific yield of
an inverter is outside the set tolerance range.
Communication
between the
Sunny Home Manager
and the Sunny Portal
User Manual
Communication monitoring
Section 11.4
You are notified by e-mail if the
Sunny Home Manager does not communicate with
the Sunny Portal within the set time.
HoMan_Portal-BA-BEN112610
61
SMA Solar Technology AG
11 Plant Monitoring
11.2 System Logbook
11.2.1 Calling up and Filtering Messages
Messages help you to identify the failures of your PV plant, for example. The following message types
are available:
• Info
• Warning
• Failure
• Error
Requirement:
☐ You are a "Standard User", "Installer" or "Plant Administrator" (see Section 13.1 "Users and User
Rights", page 82).
Calling up Messages
• Select the System Logbook in the page and drop-down menu.
Filtering Messages
You can filter messages in the system logbook to only call up certain messages.
1. Select the System Logbook in the page and drop-down menu.
2. To filter messages, set one or more of the following filters:
Input field or drop-down list Explanation
"Go to"
• Enter the date for the messages you would like to
display. Tip: Click the calendar icon and select a date
in the calendar.
"Status"
• To display all unconfirmed messages,
select Not approved.
• To display all approved messages, select Approved.
• To display all messages, select All.
"Plant/Devices"
• To display the messages of the Sunny Portal, the
Sunny Home Manager plant and the devices, select
All.
• To display the Sunny Portal messages, select Portal.
• To display the Sunny Home Manager plant,
select Plant.
• To display messages of specific devices, select the
respective device (e.g. SB 4200TL).
62
HoMan_Portal-BA-BEN112610
User Manual
SMA Solar Technology AG
11 Plant Monitoring
Input field or drop-down list Explanation
"Number per Page"
• Select the number of messages that you would like to
display.
"Type"
• To display a specific type of message, activate the
respective Info, Warning, Failure or Error
checkbox.
11.2.2 Confirming Messages
Requirement:
☐ You are a "Standard User", "Installer" or "Plant Administrator" (see Section 13.1 "Users and User
Rights", page 82).
You can confirm messages in order to mark them as read. This allows you to differentiate between
messages which you have already read and new messages.
1. Select the System Logbook in the page and drop-down menu.
2. To individually confirm messages, select
column.
in the line of the message and in the "Confirmed"
3. To confirm several messages, mark the relevant messages:
• To mark individual messages, activate the relevant checkboxes on the left of the messages.
• To mark all messages, activate the Select all checkbox.
4. Select [Submit].
User Manual
HoMan_Portal-BA-BEN112610
63
SMA Solar Technology AG
11 Plant Monitoring
11.3 Reports
11.3.1 Report Overview
Reports contain plant data or events of the PV plant. You can have the reports sent as e-mail by the
Sunny Portal.
You can have the e-mails sent by your mobile service provider as a text message or have them
forwarded as a text message from your e-mail account.
Report
Possible content
"Daily info report"
• Daily yield (kWh)
• Today's maximum power
"Monthly info report"
• CO2 avoided (kg)
• Monthly yield (kWh)
• Monthly maximum power
• Monthly CO2 avoided
"Event report"
• Information
• Warnings
• Failures
• Errors
64
HoMan_Portal-BA-BEN112610
User Manual
SMA Solar Technology AG
11 Plant Monitoring
11.3.2 Configuring Reports
The following report types are available:
• "Info reports": contain plant data and are sent to you regularly.
• "Event reports": notify you about specific plant events.
Requirement:
☐ You are an "Installer" or "Plant Administrator" (see Section 13.1 "Users and User
Rights", page 82).
Configuring "Daily Info Reports"/"Monthly Info Reports"
You can configure 3 "Daily info reports" and 3 "Monthly info reports" each with different content.
The Sunny Portal sends you the "Daily info reports" when it has processed all the data from the
pervious day and the "Monthly info report" at the end of the month.
Requirement:
☐ The amount of CO2 avoided is entered (see Section 12.10 "Entering CO2 Avoided", page 78).
1. Select Configuration > Report Configuration in the page and drop-down menu.
2. In the "Report Configuration" drop-down list, select a Daily info report or a Monthly info
report.
3. Select [Edit].
4. Configure the report.
Area
Explanation
"Activate Report"
• Activate the Active checkbox.
"Recipient"
• Enter the recipient's/recipients' e-mail address(es) in
the "E-mail Address(es)" text field. If you enter several
e-mail addresses, separate them by commas.
"Contents"
• In the "Select Channel(s)" area, activate the content
that is to be displayed in the e-mail.
• In the "Send Report as" area, select the format option
in which the Sunny Portal is to send the report.
• If the Sunny Portal is to send a Sunny Portal page
along with the report, select a page in the drop-down
list in the "Portal Page to Be Sent" area.
• If the Sunny Portal is not to send a Sunny Portal page
along with the report, select Send no page.
5. To send a test report to the set e-mail address, select [Send test report].
6. Select [Save].
User Manual
HoMan_Portal-BA-BEN112610
65
SMA Solar Technology AG
11 Plant Monitoring
Configuring Event Reports
You can configure 3 event reports each with different content.
The Sunny Portal sends you the event reports at the times you set.
1. Select Configuration > Report Configuration in the page and drop-down menu.
2. Select an "Event report" in the "Report Configuration" drop-down list.
3. Select [Edit].
4. Configure the report.
Area
Explanation
"Activate Report"
• Activate the Active checkbox.
"Recipient"
• Enter the recipient's/recipients' e-mail address(es) in
the "E-mail Address(es)" text field. If you enter several
e-mail addresses, separate them by commas.
"Interval"
• To receive an e-mail along with the event report hourly,
activate the Hourly option.
• To receive an e-mail along with the event report daily,
activate the daily option and select the time at which
you would like to receive the e-mail in the drop-down
list.
"Contents"
You can select up to 4 Sunny Portal and
Sunny Home Manager plant event types: Information,
Warnings, Failures, Errors.
• Activate the content that is to be displayed in the email.
• In the "Send Report as" area, select the format option
in which the Sunny Portal is to send the report.
• Select the maximum number of messages that is to be
displayed in the e-mail in the "Limit messages in one
report" area in the drop-down list.
• To send reports when there are no new events
available, activate Send empty reports if no new
events are available.
5. To send a test report to the set e-mail address, select [Send test report].
6. Select [Save].
66
HoMan_Portal-BA-BEN112610
User Manual
SMA Solar Technology AG
11 Plant Monitoring
11.3.3 Creating a Report for a Specific Date
Requirement:
☐ You are an "Installer" or "Plant Administrator" (see Section 13.1 "Users and User
Rights", page 82).
You can create a report for a specific date in the past.
1. Select Configuration > Report Configuration in the page and drop-down menu.
2. Select the desired report in the "Report Configuration" drop-down list.
3. Enter the date for which you would like to create a report in the "Regenerate Report Manually"
area in the "Report Date" text field. Tip: Click the calendar icon and select a date in the calendar.
4. Select [Generate].
☑ A message that the report has been successfully sent is displayed.
11.4 Setting the Communication Monitoring
You can set the time after which the Sunny Portal is to report an error and notify you by e-mail if the
Sunny Home Manager does not communicate with the Sunny Portal.
The time after which the Sunny Portal displays the error and notifies you by e-mail is defined by the
following settings:
• "Alerts"
• "Data request interval" (see Section 8.7 "Setting the Data Request Interval", page 41)
Requirement:
☐ You are an "Installer" or "Plant Administrator" (see Section 13.1 "Users and User
Rights", page 82).
1. Select Plant Monitoring in the page and drop-down menu.
2. In the "Communication Monitoring" area, select [Settings].
☑ The "Configuration communication monitoring" page opens.
User Manual
HoMan_Portal-BA-BEN112610
67
SMA Solar Technology AG
11 Plant Monitoring
3. Click the scroll bar and holding the left mouse button pressed, set how fast the Sunny Portal is
to report an error and notify you by e-mail:
"Alerts"
"Data request interval"
Time
"off"
"Automatic"
The communication monitoring is
off.
"Hourly"
"daily"
"Bounteous"
"Tolerant"
"Sharp"
"Automatic"
3:15 h
"Hourly"
4:00 h
"daily"
27:00 h
"Automatic"
1:15 h
"Hourly"
2:00 h
"daily"
25:00 h
"Automatic"
00:30 h
"Hourly"
1:15 h
"daily"
24:15 h
4. Enter the recipient's/recipients' e-mail address(es) in the "Recipient" text field. If you enter several
e-mail addresses, separate them by commas.
5. Select [Save].
68
HoMan_Portal-BA-BEN112610
User Manual
SMA Solar Technology AG
11 Plant Monitoring
11.5 Setting the Inverter Comparison
The Sunny Portal can recognize possible yield losses via the inverter comparison. If the specific yield
of an inverter deviates strongly from the average yield of all inverters, Sunny Portal can inform you
via e-mail.
Requirements:
☐ There are at least 2 inverters in the PV plant.
☐ You are an "Installer" or "Plant Administrator" (see Section 13.1 "Users and User
Rights", page 82).
1. Select Plant Monitoring in the page and drop-down menu.
2. In the "Inverter comparison" area, select [Settings].
☑ The "Configuration of inverter comparison" page opens.
3. Enter the recipient's e-mail address in the "Recipient" text field. If you enter several e-mail
addresses, separate them by commas.
4.
Generator power
The generator power is preset in the "Generator power [kWp]" text field. The
Sunny Portal calculates the generator power based on the nominal power of each
inverter. You can also enter the generator power manually or have Sunny Portal calculate
it by entering information on the strings (see Section 8.10 "Entering the Generator
Power", page 43).
5. In the "Tolerance" text field, enter the permissible tolerance for the inverter's specific yield. This
will also set the point from which the deviation of inverter specific yield is sufficient to trigger
e-mail notification by Sunny Portal.
6. To select an inverter for the inverter comparison, activate the "Monitoring" checkbox in the line
of the inverter.
7. Select [Save].
User Manual
HoMan_Portal-BA-BEN112610
69
SMA Solar Technology AG
12 Plant Settings
12 Plant Settings
12.1 Entering the String Properties
A string describes a group of series-connected PV modules. Normally, a PV plant is made up of
multiple strings. Each string has specific properties, such as deviation to south (azimuth) or the roof's
angle of inclination.
The Sunny Home Manager's yield forecasts play an important role in controlling loads. If you enter
the string properties of your PV plant, the Sunny Home Manager outputs extremely precise yield
forecasts.
Requirement:
☐ You are an "Installer" or "Plant Administrator" (see Section 13.1 "Users and User
Rights", page 82).
1. Call up the inverter's properties (see Section 8.2 "Calling up the Properties of a
Device", page 38).
2. Select [Edit].
☑ The menu for setting the device properties opens.
3. Select [Add string] to add a new string.
4. To copy an existing string, select
in the string line and the "Copy" column.
5. In the line of the copied string, select
in the "Edit" column.
☑ The menu to set the string opens.
6. Enter the string properties:
Input field or
drop-down list
Explanation
"Designation"
Name of the string, e.g. String 1
"Manufacturer"
PV module manufacturer
"Module Type"
Depending on the selected manufacturer, various module types are
displayed in the drop-down list.
"Module power"
These values are entered automatically after you select the module
type. You can change the values using or the keyboard's arrow
keys.
"Surface"
"Efficiency"
"Number of modules"
70
Number of modules that a string contains
HoMan_Portal-BA-BEN112610
User Manual
SMA Solar Technology AG
12 Plant Settings
Input field or
drop-down list
Explanation
"Azimuth angle"
The azimuth angle indicates, in degrees, the amount by which the
module surfaces deviate from a southern orientation.
• In the text field, enterthe number of degrees by which the
module surfaces deviate from a southern orientation. Enter a
negative value (e.g. − 20) for a deviation to the east and a
positive value (e.g. 20) for a deviation to the west.
• If the module surfaces track the sun automatically, activate the
"Tracking" checkbox.
"Angle of inclination"
The angle of inclination indicates, in degrees, the amount by which
the module surfaces deviate from the horizontal. For some plants, the
module surfaces are ideally aligned according to the latitude.
In Germany, the optimum orientation is 30 degrees from the
horizontal.
• In the text field, enter the number of degrees by which the
module surfaces deviate from the horizontal.
• If the module surfaces are ideally aligned according to the
latitude, activate the "Optimized" checkbox.
"Description"
• Enter any comments.
7. Select [Accept].
8. Select [Save].
12.2 Changing Plant Data
Requirement:
☐ You are an "Installer" or "Plant Administrator" (see Section 13.1 "Users and User
Rights", page 82).
1. Select Configuration > Plant Properties in the page and drop-down menu.
2. Select the Plant Data tab.
3. Select [Edit].
☑ The setting menu for the plant data opens.
4. Change the desired plant data.
5. Select [Save].
User Manual
HoMan_Portal-BA-BEN112610
71
12 Plant Settings
SMA Solar Technology AG
12.3 Changing the Plant Name
You can change the plant name that you entered when you registered the Sunny Home Manager
plant.
Requirement:
☐ You are an "Installer" or "Plant Administrator" (see Section 13.1 "Users and User
Rights", page 82).
Plant name requirements:
☐ The plant name can be a maximum of 30 characters.
1. Select Configuration > Plant Properties in the page and drop-down menu.
2. Select the Plant Data tab.
3. Select [Edit].
☑ The setting menu for the plant data opens.
4. Enter the desired plant name in the "Name" text field.
5. Select [Save].
12.4 Setting the Plant Power
12.4.1 Manually Entering the Plant Power
The plant power is the sum of the power of all PV modules. You can obtain the plant power
specifications from your installer.
The plant power is required to display the following data:
• Specific plant yield
• Average expected yield
• Performance ratio
Requirement:
☐ You are an "Installer" or "Plant Administrator" (see Section 13.1 "Users and User
Rights", page 82).
1. Select Configuration > Plant Properties in the page and drop-down menu.
2. Select the Plant Data tab.
3. Select [Edit].
☑ The setting menu for the plant data opens.
4. In the "Power" area, set the plant power in the "System power" text field.
5. To set the manufacturer of PV modules, select the manufacturer in the "Manufacturer" drop-down
list.
6. To set the module type, select the module type in the "Module type" drop-down list.
7. Select [Save].
72
HoMan_Portal-BA-BEN112610
User Manual
SMA Solar Technology AG
12 Plant Settings
12.4.2 Having the Plant Power Calculated
The plant power is the sum of the power of all PV modules. It can be calculated directly from the data
in the device properties.
The plant power is required to display the following data:
• Specific plant yield
• Average expected yield
• Performance ratio
Requirements:
☐ The generator power for all inverters is entered (see Section 8.10 "Entering the Generator
Power", page 43).
☐ You are an "Installer" or "Plant Administrator" (see Section 13.1 "Users and User
Rights", page 82).
1. Select Configuration > Plant Properties in the page and drop-down menu.
2. Select the Plant Data tab.
3. Select [Edit].
☑ The setting menu for the plant data opens.
4. In the "Power" area, activate Calculate plant performance from device properties
checkbox.
☑ The calculated plant power is displayed.
5. Select [Save].
12.5 Changing the Plant Description
You can enter important properties of the plant in the description. The text is displayed on the
"Plant profile" page.
The editor only supports text and does not support typography with HTML tags.
Requirement:
☐ You are an "Installer" or "Plant Administrator" (see Section 13.1 "Users and User
Rights", page 82).
1. Select Configuration > Plant Properties in the page and drop-down menu.
2. Select the Plant Data tab.
3. Select [Edit].
☑ The setting menu for the plant data opens.
4. Enter a description in the "Description" area.
5. Select [Save].
User Manual
HoMan_Portal-BA-BEN112610
73
12 Plant Settings
SMA Solar Technology AG
12.6 Changing Operator Data
The operator is a private or legal person who, for example, owns PV plants for business purposes.
The operator can arrange the PV plant operation without being the user himself.
The name of the operator is displayed on the "Plant profile" page.
Requirement:
☐ You are an "Installer" or "Plant Administrator" (see Section 13.1 "Users and User
Rights", page 82).
1. Select Configuration > Plant Properties in the page and drop-down menu.
2. Select the Operator tab.
3. Select [Edit].
☑ The setting menu for the operator data opens.
4. Enter the operator data.
5. Select [Save].
12.7 Changing/Deleting the Plant Image
The plant image is the image in the page and drop-down menu next to the
"Name of your Sunny Home Manager plant" menu item.
Figure 5:
Plant image
You can replace the standard plant image with a user-defined plant image. The user-defined plant
image is also displayed on the following pages:
• "Plant profile" page
• If pages for the Sunny Portal are released, it is also displayed on the list of released plants on
the www.SunnyPortal.com homepage.
You can save several images in a gallery in the Sunny Portal. This allows you to easily change the
plant image and access your images from different computers.
74
HoMan_Portal-BA-BEN112610
User Manual
SMA Solar Technology AG
12 Plant Settings
Changing the Plant Image
Requirement:
☐ You are an "Installer" or "Plant Administrator" (see Section 13.1 "Users and User
Rights", page 82).
Plant image requirements:
☐ Maximum image size: 500 kB
☐ Possible image formats: JPG, PNG, GIF
1. Select Configuration > Plant Properties in the page and drop-down menu.
2. Select the Plant Data tab.
3. Select [Edit].
☑ The setting menu for the plant data opens.
4. Select [Load image] in the "Plant image" area.
5. Select the desired image from one of your directories.
6. Select [Open].
7. To change the plant image size, move the gray squares with the mouse.
8. To move the image section, click the image section and holding the left mouse button pressed,
move the image section.
9. Select [Save].
10. To save an image in the gallery, upload the image in the gallery:
• Select [Select from the gallery].
• Select Upload.
• Select [Browse].
• Select the desired image from one of your directories.
• Select [Upload selected file].
• Select
.
☑ The image is saved in the gallery.
11. To upload an image from the gallery as a plant image, select [Select from the gallery].
12. Double-click the desired image.
13. Select [Save].
User Manual
HoMan_Portal-BA-BEN112610
75
SMA Solar Technology AG
12 Plant Settings
Deleting the User-defined Plant Image
If you delete the user-defined plant image, Sunny Portal displays the default plant image.
1. Select Configuration > Plant Properties in the page and drop-down menu.
2. Select the Plant Data tab.
3. Select [Edit].
☑ The setting menu for the plant data opens.
4. Select [No plant image] in the "Plant image" area.
5. Select [Save].
12.8 Feed-in Tariff, Self-Consumption Tariff and Electricity Tariff
The reimbursement and electricity tariff affect the following components:
• Recommended actions for the "Forecast and recommended action" diagram on the
"Current status and forecast" page
• Load control via SMA radio-controlled sockets
Requirement:
☐ You are an "Installer" or "Plant Administrator" (see Section 13.1 "Users and User
Rights", page 82).
1. Select Configuration > Plant Properties in the page and drop-down menu.
2. Select the Parameters tab.
3. Select [Edit].
☑ The setting menu for parameters opens.
4. Enter the feed-in tariff per kWh in the "Reimbursement" area in the "Feed-in tariff" text field.
Select the desired currency in the corresponding drop-down list.
5. If you receive compensation for self-consumption, enter the self-consumption tariff in the
"Self-consumption tariff" text field.
6. If you do not receive compensation for self-consumption, enter 0 in the "Self-consumption tariff"
text field.
7. Enter the time for which the electricity tariff applies in the "Electricity tariff" area in the "from" and
"to" input fields.
8. Enter the electricity tariff that applies to the entered time in the "Price" input field.
9. If the electricity tariff only applies to specific weekdays, activate the checkboxes with the
respective weekdays.
10. If the electricity tariff applies to each weekday, activate all checkboxes with the weekdays.
11. To enter additional electricity tariffs, select
and enter the data.
12. Select [Save].
76
HoMan_Portal-BA-BEN112610
User Manual
SMA Solar Technology AG
12 Plant Settings
12.9 Setting the Optimization Target
The optimization target defines which target you are pursuing with your Sunny Home Manager plant:
• Achieve the highest self-consumption possible (ecological)
• Save the most costs possible (economical)
The optimization target affects the following components:
• Load control via SMA radio-controlled sockets
• Recommended actions for the "Forecast and recommended action" diagram on the
"Current status and forecast" page
Requirements:
☐ The feed-in tariff, self-consumption tariff and electricity tariff are entered (see Section 12.8).
☐ You are an "Installer" or "Plant Administrator" (see Section 13.1 "Users and User
Rights", page 82).
1. Select Configuration > Plant Properties in the page and drop-down menu.
2. Select the Parameters tab.
3. Select [Edit].
☑ The setting menu for parameters opens.
4. In the "Optimization target" area, click the scroll bar and holding the left mouse button pressed,
set the optimization target:
• To achieve the highest self-consumption possible, move the scroll bar towards "ecological".
• To save the most costs possible, move the scroll bar towards "economical".
5. Select [Save].
User Manual
HoMan_Portal-BA-BEN112610
77
12 Plant Settings
SMA Solar Technology AG
12.10 Entering CO2 Avoided
The CO2 factor indicates how much CO2 is produced for every single kilowatt hour of electricity
generated. The CO2 factor can vary depending on the grid operator. You can find out how high the
CO2 factor is for 1 kilowatt hour of electricity from your grid operator.
Sunny Portal can use the CO2 factor to calculate how much CO2 has been avoided thanks to the
power generation of your PV plant.
You can display the CO2 avoided on the following pages:
• "Plant profile" page
• "Daily info report" or "Monthly info report" (see Section 11.3.2 "Configuring
Reports", page 65).
Requirement:
☐ You are an "Installer" or "Plant Administrator" (see Section 13.1 "Users and User
Rights", page 82).
1. Select Configuration > Plant Properties in the page and drop-down menu.
2. Select the Parameters tab.
3. Select [Edit].
☑ The setting menu for parameters opens.
4. In the "Factor" area, enter the CO2 factor in the text field or click the scroll bar and holding the
left mouse button pressed, set the CO2 factor.
5. Select [Save].
78
HoMan_Portal-BA-BEN112610
User Manual
SMA Solar Technology AG
12 Plant Settings
12.11 Calculating the Predicted Annual Yield
The Sunny Portal uses a table to show how the predicted annual yield of your PV plant is distributed
throughout the months of the year.
The predicted annual yield of the PV plant is calculated from the specific annual yield (kWh/kWp) at
the location of the PV plant multiplied by the plant power.
You can obtain the specific annual yield for your PV plant's location from irradiation maps. The
Sunny Portal does not take into account local conditions such as shadings of your PV plant or the
plant's orientation.
Requirements:
☐ The plant power is set (see Section 12.4).
☐ You are an "Installer" or "Plant Administrator" (see Section 13.1 "Users and User
Rights", page 82).
1. Select Configuration > Plant Properties in the page and drop-down menu.
2. Select the Parameters tab.
3. Select [Edit].
☑ The setting menu for parameters opens.
4. In the "Yield expectations" area, enter the specific annual yield in the "Specific Annual Yield" text
field.
☑ The predicted annual yield is displayed in the "Predicted Annual Yield" field.
5. To allow the average expected yield and the monthly distribution to be configured on the
"Annual Comparison" page, activate the The monthly distribution can be configured in the
diagrams checkbox.
6. Select [Save].
User Manual
HoMan_Portal-BA-BEN112610
79
12 Plant Settings
SMA Solar Technology AG
12.12 Setting the Monthly Distribution of the Predicted Annual
Yield
The monthly distribution shows how the predicted annual yield is distributed throughout the months of
the year.
You have the following options:
• Have Sunny Portal suggest the monthly distribution
• Manually enter the monthly distribution
Have Sunny Portal Suggest the Monthly Distribution
Requirements:
☐ The plant location is entered (see Section 12.2 "Changing Plant Data", page 71).
☐ You are an "Installer" or "Plant Administrator" (see Section 13.1 "Users and User
Rights", page 82).
1. Select Configuration > Plant Properties in the page and drop-down menu.
2. Select the Parameters tab.
3. Select [Edit].
☑ The setting menu for parameters opens.
4. Select [Suggest a Monthly Distribution] in the "Yield expectations" area.
☑ The monthly distribution is displayed in the table with the months.
5. To allow the average expected yield and the monthly distribution to be displayed in the
diagrams on the "Annual Comparison" and "Energy and Power" pages, activate the Display
the monthly distribution in the yearly comparison, as well as energy and power
checkbox.
6. To allow the average expected yield to be configured on the "Annual Comparison" and
"Energy and Power" pages, activate the The monthly distribution can be configured in the
diagrams checkbox.
80
HoMan_Portal-BA-BEN112610
User Manual
SMA Solar Technology AG
12 Plant Settings
Manually Enter the Monthly Distribution
1. Select Configuration > Plant Properties in the page and drop-down menu.
2. Select the Parameters tab.
3. Select [Edit].
☑ The setting menu for parameters opens.
4. In the "Yield expectations" area, enter the values in the "in %" text fields in the table with the
months.
5. To allow the predicted annual yield and the monthly distribution to be displayed in the diagrams
on the "Annual Comparison" and "Energy and Power" pages, activate the Display the monthly
distribution in the yearly comparison, as well as energy and power checkbox.
6. To allow the predicted annual yield to be configured on the "Annual Comparison" and
"Energy and Power" pages, activate the The monthly distribution can be configured in the
diagrams checkbox.
7. Select [Save].
12.13 Editing the Data Releases
You can set whether you would like to provide the "sonnenertrag.eu" PV database with your plant
data.
1. Select Configuration > Plant Properties in the page and drop-down menu.
2. Select the Data releases tab.
3. Select [Edit].
☑ The setting menu for the data releases opens.
4. Activate or deactivate the data releases checkbox.
5. Select [Save].
User Manual
HoMan_Portal-BA-BEN112610
81
SMA Solar Technology AG
13 User Management
13 User Management
13.1 Users and User Rights
If you have "Plant Administrator" rights, you can create additional users in the Sunny Portal so they can
access your Sunny Portal plant. You can assign various roles to users. Roles differ in the rights the users
have in your Sunny Portal. The following roles are possible:
• "Guest"
• "Standard User"
• "Installer"
• "Plant Administrator"
Rights
Role
"Guest"
"Standard
User"
"Installer"
"Plant
Administrator"
Login
✓
✓
✓
✓
View pages
✓
✓
✓
✓
Change and delete pages
-
-
✓
✓
Release pages for viewing in
Sunny Portal and publish pages
-
-
✓
✓
Save diagram data
-
✓
✓
✓
View and change user
information
✓
✓
✓
✓
Change Sunny Portal password
-
✓
✓
✓
Change the plant password
-
-
✓
✓
View device properties
-
✓
✓
✓
View plant properties
-
✓
✓
✓
Change plant properties
-
-
✓
✓
View report configuration
-
✓
✓
✓
Change report configuration
-
-
✓
✓
Change device properties
-
-
✓
✓
Configure SMA radiocontrolled sockets
-
-
✓
✓
Set the operating mode of
SMA radio-controlled sockets
using the Sunny Portal
-
-
✓
✓
Replace devices
-
-
✓
✓
82
HoMan_Portal-BA-BEN112610
User Manual
SMA Solar Technology AG
Rights
13 User Management
Role
"Guest"
"Standard
User"
"Installer"
"Plant
Administrator"
Replace the
Sunny Home Manager
-
-
-
✓
Delete devices
-
-
✓
✓
Delete Sunny Home Manager
-
-
✓
✓
Delete Sunny Home Manager
plant
-
-
✓
✓
Reassign the
Sunny Home Manager to the
plant
-
-
✓
✓
Set the communication
monitoring
-
-
✓
✓
Set inverter comparison
-
-
✓
✓
View the system logbook and
approve entries
-
✓
✓
✓
Import data
-
-
✓
✓
Read the software package
version
-
✓
✓
✓
View user management
-
-
-
✓
Create and delete users and
assign roles
-
-
-
✓
13.2 Creating a New User
Requirement:
☐ You are a "Plant Administrator" (see 13.1 "Users and User Rights", page 82).
1. Select Configuration > User Management in the page and drop-down menu.
2. Select [New User].
3. Enter the new user's e-mail address in the "E-mail Address" text field.
4. Activate the desired role option in the "Roles" area.
5. Select [Save].
☑ The new user receives an e-mail with the access data.
User Manual
HoMan_Portal-BA-BEN112610
83
13 User Management
SMA Solar Technology AG
13.3 Deleting Users
Requirement:
☐ You are a "Plant Administrator" (see 13.1 "Users and User Rights", page 82).
1. Select Configuration > User Management in the page and drop-down menu.
2. Select
in the line of the user and the "Delete" column.
3. Click [Yes] to confirm the security question.
13.4 Changing User Rights
Requirement:
☐ You are a "Plant Administrator" (see 13.1 "Users and User Rights", page 82).
1. Select Configuration > User Management in the page and drop-down menu.
2. Select
in the line of the user and the "Edit" column.
☑ The "E-mail Address" and "Roles" areas open.
3. Activate the desired role option in the "Roles" area.
4. Select [Save].
☑ The user rights are changed for the Sunny Home Manager plant.
13.5 Changing User Information
Each user can enter user information. User information includes the name and the address, for
example.
1. Select User Info/Logout > User Information in the page and drop-down menu.
2. Select [Edit].
☑ The setting menu for user information opens.
3. Enter the user information.
4. Select [Save].
84
HoMan_Portal-BA-BEN112610
User Manual
SMA Solar Technology AG
14 Password Information
14 Password Information
14.1 Selecting Secure Passwords
You increase the security of your password with the following measures:
• Select passwords that contain at least 8 characters.
• Use combinations of upper and lowercase letters, special characters and numbers.
• Do not use names or common words (e.g., "dog", "cat", "house").
• Avoid using words that have any personal relevance to you such as the names of persons or
pets, personnel numbers, identification numbers or car license plates.
• Do not repeat names or words (e.g., "househouse" or "catcat").
• Do not combine numbers or letters in the same order as they appear on your keyboard
(e.g., "12345", "qwertz").
14.2 Required Passwords
14.2.1 Sunny Portal Password
You can log into Sunny Portal with the Sunny Portal password.
If you register a PV plant in the Sunny Portal, you must define a Sunny Portal password during
registration.
If you have created a new user in Sunny Portal (see Section 13.2), you receive an e-mail with a
Sunny Portal password.
You can change the Sunny Portal password (see Section 14.3.1)
14.2.2 Plant Password
All Bluetooth devices with the same password and the same NetID form a plant. Therefore, any
password that is the same for all Bluetooth devices of a plant is referred to as the plant password.
You can only access all your PV plant's Bluetooth devices using your communication product
(e.g. Sunny Explorer, Sunny Home Manager) if all Bluetooth devices have the same password.
You must define the plant password when you register the Sunny Home Manager plant. The plant
password that you defined when you registered the Sunny Home Manager is the "Installer" user
group password. You can change the plant password (see Section 14.3.2).
User Manual
HoMan_Portal-BA-BEN112610
85
14 Password Information
SMA Solar Technology AG
14.3 Changing Passwords
14.3.1 Changing the Sunny Portal Password
Sunny Portal password requirements:
☐ The Sunny Portal password can be a maximum of 8 characters.
☐ You are a "Standard User", "Installer" or "Plant Administrator" (see Section 13.1 "Users and User
Rights", page 82).
The following special characters are permitted:
• !$%&/()=?+−.;:_<>#
• Space
1. Select User Info/Logout > User Information in the page and drop-down menu.
2. Select If you want to change your password, please click here on the "User Information"
tab.
3. Enter the old and the new Sunny Portal passwords in the designated text fields.
4. Select [Save].
86
HoMan_Portal-BA-BEN112610
User Manual
SMA Solar Technology AG
14 Password Information
14.3.2 Changing the Plant Password
Requirements:
☐ The Bluetooth LED on the inverter or Bluetooth Piggy-Back or Bluetooth Piggy-Back Offgrid lights
up blue.
☐ You are an "Installer" or "Plant Administrator" (see Section 13.1 "Users and User
Rights", page 82).
Plant password requirements:
☐ The plant password can be a maximum of 12 characters.
The following special characters are permitted:
• ?_!1. Call up the device properties of the Sunny Home Manager (see Section 8.10 "Entering the
Generator Power", page 43).
2. Select [Edit].
☑ The menu for setting the device properties opens.
3. Enter a new password in the "Plant password" text field,
4. Enter the new password again in the "Repeat" text field.
5. Select [Save].
☑ The Sunny Home Manager changes the password for all Bluetooth devices.
14.4 Lost Password
14.4.1 Forgotten Sunny Portal Password
1. Open www.SunnyPortal.com.
2. Select Forgotten Password? in the "Login" area.
3. Enter your e-mail address in the "E-mail" text field.
4. Select [Generate New Password].
☑ You will receive an e-mail with a new password.
5. Change the assigned password (see Section 14.3.1 "Changing the Sunny Portal
Password", page 86).
14.4.2 Forgotten Password
You can activate each Bluetooth device with a personal unlocking key (PUK) (see the Sunny Explorer
help).
User Manual
HoMan_Portal-BA-BEN112610
87
SMA Solar Technology AG
15 Troubleshooting
15 Troubleshooting
Problem
Cause and corrective measures
The Plant Setup Assistant does You may have entered the serial number and/or the registration
not find the
ID incorrectly.
Sunny Home Manager with the
Corrective measures:
entered serial number and
• Make sure that the entries are correct.
registration ID.
It is possible that the Sunny Home Manager is not correctly
connected to the router.
Corrective measures:
• Make sure that the Sunny Home Manager is connected to
the router correctly (see the installation manual of the
Sunny Home Manager).
The Sunny Home Manager may not be able to establish a
connection to the Sunny Portal, because DHCP is not activated on
your router.
or
The Sunny Home Manager may not be able to establish a
connection to the Sunny Portal, because there is a proxy server in
your network.
Corrective measures:
• Establish the connection to the Sunny Portal using the
Sunny Home Manager Assistant (see the installation
manual of the Sunny Home Manager).
The Sunny Home Manager is assigned to a different plant in the
Sunny Portal, e.g. if you have purchased a used
Sunny Home Manager.
Corrective measures:
• Completely reset the Sunny Home Manager (see the
installation manual of the Sunny Home Manager).
• If the problem continues, contact the previous owner and
ask him to delete the Sunny Home Manager in the
Sunny Portal.
or
Contact the SMA Service Line.
88
HoMan_Portal-BA-BEN112610
User Manual
SMA Solar Technology AG
15 Troubleshooting
Problem
Cause and corrective measures
The Sunny Home Manager
does not detect any or not all
new Bluetooth devices.
The NetID of your PV plant may not be set for the new Bluetooth
devices.
Corrective measures:
• Make sure that the NetID of your PV plant is set for the new
devices.
• Make sure that NetID "1" is not set for the new devices and
on the Sunny Home Manager.
The wireless connection of several devices may be disturbed by
ambient conditions.
Corrective measures:
• Make sure that the connection quality for the Bluetooth
devices is at least "good" (see the manual of the Bluetooth
devices).
• If the connection quality is not at least "good", use a
Bluetooth repeater or SMA radio-controlled socket. This
allows you to extend the wireless range of your Bluetooth
network.
Inverters with Bluetooth Piggy-Back shut down overnight.
Therefore, the Sunny Home Manager cannot establish a
connection to these inverters at this time.
Corrective measures:
• Continue the registration when there is sufficient irradiation.
The devices of your PV plant may not be operating. Therefore, the
Sunny Home Manager cannot establish a connection to these
devices.
Corrective measures:
• Start the devices.
The "Energy balance" page is
not displayed.
The "Energy balance" page is only displayed if at least
1 consumption meter or 1 feed-in meter is connected to the
Sunny Home Manager.
Corrective measures:
• Connect at least 1 consumption meter or 1 feed-in meter to
the Sunny Home Manager (see the installation manual of
the Sunny Home Manager).
User Manual
HoMan_Portal-BA-BEN112610
89
SMA Solar Technology AG
15 Troubleshooting
Problem
Cause and corrective measures
The "Current" tab on the "Energy The tab is only displayed if the data request interval is set to
balance" and "Load balance
"Automatic".
and control" pages is not
Corrective measures:
displayed.
• Set the data request interval to "Automatic" (see
Section 8.7 "Setting the Data Request Interval", page 41).
The diagrams are empty or
incomplete.
No energy meters or not all energy meters are connected to the
Sunny Home Manager.
Corrective measures:
• Connect the energy meters to the Sunny Home Manager
(see the installation manual of the Sunny Home Manager).
The Sunny Portal cannot receive any data from the
Sunny Home Manager.
Corrective measures:
• Make sure that the connection between the
Sunny Home Manager and the Sunny Portal is established
(see the installation manual of the Sunny Home Manager).
The Sunny Portal displays
unrealistic data.
The energy meters are connected to the wrong connection ports
of the Sunny Home Manager.
Corrective measures:
• Make sure that each energy meter is connected to the
connection port that is assigned to the energy meter
(see the installation manual of the Sunny Home Manager).
The Sunny Portal does not
It can take up to 24 hours after the Sunny Home Manager has
display a weather forecast in
been initially registered in the Sunny Portal until the weather
the "Forecast and
forecast is displayed.
recommended action" diagram.
Corrective measures:
• After 24 hours, check again to see whether the weather
forecast is displayed.
• If after 24 hours there is still no weather forecast displayed,
contact the SMA Service Line.
90
HoMan_Portal-BA-BEN112610
User Manual
SMA Solar Technology AG
15 Troubleshooting
Problem
Cause and corrective measures
The animated graphic on the
"Current status and forecast"
page does not display any
current data.
The data request interval may not be set to "Automatic". The
Sunny Portal therefore does not receive any current data from the
Sunny Home Manager.
• Set the data request interval to "Automatic"
(see Section 8.7).
There may not be a PV generation meter connected to the
Sunny Home Manager and too many data requesting devices
may access the devices of your PV plant at the same time
(e.g. Sunny Beam and several computers with Sunny Explorer).
Corrective measures:
• Make sure that in addition to the Sunny Home Manager
only a maximum of 2 other data requesting devices access
your PV plant at the same time.
No data is displayed on the
"Current" tab located on the
"Load balance and control"
page.
Too many data requesting devices may have access to the
devices of your PV plant at the same time (e.g. Sunny Beam and
several computers with Sunny Explorer).
Corrective measures:
• Make sure that in addition to the Sunny Home Manager
only a maximum of 2 other data requesting devices access
your PV plant at the same time.
No data is displayed on the
"Current" tab located on the
"Energy balance" page.
There may not be a PV generation meter connected to the
Sunny Home Manager and too many data requesting devices
may access the devices of your PV plant at the same time
(e.g. Sunny Beam and several computers with Sunny Explorer).
Corrective measures:
• Make sure that in addition to the Sunny Home Manager
only a maximum of 2 other data requesting devices access
your PV plant at the same time.
A meter reading other than the The Sunny Home Manager may have been temporarily out of
meter reading on the energy
operation or the connection between the Sunny Home Manager
meters is displayed in the
and the energy meters may have been interrupted.
Sunny Portal.
Corrective measures:
• Read the current meter reading on the energy meters and
enter it in the Sunny Portal (see Section 8.6 "Configuring the
Energy Meter", page 40).
User Manual
HoMan_Portal-BA-BEN112610
91
SMA Solar Technology AG
15 Troubleshooting
Problem
Cause and corrective measures
After the device is replaced
The new parameters may have not yet been transferred to the
using the Configuration
Sunny Portal.
Assistant, the current
Corrective measures:
parameters are not displayed in
• Call up the parameter list again later.
the parameter list.
When configuring the
The time period must be at least as long as
SMA radio-controlled sockets, a) the maximum program operating time
the time period cannot be set as
or
desired.
b) the sum of the minimum switch-on time and the minimum switchoff time and the sum of the device operating time and the minimum
switch-off time set for the time period.
Corrective measures:
• When setting the time period, take into consideration the
maximum program operating time or the minimum switch-on
and switch-off time and the set device operating time.
The Sunny Home Manager
You may have set the SMA radio-controlled socket to "Automatic"
does not switch the SMA radio- at the beginning of a time period, e.g. the time period starts at
controlled socket on.
1:00 p.m. and you have set the SMA radio-controlled socket to
"Automatic" after 1:00 p.m. If, due to the maximum program
operating time, the load cannot complete operation or if the load
does not have the set device operation time available within the
time period, the Sunny Home Manager only switches the
SMA radio-controlled socket on within the next time period.
Corrective measures:
• To set the connected load to start immediately, set the
operating mode of the SMA radio-controlled socket to
"switch on" (see Section 9.3).
You cannot configure the
SMA radio-controlled sockets
in the Sunny Portal and cannot
set the operating mode of the
SMA radio-controlled sockets
using the Sunny Portal.
92
You do not have "Installer" or "Plant Administrator" user rights.
• Ask the "Plant Administrator" to assign you "Installer" or "Plant
Administrator" user rights (see Section 13.4 "Changing User
Rights", page 84).
HoMan_Portal-BA-BEN112610
User Manual
SMA Solar Technology AG
16 Contact
16 Contact
If you have technical problems concerning our products, contact the SMA Service Line. We require
the following information in order to provide you with the necessary assistance:
• Serial number and software package of the Sunny Home Manager
• Serial number and software package of the SMA radio-controlled socket
• Energy meter type
• Reading head type
SMA Solar Technology AG
Sonnenallee 1
34266 Niestetal, Germany
www.SMA.de
SMA Service Line
Inverters
+49 561 9522 1499
Communication: +49 561 9522 2499
Fax:
+49 561 9522 4699
E‑Mail:
[email protected]
User Manual
HoMan_Portal-BA-BEN112610
93
Legal Restrictions
SMA Solar Technology AG
The information contained in these documents is property of SMA Solar Technology AG. Any publication, whether in whole or in
part, requires prior written approval by SMA Solar Technology AG. Internal reproduction used solely for the purpose of product
evaluation or other proper use is allowed and does not require prior approval.
Declaration of Conformity
SMA Solar Technology AG hereby declares that this equipment is in compliance with the essential requirements and other relevant
provisions of Directive 1999/5/EC. You can find the entire CE declaration of conformity at www.SMA.de.
Trademark
All trademarks are recognized, even if not explicitly identified as such. A lack of identification does not mean that a product or
symbol is not trademarked.
The Bluetooth® word mark and logos are registered trademarks owned by Bluetooth SIG, Inc. and any use of these marks by
SMA Solar Technology AG is under license.
SMA Solar Technology AG
Sonnenallee 1
34266 Niestetal
Germany
Tel. +49 561 9522-0
Fax +49 561 9522-100
www.SMA.de
E-mail: [email protected]
© 2004 to 2012 SMA Solar Technology AG. All rights reserved.
94
HoMan_Portal-BA-BEN112610
User Manual
4."4PMBS5FDIOPMPHZ
XXX4."4PMBSDPN
4."4PMBS5FDIOPMPHZ"(
XXX4."EF
4.""NFSJDB--$
XXX4.""NFSJDBDPN
4."5FDIOPMPHZ"VTUSBMJB1UZ-UE
XXX4.""VTUSBMJBDPNBV
4."#FOFMVY413XXX4."#FOFMVYDPN
4."#FJKJOH$PNNFSDJBM$P-UE
XXX4."$IJOBDPN
4."$[FDI3FQVCMJDTSP
XXX4."$[FDIDPN
4."'SBODF4"4
XXX4."'SBODFDPN
4.")FMMBT"&
XXX4.")FMMBTDPN
4."*C©SJDB5FDOPMPHB4PMBS4-
XXX4."*CFSJDBDPN
4."*UBMJB4SM
XXX4."*UBMJBDPN
4."5FDIOPMPHZ,PSFB$P-UE
XXX4.",PSFBDPN