1
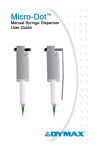
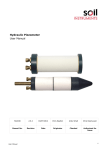
Tridak Model 1200 User Guide
Dual-Component Syringe Filling System with Disposable Fluid Path
Technology
■
Instructions for Safe Use
■
Setup and Operation
■
Maintenance
■
Ordering Spare Parts and Accessories
2
Model 1200 Syringe Filling System User Guide
About Tridak – A Dymax Company
Systems for fluid packaging.
Tridak manufactures fluid packaging systems for a variety of industries including industrial, medical, dental, pharmaceutical, and food
preparation. Tridak’s filling systems for syringes and cartridges provide significant productivity gains over manual and other more
complicated and costly filling methods. The equipment is suited for all industry standard packaging as well as custom molded syringes and
cartridges. Tridak possesses the capability to fabricate nozzles and multi-port dispensing manifolds that perfectly match the packages
being filled. Single component and dual component materials can be packaged in seconds, one at a time, or in multiples for higher volume
throughput. High-pressure filling equipment is available for packaging highly filled materials in tiny syringes or compules.
Please note that most filling system applications are unique. Tridak does not warrant the fitness of the product for the intended
application. Any warranty applicable to the product, its application and use is strictly limited to that contained in the Tridak standard
Conditions of Sale. Tridak recommends that any intended application be evaluated and tested by the user to insure that desired
performance criteria are satisfied. Tridak is willing to assist users in their performance testing and evaluation. Data sheets are available for
pressure pots upon request.
Model 1200 Syringe Filling System User Guide
Contents
Introduction ................................................................................................................................4
Introduction to the User Guide ..............................................................................................................................4
Where to Get Help .................................................................................................................................................4
Safety ..........................................................................................................................................4
General Safety Considerations ...............................................................................................................................4
Specific Safety Considerations ................................................................................................................................5
Personal Protective Equipment ..............................................................................................................................5
Product Overview ........................................................................................................................5
Description of the Model 1200 Syringe Filling System ...........................................................................................5
Special Features and Benefits of the Model 1200 Syringe Filler ............................................................................5
Description of Main Components...........................................................................................................................6
Assembly and Setup .....................................................................................................................6
Unpacking and Inspecting Your Shipment ..............................................................................................................6
Utilities Required ....................................................................................................................................................7
Parts Included in Model 1200 Syringe Filling System .............................................................................................7
Preparing the System for Use .......................................................................................................7
Cartridge Retainer Preparation ..............................................................................................................................7
System Interconnect ...............................................................................................................................................8
Installing Fill Tubing ................................................................................................................................................8
Priming the System ......................................................................................................................9
Operating the System ................................................................................................................ 11
Speed Control Adjustments ..................................................................................................................................11
Reloading System Material......................................................................................................... 11
Replacing the Fill Tubing ............................................................................................................ 11
Spare Parts and Accessories ....................................................................................................... 12
Replacement Parts ...............................................................................................................................................12
Specifications............................................................................................................................. 13
System Specifications ...........................................................................................................................................13
Warranty ................................................................................................................................... 14
Index ......................................................................................................................................... 15
3
4
Model 1200 Syringe Filling System User Guide
Introduction
Introduction to the User Guide
This guide describes how to use the Tridak Model 1200 Syringe Filling System. Sections in this guide describe
how to assemble, use, and maintain the filling system safely and efficiently.
Other Documentation Included
In addition to this guide, the following documentation is included with your filling system:
■
User guide for the Model 828 dispensing valve – MAN034
■
OEM user guide for the air regulators
Intended Audience
This user guide was prepared for experienced process engineers, technicians, and manufacturing personnel. If
you are new to filling systems and do not understand the instructions, contact Tridak Application Engineering
to answer your questions before using the equipment.
Where to Get Help
Additional resources are available to ensure a trouble-free experience with our products:
■
Detailed product information on www.tridak.com
■
Customer Support and Application Engineering teams are available in the United States, Monday through
Friday, from 8:00 a.m. to 5:30 p.m. Eastern Standard Time. You can also email us at [email protected].
Please see the back cover of this user guide for worldwide contact information.
Safety
WARNING! If you use this filling system without first reading and understanding the
information in this user guide, injury can result. To reduce the risk of injury, read and ensure you
understand the information in this user guide before assembling and operating a Tridak filling
system.
General Safety Considerations
All users of Tridak equipment should read and understand this user guide before assembling and using the
equipment.
Model 1200 Syringe Filling System User Guide
Specific Safety Considerations
Using Safe Operating Pressures
Pressurizing the components in the dispensing system beyond the maximum recommended pressure can
result in the rupturing of components and serious personal injury. To minimize the risk of rupturing
components and injury, do not exceed the maximum operating pressure of the components in your filling
system (See system specifications on page 13).
Preventing Injection Injury
Discharging fluids or compressed air with a dispensing tip against your skin can cause very serious injection
injury. To minimize the risk of injection injury, do not place the dispensing tip in contact with your skin.
Personal Protective Equipment
Operators are recommended to wear any personal protective equipment specified by their company’s safety
policy for the materials used during filling. Personal protective equipment should be in place and used at all
times before pressurizing the system and when handling any potentially hazardous materials.
Product Overview
Description of the Model 1200 Syringe Filling System
Note: These machines are customized to accept specific syringes with plungers fully inserted.
The Model 1200 Syringe Filling Machine is designed to fill dual-component syringe cartridges simultaneously.
The machine is set up to accept two different materials from pressurized reservoirs, making it an ideal filling
station for materials requiring two-component mixing, such as epoxies or composite resins. The system can
also be configured to fill small, single-component syringes.
The filling process requires an operator to load the empty syringes onto the fill nozzles and then activate the
filling system using the foot switch. The internal PC of the system controls all functions of this system. The
adjustable stroke controls the full-stroke volume.
Special Features and Benefits of the Model 1200 Syringe Filler
The Model 1200 syringe filling system is engineered for precise performance and long service life. Key features
include:
■
Utilizes disposable fluid path valve technology which eliminates cross-contamination and minimizes cleanup and downtime during product changeover
■
Fills two-component syringes simultaneously with the same or separate materials
■
Fill times from 2-6 seconds
■
Adjustable fill level, electronically controlled
■
Nozzle-end filling process with pre-inserted plunger minimizes air entrapment
■
System Dimensions: 29.125 in x 24.125 in x 18.25 in [73.98 cm x 61.28 cm x 46.36 cm] (W x H x D)
5
6
Model 1200 Syringe Filling System User Guide
Description of Main Components
Figure 1. Main Components of a Model 1200 Syringe Filling System
Power Button
Prime Left Button
Prime Right Button
Air Regulator
Cycle Start Button
Speed Control
Air In
Fill Height
Adjustment Screw
Air In
Air Regulator
Footswitch
Model 828 Valve
Nozzle Block
Model 828 Valve
Assembly and Setup
Unpacking and Inspecting Your Shipment
When your syringe filling system arrives, inspect the boxes for damage and notify the shipper of box damage
immediately.
Open each box and check for equipment damage. If parts are damaged, notify the shipper and submit a claim
for the damaged parts. Contact Tridak so that new parts can be shipped to you immediately.
Check that the parts included in your order match those listed below. If parts are missing, contact your local
Tridak representative or Tridak Customer Support to resolve the problem.
Model 1200 Syringe Filling System User Guide
Utilities Required
Air: 60-80 psi (0.41-0.55 MPa), 50 micron filtered, non-lubricated; dry air is required
Electric: 120 VAC, 50/60 Hz
Parts Included in Model 1200 Syringe Filling System
■
■
■
■
■
■
Model 1200 Syringe Filling System
Air Line Kits
Fluid Line Kits (3/8" OD Black Polyethylene tubing)
Footswitch
Power Cord
Printed User Manual
Preparing the System for Use
WARNINGS & PRECAUTIONS!
Supply air MUST be connected before connecting air to reservoir!
Disconnect air to reservoirs BEFORE supply air is disconnected!
Don’t start without a syringe in place!
Cartridge Retainer Preparation
1.
Install Cartridge End Fitting onto a Cartridge Retainer.
2.
Place a filled Cartridge into the Cartridge Retainer.
3.
Install and securely tighten the Cartridge Retainer Cover Assembly onto the Cartridge Retainer.
Figure 2. 20 oz. Cartridge Retainer
Cartridge Retainer Cover Assembly
Cartridge Retainer
Cartridge (Inside Cartridge Retainer)
Cartridge End Fitting
7
8
Model 1200 Syringe Filling System User Guide
System Interconnect
1.
Plug the Power Plug into the Power Connection (Figure 3) on the machine’s back panel.
2.
Connect the Footswitch to the Footswitch Jack (Figure 3) on the machine’s back panel.
3.
Connect the supply air to the 1/4 NPT Air Inlet on the rear of the unit (Figure 3). Set the pressure to 65 psi
(0.44 MPa).
Figure 3. Connections (Rear Panel)
Footswitch Jack
Power Connection
¼ NPT Air Inlet (shown with plug inserted)
Installing Fill Tubing
Connecting Fill Tubing to the Dispensing Valves
1.
Remove the Tubing Retainer Plate from the dispensing valve.
2.
Cut two pieces of 3/8" OD x 1/16" tubing to a length of 6 inches.
Note: 3/8" OD black polyethylene tubing is included with shipment. Bulk tubing of other material
compositions is available from Tridak.
Model 1200 Syringe Filling System User Guide
3.
Push the tubing through the Tubing Retainer (Figure 4, C) and into the Nozzle Block Fitting (Figure 4, A),
making sure it is bottomed out.
4.
Reinstall the Tubing Retainer Plate (Figure 4, B) onto the dispensing valve, being careful to tighten the
four screws evenly.
5.
Repeat steps 3-5 for the second dispensing valve.
Note: Make sure the material cartridge on the right containing “Part A” is attached to the tubing coming
from the right-side valve. Make sure the material cartridge on the left containing the “Part B” is attached
to the tubing coming from the left-side valve.
Installing Cartridge Retainers to Fill Tubing
1.
Connect the Cartridge Retainer (Figure 4, G) to the Fill Tubing (Figure 4, D) by sliding the Cartridge End
Fitting (Figure 4, F) onto the Fill Tubing (Figure 4, D).
2.
Place the Cartridge Retainer (Figure 4, G) into the Cartridge Retainer Cradle (Figure 4, H).
Note: to prevent air pockets when reloading, push down on the cartridge piston until material is at the
cartridge fitting end and then install the cartridge retainer.
Figure 4. Connecting Fill Tubing to the Dispensing Valves
D - Fill Tubing
B -Tubing Retainer Plate
A - Nozzle Block
Fitting
C - Tubing Retainer
E - Dispensing
Valve
F - Cartridge
End Fitting
G - Cartridge
Retainer
H - Cartridge
Retainer
Cradle
Priming the System
1.
Press the Power Button on the system’s Control Panel (Figure 5) to turn the system on. The light to the
right of the Power Button will turn green.
2.
Remove the plunger from a syringe and install the nozzle end of the syringe into the Nozzle Block.
3.
Press the Prime Left Button (Figure 5) to start filling the syringe. Continue to push the Prime Left Button
until all the air in the system has been expelled.
9
10
Model 1200 Syringe Filling System User Guide
4.
Press the Prime Right Button (Figure 5) to start filling the syringe. Continue to push the Prime Right Button
until all the air in the system has been expelled.
Figure 5. Control Panel
Power
Prime Left
Prime Right
Cycle Start
Setting the Fill Height
To adjust the fill height, loosen the Jam Nut and turn the Fill Height Adjustment Screw accordingly.
Figure 6. Fill Adjustment Controls
Speed Control (Retract)
Jam Nut
Fill Height
Adjustment Screw
Model 1200 Syringe Filling System User Guide
Operating the System
Speed Control Adjustments
The fill rate must exceed the plunger rise rate or you will not completely fill the syringe. To correct that
condition you can decrease the plunger rise rate with the Speed Control.
Adjustments to the Dispensing Valve
Model 828 dispensing valves are preset before shipment. If adjustment is needed, please refer to the Model
828 Dispensing Valve User Guide. This manual is included in your shipment.
Reloading System Material
1.
Remove the Air Line from the Cartridge Retainer.
2.
Using a wrench, remove the Fill Tubing from the Cartridge End Fitting.
3.
Install a filled Cartridge Retainer.
Replacing the Fill Tubing
1.
Remove the Tubing Retainer Cover. This can be done by removing the Allen cap screws that hold it in
place (Figure 7).
2.
Pull out the Fill Tubing and install new tubing.
Figure 7. Replace the Fill Tubing
11
12
Model 1200 Syringe Filling System User Guide
Spare Parts and Accessories
Replacement Parts
Item
Part Number
Air Regulator
Precision Air Regulator
T14051
Dispensing Valve
Model 828 Dispensing Valve
T17057
Material Reservoirs
Cartridge Reservoir, 20 oz (500 mL)
T16763
Cartridge Reservoir, 32 oz (900 mL)
T17035
Tubing
Fluid Line Kit, 3/8" OD Black Polyethylene
T16787
Air Line Kit
T16789
Miscellaneous
Footswitch
T14999
Power Cord, 110 VAC, 7 ft
T17021
Model 1200 Syringe Filling System User Guide
Specifications
System Specifications
Materials of Construction—Wetted Parts
Dispensing valve = See Model 828 dispensing valve user guide
Fluid tubing = light-blocking, black, polyethylene
Fluid tubing fittings = acetal
Operating Specifications
Required air pressure = 60-80 psi (0.41-0.55 MPa), 50 micron filtered, non-lubricated; dry air
Required Electrical Power = 120 VAC, 50/60 Hz
Dimensions
System Dimensions: 29.125 in x 24.125 in x 18.25 in [73.98 cm x 61.28 cm x 46.36 cm] (W x H x D)
Figure 8. Model 1200 Dimensional Diagram
13
14
Model 1200 Syringe Filling System User Guide
Warranty
From date of purchase, Tridak offers a one-year warranty against defects in material and workmanship on all
system components with proof of purchase and purchase date. Unauthorized repair, modification, or
improper use of equipment may void your warranty benefits. The use of aftermarket replacement parts not
supplied or approved by Tridak, will void any effective warranties and may result in damage to the equipment.
IMPORTANT NOTE: TRIDAK RESERVES THE RIGHT TO INVALIDATE ANY WARRANTIES, EXPRESSED OR IMPLIED,
DUE TO ANY REPAIRS PERFORMED OR ATTEMPTED ON TRIDAK EQUIPMENT WITHOUT WRITTEN
AUTHORIZATION FROM TRIDAK. THOSE CORRECTIVE ACTIONS LISTED ABOVE ARE LIMITED TO THIS
AUTHORIZATION.
Model 1200 Syringe Filling System User Guide
Index
Accessories, 12
Replacing the Fill Tubing, 11
Air Connections, 8
Components, 6
Safety, 4
Personal Protective Equipment, 5
Preventing Injection Injury, 5
Using Safe Operating Pressures, 5
Compressed Air Requirements, 7
Setup, 6
Contact Information, 4
Spare Parts, 12
Description of System Components, 6
Specifications, 12
Dispensing Valve Adjustments, 11
Speed Control Adjustments, 11
Documentation
Other Documentation Included, 4
Support, 4
Electrical Requirements, 7
System Features, 5
Fill Height Adjustment, 10
System Preparation, 7
Cartridge Retainer Preparation, 7
Install Fill Tubing, 8
System Interconnect, 8
Assembly, 6
Utilities, 7
Fluid Connections, 8
Help, 4
Installing Fill Tubing, 8
Operation, 11
Optional Equipment, 12
Parts Included, 7
Product Overview, 5
Reloading Material, 11
System Benefits, 5
System Priming, 9
Unpacking, 6
Utilities, 7
Warranty, 13
15
© 2012 Tridak LLC – A Dymax Company. All rights reserved. All trademarks in this guide, except where noted, are the property of, or used under license by Tridak LLC or Dymax Corporation, U.S.A.
Please note that most filling system applications are unique. Tridak does not warrant the fitness of the product for the intended application. Any warranty applicable to the product, its application and use is strictly limited to that contained
in Tridak’s standard Conditions of Sale. Tridak recommends that any intended application be evaluated and tested by the user to insure that desired performance criteria are satisfied. Tridak is willing to assist users in their performance
testing and evaluation. Data sheets are available for pressure pots upon request.
T17566
MAN046
10/15/2012
Dymax Corporation
860.482.1010
[email protected]
www.dymax.com
www.tridak.com
Dymax Oligomers &Coatings
860.626.7006
oligomers&[email protected]
www.dymax-oc.com
Dymax Europe GmbH
+49 (0) 611.962.7900
[email protected]
www.dymax.de
Dymax UV Adhesives &
Equipment (Shenzhen) Co Ltd
+86.755.83485759
[email protected]
www.dymax.com.cn
Dymax UV Adhesives &
Equipment (Shanghai) Co Ltd
+86.21.37285759
[email protected]
www.dymax.com.cn
Dymax Asia (H.K.)
Limited
+852.2460.7038
[email protected]
www.dymax.com.cn
Dymax Korea LLC
82.2.784.3434
[email protected]
www.dymax.co.kr