1
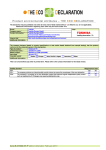
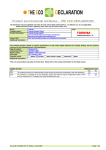
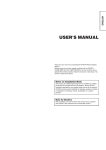
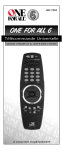
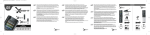
User Manual
English
English
Getting to Know Xsight . . . . . . . . . . . . . . . . . . . . . . . . . . . . . . . . . . . . . . . . 3
Unpacking and Setting Up Xsight . . . . . . . . . . . . . . . . . . . . . . . . . . . . . . . . . . . . . . . . . . . . . . . . . . . . . . . . . . . . . 3
Using Xsight Keys and Touch screen . . . . . . . . . . . . . . . . . . . . . . . . . . . . . . . . . . . . . . . . . . . . . . . . . . . . . . . . . . 3
Keys Xsight COLOUR . . . . . . . . . . . . . . . . . . . . . . . . . . . . . . . . . . . . . . . . . . . . . . . . . . . . . . . . . . . . . . . . . . . . . . . . . 4
Keys Xsight TOUCH . . . . . . . . . . . . . . . . . . . . . . . . . . . . . . . . . . . . . . . . . . . . . . . . . . . . . . . . . . . . . . . . . . . . . . . . . . . 6
Initial Setup . . . . . . . . . . . . . . . . . . . . . . . . . . . . . . . . . . . . . . . . . . . . . . . . . . . . . . . . . . . . . . . . . . . . . . . . . . . . . . . . . 8
Home Screen and Everyday Use . . . . . . . . . . . . . . . . . . . . . . . . . . . 9
Favorites . . . . . . . . . . . . . . . . . . . . . . . . . . . . . . . . . . . . . . . . . . . . . . . . . . . . . . . . . . . . . . . . . . . . . . . . . . . . . . . . . . . . .9
Activities . . . . . . . . . . . . . . . . . . . . . . . . . . . . . . . . . . . . . . . . . . . . . . . . . . . . . . . . . . . . . . . . . . . . . . . . . . . . . . . . . . . . .9
Devices . . . . . . . . . . . . . . . . . . . . . . . . . . . . . . . . . . . . . . . . . . . . . . . . . . . . . . . . . . . . . . . . . . . . . . . . . . . . . . . . . . . . . .9
Profiles . . . . . . . . . . . . . . . . . . . . . . . . . . . . . . . . . . . . . . . . . . . . . . . . . . . . . . . . . . . . . . . . . . . . . . . . . . . . . . . . . . . . .10
Settings . . . . . . . . . . . . . . . . . . . . . . . . . . . . . . . . . . . . . . . . . . . . . . . . . . . . . . . . . . . . . . . . . . . . . . . . . . . . . . . . . . . .10
Settings . . . . . . . . . . . . . . . . . . . . . . . . . . . . . . . . . . . . . . . . . . . . . . . . . . . . . . . . . . . . . 11
Device Setup . . . . . . . . . . . . . . . . . . . . . . . . . . . . . . . . . . . . . . . . . . . . . . . . . . . . . . . . . . . . . . . . . . . . . . . . . . . . . . . 11
Add Device . . . . . . . . . . . . . . . . . . . . . . . . . . . . . . . . . . . . . . . . . . . . . . . . . . . . . . . . . . . . . . . . . . . . . . . . . . . . 11
Delete Device . . . . . . . . . . . . . . . . . . . . . . . . . . . . . . . . . . . . . . . . . . . . . . . . . . . . . . . . . . . . . . . . . . . . . . . . . . 12
View Code . . . . . . . . . . . . . . . . . . . . . . . . . . . . . . . . . . . . . . . . . . . . . . . . . . . . . . . . . . . . . . . . . . . . . . . . . . . . . 12
Learning . . . . . . . . . . . . . . . . . . . . . . . . . . . . . . . . . . . . . . . . . . . . . . . . . . . . . . . . . . . . . . . . . . . . . . . . . . . . . . . . . . . 13
Volume Control . . . . . . . . . . . . . . . . . . . . . . . . . . . . . . . . . . . . . . . . . . . . . . . . . . . . . . . . . . . . . . . . . . . . . . . . . . . . . 14
Clock . . . . . . . . . . . . . . . . . . . . . . . . . . . . . . . . . . . . . . . . . . . . . . . . . . . . . . . . . . . . . . . . . . . . . . . . . . . . . . . . . . . . . . . 15
Audio . . . . . . . . . . . . . . . . . . . . . . . . . . . . . . . . . . . . . . . . . . . . . . . . . . . . . . . . . . . . . . . . . . . . . . . . . . . . . . . . . . . . . . 15
Brightness . . . . . . . . . . . . . . . . . . . . . . . . . . . . . . . . . . . . . . . . . . . . . . . . . . . . . . . . . . . . . . . . . . . . . . . . . . . . . . . . . . 15
Timeout . . . . . . . . . . . . . . . . . . . . . . . . . . . . . . . . . . . . . . . . . . . . . . . . . . . . . . . . . . . . . . . . . . . . . . . . . . . . . . . . . . . . 16
Language . . . . . . . . . . . . . . . . . . . . . . . . . . . . . . . . . . . . . . . . . . . . . . . . . . . . . . . . . . . . . . . . . . . . . . . . . . . . . . . . . . 16
RF On/Off . . . . . . . . . . . . . . . . . . . . . . . . . . . . . . . . . . . . . . . . . . . . . . . . . . . . . . . . . . . . . . . . . . . . . . . . . . . . . . . . . . 16
Reset . . . . . . . . . . . . . . . . . . . . . . . . . . . . . . . . . . . . . . . . . . . . . . . . . . . . . . . . . . . . . . . . . . . . . . . . . . . . . . . . . . . . . . . 16
PC Setup . . . . . . . . . . . . . . . . . . . . . . . . . . . . . . . . . . . . . . . . . . . . . . . . . . . . . . . . . . . . 17
2
www.oneforall.com
Getting to Know Xsight
The Xsight ToUcH / Xsight coloUr is the latest fully-featured universal remote control from ONE FOR
ALL. It offers full control of all your infra-red controlled Audio Video devices, as well as high-end features
such as Learning, Profiles and Activity Control. You can set up your remote to control your devices by
following the simple on-screen instructions on the remote, or connect to a PC for adding advanced
features such as Activities and Favorites.
Charging Cradle
Unpacking and Setting Up
“Xsight ToUcH” or “Xsight coloUr”
Lithium Ion battery
(See also the Xsight Quick Guide)
Inside the packaging you will find the following:
AC/DC Adaptor
for Charging Cradle
USB Cable
•
•
•
•
•
•
•
Your “Xsight coloUr” or “Xsight ToUcH” Universal remote control
charging cradle (Xsight ToUcH)
ac/Dc adaptor for charging cradle (Xsight ToUcH)
lithium Ion battery (Xsight ToUcH) or 3 x aa Batteries (Xsight coloUr)
USB cable
cD-rom with remote software and User manual
Quick Start Guide
Firstly, install the battery supplied in the packaging by matching the contacts + and – to the illustrations
in the battery compartment.
CD Rom
Quick Start Guide
Only Xsight TOUCH: The supplied battery comes partially charged, but we recommend charging
the battery for approximately an hour before use.
To do this, connect the charging cradle to a power outlet using the supplied AC/DC Adaptor and place
the remote on the cradle. The display will show the “battery charging icon”. In order to fully charge
the remote, leave it in the cradle for approximately 4 hours.
To begin setting up your Xsight you have two options:
1)
Follow the on-screen instructions on the remote while in front of the devices you wish to control.
This is the quickest method to set up the remote for basic control of your devices. For more
advanced setup, you can connect the remote to your PC once it is operating all your devices
correctly.
2)
To use PC setup, including Activities (translation), Favorites (translation) etc, insert the CD-ROM into
your PC and follow the install wizard. Connect the remote when prompted by the software using the
included USB Cable.
Using Xsight Keys and Touch screen
To start using your remote at any time, simply touch it or press a key and it will respond and the backlight
will illuminate. You can adjust the amount of time the light is on for in the Settings Menu (see page 16).
Xsight features the following types of controls:
• hard keys on the remote’s front that let you control common device features.
• fully-interactive screen (Xsight TOUCH features a Touch Screen) that provides functions for your devices
appropriate to your pattern of use.
3x AA
Batteries
USB Cable
CD Rom
Quick Start Guide
www.oneforall.com
3
Keys Xsight coloUr
1
2
3
4
5
7
6
8
9
10
11
4
www.oneforall.com
Keys Xsight coloUr
1
Power key
Turns device ON/OFF.
2
Screen keys
3 keys on either side of the screen give you direct access to the functions displayed on the
screen.
3
Scroll bar
Scrolls pages.
4
Home key
Shortcut key – One short press goes one back to the previous level in the Menu structure. Holding down for two seconds takes the remote to the Home screen.
favorites
Shortcut key – In user mode accesses the Favorites screen directly. Disabled in Setup mode.
activities
Shortcut key – In user mode accesses the Activities screen directly. Disabled in Setup mode.
Devices
Shortcut key – In user mode accesses the Devices screen directly. Disabled in Setup mode.
5
Guide key
Brings up device guide if your original remote has guide.
menu key
Brings up device menu if your original remote has menu. In DVD, it brings up disc menu.
Info
Displays information about your video or audio feed.
exit
Exit guide and menu.
6
channel keys
Operates channel up/down functions in video devices and preset up/down in audio devices.
7
Volume keys
Controls volume and mute.
8
navigation keys
Operates the navigation functions of your device if available.
9
Teletext keys
Accesses teletext functions if your device has text features.
10
11
Transport keys
Operates DVR functions and performs traditional Play/Pause/Fast Forward/Rewind/Record on all
other video and audio devices.
Digit 0-9
Direct digit entry or text entry for customizing labels.
aV key
Selects input function of your device. E.g. TV/SAT, TV/DVD.
enter/ -/—
Operates channel enter and 10+ digit entry.
lcD screen
Your remote’s customizable screens can be set up via the remote or by connecting to your PC. To use the
functions displayed on the screen, press the buttons adjacent to the function displayed on the screen. To
move between the pages, click the scroll bar to the left or right. Multiple pages will wrap around, so for
example if you scroll right to the last page, scrolling right again will take you back to the first page.
www.oneforall.com
5
Keys Xsight ToUcH
1
2
3
4
5
7
6
8
9
10
11
6
www.oneforall.com
Keys Xsight ToUcH
1
Power key
Turns device ON/OFF.
2
Soft keys
LCD screen displays Activities, Devices, extended functions, profiles and settings.
3
Slider bar
Scrolls pages.
4
Home key
Shortcut key – One short press goes one back to the previous level in the Menu structure.
Holding down for two seconds takes the remote to the home screen.
favorites
Shortcut key – In user mode accesses the Favorites screen directly. Disabled in Setup mode.
activities
Shortcut key – In user mode accesses the Activities screen directly. Disabled in Setup mode.
Devices Shortcut key – In user mode accesses the Devices screen directly. Disabled in Setup
mode.
5
Guide key
Brings up device guide if your original remote has guide.
menu key
Brings up device menu if your original remote has menu. In DVD, it brings up disc menu.
Info
Displays information about your video or audio feed.
exit
Exit guide and menu.
6
channel keys
Operates channel up/down functions in video devices and preset up/down in audio devices.
7
Volume keys
Controls volume and mute.
8
navigation keys
Operates the navigation functions of your device if available.
9
Teletext keys
Accesses teletext functions if your device has text features.
10
11
Transport keys
Operates DVR functions and performs traditional Play/Pause/Fast Forward/Rewind/Record on all
other video and audio devices.
Digit 0-9
Direct digit entry or text entry for customizing labels.
aV key
Selects input function of your device. E.g. TV/SAT, TV/DVD.
enter/ -/—
Operates channel enter and 10+ digit entry.
Touch screen
Your remote’s customizable touch screens can be set up via the remote or by connecting to your PC. To
use the functions displayed on the screen simply touch the buttons that appear on it. To move between
the pages, brush your thumb along the slider bar to the left or right. Multiple pages will wrap around, so
for example if you scroll right to the last page, scrolling right again will take you back to the first page.
www.oneforall.com
7
Initial Setup
When you first power up your remote, it will enter Initial Setup Mode. In this mode, you will;
1)
First choose which language you prefer to be displayed on the remote.
2)
Next you will be asked to select the region you live in. This will help the remote when setting up
devices during the setup process.
3)
Next you will be asked to select whether the remote will display the time in 12 hour or 24 hour
format, and then to set the time.
4)
To set the time you can use the digit keys 0-9, or step through the hours and minutes using the Hour
and Min keys displayed on the screen.
5)
Once ready, press “finish”.
After this, a few Tutorial screens will be displayed in order to help you familiarize yourself with the remote.
Once the tutorial is complete, the remote will lead you through the steps to set up all the devices you
wish to control.
1)
first, select the device type (e.g. TV) and then select the brand from the list of the top brands
for the selected device in your region.
If a certain device type or brand is not listed, set up all of you other devices, and then use the PC Setup (see page
17) to add that particular device type or brand. If a PC connection is not available, you can also Learn a Device
using the original remote. For Learning, see page 13.
2)
once the brand has been selected, you can then search through the available codes for that
brand by trying keys on the remote. If the keys respond correctly, you can accept the current code
by pressing “works”, or test the next code by pressing “next”. When the device has been set up,
you will have the option to set up another device.
TIP: To quickly step through and test multiple codes, alternately press “Power” and “Next”. Once the device
responds to Power, stop and test other keys to confirm the code is correct.
Once you have set up the remote to control your devices, you will be asked if you wish to set a device as
the Master Volume control. This feature is useful if you always change volume using the same device, say
for example an AV Receiver.
Once Initial Setup has taken place, the remote will display the Home Screen.
8
www.oneforall.com
Home Screen and everyday Use
To access the Home Screen at any time, you can hold down the “Home\Back”
2 seconds. Pressing this key once will take you back one screen.
key for
The Home Screen of the remote will display the following options:
favorites
This key will give you access to your Favorite Channels. Each channel will have a key of its own and be
labeled with the name of the channel. It is also possible to upload your own custom pictures to use on
the key. When pressed, the key will send the necessary commands to select the chosen channel on the
device you use to select channels (for example it may send digit buttons 1, 2 and then 3 to your Cable
box). It is possible to have up to 72 Favorites set up on your remote.
“Favorites” can be set up using PC Setup only.
To access the Favorites Screen at any time, you can press the “favorites”
screen.
key underneath the
activities
This key will give you access to all of your Activities.
An “activity” is a special mode that your remote control can be set into, where groups of keys can
address different devices to suit what you are doing at the moment. For example, if you create an Activity
called “Watch DVD”, you could set transport keys (Play, Stop etc) to control your DVD Player, but the
Volume Keys to control your Surround Sound Amp.
When you have set up your Activity, it will appear as a key on your touch screen. When this key is pressed,
as well as changing the function of the keys, the remote will send a series of commands to your AV
Devices to make sure they are in the right state for your Activity. For example, it would turn on the TV,
DVD Player and Surround Amp, and then select the correct input on the TV and Amp so the correct
picture and sound are seen and heard. A series of commands such as this is called a Macro, and you can
define this at the end of setting up an Activity.
Activities can be set up using PC Setup only.
To access the “Activities” Screen at any time, you can press the “activities”
the screen.
key underneath
Devices
This key will give you direct access to all the devices that your remote is set up to control. Once pressed,
you will see a list of devices to control (e.g. TV, Sat, Amp etc). Selecting a device will put the remote into
the correct mode to control the device selected. So if you selected TV, the remote will now act just as your
TV’s remote did.
The screen will also display a selection of keys appropriate to the current device.
Devices can be set up using the remote only (via Device Setup or Learning), or using PC Setup.
To access the Devices Screen at any time, you can press the “Devices”
screen.
www.oneforall.com
key underneath the
9
Home Screen and everyday Use
Profiles
A “Profile” is a collection of Favorites that could be grouped by User (e.g. Mom, Dad, Kids etc) or Genre
(e.g. Movies, News, Sport etc). Once the initial group of Favorites (up to 70) has been set up, you can then
choose sub-sets of Favorites to be Profiles.
Profiles can be set up using PC Setup only.
To access Profiles at any time, you can press the “favorites”
will then be able to choose between All or individual Profiles.
key underneath the screen and you
Settings
The “Settings” key will take you to a menu allowing you to change options on the remote, as well as
adding or deleting devices, and learning commands from your original remote control(s). See the next
section for more details.
10
www.oneforall.com
Settings
The Settings menu allows you to add or delete devices, learn functions from your original remote control,
and adjust various options on your remote. The following section details each option in the Settings
menu.
Device Setup
Once “Device Setup” is selected, you will be given the choice of adding or deleting a device, and also
viewing the code the remote is using to operate your devices.
➭ “add Device”
If “add Device” is selected, the procedure is similar to the initial setup. First, select the device type
(e.g. TV) and then select the brand from the list of the top brands for the selected device in your region.
In the event that a device type or brand is not listed, set up all of your other devices, and then use
the PC Setup (see page 17) to add the final devices. If a PC connection is not available, you can also Learn
(see page 13) a Device using the original remote.
Once the brand has been selected, you can then search through the available codes for that brand by
trying keys on the remote. If the keys respond correctly, you can accept the current code by pressing
“works”, or test the next code by pressing “next”. When the device has been set up, you will have the
option to set up another device.
1)
Select “Device Setup” from the Settings menu.
2)
Select “add Device”. The first page of devices is displayed.
3)
Select the device type you are adding. After you select a device type, the available device brands
are listed.
Note:
If you do not see the device type you want to add, scroll through the pages to view more device types.
4)
Select the device brand. The first code for the selected device is activated on the remote.
Note:
If you do not see your device brand, scroll through the pages to view more brands. If your desired
brand is not listed, you can use PC Setup to search for additional brands, or learn the device from your
original remote
5)
Take the remote to within range of the device and press any of the keys.
If the device responds as expected, press the function key labeled “works”!.
If the device does not respond, either try a different key or press the function key labeled “next” to test
the next device code.
Note:
www.oneforall.com
If you do not find a functioning code, you can use PC Setup to search for additional codes, or Learn
the device from your original remote
11
Settings
➭ “Delete Device”
If “Delete Device” is selected, you will be asked to choose which device you would like to delete,
followed by a confirmation screen. It is then possible to select another device to delete or to finish.
1)
Select “Device Setup” from the Settings menu.
2)
Select “Delete Device”. The first page of devices is displayed.
Note:
If you do not see the device you want to delete, scroll through the pages to view more devices.
3)
Select the device you want to delete. A confirmation screen appears.
Note:
If the device you are deleting is in use by one or more Activities or Favorites, the remote will display a
warning message.
4)
Select “Yes” to delete the device or “no” to exit without deleting the device.
➭ View code
The “View code” screen shows you which code the remote is using to control your device.
This information can be used by Customer Service should you need to contact them. The code can
be viewed by selecting the desired device from the list of currently set up devices.
1)
Select “Device Setup” from the Settings menu.
2)
Select “View code”. The first page of devices is displayed.
Note:
If you do not see the device you want, scroll through the pages to view more devices.
3)
Select the device you want to view. The remote will display the device information.
The following information is displayed:
• “Device name”
• “Device brand”
• “Device’s code location in set list” (e.g. code 7 of 9)
• “Device model number” (only available if supplied during Pc Setup)
• “Device code”
12
www.oneforall.com
Settings
learning
The Learning feature allows you to add functions from the original remote control(s) to the ONE FOR ALL
remote. Your original remotes should still be in working order to perform this process. This process can be
used to add missing keys or replace existing keys on devices that have already been set up, or even to add
a complete new device to your remote. When the Learning option is selected, you will be asked if you
want to learn a function or learn a new device. The next step is to select a key to learn onto, and to point
the original remote towards the ONE FOR ALL remote and press the key on the original remote you wish
to teach. Finally if the key is a screen key, you will have the opportunity to re-label it using the digit keys.
The full procedure is:
1)
Select “learning” from the Settings menu.
2)
If you are learning a function only, select “learn a function”.
OR If you are learning a new device, select “learn a new Device”.
Note:
If you do not see the Device you want, scroll through the pages to view more.
3)
If you are learning a function, select a key on the remote or press “On-Screen Keys” to choose a
key on the screen to learn a function onto.
Note:
You can Learn onto any key or On Screen key in any Device except for the Keys for Home, Favorites,
Activities, and Devices.
4)
Locate the remote for the device you want to learn from. Align the source remote with the
bottom end of the ONE FOR ALL, no further than 5 inches apart, preferably between 2in and 5in
(5cm and 12cm):
5)
On the remote you are learning from, press the key you want to learn.
a. If the function is not learned correctly, an error message is displayed. Select “Yes” to try
learning again, or “no” to exit to the Settings menu.
b. If the key you are learning the function onto already has a function, you will be asked if you
want to overwrite it
c. If a key function is learned correctly it is saved to the memory and you can proceed to learn
another function.
d. If a screen key function is learned correctly, the remote will prompt you to save a label.
6)
If the key learned is a Screen key, use the numeric keypad to enter a key label.
a. Enter letters using the numeric keypad. As with a standard phone, the keypad keys can
represent letters and symbols. Press a key once to display the first letter or symbol associated
with that key; repeatedly press the key to display the other letters or symbols associated with
the key.
For example, to display the letter “J”, press “5” on the numeric keypad; to display the letter “K”,
press “5” again.
To delete a letter, click “clear”.
www.oneforall.com
7)
Click “oK”. The remote will save the new function.
Note:
The remote will automatically place new on-screen keys in the first blank screen key space for the
paricular device.
13
Settings
Volume control
The Volume Control feature allows you to set one device to control the volume all the time, no matter
which device the remote is currently controlling. For example, if you always watch TV using your AV
Receiver, you would not want to alter the Television’s volume when watch TV. In this case, you can set your
ONE FOR ALL remote to always control the AV Receiver’s volume, even when in TV Mode.
In the Volume Control section you will be given the option to set the Master Volume device, to remove a
device from this group (allowing it use its own volume), or to unlock the Volume completely, allowing the
remote to control each device’s volume individually.
➭ locking Volume to a device
1)
Select “Volume control” from the Settings menu.
2)
Review the explanatory screens, then click “oK”.
3)
Select “lock Volume”. The first page of devices is displayed.
Note:
If you do not see the device you want to assign volume to, scroll through the pages to view more de
vices.
4)
Select the device you want to lock volume to. The remote will display a confirmation screen.
5)
Click “finish”.
➭ removing a Device from lock
1)
Select “Volume control” from the Settings menu.
2)
Review the explanatory screens, then click “oK”.
3)
Select “Unlock Device”. The remote removes the volume lock and displays a confirmation
screen.
4)
Click “finish”.
➭ Unlocking all Volume
1)
Select “Volume control” from the Settings menu.
2)
Review the explanatory screens, then click “oK”.
3)
Select “Unlock all”. The remote unlocks the volume and displays a confirmation screen.
4)
Click “finish”.
14
www.oneforall.com
Settings
clock
The Clock section will allow you to set the time on the remote as you did during the Initial Setup.
1)
Select “clock” from the Settings menu.
2)
Select a clock type: 12 or 24 hour.
3)
Using the keypad or the Hour and Min buttons, enter the current time.
4)
Click “finish”. The remote displays the entered time.
audio
The remote provide audible feedback to confirm when a key is pressed. This section of the settings menu
allows you to adjust the level of this sound.
1)
Select “audio” from the Settings menu.
2)
Select a tone from the Audio screen to hear a sample beep.
3)
Select “oK”. The remote will save the selected tone as the key-press sound.
Brightness
This setting allows you to adjust the brightness of the screen on the remote.
www.oneforall.com
1)
Select “Brightness” from the Settings menu.
2)
Select a brightness level. The screen will change to display the selected brightness.
To view another brightness level, press “ + ” or “ - “. The screen will change to display the new
brightness level.
3)
Select “oK”. The remote will save the selected brightness level.
15
Settings
Timeout
To save battery power, the key backlight and LCD screen will automatically dim after a period of inactivity.
The default period is 10 seconds. You can view and adjust the timing of this under the Timeout setting:
1)
Select “Timeout” from the Settings menu.
2)
The screen will change to display the current timeout length. The minimum timeout is 5 seconds
and the maximum timeout is 30 seconds. To change the timeout, press “ + ” or “ - “. The screen
will change to display the new timeout length.
Note:
If you increase the timeout, the battery life will shorten.
language
This setting will allow you to change the Language that your remote displays. Once selected, all menus
and instructions will be displayed in the language chosen.
rf on/off (Xsight ToUcH only)
Your ONE FOR ALL remote not only outputs Infra Red (IR), but also Radio Frequency (RF). This means it is
compatible with the separately available Xsight RF XTender, allowing you to control you devices even if
they are hidden in a closed cabinet. It is also compatible with ONE FOR ALL Light Accessories, for full
control of your home lighting*.
However if you do not own these accessories, you have the option to turn of the RF Transmission.
1)
Select “rf on/off” from the Settings menu. Xsight displays the current RF Transmission status.
2)
Select an RF status: “on” or “off” to turn RF transmissions ON or OFF.
3)
Select “oK” The remote will save the RF Transmission status.
* Note:
ONE FOR ALL accessories may not be available in all territories.
reset
The reset screen will delete all learned functions and labels.
Devices, Activities and Favorites you have added will remain in the remote menu.
1)
Select “reSeT” from the Settings menu. The remote will display the Reset Screen.
2)
Click “reSeT”. All Learning and Labels will be deleted, and the screen will return to the Settings
Screen.
16
www.oneforall.com
Pc Setup
As well as all of the features mentioned in this manual, it is also possible to set up your remote using a PC
with Internet Access. This will allow you to use the following features:
“activities”
– Use your remote to control multiple devices as if they were one and to set all your
device in the right state for Watch TV, Listen to Music, or any of your regular Home
Entertainment Activities.
“favorites”
– Program up to 70 screen keys to automatically select your favorite channels with one
key press. Also add logos and custom graphics to these keys to make it even easier!
“Profiles”
– Group your Favorites by family member or genre.
Also available are the following:
• Direct model number entry - the exact code for your devices can be found without having to search.
• Key Edit - keys can be moved, edited or added to your devices.
• Many more features!
Remember to check back for upgrades to your remote in the future!
To use PC setup, insert the CD-ROM supplied with this remote into any internet-connected PC running
Windows XP or Vista, and follow the on-screen instructions.
www.oneforall.com
17