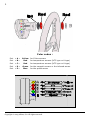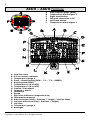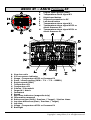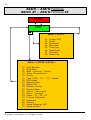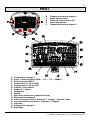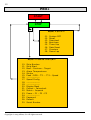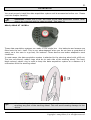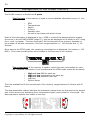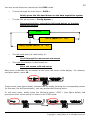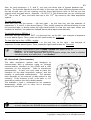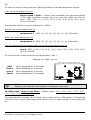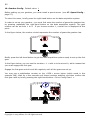
1
User’s Manual (EN) AStrO A-151 AStrO 4T A-152 AStrO Formula A-161 AStrO Formula 4T A-162 Formula PRO+ Version AStrO V2.05.00 - A-141 Version AStrO 4T V1-05.01 - Version PRO+ V1.05.00 2 Color codes : Port «A» Yellow Port «B» Red for temperature sensors (NTC type or K type) Port «C» Red for temperature sensors (NTC type or K type) Green for the magnetic sensor or the infrared sensor Port « D » Port «E» Blue for G-force sensor for the speed sensor Copyright 2005 Alfano, S.A. All rights reserved. 3 List of accessories Magnetic sensor (Green) Extensions 90 cm A-241 130 cm 250 cm 350 cm A-341 A-342 A-343 90 cm A-281 130 cm A-381 250 cm A-382 G-force sensor (Yellow) Extensions Temperature sensors « type NTC » Max : 285°C (Red) Water Breech M 10 x 1 1/8 Gas M5 40 cm 40 cm 40 cm A-251 A-252 A-253 Spark plug 14 mm Standard High Version Engine « Animal » 40 cm 40 cm 40 cm A-254 A-255 A-256 Extensions 115 cm 250 cm 350 cm A-351 A-352 A-353 Adapter to connect 1 temperature sensor type NTC + 1 temperature sensor type K, on the same port of the data acquisition system (Red) for 2 x 30 cm A-361 A-152 - A-162 Copyright 2005 Alfano, S.A. All rights reserved. 4 Temperature sensors « type thermocouple K » Max : 400°C (Red) Water Breech M 10 x 1 1/8 Gas M5 40 cm 40 cm 40 cm A-276 A-277 A-278 Spark plug 10 mm 12 mm 14 mm 40 cm 40 cm 40 cm A-273 A-274 A-275 M8 40 cm A-271 Extensions 115 cm 250 cm 350 cm A-371 A-372 A-373 17 19 22 26 A-261 A-262 A-263 A-264 Gas Max : 1.000°C Water temperature fittings for A-251 - A-276 mm mm mm mm Pressure Oil and Fuel sensors (Red) M 12 x 1.5 0 – 2 Bar M 12 x 1,5 0 – 5 Bar M 12 x 1,5 0 – 10 Bar 1/4" – 18 NPTF 0 – 5 Bar 1/4" – 18 NPTF 0 – 10 Bar Extensions A-294 A-295 A-296 A-297 A-298 150 cm 250 cm 350 cm A-395 A-396 A-397 350 cm A-313 Special High sensitivity RPM sensor Infrared connection interface for data transfer 250 cm Copyright 2005 Alfano, S.A. All rights reserved. A421 5 Speed sensor (Blue) With bracket 170 cm A-246 Extensions 130 cm 250 cm 350 cm A-346 A-347 A-348 25 30 40 45 50 A-441 A-442 A-443 A-444 A-445 Rear axle magnetized collar Permanent magnets mm mm mm mm mm 10 Pieces A-440 60 cm A-401 90 cm A-412 130 cm A-385 250 cm A-386 Infrared transmitter for time measuring Infrared sensor for time measuring (Green) Allonges Wheels Look5 : Black/Black Look5 : Red/Green Look5 : Blue/Green A-501 A-503 A-504 We are constantly striving to improve our products Therfore we reserve the right to improve any of the products described in this manual without prior notice.Please visit our web site www.alfano.be or for information on new documents and/or changes. Copyright 2005 Alfano, S.A. All rights reserved. 6 Summary List of accessories Overview - AStrO & AStrO Formula AStrO 4T & AStrO Formula 4T (4 Temperatures) PRO+ Copyright Introduction Preliminary remarks For your safety and that of the device - Batteries and accessories General Information - Serial number - Security code - Seal - Magnetic strip or infrared - Tracks including several sections Data Acquisition systems : description o AStrO & AStrO Formula o AStrO 4T & AStrO Formula 4T o PRO+ Front side o AStrO & AStrO Formula o AStrO 4T & AStrO Formula 4T o PRO+ Back side o AStrO, AStrO 4T & PRO+ o AStrO Formula & AStrO Formula 4T o Extra box for the AStrO Formula How to use - Use of keys - Turning on - Manual turning off - Automatic turning off - Low battery warning signal Installation - The AStrO, AStrO 4T & PRO+ - The AStrO Formula & AStrO Formula 4T - Color codes for accessories - The G-force sensor - Temperature sensors - Temperature sensors for 4T & AStrO Formula 4T - Pressure sensor for 4T & AStrO Formula 4T - The magnetic strip sensor - The infrared sensor and transmitter - The speed sensor - The effect of the track’s magnetic strip on the speed sensor - The engine speed sensor Copyright 2005 Alfano, S.A. All rights reserved. 3 8 8 9 11 13 13 14 14 14 15 15 15 15 15 16 17 17 17 17 17 17 17 17 18 18 18 19 20 20 20 20 20 20 21 21 22 23 24 25 26 27 27 27 28 29 29 7 - How to change the batteries - Protective caps « STOP » mode « START » mode - Displayed information - How to return to the « STOP » mode FLASH memory management « VIEW » mode How to use the Menus How to change a numeric parameter « DATA » Main menu o 01. System OFF. o 02. Recall. o 03. Download. o 04. Best Laps. o 05. Theor Lap. (theoretical) o 06. Data Reset. o 07. Counters. o 08. Demo Lap. Set-up Menu « Config System » o 10. Strip Number. o 11. Strip Start. o 12. Best/Previous/Target. o 13. Alarm Temperatures, Low/High. o 13. Alarm Temperatures, Low/High. (version 4T) o 14. Stroke. o 15. Peak. o 16. RPM Graph. o 17. Speed configuration. o 18. Speed pits. o 19. Gearbox configuration o 20. Display mask. o 21. Celsius/Fahrenheit. (C°/F°) o 22. Metric/Imperial. (Km-Meter-mm/Mile-foot-inch) o 23. Power : P1/P2/P3. o 24. G-Force calibration. o 25. Password Configuration. o 26. Default. o 27. Alarm Pressures, Low/High. (version 4T) o 30. System version. Conditions of guarantee Product modifications Damages and liability Disposal ALFANO VISION 31 31 32 33 33 33 34 36 38 40 41 41 41 43 44 44 46 47 49 50 50 50 51 51 53 55 55 56 57 59 60 61 62 62 62 64 65 65 65 67 68 68 68 68 69 Copyright 2005 Alfano, S.A. All rights reserved. 8 AStrO – AStrO Formula A B C D E F A B C D E F G H I J K L M N O P Q R Engine speed gauge (RPM) Temperature alarm signal 2 Right-hand button Infrared connection to PC Left-hand button Temperature alarm signal 1 Gear box ratio G-Force sensor indicator Temperature gauge 2 Peak / direct reading (RPM – T°1 – T°2 – SPEED) Engine speed (RPM) Temperature 1 (K or NTC) Temperature 2 (K or NTC) Celsius / Fahrenheit Imperial / Metric Indicators Speed Split time indicators (magnetic strip) Information message Reference time (Best / Previous / Target) / Section times Lap time difference (Best / Previous / Target) Lap time Temperature gauge 1 Backlight Copyright 2005 Alfano, S.A. All rights reserved. 9 AStrO 4T – AStrO Formula 4T A B C D E F G H A B C D E F G H I J K L M N O P Q R Engine speed gauge (RPM) Temperature alarm signal K2 Right-hand button Infrared connection to PC Left-hand button Temperature alarm signal K1 Temperature alarm signal NTC2 or Alarm Pressure P2 Temperature alarm signal NTC1 or Alarm Pressure P1 Gear box ratio G-Force sensor indicator Gauge : Temperature NTC2 or Pressure P2 Peak / direct reading (RPM – T°1 – T°2 – SPEED) Engine speed (RPM) Temperature K1 Temperature K2 Celsius / Fahrenheit Imperial / Metric Indicators Speed Split time indicators (magnetic strip) Information message Reference time (Best / Previous / Target) / Section times Lap time difference (Best / Previous / Target) Lap time Gauge : Temperature NTC1 or Pressure P1 Backlight Copyright 2005 Alfano, S.A. All rights reserved. 10 AStrO – AStrO Formula AStrO 4T – AStrO Formula 4T START STOP MENU « DATA » 01. 02. 03. 04. 05. 06. 07. 08. System OFF Recall Download Best Laps Theor Lap Data Reset Counters Demo Lap MENU « CONFIG SYSTEM » 10. 11. 12. 13. 14. 15. 16. 17. 18. 19. 20. 21. 22. 23. 24. 25. 26. 27. 30. Strip Number Strip Start Best – Previous – Target Alarm Temperatures Stroke Peak : RPM – T°1 – T°2 – Speed RPM Graph Speed Config Speed Pits Gearbox Config Display Mask Celcius – Fahrenheit Metric – Imperial Power : P1 – P2 – P3 G-Force Calibration Password Default Alarm Pressures (4T) Serial Number Copyright 2005 Alfano, S.A. All rights reserved. 11 PRO+ B C D E F C D E F G H I J K L M N O P Q R Temperature alarm signal 2 Right-hand button Infrared connection to PC Left-hand button Temperature alarm signal 1 Temperature gauge 2 Peak / direct reading (RPM – T°1 – T°2 – SPEED) Engine speed (RPM) Temperature 1 (K or NTC) Temperature 2 (K or NTC) Celsius / Fahrenheit Imperial / Metric Indicators Speed Split time indicators (magnetic strip) Information message Reference time (Best / Previous / Target) / Section times Lap time difference (Best / Previous / Target) Lap time Temperature gauge 1 Backlight Copyright 2005 Alfano, S.A. All rights reserved. 12 PRO+ START STOP MENU « DATA » 01. 02. 03. 04. 05. 06. 07. 08. System OFF Recall Download Best Laps Theor Lap Data Reset Counters Demo Lap MENU « CONFIG SYSTEM » 10. 11. 12. 13. 14. 15. 16. 17. 18. 19. 20. 21. 22. 23. 24. 25. 26. 30. Strip Number Strip Start Best – Previous – Target Alarm Temperatures Stroke Peak : RPM – T°1 – T°2 – Speed --------------Speed Config ----------------------------Display Mask Celcius – Fahrenheit Metric – Imperial Power : P1 – P2 – P3 --------------Password Default Serial Number Copyright 2005 Alfano, S.A. All rights reserved. 13 Copyright Copyright 2004 Alfano, S.A. All rights reserved. Any reproduction, conveyance, distribution or storage, in part or in whole, of the contents of this document, in any form, without the prior written authorization of Alfano S.A. is prohibited. Patent No. EP 0632350 : “Chronograph system provided on competition machines or similar devices allowing the user to display instantly and precisely an overview of his accomplished performances”. All rights reserved. AStrO, AStrO Formula et PRO+ are trade marks owned by Alfano S.A. Alfano S.A. implements an ongoing method of development. Therefore, Alfano S.A. reserves the right to incorporate changes and improvements to all the products described herein, without prior notice. Alfano S.A. may in no case be held responsible for any loss of data or revenue, or any specific damage or incident, whether direct or indirect. The contents of this document are provided « as is ». With the exception of obligatory applicable laws, no guarantee of any type whatsoever, whether explicit or implicit, including but not limited to those implicit guarantees regarding aptness for commercialization and adaptation to a specific use, is agreed regarding the reliability or contents of this document. Alfano S.A. reserves the right to revise this document or withdraw it at any time, without prior notice. For you to make sure of the accessory availability, which may very by region, contact your nearest Alfano S.A. retailer. Introduction We would like to thank you for purchasing this Alfano gauge.This system is the latest in a line of Alfano data acquisition systems. It has the capacity to record 24 hours of data and the display can be configured to accomodate the needs of the driver. The system has the ability to record lap times with partial times, RPM, water temperature of the cooling system oil temperature, cylinder head temperature, and even exhaust temperature. The AStrO and formula models will even record longitudinal and lateral accelerations experienced while racing on a track . When finished the data can be downloaded, and will allow the driver to map the track, supplying an even more precise analysis (all in real time) The AStrO 4T & l’AStrO Formula 4T also offer the possibility of up to 4 different temperatures or 2 temperatures + 2 Oil and Fuel pressure from 0-10 Bars. Alfano offers a 2 year warranty and is backed by a reputation that is internationally acknowledged by motorsports professionals. We listen to our customers: our goal is to help you! Therefore, do not hesitate to contact our customer services if you have any questions or technical difficulties. We often make free updates available to our clients through our local retailers or on our wesite www.alfano.be. Please, visit our web site often. We hope that these data acquisition systems will allow you to improve in a simple, effective manner while making it an even greater pleasure to drive ! We thank you for the trust you have placed in us. Have a good race ! Copyright 2005 Alfano, S.A. All rights reserved. 14 Preliminary remarks This document includes the following diagrams, which draw your attention to important information. = Pay close attention for safety reasons or in order not to damage the device. = Additional and useful information for the use of the data acquisition system in a fully safe manner. = Special tips for using the data acquisition system in the best and fastest way ! Over 123 drawings, illustrations, and photos appear in this usage manual, which will help increase your understanding. This manual forms part of the device’s standard equipment. Read its contents carefully before turning on the device. Please keep this manual for future reference. For your safety and that of the device The following safety advices must be followed for your safety, and in order to avoid any damage to the data acquisition system. Batteries and Accessories AStrO, AStrO 4T & PRO+ were designed to be run on two regular batteries : 1.5-volt type AA , IEC Code (R6). AStrO Formula & AStrO Formula 4T were designed to be run on two regular batteries : 1.5-volt type C, IEC Code (RL14). Note : It is imperative to utilize quality batteries by well known manufacturers to eliminate the possibility of leaks. Damage caused by battery acid will be considerable and irreversible. Verify often the condition of the batteries when not in use. Never leave uncharged batteries in the unit. Any damage caused by battery acid will annul the warrenty. Use only batteries and accessories approved by the manufacturer of the data acquisition system and specifically designed for the model of data acquisition system. In order for you to obtain approved accessories, please contact your local retailer. Copyright 2005 Alfano, S.A. All rights reserved. 15 Use only a X20 type screwdriver (provided with your data acquisition system) to attach the accessory connectors to the device. Please, do not overtighten the connectors. Stop tightening the screws as soon as the red joint is pressed down. Please ensure the various connectors are attached in their correct location. General Information Serial number Your data acquisition system has a unique 9-digit serial number. This serial number is an important piece of information for the post-sales and technical services, which are provided for our customers. Please keep this number handy (see menu 30. – page 67). Security code This code protects your data acquisition system from unauthorized use. To activate this code (see menu 25. Password – page 65). Seal The data acquisition system is perfectly sealed and water-resistant, but this does not mean that it is totally waterproof (you cannot submerge it in water). You will have no problem during races in the rain. Please ensure that the connectors are well-protected. The data acquisition system is IP56 certified, which means that it is resistant to any dust penetration and can be hit by a stream of water at medium pressure from all sides. Magnetic strip or infrared The data acquisition system described in this manual was designed specifically to work on tracks equipped with magnetic strips. This system was developed by our research team and it is protected by a patent (EP 0632350). When seeking accuracy and quality, we suggest you drive on tracks equipped with the Alfano magnetic strips. However, the data acquisition system also works on tracks that are not equipped with Alfano magnetic strips through the use of an infrared system, which is sold separately. Remark: We support various types of infrared systems: our infrared sensor, which is sold separately, works with most of the infrared transmitters available on the market. We also sell infrared transmitters (see accessories - page 5). The data acquisition system is attached by a cable to a magnetic strip sensor. This sensor is placed under the vehicle, a few centimeters above the ground. When the magnetic strip sensor passes over the magnetic strip on the track, the magnetic strip sensor is activated and it sends an signal to the data acquisition system. The magnetic strip is made up of small, special, permanent magnets. The magnetic strip emits free, permanent energy for approximately 200 years. Once the magnetic sensor is installed on the vehicle, you can drive on every track equipped with magnetic strips, and the system will work automatically, trouble free. Copyright 2005 Alfano, S.A. All rights reserved. 16 We have more than 850 equipped tracks around the world, 460 of which are in Europe, and the list is growing daily. We have a team of installers who work year round throughout the world. A list of « equipped tracks » is regularly updated at the following website : www.alfano.be. Please visit it regularly! An added feature of the magnetic strip is that it is in a straight line. While driving and crossing this line, you need not worry about other drivers crossing the line at the same time, because the magnetic sensor detects the signal immediately. This same precision does not exist when you use an infrared system. The signal can be delayed or disrupted by interference caused by other drivers between you and the transmitter. Also, the angle is quite large (17 degrees or more, depending on the system), whereas the magnetic strip is a short line of less than one centimeter in width. If you are seeking quality and precision, the magnetic strip is superior ! Tracks including several sections Tracks can be divided into several portions (which we call sections) through the use of magnetic strips or infrared sensors. The first thing to know is how many magnetic strips or infrared sensors are placed on the track, and to set this up in the data acquisition system (see Menu 10. Strip Number – page 50). Every time you drive over a magnetic strip, the data acquisition system records a segment time. These segment times allow you to compare your time on different sections of the track very accurately, and therefore you may tune your machine more effectively. The total of the section will be equal to the total of one lap. Copyright 2005 Alfano, S.A. All rights reserved. 17 The data acquisition systems : description The units described in this manual are on-board data acquisition systems designed for motor sports. - The AStrO & AStrO Formula : o Lap time o Up to 6 section times per lap o 2 temperatures o Engine speed RPM o Speed with or without sensor o Gearbox ratios o G Force : lateral and longitudinal - The AStrO 4T & AStrO Formula 4T: o Lap time o Up to 6 section times per lap o 4 temperatures or 3 temperatures + 1 pressure or 2 temperatures + 2 pressures o Engine speed RPM o Speed with or without sensor o Gearbox ratios o G Force : lateral and longitudinal - PRO+ o o o o o Lap time Up to 6 section times per lap 2 temperatures Engine speed RPM Speed with or without sensor Front side : AStrO & AStrO Formula (page 8) AStrO 4T & AStrO Formula 4T (page 9) The system comprises of a display, two pressable buttons, 10 signal lights for the engine speed RPM, 4 signal lights for the temperature and pressure alarm signals, and one infrared connection used to transfer data to a PC. PRO+ (page 11) The system primarily comprises a display, two pressable buttons, 4 signal lights for the temperature alarm signals, and one infrared connection used to transfer data to a PC. Copyright 2005 Alfano, S.A. All rights reserved. 18 Back side : AStrO & AStrO 4T Port A B C D E F G H Port B C AStrO & PRO+ PRO+ (page 23) Color code G-Force sensor (except for PRO+) --------------------------------------1 temperature sensor (K or NTC) ---------------------------------------1 temperature sensor (K or NTC) ---------------------------------------Magnetic sensor or infrared sensor -------------------------------------Speed sensor --------------------------------------------------------------High sensitivity engine speed (RPM) sensor Engine speed (RPM) sensor Batteries (2 x Type AA –IEC Code: R6) AStrO 4T (page 23) Color code With adapter, 2 temperature sensors K1 + NTC1 or 1 temperature sensors K1 + 1 pressure sensor P1 -------------------With adapter, 2 temperature sensors K2 + NTC2 or 1 temperature sensors K2 + 1 pressure sensor P2 -------------------- Back side AStrO Formula Copyright 2005 Alfano, S.A. All rights reserved. Yellow Red Red Green Blue Red Red 19 Extra box for the AStrO Formula All the connections between the sensors and the data acquisition system are in this box. Port A B C D E F G H Port B C AStrO Formula (page 23) Color code G- Force sensor (except for PRO+) -------------------------------------1 temperature sensor (K or NTC) ---------------------------------------1 temperature sensor (K or NTC) ---------------------------------------Magnetic sensor or infrared sensor -------------------------------------Speed sensor --------------------------------------------------------------High sensitivity engine speed (RPM) sensor Engine speed (RPM) sensor Batteries (2 x Type C –IEC Code: LR14) AStrO Formula 4T Yellow Red Red Green Blue (page 23) Color code With adapter, 2 temperature sensors K1 + NTC1 or 1 temperature sensors K1 + 1 pressure sensor P1 ------------------With adapter, 2 temperature sensors K2 + NTC2 or 1 temperature sensors K2 + 1 pressure sensor P2 ------------------- Red Red Copyright 2005 Alfano, S.A. All rights reserved. 20 How to use Use of keys The data acquisition system is simple to use ! All of the features can be accessed with just two buttons. In the following section of this document, we will explain you how best to use them. Turning on To turn on the data acquisition system, press the two buttons, right and left, and hold them for two seconds. When you release the buttons, the display turns on and the system asks you whether or not you would like to activate the backlighting of the screen. If you wish to activate it, press the right-hand button to choose the ON option. Otherwise, choose the OFF option by pressing the left-hand button. The data acquisition system will choose the OFF option automatically after 2 seconds if nothing has been choosen. Manual turning off To turn off the data acquisition system, use the left-hand button to select Menu 1 : « System Off », and press the right-hand button. Automatic turning off The data acquisition system automatically turns off when not in use for 10 seconds. Low battery warning signal The system detects when the batteries are low. The 4 temperature lighted signals will begin to blink rapidly one by one. When the data acquisition system is in the START mode, 10 minutes after the system has detected the batteries are low, it automatically returns to the STOP mode, and the message « CHANGE BAT » is displayed. The batteries must be replaced, otherwise the system will not restart in the START mode and access to the menu « Config System » will be denied. Note : If while the data acquisition system is in the START mode and the battery current is broken the information may be lost Throughout the time in which the low battery warning signal is activated, the other signal lights and the backlight remain inactive, so as to reduce the use of energy and somewhat lengthen the time in which the data acquisition system may be use. Copyright 2005 Alfano, S.A. All rights reserved. 21 Installation You must properly install the data acquisition system and its accessories before use. Please read this chapter carefully. Important : when not in use, the ports of the data acquisition system must always be protected with the caps provided. See page 31. AStrO, AStrO 4T & PRO+ These data acquisition systems are made in one single box : the batteries and sensors are fitted onto the unit itself. This is very advantageous when you do not have a great deal of space, as is the case in a go-kart, for instance. These devices are better adapted to such conditions. In most cases, the data acquisition system is attached to the steering wheel with a M8 nut. The two red-colored, rubber rings must be to each side of the steering wheel. The hard, black-colored, plastic ring is used to keep the data acquisition system at a distance of 4 millimeters from the steering wheel. When installing the device in place, ensure that the back side of the box is not touching any part of the steering wheel. This will avoid causing damage to the device. Copyright 2005 Alfano, S.A. All rights reserved. 22 AStrO Formula , AStrO Formula 4T The AStrO Formula & AStrO Formula 4T are made up of two parts : the batteries and the sensors are fitted into a separate box, which is attached to the data acquisition system via a cable. This specific layout provides several advantages. The main advantage is that the back of the data acquisition system is flat, which is quite helpful if you wish to install the device on a dashboard. In addition, the batteries of the AStrO Formula & the AStrO Formula 4T have a longer life span. The data acquisition system is attached in place using 4 M5 screws, which are provided with the unit. When installing the unit in place, ensure that the back side of the box is not touching any part of the steering wheel. This will avoid causing damage to the unit. Copyright 2005 Alfano, S.A. All rights reserved. 23 The accesory color codes The back side of the data acquisition system is color coded for each of its sensors. The color code on the end of the corresponding sensor must match that of the data acquisition system port. Thus, making it virtually impossible to make a mistake ! Color codes are as follows : Port Port Port Port Port «A» «B» «C» «D» «E» Yellow Red Red Green Blue For For For For For the G- Force sensor temperature sensors (type NTC or type K) temperature sensors (type NTC or type K) the magnetic sensor or the infrared sensor the speed sensor Make sure the color code on the port at the back of the data acquisition system matches the color code on the sensor you wish to install. Make sure the color code on the back of the data acquisition system and the sensor are placed on the same direction, to avoid attaching the connector back to front ! Also, make sure the connector fits in perfectly before screwing it. This must be done without difficulty. If it is difficult to screw in, it is quite possible that the sensor you are trying to connect to the data acquisition system is in the wrong port. Never force it in ! Please, use only a type TX20 screwdriver (you are provided with a screwdriver of this type) to attach the sensors in place. Please, be careful not to overtighten the connectors and stop tightening as soon as the red joint is pressed down. In any case, make sure that the various sensors are properly fixed in placed. Copyright 2005 Alfano, S.A. All rights reserved. 24 The G- Force sensor The G- Force sensor must be placed horizontally and level. The sensor cable must be heading towards the back of the vehicle. Installation on go-karts : Before installing the sensor on the go-kart, the G-Force sensor must be attached to the articulated bracket, which was specifically designed for this purpose. Then, the ensemble must be fitted to the nassau panel. This articulated bracket allows the G- Force sensor to be installed horizontally. Important : once installed, the G- Force sensor must be calibrated (menu 24. G-Force calibration – page 64). Important : before calibrating, make sure your vehicle is on a flat, horizontal road. Important : install the sensor in a place where the vehicle vibration is low, because vibration may distort the G- Force calibration. The G- Force sensor is coded with the color Yellow. The sensor is equipped with the articulated bracket. Copyright 2005 Alfano, S.A. All rights reserved. 25 Temperature sensors The data acquisition system enables to measure the temperature in the cooling circuit, as well as the oil, cylinder head and exhaust gases ! The data acquisition system is able to use either NTC or K type technology to perform these temperature measurements. Sensors using the « NTC » technology, measure temperatures ranging from 0°C to 285°C, depending on the sensor. This technology is used to mesure the temperature of the cooling liquid in the line (using an adapter) or on the cylinder head. Other sensors also allow temperature measurement of the engine oil and of the spark plug. Sensor using the « K » type thermocouple technology, measure temperatures as high as 1000°C. This technology is used for measuring the exhaust gas temperature. Copyright 2005 Alfano, S.A. All rights reserved. 26 The AStrO 4T & AstrO Formula 4T temperature sensors These data acquisition systems may support 4 temperature sensors. A specially designed adapter is utilized. This adapter is made up of one male plug to be connected on the side of the data acquisition system, and two female plugs to be connected to the sensors. This adapter allows connection to a single port of the data acquisition syst., « B » or « C », 1 K type thermocouple temperature sensor + 1 NTC type temperature sensor Color code : sensors and extension cables using the NTC type technology : BLACK connector, RED-colored sticker Color code : sensors and extension cables using the K type thermocouple technology : RED connector, RED-colored sticker All the temperature sensors are +/- 40 centimeters in length, and all end with a male connector (see page 3 – List of accessories.) Extension cables of different lengths are sold separately. The influence of interferences from the high tension coil on the temperature reading. The data acquisition systems are electronically protected from interferences. However, highly aggressive interferences may influence – to a smaller or a larger extent – on the temperatures displayed. To avoid this phenomenon, we suggest you install : a spark plug with an internal resistance, or a spark plug cap with an internal resistance The sensor and the extension cable are connected with two screws (this is the recommended method). To connect and disconnect rapidly, remove the two screws on the male connector and use the rubber ring placed on the female connector. Warning : the seal is not guaranteed when using this last method. Copyright 2005 Alfano, S.A. All rights reserved. 27 Pressure sensor Oil and Fuel for the AStrO 4T & AStrO Formula 4T The sensor is connected to Port B and C of the unit which is the same port used for the NTC1 and NTC2 temperature connection. - The Pressure sensor is color code red. The magnetic strip sensor The magnetic strip sensor is placed as close as possible to the road. It must be placed on the floor pan of your vehicle, parallel to the vehicle. Important : We recommend you place the magnetic strip sensor in front of the speed sensor, so that it receives the impulse first from the track magnetic strip. This way, the system may eliminate the track magnetic strip impulse received by the speed sensor, which will cause an abnormal speed rise. See chapter « The influence of the track magnetic strip on the speed sensor » (page 29). - The magnetic strip sensor is coded with the color Green. - The sensor is provided with a M6 bolt for its attachement. The infrared sensor and transmitter The infrared sensor is placed in such a way that it will accurately detect the signals from the infrared sensors placed at the edge of the track. Receiver and transmitter must be face to face at the same height. Copyright 2005 Alfano, S.A. All rights reserved. 28 - Make sure you properly align your infrared receiver and transmitter. - The infrared sensor is coded with the color Green. The speed sensor The speed sensor must be attached to a non-moving part of your vehicle. The speed sensor detects the passage of a permanent magnet previously placed on either wheel or on the transmission shaft. Every time the magnet passes over, the data acquisition system calculates your speed by knowing the circumference of your wheels and the time it took for you to make a lap. Placement on go-karts If you decide to place the sensor on one of your front tires, the sensor is to be placed onto the spindle of the axle using the bracket provided, (large or small model) and a small permanent magnet is attached on the inner side of the rim using an adhesive strip. However, if you decide to place the sensor on the transmission shaft at the back of the gokart, the sensor is to be placed on a fixed part of the chassis with the bracket provided (large or small model) and a specially magnetized collar is placed on the transmission shaft. Important : In order to obtain the accurate speed, only one magnet is to be placed on the transmission shaft or on one of your wheels. In order to check whether the speed sensor is properly in place, go to Menu 17. Speed Config (page 57) and make sure that the 2 temperature lighted signals of the data acquisition system light up every time the speed sensor receives the signal from the magnet, or in other words, every time the speed sensor is in front of the magnet. Copyright 2005 Alfano, S.A. All rights reserved. 29 The influence of the track’s magnetic strip on the speed sensor If the speed sensor is placed too close to the road, it will receive an extra impulse from the track’s magnetic strip, and the speed value will increase abnormally when passing over the magnetic strip. Preferably, in order to obtain the accurate speed, we suggest you place the speed sensor in such a way that it does not receive the impulse from the magnetic strip (place the sensor as high as possible away from the road). If you cannot place the speed sensor in such a way so as to avoid the influence of the track’s magnetic strip, there is an automatic electronic filter. But the filter will only work if the magnetic strip sensor of the data acquisition system is placed in front of the speed sensor. In fact, the track’s magnetic strip must be first to pick up the signal, so that the data acquisition system is ready to eliminate the impulse from the track’s magnetic strip received by the speed sensor. Note : the filter is able to detect and eliminate around 95% of the impulse from the magnetic strip. Important : in order for the filter to work properly, place the magnetic strip sensor in front of the speed sensor, as explained above. The speed sensor is coded with the color Blue. The engine speed sensor The data acquisition system makes it possible to measure the speed of your engine (RPM). There are different engines, each with their own particular ignition, especially in terms of power. The data acquisition system has two inputs for measuring the engine speed. The first input, i.e. port « G », is used for the so-called normal power ignitions; and the second input, i.e. port « F », is used for ignitions with weaker power. In the case of an engine whose ignition power is normal, use port « G ». It is the data acquisition system’s main port. Take the black wire provided with the data acquisition system, place this wire along the spark plug cable using the spiral sheath made of black plastic (provided). Then, pass the other end of the cable in a coil through the two holes located at the back of the data acquisition system : port « G ». Copyright 2005 Alfano, S.A. All rights reserved. 30 However, if the ignition power of your engine is weak, you might notice some fluctuation in the measurement of your engine speed. This is due to a large extent to the weak power of the ignition. The data acquisition system will not be able to receive the correct signals. In this case, you must use a high-sensitivity wire, which is sold separately. It was specially designed for this type of ignition. The procedure is the same : take the high-sensitivity wire, place it along the spark plug using the spiral sheath of black plastic, then splice its banana connection into port « F » of the data acquisition system. Extra trick : when you increase the contact surface of the high-sensitivity black wire with the high-voltage spark plug wire, you are increasing proportionally the intensity of the signal. For instance : if the contact surface is increased from 10 to 20 cm, the signal intensity is doubled. Another type of ignition > explanation : the coil that generates the high voltage to power the spark plug is located on the spark plug itself. In this case, there is not enough room to gather the high voltage required for operation of the data acquisition system’s lap counter. There is a solution : you must connect electrically (using bare wires) the high-sensitivity wire that is sold separately onto one of the low-voltage wires that power the high-voltage coil, and splice its banana connector into port « F » of the data acquisition system. In the event that the high-voltage coil is attached to the spark plug, only one of the two low-voltage wires that power the high-voltage coil allows operation of the lap-counter. Test the two wires before carrying out the final installation of the black wire. A black plastic, spiral-shaped sheath, provided with the data acquisition system, is used to attach the black wire to the high-voltage spark plug wire. Copyright 2005 Alfano, S.A. All rights reserved. 31 How to change the batteries AStrO, AStrO 4T & PRO+ were designed to be powered using two regular batteries : 1.5volt type AA, IEC Code (R6). AStrO Formula & AStrO Formula 4T were designed to be powered using two regular batteries : 1.5-volt type C, IEC Code (RL14). Use of any other batteries will void the warranty of this device, and may be hazardous. Type AA « R6 » Type C « RL14 » Note : It is imperative to utilize quality batteries by well known manufacturers to eliminate the possibility of leaks. Damage caused by battery acid will be considerable and irreversible. Verify often the condition of the batteries when not in use. Never leave uncharged batteries in the unit. Any damage caused by battery acid will annul the warrenty. Before replacing the batteries, make sure the data acquisition system is off. Remove the battery compartment cover. Remove the old batteries and then place two new batteries inside; make sure that the "+" and "-" symbols match those engraved on the outside of the box. Replace the cover and dispose of the old batteries according to regulations. Please, use only a TX20 type screwdriver (provided with your data acquisition systems). Please do not overtighten the connectors, otherwise you may damage the unit. Protective caps IMPORTANT : The ports of the data acquisition system must be covered with the caps provided while not in use. Please, use only a TX20 type screwdriver (provided with your data acquisition systems). Please do not overtighten the connectors, otherwise you may damage the unit. Copyright 2005 Alfano, S.A. All rights reserved. 32 The « STOP » mode The STOP mode is the root menu of the data acquisition system. (See figure below) When you turn on your data acquisition system, it is automatically in the STOP mode. You will therefore see the the text « STOP » instead of lap times. START STOP DATA (MENU 01 – 08) Config System (MENU 10 – 30) In the STOP mode, all data is displayed in real time on the data acquisition system’s screen : engine speed, speed, temperatures, etc. Copyright 2005 Alfano, S.A. All rights reserved. 33 The « START » mode The data acquisition system turns on automatically (START) when detecting the magnetic strip or the infrared transmitter, depending on the detection system previously selected. The START mode is from where the data acquisition system records the measurements from the various sensors. The information displayed Example : see figure above - Lap time 1’23’’09 - Engine speed « RPM » with 10 lighted signals 17.58 (no signal lights for the PRO+) - Speed 129 - Temperature 1 63 - Gearbox ratio 4 - Temperature 2 737 - Time difference « Best/Previous/Target » +0”71 - Section times (if any) 38’’07 - Number of races 03 - Number of laps saved for the last race 018 - Total numer of laps saved 123 - The arrow to the left indicates the best time - The arrow to the right indicates the highest RPM recorded - Access to the two activated counters (menu 07. Counters – page 47) o Operation time of the engine (RPM) o Distance driven - Access to the speed warning (menu 18. SPEED PITS – page 59) (None for the PRO+) - Management of 4 temperatures for models AStrO 4T & AStrO Formula 4T (page 53) The unit will return to the stop mode when : o o o the system does not detect the track’s magnetic strip for 10 minutes, or the system does not detect the RPM for 10 seconds, or by pressing the left-hand button « STOP » on the data acquisition system. Copyright 2005 Alfano, S.A. All rights reserved. 34 Management of the FLASH memory The FLASH memory is divided into 2 parts. - The first part of the memory is used to record detailed information every 0.1 of a second : o o o o o o RPM Temperatures Speed G-Force Gearbox ratio As well as lap times and section times Most of this information is displayed in the « VIEW » mode of the data acquisition system, as well as in the ALFANO VISION (page 67), and can be displayed in full detail on a PC using the « LynX » program. The time required to fill this first part of the memory depends on the number of sensors connected ; this time ranges between +/- 130 Minutes and +/- 60 Minutes. Once back to the STOP mode, the remaining recording time is displayed, for instance « 123 MIN ». This is the recording time still available in this first part of the memory. - The second part of the memory is used to record the main information for each lap. (Detailed information is not recorded and the VIEW mode cannot be accessed). o o o o o High and low RPM for each lap High and low temperatures for each lap High and low speed for each lap Lap time Section times The time available to fill this second part of the memory ranges between 24 Hours and 40 Hours. The data acquisition system indicates the automatic change from the first part to the second part of the memory by activating the 4 temperature lights, which blink for 10 seconds. The data acquisition system then starts a new race. Copyright 2005 Alfano, S.A. All rights reserved. 35 Once back in the STOP mode of the second part of the memory, you will see on the display the number of laps still available to save, for instance : 752 laps (752 LAPS). When the message « - - FULL - - » is displayed that means no more data can be recorded. In that case, the data acquisition system will not work in the START mode and must be reset first « Menu 06. Data Reset » (see page 47). The data acquisition system memory is set up to allow use for over 24 HOURS. In the second part of the memory,the « VIEW » mode cannot be accessed (in fact, detailed information will not be saved) while displaying laps in mode 02. Recall, 04. Best Laps et 05. Theor Lap. IMPORTANT : in START mode, the system is continuously saving data in a FLASH memory. The data saved in this memory cannot be partially deleted. This means that data is being saved from the time you drive over the magnetic strip until you return to the STOP mode though this information is not utilized, it takes up space in the memory. Therefore, it is very IMPORTANT that you go to STOP mode as soon as possible, to avoid filling the memory with useless information. Copyright 2005 Alfano, S.A. All rights reserved. 36 The « View » mode The « View » mode is an in-depth method of data analysis. The « View » mode is a sub-menu of : STOP 01. System OFF 02. Recall VIEW 03. Download 04. Best Laps VIEW 05. Theor Lap VIEW 06. Data Reset 07. Counters 08. Demo Lap Config System (Menu 10-30) The « VIEW » mode allows you to view one full lap in detail. Actually, the data acquisition system is able to run through a saved lap from start to finish, dividing it into tenths of a second (0.1 Sec), at a pace you choose. For instance : if the lap time you choose is 57.34 seconds, you will be able to view 574 screens, which represent one full lap around the track. On each of these screens, you will be able to see, in real time, the advancement of lap time by tenths of a second (0.1 Sec), RPM, temperatures, speed, gearbox ratio, and the arrows which represent lateral and longitudinal accelerations (see the vehicle turning right, left, accelerating and decelerating). When you return into the « VIEW » mode, the data acquisition system is at the start of the lap. You will note that all the data displayed refer to the beginning of the lap (As if you are on the first magnetic strip). Copyright 2005 Alfano, S.A. All rights reserved. 37 In order to run through this lap, watch the display at the lower left corner and at the lower right corner to see the arrows which alternate with the word « RETURN ». When these arrows are displayed, select them in order to move forward and back, exploring the lap screen by screen. If you wish to look through the data quicker, hold down the button. After one second, the scrolling of data will be 2 times faster than real time. Additional information : on tracks using several magnetic strips, when looking through the track in the « VIEW » mode, each section time, and its number, is displayed at the lower left corner. In the event that the track has only one magnetic strip, the lap time is displayed in the corner. On tracks with several magnetic strips, you will also notice that the data acquisition system is able, when viewing the track, to position itself accurately over each magnetic strip, in order to display detailed information at that specific location. The central figure below shows the data acquisition system on the magnetic strip 2, between section 1 and section 2. Thanks to this technological advancement, you will get accurate information, anywhere along the track, in order to understand and improve the tuning of your machine and, of course, your driving. While running through the lap, you may also see 4 arrows on the display of the data acquisition system : Copyright 2005 Alfano, S.A. All rights reserved. 38 The arrows pointing up and down indicate an increase or decrease in the engine speed. The arrow pointing left is activated on the best lap, whereas the arrow pointing right is activated on the lap with the highest engine speed RPM. Other arrows : when the G- Force sensor is connected to the dat acquisition system while recording (in the first part of the memory), you see arrows at the bottom of the display, in the middle of the text line. These arrows represent the lateral and longitudinal acceleration, in other words, the direction, the acceleration or the deceleration of the vehicle in real time. Deceleration Left turn Right turn Acceleration The number of arrows represents the intensity of lateral acceleration. lateral acceleration, the more arrows are displayed. The greater the In order to exit the « VIEW» mode, wait for the word « RETURN » to be displayed at the lower left corner, and then press the left-hand button for 1 second. The G-Force sensor also makes it possible, using the progam developed by our research team, to study the races you have done on a computer, and therefore, to analyse them as precisely as possible in real time. Use of menus The data acquisition system has two menus : - The main menu « DATA » (pages 41 to 49) for common use o o o o - To To To To see saved information transfer data to the VISION or a COMPUTER clear the memory parameterize time and distance counters The set-up menu « Config System » (pages 50 to 65) o To set up every parameter required to meet your needs Copyright 2005 Alfano, S.A. All rights reserved. 39 You may access these two menus from the STOP mode. o To scroll through the main menu « DATA », Briefly press the left-hand button on the data acquisition system o To enter the set-up menu « Config System », Press and hold for 1 second the left-hand button on the data acquisition system STOP DATA (MENU 01 – 08) Config System (MENU 10 – 30) o The left-hand button is used mainly to : Scroll through the menus and sub-menus o The right-hand button is used mainly to : Enter the menus, edit and set up Each menu is identified by its number at the lower left corner of the display. For instance, see figure below, menu 10. These arrows (see figure below) indicate that by briefly pressing the corresponding button (in this case, the left-hand button), you may access the following menu. To exit each menu, briefly press the left-hand button « EXIT » (see figure below) and proceed to other menus set-up or return to the STOP mode. Copyright 2005 Alfano, S.A. All rights reserved. 40 In every menu or sub-menu, the system will automatically return to the STOP mode after 60 seconds without your pressing any button, except for the menu 08. DEMO. To return to the STOP mode quickly from any menu, press the left-hand button for one second. Using this trick you avoid scrolling through all the menus, and therefore save time. Always be careful to exit each sub-menu correctly. Basically, you must never exit a set-up mode by using this trick. How to modify a numeric parameter The same method is used to modify most of the various numeric parameters in the « config system » sub-menus. This method, which is explained next, is used in the menus : o 12. Target o 17. Speed Config o 13. Alarm Temperatures o 18. Speed Pits o 16. RPM Graph o 25. Password Config o 27. Alarm Pressures When you see, at the lower right corner of the display, the arrow ponting up alternating with the arrow pointing down every two seconds (see figures above), it means that you are about to modify the numeric data displayed. To increase this numeric data, wait until the arrow points up, and then press the right-hand button. Otherwise, to reduce this numeric data, wait until the arrow points down, and then press the right-hand button. Hold the button down if you want to scroll more quickly. Otherwise, briefly press to obtain more accuracy. Copyright 2005 Alfano, S.A. All rights reserved. 41 Main menu « DATA » To scroll through the main menu « Data », from the STOP mode, briefly press the left-hand button repeatedly. To activate any option, press the right-hand button. To return to the STOP mode, press for 1 second the left-hand button on the data acquisition system. STOP 01. System OFF 02. Recall 03. Download 04. Best Laps 05. Theor Lap 06. Data Reset 07. Counters 08. Demo Lap Config System (Menu 10-30) 01. System OFF. If you wish to turn off your data acquisition system, briefly press the right-hand button. 02. Recall. This menu allows you to check all the laps saved in the memory. The best lap time is displayed before entering the menu « Recall ». Copyright 2005 Alfano, S.A. All rights reserved. 42 To enter the menu, press the right-hand button on the data acquisition system. When activating this menu, the data acquisition system shows the last lap saved. The data acquisition system is able to show automatically for each lap : o o o o o o Lap time, Section times (if the system is set-up to do so) The highest and the lowest RPM, The highest and the lowest temperatures, The highest and the lowest speed, The highest and the lowest gearbox ratio, See the examples in the figures above, this lap comprises 3 sections, Sequence 1 : display time 1 second o First section time, o The highest RPM, o The highest temperatures, o The highest speed, o The highest gearbox ratio. - Sequence 2 : display time 1 second o The second section time replaces the first section time - Sequence 3 : display time 1 second o The third section time replaces the second section time - Sequence 4 : display time 2 second o The lowest RPM, o The lowest temperatures, o The lowest speed, o The lowest gearbox ratio. Copyright 2005 Alfano, S.A. All rights reserved. 43 Also, for each sequence 1, 2, and 3, you may see three sets of figures between the arrows. The first two figures on the left refer to the race, the three following figures refer to the lap of said race you are viewing, and the three last figures refer to the lap you are viewing of all the laps saved. Example : 08-022-173. This means that you are viewing the 22nd lap of the 8th race, and that said lap is the 173rd lap saved by the data acquisition system. To view other laps : Wait until you see the arrows – left and right – on the text line, see the example of sequences 1, 2, and 3 in the above figures. Then, briefly press the left-hand button to view the previous laps, or briefly press the right-hand button to view the next laps. When you release the buttons, the sequence defined above starts again automatically. To exit the menu « RECALL » : Wait until you see the word « EXIT » on the text line, on the left – see example of sequence 4 in the above figure. Then, press the left-hand button for 1 second. To view this lap in the « VIEW » mode : Wait until you see the word « VIEW » on the text line, on the right – see example of sequence 4 in the above figure. Then, press the right-hand button for 1 second. For more information on the « VIEW » mode, see pages 36 to 38. Section = time between two magnetic strips. Example : on a track equipped with three magnetic strips, the track is divided into three parts, and each part = one Section. 03. Download. (Data transfer) The data acquisition system was designed to communicate with a computer using an infrared communication interface on the AStrO and a USB connector on the computer. Data is transferred automatically. In fact, you only need to place the interface on the data acquisition system, and the transfer is performed automatically. The transfer time depends on the amount of data stored in the memory. If the memory is full, it will take +/- 60 seconds to perform the entire data transfer. The software « LynX », developed by our research department, allows you to carry out a thorough analysis of your data. IMPORTANT : to use the communication interface A-421, you need to install on your computer the IR/USB drivers available at our website www.alfano.be. Copyright 2005 Alfano, S.A. All rights reserved. 44 04. Best Laps This menu allows you to view the best lap performed for each race. Before entering the menu « Best Laps », you may view your best time of all laps. Example : if you perform 10 races, you will see in the menu « Best Laps », ie: the best lap for each race = 10 laps. To enter the menu, briefly press the right-hand button on the data acquisition system. The menu 04. Best Laps is used in the same way as the menu 02. Recall (page 41). The only difference is that in the menu Best Laps you may only access the best lap for each race. 05. Theor Lap. This menu allows you to view the shortest lap, which is created by adding the best sections of all laps saved. Before entering this menu, you may view the theoretical lap time representing the sum of the best sections saved. To use this menu, all the laps saved must have been performed using the same number of magnetic strips. In fact, the calculation of the theoretical lap will not be valid if the number of sections varies from one lap to another. Therefore, this menu cannot be accessed (example: see below figure « NO THEOR LAP »): o o if laps saved do not have the same number of sections if laps saved have been performed with one single section Copyright 2005 Alfano, S.A. All rights reserved. 45 On the contrary, if you see « THEOR LAP » (see figure above), it means that the recordings were performed using several sections, and with the same number of sections for each lap, and therefore this menu can be accessed. To enter this menu, briefly press the right-hand button on the data acquisition system. Example below : the data acquisition system is set-up to show the theoretical lap with two sections. The data acquisition system displays the lap with the best first section that has been selected (sequence 1). The sequence between 1 and 2, as well as the sequence between 3 and 4, is automatic. The sequence between 1 and 3 is manual. In fact, when the arrows are displayed, briefly press the left-hand button to view the previous section, or press the right-hand button to view the next section. When you release the buttons, the sequence starts automatically. - Sequence 1 : display time 3 seconds o o o o o o Time for the best first section (31’’12) Time and number of lap in which this first section was perfomed (53’’79) (03-002-063) The highest RPM achieved for said lap The highest temperatures achieved for said lap The highest speed achieved for said lap The highest gearbox ratio used for said lap Copyright 2005 Alfano, S.A. All rights reserved. 46 - Sequence 2 : display time 2 seconds o o o o - lowest lowest lowest lowest RPM achieved for said lap temperatures achieved for said lap speed achieved for said lap gearbox ratio used for said lap Sequence 3 : display time 3 seconds o o o o o o - The The The The Time for the best second section (22’’43) Time and number of the lap in which this second section was performed (54’’19) (06-027-173) The highest RPM achieved for said lap The highest temperatures achieved for said lap The highest speed achieved for said lap The highest gearbox ratio used for said lap Sequence 4 : display time 2 seconds o o o o The The The The lowest lowest lowest lowest RPM achieved for said lap temperatures achieved for said lap speed achieved for said lap gearbox ratio used for said lap To view in the « VIEW » mode the lap displayed, sequence 2 or 4, press for 1 second the right-hand button « VIEW ». To exit this menu « THEOR LAP », press for 1 second the left-hand button « EXIT », sequence 2 or 4. The « VIEW » mode (see detailed explanations in pages 36 to 38) To get a correct theoretical lap, the data saved in the data acquisition system must refer to the same track, and the parameters in « menu 10. Strip Number » and « menu 11. Strip Start » can not be modified before beginning the first recording. 06. Data Reset. To enter this menu, briefly press the right-hand button on the data acquisition system. To clear data, briefly press the right-hand button. To cancel clearing of data, briefly press the left-hand button « EXIT ». Cleared data cannot be restored. This feature does not reset the 8 counters back to zero, see menu 07. Counters Copyright 2005 Alfano, S.A. All rights reserved. 47 07. Counters. The data acquisition systems has 8 counters : o 4 time counters « TIME » (counters 1, 2, 3, 4) They store the operating time of the engine (RPM) in Minutes and Hours. (only 1 counter out of 4 can be ON). o 4 distance counters « KM / MILES » (counters 5, 6, 7, 8) They store the distance driven at a given speed. You must set up correctly the menu 17. Speed Config. (only 1 counter out of 4 can be ON). To enter this menu, briefly press the right-hand button on the data acquisition system. The time counter « TIME » which is activated « ON » is displayed (1 or 2 or 3 or 4). See ex. below : counter Cnt n°2 reads 3 Hours and 17 Minutes. o If you press « CHANGE », you change counter. o If you press « RESET », 1) the counter displayed is activated ON, the remaining 3 are deactivated OFF, 2) you prepare this counter to be reset to zero. Next, o If you press « CONFIRM », the system resets to zero the counter displayed. o If you press « EXIT », the system saves the time displayed. By pressing « CONFIRM » or « EXIT », the system switches to the DISTANCE counter (5 or 6 or 7 or 8) activated ON. Copyright 2005 Alfano, S.A. All rights reserved. 48 See ex. in the left figure below, counter Cnt n°7 reads 41 Km 09 Meters. Distance and time counters are set up in the same manner. See example below. To exit this menu, briefly press the left-hand button « EXIT ». When the data acquisition system is in START mode or in the STOP mode, you may view, in real time, the value of these two counters « ON ». To do so, briefly press the right-hand button on the data acquisition system « C ». Mode START Mode STOP To switch to the next counter, briefly press the same button « C ». Example, see figure below Counter « 1 » reads 16 Hours and 57 Minutes Counter « 7 » reads 13 Km 530 Meters Beyond 99 KM 999 Meters (99.99),the distance counter displays only the KM. These values may be read in « MILES », depending on the unit selected on the menu. 22. Metric/Imperial (page 62). Copyright 2005 Alfano, S.A. All rights reserved. 49 In the START mode, the counters « ON » are displayed for 3 seconds. In the STOP mode, the counters « ON » are displayed for 10 seconds. Accurate calculation of the distance obviously depends upon having properly entered the speed (menu 17. Speed Config – page 57). 08. Demo Lap. This feature allows you to view, automatically and in real time, a full lap in a loop. To enter the menu, briefly press the right-hand button on the data acquisition system. You are now in the memory of the data acquisition system, as if you were in mode « 02. RECALL », and you have access to all the laps. You will see the arrows displayed at the bottom pointing left and right, blinking alternately every 4 seconds with the words « EXIT » and « DEMO ». Wait for the arrows – left and right – to be displayed in order to explore the memory and thus to choose the lap for which you wish to see a simulation. Then, wait for the words « EXIT » and « DEMO » to be displayed, and briefly press the right-hand button on the data acquisition system « DEMO » to begin the simulation. The data acquisition system simulates automatically the lap you have chosen in real time. To exit the simulation, briefly press either the right- or left-hand button on the data acquisition system. You may then select another lap. Or briefly press the left-hand button « EXIT » to exit the menu « Demo Lap ». Attention : the demo mode is activated while the simulation is running, the data acquisition system does not stop. The STOP mode is not activated automatically. You must stop it manually, as explained above. Copyright 2005 Alfano, S.A. All rights reserved. 50 Set-up Menu (config system) To enter the set-up menu, the data acquisition system must be in the STOP mode. Then, press the left-hand button on the data acquisition system for 1 second. You will then be able to scroll through the set-up menu by briefly pressing the left-hand button. Press the right-hand button if you wish to activate any option. To return to the STOP mode, press the left-hand button on the data acquisition system for 1 second. STOP DATA (MENU 01. – 08.) 10. Strip Number. 19. Gearbox Config. 11. Strip START. 20. Display Mask. 12. Best-Previous-Target. 21. Celsius/Fahrenheit. 13. Alarm Temperatures. 22. Metric/Imperial. 14. Stroke. 23. Power : P1/P2/P3. 15. Peak. 24. G-Force Calibration. 16. RPM Graph. 25. Password Config. 17. Speed Config. 26. Default. 18. Speed Pits. 27. Alarm Pressures. 30. Serial number. 10. Strip Number. Default value: 1 To set up the number of magnetic strips, i.e. the number of sections on the track. This number can be set from 1 to 6. 11. Strip START. Default value: 1 To select the reference magnetic strip for the data acquisition system’s start-up. This number can be set from 1 to 6, and obviously depends on the number of magnetic strips you have entered in the menu 10. Strip Number. Copyright 2005 Alfano, S.A. All rights reserved. 51 12. Best/Previous/Target. Default value: Best The data acquisition system has three comparison modes : Best/Previous/Target. o o o The Best comparison mode allows you to make comparisons with your best lap time, in real time. The Previous comparison mode allows you to make comparisons with your previous lap time, in real time. The Target comparison mode allows you to make comparisons with the target time (target time that you set up yourself) in real time. A Lap time B Lap time difference (Best/Previous/Target) C Reference time (Best/Previous/Target) To enter the menu, briefly press the right-hand button on the data acquisition system. Then, choose the type of comparison by pressing repeatedly the right-hand button on the data acquisition system until you have chosen. For Target mode, wait for approximately three seconds until a sub-menu is displayed. In this sub-menu you may set up the target time. To edit the numeric data, see « How to change a numeric parameter » on page 40. To exit this sub-menu, briefly press the left-hand button « EXIT ». 13. Alarm Temperatures Low/High. For AStrO - AStrO Formula – PRO+. Default value, T1°: 50/70 - T2°: 50/70. These devices can be attached to 2 temperature sensors. Also, they can manage both temperature sensor with « NTC » technology and temperature sensors with « K » thermocouple technology. o Port B temperature 1 (pages 18 and 19) can receive 1 NTC sensor or 1 K thermocouple sensor. o Port C temperature 2 (pages 18 and 19) can receive 1 NTC sensor or 1 K thermocouple sensor. Copyright 2005 Alfano, S.A. All rights reserved. 52 The data acquisition system has 2 red signals lights, one gauge (formed with graph bars), 4 digits, and 1 alarm triangle for each temperature sensor. Each sensor can be set up for a certain low temperature (Low T°) and high temperature (High T°). When the measured temperature falls below the low temperature set up, the low temperature alarm signal lights up, and the corresponding gauge does not exceed the Low T° level. See figure below : in the example, alarm levels are adjusted as follows : Low T°1 = 50 C° Low T°2 = 600 C°. Whereas when the measured temperature rises above the high temperature set up, the two alarm signals – low and high –blink alternately, the corresponding gauge exceeds the High T° level and the triangle is displayed. See figure below : in the example, alarm levels are set at High T°1 = 70 C° High T°2 = 750 C°. Copyright 2005 Alfano, S.A. All rights reserved. 53 Obviously, alarm signals do not light up, and the corresponding gauge is between the Low and High levels, if temperature remains within the desired temperature range. See figure below. To set up alarm temperatures, briefly press the right-hand button on the data acquisition system. Then, briefly press the left-hand button on the data acquisition system to set up the next temperatures. To edit the numeric data, see « How to change a numeric parameter » on page 40. The data acquisition systems asks you to set up consecutively : o o o o Temperature Temperature Temperature Temperature 1 (port B) 1 2 (port C) 2 low level high level low level high level « « « « T1 T1 T2 T2 LOW » HIGH » LOW » HIGH » To exit the menu, briefly press the left-hand button « EXIT ». When you exit the set-up or before entering it, the screen displays the values of the low and high set temperatures alternately. The menu can be set up in °C/°F 23. Celsius/Fahrenheit (page 62) 13. Alarm Temperatures Low/High. For AStrO 4T - AStrO Formula 4T. Default value, T1°: 50/70 - T2°: 50/70 - T3°: 50/70 - T4°: 50/70. Up to 4 temperatures sensors can be attached using an special adapter (shown on page 26). The data acquisition system can manage 2 temperature sensors with « NTC » technology + 2 temperature sensors with « K » thermocouple technology. o Port B (see pages 18 and 19) can receive, using a special adapter, 1 NTC (NTC1) sensor + 1 K (K1) thermocouple sensor. o Port C (see pages 18 and 19) can receive, using a special adapter, 1 NTC (NTC2) sensor + 1 K (K2) thermocouple sensor. Copyright 2005 Alfano, S.A. All rights reserved. 54 The data acquisition system has 1 alarm signal, 4 digits, and 1 alarm triangle for each K thermocouple temperature sensor (see figure below). The data acquisition system has 1 alarm signal and one gauge formed by graph bars for each NTC temperature sensor (see figure below). Each sensor can be set up for a certain low temperature (Low) and high temperature (High). When the measured temperature falls below the low temperature set up, the corresponding alarm signal lights up, and the corresponding gauge (for NTC sensors) does not exceed the Low T° level.. Whereas when the measured temperature rises above the high temperature set, the corresponding alarm signal blinks alternately, and when the NTC sensors are utilized the gauge exceeds the High T° level, and when the K thermocouple sensors are used the triangles are displayed. If the temperature remains within the desired temperature range, the alarm signal does not light up, and the corresponding gauges (for NTC sensors) are between the Low and High levels. To set up alarm temperatures, briefly press the right-hand button on the data acquisition system. Then, briefly press the left-hand button on the data acquisition system to set up the next temperatures. To edit the numeric data, see « How to change a numeric parameter » on page 40. Copyright 2005 Alfano, S.A. All rights reserved. 55 The data acquisition systems asks you to set up consecutively : o o o o o o o o Temperature Temperature Temperature Temperature Temperature Temperature Temperature Temperature K1 (port B) K1 K2 (port C) K2 NTC1 (port B) NTC1 NTC2 (port C) NTC2 low level high level low level high level low level high level low level high level « « « « « « « « K1 LOW » K1 HIGH » K2 LOW » K2 HIGH » NTC1 LOW » NTC1 HIGH » NTC2 LOW » NTC2 HIGH » To exit this menu, briefly press the left-hand button « EXIT ». When you exit the set-up or before entering it, the screen displays the values of set temperatures in a sequence – low and high. The menu can be set up in °C/°F 23. Celsius/Fahrenheit (page 62) 14. Stroke. Default value: x 1 There is a quite large number of engines. Not all these engines have the same type of ignition. The data acquisition system measures the number of spark plug impulses received per unit of time to determine the speed of your engine. In order for this value to be correct, you must properly set up the « Stroke » parameter. It can be assigned the following values : 1/8, 1/4, 1/2, 1, 2, 4, 8. This is the factor by which the data acquisition system multplies the number of spark plug impulses received per unit of time in order to describe one combustion cycle accurately. This depends on your engine. Try several values for these parameters until you get the right engine speed. 15. Peak. « P D » Default value, RPM: OFF – T°1: OFF – T°2: OFF – Speed: OFF. Knowing the « maximum » values on the track is very important. For this reason, the data acquisition system allows you to lengthen the display time of peak values. - Engine speed « RPM » Temperature 1 Temperature 2 Speed The data acquisition system displays these peak values for the length of time that you have set up. Copyright 2005 Alfano, S.A. All rights reserved. 56 To enter the menu, briefly press the right-hand button on the data acquisition system. First, set up the display time for o Engine speed « RPM » : briefly press repeatedly the right-hand button on the data acquisition system until you reach the value you wish to enter : (Off), (0.8), (1.2), (1.6), (2.0), (2.4), (2.8), (3.2), (3.6), (4.0), (4.4) in Seconds. Press the left button to set the subsequent « PEAK ». Second, set up the display time for o temperature 1 : (Off), (2), (3), (4), (5), (6), (7), (8) in Seconds. Third, set up the display time for o temperature 2 : (Off), (2), (3), (4), (5), (6), (7), (8) in Seconds. Last, the data acquisition system asks you to set up the display time for o speed : (Off), (0.8), (1.2), (1.6), (2.0), (2.4), (2.8), (3.2), (3.6), (4.0), (4.4) in Seconds. To exit this menu, briefly press the left-hand button « Exit ». Example of « Peak » set-up RPM Temp 1 will be displayed for 2.4 seconds will be displayed for 3 seconds Temp 2 Speed will be displayed for 2 seconds will be displayed for 3.2 seconds While the peak value is being displayed, if the real value exceeds the peak value displayed, the real value will replace the displayed peak value. 16. RPM Graph. None for the PRO+. Default values: 2.00 - 3.00 - 4.00 - 5.00 - 6.00 7.00 - 8.00 - 9.00 - 10.00 - 11.00 The data acquisition system has 10 lights, which make up the « RPM gauge ». These lights travel from left to right, depending on the intensity of your engine speed. It can be fully set up. Copyright 2005 Alfano, S.A. All rights reserved. 57 The data acquisition system gives you 2 set-up choices for these 10 lights. 1) To set-up the RPM gauge using 3 lights : enter the RPM value on the 1st light, the 7th light, and the 10th light, and the system will calculate proportionally the intermediate values for the remaining 7 lights. 2) To set-up the RPM gauge on all 10 lights : enter a RPM value for each light. Briefly press the right-hand button on the data acquisition system. First, the data acquisition system suggests the RPM gauge be set up on 3 lights. If you wish to set up the RPM gauge on 10 lights, press the left-hand button (little arrows). The figure displayed on the right represents the engine speed associated with the light that is lighted up. To edit a numeric data, see « How to change a numeric parameter » on page 40. 17. Speed Config. Default value: OFF – 850 – 10 - 80 To enter the menu, briefly press the right-hand button on the data acquisition system. By briefly pressing the right-hand button, you may choose to activate (ON) or deactivate (OFF) the use of a speed sensor. The data acquisition system allows you to choose between two methods for measuring speed. The method without speed sensor : the data acquisition system is able to measure the speed by knowing : o your engine speed (RPM), o the number of gear teeth in the engine (small sprocket), o the number of teeth on the transmission axle (large sprocket), and o the circumference of the wheel. Copyright 2005 Alfano, S.A. All rights reserved. 58 Important : this method will not work on vehicles that have a gearbox. If you choose not to use a speed sensor, then, in addition to the wheel circumference, you must enter, o the number of gear teeth in the engine (small sprocket) « ENGINE TEETH », and o the number of teeth on the transmission axle (large sprocket) « AXLE TEETH ». To edit a numeric data, see « How to modify a numeric parameter » on page 40. To exit this sub-menu, briefly press the left-hand button « Exit ». In the example of the figure below, the data acquisition system is set up as follows: o o o o Without the speed sensor « OFF » Wheel circumference « WHEEL CIRC » « 850 – mm/METRIC » Number of teeth « ENGINE TEETH » « 12 » Number of teeth on the transmission axle « AXLE TEETH » « 82 » The method with speed sensor : the data acquisition system is able to calculate the speed using a speed sensor placed on the transmission axle or on one of your wheels. This method is vital for vehicles that have a gearbox. o By briefly pressing the right-hand button, you may choose to activate (ON) or deactivate (OFF) the use of a speed sensor. If you choose to use a speed sensor, briefly press the left-hand button while (ON) is displayed, Then, you need to set up the circumference of the wheel « WHEEL CIRC », which you must enter (in mm for the METRIC system, in inches for the IMPERIAL system). To exit this sub-menu, briefly press the left-hand button « Exit ». Copyright 2005 Alfano, S.A. All rights reserved. 59 In the example of the figure below, the data acquisition system is set up as follows : o o With the speed sensor « ON » Wheel circumference « WHEEL CIRC » « 38 ‘’46 – inch/IMPERIAL » In this menu, the 2 lights (see figure above) allow you to check the installation of your speed sensor. To do so, rotate the wheel slowly and make sure that these 2 lights light up simulteneously every time the speed sensor receives the signal from the magnet, i.e. every time the speed sensor is in front of the magnet. You can also use the speed sensor on a vehicle without gearbox. However, we suggest you always use a speed sensor in order to obtain an accurate measurement of speed. For more information on how to install a speed sensor, see page 28. If you choose the « METRIC » system, the wheel circumference is displayed on the right. On the contrary, if you choose the « IMPERIAL » system, it is displayed on the left ; see figures above. You can set up the system in menu 22. Metric/Imperial (page 62). 18. Speed Pits. None for the PRO+. Default value: 80 The data acquisition system allows you to set up the maximum authorized speed in pits. In order to control your speed when you enter the pits, in the START mode, briefly press the right-hand button and then the left-hand button while driving. You are then in « Pits » mode. If you exceed the speed you have set up, the 10 lights at the top of your data acquisition system flash. To enter the menu, briefly press the right-hand button on the data acquisition system. To edit a numeric data, see « How to change a numeric parameter » on page 40. To exit this menu, briefly press the left-hand button « Exit ». In the « Pits » mode, the data acquisition system is always in START. In the « Pits » mode, press the left-hand button to return to the screen of the START mode. Copyright 2005 Alfano, S.A. All rights reserved. 60 19. Gearbox Config. Default value: 1 Before setting up your gearbox, you must install a speed sensor (see 17. Speed Config – page 57). To enter this menu, briefly press the right-hand button on the data acquisition system. In order to set up your gearbox : you must first enter the number of gears the gearbox has, by pressing repeatedly the right-hand button on the data acquisition system. The gear number can be set from 1 to 9. If you choose number 1, a small line is displayed at this point. In the figure below, the number circled represents the number of gears the gearbox has. Briefly press the left-hand button to get the data acquisition system ready to set up the first gear. In the figure below, you can see the number « 1 » with a circle around it, which means that you must engage the first gear. Engage the first gear and drive at idle regularly until all the gears are set up. You may see a stabilization counter on the « RPM » screen below (which reads in this example 246). Wait for a few seconds until these numbers stabilize, and then confirm the first gear ratio by briefly pressing the right-hand button « Drive Config Gear 1 ». Copyright 2005 Alfano, S.A. All rights reserved. 61 Then, the data acquisition system asks you to engage the second gear. Number 2 replaces number 1. Engage the second gear. Wait for the counter to stabilize, and then confirm the second gear ratio by briefly pressing the right-hand button. Repeat this operation for the subsequent ratios. Four yellow lights will blink for a few seconds once you have set up the last gear. You will then verify whether the gears set up on the data acquisition system actually match those on the gearbox. The number circled around must match the gearbox ratio engaged. To exit this menu, briefly press the left-hand button « Exit ». To return direct to the STOP mode, briefly press the right-hand button « STOP ». On go-karts, the gearbox can be set up on the carriage. 20. Display Mask. Default value: all the parameters are displayed. The data acquisition system allows you to display a great deal of information. You may also choose to mask the information while you drive so not to distract To enter the menu, briefly press the right-hand button on the data acquisition system. By pressing the right-hand button, you may also decide whether to display (short lines) or not (OFF) the lap time in the START mode. By pressing the left-hand button, you switch to the following information. Copyright 2005 Alfano, S.A. All rights reserved. 62 You may program your data acquisition system consecutively to display any of the 7 items. o o o o o o o Time Time difference Time reference Temperature 1 Temperature 2 RPM Speed « « « « « « « Time » Difference » Reference » Temp 1 » Temp 2 » RPM » Speed » In the example shown in the figure below, this data will be masked in the START mode : o o o Time Time reference Temperature 2 « Time» « Reference » « Temp 2 » To exit this menu, briefly press the left-hand button « Exit ». The « Display Mask » only works in the START mode. The information masked is however saved. 21. Celsius/Fahrenheit. (°C/°F) Default value: degrees in Celsius (°C) In order to set up the unit of temperature measurement used, briefly press the right-hand button on the data acquisition system. You may choose between : o o « Celsius °C » degrees « Fahrenheit °F » degrees 22. Metric/Imperial. Default value: Metric. To set up the unit of measurement you wish to use, briefly press the right-hand button on the data acquisition system. You may choose between : o o « Metric » (km/h, meter, millimeter), the international system « Imperial » (mph, foot, inch), the Anglo-Saxon system 23. Power : P1/P2/P3. Default value: P3 Copyright 2005 Alfano, S.A. All rights reserved. 63 The data acquisition system allows you to adjust the electrical consumption of the batteries to lengthen their life, by diminishing the intensity of the lights. (14 alarm signals) + (8 backlighting lights). By briefly pressing the right-hand button, you may choose 3 different power levels : o o o POWER 1 = Minimum consumption (minimum intensity) POWER 2 = Medium consumption (medium intensity) POWER 3 = Maximum consumption (maximum intensity) The data acquisition system automatically shows the different intensities of the lights corresponding to each power level. (With or without display backlighting). Furthermore, this adjustment directly relates to low battery detection. In fact, when the data acquisition system first detects the batteries are low, before displaying this condition (page 20), it automatically switches from POWER 3 to POWER 2. After a second detection, the data acquisition system switches from POWER 2 to POWER 1. Only after the third detection, does the data acquisition system activate the low battery warning signal. Between the first and the third detection, the data acquisition system is still in service for several hours. The letters and numbers « P1 or P2 or P3 » are circled (see figure above) and show the status of your data acquisition system in real time (P1 = POWER 1). In fact, by pressing the right-hand button you may select yourself the different power levels. However, the batteries may not be able to support the power level you have Copyright 2005 Alfano, S.A. All rights reserved. 64 selected. In this case, the data acquisition system does not increase the power level, which is indicated with this information. This information is available in the STOP mode. See figure below. To change batteries, see page 31. 24. G-Force Calibration. Default value: no calibration. Each G Force sensor is unique (different sensitivity). The AStrO must be calibrated with the G Force sensor already installed on the vehicle. See installation on page 24. Thus, the G Force values may be recorded accurately, and therefore the correct path for the vehicle may be designed on the computer using the « LynX » program. You must calibrate again the data acquisition system every time you o o change the sensor. modify the place where the sensor is installed on the vehicle. Remark : numbers change depending on the tilt of the G Force sensor. Calibrating only takes one step : Once the G-Force sensor is installed and placed on a flat surface of the vehicle, Briefly press the right-hand button. The data acquisition system is automatically calibrated. Copyright 2005 Alfano, S.A. All rights reserved. 65 You will notice that the numbers on left and right are automatically reset to zero, or close to, and that the word « YES » is displayed to indicate that the data acquisition system is correctly calibrated. See figure above. Attention : before using the AStrO for the first time, it must be calibrated with its G-Force sensor. Important : before calibrating the AStrO, the sensor must be installed correctly (see installation, page 24), and the vehicle must stand on a flat and horizontal surface. Note : the AStrO need not be calibrated again if it has always attached the same G Force sensor, and the installation of the sensor on the vehicle has not been modified. 25. Password Config. Default value: 0 Protect your data acquisition system from all unauthorized use. If you wish to enter or edit your security code on the data acquisition system, briefly press the right-hand button. To edit a numeric data, see « How to change a numeric parameter » on page 40. Once you have entered the code, briefly press the left-hand button « OK ». Then, the data acquisition system asks you to confirm the password. Briefly press the right-hand button « CONFIRM », or briefly press the left-hand button « EXIT » to exit. The code default value is 0. When the code is set at 0, the data acquisition system does not ask for any code when turned on. When the data acquisition system is turned on, and the security code is incorrectly entered five consecutive times, the data acquisition system starts up, but the whole memory is cleared for security reasons. 26. Default. In order to set all the set-up values back to their default value, briefly press the right-hand button on the data acquisition system. Then, the data acquisition system asks you to confirm « DEFAULT ». Briefly press the right-hand button « CONFIRM », or briefly press the left-hand button « EXIT » to exit. 27. Alarm Pressures Low/High. For AStrO 4T - AStrO Formula 4T. Default value, P1: OFF – P2: OFF To enter the menu press the right button of the data acquisition system from « CONFIG » menu till you reach. Copyright 2005 Alfano, S.A. All rights reserved. 66 While pressing the right button, you will have the following choices, 1 To deactivate(OFF), the pressure sensor P1 or 2 To activate pressure sensor P1 from 0 to 2 Bars or 3 To activate the pressure sensor P1 from 0 to 5 Bars or 4 To activate the pressure sensor P1 From 0 to 10 Bars. Briefly press the left button to select pressure P1. Next follow the same procedure to select pressure P2. Once you have chosen which sensors to activate the system will ask you to configure low and high alarms for the first sensor then the second sensor in: if using the Metric system you will see if using the Imperial system you will see To modify the setting see « How to modify a numeric parameter » page 40. Copyright 2005 Alfano, S.A. All rights reserved. 67 In START and STOP mode, the alarm leds and the bargraph will show the pressure levels. When the preset pressure falls below the programmed level the alarm leds will light up and the bargraph will not pass the Low Pressure level. Whereas when the preset pressure is too high the alarm leds blinks and the bargraph passes to High Pressure level. However if the pressure level is within the desired range no alarm leds will light up and the bargraph will remain between Low and High. The pressures utilizes port B and C the same port as NTC1 and NTC2 temperature sensors. ATTENTION, when the pressure sensor is configured «ON» and a temperature sensor is installed in port B and C, no temperature will be detected and no information will be visible on the screen. It is imperative that the pressure be deactivated from menu 27. Pressure Alarm in order to read the temperature sensor NTC1 and NTC2. When setting your parameters for the pressure, if you have chosen « METRIC », you will see : « BAR », likewise if « IMPERIAL », was chosen you will see: « PSI ». The unit of measurment can be set up in menu22. Metric/Imperial (page 62). When you exit the set up or before entering it the screen displays the type of sensor configured « 0-2, 0-5 or 0-10 Bar » along with the previously set high and low levels alterately or « OFF » if the pressure has not been configured.. 30. Version data acquisition. Your data acquisition system has a unique serial number. This serial number is an important piece of information for our post-sales and customer services. Please, keep it safe. It is made up of eight digits. Also, when making an exchange with our post-sale or customer services, please provide the program version of your data acquisition system. This number is made up of five digits, and it is shown at the lower right-hand corner of the display. Copyright 2005 Alfano, S.A. All rights reserved. 68 Conditions of guarantee All our devices undergo strict testing in the factory and are covered by a 24-month guarantee against manufacturing defects. The guarantee takes effect as of the purchase date. The purchase date is the date indicated on the invoice/cash register receipt given at the time of the purchase by the retailer. The manufacturer undertakes to repair and replace, for free, those pieces with a manufacturing defect during the guarantee period. Those defects which are not clearly attributable to the materials or manufacturing thereof shall be examined at one of our approved post-sales service centers or at our central headquarters and invoiced on the basis of the results. The guarantee is not applicable if the device is opened, or in the event of accidental damage, negligence, improper usage, or in the case of improper or erroneous installation, or installation not in accordance with the instructions provided in the notice, or in the event of phenomena outside the operating and usage rules applicable to the device. The garantee shall be void in the event of repair or handling performed by unauthorized third parties. Intervention under guarantee does not entitle the buyer to replacement of the device or extension of the guarantee. Intervention under guarantee is performed at one of our approved post-sales service centers or at our central headquarters. In the latter case, the item must be delivered to our establishment at no charge. In other words, the shipping costs are the user’s responsibility. The manufacturer declines all responsibility for damages to things or people resulting from a poor installation or an improper use of the device. Product Modifications Alfano S.A. implements an ongoing development method. As a result, Alfano S.A. reserves the right to incorporate changes and improvements to all the products described herein, without prior notice. Damages and liability The products are used under the sole management and liability of the customer, who must pay for any damages the products might undergo or cause. No compensation shall be awarded for loss of use. Alfano cannot be held responsible for the direct or indirect result of their exploitation or non-usage. Alfano’s obligations are obligations of means, not of results. Disposal The machine must be disposed of in an environmental friendly manner. The data acquiaition system and its accessories include a large number of plastic parts. When the data acquisition system or any of its accessories no longer works, they must be treated in accordance with all local regulations. Equally, old batteries must be disposed of in accordance with all applicable local regulations. Copyright 2005 Alfano, S.A. All rights reserved. 69 ALFANO VISION Vision is a hand held device which, through infrared communication ports, allows to pick up data from the following 5 units of our current range of products: o o o o o o o ALFANO ALFANO ALFANO ALFANO ALFANO ALFANO ALFANO FUN PRO PRO+ AStrO AStrO 4T Formula Formula 4T It allows to analyze the data , comparing them, and transfering them to a computer. It also allows you to print the data with a thermal-type printer on a 80 mm wide paper through its RS232 port. Vision also allows you to measure temperature levels of tires, asphalt, and air, you may also save these values as you wish. Vision is also a stopwatch, which can simultaneously time 4 racers. You can record their lap times as well as their split times in a very user friendly way. Vision on its own is a complete competition tool, providing unquestionable advantages to drivers, trainers, mechanics, and teams. ALFANO: the higher standard! Copyright 2005 Alfano, S.A. All rights reserved. 70 ALFANO S.A. Rue de l’ Industrie, 3b – 1400 NIVELLES www.alfano.com www.alfano.be Copyright 2005 Alfano, S.A. All rights reserved.