1
View
TM
The Record & Field-level Security
Component of iSecurity
User Guide Version 3
Table of Contents
Copyright Notice .......................................................................................... i
About This Manual ....................................................................................... ii
Who Should Read This Book ....................................................................... ii
Terminology ................................................................................................. ii
Documentation Overview ............................................................................. ii
Printed Materials .......................................................................................................ii
On-Line Help ............................................................................................................ii
Typography Conventions ............................................................................. ii
Chapter 1: Introducing View ......................................................................... 2
What is View? .............................................................................................. 2
Why You Need View .................................................................................... 2
Technical Overview ...................................................................................... 2
The View Solution ........................................................................................ 3
View Mechanism .......................................................................................... 3
Restrictions .................................................................................................. 5
How View Works .......................................................................................... 6
Top-Down Security Design ......................................................................................6
Performance impact of View ........................................................................ 7
Disk space consideration ............................................................................. 7
The User Interface ....................................................................................... 8
The Main Screen .......................................................................................................8
iSecurity ....................................................................................................... 14
Assessment ................................................................................................................14
Firewall .....................................................................................................................14
Audit .........................................................................................................................14
Action ........................................................................................................................14
Anti-Virus .................................................................................................................15
Capture ......................................................................................................................15
Screen ........................................................................................................................15
Password ...................................................................................................................15
AP-Journal ................................................................................................................15
Chapter 2: Getting Started with View ........................................................... 18
Obtaining Your Authorization Code ............................................................. 18
Entering Your Authorization Code ............................................................... 18
Changing the View Password ...................................................................... 19
Connecting to the iSeries Host ..................................................................................19
Disconnecting from the iSeries Host ........................................................................20
Working with iSeries Hosts .......................................................................... 20
Adding a New iSeries Host .......................................................................................20
Removing an iSeries Host .........................................................................................20
Chapter 3: Working With User Groups ........................................................ 22
Overview ...................................................................................................... 22
Defining and Modifying User Groups ........................................................... 22
Deleting User Groups .................................................................................. 24
Chapter 4: Working With Sets and Files ...................................................... 26
Overview ...................................................................................................... 26
Creating a New Set ...................................................................................................26
Adding or Removing Logical Files From a Set ............................................. 29
Deleting Files From a Set ............................................................................ 29
Renaming Sets ............................................................................................ 29
Deleting Sets ................................................................................................ 29
Using Link with Editor .................................................................................. 30
Chapter 5: Working With Permissions ......................................................... 32
Overview ...................................................................................................... 32
Working with Field Permissions ................................................................... 32
Understanding Field Permissions .............................................................................32
Defining Field Permissions .......................................................................................34
Activating Security ...................................................................................................34
Deactivating Security ................................................................................................34
Editing Field Permissions .........................................................................................35
Updating the Rules Database ....................................................................................35
Working with Record Permissions ............................................................... 35
Understanding Record Permissions ..........................................................................35
Defining Record Permissions ...................................................................................36
Omitting Conditions .................................................................................................41
Activation Settings ....................................................................................................42
Activate GUI Definitions from the Native ...................................................... 44
Changing the original base file ..................................................................... ii
Strategy 1 ..................................................................................................................ii
Strategy 2 ..................................................................................................................ii
Appendix ...................................................................................................... ii
View Sample Tutorial ................................................................................... ii
View Troubleshooting .................................................................................. iv
Copyright Notice
© Copyright Raz-Lee Security Ltd. All rights reserved.
This document is provided by Raz-Lee Security for information purposes only.
Raz-Lee Security© is a registered trademark of Raz-Lee Security Inc. Action, System Control, User Management, Assessment, Firewall, Screen, Password, Audit, Capture, View,
Visualizer, Anti-Virus, AP-Journal © are trademarks of Raz-Lee Security Inc. Other brand
and product names are trademarks or registered trademarks of the respective holders.
Microsoft Windows© is a registered trademark of the Microsoft Corporation. Adobe Acrobat© is a registered trademark of Adobe Systems Incorporated. Information in this document is subject to change without any prior notice.
The software described in this document is provided under Raz-Lee’s license agreement.
This document may be used only in accordance with the terms of the license agreement. The
software may be used only with accordance with the license agreement purchased by the
user. No part of this document may be reproduced or retransmitted in any form or by any
means, whether electronically or mechanically, including, but not limited to: photocopying,
recording, or information recording and retrieval systems, without written permission given
by Raz-Lee Security Inc.
Visit our web site at www.razlee.com.
Record your product authorization code here.
Computer Model
Serial Number
Authorization Code
View 3 User Manual
i
About This Manual
Who Should
Read This Book
This user guide is intended for system administrators and security administrators responsible for the implementation and management of security on iSeries systems.
Terminology
This manual attempts to adhere to standard IBM iSeries (AS/400) terminology and conventions whenever possible. However, deviations from IBM standards are employed in certain
circumstances in order to enhance clarity or when standard IBM terminology conflicts with
generally accepted industry conventions.
Documentation
Overview
Raz-Lee takes customer satisfaction seriously. Therefore, our products are designed for
ease of use. The documentation package includes a variety of materials to get you up to
speed with this software quickly and effectively.
Printed Materials
This user guide is the only printed documentation necessary for understanding this product.
It is available in user-friendly PDF format and may be displayed or printed using Adobe
Acrobat Reader version 4.0 or higher. Acrobat Reader is included on the product CD-ROM.
This manual contains concise explanations of the various product features as well as stepby-step instructions for using and configuring the product.
On-Line Help
PC based on-line help is also available in JavaHelp format. Click the Help button from your
View menubar.
Typography
Conventions
View 3 User Manual
This document is intended to be printed by the end user and viewed on-line using a variety
of different PC platforms. Accordingly, it was written using standard Windows TrueType
fonts that are installed on virtually all systems. You do not need to install any special fonts
in order to view or print this document.
Body text appears in 10-point Times New Roman.
Menu options, field names, and function key names appear in Arial Bold.
OS/400 commands, system values, data strings, etc. appear in Bold Italic.
Key combinations are separated by a dash, for example: Shift-Tab.
Referrals to chapters or procedures appear in Times New Roman Italic.
ii
Introducing View
1
Introducing View: What is View?
Chapter 1: Introducing View
What is View?
View is a state-of-the-art, record and field-level security solution that restricts access to specific records and fields in iSeries databases without any modification to other applications.
View works with all types of file access. This patent-pending solution is especially relevant
to the banking, health-care, e-commerce, and defense environments where you work with
large databases.
Why You Need
View
O/S 400 Security and other third-party solutions provide protection at the object level only.
But View is unique. It lets system administrators create rules that define which users are
authorized to view or modify the contents of individual records and fields in a database. If a
user does not possess the proper credentials, he cannot view or modify data in a protected
field. However, he can continue to work with data in unprotected fields. View security definitions do not modify your data files in any way. View features a stunning GUI interface,
and is especially designed for ease-of-use by non-technical personnel.
So why worry about prying eyes? Unauthorized access to sensitive data has serious ramifications, such as identity theft, stolen credit records, or E-mail address harvesting. But not
with View! With View, you control WHO sees WHAT and WHEN.
View....
Technical
Overview
is the only third-party solution that controls file access at the field and record level
does not require any programming or modifications to existing applications
allows you to control access to multiple fields and records
Disk Space
Minimal overhead. One additional logical file is defined for each physical file handled by
View.
I/O
Minimum to no overhead. When the user asks to hide fields (rather than records), an additional “logical view” of the file is built. When the user asks to hide records, an additional
index is built.
CPU
Minimal overhead. I/O activities resulting from View do not require additional CPU
resources
View 3 User Manual
2
Introducing View: The View Solution
The View
Solution
iSecurity View is comprised of two applications:
GUI Java-based application that is connected to the iSeries
iSeries native application
Hiding data in files is accomplished by rerouting I/O activity to files which actually implement the rules which defined the conditions for hiding records/fields.
In order to actually hide data in records/fields, certain monitoring capabilities are added to
various commands (ADDLIBLE, CHGLIBL, RMVLIBLE, OVRDBF) using a standard
OS/400 feature called Command Extension Exit Program. This feature is extremely efficient and uses an extremely small footprint.
In addition, there is a small change implemented when an interactive or batch job begins
execution. There is some overhead caused by this change, however it is important to note
that this is a one-time occurrence per job.
On the other hand, users may decide to manage activity themselves and thereby possibly
reduce overhead.
View reroutes I/O to the proper file and uses the authority of the system to prevent non
authorized access by potential hackers.
Many sites have far too many personnel with a powerful security level such as *ALLOBJ.
In such a case, View provides the ability to check the user definition each time a user file is
accessed. This check is very efficient but obviously the overhead is proportional to the number of files being opened.
View
Mechanism
iSecurity View is comprised of two applications:
•GUI Java-based application that is connected to the iSeries
•iSeries native application which is divided into 3 libraries, SMZ5, SMZ5CMD and
SMZ5DTA
View creates a user profile called SECURITY3P which is the owner of the View commands.
View provides a set-up option called “Add on the Fly Detection” which inserts the following 4 exit programs into the exit point named QIBM_QCA_CHG_COMMAND
View 3 User Manual
1.
Exit program for the ADDLIBLE command
2.
Exit program for the CHGLIBL command
3.
Exit program for the OVRDBF command
4.
Exit program for the RMVLIBLE command
3
Introducing View: View Mechanism
View also provides a "Remove on the Fly Detection" option that allows the site to remove
all the exit programs from the exit point.
View has additional options required for successful operation:
Program RL#QCMD is added to the subsystem routing entry
A Remove option to safely uninstall View is also available and can be used any
time
During the installation of View, the command: CHGUSRPRF is used as follows:
CHGUSRPRF USRPRF(SECURITY3P) USRCLS(*SECOFR)
SPCAUT(*JOBCTL *ALLOBJ *SECADM)
This command activates the site’s existing exit program; as such, View does not intervene or
otherwise enter any of the site libraries!
During the installation process View changes the Audit value of the user profile
SECURITY3P. Therefore, for the installation process, QSECOFR with *AUDIT authorization is required, as follows:
"CHGUSRAUD USRPRF (SECURITY3P) OBJAUD(*NONE)
AUDIT special authority is required to change the AUDLVL(*NONE)"
The GUI application creates a group of users (4 characters) that will represent the group
using the encrypted files.
This group will create a new library called SMZ5XXXX where XXXX = group that is the
library
containing the product’s encrypted logical files based on the site’s physical or logical files.
View can encrypt either specific fields or records.
In order to encrypt decimal fields, View adds 2 new fields to the physical file. It is therefore
suggested initially to test View with small test files in order to understand exactly how the
product works.
If a character field in selected records is to be encrypted, there are no additional changes
required, besides creating new logical files.
View 3 User Manual
4
Introducing View: Restrictions
View can be used by users that in the initial program specify CHGLIBL or ADDLIBLE and
applications that use OVRDBF.
View also provides the possibility to change, for the group of users, the authority for the
files so that if the to-be-encrypted files are addressed directly with the library, an error will
result saying that the user is not authorized to this file.
Restrictions
View requires no changes to application code in order to support the product. Yet there are
some restrictions:
1.
If the hidden field is Numeric or a DBCS (double byte character set) field, when
creating the screen view, the PF will be modified to contain a dummy field. The
file will than be changed to LVLCHK(*NO) so that the existing software continues
running without any interference. This process is automatic.
2.
If the program uses an SQL statement which specifically names the hidden field
for update (instead of just issuing “update last fetched row”), a change is required
in the application to monitor for such an error and reattempt the SQL.
3.
If the program uses a LIBRARY/FILE reference to the file in any CL command
except OVRDBF, or if the program uses a LIBRARY/FILE reference to the file in
any SQL command except XXXXXXXXXXXX, a change is required to the
application to work with OVRDBF or use the *LIBL instead.
4.
If the system is operating with a maximum of 25 files as in old releases (instead of
the 250 that are now enabled), and you are approaching 25 files, you must upgrade
to the new capability of 250 libraries or reduce the number of libraries in the
library list.
It is highly recommended to have access to either the application developers or to the application source itself.
On the other hand, our experience has shown that all standard applications with traditional
IO require no change, or merely some changes in a minimum number of CLPs.
All standard applications using SQL require a minimal number of changes if any, or merely
some changes in a minimum number of CLPs.
View 3 User Manual
5
Introducing View: How View Works
How View
Works
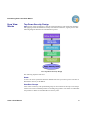
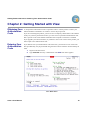
Top-Down Security Design
View security works according to a logical, hierachical design. This means that designing
and applying record and field-level security rules follow an intuitive, logical process. The
following diagram illustrates the rule-definition process.
View Top-Down Security Design
The following explains each level.
Hosts
A host is an iseries system that hosts the database files that you wish to protect. The host is
identified in View by its IP address.
User/User Groups
View works exclusively with pre-defined groups of users called User Groups. User Groups
contain one or more individual profiles or OS/400 group profiles. You cannot use individual
user profiles to define record and field-level security rules.
View 3 User Manual
6
Introducing View: Performance impact of View
Sets
A set consists of one physical file and, optionally, any logical files associated with that
physical file. A set is always associated with one or more user groups.
Files
Record and field-level security rules are defined individually for each file. There are two
types of native OS/400 files:
Physical files contain the actual physical data organized into several data fields.
Logical files do not actually contain any data, but present logical formatted
“views” from one or more physical files. This is roughly analogous to SQL views.
Since you can use logical files to view, modify, and update data residing in physical files, View provides record and field-level security for logical files in the same
manner as physical files.
Permissions
View features two types of security permission rules.
Performance
impact of View
Record Permissions are rules that restrict access to specific database records
according to Boolean selection comparison operators (i.e. a record permission rule
that restricts access to payroll records where the base salary > 12,000 $).
Field Permissions are rules that restrict access to specific fields in a database
record. These rules are based on three types.
Full Access - Users can view and modify fields
Read-Only Access - Users can view but not modify field contents
None (Access Denied) - Users cannot view or modify field contents
View is implemented by use of a Logical File (LF) per each file that has hidden fields/
records
The performance impact is virtually near zero.
Disk space
consideration
As long as only fields are hidden, the disk space consumed is minimal. It is normally the
size of an empty LF (0.1MB). This is because the access path of the existing file will be
used by the View.
If records should be hidden, the disk space is the size of a LF which includes Select/Omit
rules.
View 3 User Manual
7
Introducing View: The User Interface
The User
Interface
The Main Screen
View has one screen, which is divided into two work areas, the Navigator pane and the
Data pane. The following is the main interface of View and its main components.
View Main Screen
View 3 User Manual
8
Introducing View: The User Interface
Navigator Pane
The Navigator pane enables you to find, select, open, delete, and rename your groups, sets
and files, in addition to displaying their hierarchy. The Navigator pane also displays
whether or not a file (logical or physical) has Activated Security (see Chapter 6, Working
with Permissions).
Navigator Pane
View 3 User Manual
9
Introducing View: The User Interface
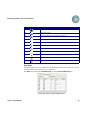
Item
Icon
Description
A
iSeries host
B
View User Group
C
File set (a physical file and its logical file/s)
D
Physical file without activated security
E
Physical file with activated security in progress
F
Physical file with activated security
G
Physical file that failed to activate security
H
Logical file without activated security
I
Logical file with activated security in progress
J
Logical file with activated security
K
Logical file that failed to activate security
Data Pane
This pane displays the security definitions for fields and records in the current file. Use this
screen to define rules that govern access definitions.
The Data pane contains the Field Security tab and the Record Security tab.
Data Pane (shown open to Field Security)
View 3 User Manual
10
Introducing View: The User Interface
Record Security
Status Bar
The Status Bar, found at the top of the Data pane, displays the current host, user group, and
file.
Status Bar
Icon
Description
IP address of the iSeries host
Name of the User Group
File name and library
Shortcut Menus
Shortcut menus appear whenever you press the right mouse button. The contents of the
shortcut menus vary according to the specific operation being performed and/or the location
of the cursor.
View 3 User Manual
11
Introducing View: The User Interface
Menu Bar
Many View features are available from the menu bar, located at the upper left side of the
screen.
Menu Bar
Item
File
Icon
Command/Submenu
Edit
New > Group = Defines a new User Group
New > Set = Defines a new file set
New > Logical File/s = Displays a list of all logical files relevant to a particular physical file
System > New = Defines a new iSeries host
System > Disconnect = Disconnects the iSeries host from
View
System > Remove = Removes the iSeries host from View
Properties = Displays group properties, enabling you to edit
group
Exit View = Close application
Delete = Deletes groups files, and sets from View
View
Rename = Renames sets
Deactivate Security = Disenables security rules and permissions
Configuration =
Refresh = Updates the Rules Database in View
Link with Editor = Highlights (in blue) the file in the navigator pane that is being displayed in the Data pane
View 3 User Manual
12
Introducing View: The User Interface
Toolbar Icons
The View toolbar provides a fast, easy way to access many of the features. The following is
a list of all toolbar buttons.
Icon
View 3 User Manual
Name
Description
New
Define a new iSeries host, group, file, or set
Delete
Deletes groups, files, and sets from View
Deactivate
Security
Refresh
Disenables security rules and permissions
Link with
Editor
Properties
Highlights (in blue) the file in the Navigator pane that is being
displayed in the Data pane
Displays Group properties, enabling you to edit group
Updates the Rules Database in View
13
Introducing View: iSecurity
iSecurity
Raz-Lee’s iSecurity is an integrated, state-of-the-art, security solution for all iSeries systems, providing cutting-edge tools for managing all aspects of network access, data, and
audit security. Its individual components work together transparently, providing comprehensive “out-of-the-box” security. Other iSecurity products include:
Assessment
Assessment checks your ports, sign-on attributes, user privileges, passwords, terminals,
and more. Results are instantly provided, with a score of your current network security status with its present policy compared to the network if iSecurity were in place.
Firewall
Firewall protects and secures all types of access, to and from the iSeries, within or outside
the organization, under all types of communication protocols. Firewall manages user profile status, secures entry via pre-defined entry points, and profiles activity by time. Its Best
Fit algorithm determines the validity of any security-related action, hence significantly
decreasing system burden while not compromising security.
Audit
Audit is a security auditing solution that monitors iSeries events in real-time. It includes a
powerful query generator plus a large number of predefined reports. Audit can also trigger
customized responses to security threats by means of the integrated script processor contained in Action.
Action
Action automatically intercepts and responds to security breaches, system activity events,
QHST contents, and other message queues. Inquiring messages can be automatically
answered. Alerts are sent by e-mail, SMS, pagers, or the message queues. Command scripts
with replacement variables perform customized corrective actions, such as terminating a
user session or disabling a user profile.
View 3 User Manual
14
Introducing View: iSecurity
Anti-Virus
Anti-Virus provides solid virus protection that prevents your iSeries from becoming an
infection source. Anti-Virus automatically scans and examines all incoming IFS files, validating and checking them as they are enrolled or modified. Anti-Virus authenticates them,
and finally quarantines or erases infected files.
Capture
Capture silently captures and documents user screens for tracking and monitoring, without
any effects on system performance. It also preserves job logs for subsequent review. capture
can run in playback mode and can be used to search within texts.
Screen
Screen protects unattended terminals and PC workstations from unauthorized use. It provides adjustable, terminal- and user-specific time-out capabilities.
Password
Password provides a first-tier wall of defense for users by ensuring that user passwords
cannot be easily cracked and guessed.
AP-Journal
AP-Journal automatically manages database changes by documenting and reporting
exceptions made to the database journal.
View 3 User Manual
15
Introducing View: iSecurity
View 3 User Manual
16
Getting Started with View
2
Getting Started with View: Obtaining Your Authorization Code
Chapter 2: Getting Started with View
Obtaining Your
Authorization
Code
A valid product authorization code is required in order to run this product. Contact your
authorized Raz-Lee distributor or reseller to receive the proper code.
If you are evaluating this product, you will receive a temporary authorization code valid for
30 days. If you have purchased a license, you will receive a permanent authorization code
that is specific to the serial number and model of the computer on which it is installed.
If you upgrade your iSeries hardware, or purchase a more recent version of the product, you
must request a new authorization code.
Entering Your
Authorization
Code
If you did not enter your authorization code at this time, you must do so now at this time.
This proceduremay only be performed using the native iSeries interface. Perform allsteps in
order.
1. Signon to the iSeries host.
2. Type STRVIEW from any command line. The View main menu appears.
View Main Menu
View 3 User Manual
18
Getting Started with View: Changing the View Password
3. Select 81 > F22 from the main menu.
4. Enter the authorization code in the appropriate field.
NOTE: If you enter an incorrect code, you will receive an error message when you
attempt to access product features. If this occurs, simply repeat the above
procedure to enter the correct code.
Changing the
View
Password
An additional product-specific password is required to access certain features. The default
password is QSECOFR. It is highly recommended to change this password immediately
after using the product for the first time. This operation may only be performed using the
native iSeries interface.
To change the product-specific password:
1. From the View main menu, select 81 > 92. The Modify Password screen
appears.
2. Enter the new password in the New Password field.
3. Enter again in the New Password (to verify) field.
4. Press Enter to continue. If the two paswords you entered fail to agree, an error
message will appear. Repeat steps 2 and 3 to correct.
Connecting to the iSeries Host
You must connect to the iseries host in order to work with your files.
NOTE: If this is the first time the View is activate, select System>New from the
File menu to define the system connection.
1. Double click the iSeries host icon
appears.
. The Connect to Server dialog box
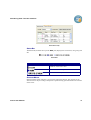
Connect to Server
View 3 User Manual
19
Getting Started with View: Working with iSeries Hosts
2. Enter user name, password, and View password (the default is QSECOFR). Note
that the system address already appears.
3. Click OK to connect.
Disconnecting from the iSeries Host
1. Select System > Remove from the File menu.
2. Click Yes to confirm.
Working with
iSeries Hosts
Adding a New iSeries Host
This procedure describes how to create and modify iSeries systems in View.
To add a new iSeries host system, perform the following steps:
1. Select System > New from the File menu. The New System dialog box
appears.
2. Enter the IP number for the new system and click OK. The system icon appears in
the Navigator pane.
Removing an iSeries Host
To remove an iSeries host from View, perform the following steps.
1. Select System > Remove from the File menu. The Confirm dialog box
appears.
Confirm
2. Click Yes.
NOTE: Removing a host from View does not delete the product data from the system.
View 3 User Manual
20
Working With User Groups
3
Working With User Groups: Overview
Chapter 3: Working With User Groups
Overview
View user groups enable you to apply field-level security rules to pre-defined groups of
users. User groups contain one or more individual user profiles, thereby greatly reducing
the number of rules required to implement field-level security.
Note that field-level security rules require the use of group profiles. You cannot define rules
for individual user profiles or OS/400 group profiles.
When creating user goups, View enables you to restrict and except users, thereby creating
a group unique to View. The following provides an explanation.
Restrict
Except
Basing your user group on any combination of individual users and OS/400
user profiles. For example, you can create a user group called “Finance”
which restricts the Accounting Department, the Marketing Department, and
the two out of the five company secretaries.
When creating your user group based on a particular OS/400 user profile,
leaving out certain member/s of that group. For example, in the above group
called “Finance”, I want to except the Marketing department manager. he
will not be in the new user group created for View and the permissions and/
or restrictions will not apply to him.
The following section describes the procedures for defining and modifying View user
groups.
Defining and
Modifying User
Groups
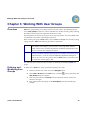
To define a new View user group, perform the following nine steps.
1. Select the desired host system icon in the Navigator pane.
2. Select New > Group from the File menu, or click the
New Group dialog box appears.
icon on the toolbar. The
3. Enter the group name in the Group field. Group names must be exactly four
characters in length.
4. Enter a description of the group in the Description field. See the following
example.
View 3 User Manual
22
Working With User Groups: Defining and Modifying User Groups
New Group
5. From the Exceptions and Restricted field, perform one or both of the
following:
Click Restricted Users/Groups to restrict individual users of the group
Click Exceptions to restricted users to except individual users in the group
The Users/Groups dialog box appears. (The following shows Restricted Users/
Groups.)
Restricted Users/Groups
View 3 User Manual
23
Working With User Groups: Deleting User Groups
NOTE: Individual users are displayed in the color red, whereas iseries group profiles are displayed in the color green.
6. Select the check-box to choose which individual user or group profiles to restrict
and/or except. You may also click the Search button at the bottom of the dialog
box to search for a specific profile.
Input
7. Click OK to confirm. The New Group dialog box returns.
8. Repeat steps five through seven in this procedure to add or exclude additional users
and/or groups from the new group.
9. Click OK to complete the group definition.
Deleting User
Groups
To delete a user group, perform the following steps.
1. Select the desired user group in the Navigator pane.
2. Click the
deleted.
View 3 User Manual
icon, and then Yes in the Confirmation box. The group is now
24
Working With Sets and Files
4
25
Working With Sets and Files: Overview
Chapter 4: Working With Sets and Files
Overview
A set consists of one physical file and, optionally, any logiacal files associated with that
physical file. Logical files contained in a set may be located in different libraries from its
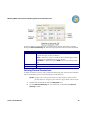
physical file. A set is always associated with one or more user groups.
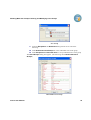
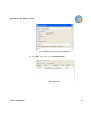
Creating a New Set
To create a new set, perform the following steps.
1. Select the group in the Navigator pane where you want the set to appear, rightclick on the group’s name and select New>Set. The New File in Group dialog
box appears.
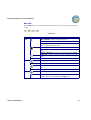
New File in Group
2. Type the library or file name in the appropriate fields, or click the Browse button
to select the file and/or library from a dialog box.
NOTE: You may also search for a specific library or file by clicking the Search
button (see below) in the dialog box that appears whenever you click
Browse. Click to select the correct row (if using the scroll option), and
click OK.
View 3 User Manual
26
Working With Sets and Files: Overview
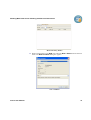
Libraries
3. Verify your selection in the New File dialog box, and click Next to continue. If
you have selected a logical file, a message appears indicating this fact.
New File in Group (highlighting logical file message)
4. If you selected a logical file, the New File dialog box appears with a message
requesting that you associate it with a physical file. Click to select a physical file
View 3 User Manual
27
Working With Sets and Files: Overview
associated with the logical file, and then click Next to continue. This step is not
applicable if a physical file is initially selected.
New File in Group (continued)
5. Enter a description of the file in the wizard and click Next to continue.
6. If you want to add additional logical files, select the View Logicals button. The
Logical Files dialog box appears.
Logical Files
View 3 User Manual
28
Working With Sets and Files: Adding or Removing Logical Files From a Set
7. Select the relevant logical files for the set and click OK.
8. Click Finish from the New File in Group dialog box. The new set appears in the
Navigator pane.
Adding or
Removing
Logical Files
From a Set
1. Select the
icon in the Navigator pane. Alternately, you can select the physical
file in the set that is relevant to the logical file you want to remove.
2. Click the
icon and select Logical Files from the pop-up menu.
3. Check or un-check logical files as appropriate from the Logical Files dialog box.
Click OK to continue.
4. Right-Click the set
and select “Apply rules to relevant LF”
5. Check “Activate Data” and “Activate Authorization”
6. Select to activate the ruls “Immediately” or in “Batch” and click “Apply”
Deleting Files
From a Set
1. Highlight the file in the Navigator pane.
2. Click the
icon and click Yes from the Confirm dialog box.
NOTE: Deleting a physical file results in deleting that entire file set.
Renaming Sets
To change the name of an existing set, perform the following steps.
1. Select Edit > Rename. The Rename Set dialog box appears.
Rename Set
2. Enter the desired name change and click OK.
Deleting Sets
To delete an existing set, perform the following steps.
1. Highlight the file in the Navigator pane.
2. Click the
View 3 User Manual
icon and click Yes from the Confirm dialog box.
29
Working With Sets and Files: Using Link with Editor
NOTE: This procedure can also be used to delete individual files. However, deleting a physical file is the same as deleting its set because the set does not
exist without its physical file. Logical files, on the other hand, can be
deleted without any effect to the set.
Using Link
with Editor
This convenience option highlights the active (open) file in the Navigator pane.
To use Link with Editor, follow this simple procedure.
1. Click the
icon in the toolbar. The file that is active in the Data pane is now
highlighted in the Navigator pane.
2. Check by noting that the file name displayed on the status bar and the file
highlighted in the Navigator pane are one and the same. The following screen
capture shows the highlighted file in the Navigator pane, and the file name
displayed on the status bar.
View Main Screen (highlighting Link with Editor option)
View 3 User Manual
30
Working With Permissions
5
Working With Permissions: Overview
Chapter 5: Working With Permissions
Overview
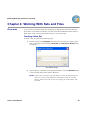
View offers two types of permissions, Field Permissions and Record Permissions.
Field Permissions are rules that restrict acces to specific fields in a database
record. There are three kinds of Field Permissions:
Full Access - Users can view and modify field contents
Read-Only Access - Users can view but not modify field contents
None (Access Denied) - Users cannot view field contents
Record Permissions are rules that restrict access to specific database records
according to Boolean selction comparison operators. For example, you may define
a record permission rule that restricts access to payroll records where the base salary is greater than (>) $ 12,000.
These permissions are accessible only through the Data pane. The Data pane is composed
of two parts.
The Field Security tab enables you to define field permissions
The Record Security tab enables you to define record permissions
These tabs can only be opened one at a time. When opening the Data pane, Field Security
opens first by default.
Working with
Field
Permissions
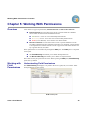
Understanding Field Permissions
The Field Security tab displays every field in the active (open) file, in list form. Additional parameters are also shown.
Field Security tab
View 3 User Manual
32
Working With Permissions: Working with Field Permissions
The table on the following page provides an explanation.
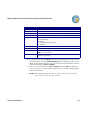
Parameter
Definition
Field
Field Text
Field name
Description of the field, i.e. Country of Citizenship or Company Payroll
Type of data contained in field:
A = Alphabetical
B = Binary
P = Packed decimal (numeric)
S = Decimal
The types of permission you wish to grant:
Full Access - Users can view and modify field contents
Read-Only Access - Users can view but not modify field contents
None (Access Denied) - Users cannot view field contents
Org. = Indicates that according to original file, the field is already
protected from modication. This access appears only in the ReadOnly and None permissions.
The character that appears in the data field in place of the restricted
data. The character appears only where access is None. The default
is an asterisk (*) for alphabetical fields and zero (0) for numerical
fields.
This column appears only on logical files and shows the physical file
origin of each field.
Type
Access
Character
Based on PF
Fields
The process of defining field permissions is simple. Decide:
View 3 User Manual
Which user group do you want to grant access to?
Which specific fields do you ant to allow and/or restrict to that group?
Which level of access do you want that group to have? Do you want them to be
able to:
both read and modify the specific fields?
only read the fields with no permission to modify?
be restricted from viewing completely?
33
Working With Permissions: Working with Field Permissions
Defining Field Permissions
To grant field permissions in file access, perform these steps.
1. Double click the desired file in the Navigator pane. The Field Security tab
appears in the Data pane. You may also “drag and drop” the file from the
Navigator pane to the Data pane.
2. If working in Multiple Record Format, you may need to change the record
format from the Format drop-down option (located at the top left of the Data
pane).
3. Find the desired field in Field Security and right click that line.
4. Select Access from the shortcut menu, and then select your desired permission.
When choosing Access > None, you may edit the character.
Field Security (partial view)
Activating Security
See Activation Settings in this chapter.
Deactivating Security
1. Select the desired file in the Navigator pane.
2. Click the
icon or the
Deactivate Security dialog box.
field, and then click OK in the
Deactivate Security
View 3 User Manual
34
Working With Permissions: Working with Record Permissions
Editing Field Permissions
1. Double click the file in the Navigator pane that contains the field(s) you want to
edit. The file opens in the Data pane.
2. Find the correct field and right click that line. The Access shortcut menu appears.
3. Select the desired permission.
4. Click Apply and then Close.
Updating the Rules Database
Any changes/additions to View must be updated in the Rules Database. Therefore, perform
this procedure immediately after you define or edit permissions.
1. Right click the host you want to update.
2. Click the
Working with
Record
Permissions
icon.
Understanding Record Permissions
View enables you to define record-level security rules that control whether or not specific
users can view or modify specific records in a database. Record-level security rules are
based on conditional values of one or more fields using Boolean (comparison) operators.
Examples are:
All salaries less than $40,000
All employees working in the company for more than five years.
All customers from a particular list
View supports multiple conditions in record-level security rules. You can create complex
conditions by using logical AND and OR statements. For example, you can create a rule
restricting access to inventory records where:
Vendor number greater than 40 AND quantity on hand is less than 100 units
OR...
Vendor number less than or equal to 40 AND quantity on hand is less than 300
units
The above example is shown in the following Record Security screen capture.
View 3 User Manual
35
Working With Permissions: Working with Record Permissions
In order to define record permissions, you must use the shortcut menu that is optioned
through the Record Security tab. The following explains the shortcut menu commands.
Command
Definition
New
Select = Add a new group of conditions. Users are permitted to see
records that apply to those conditions.
Omit = Add a new group of conditions. Records that apply to those
conditions are prohibited to be seen by the user.
Condition = Appends a logical AND criteria to an existing condition
Delete a condition or group of conditions
Edit a condition
Delete
Edit
Defining Record Permissions
To define record-level security rules, perform the following steps. The rules and examples
refer to the example given in Understanding Record Permissions.
NOTE: To apply rules from a physical file to its logical file(s),right-click that
physical filein the Navigator pane and select Apply Rules to Relevant LF.
1. Double click the desired file from the Navigator pane.
2. Click the Record Security tab. If no rules have yet been defined, Record
Security is blank.
View 3 User Manual
36
Working With Permissions: Working with Record Permissions
Record Security (blank)
3. Right click anywhere in the Data pane and select New > Select from the shortcut
menu. The New Condition dialog box appears.
New Condition
View 3 User Manual
37
Working With Permissions: Working with Record Permissions
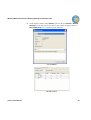
Parameter
Definition
Name
Text
Format
Format Text
Type
Select field name from drop-down list
Field description
The format of the field (display only)
Format description (display only)
Type of data contained in field (display only):
A = Alphabetical
B = Binary
P = Packed decimal (numeric)
S = Decimal
Size
Number of characters in field (display only)
Decimal Position Number of decimal places in numeric field.
Test
RANGE = Between two values
LIST = A list of values
Values
The value that the test is being compared to (alphabetic fields are
entered in quotations).
4. Use the pull-down menu in Name (at the top) to find the field you want to define
record conditions. Note that Field Attributes appear automatically; these are for
display and information purposes only. The only parameters beside name that must
be entered manually are Test and Values.
5. Enter the correct information in Test and Values and click OK. The following
screen capture shows “Vendor number greater than 40”, and the condition appears
in the Record Security.
NOTE: When handling alphabetic fields, the value of the rule must be placed
between quotes, unless the value is a field.
View 3 User Manual
38
Working With Permissions: Working with Record Permissions
New Condition
Record Security
View 3 User Manual
39
Working With Permissions: Working with Record Permissions
6. To add another condition within Select, right click the word Select in Record
Security (see the following screen capture). The conditions appear together in
Record Security next to “bulleted” purple diamonds.
New Condition
Record Security
View 3 User Manual
40
Working With Permissions: Working with Record Permissions
7. To create an OR condition, right click in Record Security, and select New >
Select from the shortcut menu.
8. Continue to use the New Condition dialog box to define all your conditions.
Omitting Conditions
OMIT is the opposite of Select. OMIT instructs you not to apply the rules if certain conditions appear.
If we add an OMIT condition to our previous example, we note that permission is granted if:
Vendor number greater than 40 AND quantity on hand is less than 100 units
OR...
Vendor number less than or equal to 40 AND quantity on hand is less than 300
units
BUT...
Not if the quantity on order is greater than 200
By adding an OMIT condition, we state that the rules concerning the vendor number, etc.,
don’t apply if the quantity on order is greater than 200.
The following screen capture displays this OMIT condition in Record Security.
Record Security
View 3 User Manual
41
Working With Permissions: Working with Record Permissions
To omit conditions, follow this procedure:
1. Right click in Record Security and select New > Omit from the shortcut menu..
The New Condition dialog box appears.
2. Define your desired omission and click OK.
Activation Settings
After defining field and/or record permissions, you have four options.
Save the settings in the database without activating or implementing security by
simply pressing Apply.
Implement standard protection by selecting Activate Data. This will create the
logical file in the group library and is acceptable for most users.
To protect from access to file from its full-qualified name (library/file), select
Activate Authorization.This will revoke authorization from the user to the original file.
Select Activate Data and Activate Authorization to provide maximum protection.
These options are achieved via the following procedures.
Saving Settings Without Activation
Keep the Activate Data and Activate Authorization check-boxes unselected and click
Apply. As a result, all the seettings are saved in the View database and the file will maintain its former security.
If the file wasn’t secured before (
If the file was secured before (
its former settings
or
or
), it will remain that way
), it will remain secured, but accoording to
Saving Settings and Activating as a Batch Job
1. Check the Activate Data and Activate Authorization check-boxes.
2. Make sure that the batch radio button is checked and click Apply.
As a result, all the settings are saved in the View database, and the command to activate the
file security is submitted as a batch job. Upon completion, the file icon in the Navigator
pane changes to
may click
View 3 User Manual
or
when the batch job finishes running. The icons will change (you
to refresh the file set on the Navigator pane to check progress).
42
Working With Permissions: Working with Record Permissions
If the batch job is successful, the file security is activated and the icons will change
to
or
.
If the batch job fails, the file isn’t secured and the icons will change to
or
.
Check the reason for failure by going to the job spool file (the job name is always
the file name).
Saving Settings Without Activating Immediately
Check the Activate Data and Activate Authorization checkboxes and make sure that
the Immediately radio button is checked and click Apply. As a result, all the settings are
saved in the View database and the command to activate the file security is running. Upon
completion, the file in the Navigator pane changes:
If the batch job is successful, the file security is activated and the icons will change
to
or
.
If the job fails, the file isn’t secured and the icons will change to
the reason for failure by going to the job spool file.
or
. Check
NOTE: When activating security the first time a None access is applied to a
numeric field in the file set, changes to the original file structure will take
place. This process can be extensive, depending on the file size and system
performance.
Deactivating Security
1. Select the desired file in the Navigator pane.
2. Click the
dialog box.
icon on the toolbar, and then click OK in the Deactivate Security
3. As a result, the file will not be secured. However, its security definitions will
remain in the View database.
Editing Record Permissions
1. Right click on the desired condition in Record Security.
2. Select Edit from the shortcut menu.
3. Enter your desired changes and click OK.
Deleting Record Permissions
1. Right click on the desired condition in Record Security.
2. Select Delete from the shortcut menu and click Yes to confirm.
View 3 User Manual
43
Working With Permissions: Activate GUI Definitions from the
To delete an entire selection, right click the line of the word “SELECT” from that selection
and continue with the same procedure.
Changing Restriction Characters
This procedure shows you how to change the default restriction character, an asterisk (*), to
the character of your choice.
1. Open Field Security.
2. Right click the Character column.
3. Select Edit Character from the shortcut menu. The Edit Character dialog box
appears.
4. Enter your desired character and click OK. Use only a single character and no
doubles characters. For example, “$” is correct whereby “$$” is incorrect. After
editing characters, all previously displayed characters automatically convert to the
new one.
Activate GUI
Definitions
from the
Native
After defining the fields and records according to the users and groups, the application must
be activated from the native green screen.
1. Type STRVIEW to start the View.
2. Select option 71. Add *LIBL and OVRDBF Detection
3. Select option 73. Add Job Initiation Setup to activate the GUI definitions for
specific subsystems.
4. Select option 31. Activate Definitions to activate the GUI definitions for
specific groups.
View 3 User Manual
44
Appendix A
Appendix A:
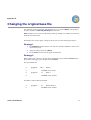
Changing the original base file
The following is true for changes made manually or by use of the CHGPF (Change Physical File) command of iSecurity FileScope products line.
View modifies (in most cases) the PF (Physical File) by adding 2 (3 in DBCS environment)
fields after the other fields.
Should there be a need to apply a change to the PF, use one of the following strategies:
Strategy 1
1.
Use STRPDM and delete the file view which is located in SMZ5xxxx where xxxx
represent the group.
2.
Apply the changes using the CHGPF
3.
Use the View GUI and activate again the definitions
Strategy 2
Before applying any change to the PF, add to the DDS the special fields that View adds to
the product. Then, apply your changes and use CHGPF.
The special fields are:
A
QQQQ00
A
A
2B 0
DFT(0)
COLHDG('View' 'field')
QQQQA0
A
1A
DFT('-')
COLHDG('View' 'fieldA')
For DBCS countries add also the field:
A
A
View 3 User Manual
QQQQG0
1G
DFT(G'SO*SI’)
COLHDG('View' 'fieldA')
ii
Appendix b
Appendix b: View Sample Tutorial
Appendix
The View User Guide Appendix is divided into two parts, View Sample Tutorial and
View Troubleshooting.
View Sample
Tutorial
Suppose you want to grant the members of user group MSY2 (Marketing Department) permission to read but not modify the field Retail Customer Group called “Southside
Merchants” and “Country of Location” (only USA). After defining field permissions
for Read-Only:
1. Click the Record Security tab (it appears empty).
2. Select New > Select from the shortcut menu. The New Condition dialog box
appears.
3. In Name, scroll to find the correct field, (in this example, it’s
YEAR@@@@@@).
New Condition (displaying field YEAR@@@@@@)
4. Enter the correct data in Test and Values areas. In this example, because the
desired year is 2007, enter an equal sign (=) in Test and write “2007” in Values..
The dialog box should look like this:
View 3 User Manual
ii
Appendix b: View Sample Tutorial
New Condition (after entering Test and Values)
5. Click OK to get the final result in Record Security:
Record Security
View 3 User Manual
iii
Appendix b: View Troubleshooting
View
Troubleshooting
Problem
Cause
Unable to connect to host
Wrong password, user
name, or View password
Apply Security procedure Wrong configuration value
wasn’t successful
in file record security
Want to enter new group
name but the OK buton is
unavailable (grayed out)
Want to grant full access to a
certain field but the option is
unavailable (grayed out)
View 3 User Manual
Too many characters in
name
Solution
Verify and enter again
Find the spool file of the job
in the AS/400 and fix
accordingly
Re-enter using only four
characters
It is an original file from the None! You cannot grant
host. Look for the blue
more permission to such a
asterisk.
file.
iv