1
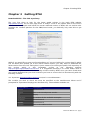
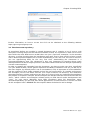
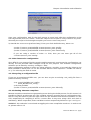
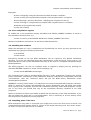
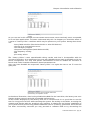
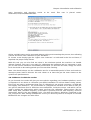
RTAI 3.3 User Manual
rev 0.2
RTAI User Manual 3.3 - pag 1
Chapter 2 Copyright info
Chapter 2
Copyright info
This document, is copyrighted © 2006 by Giovanni Racciu <[email protected]> and Paolo
Mantegazza <[email protected]>. Part of this documentation has been copied and
derived from README files included in the RTAI3.3 distribution and its CVS repositories. The
RTAI-doc project makes no representations or warranties with respect to the contents or use of
this manual, and specifically disclaims any express or implied warranties of merchantability or
fitness for any particular purpose. The RTAI-doc project reserves the right to revise this
publication and to make changes to its content, at any time, without obligation to notify any
person or entity of such revisions or changes.
This work is licensed under the Creative Commons Attribution-NonCommercial-NoDerivs
2.5 License. To view a copy of this license, visit http://creativecommons.org/licenses/by-ncnd/2.5/
If you have questions or suggestions about this document, please send an email at
[email protected] or contact the RTAI-doc project by use of the mailing-list.
Preliminary version
We have decided to start publishing this document, even if it contains only few
chapters, as we think it may be very useful to the RTAI community. We will keep
releasing new versions of this document as soon as new chapters are available.
RTAI User Manual 3.3 - pag 2
Chapter 3 Getting RTAI
Chapter 3
Getting RTAI
Download RTAI – The CVS repository
The very first place to look for the latest stable release is the main RTAI website
http://www.rtai.org. On the first page there is always a link to the tarball with all the source
code needed to compile and install the actual released version of RTAI; this tar archive also
contains the certified patches for the GNU/Linux kernel; you basically only need this to get
started.
Illustration 1: The main RTAI webpage
While if you would like to test new functionalities or if you are looking for a minor bug fix which
has not been back ported yet to the official stable version, you may want to download the
latest version from the CVS. Doing this is just a matter of accessing the public CVS repository of
this
project
which
is
also
browsable
on-line
at
the
following
address
http://cvs.gna.org/cvsweb/?cvsroot=rtai. It is suggested browsing it to locate better what is
needed and to get familiar with the naming scheme used by RTAI. Once you have found what
you need to download on your local machine you have to access the CVS anonimously with the
following comand:
cvs -d:pserver:[email protected]:/cvs/rtai co <modulename>
The module you wish to check out must be specified as the modulename. When and if
prompted for a password simply press the Enter key. The available modules are:
Module Name
Description
Kilauea
Closed branch
Magma
This is the development version
rtai
Empty
Showroom
It contains all the available examples
Stromboli
Closed branch
Vesuvio
Closed branch
Vulcano
This is the stable version
RTAI User Manual 3.3 - pag 3
Chapter 3 Getting RTAI
Illustration 2: The browsable CVS repository
Further information on how to access the CVS can be obtained at the following address
https://gna.org/cvs/?group=rtai
3.1 The showroom repository
As mentioned before one module is named showroom and it contains a lot of source code
examples covering almost all the features available in RTAI. It's important to take into account
that inside the main RTAI source tarball there are just a few basic examples, in the testsuite
directory, to allow checking that the installation went well. That is done mainly to keep it small
and to allow experienced RTAI user to avoid downloading it over and over. For such a reason if
you are approaching RTAI for the very first time, downloading the showroom is a
necessary/mandatory step. The showroom is also very important for knowing about newly
developed features which maybe present in the latest release and that are always explained by
a brand new example(s).
In order to compile the examples from the showroom, you have to make sure that $prefix/bin
is in your PATH variable, where $prefix represents the RTAI's installation root (as you will see in
the next chapter, by default prefix is set to /usr/realtime). This is important to let the Makefiles
and the runfiles of each single example access the rtai-config utility. To compile and execute
the examples just run the make and the ./run script located in its directory. The showroom
examples directory scheme and names are also very clear to help you understand immediately
the purpose of a specific example. All the examples are divided into two main branches that are
“kern”, which contains the examples related mainly to RTAI kernel mode development and
“user”, for user space. Naturally since RTAI schedulers allow full kernel/user space
inter/intraoperability you will find also mixed applications in both branches. Last but not least
all the examples have a README file that explains better its behavior and its design.
RTAI User Manual 3.3 - pag 4
Chapter 4 Installation and calibration
Chapter 4
Installation and calibration
Installing RTAI
Once you have downloaded the latest tarball it's time to start configuring and compiling RTAI,
but before explaining the entire procedure I'd like to introduce some of the most common
pitfalls to allow a smooth installation. As you have already learned, RTAI is made of two
separate parts; the patch for the abstraction layer and the services. Any RTAI release comes
with several patches, which will be described later, but all of them are for a specific vanilla
GNU/Linux kernel. This means that RTAI is designed to run on a standard Linux kernel which
can be downloaded from http://www.kernel.org and not on the kernel's source code that comes
with the most common distributions and they are sometimes (read:almost/always) heavily
patched and this can lead to incompatibilities, strange warnings and if successfully compiled to
weird behaviors. For this reason always get a standard fresh kernel.
Another recurring question/error is that the kernel compiled with your distribution has a lot of
features which are available as modules or static (compiled with the kernel) and you must
somehow simulate this, also with the RTAI patched kernel, if you want to have it running
transparently. Doing so is generally just a matter of importing the configuration file of the
actual running kernel. It can be found under the /boot directory as .config or as config-{kernelverions-tag}. If you don't want to compile the kernel starting from that file, which will generally
lead to a longer process and a bigger file, you have to pay attention to enable all the features
your hardware requires to work properly. This includes the file system, the network card and all
the options needed; failing to enable the right features will produce a kernel with missing
functions and wrong behavior and in the end you will not be able to fully use the system (as
expected). Last but not least, always keep your old working kernel and modules available as
entry in your boot loader so that you can easily access the system if something goes wrong.
4.0 Introduction
RTAI uses only the leanest and fastest RTAI+Linux combination now; it dispatches real time
interrupts immediately. Moreover within such a scheme i386 has the possibility of completely
avoiding the dispatching of critical internal timers and interprocessor scheduling interrupts by
vectoring them directly to their handlers. Such an option strongly enhances performances on
low end machines and comes by default. You can disable it while configuring RTAI though. See
the related configuration helper. This will require you to patch Linux just with patches found
within this distribution.
4.0.1 Patching and compiling the kernel
The very first step is to patch and build a vanilla Linux kernel tree with the RTAI support. The
patches, for different architectures and for specific kernels are located under:
rtai_dir/base/arch/<specific_arch>/patches
Once you have chosen and defined one patch that matches your kernel version it's time to
apply it by typing the following commands:
cd $linux_src_dir
patch -p1 -b < rtai_dir/base/arch/i386/patches/hal-linux-2.6.15-i386-1.2-00.patch
This example applies the latest patch to a GNU/Linux kernel 2.6.15 and it's one available in
RTAI 3.3.
Note:Latest kernels are available with additional numbering scheme, for instance at the time of
this writing the latest stable is 2.6.16.11, but as you will notice the patches are limited to the
first 3 numbers. Apparently the additional last number should not generate problems and the
RTAI User Manual 3.3 - pag 5
Chapter 4 Installation and calibration
kernel can be patched and compiled, but it's better to consider using only the official version
indicated by the patch, because it is the only one fully tested and therefore supported.
It's common to place the Linux kernel source tree under /usr/src/linux (note that it's a link to
the real directory) but if you would like to keep this build separated from the whole system you
may create and put everything into a specific directory. If this is your case you need to specify
this directory during the RTAI configuration step.
Immediately after having patched the kernel you need to configure and compile it.
The configuration depends mainly on your specific needs, your hardware's spec and the
devices which are on your system; it's a good idea to start the configuration by importing the
existing .config file which is shipped with the distro. Generally you can find this file under the
/boot directory with a name config_xxx_yyy (even if this can be different according to the distro
you choose); simply copy it into the patched kernel dir and rename it as .config. A make
oldconfig command will do the rest, by importing all the existing configuration.
Beside all the specific options you may enable and/or disable there are several of them which
must be configured to allow RTAI to work properly They are:
“Use register arguments” under “Processor type and features” must be disabled
“Interrupt pipeline” under “Processor type and features” must be enabled (but, unless
you want to control/debug the patch behaviour) is better to disable statitics gathering as
it adds some overhead)
“Module versioning support” under “Loadable module support” must be disabled
Note: Attention must be taken for the APIC (Advanced Programmable Interrupt Controller)
configuration; the option is located under “Processor type and features”. In the previous
versions the APIC had to be disabled on UP machine, and could only by used on MP ones. With
the latest RTAI release the APIC can be enabled and used with success even on UP machines
and with this option enabled the system will benefit of faster timer reprogramming in oneshot
mode and lesser overhead. Anyhow if the APIC is configured/enabled in the kernel but it's not
present on your hardware RTAI will complain and give you the following error:
RTAI[hal]:ERROR, LOCAL APIC CONFIGURED BUT NOT AVAILABLE/ENABLED
in this case you have to disable the option and recompile/reinstall the kernel, its modules and
RTAI.
Note:Before running the compilation for the kernel you may want to configure rtai first (see
4.1.1) as the configure script will advise if any option for the kernel is wrongly configured.
This document does not cover any other specific issues regarding the kernel compiling and
installing procedure which you will easily find on the Internet and limits the instructions to the
following easy steps:
$ make xconfig
$ make
$ make install
If you configured any option as a module you will also have to run:
$ make modules_install
RTAI User Manual 3.3 - pag 6
Chapter 4 Installation and calibration
Illustration 3: Linux kernel configuration: make xconfig
("Interrupt pipeline")
Note:Once the kernel and the modules have been installed it maybe necessary to run a
mkinitrd script which will create an initial ramdisk for correctly booting the machine. Failing to
generate it won't allow the system to boot.
You should also define the new kernel and it's parameters as a (new) entry inside the
configuration file of your boot loader. Again, it's important to keep the old kernel entry
available to avoid problems if something goes wrong with the new RTAI-Kernel.
Note: If you use LILO you should also run the lilo command, while if you use GRUB the entry in
the menu is enough. The LILO command may also be executed automatically according to
specific distro's settings.
4.1 Standard installation procedure
The RTAI build system is a merge of Linux's Kconfig with autoconf/automake/libtool. Therefore,
you can either build RTAI:
4.1.1 Interactive configuration
The interactive configuration is the preferred and easier way to configure RTAI especially for a
first time user. All the options are browsable, selectable and well documented. To run the
interactive configuration you have to:
1) Into the source tree like with 3.x (your_source_dir == your_build_dir). Just run either:
$ make xconfig # (Qt-based)
$ make gconfig # (GTK-based)
$ make menuconfig (dialog-based)
RTAI User Manual 3.3 - pag 7
Chapter 4 Installation and calibration
Illustration 4: RTAI - make menuconfig
Save your configuration, wait for the shell prompt to come back after the configuration script
has fully finished, then run "make". Check the output of the scripts to verify if there is any error.
Generally the script is kind enough to explain you how to correct any errors.
2) Outside the source tree (preferred way). From your fresh build directory, either run:
$ make -f $source_tree/makefile srctree=$source_tree xconfig
$ make -f $source_tree/makefile srctree=$source_tree gconfig
$ make -f $source_tree/makefile srctree=$source_tree menuconfig
If you are using a version of make >= 3.80, then you can even get rid of the
"srctree=$source_tree" setting.
4.1.2 Non-interactive configuration
Since RTAI 3.x has autoconf inside, people needing automatic non-interactive configuration can
directly use the provided GNU configure script for this purpose. The available configuration
switches can be listed by running ./configure --help.
Some configuration targets in base/ can either produce a module, or be statically linked to the
RTAI schedulers. Either pass "m" for the modular build to their respective --enable-xxx switch,
or "y" for selecting the built-in mode.
4.1.3 Recycling a configuration file
If you are an experienced RTAI user, you can also recycle an existing .rtai_config file from a
previous build by running:
$ cp -rp $old_builddir/.rtai_config \
$new_builddir/.rtai_config
$ cd $new_builddir
$ make -f $source_tree/makefile srctree=$source_tree oldconfig
4.1.4 Selecting alternate compilers
Newest compilers sometimes are generating errors during the build process; for this reason it is
possible to specify an alternate one. The compiler selection must be done at configuration time.
There is only the need to pass the right values for the standard environment variables CC and
CXX, respectively for compiling C and C++ source files. In any case, using a GCC tool chain is
mandatory. When unspecified, these variables's values respectively default to "gcc" and "g++".
WARNING: this selection is not aimed at toggling the cross-compilation mode on. In order to do
so, please refer to 4.2
RTAI User Manual 3.3 - pag 8
Chapter 4 Installation and calibration
Examples:
# Start configuring using the Qt-based GUI with alternate compilers
$ make xconfig CC=/my/favorite/c/compiler CXX=/my/favorite/c++/compiler
# Reconfiguring a previous build tree, changing the compilers on-the-fly.
$ make reconfig CC=/my/favorite/c/compiler CXX=/my/favorite/c++/compiler
# Rebuild all [and optionally install]
$ make [all [install]]
4.2 Cross-compilation support
To enable the cross-compilation simply add ARCH and CROSS_COMPILE variables as usual to
the standard command lines, e.g.
$ make -f $source_tree/makefile ARCH=arm CROSS_COMPILE=arm-linuxNames of available architectures can be found under base/arch/*.
4.3 Installing the software
When the standard (or cross-) compilation has finished with no errors you may proceed to the
installation by typing the following commands:
$ cd $builddir
$ make install
Everything needed to use the RTAI distribution will be copied to the default installation
directory, or to the one specified during the configuration of the build tree. From now on, you
should be able to refer to the installation directory as the root of a complete standalone binary
RTAI distribution.
The RTAI programs can also be installed under a temporary staging tree by passing the
standard DESTDIR variable to "make" while installing. e.g.:
$ make install DESTDIR=/mnt/target
this command will create a standard RTAI hierarchy under /mnt/target, keeping the original
prefix information unmodified. If the installation directory selected at configuration time was
"/usr/realtime", then the command above will put the RTAI binary distribution under
/mnt/target/usr/realtime.
WARNING: running "make install" it is required to run several standard RTAI programs correctly.
RTAI 3.x enforces the actual split between the source distribution tree, the build tree where
RTAI is going to be compiled, and the final installation directory where RTAI programs can be
run. In any case, you should only rely on the installation directory contents to run RTAI
programs.
Note:You should also add to your PATH variables the bin directory of the RTAI installation. If you
did not modify the target dir it is /usr/realtime/bin. This is necessary to access directly some
files required to compile and run the programs.
4.4 Compiling parts of the tree
RTAI developers may want to recompile just single parts of the tree from times to times. The
automake-based build system allows it: just go to the proper directory level, then issue "make",
as usual. This process will recurse as needed.
RTAI User Manual 3.3 - pag 9
Chapter 4 Installation and calibration
4.5 Changing the configuration
Each time you want to change your configuration, just run "make xconfig|gconfig|menuconfig"
in your build dir, then "make" (or "make all").
If you only want to rerun the "configure" script using the current RTAI configuration, just run
"make reconfig", there is no need to restart any GUI for that.
When invoked for the first time in an empty build directory, the default "make" goal is
"menuconfig" in a regular terminal, or "xconfig" in an emacs-term.
4.6 Modifying the autotool template files
If you have to change some template files used by any of the autotools (i.e. Makefile.am,
configure.in, acinclude.m4), then you will need the following packages to rebuild the derived
files:
- autoconf 2.59
- automake 1.9.2
- aclocal 1.9.2
- libtool 1.5.8
4.7 Checking the performance
Before using the integrated calibration tool it's a good idea to verify the overall performances of
your system and find out if it is suitable for real-time applications. Doing so it's just a matter of
running the latency test which is available for kernel and user mode. It verifies the architectural
latency and jitter, up to the scheduling of a task. When used with the hard timer in oneshot
mode it can serve as a fine tuning of the average real-time scheduling latency. In oneshot
mode the idea is to measure the difference in time between the expected switch time and the
time when a task is actually called by the scheduler. In periodic mode however the variations of
the task period are used as measures of the scheduling latency/jitter. The reason for such a
choice are that there will be always a drift because the timer interrupt is based on a time
baseline that is different from the one used to carry out measurement calculations; in case of a
very good calibration (see next paragraphs) such a drift can be made very small and as far as
there is no loss of timer interrupts there will be no drift in periodic mode, unless the hardware
goes astray, so period variations are valid measures. The execution is fully customizable at
insmod time as it is possible to set up, the timer mode, the timer period, the averaging time,
the per average time or overall worst cases and the use of the FPU (with some calculations).
This test is located, after having installed RTAI under install_dir/testsuite/kern/latency or
install_dir/testsuite/user/latency. Running the ./run script will start it and the following results
will appear:
RTAI User Manual 3.3 - pag 10
Chapter 4 Installation and calibration
Illustration 5: latency test in kernel mode with bad
results
As you can see in this example the test shows weird results, which obviously aren't acceptable
for a real time applications. To better understand why this can happen you should be aware of
a series of “latency killer” conditions which may be present on your system. Among them there
are:
-heavy DMA activities (like the hard-drive or other PCI devices)
-the use of an accelerated x-server
-the USB legacy support
-the power management (both APM and ACPI)
-CPU frequency scaling
-SMI
-plus many others
The “latency killers” cause unpredictable timing results and that is incompatible with the
concept of real-time. As a workaround you may start disabling them both in the BIOS and in the
kernel configuration. You may find specific informations on how to disable the functions at
kernel level under linux/Documentation kernel-parameters.txt.
Once you have disabled the suspected “latency killer” run again the test to see if it was the
guilty one.
Illustration 6: latency test in kernel mode with
(preliminary) acceptable results
In the above illustration, after having disabled the DMA for the hard-drive, the latency test runs
fluently without overruns and with acceptable performances.
All the results displayed by the latency tests are in nanoseconds. It's a good idea to run this
test for a long period of time while stressing the system, like writing on the disks, accessing the
network and playing with the graphical user interface to obtain the real timing capabilities of
your system and to find out any possible additional source of latency generation. Once the test
has been successfully executed you may proceed to calibrate RTAI to try decreasing the
RTAI User Manual 3.3 - pag 11
Chapter 4 Installation and calibration
latencies and to obtain a more deterministic system.
Note: Always run both tests (kernel/user) for understanding the overall latency of your system.
In user mode you should expect a slightly worse result, but not so bad, compared to its kernel
brother.
4.7.1 The “switches” test
There is another important test-tool, which is placed in the testsuite directory, that can provide
you some informations about the maximum time RTAI needs to disable the interrupts. The
software is under the testsuite/kern/switches (or user/switches) and checks for the task
switching timings. To do so the utility uses a repeated sequence of suspend/resume and
semaphore signal/wait, with the FPU support and under a relatively heavy load (about 10
tasks). Assuming the kernel has been properly patched and executed as described before, the
results gives you an idea about the architectural switching time. If the values are too high you
should verify again if there is any latency killer left. Moreover you will see that the switching
time figures a far below the worst case latency with respect to the one will get by running any
RTAI calibration tool like task scheduling latency or the interrupt only latency check, especially
if any Linux load is applied. That is a clear evidence that the real latency limitation is very
seldom due to RTAI but is an intrinsic drawback of using a General Purpose CPU (GCPU) for real
time applications. To run this test simply execute the ./run script located into the directory. You
will obtain a result similar to the following:
Illustration 7: the switch test
4.7.2 The “preempt” test
This is the last test which is in the testsuite directory. It is designed to verify the schedulers
under intense load. You may look at this test as a stress utility. This software combines the
latency calibration task with a fast and slow task to have two levels of preemption, nesting on
an odd number of tasks. You may verify what happens by launching the display utility which
will show the min/max/avrg jitters of the latency check task, next to highest priority, and of the
slow task, at the slowest priority. Reasonable jitters are a clear indication of preemption. This
test on a UP machine will eat up to the 75% computing power of your machine so you may
want to decrease the ticking to obtain less load. This means that you also have to adjust the
parameters of this test according to your machine spec to avoid unfair locking of the scheduler.
To apply some additional stress to your machine you may want to use at least one of the
following commands:
ping -f whatever.address.youlike
pint -f localhost
top on one screen and maybe another on a X screen
a “while “true”; do ls -lR / > list; done”
a “while “true”; cat /proc/interrupts; done”
RTAI User Manual 3.3 - pag 12
Chapter 4 Installation and calibration
launch at least a dd command to access heavily the hard-drive
It is also suggested to run run this test for several time (at least a couple of hours) to get the
real picture of your machine. This test is also available in the user subdirectory.
4.8 Using the integrated calibration tool for i386 architectures
RTAI 3.x comes with a brand new calibration tool which should help you determining if your
hardware platform is up to the hard real-time duties and to tune it to its best. You can find this
tool under $installdir/calibration. To obtain all the options just type:
$ ./calibrate –help
To run this tool the following modules should be already loaded:
1)
2)
3)
4)
rtai_hal
rtai_lxrt or rtai_sched
rtai_fifos
rtai_calibrate
Note: The rtai_lxrt must be inserted if you want calibrate, for further use, the Linux threads in
kernel; while the rtai_sched is for using the specific RTAI kernel tasks, along with Linux threads
in kernel.
You can also execute the ./run script to automatically load the modules and launch the tool.
This scripts also accepts some options like: calibrate_irq and calibrate_user.
The main purpose of the calibrate tool is to show you how to fine tune your system as it gives
informations about the 8254 oneshot mode, the CPU frequency, the APIC frequency, the latency
and the worst case interrupt locking/contention.
There is a complete README file located under base/arch/i386/calibration which contains all the
details about each calibration procedure but briefly we may say that the 8254 Calibration
evaluates the time it takes to write two bytes to the 8254 timer. The APIC Frequency calibrates
the APIC timer against the 8259 timer. The CPU Frequency test calibrates the cpu clock against
the 8259 timer. You can run the two above tests together simply by typing calibrate -b. The
Latency test calibrates the scheduling latency of RTAI schedulers with oneshot timers, to allow
more precision for timed tasks. The last important test is the interrupt locking/contention
(calibrate -i); more and more motherboards are being sold with chipsets that have hardware
optimizations allowing locking the bus, maybe up to few milliseconds. Without judging if such a
way of working is acceptable, it make make it appear to improve overall average performances
in general applications, it surely dooms real time usage. Often what RTAI users see, are large
scheduling jitters and they start hinting at bugs that likely do not exist. This check is aimed at
helping in tracking such a problem. It measures interrupt latency by using the TSC on the timer
interrupt, machines without TSCs are old enough to have no optimizing chipsets. Thus they do
not have such a problem. The only module implied is rtai.c, there is thus no scheduling but just
interrupt dispatching, that should have latencies in the range of 20/30 us worst case. So if you
see something too much higher then play with its configuration parameters, with those of Linux
as well, and you may end in buying another board. The worst interrupt latency is displayed at
the end of the run, which comes when you type "Ctrl-C". Note that it is possible to check it also
on a scope by defining using "-sy" and connecting the scope to the first output bit of the
parallel port.
See also the README.SMI file in the same directory for some clues that might help with some
INTEL chipsets.
4.8.1 Playing with the showroom calibration tool
In the showroom repository there is a modified version of the calibration tool; it differs from the
standard one mainly because it can calibrate both RTAI ktasks and Linux kthreads and it is
RTAI User Manual 3.3 - pag 13
Chapter 4 Installation and calibration
more interactive and therefore easier
showroom/v3.x/kern/i386/calibration
to
be
used.
This
test
is
placed
under:
Illustration 8: Interactive calibration
All the available tests can be executed without exiting and restarting the process, thus allowing
a faster and more clear calibration of your hardware.
To choose a test simply type the “Upper case character” as indicated in the list and insert, if
required, the proper setup values.
With this tool you can also find out what is the minimum period the machine can handle
without freezing. This test is not really for calibrating the hardware but it's important to give
you an idea on the maximum achievable performance. To discover this limit, simply run a bus
Lock check with a decreasing period up to the machine freezing.
Note: You should always run the calibration test for a reasonable period of time and under an
average system load to discover the real values or at least the get the ones closest to the
system true performances.
4.8.3 What to do with the results
As you learned, the results will give you some advice regarding your hardware platform; now it
is important to use them to customize your RTAI installation to achieve better timing values.
First of all we need to understand that even if calibrating is not strictly necessary, as RTAI will
run happily even without it, it's much better to configure the machine at it's best so that you
can get the maximum from it. RTAI has some definitions, inside the source code which can be
used to assign the right values which came out from the calibration. These values, like the
8254 setup time, the APIC frequency (if the APIC is present) and the CPU frequency must be
inserted by hand in the asm-i386/rtai_hal.h file while the latency definition is defined in the
rtai_config.h file. After having modified the source you obviously need to recompile an reinstall
RTAI before the changes can take effect.
RTAI User Manual 3.3 - pag 14
Chapter 4 Installation and calibration
Illustration 9: Editing the rtai_hal.h file to insert the real
calibrated values.
These values can also be passed to the modules, thus avoiding recompiling RTAI and allowing
an easier/portable installation on different machines. The timer setup and the latency can be
passed to the scheduler module while the APIC and CPU frequency to the rtai_hal module like in
the following examples:
Get the result coming out from calibrate -c which is the CPU Frequency and type:
insmod rtai_hal.ko rtai_cpufreq_arg=996677084
If the APIC is present run calibrate -a and pass the result to rtai_hal with:
insmod rtai_hal.ko rtai_apicfreq_arg=VALUE_FOR_THE_APIC
The 8254 Calibration and the Latency (calibrate -r and -k or -u) should be passed to the
scheduler rtai_ksched or rtai_lxrt
insmod rtai_lxrt.ko SetupTimeTIMER=xvalue Latency=yvalue
or
insmod rtai_ksched.ko SetupTimeTIMER=xvalue Latency=yvalue
Note: The latency should be calibrated to find out an average value which has to be acceptable
both for kernel and for user, even if, as you will notice, the differences are very small. While, if
your own RTAI project, is based only on kernel or only on user mode, just check the latency for
the selected scheduler.
At the end you may want to run again the latency test and the calibration to verify the latest
performance level after the tuning procedure.
RTAI User Manual 3.3 - pag 15
Chapter 5 RTAI schedulers
Chapter 5
RTAI schedulers
Schedulers and hard real time in kernel/user space.
The scheduler is the heart of RTAI, it provides trough a series of mechanisms the real-time
capabilities which are peculiar to this project. By using the RTAI scheduler the process can
meet hard real time constraints and being able to run deterministically, that means that the
process can be executed precisely as designed and not limited by the general purpose
GNU/Linux scheduler. A real-time process which links to RTAI can therefore used to control
complex applications, such as numerical control, industrial process and any complex task which
requires “correct” scheduling.
RTAI provides symmetric hard real time services inter/intra user/kernel space. Such a support
comes through two schedulers, that at the moment are called rtai_lxrt and rtai_sched. They
can operate in both user and kernel mode and they differ only in relation to the objects they
can schedule. That means that rtai_lxrt is simply a GNU/Linux co-scheduler, this means that it
supports hard real time for all Linux schedulable objects like processes/threads/kthreads. The
rtai_sched instead supports not only hard real time for all Linux schedulable objects, like
processes/threads/kthreads, but also for RTAI own kernel tasks, which are very light kernel
space only schedulable objects proper to RTAI.
So while in user space there is no choice but scheduling Linux processes and threads, one could
ask her/himself what is worth the redundancy of having different scheduling objects in kernel
space, as at a first glance they will afford much the same functionalities. Understanding the
advantages and the disadvantages of one scheduler with respect to the other is important to
decide which one to use and how to implement your own real time software project. Please
remark that for user space only applications the two schedulers are the same. So the
idea that user space means LXRT is wrong as RTAI is LXRT always. The different
names of the schedulers are meant just to distinguish the schedulable objects
available in kernel space and to ease those that want to use Linux schedulable
objects only and everywhere.
Thus let's say immediately that the big advantage of RTAI's light kernel tasks is their fast
switching time with respect to Linux kernel threads, but on the other side it's important to know
that they operate outside any Linux environment. This behavior requires some special care if
one needs to inter-operate with Linux. This attention has not to be payed with Linux kernel
threads as they offer the advantage of being fully integrated in the Linux environment and ease
any needed RTAI Linux interaction. So unless there is a real design constraint using the
GNU/Linux co-scheduler is the best choice; or at least is the one which gives more freedom to
the development process.
5.1 How the scheduler(s) works
That said let's see first how any of the 2 available RTAI schedulers can become a co-scheduler
of Linux schedulable objects. To such an aim we assume to be within a process, you know how
to build it for sure: launching it by typing its name, through a shell scripts, a fork, a user thread,
created either by pthread_create or clone, a kernel thread, created by kernel_thread or the
newer support functions found in 2.6.xx. Then to use RTAI you need to extend the Linux task
structure, by linking it to RTAI. That comes by using:
•
rt_task_init_schmod (or with rt_task_init, a simpler but somehow limited shortcut) in user
space only;
•
set_rtext in kernel space, but you'll never need to use it directly as rt_task_init, if
you are using rtai_lxrt, and rt_kthread_init, both with rtai_lxrt and rtai_sched,
are the only things needed mostly.
After such calls your Linux schedulable object can use both Linux and RTAI APIs, without
any constraint, but you'll be in hard real time in kernel space only. At most you might be
RTAI User Manual 3.3 - pag 16
Chapter 5 RTAI schedulers
in Linux user space soft real time by setting SCHED_FIFO/SCHED_RR in
rt_task_init_schmod or, in kernel space, by calling rtai_set_linux_task_priority to obtain
the same result. Note that fifo is the default; Round_Robin must be set if you want this
behavior (see also rt_set_sched_policy)
At this point if you want to operate in hard real in user space time you have to call:
rtai_make_hard_real_time. In user space you should anticipate such a call with a cautious stack
extension plus a preallocation of all the needed memory followed by memory locking, see "man
mlockall", to convert into “static” all of your needed stack and heap.
You may also want to use the macro rt_grow_and_lock_stack. That is needed to avoid breaking
hard real time through dynamic virtual memory paging. In kernel space there is no such a need
for the stack, but beware that you'll have available just the small stack that the kernel makes
available for its kthreads, approximately either 4 or 8 KB acccordingly upon how you have
configured it in Linux, but you need to do much the same with k/vmalloc, that is call them for
all of what is needed before going hard real time anyhow, even if without the need for any
further memory locking call. Notice that there is a difference here with RTAI porper kernel tasks
as for them you can assign a larger stack, as allowed within the memory size you assigned at
RTAI configuration (the default is 2 MB).
Now you are in hard real time and to keep so you cannot use any Linux syscall or kernel space
service as that will:
● send you back into Linux hands
● execute what you asked to Linux, possibly being rescheduled by it
● return to RTAI hard real time when Linux has served you. RTAI can bear such things but
it is suggested that you'll be fully aware of it by mating you hard real time task to a
Linux buddy, to which you'll ask for the Linux service you need, thus being fully aware
that you are giving up hard real time till your buddy has served you. If you'll find it a bit
annoying consider using the support of Linux server RTAI makes available through:
rt_linux_syscall_server_create; If that is still unacceptable then keep mixing Linux and
RTAI even for hardened tasks but be aware that experience shows that even
experienced users have found them bitten already by too much confidence in doing it
"we know what we are doing" way. With too much a confidence Linux services are often
placed, inadvertently of course, in the wrong place and you'll get slapped, better say
you'll slap against end run stoppers, may be it is better to call them crashes of course.
Notice that RTAI does such transitions as effectively as possible. So as hard real time
capabilities improves in Linux natively (PREEMPT_RT) such pains might be lifted a bit
and a higher level real time interoperabilty might become feasible. Finally when a task is
exiting or hard real time is not needed any more one should call
rtai_make_soft_real_time following it with:
● rt_task_delete in user space, to detach RTAI from the Linux task structure;
● clr_rtext in kernel space to do the same for kernel threads, but you'll need not to
use it as in such a space rt_task_delete is all what is needed also. Latest RTAI
versions should be capable of doing that for you, if you'll forget it.
The above generic scheme is mostly used for user space, a worth to note exception being
found in netrpc.c. In fact in kernel space the standard usage legacy is to work in hard real time
mode directly and this is where the difference between rtai_lxrt and rtai_sched comes into the
play. To understand it more clear, one should recall that RTAI was first in promoting hard real
time in user space and the symmetric kernel/user space usage was achieved by using RTAI own
light kernel space tasks only. When the need was felt of supporting a symmetric scheduling in
user/kernel space based on a co-scheduler approach only emphasis was shifted to user space
mainly with some kernel space only. So to avoid the burden of making Linux kthreads hard real
time, as explained above, a support for the direct creation of hardened Linux kthreads was
created, by setting up functions rt_kthread_init and rt_kthread_init_cpuid, mirroring the
functions rt_task_init and rt_task_init_cpuid used for RTAI own light kernel tasks. However RTAI
users were most used to the latter function so, to allow them to not care of what was behind
the curtains, there was the need to have rt_task_init and rt_task_init_cpuid create hardened
Linux kthreads. In such a view rtai_lxrt must be used, so that kthread_inits and task_inits end in
RTAI User Manual 3.3 - pag 17
Chapter 5 RTAI schedulers
being the same things. Thus users wanting to use RTAI own light kernel threads only or both
them and hardened Linux kthreads should use rtai_sched, caring of using kthread_init/task_inits
according to their needs.
So let's get rid of badly inherited legacy concepts that drifted into a long series of urban
legends, not to say FUD, and state clearly what has been true for years now:
THERE IS JUST ONE WAY OF SCHEDULING IN RTAI AND IS AN ORIGINAL RTAI FIRST, IT HAS AN
UBIQUITOUS APPEARENCE IN TWO FORMS BECAUSE OF WHAT EXPLAINED ABOVE.
5.2 How does hard real time comes for Linux schedulable objects?
Hardened real time Linux schedulable objects are just normal Linux processes/threads/kthreds;
by calling rt_make_hard_real_time a task suspends itself so that another schedulable Linux
objects is switch in. As soon as the new task is switched in, the RTAI task switching is called,
without even exiting the just called Linux "schedule" function and the RTAI tasks is resumed in
real time hardened mode. When it has nothing to else do, it will call RTAI rt_schedule and such
a function will schedule a Linux object again. Notice that, full interoperability of Linux/RTAI
context switches is assured by a a common context switch function available in Linux sched.c.
This is believed to be a truly original, albeit trivial idea, within Linux environment that appear to
have been blatantly copied by others. Doing the trick the other way around, that is going back
into Linux hands, requires some care. In fact once hardened a schedulable object can fully
preempt Linux anywhere without it being aware it happened. The solution is as trivial as going
hardened though. So, for the hardened task, suspend itself and put itself on a circular buffer
list; there is one for each CPU and waiting to be awaken by a call to Linux "wake_up_process"
when there is no other hard real time to be scheduled by the RTAI scheduler, so a full return to
the Linux environment is ensured. Thanks to the commonality of context switches when the
task is resumed by Linux it finds itself softened again. However it will not be at the end of Linux
"schedule" but of RTAI "rt_schedule" instead. So RTAI must care of carring out the same
epilogue found in schedule and all the black magic will do no harm. The actual function doing
all of it are: steal_from_linux and give_back_to_linux.
Such functions are used, without an explicit user request, when a hardened real time
schedulable objects issues a linux syscalls. For that RTAI has to intercept all of the Linux
syscalls and if any is done in hard real time mode the hardened object is given back to Linux,
then depending on the architecture the Linux syscall is either executed immediately (i.e.
internally to the RTAI scheduler) and the object stolen from Linux just after returning from the
syscall (e.g. i386) or the syscall is executed along the standard Linux syscall path, so that the
recovery of hard real time will happen just at the next RTAI call (e.g. x86_64, at the moment).
RTAI User Manual 3.3 - pag 18
Chapter 5 RTAI schedulers
5.3 The APIs provided by the schedulers
All the common scheduling functions are handled by the base/sched/api.c. They are the
following:
Return Value
Functions
Description
int
rt_get_prio (RT_TASK *task)
Check a task priority.
int
rt_get_inher_prio (RT_TASK *task)
Check a task priority.
int
rt_change_prio (RT_TASK *task, int priority)
Change a task priority.
RT_TASK *
rt_whoami (void)
Get the task pointer of the current
task.
void
rt_task_yield (void)
Yield the current task
Int
rt_task_suspend (RT_TASK *task)
rt_task_suspend suspends execution
of the task task.
Int
rt_task_resume (RT_TASK *task)
Resume a task.
Int
rt_get_task_state (RT_TASK *task)
Query task state.
void
rt_linux_use_fpu (int use_fpu_flag)
Set indication of FPU usage.
Int
rt_task_use_fpu (RT_TASK *task, int use_fpu_flag)
Int
rt_task_signal_handler (RT_TASK *task, void(*handler)(void)) Set the signal handler of a task.
Int
rt_task_make_periodic_relative_ns (RT_TASK *task, RTIME Make a task run periodically.
start_delay, RTIME period)
Int
rt_task_make_periodic (RT_TASK *task, RTIME start_time, Make a task run periodically.
RTIME period)
Int
rt_task_wait_period (void)
Wait till next period.
RTIME
next_period (void)
Get the time a periodic task will be
resumed
after
calling
rt_task_wait_period.
Void
rt_busy_sleep (int ns)
Delay/suspend execution for a while.
Int
rt_sleep (RTIME delay)
Delay/suspend execution for a while.
Int
rt_sleep_until (RTIME time)
Delay/suspend execution for a while.
Int
rt_register (unsigned long name, void *adr, int type, struct Register an object.
task_struct *t)
Int
rt_drg_on_name (unsigned long name)
Deregister an object by its name.
Int
rt_drg_on_adr (void *adr)
Deregister an object by its address.
unsigned long
rt_get_name (void *adr)
Get an object name by its address.
void *
rt_get_adr (unsigned long name)
Get an object address by its name.
by using them a program can access the scheduling capabilities offered by RTAI.
5.3.1 Functions descriptions
int rt_get_prio (RT_TASK *task)
With this functions a program can check the actual priority of a task. It returns the base priority
of task task.
It's is important to remember that a task has a base native priority, assigned at its birth or by
rt_change_prio() function, and an actual, inherited, priority. They can be different because of
priority inheritance.
Parameters:
task is the affected task.
Returns:
rt_get_prio returns the priority of task task.
RTAI User Manual 3.3 - pag 19
Chapter 5 RTAI schedulers
This function and the next two ones deal with the priority of a task. The priority values are
defined in the include file base\include\rtai_sched.h as follow:
#define
#define
#define
RT_SCHED_HIGHEST_PRIORITY
RT_SCHED_LOWEST_PRIORITY
RT_SCHED_LINUX_PRIORITY
0
0x3fffFfff
0x7fffFfff
Note that tasks with higher priority (lower values) are executed before and cannot be
interrupted by tasks with lower priority (higher values).
int rt_get_inher_prio (RT_TASK *task)
This function checks the actual priority of a task. It returns the base priority task task has
inherited from other tasks, either blocked on resources owned by or waiting to pass a message
to task task.
Parameters:
task is the affected task.
Returns:
rt_get_inher_prio returns the priority of task task.
int rt_change_prio(RT_TASK *task,int priority)
With this function it is possible to change the base priority of a given task task. Recall that a
task has a base native priority, assigned at its birth and an actual, inherited, priority. They can
be different because of priority inheritance.
Parameters:
task is the affected task.
priority is the new priority, the range it 0<priority< RT_SCHED_LOWEST_PRIORITY.
Returns:
rt_change_prio returns the base priority that the task task had before the change.
RT_TASK* rt_whoami(void)
This functions can be used to obtain a pointer of the current task. The return value is the
structure of the calling task. The structure is defined in the base\include\rtai_sched.h include
file and contains all the data relative to a single task.
Returns:
The pointer to the current task.
A typical use of this function could be:
rt_task_delete(rt_whoami());
or
task=rt_whoami(); where task is defined as RT_TASK *task;
RTAI User Manual 3.3 - pag 20
Chapter 5 RTAI schedulers
The definition of RT_TASK structure is the the following and as you can see it contains all the
informations relative to a task to be properly handled by RTAI.
typedef struct rt_task_struct {
long *stack __attribute__ ((__aligned__ (L1_CACHE_BYTES)));
int uses_fpu;
int magic;
volatile int state, running;
unsigned long runnable_on_cpus;
long *stack_bottom;
volatile int priority;
int base_priority;
int policy;
int sched_lock_priority;
struct rt_task_struct *prio_passed_to;
RTIME period;
RTIME resume_time;
RTIME yield_time;
int rr_quantum;
int rr_remaining;
int suspdepth;
struct rt_queue queue;
int owndres;
struct rt_queue *blocked_on;
struct rt_queue msg_queue;
int tid; /* trace ID */
unsigned long msg;
struct rt_queue ret_queue;
void (*signal)(void);
FPU_ENV fpu_reg __attribute__ ((__aligned__ (L1_CACHE_BYTES)));
struct rt_task_struct *prev;
struct rt_task_struct *next;
struct rt_task_struct *tprev;
struct rt_task_struct *tnext;
struct rt_task_struct *rprev;
struct rt_task_struct *rnext;
/* Appended for calls from LINUX. */
long *fun_args;
long *bstack;
struct task_struct *lnxtsk;
long long retval;
char *msg_buf[2];
long max_msg_size[2];
char task_name[16];
void *system_data_ptr;
struct rt_task_struct *nextp;
struct rt_task_struct *prevp;
/* Added to support user specific trap handlers. */
RT_TRAP_HANDLER task_trap_handler[HAL_NR_FAULTS];
/* Added from rtai-22. */
long unblocked;
void *rt_signals;
volatile unsigned long pstate;
unsigned long usp_flags;
unsigned long usp_flags_mask;
unsigned long force_soft;
volatile int is_hard;
void *trap_handler_data;
struct rt_task_struct *linux_syscall_server;
/* For use by watchdog. */
int resync_frame;
/* For use by exit handler functions. */
XHDL *ExitHook;
RTIME exectime[2];
struct mcb_t mcb;
/* Real time heaps. */
struct rt_heap_t heap[2];
volatile int scheduler;
#ifdef CONFIG_RTAI_LONG_TIMED_LIST
rb_root_t rbr;
rb_node_t rbn;
#endif
} RT_TASK __attribute__ ((__aligned__ (L1_CACHE_BYTES)));
void rt_task_yield (void)
This function yield the current task. That is, it stops the current task and takes it at the end of
RTAI User Manual 3.3 - pag 21
Chapter 5 RTAI schedulers
the list of ready tasks having its same priority. The scheduler makes the next ready task of the
same priority active.
Recall that RTAI schedulers allow only higher priority tasks to preempt the execution of lower
priority ones. So equal priority tasks cannot preempt each other and rt_task_yield() should be
used if a user needs a cooperative time slicing among equal priority tasks. The implementation
of the related policy is wholly in the hand of the user. It is believed that time slicing is too much
an overhead for the most demanding real time applications, so it is left up to you.
int rt_task_suspend (RT_TASK *task)
The rt_task_suspend suspends the execution of the task task.
The task task will not be executed until a call to rt_task_resume() or rt_task_make_periodic() is
made. No account is made for multiple suspends, i.e. a multiply suspended task is made ready
as soon as it is rt_task_resumed, thus immediately resuming its execution if it is the highest in
priority.
Parameters:
task pointer to a task structure.
Returns:
the task suspend depth. An abnormal termination returns as described below:
-EINVAL: the task does not refer to a valid task.
RTE_UNBLKD: the task was unblocked while suspended;
Similar functionality is also available by using the following 3 APIs:
1. int rt_task_suspend_if(RT_TASK *task)
2. int rt_task_suspend_until(RT_TASK *task, RTIME time)
3. int rt_task_suspend_timed(RT_TASK *task, RTIME delay)
•
•
The suspending functions can be used also as a synchronization tool, somehow similar to a
semaphore technique but applied to to a task. That is, it can only be used by the task itself
while the semaphore can be used to forcing a wait to other tasks.
int rt_task_resume (RT_TASK *task)
This function resumes a task execution of the task task which has been previously suspended
by rt_task_suspend(), or makes a newly created task ready to run. Since no account is made for
multiple suspend rt_task_resume unconditionally resumes any task it makes ready.
Parameters:
task pointer to a task structure.
Returns:
•
0 on success. A negative value on failure as described below:
•
EINVAL: task does not refer to a valid task.
int rt_get_task_state (RT_TASK *task)
This API queries the actual state of a real time task task.
Parameters:
task is a pointer to the task structure.
Return values:
Task state is formed by the bitwise OR of one or more of the following flags:
RTAI User Manual 3.3 - pag 22
Chapter 5 RTAI schedulers
•
•
•
•
•
•
•
•
•
RT_SCHED_READY The task task is ready to run (the task is unblocked). Note that on a
UniProcessor machine the currently running task is just in READY state, while on
MultiProcessors can be (READY | RUNNING), see below.
RT_SCHED_SUSPENDED
The task task is blocked waiting for a resume.
RT_SCHED_DELAYED The task task is blocked waiting for its next running period or
expiration of a timeout.
RT_SCHED_SEMAPHORE
The task task is blocked on a semaphore, waiting for the
semaphore to be signaled.
RT_SCHED_SEND
The task task is blocked on sending a message, receiver
was not in RECEIVE state.
RT_SCHED_RECEIVE The task task is blocked waiting for incoming messages, sends or
rpcs.
RT_SCHED_RPC
The task task is blocked on a Remote Procedure Call,
receiver was not in RECEIVE state.
RT_SCHED_RETURN The task task is blocked waiting for a return from a Remote
Procedure Call; the receiver got the RPC but has not replied yet.
RT_SCHED_RUNNING
The task task is running, used only for SMP schedulers.
Note that the returned task state is just an approximate information. Timer and other hardware
interrupts may cause a change in the state of the queried task before the caller could evaluate
the returned value. This means that the caller should disable interrupts if it wants reliable
informations about an other task. It is also important to know that rt_get_task_state does not
perform any check on pointer task.
To correctly use the rt_get_task_state_functions is just a matter of interpreting the returns
value which can be a combination of the above flags like for example:
for (i = 0; i < NTASKS; i++) {
rt_task_resume(&thread[i]);
// to be sure they are all wait synchronized
while(!(rt_get_task_state(&thread[i]) & RT_SCHED_SEMAPHORE));
}
void rt_linux_use_fpu (int use_fpu_flag)
This function sets indication of FPU usage and informs the scheduler that floating point
arithmetic operations will be used also by foreground Linux processes, i.e. the Linux kernel
itself (unlikely) and any of its processes.
Parameters:
use_fpu_flag If this parameter has a nonzero value, the Floating Point Unit (FPU)
context is also switched when task or the kernel becomes active.
Note that enabling the use of FPU makes task switching slower, negligibly, on all 32 bits CPUs
but 386s and the oldest 486s. This flag can be set also by rt_task_init when the real time task is
created. With UP and MUP schedulers care is taken to avoid useless saves/restores of the FPU
environment. Under SMP, tasks can be moved from CPU to CPU so saves/restores for tasks
using the FPU are always carried out. Note that by default Linux has this flag cleared. Beside by
using rt_linux_use_fpu you can change the Linux FPU flag when you insmod any RTAI scheduler
module by setting the LinuxFpu command line parameter of the rtai_sched module itself.
int rt_task_use_fpu(RT_TASK *task, int use_fpu_flag)
rt_task_use_fpu informs the scheduler that floating point arithmetic operations will be used by
the real time task task.
Parameters:
task is a pointer to the real time task.
RTAI User Manual 3.3 - pag 23
Chapter 5 RTAI schedulers
use_fpu_flag If this parameter has a nonzero value, the Floating Point Unit (FPU)
context is also switched when task or the kernel becomes active.
Returns:
•
0 on success. A negative value on failure as described below:
•
-EINVAL: task does not refer to a valid task.
See also: rt_linux_use_fpu() for a description on how the use of FPU can affect the task
switching performance.
int rt_task_signal_handler (RT_TASK *task, void(*)(void)handler)
This functions sets the signal handler of a task by installing, or changing, the signal function of
a real time task.
Parameters:
task is a pointer to the real time task.
handler is the entry point of the signal function.
A signal handler function can be set also when the task is newly created with rt_task_init(). The
signal handler is a function called within the task environment and with interrupts disabled,
when the task becomes the current running task after a context switch, except at its very first
scheduling. It allows you to implement whatever signal management policy you think useful,
and many other things as well.
Returns:
•
0 on success.A negative value on failure as described below:
•
-EINVAL: task does not refer to a valid task.
int rt_task_make_periodic_relative_ns(RT_TASK * task, RTIME start_delay,RTIME period)
rt_task_make_periodic_relative_ns makes a task run periodically; it marks the task task,
previously created with rt_task_init(), as suitable for a periodic execution, with period period,
when rt_task_wait_period() is called.
The time of first execution is defined through start_delay that is relative to the current time and
it is measured in nanoseconds.
Parameters:
task is a pointer to the task you want to make periodic.
start_delay is the time, to wait before the task start running, in nanoseconds.
period corresponds to the period of the task, in nanoseconds.
Return values:
•
0 on success. A negative value on failure as described below:
•
-EINVAL: task does not refer to a valid task.
It is very important to know that the term clock ticks depends on the mode in which the hard
timer runs. So if the hard timer was set as periodic a clock tick will last as the period set in
start_rt_timer, while if oneshot mode is used, a clock tick will last as the inverse of the running
frequency of the hard timer in use and irrespective of any period used in the call to
start_rt_timer.
The following source code, which is taken from the showroom repository (kern/i386/scb), uses
this api. Inside this code, that is designed to run in kernel mode you will also see some
important APIs which are not described yet, but it is important to start see them because they
have already been mentioned in the introduction and they are mandatory to set up a real time
task. Note that for proof reading the following source code the APIs coloured in red represent
RTAI User Manual 3.3 - pag 24
Chapter 5 RTAI schedulers
the ones described inside this chapter, while the blue ones are the one simply mentioned.
Example 1 speaker.c:
#include <linux/kernel.h>
#include <linux/module.h>
#include <asm/io.h>
#include <rtai_nam2num.h>
#include <rtai_sched.h>
#include <rtai_scb.h>
#include "pcsp_tables.h"
MODULE_LICENSE("GPL");
//#define CONFIG_X86_64
#define SCBSUPRT USE_GFP_ATOMIC
#define SCBSIZ 2000
#define TICK_PERIOD 25000 /* 40 khz */
#define DIVISOR 5
#define STACK_SIZE 4000
/*You can make this bigger, but then you start to get
*clipping, which sounds bad. 29 is good.
*/
#define VOLUME 30
static RT_TASK thread;
static int cpu_used[NR_RT_CPUS];
static unsigned char vl_tab[256];
static int port61;
static void *scb;
static volatile int end;
#define PORT_ADR 0x61
static int filter(int x)
{
static int oldx;
int ret;
if (x & 0x80) {
x = 382 – x;
}
ret = x > oldx;
oldx = x;
return ret;
}
static void intr_handler(long t)
{
char data, temp;
int go = 0;
int divisor = DIVISOR;
while (!end) {
if (!(--divisor)) {
divisor = DIVISOR;
cpu_used[hard_cpu_id()]++;
go = !rt_scb_get(scb, &data, 1);
}
else {
go = 0;
}
if (go) {
#ifdef CONFIG_X86_64
data = filter(data);
temp = inb(PORT_ADR);
temp &= 0xfd;
temp |= (data & 1) << 1;
outb(temp, PORT_ADR);
#else
outb(port61, 0x61);
outb(port61^1, 0x61);
outb(vl_tab[((unsigned int)data)&0xff], 0x42);
#endif
}
rt_task_wait_period();
}
}
int init_module(void)
{
int i;
outb_p(0x92, 0x43); /* binary, mode1, LSB only, ch 2 */
for (i = 0; i < 256; vl_tab[i] = 1 + ((VOLUME*ulaw[i]) >> 8), i++);
port61 = inb(0x61) | 0x3;
scb = rt_scb_init(nam2num("SCB"), SCBSIZ, SCBSUPRT);
RTAI User Manual 3.3 - pag 25
Chapter 5 RTAI schedulers
rt_task_init(&thread, intr_handler, 0, STACK_SIZE, 0, 0, 0);
rt_set_oneshot_mode();
start_rt_timer(0);
rt_task_make_periodic_relative_ns(&thread, 10000000, TICK_PERIOD);
return 0;
}
void cleanup_module(void)
{
int cpuid;
end = 1;
stop_rt_timer();
rt_task_delete(&thread);
rt_scb_delete(nam2num("SCB"));
printk("\n\nCPU USE SUMMARY\n");
for (cpuid = 0; cpuid < NR_RT_CPUS; cpuid++) {
printk("# %d -> %d\n", cpuid, cpu_used[cpuid]);
}
printk("END OF CPU USE SUMMARY\n\n");
}
int rt_task_make_periodic (RT_TASK * task, RTIME start_time, RTIME period)
This function is similar to the previous one with the only difference that start_time and period
are in clock ticks instead of nanoseconds. It makes a task run periodically by marking the task
task, previously created with rt_task_init(), as suitable for a periodic execution, with period
period, when rt_task_wait_period() is called.
The time of first execution is defined through start_time that is an absolute value measured in
clock ticks.
Parameters:
task is a pointer to the task you want to make periodic.
start_time is the absolute time to wait before the task start running, in clock ticks.
period corresponds to the period of the task, in clock ticks.
Return values:
•
0 on success. A negative value on failure as described below:
•
-EINVAL: task does not refer to a valid task.
See also: rt_task_make_periodic_relative_ns(). Recall that the term clock ticks depends on the
mode in which the hard timer runs. So if the hard timer was set as periodic a clock tick will last
as the period set in start_rt_timer, while if oneshot mode is used a clock tick will last as the
inverse of the running frequency of the hard timer in use and irrespective of any period used in
the call to start_rt_timer.
int rt_task_wait_period(void)
This function waits till next period by suspending the execution of the currently running real
time task until the next period is reached. The task must have been previously marked for a
periodic execution by calling rt_task_make_periodic() or rt_task_make_periodic_relative_ns().
Returns:
•
0 if the period expires as expected. An abnormal termination returns as described
below:
•
RTE_UNBLKD: the task was unblocked while sleeping;
•
RTE_TMROVRN: an immediate return was taken because the next period has already
expired.
Note that the task is suspended only temporarily, this means that it simply gives up control
until the next time period.
RTAI User Manual 3.3 - pag 26
Chapter 5 RTAI schedulers
RTIME next_period (void)
It gets the time a periodic task will be resumed after calling rt_task_wait_period. This function
returns the time when the caller task will run next. Combined with the appropriate rt_get_time
function() it can be used for checking the fraction of period used or any period overrun.
Returns:
Next period time in internal count units.
void rt_busy_sleep (int ns)
This function delays/suspends the execution of the calling task for a specified period of time
without giving back the control to the scheduler. This means that rt_busy_sleep burns away
CPU cycles in a busy wait loop so it should be used only for very short synchronization delays.
On machine not having a TSC clock it can lead to many microseconds uncertain busy sleeps
because of the need of reading the 8254 timer.
Parameters:
ns is the number of nanoseconds to wait.
The sleep action can also be performed by using two different functions:
•
rt_sleep(RTIME delay) that suspends the execution of the caller task for a time of delay
in internal count units. During this time the CPU is used by other tasks. This function
return 0 if the delay expires as expected or RTE_UNBLKD if the task was unblocked while
sleeping or RTE_TMROVRN if an immediate return was taken because the delay is too
short to be honoured.
•
rt_sleep_until(RTIME time) that is similar to rt_sleep() but the parameter time is the
absolute time till the task have to be suspended. If the given time is already passed this
call has no effect. It returns 0 if the sleeping expires as expected or RTE_UNBLKD if the
task was unblocked while sleeping or RTE_TMROVRN if an immediate return was taken
because the time deadline has already expired.
Note that an higher priority task or interrupt handler can run before the task goes to sleep, so
the actual time spent in these functions may be longer than that specified.
int rt_register (unsigned long name, void *adr, int type, struct task_struct *
t)
This function is used to register an object identified with name, which is pointed by adr.
Returns:
a positive number on success, 0 on failure
An example on how to use this function is available in the showroom repository under
/user/i386/resumefrominter. The following source code shows two ways for waking up user
space hard real time processes directly from interrupt handlers. The process itself can then act,
partly or as a whole, as an interrupt handler but do not confuse it with bottom halves, it is
better, more direct, effective and true real time. It is based on using either suspend/resume or
semaphore wait/signal. In this example, you can also control period, duration and wakeup
method through macros in period.h. As already described before the APIs described in this
chapter are marked in red.
Example 2 rt_handler.c:
#include <linux/module.h>
#include <asm/io.h>
#include <rtai_registry.h>
RTAI User Manual 3.3 - pag 27
Chapter 5 RTAI schedulers
#include <rtai_mbx.h>
#include "period.h"
static MBX mbx;
static SEM sem;
static char wakeup;
static void rt_timer_tick(void)
{
RT_TASK *task;
rt_times.tick_time = rt_times.intr_time;
rt_times.intr_time = rt_times.tick_time + rt_times.periodic_tick;
rt_set_timer_delay(0);
if (rt_times.tick_time >= rt_times.linux_time) {
rt_times.linux_time += rt_times.linux_tick;
rt_pend_linux_irq(TIMER_8254_IRQ);
}
rt_mbx_receive_if(&mbx, &wakeup, 1);
if (wakeup) {
if ((task = rt_get_adr(nam2num("PRCTSK")))) {
if (wakeup==1) rt_sem_signal(&sem);
else rt_task_resume(task);
}
}
}
int init_module(void)
{
rt_mbx_init(&mbx, 1);
rt_register(nam2num("RESMBX"), &mbx, IS_MBX, 0);
rt_sem_init(&sem, 0);
rt_register(nam2num("RESEM"), &sem, IS_SEM, 0);
rt_request_timer(rt_timer_tick, imuldiv(PERIOD, FREQ_8254, 1000000000), 0);
return 0;
}
void cleanup_module(void)
{
rt_free_timer();
rt_mbx_delete(&mbx);
rt_sem_delete(&sem);
}
int rt_drg_on_name (unsigned long name)
This function de-registers an object identifyed by its name.
Returns:
a positive number on success, 0 on failure.
int rt_drg_on_adr(void * adr)
This function de-registers an object by its address.
Returns:
a positive number on success, 0 on failure.
void* rt_get_adr (unsigned long name)
It gets an object address by its name.
Returns:
the address associated to name on success, 0 on failure
unsigned long rt_get_name (void * adr)
This function gets an object name by its address.
Returns:
RTAI User Manual 3.3 - pag 28
Chapter 5 RTAI schedulers
the identifier pointed by the address adr on success, 0 on failure.
RTAI User Manual 3.3 - pag 29