1
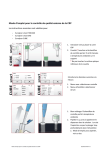
SERVICE MANUAL Eurolyser Diagnostica GmbH Bayernstrasse 11a, 5020 Salzburg, Austria smart service manual engl. (vers. A03/2010) page 1 of 17 G. Bonecker TABLE OF CONTENTS Introduction 3 Requirements / Recommendations 4 Troubleshooting 5 Service Actions Actions 7 Service Menu 8 Test Sensor Menu 11 Test Motors Menu 12 Test Photometer Menu 13 Test Temperature Menu 14 Self Test Menu 15 Technical Specifications 16 Declaration of conformity 17 smart service manual engl. (vers. A03/2010) page 2 of 17 G. Bonecker INTRODUCTION About this manual This service manual will guide you through the various service options of your Eurolyser laboratory photometer. It is recommended that you become familiar with the service manual before you start performing any service operations with the Eurolyser smart laboratory photometer. Some of the information in this User Manual is accompanied with a symbol that points you to the following particulars: Operator's handling Y Warnings and precautions i Consult the user instructions smart service manual engl. (vers. A03/2010) page 3 of 17 G. Bonecker REQUIREMENTS / RECOMMENDATIONS Firmware Important notices regarding the firmware update Y • • • • When processing a firmware update all results are deleted When processing a firmware update all settings are set to default (e.g. units, norm values, language, …) When using the USB interface please make sure before starting the firmware update that the driver has been installed correctly. (Check if the Eurolyser smart is enlisted in the device manager at section “Ports (COM and LPT)”) It is recommended to use the latest firmware-update-files available. They can be found at www.eurolyser.com FW-Requirements / Recommendations • • • • It is recommended to use firmware version v1.17 or higher To run an optional language package (excluding English/German) it is necessary to run firmware version v1.14 or higher: Warning! Due to a bug up to and including firmware version v1.18 it is strongly recommended to run v1.19. (Bug description: If number of measurement results exceed 94 the optional language package is deleted) The thermo-printer is supported starting at version v1.08. The barcode reader is supported starting at version v1.09. Interfaces • It is recommended to use the RS232 interface instead of the USB interface (no driver installation necessary). Troubleshooting USB-Driver problems When encountering difficulties with the USB driver please follow these steps: • Disconnect the USB connection • Start up the device manager and make all devices visible (including not connected) • To make all devices visible (including not connected): o Follow these steps: Create a new system-wide environment variable: Value: 1 Name: DEVMGR_SHOW_NONPRESENT_DEVICES Start up the device manager o Alternatively run the following commands at the shell (cmd.exe): • • • • • C:\> set DEVMGR_SHOW_NONPRESENT_DEVICES=1 C:\> start devmgmt.msc In the device manager window „View Display Hidden Devices “ In section „Ports (COM and LPT)“ uninstall all entries that are named „Eurolyser smart (VCP) (COMx)“ or „USB Serial Port (COMx)“ (x is a number between 1 and 255) In section „ USB-Controller “ uninstall all entries that are named „ Eurolyser smart “ or „ USB Serial Converter “ Restart the PC Reconnect the smart with the PC and reinstall the drivers again. Y • The Firmware-Update-Tool won’t find the smart in case the COM-Port exceeds COM10. o Lower the COM-Port at the device manager. smart service manual engl. (vers. A03/2010) page 4 of 17 G. Bonecker TROUBLESHOOTING E rror Message - Invalid Card Reason (User man u al) wrong, defective or expired RFID card How to correct (User m an u al) Poin t in tim e / Screen use a new test kit Main screen - No Results no test results stored perform test - Calibration failed calibration values out of acceptable repeat calibration with new test kit range or new calibrator kit test cartridge has passed expiration date repeat the test using a new sample and a new test cartridge from another test kit Rem arks Addition al reason (s) / Furth er in formation Trying to perform a test which is not compatible with the wavelength of the device. Update with wrong firmware update file. Defective RFID-Module After measurement Up to firmware version 1.16 the result was not displayed or saved if no ID (patient input) was specified. When performing a firmware update all results are deleted, settings are set to default values. Result screen (called from main screen) - Tests expired - Kalibration required calibration interval exceeded - Door blocked - Wrong Cap Missing Cap Missing Cartridge perform new calibration - Bolt blocked test cartridge blocks the bolt because an incorrect ERS cap is applied - Measurement Overflow photometric measurement value is out repeat the test using a new sample of range (e.g. if a cold cartridge is used) and a new cartridge - Blank Error After calibration Main screen Maybe wrong date/time input. Check date/time settings; Firmware-Version Set correct date settings v1.09 - or higher - displays the current date on the main screen in case no RFID card is inserted. If running a FW before v1.09 check date in the settings menu. Device error: Door motor has not enough power (Door opens or closes not completely) Self test menu After start of test (after inserting the cartridge) 1. Detection possibility: Cap sensor Device error: Cap sensor is dirty Self test menu Clean sensor with little alcohol on cotton bud After adding R2 Device error: Cap sensor energy not ok Device error: Bolt loosely Sensor test menu Test Motors Menu: ‚Bolt down’ with new ERS cap -> upper seal won't be pushed down completely to the end of the ERS cap. Correction done at factory Correction done at factory Device error: Door catch misadjusted -> Door is moved too much into the device Correction done at factory Test Motors Menu: Press ‚Door open’ and afterwards 'Door close' -> Door does not flush with case (bends inside) Test Photometer Menu and optical check Clean sensor with little alcohol on cotton bud Main screen test cartridge blocks the test lid because reposition the test cartridge, apply the cartridge has not been inserted cup firmly to cuvette completly or the cap has not been applied to the cuvette firmly incorrect ERS cap is applied or ERS cap use correct ERS cartridge and cap is missing or cartridge is missing use correct ERS cartridge and cap photometric measurement value is out repeat the test after switching of range (without cartridge) power off and on Depends on test (at the moment not implemented) 2. Detection possibility: Current consumption of bolt actuator. (Error implemented beginning at FirmwareVersion 1.17; Current has to rise above a specified limit – it won't if an already used or no ERS cartridge is used.) After adding R2 During measurement After start of test (before inserting the cartridge) No energy at receiver of photometer (Value >= 5000mOD) Insufficient energy at receiver of photometer (Value > 1000mOD) Too much energy at receiver of photometer (Value < 10mOD) - Temperature Error temperature is out of range - Wrong Sampletype? maybe incorrect sample type is used repeat the test after switching power off and on After start of test select correct sample type After end of test Beam blocked Test Photometer Menu and optical check Correction done at factory Check device type (wavelength(s) noted on Perform firmwareupdate with correct label over door) and check logo on main screen. firmwareupdate file Beam blocked Test Photometer Menu and optical check LED is not illuminated Update with wrong firmware update file Test Photometer Menu and optical check Correction done at factory Check device type (wavelength(s) noted on Perform firmwareupdate with correct label over door) and check logo on main screen. firmwareupdate file Update with wrong firmware update file Check device type (wavelength(s) noted on Perform firmwareupdate with correct label over door) and check logo on main screen. firmwareupdate file Trying to process measurement shortly after the warm up has been aborted (approx. <15 min, depends on room temperature) Test Temperature Menu - Depends on test. There exist two possibilites: 1. Sampletype ‚serum’ is chosen: If sample 2. Sampletype ‚whole blood’ is chosen: If sample blank value is below a specified limit (saved on RFID card) the message appears and it is possible to switch to ‚serum’. kinetic reaction is not linear (e.g. if a cold cartridge is used) smart service manual engl. (vers. A03/2010) repeat the test using a new sample and a new cartridge After end of test page 5 of 17 Correction done at factory LED is not illuminated Update with wrong firmware update file A too high sample blank value may also be caused blank value exceeds a specified limit (saved by a (too cold) cartridge covered with on RFID card) the message appears and it is condensation possible to switch to 'whole blood'. - Linarity Error Ch eckin g How to correct Check device typ (wavelength is noted on label over door) and check test type. Check device typ (wavelength is noted on label Perform firmwareupdate with correct over door) and logo on main screen. firmwareupdate file Results in lagged response times on the main Correction done at factory screen. Perform firmwareupdate to latest version G. Bonecker Clean sensor with little alcohol on cotton bud Perform test again with new cartridge TROUBLESHOOTING Fault scenario - Message 'Remove Cartridge' altough the cartridge is removed. Rem arks Cap sensor Add itional c ause(s) / Further information page 6 of 17 Correction Device error: Cap sensor dirty Sensor Test Menu Clean sensor with little alcohol on cotton bud Device error: Cap sensor energy not okay Sensor Test Menu Correction done at factory e.g. Password input after 'Service' Perform touchpanel adjustment - Touchscreen won't work correctly smart service manual engl. (vers. A03/2010) Verification / Check G. Bonecker SERVICE ACTIONS Touchpanel Adjustment 1. Switch off the Eurolyser smart. 2. Touch the display; while keeping it touched turn on the smart. 3. On the display it says „touch adjustment?“ 4. Release the touch screen short (about 0,5 seconds) and touch it again by pressing it at least 1 second Attention: If the display initialization has not been processed correctly the Eurolyser smart will start up in normal mode. If this has happened please start again on step 1. Some practice may be needed to accomplish this step. 5. Follow the instructions to adjust the touch panel: Tip: If available use a tool (best possible: rounded plastic pen) to achieve a precise adjustment. Attention: Do not scratch the damageable display surface. a. Touch blinking dot in upper left corner b. Touch blinking dot in bottom right corner 6. After the adjustment has been processed successfully please restart the smart (disconnect power supply and reconnect again) 7. The touch screen is now adjusted. smart service manual engl. (vers. A03/2010) page 7 of 17 G. Bonecker SERVICE MENU smart service menu overview 1. Start-up menu Touch to get to the Settings menu 4. Service menu Touch Tests to get to the tests menu 2. Settings menu 3. Password menu Touch Service Enter the password. The default setting is 3030. Confirm with 5. Tests menu 6. Test sensors menu Touch Sensor (or ( Motors or other touch buttons)) to get to the preferred menu Read the status of the sensors. Confirm with i see details on page 7 7. Test motors menu Touch button to perform preferred test. Confirm with 8. Channel selection menu 9. Test photometer menu If photometer in test menu is selected, the channel selection menu appears. Touch button to select channel. Read photometer values and confirm with i see details on page 8 smart service manual engl. (vers. A03/2010) i see details on page 9 page 8 of 17 G. Bonecker SERVICE MENU 10. Channel selection menu If temp in test menu is selected, the channel selection menu appears. Touch button to select channel. 11. Test temperature menu 12. Self test menu Read temperature of photometer and AD converter values. Finish with If self test is selected in the test menu the instrument automatically performs a self test. The finished test cycles are displayed. End procedure with i see details on page 10 i see ee details on page 11 13. Remote control menu If remote is selected in the test menu the instrument is ready to receive remote commands (no application as of now available) 16. Boot loader menu Instrument is ready for FW update. Start update from a PC according to FW update instructions. (see Eurolyser homepage for instructions) smart service manual engl. (vers. A03/2010) 14. Update menu 15. FW-Update menu If updates is selected in the service menu the update menu is displayed. Press button to perform desired action. Confirm with Confirm with , the boot loader menu appears 17. Language-Update menu 18. Language-Update status menu If LangLang-update is selected in the updates menu the language update menu is displayed. Press button to perform desired action. Confirm with Instrument is ready for language update. Start update from a PC according to language update instructions. (not active) page 9 of 17 G. Bonecker SERVICE MENU 19. LCD-Update status menu If LCDLCD-update is selected in the updates menu the LCD update status menu is displayed. Instrument is ready for LCD update. Start update from a PC according to LCD update instructions. (not active) smart service manual engl. (vers. A03/2010) page 10 of 17 G. Bonecker TEST SENSOR MENU Test sensors menu menu Doorsensor1: Type of sensor: State: Doorsensor2: Type of sensor: State: Boltsensor1: Type of sensor: State: Boltsensor2: Type of sensor: State: Cap sensor: Type of sensor: State: magnetic hall senor On .. door is closed Off .. door is not closed magnetic hall sensor On .. door is completely open Off .. door is not completely open optical senor On .. bolt is in top position Off .. bolt is not in top position optical senor On .. bolt is in bottom position Off .. bolt is not in bottom position optical senor On .. cartridge with cap is in measurement position Off .. no cartridge with cap is in measurement position smart service manual engl. (vers. A03/2010) page 11 of 17 G. Bonecker TEST MOTORS MENU Test motors menu Door open: Precondition: door is opened bolt is in top position Door close: Precondition: door is closed bolt is in top position Bolt up: Precondition: bolt moves to top position none Bolt down: Precondition: bolt moves to bottom position door is closed Mix on: Precondition: mix motor is switched on none Mix off: Precondition: mix motor is switched off none smart service manual engl. (vers. A03/2010) page 12 of 17 G. Bonecker TEST PHOTOMETER MENU Test photometer menu Meas [mOD]: Range: Blank [mOD]: Blank: Blank = 0: Min: Min = 0: current measvalue (blank value is subtracted) > 10 mOD and < 1000 mOD without a cartridge inserted (for blank value = 0) blank value sets the blank value to the current measvalue sets the blank value to zero performs a minimum measurement sets the minimum value to zero smart service manual engl. (vers. A03/2010) page 13 of 17 G. Bonecker TEST TEMPERATURE MENU MENU Test temperature menu Temp [C]: Range: Abs [mOD]: Range: ADC: current temperature > 35 °C and < 39 °C if warm-up is finished (about 15 min after power-on) current photometric measvalue > 10 mOD and < 1000 mOD without a cartridge inserted current analog-digital-conversion-value of photometric sensor smart service manual engl. (vers. A03/2010) page 14 of 17 G. Bonecker SELF TEST MENU Self test menu The following sequence is performed until either an error occurs or the test is stopped. Close door Wait 1 sec Move bolt down Wait 1 sec Switch mix motor on Wait 1 sec Switch mix motor off Wait 1 sec Move bolt up Wait 1 sec Open door Wait 1 sec Close door One of the following messages is displayed in case of an error occurs during the self test: Error occurred: Error occurred: Error occurred: Error occurred: Door close Door open Bolt up Bolt down smart service manual engl. (vers. A03/2010) page 15 of 17 G. Bonecker TECHNICAL SPECIFICATIONS SPECIFICATIONS smart laboratory photometer resolution photometer reproducibility linearity temperature control 0,0001 ABS <1,5% CV at 1 OD 0.1000 – 3.0000 OD better than +/- 1,5% and +/- 0,01 OD electrical temperature control of the photometer unit 37°C +- 2°C display standard LDC display with back light and integrated touch panel buffer battery BR2032 fuse 2,5 ampere, self-healing size 26,0 x 14,5 x 14,0 cm (H x B x T) weight 3,5 kg (unpacked) communication interface RS232, USB operating conditions temperature : relative humidity: temperature: 15 - 28°C 10 – 90 % 0 – 50°C relative humidity: 5 – 95 % storage conditions location dry, clean, horizontal surface. Avoid direct sunlight Power supply Or Manufacturer Mascot Globtek Type 9921 GTM21097-5012 Mains adapter separate AC to DC mains adapter, double insulated Primary voltage (input) 100-230V AC, 50-60 Hz 90-264V AC, 47-63 Hz Secondary voltage (output) 12 V DC, 3A 12 VDC, 4.17A power usage max. 30 VA max. 30 VA Options thermo printer interface mains adapter Seiko DPU-414 serial 100-240 VAC barcode reader reading distance max. resolution mains adapter Datalogic Touch65 63mm 0.10mm (4mils) 100-240 VAC IPIP- class IP - class III smart service manual engl. (vers. A03/2010) page 16 of 17 G. Bonecker DECLARATION OF CONFORMITY CONFORMITY C Conformity to the IVD directive The Eurolyser SMART laboratory photometer meets all provisions in the directive 98/79/EC on In Vitro Diagonstic Medical Devices and is CE marked accordingly Safety Standards The Eurolyser SMART laboratory photometer is tested and conforms to the safety standards IEC/EN 61010-1, IEC/EN 61010-2081 and IEC/EN 61010-2-101, and to the EMC standard IEC/EN 61326 smart service manual engl. (vers. A03/2010) page 17 of 17 G. Bonecker