1
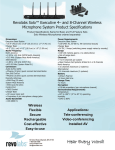
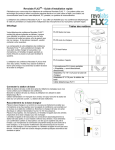
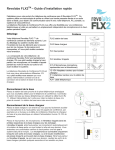
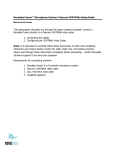
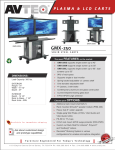
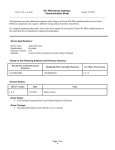
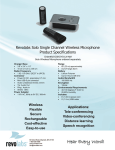
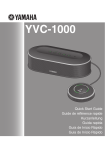
Revolabs Fusion™ Wireless
Microphone System
User’s Guide
Rev 1.12
Revolabs Fusion™
Great audio, wireless mobility, and simple to install!
Simply plug the cable into the AV system or phone system and it works. No software
configuration is necessary. Even the Fusion box is designed to be easy to use–
vertically or horizontally. No equipment rack needed. Just set the Fusion system on
the credenza.
Video Conferencing
Revolabs Fusion Wireless Microphone Solution is compatible with all of the major
video-conferencing solutions, including Lifesize, Polycom, Sony, and Tandberg. It
includes a remote control . Decide on where you want to put the Fusion system,
whether you want to place it vertically or horizontally, plug in the cables and you are
ready to have great wireless audio in any conference room.
Audio Conferencing
Plug the Fusion Wireless Microphone Solution into an analog telephone jack and you
are on your way to great wireless teleconference calls. There is a remote control
dialer to dial the conference phone number . You may connect to powered
speakers, connect to existing speaker system or connect to a new room speaker
system to hear the call. Decide on where you want to put the Fusion system,
whether you want it vertical or horizontal, plug in the cables and you are ready to
have great wireless audio in any conference room.
Flexible
The Fusion System supports any combination of Solo Wireless MicrophonesWearable, Tabletop, or XLR adapter for s handheld microphone. Choose the right
microphone for your meeting dynamics.
Rechargeable
Revolabs Wireless Microphones have a rechargeable battery that provides eight
hours of talk time after each full charge. Revolabs Wireless Microphones recharge
to 85% capacity in approximately 45 minutes.
Secure
All of Revolabs Wireless Microphones use 128-bit authentication, so that no one can
listen in.
User’s Guide
Using the Fusion™ IR Remote Control
Phone Dial Pad
Vol +: increases volume
Call: dial-tone
End: hang-up
Vol -: decreases volume
Flash: phone function
Redial: phone function
Dial a Call
To make a call, push “Call” to get dial tone, then dial the phone number on the Phone
Dial Pad.
Answer a call
To answer a call when the system is ringing, push “Call",
Mute and Unmute a Call Using Remote Control Mute Button
To mute all of the microphones, press the red MUTE button; all microphones will flash
red and no individual microphone can be unmuted until the remote MUTE button is
pressed again. To unmute, press it again. All microphones will return to their prior
state.
.
Revolabs Fusion™
NOTE: In the default setting, each Solo microphone will mute only itself when its MUTE button on the
microphone is pressed. To mute all of the microphones, press the red MUTE button on the Remote
Control; all microphones will flash red and no individual microphone can be unmuted until the remote
MUTE button is pressed again. All microphones will return to their prior state.
However, if the tabletop microphone master mute has been enabled (Refer to Set-Up Guide), the mute
will work as follows: in addition to the Remote Control MUTE button muting all of the microphones,
the Solo Tabletop microphone MUTE button will also act as a master mute and mute all active
microphones. Pressing any Tabletop microphone MUTE button or the Remote Control MUTE button
will unmute all tabletop microphones. All wearable and handheld adapter microphones in use will
return to their prior state.
End a Call
To end a call, the user must push “End", even if the other callers have hung up.
Redial a Call
To redial a the last phone number, push “Redial”.
Adjust Volume
To increase and decrease the volume , use the Vol + and Vol- buttons.
Flash Button
“Flash” works according to your phone system.
User’s Guide
Using the Fusion™ Charger Base
When microphones are not in use, they should be properly inserted into the Charger Base.
It is important to ensure that the system microphones are inserted fully in the base so that
charging will occur.
3
1
2
1.
2.
3.
LED indicator — power / mute status indicator
Charger Bay — charges up to 8 Microphones.
Power Cord Receptacle— power supply input (on rear)
The Charger Base requires 5VDC power, provided by the AC Adapter. Plug the supplied
AC wall adapter into an appropriate power outlet 110-240 AC, 50-60Hz. The power LED
on the Charger Base will illuminate.
Charging the Microphone Batteries
First-time use — before using the wireless microphone the first time, charge the batteries
in the microphones for eight hours (or overnight) in the Charger Base.
Revolabs Fusion™
Recharging — when the YELLOW LED starts to flash intermittently on the
microphone the battery has 30 minutes of charge remaining. To charge the batteries
place microphones into the Revolabs Solo™ Executive Charger Base and the mic
LED's will display a 5 blink "self test". During charging, the LED indicator will be RED
when mics are discharged and turn GREEN when charged. The microphones are
muted while in the Charger Base. In normal use, batteries should fully charge in about
2 hours, and can be “quick-charged” to 85% capacity in 45 minutes. Over time (years),
batteries gradually wear down and require longer charging times. This is normal.
Always return microphones to the Charger Base when not in use.
The batteries of microphones left in the Charger Base remain solid GREEN.
Important: The Lithium Polymer rechargeable batteries that power the microphones are
not user serviceable. Please contact Revolabs (www.revolabs.com) or your AV service provider
for replacement instructions and to assure the proper disposal method is used.
Warning: Never dispose of batteries in a fire because they may explode.
NOTE: A fully charged battery provides approximately 8 hours of
talk time
User’s Guide
Using Revolabs Solo™ Microphones and
Microphone Adapters
Use any Solo Microphone microphones with your Revolabs Solo™ Executive system:
• Revolabs Solo™ Wearable Wireless Microphone
• Solo Tabletop Wireless Boundary Microphone
• Solo Universal Wireless Adapter for Handheld Microphone
Using Revolabs Solo™ Wearable Wireless Microphone
The Revolabs Solo™ Wearable Microphones, shown in the following figure, are paired to
the Base Station and can be worn on the user’s shirt pocket, lapel or on a lanyard.
1. Microphone port — direct port toward mouth for best audio pickup
2. Noise cancelling port — do not block opening
3. Mute Button — press to mute, un-mute and pair microphone
4. Pocket clip — also used to attach microphone to lanyard
5. LED display — visual status for mute, un-mute, and pairing.
6. Earpiece jack — accepts the 2.5mm plug for the earpiece*
7. Charging port — charges in Charger Base
* Please note that the audio heard through the earpiece will be the far end only. If you need
hearing assistance to hear the audio from both the far end and the microphones in the
room, you must reconfigure the Fusion System. Refer to the Fusion Set-Up Guide.
Revolabs Fusion™
Revolabs Solo™ Wearable Microphones turn on and mute automatically when removed from
Charger Base, to reduce noise while being attached. The microphone has a clip on the back
which allows the microphone to be easily attached onto a shirt pocket, blouse, lapel or
lanyard.
To use the Wearable Microphone:
•
•
•
•
•
•
Remove the microphone from the Charger Base.
Attach the microphone to clothing or to a lanyard close to the mouth, within 6 12 inches (15 – 30cm) is recommended. Make sure microphone is attached
securely with the microphone port pointed up toward mouth.
With the microphone in the wearing position, un-mute the microphone by
pressing and releasing the Mute button (confirm by viewing flashing GREEN
LED). If the volume is too low, move the microphone closer to the mouth.
To turn microphones off, return the microphone unit to the Charger Base or press
and hold the Mute button for ~10 seconds until the LED turns solid RED and
release button.
If the microphones are moved out of range of the Base Station (~100 feet or 30
meters) the connection will be dropped (LED flashes all colors) and the
microphone will mute.
After 15 seconds the microphone will beep 5 times, and will continue beeping
every 30 seconds to remind the user to return the microphone to the conference
room. If the microphone is moved back into range within 15 minutes the
connection will automatically be re-established to its original state, and the
beeping will cease. If not, the microphone will turn off.
Muting Microphones
In the default setting, each Solo microphone will mute only itself when its MUTE button on
the microphone is pressed. To mute all of the microphones, press the red MUTE button on
the Remote Control; all microphones will flash red and no individual microphone can be
unmuted until the remote MUTE button is pressed again. All microphones will return to their
prior state.
However, if the tabletop microphone master mute has been enabled (Refer to Set-Up Guide),
the mute will work as follows: in addition to the Remote Control MUTE button muting all of
the microphones, the Solo Tabletop microphone MUTE button will also act as a master mute
and mute all active microphones. Pressing any Tabletop microphone MUTE button or the
Remote Control MUTE button will unmute all tabletop microphones. All wearable and
handheld adapter microphones in use will return to their prior state.
User’s Guide
Using Solo Tabletop Wireless Boundary Microphones
The Solo Tabletop Wireless Boundary Microphones enable multiple conference attendees
to use a single microphone.
The Tabletop Wireless Microphone, shown on the following page, is designed to provide
optimum coverage when placed on a conference room table.
1. Mute button — press to mute, un-mute and pair microphone
2. LED display — visual status for mute, un-mute, and pairing
3. Integral grille — protects internal parts (non-removable)
4. Audio jack — accepts the 2.5mm plug for the earpiece*
5. Charging port — docks to Charger Base
6. Rubber feet — non-slip, vibration absorbing pads
To use the Revolabs Solo™ Tabletop Microphone:
•
•
Remove the microphone from the Charger Base to turn on and automatically
mute the microphone (indicated by a flashing RED LED) during placement on
the conference table.
Tabletop microphones should be centered on the table with the integral grill
pointed toward the users (uni-directional), or centrally located between users
(Omni-directional), from 2 to 5 feet (.75 to 1.75m) away. It is always better to
be as close to the person speaking as possible, but avoid placing the
microphone where it might be blocked by equipment or meeting paperwork.
Also do not place microphones too close to an audio or video conference
speaker to avoid echoes.
Revolabs Fusion™
•
•
•
•
With the microphone in position, un-mute the microphone by pressing and
releasing the Mute button (confirm by viewing flashing GREEN LED).
To turn microphone off, return the microphone unit to the Charger Base or press
and hold the Mute button for ~10 seconds until the LED turns solid RED and
release button.
If the microphones are placed too far from the Base Station (~100 feet or 30
meters) the connection will be dropped (LED flashes all colors) and the
microphone will mute. After 15 seconds the microphone will beep 5 times, and
will continue beeping every 30 seconds to indicating it’s out of range.
Move the microphone closer to the Base Station and the connection will
automatically be re-established to its original state, and the beeping will cease.
If not, the microphone will continue beeping until it turns off in about 15
minutes.
Muting Microphones
In the default setting, each Solo microphone will mute only itself when its MUTE button on
the microphone is pressed. To mute all of the microphones, press the red MUTE button on
the Remote Control; all microphones will flash red and no individual microphone can be
unmuted until the remote MUTE button is pressed again. All microphones will return to
their prior state.
However, if the tabletop microphone master mute has been enabled (Refer to Set-Up
Guide), the mute will work as follows: in addition to the Remote Control MUTE button
muting all of the microphones, the Solo Tabletop microphone MUTE button will also act as a
master mute and mute all active microphones. Pressing any Tabletop microphone MUTE
button or the Remote Control MUTE button will unmute all tabletop microphones. All
wearable and handheld adapter microphones in use will return to their prior state.
* Please note that the audio heard through the earpiece will be the far end only. If you need
hearing assistance to hear the audio from both the far end and the microphones in the
room, you must reconfigure the Fusion System. Refer to the Fusion Set-Up Guide.
User’s Guide
Using the Solo XLR Microphone Wireless Adapter
The Revolabs Solo™ Universal Wireless Adapter for Handheld Microphones, shown in the
following figure, is connected to your existing handheld dynamic microphones for wireless
freedom during open microphone meetings, Q&A sessions, classrooms, etc.
1. Mute button — press to mute, un-mute and pair microphone
2. Rubber collar — durable and impact/strain protection
3. XLR Female connector — balanced audio for dynamic microphones
4. LED display — visual status for mute, un-mute, and pairing
5. Audio Out port — accepts the 2.5mm plug for the earpiece*
6. Power/Charging Port — docks to Charger Base
* Please note that the audio heard through the earpiece will be the far end only. If you
need hearing assistance to hear the audio from both the far end and the microphones in the
room, you must reconfigure the Fusion System. Refer to the Fusion Set-Up Guide.
To use the Revolabs Solo™ Universal Wireless Adapter:
•
•
Remove the Microphone Adapter from the Charger Base.
The adapter turns on and mutes automatically when removed from Charger Base
(flashing RED LED). The XLR Microphone Adapter is attached to a standard dynamic
microphone to convert it from a wired microphone to a wireless microphone (see
following figure).
• The Adapter does not provide phantom power or bias current so it cannot be used
with condenser or electret microphones.
• With the microphone attached, un-mute the Adapter by pressing and releasing the
Mute button (confirm by viewing flashing GREEN LED).
NOTE: If the microphone has an on-board mute switch, this switch must also be un-muted prior to
use.
Revolabs Fusion™
To turn the Adapter off, return the microphone unit to the Charger Base or press and hold
the Mute button for ~10 seconds until the LED turns solid RED and release button.
Important: Always remove the microphone from the Adapter by pressing the latch switch
and separating the parts before returning the Adapter to the Charger Base.
If the Adapter is moved too far from the Base Station (~100 feet or 30 meters) the
connection will be dropped (LED flashes all colors) and the audio will mute.
After 15 seconds the microphone will beep 5 times, and will continue beeping every 30
seconds to indicate that it is out of range.
Move the XLR Adapter closer to the Base Station and the connection will automatically be
re-established to its original state, and the beeping will cease. If not, the XLR Adapter will
continue beeping until it turns off in about 15 minutes.
Muting Microphones
In the default setting, each Solo microphone will mute only itself when its MUTE button on
the microphone is pressed. To mute all of the microphones, press the red MUTE button on
the Remote Control; all microphones will flash red and no individual microphone can be
unmuted until the remote MUTE button is pressed again. All microphones will return to
their prior state.
However, if the tabletop microphone master mute has been enabled (Refer to Set-Up
Guide), the mute will work as follows: in addition to the Remote Control MUTE button
muting all of the microphones, the Solo Tabletop microphone MUTE button will also act as a
master mute and mute all active microphones. Pressing any Tabletop microphone MUTE
button or the Remote Control MUTE button will unmute all tabletop microphones. All
wearable and handheld adapter microphones in use will return to their prior state.
User’s Guide
Indicator Lights
Equipment Use
Microphone LED
Base Station
LEDs
Meaning
Microphone in Charger
Base
Solid RED
OFF
Charging in Progress
Solid GREEN*
OFF
Charging Complete
OFF
OFF
Microphone powered OFF or
battery discharged
One RED flash
every 1.5 seconds
RED Flashing
Microphone master muted by
remote control or tabletop
master mute
Two RED flashes
every 1.5 seconds
RED Flashing
Microphone paired and muted
GREEN flash every
1.5 seconds
GREEN Flashing
Microphone paired and “live”
Solid RED
Solid RED
Pairing mode or confirmation of
powering-down.
Alternating slow
GREEN and RED
OFF
or
Alternating slow
GREEN and RED
Microphone or channel not
paired
YELLOW flash alternating
with GREEN
GREEN Flashing
Microphone low battery
(mic live)
YELLOW flash alternating
with two RED flashes
RED Flashing
Microphone low battery
(mic muted)
Alternating RED, YELLOW,
GREEN, YELLOW
OFF
Searching for a connection, or
out of radio range. The
Microphone will try to reestablish the link for about 15
minutes, and then turn off.
Rapid RED flashes
continuing
for more than a few
seconds
OFF
Radio congestion – it is not
possible to make a radio
connection because there are
already too many nearby users,
or there is heavy radio
interference.
Groups of five rapid RED
flashes
OFF
Unit is faulty. Contact your AV
service provider for advice.
Microphone not in
Charger Base
Revolabs Fusion™
Microphones must be fully charged and paired to the Fusion
Base Station prior to first use.
© 2008 REVOLABS, INC. All rights reserved. No part of this document may be reproduced in any form or by any means without express
written permission from Revolabs, Inc. Product specifications are subject to change without notice.
Part #295033 REV 1.12