1
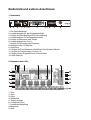
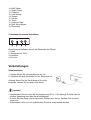
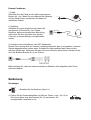
Vorsicht Bitte beachten Sie folgende grundlegenden Hinweise um sich oder andere nicht zu gefährden und Schäden an externen Geräten zu vermeiden. ! Warnhinweise • Bauen Sie das Instrument nicht auseinander und nehmen Sie keine Modifikationen daran vor. Dies könnte Verletzungen durch Stromschlag zur Folge haben. Betrauen Sie eine Fachwerkstatt mit eventuell nötigen Service- und Wartungsarbeiten oder wenden Sie sich an Ihren Händler. • Wenn Sie feststellen, dass das Stromkabel deutliche Gebrauchsspuren aufweist, das Gerät Aussetzer hat, verbrannt riecht oder raucht, ziehen Sie umgehend den Stecker aus der Steckdose und beauftragen Sie einen Techniker mit der Reparatur. • Bevor Sie das Piano reinigen, sollten Sie es vom Strom trennen. • Stellen Sie das Piano stets auf ebene, stabile Oberflächen um ein Wackeln oder Umfallen zu verhindern. • Befestigen Sie das Piano mit den beiliegenden Schrauben auf seinem Ständer, damit es nicht herunterfallen kann. • Benutzen Sie das Instrument nicht in feuchter oder nasser Umgebung. • Stellen Sie keine Gefäße darauf, die mit Flüssigkeiten gefüllt sind, wie z.B. Vasen, Gläser oder Flaschen. • Legen Sie keine kleinen Gegnstände darauf, die hineinrutschen könnten, wie z.B. Haarnadeln, Nähnadeln oder Münzen. • Stellen Sie keine brennenden Kerzen auf das Instrument. ! Vorsichtsmaßnahmen • Um Schäden am Piano zu vermeiden, stellen Sie es nicht an Plätze mit hohen Temperaturen oder viel Staub, stellen Sie es nicht direkt neben eine Klimaanlage und vermeiden Sie direkte Sonneneinstrahlung. • Stellen Sie das Instrument nicht in die Nähe von anderen elektrischen Geräten um Interferenzen zu vermeiden. • Wenden Sie im Umgang mit dem Piano keinerlei Gewalt an und stellen Sie keine schweren Gegenstände auf das Gerät. • Trennen Sie das Piano vom Strom, wenn Sie es längere Zeit nicht benutzen. Um das Gerät vom Strom zu trennen, ziehen Sie bitte am Stecker, nicht am Kabel. • Halten Sie sich beim Aufbau an die Bedienungsanleitung und vergewissern Sie sich, dass alle Klammern und Schrauben ordnungsgemäß befestigt sind. Tun Sie das bitte auch später regelmäßig. Geben Sie beim Aufbauen auf Ihre Finger acht. • Wenn Sie das Piano verrutschen möchten, bitte Sie mindestens eine weitere Person um Hilfe. • Gehen Sie bitte vorsichtig mit dem Stromkabel um. Es sollte nicht in der Nähe von Heizkörpern liegen, Sie sollten keine schweren Gegenstände daraufstellen und es so verlegen, dass keine Personen darauf treten oder darüber fallen könnten. • Bitte beachten Sie, dass dauernde hohe Lautstärke Ihr Gehör dauerhaft schädigen kann. Passen Sie daher die Lautstärke sorgfältig an. Inhaltsverzeichnis Aufbau! Bedienfeld und externe Anschlüsse! 1. Bedienfeld! Diagramm des LCDs! Buchsen für externe Anschlüsse! Vorbereitungen! Stromanschluss! Externe Funktionen! Bedienung! Grundlagen! Tone! Effekte und Funktionen! Touch! Keyboard Split! Dual Voice! Sustain! Vibrato! Metronom! Data-Drehrad! Style & Funktionen! Auswahl eines Styles! Start/Stop ! Sync-Funktion! Fill In! Intro/Ending! Tempo-Anpassung! Lautstärke der Begleitung! Chord-Lautstärke! Chord-Begleitung! Single Finger! Fingered! Chord Clear! Aufnahme! Demo-Songs! Intelligentes Unterrichten! Lektion 1! Lektion 2! Anhang I: Sounds! Anhang II: Styles! Anhang III: Demo-Songs! Hilfe bei Störungen! Technische Spezifikationen! 4 5 5 5 6 6 6 7 7 7 8 8 8 8 8 8 8 9 9 9 9 9 9 10 10 10 10 10 11 11 11 11 11 12 12 12 12 13 15 17 17 18 ution: Press[INTELLIGENTTEACHING]button TEACHING]button toenter enterteaching teachingmodel model,then, ,then, ution: Press[INTELLIGENT Press[INTELLIGENT TEACHING]button totoenter teaching model ,then, white keys to choose different songs.Press this button again,exits teaching function.The white choose different differentsongs.Press songs.Pressthis thisbutton buttonagain,exits again,exits teaching function.The white keys to choose teaching function.The tone can choose different songs.Press this button again,exits teaching function.The current tone choose different differentsongs.Press songs.Pressthis thisbutton buttonagain,exits again,exitsteaching teaching function.The current tone can can choose function.The current n can be changed If you press [TONE]button and adjust the data wheel in the playback nn can changed IfIf you youpress press[TONE]button [TONE]buttonand andadjust adjustthe the data wheel the playback can be be changed data wheel in in the playback . .. Aufbau ation of piano piano body: body: ation ation of of piano body: s shown in the figure, first assemble the stands into one body and fasten with 4pcs of M5×60 ss shown in the the figure, figure, first firstassemble assemblethe thestands standsinto intoone onebody bodyand and fasten with 4pcs M5×60 shown in fasten with 4pcs of of M5×60 1. Bauen Sie zuerst die Füße zusammen und verschrauben Sie sie fest mit 4 Schrauben s shown in the figure, connect left and right stands and supporting plates with pedal rack s shown in in the the figure, figure, connect connectleft leftand andright rightstands standsand andsupporting supporting plates with pedal rack As plates with pedal rack M5x60 gemäß der Abbildung. nt shown baffle and fasten with 4pcs of M5×60 screws. nt baffle and fasten with 4pcs of M5×60 screws. nt baffle and fasten with 4pcspiano of M5×60 screws. s shown in the figure, place body on the und base and fasten with 12 pcs of M4x14 screws Verbinden Siebody rechten linken Fuß Verbindungsplatte zu einem Ständer und s shown in the2. figure, place piano on the base and fasten withüber 12 pcsdie of M4x14 screws s shown in the figure, place piano body on the base and fasten with 12 pcs of M4x14 screws cs of M6X20 screws. cs of M6X20 screws. befestigen Sie ihn mit 4 Schrauben M5x60. cs of M6X20 screws. s: s: s: 3. Legen Sie das Piano auf den Ständer und befestigen Sie es, wie auf der Abbildung zu sehen, mit 12 Schrauben M4x14 und 4 Schrauben M6x20. M4*14 Screw 12 pieces M4*14 Screw 12 pieces M4*14 Screw 12 pieces M4x14 (12 Stück) M6*20 Screw 4 pieces M6*20 Screw 4 pieces M6x20 Stück) M6*20 (4 Screw 4 pieces M5*60 Screw 8 pieces M5x60 M5*60(8Stück) Screw 8 pieces Assembly Drawing 08 M5*60 Screw 8 pieces Note : Pls refer the assembly drawing on the page 08. Note : Pls refer the assembly drawing on the page 08. Note : Pls refer the assembly drawing on the page 08. 3.Sync Function: Press[SYNC]button to left hand to start style synch chord area to start auto cho button to stop style and star 4.Fill 4.Fill-lN: lN: Press[FILL-IN]button to effect,then play based on th 5.Intro/Ending: When you press[INTRO/ gone to the normal style,wh playback will be finished afte 1 1 2 3 1 1 6.Tempo Adjustment: Press [ TEMPO ] +/- butto adjustment range is 30-240 2 3 7. 7.Accompaniment Accompaniment Volume The default Accompa [ACCOMPANIMENT] + or will restore the default Acco buttons at the same time.Th 3 3 8.Chord Volume Adjustme The default Chord Vol is 1 LCD has the relative display w if you press the [ CHORD VO 3 3 Bedienfeld und externe Anschlüsse Panel Control and External Jacks 01 1.Panel Bedienfeld Control and External Jacks 1、Panel Control CH OR D VO LU ME AC CO MPANI ME NT VO LU ME 主音 量 RE C ST YL E PLAY TONE TOUC H SP LI T SU STAIN DU AL VI BR ATOL ON START/S TOP SY NC IN TR O/ EN DI NG FI LL IN TE MP O ME TR ON OM E OF F DE MO GU ID E1 GU ID E2 SI NG LE FI NG ER CH OR D CL EA R PO WE R AC CO MPANI ME NT CON TR O Panel Control and External Jacks 2 1 CH OR D FU NC TI ON 智 能教学 3 4 5 6 7 8 1.Power Switch Button 1. Ein-/Ausschaltknopf 2.Master Volume Button 9 10 11 12 DATA WH EE L 13 7.Recording/ Playback Button 01 8.LCD Display screen Panel Control and External Jacks 2. Lautstärkeregler 3.Start/Stop/Sync/Fill infür / die Gesamtlautstärke 9.Style/ Tone 1、Panel Control 3. /Intro/Ending Knöpfe für Start/Stop/Sync/Fill In/Intro/Ending Button 10.Touch/ Keyboard Split/ Dual Voice 4. Lautstärkeknopf für die Begleitautomatik / Sustain/ Vibrato Button 4.Accompaniment Volume Button 5. Knöpfe für 5.Metronome 、Metronom Tempo Buttonund Tempo11.Demo、Lesson1、Lesson2 Button 6. Lautstärkeknopf für Chord 6.Chord Volume Button 12.Single Finger/Fingered/Chord Close Button 7.1 Knöpfe für Recording Playback 11 12 13 2 3 4 5 6 und 7 8 13.Data Wheel 9 10 Button 8.2、LCD Bildschirm des LC-Displays Display Screen Diagram 1.Power Switch Button 7.Recording/ Playback Button 9. Style/Tone 2.Master Volume Button 8.LCD Display screen 10. Knöpfe für Touch/Keyboard Split/Dual Voice/Sustain/Vibrato 3.Start/Stop/Sync/Fill in / 9.Style/ Tone 11. Knöpfe für Demo/Lesson 1/Lesson 2 /Intro/Ending Button 10.Touch/ Keyboard Split/ Dual Voice 12. Single Finger/Fingered/Chord Close-Knöpfe / Sustain/ Vibrato Button 4.Accompaniment Volume Button 13. Data-Drehrad 5.Metronome、Tempo Button 11.Demo、Lesson1、Lesson2 Button CH OR D VO LU ME AC CO MPANI ME NT VO LU ME 主音 量 RE C ST YL E PLAY TONE TOUC H SP LI T SU STAIN DU AL VI BR ATOL ON START/S TOP SY NC FI LL IN IN TR O/ EN DI NG ME TR ON OM E OF F TE MP O DE MO GU ID E1 GU ID E2 SI NG LE FI NG ER CH OR D CL EA R PO WE R AC CO MPANI ME NT CON TR O 智 能教学 CH OR D FU NC TI ON DATA WH EE L VELOCLTY SINGLE SPLIT FINGER 6.Chord Volume Button 2. Diagramm des LCDs LEARN 12.Single Finger/Fingered/Chord Close Button 13.Data Wheel Button DUAL 2、LCD Display Screen Diagram RECDRD SUSTAIN VIBRA VELOCLTY SINGLE 1.Tone FINGER 2.Style 3.Song LEARN 6. Chord V olume 11.Single Finger 7.Accompaniment Volume 12.Fingered 8.Metronome 13.Learning SPLIT 16.Touch 17.Keyboard split 18. Dual DUAL Voice 4.Digit Display 9.Staff 10.B/W Keys Display 14.Sustain 19.Recording SUSTAIN 5.Tempo Display 15.Vibrato RECDRD VIBRA 3、External Jacks Pedal Sustain 220V 1.Pedal Sustain 2.220V Input 11.Single 6. Chord V olume 3.Headphone out Finger 7.Accompaniment Volume 4.Line Out12.Fingered Headphone Line Out 1.Tone 1. Tone 2.Style 1 3 2 4 2. Style 3.Song 13.Learning 8.Metronome 3. SongDisplay 4.Digit 9.Staff 14.Sustain 4. Zahlenfeld 5.Tempo Display 10.B/W Keys Display 15.Vibrato 5. Tempo-Anzeige 3、External Jacks 6. Lautstärke Chord 7.Pedal Lautstärke Begleitung Headphone Sustain Line Out 1.Pedal Sustain 220V 2.220V Input 8. Metronom 3.Headphone out 9. Staff 1 2 3 4 4.Line Out 16.Touch 17.Keyboard split 18. Dual Voice 19.Recording VELOCLTY SINGLE 10. B/W-Tasten 11. Single Finger 12. Fingered 13. Lern-Modus 14. Sustain 15. Vibrato 16. Touch 17. Keyboard Split 18. Dual Voice-Modus 6.Chord Volume 1.Tone 19. Recording 2.Style 7.Accompaniment FINGER SPLIT LEARN DUAL SUSTAIN RECDRD VIBRA 11.Single Finger 3.Song 8.Metronome 13.Learning 16.Touch 17.Keyboard split 18.Dual Voice 4.Digit Display 9.Staff 10.B/W Keys Display 14.Sustain 19.Recording 5.Tempo Display Volume 3. Buchsen für externe Anschlüsse 12.Fingered 15.Vibrato 3、External Jacks Pedal Sustain 1 220V Headphone Line Out 3 2 4 1.Pedal Sustain 2.220V Input 3.Headphone out 4.Line Out Diese Buchsen befinden sich an der Rückseite des Pianos: 1. Pedal 2. Stromkabel für 220 V 3. Kopfhörer 4. Line Out 02 Preparation before performance Vorbereitungen Power Connection Name Stromanschluss 1. First Make sure whether the power switch of Electric Club P Grand piano is at OFF position.If not,pull the Switch to OFF position. 1. Stellen Sie den Ein-/Ausschaltknopf auf „off“. 2. Conect power cord: Insert power cord in power 2. Schließen Sie das Stromkabel an der Steckdose AC 220V socket. 16 Bea an. Achtung: Wenn Sie das Gerät längere Zeit nicht Caution:When you do this piano, should unplug the plug of AC power 220V from benutzen, trennen Sienotesusewieder vomyou Strom. power socket safely in oder to avoid the obstacle of piano parts or other accident for the power is on for long-time. 8 Beat 8 Beat 8 Beat Rap P Pop R 60’s S 70’s S Caution Vorsicht! + 10% , Too high or low Voltage will cause the damage of the Be sure power voltage is AC 220V - electric grand piano. Sie sich, dass die Stromspannung 220 V ± 10% beträgt. Zu hohe oder zu • Vergewissern Do not unplug the power cord from power socket when the power is on. niedrige Spannung kann das Gerät beschädigen. Fuse replacement shall be only made by qualified person. • Trennen Sie das Gerät nicht im laufenden Zustand vom Strom. Schalten Sie es immer zuerst aus. External Function • Sicherungen sollten nur von qualifiziertem Personal ausgetauscht werden. 1.Pedal Sustain: The sustain function can produce natural sustain by stepping upon sustain pedal when you perform.Please insert the plug of sustain pedal into SUS PEDAL jack. You can open/close the sustain function through the sustain pedal plug. SUSTAIN PEDAL JACK Funk 16 Bea Twist British Hard R Fusion FunkS Fusion Rock'n Rock'n Straig 2.Use of headphone: Insert headphone plug into“HEADPHONE”jack in the rear of the electric grand piano.The Jazz R FastG Fuse replacement shall be only made by qualified person. External Function 1. Pedal Sustain: Externe FunktionenThe sustain function can produce natural sustain by stepping upon sustain pedal w perform.Please insert the plug of sustain pedal into SUS PEDAL jack. You can open/close the 1. Pedal function through the sustain pedal plug. Schließen Sie das Pedal an der dafür vorgesehenen Buchse Nr. 1 an. Wenn Sie nun während des Spielens auf das Pedal treten, produzieren Sie damit ein natürliches Sustain. SUSTAIN PEDAL JACK 2.Use of headphone: Insert headphone plug into“HEADPHONE”jack in the rear of the electric grand pia internal speaker cuts off automatically . It does not interfere with others,if you use hea 2. Kopfhörer during performance.It is special Schließen Sie einen Kopfhörer mit einen 6,35 for personal monitor and exercising at night. mm-Stecker an Buchse Nr. 3 an. Dieser Kopfhörer dient zum persönlichen Monitoring oder wenn Sie üben möchten ohne andere Personen zu beeinträchtigen, beispielsweise nachts. 3.Connection wlth Amplifier or Hi-Fi Equipment: This electric grand piano has built-in speaker system.It can be connected with other external or speaker system.First turn off the power of electric grand piano and external equipme 3. Anschluss eines Verstärkers HiFi-Equipments insert one end ofoder stereo audio cable into LINE IN or Aux IN jack of other hi-fi equipment an the other LINE Lautsprechersystem, OUT jack in rear panel das of electric Dieses Piano verfügt überend eininto internes an einpiano. anderes, externes System angeschlossen werden kann. Schalten Sie dazu zunächst das Piano und die Amplifier externen Geräte aus. Verbinden Sie Line dann out die Line In-Buchse des externen Geräts mit der Line Out-Buchse (Buchse Nr. 4) des Pianos. LINE OUT Speaker box Note: All the above external facilities are not equipped with this product,users nee themsevles, please forgive us for this. Bitte beachten Sie, dass das oben beschriebene Zubehör nicht mitgeliefert wird. Es ist optional erhältlich. Table of Tone Basic Operation LCD display LCD display Basic Oboe Operation Echoes Bedienung Sci-Fi Basic Operation 03 1.Turn on power : Press[POWER] button to turn on"power",press it again to turn off power EngHorn Bassoon Grundlagen ON Sitar Clarinetit again to turn offBanjo on"power",press power of electric grand piano. Piccolo ON Flute RecorderPower PanFlute OFF Shamisen Koto 1.Schalten OFF Power 2.Master Volume Adjustment: Press[ Sie das Gerät ein (Knopf 1). MASTER VOLUME] "+,-"button,Users can do the suitable ad Kalimba BagPipe volume depend on their requirement .You also can use data wheel rotar default Volume is14,When the eletric grand piano is open. MASTER VOLUME 2. Passen Sie die Gesamtlautstärke mit Hilfe der Tasten + und - (Nr. 2) an. BottBlow Fiddle "+,-"button,Users can do the suitable adjustment on the whole ment .You also can use data wheel rotary button adjust.The(Nr. 14) verwenden. Die Sie können dazu auch dasto Drehrad Shakuhac Shanai etric grand piano is open. voreingestellte Lautstärke ist 14. TONE Whistle TinklBel MASTER Tone Selection: VOLUME Ocarina Agogo The default status is "TONE",When the electric grandpiano is open tone.You need to press[TONE]button.or you can select tone by data w Square SteelDrm Sawtooth WoodBlck STYLE Calliope ",When the electric grandpiano isTaikoDrm open.If current status is not button.or you can select tone by data wheel rotary button. Chiff MelodTom STYLE TONE Charang SynthDrm Voice RevCymbl Effect & Control Fifths GtrFrt 1.Touch: TONE OFF MASTER ASTER VOLUME] "+,-"button,UsersPower can OFF do the suitable adjustment on the whole VOLUME nd on their requirement .You also can use data wheel rotary button to adjust.The me Adjustment: Power e is14,When the eletric grand piano is open. me Adjustment: STER VOLUME] "+,-"button,Users can do the suitable adjustment on the whole dSTER on their requirement .You alsoMASTER cancan usedo data rotary button to VOLUME] "+,-"button,Users thewheel suitable adjustment onadjust.The the whole VOLUME is14,When the eletric .You grand piano is open. d on their requirement also can use data wheel rotary button to adjust.The NE",When theTone electric grandpiano is open.If current status is not is14,When the can eletric grand piano is open. MASTER ]button.or you select toneVOLUME by data wheel rotary button. MASTER STYLE VOLUME on: ult status is "TONE",WhenWenn the electric open.If currentist status is notausgewählt. Sie grandpiano das Pianoisanschalten, „Tone“ d: to press[TONE]button.or you can select tone by data wheel rotary button. Sie können diesen Status jederzeit auch durch Drücken des Tone-Knopfes (Nr. 9) aufrufen. TONE t status is "TONE",When the electric grandpiano is open.If current status is not STYLE : to press[TONE]button.or you can select tone by data wheel rotary button. status is "TONE",When the electric grandpiano is open.If current status is not o press[TONE]button.or youSTYLE can select tone by data wheel rotary button. TONE STYLE the touch response keyboard.When the piano is open,touch function TONE undtouch,the Funktionen play keyboard Effekte with different piano will play different size ntrol ,the touch function exits and keyboard touch was cancelled. Press TONE h function will start again. Touch rol of this pianois ard the touch response keyboard.When the piano is open,touch function VIBRATO SPLIT DUAL SUSTAIN TOUCH Das verfügt über eine Anschlagdynamik. Die size Funktion startet automatisch mit dem ically.When you playPiano keyboard with different touch,the piano will play different rol button ,the touch function exits andSie keyboard touch was cancelled. Press „Touch“ (Nr. 10) aus- und wieder d[TOUCH] of this pianois the touch response the piano open,touch function Einschalten des keyboard.When Pianos. kann mitisHilfe des Knopfes on again,the touch willwith startdifferent again. touch,the piano will play different size cally.When you playfunction keyboard angeschaltet werden. d of this pianois the keyboard.When the piano open,touch function TOUCH] button ,thetouch touchresponse function exits and keyboard touchis was cancelled. Press VIBRATO SPLITwith different DUAL SUSTAIN TOUCH play keyboard touch,the piano will play different size nally.When again,theyou touch function will start again. TOUCH] ,the touch function exits and keyboard touch was cancelled. Press he left 24thbutton key, the keyboard forms left and right two tone keyboards. VIBRATO Swill P L I T startD Uagain. AL SUSTAIN TOUCH n again,the touch function el button to adjust the tone of the right Keyboard. SUSTAIN TOUCH DUAL SPLIT SPLIT DUAL SUSTAIN TOUCH plit: LIT ]button, from the left 24th key, the keyboard forms left and right two tone keyboards. lit: Keyboard Split el, press data wheel button to adjust the tone of the right Keyboard. T ]button, fromDrücken the left 24thSie key, the keyboard forms left and right two tone keyboards. dieDUAL Taste SPLIT um die Tastatur bei Taste 24 zu SUSTAIN VIBRATO TOUCH SPLIT it: press data wheel button to adjust the tone of the right Keyboard. und rechten mit verschiedenen DUAL] button linken ,the keyboard enters theTeil model of dual voice.Namely Sounds belegen. T ]button, from the left 24thLkey, the keyboard forms left and right two tone keyboards. SUSTAIN IBRATO DUAL before I T voice voices,The firstTOUCH voice isS Pthe you Vpressed dual voice data wheel button to adjust thedual tone of the right Keyboard. spress the selected voice after pressed voice button. : SUSTAIN VIBRATO TOUCH DUAL SPLIT VIBRATO VIBRATO teilen. Sie können dann den TOUCHstatus,press DUAL SUSTAIN SPLIT mal [DUAL] buttonVIBRATO ,the keyboard enters the model of dual voice.Namely composed of two voices,The first voice is the voice before you pressed dual voice al status,press button ,the keyboard enters the model of button. dual voice.Namely e second voice[DUAL] is the selected voice after pressed dual voice mposed of two voices,The Dual Voicefirst voice is the voice before you pressed dual voice second voice is the selected voice after pressed dualmodel voiceof button. al status,press [DUAL] keyboard enters the dual voice.Namely TOUCH button SUSTAIN SPLIT VIBRATO Drücken Sie,the dieDUAL Taste DUAL VOICE um den entsprechenden Modus zu aktivieren. Sie mposed of two voices,The first voice is the voice before you pressed dual voice können dann einen zweiten Sound auswählen, der zusammen mit dem ersten klingt (der DUAL after SUSTAIN SPLIT V I B R A Tdual O second voice isTOUCH the selected voice pressed voice button. erste ist der Sound, der vor dem Drücken der Taste ausgewählt war). TOUCH SPLIT DUAL SUSTAIN VIBRATO Appendix Basic Operation Sustain Drücken Sie SUSTAIN um die Funktion zu aktivieren. Wenn Sie gleichzeitig Name mit B/Wof Tone Appendix Name of Basic Operation n]button to start sustainspielen, function. Itwird will produce prolonged effect if you play with B/W Drücken Sie die Taste abermals Tasten eine Klangverlängerung produziert. Electric Ba Acoustic Grand Piano e time. Press [sustain] button again to exit the function. um den Effekt wieder auszuschalten. TOUCH SPLIT DUAL SUSTAIN Bright Acoustic Piano Name of Tone VIBRATO n]button to start sustain function. It will produce prolonged effect if you play with B/W time. Press [sustain] button again to exit the function. DUAL SUSTAIN S P L I T function.It V I B R A T Othe aquiver effect tone if you play RATO] button toTOUCH start vibrato will produce the same time.Press[VIBRATO]botton again to exit the function. Vibrato TOUCH SPLIT DUAL SUSTAIN VIBRATO ATO] button toMit startder vibrato function.It will produce the aquiver effect tone if you play Taste VIBRATO können Sie den Vibrato-Effekt the same time.Press[VIBRATO]botton again to exit the function. wird ein „zitternder“ Klangeffekt erzeugt. TOUCH SPLIT DUAL SUSTAIN VIBRATO TRONOME]button,the tick - tock beat sound will occur. Here are four kinds of beats Press this button again, it goes into the next kind of beat. The LCD has the relative [START/STOP] button to exit this function. RONOME]button,the tick - tock beat sound will occur. Here are four kinds of beats TEMPO METRONOME Press this button again, it goes into the next kind of beat. The LCD has the relative START/ STOP] button to exit this function. TEMPO METRONOME l: heel can adjust your own favourite tone or style convenientlly during performance, e relative display when the data wheel was rotated as to you can choose your favorite pidly : . users aslo can adjust the volume size(Press the volume button firstly , then wheel , the L C Dyour has own the relative display) heel can adjust favourite tone or style convenientlly during performance, an- und auch Electric Grand Piano Acoustic Grand Piano Honky-tonk Piano Bright Acoustic Piano Rhodes Piano Electric Grand Piano Chorused Piano Honky-tonk Piano Harpsichord wieder abschalten. Es Rhodes Piano Clavichord Chorused Piano Celesta Harpsichord Fretless Ba Name of T Slap Bass Electric Bas Slap Bass Fretless Ba Synth Bass Slap Bass 1 Synth Bass Slap Bass 2 Violin Synth Bass Viola Synth Bass Cello Violin Glockenspiel Clavichord Contrabas Viola Music box Celesta Tremolo St Cello Vibraphone Glockenspiel Pizzicato S Contrabass Marimba Music box Orchestral Tremolo Str Xylophone Vibraphone Timpani S Pizzicato Tubular Bell Marimba String Ens Orchestral Dulcimer Xylophone String Ens Timpani Drawbar Organ Synth Strin Electric Bass Acoustic Slap Bass 1 (pick) Electric Grand Piano Slap Bass 2 Honky-tonk Piano Fretless Bass Bright Acoustic Piano Slap Bass 2 Honky-tonk Piano TOUCH DUAL SUSTAIN SPLIT VIBRATO Synth Bass 1 Rhodes Piano to start vibrato function.It will produce effect tone if you play ame time.Press[VIBRATO]botton againthe to aquiver exit the function. Slap Bass 1 1 Electric Synth Bass RhodesGrand PianoPiano me.Press[VIBRATO]botton again to exit the function. Synth Bass 2 Chorused Piano TOUCH DUAL SUSTAIN SPLIT VIBRATO Slap Bass 2 2 Honky-tonk Piano Name of Tone Synth Bass Name of Tone Chorused Piano TOUCH DUAL SUSTAIN LIT IBRATO Violin Harpsichord otton start function.It will produce the aquiver effecteffect tone ifif you to vibrato startS Psustain function. It will Vproduce prolonged you play play with B/W Synth Bass 1 Rhodes Piano Metronom Electric Bass (p Acoustic Grand Piano Violin Harpsichord e.Press[VIBRATO]botton e. Press [sustain] button again to exit the function. Viola Clavichord Drücken Sie die Taste METRONOME um das Metronom einzuschalten. Sie können aus Synth Bass 2 Chorused Piano Fretless Bass Bright Acoustic Piano Viola Clavichord DUAL S P L I T SUSTAIN VIBRATO TOUCH DUAL S PTOUCH LIT V ISUSTAIN BRATO Cello Celesta OME]button,the tick tock beat sound will occur. Here are four kinds of beats vier Taktarten wählen. Benutzen Sie dazu die Taste BEAT. Sie sehen die ausgewählte Violin Harpsichord Slap Bass 1 Cello Celesta Electric Grand Piano tick - tock sound will next occur. Here are four beats sutton,the this button again , itbeat goes into the kind of beat . Thekinds LCD of has the relative Contrabass Glockenspiel Taktart im Display. Drücken Sie erneut METRONOME um die Funktion wieder utton again , it goes into the next kind of beat . The LCD has the relative Viola Clavichord Slap Bass 2 Honky-tonk Piano Contrabass Glockenspiel RT/ STOP] button to exit this function. Tremolo Strings Music box OP] button toabzuschalten. exit this function.It function. will produce the aquiver effect tone if you play O ] button to start vibrato Cello Celesta utton,the tick - tockMETRONOME beat sound will occur. Here are four kinds of beats Synth Bass 1 Rhodes Piano Tremolo Strings Music box TEMPOagain to exit the function. same time.Press[VIBRATO]botton Pizzicato Strings Vibraphone ton again,METRONOME it goes into TEMPO the next kind of beat. The LCD has the relative Glockenspiel Bass 2 Chorused Piano Contrabass PizzicatoSynth Strings Vibraphone TOUCH DUAL SUSTAIN S P L I Tfunction. VIBRATO Orchestral Harp Marimba P] button to exit this Tremolo Strings Music boxHarpsichord Violin Orchestral Harp Marimba Timpani Xylophone TEMPO METRONOME Pizzicato Vibraphone Viola Clavichord Timpani Strings Xylophone an adjust your own favourite tone or style convenientlly during performance, String Ensemble Tubular Bell ust your own favourite tone or style convenientlly during performance, ve display when thetick data wheel rotated to you canare choose your favorite Orchestral Harp 1 Marimba Cello Celesta String Ensemble Tubular Bell NOME]button,the - tock beatwas sound will as occur. Here four kinds of beats lay when the data wheel was rotated as to you can choose your favorite String Ensemble Dulcimer users can adjust volume size(Press volume button firstly , then ss this aslo button again , it the goes into the next kind the of beat . The LCD has the relative Timpani Xylophone Contrabass String Ensemble 2 DulcimerGlockenspiel aslo can adjust the relative volume display) size(Press the volume button firstly , then , the L CD hasbutton the Synth Strings 1 Drawbar Organ Data-Drehrad ART/ STOP] to exitorthis function. st your own favourite tone style convenientlly during performance, C D has the relative display) String Tubular Bell Tremolo Music SynthEnsemble Strings 1 1 Strings Drawbar Organ box ay when the data wheel was rotated as to you can choose your favorite Synth Strings 2 Percussive Organ TEMPO METRONOME String Dulcimer Pizzicato Vibraphone SynthEnsemble Strings 2 2 String Percussive Organ slo can adjust the volume size(Press thedes volume button firstly , then Sie bequem während Mit Hilfe Drehrads können desRock Spielens Organ Parameter Choir Aahs D has the relative display) Synth 1 Drawbar Organ Orchestral Harp Marimba ChoirStrings Aahs Rock Organ wie Sound oder Style ändern. Sie sehen die Änderung sofort auf dem Display. Voice Oohs Church Organ Synth Strings 2 Percussive Organ Timpani Xylophone Church Organ Sie können auch zuerst den Lautstärkeknopf drücken und dann mit HilfeVoice desOohs Synth Voice Reed Organ DATA WHEEL can adjust your own favourite tone or style convenientlly during performance, Choir Aahs Rock Organ Drehrads die Lautstärke anpassen. String Ensembl Tubular Bell Synth Voice Reed Organ Function theDATA Style Orchestra Hit Accordion ative displayofwhen theWHEEL data wheel was rotated as to you can choose your favorite on of the Style Voice Oohs Church Organ String Dulcimer Orchestra Hit Ensembl Accordion . users aslo can adjust the volume size(Press the volume button firstly, then Trumpet Harmonica nd has 128 kinds of style for your choice.For style table,please refer it to el ,piano the L C D has the relative display) Synth Voice Reed Organ Drawbar Organ Trumpet Synth Strings 1 Harmonica DATA WHEEL Trombone Tango Accordion on 128Style kinds of style for stylefunction.LCD table,please displays refer it tocurrent II.has Press [STYLE]button to your enterchoice.For style selection of the Orchestra Hit Strings 2 Accordion Synth Percussive Organ Trombone Tango Accordion s [STYLE]button to enter style selection function.LCD displays current t 001-128style,Use data wheel rotary button to choose. Tuba Acoustic Guitar (nylon) Trumpet Harmonica 28style,Use data wheelSTYLE rotary button to choose. Choir Aahs Rock Organ Tuba Acoustic Guitar (nylon) has 128 kindsStyle of style& forFunktionen your choice.For style table,please refer it to Muted Trumpet Acoustic Guitar (steel) STYLE Trombone Tango Accordion Voice Oohs Church(steel) Organ Muted Trumpet Acoustic Guitar [STYLE]button to enter style selection function.LCD displays current French Horn Electric Guitar (jazz) 8style,Use data wheel rotary button to choose. Tuba Acoustic Synth Voice Reed(nylon) Organ French Horn ElectricGuitar Guitar (jazz) DATA WHEEL Auswahl eines Styles Brass Section Electric Guitar (clean) TONE STYLE e Function of the Style Muted Acoustic (steel) Orchestra Hit Accordion BrassTrumpet Section Electric Guitar (clean) TONE Synth Brass 1 Electric Guitar (muted) French Horn Electric (jazz) Das Piano verfügt über 128 Styles. Eine detaillierte Übersicht finden Trumpet Harmonica Synth Brass 1 ElectricGuitar Guitar (muted)Sie in Synth Brass 2 Overdriven Guitar and piano has 128 kinds of style for your choice.For style table,please refer it to Anhang II.selection Drücken Sie die Taste STYLE zu aktivieren. Brass Electric Guitar (clean) TONE is open, Trombone Tango Accordion SynthSection Brass 2 sx when the piano press the [ START/STOP ] button play um die Auswahlfunktion Overdriven Guitar II. Press [STYLE]button to enter style function.LCD displaystocurrent Soprano Sax Distortion Guitar nRT/STOP the piano is open, press the [ START/STOP ] button to play ] button again , It can exit other function. Im Display wird die aktuell gewählte Style-Nummer angezeigt. Suchen Sie sich Synth Brass 1 Electric Guitar (muted) ct 001-128style,Use data wheel rotary button to choose. Tuba Acoustic Guitar (nylon) Soprano Sax Distortion Guitar Alto Sax Guitar Harmonics TOP ] button again , It can other mitFILLexit Hilfe des function. Drehrads einen beliebigen Style (001 bis 128) aus. STYLE START / STOP IN INTRO / ENDING SYNC Synth Brass 2 Trumpet Overdriven Guitar Guitar (steel) Muted Acoustic Alto Sax Guitar Harmonics Tenor Sax Acoustic Bass START /is STOPopen, / ENDING FILL IN INTRO SYNC the piano press the [ START/STOP ] button to play Soprano Sax Distortion Guitar Guitar (jazz) French Horn Tenor Sax Acoustic Electric Bass OP ] button again , It can exit other function. Baritone Sax Electric Bass(finger) Alto Sax Guitar Harmonics Electric Guitar (clean) Baritone Brass Sax Section Electric Bass(finger) TONE ACCOMP CONTROL sustain] button again to exit the function. Appendix I. Basic Operation ] button to start vibrato function.It will produce the aquiver effect tone if you play START / STOP FILL IN SYNC INTRO / ENDING Tenor SaxSynth Brass 1 Acoustic Bass Electric Guitar (muted) Start/Stop ACCOMP CONTROL us when the Um piano is open, press the [ START/STOP ] button to play ACCOMP CONTROL Style abzuspielen, drücken Sie die Taste einen ART/STOP ] button again , It can exit other function. abermals um die Funktion zu beenden. START / STOP SYNC FILL IN INTRO / ENDING Electric Bass(finger) Synth Brass 2 Overdriven Guitar Baritone Sax START/STOP. Drücken Sie sie Distortion Guitar Guitar Harmonics Alto Sax Acoustic Bass Tenor Sax Electric Bass(finger) Baritone Sax ACCOMP CONTROL Basic Operation Sync-Funktion 05 Starten Sie die Funktion indem Sie die Taste SYNC drücken. Sobald Sie nun eine der 19 : Tasten für die linke Hand betätigen, startet der Style synchron. Wenn die Chord-Funktion utton to start sync accompaniment function and press any key of 19 keys in aktiv ist, wird auf diese Weise auch der Start der Begleitung synchronisiert. Wenn zuvor le synchronously.If chord function is started,press relevant key of 19 keys in ein Style gespielt wurde, drücken Sie SYNC um den Style zu stoppen und die uto chord synchronously.If a style was being played previously.press[SYNC] and start sync Begleitautomatik accompaniment function. zu starten. START / STOP SYNC FILL IN INTRO / ENDING ACCOMPANIMENT CONTROL button to insert a intermezzo during style playback as to enhance the performane ed on the original style. START / STOP SYNC FILL IN INTRO / ENDING Soprano Sax and start sync accompaniment function. n: button to start sync accompaniment function and press any key of 19 keys in START / STOPchord ENDING SYNC function FILL IN INTRO yle synchronously.If is /started,press relevant key of 19 keys in 05 auto chord synchronously.If a style was being played previously.press[SYNC] and start sync accompaniment function. Basic Operation Fill In ACCOMPANIMENT CONTROL Basic Operation n to start sync accompaniment function and press any key of 1905 keys in START / STOP SYNC FILL IN INTRO / ENDING Sie die Taste während nchronously.IfDrücken chord function is started,press relevantdes key Playback of 19 keys ineines button to insert einzufügen. a intermezzo during playback to enhance the performane hord synchronously.If a style wasstyle being played as previously.press[SYNC] ed theaccompaniment original style. function. tarton sync ACCOMPANIMENT CONTROL o start sync accompaniment function and press any key of 19 keys in START / STOP SYNC FILL IN INTRO / ENDING chronously.If chord function is started,press relevant key of 19 keys in START / STOP SYNC FILL IN INTRO / ENDING ord synchronously.If a style during was being previously.press[SYNC] button to insert a intermezzo style played playback as to enhance the performane 05 art accompaniment sedsync on the original style.function. Styles um ein Zwischenspiel Basic Operation ACCOMPANIMENT CONTROL START / STOP SYNC FILL IN INTRO / ENDING ACCOMPANIMENT CONTROL SYNC FILL IN INTRO / ENDING START / STOP INTRO/ENDING]button,an intro will be played,and thenkey it contitues to play o start sync accompaniment function and press any of 19 keys in after tyle,when pressfunction [INTRO/ENDING] button during style playback,the chord started,press keythe of 19 keys in style nchronously.If to insert ayou intermezzo during is style playback asrelevant to enhance performane Intro/Ending hed after a paragraph ending is played. a of style wasCONTROL played previously.press[SYNC] nord thesynchronously.If original style. ACCOMPANIMENT Drücken Sie diebeing Taste INTRO/ENDING. Der Style startet mit einem ACCOMPANIMENT CONTROL art sync accompaniment function. START / STOP SYNC FILL IN INTRO/ ENDING START / STOP SYNC FILL IN INTRO / ENDING während des Playbacks erneut Taste INTRO/ENDING drücken, s[INTRO/ENDING]button,an intro will be played,and thendie it contitues to play after o insert a intermezzo during style playback as to enhance the performane einem Ending beendet. style,when press [INTRO/ENDING] button during style playback,the style STARTyou / STOP SYNC FILL IN INTRO / ENDING the original shed after a style. paragraph of ending is played. Intro. Wenn Sie wird das Playback mit ACCOMPANIMENT CONTROL CONTROL START / STOPACCOMPANIMENT INTRO / ENDING SYNC FILL IN START / STOP SYNC FILL IN INTRO/ ENDING nt: +/- buttons , itACCOMPANIMENT can adjustCONTROL tempo of style,metronome,demo . The RO/ENDING]button,an introthe willplayback be played,and then it contitues to play after 30-240,the default is “120” after the power is on. when you press [INTRO/ENDING] button during style playback,the style ACCOMPANIMENT CONTROL o insert a intermezzo ACCOMPANIMENT during style CONTROL playback as to enhance the performane after a paragraph of ending is played. TEMPO the original style. M E T R O N O M E ent: START / STOP SYNC FILL IN INTRO/ENDING O/ENDING]button,an intro will be played,and then contitues to play after . The START /, STOP INTRO / ENDING SYNCadjust FILL IN ] +/- buttons it can the playback tempo ofitstyle,metronome,demo hen you press [INTRO/ENDING] during style playback,the style s 30-240,the default is “120” after button the power is on. fter a paragraph of ending is played. Tempo-Anpassung MPO METRONOME / STOPDas INTRO/ ENDING SYNC FILL IN Volume START Adjustment: ACCOMPANIMENT CONTROL Tempo fürT EStyle, ACCOMPANIMENT CONTROL Metronom oder Demo-Songs können Sie anpassen, indem Sie die c o m p a n i m e nTasten t Vo l i s 1Tempo 6 , y o u c a+n oder a d j u s -t Adrücken. c o m p a n i mDie e n t Reichweite Vo l b y p r e s s i nbeträgt g 30-240. Beim Einschalten des T]uttons + or -,button.The LCD has the relative display when you adjust.The system it can Geräts adjust theist playback tempo of style,metronome,demo . The Tempo 120 eingestellt. O/ENDING]button,an intro will be played,and then it contitues to play after ult Accompaniment Vol automatically you 40,the defaultACCOMPANIMENT is “120” after the powerif is on.press the Accompaniment Vol +/CONTROL hen you press [INTRO/ENDING] button during style playback,the style time.The is 16 after the power is on. Volume default Adjustment: fter a paragraph of ending is played. TEMPO METRONOME cttons c o m,pitacan n i madjust e n t Vothe l i sACCOMPANIMENT 16,you ca n a d j uofs tstyle,metronome,demo A c o m p a n i m e n t Vo l b.yThe pressing playback tempo START / STOP SYNC FILLVOLUME IN INTRO/ ENDING T] + or button.The LCD has the relative display when you adjust.The system 0,the default is “120” after the power is on. ault Accompaniment Vol automatically if you press the Accompaniment Vol +/e time.The default is 16 after T E M P Othe power is on. djustment: M E T R O N O M E ACCOMPANIMENT CONTROL dme VolAdjustment: is 16,you can adjustACCOMPANIMENT Chord Vol by pressing[CHORD VOL]+ or - button.The VOLUME display you p a n i mwhen e n t Vo lLautstärke i adjust.The s 1 6 , y o u csystem a nder a d jwill uBegleitung s trestore A c o m the p a ndefault i m e n tChord Vo l b yVol p rautomatically essing ORD ] button the same time.The the power is on. ttons ,VOL it can adjust the playback tempo ofdefault style,metronome,demo . The r - button.The LCDat has the relative display whenis16 you after adjust.The system Diese Lautstärke ist beimtheEinschalten des auf 16 eingestellt. Mit Hilfe der 0,the default is “120” after the power ispress on. e Adjustment: djustment: ccompaniment Vol automatically if you Accompaniment VolInstrumentes +/CH OR D VOL UME .The default is 16 after the power is on. Tasten ACCOMPANIMENT + oder können Sie die Lautstärke nach Ihren Wünschen rd Vol is 16,you can adjust Chord Vol by pressing [ CHORD VOL ] + or button.The a n i m e n t Vo lM Ei TsR O1N O6M E, y o u cTaE MnP O a d j u s t A c o m p a n i m e n t Vo l b y p r e s s i n g display when you adjust.The system will restore the default Chord Vol automatically - button.The LCD has the relative display when you adjust.The anpassen. Der Wert der Lautstärke wirdsystem im Display angezeigt. Sie können den Wert ACCOMPANIMENT HORD VOL ] button atVOLUME the sameiftime.The default is16 after the power is on. ompaniment Vol automatically youSie press the Accompaniment Vol +/speichern indem die Tasten + und gleichzeitig drücken. The default is 16 after the power is on. CH OR D VOL UME ACCOMPANIMENT ment: me Adjustment: VOLUME is 16,you can adjust Chord Vol by pressing[CHORD VOL]+ or - button.The a i m e nyou t Vo l i s 1 6 , y osystem u c a n awill dju s t A c othe m pdefault a n i m eChord n t VoVol l b yautomatically pressing y nwhen adjust.The restore - button.The LCD has the relative display when you adjust.The system ent: VOL ] button at the same time.The default is16 after the power is on. ompaniment Vol automatically if you press the Accompaniment Vol +/16,you canisadjust Chord Vol by pressing[CHORD VOL]+ or - button.The CH OR Dpower is on. The default 16 after the VOL UME will restore the default Chord Vol automatically when you adjust.The system ACCOMPANIMENT VOL ] button atChord-Lautstärke the same time.The default is16 after the power is on. VOLUME Diese Lautstärke ist beim Einschalten des Instrumentes auf 16 eingestellt. Mit Hilfe der CH OR D VOL UME Tasten CHORD + oder - können Sie die Lautstärke nach Ihren Wünschen anpassen. Der ent: Wert derVol Lautstärke im VOL Display Sie können den Wert speichern indem Sie 16,you can adjust Chord by pressing[wird CHORD ]+ or -angezeigt. button.The when you adjust.The system will restore the default Chord Vol automatically die Tasten + und - gleichzeitig drücken. VOL ] button at the same time.The default is16 after the power is on. CH OR D VOL UME Chord-Begleitung Basic Operation Basic Operation 06 Single Finger rd Accompaniment Accompaniment gle Finger : Wenn der Style-Modus The Playback of the Demo: gestartet ist, drücken Sie die Taste SINGLE FINGER. Sie TheDrücken Playback of the Demo: Press[DEMO]button to pla Basic Operation When style is started,press [SINGLE FINGER] button to enter the function of single finger auto Finger : nun eine Taste im Begleitbereich (Tasten 1 bis 19) um den entsprechenden Akkord zu Press[DEMO]button to play so refer the 11th page DEMO Appe Basic Operation Basic Operation n style is started,press [SINGLE button to enter the function of single finger auto d,Now in 1~19hören. keys of Drücken the chordFINGER] area,applying different fingerings to hear different chord refer the 11th page DEMO Appendix stop. Sie die Taste START/STOP um die Funktion wieder auszuschalten. ow in 1~19 keys of [START/STOP] the chord area,applying fingerings to hear different chord mpaniment,press button todifferent exit this function. stop. The Playback of the Demo: Accompaniment animent,press [START/STOP] button to exit this function. The Playback of the Demo: The Playback of the Demo: Finger : Press[DEMO]button to play so Press[DEMO]button toplay playsong. song. Pressthis thisbutton butto n style is started,press [SINGLE FINGER] button to enter the function of single finger auto Press[DEMO]button refer to the 11th pagePress DEMO Appendix s [SINGLE FINGER] button to enter the function of single finger auto refer the 11th page DEMO Appendix).Press [START/ST sow [SINGLE button to enter the function of single finger auto refer the 11th page DEMO in 1~19FINGER] keys of the chord area,applying different fingerings to hear different chord stop. Appendix).Press [START/STO chord area,applying area,applying different different fingerings fingeringsto tohear heardifferent different chord stop. ee chord stop. CHORD FUNCTION button animent,press [START/STOP] to exit this function. chord Intelligent Teaching: DEMO LESSON1 LES RT/STOP] button button to exit exit this function. function. DEMO LESSON1 LESS RT/STOP] to this CHORD FUNCTION Intelligent Teaching: 1.Lesson-1:Whe you pres gered: 1.Lesson-1:Whe pressthe an right or wrong.It willyou produce Fingered FINGERED] button to enter the function of fingered auto bass ed: style is started,press[ When rightbutton or wrong.It will produce the cor one note model. INTELLIGENT TEACHING TEACHING en styleinis1-19 started,press[ button to different enter the function ofto fingered auto bass Wenn Stylearea,applying startet, drücken Siefingerings die Taste FINGERED um die Auto-Bass-Funktion zu INTELLIGENT d.Now keys of der theFINGERED] chord hear different chord button one note model. CHORD FUNCTION Intelligent Teaching: ow in 1-19 keys of the chord area,applying different fingerings to hear different chord mpaniments.Press[START/STOP]button exit this function. aktivieren. Drücken Sie to die Taste START/STOP um die Funktion wieder auszuschalten. FUNCTION Intelligent Teaching: UNCTION Intelligent Teaching: animents.Press[START/STOP]button to exit this function. 1.Lesson-1:Whe you press an ed: 1.Lesson-1:Whe Wheyou youpress pressany anybutton buttonfor forlearning learning 1.Lesson-1: right or wrong.It will produce the cor en style is started,press[ FINGERED] button to enter the function of fingered auto bass right or wrong.It will produce the correct melody notes, a right or wrong.It will produce the correct melody notes, an button one note model. ss[FINGERED] FINGERED]button button to to enter enter the thefunction functionof offingered fingeredauto autobass bass ss[ ow in 1-19 keys of the chord area,applying different fingerings to hear different chord button one note model. button one note model. chord area,applying area,applying different fingeringsto to heardifferent different chord CHORD FUNCTION fingerings eeaniments.Press[START/STOP]button chord different to exithear this function. chord 2.Lesson-2:the master volu DEMO LESSON1 LES DEMO LESSON1 LESS ART/STOP]button to exit exit this this function. function. CHORD FUNCTION RT/STOP]button to 2.Lesson-2:the master volume piano key notes.The master volu od Close: piano key notes.The master volume song if you don't play the piano k Close: ft e r the chord was started,press[CHORD CLOSE]button to stop chord accompaniment while song if you don't play the piano key f INTELLIGENT TEACHING play. rcontinues the chordto was started,press[CHORD CLOSE]button to stop chord accompaniment while INTELLIGENT TEACHING CHORD FUNCTION tinues to play.Chord Clear 2.Lesson-2:the master volume w FUNCTION UNCTION 2.Lesson-2:themaster master volume willbe bemaster closedvolume overwh w 2.Lesson-2:the volume closed over piano notes.The Um die Chord-Begleitung zu stoppen, während der Style weiterspielt, drücken key Sie diewill Close: piano key notes.The master volume will recover the perfo piano key notes.The master willplay recover the perfo song ifvolume you don't the piano key fo Taste CHORD CLEAR. r the chord was started,press[CHORD CLOSE]button to stop chord accompaniment while songififyou youdon't don'tplay playthe thepiano pianokey keyfor for33seconds. seconds. CHORD FUNCTION song d,press[CHORD CLOSE]button to stop chord accompaniment while d,press[CHORD ntinues to play. CLOSE]button to stop chord accompaniment while GERED ERED GERED ERED SINGLE FINGER CHORD CHORD CLEAR CLEAR FINGERED CHORD CLEAR SINGLE FINGER FINGERED CHORD CLEAR SINGLE FINGER CHORD CHORD CLEAR CLEAR FINGERED SINGLE FINGER FINGERED SINGLE FINGER FINGERED CHORD CLEAR SINGLE FINGER FINGERED CHORD CLEAR SINGLE FINGER SINGLE FINGER FINGERED FINGERED CHORD CLEAR CHORD CLEAR CHORD CLEAR CHORD CLEAR CHORD FUNCTION CHORD CHORD CLEAR CLEAR SINGLE FINGER FINGERED CHORD CLEAR ording Function ng Function Press[RECORDING]button to enter recording model.The metronome sound sounds and the GERED ERED Caution: DEMO Press[INTELL LESSON1LESSO LESS DEMO LESSON1 Caution: Press[INTELLIGE press white keys to choose d press white keys choose differ current tone cantochoose differen current different so tonetone cancan canchoose beINTELLIGENT changed If you INTELLIGENT TEACHING TEACHING CHORD FUNCTION ult tempo is 120.Now presstoany keyrecording to start recording.The maximum sound recording quantity is 180. ss[RECORDING]button enter model.The metronome sounds and the FUNCTION tonecourse. can can be changed If you pre UNCTION Caution: Press[INTELLIGE n the maximum quantity is full,metronome sound will stop and the recording next note cann't beisrecorded. empo is 120.Now press any key to start recording.The maximum quantity 180. Caution: Press[INTELLIGENT Press[INTELLIGENT TEACHING]b course. Caution: TEACHING]b ytimeyou press this button,the previoussound memory beand cleared andnote the piano into the Installation piano body: press white keysofto choose differ e maximum quantity is full,metronome willwill stop the next cann'twill be enter recorded. ng Function presswhite whitekeys keysto tocurrent choose different songs.Press this ding press choose different songs.Press this eyoumodel press again. this button,the previous memory will be cleared and the piano will enter into the Installation of piano body: tone can choose different son 1.As shown in the figure, firs g model again. current tone can choose different songs.Press this button ess[RECORDING]button to enter recording model.The metronome sound sounds and the current tone can choose different songs.Press this button RECORDING tonescrews. can can be changed If you pre 1.As shown in the figure, first as ton to tois enter recording model.The metronome soundsounds sounds andrecording the ton enter recording sound and the empo 120.Now pressmodel.The any key tometronome startRECORDING recording.The maximum quantity is 180 . can tone cancan canbe bechanged changed you press [TONE]button a tone IfIfyou press [TONE]button 2.As shown in the figure, an co course. screws. any key key to toquantity start recording.The recording.The maximum recording quantity 180 ses any start maximum recording isis180 .. cann't be recorded. maximum is full,metronome sound will stop quantity and the next note course. and front baffle and fasten with course. 2.As shown in the figure, conne full,metronome sound will will stop stop and and the the next next note notebe cann't berecorded. recorded. full,metronome cann't be eyou press this sound button,the previous memory will cleared and the piano will enter into the Installation of piano body: pla 3.As shown the figure, andbody: front baffle and in fasten with 4pc ,the previous memory will be be cleared cleared and andPLAYBACK the piano pianowill willenter enterinto intothe the Installationof ofpiano piano ,the previous will the g model again.memory Aufnahme Installation body: 1.As shown in the figure, first ass 3.As shown in the figure, place p and 4pcs of M6X20 screws. PLAYBACK RECORDING 1.Asshown shownininthe thescrews. figure, first assemble thestands standsinto int 1.As figure, first assemble the and 4pcs of M6X20 screws. RECORDING RECORDING shown screws. zu aktivieren.2.As Parts: screws. Drücken Sie RECORDING um den Aufnahmemodus Sie hörenin the figure, conne 2.Asshown shownininthe the figure, connect left andright right stan 2.As figure, left and and frontconnect baffle and fasten withstand 4pc Parts: das Metronom mitnotes. dem voreingestellten Tempoand von 120. Drücken Sie eine and front baffle andfasten fasten with 4pcsof ofthe M5×60 screws. .Press [ PLAYBACK] button to play the recorded front baffle and with 4pcs M5×60 screws. Mp 3.As shown in figure, place PLAYBACK 3.Asshown showninin theand figure, place pianoscrews. bodyon onthe the bas Taste notes. um die Aufnahme zu starten. Die maximale Aufnahmemenge ess [ PLAYBACK ] button tobeliebige play the recorded RECORDING 3.As the figure, place piano body bas M4*1 4pcs of M6X20 PLAYBACK PLAYBACK and4pcs 4pcs ofM6X20 M6X20screws. screws. and of beträgtRECORDING 180 Takte. Wenn sie erreicht sind, stoppen Aufnahme und Metronom. M Parts: Drücken Sie die Taste erneut, um den Speicher zu leeren und eine neue Parts: Parts: PLAYBACK ess [ PLAYBACK] button toAufnahme play the recorded notes. zu beginnen. tton to to play play the the recorded recorded notes. notes. tton PLAYBACK RECORDING RECORDING RECORDING Drücken Sie die Taste PLAYBACK um die Aufnahme anzuhören. PLAYBACK PLAYBACK PLAYBACK M6*2 M M4*1 M5*6 M4*14 Screw Screw 12 12pieces pieces M4*14 Note : Pls refer the M6*2 Note : Pls refer the as M6*20 Screw Screw 44 pieces pieces M6*20 M5*6 M5*60 Screw Screw 88pieces pieces M5*60 Note : Pls refer the as Note::Pls Plsrefer referthe theassembly assemblydrawing drawingon ont Note Demo-Songs 07 Drücken Sie die Taste DEMO um einen Demo-Song abzuspielen. Wenn Sie die Taste erneut denthe nächsten Song. Im Anhang finden Sie eine Übersicht über ton to play song. Pressdrücken, this button hören again,ItSie will play next song.(Please die Demo-Songs. START/STOP um das Playback zu stoppen. MO Appendix).Press [START/STOP]Drücken button,the Sie playback of the Demo will e Demo: DEMO LESSON1 LESSON2 INTELLIGENT TEACHING g: Demo: 07 07 you press anyPress buttonthis forbutton learning, no matter whether thesong.(Please performance is to play song. again,It will play the next oduce the correct melody notes, and repeats its accompaniment that will is one O Appendix).Press [START/STOP] button,the playback of the Demo Demo: l. n to play song. DEMO Press thisLESSON1 button again,It will play the next song.(Please LESSON2 DEMO LESSON1 LESSON2 O Appendix).Press [START/STOP] button,the playback of the Demo will Intelligentes Unterrichten DEMO LESSON1 LESSON2 INTELLIGENT TEACHING INTELLIGENT TEACHING Lektion 1 over when you play the piano key and follow the aster volume will be closed INTELLIGENT TEACHING aster volume will recover theeine performance learning the piano keygleichgültig, of ofisthis Wenn beliebige Tastethe drücken, ob richtig oder falsch, werden die u press any button forSie learning,no matterofwhether performance he key forkorrekten 3 seconds. ucepiano the correct melody notes, and repeats its accompaniment that is one Noten erzeugt und die Begleitung im Model „eine Taste - eine Note“ gespielt. DEMO LESSON1 LESSON2 u press any button for learning,no matter whether the performance is DEMO LESSON1 LESSON2 uce the correct melody notes, and repeats its accompaniment that is one INTELLIGENT TEACHING DEMO LESSON1 LESSON2 INTELLIGENT TEACHING [INTELLIGENT TEACHING]button to enter teaching model ,then, er volume will be closed over when you play the pianoteaching key and follow the choose different songs.Press this button again,exits function.The Lektion 2 INTELLIGENT TEACHING er volume will recover the of learning the piano key of ofcurrent this e different songs.Press thisperformance button again,exits teaching function.The Die Gesamtlautstärke wird vermindert, wenn Sie eine Taste drücken um die piano key for 3 seconds. ged If you press andyou adjust wheel in the playback er volume will be [TONE]button closed over when playthe thedata piano key and follow the wiederzugeben. Wenn Sie 3 Sekunden lang keine Taste drücken, spielt das LESSON2 er volume will DEMO recoverLESSON1 the performance of learning the piano key of of this die richtige Note. o body: piano key for 3 seconds. Melodie Piano für Sie igure, first assemble the stands into one body and fasten with 4pcs of M5×60 DEMO LESSON1 LESSON2 INTELLIGENT TEACHING figure, connect left and right stands and supporting plates with pedal rack NTELLIGENT TEACHING]button to enter teaching model ,then, sten with 4pcs of M5×60 screws. INTELLIGENT TEACHING oose songs.Press thisbase button again,exits figure,different place piano body on the and fasten withteaching 12 pcs offunction.The M4x14 screws ifferent songs.Press this button again,exits teaching function.The current ews. NTELLIGENT TEACHING]button to enter teaching model ,then, d If you press [TONE]button data wheel in the TEACHING playback Drücken Sieand dieadjust TastetheINTELLIGENT um in den Lernmodus zu gelangen (oder oose different songs.Press this button again,exits teaching function.The auch um ihn wieder zu verlassen) und wählen Sie mit Hilfe der weißen Tasten einen Song ändern, indem Sie TONE drücken und different songs.Press this button again,exits teaching function.The current ody: M4*14 Screw pieces können Sie während des Spiels Den12Sound d If you press aus. [TONE]button and adjust the data wheel in the playback ure, first assemble the stands into oneeinen body and fasten with 4pcs of M5×60 mit dem Drehrad anderen auswählen. M6*20 Screw 4 pieces ody:connect left and right stands and supporting plates with pedal rack ure, n with of M5×60 screws. M5*60 Screw 8 pieces ure, first4pcs assemble the stands into one body and fasten with 4pcs of M5×60 ure, place piano body on the base and fasten with 12 pcs of M4x14 screws s.refer connect left and drawing right stands andpage supporting plates with pedal rack sure, the assembly on the 08. en with 4pcs of M5×60 screws. ure, place piano body on the base and fasten with 12 pcs of M4x14 screws ws. M4*14 Screw 12 pieces M6*20 Screw 4 pieces M4*14 Screw 12 pieces M5*60 Screw 8 pieces M6*20 Screw 4 pieces efer the assembly drawing on the page 08. M5*60 Screw 8 pieces efer the assembly drawing on the page 08. Anhang I: Sounds Appendix I.Table of Tone Name of Tone Name of Tone Name of Tone 09 Name of Tone Acoustic Grand Piano Electric Bass (pick) Oboe FX 7 (echoes) Bright Acoustic Piano Fretless Bass English Horn FX 8 (sci-fi) Electric Grand Piano Slap Bass 1 Bassoon Sitar Honky-tonk Piano Slap Bass 2 Clarinet Banjo Rhodes Piano Synth Bass 1 Piccolo Shamisen Chorused Piano Synth Bass 2 Flute Koto Harpsichord Violin Recorder Kalimba Clavichord Viola Pan Flute Bagpipe Celesta Cello Bottle Blow Fiddle Glockenspiel Contrabass Shakuhachi Shanai Music box Tremolo Strings Whistle Tinkle Bell Vibraphone Pizzicato Strings Ocarina Agogo Marimba Orchestral Harp Lead 1 (square) Steel Drums Xylophone Timpani Lead 2 (sawtooth) Woodblock Tubular Bell String Ensemble 1 Lead 3(calliope lead) Taiko Drum Dulcimer String Ensemble 2 Lead 4 (chiff lead) Melodic Tom Drawbar Organ Synth Strings 1 Lead 5 (charang) Synth Drum Percussive Organ Synth Strings 2 Lead 6 (voice) Reverse Cymbal Rock Organ Choir Aahs Lead 7 (fifths) Guitar Fret Noise Church Organ Voice Oohs Lead 8(bass+lead) Breath Noise Reed Organ Synth Voice Pad 1 (new age) Seashore Accordion Orchestra Hit Pad 2 (warm) Bird Tweet Harmonica Trumpet Pad 3 (polysynth) Telephone Ring Tango Accordion Trombone Pad 4 (choir) Helicopter Acoustic Guitar (nylon) Tuba Pad 5 (bowed) Applause Acoustic Guitar (steel) Muted Trumpet Pad 6 (metallic) Gunshot Electric Guitar (jazz) French Horn Pad 7 (halo) Electric Guitar (clean) Brass Section Pad 8 (sweep) Electric Guitar (muted) Synth Brass 1 FX 1 (rain) Overdriven Guitar Synth Brass 2 FX 2 (soundtrack) Distortion Guitar Soprano Sax FX 3 (crystal) Guitar Harmonics Alto Sax FX 4(atmosphere) Acoustic Bass Tenor Sax FX 5 (brightness) Electric Bass(finger) Baritone Sax FX 6 (goblins) Appendix I.Table of Tone 10 Basic Oper LCD display LCD display LCD display LCD display AcoPiano BassPick Oboe Echoes BrtPiano FretBass EngHorn Sci-Fi ElcPiano SlpBass1 Bassoon Sitar HnkPiano SlpBass2 Clarinet Banjo RhoPiano SynBass1 Piccolo Shamisen ChoPiano SynBass2 Flute Koto Hrpchord Violin Recorder Kalimba Clvichrd Viola PanFlute BagPipe Celesta Cello BottBlow Fiddle Glcknspl CntrBass Shakuhac Shanai MusicBox TremoStr Whistle TinklBel Vibphone PizziStr Ocarina Agogo Marimba OrchHarp Square SteelDrm Xylophon Timpani Sawtooth WoodBlck TubBells String1 Calliope TaikoDrm Dulcimer String2 Chiff MelodTom DrawOrg SynStr1 Charang SynthDrm PercOrg SynStr2 Voice RevCymbl Effect & Co RockOrg ChoirAah Fifths GtrFrt ChurhOrg VoiceOoh Bas+Lead BrthNse ReedOrg SynVoice New Age Seashore Accrdion OrchHit Warm BrdTweet 1.Touch: The keyb starts autom volume .Pres [TOUCH] bu Harmnica Trumpet Polysyn TeleRing TangoAcc Trombone Choir Helicopt NylonGtr Tuba Bowed Applause SteelGtr MuteTrmp Metallic GunShot JazzGtr FrnchHrn Halo CleanGtr BrassSec Sweep MutedGtr SynBrss1 Rain OverGtr SynBrss2 Soundtrk DstorGtr SoprnSax Crystal GtrHrmnc AltoSax Atmosphe AcoBass TenorSax Brights ElecBass BariSax Goblins 1.Turn on po Press[PO 2.Master Vo Press[ volume dep default Volu TONE Tone Select The defa tone.You ne 2.Keyboard Press[S In''tone'' mod 3.Dual Voic Under no each note is button,and t Anhang II: Styles Appendix II. Table of Style 11 Name of Style Name of Style Name of Style Name of Style Club Pop Pop Waltz Calypso Disco Party 16 Beat Pop USA March GuadDance Disco Samba 8 Beat Pop Hully Gully Reggae12Beat UK Pop 8 Beat Soul Tarantella Reggae16Beat Club Dance 8 Beat Rock Limbo Rock Slow Rock 1 Modern R&B Rap Pop Swing Waltz Slow Rock 2 Hip Shuffle Pop Rock Pub Piano Slow Rock 3 Charleston 60’s Soul Jazz Waltz 1 Slow Soul DiscoPop 70’s Soul Jazz Waltz 2 8 Beat Adria DiscoSoul Funk Show Tune Classic Piano DiscoTrot 16 Beat Shuffle Polka Unplugged EuroBeat Twist Waltz Pop Ballad Rap British Pop Cha Cha Pop New Age Rave Hard Rock Rumba 8 Beat Modern Big Band Shuffle1 Fusion Jive Country Ballad Big Band Shuffle2 FunkShuffl Pasodoble Love Song Big Band Shuffle3 FusionShuffl Samba 1 Rock'n Roll 1 Samba 2 Modern Country Pop Fast Band 1 Electro Pop Fast Band 2 Rock'n Roll 2 Schlager Rock 1 Acoustic Ballad Cat Groove Straight Rock Schlager Rock 2 Piano Ballad Dixie Jazz R&B Ballad Medium Jazz Rock Ballad Jazz Big Band Jazz Rock FastGospel FoxTrot Viennese Waltz FolkRock Tango1 Slow & Easy Jazz Club RockBilly Tango2 Analog Ballad Ragtime RockBoogie Bossanova E_Ballad Country 1 RockChaCha Mambo 1 Techno 1 Country 2 RockClassical Mambo 2 Techno 2 RockShuffle Bolero Funky Disco RockPop Cumbia Saturday Night Ober Polka Latin Rock Club Latin Polka Pop Disco Latin Disco Chocolate Blue Grass Tijuana Disco Fox Blue Grass 2 Reggae Disco Funk Blue Grass 3 Salsa Disco Hands Appendix II. Table of Style 12 LCD display LCD display LCD display LCD display Panel Con 1、Panel ClubPop PopWltz Calypso DscoPrty 16Pop USAMarch GuadDanc DscoSmba 8Pop HullGull Reggae12 UKPop 8Soul Tarantla Reggae16 ClubDnce 8Rock LmboRock SloRock1 ModernRB RapPop SwgWaltz SloRock2 HipShffl PopRock PubPiano SloRock3 ChrlSton 1.Power Sw 2.Master Vo 60sSoul JzzWltz1 SlowSoul DiscoPop 3.Start/Stop 70sSoul JzzWltz2 8BtAdria DiscSoul Funk ShowTune ClssPno DiscTrot /Intro/Endi 4.Accompan 16Shuffl Polka Unpluggd EuroBeat Twist Waltz PopBalld Rap BritPop ChaCha PopNewAg Rave HardRock Rumba 8BModern BndShfl1 Fusion Jive CntryBld BndShfl2 FunkShuf Pasodobl LoveSong BndShfl3 FusShufl Samba1 MdCnPop FastBnd1 RockRol1 Samba2 ElecPop FastBnd2 RockRol2 SchlRck1 AcouBlld CatGrve StrtRock SchlRck2 PianoBld DixieJzz JazzRock FoxTrot RBBallad MedJazz FastGosp VieWaltz RckBlld JazzBand FolkRock Tango1 SlowEasy JazzClub 主音量 ON START/S TOP SY N OF F PO WE R AC CO MP RkBilly Tango2 AnaBlld Ragtime RkBoogie Bosanova EBallad Country1 RkChaCha Mambo1 Techno1 Country2 RkClassi Mambo2 Techno2 RkShuffl Bolero FnkyDsco RockPop Cumbia SatNight OberPoka LatnRock ClubLtn PolkaPop DiscoLtn DscoChoc BluGrss1 Tijuana DiscoFox BluGrss2 Reggae DiscoFnk BluGrss3 Salsa DscoHand 2 1 5.Metronom 6.Chord Vol 2、LCD Di SINGLE FINGER LEARN SUSTAIN VIBRA 1.Tone 2.Style 3.Song 4.Digit Disp 5.Tempo Di 3、External Pedal Sustain 1 22 2 Anhang III: Demo-Songs Appendix III. Table of Demo 13 NO. Code of song 01 Turkish March 07 The Song Of Season 02 Impromptu 08 Serenade 03 Red River 09 Lieder 04 Oh Susanna 10 Katiollia 05 American Patrol 11 Espano 06 Haw - Tree 12 Mozart Piano Sonata NO. Code of song IV. Trouble Shooting Hilfe beiAppendix Störungen Possible Reason/Resolution Trouble Accompanying a slight noise in turning Normal phenomenon. Please do not worry. ON/OFF power. Störung Mögliche Ursache/Abhilfe After turned on power, pressed the Check whether main volume button was set proper Leichtes Geräusch beim An- und Normales Ereignis. position.Check whether headphone out jack was key,there was no sound. connected with other equipment so that the built-in Ausschalten. speaker system cutted off automatically. Kein Sound nach dem Einschalten. When you use the sustain function, some tone has the long sustain, some tone has the short sustain Überprüfen Sie die Lautstärke. Überprüfen Sie, ist, der das This is normal phenomenon.it is because the sustain ob ein Kopfhörer angeschlossen setting of the different tone of the grand interne abschaltet. electric piano wasSignal best length. caused by different tonefür jeden Ton Das Sustainand istnote beiquality verschiedenen Dasphenomenon ist normal, da das Sustain In a tone,note has the This is normal Sampling jeweils system ofauf the electric grand piano. Tönen unterschiedlich lang. die optimale Länge eingestellt wurde. slight difference. Innerhalb eines Sound weisenen Das ist ein normales Phänomen, verursacht The master volume or the accompaniment Please check whether the master volume control or Note und Notenqualität leichte durchvolume die unterschiedlichen Sample-Systeme accompaniment control was set the suitable volume is abnormal. position Unterschiede auf. des Pianos. Please check whether single finger or fingered was In SYNC status, auto accompament Die Gesamtlautstärke oder die set.Now,play Überprüfen Sie die Einstellung der Lautstärke. a note at left-hand keyboard area does not start. Lautstärke der Begleitung erscheint (19 keys in the left-hand keyboard area). nicht normal. When use the external power,there was Please check whether the power socket has the no sound when the piao was open,there was anything displayed on the LCD. Im Sync-Modus startet die Begleitautomatik nicht. electricity,whether the power adaptor was inserrted well.Check whether the power jack has the bad Überprüfen Sie ob „Single Finger“ contact or the voltage isn't enough. oder „Fingered“ ausgewählt ist. When use the mobile phone,the electri c Mobile phone can disturb the electric grand piano. To avoid the noise, pleaseSie, turn off mobile phone gran d pian o haserscheint the noise. keine Anzeige Im Display Überprüfen obthedas Stromkabel or use it in far away. und kein Sound ist zu hören, obwohl das Piano eingeschaltet ist. Das Piano verursacht Geräusche, wenn ein mobiles Telefon in Gebrauch ist. in ordnungsgemäßem Zustand ist und korrekt angeschlossen ist. Vergewissern Sie sich, dass die richtige Spannung anliegt. Schalten Sie das Telefon ab oder benutzen Sie es etwas weiter weg vom Piano. Technische Spezifikationen Carried Standard GB/T12105-1998, GB/8898-2001 GB13837-2003, GB17625-2003 Display LCD Sounds 128 verschiedene Sounds Styles 128 verschiedene Begleitungen Demo-Songs 12 Effektregler Touch, Split, Dual, Sustain, Vibrato, Metronom, Drehrad Aufnahmefunktion Aufnahme und Playback Lernmodus Lektion 1, Lektion 2 Funktionen der Begleitautomatik Start/Stop, Sync, Fill-In, Intro/Ending Chord-Tasten Single Finger, Fingered, Chord Clear weitere Tasten Power, Master Volume, Accompaniment Volume, Tempo, Chord Volume Buchsen für externe Anschlüsse Kopfhörer, Line Out, Pedal Diapason C3 - C8 Intonation ≤ 3 cent Karton Größe (mm) 1070 x 490 x 265 Gewicht 26 kg Stromversorgung 230 V / 50 Hz Ausgangsleistung 2 x 6W mitgeliefertes Zubehör Schrauben, Bedienungsanleitung, Netzteil Herstellererklärung Garantie und Gewährleistung Neben der gesetzlichen 24 monatigen Gewährleistungsfrist übernehmen wir eine Garantie von 6 Monaten. Die Garantiezeit beginnt ab dem Datum des Kaufs von fabrikneuen ungebrauchten Produkten durch den erstmaligen Endkunden. Zum Nachweis heben Sie bitte unbedingt den Kaufbeleg auf. Ohne diesen Nachweis, die der zuständige ServicePartner prüft, werden Reparaturen grundsätzlich kostenpflichtig durchgeführt. Auf dem Kaufbeleg müssen das Kaufdatum und die Bezeichnung des Produkts angegeben sein. Die Garantie-Leistungen bestehen nach unserer Wahl in der unentgeltlichen Beseitigung von Material- oder Herstellungsfehlern durch Reparatur, Austausch von Teilen oder des kompletten Geräts. Die im Rahmen eines Garantiefalls aus einem Produkt entfernten defekten Teile gehen in das Eigentum des Herstellers oder dessen Service-Partner zurück. Ausgenommen von der Garantie sind: unwesentliche Fehler oder Abweichungen in der Beschaffenheit des Produkts, die für Wert und bestimmungsmäßigen Gebrauch unerheblich sind, dem Produkt beigefügte Zubehörartikel, Akkus und Batterien (diese Produkte haben wegen ihrer Beschaffenheit eine kürzere Lebensdauer, die zudem im Einzelfall konkret von ihrer Nutzungsintensität abhängt), Mängel durch unsachgemäßen Gebrauch (z. B. Bedienungsfehler, mechanische Beschädigungen, falsche Betriebsspannung), (Unter sachgemäßem Gebrauch ist die Verwendung des Produkts unter den Bedingungen zu verstehen, die in der Betriebsanleitung beschrieben sind.) Mängel durch Verschleiß, von Ihnen oder Dritten vorgenommene Modifikationen an den Produkten, wenn über Art und Umfang der Modifizierung keine vorherige schriftliche Zustimmung des Herstellers vorliegt, Mängel aufgrund höherer Gewalt, Mängel, die Ihnen beim Kauf bereits bekannt sind Der Garantieanspruch erlischt bei Eingriffen in das Produkt durch nicht autorisierte Personen oder Werkstätten. Im Garantiefall senden Sie das Gerät inklusive Zubehör und Kaufbeleg an den für Sie zuständigen Service-Partner oder direkt an das Musikhaus Kirstein. Das Risiko der erfolgreichen Zusendung liegt beim Kunden. Zur Vermeidung von Transportschäden sollte möglichst die Original-Verpackung verwendet werden. Konformitätserklärung Dieses Produkt entspricht den grundlegenden Anforderungen und den weiteren folgender Richtlinien: 2004/108/EU EMV-Richtlinie 2006/95EU Niederspannungsrichtlinie Die vollständige Konformitätserklärung kann unter http://www.kirstein.de/docs/konformitaetserklaerungen eingesehen werden Akkus und Batterien Die mitgelieferten Akkus oder Batterien sind recyclingfähig. Bitte entsorgen Sie die Akkus über den Batteriecontainer oder den Fachhandel. Entsorgen Sie nur leere Batterien oder Akkus, um den Umweltschutz zu gewährleisten. WEEE-Erklärung Ihr Produkt wurde mit hochwertigen Materialien und Komponenten entworfen und hergestellt, die recycelbar sind und wieder verwendet werden können. Dieses Symbol bedeutet, dass elektrische und elektronische Geräte am Ende ihrer Nutzungsdauer vom Hausmüll getrennt entsorgt werden müssen. Bitte entsorgen Sie dieses Gerät bei Ihrer örtlichen kommunalen Sammelstelle oder im Recycling Center. Bitte helfen Sie mit, die Umwelt, in der wir leben, zu erhalten.