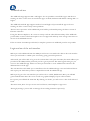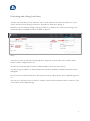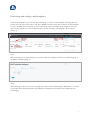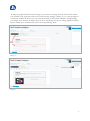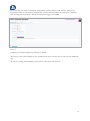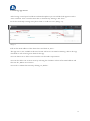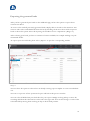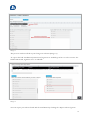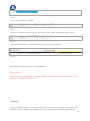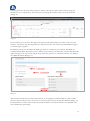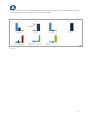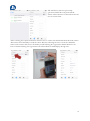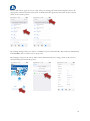
1
User guide AddLeads
Index
Technical advises .................................................................................................................................... 2
Login and use of the web interface ......................................................................................................... 2
Generating and editing lead sheets ........................................................................................................ 3
Generating and editing e-mail templates ............................................................................................... 7
Installing app users ............................................................................................................................... 11
Exporting the generated leads.............................................................................................................. 12
Statistics ................................................................................................................................................ 14
AddLeads App ....................................................................................................................................... 17
1
Technical advises
The AddLeads App supports iOS 7 and higher. It’s not possibile to install the app to iOS devices
running an older version. You can install the app to an iPad, iPad mini and iPhone running iOS 7 or
higher.
The AddLeads android App supports android 4.0 and higher. If you install the app on devices
running an older version it may causes problems.
The best user experience of the AddLeads portal will be performed by using the latest version of
Chrome or Firefox.
Using the Internet Explorer, ab version 10.0 may result in reduced functionality of the AddLeads
portal. Older versions of Internet Explorer are not supported and may cause strong restrictions on
the use of the AddLeads Portal.
If the execution of JavaScript is blocked, a complete operation of AddLeads portal is not possible.
Login and use of the web interface
When you order AddLeads from the OBS you will receive an email with a link to the web interface
where you will need to confirm your account by giving yourself a password.
Afterwards you will be able to log in to the web interface with your username (the email address you
provided in the OBS) and the password you have given yourself. The same login details give you
access to the AddLeads app. Please note that you will need to create additional accounts for the
additional users of the app.
The web interface will enable you to install users for the AddLeads app, create and edit lead sheets
and export your leads after you have compiled them with the AddLeads app.
When you log in to the web interface you will see the co called „Dashboard“. Here you will find
general information about the event as well as a graphical display of your collected leads.
In top area you will find the menu bar. By clicking on “Leads” you will receive a list of all collected
leads.
The menu item „New“ lets you create new lead sheets, email template or app users.
Through „Settings“ you are able to manage the according elements respectively.
2
Generating and editing lead sheets
To add a new lead sheet you can either use “New” in the menu bar and select “Lead sheets” or you
can use the menu item “Settings” and select “Lead sheets” from there (Image 1).
From here you can manage already existing lead sheets or add new ones. After your first login you
will already find a standard lead sheet available in this list.
Image 1
You can now select an already existing lead sheet, adjust the content of the sheet with the “Edit”
button or add a completely new one.
To add a new lead sheet please click on „Add Lead Sheet“ above the list of sheets.
As a first step you will have to decide whether the lead sheet should be available in German and/or
in English.
Now you need to name the lead sheet. The name you choose will be shown in the AddLeads app later
on.
You can stet a lead sheet active or inactive with the „status“ field. Lead sheets that are “inactive” will
not be shown in the AddLeads app.
3
In the next step you are shown the standard fields which will integrate in every lead sheet. You
cannot make any modification on these fields. By a click on the “Next”-button you get to the next
step (Image 2).
Image 2
After the standard fields you will have to specify its content. For this, you have different field types
such as dropdown lists, checkboxes and so on to your disposal (Image 3).
Image 3
You can find the available field types on the right side of the screen and use drag & drop to pull them
into your lead sheet on the left. These only show an example how the current fields can look like.
Each selected field type will later on appear in the according lead sheet in the AddLeads app so it is
important to name each field accordingly.
4
As soon as you pull a field type into the lead sheet an editor will appear on the right which allows
you to specify the element (Image 4).
Image 4
„Field name“ allows you to label the element. If you like, you can also pose it as a question (Image 5).
If you select a field type that includes a selection value, such as a dropdown list, you will need to
specify these values so they will be available for selection in the lead sheet. To add additional values
please click on “Add Value”.
Image 5
After you have specified the element you need to confirm your specifications with the „Save
Element“-button.
The element you have just created is now part of your lead sheet and you can continue by adding
more elements.
All elements of the lead sheet can be edited or deleted afterwards. Do to so, simply select the
according button above the element.
5
You can also change the order of the elements by moving the according element via drag & drop to
the desired position (Image 6).
Image 6
If you have finished adding all elements for your lead sheet you need to confirm your specifications
by clicking the button “Save lead” below the lead sheet.
Your created lead sheet is now available in your lead selection in the back end as well as in the
AddLeads app.
If you want to edit one of the existing lead sheet, simply click on the „edit“ icon below “Operations”
in the lead list. You can now edit each of the elements or add new field types.
Please confirm all changes by clicking the „Save Lead“-button.
6
Generating and editing e-mail templates
Aside of the lead sheets you can also add and manage a variety of email templates through the web
portal. You can either select “New” and then “E-Mail” from the menu bar to add a new mail template
or select “E-Mail” from “Settings” to view and manage a list of available email templates. You can
edit existing template or create completely new ones by selecting “Add template” above the list
(Image 7).
Image 7
When creating a new email template you need to name the template and select in which language it
should be available (Image 8).
Image 8
After clicking on „Next“ you need to specify the content of the email template. By default, a text field
is provided which already includes a placeholder for salutation. Please fill in your additional text
accordingly.
7
If you would like to add a graphical element into your email, you can also select an image field or a
combined field for your template. To do so, simply click on the according icon above the email editor
(Image 9).
Image 9
8
To fill your graphical element with an image you can select an image from the selection list which
you can find on the right side of the screen under the flag “Images” (Image 11 & 11). If your image is
not already available in the list, you can add it by clicking on the button “Add files” and uploading
your image. You can then use drag & drop to move your image into the according graphical element.
Please confirm your customization of the content by clicking “Next”.
Image 10
Image 11
9
In the last step you need to specify the email details such as “Subject” and “Sender” (Image 12).
Please fill out the according field. Additionally, you can add attachments by clicking on “Add files”
and selecting the required file. The file should not be bigger than 2 MB.
Image 12
Complete your email template by clicking on „Finish“.
The newly create email template is now available from your selection list as well as in the AddLeads
app.
To edit an existing email template, please select “edit” in the selection list.
10
Installing app users
After having created your lead sheets and email templates you can add the lead app users. Select
“New” and then “User” from the menu bar or alternatively “Settings” and “User”.
In the list of already existing users please click on “Add new user” (Image 13).
Image 13
Fill out the email address of the desired user and click on „Save”.
The app user is now available in the user list. He will receive an email containing a link to the app
download as well as his login in detail for the app.
You can deactivate or delete a user from the user list under “Operations”.
You can also delete one or more users by selecting the checkbox in front of his email address and
then use the „Delete user“-button.
You need to confirm this action by clicking on „Delete“.
11
Exporting the generated leads
After you have generated your leads via the AddLeads app you have the option to export those
contacts into Excel.
To receive a list with all previously generated leads, simply click on “Leads” in the menu bar. You
can now either select individual leads from the list by checking the boxes in front of the respective
leads or choose the option “Select all” by using the checkbox next to “Operations” (Image 14).
After selecting your leads, you have a variation of actions available, for example sending out your
customized emails.
To export your selected leads, please select „Export” to open the corresponding module.
Image 14
You now have the option to either select an already existing export template or create an individual
one.
You can see a preview of how your Excel export will look in the preview window.
You can select all fields from your lead sheet for your export. Simply use drag & drop to move the
according field from the selection list on the left to the right side. You can also change to order of the
selected fields by moving them via drag & drop to the desired position.
12
Image 15
The preview window will show your changes in real-time (Image 15).
To export the lead attachments (businesscard, signature or audiofile) you have to select coactive the
fields businesscard, signature and / or audiofile.
Image 16
You can export your selected leads and the attachments by clicking the “Export selected guests”.
13
Image 17
Now you get you files in a zip-file.
Image 18
You have to extract (unzip) the zip-file. Than you get a new folder with all you exported data.
Image 19
The folder includes the excel-file which show you all of your exported data.
Image 20
By clicking the link you open the corresponding file.
Important note:
Opening the files by clicking the link in the excel-file only works as long as the files and the excelfile are located in the same directory.
Statistics
To get a statistic you have to select the leads you want to show in your statistic. You can select you
leads by a click on “Leads” in the menu bar. Now you can select individual leads from the list by
14
checking the boxes in front of the respective leads or choose the option “Select all” by using the
checkbox next to “Operations”. After that you can call up the statistic with a click on “Statistics”
(Image 16).
Image 21
In the statistic you can select data typist, the time period and the fields you want to show in your
statistic. You choose the data typist about a drop-down menu. You select any individual data typist
or all data typist together.
In addition to that you can define the fields you want to consider in your statistic. All fields are
considered by default. If you don’t want a field in your statistic you switch the relevant field from the
right cleavage to the left one by drag & drop. After that you have to reload the statistic via clicking
the “Refresh”-button (Image 17).
Image 22
The statistics will be shown as bar charts. There is one graph for each field and the values will be
shown in percent. If you move the cursor over the bars you will see the specific numbers (Image 18).
Leads that have no select value in the relevant field will be concentrated under “not specified” and
also considered in percentage.
15
At this Point you can also evaluate fields which contain multiple-choice like multi-checkboxes. Please
consider that the percent could be above 100 for these fields.
Image 23
16
AddLeads App
You can log in to the app with your web interface details. For additional app users you will need to
install the according accounts within the web interface by following the guideline in the step
“Installing app users”.
When the user has downloaded the AddLeads app to his iOS or Android devise he needs to log in
with the account details provided in the email he has received.
Dear Sir, dear Madam,
You have been granted authorization
to use the AddLead app – an
application which allows you to record
visitor information during Hannover
Messe and to export it using the
associated Web portal.
Click here to complete your
registration:
Link
Sincerely,
Deutsche Messe AG
Project Manager Exhibitor Services
Sales & Consultancy
After logging in to the app the main menu will appear. From here the
user can register a new lead by clicking on the “New Lead” button.
17
The lead sheets you have previously
generated within the web portal will be
shown will be shown in a selection list for the
user to choose from.
After selecting the required lead sheet the user have to collect the main details from the lead contact.
This can be done manually or with the “Scan” function, allowing the user to scan the exhibition
ticket of the contact and receive all details provided during the registration. Fields that have not
been considered during the registration can still be filled out manually by the app user.
18
iOS (iPhone, iPad)
Android (Smartphone, Tablet)
Alternatively, you have the option to scan the business card of the guest to fill the contact fields
After filling out the contact details please click on “Next” to proceed to the selected lead sheet. When
all fields have been filled out together with the contact person.
19
Please click “Next” again to receive a list of the previously generated email templates. Select the
appropriate email and click in “Save lead” to finish the lead registration and send out the selected
email to the contact person.
By clicking manage leads, you will see a summary of your collected leads. The results in "NOT YET
UPLOADED" have not been sent to the portal.
By clicking a lead, you can edit it. This is done simultaneously as creating a lead. At the end it is
automatically synced with the portal.
20