1
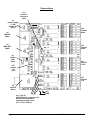
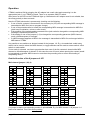
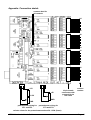
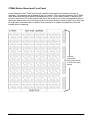
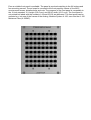
CTM64
(Contact To Midi Converter)
Version 4
User's Guide
© 2008 by Doepfer Musikelektronik
Electrical safety / EMC compatibility
CTM64 is a so-called OEM product (OEM original equipment manufacturer) that cannot be used
independently but has to be combined with additional electrical or electronical equipment to become a
working device (e.g. keyboard, switches, buttons, potentiometers, power supply, case/housing). The
manufacturer of CTM64 does not know the final assembly of the complete device in which the CTM64
is used as a part of the complete device. The final responsibility with regard to electrical safety and
electromagnetic compatibility is up to the user who is assembling the complete device.
Please pay attention to the following items:
The power supply used in combination with the CTM64 has to be a closed type (in Germany a power
supply with VDE approval is required). Normally an AC adapter with plastic case is used. It is not
allowed to use open power supplies with open mains voltage access (e.g. via mains lead, pcb
tracks, electronic parts).
On the CTM64 electronics preventing measures against electromagnetic radiation are met (RF
filters at the power supply input and the MIDI lines). But it is impossible to estimate to what extend the
components added by the user affect the EMC properties of the complete assembly. Therefore the
complete device has to be shielded against electromagnetic radiation (incoming and outgoing).
These demands are normally met by a closed metal case that covers the complete assembly. The
metal case should be connected to GND of the CTM64.
Warranty
• The 64 contact connectors (JP1, JP2, JP3, JP4) and the common connector for contacts (JP6) are
allowed to be connected only to free contacts but not to voltages !
• Applying any voltage (including GND or +5V) to the 64 contact connectors (JP1, JP2, JP3, JP4) will
destroy the circuit.
• Applying any negative voltage (< 0V) or positive voltage above +5V (> +5V) to the common
connector for contacts (JP6) will destroy the circuit !
• Applying any negative voltage (< 0V) or positive voltage above +5V (> +5V) to the potentiometer
connectors (ST1, ST2, ST3, ST4) will destroy the circuit !
• Applying any negative voltage (< 0V) or positive voltage above +5V (> +5V) to the sustain socket
(BU4) will destroy the circuit !
• Applying any negative voltage (< 0V) or positive voltage above +5V (> +5V) to the jumper pin header
(JP5) will destroy the circuit !
• Do not solder directly to any of the pin headers but use female connectors to make the connections
between the CTM64 and your application. We offer a suitable cable set that contains all required
connectors and cables.
• Carry out all connections in the off-state of the CTM64 (i.e. without power supply) !
• The CTM64 electronics is an electrostatic sensitive device. Avoid any electrostatic charges !
• Avoid short cuts !
• Ignoring any of these items will cause warranty loss !
• Return of the CTM64 within the 2 weeks return time limit (valid only in Germany) is only possible if
all these items have been met. Return of used cable sets is not possible.
page 2
CTM64 Version 4 - User's Guide
Contents
Electrical safety / EMC compatibility .........................................................................................................2
Warranty ...................................................................................................................................................2
Contents....................................................................................................................................................3
Introduction ...............................................................................................................................................4
Connections ..............................................................................................................................................6
Power supply (1) ...................................................................................................................................7
Midi Out (3)............................................................................................................................................7
Midi In (2) ..............................................................................................................................................7
Control LED (4) .....................................................................................................................................7
Sustain (5) .............................................................................................................................................7
Potentiometer connectors (6,7,8,9) .......................................................................................................8
Contact 1-64 (10) and Common (11) ...................................................................................................9
Jumpers 1-8 (12) ...................................................................................................................................9
Operation ................................................................................................................................................10
Detailed function of the 8 jumpers of JP5............................................................................................10
Midi channel (jumper 1,2,3,4) ..........................................................................................................10
Mode (jumper 5) ..............................................................................................................................11
Note/program offset (jumper 8)........................................................................................................11
Octave offset (jumper 6/7, working only in note mode ) ..................................................................11
Control LED (4) ...................................................................................................................................11
Factory setting of the jumpers .............................................................................................................11
Check list ................................................................................................................................................12
Appendix: Connection sketch .................................................................................................................13
MTC64.................................................................................................................................................14
Additional jumpers for pcb version 4 ...................................................................................................15
64 note offset ...................................................................................................................................15
Normal / Toggle operation ...............................................................................................................16
Control Change mode......................................................................................................................16
CTM64 Button Board and Front Panel....................................................................................................17
CTM64 Relay Board ...............................................................................................................................19
CTM64 Version 4 - User's Guide
Page 3
Introduction
CTM64 is an universal MIDI Out kit. Up to 64 free contacts can be connected to generate MIDI note
on/off or program change messages. CTM is suitable to retrofit keyboards, switch panels, button
arrangements or any other contacts so that they are able to transmit MIDI data. Up to 4
potentiometers can be connected to generate common MIDI controllers, pitch bend and after
touch. Additionally a 1/4 jack socket is available for connecting a sustain pedal.
Two different modes are selected with the first of 8 jumpers: note on/off or program change. In the
note mode closing of a contact generates the corresponding MIDI note on message, opening generates
note off - both without velocity (velocity is fixed to 100). In the program change mode closing of a
contact leads to the corresponding MIDI program change message.
The note offset (i.e. the MIDI note number assigned to the first contact) can be set to 0 or 36 with the
second jumper. With two more jumpers one can transpose up/down one octave, i.e. +12/-12 semitones.
Instead of these jumpers a 3-position switch (1-0-1) working as an octave switch can be soldered to
the corresponding pins of the jumper pin header. In this way the note offsets 0, 12, 24, 36 and 48 are
available. If another note offset (e.g. 41) is required the contacts are displaced correspondingly and the
unused contact terminals are left free.
In the program change mode the offset can be set to 1 or 64, i.e. setting the program number range to
1-64 or 65-128 (0-63 or 64-127 in MIDI code). With two daisy-chained CTM64 the whole program
number range 1...128 is covered.
The 4 potentiometer plugs are used to connect up to 4 potentiometers (e.g. rotary, slider, wheels or
others) generating the MIDI messages pitch-bend, modulation (controller #1), volume (controller
#7) and monophonic after touch.
The 1/4“ jack socket can be used to insert a sustain pedal (contact type ”closed at rest” is required)
generating the MIDI sustain message (controller #64).
The MIDI channel for all messages transmitted by the CTM64 is set with the last 4 jumpers.
The 64 contacts are connected to four double row pin headers with 16 pins each. 16 pin socketconnectors (female) with flat cable can be connected to these pin headers (not included with the
CTM64). Additionally there is one common pin for all contacts. Pay attention that only free contacts can
be used. This means that the contacts are not allowed to be connected with another electronics or
connected with a fixed voltage (e.g. GND).
For the potentiometer four male pcb connectors with 3 pins (GND, slider, +5V) are available. Suitable
female connectors with assembled cables can be connected to these pin headers (not included with the
CTM64).
CTM64 is equipped with MIDI In and MIDI Out. The incoming MIDI messages are merged to the data
generated by the CTM64. In this way several CTM64 can be linked together (e.g. 3 CTM64 required
for 2 keyboards with 61 keys and one basepedal with 32 keys, or switch boards with more than 64
switches).
CTM64 is available only as an assembled and tested pc board. The pc board measures are about 90
x 105 mm. Four mounting holes with 3 mm diameter are available for mounting the pc board to a
suitable base e.g. with distance sleeves or spacers and screws.
The configuration of CTM64 (i.e. MIDI channel, mode, note offset and so on) is made by the customer
with 8 jumpers - as described above.
page 4
CTM64 Version 4 - User's Guide
We do not offer a suitable housing as the CTM64 is normally installed into the housing of the keyboard
or switch board. An external power supply (7-12VDC@min. 250mA) is required. It is included with the
CTM64 only within Germany. In other countries the external power supply has to be ordered
additionally by the local dealer if necessary.
We offer a suitable connector set for the CTM64 (25.00 Euro in Germany, i.e. about 30.00 US$). This
includes four 16 pin flat cables with 16 pin socket connectors (female) pressed to the cables at one end
(length about 50cm) and four 3 pin female connectors with assembled cables for the potentiometers
(length about 30cm, potentiometers are not included). We also offer a suitable power supply (mains
input: 90-240VAC with European type connector, output: 9V DC/800mA) with CE and VDE approval
(20.00 Euro in Germany, i.e. about 25.00US$).
Installation of the CTM64 requires some electrical/electronical knowledge by the user. Please leave the
installation of CTM64 to an expert if you are not familiar with electronics. We take back only CTM64
modules in the original state, i.e. without solder residues, without scratches and so on.
The counterpart to CTM64 (MTC64) that converts 64 succeeding note messages into 64 0/+5V signals
is planned for early in 2001. With suitable drivers relays, lamps or electromagnetic valves can be
controlled via MIDI.
Please pay attention to the warranty notes on page 1. Ignoring these notes causes warranty loss and
the right to return the goods.
CTM64 Version 4 - User's Guide
Page 5
Connections
(11)
common
connector
(JP6)
(1)
power supply
7-12V/
100mA DC
(BU3)
(10)
contact
49-64
(2)
MIDI IN
(BU1)
(3)
MIDI OUT
(BU2)
(4)
control
LED
(D68)
(12)
jumper
1-8
(JP5)
(10)
contact
33-48
1
2
3
4
5
6
7
8
(10)
contact
17-32
(10)
contact
1-16
(5)
sustain
(BU4)
(6) (7) (8) (9)
potentiometer connectors for
pitch bend, modulation,
volume and after touch
(ST1, ST2, ST3,ST4)
page 6
+5V
GND
CTM64 Version 4 - User's Guide
Power supply (1)
The CTM64 does not have a built-in power supply. Instead it uses a plug-in type external power supply
(AC adapter). One reason for this feature is electrical safety. Keeping danger voltages (main) out of the
CTM64 increases the electrical safety. Therefore an external power supply of high quality and safety
should be used. If the keyboard is used in Germany the external power supply has to be VDE
approved. Another reason for the external power supply is the fact that line voltages and plug types
vary considerably from country to country. Using a plug-in external supply the CTM64 can be used any
where with a locally purchased power supply, thus keeping the retail price down.
The power supply must be able to deliver 7-12 VDC unstabilized voltage, as well as a minimum current
of 100mA. The CTM64 is switched ON by plugging the AC adapter into a wall outlet and connecting it
to the appropriate jack on the CTM64 board. There is no separate ON/OFF switch. If the polarity of the
power supply is incorrect, the CTM64 will not function. However, there is no danger of damage to the
circuitry since it is protected by a diode. The correct polarity is: outside ring = GND, inside lead =
+7...12V. The power supply is not included with the CTM64 and has to be purchased separately.
Midi Out (3)
Connect the MIDI-OUT jack with MIDI-IN of the device(s) to be controlled (i.e. Expander, Sequencer,
Synthesizer, etc. or a second CTM64) via a suitable MIDI-cable. If you want to control more than one
MIDI device you have to use daisy chain MIDI THRU/MIDI IN connection of the devices ore use a
external MIDI THRU BOX.
Midi In (2)
The CTM64 features a MIDI input. This input may be connected to another MIDI device. The incoming
MIDI data are merged to the data generated by the CTM64. At the first place the MIDI input is used for
daisy-chaining several CTM64. The MIDI input of CTM64 is not suitable for large amounts of MIDI data
(e.g. SysEx strings or MIDI messages coming from an computer sequencer) as the MIDI in buffer is
only 48 bytes. In case of large amounts of incoming MIDI messages data loss or delay may occur. If the
merge feature of the CTM64 is not required the MIDI input may be left open.
Control LED (4)
The LED is used to display any MIDI out activity. After power on the LED is permanently on. As soon
as a MIDI out event occurs the LED turns off for a short time thus indicating MIDI activity.
Sustain (5)
The ¼" jack socket is used to connect a foot switch for the MIDI sustain function (MIDI controller #64).
Do not connect the footswitch unless the CTM64 is switched OFF. While power on the CTM64
electronics checks the level of the foot switch and assumes that this level is the "off" state. So do not
operate the foot switch while turning power on. This feature allows the use of foot switches with
contacts open at rest as well as those closed at rest. The foot switch is not included with the CTM64
and has to be ordered separately if required (e.g. the VFP2). The CTM64 will work without the foot
switch, although the function Sustain will not be available in that case.
CTM64 Version 4 - User's Guide
Page 7
Potentiometer connectors (6,7,8,9)
The four 3-pin connectors (6,7,8,9) are used to connect up to four potentiometers (rotary
potentiometers, faders, wheels). The middle pin of each connector is the slider pin (or control voltage
pin), the left one is GND, the right one is +5V. As the potentiometers are used as voltage dividers the
resistance value of the potentiometer is not critical. Any value between about 5kOhm and 250kOhm will
work without problems (linear response recommended).
The additionally available CTM64 connector set includes 4 suitable female connectors with assembled
cables to connect the potentiometers (length about 30cm, potentiometers are not included).
The four connectors are assigned to the following MIDI events:
•
•
•
•
ST1
ST2
ST3
ST4
pitch bend (with middle plateau around MIDI data 64)
modulation (MIDI controller #1)
volume (MIDI controller #7)
monophonic after touch
The actual control voltage range used for ST1 and ST2 is 0... +2.5V. 0V corresponds to MIDI data 0,
+1.25V corresponds to MIDI data 64 (middle position) and +2.5V corresponds to MIDI data 127. This
voltage range was chosen as in case of wheel potentiometers usually not the whole rotation angle is
available but only about 50%. If the full voltage range 0...+5V would be used the wheels could not cover
the complete MIDI data range 0...127 but only a small fraction (e.g. 30...100). If a standard
potentiometer with whole rotation angle is used a pre-resistor with the same value as the potentiometer
should be used (see appendix: "connection sketch" for details) to obtain a control voltage range of
0...+2.5V. For pitch bend there is a small plateau around +1.25V (MIDI data 64) so that it is easier to
find the neutral position of the pitch bender. For most of the spring-loaded pitch bend wheels this
plateau is required as the mechanical neutral position sligthly differs depending on the resetting
direction.
The control voltage range for ST3 and ST4 is 0 ... +5V. 0V corresponds to MIDI data 0, +2.5V
corresponds to MIDI data 64, +5V corresponds to MIDI data 127. This voltage range was chosen as for
these controls usually standard potentiometers with the whole rotation angle are used.
Unused potentiometer connectors have to be jumpered to GND (factory setting). Senseless MIDI data
will be sent if one of the potentiometer connectors is left open. If a potentiometer connector is not used
it has to be jumpered to GND, i.e. a jumper has to be installed in the left position (in direction to the 1/4"
jack socket).
The resistor values for the potentiometers used should be in the range of about 5k...250k. Instead of
the usage of potentiometers also control voltages may be applied to the middle pins of ST1...4 provided
that the applied voltages are in the range of 0....+5V.
Attention: Negative control voltages (< 0V) or voltages higher than +5V applied to middle pins of
ST1...4 will destroy the CTM64 ! Please pay attention to the warranty notes on page 1. Ignoring these
notes causes warranty loss and the right to return the goods.
The scan rate for the potentiometers (i.e. how often a new value is transmitted via MIDI out) is fixed to a
suitable value so that each control change is recognized very fast but the MIDI line is not blocked by
too many data. From our experience many MIDI devices would have problems to process the incoming
MIDI data in case of a too high scan rate.
We are planning an additional small hardware that converts voltages beeing not in the required range
to the necessary 0...+2.5V range (e.g. +2...+4V → 0...2.5V). Please ask if you are interested in this
supplement board to CTM64. It will probably be available early in 2001 and consists of a small pc board
with 2 trimming potentiometers that are used to adjust voltage offset and scale/amplification. One side
of the board will be connected to ST1 (or ST2), the other side to the controller that outputs the voltage
range.
page 8
CTM64 Version 4 - User's Guide
Contact 1-64 (10) and Common (11)
The 64 contacts are connected to four double row pin headers with 16 pins each. 16 pin socketconnectors (female) with flat cable can be connected to these pin headers (not included with the
CTM64). Additionally there is one common pin (11) for all contacts. Pay attention that only free contacts
can be used. This means that the contacts are not allowed to be connected with another electronics or
connected with a fixed voltage (e.g. GND).
The cable length has to be limited to a certain value. In accordance to the characteristics of the cable in
use capacitive and inductive effects deform the signal of the pulses that are used to detect a closed or
open contact on the common line (11). In this case closed contacts are no longer recognized or
accidentally only. From our experience cables up to 50 cm do not cause problems. For length between
50 cm and 2 m it depends upon the cable characteristics if the CTM64 will work as it should. Cables
longer than 2 m should be avoided. If long cables are essential relays have to be used. The relays are
located close to the CTM64 and the relay contacts are connected to the CTM64 like normal contacts.
Please pay attention to the warranty notes on page 1. Ignoring these notes causes warranty loss and
the right to return the goods.
Two different modes are available for the contacts: note on/off or program change. In the note
mode closing of a contact generates the corresponding MIDI note on message, opening generates note
off - both without velocity (velocity is fixed to 127). In the program change mode closing of a contact
leads to the corresponding MIDI program change message.
Jumpers 1-8 (12)
The CTM64 configuration (MIDI channel, mode, note offset) is defined with 8 jumpers. The jumpers are
put on the double row pin header JP5.
The jumpers 1-4 (next to the control LED) are used to set the MIDI channel.
Jumper 5 defines the mode (note or programm change).
In note mode the jumper 8 is used to select the note offset, i.e. the MIDI note number assigned to the
first contact (= contact no 1). Two different settings are possible: 0 or 36. 0 is the lowest note than can
be generated with MIDI. 36 is the lowest "C" on a standard 5 octave keyboard. Additionally the
jumpers 6 and 7 can be used to transpose one octave up or down (±12 semi tones). Instead of the
jumpers 6 and 7 also a toggle switch with middle position (1-0-1 type) can be used. In this case the
terminals of the switch are connected to the corresponding pins of the double row pin header JP5.
Consequently the note offsets 0, 12, 24, 36 and 48 are available. In case that another note offset is
required the contacts are displaced correspondingly and the unused contact terminals are left free. If for
example a note offset 41 is required the note offset 36 is selected and the terminals 1-5 (corresponding
to the note numbers 36-40) are left open and the first contact is connected to terminal 6 (corresponding
to note number 41).
When the program change mode is selected the closing of a contact causes the transmission of a
MIDI program change message on the selected MIDI channel. In this mode jumper 8 sets the program
change offset to 0 or 64. Using two daisy-chained CTM64 with 64 buttons each the complete program
number range 0...127 is available. It is also possible to use a toggle switch instead of jumper 8 to
switch between the program number areas 0-63 and 64-127. The jumpers 6 and 7 have no function in
the program change mode.
Pay attention that there are 2 ways of counting of the program numbers: "1-128" or "0-127". If the
counting mode "1-128" is used one has to subtract "1" to obtain the corresponding program change
number in the counting mode "0-127". It depends upon the manufacturer of a MIDI device (synthesizer,
expander, sampler ...) if the counting "1-128" or "0-127" is used.
CTM64 Version 4 - User's Guide
Page 9
Operation
CTM64 is switched ON by plugging the AC adapter into a wall outlet and connecting it to the
appropriate jack (1) on CTM64 pc board. There is no separate ON/OFF switch.
After power on the LED on the CTM64 will light up. Otherwise the AC adapter used is not suitable, has
the wrong polarity or does not work.
Now the CTM64 electronics is permanently checking out the following:
• if one of the 64 contacts is connected to the common pin (JP6) the corresponding MIDI message is
transmitted to MIDI Out (note or program change)
• if one of the potentiometers is turned the corresponding MIDI message is transmitted to MIDI Out
(pitch bend, modulation, volume or after touch)
• if the position of the sustain pedal connected to the jack socket is changed the corresponding MIDI
message is transmitted to MIDI Out
• if the setting of one of the jumpers (1-8) is changed the corresponding parameter (MIDI channel,
mode, offset/transpose) is changed
• if a MIDI message appears at MIDI In the message is transmitted to MIDI Out and merged with the
MIDI data of CTM64
It is possible to use switches or buttons instead of the jumpers 1-8. E.g. a hexadecimal coded rotary
switch can be used to select the MIDI channel, or toggle switches can be used as octave switch, offset
switch or mode switch.
If note mode is selected one has to pay attention that none of the 64 contacts is closed while MIDI
channel or offset/transpose is altered ! In this case the note off event (when opening the contact) would
be transmitted on another MIDI channel or note than the preceding note on event thus leading to
suspending notes !
Detailed function of the 8 jumpers of JP5
Midi channel (jumper 1,2,3,4)
jumper
1
2
3
4
jumper
1
2
3
4
channel
1
jumper
1
2
3
4
jumper
1
2
3
4
channel
9
channel
5
channel
13
jumper
1
2
3
4
jumper
1
2
3
4
channel
2
jumper
1
2
3
4
jumper
1
2
3
4
channel
10
channel
6
channel
14
jumper
1
2
3
4
jumper
1
2
3
4
channel
3
jumper
1
2
3
4
jumper
1
2
3
4
channel
11
channel
7
channel
15
jumper
1
2
3
4
jumper
1
2
3
4
channel
4
jumper
1
2
3
4
jumper
1
2
3
4
channel
12
channel
8
channel
16
If a jumper is set the corresponding number is printed bold. E.g. for MIDI channel 1 all jumpers 1-4
have to be installed. This is the factory setting.
page 10
CTM64 Version 4 - User's Guide
Mode (jumper 5)
Jumper 5 installed:
Jumper 5 removed:
note mode (factory setting)
program change mode
Note/program offset (jumper 8)
Jumper 8 installed:
Jumper 8 removed:
offset = 0 (factory setting)
offset=36 (in note mode), resp. 64 (in program mode)
Octave offset (jumper 6/7, working only in note mode )
Jumper 6 installed:
Jumper 6 removed:
Jumper 7 installed:
Jumper 7 removed:
offset = - 12 semitones (minus one octave) (factory setting)
offset = 0 (no transposition)
offset = + 12 semitones (plus one octave) (factory setting)
offset = 0 (no transposition)
If both jumpers are installed there is no transposition (+12-12 = 0).
Control LED (4)
The LED is used to display any MIDI out activity. After power on the LED is permanently on. As soon
as a MIDI out event occurs the LED turns off for a short time thus indicating MIDI activity.
Factory setting of the jumpers
In the factory all jumpers of JP5 are installed. This means: MIDI channel 1, note mode, offset = 0, no
transpose ( +12 - 12 = 0). The potentiometer connectors ST1...ST4 are equipped with jumpers too so
that the inputs are connected to GND (i.e. no function).
CTM64 Version 4 - User's Guide
Page 11
Check list
In case that your CTM64 installation does not work at the first go please check the following points:
• Is the power supply working correctly ? After power on the LED has to be on ! Otherwise the AC
adapter used is not suitable, has the wrong polarity or does not work. The correct polarity is: outside
ring = GND, inside lead = +7...12V.
• Is the control LED flickering if one of the contacts is closed/opened or one of the potentiometers is
operated ? It is very easy to simulate the contacts in the testing state by connecting one end of a
wire to the common pin (JP6) and touch one or more of the contact pins 1...64 with the other end of
the wire. The corresponding MIDI note or program changes messages should appear at the MIDI
output of the CTM64 and the LED should flicker.
• Is the control LED flickering if incoming MIDI messages appear at the MIDI In of MTC64 ? (this
check required only if MIDI In of CTM64 is used)
• Are the MIDI connections between CTM64 and the other MIDI devices installed correctly ? MIDI Out
of CTM64 has to be connected to MIDI In of the MIDI device controlled by CTM64. Especially when
computers are used MIDI In and Out are very often mixed up by the user. Once again: MIDI Out →
MIDI In (not MIDI Out → MIDI Out and not MIDI In → MIDI In). Please use only cables that are
suitable for MIDI.
• Are the right MIDI cannels selected (same for CTM64 and the device controlled by CTM64)
• Is the right note range selected ?
page 12
CTM64 Version 4 - User's Guide
Appendix: Connection sketch
common lead for
all contacts
64
49
48
33
32
17
16
1
+5V
+5V
+2.5V
16 pin female
connectors with
pressed 16 pin
flat cable
contact
number
GND
GND
potentiometer wiring for
ST1 and ST2
potentiometer wiring for
ST3 and ST4
resistor values for the potentiometers about 5k...250k (linear)
CTM64 Version 4 - User's Guide
Page 13
MTC64
The counterpart to CTM64 that converts 64 succeeding note messages into 64 0/+5V (TTL type)
signals is called MTC64 (MIDI To Contact/Gate). With suitable drivers it is possible to control relays,
lamps, electromagnets, electromagnetic valves, motors, dimmer packs or switch packs and so on via
MIDI. The ideal control unit for the MTC64 is the CTM64. Closing a contact connected to CTM64 (e.g.
buttons) leads to activate the corresponding element (e.g. lamp or electromagnet) via MTC64. It is also
possible to record the CTM64/MTC64 activities with a computer sequencer so that the complete course
of events can be recorded.
page 14
CTM64 Version 4 - User's Guide
Additional jumpers for pcb version 4
For version of the CTM64 e few more jumpers are available. The sketch below shows the position of
these additional jumpers.
64 note offset
GND
normal/toggle operation
normal/inverted
operation
+5V
The pin header JP7 is located near the LED between the MIDI out socket (BU2) and the foot switch
socket (BU4). The upper jumper of JP7 (next to the LED) is relevant only in the note mode:
64 note offset
•
•
Jumper installed:
Jumper removed:
note offset as described above in this manual (factory setting)
note offset = 64
The jumper has no meaning in the program change mode. This new feature was added to cover all 128
MIDI note values 0...127 with two daisy-chained CTM64 (e.g. for remote control of certain programs,
e.g. for Ableton Live).
The lower jumper of JP7 has this meaning:
Normal / Inverted operation
•
•
Jumper installed:
normal mode, i.e. closing a contact generates a Midi note on message,
opening a contact generates a Midi note off messaged (factory setting)
Jumper removed:
inverted mode, i.e. closing a contact generates a Midi note off message,
opening a contact generates a Midi note on (application example: "laser harp" with photo diodes or
light depending resistors)
Attention ! In this mode 64 note on messages are sent immediatly after power on if no (closed)
contacts are connected ! This may cause problems with Midi devices that have only small Midi input
buffers ! Even computers may have a problem with that and cause an Midi buffer overrun. Unused
inputs have to be connected to the common lead (JP6). Otherwise hanging notes will appear for
these terminals.
CTM64 Version 4 - User's Guide
Page 15
Another pin header labelled JP8 is located right to the main processor. The jumper installed to JP8 has
this meaning:
Normal / Toggle operation
•
•
Jumper installed in upper position (GND, towards the XTAL):
Jumper installed in lower position (+5V)
normal mode (factory setting)
toggle mode
When the toggle mode is selected the CTM64 transmits alternately note on and note off at each closing
of the contact (opening the contact has no meaning in this mode). This can be used to realize a toggle
switch e.g. in Ableton Live).
Control Change mode
When two resistors are installed to JP8 instead of a jumper the control change mode can be selected.
In this mode the CTM64 transmits Midi control change messages instead of note or program change
messages. The resistors work as a voltage divider and generate certain voltages that are used by the
CTM64 firmware to select the control change mode:
• 10KOhm from center pin to GND / 20kOhm from center pin to +5V: Control change mode normal
• 10KOhm from center pin to +5V / 20kOhm from center pin to GND: Control change mode toggle
For the control change messages the same parameters as for the note messages are taken (i.e. the
note number corresponds to the control change number).
Remark: The state of JP8 is checked only once during power on. It is not possible to change the
operation modes defined by JP8 during operation !
CTM64 Button Board and Front Panel
As an addition to the CTM64 main board a button board with 64 momentary switches is
available. The switches are arranged as an 8 x 8 matrix. The connection between the CTM64
main board and the button board is established by four 16-pin ribbon cables. In addition the
common connector JP6 of the main board has to be wired to one of the corresponding pins of
the button board (only one of the three pins of the button board is used for this). Even any kind
of single-pole connector can be used for this connection to enable a separation of the two
boards without soldering.
common
connectors
(only one is wired
to JP6 of the main
board)
CTM64 Version 4 - User's Guide
Page 17
Even a suitable front panel is available. The panel is punched matching to the 64 buttons and
four mounting screws. The pc board is mounted to the front panel by means of four M2.5
counter-sunk screws, distance bolts and nuts. The measure of the front panel is compatible to
the 19 inch standard: 3 U height (128,5 mm) and 20 HP width (101,3 mm). The front panel is
not printed but labels with the numbers 1-64 and 65-128 are delivered. The front panel can be
mounted e.g. into one of the frames of the Analog Modular System A-100, even into the A-100
Miniature Case (A-100MC).
CTM64 Relay Board
Another addition to the CTM64 main board is the CTM relay board. This boards contains 16
reed relays and allows the control of the CTM64 via a large distance (we tested up to 100 m).
Up to four relay boards can be connected to one CTM64 main board. Simple 2-pole wires that
have to be shortened at their ends (e.g. by momentary switches) are used to control the
CTM64.
For the CTM64 Relay Board a separate user's guide is available.
CTM64 Version 4 - User's Guide
Page 19
Doepfer
Musikelektronik
www.doepfer.com
© 2008 by Doepfer Musikelektronik