1
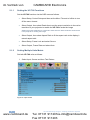
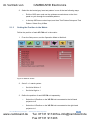
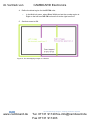
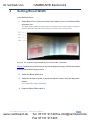
im Vertrieb von CAMBOARD Electronics K R A ME R E LE CT R O N IC S L T D . USER GUIDE MODEL: VP-790 Blending Projected Images on a Curved Screen P/N: 2900-300214 Rev 1 www.camboard.de Tel. 07131 [email protected] Fax 07131 911203 im Vertrieb von CAMBOARD Electronics Contents 1 Introduction 1 2 2.1 Setting the Basic System Optical Alignment 2 3 3 Setting Blend Width 4 4.1 Warp Adjustment Warp the Projection Image on to a Curved Screen 7 10 10 Figures Figure 1: Basic Setup Figure 2: Image Projection Figure 3: Input Screen Figure 4: Multiunit Screen Figure 5: Two Overlapping Images on a Screen Figure 6: Two Projected Images Displaying the Horizontal Bar Test Pattern Figure 7: Left Hand Blend Width Correctly Adjusted Figure 8: Blend Width Correctly Adjusted on both Scalers Figure 9: The Cross Hatch (F) Warp Pattern Figure 10: VP-790 Warp Generator Main Window Figure 11: Auto Connect Window Figure 12: Connect to Unit Window Figure 13: A New 2x2 Grid Figure 14: Setting a Grid Mesh of Nine Points Figure 15: Setting the Warp Figure 16: Adjusting the Linearity Figure 17: Complete Linear Adjustment Figure 18: Blend Curve Type – S-Curve 2 3 4 5 6 7 8 9 10 11 12 12 12 13 13 14 15 15 VP-790 Blending Images – Introduction i U U U U U U U U U U U U U U U U U U U U U U U U U U U U U U U U U U U U www.camboard.de Tel. 07131 [email protected] Fax 07131 911203 im Vertrieb von 1 CAMBOARD Electronics Introduction Welcome to Kramer Electronics! Since 1981, Kramer Electronics has been providing a world of unique, creative, and affordable solutions to the vast range of problems that confront the video, audio, presentation, and broadcasting professional on a daily basis. In recent years, we have redesigned and upgraded most of our line, making the best even better! Our 1,000-plus different models now appear in 11 groups that are clearly defined by function: GROUP 1: Distribution Amplifiers; GROUP 2: Switchers and Routers; GROUP 3: Control Systems; GROUP 4: Format/Standards Converters; GROUP 5: Range Extenders and Repeaters; GROUP 6: Specialty AV Products; GROUP 7: Scan Converters and Scalers; GROUP 8: Cables and Connectors; GROUP 9: Room Connectivity; GROUP 10: Accessories and Rack Adapters and GROUP 11: Sierra Products. This online guide describes how to blend two projected images accurately onto a curved screen via the Kramer VP-790 Warp Generator application software. VP-790 Blending Images – Introduction www.camboard.de 1 Tel. 07131 [email protected] Fax 07131 911203 im Vertrieb von 2 CAMBOARD Electronics Setting the Basic System The basic system, illustrated in Figure 1, shows a video source distributed to two VP-790 units and output to two identical projectors. Figure 1: Basic Setup i One video source is distributed to both VP-790 units via a distribution amplifier (for example, the Kramer VM-2Hxl). Each VP-790 unit outputs the signal to a separate projector. To successfully blend two or more projections: 2 • Each projector should be of the same manufacture and of the same model • The projector lamps should be of the same age • DLP color wheels should be designed for video • The ‘dynamic gamma’ and ‘dynamic contrast’ applications should be set to off www.camboard.de VP-790 Blending Images - Setting the Basic System Tel. 07131 [email protected] Fax 07131 911203 im Vertrieb von 2.1 CAMBOARD Electronics Optical Alignment 4B Figure 2 shows an example of the two 4:3 projectors being used to project a single U U 16:9 image. Figure 2: Image Projection Set the projectors so that the light from both projectors covers the whole screen area. Use the VP-790 built-in test patterns to adjust the position, zoom and focus of both projectors. VP-790 Blending Images – Setting the Basic System www.camboard.de 3 Tel. 07131 [email protected] Fax 07131 911203 im Vertrieb von 2.1.1 CAMBOARD Electronics Setting the VP-790 Functions Set the VP-790 functions via the OSD menu as follows: • Select Setup, Control Setup and then set the Menu Timeout to Infinite to turn off the menu timeout • Select Output, then select Resolution to set the output resolution to the native resolution of your projector to enable the VP-790 to scale the image Setting the output resolution to a resolution other than the native resolution would result in the projector re-scaling the image! • Select Output, then select Aspect Ratio to fit the aspect ratio to the display’s natural aspect ratio 2.1.2 • Select Setup, Frame Lock and select Source • Select Output, Frame Rate and select Auto Setting Multiple Units Matrix Set both VP-790 units as follows: 1. Select Input, Source and then Test Pattern. Figure 3: Input Screen 4 www.camboard.de VP-790 Blending Images - Setting the Basic System Tel. 07131 [email protected] Fax 07131 911203 im Vertrieb von CAMBOARD Electronics 2. Select the horizontal grey bars test pattern in one of the two following ways: Exit the OSD menu and use the up/down arrow buttons on the front panel to cycle through the available patterns In the top OSD menu select Input, and then Test Pattern Setup and Test Pattern. Select Grey H Bars 2.1.3 Setting the Position in the Matrix 8B Define the position of each VP-790 unit in the matrix: 1. From the Setup menu, set the Operation Mode to Multiunit. Figure 4: Multiunit Screen 2. Set a 2 x 1 matrix system: Set Units Wide to 2 Set Units High to 1 3. Define the position of each VP-790 unit separately: Select the H-Position on the VP-790 unit connected to the left hand projector to 0 Select the H-Position on the VP-790 unit connected to the right hand projector to 1 VP-790 Blending Images – Setting the Basic System www.camboard.de 5 Tel. 07131 [email protected] Fax 07131 911203 im Vertrieb von CAMBOARD Electronics 4. Define the blend region for the VP-790 units: In the Multiunit menu, select Blend Width and set the overlap region to Right on the left hand VP-790 unit and Left to the right hand unit 5. Set Auto zoom to ON. Figure 5: Two Overlapping Images on a Screen 6 www.camboard.de VP-790 Blending Images - Setting the Basic System Tel. 07131 [email protected] Fax 07131 911203 im Vertrieb von 3 CAMBOARD Electronics Setting Blend Width In the Multiunit menu: 1. Select Blend Curve Type and select Align Pattern to turn on the Blend Width alignment tool. The align pattern displays a sharp border of the blend and non-blend regions, making it easier to determine the width of the blend and control of the 4-corner set-up. Figure 6: Two Projected Images Displaying the Horizontal Bar Test Pattern Figure 6 shows two projections side-by-side displaying the grey H Bars test pattern U U with the Blend Width alignment tool. 2. Select the Blend Width item. 3. Adjust the number of pixels to equal the optical overlap, using the alignment pattern. The default blend width is 200 pixels 4. Keep the Blend Offset value 0. VP-790 Blending Images – Setting Blend Width www.camboard.de 7 Tel. 07131 [email protected] Fax 07131 911203 im Vertrieb von CAMBOARD Electronics The two vertical lighter stripes near the center of the screen are the blend width alignment tool. This is a visible cursor which will move as the blend width is adjusted: • Line 1 is the left hand edge of the right hand projection • Line 2 is the right hand edge of the left projection blend region • Line 3 is the left hand edge of the right projection’s blend region • Line 4 is the right hand edge of the left hand projection With reference to Figure 6 above on page 7, adjust line 3 to meet line 1 and adjust line 2 to meet line 4. This adjusts the blend width of each projector so that the shadowed alignment area is equal to the optical overlap. Figure 7 shows the left hand blend width correctly adjusted: Figure 7: Left Hand Blend Width Correctly Adjusted Figure 8 shows the view when the blend widths on both Scalers are adjusted correctly. 8 www.camboard.de VP-790 Blending Images - Setting Blend Width Tel. 07131 [email protected] Fax 07131 911203 im Vertrieb von CAMBOARD Electronics Figure 8: Blend Width Correctly Adjusted on both Scalers i You must set the number of blend width pixels to the same number for both processors. The blend will work properly even if the lines in Figure 8 do not align completely and even if the lines do not exactly match the overlap for one projector this just indicates that the optical zoom of the projectors is not matched. U U VP-790 Blending Images – Setting Blend Width www.camboard.de 9 Tel. 07131 [email protected] Fax 07131 911203 im Vertrieb von 4 CAMBOARD Electronics Warp Adjustment The images from both processors/projectors must be geometrically corrected to fit the screen and the overlapped regions must be set to align accurately. This is achieved by warping (changing the shape) the image. 1. Change the test pattern to the Warp Adjust (F) pattern. The left hand pattern is green and the right hand pattern is magenta intentionally. Figure 9: The Cross Hatch (F) Warp Pattern The color is set automatically when the position information is entered. The alternating colors help in two ways: • To clearly see each projection separately • When the geometry adjustment is complete, the parts of the pattern in the overlapping blend region will be super-imposed and appear white Inaccurate adjustment can be clearly seen as a colored fringe around the white. 4.1 Warp the Projection Image on to a Curved Screen For curved and irregular shaped screens, use the VP-790 Warp Generator application which calculates warp maps to be uploaded to memories built-in to the VP-790. 10 www.camboard.de VP-790 Blending Images - Warp Adjustment Tel. 07131 [email protected] Fax 07131 911203 im Vertrieb von 4.1.1 CAMBOARD Electronics Downloading and Installing the Warp Generator 9B i To download, install and use the VP-790 Warp Generator software, refer to the VP-790 Warp Generator online guide. Connect your PC to both VP-790 units via a LAN connection (refer to the VP-790 Warp Generator online guide); use a change-over cable to connect to one unit at a time or use both at once via an Ethernet switch or network. Double-click the VP-790 Warp Generator icon. The main window opens. This section defines the Warp Generator main window: Figure 10: VP-790 Warp Generator Main Window VP-790 Blending Images – Warp Adjustment www.camboard.de 11 Tel. 07131 [email protected] Fax 07131 911203 im Vertrieb von CAMBOARD Electronics 2. Click the Connect button on the top left corner of the screen. One of two connection windows appears: The Auto Connect window to reconnect to a previously connected unit (see Figure 11) The Connect to Unit window if you need to enter a new IP address (see Figure 12) Figure 11: Auto Connect Window Figure 12: Connect to Unit Window 3. Connect to the unit. The following window appears: Figure 13: A New 2x2 Grid 12 www.camboard.de VP-790 Blending Images - Warp Adjustment Tel. 07131 [email protected] Fax 07131 911203 im Vertrieb von CAMBOARD Electronics 4. Resample the grid to start with a grid mesh of nine points. Figure 14: Setting a Grid Mesh of Nine Points 5. Check the Mirror and Snap boxes in the Evaluator Control window to turn them off. 6. Adjust the position of the nodes with either the mouse or the arrow keys to a position that will bring the test pattern correctly onto your screen. 7. Click the SEND button and wait for the result to be seen on the screen and the comment Warp Success to appear in the Send Warp area. Figure 15: Setting the Warp VP-790 Blending Images – Warp Adjustment www.camboard.de 13 Tel. 07131 [email protected] Fax 07131 911203 im Vertrieb von CAMBOARD Electronics Note that in the example in Figure 15, the size and shape of the squares are not even across the whole screen. The linearity needs adjustment. Linearity is achieved by adjusting the center positions as indicated in Figure 16. Note the relative sizes of the red rectangles, these should be equal sizes. If they are not equal as in the example below the linearity will be poor. Figure 16: Adjusting the Linearity Continue the adjustment looking to achieve an even size of test pattern squares across the whole screen and the overlapping area as closely aligned as possible. When the Green and Magenta Test pattern lines are correctly over-laid, their combined colors turn white (see Figure 17). i 14 Increase the number of nodes to give a more detailed adjustment only when you have made all the adjustments you can with the coarse setting. www.camboard.de VP-790 Blending Images - Warp Adjustment Tel. 07131 [email protected] Fax 07131 911203 im Vertrieb von CAMBOARD Electronics Figure 17: Complete Linear Adjustment 8. In the Multiunit OSD menu switch the Blend Curve Type to S-Curve. Figure 18: Blend Curve Type – S-Curve 9. Select the video source (via the Input OSD menu item) on both VP-790 units. VP-790 Blending Images – Warp Adjustment www.camboard.de 15 Tel. 07131 [email protected] Fax 07131 911203