1
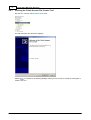
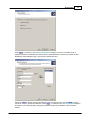
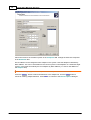
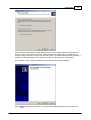
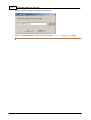
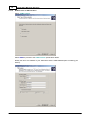
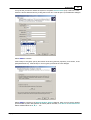
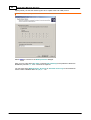
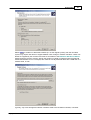
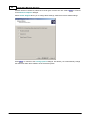
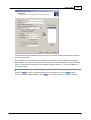
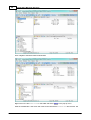
CBMR
Cristie Bare Machine Recovery
Automated Disaster Recovery User Guide
For Windows
April 2013
Version 6.5
Cristie Softw are Ltd.
New Mill
Chestnut Lane
Stroud GL5 3EH
United Kingdom
Tel:+44(0)1453 847000
Fax:+44(0)1453 847001
[email protected]
Cristie Data Products GmbH
Nordring 53-55
Cristie Nordic AB
Gamla Värmdövägen 4
63843 Niedernberg
Germany
Tel: +49 (0) 60 28/97 95-0
Fax: +49 (0) 60 28/97 95 7-99
[email protected]
SE-131 37 Nacka
Sw eden
Tel:+46(0)8 718 43 30
Fax:+46(0)8 718 53 40
[email protected]
Copyright © 1998-2013 Cristie Software Ltd.
All rights reserved.
The software contains proprietary information of Cristie Software Ltd.; it is provided under a license agreement
containing restrictions on use and disclosure and is also protected by copyright law. Reverse engineering of the
software is prohibited.
Due to continued product development this information may change without notice. The information and intellectual
property contained herein is confidential between Cristie Software Ltd. and the client and remains the exclusive
property of Cristie Software Ltd. If you find any problems in the documentation, please report them to us in writing.
Cristie Software Ltd. does not warrant that this document is error-free.
No part of this publication may be reproduced, stored in a retrieval system, or transmitted in any form or by any
means, electronic, mechanical, photocopying, recording or otherwise without the prior written permission of Cristie
Software Ltd.
IBM Tivoli Storage Manager (TSM), AIX and TIVOLI are trademarks of the IBM Corporation.
NetWorker and Avamar are trademarks of the EMC Corporation.
Cristie Management Console (CMC), PC-BaX, UBax, Cristie Storage Manager (CSM), SDB, ABMR (Bare Machine
Recovery for EMC Avamar), NBMR (Bare Machine Recovery for EMC NetWorker), TBMR (Bare Machine Recovery for
TSM), CBMR (Cristie Bare Machine Recovery), CloneManager and CRISP (Cristie Recovery ISO Producer) are all
trademarks of Cristie Software Ltd.
Cristie Software Ltd
New Mill
Chestnut Lane
Stroud
GL5 3EH
UK
Tel: +44 (0) 1453 847000
Email: [email protected]
Website: http://www.cristie.com
Contents
3
Contents
1
Introduction
4
1.1 Document
...................................................................................................................................
conventions
4
2
Preparation
2.1
2.2
2.3
2.4
5
Install
...................................................................................................................................
CBMR
5
Create
...................................................................................................................................
System Configuration
5
Create
...................................................................................................................................
System Backup
5
Create
...................................................................................................................................
Answer File For Automated DR
5
Cristie Answ er File Creator Tool
6
2.4.1 Running the.........................................................................................................................................................
Restore From
..................................................................................................................................................
a File Location
9
Restore From
..................................................................................................................................................
a TSM Location
18
2.5 Prepare
...................................................................................................................................
Boot Media For Automated Recovery
27
Custom
ise
.........................................................................................................................................................
Boot
Media
For
AutoBoot
27
2.5.1
Window s PE
..................................................................................................................................................
2
27
Add
Answ
.........................................................................................................................................................
er
File
To
Product
ISO
Root
Folder
29
2.5.2
Add
Answ
.........................................................................................................................................................
er
File
to
Boot
Im
age
Root
Folder
31
2.5.3
Window s PE
..................................................................................................................................................
2
31
3
Recovery
34
3.1 Boot
...................................................................................................................................
Recovery Environment
34
.........................................................................................................................................................
In CD/DVD Im age
34
3.1.1 Answ er File
.........................................................................................................................................................
On Rem ovable Device
34
3.1.2 Answ er File
3.2 Check
...................................................................................................................................
Result Of Recovery
35
4
Cristie Technical Support
Copyright © 1998-2013 Cristie Software Ltd.
36
4
1
Cristie Bare Machine Recovery
Introduction
This document describes how to configure and run automated disaster recoveries in conjunction with
one of the Cristie range of bare machine disaster recovery products; CBMR in this case.
The steps required to prepare for automated Disaster Recovery (DR) are as follows:
1.
2.
3.
4.
5.
Install the CBMR product
Create the system configuration
Create a system backup
Create an automated DR answer file
Optionally inject the answer file into the DR recovery environment or copy to a Windows
compatible removable device (e.g. USB disk)
The steps required to run an automated DR are as follows:
1. If the DR answer file is located on a removable device, ensure it is connected to the recovery
machine
2. Boot the customised DR recovery environment
Each process is explained in the following chapters of this document.
1.1
Document conventions
The following typographical conventions are used throughout this guide:
/etc/passwd
Next >
Note:
represents command-line commands, options, parameters, directory
names and filenames
used to signify clickable buttons on a GUI dialogue
describes something of importance related to the current topic
AutomatedDisasterRecovery
Preparation
2
5
Preparation
To enable successful automated DR, the following steps should be taken.
2.1
Install CBMR
Run a normal installation of the Cristie CBMR product. Refer to the separate product Installation
and Licensing Guide for instructions on how to do this.
The Cristie Answer File Creator (AFC) program will be installed along with the main product.
2.2
Create System Configuration
With CBMR, a system configuration will be captured to the system during the installation. If this isn't
triggered manually, run the supplied CBMRCfg.exe program from the script RunCBMR.cmd or
ensure the Cristie backup is configured to create the configuration as part of a Pre-Sched operation.
Refer to the separate CBMR User Guide for further details on this.
2.3
Create System Backup
Use the CBMR GUI or command-line program to create a full backup as described in the separate
CBMR User Guide document.
2.4
Create Answer File For Automated DR
During an interactive DR session, the user would normally specify recovery parameters. Such
parameters would typically include:
setup network details (DHCP/static IP, gateway IP etc)
network details of the Cristie server (hostname/IP address, port no.)
automatic/manual recovery
define disk partition layout for recovery
select partitions to recover
commence SystemState/file restore
view/copy log files
re-boot after DR
driver location for dissimilar recovery where applicable
During an unattended DR, this same information must be prepared in advance - captured to an
answer file and made available to the DR environment as part of the DR start-up process.
Cristie supply an Answer File Creator (AFC) tool with their BMR products to help you create the
answer file. The format of the file is in the form of a structured INI file and may be edited by any
Windows editor such as Notepad or Wordpad. However, it is strongly recommended that the AFC
tool is used to initially create the answer file.
Copyright © 1998-2013 Cristie Software Ltd.
6
2.4.1
Cristie Bare Machine Recovery
Running the Cristie Answer File Creator Tool
Run the AFC tool from the Windows Start menu:
This will invoke the AFC Welcome dialogue:
Select Next> to continue to the following dialogue where you can choose to modify an existing file or
create a new one.
AutomatedDisasterRecovery
Preparation
7
Select Create a new answer file and click the Next> button. You can then select the Cristie
BMR product that the answer file is being created for.
Note: you may use the Next> and <Back buttons at any time to change information you have already
entered before creating the answer file. Select Cancel at any time to abandon the answer file creation
process and exit the program.
Choose the CBMR product and select Next>.
Copyright © 1998-2013 Cristie Software Ltd.
8
Cristie Bare Machine Recovery
Select the type of backup location where your DR backup is held. Currently this is either a File, SEP
Sesam or TSM location.
Note: Currently automated recovery from a locally attached physical Tape device is not supported.
AutomatedDisasterRecovery
Preparation
2.4.1.1
9
Restore From a File Location
Select 'File Location':
Select Next> to proceed to the File Location specification details. Provide the full path to the VTD
and the corresponding network authentication details:
Note: Point-in-time selections are not supported for VTD recoveries.
Copyright © 1998-2013 Cristie Software Ltd.
10
Cristie Bare Machine Recovery
Select Next> to continue. Before moving onto the next dialogue a confirmation prompt will be
displayed to allow the path to be confirmed.
If anything looks wrong select Cancel to return to the path setup dialogue and make the relevant
corrections. If the path is correct select OK to continue.
Next, if the backup is encrypted, specify the location of the encryption key repository file if one
exists, or the passphrase/clear key. If the backup is not encrypted, proceed to the next dialogue.
Press Next> to continue to the Specify Restore Options dialogue. Here you may specify whether
just the default system drive (partition or volume) will be restored, or All drives or Selected drives.
Select individual disks as A, B, C ... etc.
Specify where you want the restore log files to be copied at the end of DR process.
Note: the facility to specify the detail level is not available within CBMR.
AutomatedDisasterRecovery
Preparation
Select Next> to continue to the Disk Operations dialogue.
Here you may select either All disks or specific Disk number(s) to be partitioned. Disks are
identified by number 0, 1, 2 etc. Commas are required.
You may also select Default Drives, All drives or Selected drives only to be formatted on
restore. Select individual disks as A, B, C ... etc.
Copyright © 1998-2013 Cristie Software Ltd.
11
12
Cristie Bare Machine Recovery
Select Next>. If the DR is to dissimilar hardware (ie. not the original system), then the recovered
system may require new drivers to support different mass storage or network controllers. These new
drivers are supplied by the customer and must be accessible to the Dissimilar Hardware Wizard
(DHW) during the recovery process. Specify the location of a folder (or folders) where the DHW will
retrieve these drivers from. For example, this could be a locally attached device like a USB disk or a
network share, or both.
Typically, only mass storage and network controllers need to be considered. However, if all driver
classes need to be examined, select the 'Load all types of drivers' tick box. Select Next> to
continue to the Advanced Options dialogue.
Unless Cristie Support direct you to change these settings, leave them at their default settings.
AutomatedDisasterRecovery
Preparation
13
Press Next> to continue to the Network Connections dialogue. Here you can define a list of
network connection credentials that will be used by automated DR to access any network shares
identified in earlier dialogues (eg. copy log files, DHW drivers etc).
Press the Add to-> button to add a new definition to the Connection list. Use the Delete button to
remove an existing Connection definition. Press Next> to continue to the Cloning Options dialogue.
This allows you to automatically change the hostname and/or the IP address of the recovered
system.
Copyright © 1998-2013 Cristie Software Ltd.
14
Cristie Bare Machine Recovery
Add a new name for the recovered system in the Computer field. Change the hostname if required
in the Hostname field.
The IP address can be changed for each adapter on the system. Note the adapter is identified by
MAC address. This can be extracted from the current system or new adapters on a dissimilar target
system. In the latter case identify the new adapters by MAC address (i.e. enter a new address in
the Adapter field).
Note: These settings apply to the recovery environment only - not the restored machine.
Press the Add to-> button to add a new definition to the Adapter list. Use the Delete button to
remove an existing Adapter definition. Press Next> to continue to the Reboot Options dialogue.
AutomatedDisasterRecovery
Preparation
15
Specify how the automated DR should handle the post recovery reboot when the DR finishes with
success or failure. If the DR is successful, select the automatic reboot option. If the DR fails, it is
unlikely that the reboot will succeed, so there is little point in proceeding with the reboot. However, if
a reboot should be attempted, even in a failure scenario, tick the failure auto reboot option.
The completion of the Answer File definition is confirmed with the following dialogue:
Select Finish to generate the answer file. A pop-up will be displayed prompting for the name and
Copyright © 1998-2013 Cristie Software Ltd.
16
Cristie Bare Machine Recovery
location of where the AFC should create the answer file.
Select a path and press OK. This will create a file called DRAnswer.ini in the C:\Temp folder.
Note: the answer file MUST be called DRAnswer.ini when transferred to the ISO.
AutomatedDisasterRecovery
Preparation
Answer File Content Example:
[ProductType]
Product = "CBMR"
[CbmrCmdBackupLocation]
FilePath=\\cristienas\uranus\share1\Nigelp\CBMRVTDs\Win2008R2.VTD
FileDomain=stroud
FileUserName=nigelp
FilePassword=Encrypted: 95860A8F6B9FBE1F
DeviceType=File
EncryptLocType=
PointInTime=
[RestoreData]
[LogFiles]
LogfileCopyPath = "B:\nigelp\logs"
[NetLogin]
Connection1 = "params.Connection1"
[params.Connection1]
NetworkPath = "\\galaxy\public"
Domain = "stroud"
Username = "nigelp"
Password = "Encrypted: 95860a8f6b9fbe1f"
MapToDrive = "B:"
[System]
RebootOnSuccess = "True"
RebootOnFailure = "False"
[DiskOperation]
FormatVolume = "Default"
[DissimilarHardware]
DriverPaths = "B:\nigelp\drivers"
[Cloning]
ChangeComputerName="NewTestHost"
ChangeHostName="NewTest"
ChangeNetworkSettings1 = "params.cloning.nic1"
[params.cloning.nic1]
AdapterName = ""
HardwareAddress = "00-0C-29-78-3D-DF"
IPAddress = "10.10.11.125"
SubnetMask = "255.0.0.0"
Gateway = "10.0.1.100"
DnsServer = "10.1.1.1"
Copyright © 1998-2013 Cristie Software Ltd.
17
18
2.4.1.2
Cristie Bare Machine Recovery
Restore From a TSM Location
Select 'TSM Location'.
Select Next> to proceed to the TSM Location specification details.
Identify the name or IP address of your TSM server and the TSM Node/Filespace containing your
backup:
AutomatedDisasterRecovery
Preparation
19
It may be that you want to restore the system to a specific Point-in-Time (PIT). If this is the case,
select the restore date and time by ticking the PIT tick box. This will open up the date/time dialogue:
Select Next> to continue.
If the backup is encrypted, specify the location of the encryption key repository if one exists, or the
passphrase/clear key. If the backup is not encrypted, proceed to the next dialogue.
Select Next> to continue to the Specify Restore Options dialogue. Here you may specify whether
just the default system drive (partition or volume) will be restored, or All drives or Selected drives.
Select individual disks as A, B, C ... etc.
Copyright © 1998-2013 Cristie Software Ltd.
20
Cristie Bare Machine Recovery
Specify where you want the restore log files to be copied at the end of DR process.
Note: the facility to specify the detail level is not available within CBMR.
Select Next> to continue to the Disk Operations dialogue.
Here you may select either All disks or specific Disk number(s) to be partitioned. Disks are
identified by number 0, 1, 2 etc. Commas are required.
You may also select Default Drives, All drives or Selected drives only to be formatted on
restore. Select individual disks as A, B, C ... etc.
AutomatedDisasterRecovery
Preparation
21
Select Next>. If the DR is to dissimilar hardware (ie. not the original system), then the recovered
system may require new drivers to support different mass storage or network controllers. These new
drivers are supplied by the customer and must be accessible to the Dissimilar Hardware Wizard
(DHW) during the recovery process. Specify the location of a folder (or folders) where the DHW will
retrieve these drivers from. For example, this could be a locally attached device like a USB disk or a
network share, or both.
Typically, only mass storage and network controllers need to be considered. However, if all driver
Copyright © 1998-2013 Cristie Software Ltd.
22
Cristie Bare Machine Recovery
classes need to be examined, select the Load all types of drivers tick box. Select Next> to continue
to the Advanced Options dialogue.
Unless Cristie Support direct you to change these settings, leave them at their default settings.
Press Next> to continue to the Cloning Options dialogue. This allows you to automatically change
the hostname and/or the IP address of the recovered system.
AutomatedDisasterRecovery
Preparation
23
Add a new name for the recovered system in the Computer field. Change the hostname if required
in the Hostname field.
The IP address can be changed for each adapter on the system. Note the adapter is identified by
MAC address. This can be extracted from the current system or new adapters on a dissimilar target
system. In the latter case identify the new adapters by MAC address (i.e. enter a new address in
the Adapter field).
Note: These settings apply to the recovery environment only - not the restored machine.
Press the Add to-> button to add a new definition to the Adapter list. Use the Delete button to
remove an existing Adapter definition. Press Next> to continue to the Reboot Options dialogue.
Copyright © 1998-2013 Cristie Software Ltd.
24
Cristie Bare Machine Recovery
Specify how the automated DR should handle the post recovery reboot when the DR finishes with
success or failure. If the DR is successful, select the automatic reboot option. If the DR fails, it is
unlikely that the reboot will succeed, so there is little point in proceeding with the reboot. However, if
a reboot should be attempted, even in a failure scenario, tick the failure auto reboot option.
The completion of the Answer File definition is confirmed with the following dialogue:
Select Finish to generate the answer file. A pop-up will be displayed prompting for the name and
AutomatedDisasterRecovery
Preparation
25
location of where the AFC should create the answer file.
Select a path and press OK. This will create a file called DRAnswerFile.ini in the C:\Temp folder.
Note: the answer file MUST be called DRAnswer.ini when transferred to the ISO.
Copyright © 1998-2013 Cristie Software Ltd.
26
Cristie Bare Machine Recovery
Answer File Content Example:
[ProductType]
Product = "CBMR"
[CbmrCmdBackupLocation]
TsmFilespaceName=/TESTNODE
TsmNodeName=TESTNODE
TsmNodePassword=Encrypted: 95860A8F6B9FBE1F
TsmPort=1500
TsmServerName=10.2.1.17
DeviceType=Tsm
EncryptLocType=
PointInTime=
[RestoreData]
[LogFiles]
LogfileCopyPath = "B:\nigelp\logs"
[NetLogin]
Connection1 = "params.Connection1"
[params.Connection1]
NetworkPath = "\\galaxy\public"
Domain = "stroud"
Username = "nigelp"
Password = "Encrypted: 95860a8f6b9fbe1f"
MapToDrive = "B:"
[System]
RebootOnSuccess = "True"
RebootOnFailure = "False"
[DiskOperation]
FormatVolume = "Default"
[DissimilarHardware]
DriverPaths = "B:\nigelp\drivers"
[Cloning]
ChangeComputerName="NewTestHost"
ChangeHostName="NewTest"
ChangeNetworkSettings1 = "params.cloning.nic1"
[params.cloning.nic1]
AdapterName = ""
HardwareAddress = "00-0C-29-78-3D-DF"
IPAddress = "10.10.11.125"
SubnetMask = "255.0.0.0"
Gateway = "10.0.1.100"
DnsServer = "10.1.1.1"
AutomatedDisasterRecovery
Preparation
2.5
27
Prepare Boot Media For Automated Recovery
The product boot media (i.e. the DR console ISO file) is now prepared by the CRISP (Cristie ISO
Producer) tool. Please refer to the separate CRISP User Guide documentation for details on how to
do this.
To prepare boot media for automated recovery, the boot image must be customised to both auto
boot and to add the answer file to an expected location. The auto boot modification is required
because normally the PE 2 distribution media is designed to prompt for DR boot. By default, it will
not boot into DR unless a key is pressed. If no key is pressed, any installed OS is booted instead.
This behaviour needs to be suppressed for automated recoveries. This is described in Customise
Boot Media For Auto Boot.
If the answer file needs to be added to CBMR boot media itself, an ISO editing tool such as
MagicISO or UltraISO is required. This is then used to extract the Windows PE 2 boot file from the
distribution ISO image. It can also be used to create the new modified ISO image containing the
answer file.
During an automated DR sequence, the Windows PE 2 environment will search for the answer file in
one of these locations and in this order of precedence:
1. The root folder of the Windows PE 2 boot environment (always drive X: when booted)
2. The root folder of the CD/DVD containing the CBMR distribution media
3. The root folder of any locally attached removable storage
As soon as a suitable answer file is found in one of these locations, the search stops and that
answer file is used to control the automated DR process. If no answer file is found, the normal
interactive DR GUI is started. Refer to sections Add Answer File To Product ISO Root Folder and
Add Answer File to Boot Image Root Folder for a discussion on how this is achieved.
The boot image created for Option 1 is suitable for network boot, but requires the standard CBMR
boot image or WIM file to be customised.
Use Option 3 above when customising the boot image is not practical. In this case, simply copy the
generated answer file to the root folder on suitable removable storage (eg. USB disk).
Note: the answer file will only be detected during boot if the file is located in one of the three locations
specified above.
2.5.1
Customise Boot Media For AutoBoot
By default, the PE 2 distribution media will display a prompt to boot into the DR environment when
auto-run. If no key is pressed, any alternative installed OS is booted instead. For automated DR, this
behaviour needs to be suppressed.
At the moment the only way to do this is to customise the CBMR distribution media. This section
describes how to achieve this for the PE 2 environment.
2.5.1.1
Windows PE 2
The steps required to customise the Windows PE 2 ISO image for auto boot are as follows:
Open the product PE 2 distribution media image with your ISO editor:
Copyright © 1998-2013 Cristie Software Ltd.
28
Cristie Bare Machine Recovery
Then navigate to the BOOT folder as illustrated:
Right click on the file BOOTFIX.BIN in this folder and select Delete in the pop-up menu.
Save the modified ISO. This action will create a new ISO with the BOOTFIX.BIN file removed. The
AutomatedDisasterRecovery
Preparation
modified PE 2 ISO will now automatically boot into the PE 2 environment.
2.5.2
Add Answer File To Product ISO Root Folder
To add the answer file to the root folder of the boot image follow these steps:
Open the distribution media image with your ISO editor:
Drag and drop your answer file into the root of the ISO:
Copyright © 1998-2013 Cristie Software Ltd.
29
30
Cristie Bare Machine Recovery
Now save the new ISO image to a new file or overwrite the existing image. Use this new ISO image
to create new physical CD/DVDs as required.
AutomatedDisasterRecovery
Preparation
2.5.3
31
Add Answer File to Boot Image Root Folder
The PE 2 boot image is in Microsoft WIM file format. Use an ISO editor to extract the WIM file from
the product distribution media and use the Microsoft Windows Automated Installation Kit (WAIK)
tools to add the answer file.
2.5.3.1
Windows PE 2
The PE 2 boot image is in WIM file format and can only be modified by using the Microsoft Windows
Automated Installation Kit (WAIK). Download the WAIK version 1.1 (dated 25/2/2008) from the
Microsoft Download Center. This is the February 2008 update.
The downloaded image (in .IMG format) should be burnt to a DVD (it is too large for a CD) and
installed on a suitable PC. Run the .NET 2.0, MSXML 6.0 and Windows AIK Setup options in that
order.
With the WAIK successfully installed, the steps required to modify the Windows PE 2 WIM image
are as follows:
Open the product PE 2 distribution media image with your ISO editor:
Copyright © 1998-2013 Cristie Software Ltd.
32
Cristie Bare Machine Recovery
Navigate to the \SOURCES folder and extract the file BOOT.WIM to a convenient location.
The following description assumes the BOOT.WIM file has been extracted to C:\Temp. It also
assumes that the answer file is also in C:\Temp. The WIM is edited by mounting the image onto a
standard folder in the file system. Once this is done, the answer file can be simply copied into the
AutomatedDisasterRecovery
Preparation
33
target folder and the image unmounted.
It is therefore necessary to create a folder where the WIM image will be mounted. This folder must
be empty. The WAIK tool used to modify the WIM image is called ImageX.
Now run a Windows PE Tools Command window (a shortcut for this is normally created on the
Desktop by the WAIK installation) and enter the command:
imagex /mountrw C:\Temp\boot.wim 1 C:\mount
copy C:\Temp\DRAnswer.ini C:\mount
imagex /unmount /commit C:\mount
The modified WIM file can then be either added back into the product ISO or kept and used in
conjunction with Windows Deployment Services (WDS) for remote network boot. If required, use the
ISO editor to write the WIM file back into the product ISO in the \SOURCES folder.
Note: the answer file MUST be named DRAnswer.ini when transferred to the ISO.
Copyright © 1998-2013 Cristie Software Ltd.
34
3
Cristie Bare Machine Recovery
Recovery
An automated recovery can be initiated either by a network or CD/DVD boot of the customised
CBMR boot image as described in Prepare Boot Media For Automated Recovery.
Starting the boot process is the only part of the restore process that requires manual intervention.
Even this can be avoided if a suitable Lights-Out system is in place or remote boot is possible.
Note: the system BIOS should be set to boot from the prepared Windows PE boot ISO whether this is
in the form of a physical CD/DVD or ISO image. It is also possible to network boot the PE 2 image.
3.1
Boot Recovery Environment
Once the customised boot image is booted, the normal plug and play sequence will run. The
automated DR will then proceed if the DR answer file is found in one of the prescribed locations. If
the file is not found, the normal interactive GUI will be displayed.
3.1.1
Answer File In CD/DVD Image
If the DR answer file is detected within the CD/DVD image, then the automated DR will proceed with
no user intervention. Each step in the disaster recovery process will be displayed on the system
console and recorded to a log file. This log file will be transferred to the location specified in the DR
answer file at the end of the recovery.
At the end of the DR sequence, the logs will be copied to the location specified in the answer file. At
this point the recovered system will be automatically booted if configured as such in the DR answer
file. Otherwise manual intervention will be required to boot the system (by pressing the <ESC> key).
If errors are detected during the restore process, the recovery will halt or re-boot the system
depending upon the setting in the answer file.
Note: if the boot media is configured to boot directly into the PE 2 boot environment after recovery,
manual intervention will be required to reset the boot sequence on the system. This must be done in
order to prevent the PE 2 boot environment being booted once more. Normally the system BIOS
should be reset to boot from the OS disk as required.
3.1.2
Answer File On Removable Device
If the DR answer file is detected on any attached removable media, then the automated DR will
proceed with no user intervention. Each step in the disaster recovery process will be displayed on
the system console and recorded to a log file. This log file will be transferred to the location specified
in the DR answer file at the end of the recovery.
At the end of the DR sequence, the logs will be copied to the location specified in the answer file. At
this point the recovered system will be automatically booted if configured as such in the DR answer
file. Otherwise manual intervention will be required to boot the system (by pressing the <ESC> key).
If errors are detected during the restore process, the recovery will halt or re-boot the system
depending upon the setting in the answer file.
Note: if the boot media is configured to boot directly into the PE 2 boot environment after recovery,
manual intervention will be required to reset the boot sequence on the system. This must be done in
order to prevent the PE 2 boot environment being booted once more. Normally the system BIOS
should be reset to boot from the OS disk as required.
AutomatedDisasterRecovery
Recovery
3.2
35
Check Result Of Recovery
It is recommended that after the recovery has completed, the saved log files are inspected to ensure
that the DR ran with no reported errors.
Copyright © 1998-2013 Cristie Software Ltd.
36
4
Cristie Bare Machine Recovery
Cristie Technical Support
If you have any queries or problems concerning your Cristie Bare Machine Recovery product, please
contact Cristie Technical Support. To assist us in helping with your enquiry, make sure you have
the following information available for the person dealing with your enquiry:
CBMR Version Number
Installed OS type and version
Any error message information (if appropriate)
Description of when the error occurs
Log Files
Contact Numbers - Cristie Software (UK) Limited
Technical Support +44 (0) 1453 847 009
Toll-Free US Number 1-866-TEC-CBMR (1-866-832-2267)
Sales Enquiries +44 (0) 1453 847 000
Sales Fax +44 (0) 1453 847 001
Email [email protected]
Web www.cristie.com
Support Hours
05:00 to 17:00 Eastern Standard Time (EST) Monday to Friday
Out-of-Hours support available to customers with a valid Support Agreement - Severity 1 issues* only
UK Bank Holidays** classed as Out-of-Hours - Severity 1 issues only.
*Severity 1 issues are defined as: a production server failure, cannot perform recovery or actual loss
of data occurring.
**For details on dates of UK Bank Holidays, please see www.cristie.com/support/
Cristie Software Limited are continually expanding their product range in line with the latest
technologies. Please contact the Cristie Sales Office for the latest product range. Should you have
specific requirements for data storage and backup devices, then Cristie's product specialists can
provide expert advice for a solution to suit your needs.
AutomatedDisasterRecovery