1
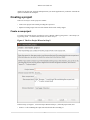
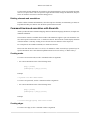
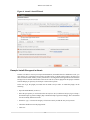
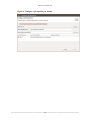
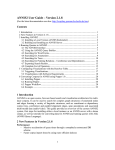
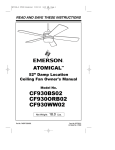
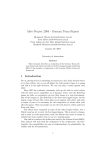
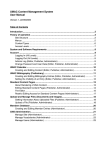
Atomic User Guide v0.2
Stephan Druskat
Friedrich Schiller University Jena
Copyright © 2015 Friedrich Schiller University Jena
Table of Contents
Getting started ....................................................................................................................
Resources ..................................................................................................................
The workspace ............................................................................................................
Creating a project ........................................................................................................
Annotation with the Annotation Graph Editor ..................................................................
Updates .....................................................................................................................
Reference ...........................................................................................................................
Reserved keys ............................................................................................................
AtomicAL ..................................................................................................................
Install new plugins ......................................................................................................
1
1
1
2
3
7
8
8
8
9
Getting started
This guide gives a workflow example for annotating a corpus with Atomic.
Resources
If you want to know more about Atomic, please refer to the Atomic website [http://linktype.iaa.uni-jena.de/
atomic] .
If you want to receive notifications about upcoming changes, new releases, etc., or get in touch with
other Atomic users, please subscribe to the Atomic Users mailing list ([email protected])
[https://lserv.uni-jena.de/mailman/listinfo/atomic-user] .
If you have suggestions, feature requests, problems, or want to file a bug report, please create a new
issue at Atomic's issue tracker at github.com [https://github.com/infraling/atomic/issues] . When reporting
bugs, please don't forget to mention the version of Atomic you are using, and your operating system and
architecture (e.g., Windows 7, 64 bit).
Atomic is open source under the Apache License, Version 2.0 [http://www.apache.org/licenses/LICENSE-2.0.html] , and you can find the source code at github.com/infraling/atomic [https://
github.com/infraling/atomic] .
If you want to learn about Salt (Atomic's data model), or Pepper, the converter framework for linguistic formats (included in Atomic), please go to the SaltNPepper homepage [https://korpling.german.huberlin.de/saltnpepper/] .
The workspace
In Atomic, workspaces can be defined. A workspace is a physical location (i.e., path on the file system)
where Atomic stores projects, folders and files. You are asked to pick a workspace location when running
1
Atomic User Guide v0.2
Atomic for the first time, and each subsequent time you run the application if you haven't activated the
option to remember the workspace.
Creating a project
There are two ways to create a project in Atomic:
• Create a new project from scratch, providing the corpus text.
• Import an existing corpus from one of the formats which can be read by Pepper.
Create a new project
To create a new Atomic project, open the New Project Wizard, either by going to File → New Project, or
by pressing CTRL + N. In the wizard, choose New Atomic Project.
Figure 1. The New Project Wizard at Step 2.
In the next step (cf. Figure 1, “The New Project Wizard at Step 2.”), fill in the project name, and
• choose a .txt file containing the corpus text and select the file's encoding, or
2
Atomic User Guide v0.2
• enter the corpus text via the text field provided after clicking the ... button.
Finally, choose the tokenizer that should be used to tokenize the corpus text (currently, only the TreeTagger
Tokenizer is available), and press Finish.
The corpus text will now be tokenized, and the project created.
Import an existing corpus
In order to import an existing corpus, right-click into the Navigation window and choose Import ... from the
pop-up menu. In the Import Wizard, choose Atomic → Corpus Import. Follow the instructions provided
by the Import Wizard to import a corpus from one of the supported formats. These are currently: CoNLL,
EXMARaLDA, Elan, MMAX2, PAULA, RelANNIS, SaltXML, Treetagger, UAM. The corpus will be
imported, and wrapped in a new project.
Annotation with the Annotation Graph Editor
To open a corpus document of your choice in the Annotation Graph Editor, double-click the file containing
the respective corpus document in the Navigation view. Should you have opened this file with another
editor before, Atomic will have remembered the editor the file was opened with last. In this case, rightclick onto the file, and choose Open With → Annotation Graph Editor from the pop-up menu.
Figure 2. Atomic application window with Annotation Graph Editor.
Opening a corpus document file with the Annotation Graph Editor will also open a new perspective, the
Annotation Graph Perspective. Perspectives consist of a number of GUI elements (views or editors), which
are ordered in a specific way, optimized for a specific task. The Annotation Graph Perspective consists of
the Annotation Graph Editor (6), which is accompanied by three automatically opened views:
• (2) The Sentence View: Displays a numbered list of sentences making up the corpus document. You can
select sentences for display in the editor by checking the checkbox next to it. Multiple sentences can
be displayed. However, rendering large annotation graphs is an expensive operation and consequently
3
Atomic User Guide v0.2
may slow down Atomic. Therefore, be cautious about how many sentences you want to display at any
one time.
• (3) The Level View: Displays a) a combo box where the active level can be set, b) a button to create a
new level, c) a numbered list of existing levels, and additionally the option "NO ASSIGNED LEVEL".
When an existing level is selected in the combo box, all newly created annotation graph elements are
assigned to this level. When clicking the "[+] Add new level" button, you can enter a name for the
level. Newly created levels are automatically set active, and set visible in the Annotation Graph Editor.
Checking an existing level in the level list makes its elements visible in the Annotation Graph Editor.
Again, be cautious that trying to display large numbers of levels over large numbers of sentences may
significantly slow down Atomic. The levels for an element are displayed in a pop-up when hovering
over the element figure in the Annotation Graph Editor.
• (4) The Linked Sentences View: Displays a list of sentences the currently selected (i.e., highlighted)
sentence in the Sentence View is linked to. "Linked" in this case means that there exist annotation
graph elements which are linked to one or more other sentences via a chain of one or more edges. In
order to display linked sentences alongside the selected sentence, simply check them in the Sentence
View. Please note: Annotation graph elements which are part of a link chain between sentences are only
displayed if all linked sentences are also displayed. E.g., an edge between a node exclusively dominating
sentence X and a node exclusively dominating sentence Y will only be displayed when both sentence
X and sentence Y are also displayed.
Additionally, the Annotation Graph Perspective reserves space for the Atomical Console (5). the section
called “Annotation of elements” All views can be closed. They can be re-opened via View menu.
You can switch between perspectives via the Perspective Bar (1). The Navigation Perspective contains
the Navigation View, which you can use to navigate through projects.
Tool-based annotation
The Annotation Graph Editor includes a tools palette which can be used for tool-based annotation. The
following paragraphs describe how to use the tools in the palette to create an annotation graph for the
corpus document.
Keyboard navigation
The Annotation Graph Editor can be navigated via the keyboard using the following keys.
• Arrows (Left, Right, Up, Down): Change the currently selected element.
• Shift-Arrows: Extend the currently selected element to include the elements to the left, the right, above,
or below.
• Ctrl-Arrows: Move focus to a different element without changing the selection.
• Ctrl-Shift-Arrows: Scroll the GEF viewer left, right, up, or down.
• Alt-Down Arrow: Change the currently selected element to be the first nested element within the element
that currently has focus.
• Alt-Up Arrow: Change the currently selected element to be the parent element containing the element
that currently has focus.
• /, \: Change the selection to be a connection associated with the element with focus. Repeatedly pressing
either of these keys cycles the current selection forward or backward through the connections associated
with the element with focus.
4
Atomic User Guide v0.2
• ?, |: Extend the selection to include connections associated with the element with focus.
Creating nodes
Click on the Structure Tool or the Span Tool in order to create a new node. Then, either drag-and-drop
the tool onto a position of your choice in the editing area, or click on the editing area at the position of
your choice.
Drag-and-drop will create the node, but will not open the annotation field for direct annotation of the newly
created node. Click-and-point will create the node and open the annotation field for direct annotation of
the node.
Alternatively, you can use the keyboard shortcuts CTRL + 1 to create spans, and CTRL + 0 to create
structures.
If you have selected any nodes in the editing area before using a node tool or keyboard shortcut, the new
node will be created, and edges will be created from it to all of the selected nodes.
When using the Structure Tool or CTRL + 0, the type of the newly created edges will be dominance
relation.
When using the Span Tool or CTRL + 1, the type of the newly created edges will be spanning relation,
and edges will only be created to selected nodes of type token, as spanning relations only accept tokens
as target nodes.
Creating edges
To create an edge, click on the respective tool, then click on the node that should be the source of the edge,
and subsequently on the node that should be the target of the edge.
The edge will be created, but the annotation field will not automatically open. In order to annotate edges,
please see Annotation of elements.
Annotation of elements
In the Annotation Graph Editor, annotations have a key and a value, and optionally can be assigned to a
namespace. Annotations are entered in the annotation field using either of the following patterns.
[namespace]::[key]:[value]
[key]:[value]
[Key] and [value] are shown directly on the element, the namespace is shown in a pop-up when hovering
over an annotation.
Please note that Atomic has some reserved keys for annotation. These reserved keys represent keys for
specific annotations. For a more detailed explanation and a list of reserved keys, cf. Reserved keys.
Elements (i.e., nodes as well as edges) can be annotated by selecting the element via the mouse or the
keyboard's arrow buttons, and then either clicking on it once, or pressing Return.
This action will open the annotation field for direct editing. You can enter one or more annotations, with
one annotation per line. To add a line-break, press Return. To commit the annotations, press CTRL +
Return. To abort editing the annotations, press ESC.
5
Atomic User Guide v0.2
To edit a single existing annotation on an element, select the annotation by mouse or keyboard, and either
click on it, or press Return. This will open the single annotation field. Change the annotation, and press
Return to commit it. Press ESC to abort the editing process.
Deleting elements and annotations
In order to delete elements and annotations, select the respective element(s) or annotation(s) per mouse or
keyboard and either press DEL or click the delete symbol in the menu bar.
Command-line-based annotation with AtomicAL
Atomic provides the native annotation language Atomic Annotation Language (AtomicAL) for rapid command-line annotation.
The AtomicAL console is available when an editor with AtomicAL support is open. The AtomicAL console can be opened via the menu: View → AtomicAL Console. The AtomicAL console displays the name
of the document it is currently working on as well as the first few characters of the corpus text.
For a complete list of available commands, see AtomicAL reference.
Please note that Atomic has some reserved keys for annotation. These reserved keys represent keys for
specific annotations. For a more detailed explanation and a list of reserved keys, cf. Reserved keys.
Creating nodes
To create a new structure node, use the n command. It takes as arguments
• one or more annotations in one of the following forms.
[key]:[value]
[namespace]::[key]:[value]
Example:
n syntax::cat:NP lemma:Atomic
To create a new span node, use the s command. It takes as arguments
• one or more annotations in one of the following forms.
[key]:[value]
[namespace]::[key]:[value]
Example:
s coref::reftype:group text:"The board"
Creating edges
To create a new edge, use the e command. It takes as arguments
6
Atomic User Guide v0.2
• an edge type flag, which defines the type of the edge to be created
For a list of valid flags see Table 3, “AtomicAL edge type flags”. Also see there for an explanation of
how edge type flags are re-used.
• exactly one source node, referenced via its ID
• exactly one target node, referenced via its ID
• one or more annotations in one of the following forms.
[key]:[value]
[namespace]::[key]:[value]
Example:
e -p n2 n1 coref::coreftype:anaph
Annotation of elements
To annotate elements, use the a command. It takes as arguments
• an element or a list of elements or a set of elements or a combination of the three
• one or more annotations in one of the following forms, where the last one (an annotation with a null
value) marks an existing annotation with key [key] for deletion.
[key]:[value]
[namespace]::[key]:[value]
[key]:
Example:
a n1 n3 t2..t5 d3 o4 x: y:y z::z:z
Deleting elements and annotations
For the deletion of annotations, see the section called “Annotation of elements”.
To delete elements, use the d command. It takes as arguments
• an element or a list of elements or a set of elements or a combination of the three
Example:
d n1..n5 d1 o3
Updates
If your computer is connected to the internet, Atomic will automatically check for available updates on
startup. If updates are available, you will be notified and have the option to install the available updates.
7
Atomic User Guide v0.2
Installed updates will be available after the next restart of the application. You will also be prompted to
restart once the installation of updates is completed.
Reference
Reserved keys
Atomic knows some reserved keys which represent keys for specific annotations. One example is the
annotation of element type, which is represented internally as a specific data type (as a Salt STYPE to
be specific).
However, while reserved keys are necessary to have, they may comfortably be re-defined in Atomic via the
application preferences. It is possibly to overwrite these preferences on a per-project-basis as well, e.g., in
case a reserved key collides with tagset necessities. The latter is done from the Project Properties. To edit
the application preferences, go to Options → Preferences . To edit a project's properties and overwrite the
application-wide preferences, richt-click onto the project in the Navigation view, and choose Properties
or press Alt + Enter, then navigate to the Reserved keys section.
Table 1. Reserved keys in Atomic
Annotation type
Reserved key (default)
Element type (represented as STYPE in the data
model)
t
AtomicAL
Note that some AtomicAL commands can be issued not only for single elements, but also for sets of
elements where all elements are of the same type and have subsequent IDs. The following command, for
example, groups all tokens from t1 to t5 (i.e., t1, t2, t3, t4, and t5) under a new parent structure node,
which is annotated with cat:NP.
p t1..t5 cat:NP
Also note that whenever a command takes [key]:[value] or [key]: commands, these can be grouped. I.e.,
to annotate element n1 with annotations x:x, y:y and z:z, you can do so in one single command, as shown
below.
a n1 x:x y:y z:z
Table 2. AtomicAL commands
Command
Arguments
Syntax example a
help (Show help)
help
clear (Clear the console)
clear
n (New structure node)
[key]:[value]
s (New span node)
[element] [element] [key]:[value] s t1 t2 t3 cat:NP
[element]..[element] [key]:[val- s t1..t10 cat:NP
ue]
e (New edge)
-[type] b [source] [target] [key]:
[value]
8
n pos:np
e -d n1 t3 cat:NP
Atomic User Guide v0.2
Command
Arguments
Syntax example a
a (Annotate)
[element] [key]:[value]
[element] [key]:
a n1 pos:np
(Deletes the annotation with key
[key])
d (Delete element)
d [element] [element]
d [element]..[element]
d n1 n2 n3
d n1..n10
p (Group under new parent)
p [element] [element] [key:val]
p [element]..[element] [key:val]
p n1 n2 cat:NP
p n1..n8 cat:NP
l (Set active level)
l [level index]c
l 13
a
For reasons of readability, namespace annotations have been left out completely. Please note that whenever a command can take
a [key]:[value], it can also take a [namespace]::[key]:[value] argument.
b
Cf. Table 3, “AtomicAL edge type flags”. Also note that if a flag has been set in an e command before, this flag can be re-used
in subsequent uses of the command, i.e., the edge type flag remains active until a new flag is explicitly set. In order to re-use the
active flag, don't specify a flag with the command (e.g., e n1 n2).
c
The level index is the number the level is assigned to in the Level View.
Table 3. AtomicAL edge type flags
Flag
Edge type
d
Dominance relation
s
Spanning relation
p
Pointing relation
o
Order relation
Install new plugins
In Atomic, you can very easily add new functionality to the application yourself, at runtime. This is done
by installing additional plugins in Atomic. There are generally two way to achieve this, depending on how
the plugin is being made available:
• Install new plugins via the Eclipse Marketplace
• Install new plugins from a p2 repository
Install new plugins via the Eclipse Marketplace
The Eclipse Marketplace [http://marketplace.eclipse.org/] is a platform for third-party Eclipse-based solutions, i.e., plugins (or complete applications). Plugins available from the marketplace can be consumed
by any Eclipse-based application, such as Atomic. Searching the marketplace and installing software from
it is achieved via the Eclipse Marketplace client included in Atomic.
9
Atomic User Guide v0.2
Figure 3. The Eclipse Marketplace client.
In order to install a new plugin, go to Options → Install new plugins from Eclipse Marketplace . This will
open the Eclipse Marketplace client. Its use is fairly self-explanatory. You can browse different categories,
or search for plugins. Once you have found a plugin you want to install, simply click the provided install
button next to the search result, and follow the instructions.
10
Atomic User Guide v0.2
Example: Install XML editing support in Atomic
If you are working on corpus annotations available in an XML dialect, such as SaltXML which is used
in Atomic, you may want to be able to edit the source files comfortably with a dedicated XML editor.
There is a variety of solutions available from the Eclipse Marketplace, including XMLEspresso [http://
marketplace.eclipse.org/content/xmlespresso-xml-editor-eclipse-plugin], which can automatically generate grammars for unknown XML schemas and DTDs. To install this plugin, do the following.
• Open the Eclipse Marketplace Client (see above).
• Search for "xmlespresso". The first result should be the XMLEspresso plugin.
• Click the install button.
• The EM client will calculate requirements and dependencies. Once its finished, review the items that
you want to install and click Next.
• Read the license and accept it.
• Atomic will now install XMLEspresso. Once its finished, you wil be prompted to restart Atomic. Click
Restart Now.
• Once Atomic is restarted, XMLEspresso is installed and accessible via right-click on an XML, or .salt,
file in the Navigation View, and the Open With → Other ... menu item.
Install new plugins from a p2 repository
Atomic can install plugins from p2 repositories, e.g., when they are not available via the Eclipse Marketplace. All of the plugins provided by Eclipse are available from the official Eclipse Software Site. Thirdparty plugins may have their own update sites, usually specified on the plugins homepage. Atomic includes an Install Wizard to search the available plugins and install them as needed. You can access it via
Options → Install new plugins from p2 repository. In the Wizard you have to provide the URL of a p2
repository (Atomic already includes the reference to the official Eclipse repository). Select the Software
Site for additional Eclipse plugins from the Work with: field, and wait until the contents are fully loaded.
The plugins are shown in categories, but you can switch categorization off in the self-explanatory Install
Wizard as well.
For further information on how to install plugins from a p2 repository, cf. Example: Install Git support
in Atomic.
11
Atomic User Guide v0.2
Figure 4. Atomic's Install Wizard.
Example: Install Git support in Atomic
In order to be able to version your corpora and annotations, and enable them for collaborative work, you
may want to use a versioning system such as git, Subversion, or similar. And in order to be able to use
these CVS from within Atomic, you may want to have CVS integration in the application itself instead of
having to use an external command line. There are at least one (or more) plugins for this purpose available
from the Eclipse p2 repository for all major version control systems.
In the case of git, the plugin you would want to install is Eclipse EGit. To install this plugin, do the
following.
• Open the Install Wizard (see above).
• Select the p2 repository to work with, in this case Software Site for additional Eclipse plugins at http://
download.eclipse.org/releases/indigo [http://download.eclipse.org/releases/indigo]. This is the default
site and is already defined in Atomic.
• Search for "egit", or browse the category Collaboration until you find the entry "Eclipse EGit".
• Check the checkbox next to the plugin name.
• Click Next.
12
Atomic User Guide v0.2
• The wizard will calculate requirements and dependencies. Once its finished, review the items that you
want to install and click Next.
• Read the license and accept it.
• Atomic will now install EGit. Once its finished, you will be prompted to restart Atomic. Click Restart
Now.
• Once Atomic is restarted, EGit is installed and accessible via right-click on a project in the Navigation
View (cf. Figure 5, “Sharing an Atomic project to a git repository.”). You can now use EGit to version
your corpus documents or any other files you have in your workspace. For more information on how to
use EGit, please refer to the EGit User Guide [http://wiki.eclipse.org/EGit/User_Guide].
Figure 5. Sharing an Atomic project to a git repository.
13
Atomic User Guide v0.2
Figure 6. Configure a git repository in Atomic.
14