1
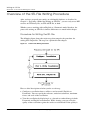
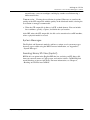
Rapid Prototyping Interface
User Guide and Menu Reference
CADDS® 5 15.0
DOC38529-006
Parametric Technology Corporation
Copyright © 2007 Parametric Technology Corporation. All Rights Reserved.
User and training guides and related documentation from Parametric Technology Corporation and its
subsidiary companies (collectively “PTC”) is subject to the copyright laws of the United States and other
countries and is provided under a license agreement that restricts copying, disclosure, and use of such
documentation. PTC hereby grants to the licensed software user the right to make copies in printed form
of this documentation if provided on software media, but only for internal/personal use and in
accordance with the license agreement under which the applicable software is licensed. Any copy made
shall include the PTC copyright notice and any other proprietary notice provided by PTC. Training
materials may not be copied without the express written consent of PTC. This documentation may not be
disclosed, transferred, modified, or reduced to any form, including electronic media, or transmitted or
made publicly available by any means without the prior written consent of PTC and no authorization is
granted to make copies for such purposes.
Information described herein is furnished for general information only, is subject to change without
notice, and should not be construed as a warranty or commitment by PTC. PTC assumes no
responsibility or liability for any errors or inaccuracies that may appear in this document.
The software described in this document is provided under written license agreement, contains valuable
trade secrets and proprietary information, and is protected by the copyright laws of the United States and
other countries. It may not be copied or distributed in any form or medium, disclosed to third parties, or
used in any manner not provided for in the software licenses agreement except with written prior
approval from PTC.
UNAUTHORIZED USE OF SOFTWARE OR ITS DOCUMENTATION CAN RESULT IN CIVIL
DAMAGES AND CRIMINAL PROSECUTION.
For Important Copyright, Trademark, Patent, and Licensing Information: For Windchill products, select
About Windchill at the bottom of the product page. For InterComm products, on the Help main page,
click the link for Copyright 2007. For other products, select Help > About on the main menu for the
product.
UNITED STATES GOVERNMENT RESTRICTED RIGHTS LEGEND
This document and the software described herein are Commercial Computer Documentation and
Software, pursuant to FAR 12.212(a)-(b) (OCT’95) or DFARS 227.7202-1(a) and 227.7202-3(a)
(JUN’95), and are provided to the US Government under a limited commercial license only. For
procurements predating the above clauses, use, duplication, or disclosure by the Government is subject
to the restrictions set forth in subparagraph (c)(1)(ii) of the Rights in Technical Data and Computer
Software Clause at DFARS 252.227-7013 (OCT’88) or Commercial Computer Software-Restricted
Rights at FAR 52.227-19(c)(1)-(2) (JUN’87), as applicable. 02202007
Parametric Technology Corporation, 140 Kendrick Street, Needham, MA 02494 USA
Table of Contents
Preface
Related Documents ________________________________________ vii
Book Conventions __________________________________________ viii
Window Managers and the User Interface ___________________ viii
Online User Documentation __________________________________ ix
Online Command Help ______________________________________ x
Printing Documentation _____________________________________ x
Resources and Services ______________________________________ x
Documentation Comments __________________________________ xi
Overview of the Rapid Prototyping Interface
Rapid Prototyping ________________________________________________ 1-2
Phase 1 ____________________________________________________ 1-2
Phase 2 ____________________________________________________ 1-3
Phase 3 ____________________________________________________ 1-3
Rapid Prototyping Interface ______________________________________ 1-4
How Is the STL File Used? ____________________________________ 1-4
Flow Diagram for Writing STL Output Using the RPI ____________ 1-4
Preparing a Model for Writing an STL File
Overview of the Preparation Procedure ___________________________ 2-2
Before You Begin ___________________________________________ 2-2
Rapid Prototyping Interface User Guide and Menu Reference
Contents-iii
Sizing the Part ____________________________________________________ 2-3
Part Scaling ________________________________________________ 2-3
Part Breakdown ____________________________________________ 2-3
X, Y, Z Scale Adjustments____________________________________ 2-3
Establishing Output Orientation ___________________________________ 2-4
Build in Positive Model Space _______________________________ 2-4
Define a New Cplane ______________________________________ 2-4
Creating Support Structures_______________________________________ 2-7
Why Models Need Support Structures ________________________
How You Create the Structures ______________________________
Using a Separate STL File ____________________________________
Positioning the Cplane______________________________________
2-7
2-7
2-7
2-8
Writing an STL File
Overview of the STL File Writing Procedure _________________________ 3-2
Procedure for Writing the STL File ____________________________ 3-2
System Messages ___________________________________________ 3-3
Reading Binary STL Files (Explicit) ____________________________ 3-3
How to Configure a Tessellation ___________________________________ 3-4
Before You Begin ___________________________________________ 3-4
Configuring the Tessellation _________________________________ 3-4
How to View and Verify the Tessellation ___________________________ 3-8
Display If You Are Using the Parametric RPI___________________ 3-8
Display If You Are Using the Explicit RPI _______________________ 3-9
If You Do Not Want to Display the Tessellation _______________ 3-10
Examples of Displayed Images _____________________________ 3-10
Examples of a Rendered Image at Two Tolerance Levels ____ 3-10
Example of a Faceted Tessellated Image ___________________ 3-12
How to Write the STL Output File__________________________________ 3-15
Reading an STL File into CADDS
Reading an STL File _______________________________________________ 4-2
System Messages ___________________________________________ 4-2
Contents-iv
Rapid Prototyping Interface User Guide and Menu Reference
How to Start the RPI Read Option____________________________ 4-2
Converting an STL File ____________________________________________ 4-4
Choosing a Conversion Option ______________________________ 4-4
Using the To Create ASCII Option ____________________________ 4-5
Example of the To Create ASCII Option ______________________ 4-5
Using the To CADDS Database Option _______________________ 4-6
Example of the To CADDS Database Option _________________ 4-7
RP Standard Terminology
RP Standard Terminology ________________________________________ A-2
BPM ______________________________________________________
Concept Model ___________________________________________
Desktop Manufacturing ____________________________________
FDM (fused deposition modeling) __________________________
Filament __________________________________________________
Fill vectors_________________________________________________
Free-form Fabrication ______________________________________
Free-form Manufacturing __________________________________
LOM (laminated object manufacturing) ____________________
Photopolymerization _______________________________________
Rapid Prototyping _________________________________________
Resin______________________________________________________
SGC (solid ground curing)__________________________________
SLS (selective laster sintering) _______________________________
Stereolithography _________________________________________
STL file ____________________________________________________
Support ___________________________________________________
A-2
A-2
A-2
A-2
A-2
A-2
A-2
A-2
A-3
A-3
A-3
A-3
A-3
A-3
A-3
A-3
A-4
RPI Commands
RPI Commands__________________________________________________ B-2
Where to Find Command Information ______________________ B-2
System Messages
System Messages: Explicit ________________________________________ C-2
RPI (PUT STL) Messages _____________________________________ C-2
Rapid Prototyping Interface User Guide and Menu Reference
Contents-v
RPI Read (GET STL) Messages _______________________________ C-4
System Messages: Parametric ____________________________________ C-7
Messages Appearing in the Prompt Buffer __________________ C-7
Messages Appearing in the Message Buffer _________________ C-8
Contents-vi
Rapid Prototyping Interface User Guide and Menu Reference
Preface
Rapid Prototyping Interface User Guide and Menu Reference contains an
overview of rapid prototyping and instructions on how to use the Rapid
Prototyping Interface (RPI) utility.
Rapid Prototyping Interface User Guide and Menu Reference provides instructions
for section leaders, managers, and design engineers who need to create STL output
files from an Explicit solid or surface model database, or from a Parametric solid
model database. Future enhancements may change some of this information. See
your product READ ME FIRST Notes for further information.
Related Documents
The following documents may be helpful as you use Rapid Prototyping Interface
User Guide and Menu Reference:
• Explicit Modeling User Guide and Menu Reference
• Explicit Solid Modeling User Guide and Menu Reference
• Parametric Modeling User Guide and Menu Reference
• NURBS User Guide and Menu Reference
Book Conventions
The following table illustrates and explains conventions used in writing about
CADDS applications.
Convention
Example
Menu selections and options List Section option, Specify Layer
field
User-selected graphic
location
X, d1 or P1
Rapid Prototyping Interface User Guide and Menu Reference
Explanation
Indicates a selection you must make from a
menu or property sheet or a text field that you
must fill in.
Marks a location or entity selection in graphic
examples.
vii
Preface
Convention
Example
Explanation
User input in CADDS text
fields and on any command
line
cvaec.hd.data.param
Enter the text in a CADDS text field or on any
command line.
System output
Binary transfer complete. Indicates system responses in the CADDS text
tar -xvf /dev/rst0
window or on any command line.
Variable in user input
tar -cvf /dev/rst0 filename Replace the variable with an appropriate
substitute; for example, replace filename with an
actual file name.
Variable in text
tagname
Indicates a variable that requires an appropriate
substitute when used in a real operation; for
example, replace tagname with an actual tag
name.
CADDS commands and
modifiers
INSERT LINE TANTO
Shows CADDS commands and modifiers as
they appear in the command line interface.
Text string
"SRFGROUPA" or ’SRFGROUPA’
Shows text strings. You must enclose text string
with single or double quotation marks.
Integer
n
Supply an integer for the n.
Real number
x
Supply a real number for the x.
#
# mkdir /cdrom
Indicates the root (superuser) prompt on
command lines.
%
% rlogin remote_system_name
-l root
Indicates the C shell prompt on command lines.
$
$ rlogin remote_system_name -l Indicates the Bourne shell prompt on command
lines.
root
Window Managers and the User Interface
According to the window manager that you use, the look and feel of the user
interface in CADDS can change. Refer to the following table:
Look and Feel of User Interface Elements
User Interface
Element
Common Desktop Environment (CDE)
on Solaris and HP
Window Manager Other Than CDE on
Solaris, HP, and Windows
Option button
ON — Round, filled in the center
OFF — Round, empty
ON — Diamond, filled
OFF — Diamond, empty
Toggle key
ON — Square with a check mark
OFF — Square, empty
ON — Square, filled
OFF — Square, empty
viii
Rapid Prototyping Interface User Guide and Menu Reference
Preface
Online User Documentation
Online documentation for each book is provided in HTML if the documentation
CD-ROM is installed. You can view the online documentation in the following
ways:
• From an HTML browser
• From the Information Access button on the CADDS desktop or the Local Data
Manager (LDM)
Please note: The LDM is valid only for standalone CADDS.
You can also view the online documentation directly from the CD-ROM without
installing it.
From an HTML Browser:
1.
Navigate to the directory where the documents are installed. For example,
/usr/apl/cadds/data/html/htmldoc/ (UNIX)
Drive:\usr\apl\cadds\data\html\htmldoc\ (Windows)
2.
Click mainmenu.html. A list of available CADDS documentation appears.
3.
Click the book title you want to view.
From the Information Access Button on the CADDS Desktop or LDM:
1.
Start CADDS.
2.
Choose Information Access, the i button, in the top-left corner of the CADDS
desktop or the LDM.
3.
Choose DOCUMENTATION. A list of available CADDS documentation appears.
4.
Click the book title you want to view.
Rapid Prototyping Interface User Guide and Menu Reference
ix
Preface
From the Documentation CD-ROM:
1.
Mount the documentation CD-ROM.
2.
Point your browser to:
CDROM_mount_point/htmldoc/mainmenu.html
(UNIX)
CDROM_Drive:\htmldoc\mainmenu.html (Windows)
Online Command Help
You can view the online command help directly from the CADDS desktop in the
following ways:
• From the Information Access button on the CADDS desktop or the LDM
• From the command line
From the Information Access Button on the CADDS Desktop or LDM:
1.
Start CADDS.
2.
Choose Information Access, the i button, in the top-left corner of the CADDS
desktop or the LDM.
3.
Choose COMMAND HELP. The Command Help property sheet opens
displaying a list of verb-noun combinations of commands.
From the Command Line: Type the exclamation mark (!) to display online
documentation before typing the verb-noun combination as follows:
#01#!INSERT LINE
Printing Documentation
A PDF (Portable Document Format) file is included on the CD-ROM for each
online book. See the first page of each online book for the document number
referenced in the PDF file name. Check with your system administrator if you
need more information.
You must have Acrobat Reader installed to view and print PDF files.
The default documentation directories are:
• /usr/apl/cadds/data/html/pdf/doc_number.pdf (UNIX)
• CDROM_Drive:\usr\apl\cadds\data\html\pdf\doc_number.pdf
(Windows)
x
Rapid Prototyping Interface User Guide and Menu Reference
Preface
Resources and Services
For resources and services to help you with PTC (Parametric Technology
Corporation) software products, see the PTC Customer Service Guide. It includes
instructions for using the World Wide Web or fax transmissions for customer
support.
Documentation Comments
PTC welcomes your suggestions and comments. You can send feedback
electronically to [email protected].
Rapid Prototyping Interface User Guide and Menu Reference
xi
Chapter 1
Overview of the Rapid
Prototyping Interface
This chapter defines rapid prototyping and describes the Rapid Prototyping
Interface. It also discusses its two major functions, namely; writing a CADDS part
into an STL output file and reading an STL file into the CADDS database.
• Rapid Prototyping
• Rapid Prototyping Interface
Rapid Prototyping Interface User Guide and Menu Reference
1-1
Overview of the Rapid Prototyping Interface
Rapid Prototyping
Rapid Prototyping
Prototyping is the creation of a physical model from a design. The prototype is
used to evaluate, verify, and analyze the integrity of a product with respect to its:
• Marketing requirements
• Design intent
• Manufacturing processes
Rapid prototyping (RP) technology is a process that allows the representation of a
CAD solid or surface model to be transferred to a variety of computer-aided
fabrication systems for direct manufacture of a physical model or prototype.
RP systems generate physical models in hours (or days), as opposed to weeks (or
months) with traditional prototyping methods. RP systems reduce the cost of
product design/manufacture, speed the production cycle, and enhance product
quality.
The rapid prototyping process is divided into three phases.
Phase 1
The solid or surface model database and any necessary support structures are
created. An output file is then generated containing a triangular facet
representation (tessellation) of the CAD model in Stereolithography (STL) file
format. STL is the defacto standard file format that feeds all RP fabrication
methods.
1-2
Rapid Prototyping Interface User Guide and Menu Reference
Overview of the Rapid Prototyping Interface
Rapid Prototyping
Phase 2
The STL file containing the tessellation is sent to an RP machine. The file is sliced
into many cross-sectional layers. The layer thickness specified by the RP system
determines the total number of layers required to represent the model.
Phase 3
During Phase 3, the model is built layer by layer, by either tracing or filling each
section with material from the RP system. The final model is cured, if necessary,
and secondary finishing operations are performed. The finished prototype, or
master, is ready for use.
Rapid Prototyping Interface User Guide and Menu Reference
1-3
Overview of the Rapid Prototyping Interface
Rapid Prototyping Interface
Rapid Prototyping Interface
The Rapid Prototyping Interface (RPI), a CADDS utility, has two major functions
that enable you to:
• Write an STL binary file, an ASCII file, or both from a CADDS Parametric or
Explicit model database. During the process, RPI creates a tessellation of the
model, enabling you to view, verify, and modify it before writing the file. This
feature helps you ensure the quality of the prototype before it is produced.
• Read an STL binary file, regardless of its source, and convert it to a CADDS
part in the Explicit environment, an ASCII file, or both.
How Is the STL File Used?
The STL file produced by the RPI is a standard format that feeds all RP fabrication
methods, including those shown in the following table.
Table 1-1
RP System Technologies/Vendors/Products
Technology
Vendor
Product
Stereolithography
3D Systems, Inc.
SLA Family
Selective Laser Sintering
DTM Corp.
Sinterstation
Stereolithography
Teijin Seiki Co.
SOMOS
Laminated Object Mfg.
Helisys, Inc.
LOM1015, 2030
Solid Ground Curing
Cubital, LTD.
Solider 5600
Fused Deposition Modeling
Stratasys
3D Modeler
Flow Diagram for Writing STL Output Using the RPI
The RPI process for writing a Parametric or Explicit CADDS model database to
an STL output file consists of two major procedures: preparing the model and
writing the STL file. The flow diagram below shows the steps that comprise the
procedures and the chapters of this document in which you can find information
about performing these steps.
1-4
Rapid Prototyping Interface User Guide and Menu Reference
Overview of the Rapid Prototyping Interface
Rapid Prototyping Interface
Figure 1-1
Flow Diagram for Writing STL Output
Rapid Prototyping Interface User Guide and Menu Reference
1-5
Chapter 2
Preparing a Model for Writing
an STL File
This chapter provides information on preparing a CADDS solid or surface model
to be written as an STL output file using the RPI.
• Overview of the Preparation Procedure
• Sizing the Part
• Establishing Output Orientation
• Creating Support Structures
Rapid Prototyping Interface User Guide and Menu Reference
2-1
Preparing a Model for Writing an STL File
Overview of the Preparation Procedure
Overview of the Preparation Procedure
Prior to writing an STL output file, you must prepare your solid or surface model
database.
The RP device you use to build the physical model determines which preparation
steps you must perform. Below are the steps that comprise the procedure:
Figure 2-1
Steps in the Preparation Procedure
Before You Begin
Be aware of the following before you prepare your model:
• Make sure that all surfaces of a surface model match and form a water-tight
model.
• To save time during the STL file generation process, you can convert a
Parametric model to an Explicit model if you are working in the Explicit
environment. To convert a model, choose the Entity option on the Desktop top
bar, then choose Convert To Explicit from the menu.
2-2
Rapid Prototyping Interface User Guide and Menu Reference
Preparing a Model for Writing an STL File
Sizing the Part
Sizing the Part
You must size models to fit within the physical building volume of the rapid
prototyping machine creating the prototype. For example, 3D System’s 250
Machine has a 10x10x10-inch maximum volume in which to build a part.
You can size parts that exceed specification using the following methods:
• Part scaling
• Part breakdown
• X, Y, Z scale adjustments
Part Scaling
If you do not need a full-scale prototype of your model, scale your database
appropriately. See the Explicit Modeling User Guide or the Parametric Modeling
User Guide.
Part Breakdown
If you need a full-scale prototype of your model, but your model is too large to be
built in the RP machine, break the model down into several smaller models using
standard geometric modeling techniques. After the smaller models are built, you
can assemble them to obtain the full-scale model. See the Explicit Modeling User
Guide or the Parametric Modeling User Guide.
X, Y, Z Scale Adjustments
The Rapid Prototyping Interface - Viewing and Verifying Tessellation property
sheet contains scale adjustments that enable you to modify the scale of the entire
tessellation, or the x, y, and z scales individually. See Chapter 3, “Writing an STL
File” for more information.
Rapid Prototyping Interface User Guide and Menu Reference
2-3
Preparing a Model for Writing an STL File
Establishing Output Orientation
Establishing Output Orientation
You must ensure that the position and orientation of the CADDS model conforms
to the RP device constraints. If it does not, you must establish a new model
orientation and position for output to an STL file.
Build in Positive Model Space
Most RP systems require that the model and its support structure be built in
positive model space (first quadrant). See the figure below, TOP Cplane
Orientation of Design in CADDS, as an example.
Figure 2-2
TOP Cplane Orientation of Design in CADDS
Define a New Cplane
To establish output orientation, define a new construction plane (Cplane), or RP
Cplane that locates the xy-plane for STL output and support structure design. For
examples, see the figures below, RP Cplane Orientation for STL Output and TOP
Cplane Orientation to RP Cplane Orientation. Also see the Explicit Modeling
User Guide and the Parametric Modeling User Guide.
2-4
Rapid Prototyping Interface User Guide and Menu Reference
Preparing a Model for Writing an STL File
Establishing Output Orientation
Figure 2-3
RP Cplane Orientation for STL Output
Rapid Prototyping Interface User Guide and Menu Reference
2-5
Preparing a Model for Writing an STL File
Establishing Output Orientation
Figure 2-4
2-6
TOP Cplane Orientation to RP Cplane Orientation
Rapid Prototyping Interface User Guide and Menu Reference
Preparing a Model for Writing an STL File
Creating Support Structures
Creating Support Structures
You may need to create support structures for your model, depending on the RP
device you will be using to build your prototype model. The direction in which the
RP device builds the model determines the configuration of the support structure.
Why Models Need Support Structures
Prototype models require support structures:
• To attach the base of the prototype model to the transfer system of the RP
machine
• To support faces of the prototype model normal to the build direction of the RP
machine
• To support faces representing a cantilevered overhang
Please note: Consult with the operator of the RP device to confirm support
structure requirements.
How You Create the Structures
You can create support structures in CADDS as Explicit or Parametric models. To
obtain the geometry of a support structure, section through the model and:
• Extract the geometry of the model (see the Explicit Modeling User Guide and
Menu Reference or the Parametric Modeling User Guide and Menu Reference).
Or:
• Reference the geometry of the model.
Using a Separate STL File
Support structures must be created in a separate STL file. Build the structure as
described below:
• In the Explicit environment, place the part model geometry and support
structure geometry on different layers.
• In the Parametric environment, digitize the support structure in an RPI process
separate from that of the model.
Rapid Prototyping Interface User Guide and Menu Reference
2-7
Preparing a Model for Writing an STL File
Creating Support Structures
Positioning the Cplane
As a rule, define the Cplane with the xy-plane positioned .300 inch below the
bottom of the model. Design the support structures to penetrate the model by .030
inch and extend down to the xy-plane. See the figure below as an example:
Figure 2-5
2-8
Support Structure Example
Rapid Prototyping Interface User Guide and Menu Reference
Chapter 3
Writing an STL File
This chapter includes instructions for using the RPI to write an STL file from a
CADDS model database. The procedure includes configuring a tessellation;
viewing and verifying it; and writing the STL output file.
• Overview of the STL File Writing Procedure
• How to Configure a Tessellation
• How to View and Verify the Tessellation
• How to Write the STL Output File
Rapid Prototyping Interface User Guide and Menu Reference
3-1
Writing an STL File
Overview of the STL File Writing Procedure
Overview of the STL File Writing Procedure
After you have prepared your surface or solid model database as described in
Chapter 2, “Preparing a Model for Writing an STL File”, you are ready to use RPI
to write an STL binary file, an STL ASCII file, or both.
Whether you are working with an Explicit or a Parametric model database, the
process for writing an STL file is similar; differences are noted in this chapter.
Procedure for Writing the STL File
The following figure shows the major steps that comprise the procedure for
writing STL output files. The steps are explained in this chapter.
Figure 3-1
The STL File Writing Procedure
Here are brief descriptions of what you do at each step:
3-2
1.
Configure a tessellation from a solid or a surface model (Explicit or
Parametric). You can specify the tolerance, unit of measurement, maximum
facets, and scale of the tessellation.
2.
View the tessellation by displaying it as a faceted or rendered image in both
Parametric and Explicit environments. While viewing, you can verify the
quality of the tessellation against the surface or solid model. If the quality is
Rapid Prototyping Interface User Guide and Menu Reference
Writing an STL File
Overview of the STL File Writing Procedure
unsatisfactory, you can reconfigure and display another tessellation using a
different tolerance.
Please note: Viewing the tessellation is optional. However, to correlate the
quality of the STL output file with the quality of the fabricated model, viewing the
tessellation is strongly recommended.
3.
Write the STL output file in binary, ASCII, or both formats. You can include
facet attributes, specify a Cplane, and define the xyz location.
After RPI writes the STL output file, the file can be transferred to an RP machine,
where a physical model is created.
System Messages
The Explicit and Parametric models each have a unique set of system messages
that may appear while using the RPI. For more information, see Appendix C,
“System Messages”.
Reading Binary STL Files (Explicit)
RPI Read is an option in the Explicit RPI that lets you bring an STL binary file
from any external source or CAD system, and convert it into a CADDS Explicit
model database or into an ASCII file. For more information, see Chapter 4,
“Reading an STL File into CADDS”.
Rapid Prototyping Interface User Guide and Menu Reference
3-3
Writing an STL File
How to Configure a Tessellation
How to Configure a Tessellation
Configuring a tessellation of your model database is the first step in the STL file
writing process.
Before You Begin
Check that you have sufficient tmp directory and swap space available. For each
megabyte of part, you need (depending on your CADDS environment):
• Parametric: 20 MB of swap space
• Explicit: 50 MB of swap space
These requirements are in addition to the space required for part and drawing
activation in CADDS.
Configuring the Tessellation
Follow the instructions below to configure a tessellation of an Explicit or
Parametric model:
3-4
1.
Ensure that a complete, volumetric, water-tight model of your CADDS part
exists as either a solid or surface model.
2.
Design any necessary support structures. See “Creating Support Structures” to
determine if your model requires support structures.
3.
(Explicit Only) Ensure that only the geometry of the model to be processed is
visible (echoed on) in the graphics window. Use the Layer option on the top
bar, and echo only the layers to be contained in the STL output file.
4.
Choose the Utility option on the desktop top bar to access RPI.
5.
Choose the Rapid prototyping option on the Utility menu. The RPI
Write/Read command palette appears.
Rapid Prototyping Interface User Guide and Menu Reference
Writing an STL File
How to Configure a Tessellation
Figure 3-2
6.
RPI Write/Read Command Palette
(Explicit Only) Select the following icon.
The Rapid Prototyping Interface - View and Verify Tessellation property sheet
appears. The property sheet with default values is shown below.
Rapid Prototyping Interface User Guide and Menu Reference
3-5
Writing an STL File
How to Configure a Tessellation
Figure 3-3
7.
Rapid Prototyping Interface Property Sheet
Specify the quality of the tessellation by filling in these fields if you are not
satisfied with the default values:
Tolerance- Specifies the maximum chordal deviation (tolerance) between the
tessellation of the model and the model’s actual geometry. The default value on
the property sheet will be the equivalent of 0.001 centimeters (0.01 millimeters
for an mm part or .0003937 inches for an inch part). The value issued at the
command line is in db units, that is, centimeters.
Units - Specifies the units of measurement. Defaults to the units used in the
active model. You can specify centimeters, millimeters, inches, kilometers,
miles, or feet.
Maximum Facets- Specifies the maximum number of triangles that can be
generated. The default value is 250,000. If the number of triangles is greater
than the value in this field, an error message appears stating the current facet
value and prompting you to specify another value.
Scale - Specifies the scale for the xyz coordinates. You can choose to modify
the scale of all coordinates using a single value (default) or modify a coordinate
value individually by choosing the Independent Scaling button and
specifying values for each coordinate. The default value for all coordinates is
1.0.
3-6
Rapid Prototyping Interface User Guide and Menu Reference
Writing an STL File
How to Configure a Tessellation
8.
Choose the type of image you want to display for viewing and verifying the
tessellation by choosing either of these buttons:
Render - Specifies that the tessellation triangles of the selected solid or solids
will be displayed as a rendering (shaded image). This is the default selection.
Facets - Specifies that the tessellation triangles of the selected solid or solids
will be displayed as facets (triangles).
Rapid Prototyping Interface User Guide and Menu Reference
3-7
Writing an STL File
How to View and Verify the Tessellation
How to View and Verify the Tessellation
After you have configured the tessellation, follow the instructions below to display
it so that you can view and verify the results.
This procedure is not required, but is strongly recommended. For more
information, see “If You Do Not Want to Display the Tessellation”.
Display If You Are Using the Parametric RPI
3-8
1.
Click Apply at the bottom of the property sheet. The button changes to Display.
2.
You are prompted to select a view. Select the view in which you want the image
to appear.
3.
You are prompted to select one or more solids. Select the solid or solids on
which you want to display the tessellation.
4.
Click Display at the bottom of the property sheet. If no processing errors occur,
a rendered or faceted image will appear directly over the model on your screen.
Rapid Prototyping Interface User Guide and Menu Reference
Writing an STL File
How to View and Verify the Tessellation
If you want to change the image quality, fill in the property sheet again,
changing values as appropriate, and click Display.
Warning
If a warning message is displayed while the RPI attempts to
display the tessellation, return to the original model and
correct face or surface defects as specified in the message.
5.
If you manipulate the display orientation while in the command, click Display
to recreate the rendered image.
6.
When satisfied with the appearance of the display, you can write the file. See
“How to Write the STL Output File”for details. Alternatively, click Abort to
exit the command.
Display If You Are Using the Explicit RPI
1.
Click Apply at the bottom of the property sheet. The button changes to Display.
2.
Click Display. If no processing errors occur, a rendered or faceted image
appears directly over the model on your screen. If you want to change the
quality of the image, fill in the property sheet again, changing values as
appropriate, and click Display.
Rapid Prototyping Interface User Guide and Menu Reference
3-9
Writing an STL File
How to View and Verify the Tessellation
Warning
If a warning message is displayed while the RPI attempts to
display the tessellation, return to the original model and
correct face or surface defects as specified in the message.
3.
When satisfied with the appearance of the display, you can write the file. See
“How to Write the STL Output File”for details.
Warning
When you use Display, the rendered images of any
associated assemblies via View Part or Concurrent Assembly
Mock-Up (CAMU) do not necessarily represent what will be
written to the STL file and produced by the RP device. The
displayed images you see are not tessellations based on the
currently specified tolerance, but are images based on the
tessellation data present in the _gr files that exist in the
directories of the assemblies. These files can be created or
modified only when the assemblies exist as active parts in
CADDS.
If You Do Not Want to Display the Tessellation
You are not required to display the tessellation in order to write the STL output
file. That is, you can fill in the fields (or leave default values) on the Rapid
Prototyping Interface - View and Verify Tessellation property sheet and then
choose the second icon. The Rapid Prototyping Interface - Write STL Output
property sheet appears, enabling you to generate the STL output file or files. See
“How to Write the STL Output File”for details.
Examples of Displayed Images
The following examples show rendered and faceted images and the Rapid
Prototyping Interface - View and Verify property sheets used to create them.
Examples of a Rendered Image at Two Tolerance Levels
The following figures show a rendered image with high (coarse) and low (smooth)
tolerances.
3-10
Rapid Prototyping Interface User Guide and Menu Reference
Writing an STL File
How to View and Verify the Tessellation
Figure 3-4
High Tolerance (0.1 cm) Rendered Image
Figure 3-5
Low Tolerance (0.001 cm.) Rendered Image
Rapid Prototyping Interface User Guide and Menu Reference
3-11
Writing an STL File
How to View and Verify the Tessellation
Example of a Faceted Tessellated Image
The following examples show a wireframe representation of a CADDS part and a
faceted tessellation of the part.
Figure 3-6
3-12
Wireframe Representation of CADDS Part
Rapid Prototyping Interface User Guide and Menu Reference
Writing an STL File
How to View and Verify the Tessellation
The following property sheet is used to create a faceted tessellation.
Figure 3-7
Rapid Prototyping Interface Property Sheet
Rapid Prototyping Interface User Guide and Menu Reference
3-13
Writing an STL File
How to View and Verify the Tessellation
Figure 3-8
3-14
Faceted Tessellation of CADDS Part
Rapid Prototyping Interface User Guide and Menu Reference
Writing an STL File
How to Write the STL Output File
How to Write the STL Output File
After you have configured (displayed, viewed, and verified) the tessellation, follow
these instructions to write the STL output file or files.
1.
Select the following icon on the Rapid Prototyping Interface property sheet.
Fields for Write STL Output appear on the sheet. The following figures show
the Parametric and Explicit property sheets with their default values.
Figure 3-9
Parametric RPI - Write STL Output Property Sheet
Rapid Prototyping Interface User Guide and Menu Reference
3-15
Writing an STL File
How to Write the STL Output File
Figure 3-10 Explicit RPI - Write STL Output Property Sheet
2.
If you want to return to the View and Verify Tessellation mode and make
modifications before creating the file, click the first icon. Otherwise, proceed to
Step 3.
3.
Select the button next to the type of file or files that you want to generate
(Binary, ASCII, or both). The Binary button is selected by default.
4.
Provide a file name for each file type you select.
Binary name - The name you specify is appended with .stl. The resulting
binary file is placed in the part directory. For example, specifying a binary
name of TRIALBIN produces the file <part directory>/trialbin.stl.
ASCII name- The name you specify is appended with .stl. The resulting ASCII
file is placed in the part directory under _bcd. For example, specifying a binary
name of TRIALASC produces the file <part directory>/_bcd/trialasc.stl.
5.
To have each facet attribute (attached to each triangle) in the resulting STL file
contain a surface number, select the Surface Numbers button. Default is zero
(no attribute attached).
Please note: STL file output containing non-zero attributes may not be
compatible with 3D Systems STL software.
3-16
Rapid Prototyping Interface User Guide and Menu Reference
Writing an STL File
How to Write the STL Output File
6.
Specify a Cplane on which the coordinates in the resulting STL file will be
based. You can select any of the seven system Cplane names or numbers (TOP
or 1, FRONT or 2, RIGHT or 3, BOTTOM or 4, LEFT or 5, REAR or 6, ISO or
7) or any user-defined Cplane. The default is TOP.
7.
If applicable, specify the XYZ location to be applied to all coordinates when
mapping to the STL format. The defaults are X: 0.0, Y: 0.0, Z: 0.0.
8.
Click Go (Parametric) or Apply (Explicit). In the Parametric environment, if
you have not viewed and verified the tessellation data, click Apply and Go. The
tessellation is written to the STL file or files.
Please note: In the Explicit environment, RPI creates STL output via View
Part or CAMU for assemblies that exist on visible layers of an active part.
Rapid Prototyping Interface User Guide and Menu Reference
3-17
Chapter 4
Reading an STL File into CADDS
This chapter provides instructions for using RPI to read an STL binary file and
convert it into a CADDS part, an ASCII file, or both.
This utility is available in the Explicit environment only.
• Reading an STL File
• Converting an STL File
Rapid Prototyping Interface User Guide and Menu Reference
4-1
Reading an STL File into CADDS
Reading an STL File
Reading an STL File
The RPI in the Explicit environment enables you to read an Explict STL binary
format file created in an external source and convert it into a CADDS database, an
ASCII format file, or both. For example, you can use RPI to read laser scanned
data that is formatted as an STL file and convert it into CADDS.
By converting non-CADDS STL files into CADDS entities, you can create model
geometry based on this STL data - a first step in reverse engineering an object’s
basic shape.
System Messages
System messages that may appear while using RPI Read are described in
Appendix C.
How to Start the RPI Read Option
1.
Ensure that the CADDS part and drawing of the model are active in the Explicit
environment.
2.
Use the View option on the top bar to define a view (if it is a new model).
3.
Choose the Utility option on the desktop top bar to access the Utility menu.
4.
Choose the Rapid Prototypingoption on the Utility menu.
5.
When the RPI Write/Read command palette appears, choose the right icon.
Figure 4-1
RPI Write/Read Command Palette
The Rapid Prototyping Read property sheet appears.
4-2
Rapid Prototyping Interface User Guide and Menu Reference
Reading an STL File into CADDS
Reading an STL File
Figure 4-2
6.
Rapid Prototyping Read Property Sheet
Specify the name of the binary file to be translated. RPI Read appends .stl to the
file name you enter. The binary file must reside under the active part directory.
Please note: The default binary file name STLBIN is displayed when you
open the property sheet. If you want a binary file name other than the default,
change it to the desired name.
7.
Click the Surface Number button and enter a surface number value if you want
to map a specific surface ID number to attribute values in the STL file. The
Surface Number button applies only to binary STL files that were generated
with the Surface Numbers option during the writing of an STL file.
By default, this button is not selected and all facets are mapped.
Rapid Prototyping Interface User Guide and Menu Reference
4-3
Reading an STL File into CADDS
Converting an STL File
Converting an STL File
After you specify the file you want to read, you must choose a conversion option.
Choosing a Conversion Option
The Rapid Prototyping Read property sheet displays these options for converting
the file:
• To Create ASCII converts an STL file into ASCII format.
• To CADDS Database converts a faceted image of an STL file to a CADDS
part as string or surface (spole) entities.
You can select one or both of these options. The To Create ASCII option is
selected by default. At least one conversion option must be selected.
The diagram below shows the To Create ASCII and the To CADDS Database
conversion options.
Figure 4-3
4-4
Process Diagram of RPI Read
Rapid Prototyping Interface User Guide and Menu Reference
Reading an STL File into CADDS
Converting an STL File
Using the To Create ASCII Option
The To Create ASCII option on the Rapid Prototyping Read property sheet creates
an ASCII file. To use this option:
1.
Click the To Create ASCII button (selected by default) on the property sheet.
2.
Specify the ASCII file name. (RPI Read appends .stl to the name you enter.) If
you want an ASCII file name other than the default STLASC, change it to the
desired name(s).
3.
Click Apply. A file is created under
<create_directory>/<partname>/_bcd/filename.stl. The following message
appears.
Generating .stl file
<create_directory>/<partname>/&BCD/<filename> @STL!
Example of the To Create ASCII Option
The Rapid Protoyping Read property sheet below is configured to create an ASCII
file.
Rapid Prototyping Interface User Guide and Menu Reference
4-5
Reading an STL File into CADDS
Converting an STL File
Using the To CADDS Database Option
The To CADDS Database option on the Rapid Prototyping Read property sheet
lets you create a CADDS model as string or surface (spole) entities. To use this
option:
1.
Click the To CADDS Database button.
2.
Specify that the facets in the binary file be represented in the CADDS model as
strings or surfaces .
3.
Click the Layer button if you want to specify the layer on which you want these
entities to appear. By default, the button is not selected; entities will appear on
the active layer.
4.
Select Apply. The following message appears (depending on the type of entity
you selected):
***Creating SPOLE Geometry***
or
***Creating STRING Geometry***
4-6
Rapid Prototyping Interface User Guide and Menu Reference
Reading an STL File into CADDS
Converting an STL File
Example of the To CADDS Database Option
The Rapid Protoyping Read property sheet below is configured to convert an STL
file to a string CADDS entity and to an ASCII file:
Rapid Prototyping Interface User Guide and Menu Reference
4-7
Appendix A
RP Standard Terminology
This appendix describes standard terms that are used throughout the RP industry.
• RP Standard Terminology
Rapid Prototyping Interface User Guide and Menu Reference
A-1
RP Standard Terminology
RP Standard Terminology
RP Standard Terminology
The following terms are standard throughout the RP industry.
BPM
Ballistic particle manufacturing
Concept Model
A 3D model having relatively loose accuracy requirements. Intended for
evaluation of appearance, form, and similarities.
Desktop Manufacturing
A synonym for rapid prototyping.
FDM (fused deposition modeling)
Rapid prototyping technology in which a thermoplastic material is extruded by
moving orifice and hardened to form a layer.
Filament
In fused deposition modeling, wire-like form of raw material. Also used
sometimes as a synonym for line.
Fill vectors
Closely spaced drawing vectors used to form skins.
Free-form Fabrication
A synonym for rapid prototyping.
Free-form Manufacturing
A synonym for rapid prototyping.
A-2
Rapid Prototyping Interface User Guide and Menu Reference
RP Standard Terminology
RP Standard Terminology
LOM (laminated object manufacturing)
Rapid prototyping technology in which part layers are cut from sheet material
using a laser, and laminated together through heat and pressure to form a 3D
structure.
Photopolymerization
Chemical process in which monomers and other small molecules combine to form
complex molecules while producing solidification of the material.
Rapid Prototyping
Fabrication of a physical, 3D part of arbitrary shape directly from a numerical
description (typically a CAD model) by a quick, highly automated,and totally
flexible process.
Resin
Photopolymer liquid used as raw part-building material in some rapid prototyping
technologies.
SGC (solid ground curing)
Rapid prototyping technology in which unexposed liquid photopolymer resin is
removed from each layer and replaced by wax, after which the resin and wax layer
is milled to the correct thickness before a new layer is added.
SLS (selective laster sintering)
Rapid prototyping technology in which a laser draws the pattern of a layer onto a
thin layer of thermoplastic powder, causing localized sintering of particles into a
solid mass and adhesion to the underlying layer.
Stereolithography
Rapid prototyping technology in which an ultraviolet laser is used to draw
successive cross-sectional patterns on the surface of a photopolymer resin. The
resin solidifies where illuminated, generating layers that adhere to one another to
form a 3-dimensional part.
STL file
Data file of a specific format originally developed by 3D Systems in which the
surfaces of a CAD model are represented by a set of triangular facets.
Rapid Prototyping Interface User Guide and Menu Reference
A-3
RP Standard Terminology
RP Standard Terminology
Support
Structure that, like scaffolding, holds and stabilizes a part during the building
process in liquid-based RP systems (for example, stereolithography) and is
ultimately removed.
A-4
Rapid Prototyping Interface User Guide and Menu Reference
Appendix B
RPI Commands
This appendix describes the commands you can use to run the RPI utility.
• RPI Commands
Rapid Prototyping Interface User Guide and Menu Reference
B-1
RPI Commands
RPI Commands
RPI Commands
As an alternative to the menus and property sheets provided by RPI, you can use
line commands at the system level to perform RPI functions.
The table here shows the RPI command names, the CADDS environments in
which they are used, and a brief description of what each command does.
Command
CADDS
Environment
Description
GET STL
Explicit
Translates an STL binary file to CADDS string or
spole entities, or to ASCII format.
PUT STL
Explicit
Generates an STL binary and/or ASCII file from an
Explicit solid or surface model.
PUT STL
Parametric
Generates an STL binary and/or ASCII file from a
Parametric solid model.
Where to Find Command Information
For online information about each command, including a functional description,
syntax, explanation of modifiers, and examples of the command usage, choose
the Information Access option on the CADDS desktop, then choose the
Command Help menu.
B-2
Rapid Prototyping Interface User Guide and Menu Reference
Appendix C
System Messages
This appendix contains a list of system messages you may receive when using the
Rapid Prototyping Interface from the Explicit and Parametric environment.
• System Messages: Explicit
• System Messages: Parametric
Rapid Prototyping Interface User Guide and Menu Reference
C-1
System Messages
System Messages: Explicit
System Messages: Explicit
These messages are grouped by function (RPI and RPI Read) and in alphabetical
order, with an explanation for each message.
RPI (PUT STL) Messages
ERROR: An error has occurred in the tailor/tessellator STL output
cannot be generated.
A fatal error occurred in the tailor or tessellator utility. RPI terminates
immediately. If this message is displayed, report it through the normal defect
tracking channels.
ERROR: The maximum number of triangles has been surpassed. Please
specify a new MAXTRIS value greater than <n>.
Self explanatory. RPI terminates immediately.
ERROR: The value specified for MAXTRIS must be greater than 0.
Self explanatory. RPI terminates immediately.
ERROR: You must specify BINFILE, ASCIIFILE, DISPLAY or USEDISPLAY
Self explanatory. RPI terminates immediately
Invalid Cplane specified.
A specified Cplane was not user defined or one of the seven system Cplanes. RPI
terminates immediately. Reissue the command with a valid Cplane (see Chapter 2,
“Preparing a Model for Writing an STL File” for information on specifying
Cplanes).
NOTE: PUT STL DISPLAY was issued with assemblies active (via
VIEWPART). The assemblies will not be tessellated. See the RPI
User Guide or the on-line documentation for clarification of this
restriction.
If this message is displayed, see the description of the view part or display
restriction in Chapter 3, “Writing an STL File”.
NOTE: SURFNUMBER specified. Facet attributes will be filled
with surface IDs.
This message warns the user that the RPI “Surface Number” option was specified,
and that the resultant STL output files may cause problems when used as input to
C-2
Rapid Prototyping Interface User Guide and Menu Reference
System Messages
System Messages: Explicit
RPI devices. This feature is intended only when used in conjunction with the RPI
“Surface Number” option used to read STL data. RPI will continue processing.
PUT STL PROCESS COMPLETE: <n> Triangles (Facets) Generated.
Indicates successful execution. The number or triangles generated is indicated.
Processing Active Part (<partname>).
Self explanatory.
Processing Assembly/View Part (<viewpartname>)
Self explanatory.
STL ASCII file <filename> Created.
Self explanatory.
STL Binary file <filename> Created.
Self explanatory.
*** RPI End Time <time> ***
The last RPI message to appear before the CADDS prompt returns.
*** RPI Start Time <time> ***
The first RPI message to appear after the file overwrite prompt.
The .stl Binary File <partname> exists. Type “ok” to overwrite.
This message indicates that the STL Binary file exists. It also asks if you want to
overwrite it. Any response other than “ok” results in the RPI skipping STL Binary
file creation.
The .stl ASCII File <partname> exists. Type “ok” to overwrite.
This message indicates that the STL ASCII file exists. It also asks you if you want
to overwrite it. Any response other than “ok” results in the RPI skipping STL
ASCII file creation.
WARNING: A Tailor/Tessellator error encountered on face ID <n>
(surface ID <n>); No tessellation generated for that face
Rapid Prototyping Interface User Guide and Menu Reference
C-3
System Messages
System Messages: Explicit
This message indicates that this particular face was not tessellated due to a tailor
or tessellator error. This would occur when processing a bad face within a solid or
an open trimmed surface. RPI will continue.
WARNING: A Tailor/Tessellator error encountered on surface ID <n>.
No tessellation generated for that surface.
This message indicates that this particular surface was not tessellated due to a
tailor or tessellator error. This would occur when processing a bad standalone
surface. RPI will continue.
WARNING: Due to scaling, some coordinate(s) are outside the part
extents. Viewing the shaded image will show that the display list
is not usable for STL file output (using the USEDISPLAY option).
Issue CHANGE EXTENTS and change the MIN and MAX so that the
coordinate <f.f>, <f.f>, <f.f> fits within the extents. Then
reissue PUT STL with the DISPLAY option.
This message appears only if RPI Write is issued with the Display option and one
of the Scale options, and some resulting coordinate data is outside the part extents.
You should go through the steps described in the message to resolve the problem.
For STL file output, do not use the display list that is active immediately
subsequent to this message. Use the display list only if this message does not
appear.
WARNING: No eligible (visible) faces/surfaces in <partname>. No
tessellation generated
This message indicates that no solids or surfaces were on a visible layer, or were
erased, blanked, and so on. If there are active assemblies, RPI will skip the active
part and continue. Otherwise RPI will terminate immediately
WARNING: <n> FACE(S)/SURFACE(S) NOT TESSELLATED. See previous
messages for face/surface ID number(s).
This message appears only if bad faces or surfaces were previously encountered. It
is a final warning to analyze the problem faces or surfaces before writing the STL
file output and sending it to an RP device.
RPI Read (GET STL) Messages
*** Creating STRING Geometry ***
This message occurs when the “To CADDS Database” (TODBASE STRING)
option is specified.
*** Creating SPOLE Geometry ***
C-4
Rapid Prototyping Interface User Guide and Menu Reference
System Messages
System Messages: Explicit
This message occurs when the “To CADDS Database” (TODBASE SPOLE)
option is specified.
ERROR: The specified STL file does not contain surface attribute
information. Use the “To CADDS Database” (TODBASE modifier) option
without specifying SURFNUMBER.
This message occurs if the STL binary was not written using the Surface Numbers
option but you have attempted to use the Surface Number option with RPI Read.
ERROR: The specified STL binary file <partname> does not exist in
the part directory
Self explanatory. RPI terminates immediately.
Generating Execute File <partname>.
Self explanatory.
Generating .stl ASCII file <partname>
Self explanatory.
Reading STL Binary File <filename>
Self explanatory
STL ASCII file <filename> Created.
Self explanatory
*** RPI End Time <time> ***
The last RPI message to appear before the CADDS prompt returns.
*** RPI Start Time <time> ***
The first RPI message to appear after the file overwrite prompts.
The .stl ASCII File <partname> exists. Type “ok” to overwrite.
This message indicates that the STL ASCII file exists. It also asks if you want to
overwrite it. Any response other than “ok” results in RPI skipping STL ASCII file
creation.
The Execute File <partname> exists. Type “ok” to overwrite.
Rapid Prototyping Interface User Guide and Menu Reference
C-5
System Messages
System Messages: Explicit
This message indicates that the execute file exists. It also asks if you want to
overwrite it. Any response other than “ok” results in RPI skipping execute file
creation.
C-6
Rapid Prototyping Interface User Guide and Menu Reference
System Messages
System Messages: Parametric
System Messages: Parametric
This is a list of system messages you may receive when using the Rapid
Prototyping Interface (PUT STL) from a Parametric model. Messages are divided
into two groups, Prompts and Processing Messages. Following each message is an
explanation.
Messages Appearing in the Prompt Buffer
The following messages appear in the prompt buffer during command processing.
Enter a binary file prefix
Appears after you issue the Binfile modifier.
Enter a cplane name
Appears after you issue the Cplane modifier.
Enter an ascii file prefix
Appears after you issue the ASCIIfile modifier.
Enter a scale value
Self explanatory.
Enter a scale value for x
Self explanatory.
Enter a scale value for y
Self explanatory.
Enter a scale value for z
Self explanatory.
Enter a tolerance value
Appears after you issue the Tolerance modifier.
Enter modifiers and select solid(s)
Appears after you issue PUT STL.
Rapid Prototyping Interface User Guide and Menu Reference
C-7
System Messages
System Messages: Parametric
Enter the maximum number of facets (triangles)
Appears after you issue the Maxtris modifier.
Optionally select new view for Display
If you issue Render or Facets, select a view, then issue Render or Facets again in
the same command string, this message appears. If you want the rendering to
appear in the previously selected view, do not select a new view. Or, select a new
view in which you want the next display to appear; the rendering will not appear in
the previously selected view.
Select view for Display
Appears after you issue Render or Facets if you did not previously select a view.
Select a view in which you want the display to appear.
Select solid(s) before issuing Display.
You selected a view, but did not then select solid(s).
Select solid(s) before issuing the carriage return.
You issued any of the output modifiers, but you did not select solid(s).
Specify location for the output origin (via digitize or
“[x,y,z]”).
Appears after you issue the Origin modifier.
Messages Appearing in the Message Buffer
The following messages appear in the message buffer during processing.
ERROR: An error has occurred in the tailor/tessellator. STL output
cannot be generated.
A fatal error occurred in the tailor/tessellator utility. RPI terminates immediately.
If this message occurs, report it through the normal bug tracking channels.
Please note: The tailor is the utility that insures all triangles are
vertex-matched. The tessellator is the utility that generates triangles.
C-8
Rapid Prototyping Interface User Guide and Menu Reference
System Messages
System Messages: Parametric
ERROR: An error has occurred while reading CPLANE id’s. STL output
cannot be generated for one of the solids.
RPI terminates immediately. If this message occurs, report it through the normal
bug tracking channels.
ERROR: Invalid Cplane Specified
The Cplane you specified with the Cplane modifier is not a user-defined Cplane or
one of the seven system Cplanes. You must reissue a valid Cplane name before you
continue.
ERROR: The maximum number of triangles surpassed. Specify a new
Maxtris value greater than <n>.
The number of triangles will exceed the Maxtris value you specified. n indicates
the current Maxtris value. To correct, reissue Maxtris, and specify a value greater
than n, then issue Display again or <CR> as appropriate.
For STL output you must issue Binfile {prefix} or Asciifile
{prefix} before issuing the carriage return.
You did not issue Binfile or Asciifile, and a prefix, before you selected Apply. To
correct, you must reissue the entire command, being sure to issue Binfile or
Asciifile, and a prefix, as appropriate.
NOTE: Surfnumber specified. Facet attributes will be filled with
face IDs.
This message appears if you issue Surfnumber. Each facet attribute in the STL file
will contain a surface number that pertains to the surface (on one of the solids
selected) from which the facet was derived.
STL Ascii file <filename> Created
Appears only if you issued Asciifile.
STL Binary file <filename> Created
Appears only if you issued Binfile.
*** STL End Time <hh:mm:ss> ***
This message appears immediately before you are returned to the command
processor, and indicates the time in the format <hour:minute:second>.
Rapid Prototyping Interface User Guide and Menu Reference
C-9
System Messages
System Messages: Parametric
PUT STL PROCESS COMPLETE: <n> TRIANGLES (FACETS) GENERATED.
Self-explanatory.
*** STL Start Time <hh:mm:ss> ***
This message appears immediately after you issue a Carriage Return or Display.
The STL Rapid Prototyping Interface is not licensed for this
machine.
This message appears if you issue PUT STL, but the interface has not been
purchased.
You must issue a Display option (Render or Facets) and select a
view before issuing Display.
You issued Display without first issuing Render or Facets and selecting a view. To
correct, issue Render or Facets, select a view, then issue Display again.
You must select solid(s) before issuing the carriage return.
You did not select solid(s) before you pressed the Carriage Return. To correct this,
you must reissue the command, being sure to select a solid when appropriate.
You must select solid(s) before issuing Display.
You did not select solid(s) before you issued Display. To correct this, select a
solid, then immediately issue Display.
WARNING: <n> FACE(S) NOT TESSELLATED. See previous messages for
face ID numbers.
This message will appear only if bad faces were previously encountered. It is the
final warning to analyze the problem faces before sending the STL file output to
an RP device.
WARNING: Unable to generate the domain of face ID <n>. No
tessellation generated for that face
This message indicates that the specified face was not tessellated due to an error
attempting to generate the domain of a face. This occurs when processing a bad
face within a solid. RPI will continue.
C-10
Rapid Prototyping Interface User Guide and Menu Reference
System Messages
System Messages: Parametric
WARNING: A Tailor/Tessellator error encountered on face ID <n>. No
tessellation generated for that face.
This message indicates that this particular face was not tessellated due to a
tailor/tessellator error. This would occur when processing a bad face within a solid.
RPI will continue.
Rapid Prototyping Interface User Guide and Menu Reference
C-11
Index
C
Convert To Explicit 2-2
Converting an STL File 4-4
Choosing a Conversion Option 4-4
CADDS Database 4-4
Create ASCII 4-4
Process Diagram of RPI Read 4-4
Example of the To CADDS Database
Option 4-7
Example of the To Create ASCII Option 4-5
Using the To CADDS Database Option 4-6
Using the To Create ASCII Option 4-5
Creating Support Structures 2-7
How You Create the Structures 2-7
Positioning the Cplane 2-8
Support Structure Example 2-8
Using a Separate STL File 2-7
Why Models Need Support Structures 2-7
D
Documentation, printing from Portable
Document Format (PDF) file 1-x
E
Entity 2-2
Establishing Output Orientation 2-4
Build in Positive Model Space 2-4
TOP Cplane Orientation of Design in
CADDS 2-4
Define a New Cplane 2-4
RP Cplane Orientation for STL Output 2-5
TOP Cplane Orientation to RP Cplane
Orientation 2-6
H
How to Configure a Tessellation 3-4
Configuring the Tessellation 3-4
Facets 3-7
Maximum Facets 3-6
Render 3-7
Scale 3-6
Tolerance 3-6
Units 3-6
How to View and Verify the Tessellation 3-8
Display If You Are Using the Explicit RPI 3-9
Display If You Are Using the Parametric RPI 3-8
Example of a Faceted Tessellated Image 3-12
Faceted Tessellation of CADDS Part 3-14
Wireframe Representation of CADDS
Part 3-12
Examples of a Rendered Image at Two
Tolerance Levels 3-10
Examples of Displayed Images 3-10
If You Do Not Want to Display the
Tessellation 3-10
How to Write the STL Output File 3-15
ASCII name 3-16
Binary name 3-16
Rapid Prototyping Interface User Guide and Menu Reference
Index-1
Index
O
S
Overview of the Preparation Procedure 2-2
Overview of the STL File Writing Procedure 3-2
Major Steps in the Procedure
Configure a tessellation 3-2
View the tessellation 3-2
Write the STL output file 3-3
Procedure for Writing the STL File 3-2
Reading Binary STL Files (Explicit) 3-3
System Messages 3-3
scaffolding A-4
Sizing the Part 2-3
Part Breakdown 2-3
Part Scaling 2-3
X, Y, Z Scale Adjustments 2-3
Stereolithography (STL) 1-2
Surface Number 4-3, C-3
System Messages C-2
Explicit C-2
RPI (PUT STL) Messages C-2
RPI Read (GET STL) Messages C-4
Parametric C-7
Messages Appearing in the Message
Buffer C-8
Messages Appearing in the Prompt
Buffer C-7
P
photopolymer resin A-3
Printing documentation from Portable
Document Format (PDF) file 1-x
Prototyping 1-2
T
R
thermoplastic powder A-3
Rapid Prototyping Interface 1-1
Reading an STL File 4-2
How to Start the RPI Read Option 4-2
RP Standard Terminology A-2
BPM A-2
Ballistic particle manufacturing A-2
Concept Model A-2
Desktop Manufacturing A-2
FDM (fused deposition modeling) A-2
Filament A-2
Fill vectors A-2
Free-form Fabrication A-2
Free-form Manufacturing A-2
LOM (laminated object manufacturing) A-3
Photopolymerization A-3
Rapid Prototyping A-3
Resin A-3
SGC (solid ground curing) A-3
SLS (selective laster sintering) A-3
Stereolithography A-3
STL file A-3
Support A-4
RPI Commands B-2
Where to Find Command Information B-2
Index-2
Rapid Prototyping Interface User Guide and Menu Reference