1
User’s Guide
MODELS : D46**A,
D46**B,
D46**P,
D46**L,
D55**A
D55**B
D55**P
D55**L
DIGITAL SIGNAGE
Contents
Major features........................................................................................................... 2
Safety Information.................................................................................................... 2
Be sure to understand .............................................................................................. 5
Check the product list ............................................................................................... 6
Proper location for product installation .................................................................. 7
Portrait Mode ............................................................................................................ 8
Storage Method For Panel Protection ..................................................................... 8
Installing a Bracket ................................................................................................... 9
Title and function of each part .............................................................................. 10
Support timing for HDMI/DVI ............................................................................... 15
Support timing for Analog RGB ............................................................................ 16
Support timing for Component & AV ................................................................... 16
Adjusting OSD and explanation of its function ................................................... 17
Diagnosis ................................................................................................................. 37
Specifications .......................................................................................................... 39
* REMOTE CONTROL / RS232C COMMAND SPEC
DIGITAL SIGNAGE
Major features
Safety Information
This product has been designed to enable the user ease of use, and display information
effectively and conveniently. The functions may vary depending on models.
UÊ//Ê
Ê`ÕiÊ>`«Ìi`Ê
UÊ"-ÊVÌÀÊvÕVÌÊ Ê
Ê
Ê
UÊ6Û`Ê`}Ì>ÊVÀÊ`ë>Þ
UÊÕÌ>ÌVÊ>}iÊVÌÀ
UÊ}
Êëii`ÊÀiëÃiÊ Ê
Ê
UÊÕÌÊÊÕÌÛÃÊvÕVÌÊÊ
Ê
This product is designed to ensure user's safety.
Avoid the following items to prevent serious electric shock and other dangers.
ÊÊÊÌÊ«>ViÊÜiÌÊLiVÌÃÊÊÀÊ>ÀÕ`ÊÌ
iÊ«À`ÕVÌÊÀÊÌ
iÊ«ÜiÀÊVÀ`°
ÊÊÊÊÌÊVÛiÀÊÀÊÃiÀÌÊ>ÞÌ
}ÊÛiÀÊÀÊÌÊÌ
iÊÛiÌ>ÌÊ«i}ðÊ
ÊÊÊÊÌÊ«>ViÊÊ>ÊV>ÌÊÜ
iÀiÊ`>>}iÊV>ÊLiÊV>ÕÃi`ÊLÞÊ]ÊÃi]Ê
}
ÊÌi«iÀ>ÌÕÀi]Ê
high humidity, dust etc.
ÊÊ/
iÊ«À`ÕVÌÊÃÊÌÊÃÕÌ>LiÊvÀÊÕÃiÊ>ÌÊÛÃÕ>Ê`ë>ÞÊÜÀ«>ViÃÊ>VVÀ`}ÊÌÊÅÓÊvÊÌ
iÊiÀ>Ê
Ordinance for Work with Visual Display Units.
ÊÊThe main plug of the power supply cord shall remain readily operable.
ÊÊÊ>««>À>ÌÕÃÊÜÌ
Ê
--ÊÊVÃÌÀÕVÌÊÃ
>ÊLiÊViVÌi`ÊÌÊ>Ê>ÃÊÃViÌÊÕÌiÌÊ
with a protective earthing connection.
ÊÊ>iÊÃÕÀiÊÌ
>ÌÊÌ
iÊ«ÜiÀÊVÀ`Ê>`ÊÌ
iÀÊV>LiÃÊ>ÀiÊVÀÀiVÌÞÊ«Õ}}i`Ê°Ê
ÊÊ*Õ}ÊÌ
iÊ«ÜiÀÊVÀ`ÊVÀÀiVÌÞÊÌÊÌ
iÊi`]Ê`ÊÌÊÜLLiÉ}}i]ÊÌÊ>ÞÊV>ÕÃiÊiiVÌÀVÊÃ
VÊvÀi°
2
DIGITAL SIGNAGE
ÊÊÊÌÊÌÕV
ÊÌ
iÊ«ÜiÀÊVÀ`ÊÜÌ
ÊÜiÌÊ
>`Ã]ÊÌÊ>ÞÊV>ÕÃiÊiiVÌÀVÊÃ
V°
ÊÊÊ"ÛiÀ>`i`Ê
ÊÕÌiÌÃÊ>`ÊiÝÌiÃÊV>LiÃÊ>ÀiÊ>ÃÊ`>}iÀÕÃÊ>ÃÊÌ
iÊ«ÜiÀÊVÀ`ÊLi}Ê`>>}i`]Ê
call service engineer for replacement as it may cause electric shock or fire.
ÊÊÊÌÊÕÃiÊÕÌ«iÊ`iÛViÃÊÊ>ÊÃ}iÊ«ÜiÀÊÕÌiÌ]ÊÌÊ>ÞÊV>ÕÃiÊÛiÀ
i>Ì}ÊÀÊvÀi°
ÊÊÊÊÌÊÕÃiÊÀÊ«>ViÊÃ
>À«ÊLiVÌÃÊi>ÀÊÌ
iÊ
ÊÃÕÀv>Vi]Ê>ÃÊÌ
ÃÊV>ÊV>ÕÃiÊ`>>}iÊÌÊÌ
iÊÃVÀiiÊÌÃiv°
ÊÊÊ7
iÊVi>}ÊÌ
iÊ
ÊÃVÀiiÊÉÊ-ÕÀv>Vi]Ê`ÊÌÊÕÃiÊV
iV>ÊVi>}Ê«À`ÕVÌÃÊ>ÃÊÌ
ÃÊV>Ê
seriously damage the special coatings on the screen. Only use water to dampen a soft cloth and
lightly clear the screen.
ÊÊÊ"ÛiÀÊÌiÊ`ÕÃÌÊ`i«ÃÌÃÊV>ÊLÕ`ÊÕ«ÊÃ`iÊÌ
iÊ«À`ÕVÌ]ÊÌ
ÃÊV>ÊV>ÕÃiÊÌ
iÊ«À`ÕVÌÊÌÊÛiÀ
i>ÌÊ
thus causing premature malfunction or fire. Please do not attempt to clean the inside of the
product yourself, please contact the local service agent.
ÊÊÊÌÊÕÃiÊ>V
ÊÀÊÃÌÀ}ÊV
iV>ÊÃÛiÌÊÃÕV
Ê>ÃÊiÌ
Þ]ÊiÌ
ÞÊÀÊ>ÊëÀ«Þ°
ÊÊÊÌ
iÊV>ÃiÊvÊVi>}]ÊLiÊÃÕÀiÊÌÊÀiÛiÊÌ
iÊ«ÜiÀÊVÀ`Ê>`ÊÜ«iÊÜÌ
Ê>ÊÃvÌÊ`ÀÞÊv>LÀV°
ÊÊii«ÊL>ÌÌiÀiÃÊvÀÊÌ
iÊÀiÌiÊVÌÀÊÕÌÊvÊV
`Ài¿ÃÊÃ}
Ì°
ÊÊ>ÌÌiÀiÃÊÃ
Õ`ÊLiÊÃiÀÌi`ÊÕÃ}ÊÌ
iÊVÀÀiVÌÊ«>ÀÌÞʳ]®°
ÊÊ1ÃiÊÞÊiÜÊL>ÌÌiÀiÃ]Ê`ÊÌÊÝÊ`ÊEÊiÜ°
ÊÊÊ,ÃÊvÊÝ«ÃÊvÊ>ÌÌiÀÞÊÃÊÀi«>Vi`ÊLÞÊ>ÊVÀÀiVÌÊ/Þ«i°ÊëÃiÊvÊ1Ãi`Ê>ÌÌiÀiÃÊ
According to the Instructions.
ÊÊ*>ViÊÕÌÊÊ>ÊÃÌ>LiÊLÀ>ViÌÊÀÊÃÕÀv>Vi°
ÊÊÀiÊÌ
>ÊÓÊ«i«iÊÃ
Õ`ÊÜÀÊÌ}iÌ
iÀÊÜ
iÊÛ}ÊÀÊÃÌ>}°
ÊÊÊÌÊ
>}ÊÊÀÊÕ«ÊÌÊÌ
iÊ«À`ÕVÌÊÀÊÕÌ}ÊÀ>V°
ÊÊ7
iÊÌ
iÊ«À`ÕVÌÊÃÊivÌÊÕÕÃi`ÊvÀÊ>Ê}ÊÌi]ÊLiÊÃÕÀiÊÌÊÕ«Õ}ÊÌ
iÊ«ÜiÀÊVÀ`°
ÊÊÊÊÌ
iÊV>ÃiÊvÊ`>>}iÊÀÊLÀi>>}iÊ`ÊÌÊ>ÌÌi«ÌÊÌÊÃivÊÀi«>À]Ê«i>ÃiÊVÌ>VÌÊV>ÊÃiÀÛViÊ
engineer.
3
DIGITAL SIGNAGE
ÊÊÊV>ÃiÊvÊÃÊ`i]Êii«ÊÃÌ>}ÊÌ
iÊ«À`ÕVÌÊÊÌ
iÊv>ÌÊV>ÌÊ>`ÊvÝ}ÊÌ
iÊÜ
iiÃÊ
not to move itself or fall down.
ÊÊ"ÊÃÊ`i]Ê>iÊÃÕÀiÊÌÊÌÕÀÊvvÊÌ
iÊ«ÜiÀÊLivÀiÊViVÌ}ÊV>Lið
ÊÊ/
ÃÊ>Õ>ÊVÌ>ÃÊ}iiÀ>ÊÃÌÀÕVÌÃÊvÀÊÌ
iÊ`ë>ÞÊ«À`ÕVÌÃÊÞÊÃÊÀiviÀÊÌÊÌ
iÊ
«ÀÛ`i`Ê
,"Ê>Õ>Ê>`ÊÌ
iÊ`ÀÛiÀÊÃÌ>>ÌÊ>Õ>ÊvÀÊÌ
iÊ`ÀÛiÀÊÃÌ>>ÌÊ
instructions for touch screen and/or touch screen itself.
ÊÊ/
iÊ>««>À>ÌÕÃÊÃ
>ÊÌÊLiÊiÝ«Ãi`ÊÌÊ`À««}ÊÀÊë>Ã
}Ê>`ÊÌ
>ÌÊÊLiVÌÃÊvi`ÊÜÌ
Ê
liquids, such as vases, shall be placed on the apparatus.
ÊÊ-
>ÊLiÊViVÌi`ÊÌÊ>Ê -ÊÃViÌÊÕÌiÌÊÜÌ
Ê>Ê«ÀÌiVÌÛiÊi>ÀÌ
}ÊViVÌ°Ê
ÊÊ/
iÊ`ÃViVÌÊ`iÛViÊÃ
>ÊÀi>ÊÀi>`ÞÊ«iÀ>Li°
ÊÊ/
iÊÃViÌÕÌiÌÊÃ
>ÊLiÊÃÌ>i`Êi>ÀÊÌ
iÊiµÕ«iÌÊ>`ÊÃ
>ÊLiÊi>ÃÞÊ>VViÃÃLi°
ÊÊ1ÃiÊÞÊÜÌ
Ê>ÊV>ÀÌ]ÊÃÌ>`]ÊÌÀ«`]ÊLÀ>ViÌ]ÊÀÊÌ>LiÊëiVvi`ÊLÞÊÌ
iÊ
manufacturer, or sold with the apparatus. When a cart is used, use
caution when moving the cart/apparatus combination to avoid injury
vÀÊÌ«ÛiÀ°
4
DIGITAL SIGNAGE
Be sure to understand
Image quality of the product
CAUSE
Due to the nature of LCD's property, Afterimage can occur. Afterimage appears when
identical frames / images are displayed continuasly. If displayed for prolonged periods of
time this can become permanent.
PREVENTION
When you display a freeze frame for a long time, lower the brightness and contrast
À}
ÌiÃÃ]ÊÇäÉÊ
ÌÀ>ÃÌ]Ênä®°ÊÃÊÌÊV>ÊLiÊ`iVÀi>Ãi`ÊLÞÊÕÃ}Ê*ÝiÃ
vÌÊvÕVÌ°
COUNTERMEASURES
Temporary afterimage can be alleviated by displaying white or moving frame about 10
ÕÀðÕÌ]Ê«iÀ>iÌÊ>vÌiÀ>}iÊV>ÌÊLiÊ`Ã>««i>Ài`Ê>VVÀ`}ÊÌÊÌ
iÊ«À«iÀÌÞÊvÊ
®ÊÊ/
ÃÊiÌ
`ÊÃÊÕÃi`ÊÌÊÀiÛiÊÌi«À>ÀÞÊ>vÌiÀ>}iÊÌ
>ÌÊ>ÞÊVVÕÀÊ>vÌiÀÊ
displaying a still frame for a certain time.
It can take several minutes or hours to remove afterimage according to the severity. In
the case that your cannot avoid displaying identical still image continuously, you can
prevent it by displaying moving image for 2 or 3 minutes in every hour. As the brightness
of still image and time of display are the cause of afterimage, you are recommended to
lower the brightness in that case.
!
Above problem shall not be covered by warranty.
5
DIGITAL SIGNAGE
Check the product list
Please check the following components provided with the product after you open the box.
!
Remote control
Audio cableÊ"«Ì®
Power Cord
HDMI cable
ÊÌÊ6Ê
>LiÊ"«Ì®
CD Manual &Sheet
-1Ê
>Li
RS232C Cable
please check the following components provided with the product after you open
the box and contact the dealer if any missing.
* The contents may vary depending on models and sometimes the contents may be attached on the product.
6
DIGITAL SIGNAGE
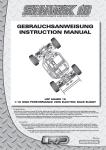
Proper location for
product installation
1. Locate the product at least 30cm away from the electric appliance or heating product.
2. The product must be placed at least 10cm away from the wall and ground.
ΰÊÊÊii«ÊÌ
iÊ«À`ÕVÌÊÕÌÊvÊ`ÀiVÌÊÀ>ÞÊvÊ}
ÌÊ>`ÊV>ÌiÊÃVÀiiÊÌÊÌÊLiÊÀiviVÌi`ÊLÞÊÌ
iÊÃÕ}
Ì°
4. Make sure the mounting rack firmly tightened before installation.
5. Use an authorized wall mount and contact the local dealer or qualified personnel.
!
Please take extra care during installation, it is possible to cause damage if the unit is
handled badly or knocked.
Use the screws and wall mounts that meet the VESA standard. Any damages or injuries by
misuse or using an improper accessory are not covered by the warranty.
ÊÊÊÊÊÌÊÃÌ>ÊÌ
iÊ«À`ÕVÌÊÊ>Ê«>ViÊÜÌ
ÊÊÛiÌ>ÌÊi°}°]ÊÊ>ÊLÃ
ivÊÀÊÊ>ÊVÃiÌ®Ê
or on a carpet or cushion. If there is no other option but to mount the product on the wall,
make sure that sufficient ventilation is provided before installation.
ÊÊÊÊ>ÕÀiÊÌÊ`ÊÃÊ>ÞÊÀiÃÕÌÊÊ>ÊvÀiÊ`ÕiÊÌÊÌ
iÊVÀi>ÃiÊÊÌ
iÊÌiÀ>ÊÌi«iÀ>ÌÕÀi°
:DOO
10 cm
10 cm
10 cm
'LVSOD\
10 cm
10 cm
:DOO
Display
10 cm
7
DIGITAL SIGNAGE
Portrait Mode
Storage Method For
Panel Protection
Ê"ÞÊÊÃiÊ`ið
Ê7
iÊÃÌ>}ÊÊ«ÀÌÀ>ÌÊ`i]ÊÀÌ>ÌiÊÌ
iÊÌÀÊVVÜÃi
Panel
Panel
Panel
If the product needs to be set upright,
hold both sides of the product, and tilt
backward carefully for. Do not let the
panel not to touch the floor.
8
When laying down the product, lay a
cushion on a flat floor. Put the product
on it with the panel of the product
facing down.
If there is not a cushion available, ensure
the floor is clean and then lay the product
down carefully with the panel facing either
upward or downward. At this time, be
careful for objects not to fall on the panel.
DIGITAL SIGNAGE
Installing a Bracket
Ê/
iÊVÌiÌÃÊ>ÞÊÛ>ÀÞÊ`i«i`}ÊÊ`iÃ
B Bracket Vertical
C
C
H
H
B
C Bracket Corner
C
B
Bracket Horizontal H
9
DIGITAL SIGNAGE
Title and function of each
part
1
2
Power button ; to turn the power on or off.
3
4
Menu button : to display menu or exit from the menu.
Input selection button : to select other connected
device.
5
6
7
8
To move down in OSD menu.
To move up in OSD menu.
To move left and control the volume down in OSD menu.
To move right and control the volume up OSD menu.
Select button.
Buttom
or
Right Side
1 2 3
POWER
SOURCE
MENU
4
SELECT
5
6 7 8
VOL
✔ The locations of OSD board and remote control receiving sensor may vary depending on models.
10
DIGITAL SIGNAGE
/iÀ>Ê«>iÊÌÞ«i®
- MODELS :
D46**A, D55**A
%
^ & * ( )
1 2
3
1 Ê*,Ê- -",Ê Ê"«Ì®
2 HDMI IN
3 DVI OUT
4 Ê*
Ê-1Ê
5 Ê*
Ê-1Ê"1/
6 PC AUDIO IN
4
5
678 90 !
70!
UPGRADE Port :
*this port is used for upgrade service
and not for general users.
8 Ê,-ÓÎÓ
Ê
9 Ê,-ÓÎÓ
Ê"1/
@ Ê
"*" /Ê"1/Ê9É*LÉ*À®
# CVBS OUT
$ Ê
6-Ê1"Ê ÊÉ,®
@ # $
% Ê-*,Ê"1/
^ Ê
"*" /Ê Ê9É*LÉ*À®
& CVBS IN
* Ê
"*" /Ê1"Ê ÊÉ,®
( AC POWER SWITCH
) AC IN
11
DIGITAL SIGNAGE
/iÀ>Ê«>iÊÌÞ«i®
- MODELS :
D46**B, D55**B
D46**P, D55**P
2
1
3 4
56 7
1 ë>Þ*ÀÌÊ"«Ì®
At the end of the model name “P” is the
DisplayPort default.
2 ë>ÞÊ
ÌÀ É"1/Ê"«Ì®
3 6 UPGRADE Port :
This port is used for upgrade service and not
for general users.
4 Ê, É"1/
5 Ê,-ÓÎÓ
12
É"1/
8
9
0 !@
7 HDMI IN
8 DVI IN
9 DVI OUT
0 Ê*
Ê-1Ê
! Ê*
Ê1"
@ Ê1"Ê "1/
# Ê
"*" / Ê
#
%
&
$
^
*
$ Ê
"*" /"1/Ê
% Ê
6- Ê
^ Ê
6-"1/
& Ê
"*" /Ê1"
* Ê
6-Ê1" Ê
( AC POWER SWITCH
) Ê
( )
Ê
DIGITAL SIGNAGE
/iÀ>Ê«>iÊÊÌÞ«i®
- MODELS :
D46**L, D55**L
1
2
5
3
4
6
7
8
0
@
$ ^
9
!
#
% &
** The locations of connectors may vary depending on models.
Ê/
iÊÌiÃÊ°Ê£Óq£ÇÊ>ÀiÊ«Ì>ÊÌið
Ê When you select the "Source"button on the remote control, the "Source"menu of the "Option" item
is displayed.
1 AC IN
2 AC POWER SWITCH
3 HDMI IN
4 HDMI OUT
5 Ê-*,Ê"1/
6 Ê*
Ê-1Ê
7 *
Ê-1Ê"1/
8 UPGRADE
9 PC AUDIO IN
0 Ê,-ÓÎÓ
Ê"1/
! Ê,-ÓÎÓ
Ê
@ Ê
"*" /Ê
# Ê
"*" /Ê"1/Ê9É*LÉ*À®
$ CVBS IN
% CVBS OUT
^ "*" /Ê1"Ê ÊÉ,®
& 6-Ê1"Ê ÊÉ,®
Ê9É*LÉ*À®
13
DIGITAL SIGNAGE
Remote control
å
ï
ç
é
è
ë
ê
í
ì
î
1 To turn the power on or off.
2 Move up in OSD menu.
3 To move left or control the volume down in OSD menu.
4 To move right or control the volume up in OSD menu.
5 To move down in OSD menu.
6 [ENTER] Select in OSD menu.
7 Display the OSD menu.
8 Close the OSD menu.
9 Display the menu of signal source and choose it.
0 Temporary sound switch off.
[TIP]ÊÊvÊÌÊ`iýÌÊii`ÊÌÊVÌÀÊ`ë>ÞÊLÞÊ>ÊÀiÌiVÌÀiÀ]Ê«ÀiÃÃÊLÕÌÌÊvÊÀiÌiVÌÀiÀÊÊÀ`iÀÊvÜ}°
MENU → SOURCE → EXIT → ▼ → ENTER(↵)
* Press button once again in order above so that original condition is returned.
14
DIGITAL SIGNAGE
Support timing for
HDMI/DVI
15
NO
Resolution
Horizontal frequency
â®
Vertical frequency
â®
1
480p
640 x 480p
60
2
576p
720 x 576p
50
3
720p
1280 x 720p
50 / 60
4
1080i
1920 x 1080i
50 / 60
5
640 x 480
31.47
59.94
6
800 x 600
37.88
60.32
7
1024 x 768
48.36
60
8
1360 x 768
47.70
60
9
1280 x 1024
63.98
60
10
1920 x 1080
67.50
60
11
1080p
1920 x 1080p
60
DIGITAL SIGNAGE
Support timing for
Analog RGB
Support timing for
Component & AV
NO
Resolution
Horizontal frequency
â®
Vertical frequency
â®
1
640 x 480
31.47
59.94
2
800 x 600
37.88
60.32
3
1024 x 768
48.36
60.00
4
1360 x 768
47.71
60.00
5
1280 x 1024
63.98
60.00
6
1920 x 1080
67.50
60.00
NO
Resolution
Horizontal frequency
â®
Vertical frequency
â®
1
480i
640 x 480i
59.94 / 60
640 x 480p
59.94 / 60
2
480p
720 x 480p
59.94 / 60
3
576p
720 x 576p
50
4
720p
1280 x 720p
59.94 / 60 / 50
5
1080i
1920 x 1080i
59.94 / 60 / 50
*6
1080p
1920 x 1080p
60 / 50
16
DIGITAL SIGNAGE
Adjusting OSD and
explanation of its
function
Users can automatically adjust the picture mode according to the input mode.
Picture
Picture Mode
How to Select the Picture
Mode
:
ÑÑ
High
Colour Tone
ÑÑ
Middle
Size
:
Select
Low
ÑÑ
PC
U
Custom
Custom
8
Enter
-
1. Press Menu button.
Menu items appear on the screen.
2. Press ↲ button to select “Picture” Icon. “Picture mode” is
highlighted.
3. Press ▶ or ↲ buttons to select “Picture mode”.
4. The menu changes in the following order.
ÊÊÊÊ
ÕÃÌÊÊ}
ÊÊ``iÊÊÜÊ
5. Press EXIT button to escape OSD MENU or press MENU
button to return to the previous menu.
Menu
✔ Menu of PC doesn’t appear on OSD when user uses HDMI and DVI signal.
17
DIGITAL SIGNAGE
How to Set the Desired
Picture
Users can manually adjust their desired picture
Custom
U
Brightness
:
70
Contrast
:
80
Move
|}
Adjust
-
Menu
1. Press Menu button.
Menu items appear on the screen.
2. Press ↲ button to select "Picture" Icon.
"Picture mode" is highlighted.
3. Press ▲ / ▼ buttons to move to "Custom" and press ▶or
↲ buttons to select "Custom".
4. Select required option by pressing the ▲ / ▼ or ↲ button,
then Press◀ / ▶ button to adjust.
5. Press EXIT button to escape OSD MENU or press MENU
button to return to the previous menu.
ÊÀ}
ÌiÃÃÊ\Ê`ÕÃÌÊÌ
iÊLÀ}
ÌiÃÃÊvÊÌ
iÊiÌÀiÊ«VÌÕÀi°Ê
Ê
ÌÀ>ÃÌÊ\Ê`ÕÃÌÊÌ
iÊLÀ}
ÌiÃÃÊ>`Ê`>ÀiÃÃÊvÊÌ
iÊLiVÌÊ>`ÊL>V}ÀÕ`ðÊ
18
DIGITAL SIGNAGE
How to Select a Colour Tone
Users can adjust Color as users want.
Colour Tone
U
Colour Tone
:
Normal
Red
:
50
Green
:
50
Blue
:
50
Move
8
Enter
-
1. Press Menu button.
Menu items appear on the screen.
2. Press ↲ button to select "Picture" Icon.
"Picture Mode" is highlighted.
3. Press ▲ / ▼ buttons to move to "Colour Tone"
4. Press ▶ or ↲ buttons to select "Colour Tone" .
5. Press ▲ / ▼ buttons, then the menu changes in the
following order.
ÕÃÌÊÊ
ÓÊÊ
£ÊÊ À>ÊÊ7>À£ÊÊ7>ÀÓ
Menu
6. Press EXIT button to escape OSD menu or press MENU button to return to the previous menu.
Ê
ÕÃÌÊ\Ê7
iÊÌ
iÊÕÃiÀÊÜ>ÌÃÊÌÊÃiÌÊÌ
iÊ`i}ÀiiÊvÊ,Ê`ÀiVÌÞ°Ê
Ê
Ê\ÊÀÊVÊVÀÃÊÜÌ
ÊLÕÃ
ÊÌi°
Ê À>Ê\ÊÀÊ>Ê}iiÀ>Ê
ÕÀÊ/i°
Ê7>ÀÊ\ÊÀÊÜ>ÀÊVÀÃÊÜÌ
ÊÀi``Ã
ÊÌi°
19
DIGITAL SIGNAGE
How to Set the Display Size
Users can adjust the display scale as they want
Picture
PC
Picture Mode
:
Custom
ÑÑ
Colour Tone
ÑÑ
:
Size
Select
8
Enter
HDMI
Picture Mode
:
Custom
ÑÑ
Wide
Colour Tone
ÑÑ
Wide
4:3
Size
:
4:3
ÑÑ
16 : 9
ÑÑ
PC
U
Picture
PC
-
Menu
U
Select
8
Enter
-
Menu
1. Press Menu button. Menu items appear on the screen.
2. Press ↲ button to select “Picture” Icon. “Picture Mode” is highlighted.
3. Press ▲ / ▼ buttons to move to “Size”.
4. Press ◀ / ▶ or ↲ buttons and press ▲ / ▼ then the mode change in the following order.
ҟ7`iÊÊ{Ê\ÊÎÊ
* The display size aspect mode change in the HDMI, DVI mode in the following order.
ҟ7`iÊÊ{Ê\ÊÎÊÊ£ÈÊ\Ê
5. Press EXIT button to escape OSD MENU or press MENU button to return to the previous menu.
✔ Menu of PC doesn’t appear on OSD when user uses HDMI and DVI signal.
20
DIGITAL SIGNAGE
How to set image adjustment
in PC mode
-Õ««ÀÌi`ÊÞÊÊ*
Ê`i®ÊÊÊÊÊÊÊÊÊÊ
Picture
ÑÑ
Auto Adjust
U
Phase
:
52
*Ã
:
16
6*Ã
:
24
Fiequency
:
Çn
Resolution
:
Move
8
Enter
-
Menu
1. Press Menu button.
Menu items appear on the screen.
2. Press ↲ button to select "Picture" Icon.
"Picture Mode" is highlighted.
3. Press ▲ / ▼ buttons to move to PC and press
▶ or ↲ buttons to select to "PC"
"Auto Adjust" is high lighted.
4. Press ↲ button to execute the "Auto Adjust"
5. Select the required option by pressing the ◀ / ▶ or ↲
button, then press ◀ / ▶button to adjust
6. Press EXIT button to escape OSD MENU or press MENU button to return to the previous menu.
ÊÕÌÊ`ÕÃÌÊ\ÊÀâÌ>ÉÛiÀÌV>Ê«ÃÌÃÊ>ÀiÊ>ÕÌ>ÌV>ÞÊ>`ÕÃÌi`°
Ê*
>ÃiÊ\Ê/Êi>ÌiÊÌ
iÊÃ
>iÊvÊÌ
iÊ«VÌÕÀi°
Ê*ÃÌÊ\Ê/Ê>`ÕÃÌÊÌ
iÊ
ÀâÌ>Ê«ÃÌÊvÊÌ
iÊ«VÌÕÀi°ÊÊ
Ê6*ÃÌÊÊ\Ê/Ê>`ÕÃÌÊÌ
iÊÛiÀÌV>Ê«ÃÌÊvÊÌ
iÊ«VÌÕÀi°
ÊÀiµÕiVÞÊ\Ê/Êi>ÌiÊÌ
iÊÃ
>iÊvÊ«VÌÕÀi°
Ê,iÃÕÌÊ\ÊÊ-iiVÌ}ÊÀiÃÕÌÊÃÊ>Üi`ÊÌÊÞÊÃiÌÊÌÊ£äÓ{ÝÇÈn]Ê£ÓnäÝÇÈn]Ê£ÎÈäÝÇÈn]Ê£ÎÈÈÝÇÈn°Ê
Select corresponsive resolution with specified resolution of image.
21
DIGITAL SIGNAGE
How to Select the Audio
Mode
Users can adjust sound mode automatically as they want.
Sound
Mode
:
Custom
Volume
:
Standard
Balance
:
Music
ÑÑ
Movie
Auto Volume
:
Speech
Sound Mode
:
HDMI Sound
:
Equalizer
U
Select
8
Enter
-
1. Press Menu button. Menu items appear on the screen.
2. Press ▲ / ▼ buttons to move to “Sound” Icon.
3. Press ↲ button to select “Sound” Icon. “Mode” is
highlighted.
4. Press ▶ or ↲ buttons, to select to Sound mode.
then the menu changes in the following order.
ÕÃÌ-Ì>`>À`ÊÊÕÃVÊÊÛiÊÊ-«iiV
ÊÊÊÊ
5. Press EXIT button to escape OSD MENU or press MENU
button to return to the previous menu.
Menu
Ê
ÕÃÌÊ\Ê7
iÊÌ
iÊÕÃiÀÊÜ>ÌÃÊÌÊÃiÌÊÌ
iÊÛ>ÕiÃÊ`ÀiVÌÞ°
Ê-Ì>`>À`Ê\ÊÀÊÌ
iÊ}iiÀ>ÊÃÕ`°ÊÃÌÊ>Õ`ÊVÌiÌÃÊ>ÀiÊ>««À«À>ÌiÊÌÊÌ
ÃÊ`i°ÊÊ
ÊÕÃVÊ\ÊÀÊiÞ}ÊÀ}>ÊÃÕ`°Ê
ÊÛiÊ\ÊÀ>`ÃiÊÃÕ`°Ê
Ê-«iiV
Ê\Ê
i>ÀÊÃÕ`°Ê
22
DIGITAL SIGNAGE
How to Adjust the Desired
Audio Mode
Users can adjust sound mode automatically as they want.
Sound
Sound
Mode
:
Standard
Volume
:
30
:
L50 R50
Balance
ÑÑ
Equalizer
U
Auto Volume
:
Off
Sound Mode
:
Stereo
HDMI Sound
:
HDMI
Move
L
Adjust
-
Menu
U
£äâ
50
Îâ
50
£â
50
300Hz
50
100Hz
50
Move
L
Adjust
-
Menu
1. Press Menu button. Menu items appear on the screen.
2. Press ▲ / ▼ buttons to move to "Sound" Icon.
3. Press ↲ button to select "Sound" Icon. "Mode" is highlighted.
4. Press ▲ / ▼ buttons to move to "Balance" or "Equalizer" .
5. Press ↲ buttons to select "Balance" or "Equalizer". Balance or Equalizer menu appears.
6. Select required option by pressing the ▲ / ▼ buttons, then Press ◀ / ▶ buttons to adjust.
7. Press EXIT button to escape OSD MENU or press MENU button to return to the previous menu.
ÊÊ>>ViÊ\Ê`ÕÃÌÃÊÌ
iÊL>>ViÊvÊivÌÊ>`ÊÀ}
ÌÊëi>iÀðÊ
ÊʵÕ>âiÀÊ\Ê`ÕÃÌÃÊÌ
iÊ>Õ`ÊÕÌ«ÕÌÊÃ}>ÊÊÌ
iÊ`iÃÀi`ÊL>`°
23
DIGITAL SIGNAGE
How to Select Auto Volume
This function will automatically give a similar volume size to each channel.
Sound
Mode
:
Volume
:
Balance
:
ÑÑ
On
Auto Volume
:
Off
Sound Mode
:
HDMI Sound
:
Equalizer
U
How to Select Sound Mode
Select
8
-
Enter
Menu
1. Press Menu button.
Menu items appear on the screen.
2. Press ▲ / ▼ buttons to move to "Sound" Icon.
3. Press ↲ button to select "Sound" Icon.
"Mode" is highlighted.
4. Press ▲ / ▼ buttons to move to "Auto Volume".
5. Press ◀ / ▶ or ↲ buttons to select "On/Off".
6. Press ▲ / ▼ or ↲ buttons to set to "On/Off".
7. Press EXIT button to escape OSD MENU or press MENU
button to return to the previous menu
Depending on the particular program being broadcast, you can select stereo or mono.
Sound
Mode
:
Volume
:
Balance
:
ÑÑ
Stereo
Auto Volume
:
Mono L
Sound Mode
:
Mono R
HDMI Sound
:
Equalizer
U
Select
8
Enter
-
Menu
1. Press Menu button.
Menu items appear on the screen.
2. Press ↲ button to select "Sound" Icon.
"Mode" is highlighted.
3. Press ▲ / ▼ buttons to move to "Sound Mode".
4. Press ▶ or ↲ buttons to select to "Sound Mode".
5. Press ▲ / ▼ buttons to select to "Stereo"," Mono L"or
"Mono R.
6. Press exit button to escape OSD MENU or press MENU button
to return to the previous menu
Ê
Ãiʸ-ÌiÀi¸ÊvÀÊV
>iÃÊÌ
>ÌÊ>ÀiÊLÀ>`V>ÃÌ}ÊÊ-ÌiÀi°
ÊÊ
Ãiʸ¸ÊvÀÊV
>iÃÊÌ
>ÌÊ>ÀiÊLÀ>`V>ÃÌ}ÊÊ]ÊÀÊvÊÞÕÊ>ÀiÊ
>Û}Ê`vvVÕÌÞÊÀiViÛ}Ê
a Stereo signal.
24
DIGITAL SIGNAGE
How to Select HDMI Sound
Sound
Mode
:
Volume
:
Balance
:
ÑÑ
Equalizer
U
Auto Volume
:
Sound Mode
:
HDMI
HDMI Sound
:
DVI
Select
8
Enter
-
1. Press Menu button.
Menu items appear on the screen.
2. Press ↲ button to select “Sound” Icon.
“Mode” is highlighted.
3. Press ▲ / ▼ buttons to move to “HDMI Sound”.
4. Press ▶ or ↲ buttons to select to “HDMI Sound”.
5. Press ▲ / ▼ buttons to select to “DVI”.
6. Press exit button to escape OSD MENU or press MENU
button to return to the previous menu
Menu
✔ HDMI : Audio signal is included in the HDMI signal.
✔ DVI : If audio signal is not inclulded in the HDMI signal, you can listen audio from PC audio port.
25
DIGITAL SIGNAGE
How to Reset
Setup
U
Reset
ÑÑ
Time
ÑÑ
Language
:
OSD Tone
:
iÞÊV
:
DCR
:
Pixelshift
:
Move
8
1. Press Menu button.
Menu items appear on the screen.
2. Press ↲ button to select "Setup" Icon.
"Reset" is highlighted.
3. Press ▶ or ↲ buttons to select to "Reset".
4. Press ↲ buttons to choose to "Reset".
5. Press EXIT button to escape OSD MENU or press MENU button
to return to the previous menu.
-
Enter
Menu
When you select "Reset" user setting Value will initialize.
How to Set Clock,Sleep Time,
ON/OFF Time
Setup
U
Reset
ÑÑ
Time
ÑÑ
Language
:
OSD Tone
:
Off
iÞÊV
:
Off
DCR
:
Off
Pixelshift
:
Move
8
Enter
English
-
1. Press Menu button.
Menu items appear on the screen.
2. Press ↲ button to select "Setup" Icon.
"Reset" is highlighted.
3. Press ▲ / ▼ buttons to move to "Time".
4. Press ▶ or ↲ buttons to select "Time".
Time menu appears, then "Clock" is highlighted.
5. Press ◀ / ▶ buttons to move between Hour, Minute and
Press ▲ / ▼ buttons to set Hour, Minute.
Menu
26
DIGITAL SIGNAGE
Time
U
Clock
:
05 : 00
On Timer
:
00 : 00
Off
Off Timer
:
00 : 00
Off
On Time Volume
:
20
Source
:
PC
Move
8
-
Enter
ÊÌÊÃÌi«ÊÈÊvÊÞÕÊii`ÊÌÊÃiÌÊÌ
iʸ"ÊÀÊ"vvÊ/iÀ¸
6. Press ▲ / ▼ buttons to move to "On or Off Timer".
7. Press ▶ or ↲ buttons to select "On or Off Timer" .
8. Press ◀ / ▶ buttons to move between Hour, Minute and on/
off and Press ▲ / ▼ buttons to set Hour, Minute and on/off
}ÊÌÊÃÌi«ÊÊvÊÞÕÊii`ÊÌÊÃiÌÊÌ
iʸ"Ê/iÊ6Õi¸Ê
9. Press ▲ / ▼ buttons to move to "On Time Volume".
10. Press ◀ / ▶ buttons to adjust Volume.
Menu
}ÊÌÊÃÌi«Ê££ÊvÊÞÕÊii`ÊÌÊÃiÌÊÌ
iʸ-ÕÀVi¸Ê
11. Press ▲ / ▼ buttons to move to "Source"
12. Press ▶ or ↲ buttons to select to "Source"
13. Press ▲ / ▼ buttons to set to Source
Ã}ÊÌ
iÊ9ÕÀÊÊÊ
Languages
Setup
U
27
Reset
ÑÑ
English
Time
ÑÑ
Français
Language
:
Deutsch
OSD Tone
:
Italiano
iÞÊV
:
Español
DCR
:
Nederland
Pixelshift
:
Suomi
Polski
Čeština
Pусский
Select
8
Enter
-
Menu
1. Press Menu button.
Menu items appear on the screen.
2. Press ↲ button to select "Setup" Icon.
"Reset" is highlighted.
3. Press ▲ / ▼ button to move to "Language" and press
▶ or ↲ button to select to “Language”.
4. Press ▲ / ▼ buttons to set to language.
5. Press EXIT button to escape OSD MENU or press MENU
button to return to the previous menu.
DIGITAL SIGNAGE
How to set OSD
Transparency
Setup
U
Reset
ÑÑ
Time
ÑÑ
Language
:
Off
OSD Tone
:
On
iÞÊV
:
DCR
:
Pixelshift
:
Select
8
-
Enter
1. Press Menu button.
Menu items appear on the screen.
2. Press ↲ button to select "Setup" Icon.
"Reset" is highlighted.
3. Press ▲ / ▼ buttons to move to "OSD Tone"
4. Press ▶ or ↲ buttons to select to "OSD Tone".
5. Press ▲ / ▼ or ↲ buttons to set to "On/Off".
Menu
User can lock the control buttons on the front bottom of the Monitor.
ÊÜÊÌÊ-iÌÊiÞV
Setup
U
Reset
ÑÑ
Time
ÑÑ
Language
:
OSD Tone
:
Off
On
iÞÊV
:
DCR
:
Pixelshift
:
Select
8
Enter
-
Menu
1. Press Menu button.
Menu items appear on the screen.
2. Press ▲ / ▼ button to move to "Setup" Icon.
3. Press ↲ button to select "Setup" Icon.
"Reset" is highlighted
4. Press ▲ / ▼ LÕÌÌÃÊÌÊÛiÊÌʸiÞÊV¸°
5. Press ▶ or ↲ LÕÌÌÃÊÌÊÃiiVÌÊÌʸiÞÊV¸°
6. Press ▲ / ▼ or ↲ buttons to set to "On/Off".
7. Press EXIT button to escape OSD MENU or press MENU
button to return to the previous menu.
✔ÊÊvÊÞÕÊÌÕÀÊvvÊÌ
iÊ
Ê«ÜiÀ]ÊiÞVÊvÕVÌÊÃÊÕV°
28
DIGITAL SIGNAGE
How to select DCR
Setup
U
29
Reset
ÑÑ
Time
ÑÑ
Language
:
OSD Tone
:
iÞÊV
:
Off
DCR
:
On
Pixelshift
:
Select
8
Enter
-
Menu
1. Press Menu button.
Menu items appear on the screen.
2. Press ▲ / ▼ button to move to “Setup” Icon.
3. Press ↲ button to select "Setup" Icon.
"Reset" is highlighted.
4. Press ▲ / ▼ buttons to move to “DCR”.
5. Press ▶ or ↲ buttons to select to "DCR".
6. Press ▲ / ▼ or ↲ buttons to set to "On/Off".
7. Press EXIT button to escape OSD MENU or press MENU
button to return to the previous menu.
DIGITAL SIGNAGE
How to select Pixelshift
/
ÃÊvÕVÌÊ«ÀiÛiÌÃÊ>}iÊLÕÀÊ«ÀLiÊÊ
ÊÃVÀii°
Setup
U
Reset
ÑÑ
Time
ÑÑ
Language
:
OSD Tone
:
iÞÊV
:
DCR
:
Off
Pixelshift
:
On
Select
8
Enter
-
Menu
1. Press Menu button.
Menu items appear on the screen.
2. Press ▲ / ▼ button to move to “Setup” Icon.
3. Press ↲ button to select "Setup" Icon.
"Reset" is highlighted.
4. Press ▲ / ▼ buttons to move to “Pixelshift”.
5. Press ▶ or ↲ buttons to select to "Pixelshift".
6. Press ▲ / ▼ or ↲ buttons to set to "On/Off".
7. Press EXIT button to escape OSD MENU or press MENU
button to return to the previous menu.
✔ When Pixelshift option is on, the image moves on the display periodically. It might be seen like the
image pops but not the symptoms of display error.
✔ Pixelshift function is to decrease image sticking.
30
DIGITAL SIGNAGE
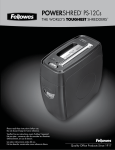
How to Set the Multi
Function
Multi
Multi
U
Temp Control
ÑÑ
H Set Count
:
Multi Function
ÑÑ
V Set Count
:
1
Display Sequence
:
1
H Edge ADJ
:
0
V Edge ADJ
:
0
SET ID
:
1
Master
:
Off
Compensation
:
Move
8
Enter
-
U
Menu
Move
8
Adjust
1
-
Menu
1. Press Menu button. Menu items appear on the screen.
2. Press ▲ / ▼ button to move to "Multi" Icon.
3. Press ↲ button to select "Mutli" Icon.
4. Press ▲ / ▼ buttons to move to “Mutli Function”.
5. Press ▶ or ↲ buttons to select to “Mutli Function”.
4. Press ▲ / ▼ buttons to set up and change the location of the screen to be displyed. H Set Count/
V Set Count/Display Sequence / H Edge ADJ / V Edge ADJ / SET ID/ Master
Ý>«iÊvÊÃÌ>>Ì®ÊÃÌ>ÊÎÝÓÊÜÌ
ÊÈÊÕÌÃ
31
Product 1
Product 2
Product 3
Product 4
Product 5
Product 6
DIGITAL SIGNAGE
Set up Value
installation item
Product 1
Product 2
Product 3
Product 4
Product 5
Product 6
H Set Count
3
3
3
3
3
3
V Set Count
2
2
2
2
2
2
Display Sequence
1
2
3
4
5
6
H Edge ADJ /
V Edge ADJ
SET ID
Master
/
iÃiÊ>ÀiÊÌ
iÊÃiÌÊÕ«ÊÛ>ÕiÊÌÊ>iÊÕ«ÊÌ
iÊÕ`ë>Þi`Ê>Ài>ÊvÊiâiÊ*>ÀÌ°
It can be adjustable according to the contents
1
2
3
4
5
6
9ÕÊ>ÀiÊÀiVi`i`ÊÌÊÕÃiÊÌ
iÊ>ÃÌiÀÊÊÃÌ>ÌiÊÞÊiÊvÊ«À`ÕVÌÃÊÌ
>Ì
you are using
[Cautions]
ÊÊV>ÃiÊvÊViVÌ}ÊÌ
iÊ«À`ÕVÌÃÊÊÃiÀiÃÊvÀÊÌ
iÊ«ÕÌÊ`iÛViÊ➔ analog RGB ➔ component
➔ Û`i®]Ê>Ê`ÃÌÀLÕÌÀÊÃÊÀiVi`i`ÊÊÀ`iÀÊLiV>ÕÃiÊÌ
iÀiÊ>ÞÊLiÊÃÃÊvÊÃVÀiiʵÕ>ÌÞ°
ÊÊ9ÕÊ>ÀiÊÀiVi`i`ÊÌÊÕÃiÊÌ
iÊ«À}ÀiÃÃÛiÊvÀiµÕiVÞÊvÊÊÊV>ÃiÊvÊÕÃ}ÊÕÌÛÃÊ
vÕVÌ°ÊÌÊ>ÞÊÌÊLiÊ`ë>Þi`Ê«À«iÀÞÊÜ
iÊÕÃ}Ê6`iÊ«ÕÌÊÀÊÌiÀ>ViÊvÀiµÕiVÞ®
✔ Master : In case of RS232C Communication, If you control products by “all” protocol, the PC received the
return message from master.
32
DIGITAL SIGNAGE
To connect multiple monitors
to the PC in HDMI/DVI mode
HDMI Cable
HDMI-IN
DVI-OUT
HDMI-IN
DVI-OUT
HDMI-IN
DVI-OUT
HDMI-IN
OR
6Ê
>Li
ÌÊVÕ`i`®
Product 1
To connect multiple monitors
to the PC in RGB mode
Product 2
Product 3
-1Ê
>Li
- Terminal panel : A-type, L-type
PC-IN
PC-OUT
PC-IN
PC-OUT
PC-IN
PC-OUT
-1Ê
>Li
ÌÊVÕ`i`®
Product 1
Product 2
Product 3
✔ÊÊÊÊ7
iÊÕÌViVÌ}ÊÉÕÌÊV>ÃV>`iÊvÀ>Ì]ÊÃÃÊvÊ`ë>ÞʵÕ>ÌÞÊV>Ê
>««i°ÊÊÊÊÊÊÊÊÊÊÊÊÊÊÊÊÊÊÊÊÊÊÊÊÊÊÊÊÊÊÊÊÊÊÊÊÊÊÊÊÊÊÊ
We recommend using a cable distributor.
33
DIGITAL SIGNAGE
To connect multiple monitors
to the Video in Component
mode
Component
Cable
ÌÊVÕ`i`®
COMPONENT
PON T-IN
N
Y
Pb
CVBS-IN
CO
OMPONENT-OUT
Y
Pb
COM
MPON
PONENT
T-IN
N
Pr
Y
CVBS-OUT
Pb
CVBS
S-IN
Pr
COMP
PONENT-O
OUT
Pr
Y
Product 1
Pb
COMP
PO
ONE
NENT-IN
N
Y
CVBS--OUT
Pr
Product 2
Pb
CV
VBS
S-IN
N
Prr
CO
OMP
PONENT
T-OU
UT
Y
Pb
CVBS
S-OUT
T
Prr
Product 3
To connect multiple monitors
to the Video in AV mode
CVBS-IN
BNC Cable
ÌÊVÕ`i`®
CVBS-OUT
COMPONENT AUDIO-IN
COMPOSITE AUDIO-IN
Product 1
CVBS-IN
S N
CVBS-OU
UT
COMPONEN
NT AUDIO-IN
COMPOSIT
TE AU
UDIO-IN
Product 2
CVB
BS-IN
BS
CVB
BS--OUT
CO
OMPONENT
T AUDIO
O-IN
COMPOSIT
TE AUDIO
O-IN
Product 3
IÊÊ7
iÊÕÌViVÌ}ÊÉÕÌÊV>ÃV>`iÊvÀ>Ì]ÊÃÃÊvÊ`ë>ÞʵÕ>ÌÞÊV>Ê
>««i°ÊÊÊÊÊÊÊÊÊÊÊÊÊÊÊÊÊÊÊÊÊÊÊÊÊÊÊÊÊÊÊÊÊÊÊ
We recommend using a cable distributor.
34
DIGITAL SIGNAGE
How to select Compensation
This function emphasizes the signal level to prevent the signal loss when the displays are chained by HDMI
cable.
Multi
Multi
U
Temp Control
ÑÑ
H Set Count
Multi Function
ÑÑ
V Set Count
:
Display Sequence
:
H Edge ADJ
:
V Edge ADJ
:
SET ID
:
Master
:
Off
Compensation
:
On
Move
8
Enter
-
Menu
U
Move
:
8
Adjust
-
Menu
1. Press Menu button. Menu items appear on the screen.
2. Press ▲ / ▼ button to move to "Multi" Icon.
3. Press ↲ button to select "Mutli" Icon.
4. Press ▲ / ▼ buttons to move to “Mutli Function”.
5. Press ▶ or ↲ buttons to select to “Mutli Function”.
4. Press ▲ / ▼ buttons to move to “Compensation”.
5. Press ▶ or ↲ buttons to select to “Compensation”.
6. Press ▲ / ▼ or ↲ buttons to set to “On/Off”.
7. Press EXIT button to escape OSD MENU or press MENU button to return to the previous menu.
✔ In the multi connection, in the product 1 set compensation is on, and the other sets compensation is off
in the other product.
35
DIGITAL SIGNAGE
How to check the currently
temperature
Multi
Multi
U
Temp Control
ÑÑ
Fan Control
:
Auto
Multi Function
ÑÑ
Fan Active Temp
:
38 °C
Hysteresis
:
5 °C
Temprature
:
32 ŭ
Move
8
Enter
-
Menu
U
Move
8
Enter
-
Menu
1. Press Menu button. Menu items appear on the screen.
2. Press ▲ / ▼ button to move to “Multi” Icon.
3. Press ↲ button to select “Multi” Icon, then “Temp Control” is highlighted.
4. Press ▶ or ↲ buttons to select to “Temp Control”.
The current temperature is displayed.
5. Press EXIT button to escape OSD MENU or press MENU button to return to the previous menu.
36
DIGITAL SIGNAGE
Diagnosis
When the product is not working properly, please check before you call customer center.
Symptoms
How to solve the problem
Screen displays late
after the power is on.
It happens not to show the screen noise when the power is on. Therefore it is not a
defect. But if the screen doesn't show up within 5 minutes from turning on, please
contact the customer center.
The screen is too dark
or bright?
Adjust the brightness or contrast.
The screen doesn't
show up indicating
"Out of range".
9ÕÊ>ÀiÊÕÃ}Ê>ÊÃ}>ÊÜ
V
ÊÃÊÕÌÃ`iÊÌ
iÊ«iÀ>Ì}ÊvÀiµÕiViÃÊvÊÌ
iÊ«À`ÕVÌÊ
1ÃÕ««ÀÌi`®]Ê«i>ÃiÊV
>}iÊÞÕÊÛ`iÊÃ}>°
when the screen is
scrambled.
please check the cable connection and the signal generator and contact customer
center.
ÕÌ>ÌVÊÃÜÌV
}Ê
function is not working
/ the input data were
disapperared when
reboot the system after
setting up the time
ÕÌ>ÌVÊÃÜÌV
}ÊvÕVÌÊÃÊÜÀ}ÊÜ
iÊÌ
iÊ«À`ÕVÌÊ
>ÃÊLiiÊÌÕÀi`Ê
vvÊÛ>ÊÀiÌiÊVÌÀÊÀÊ«ÜiÀÊLÕÌÌÊÊ>ÊL`Þ°ÊÌÊÃÊÊLiV>ÕÃiÊÌ
>ÌÊÌ
iÊÃiÌ
up values are deleted when the power cord is unplugged.
The screen and sound
are not synchronized
Check if the power is on, suspended or is correctly plugged into the outlet. Plug
the power cord of other peripheral device to the outlet that the product is being
connected.
37
DIGITAL SIGNAGE
Symptoms
How to solve the problem
The screen displays
without the sound.
check the volume up and down with remote control and audio connection cable
No sound from either
right speaker or left
speaker.
Confirm the status of the sound balance on OSD menu and check the connection
of speaker cable.
Remote control
doesn't work.
Check if any foreign substances in the sensor and the polarity of battery inserted.
If the batteries are drained, replace them with new batteries.
*
Ê-1Ê`iÿÌÊ
work.
-iÌÊÕ«ÊÌ
iÊÀiÃÕÌÊÀiviÀÀ}ÊÌÊvÀiµÕiVÞÊÌ>LiÊvÊ«ÕÌÊÌiÀ>°Ê`ÊÀiLÌÊ
the system as it supports Plug and Play.
UÊIf any problem unsolved by above diagnosis, please call customer center.
38
DIGITAL SIGNAGE
Specifications
- MODELS :
D46**A, D55**A,
D46**B, D55**B,
D46**P, D55**P
LCD
-VÀiiÊÃâiÊÝ6É®
Recommended resolution
£ÓäÊÝÊ£änäÊ*ÝiÊÕÊ®
D46KF*, D46CF* :Ê£ä£n°Îx®ÊÝÊxÇÓ°x{6®Ê
D558F*, D552F* : £Óä°È®ÊÝÊÈnä°{6®Ê
1920 x 1080 @60Hz
UÊ{ÈII]ÊxxIIÊ\
Ê*,«Ì®]Ê]Ê-1]Ê*
ÊÕ`]Ê,-ÓÎÓ
]Ê
6-]Ê
«iÌ]Ê
6-ÊÕ`]ÊÊ
«iÌÊÕ`
Input
UÊ{ÈII]ÊxxIIÊ\
ÊÊÊÊë>Þ*ÀÌ«Ì®]Êë>ÞÊ
ÌÀ«Ì®]Ê,]Ê,-ÓÎÓ
]Ê]Ê6]Ê-1]ÊÊÊÊÊÊÊÊÊÊÊÊÊÊÊÊÊÊÊÊÊÊÊÊÊÊÊÊÊÊÊÊÊÊÊÊÊÊÊ
PC Audio, Component, CVBS, Component Audio, CVBS Audio
UÊ{ÈII*]ÊxxII*Ê\
ÊÊÊÊë>Þ*ÀÌ]Êë>ÞÊ
ÌÀ«Ì®]Ê,]Ê,-ÓÎÓ
]Ê]Ê6]Ê-1]ÊÊÊÊÊÊÊÊÊÊÊÊÊÊÊÊÊÊÊÊÊÊÊÊÊÊÊÊÊÊÊÊÊÊÊÊÊÊÊÊÊÊ
PC Audio, Component, CVBS, Component Audio, CVBS Audio
UÊ{ÈII]ÊxxIIÊ\
ÊÊÊ6]Ê-ÕL]Ê,-ÓÎÓ
]Ê
«iÌ]Ê
6-]Ê-«i>iÀÊÉ,
Output
UÊ{ÈII]ÊxxII]Ê{ÈII*]ÊxxII*Ê\
ÊÊÊë>ÞÊ
ÌÀ«Ì®]Ê,]Ê,-ÓÎÓ
]Ê6]ÊÕ`]Ê
«iÌ]Ê
6Power
Ê£ääÊÓ{ä6ÊxäÉÈäâ
ÃÕ«ÌÊ/Þ«V>®
D46KF* : 140 W
D46CF* : 120 W
D558F* : 300 W
Operating Temperature
0 ~ 40°C
Control type
D468F* : 260 W
D462F* : 220 W
D552F* : 180 W
Remote control, key control
UÊAbove specification may be changed without prior notification for quality improvement.
39
DIGITAL SIGNAGE
Specifications
LCD
- MODELS :
D46**L, D55**L
-VÀiiÊÃâiÊÝ6É®
Recommended resolution
Input
D46**L : 1366 x 768 Pixel
D55**L : £ÓäÊÝÊ£änäÊ*ÝiÊÕÊ®
D46**L :Ê£ä£n°Îx®ÊÝÊxÇÓ°x{6®Ê
D55**L : £Óä°È®ÊÝÊÈnä°{6®Ê
D46**L : 1360 x 768 @60Hz
D55**L : 1920 x 1080 @60Hz
}Ì>Ê,]Ê>}Ê,]Ê
«iÌ"«Ì®]Ê6`i"«Ì®]Ê*
ÊÕ`ÊÉ,]Ê
«iÌÊÕ`ÊÉ,"«Ì®]Ê
«ÃÌiÊÕ`ÊÉ,"«Ì®]Ê,-ÓÎÓ
Output
}Ì>Ê,]Ê>}Ê,]Ê
«iÌ"«Ì®]Ê6`i"«Ì®]
Speaker Out L/R, RS232C
Power
Ê£ääÊÓ{ä6ÊxäÉÈäâ
ÃÕ«ÌÊ/Þ«V>®
D468FL : 260 W
D558FL : 225 W
Operating Temperature
0 ~ 40°C
Control type
D462FL : 220 W
D552FL : 170 W
Remote control, key control
UÊAbove specification may be changed without prior notification for quality improvement.
40
< REMOTE CONTROL SPEC >
1. REMOTE CONTROL WAVE FORM
2. REMOTE CONTROL KEY CODE TABLE
1) Remote Control System Infrared rey system
Custom Code : 7788H
fosc=455KHZ fc=fosc/2=37.917KHZ
2) Signal code
• Transmission
- One pulse
LEAD CODE
9ms
CUSTOM CODE
LOW
CUSTOM CODE
HIGH
DATA CODE
DATA CODE
4.5ms
- Bit Desciption
KEY
DATA
POWER
0x80
MUTE
0x81
MENU
0x95
EXIT
0x96
SOURCE
0xAC
ENTER (↵)
0x8C
UP
0x8D
DOWN
0x8E
LEFT
0x8F
RIGHT
0x90
DATA LAYOUT
Bit “0”
Bit “1”
80
81
0.56ms
0.56ms
8D
2.25ms
1.125ms
8C
8F
- Flame Interval
9O
8E
Tf
Tf
95
96
Tf=108ms 455KHz
AC
< RS232C COMMAND SPEC >
1. CONFIGURATION
sd
input hdmi
0x73 0x64
1) SPEED : 9600 Baud/s, 8 bit, No parity, 1 Stop bit.
2) Cable Connection
sv
input dvi
0x73 0x76
sp
input pc
0x73 0x70
sc
input component
0x73 0x63
sa
input av
0x73 0x61
sdp
input Droid PC
sr
input DisplayPort
0x73 0x72
is
input source status
0x69 0x73
pc
picture size : 4:3
0x70 0x63
pw
picture size : wide
0x70 0x77
at
pc auto
0x61 0x74
rt
?x?, h?, v?
&21752/(53&
&21752//(53&
5[
7[
*
3LQ',1PDOH
7[
5[
*
56&&DEOH
Input Source
5;
7;
*1'
56&&DEOH
3LQ',1PDOH
▲Terminal panel L Type
*1'
7;
5;
▲Terminal panel A, B Type
Picture
2. COMMAND FORMAT
- SET ID must select from the OSD menu and can’t be select through the COMMAND.
- Only one unit can be set as Master unit, select Master ON from the OSD Menu. (DEFAULT OFF)
- For viewing COMMAND from Hyper Terminal windows, One unit must set as MASTER ON
Audio
HEADER
SET ID
COMMAND
END
askii
did:
xxx- or all-
follow 2.2
.
hexa
0x64 0x69 0x64 0x3A
0x78 0x78 0x78 0x2D or 0x61
0x6C 0x6C 0x2D
follow 2.2
0x2E
Item
Return
232
SET ID
COMMAND
END
askii
did:
01-
pn
.
hexa
0x64 0x69 0x64 0x3A
0x30 0x31 0x2D
0x70 0x6E
WYl
decimal
100 105 100 58
48 49 45
112 110
[]
2) Command Type
Item
Description
Command
hexa
power on
W^WGW]l
pf
power off
W^WGW]]
ps
on, video out / on, video in /
off, video out / off, video in /
on, dpms mode
pn
Power
W^WGW^Z
zb
volume up
0x7A 0x62
zc
volume down
0x7A 0x63
"Error"
rf
Return 232 off
0x72 0x66
ro
Return 232 on
0x72 0x6F
cr
Example. 1 To power on Set ID No 1
HEADER
0x72 0x74
If you want receive return message in power off or DPMS. To set return 232 “ON”.
HEADER : Command head code.
SET ID : Set ID.
all unit control - “xxx- or all-”
unit no : “01 ~ 99”
COMMAND : follow 2.2
END : inform end of send data.
Item
ex) "1920x1080, h47, v60"
Error
1) Data Format
0x73 0x64 0x70
Factory
Color
Control
Enable Color Control Mode
0x63 0x72
q
quit (from ir & cr mode)
sbu
sub-brightness 1 step up
0x71
sbd
sub-brightness 1 step down
0x73 0x62 0x64
rou
red offset 1 step up
0x72 0x6F 0x75
rod
red offset 1 step down
0x72 0x6F 0x64
gou
green offset 1 step up
0x67 0x6F 0x75
god
green offset 1 step down
0x67 0x6F 0x64
bou
blue offset 1 step up
0x62 0x6F 0x75
bod
blue offset 1 step down
0x62 0x6F 0x64
scu
sub-contrast 1 step up
0x73 0x63 0x75
scd
sub-contrast 1 step down
0x73 0x63 0x64
rgu
red gain 1 step up
0x72 0x67 0x75
rgd
red gain 1 step down
0x72 0x67 0x64
ggu
green gain 1 step up
0x67 0x67 0x75
0x73 0x62 0x75
ggd
green gain 1 step down
0x67 0x67 0x64
bgu
blue gain 1 step up
0x62 0x67 0x75
bgd
blue gain 1 step down
0x62 0x67 0x64
blu
backlight value 1 step up
0x62 0x6C 0x75
bld
backlight value 1 step down
0x62 0x6C 0x64