1
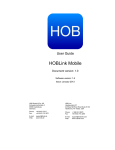
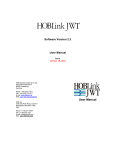
User Guide HOBLink iWT Software version: 1.1 Issue: October 2014 HOBLink iWT Software and Documentation - Legal Notice Contact: HOB GmbH & Co. KG Schwadermuehlstr. 3 90556 Cadolzburg Represented by: Klaus Brandstätter, Zoran Adamovic Phone: + 49 9103 715 0 Fax: + 49 9103 715 271 E-mail: [email protected] Register of Companies: Entered in the Registry of Companies, Registry Court: Amtsgericht Fürth, Registration Number: HRA 5180 Tax ID: Sales Tax Identification Number according to Section 27a Sales Tax Act: DE 132 747 002 Responsible for content according to Section 55 Paragraph 2 Interstate Broadcasting Agreement: Klaus Brandstätter, Zoran Adamovic, Schwadermuehlstr. 3, 90556 Cadolzburg. Disclaimer All rights are reserved. Reproduction of editorial or pictorial contents without express permission is prohibited. HOBLink iWT software and documentation have been tested and reviewed. Nevertheless, HOB will not be liable for any loss or damage whatsoever arising from the use of any information or particulars in, or any error in, or omission from this document. All information in this document is subject to change without notice, and does not represent a commitment on the part of HOB. Liability for content The contents of this publication were created with great care and diligence. While we keep it as up-to-date as practicable, we cannot take any responsibility for the accuracy and completeness of the contents of this publication. As a service provider we are responsible for our own content in this publication under the general laws according to Section 7 paragraph 1 of the TMG. According to Chapters 8 to 10 of the TMG we are not obliged as a service provider to monitor transmitted or stored information not created by us, or to investigate circumstances that indicate illegal activity. Obligations to remove or block the use of information under the general laws remain unaffected. Liability is only possible however from the date of a specific infringement being made known to us. Upon notification of such violations, the content will be removed immediately. Liability for links This publication may contain links to external websites over which we have no control. Therefore we cannot accept any responsibility for their content. The respective provider or operator of the website pages to which there are links is always responsible for the content of the linked pages. The linked sites were checked at the time of linking for possible violations of the law. At the time the link was created in this publication, no illegal or harmful contents had been identified. A continuous and on-going examination of the linked pages is unreasonable without concrete evidence of a violation. Upon notification of any violations, such links will be removed immediately. Copyright The contents and works on these pages created by the author are subject to German copyright law. Reproducing, copying, modifying, adapting, distributing or any kind of exploiting of this material outside the realms of copyright require the prior written consent of the respective author or creator. The downloading of, and making copies of, these materials is only permitted for private, non-commercial use. Where contents of this publication have not been created by the author, the copyright of the third parties responsible for these contents shall be upheld. In particular any contents created by a third party are marked as such. If you become aware of any copyright infringement within this publication, we kindly ask to be provided with this information. Upon notification of any such violation, the concerned content will be removed immediately. Certificates All products delivered by HOB include trusted root certificates issued by many of the certificate authorities, which are located worldwide. HOB has made every reasonable effort to ensure that these root certificates are accurate. Customers will not have any claim to the accuracy, integrity, validity of any of the delivered certificates or their completeness. HOB does not warrant, and will not accept, any responsibility for any damage that results from the usage of the root certificates that are delivered with HOB products. All risks are borne by the customer and it is the responsibility of the customer to verify the configured certificates that are used by the customer's entity. Trademarks Microsoft Windows is a trademark of Microsoft Corporation. Mac OS and Apple are trademarks of Apple Inc., registered in the U.S. and other countries. All other product names, company names and service names may be trademarks, registered trademarks or service marks of their respective corporations or owners, even if they are not specifically marked as such. Issued: October 10, 2014 2 Connectivity Solutions by HOB Purpose of this Guide This guide is designed to provide users with detailed information concerning HOBLink iWT and to help them make the best possible use of the application. The procedures for configuring the individual software components are documented in detail with step-by-step instructions. Symbols and Conventions This guide uses certain conventions and abbreviations which are explained here: This symbol indicates useful tips that can make your work easier. This symbol indicates additional informative text. This symbol indicates an important tip or procedure that may have far-reaching effects. Please consider carefully the consequences of any changes and settings you make here. References to program commands, options and buttons are printed in Bold, for example: select the command Open. Cross-references to section headings and figures with numbers are marked in color as follows: Section 5 Information and Support. File names and text to be entered by the user are printed in Courier New. This input is – unless otherwise mentioned - case sensitive. In this documentation, HOB-specific terminology is abbreviated as follows: HOB-specific Terminology Abbreviation HOB WebSecureProxy HOB WSP HOBLink iWT a HOBLink iWT Connectivity Solutions by HOB 3 4 Connectivity Solutions by HOB Contents 1 2 Introducing HOBLink iWT 7 1.1 Features of HOBLink iWT............................................................................... 7 1.2 Connecting HOBLink iWT to your network ..................................................... 7 System Requirements 2.1 9 Hardware/Memory Requirements................................................................... 9 3 Installing HOBLink iWT 11 4 Configuration 13 5 4.1 Configuration Name...................................................................................... 18 4.2 Connection ................................................................................................... 19 4.3 Logon ........................................................................................................... 43 4.4 Display.......................................................................................................... 44 4.5 Keyboard ...................................................................................................... 47 4.6 Expert ........................................................................................................... 49 Starting a HOBLink iWT Session 51 5.1 The Connection Bar...................................................................................... 55 5.2 The Keyboard ............................................................................................... 57 6 Gestures 59 7 Information and Support 61 Connectivity Solutions by HOB 5 6 Connectivity Solutions by HOB HOBLink iWT 1 Introducing HOBLink iWT Introducing HOBLink iWT HOBLink iWT is an RDP remote connectivity client that provides secure remote access from any iPad running iOS 3.2 (or later) to Windows applications running on Windows XP Professional, Windows Vista Business, Windows 7 Professional or Windows 8 or Windows 8.1 on the client side and Windows Server 2003, Windows Server 2008/R2 or Windows Server 2012 on the server side. HOBLink iWT enables fast and easy access to centrally stored Windows applications without requiring any additional server components for communication. When used together with HOB WebSecureProxy, HOBLink iWT also protects your Terminal Servers from unauthorized Web access. 1.1 Features of HOBLink iWT With HOBLink iWT you have the following benefits: Single-user remote access to Windows applications Reconnect if the connection is interrupted Multiple, parallel sessions Wake-on-LAN Load balancing Comprehensive on-screen Windows keyboard External keyboard support Portrait and landscape modes Security using certificates Application serving VNC bridge in conjunction with HOB WSP Connection broker 1.2 Fast reconnect – if no Username and Password were entered into the configuration and your session disconnects due to a network problem you will be asked if the session should be terminated or restored (without having to enter a Username or Password again). Connecting HOBLink iWT to your network There are two communication scenarios that are possible for HOBLink iWT, both of which will be set up by your IT administrators: 1. Direct communication between HOBLink iWT and the company network. The advantage of using direct communication is that it is easy to use. Connectivity Solutions by HOB 7 Introducing HOBLink iWT HOBLink iWT Figure 1: Diagram of Direct Communication 2. Communication between HOBLink iWT and the company network over the HOB RD VPN WebSecureProxy (HOB WSP). HOB RD VPN is a software solution that is specially designed to give you secure remote access over the Internet to the resources in your corporate network. HOB WSP is the server component of HOB RD VPN. The advantage of using communication over HOB WSP is that it offers an even higher level of security requiring certificates. In addition, it is also encrypted with SSL (see Figure 2 on page 8). HOB WebSecureProxy is not included in the HOBLink iWT solution. HOB WSP can be obtained at additional cost. If your company uses HOB WSP, please contact your IT administrator for configuration details. Figure 2: Diagram of Communication over the HOB RD VPN WebSecureProxy 8 Connectivity Solutions by HOB HOBLink iWT 2 System Requirements System Requirements HOBLink iWT is the client component of the secure mobile access software solution from HOB. HOBLink iWT supports the following Apple product: iPad HOBLink iWT requires the following Apple OS to be installed: 2.1 iOS 3.2 or later Hardware/Memory Requirements Client: iPad basic version Minimum: iPad WiFi 16 GB RAM RDP Connections to following systems: Hardware requirements for Windows Terminal Services that support RDP connections or Servers with Remote Desktop Services differ depending on several factors: The number of clients who will be granted access rights The applications running on the server The behavior of the users Desktop operating systems: Windows XP Professional Windows Vista Business Windows 7 Professional Windows 8 Windows 8.1 Server operating systems: Windows Server 2003 Windows Server 2008/R2 Windows Server 2012 Connectivity Solutions by HOB 9 System Requirements 10 HOBLink iWT Connectivity Solutions by HOB HOBLink iWT 3 Installing HOBLink iWT Installing HOBLink iWT HOBLink iWT can be downloaded onto your iPad and installed exactly as any other iPad application via the App Store. You only need to have an iTunes account with an Apple ID. HOBLink iWT is available for download free from the App Store. 1. Open the App Store. 2. Search for HOBLink iWT. Figure 3: App Information 3. Tap Free and then Install to download the app. Connectivity Solutions by HOB 11 Installing HOBLink iWT 4. HOBLink iWT Enter your Apple ID and password. Figure 4: Enter Apple ID Once the download process is complete, you can see the HOBLink iWT icon on the screen of your iPad. Figure 5: HOBLink iWT App Icon If you cannot see this icon, or have any problems during the download process, please contact your IT administrator. 12 Connectivity Solutions by HOB HOBLink iWT 4 Configuration Configuration The Configurations screen is the control center for all configurations. Here you can do the following: Create, edit, rearrange and delete various HOBLink iWT configurations Start HOBLink iWT sessions View product information To configure HOBLink iWT, tap the HOBLink iWT App Icon (see Figure 5 on page 12) on the screen of your iPad. The Configurations screen is displayed. Figure 6: Configurations All configurations are listed on this screen. If you are using HOBLink iWT for the first time, you will only have the default configuration (as seen at the top of the list). This can be used as a template for new configurations or you can use it to connect to a session. See Section 5 Starting a HOBLink iWT Session on page 51 for more information. Connectivity Solutions by HOB 13 Configuration HOBLink iWT Please note that any changes made to the default configuration are saved and will then be used as the default when creating new configurations. The buttons on the Configurations screen (see Figure 6 on page 13) have the following functions: Tap the Info button to the right of a configuration to edit it. Tap the Info button at the top of the screen to view HOBLink iWT product information. Tap the Delete button to delete or move configurations (see Figure 7 on page 15 and Figure 8 on page 16). Tap the Plus button to add a new configuration and to open the Connection Configuration screen (see Figure 9 on page 17). 14 Connectivity Solutions by HOB HOBLink iWT Configuration Tap the Delete button on the Configurations screen (see Figure 6 on page 13) to delete or move configurations in the list. The following screen is displayed: Figure 7: Delete Configuration Here you have the following options:. Tap the Delete symbol to select a configuration. The Delete button appears to the right of the configuration. Tap the Delete button to delete the configuration. Tap anywhere to cancel the action. Tap the Move button to move the configuration (see Figure 8 on page 16). The buttons at the top of the screen have the following functions: Tap the Info button to view HOBLink iWT product information. Tap the Delete button to delete or move configurations (as can be seen above). Tap the Plus button to add a new configuration and to open the Connection Configuration screen (see Figure 9 on page 17). Connectivity Solutions by HOB 15 Configuration HOBLink iWT Tap the Move button on the Delete Configuration screen (see Figure 7 on page 15) to reposition a configuration. Figure 8: Move Configuration Tap the Move button to the right of the configuration to be moved. Drag the configuration to the desired position. (In the screen above, the PC configuration is being dragged to the top of the list.) Drop the configuration to place it in the new position. The buttons at the top of the screen have the following functions: Tap the Info button to view HOBLink iWT product information. Tap the Delete button to delete or move configurations (as can be seen above). Tap the Plus button to add a new configuration and to open the Connection Configuration screen (see Figure 9 on page 17). 16 Connectivity Solutions by HOB HOBLink iWT Configuration Tap the Plus button on the Configurations screen (see Figure 6 on page 13) to open a new configuration. Here you can do the following: Name or edit a configuration Choose a connection type Edit or save your logon information Set the size and color quality of the display Set audio settings Load or clear certificates Figure 9: Connection Configuration Not all configuration settings are displayed on this screen. Scroll down for the remaining settings (see Figure 10 on page 18). Connectivity Solutions by HOB 17 Configuration HOBLink iWT Figure 10: Connection Configuration Continued The following can be configured on the Connection Configuration screen (see Figure 9 on page 17): 4.1 Configuration Name Configuration name – HOBLink iWT automatically names every new configuration Configuration. Tap this field to open it for editing and then give the configuration a new name. The name of the configuration will also appear in the gray bar at the top of the screen. 18 Connectivity Solutions by HOB HOBLink iWT 4.2 Configuration Connection Connection type – tap Connection type on the Connection Configuration screen (see Figure 9 on page 17) to display the following screen: Figure 11: Connection Type Tap a connection type to select it. There are 3 connection types: Direct – see Section 4.2.1 Connection Type – Direct on page 21. Load balancing – see Section 4.2.2 Connection Type – Load Balancing on page 35. WebSecureProxy socks mode – see Section 4.2.3 Connection Type – WebSecureProxy Socks Mode on page 39. The options following Connection type differ depending on which connection type has been chosen. Refer to the appropriate connection type sections for more information. Connectivity Solutions by HOB 19 Configuration HOBLink iWT You have the following options on the Connection Type screen (see Figure 11 on page 19): Done Tap Done when you are finished to save your changes, which will return you to the Configurations screen (see Figure 6 on page 13). Tap the Info button to view HOBLink iWT product information. Configuration Tap Configuration to return to the Connection Configuration screen (see Figure 9 on page 17) without saving any changes. This option will not be named “Configuration”, instead it will show the name that you have given the configuration (e.g. Office PC). Please note that while tapping Configuration (or any button/option that takes you back to the previous page) temporarily saves your changes, no changes will be permanently saved until you tap Done. 20 Connectivity Solutions by HOB HOBLink iWT Configuration 4.2.1 Connection Type – Direct Direct is the default connection type (see Figure 9 on page 17). Here you can set the following: RD server (Remote Desktop server) – enter the IP address or the host name of the server to be connected to (e.g. Companyserver1). Port – enter the number of the port here. The default port is 3389. Startup – tap Startup to display the following screen: Figure 12: Startup Options You have two options here: Desktop – this displays the desktop upon starting the session. Application serving – this opens a specific application upon starting the session. Tap to display the Application Serving screen (see Figure 13 on page 23). Connectivity Solutions by HOB 21 Configuration HOBLink iWT The options on the Startup Options screen (see Figure 12 on page 21) have these functions: Done Tap Done when you are finished to save your changes, which will return you to the Configurations screen (see Figure 6 on page 13). Tap the Info button to view HOBLink iWT product information. Configuration Tap Configuration to return to the Connection Configuration screen (see Figure 9 on page 17) without saving any changes. This option will not be named “Configuration”, instead it will show the name that you have given the configuration (e.g. Office PC). Please note that while tapping Configuration (or any button/option that takes you back to the previous page) temporarily saves your changes, no changes will be permanently saved until you tap Done. 22 Connectivity Solutions by HOB HOBLink iWT Configuration Tap Application serving on the Startup Options screen (see Figure 12 on page 21) to display the Application fields: Figure 13: Application Serving Application – enter the path and file name of the application to be run upon starting the session (e.g. C:\Program Files\Program\ program.exe). Start in – enter the name of the path where the program is executed. You also have the following options on this screen: Done Tap Done when you are finished to save your changes, which will return you to the Configurations screen (see Figure 6 on page 13). Tap the Info button to view HOBLink iWT product information. Configuration Tap Configuration to return to the Connection Configuration screen (see Figure 9 on page 17) without saving any changes. This option will not be named “Configuration”, instead it will show the name that you have given the configuration (e.g. Office PC). Connectivity Solutions by HOB 23 Configuration HOBLink iWT Please note that while tapping Configuration (or any button/option that takes you back to the previous page) temporarily saves your changes, no changes will be permanently saved until you tap Done. 24 Connectivity Solutions by HOB HOBLink iWT Configuration Proxy – tap Proxy on the Connection Configuration screen (see Figure 9 on page 17) to display the following: Figure 14: Proxy Options Use client-side proxy – turn this ON to activate the following settings: Proxy mode – see Figure 15 on page 27. Host name – enter the name of the host here. Port – enter the number of the port here. You also have the following options on this screen: Done Tap Done when you are finished to save your changes, which will return you to the Configurations screen (see Figure 6 on page 13). Tap the Info button to view HOBLink iWT product information. Configuration Tap Configuration to return to the Connection Configuration screen without saving any changes. This option will not be named “Configuration”, instead it will show the name that you have given the configuration (e.g. Office PC). Connectivity Solutions by HOB 25 Configuration HOBLink iWT Please note that while tapping Configuration (or any button/option that takes you back to the previous page) temporarily saves your changes, no changes will be permanently saved until you tap Done. 26 Connectivity Solutions by HOB HOBLink iWT Configuration Tap Proxy Mode on the Proxy Options screen (see Figure 14 on page 25) to display the following screen: Figure 15: Proxy Mode Here you choose the type of proxy mode that you would like to use. Please ask your IT administrator what settings you should make here. You also have the following functions on this screen: Done Tap Done when you are finished to save your changes, which will return you to the Configurations screen (see Figure 6 on page 13). Tap the Info button to view HOBLink iWT product information. Proxy Tap Proxy to return to the Proxy Options screen without saving any changes. Connectivity Solutions by HOB 27 Configuration HOBLink iWT Please note that while tapping Proxy (or any button/option that takes you back to the previous page) temporarily saves your changes, no changes will be permanently saved until you tap Done. 28 Connectivity Solutions by HOB HOBLink iWT Configuration Audio – tap Audio on the Connection Configuration screen (see Figure 9 on page 17) to display the following. Figure 16: Audio Options Audio Play – turn this to ON to display the following field: Play quality – displays the Play Quality screen (see Figure 17 on page 31). Supported audio formats are PCM, AAC and A-law. You also have the following options on this screen: Done Tap Done when you are finished to save your changes, which will return you to the Configurations screen (see Figure 6 on page 13). Tap the Info button to view HOBLink iWT product information. Connectivity Solutions by HOB 29 Configuration HOBLink iWT Configuration Tap Configuration to return to the Connection Configuration screen (see Figure 9 on page 17) without saving any changes. This option will not be named “Configuration”, instead it will show the name that you have given the configuration (e.g. Office PC). 30 Connectivity Solutions by HOB HOBLink iWT Configuration Tap Play quality on the Audio Options screen (see Figure 16 on page 29) to display the following screen: Figure 17: Play Quality Play Quality Choose the level of quality desired. Choosing a lower quality could increase performance. You also have the following options on this screen: Done Tap Done when you are finished to save your changes, which will return you to the Configurations screen (see Figure 6 on page 13). Tap the Info button to view HOBLink iWT product information. Audio Tap Audio to return to the Audio Options screen without saving any changes. Connectivity Solutions by HOB 31 Configuration HOBLink iWT Security This option allows you to load and delete certificates. In some cases it could be necessary to import certificates when using HOBLink iWT in connection with HOB RD VPN. Please ask your IT administrator if it is necessary to import certificates. Tap Security on the Connection Configuration screen (see Figure 10 on page 18) to display the following: Figure 18: Security Options Here you have the following options: SSL Folder SSL folder – enter the path of the SSL folder containing the certificates here. SSL Filename 32 SSL filename – enter the name of the SSL file here. Connectivity Solutions by HOB HOBLink iWT Configuration Actions Load certificates – tap to load the certificates. Clear certificates – tap to clear all loaded certificates. Please ask your IT administrator for the SSL folder and SSL filename. The options on the Security Options screen (see Figure 18 on page 32) have the following functions: Done Tap Done when you are finished to save your changes, which will return you to the Configurations screen (see Figure 6 on page 13). Tap the Info button to view HOBLink iWT product information. Configuration Tap Configuration to return to the Connection Configuration screen (see Figure 9 on page 17) without saving any changes. This option will not be named “Configuration”, instead it will show the name that you have given the configuration (e.g. Office PC). Please note that while tapping Configuration (or any button/option that takes you back to the previous page) temporarily saves your changes, no changes will be permanently saved until you tap Done. Wake-on-LAN Wake-on-LAN allows remote access to a workstation even if it has been shutdown. Wake-on-LAN uses Broadcast mode to send a packet (containing the workstation’s Mac address) to the workstation to be woken up remotely. See Figure 19 on page 34 for more information. The workstation, BIOS and Network interface must be configured to listen to port 9 in order to receive the packet and they must support Wake-on-LAN. Please refer to proper documentation for your workstation for more information. Connectivity Solutions by HOB 33 Configuration HOBLink iWT Tap Wake-on-LAN on the Connection Configuration screen (see Figure 9 on page 17) to display the following: Figure 19: Wake-on-LAN Options You can set the following on this screen: Use Wake-on-LAN – turn this ON to activate the fields below: Mac address – enter the Mac address of the workstation to be woken up here. Limit to wait for server in seconds – enter the amount of time the server should wait while attempting to connect to the selected workstation. If a connection is not made within this period of time, the connection attempt will be aborted. The default setting is 90 seconds. Wake-on-LAN mode – Broadcast – this mode uses a port to search for all responding servers that are available for selection. Broadcast is the only available mode. Please make sure your network is able to support Wake-on-LAN per Broadcast mode. 34 Connectivity Solutions by HOB HOBLink iWT Configuration Port – specify the port to be used for Broadcast mode here. The default setting is 9. You also have the following options on the Wake-on-LAN Options screen (see Figure 19 on page 34): Done Tap Done when you are finished to save your changes, which will return you to the Configurations screen (see Figure 6 on page 13). Tap the Info button to view HOBLink iWT product information. Configuration Tap Configuration to return to the Connection Configuration screen (see Figure 9 on page 17) without saving any changes. This option will not be named “Configuration”, instead it will show the name that you have given the configuration (e.g. Office PC). Please note that while tapping Configuration (or any button/option that takes you back to the previous page) temporarily saves your changes, no changes will be permanently saved until you tap Done. 4.2.2 Connection Type – Load Balancing HOBLink iWT supports HOB Load Balancing for Windows Servers and is an optional server component from HOB that needs to be configured on the server. For more information, please contact your HOB sales partner or contact HOB directly. Connectivity Solutions by HOB 35 Configuration HOBLink iWT Tap Load balancing on the Connection Type screen (see Figure 11 on page 19) to display the Load Balancing screen: Figure 20: Load Balancing Not all configuration settings are displayed on this screen. Scroll down for the remaining settings (see Figure 21 on page 37). 36 Connectivity Solutions by HOB HOBLink iWT Configuration Figure 21: Load Balancing Continued The buttons on the Load Balancing screen (see Figure 20 on page 36) have the following functions. Done Tap Done when you are finished to save your changes, which will return you to the Configurations screen (see Figure 6 on page 13). Tap the Info button to view HOBLink iWT product information. Configuration Tap Configuration to return to the Connection Configuration screen (see Figure 9 on page 17) without saving any changes. This option will not be named “Configuration”, instead it will show the name that you have given the configuration (e.g. Office PC). Please note that while tapping Configurations (or any button/option that takes you back to the previous page) temporarily saves your changes, no changes will be permanently saved until you tap Done. Connectivity Solutions by HOB 37 Configuration HOBLink iWT You can set the following on the Load Balancing screen (see Figure 20 on page 36): Startup – see Figure 12 on page 21. Load balancing – tap this field to display the Load Balancing Options screen. Figure 22: Load Balancing Options Server Selection Connect to server with least load – tap this field to select it and HOBLink iWT will always connect to the server with the least load. Select from all responding servers – tap this field to select it if you would like to choose which server should be used for the connection from a list of all responding servers. In the case of a disconnected session, HOBLink iWT will automatically reconnect to the session if Connect to server with least load is chosen. The disconnected session will have to be manually connected to if Select from all responding servers has been chosen. 38 Connectivity Solutions by HOB HOBLink iWT Configuration Broadcast Broadcast – this is ON by default and cannot be turned OFF as Broadcast is the only option here. Broadcast uses a port to search for all responding servers that are available for selection. Port Port – enter the port here. The default port setting for HOB Load Balancing is 4095. Proxy – see Section 4.2.1 Connection Type – Direct on page 21. Security – see Figure 18 on page 32. Wake-on-LAN – see Figure 19 on page 34. You also have the following options on the Load Balancing Options screen (see Figure 22 on page 38) Done Tap Done when you are finished to save your changes, which will return you to the Configurations screen (see Figure 6 on page 13). Tap the Info button to view HOBLink iWT product information. Configuration Tap Configuration to return to the Connection Configuration screen (see Figure 9 on page 17) without saving any changes. This option will not be named “Configuration”, instead it will show the name that you have given the configuration (e.g. Office PC). Please note that while tapping Configuration (or any button/option that takes you back to the previous page) temporarily saves your changes, no changes will be permanently saved until you tap Done. 4.2.3 Connection Type – WebSecureProxy Socks Mode HOB WebSecureProxy is part of the HOB RD VPN solution. Please contact your IT administrator to see if HOB RD VPN has been configured on your company network. Connectivity Solutions by HOB 39 Configuration HOBLink iWT Tap WebSecureProxy socks mode on the Connection Type screen (see Figure 11 on page 19) to display the screen below: Figure 23: WebSecureProxy Socks Mode Not all configuration settings are displayed on this screen. Scroll down for the remaining settings (see Figure 24 on page 41). 40 Connectivity Solutions by HOB HOBLink iWT Configuration Figure 24: WebSecureProxy Socks Mode Continued You can set the following on the WebSecureProxy Socks Mode screen (see Figure 23 on page 40) Startup – see Figure 12 on page 21. WebSecureProxy – see Figure 25 on page 42. Load balancing – this option is not supported by HOBLink iWT in connection with WebSecureProxy socks mode. For information on Load balancing, see Section 4.2.2 Connection Type – Load Balancing on page 35. Proxy – see Section 4.2.1 Connection Type – Direct on page 21. Security – see Figure 18 on page 32. Wake-on-LAN – this option is not supported by HOBLink iWT in connection with WebSecureProxy socks mode. For information on Wake-on-LAN, see Figure 19 on page 34. The options on the WebSecureProxy Socks Mode screen have these functions: Done Tap Done when you are finished to save your changes, which will return you to the Configurations screen (see Figure 6 on page 13). Tap the Info button to view HOBLink iWT product information. Configuration Tap Configuration to return to the Connection Configuration screen (see Figure 9 on page 17) without saving any changes. This option will not be named “Configuration”, instead it will show the name that you have given the configuration (e.g. Office PC). Connectivity Solutions by HOB 41 Configuration HOBLink iWT Please note that while tapping Configurations (or any button/option that takes you back to the previous page) temporarily saves your changes, no changes will be permanently saved until you tap Done. Tap WebSecureProxy on the WebSecureProxy Socks Mode screen (see Figure 23 on page 40) to display the screen below: Figure 25: WebSecureProxy Options You can set the following on this screen: Server List 42 WebSecureProxy – enter the address of the proxy to be used here. This can also be a DNS name or IP address (for example, server.company.com). This is a required field and cannot be left empty. Port – enter the number of the port (for example, 443) for the connection here. This is a required field and cannot be left empty. User name – enter a user name for authentication for the HOB WSP here. This field is optional. Connectivity Solutions by HOB HOBLink iWT Configuration WSP Socks Server Prompt user when connecting – turn this ON to be prompted to enter the name of the socks server every time you start a session. Turn this OFF to activate the Socks server name field. Socks server name – Enter the name of the socks server to be connected to here. This server will be used for every session. Please ask your IT administrator for the Socks server name. The options on the WebSecureProxy Options screen (see Figure 25 on page 42) have the following functions: Done Tap Done when you are finished to save your changes, which will return you to the Configurations screen (see Figure 6 on page 13). Tap the Info button to view HOBLink iWT product information. Configuration Tap Configuration to return to the Connection Configuration screen (see Figure 9 on page 17) without saving any changes. This option will not be named “Configuration”, instead it will show the name that you have given the configuration (e.g. Office PC). Please note that while tapping Configuration (or any button/option that takes you back to the previous page) temporarily saves your changes, no changes will be permanently saved until you tap Done. 4.3 Logon You have the following options under Logon on the Connection Configuration screen (see Figure 10 on page 18): Logon automatically – turn this ON to save your logon information. You only need to enter your logon credentials once and HOBLink iWT will use these credentials for each subsequent logon. Turn this OFF if you do not wish to logon automatically. Here you can set the following: 1. User name – enter a user name for authentication for the remote desktop session here. 2. Password – enter a password for authentication for the remote desktop session here. 3. Domain – enter the domain name here. Saving passwords in the configuration is a security risk and is not recommended. Connectivity Solutions by HOB 43 Configuration 4.4 HOBLink iWT Display Size – tap Size on the Connection Configuration Continued screen (see Figure 10 on page 18) to display the following: Figure 26: Size Options You can set the size of the display here. The default setting is 800 x 600. Choosing a lower resolution could increase performance. The options on this screen have the following functions: Done Tap Done when you are finished to save your changes, which will return you to the Configurations screen (see Figure 6 on page 13). Tap the Info button to view HOBLink iWT product information. 44 Connectivity Solutions by HOB HOBLink iWT Configuration Configuration Tap Configuration to return to the Connection Configuration screen (see Figure 9 on page 17) without saving any changes. This option will not be named “Configuration”, instead it will show the name that you have given the configuration (e.g. Office PC). Please note that while tapping Configuration (or any button/option that takes you back to the previous page) temporarily saves your changes, no changes will be permanently saved until you tap Done. Color quality – tap Color quality on the Connection Configuration Continued screen (see Figure 10 on page 18) to display the following: Figure 27: Color Quality Here you can choose the desired color depth. The default is Automatic. Choosing a lower color quality setting could increase performance. Connectivity Solutions by HOB 45 Configuration HOBLink iWT The options on the Color Quality screen (see Figure 27 on page 45) have the following functions: Done Tap Done when you are finished to save your changes, which will return you to the Configurations screen (see Figure 6 on page 13). Tap the Info button to view HOBLink iWT product information. Configuration Tap Configuration to return to the Connection Configuration screen (see Figure 9 on page 17) without saving any changes. This option will not be named “Configuration”, instead it will show the name that you have given the configuration (e.g. Office PC). Please note that while tapping Configuration (or any button/option that takes you back to the previous page) temporarily saves your changes, no changes will be permanently saved until you tap Done. ON/OFF Options Below Color quality on the Connection Configuration Continued screen (see Figure 10 on page 18), you have display options that can be turned ON or OFF. These are as follows: Themes – turn this ON to allow the design of the HOBLink iWT session to be modified or OFF to disable this option. Desktop background – turn this ON to allow the desktop background of the HOBLink iWT session to be modified or OFF to disable this option. If the changing of the desktop background is blocked on the WTS, then this setting cannot be changed. Menu and window animation – turn this ON to enable options to animate menus and windows in the HOBLink iWT session or OFF to disable this feature. Show contents of window while dragging – turn this ON to show the window contents when moving or resizing a window. If you turn this OFF, you will see only the outline of the window when you move it. This function can affect the system performance and increase the system load. 46 Mouse cursor shadow – turn this ON to show mouse movements with a shadow or OFF to disable this option. Text cursor blinking – turn this ON to set the cursor to be shown as blinking or OFF to disable this option. when only a narrow network bandwidth is available. Font smoothing – turn this ON to allow Windows Font Smoothing in the session or OFF to disable this option. Connectivity Solutions by HOB HOBLink iWT 4.5 Configuration Keyboard Layout – tap Layout on the Connection Configuration Continued screen (see Figure 10 on page 18) to display the following: Figure 28: Keyboard Layout Choose the language desired. You also have the following options here Done Tap Done when you are finished to save your changes, which will return you to the Configurations screen (see Figure 6 on page 13). Configuration Tap Configuration to return to the Connection Configuration screen (see Figure 9 on page 17) without saving any changes. This option will not be named “Configuration”, instead it will show the name that you have given the configuration (e.g. Office PC). Click volume – adjust the keyboard click volume. If you change the keyboard layout for a configuration, the session must be logged off from the server for the change to successfully take place, disconnecting it does not suffice. Connectivity Solutions by HOB 47 Configuration HOBLink iWT HOBLink iWT supports the following keyboard layouts: 48 Bulgarian Croatian Czech Danish Dutch English (US) English (UK) Finnish French French (Belgium) French (Canada) French (Switzerland) German German (Switzerland) Greek Hungarian Icelandic Italian Norwegian Polish Portuguese (Brazil) Portuguese Romanian Russian Slovak Slovenian Spanish Spanish (Latin America) Spanish (Mexico) Swedish Turkish Ukrainian Connectivity Solutions by HOB HOBLink iWT 4.6 Configuration Expert Trace – turn Trace to ON on the Connection Configuration Continued screen (see Figure 10 on page 18) to allow actions to be traced and put into a log. This is useful, for example, if you are experiencing errors. If you have turned Trace ON in a configuration, start the session and find/reproduce the error. Now go back into the configuration and turn Trace OFF in order to restore the normal level of performance. The next time you start that session, the following screen is displayed: Figure 29: Trace Options Here you have the following options: Show Tap Show to view the trace log. Send Tap Send to send the trace log to HOB Support. Delete Tap Delete to delete the trace log and proceed with connecting to the session. Cancel Tap Cancel to close the window and return to the Configurations screen (see Figure 6 on page 13). Connectivity Solutions by HOB 49 Configuration 50 HOBLink iWT Connectivity Solutions by HOB HOBLink iWT 5 Starting a HOBLink iWT Session Starting a HOBLink iWT Session In order to start a session, tap a configuration on the Configurations screen (see Figure 6 on page 13). If you connect using a direct connection or the default configuration, the following screen will be displayed: Figure 30: Direct Connection Logon Here you set the following: RD server – enter the IP address or the host name of the server to be connected to (e.g. Companyserver1). This is a required field and cannot be left empty. Port – enter the number of the port here. The default port is 3389. There are also three options on this screen: Continue Tap Continue when you are finished to connect to the session. Tap the Info button to view HOBLink iWT product information. Cancel Tap Cancel to return to the Configurations screen. Connectivity Solutions by HOB 51 Starting a HOBLink iWT Session HOBLink iWT If you have configured a Load balancing configuration (see Section 4.2.2 Connection Type – Load Balancing on page 35), tap the configuration on the Configurations screen (see Figure 6 on page 13) and the following is displayed: Figure 31: HOB Load Balancing Authentication You have the following options on this screen: User name – enter your user name for authentication for HOB Load Balancing. Password – enter your password for authentication for HOB Load Balancing. Domain – enter the name of the domain here. Only the field User name is required to logon above. Entering your information in the other fields is useful if you would like to logon automatically. See Section 4.3 Logon on page 43 for more information. The options on this screen have the following functions: Continue Tap Continue when you are finished to connect to the session. Tap the Info button to view HOBLink iWT product information. 52 Connectivity Solutions by HOB HOBLink iWT Cancel Starting a HOBLink iWT Session Tap Cancel to return to the Configurations screen (see Figure 6 on page 13). If you have configured a WebSecureProxy socks mode configuration (see Section 4.2.3 Connection Type – WebSecureProxy Socks Mode on page 39), then tap the configuration on the Configurations screen (see Figure 6 on page 13) and the following screen will be displayed: Figure 32: WebSecure Authentication User name – enter your user name for authentication for the HOB WSP here. This is a required field. Password – enter your password for authentication for the HOB WSP here. This is a required field. Change password – turn this ON to display the appropriate fields for changing and confirming your new password The options on this screen have the following functions:. Continue Tap Continue when you are finished to connect to the session. Tap the Info button to view HOBLink iWT product information. Connectivity Solutions by HOB 53 Starting a HOBLink iWT Session Cancel HOBLink iWT Tap Cancel to return to the Configurations screen (see Figure 6 on page 13). Please be careful when changing your password as it could change across the entire domain. This depends on how the server has been configured. Contact your IT administrator to find out what consequences changing your password could have. After successful authentication, you will be connected to the Windows application. Figure 33: Windows Application You can use every program and application just as if you were sitting at the workstation. At the top of the screen, you have the Connection Bar. 54 Connectivity Solutions by HOB HOBLink iWT 5.1 Starting a HOBLink iWT Session The Connection Bar Figure 34: Connection Bar The Connection Bar is always visible in portrait mode; however, in landscape mode it is hidden and can be accessed by tapping the Keyboard button. The name of the connection is in the middle of the Connection Bar (in this case it is Windows 8). The Connection Bar has the following options: Disconnect Tap Disconnect to disconnect your connection and return to the Configurations screen (see Figure 6 on page 13). If you have more than one connection running, the current connection will be disconnected and the next connection in the list (when you tap the Connections button, as described below) will be opened. Tap the Info button to view HOBLink iWT product information. Tap the Keyboard button to open or close the keyboard. Tap the Connections button to view a list of current connections, as shown in Figure 35 on page 56. Connectivity Solutions by HOB 55 Starting a HOBLink iWT Session HOBLink iWT Tap the Connections button on the Connection Bar (see Figure 34 on page 55) to display the following screen: Figure 35: Connections Options Tap New Connection to return to the Configurations screen (see Figure 6 on page 13) to start a new connection. You can also switch between connections by tapping them. You can also do the following on this screen: Tap the Connections button to close the Connections window. 56 Connectivity Solutions by HOB HOBLink iWT 5.2 Starting a HOBLink iWT Session The Keyboard At the bottom of the Windows Application screen (see Figure 33 on page 54), you have the keyboard. You can use the Keyboard button on the Connection Bar (see Figure 34 on page 55) to open or close the keyboard or you can use the Keyboard Toggle gesture, see Section 6 Gestures on page 59. HOBLink iWT also supports external keyboards (either with a cable connector or bluetooth). The keyboard is split up into two halves due to space: Figure 36: Keyboard First Half Figure 37: Keyboard Second Half The following keys have been added to the keyboard in portrait mode in order to make working with HOBLink iWT easier: Tap the Function key to display the second half of the keyboard (see Figure 36 above) when working in portrait mode. Tap the ABC key to display the first half of the keyboard (see Figure 37 above) when working in portrait mode. Connectivity Solutions by HOB 57 Starting a HOBLink iWT Session HOBLink iWT This is the keyboard in landscape mode: Figure 38: Keyboard Landscape Mode The keyboard has all of the functions of a Windows keyboard. The following keys have been added to the keyboard in landscape mode in order to make working with HOBLink iWT easier: Tap the Show/Hide key to show/hide the Connection Bar (see Figure 34 on page 55) while working in landscape mode. Tap the Keyboard key to hide the keyboard in landscape mode. If you have hidden the keyboard, use the Keyboard Toggle gesture (see Section 6 Gestures on page 59) to open it again. The keyboard layout will differ depending on what language settings you have chosen on your iPad. 58 Connectivity Solutions by HOB HOBLink iWT 6 Gestures Gestures Due to the absence of the mouse, gestures are used to control the mouse pointer. Tap gestures (single, double and triple) are interpreted as left button mouse clicks at the tap position. Left Click: A quick, single tap is interpreted as a left click. Right Click: A long, single tap is interpreted as a right click. Keyboard Toggle: Tap with 2 or 3 fingers to toggle the keyboard on or off while working in the Windows application. This is useful in landscape mode. Zoom In: Place 2 fingers on the screen and move them apart from each other to zoom in. Zoom Out: From the Zoom In position, move the 2 fingers closer together to zoom out. Connectivity Solutions by HOB 59 Gestures HOBLink iWT Shake: Shake the iPad from left to right to resize the screen content to the locked mode. Further information on gestures: Pan: move your finger around on the screen to pan. If the content fits entirely on the screen, the screen is then locked and the pan motion is interpreted as a mouse motion with the left mouse button clicked, e.g. to mark text or to move an icon. Zoom In: this gesture is used to toggle between two modes: 60 If the content is too large to be shown completely on the screen, the screen is then unlocked and the content is can be moved. If the content is too large to be shown completely on the screen, the screen is then unlocked and can be moved to show the content. If the content fits entirely on the screen, the screen is then locked and cannot be moved in any direction. Connectivity Solutions by HOB HOBLink iWT 7 Information and Support Information and Support If you would like further information about HOBLink iWT or if you need product support, please contact us at: U.S.A. and Canada General Enquiries: Phone: + 1 866 914 9970 Fax: + 49 9103 715 3299 E-mail: [email protected] Web: www.hobsoft.com Technical Support: Phone: + 1 866 914 9970 Fax: + 49 9103 715 3299 E-mail: [email protected] Germany General Enquiries: Phone: + 49 9103 715 0 Fax: + 49 9103 715 3271 E-mail: [email protected] Web: www.hob.de Technical Support: Phone: + 49 9103 715 3161 Fax: + 49 9103 715 3299 E-mail: [email protected] Other Countries General Enquiries: Phone: + 49 9103 715 3103 Fax: + 49 9103 715 3299 E-mail: [email protected] Web: www.hobsoft.com Technical Support: Phone: + 49 9103 715 3103 Fax: + 49 9103 715 3299 E-mail: [email protected] Connectivity Solutions by HOB 61